1
Mamba Image User Manual
Nicolas BEUCHER
Serge BEUCHER
www.mamba-image.org
Except where otherwise noted, the Mamba Documentation Project is covered by the
Creative Commons Attribution 3.0 License (see http://creativecommons.org/
licenses/by/3.0/)
November 3, 2015
Mamba Image User Manual
November 3, 2015
Contents
Contents
2
List of Figures
3
1 Introduction
4
2 A quick start
5
3 Why/When use Mamba?
7
4 License
8
5 Requirements
9
6 Installation/Compilation
10
6.1 Windows (all versions) . . . . . . . . . . . . . . . . . . . . . . . . . . . . . . . . . . . . . . . . . . 10
6.2 Linux . . . . . . . . . . . . . . . . . . . . . . . . . . . . . . . . . . . . . . . . . . . . . . . . . . . 11
6.3 Other platforms . . . . . . . . . . . . . . . . . . . . . . . . . . . . . . . . . . . . . . . . . . . . . . 12
7 Using the library
7.1 Philosophy and implicit working of the library . .
7.2 A word for previous versions users . . . . . . . .
7.3 Contents of the library . . . . . . . . . . . . . . .
7.4 Importing the packages . . . . . . . . . . . . . .
7.5 Grid and Edge . . . . . . . . . . . . . . . . . . .
7.5.1 Edge . . . . . . . . . . . . . . . . . . . . .
7.5.2 Grids 2D . . . . . . . . . . . . . . . . . .
7.5.3 Grids 3D . . . . . . . . . . . . . . . . . .
7.5.4 More on 2D and 3D grids . . . . . . . . .
7.6 Creating and manipulating images . . . . . . . .
7.6.1 2D images . . . . . . . . . . . . . . . . . .
7.6.2 3D images . . . . . . . . . . . . . . . . . .
7.6.3 Saving and loading images . . . . . . . . .
7.6.4 Other imageMb and image3DMb methods
7.7 Pixels manipulation . . . . . . . . . . . . . . . .
7.8 Displaying images . . . . . . . . . . . . . . . . .
7.8.1 Basic display methods . . . . . . . . . . .
7.8.2 2D display . . . . . . . . . . . . . . . . . .
7.8.3 3D display . . . . . . . . . . . . . . . . . .
7.8.4 Display control inside a script . . . . . . .
7.8.5 Display shortcuts . . . . . . . . . . . . . .
7.8.6 Palettes and other display functions . . .
7.8.7 Extra displays . . . . . . . . . . . . . . .
7.9 Structuring elements . . . . . . . . . . . . . . . .
7.9.1 Defining structuring elements . . . . . . .
7.9.2 Structuring element methods . . . . . . .
7.10 Mamba Shell . . . . . . . . . . . . . . . . . . . .
7.11 Regarding optimizations . . . . . . . . . . . . . .
7.12 Further information regarding Mamba3D . . . .
7.12.1 Computations/Functions . . . . . . . . .
7.12.2 Performance discussion . . . . . . . . . .
7.12.3 Missing or reduced operators . . . . . . .
.
.
.
.
.
.
.
.
.
.
.
.
.
.
.
.
.
.
.
.
.
.
.
.
.
.
.
.
.
.
.
.
.
.
.
.
.
.
.
.
.
.
.
.
.
.
.
.
.
.
.
.
.
.
.
.
.
.
.
.
.
.
.
.
.
.
.
.
.
.
.
.
.
.
.
.
.
.
.
.
.
.
.
.
.
.
.
.
.
.
.
.
.
.
.
.
.
.
.
.
.
.
.
.
.
.
.
.
.
.
.
.
.
.
.
.
.
.
.
.
.
.
.
.
.
.
.
.
.
.
.
.
.
.
.
.
.
.
.
.
.
.
.
.
.
.
.
.
.
.
.
.
.
.
.
.
.
.
.
.
.
.
.
.
.
.
.
.
.
.
.
.
.
.
.
.
.
.
.
.
.
.
.
.
.
.
.
.
.
.
.
.
.
.
.
.
.
.
.
.
.
.
.
.
.
.
.
.
.
.
.
.
.
.
.
.
.
.
.
.
.
.
.
.
.
.
.
.
.
.
.
.
.
.
.
.
.
.
.
.
.
.
.
.
.
.
.
.
.
.
.
.
.
.
.
.
.
.
.
.
.
.
.
.
.
.
.
.
.
.
.
.
.
.
.
.
.
.
.
.
.
.
.
.
.
.
.
.
.
.
.
.
.
.
.
.
.
.
.
.
.
.
.
.
.
.
.
.
.
.
.
.
.
.
.
.
.
.
.
.
.
.
.
.
.
.
.
.
.
.
.
.
.
.
.
.
.
.
.
.
.
.
.
.
.
.
.
.
.
.
.
.
.
.
.
.
.
.
.
.
.
.
.
.
.
.
.
.
.
.
.
.
.
.
.
.
.
.
.
.
.
.
.
.
.
.
.
.
.
.
.
.
.
.
.
.
.
.
.
.
.
.
.
.
.
.
.
.
.
.
.
.
.
.
.
.
.
.
.
.
.
.
.
.
.
.
.
.
.
.
.
.
.
.
.
.
.
.
.
.
.
.
.
.
.
.
.
.
.
.
.
.
.
.
.
.
.
.
.
.
.
.
.
.
.
.
.
.
.
.
.
.
.
.
.
.
.
.
.
.
.
.
.
.
.
.
.
.
.
.
.
.
.
.
.
.
.
.
.
.
.
.
.
.
.
.
.
.
.
.
.
.
.
.
.
.
.
.
.
.
.
.
.
.
.
.
.
.
.
.
.
.
.
.
.
.
.
.
.
.
.
.
.
.
.
.
.
.
.
.
.
.
.
.
.
.
.
.
.
.
.
.
.
.
.
.
.
.
.
.
.
.
.
.
.
.
.
.
.
.
.
.
.
.
.
.
.
.
.
.
.
.
.
.
.
.
.
.
.
.
.
.
.
.
.
.
.
.
.
.
.
.
.
.
.
.
.
.
.
.
.
.
.
.
.
.
.
.
.
.
.
.
.
.
.
.
.
.
.
.
.
.
.
.
.
.
.
.
.
.
.
.
.
.
.
.
.
.
.
.
.
.
.
.
.
.
.
.
.
.
.
.
.
.
.
.
.
.
.
.
.
.
.
.
.
.
.
.
.
.
.
.
.
.
.
.
.
.
.
.
.
.
.
.
.
.
.
.
.
.
.
.
.
.
.
.
.
.
.
.
.
.
.
.
.
.
.
.
.
.
.
.
.
.
.
.
.
.
.
.
.
.
.
.
.
.
.
.
.
.
.
.
.
.
.
.
.
.
.
.
.
.
.
.
.
.
.
.
.
.
.
.
.
.
.
.
.
.
.
.
.
.
.
.
.
.
.
.
.
.
.
.
.
.
.
.
.
.
.
.
.
.
.
.
.
.
.
.
.
.
.
.
.
.
.
.
.
.
.
.
.
.
.
.
.
.
.
.
.
.
.
.
.
.
.
.
.
.
.
.
.
.
.
.
.
.
.
.
.
.
.
.
.
.
.
.
.
.
.
.
.
.
.
.
13
13
13
14
14
14
15
15
15
21
21
21
23
24
26
26
26
26
27
27
31
31
32
33
34
34
38
38
39
40
40
40
40
8 Add-ons and extensions
41
8.1 mambaRealtime . . . . . . . . . . . . . . . . . . . . . . . . . . . . . . . . . . . . . . . . . . . . . 41
9 Limitations and restrictions
42
10 Other documents and references
43
1
www.mamba-image.org
Mamba Image User Manual
November 3, 2015
11 Algorithmic approaches in Mamba
11.1 Hierarchical lists : Watershed and Build
11.2 Labelings . . . . . . . . . . . . . . . . .
11.3 Large erosions and dilations . . . . . . .
11.4 Hierarchical segmentations . . . . . . . .
11.5 Working with partitions . . . . . . . . .
.
.
.
.
.
.
.
.
.
.
.
.
.
.
.
.
.
.
.
.
.
.
.
.
.
.
.
.
.
.
.
.
.
.
.
.
.
.
.
.
.
.
.
.
.
.
.
.
.
.
.
.
.
.
.
.
.
.
.
.
.
.
.
.
.
.
.
.
.
.
.
.
.
.
.
.
.
.
.
.
.
.
.
.
.
.
.
.
.
.
.
.
.
.
.
.
.
.
.
.
.
.
.
.
.
.
.
.
.
.
.
.
.
.
.
.
.
.
.
.
.
.
.
.
.
.
.
.
.
.
.
.
.
.
.
.
.
.
.
.
.
.
.
.
.
.
.
.
.
.
.
.
.
.
.
.
.
.
.
.
44
44
44
45
45
45
12 Extending and customizing Mamba
12.1 Library architecture and design . .
12.2 Creating your own displayer . . . .
12.3 Vectorization . . . . . . . . . . . .
12.4 Adding your own 3D grid . . . . .
12.5 Testing Mamba . . . . . . . . . . .
.
.
.
.
.
.
.
.
.
.
.
.
.
.
.
.
.
.
.
.
.
.
.
.
.
.
.
.
.
.
.
.
.
.
.
.
.
.
.
.
.
.
.
.
.
.
.
.
.
.
.
.
.
.
.
.
.
.
.
.
.
.
.
.
.
.
.
.
.
.
.
.
.
.
.
.
.
.
.
.
.
.
.
.
.
.
.
.
.
.
.
.
.
.
.
.
.
.
.
.
.
.
.
.
.
.
.
.
.
.
.
.
.
.
.
.
.
.
.
.
.
.
.
.
.
.
.
.
.
.
.
.
.
.
.
.
.
.
.
.
.
.
.
.
.
.
.
.
.
.
.
.
.
.
.
.
.
.
.
.
46
46
46
47
47
47
.
.
.
.
.
.
.
.
.
.
.
.
.
.
.
A To go further
48
A.1 Python websites . . . . . . . . . . . . . . . . . . . . . . . . . . . . . . . . . . . . . . . . . . . . . 48
A.2 Mathematical Morphology websites . . . . . . . . . . . . . . . . . . . . . . . . . . . . . . . . . . . 48
A.3 Other mathematical morphology libraries . . . . . . . . . . . . . . . . . . . . . . . . . . . . . . . 48
B Coding rules and standards
B.1 Policy . . . . . . . . . . . . . . . . . . . . .
B.1.1 A Mathematical Morphology library
B.1.2 Simple yet Fast . . . . . . . . . . . .
B.1.3 Portable . . . . . . . . . . . . . . . .
B.1.4 ... and Free . . . . . . . . . . . . . .
B.2 Programming . . . . . . . . . . . . . . . . .
B.2.1 Languages . . . . . . . . . . . . . . .
B.2.2 Rules for C . . . . . . . . . . . . . .
B.2.3 Rules for Python . . . . . . . . . . .
B.3 Documentation . . . . . . . . . . . . . . . .
B.3.1 In code . . . . . . . . . . . . . . . .
B.3.2 Other documents . . . . . . . . . . .
B.4 Testing . . . . . . . . . . . . . . . . . . . . .
B.5 Licensing . . . . . . . . . . . . . . . . . . .
B.6 Other contributions . . . . . . . . . . . . .
2
.
.
.
.
.
.
.
.
.
.
.
.
.
.
.
.
.
.
.
.
.
.
.
.
.
.
.
.
.
.
.
.
.
.
.
.
.
.
.
.
.
.
.
.
.
.
.
.
.
.
.
.
.
.
.
.
.
.
.
.
.
.
.
.
.
.
.
.
.
.
.
.
.
.
.
.
.
.
.
.
.
.
.
.
.
.
.
.
.
.
.
.
.
.
.
.
.
.
.
.
.
.
.
.
.
.
.
.
.
.
.
.
.
.
.
.
.
.
.
.
.
.
.
.
.
.
.
.
.
.
.
.
.
.
.
.
.
.
.
.
.
.
.
.
.
.
.
.
.
.
.
.
.
.
.
.
.
.
.
.
.
.
.
.
.
.
.
.
.
.
.
.
.
.
.
.
.
.
.
.
.
.
.
.
.
.
.
.
.
.
.
.
.
.
.
.
.
.
.
.
.
.
.
.
.
.
.
.
.
.
.
.
.
.
.
.
.
.
.
.
.
.
.
.
.
.
.
.
.
.
.
.
.
.
.
.
.
.
.
.
.
.
.
.
.
.
.
.
.
.
.
.
.
.
.
.
.
.
.
.
.
.
.
.
.
.
.
.
.
.
.
.
.
.
.
.
.
.
.
.
.
.
.
.
.
.
.
.
.
.
.
.
.
.
.
.
.
.
.
.
.
.
.
.
.
.
.
.
.
.
.
.
.
.
.
.
.
.
.
.
.
.
.
.
.
.
.
.
.
.
.
.
.
.
.
.
.
.
.
.
.
.
.
.
.
.
.
.
.
.
.
.
.
.
.
.
.
.
.
.
.
.
.
.
.
.
.
.
.
.
.
.
.
.
.
.
.
.
.
.
.
.
.
.
.
.
.
.
.
.
.
.
.
.
.
.
.
.
.
.
.
.
.
.
.
.
.
.
.
.
.
.
.
.
.
.
.
.
.
.
.
.
.
.
.
.
.
.
.
.
.
.
.
.
.
.
.
.
.
.
.
.
.
.
.
.
.
.
.
.
49
49
49
49
49
49
49
49
50
50
54
54
55
55
56
56
www.mamba-image.org
Mamba Image User Manual
November 3, 2015
List of Figures
1
2
3
4
5
6
7
8
9
10
11
12
13
14
15
16
17
18
19
20
21
22
23
24
25
26
27
28
29
30
31
3
CMake configuration on Windows . . . . . . . . . . . .
Visual C++ solution . . . . . . . . . . . . . . . . . . . .
Hexagonal grid: representation and directions . . . . . .
Square grid: representation and directions . . . . . . . .
Odd and even lines in the hexagonal grid . . . . . . . .
Cubic grid, top view . . . . . . . . . . . . . . . . . . . .
Cubic grid, perspective view . . . . . . . . . . . . . . . .
Centered cubic grid, top view . . . . . . . . . . . . . . .
Centered cubic grid, perspective view . . . . . . . . . . .
Planes arrangement in the centered cubic grid . . . . . .
Face centered cubic grid, top view . . . . . . . . . . . .
Face centered cubic grid, perspective view . . . . . . . .
Planes arrangement in the face centered cubic grid . . .
Image pixels coordinates . . . . . . . . . . . . . . . . . .
Image 3D pixels coordinates . . . . . . . . . . . . . . . .
2D display . . . . . . . . . . . . . . . . . . . . . . . . . .
2D display: contextual menu . . . . . . . . . . . . . . .
3D display: projection . . . . . . . . . . . . . . . . . . .
3D display: volume rendering . . . . . . . . . . . . . . .
3D display: volume rendering controls . . . . . . . . . .
3D display: volume rendering methods . . . . . . . . . .
3D display: player . . . . . . . . . . . . . . . . . . . . .
Interactive thresholding of the left Burner image . . . .
Superposing a greyscale and a binary image (left) or two
Interactive segmentation . . . . . . . . . . . . . . . . . .
Structuring elements defined in Mamba . . . . . . . . .
Cuboctahedron defined on the face centered cubic grid .
Cuboctahedron defined on the cubic grid . . . . . . . . .
Cuboctahedron defined on the centered cubic grid . . .
Library architecture layout . . . . . . . . . . . . . . . .
Edges in a 3D image . . . . . . . . . . . . . . . . . . . .
. . . .
. . . .
. . . .
. . . .
. . . .
. . . .
. . . .
. . . .
. . . .
. . . .
. . . .
. . . .
. . . .
. . . .
. . . .
. . . .
. . . .
. . . .
. . . .
. . . .
. . . .
. . . .
. . . .
binary
. . . .
. . . .
. . . .
. . . .
. . . .
. . . .
. . . .
. . . . . . . . .
. . . . . . . . .
. . . . . . . . .
. . . . . . . . .
. . . . . . . . .
. . . . . . . . .
. . . . . . . . .
. . . . . . . . .
. . . . . . . . .
. . . . . . . . .
. . . . . . . . .
. . . . . . . . .
. . . . . . . . .
. . . . . . . . .
. . . . . . . . .
. . . . . . . . .
. . . . . . . . .
. . . . . . . . .
. . . . . . . . .
. . . . . . . . .
. . . . . . . . .
. . . . . . . . .
. . . . . . . . .
images (right)
. . . . . . . . .
. . . . . . . . .
. . . . . . . . .
. . . . . . . . .
. . . . . . . . .
. . . . . . . . .
. . . . . . . . .
.
.
.
.
.
.
.
.
.
.
.
.
.
.
.
.
.
.
.
.
.
.
.
.
.
.
.
.
.
.
.
.
.
.
.
.
.
.
.
.
.
.
.
.
.
.
.
.
.
.
.
.
.
.
.
.
.
.
.
.
.
.
.
.
.
.
.
.
.
.
.
.
.
.
.
.
.
.
.
.
.
.
.
.
.
.
.
.
.
.
.
.
.
.
.
.
.
.
.
.
.
.
.
.
.
.
.
.
.
.
.
.
.
.
.
.
.
.
.
.
.
.
.
.
.
.
.
.
.
.
.
.
.
.
.
.
.
.
.
.
.
.
.
.
.
.
.
.
.
.
.
.
.
.
.
.
.
.
.
.
.
.
.
.
.
.
.
.
.
.
.
.
.
.
.
.
.
.
.
.
.
.
.
.
.
.
.
.
.
.
.
.
.
.
.
.
.
.
.
.
.
.
.
.
.
.
.
.
.
.
.
.
.
.
.
.
.
.
.
.
.
.
.
.
.
.
.
.
.
.
.
.
.
.
.
.
.
.
.
.
.
.
.
.
.
.
.
.
.
.
.
.
.
.
.
.
.
.
.
.
.
.
.
.
.
.
.
.
.
.
.
.
.
.
.
.
.
.
.
.
.
.
.
.
.
.
.
.
.
.
.
.
.
.
.
.
.
.
.
.
.
.
.
.
.
.
.
.
.
.
10
11
15
15
16
17
17
18
18
19
19
20
20
22
24
27
28
29
29
30
30
30
33
34
35
35
36
37
37
46
55
www.mamba-image.org
Mamba Image User Manual
November 3, 2015
1
Introduction
This document is the user manual of the library for Python Mamba Image.
Mamba Image is a mathematical morphology library, its name actually stands for MAthematical Morphology
liBrAry Image (For sake of simplicity, the library will be referred to as Mamba). The library provides a wide
set of functions needed to perform common operations used in mathematical morphology like erosion, dilation,
etc... but also more complex ones (geodesic operators, watershed transformations...).
Before reading this document, make sure you have a basic knowledge of the Python programming language (see the Python tutorial at http://docs.python.org/tutorial/) and that you know the basics of
mathematical morphology (online courses are available at http://cmm.ensmp.fr/~serra/acours.htm and
http://cmm.ensmp.fr/~beucher/publi.html).
This document addresses various points to help you understand how to use and enjoy Mamba, such as getting
familiar with it, what it does and does not, understand how the library works, what you can do to optimize it
for your needs. If you are new to it, read the next section, quick start, before going further.
This is the user manual of version 2 of the library. If you were a Mamba 1 or 1.1 user, please read the section
7.2. Many changes were introduced in this version and this section will help you know what to expect.
4
www.mamba-image.org
Mamba Image User Manual
November 3, 2015
2
A quick start
For all intent and purpose, we will now assume that you know what mathematical morphology is, at least
theoretically (and your interest in Mamba is to go practical), and that you have a minimum know-how in
programming with Python.
We are aware that fulfilling these two conditions may be quite difficult. It is likely you know one and not
the other. The present authors were unable to fulfil them when the project Mamba started. So don’t get
discouraged if you are not yet familiar with one aspect or the other. There is plenty information over the web
to get you started on either one. This document is not intended to serve as a mathematical morphology course
nor as a programming lesson as these goals are beyond our time or ability to perform. However, we list at the
end of the document (see appendix A) various websites or pdf documents which are accessible online that can
provide you with this information. Of course, we hope that Mamba will give you the incentive to learn one
aspect or the other to solve any image analysis problem you may have (see our examples to see the possibilities
offered by such a tool).
To get started with Mamba, you need to install some software on your PC. The most obvious one is Python.
You can find Python at http://www.python.org. Download version 2.7 or 3.4 and install it. Once Python is
installed, you will need to download the lastest version of the Python Imaging Library fork, Pillow (standard
PIL may not work, we do test Mamba only with Pillow) at https://pypi.python.org/pypi/Pillow/. You
need to download the version corresponding to your version of Python (this should be indicated in the name
of the file). Again install it. On Linux, you may have to install the Tkinter library if it was not provided with
your Python distribution (Windows users don’t need to worry as it is part of the standard Python distribution
they just installed). Finally download the Mamba library from http://www.mamba-image.org (as for Pillow,
select the version corresponding to your Python version) and install it.
These instructions may not be interpreted in the same way depending on your system specification. If you
need more information refer to section 6.
At this point your PC is now equipped with every piece of software it needs to use Mamba, so let’s get
started.
First, we will show you how to launch Mamba and use it in your programs. To use Mamba, simply type in
your Python console:
from mamba import ∗
This import gives you direct access to all the functions needed to perform basic and advanced operations
found in every mathematical morphology algorithm on 2D images.
The 3D operators can be accessed through the following import:
from mamba3D import ∗
If you are using Windows, you can start more easily by clicking on the created Mamba Shell shortcut in your start menu. It will launch an IDLE (the
standard Python shell on Windows) with preloaded Mamba modules and packages and some default images created. If you are an IDLE user, this is the
recommanded way (see section 9 for more information regarding Mamba and
IDLE).
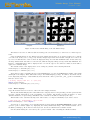
You now have all the tools offered in Mamba loaded on your computer and you are ready to try your ideas.
Obviously you have some image that you would like to process, so naturally the very first step is to load it into
your program.
# R e p l a c e t h e " path / t o / your / image " by t h e c o r r e c t path
im = imageMb ( " path / to / your / image " )
At this point, you can manipulate your image using the reference im. For example, you could try to get
some information about this image:
# P r i n t i n g t h e s i z e o f t h e image ( width , h e i g h t )
print ( im . g e t S i z e ( ) )
# P r i n t i n g t h e depth o f t h e image
print ( im . getDepth ( ) )
The first thing you may notice is that the returned image size is not the actual image size (as it is registered
when you look into the image properties). For performance sake, Mamba can only work with images that have
a width multiple of 64 and a height multiple of 2. If not, the image is automatically padded. You can also
5
www.mamba-image.org
Mamba Image User Manual
November 3, 2015
notice that your image was put into a greyscale image (the second command returns 8 which means 8 bits per
pixel, the image pixels can take 256 values, from 0 to 255). Depth can be 1 bit per pixel, 8 bits per pixel or 32
bits per pixel.
Well, this is all interesting but it does not give you access to the primary properties of an image i.e. how it
looks like. To do so, Mamba gives you access to an embedded image displayer. You can call it for every image
you create.
im . show ( )
This should have created a window displaying your image. There is no color obviously because your image
was transformed into a greyscale image upon loading.
The display comes with lots of options and possibilities to help you visualize your image. More information
can be found in section 7.8.
Now you have loaded your image, you are displaying it and you have access to some of its properties but
one image is insufficient so you will have to create other images to store your computation, compare, etc ... At
this point you can create them with the same properties as image im:
# C r e a t i n g o t h e r images
im1 = imageMb ( im )
im2 = imageMb ( im )
im3 = imageMb ( im , 1 )
Here we created 3 new images with the same properties as our original image im. Thus im1, im2 and im3
will have the same size as im. im1 and im2 also share the same depth as im (i.e. 8 bits per pixels) whereas
im3 was created with a binary depth (1 bit per pixel as specified by the second argument). There are many
possibilities for creating new images, refer to section 7.6 for more details.
You can activate the display for all of them as well. A window will be created for each.
Now to give you an idea of how to use the functions of Mamba, we will now show you a small example using
the created images above.
# 1 − Computing t h e g r a d i e n t o f image im and p u t t i n g t h e r e s u l t i n im1
g r a d i e n t ( im , im1 )
# 2 − Computing a s m a l l o p e n i n g o f image im and p u t t i n g t h e r e s u l t i n im2
o p e n i n g ( im , im2 )
# 3 − Computing t h e g r a d i e n t o f im2 and p u t t i n g t h e r e s u l t i n im2
g r a d i e n t ( im2 , im2 )
# 4 − C o n v e r t i n g im1 i n t o b i n a r y and p u t t i n g t h e r e s u l t i n im3
c o n v e r t ( im1 , im3 )
As random as these examples are (they are here for the sake of demonstration), you may have already
noticed some points. Firstly, function names closely match the mathematical operators they are implementing
(We tried to respect this rule as best as we could to make the code more understandable). Secondly, you can use
an image both as input and output in the same function (see number 2). Last but not least, convert is not the
best function to transform your greyscale image into a binary version at least from a mathematical morphology
point of view.
And by the way, if you happened to have activated the display for the result images, you may have found
that the operations were quite slow (although in these basic examples, they are not so slow...). Indeed the
display is automatically updated for each operation. Of course, when there is only one (such as for convert)
this is quite transparent but many functions, e.g. gradient and opening, are a mix of other basic functions for
which there is a display udpate for every call. Let us assure you that the delay is only a consequence of display
updates.
# A c t i v a t i n g t h e d i s p l a y and p e r f o r m i n g a s i z e 100 e r o s i o n
im1 . show ( )
e r o d e ( im , im1 , 1 0 0 )
# Now d i s a b l i n g t h e d i s p l a y and d o i n g t h e same o p e r a t i o n
im1 . h i d e ( ) # <− you can a l s o c l o s e t h e window o r minimize i t
e r o d e ( im , im1 , 1 0 0 )
This example ends this very simple introduction to Mamba. Of course it does not cover everything you can
do with Mamba nor gives you all the details to better harness its capabilities. However, hopefully now you
have a basic understanding of how the library works. For more precision, read section 7. Also note that this
document does not list the functions offered in Mamba, you will need to refer to the Python reference document
or to the Python API quick reference (see section 10) for a list and explanations.
6
www.mamba-image.org
Mamba Image User Manual
November 3, 2015
3
Why/When use Mamba?
Before going further in this document, let’s see why you should use Mamba and, almost more importantly,
when. It can be sum up in the following sentence:
Mamba is meant to be a fast and easy library for coding mathematical morphology algorithms.
What we meant here is that, if your main concern is to try new algorithms to address your mathematical
morphology problems while not waiting all night long for your result to come out or worse not come out because
you made a mistake, then Mamba is meant for you. However, if you are looking for a library to perform image
processing tasks like convolutions, contrast enhancers or likewise, you had better not using it (try Pillow or
openCV instead). In fact, as Python bindings exist for openCV, numpy/scipy, matplotlib and many other
valuable libraries, you can use them in conjonction with Mamba to solve your image analysis applications (see
the examples manual to see how images can be exchanged between Mamba and some of these libraries). And
by the way, Mamba does not make coffee (sorry about that...).
To do as intended, Mamba low level library is coded in C with performance through simplicity in mind. The
Python wrapper purpose is to give you an interface to that library which is fast to code and easy to play (with
no compilation required and interactive help). Another objective regarding Mamba code is to be as portable as
possible. This means that, if you need to port your algorithm to a specific system, you can easily adapt the C
code to it.
Regarding licensing, Mamba is released under X11 license (also known as MIT license), see section 4 for
more information.
To conclude this, let us remind you that mambas are fast-moving land-dwelling snakes of Africa. Their bite
(at least for the black mamba) is extremely deadly but we assure you that no harm may come to you using
Mamba... Well it won’t bite you.
7
www.mamba-image.org
Mamba Image User Manual
November 3, 2015
4
License
Here is a copy of the license of Mamba. This license is known as the X11 license (also named MIT license).
Copyright (c) <2009>, <Nicolas BEUCHER and ARMINES for the Centre de Morphologie
Mathématique(CMM), common research center to ARMINES and MINES Paristech>
Permission is hereby granted, free of charge, to any person obtaining a copy of this software
and associated documentation files (the "Software"), to deal in the Software without restriction,
including without limitation the rights to use, copy, modify, merge, publish, distribute, sublicense,
and/or sell copies of the Software, and to permit persons to whom the Software is furnished to
do so, subject to the following conditions: The above copyright notice and this permission notice
shall be included in all copies or substantial portions of the Software.
Except as contained in this notice, the names of the above copyright holders shall not be used
in advertising or otherwise to promote the sale, use or other dealings in this Software without
their prior written authorization.
THE SOFTWARE IS PROVIDED "AS IS", WITHOUT WARRANTY OF ANY KIND, EXPRESS OR IMPLIED, INCLUDING BUT NOT LIMITED TO THE WARRANTIES OF MERCHANTABILITY, FITNESS FOR A PARTICULAR PURPOSE AND NONINFRINGEMENT.
IN NO EVENT SHALL THE AUTHORS OR COPYRIGHT HOLDERS BE LIABLE FOR
ANY CLAIM, DAMAGES OR OTHER LIABILITY, WHETHER IN AN ACTION OF CONTRACT, TORT OR OTHERWISE, ARISING FROM, OUT OF OR IN CONNECTION WITH
THE SOFTWARE OR THE USE OR OTHER DEALINGS IN THE SOFTWARE.
Please note that this license does not cover documentation and images found
in source packages. Some restrictions also apply to add-on packages.
8
www.mamba-image.org
Mamba Image User Manual
November 3, 2015
5
Requirements
To use Mamba, you will need:
• A computer running Linux or Windows. Mamba will run on all kind of processors. However, you have to
verify if yours supports SSE2 instructions. If you are not sure, install the version of Mamba without SSE2,
please note this version is very slow. See http://en.wikipedia.org/wiki/SSE2#CPUs_supporting_SSE2
for a list of compatible CPUs.
• Python version 2.7 or later (Python 3 is supported).
• Python Imaging Library (Pillow) for your current version of Python.
• Tkinter (normally comes with Python on Windows systems but you may need to install it on Linux
systems).
• VTK (optional, see http://www.vtk.org/ for more info) with Python bindings if you want to use the
mamba3D integrated display based on it. The Windows binaries for the VTK Python extension package
can be found at http://cmm.ensmp.fr/~beucher/Mamba_download.html (due to some issues with the
latest versions of the VTK bindings, installing version 5.10.1 is strongly recommended).
Please note that VTK is not compatible with Python 3 yet. Therefore, if you
want to use Mamba 3D with all the display capabilities offered by VTK, use
Python 2 (32-bit or 64-bit).
While Mamba3D will certainly work on a large range of systems, it is still
strongly recommanded that you work on a powerful computer if you want an
optimal experience with it (see section 7.12.2 for more information).
9
www.mamba-image.org
Mamba Image User Manual
November 3, 2015
Figure 1: CMake configuration on Windows
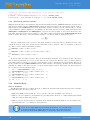
6
Installation/Compilation
6.1
Windows (all versions)
If you are only interested in installing and don’t want to go through the bother of compiling it, just pick up the
installer on the website. Select the appropriate installer corresponding to your version of Python (2 or 3, 32-bit
or 64-bit), launch it and follow the instructions.
If you actually are interested in compiling the installers, here is the tools you will need:
• Python version 2.7 or later with the distutils package.
• SWIG version 2.0 or later (see http://www.swig.org/).
• CMake version 2.8 or later (see http://www.cmake.org/) for the compilation process.
• Microsoft Visual C++ (compilation was realized on Express 2008 for Python 2.7 32-bit only and Express
2010 for the other 32/64-bit releases).
Make sure you have correctly installed the required tools and that they appear in your PATH environment
variable. In particular, make sure that SWIG binary (swig.exe) path is devoid of spaces as this may cause
problems to the setup script.
Because Python is not compiled with the same Visual C++ version you may need to add some environment
variables to link to your version. With Python 2.7 and visual C++ 2010 express, you need to add variable
VS90COMNTOOLS with value set to %VS100COMNTOOLS%. This may change if you are using another
visual C++ compiler. We deeply recommend to use the C++ compiler adapted to the Python version in use.
For Python 2.7, use VC+2008, for Python 3.4, use VC++2010. Although using other VIsual C++ versions
may also work, you may experience errors depending on your computer environment.
Get the source code of Mamba from the website. It comes in a zip that once extracted will create a
directory Mamba.X.X. Alternatively you can find the latest version in the GitHub repository at https:
//github.com/nicolasBeucher/mamba-image.
Launch CMake.
In "where is the source code", select path/to/Mamba.X.X/src with the browse source button. Select a
directory "where to build the binaries". This is an out of source build so you must create and select a different
directory than the source. In this example, we will use mamba_build in the following instructions.
Press the configure button in CMake. You should see something like figure 1.
There are 4 configurable fields:
• CMAKE_CONFIGURATION_TYPES: Set this variable to "Release" to generate only the release
configuration.
10
www.mamba-image.org
Mamba Image User Manual
November 3, 2015
Figure 2: Visual C++ solution
• CMAKE_INSTALL_PREFIX: Ignore this option. It is a CMake mandatory that is not used by
Mamba on Windows.
• SELECTED_PYTHON_EXECUTABLE: Make sure this option points to your Python executable.
In particular, if you have multiple Python installation on your computer you should verify that you are
using the correct one.
• USE_SSE2: Only on 32-bit systems, allows you to enable (default) or disable SSE2 support in Mamba.
On 64-bit systems, SSE2 is always enabled.
Once you have set the configuration, you must press Configure again for it to take effect. Then press
"Generate". This should have created a Mamba.sln file in the mamba_build directory.
Open this file using Visual C++, you should see something similar to figure 2.
Open the menu "Generate" and select "Generate ALL_BUILD". This should proceed with the compilation
and the generation of the Python installer.
If everything went OK, you should find in the mamba_build directory the following files:
• the Python stand alone installer, Mamba Image-X.X.winYY-pyZ.Z.exe: in python/dist subdirectory.
• C core library DLL (not needed for Python): mamba.dll, mamba.def, mamba.lib in lib/Release subdirectory and include files in include subdirectory.
We strongly recommand you to verify the generated installer by installing it on your computer and running
the tests (see section 12.5).
6.2
Linux
On linux, you will need the following tools and libraries:
• Python version 2.7 or later with the distutils package.
• Python development headers for your python version.
• SWIG version 2.0 or later (see http://www.swig.org/).
• CMake version 2.8 or later (see http://www.cmake.org/) for the compilation process.
• GCC.
11
www.mamba-image.org
Mamba Image User Manual
November 3, 2015
As for Windows, you will have to create a directory where you will proceed with the compilation and
installation. Open a terminal and cd your way to this directory. Once there, type the following commands to
compile and install on Linux:
• cmake -C path/to/Mamba.X.X/src
• cmake -D CMAKE_BUILD_TYPE:STRING=Release -D CMAKE_INSTALL_PREFIX:STRING=/usr .
• cmake -G "Unix Makefiles" .
• make
• su -c "make install python_install"
Of course you can use the CMake GUI to perform the first three operations.
In particular, if you want to compile Mamba for a different version of Python the CMake GUI will give
you access to the SELECTED_PYTHON_EXECUTABLE variable to select the appropriate Python
executable.
6.3
Other platforms
If you are not running one of the afore-mentionned systems but still want to try Mamba, you will need to find
how to do it on your own. Currently, we have only access to these kind of systems and thus cannot provide
you with instructions on how to do it with others. However, the basic requirements and instructions will likely
apply.
By the way, if you have installed Mamba on another platform (successfully!), please share your knowledge
with others. We will be happy to insert your procedure in this user manual (and give you credits...).
12
www.mamba-image.org
Mamba Image User Manual
November 3, 2015
7
Using the library
This section explains how to use the library.
7.1
Philosophy and implicit working of the library
Before giving you details regarding how to fully grasp the library, we would like to give you details regarding
the way it implicitly works. This section aims at presenting some aspects that will always be present in Mamba
but likely not explained nor talked about.
When we talk about an empty image or edge, this always means that pixels (inside or outside the image)
take value 0. Thus an empty image is an image where all the pixels are set to 0. On the opposite, the term
filled is always associated with the maximum possible value of a pixel (which depends on the image depth).
All image pixels are stored with unsigned integers. This is true for binary, greyscale and 32-bit images.
As a consequence of the coding rules applied to Mamba, functions image parameters always begin with the
input arguments and ends with the output arguments (This is a general rule and there may be some exceptions
for particular functions). Most of the time, images arguments are imIn when the image is an input and imOut
when it is the output of the function. When functions require arguments other than image arguments (scalar
values, edge or grid settings, etc.), they are placed after the image arguments. Some images are both input and
output and thus are named imInOut.
When functions accept input and output images, you can safely use the same image for both and you will
obtain the expected result. If the function cannot guarantee this, it will return an error.
Regarding the mamba3D package, everything was created to reuse as much as possible the basic C operators
from Mamba to perform the 3D computations so as to avoid rewriting them (apart from hierarchical and
labelling operators, this was actually possible). Functions and classes are created with the same "look and feel"
as their counterpart in 2D.
These choices had consequences on the design of the package and thus on its capacities. Overall we believe
the possible downfall of that choices are dimmed by the gains in terms of easiness of use, reuse of proven and
robust code and work versus objective ratio.
7.2
A word for previous versions users
Version 2 of Mamba introduced a lot of changes, made for performance and easiness improvement, that will
break your scripts written for previous versions (1.x). However, we believe this should not present too much of
a challenge to upgrade your scripts to the newest version.
The list of changes is quite long and we tried our best to not forget anything important:
• All the Python sources (modules mamba.py, mambaDraw.py mambaExtra.py, mambaDisplay.py and package mambaComposed) have been regrouped inside two packages mamba and mambaDisplay. Functions
and operators have also been reorganized by families inside this package mainly for documentation purposes. This makes old imports of Mamba incompatible. The mamba3D package, previously available as
an add-on, has been merged in the main library (both C and Python code). image3DMb now longer
inherits from sequenceMb (other way around in Mamba 2).
• The source reorganisation also impacts display with the creation of the package mambaDisplay to contain
both 2D and 3D displays. New displays were added. Display methods in imageMb and image3DMb
have been shortened (show, hide, update instead of showDisplay ...). Palette and opacity methods were
removed from these classes. The 3D display methods were also strongly modified by these changes.
• Some operators were added (div), other were augmented or modified (label now supports 8-bit and 32-bit
images and its default behavior regarding label values has been changed, convert can be used with all image
depths, close and open operators were renamed closing and opening to avoid conflict with Python standard
functions, hitOrMiss now works directly with a doubleStructuringElement object making binaryHMT
useless, loadRaw methods were homogenized for image3DMb and imageMb, copyBitPlane now supports
32-bit to binary and reverse copies). C functions regarding neighbors (sup, inf, diff ...) have been modified
to gain performance. The corresponding Python functions are also impacted. Support for hierarchical
algorithms (watershed and build) on 32-bit images was added in C with removal of the specific Python
functions (namely watershedSegment32, basinSegment32, hierarBuild32 and hierarDualBuild32). The
operators are accessible through the standard functions (watershedSegment, basinSegment, hierarBuild
and hierarDualBuild).
13
www.mamba-image.org
Mamba Image User Manual
November 3, 2015
• Mamba is now compatible with Python 3. This may have impact on the behavior of some functions
(getDirections, for example, is based upon range which does not have the same behavior in Python 3).
• Mamba will no longer be supported on our part for Python 2.6. Mamba 2 needs ttk (themed Tk) for its
display and the module is not natively available in Python 2.6.
• Mamba uses Pillow instead of PIL. You may have to update to Pillow if you were a PIL user. Both library
are normally equivalent in functionality except for import mechanisms.
• The C code is now compiled in a specific library (.dll or .so) with its include files available separately
making it possible to build applications with the core functions of Mamba more easily. This has an
impact on the compilation process which now use CMake.
• Mamba has support of Windows 64-bit thanks to available win64 packages of Pillow.
• Vectorisation in the C code was changed (see mambaApi_vector.h).
• The documentation was modified : directory containing doc in source renamed, better use of doxygen to
generate the C API doc, merge of the 2D and 3D doc, separation of user manual and examples, change
in the mamba style. Conversely, some documents have been merged into the user manual.
• The new version also means reorganisation of the source directory, of the examples, of the tests.
The result of these changes is a faster and, we hope, more user-friendly library.
7.3
Contents of the library
The Python Mamba library is composed of four packages:
• mamba, which is the main package of Mamba and contains all the operators (from the most basic to
quite advanced ones) to perform mathematical morphology computations on 2D images.
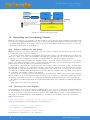
• mamba3D, which contains the same operators (except some of them without equivalent in a three
dimensional context) working on 3D images.
• mambaDisplay, which contains all the code related to image displays for both 2D and 3D.
• mambaShell, which is a container for functions and modules that are needed to create and operate an
appropriate shell for Mamba. In particular, it contains demo presentations.
7.4
Importing the packages
To use Mamba, simply type in your Python console:
import mamba
import mamba3D
Both imports will give you access to the complete library (2D and 3D respectively). You do not need to
import mamba to use mamba3D or vice versa.
You can also use the following syntax:
from mamba import ∗
from mamba3D import ∗
There is no conflict between 2D and 3D functions (usually the later have the same name postfixed 3D).
Other imports can be useful while working with mamba:
import mambaDisplay
import mambaDisplay . e x t r a
They give you access to display management functions, palette functions and extra displays.
7.5
Grid and Edge
Grid and edge are important notions in mathematical morphology. Let us explain how they are handled in
Mamba.
14
www.mamba-image.org
Mamba Image User Manual
November 3, 2015
6
5
1
0
4
2
3
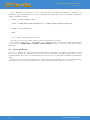
Figure 3: Hexagonal grid: representation and directions
8
1
2
7
0
3
6
5
4
Figure 4: Square grid: representation and directions
7.5.1
Edge
The edge defines the status of all the pixels which are not in the image. Let us explain what this assertion
means. Obviously, any image is made of a finite set of pixels. However, mathematical morphology operations,
which are neighbourhood operations, need that the status of the neighbours of the pixels found at the edge
of the image be defined, otherwise it would not be possible to define the transformation. This is the purpose
of the edge attribute. The edge defines the virtual pixels which are outside the image. The edge (remember,
it is the outside edge) can be set to EMPTY or FILLED. The EMPTY edge is assuming that external
world surrounding the image is made of virtual pixels at value 0 (the edge is set to 0) whereas the FILLED
edge assumes an external world completely filled (the edge is set to the maximum possible value of a pixel
according to the image depth). This notion applies to both 2D and 3D operators. See section B.2.3 for further
explanations on edge settings for 2D and 3D images.
7.5.2
Grids 2D
The grid defines the neighbourhood of each pixel in an image.
There are two possible grids in Mamba:
• HEXAGONAL: defines six neighbours for each pixel as can be seen in figure 3.
• SQUARE: defines the usual eight neighbours for each pixel as in figure 4.
2D grids are built-in grids. There is no way to modify them (that is to modify the neighborhood relationships)
under Python. These grids are straightforward and you can see the coding of the directions defined on these grids
in the documentation (Mamba Image Library Python Reference and Mamba API Quick Reference manual), see
section 10.
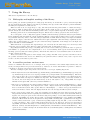
On the hexagonal grid, an image contains even lines (vertical coordinate multiple of 2) and odd lines. Even
lines are shifted to the left in relation to the odd lines, see figure 5.
As you will see later in this document, some functions need a direction or a neighbor as input. Figures 3 and
4 give you the direction/neighbor encoding depending on the grid in use. The directions are numbered from 0
to 6 or 8.
Some public operators are available with 2D grids (which are instances of a class _grid). They are self
explanatory. See the documentation on the directions encoding for further details.
7.5.3
Grids 3D
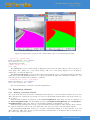
There are three possible grids in 3D. They are a bit more difficult to represent. Thus we will try to give you an
overview of what they look like. They also have some limitations that we think you should be aware of.
15
www.mamba-image.org
Mamba Image User Manual
November 3, 2015
(0,0)
(0,1)
(0,2)
Figure 5: Odd and even lines in the hexagonal grid
As a foreword, we would like to explain how 3D grids are built. Instead of the 2D ones which are defined
for low-level C operators, 3D grids are very high level complex structures. They are built using 2D grids and
a mix of programmation magic. Some operators were rewritten in low-level C functions working on 3D images
because their 2D counterpart could not be adapted to a 3D structure (e.g. hierarchical queues operators). As
they work using the grid, we defined some grids in low-level C but not all of them (too much work). So some
operators may not work with the grid you selected. Be warned !
A 3D grid is defined by providing two settings:
• The 2D grid (hexagonal or square) which is used with the 2D image sections of the 3D image.
• The way these 2D images are stacked, this stacking defining the neighborhood relationships in the 3D
grid.
Grids in Mamba3D are strongly influenced by crystallography. For example,
the face centered cubic grid is describing the way carbon atoms are crystallized
to form diamonds and the centered cubic one (also named body centered cubic) is a structure by which iron atoms organise themselves. Of course, there is
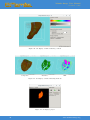
a lot of other structures in crystals that are not represented in Mamba3D.
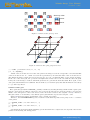
Three grids are defined in Mamba3D (they are represented by means of top views and perspective views,
with the coreesponding directions/neighbors numbers):
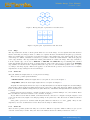
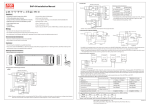
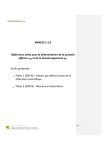
• CUBIC (C): The very basic cubic grid, built by stacking square grids one on the other. See figures 6
and 7.
• FACE_CENTER_CUBIC (FCC): A face centered cubic grid. It is in fact built by stacking hexagonal
grids one on the other with a slight shift. See figures 11 and 12.
• CENTER_CUBIC (CC): Also known as body centered cubic, this grid is built by stacking square
grids with a half shift in the two directions. See figures 8 and 9. This grid is not supported by low-level
C operators.
These grids are instances of a _grid3D class. Each grid comes with various methods to handle it. Some
of them are similar to the operators provided with 2D grids. However, some others are specific and are more
complex.
For each 3D grid, The 2D grid on which it is based is given by the method get2DGrid.
In addition, three specific methods come with 3D grids: getEncodedDirs, convertFromDir and getShiftDirsList.
• getEncodedDirs is mainly used with 3D structuring elements. It allows to decompose any elementary
3D structuring element (defined by a list of directions) into three 2D structuring elements corresponding
to the three sections of the initial 3D structuring element, see section 7.9.1 for further explanations.
• convertFromDir requires two parameters: a 3D direction and the z coordinate of the pixel. It returns a
tuple containing the section (-1 if below, 0 if current and 1 if above) and the 2D direction in this section
corresponding to the 3D direction and to the z position of the pixel. This method is quite useful to
increase the computation speed of some 3D operators like shiftings as it provides directly the z offset and
the corresponding horizontal direction (at least for the cubic grid - for the others, it is a bit more complex)
of this shifting.
16
www.mamba-image.org
Mamba Image User Manual
November 3, 2015
17 8 26
10 1 19
11 2 20
16 7 25
9 0 18
12 3 21
Stacking order:
below
above
15 6 24
14 5 23
13 4 22
Figure 6: Cubic grid, top view
19
26
25
18
21
8
1
23
24
0
3
17
15
4
9
14
11
10
5
16
2
22
7
6
20
12
13
Figure 7: Cubic grid, perspective view
• getShiftDirsList is a more complex method mainly used in the 3D shift operator (shift3D) and in
the infFarNeighbor3D and supFarNeighbor3D operators. This method requires three parameters: a 3D
direction d, the amplitude (size) amp of the shift applied in this direction and the z coordinate of the
pixel (or the section) which will be shifted, zindex. It returns a list (of variable length) containing tuples
(dh, amph, grid2D), each one providing the horizontal direction dh, the horizontal amplitude amph of
the corresponding horizontal shift which will be applied on each section. grid2D indicates the 2D grid on
which this 2D shift will be performed.
These methods will be explicited below for the different grids.
Cubic grid
This grid (named CUBIC) is made by stacking 2D images defined with a square grid (figures 6 and 7).
>>> CUBIC . get2DGrid ( )
SQUARE
Each pixel of the cubic grid is surrounded by 26 neighbors, associated to 26 directions scattered among the
section containing the central pixel (8 directions) and the two sections below and above it (9 directions each).
>>> CUBIC . convertFromDir ( 1 2 , 5 )
( −1 , 3 )
The direction 12 in the cubic grid corresponds to the direction 3 in the section below section 5.
Note that, for the cubic grid, the result is the same whatever z because all the 2D images are stacked without
shifting. It is not the case for the other grids (see below).
17
www.mamba-image.org
Mamba Image User Manual
November 3, 2015
8
1
11 13
7
2
Stacking order:
12 14
0
10 16
6
below
3
above
9 15
5
4
Figure 8: Centered cubic grid, top view
13
14
16
15
8
1
2
3
0
7
5
6
4
11
10
12
9
Figure 9: Centered cubic grid, perspective view
>>> CUBIC . g e t S h i f t D i r s L i s t ( 1 1 , 2 3 , 4 9 )
[ ( 2 , 2 3 , SQUARE) ]
A shift of size 23 in direction 11 on the cubic grid for the image section 49 corresponds to an horizontal shift
of size 23 in direction 2. So, a shift of section 49 is performed by an horizontal shift of size 23 in direction 2.
The shifted 2D image is then stored in section 26 (49 - 23, it is a downwards shift) of the output 3D image.
In the case of the cubic grid, the operation is straightforward. But it is not the case with the other 3D grids.
It may also seem strange to indicate which 2D grid is used to perform the horizontal shift. Here again, on the
cubic grid, this information is redundant. But we shall see, for the FCC grid, that this information is necessary
to cope with edge effects.
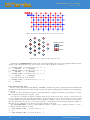
Centered cubic grid
Here again, this grid (named CENTER_CUBIC) is defined by stacking 2D images defined with a square grid.
But the odd sections are shifted compared to the even sections just below so that the pixels be placed in the
middle of the 2x2 squares of the below section, hence the name "centered cubic (figures 8 and 9). Therefore,
this grid is made of an assembly of two shifted square grids which is repeated all along the z axis.
Figure 10 shows the relative arrangement of the odd and even planes.
Therefore, the convertFromDir operator returns a result which depends on the parity of the z coordinate
of the pixels:
>>>
(1 ,
>>>
(1 ,
CENTER_CUBIC. c o n v e r t F r o m d i r ( 1 5 , 0 )
0)
CENTER_CUBIC. c o n v e r t F r o m d i r ( 1 5 , 1 )
4)
Calculating the horizontal offsets in shifting operations is then more complicated as it depends of the relative
parities of the starting and ending planes.
18
www.mamba-image.org
Mamba Image User Manual
November 3, 2015
(0,0,0)
(0,0,1)
Figure 10: Planes arrangement in the centered cubic grid
6
1
9
10
5
Stacking order:
11
0
8
2
7
12
4
below
above
3
Figure 11: Face centered cubic grid, top view
On this grid, getShiftDirsList returns a list of horizontal shifting directions and amplitudes which strongly
depend on the 3D amplitudes and on the parity of the z index. We have for instance:
>>> CENTER_CUBIC. g e t S h i f t D i r s L i s t ( 1 4 , 1 0 , 4 )
[ ( 1 , 5 , SQUARE) , ( 3 , 5 , SQUARE) ]
>>> CENTER_CUBIC. g e t S h i f t D i r s L i s t ( 1 4 , 1 1 , 5 )
[ ( 1 , 5 , SQUARE) , ( 3 , 6 , SQUARE) ]
>>> CENTER_CUBIC. g e t S h i f t D i r s L i s t ( 1 4 , 1 1 , 6 )
[ ( 1 , 6 , SQUARE) , ( 3 , 5 , SQUARE) ]
Some directions only need one shift:
>>> CENTER_CUBIC. g e t S h i f t D i r s L i s t ( 9 , 1 1 , 4 )
[ ( 4 , 5 , SQUARE) ]
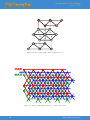
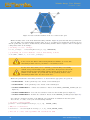
Face centered cubic grid
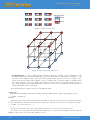
The face centered cubic grid (named FACE_CENTER_CUBIC) is the most complex grid defined in Mamba3D.
The 2D base grid is hexagonal and the 3D grid is obtained by piling and shifting these 2D hexagonal grids (figures
11 and 12).
In this case, three 2D hexagonal grids are used and shifted according to the scheme given in figure 13. Then,
this configuration is repeated along the z axis.
You can notice on figure 12 that the triangles drawn by below directions (blue) and above directions (red)
do not point the same way. Stacking and shifting 3 planes (instead of 2 as for the centered cubic grid) allows
to define symmetrical structuring elements (cuboctahedrons). Shifting only two planes would produce another
grid structure named hexagonal closed packed structure. Unfortunately, the structuring elements defined on
this grid are not symmetrical (we have in particular anticuboctahedrons).
The convertFromDir operator provides different results according to the congruence modulo 3 of the z
coordinate with the values 0, 1 and 2:
>>> FACE_CENTER_CUBIC. c o n v e r t F r o m d i r ( 1 0 , 0 )
(1 , 6)
>>> FACE_CENTER_CUBIC. c o n v e r t F r o m d i r ( 1 0 , 1 )
19
www.mamba-image.org
Mamba Image User Manual
November 3, 2015
10
11
12
6
1
5
0
4
2
3
9
8
7
Figure 12: Face centered cubic grid, perspective view
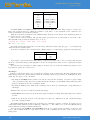
(0,0,0)
(0,0,2)
(0,0,1)
Figure 13: Planes arrangement in the face centered cubic grid
20
www.mamba-image.org
Mamba Image User Manual
November 3, 2015
(1 , 5)
>>> FACE_CENTER_CUBIC. convertFromDir ( 1 0 , 2 )
(1 , 0)
On this FCC grid, getShiftDirsList returns horizontal directions on the hexagonal grid corresponding to
3D directions. For instance:
>>> FACE_CENTER_CUBIC. g e t S h i f t D i r s L i s t ( 1 0 , 1 1 , 4 )
[ ( 6 , 3 , HEXAGONAL) , ( 5 , 4 , HEXAGONAL) ]
However, in directions 9 and 12, one direction is defined on the square grid:
>>> FACE_CENTER_CUBIC. g e t S h i f t D i r s L i s t ( 9 , 1 1 , 5 )
[ ( 1 , 6 , SQUARE) , ( 1 , 1 , HEXAGONAL) ]
This trick allows to avoid edge effects which would happen if the hexagonal grid was used. Indeed, in this
case, the first shift would likely send a shifted pixel close to the edge outside of the image window with no
possibility to recover it with the second shift.
7.5.4
More on 2D and 3D grids
As it is, we could have added a lot more grids in Mamba3D. For example, we could have built a grid stacking
without any shifted hexagonal grids. We chose not to do it, but it does not mean you can’t, although we doubt
very much you find such grids useful. In this event, we encourage you to look at section 12.4.
Be aware that the grid is never an image attribute, but a structuring element attribute. A structuring element
is always defined on a given grid. Therefore, when performing a transformation with a given structuring element,
the corresponding grid will be used with the image. Changing the grid of a 2D image can be seen as a simple
shift of the even lines of the image versus the odd ones so that the pixels belonging to an even line are between
the pixels of the following odd line. The even lines are shifted to the right compared to the odd ones (the first
line is numbered 0, it is therefore an even one). See section 7.5.2 for further details.
By default, when it is launched, Mamba uses the HEXAGONAL grid (through the DEFAULT_GRID
variable). Mamba3D uses the FACE_CENTER_CUBIC grid (through the DEFAULT_GRID3D variable)
Each function requiring a grid configuration as a parameter is given DEFAULT_GRID(3D) by default. When
an edge status is needed, the default value is selected depending on the operator in use. The edge, as the grid,
is not an image attribute.
There are different ways to change the grid. You can use the setDefaultGrid (setDefaultGrid3D for Mamba3D)
function:
# Changes t h e d e f a u l t g r i d (DEFAULT_GRID) t o HEXAGONAL
s e t D e f a u l t G r i d (HEXAGONAL)
# Changes t h e d e f a u l t g r i d (DEFAULT_GRID) t o SQUARE
s e t D e f a u l t G r i d (SQUARE)
You can change the grid used when calling the operator.
You can get a list of all the available directions of a grid by calling the function getDirections (getDirections3D
for Mamba3D).
# Returns a l i s t o f a l l t h e a v a i l a b l e d i r e c t i o n s f o r t h e d e f a u l t g r i d
directions = getDirections ()
# Returns a l i s t o f a l l t h e a v a i l a b l e d i r e c t i o n s f o r t h e SQUARE g r i d
d i r e c t i o n s = g e t D i r e c t i o n s (SQUARE)
# Returns a l i s t o f a l l t h e a v a i l a b l e d i r e c t i o n s f o r t h e HEXAGONAL g r i d
d i r e c t i o n s = g e t D i r e c t i o n s (HEXAGONAL)
There are other utilities functions that are provided by Mamba and Mamba3D to handle directions/neighbors. Refer to the Python API reference manual.
7.6
7.6.1
Creating and manipulating images
2D images
To handle images, a Python class named imageMb has been created. This class will allow you to create, load,
save and perform standard operations on your images.
21
www.mamba-image.org
Mamba Image User Manual
November 3, 2015
(0,0)
(w-1,0)
width
image
(0,h-1)
(w-1,h-1)
height
Figure 14: Image pixels coordinates
An image is basically an array of pixels. Each pixel is referred by its coordinates (x,y), see figure 14. Each
pixel can take a 1-bit (binary), 8-bit (greyscale) or 32-bit value. This parameter is called depth of the image. If
you want to process 16-bit images, you will have to load them in a 32-bit Mamba image (which is actually not
at all a problem).
Width w and height h are the two other parameters (attributes) of an image. width is the number of pixels
per line in the horizontal direction, height the number of lines (or the number of pixels in the vertical direction),
see figure 14.
The imageMb constructor offers a wide range of possibilities to create an image. Here is the list of all these
possibilities:
• imageMb(), without arguments, will create an empty 256x256 greyscale image.
• imageMb(im) will create an image using the same size and depth than ’im’.
• imageMb(depth) will create an image with the desired ’depth’ (1, 8 or 32).
• imageMb(path) will load the image located in ’path’.
• imageMb(im, depth) will create an image using the same size than ’im’ and the specified ’depth’.
• imageMb(path, depth) will load the image located in ’path’ and convert it to the specified ’depth’.
• imageMb(width, height) will create an image with size ’width’x’height’.
• imageMb(width, height, depth) will create an image with size ’width’x’height’ and ’depth’.
When not specified, the width and height of the image will be set to 256x256. The default depth is 8
(greyscale).
2D images can be defined with any positive w and h values. However, Mamba works only with images that
have a width multiple of 64 and a height multiple of 2. It means that if you requested the creation of an image
of size 747x621, Mamba will actually create an image of size 768x622. The actual image is always larger than
or equal to the defined size.
>>> im = imageMb ( 7 4 7 , 6 2 1 )
>>> im . g e t S i z e ( )
(768 , 622)
Two factors explain this particularity:
• In order to increase the processing speed, pixel values are stored in words and these words may be 64 bits
long if your OS allows it. By this means, 64 pixels of a binary image are stored in a single word and then
processed in parallel. The result is a dramatic increase of the computation speed. So, if the horizontal
size of the image is not multiple of 64, this could deeply deteriorate the performance, as each end of line
should be processed differently.
22
www.mamba-image.org
Mamba Image User Manual
November 3, 2015
• Similarly, if the height is not even, a supplementary line is added to the image. The reason is that the
image can be processed on an hexagonal grid (see section 7.5.2). In this case and to avoid again to increase
the complexity of the operators, the number of even lines must be equal to the number of odd ones.
The pixels added to the image are set to 0. This procedure is called padding. Padding may seem confusing
because it adds strips of black pixels on the right and bottom of the image. Therefore, processing such an image
leads to unwanted edge effects. The erosions for instance increase the size of the black strips but many other
operators are also concerned.
A better solution consists in cropping the image, that is cutting it in order to let it fit to the image size.
However, padding has been preferred to cropping because it allows the user not to lose any pixel of the image
and to choose at the end the part of it which will be discarded by cropping.
Nevertheless, cropping can be performed by two means:
• cropCopy can be used to extract from the padded image the part which interests you. Note that
cropCopy does not clear the destination image, it simply replace the cropped part (see the Mamba
Image Examples manual (section 10).
• The size of the destination image can also be set before loading the image file:
>>> im = imageMb ( 2 5 6 , 2 5 6 )
>>> im . l o a d ( " myimage . png " )
"myimage.png" is a (300x300) image stored in the Python working directory. This solution however does
not allow you to choose the part of the image which will be loaded: it is always the upper left part.
Mamba allows you to create images with different sizes but not to perform
computations between them. If you want to do so, you will have to use the
cropCopy() function to extract the part of the images you want to match.
7.6.2
3D images
The basic data model used in Mamba3D is the image3DMb image class. This class is the complete equivalent
to the imageMb class for 3D images and it inherits its attributes and methods. New attributes and methods
are defined to deal with these images.
You should know that this class is actually a stack of standard Mamba images (imageMb object) with all
the same size and depth. The dimension of a 3D image is thus given by the size of the Mamba images inside the
stack and by its length. Contrary to the two other dimensions, there is no restriction on the value of length..
This choice may seem strange because it differentiates one direction (supposedly z-axis) in the data structure
from the other two (x-axis and y-axis) but it was dictated by the need to reuse as much as possible the basic C
functions of Mamba which work with the imageMb low-level structure.
A 3D image is in fact a list of 2D images. Therefore, each 2D image at position i (the indexing starts at 0)
composing the 3D image im3D can be accessed by:
im3D [ i ]
Figure 15 shows the coordinates arrangement of a 3D Mamba image. The length of the pile of 2D images
(the third dimension of the 3D image) corresponds to the length of the im3D list:
imLength = len ( im3D )
There is a wide range of possibilities to create a 3D image object :
• image3DMb() : without arguments will create an empty greyscale 3D image (by default its size is
256x256x256).
• image3DMb(im3D) : will create a 3D image using the same width, height, length and depth than 3D image
’im3D’.
• image3DMb(im) : will create a 3D image using the same width, height and depth than 2D image ’im’ (a
imageMb object). Its length will be defaulted to 256.
• image3DMb(depth) : will create a 3D image with the desired ’depth’ (1, 8 or 32) and default size
(256x256x256).
23
www.mamba-image.org
Mamba Image User Manual
November 3, 2015
length
(0,0,l-1)
(w-1,0,l-1)
z
(0,0,0)
width
(w-1,0,0)
height
(0,h-1,0)
(w-1,h-1,0)
Figure 15: Image 3D pixels coordinates
• image3DMb(path) : will load the image sequence located in ’path’, see the load method.
• image3DMb(im3D, depth) : will create a 3D image using the same size than 3D image ’im3D’ and the
specified ’depth’.
• image3DMb(im, length) : will create a sequence using the same width, height and depth than 2D image
’im’ (a imageMb object). Its length will be the specified ’length’.
• image3DMb(path, depth) : will load the image sequence located in ’path’ and convert it to the specified
’depth’.
• image3DMb(width, height, length) : will create a greyscale 3D image with ’width’, ’height’ and
’length’.
• image3DMb(width, height, length, depth) : will create a 3D image with the given parameters.
In the new release of Mamba (2.x), the sequenceMb class is simply an alias of the image3DMb class.
Indeed, a sequence is simply a list of 2D images. It can be considered as a special case of 3D image where the
third dimension is time.
7.6.3
Saving and loading images
2D images
Upon creation of after you created an image you can load it with the data contained inside a file. Loading
an image, either at construction or with the load method, makes use of the Pillow library. Any image format
supported by this library will then be supported by Mamba.
You can proceed like this:
# Loading t h e c o n t e n t o f t e s t . png i n image im1
im1 . l o a d ( ’ test . png ’ )
# C r e a t i n g an image with t h e c o n t e n t o f t e s t . png l o a d e d a t s t a r t
im2 = imageMb ( ’ test . png ’ )
Loading an image after the creation will not change the size of the original image to adapt it to the loaded
image. The loaded image is padded/cropped to fit the original size. Whereas, when the image is loaded in the
constructor, its size is used as an information for the imageMb size.
Pillow images came with a mode property that depends on the type of image. Here are the rules applied
when converting from Pillow to Mamba:
24
www.mamba-image.org
Mamba Image User Manual
November 3, 2015
Pillow mode
"1"
"L"
"P"
"RGB"
"RGBA"
"CMYK"
"I"
"F"
Mamba depth
8
8
8
8 (using rgbfilter)
8 (using rgbfilter)
8 (using rgbfilter)
32
32
For RGB, RGBA and CMKY formats, you can specify the RGB filter that will be used to convert color
image into greyscale image by adding the rgbfilter=<your_filter> to the argument of the constructor (see
Pillow documentation for examples of filters).
With the load method, when the loaded Mamba image depth is not the depth of the destination image, it
is converted to the correct depth.
Once you have created an image and performed some operations on it, you may want to save it into a file.
The imageMb class provides the method save() to do so:
# S a v i n g t h e c o n t e n t o f im1 image i n t e s t . png
im1 . s a v e ( ’ test . png ’ )
The method uses Pillow functions to save the image. Thus the format (bmp, gif, jpeg, ...) is automatically
deduced from the extension used.
As for the load method, the conversion from a Mamba image to a Pillow image applies the following rules:
Mamba depth
1
8
32
Pillow mode
"L"
"L"
"I"
If you want to preserve the image unmodified to reuse it later, make sure to select a format that supports
the mode of the Pillow image (such as TIFF for "I" mode) and that the format does not compress data (such
as BMP).
You can also save your image for display purpose. In that case you can use the additional parameter of the
save function, palette (see section 7.8.6).
3D images
Contrary to 2D images where a lot of formats are available, most of them being efficiently addressed by the
Pillow library, there is not such standard formats in 3D. Many of them are proprietary. So, in Mamba 3D, there
exists only two ways to load a 3D image:
• By using the loadRaw method, where raw data are stored in the 3D image. Note that a preprocessing
can be performed on the data before loading them in the 3D image. See the Mamba Image Library Python
Reference manual (section 10 ) for further details.
• By using the load operator which reads a 3D image from a directory containing the corresponding pile of
2D images.
Similarly, there are two procedures for saving 3D images:
• extractRaw extracts raw data from an image and stores them in a string. Then this string can be written
in a file.
• save stores all the 2D sections of the 3D image in a directory. This directory will contain 2D images
stored in a standard format.
The load and save methods will work on any directory containing a sequence of images. A sequence is a set
of files named using numbers (such as "001.png", "002.png" ...). We advise you to look at the Mamba Image
Python Reference manual for further information.
You can also use the loadRaw and extractRaw methods to load data inside your image or extract it and
save it. The loadRaw method accepts either a path to a file containing the raw data or the raw data (byte
string) itself.
25
www.mamba-image.org
Mamba Image User Manual
November 3, 2015
# Loading im1 with raw data
raw_data = 128∗128∗ b"\ x00 "
im1 . loadRaw ( raw_data )
Of course the data size (given on argument or read from the file) must fit the image size.
7.6.4
Other imageMb and image3DMb methods
Besides creating, loading or saving your image, a range of other functionalities are accessible using specific
methods.
If you need to convert an image into another format (another depth), use the convert() method. All
conversions are supported. convert() takes the required depth as argument. This method is here for convenient
purposes, there are more elaborated ways to convert an image available inside Mamba.
# Co n v e r t s t h e g r e y s c a l e image i n t o b i n a r y format
g r e y s c a l e = imageMb ( depth =8)
greyscale . convert (1)
# Co n v e r t s t h e b i n a r y image i n t o g r e y s c a l e format
b i n a r y = imageMb ( depth =1)
binary . convert (8)
If you want to erase an image, you can use the reset() method.
# E r a s e t h e image im1 by s e t t i n g a l l i t s p i x e l s t o 0
im1 . r e s e t ( )
The fill() method allows you to set all the pixels of an image to a given value.
# F i l l im2 image with t h e v a l u e 3
im2 . f i l l ( 3 )
There are other methods that will be explained more thoroughly in the next sections. In particular the
display methods are explained in section 7.8.
7.7
Pixels manipulation
The imageMb and image3DMb classes offer methods to set or get pixels in the image.
# S e t t i n g t h e p i x e l a t x , y i n im2 t o v a l u e
position = (x , y)
im2 . s e t P i x e l ( v a l u e , p o s i t i o n )
# Same a s p r e v i o u s l y but t h i s method w i l l not update t h e s c r e e n ( not a v a i l a b l e
# i n 3D)
im2 . f a s t S e t P i x e l ( v a l u e , p o s i t i o n )
# Getting the p i x e l value at p o s i t i o n
v a l u e = im2 . g e t P i x e l ( p o s i t i o n )
7.8
Displaying images
When trying new algorithms, it can be very useful to be able to follow the evolution of your images without
having to save the image at each step. Mamba provides a graphical interface which can display every required
image into its own display window.
Important notice: We saw previously that two grid definitions were available in Mamba: hexagonal or
square grids. However, any image will always be displayed on a square grid, even if this image has been obtained
with an operator defined on the hexagonal grid! Remember: the grid is an operator attribute, not an image
attribute. This may lead to some strange phenomenons if you are displaying small hexagons for instance. They
seem to be distorted and in fact they are. However, be sure that it’s only a display artefact: the operator is
really applied on an hexagonal grid (as you may ascertain this by displaying larger hexagons).
7.8.1
Basic display methods
The methods described in this section are found in imageMb and image3DMb.
To activate a display, type:
26
www.mamba-image.org
Mamba Image User Manual
November 3, 2015
Figure 16: 2D display
# Shows t h e image im i n i t s own window
im . show ( )
After this call, for 2D image (i.e. imageMb class) every modification on the image will be shown inside the
opened window. This operation is known to be very demanding on performance. For 3D image, the display is
not updated automatically for this reason. You can update the display with the method:
# Update t h e image d i s p l a y
im . update ( )
If you want to disable the display you have two options, either close the window by clicking the appropriate
button or type:
# Hide t h e window a s s o c i a t e d with im
im . h i d e ( )
Both operations will prevent the display to be updated for every modification of the image and thus will
remove the performance overhead (reducing or minimizing the display window will have the same result for
performance but the window will remain visible in your access bar).
If you want to stop the display from being automatically updated when a computation is performed while
still being able to see it, you can freeze the display using the appropriate method:
# F r e e z e t h e window a s s o c i a t e d with im ( no more updated )
im . f r e e z e ( )
# U n f r e e z e t h e window a s s o c i a t e d with im ( updated a g a i n )
im . u n f r e e z e ( )
Of course all the displays come with integrated controls. There are two ways to control the display. The
first one is achieved with the show() command with some arguments added. These arguments are described in
section 7.8.4. This first possibility allows you to control the displays inside scripts. The second way consists in
using interactive controls. They are described in section 7.8.5.
7.8.2
2D display
The 2D display, see figure 16, is a standard window with the image in the center. It also gives information
regarding the image volume, the position of the mouse inside the image (and the associated pixel value).
A contextual menu is also available by right-clicking in the display. It offers services like saving, opening,
etc. Figure 17 shows an example of contextual menu. The first three choices are obvious. Then, you can choose
a zoom value between 100% or 200%. The last menu item indicates the size of the image.
7.8.3
3D display
The 3D display is composed of three different approaches to display 3D images: Volume rendering, projection and
player. When you activate the 3D display, you can dynamically switch between the three at your convenience.
27
www.mamba-image.org
Mamba Image User Manual
November 3, 2015
Figure 17: 2D display: contextual menu
The foot data used for the display demo in this section can be found at
http://tc18.liris.cnrs.fr/code_data_set/3D_images.html
Projection display This display, see figure 18, is basically an adaptation of the 2D display. It is a basic
plane projection along the three axis. You can select this display by pressing key F1 on your keyboard.
You can navigate through planes moving your mouse while holding <ctrl> down. The mouse motion will
allow you to change the plane following it (the displayer shows a red cross to indicate where you are in the
image data).
This is a more appropriate display if you need precision and careful analysis of a result. However it only
shows a limited amount of the image at any given time.
Volume rendering display This display, see figure 19, is ensured through the VTK library and thus is only
available if you have this library installed with the Python bindings. Also remember that VTK is currently not
available with Python 3. You can select this display by pressing key F2 on your keyboard.
The image is displayed inside its bounding cube and you can control its rotation and zoom with your mouse.
This display comes with an integrated controller which allows you to change the various options of display
available. As shown in figure 20, you can change the opacity, the background color and the rendering methods.
The transparency/opacity of a pixel depends on its value. By clicking on the transparency bar, every pixel
with value below will be transparent and above pixels will be opaque.
To change the background, just click on the background bar. It will open a color chooser dialog box in which
you can pick up any background color you might want.
Three distinctive methods to perform volume rendering can be selected:
• Composite: the result is a blend of all the pixels crossed by the ray of light accordingly to their color
and transparency.
• Isosurface: the result shows only pixels with a given value. It also uses shading to allow a better
visualisation of the volume.
• Maximum Intensity Pixel (MIP): the result is the color and transparency of the pixel with the highest
value that the light ray hits.
You can see the results of the 3 different methods in figure 21.
You can rotate (holding your mouse left button while moving it), zoom in and out (same movement while
holding the right button) and displace the image (this time by holding both the left button and the shift key on
your keyboard while moving the mouse). This allows you to view more precisely any area of your image. You
can restore the initial settings by pressing r (Although this does not seem to affect rotation).
We feel this display is appropriate to get an overall idea of your result. However, it may lack precision and
it could be troublesome to understand what or where you are looking at. Use it cautiously.
28
www.mamba-image.org
Mamba Image User Manual
November 3, 2015
Figure 18: 3D display: projection
Figure 19: 3D display: volume rendering
29
www.mamba-image.org
Mamba Image User Manual
November 3, 2015
Figure 20: 3D display: volume rendering controls
Composite
Isosurface
MIP
Figure 21: 3D display: volume rendering methods
Figure 22: 3D display: player
30
www.mamba-image.org
Mamba Image User Manual
November 3, 2015
Player display This display, see figure 22, will display the 3D image as a sequence of 2D images that can be
played as a movie. You can select this display by pressing key F3 on your keyboard.
The button allows you to play/stop or go to previous or next image in the sequence. You can select the
speed at which images are displayed.
3D displays particularities As you will see, unlike 2D images displays that are updated as the computations
progress, 3D images displays are not (for performance reasons). You will have to update them manually by
either hitting key F5 on your keyboard (with the focus on the display you want to update) or call the update
method.
We tried to provide Mamba3D with a coherent, useful and appropriate display. However, contrary to 2D
images, 3D images are difficult to represent on a 2D display. Be sure to correctly configure the display before
analysing results.
Lastly, as 3D images in Mamba3D are stacks of 2D images (imageMb objects), you always have the possibility
to activate their own display at all time.
# A c t i v a t e s t h e d i s p l a y f o r s l i c e number 128 o f 3D image
im3D [ 1 2 8 ] . show ( )
7.8.4
Display control inside a script
Image displays can be set and controlled inside a script (Mamba program) through the use of some arguments
inside the show() method.
The palette can be changed. For instance, changing the im palette to "rainbow" can be performed by:
im . show ( p a l e t t e=" rainbow " )
Returning back to the default palette (grey) can be achieved by:
im . show ( p a l e t t e=None )
# This a l s o works . . .
im . show ( p a l e t t e="" )
The zoom value can be set with the zoom argument. For instance:
im . show ( zoom =1.5)
It is also possible to move the zoomed image with the argument at=(x,y), (x,y) being a tuple defining
the origin of the zoomed part (it is similar to a displacement of the scroll bars of the display window). Both
arguments can be used simultaneously:
im . show ( zoom=2, a t = ( 5 0 , 6 0 ) )
When displaying 32-bit images, the plane argument allows to select the byte plane (from 0 to 3) among the
four ones which will be displayed:
im32 . show ( p l a n e =2)
To come back to the whole display, enter:
im32 . show ( p l a n e =4)
Regarding 3D images, there exists three different display modes in Mamba: VOLUME, PROJECTION and
PLAYER (for image sequences which are considered in Mamba 2 as 3D images). Each mode can be set up by
using the mode argument:
# This mode e n a b l e s t h e 3D r e n d e r i n g d i s p l a y ( p r o v i d e d t h a t VTK i s p r o p e r l y i n s t a l l e d )
im32 . show ( mode=" VOLUME " )
Any string other than the three mentioned above enables the default display (PROJECTION).
7.8.5
Display shortcuts
There are numerous possibilities to interactively control displays. Here is a list of keyboard shortcuts available
in the various displays:
• P: will circle through all the available palettes.
• Z and A: will zoom in/out in 2D displays (basic, projection, player ...)
31
www.mamba-image.org
Mamba Image User Manual
November 3, 2015
• B and N: With 32-bit images, these keys will allow you to move through byte planes or to show the
complete image downscaled.
• Control-F: will freeze/unfreeze the display. See the freeze() method.
• Control-R: will reset the display to its original size and zoom value.
• Control-V: will copy any image stored inside the clipboard in your image (only works on 2D images on
Windows platforms).
• F1: on a 3D image display, will switch to PROJECTION mode.
• F2: on a 3D image display, will switch to VOLUME mode if you have VTK Python bindings available on
your computer.
• F3: on a 3D image display, will switch to PLAYER mode.
• F5: on a 3D image display, will update the display with the image content. Similar to the method update.
• Space : will start/stop the player in the 3D image display PLAYER mode.
• Page-Up : will display the next image in the sequence in the 3D image display PLAYER mode.
• Page-Down : will display the previous image in the sequence in the 3D image display PLAYER mode.
You can also use your mouse:
• scrolling : will zoom in/out in 2D displays (basic, projection, player ...)
• motion+Control : will allow to move through the image in the 3D image display PROJECTION mode.
7.8.6
Palettes and other display functions
As you have seen above, you can activate palette through shortcut P when displaying images. Mamba comes
with four preintegrated palettes : "rainbow", "inverted rainbow", "patchwork" and "heat view".
You can create your own palette using the functions offered in package mambaDisplay.
import mambaDisplay
# C r e a t e s a p a l e t t e t o emphase one s p e c i f i c p i x e l v a l u e
# Here t h e 255 v a l u e d p i x e l s w i l l be s e e n i n r e d .
mambaDisplay . t a g O n e C o l o r P a l e t t e ( 2 5 5 , ( 2 5 5 , 0 , 0 ) )
# Once c r e a t e d t h e p a l e t t e i s a v a i l a b l e through t h e P s h o r t c u t
# under t h e name ’ t a g 255 ( 2 5 5 , 0 , 0 ) ’
# You can a l s o add your own p a l e t t e
mambaDisplay . a d d P a l e t t e ( " my own palette " , my_own_palette )
# where my_own_palette i s a t u p l e c o n t a i n i n g 256∗3 v a l u e s ( r0 , g0 , b0 , r1 , g1 , b1 . . . )
Palette can also be used with the save method to colorize the saved image.
Sometimes, you will have lots of images opened and displayed making it quite messy on your desktop and
thus very difficult to read and analyze. There are a bunch of methods and functions to help you organise your
displays.
Firstly, you can give a name to your image that will be displayed in the window title making it easier to
know what is represented by the display:
# S e t t i n g im name t o ’ r e s u l t ’
im . setName ( ’ result ’ )
When the screen gets filled with lots of displays, it can be excruciatingly boring and slow to order all of
them so that they don’t overlap. To make sure displays are properly and automatically organised, you can call
the following function in the mambaDisplay package:
mambaDisplay . t i d y D i s p l a y s ( )
32
www.mamba-image.org
Mamba Image User Manual
November 3, 2015
Original
Threshold
Figure 23: Interactive thresholding of the left Burner image
The function does not do miracles (like increasing your screen resolution) so don’t have too much expectations.
Large and small images are not displayed at their original size but they are zoomed in (if they are too small)
or zoomed out (if they are too large). By default, images larger than 512 in width or height are zoomed out
by a factor 2 until the size of the zoomed out displayed image is below this maximum value. In the same way,
an image smaller than 256 will be zoomed in (x2) until the displayed image is larger than this minimum. For
instance, a 1024x1024 image will be displayed after a zoom-out equal to 25% whereas a 200% zoom-in will be
applied on a 128x128 image.
The default values of the display sizes can be changed by means of the following functions:
mambaDisplay . setMaxDisplay ( s i z e )
mambaDisplay . s e t M i n D i s p l a y ( s i z e )
where size is a tuple containing the upper (in setMaxDisplay) or lower (in setMinDisplay) limits of the width
and height of the display. These functions belong to the mambaDisplay package. It is wise to use them at start
before displaying any image. Under Windows, these functions could be put in the _init_.py file of the Mamba
shell (see section 7.10).
# S e t t i n g d i s p l a y max s i z e t o ( 8 0 0 , 8 0 0 )
import mambaDisplay
mambaDisplay . setMaxDisplay ( ( 8 0 0 , 8 0 0 ) )
7.8.7
Extra displays
A specific module has been created to offer some extra display methods.
The module mambaDisplay.extra offers functions to display, interact and generally perform operations that
need the constant intervention of the programmer. For example, this module provides an interface to allow
dynamic threshold of a given image (threshold value can then be modified on the fly by the user).
This module is not automatically imported and needed to be imported manually if you want to use it.
# I m p o r t i n g t h e mambaDisplay . e x t r a module
from mambaDisplay . e x t r a import ∗
A greyscale or 32-bit image can be thresholded interactively with the dynamicThreshold operator. This
operator opens a window (figure 23) displaying the binary thresholded image. The threshold values can be
modified by hitting Q, W, S and X on the keyboard. See the documentation for further details.
On exit (when hitting the close button), the operator returns a list containing the threshold values.
33
www.mamba-image.org
Mamba Image User Manual
November 3, 2015
Greyscale and binary image
Two binary images
Figure 24: Superposing a greyscale and a binary image (left) or two binary images (right)
# Interactive thresholding
from mambaDisplay . e x t r a import ∗
im . l o a d i m a g e ( " Burner . png " )
dynamicThreshold ( im )
# When e x i t i n g , we g e t :
[139 , 192]
The superpose operator, when launched, displays, superposed in the same window, either a greyscale or
32-bit image and a binary one, or two binary images. The color of the binary displays can be modified by
clicking the color buttons (figure 24).
The interactiveSegment operator allows to interactively segment a 8-bit or 32-bit image with the watershed
transform by injecting manually markers on it. Each new marker modifies the segmentation (figure 25). On
exit, this operator returns a list of markers coordinates.
# Launching i n t e r a c t i v e s e g m e n t a t i o n
from mambaDisplay . e x t r a import ∗
i n t e r a c t i v e S e g m e n t ( im , im32 )
The 32-bit im32 image contains the watershed segmentation.
7.9
7.9.1
Structuring elements
Defining structuring elements
Two of the most important operations of mathematical morphology: erosion and dilation (functions erode and
dilate and their 3D counterpart respectively) are based on a structuring element which controls the behavior of
the operator.
2D structuring elements are instances of the structuringElement class, while 3D ones are instances of
the structuringElement3D class. Remember also that a doubleStructuringElement and a doubleStructuringElement3D classes exist. They are used with the thinning and thickening operators.
Each structuring element is associated to a grid. It is defined by the neighbors of the central point it contains.
Its origin is always the central point, even when this point does not belong to the structuring element.
The class structuringElement allows you to describe a structuring element to be used with the erode and
dilate functions. This class can only describe structuring elements that are included in the local neighbors of
the central point (adjacent points).
34
www.mamba-image.org
Mamba Image User Manual
November 3, 2015
Figure 25: Interactive segmentation
HEXAGON
TRIANGLE
TRIPOD
SQUARE3X3
SQUARE2X2
DIAMOND
SEGMENT
Figure 26: Structuring elements defined in Mamba
35
www.mamba-image.org
Mamba Image User Manual
November 3, 2015
10
11
12
6
1
5
0
2
3
4
9
8
7
Figure 27: Cuboctahedron defined on the face centered cubic grid
Mamba includes some of the most usual structuring elements. Figure 26 gives their list and representation.
You can define your own structuring element easily. To do so you will need to identify the grid it is based on
and the points that you want to include inside your structuring element. Refer to figures 3 and 4 for neighbors
coding values. Here is an example:
# Creating a reverse t r i a n g l e
r e v e r s e _ t r i a n g l e = s t r u c t u r i n g E l e m e n t ( [ 0 , 1 , 6 ] , HEXAGONAL)
# p e r f o r m i n g an e r o s i o n with t h e c r e a t e d s t r u c t u r i n g e l e m e n t
e r o d e ( imIn , imOut , 1 , s e=r e v e r s e _ t r i a n g l e )
Some erosion and dilation functions implemented in Mamba do not use this
structuring element class for performance or feasability reasons.
Be also aware that, when you are combining operations using a structuring
element and operations using a grid, you may have discrepancies between the
internal grid used in the structuring element and the grid you used as an argument (or the default). To prevent this, use the getGrid() method of the
structuring element class. See also section B.2.3.
Mamba3D predefined five structuring elements to be used with the appropriate 3D operators:
• CUBIC3X3X3 : A three pixels large cube. Based on the CUBIC grid.
• CUBIC2X2X2 : A two pixels large cube. Based on the CUBIC grid.
• CUBOCTAHEDRON1 : A first cuboctahedron. Based on the FACE_CENTER_CUBIC grid (see
figure 27).
• CUBOCTAHEDRON2 : A second cuboctahedron. Based on the CUBIC grid (see figure 28).
• CUBOCTAHEDRON3 : A third cuboctahedron. Based on the CENTER_CUBIC grid (see figure 29).
Note that the orientation and size of the different cuboctahedrons are different in the three grids.
You can also, of course, create your own structuring elements:
# C r e a t i n g a s m a l l pyramid
pyramid = s t r u c t u r i n g E l e m e n t 3 D ( [ 0 , 1 , 2 , 3 , 1 4 ] , CENTER_CUBIC)
# Why not a t e t r a h e d r o n
t e t r a h e d r o n = s t r u c t u r i n g E l e m e n t 3 D ( [ 0 , 1 , 2 , 1 1 ] , FACE_CENTER_CUBIC)
# You can o f c o u r s e b u i l d pyramids and t e t r a h e d r o n s with
36
www.mamba-image.org
Mamba Image User Manual
November 3, 2015
19
26
18
25
21
8
1
23
24
0
3
10
17
5
11
4
16
15
2
22
7
6
20
9
12
13
14
Figure 28: Cuboctahedron defined on the cubic grid
13
14
16
15
8
1
2
3
0
7
5
6
4
11
10
12
9
Figure 29: Cuboctahedron defined on the centered cubic grid
37
www.mamba-image.org
Mamba Image User Manual
November 3, 2015
# d i f f e r e n t d i r e c t i o n s . The next two a r e a b i t b e t t e r b e c a u s e they
# are centered
pyramid2 = s t r u c t u r i n g E l e m e n t 3 D ( [ 0 , 9 , 1 0 , 1 1 , 1 2 ] , CENTER_CUBIC)
t e t r a h e d r o n 2 = s t r u c t u r i n g E l e m e n t 3 D ( [ 0 , 7 , 8 , 9 ] , FACE_CENTER_CUBIC)
7.9.2
Structuring element methods
Different methods exist to deal with these 2D and 3D structuring elements: getGrid returns the grid associated
with the structuring element, getDirections returns the directions used by the structuring element (with or
without direction 0), hasZero indicates if the structuring element contains or not the central point, etc. In 2D,
a major difference between Mamba 1.x and Mamba 2.x lies in the way directions are defined and used in the
infNeighbor, supNeighbor and diffNeighbor operators. It is now possible to use several directions at the
same time. These directions, however, must be coded. This coding is performed by the getEncodedDirections
method. All the directions i of the structuring element se are used to define a number nb equal to:
X
nb =
2i
i∈se
which is actually used by the operators. The main advantage of this approach is a dramatic increase of the
computation speed of the basic morphological transforms (erosion, dilation). Here are examples of direction
encoding for some common structuring elements:
>>> HEXAGON. g e t E n c o d e d D i r e c t i o n s ( )
127
>>> HEXAGON. g e t E n c o d e d D i r e c t i o n s ( w i t h o u t Z e r o=True )
126
>>> TRIANGLE. g e t E n c o d e d D i r e c t i o n s ( )
25
In 3D, the same encoding is needed. But, as the structuring elements can be defined on three 2D layers,
this encoding is performed on each one so that the basic 3D erosions and dilations can be obtained rapidly by
performing partial operations on each plane of the 3D image and by combining these partial results. This encoding is performed by the getEncodedDirs method which returns a dictionnary containing the 2D structuring
elements encodings for the three sections of a given 3D structuring element. The result obviously depends of
the z position of the structuring element:
>>>
>>>
{0:
>>>
{0:
>>>
{0:
d i r s = CUBOCTAHEDRON1. g e t D i r e c t i o n s ( )
CUBOCTAHEDRON1. g r i d . g e t E n c o d e d D i r s ( d i r s , 0 )
1 2 7 , 1 : 6 7 , −1: 97}
CUBOCTAHEDRON1. g r i d . g e t E n c o d e d D i r s ( d i r s , 1 )
1 2 7 , 1 : 4 9 , −1: 25}
CUBOCTAHEDRON1. g r i d . g e t E n c o d e d D i r s ( d i r s , 2 )
1 2 7 , 1 : 1 3 , −1: 7}
7.10
Mamba Shell
Only on Windows
The Mamba Shell is in fact a simple shortcut to IDLE, the standard Python shell integrated into a Tkinter
GUI. This shortcut serves three purposes:
• Make sure IDLE is started with the correct options to run properly Mamba (see section 9).
• Make it easy for beginners to start Mamba by providing them a shortcut to a fully working environment
with preloaded modules and packages.
• Make it easy for advanced users to customize their default environment (number of loaded images, size,
particular imports ...) by editing an appropriate file.
If you are not using IDLE as your Python environment, you can still benefit
from the mambaShell by simply importing it inside your own Python shell.
The syntax "from mambaShell import *" is strongly advised for easier use.
38
www.mamba-image.org
Mamba Image User Manual
November 3, 2015
7.11
Regarding optimizations
If you are trying to optimize your algorithm, the Python reference documents
will be useful to obtain information on how functions operate and what sort of
performance is to be expected. See section 10.
Mamba is a very large library implementing a lot of functions. Consequently, it is likely there is more
than one way to create your algorithm using the functions provided by the library. However, among all these
possibilities, one is surely more fitted to your purpose (as regards code clarity and comprehension, speed, size
...).
Regarding speed, you will likely have to study extensively the various available functions. Mamba always tries
to implement the fastest function to perform any task. However, sometimes other constraints (like readability
and simplicity) gets in the way of the fastest implementation.
For example, consider the opening by build of an image. The openByBuild function found in the mamba
package is appropriate to perform this operation and is as fast as possible if it has to work with all image
depths indiscriminately. This operator uses the build function which works with any image depth. However,
there exists a faster reconstruction operator, hierarBuild, which works with non binary images (8-bit or 32-bit).
Therefore, if you know that you are only using greyscale or 32-bit images, it might be a good idea to create
your own openByBuild function like this:
import mamba
def o p e n B y B u i l d _ g r e y s c a l e ( imIn , imOut , n=1, s e=mamba .DEFAULT_SE) :
"""
Performs an opening by reconstruction operation on image ’ imIn ’ and puts the
result in ’ imOut ’. ’n ’ controls the size of the opening .
This function only works for greyscale or 32 - bit images and is an optimization of
openByBuild .
"""
imWrk = mamba . imageMb ( imIn )
mamba . copy ( imIn , imWrk)
mamba . e r o d e ( imIn , imOut , n , s e=s e )
mamba . h i e r a r B u i l d (imWrk , imOut , g r i d=s e . g e t G r i d ( ) )
In other cases, Mamba will offer two functions performing the exact same operation with identical results
but doing it with two algorithms presenting different performance characteristics.
Consider the case of erosion using an hexagon. Two functions exist in Mamba to perform this operation:
erode and largeHexagonalErode.
# E r o s i o n o f imIn by an hexagon o f s i z e 1 put i n t o imOut
e r o d e ( imIn , imOut , 1 , s e=HEXAGON)
l a r g e H e x a g o n a l E r o d e ( imIn , imOut , 1 )
In the example above, the result is the same for both functions. However, erode is more than two times
faster than largeHexagonalErode. But in this case:
# E r o s i o n o f imIn by an hexagon o f s i z e 20 put i n t o imOut
e r o d e ( imIn , imOut , 2 0 , s e=HEXAGON)
l a r g e H e x a g o n a l E r o d e ( imIn , imOut , 2 0 )
largeHexagonalErode is this time more than two times faster than erode. You will have to take into account
this particularities when implementing your algorithm if you want to speed it up. Regarding largeHexagonalErode, refer to section 11.3 for more information.
39
www.mamba-image.org
Mamba Image User Manual
November 3, 2015
7.12
7.12.1
Further information regarding Mamba3D
Computations/Functions
Performing computations with Mamba3D was meant to be as close as possible as the way they are done in
Mamba. Thus function names are identical except for a postfix "3D" indicator.
# For example t h e e r o d e f u n c t i o n i n Mamba
e r o d e ( imIn , imOut , n=1, s e=DEFAULT_SE, edge=FILLED)
# w i l l become i n Mamba3D ( beware o f t h e mamba . FILLED needed i f you d i d
# not import mamba)
erode3D ( imIn , imOut , n=1, s e=CUBOCTAHEDRON1, edge=mamba . FILLED)
Although it might seem bothersome to add the "3D" postfix to every function you are using when computing
in 3D, it is also needed to be able to use both the 2D functions and their 3D counterpart in the same script.
This naming convention was also adopted, for the most part, by module names in the Mamba3D package.
As simple as it is, you will still face difficulties if you try to translate your 2D algorithm into 3D. First,
computations take more time (see section 7.12.2) but Mamba3D does not offer all the functions found in the
Mamba API. The section 7.12.3 describes some of the main differences between the two.
7.12.2
Performance discussion
Performing computation on 3D data is performance consuming. For example, if you compare a 2D erosion with
a hexagonal structuring element versus a 3D erosion using a cuboctahedron structuring element, you will have
to perform twice more operations per pixel in the later. If you take into account that the number of pixels is
also greater in 3D (and not by a small amount), you end up with a very large difference of speed between the
two operations.
Thus, if you need to process 3D images, you get only three choices, get patient, get a faster computer or
code a library fully optimized for 3D operations (which Mamba3D isn’t).
Another performance problem arises with the display. VTK is a very powerful library offering state of the
art methods and algorithms to display data of all kinds. Mamba3D uses the volume rendering techniques based
on CPU computation and not GPU implemented into VTK. Of course, they are slower than the ones using
the GPU but they do not require a modern graphic card. Feel free to modify the source code of Mamba3D to
use the GPU volume rendering methods. Other displays are less greedy but they are still more CPU consuming
than a simple 2D display.
Last but not least, memory consumption will also be dramatically more important in Mamba3D but that
goes without saying.
7.12.3
Missing or reduced operators
As you will see, Mamba3D does not completely translate the Mamba API into a 3D version of it. There are still
some missing operators. Here is a non exhaustive list of 2D operators that have not been transposed in Mamba
3D yet. Some of them could be added in the future. For some others (rotating thinnings and thickenings in
particular), it is unlikely that they will be translated, as this would be a really difficult challenge.
• Most of the operators in mamba module thinthick (except the basic ones).
• Some operators in mamba module largeErodil, especially those using 3D Steiner polyhedra (except for
the cube).
• All the operators in mamba module residues.
• All the operators in mamba module hierarchies.
• Some of the operators in mamba module measure.
Some operators do not work in Mamba3D exactly as in Mamba.
• structuringElement3D offers no method to rotate them.
This is not the complete list and if you have any doubt about the behavior of a function, we advise you to
go and look at its documentation.
40
www.mamba-image.org
Mamba Image User Manual
November 3, 2015
8
Add-ons and extensions
8.1
mambaRealtime
The Mamba Realtime module is an extension to the Mamba library for Python that allows you to test your
algorithms on realtime acquired images.
The Mamba library allows you to develop easily and rapidly applications based on mathematical morphology
algorithms.
Most of the time, you will test and try your ideas on static images to make sure that your algorithm is
working correctly and efficiently. However, as good as this approach might be, it still lacks something when you
want to confront your algorithm to "dynamic real life situation", meaning noise, unpredictable movement, fast
input, etc ... that your algorithm will have to handle to efficiently work in a realtime situation.
The Mamba Realtime was built to help you test these situations easily without having to recode your
algorithm in another language.
Currently two versions of this module are under development, one for Windows platforms and another for
Linux platforms. These two versions are available at the GitHub Mamba repository. Note that the Windows
version is currently far from being functional.
Note that the Mamba Realtime module does not work properly on any Windows environment. Therefore, we advise you to use Linux if you intend to use
this add-on.
This add-on offers the following services :
• Acquire images from supported image acquisition device (Video 4 Linux 2 devices on Linux). Currently,
this means that most of the webcams are supported.
• Retrieve images from video sources using the FFmpeg library (lots of video codecs are supported).
• Display the result of your algorithm in realtime.
• Record the result using the FFmpeg library.
Please note that the Mamba Realtime module is NOT released under the
same license. Currently this module is under GPL. Consult the appropriate
documentation for more information.
For more information regarding this add-on, refer to the appropriate documents (readme.txt and source
code at the GitHub repository).
41
www.mamba-image.org
Mamba Image User Manual
November 3, 2015
9
Limitations and restrictions
Unfortunately, Mamba has some built-in limitations that may be corrected later but that you will have to deal
with in the meantime.
Whatever image you load, it will always be assumed that it is a greyscale image. By default, Mamba uses
the ITU-R 601-2 luma transform to convert color images into greyscale images. You can of course specify your
own transformation matrix (refer to the Python and Pillow reference documentations).
Mamba is known to have some troubles with IDLE. Mamba uses Tkinter for image display and this may
produce interferences with IDLE. The problem is known to occur when IDLE is run with subprocess enabled
which is the default mode when IDLE is invoked through the Windows main menu. However, there is no problem
when IDLE is started with no subprocess (option -n) as, for example, when right-clicking on a Python file and
selecting "Edit with IDLE" from the contextual menu. IDLE will display a short sentence if subprocesses are
deactivated before the first shell prompt. So if you want to use IDLE, you have three options:
• Start IDLE with subprocess disabled (option -n). This will allow you to use Mamba display but unfortunately will prevent you using the integrated debugger. The Mamba Shell on Windows is in fact a shortcut
to do this.
• Start IDLE with subprocess enabled (default mode on Windows) but do not use Mamba standard display.
This way you have access to the integrated debugger.
• Install Mamba with the IDLE shell and launch MambaShell at startup (see section 7.10).
In any case, Mamba should work perfectly with the standard Python shell (command line).
Along those problems with IDLE, you can also face difficulties when using Mamba with other GUI libraries.
Indeed, when using the embedded display, Mamba relies on the PyOS_InputHook trick. It allows the Python
shell (where you type all your commands) to still be operational while at the same time processing GUI events
(such as mouse clicks keyboard inputs ...). When you start any Mamba display, Tkinter grabs the hook thus
making it unavailable for other libraries which might need it. Similarly if Mamba is started after a library that
has grabbed the hook, the embedded display will not work (display will be frozen). In particular, if you are a
user of pylab, make sure to import it after Mamba because it is likely this library will grab the hook (you must
do this only if your intention is to display Mamba images). It is not sure we will be able to fix this in a near
future. However, as long as you don’t need to use the display, Mamba should work fine with any other library.
42
www.mamba-image.org
Mamba Image User Manual
November 3, 2015
10
Other documents and references
Mamba documentation is pretty large and covers C API, Python API, user manual and add-ons documentation.
Here is a list of these documents and what information you can find in them:
• mamba C API Reference Manual: This document refers to the low-level C API. It is generated
using sources code and Doxygen. If you intend to modify the C functions, this document may be useful
to you. It gives some explanations regarding the image data structure used inside Mamba. Have also a
look at section 12.1 for general information regarding Mamba architecture.
• Mamba Image Library Python Reference: As soon as you start using Mamba, you will need
to keep this document close to you. All the Python functions present in Mamba are explained in this
document. It gives information on how to use them, what sort of result to expect and so on...
• Mamba API quick reference: This document is the very compacted version of the previous one.
All the functions listed on the shortest possible number of pages plus some of the more useful pieces of
information you might need. This quick reference is meant to help you quickly remember function name
and arguments but it can also be useful to get to know all the functions implemented in Mamba.
• Mamba Image Examples: This document describes various examples regarding how to use Mamba
and the kind of results you can expect.
43
www.mamba-image.org
Mamba Image User Manual
November 3, 2015
11
Algorithmic approaches in Mamba
Some of the operators included in Mamba are based on specific algorithms. In this section, we list some of them
and give references to the articles or courses that describe them. You can also take a glimpse inside the sources
to see how they were implemented.
11.1
Hierarchical lists : Watershed and Build
Mamba is using hierarchical lists to perform watershed computations and some particular build operators.
The use of hierarchical lists for watershed was first described in a patent document. This article described
mainly an algorithm to extract basins.
1. Fernand Meyer, Image processing method by hierarchical queues, Available at http://www.freepatentsonline.
com/EP0576584.html, 1992
More details for a similar algorithm allowing to extract an idempotent watershed line can be found in the
following article.
2. Serge Beucher, Nicolas Beucher, Hierarchical queues implementation: general description and enhancements in Mamba software library, Available at http://cmm.ensmp.fr/~beucher/Mamba_documentation.
html, (to be published)
Mamba implements these algorithms in the C core library for performance sake. If you are interested, you
can find them in the sources in files:
• mambaApi_loc.h: The data structures used to represent the hierarchical lists in Mamba are described
in this file.
• MB_Basins.c: A simple implementation of the hierarchical queues to extract basins using a marker
image for flooding wells. This is the simplest use of hierarchical lists that is done in Mamba.
• MB_Watershed.c: An implementation of the hierarchical queues to extract basins and watershed lines
using a marker image for flooding wells.
Build (and its dual) operation can be performed using hierarchical queues in Mamba by calling the appropriate functions. The implementation refers to 2.
Here is the list of source files implementing these operators. They are based on the same data structures for
the hierarchical lists as watershed operators:
• MB_HierarBld.c: Implementation of the build operator for greyscale images using the hierarchical
lists.
• MB_HierarDualBld.c: Implementation of the dual build operator for greyscale images using the hierarchical lists.
11.2
Labelings
The labeling algorithm implemented in Mamba employs a version of the union-find algorithm.
3. Wikipedia Free Encyclopedia, Connected component labeling, Available at http://en.wikipedia.org/
wiki/Connected_Component_Labeling, 2007
The code source implementing this algorithm can be found in the C core library in file MB_Label.c.
Other labeling operators can be found in the labelling.py module. They are described in 4.
4. Serge Beucher, Labelling Operators, Available at http://cmm.ensmp.fr/~beucher/Mamba_documentation.
html, 2014
44
www.mamba-image.org
Mamba Image User Manual
November 3, 2015
11.3
Large erosions and dilations
Erosion and dilation are quite common in mathematical morphology and thus Mamba implements many variations of them to give you access to the most powerful ones.
5. Serge Beucher, Fast implementation of large erosions and dilations in Mamba, Available at http://cmm.
ensmp.fr/~beucher/Mamba_documentation.html, 2010
5 describes an algorithm to perform large erosions and dilations faster than with the standard method by
repeating over a simple operator. These algorithms are implemented in the large erosion and dilation functions
in Mamba. You can found them in module erodilLarge.py of the mamba package and a reduced set of them
adapted to 3D images in the erodilLarge3D.py module.
11.4
Hierarchical segmentations
Mamba implements multiple algorithms performing segmentations based on a hierarchization of an initial watershed.
6. Serge Beucher, Beatriz Marcotegui P algorithm, a dramatic enhancement of the waterfall transformation,
Available at http://cmm.ensmp.fr/~beucher/publi.html, 2009
7. Serge Beucher Towards a unification of waterfalls, standard and P algorithms, Available at http://cmm.
ensmp.fr/~beucher/publi.html, 2012
6 and 7 describe algorithms implemented in module hierarchies.py of the mamba package.
11.5
Working with partitions
A module, named partitions.py, provides basic and less basic morphological transforms applied on partitions
which can be considered as a dual representation of a graph: each cell of the partition corresponds to a node of
the graph and acts as a whole (it is sometimes called a super-pixel).
8. Serge Beucher Basic Morphological Operators Applied On Partitions, Available at http://cmm.ensmp.
fr/~beucher/publi.html, 2013
8 describes the various operators implemented in module partitions.py of the mambaComposed package.
45
www.mamba-image.org
Mamba Image User Manual
November 3, 2015
PIL
mamba
tkInter
mamba3D
mambaDisplay
SWIG Generated C/Python interface
mambaCore
public use python module/package
external API/library dependancy
PYTHON
C
Mamba C API
internal reserved python module/package
C core library
C core library
mamba.dll/libmamba.so
Figure 30: Library architecture layout
12
Extending and customizing Mamba
Mamba is open-source so, if you want to modify/extend it, you are welcome. The following section will present
some aspects you might find useful in this prospect. This section intended audience is advanced users who want
to go further with Mamba. If you want to share your extensions of Mamba with other users, have a look to the
coding rules and standards in appendix B.2.3.
12.1
Library architecture and design
Mamba is based on a very simple architecture. If you are going to modify it or if you want to know more about
it, reading this section is what you should do.
As you already know, Mamba is programmed in C and Python. The C code implements very basic functions.
They are coded to be specific, fast and simple. Each function performs only one operation and do it the best
it can. The C code is compiled to create the core library which is a collection of simple operations.
Simple Wrapper Interface Generator (SWIG) is used to create the interface between the C code and the
Python code. This tool makes it easier to add new functions inside the C part by automatically generating the
Python wrapper around it (Except for particular parameters).
The Python code is split into various packages. The mamba package is the main package. It implements
the imageMb class that is the central data structure of the library. This class is an extended, more Python
friendly, version of the data structure used to represent image data inside the C core library. It also wraps the
core functions to simplify them and make them compatible with the imageMb class. The mamba3D package is
the equivalent of the mamba package for 3D images.
Because the C core library does not offer functions to read image files, Mamba relies on the Python Imaging
Library (Pillow) to do so. An internal module is used to create an interface to Pillow that makes sure images
are properly loaded and converted to a format that is compatible with Mamba internal data representation.
The display capability is implemented by an internal module which relies on Tkinter for windows and widgets
creation.
This architecture is described in figure 30.
12.2
Creating your own displayer
If your intent is to create your own display for Mamba image, you can create a "displayer" class inheriting from
the mambaDisplayer class described in the mambaDisplay package. This class is actually an abstract class (or
as close as an abstract class that is allowed by Python). The mambaDisplay package actually implements one
child class of the mambaDisplayer called DftDisplayer. Creating your own display will then look like this:
import mambaDisplay
# your own d i s p l a y e r ( i n h e r i t s from t h e g e n e r i c d i s p l a y e r )
c l a s s YourOwnDisplayer ( mambaDisplay . mambaDisplayer ) :
...
# C r e a t i n g an i n s t a n c e o f your d i s p l a y e r
y o u r _ d i s p l a y e r = YourOwnDisplayer ( )
# S e t t i n g up your d i s p l a y e r a s t h e d e f a u l t
mambaDisplay . s e t D i s p l a y e r ( y o u r _ d i s p l a y e r )
46
www.mamba-image.org
Mamba Image User Manual
November 3, 2015
A "displayer" must implement various functionnalities to work correctly. The best way to create your own
is to have a look at the default one in mambaDisplay.
12.3
Vectorization
Mamba C core library use vectorized computations to squeeze out better performance from your computer.
Vectorization is achieved through the SSE2 instruction set available on all modern intel and AMD CPUs.
If you are planning to compile Mamba for other architectures you might want to use the available equivalent
instruction set. You can easily do this by modifying the file mambaApi_vector.h found in the src/mambaApi/includeprivate directory in the sources.
Replace or add your own definition of the macros MB_vec* using the appropriate instruction set.
12.4
Adding your own 3D grid
To add your own grid, we recommand you have a look at the grids3D module in the mamba3D package.
In it, you will find a class called _grid3D that defines all the requested methods that a grid must define to
properly work in Mamba3D. Your own grid will have to inherit from this class.
Of course, the best way to create your own grid is to copy and modify one of the aforementioned grids (they
can also be found in the grids3D module).
12.5
Testing Mamba
Mamba has a comprehensive set of tests designed to verify the appropriate working of the library.
If you made some modifications on the library you may find useful to retest it to prevent any unwanted
regressions or to verify your modification did not break the library.
Tests are located in the directory test of the sources. You can run the complete set of tests by typing the
following command in a terminal:
python runTest.py -c -o test_run.html -v 2
Once the tests are done, you will find an HTML report with all the results in it.
The test runner makes use of coverage (see https://pypi.python.org/pypi/coverage) package to generate
coverage information for the Python packages.
If you want more information regarding the test runner, you can type:
python runTest.py -h
47
www.mamba-image.org
Mamba Image User Manual
November 3, 2015
A
To go further
A.1
Python websites
Here is a list of Python related websites:
• http://www.python.org: The official Python website. You can download it there, find documentation
and other links for Python.
• http://docs.python.org/tutorial/: The official Python tutorial.
• http://www.greenteapress.com/thinkpython/thinkCSpy/: How to Think Like a Computer Scientist.
A free book to learn computer science with Python programming. Many translations are available.
• https://pypi.python.org/pypi/Pillow/: The Pillow website. You can download it, find documentation and source.
• http://wiki.python.org/moin/TkInter: A wiki providing ressources for the Tkinter library used in
Mamba for display.
• http://www.pythonchallenge.com/: An online puzzle game where you will need to use Python to solve
the riddles.
A.2
Mathematical Morphology websites
The list below presents websites where you will find courses, documentation and other information related to
mathematical morphology at large:
• http://cmm.ensmp.fr/: The Centre de Morphologie Mathématique website. This Mines Paristech research laboratory was founded by Georges Matheron and Jean Serra, the pioneers of mathematical morphology. Various publications are available with online courses.
• http://en.wikipedia.org/wiki/Mathematical_morphology: The Wikipedia page on mathematical morphology.
A.3
Other mathematical morphology libraries
If you are not happy with Mamba, here is a list of other mathematical morphology libraries:
• Fulguro: A free library, released under LGPL, implementing mathematical morphology and image
processing functions. Coded in C with wrappers for Python and Ruby. You can find it at http://
fulguro.sourceforge.net/.
• Morph-M: A proprietary library developed by the Centre de Morphologie Mathématique. Morph-M is
coded in C++ with a wrapper for Python. More information can be found at http://cmm.ensmp.fr/
Morph-M/index_en.html.
48
www.mamba-image.org
Mamba Image User Manual
November 3, 2015
B
Coding rules and standards
Mamba is an open-source library and any contribution is welcome. In order to help programmers, users and
would be contributors, this appendix presents the basic policy ruling the development of Mamba. It it our
vision, as its creators, of what is Mamba and where we want it to go in the future. Anyone who wish to
participate (by giving ideas, suggestions or code) should read at least the policy section B.1.
B.1
Policy
As you may already know, Mamba objective is to be a fast, simple, portable and free (as in free speech but also
as in free beer, this being the case only because no one on Earth could afford it if we had decided to sell it)
mathematical morphology library. To cover this purpose, a basic policy was decided by its creators.
B.1.1
A Mathematical Morphology library
Mamba is a mathematical morphology library only. It basically means that there is no convolution, Fast Fourier
Transform and such in it. Only algorithms related to mathematical morphology may be present in it.
This policy is one of the founding aspect of Mamba. The objective it to prevent Mamba from dispersing
itself into aspects that are not related to its original purpose. We believe that there is already enough good
libraries out there to compute images using other techniques than mathematical morphology and thus that
there is no need for Mamba to include them. On the other hand, as a Python library, Mamba can be mixed
efficiently with other image processing libraries also developped in Python.
B.1.2
Simple yet Fast
Fast and simple can appear somehow contradictory as complex algorithms may deliver faster performances.
However, what we mean here is to make sure Mamba is simple to use. As such, we believe that it is important
not to have to wait a very long time to get the result of your algorithm. Mamba is meant to be used in research
and education where you are not always sure of your idea. Being able to rapidly evaluate the soundness of an
algorithm is also what will make Mamba simple to use. In other words, the faster Mamba is, the simpler it
becomes to try new ideas with it. Moreover, Mamba is not only a simple educational software and it can be
used for solving real applications. Performance is even more important in this case.
It seems also important for us to provide tools, inside Mamba, helping users to "visualize" their ideas and
thus be able to easily assess their worthiness. As a result, Mamba comes with a set of tools to fulfil this objective,
the most visible being the capability to see manipulated images in live. These tools are a very important part of
the library (equally in our eyes to the core functions used in computations). Again, the objective is to provide
a simple framework for testing and trying new ideas in mathematical morphology.
B.1.3
Portable
Mathematical morphology algorithms variety and diversity make it somehow stupid to try to restrain their use
to a very limited set of computers and devices (or so we think). Thus the effort towards portability.
B.1.4
... and Free
Last but not least, as we hope Mamba will become a huge success and help spread knowledge and use of
mathematical morphology, we believe it is important not to restrain its future users with a complex or obscure
license. Similarly, we think that a commercial license is inapropriate for some of the intended audience of this
library (students, university...) and too complex for us to handle with others (industry, ...). Thus we decided
to license Mamba under a slightly modified version of the X11 license (also known as the MIT license). This is
one of the least restrictive free license. Any contributor to Mamba will have to make sure his contribution is
licensed under a similar license (see B.5).
B.2
B.2.1
Programming
Languages
• Mamba low level is written in C.
• Mamba high level is written in Python.
49
www.mamba-image.org
Mamba Image User Manual
November 3, 2015
This language choice is meant to cover the Mamba objective of being a fast portable and easy to use library.
C choice for low-level answers the speed requirement and partly covers the portability. Indeed, Mamba is
meant to be portable to embedded systems. Of course, the part written in C must be compilable on various
environmments (Windows, Unix ...) and for various processors (Pentium, Core 2 Duo, ARM, ...).
Python choice is here to ensure easiness of use. As a high level language, it makes it easier to develop
programs and algorithms without taking care of memory management, OS portability ... Other languages could
be used for high level but currently all the high level functionnalities are written in Python. Of course, if you
have the time and the need to develop a high level interface in another language, feel free to do so. However,
maintaining multiple high level interfaces in different languages may prove too much hassle so your high level
interface may not be integrated to the official Mamba distribution.
B.2.2
Rules for C
Three words can be used to sum up the philosophy of rules/standards applying to Mamba C code.
• simplicity
• readability
• portability
Simplicity means that your code must not try to answer all the problems or to take into account all the possible
situations. You should leave the complexity to the high level interface (where generally it is much easier to
handle the real life situations).
Readability is a vague notion. Mainly, you have to make sure your code is understandable. Comments,
coherent naming, and so on are strongly advised. More specific rules are :
• Use of english in comments is mandatory.
• Function descriptions in comments use Doxygen style (see the documentation section below for more
details regarding documentation). At least all the exported functions must have a description.
• Indentations are done using 4 spaces (no tabs, they are ugly because they messed up when changing the
editor).
• Functions and variables that are exported (visible by the exterior) should begin with "MB_".
Portability means that you should always take care to write your program so that it will run on the greatest
number of machines and equipments. Of course this is not always feasable (particularly if you are going very
low level). Anyway, it simply means that if, for example, you write an algorithm using SSE instructions of
modern Intel/AMD processors, you should also include your algorithm in standard C code (even if that means
it’s excruciatingly slow).
B.2.3
Rules for Python
When coding in Python, you must take great care to make your code and the various functionnalities you are
implementing as simple to use as possible.
The rules presented here aim at defining good practices in the design of new Mamba operators in order
that these operators be as general and usable as possible. Although these rules are not compulsory, you are
advised to follow them if you wish to share your work. Presently, these rules concern mainly the use of the
very important arguments, edge, structuring element (se) and grid. The use of input and output images is also
considered.
It is also compulsory that your Python code be compatible with Python 2.x and Python 3.x as it is the case
for Mamba 2.
General rules for simplicity and readability The Python API is meant to be used easily by users regardless of their proficiency at programming (of course they need to have a basic idea of what they are doing).
Complexity is handled in the Python interface. Most of the time, C functions only deal with image data
and their depth. The Python code is in charge of calling the appropriate C function depending on the image
depth it is dealing with. Thus the same function is used for binary, greyscale and 32-bit images in Python and
corresponds to three functions in C (one for each depth). Complexity should only be handled in C if this makes
computations go significantly faster.
50
www.mamba-image.org
Mamba Image User Manual
November 3, 2015
As for comments, you need to document each function that is meant to be public with docstring. You should
also begin your internal functions with a "_" that will tell Python that it’s an internal function (the same goes
for global variables).
Every non internal function must provide a docstring explaining what it does, its arguments and its output. Keep in mind that this docstring will be automatically extracted to build the Python/Mamba reference
documentation.
Rules for operators using ’grid’ and/or ’se’ as arguments The following five rules address particularly
the use of the two arguments ’grid’ (grid used by the operator, hexagonal or square in 2D, cubic, face centered
cubic or centered cubic in 3D) and ’se’ (structuring element possibly used by the operator). As ’se’ is always
defined in association with a specific grid, possible conflicts are at stake if these two arguments are used in an
antagonistic way inside the Mamba/Python scripts defining the operators.
Rule n◦ 1
When creating an operator or wrapping a C function, make sure that the grid, edge and structuring element
that may be given as argument have a default value available when calling the Python function thus making it
easier for interactive sessions (by reducing the number of mandatory arguments).
For example, the following C function:
MB_errcode MB_InfNbb(MB_Image ∗ s r c ,
MB_Image ∗ s r c d e s t ,
Uint32 n e i g h b o r s ,
enum MB_grid_t g r i d ,
enum MB_edgemode_t edge ) ;
is wrapped in Python by the function :
def i n f N e i g h b o r ( imIn , imInout , nb , g r i d=DEFAULT_GRID, edge=FILLED ) :
Information regarding edge and grid have default values in the Python module and thus do not need to be
defined every time.
The same rule applies for structuring element, for example:
def d i l a t e ( imIn , imOut , n=1, s e=DEFAULT_SE, edge=mamba .EMPTY) :
Rule n◦ 2
If ’se’ is passed as an argument in the operator, as ’se’ is always associated with a grid (for instance,
SQUARE3X3 is defined on the square grid), internal operators using a grid as argument must use this grid
in their argument list. This ’grid’ argument can be passed by means of the method getGrid() of the structuringElement class.
Example:
buildOpen definition in module openClose.py (commented script):
def buildOpen ( imIn , imOut , n=1 , s e=mC.DEFAULT_SE)
"""
Performs an opening by reconstruction operation on image ’ imIn ’ and puts the
result in ’ imOut ’. ’n ’ controls the size of the opening . ’se ’ is passed as
default argument .
"""
imWrk = mamba . imageMb ( imIn )
mamba . copy ( imIn , imWrk)
mC. e r o d e ( imIn , imOut , n , s e=s e )
# ’ s e ’ i s used by t h e e r o s i o n i n t h e f i r s t s t e p . You can u s e any s t r u c t u r i n g
# e l e m e n t you wish t o a c h i e v e t h i s o p e r a t i o n .
mC. b u i l d (imWrk , imOut , g r i d=s e . g e t G r i d ( ) )
# However , a s you u s e a b u i l d o p e r a t o r i n t h e s e c o n d s t e p and a s t h i s o p e r a t o r
# depends on t h e g r i d i n use , you must p a s s t o i t t h e g r i d a s s o c i a t e d with
# ’ s e ’ . This i s done through t h e s t a t e m e n t g r i d=s e . g e t G r i d ( ) which a s s i g n s
# t o ’ g r i d ’ t h e g r i d on which ’ s e ’ i s d e f i n e d .
Rule n◦ 3
If ’grid’ is used in the operator argument list, internal operators needing a structuring element ’se’ as
argument must explicitely define this ’se’. Make sure that ’se’ is compatible with the ’grid’ in use.
Example:
This example is not very useful, it is just to illustrate the rule...
51
www.mamba-image.org
Mamba Image User Manual
November 3, 2015
def myOperator ( imIn , imOut , g r i d=mamba .DEFAULT_GRID)
"""
Performs an erosion of ’ imIn ’ and puts the result in ’ imOut ’. ’ grid ’ is
passed as default argument . If ’ grid ’ is hexagonal , the erosion must use an
hexagon and a square if ’ grid ’ is square .
"""
i f g r i d == mamba .HEXAGONAL:
s e = mC.HEXAGON
else :
s e = mC. SQUARE3X3
# The s t r u c t u r i n g e l e m e n t ’ s e ’ i s d e f i n e d a c c o r d i n g t o t h e g r i d i n u s e .
e r o d e ( imIn , imOut , s e=s e )
If you do not define explicitely the structuring element used by the erosion, DEFAULT_SE will be used.
However, you have no idea of the status of this default structuring element (it could be DIAMOND for instance
whereas the grid in use is hexagonal...).
You may argue that the definition of HEXAGON or SQUARE3X3 may also be changed by the user. This
is true and this is the reason why it is not wise to modify the definition of standard structuring elements.
A lot of operators use what is called “an elementary structuring element” which is in fact the size 1 structuring
element defined on the grid: if the grid is hexagonal, it corresponds to HEXAGON (in the standard definition)
and to SQUARE3X3 if we deal with a square grid. In this situation, if you want to be sure to use an unmodified
structuring element, you may proceed this way instead:
def myOperator ( imIn , imOut , g r i d=mamba .DEFAULT_GRID)
"""
Performs an erosion of ’ imIn ’ and puts the result in ’ imOut ’. ’ grid ’ is
passed as default argument . If ’ grid ’ is hexagonal , the erosion must use an
hexagon and a square if ’ grid ’ is square .
"""
s e = s t r u c t u r i n g E l e m e n t (mamba . g e t D i r e c t i o n s ( g r i d ) , g r i d ) :
# The s t r u c t u r i n g e l e m e n t ’ s e ’ i s
s t i l l def ined according to the g r i d in
# use . I t s d e f i n i t i o n uses d i r e c t l y the c h a r a c t e r i s t i c s of the grid , that i s
# t h e l i s t o f a l l i t s d i r e c t i o n s ( i n c l u d i n g d i r e c t i o n 0 ) and t h e g r i d i t s e l f
# which i s n e c e s s a r i l y a s s o c i a t e d t o ’ s e ’ .
e r o d e ( imIn , imOut , s e=s e )
Rule n◦ 4
Using at the same time ’se’ and ’grid’ in an operator argument list is strictly forbidden. This practice is at
best redondant (if ’se’ and ’grid’ are compatible), at worst dangerous and inconsistent.
It is obvious that, if this rule is not enforced, this will lead sooner or later to a “grid and structuring element
mess”.
Rule n◦ 5
It is possible that no argument (’grid’ or ’se’) be passed to an operator. This is allowed provided that no
conflict is generated by this means. To achieve this, make sure that all internal operators use only either ’grid’
or ’se’. If it is not the case (for instance, there exists in the definition script at least one operator requesting
’grid’ and another one requesting ’se’), this situation is likely to produce conflicts and errors.
If no argument is passed, the operator will use DEFAULT_SE or DEFAULT_GRID defined outside its
definition space (with a possible risk of conflicts).
Example:
def a l t e r n a t e F i l t e r ( imIn , imOut , n ) :
"""
Performs an alternate filter operation of size ’n ’ on image ’ imIn ’ and puts
the result in ’ imOut ’. If ’ openFirst ’ is True , the filter begins with an
opening , a closing otherwise .
"""
i f openFirst :
mC. open ( imOut , imOut , n )
mC. c l o s e ( imOut , imOut , n )
else :
mC. c l o s e ( imOut , imOut , n )
mC. open ( imOut , imOut , n )
# N e i t h e r open nor c l o s e need ’ g r i d ’ i n t h e i r arguments , but o n l y ’ s e ’ .
# T h e r e f o r e , a s t h e r e i s , i n t h e d e f i n i t i o n o f a l t e r n a t e F i l t e r , no o t h e r
52
www.mamba-image.org
Mamba Image User Manual
November 3, 2015
# o p e r a t o r r e q u e s t i n g ’ g r i d ’ , no c o n f l i c t o c c u r s and t h e s t r u c t u r i n g e l e m e n t
# used by open and c l o s e w i l l be DEFAULT_SE.
Although this rule is admitted, it is not wise in practice to apply it. Indeed, to be applied without risk,
this rule states that all internal operators need only one argument, ’grid’ or (exclusive) ’se’, it is therefore more
efficient and safe to systematically pass this argument in the operator argument list. This avoids later difficulties
if the operator itself is used in the definition of more complex functions.
Thus, the following definition of ’alternateFilter’ is safer and usable inside another definition:
def a l t e r n a t e F i l t e r ( imIn , imOut , n , s e=mamba .DEFAULT_SE) :
"""
Performs an alternate filter operation of size ’n ’ on image ’ imIn ’ and puts
the result in ’ imOut ’. If ’ openFirst ’ is True , the filter begins with an
opening , a closing otherwise .
"""
i f openFirst :
mC. open ( imOut , imOut , n , s e=s e )
mC. c l o s e ( imOut , imOut , n , s e=s e )
else :
mC. c l o s e ( imOut , imOut , n , s e=s e )
mC. open ( imOut , imOut , n , s e=s e )
These five rules are not mandatory and do not constitute a dogma. However, using them will avoid some
nasty problems during your first steps with Mamba. They allow also a better applications sharing.
Most of the time, ’grid’ and ’se’ are passed in the argument list as default arguments (se=mC.DEFAULT_SE
and grid=mamba.DEFAULT_GRID). This is very handy when you use Mamba operators in terminal/console
mode to test ideas and to concatenate these operators in order to solve a problem. In this case, you generally
work in a chosen environment, you know which grid you are using (the grid which is defined as default grid)
and you control totally your structuring elements. For instance, if your grid is hexagonal, it is likely that your
default structuring element is set to HEXAGON.
This interesting simplification when in interactive mode, is unacceptable when you define a new operator if
you want to share it with other users. In this case, you do not control the environment anymore and you must
make sure that this operator will be used according to your wishes. Therefore, it is of the outmost importance
to correctly manage the ’grid’ and ’se’ arguments in your definition.
Rules for input and output images You can define with Mamba new operators using one or more input
image(s) and putting some results in one or more output image(s). An important programming rule is that
your operators should be defined in such a way that the same image may be used both as input and output.
This means that you must be aware to avoid to replace your input image by any output image prematurely.
Indeed, if you do not take care of this rule, it is likely that, in most cases, no error will occur. However, your
result will certainly be wrong.
Example:
# F i r s t approach ( bad one ) .
def myOper ( imIn , imOut ) :
"""
This operator computes a very simple morphological gradient of imIn and
puts the result in imOut .
"""
imWrk = imageMb ( imIn )
d i l a t e ( imIn , imOut )
e r o d e ( imIn , imWrk)
sub ( imOut , imWrk , imOut )
In this example, if imIn and imOut are identical, although no error is detected, the final result will be
incorrect since, in the erode operator, imIn has been replaced by its dilation.
# C o r r e c t approach .
def myOper ( imIn , imOut ) :
"""
This operator computes very simple morphological gradient of imIn and
puts the result in imOut .
"""
53
www.mamba-image.org
Mamba Image User Manual
November 3, 2015
imWrk = imageMb ( imIn )
d i l a t e ( imIn , imWrk)
e r o d e ( imIn , imOut )
sub ( imWrk , imOut , imOut )
In this case, imIn may possibly be overwritten after the erosion with no harmful consequences regarding the
final result.
Here again, enforcing this rule makes your operators user friendly and their sharing is made easier. This
rule can be implemented very easily by using intermediary working images in your definition and by copying
the input imIn into the working image at the beginning of this definition.
Rules for ’edge’ argument in user-defined operators Contrary to ’grid’ and ’se’, it is generally neither
necessary nor wise to pass ’edge’ in your operators arguments list.
There is no default value in Mamba for ’edge’. The reason of this is that ’edge’ is always used to impose
specific behavior and properties to some operators. It is the case for instance with geodesic operators. It is
well known that non extensive geodesic operators need that ’edge’ be defined as ’FILLED’. Obviously, for these
operators, the edge setting is defined inside the operator definition and not at all in its argument list.
In fact, ’edge’ allows to define two different contexts for your transformation depending on the way you
consider the outer space, that is the space outside your image window.
If you consider that the outer space is empty, you are then in an euclidean context. In this configuration,
’edge’ is defined as ’EMPTY’ and the main consequence of this choice is that outer ’black’ pixels may have
some influence on the result of your transformation for inside pixels, in particular if your transformation is antiextensive. Note that you could equally define the outer space as ’FILLED’ in this context (and Mamba allows
it without problem). However, this configuration is seldom used in practice, being considered as “unnatural”
(we prefer to imagine the outer space completely empty rather than totally filled!).
If you consider that you have no idea of the content of the outer space and, moreover, that you don’t care of
it, you are working in a geodesic context. Your image window is considered as a geodesic space and you do not
have to take the outside pixels into account in your operator. This can be achieved by setting ’edge’ accordingly
in your definition. If an extensive operator requesting the setting of ’edge’ is called in the definition, ’edge’
should be set to ’EMPTY’. Conversely, if the operator is anti-extensive, ’edge’ should be set to ’FILLED’.
It is important to keep in mind the fact that an empty edge is NOT equivalent to an euclidean context and,
conversely, that a filled edge is NOT equivalent to a geodesic context. This is the main reason why ’edge’ should
not be passed in your operator argument list.
The only case where this rule can be by-passed is when you know that the operator you are defining can be
used in both contexts and that it produces a legitimate result (but possibly different). This is true for instance
for the basic morphological operators: dilations, erosions, openings, closings, thinnings and thickenings. So,
when defining another implementation of these basic transforms (this is perfectly allowed), it is nevertheless
wise (if not compulsory) to pass ’edge’ in the operator argument list.
Specific edge management for 3D images As already mentioned in section 7.5.1, edge management is
the same for 2D and 3D images and the ’EMPTY’ and ’FILLED’ options apply for both types. However, if you
intend to define your own basic 3D transforms by manipulating the 2D sections of a 3D image, you must know
how edges are effectively defined in a 3D image.
Edge management for 3D images is a combination of two approaches as edges in a 3D image are twofold.
3D images being made of a pile of 2D images, the edges parallel to the z axis are defined by the edges of the
corresponding 2D images. These edges are therefore virtual and their management is controlled by the edge
argument (set to EMPTY or FILLED) of the 2D images. But two other edges must be defined. They correspond
to the floor and the ceiling (along the z axis) of the 3D volume of data formed by a 3D image. Contrary to
the 2D edges, these two ones are real and are built by adding two supplementary 2D images set to 0 or to the
maximum value (1, 255 or 232 − 1) depending on the status (FILLED or EMPTY) of the 2D edge (figure 31).
So, it is up to you, when defining operators where the edge status is relevant, to properly manage this status.
As an example, have a look on the definition of the erosions and dilations for 3D images.
B.3
B.3.1
Documentation
In code
As was explained in the programming section, documentation related to code must take two forms :
For Python code, use docstring.
For C code, use Doxygen style.
54
www.mamba-image.org
Mamba Image User Manual
November 3, 2015
Ceiling edge
3D image
data
Bottom edge
Vertical edges
(assembly of
2D images edges)
Figure 31: Edges in a 3D image
You should indeed know that part of the actual documentation is created automatically using these forms
of documentation. The whole documentation must be written in english.
B.3.2
Other documents
All the other documents existing to date were created using Latex. Mamba comes with a specific Latex style
that allows creating an homogeneous set of documents (with header, code listing style, etc... coherent between
documents).
If you have an idea of documentation, we strongly advise you to use Latex along with the Mamba style (which
can be found in the source). To use it, you simply need to create a directory texmf/tex/latex in your $HOME
or wherever your Latex distribution may find it and add the files mamba.sty and mamba_logo_white.png in it.
We prefer Latex because it makes it easier to track modifications inside our versioning repository (Latex being
text format and not binary).
For those of you who do not have Latex or who do not wish to use it, we can accept documents in other
formats provided you also give along a PDF version of them (making sure that way that the document will be
readable by anyone).
And of course, whatever the format you choose, make sure your name appears in the document.
B.4
Testing
Mamba is tested to ensure that it works properly and that it implements correctly the mathematical morphology
algorithms it uses.
Testing is performed in a specific environment. We tried to avoid verification with test images because they
are not easy to handle (often a lot of images to store) and although they correctly reveal errors, they cannot be
used to identify and correct them. Another problem with test images is the production of the expected result
image and the insurance that it is correct.
There are two levels of testing:
• Basic C level operators/functions : They are tested and verified as extensively as possible to
ensure that they are working properly and do not crash. The testing is performed by calling their wrapping
Python function. Algorithm soundness, edge effects, grid effects, image depth acceptation, proper error
handling are tested for every C function.
• Mathematical operators and other high-level Python functions : These are tested
less thoroughly as this is not a realistic task. Basic algorithmic verification is performed. The idea is to
cover all the Python code (100% code coverage) to make sure there is no typo.
55
www.mamba-image.org
Mamba Image User Manual
November 3, 2015
Although we take great care of producing a bug free library, there is no way for us to guarantee that. Tests
are likely to have some blind spot. They are mainly here to ensure a bottom line quality level and to prevent
any regression. If you have written some operators/functions and would like to add it into the official Mamba
release, we would be grateful if you could provide us with some tests to verify them.
B.5
Licensing
For code contribution, make sure your work is licensed under a similar license than the one covering Mamba.
Here is a reminder of the license:
Copyright (c) <2009>, <Your name here>
Permission is hereby granted, free of charge, to any person obtaining a copy of this software
and associated documentation files (the "Software"), to deal in the Software without restriction,
including without limitation the rights to use, copy, modify, merge, publish, distribute, sublicense,
and/or sell copies of the Software, and to permit persons to whom the Software is furnished to
do so, subject to the following conditions: The above copyright notice and this permission notice
shall be included in all copies or substantial portions of the Software.
Except as contained in this notice, the names of the above copyright holders shall not be used
in advertising or otherwise to promote the sale, use or other dealings in this Software without
their prior written authorization.
THE SOFTWARE IS PROVIDED "AS IS", WITHOUT WARRANTY OF ANY KIND, EXPRESS OR IMPLIED, INCLUDING BUT NOT LIMITED TO THE WARRANTIES OF MERCHANTABILITY, FITNESS FOR A PARTICULAR PURPOSE AND NONINFRINGEMENT.
IN NO EVENT SHALL THE AUTHORS OR COPYRIGHT HOLDERS BE LIABLE FOR
ANY CLAIM, DAMAGES OR OTHER LIABILITY, WHETHER IN AN ACTION OF CONTRACT, TORT OR OTHERWISE, ARISING FROM, OUT OF OR IN CONNECTION WITH
THE SOFTWARE OR THE USE OR OTHER DEALINGS IN THE SOFTWARE.
Any similar license is appropriate (see X11 license, BSD license). Make sure your license is compatible with
GNU GPL and that it has NO copyleft obligations (GPL is a copyleft license). If your license has a copyleft
obligation, we will not be able to add your code to the Mamba source. However an optional package/module
can be created that will let the user decide if the copyleft obligation is a problem for her/him or not (see the
mambaRealtime for an example of this situation).
For documentation contributions, make sure that your work license allows us to distribute it freely.
B.6
Other contributions
There are lot of things you could do for Mamba, even if your are not a programmer or a writer.
First of all, you can give us feedback regarding the way you use Mamba. Any comment, criticism or
suggestion is welcome and will be taken into consideration (as long as it does not infringe our policy).
56
www.mamba-image.org