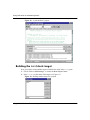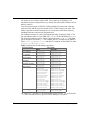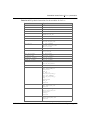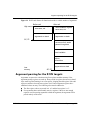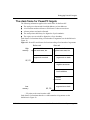
1
*183UR 7RROV IRU(PEHGGHG 6\VWHPV YHUVLRQU Frontispiece Copyright © 1991-1999 Cygnus®. All rights reserved. GNUPro®, the GNUPro logo, the Cygnus logo, Cygnus Insight™, Cygwin™, eCos™ and Source-Navigator™are all trademarks of Cygnus. All other brand and product names, trademarks and copyrights are the property of their respective owners. Permission is granted to make and distribute verbatim copies of this documentation, provided the copyright notice and this permission notice are preserved on all copies. Permission is granted to copy and distribute modified versions of this documentation under the conditions for verbatim copying, provided also that the entire resulting derived work is distributed under the terms of a permission notice identical to this one. Permission is granted to copy and distribute translations of this documentation into another language, under the above conditions for modified versions. This documentation has been prepared by Cygnus Technical Publications; contact the Cygnus Technical Publications staff: [email protected]. While every precaution has been taken in the preparation of this documentation, the publisher assumes no responsibility for errors or omissions, or for damages resulting from the use of the information within the documentation. For licenses and use information, see in GETTING STARTED: “General licenses and terms for using GNUPro Toolkit” on page 13, “GNU General Public License” on page 16, “Source-Navigator source code comprehension tool license” on page 21, “Tcl/Tk tool command language and windowing toolkit license” on page 24. Part #: 300-400-1010046-99r1 ii ■ GNUPro Tools for Embedded Systems CYGNUS Frontispiece r©##o« The GNUPro Toolkit is free software, covered by the GNU General Public License, and you are welcome to change it and/or distribute copies of it under certain conditions. This version of GNUPro Toolkit is supported for customers of Cygnus. For non-customers, GNUPro Toolkit software has NO WARRANTY. Because this software is licensed free of charge, there are no warranties for it, to the extent permitted by applicable law. Except when otherwise stated in writing, the copyright holders and/or other parties provide the software “as is” without warranty of any kind, either expressed or implied, including, but not limited to, the implied warranties of merchantability and fitness for a particular purpose. The entire risk as to the quality and performance of the software is with you. Should the software prove defective, you assume the cost of all necessary servicing, repair or correction. In no event, unless required by applicable law or agreed to in writing, will any copyright holder, or any other party who may modify and/or redistribute the program as permitted above, be liable to you for damages, including any general, special, incidental or consequential damages arising out of the use or inability to use the program (including but not limited to loss of data or data being rendered inaccurate or losses sustained by you or third parties or a failure of the program to operate with any other programs), even if such holder or other party has been advised of the possibility of such damages. CYGNUS GNUPro Tools for Embedded Systems ■ iii Frontispiece !H#¤®®®6rj|fc#o6H This and all subsequent releases of the GNUPro Toolkit products are Year 2000 Compliant. For more information regarding Cygnus development and Y2K issues, see: http://www.cygnus.com/y2k.html Cygnus Solutions defines a product to be Year 2000 Compliant (Y2K) if it does not produce errors in recording, storing, processing and presenting calendar dates as a result of the transition from December 31, 1999 to January 1, 2000. A Y2K product will recognize the Year 2000 as a leap year. This compliance is contingent upon third party products that exchange date data with the Cygnus product doing so properly and accurately, in a form and format compatible with the Cygnus product. GNUPro Toolkit processes dates only to the extent of using the date data provided by the host or target operating system for date representation used in internal processes, such as file modifications. Any Y2K issues resulting from the operation of the Cygnus products, therefore, are necessarily dependent upon the Y2K compliance of relevant host and/or target operating systems. Cygnus has not tested all operating systems and, as such, cannot assure that every system and/or environment will manage and manipulate data involving dates before and after December 31, 1999, without any time or date related system defects or abnormalities, and without any decreases in functionality or performance. Cygnus cannot assure that applications which you modify using Cygnus products will be Year 2000 compliant. iv ■ GNUPro Tools for Embedded Systems CYGNUS Frontispiece r©r6ro#6«Xo¦ Use the following means to contact Cygnus. Cygnus Headquarters 1325 Chesapeake Terrace Sunnyvale, CA 94089 USA Telephone (toll free): +1 800 CYGNUS-1 Telephone (main line): +1 408 542 9600 FAX: +1-408 542 9699 (Faxes are answered 8 a.m.–5 p.m., Monday through Friday.) email: [email protected] Website: www.cygnus.com/ Cygnus United Kingdom 36 Cambridge Place Cambridge CB2 1NS United Kingdom Telephone: +44 1223 728728 FAX: +44 1223 728728 email: [email protected]/ Website: http://sourceware.cygnus.com/ecos/ Cygnus Japan Nihon Cygnus Solutions Madre Matsuda Building 4-13 Kioi-cho Chiyoda-ku Tokyo 102-0094 Telephone: +81 3 3234 3896 FAX: +81 3 3239 3300 email: [email protected] Website: http://www.cygnus.co.jp/ To get help, the most reliable and most expedient means to resolve problems with GNUPro Toolkit is to use the Cygnus Web Support site: http://support.cygnus.com CYGNUS GNUPro Tools for Embedded Systems ■ v Frontispiece vi ■ GNUPro Tools for Embedded Systems CYGNUS roHo GNUPro warranty............................................................................................... iii Year 2000 compliance...................................................................................... iv How to contact Cygnus .........................................................................................v Using GNU tools on embedded systems ..............................................................1 GNUPro tools for development .............................................................................2 Targets for development .......................................................................................3 Invoking the tools .................................................................................................4 gcc, the GNU compiler ......................................................................................5 cpp, the GNU preprocessor ................................................................................6 gas, the GNU assembler ....................................................................................6 ld, the GNU linker ............................................................................................6 binutils, the GNU binary utilities .....................................................................6 gdb, the debugging tool ......................................................................................8 Useful debugging routines ..................................................................................8 Insight, a visual debugger ..................................................................................8 libgloss, newlib and libstdc++, the GNU libraries .........................................9 Source Navigator, a source comprehension tool ..................................................9 Cross-development environment..........................................................................10 The C run-time environment (crt0) .....................................................................11 CYGNUS GNUPro Tools for Embedded Systems ■ vii Contents main startup file ...................................................................................13 The linker script .................................................................................................17 Source Navigator demonstration ..........................................................................20 I/O support code .................................................................................................21 Memory support .................................................................................................22 Miscellaneous support routines ............................................................................23 crt0, the Overview of supported targets for cross-development ......................................25 Cygwin: a free Win32 porting layer for UNIX applications ............................27 Porting UNIX tools to Win32 ..............................................................................29 Initial goals of Cygwin........................................................................................30 Harnessing the power of the web for Cygwin .....................................................31 The Cygwin architecture ..................................................................................32 Process creation for Cygwin ............................................................................35 Future work for Cygwin ...................................................................................39 Proprietary alternatives to Cygwin ...................................................................40 Acknowledgements for Cygwin .........................................................................40 Compatibility issues with Cygwin........................................................................42 Cygwin’s compatibility with ANSI standards .....................................................42 Cygwin’s compatibility with POSIX.1 standards ................................................43 Cygwin’s compatibility with other miscellaneous standards ...............................44 Setting up Cygwin ..............................................................................................46 Installing the binary release for Cygwin ............................................................46 Directory structure for Cygwin .........................................................................47 Environment variables for Cygwin ....................................................................47 Mount table .....................................................................................................50 Text and binary modes .....................................................................................51 Using GCC with Cygwin ....................................................................................56 Console mode applications...............................................................................56 GUI mode applications ....................................................................................56 Debugging Cygwin programs ..............................................................................58 Building and using DLLs with Cygwin ................................................................60 Building DLLs .................................................................................................61 Linking against DLLs.......................................................................................62 Defining Windows resources for Cygwin .............................................................63 Cygwin utilities ..................................................................................................67 Cygwin functions ...............................................................................................80 viii ■ GNUPro Tools for Embedded Systems CYGNUS Contents ARM development ..............................................................................................97 ARM specific features ........................................................................................98 Connecting to the ARM7 PID target ...............................................................100 Compiler issues for ARM targets .......................................................................101 ARM compiler options ...................................................................................101 THUMB compiler options ..............................................................................104 Preprocessor symbols for ARM and THUMB targets .......................................105 ARM7/7T-specific attributes ...........................................................................106 ABI summary for ARM targets .........................................................................107 Data types sizes and alignments for ARM targets .............................................107 Subroutine calls for ARM targets ....................................................................108 The stack frame for ARM targets ....................................................................108 C language calling conventions for ARM targets .............................................110 Function return values for ARM targets ..........................................................111 Assembler issues for ARM targets .....................................................................112 Register names for the ARM7/7T targets .........................................................113 Floating point support for ARM targets ...........................................................113 Opcodes for ARM targets ...............................................................................113 Synthetic instructions for ARM targets ............................................................114 ARM7/7T-specific assembler error messages ...................................................114 Linker issues for ARM targets ...........................................................................115 Linker script for ARM targets .........................................................................115 Debugger issues for ARM targets ......................................................................117 Simulator issues for ARM targets ......................................................................118 Run on the stand-alone simulator for ARM 7/7T targets ...................................118 Reducing code size on the ARM 7/7T ................................................................120 Hewlett Packard development .........................................................................123 Compiling for HP targets ..................................................................................124 Assembler options for HP targets .......................................................................126 HPPA syntax .................................................................................................126 HPPA floating point ......................................................................................127 HPPA assembler directives ............................................................................127 Debugging for HP targets ..................................................................................130 Hitachi development ........................................................................................131 Developing for Hitachi H8 targets .....................................................................132 Compiling for H8/300, H8S and H8/300H targets ...............................................133 Using C++ for H8/300, H8S and H8/300H targets ..........................................133 CYGNUS GNUPro Tools for Embedded Systems ■ ix Contents Predefined preprocessor macros for H8/300, H8S and H8/300H targets ...........134 Assembler options for H8/300, H8S and H8/300H targets ...................................135 Calling conventions for H8/300, H8S and H8/300H targets .................................137 Debugging for H8/300, H8S and H8/300H targets ..............................................138 Loading on specific targets for H8/300, H8S and H8/300H atrgets .......................141 Developing for Hitachi SH targets .....................................................................144 Compiling on Hitachi SH targets .......................................................................145 Compiler options for Hitachi SH targets .........................................................145 Compiler options for architecture/code generation for Hitachi SH targets.........145 Floating point subroutines for Hitachi SH targets ............................................146 Preprocessor macros for Hitachi SH targets ...................................................146 Assembler options for Hitachi SH targets ...........................................................147 General assembler options for Hitachi SH targets ...........................................147 Assembler options for listing output for Hitachi SH targets ..............................147 Assembler listing-control directives for Hitachi SH targets...............................148 Calling conventions for Hitachi SH targets .........................................................149 Debugging on Hitachi SH targets .......................................................................150 Linux development...........................................................................................153 Using GNUPro tools with Linux systems ...........................................................154 LSI TinyRisc development ...............................................................................155 Compiler features for LSI TinyRISC..................................................................156 ABI summary for LSI TinyRISC .......................................................................157 Data type sizes and alignments for the LSI TinyRISC .......................................157 Register allocation definitions for the LSI TinyRISC ........................................157 Stack frame features for the LSI TinyRISC.......................................................158 Calling conventions for LSI TinyRISC .............................................................159 Assembler features for the LSI TinyRISC ..........................................................161 Linker features for the LSI TinyRISC ................................................................162 Linker script for LSI TinyRISC .......................................................................162 Debugger features for the LSI TinyRISC............................................................165 Special commands for LSI TinyRISC ...............................................................165 Stand-alone simulator issues for LSI TinyRISC ..................................................167 Matsushita development ..................................................................................169 Matsushita MN10200 development....................................................................170 Compiler options for MN10200 .........................................................................171 Preprocessor symbols for MN10200 ...............................................................171 MN10200-specific attributes ..........................................................................171 x ■ GNUPro Tools for Embedded Systems CYGNUS Contents ABI summary for MN10200 .............................................................................172 Data type and alignment for MN10200 ...........................................................172 CPU register allocation for MN10200 ............................................................173 Switches for MN10200 ...................................................................................173 The stack frame for MN10200 ........................................................................174 Argument passing for the MN10200 ................................................................176 Function return values for the MN10200 .........................................................176 Assembler features for the MN10200 .................................................................177 MN10200-specific assembler error messages ..................................................178 Linker features for MN10200 ............................................................................179 Debugger issues for MN10200 ..........................................................................186 Simulator issues for MN10200 ..........................................................................187 CygMon usage with MN10200 ..........................................................................188 Configuring CygMon for MN10200 ................................................................188 Building programs with MN10200 for using CygMon ......................................189 Matsushita MN10300 development....................................................................190 Compiler features for MN10300 ........................................................................191 MN10300-specific command-line options ........................................................191 Preprocessor symbols for MN10300 ...............................................................191 MN10300-specific attributes ..........................................................................191 ABI summary for MN10300 .............................................................................192 Data types sizes and alignments for MN10300 .................................................192 Register allocation for MN10300 ....................................................................192 Register usage for MN10300 ..........................................................................193 Switches for MN10300 ...................................................................................193 Stack frame information for MN10300 targets .................................................194 Argument passing for MN10300 .....................................................................195 Function return values for MN10300 ..............................................................195 Assembler features for MN10300 ......................................................................197 MN10300 command-line assembler options ....................................................197 Syntax for MN10300 ......................................................................................197 Special characters for MN10300 ....................................................................197 Register names for MN10300 .........................................................................197 Addressing modes for MN10300 .....................................................................198 Floating point for MN10300 ...........................................................................198 Opcodes for MN10300 ...................................................................................199 Synthetic instructions for MN10300 ................................................................199 MN10300-specific assembler error messages ..................................................199 CYGNUS GNUPro Tools for Embedded Systems ■ xi Contents Linker features for the MN10300 .......................................................................200 MN10300-specific linker options ....................................................................200 Linker script for the MN10300 .......................................................................200 Debugger features for MN10300 .......................................................................207 Simulator information for MN10300 ..................................................................208 Configuring, building and loading CygMon for MN10300 ..................................209 Configuring CygMon for MN10300 ................................................................209 Building user programs for MN10300 to run under CygMon ............................210 CygMon (Cygnus ROM monitor) for the MN10200 and MN10300 processors .....211 CygMon command list ...................................................................................211 CygMon API .................................................................................................216 MIPS development ...........................................................................................217 Compiling on MIPS targets ...............................................................................219 Compiler options for MIPS targets .................................................................219 Options for architecture and code generation for MIPS targets ........................219 Compiler options for floating point for MIPS targets .......................................221 Floating point subroutines for MIPS targets ....................................................221 Preprocessor macros for MIPS targets ...........................................................222 Assembler options for MIPS targets ...................................................................223 Assembler options for listing output for MIPS targets ......................................223 Assembler listing-control directives for MIPS targets.......................................224 Special assembler options for MIPS targets .....................................................224 Assembler directives for debugging information for MIPS targets .....................225 MIPS ECOFF object code ..............................................................................225 Options for MIPS ECOFF object code targets .................................................226 Directives for MIPS ECOFF object code targets .............................................226 Registers used for integer arguments for MIPS targets .....................................226 Registers used for floating-point arguments for MIPS targets ...........................227 Calling conventions for integer arguments for MIPS targets.............................227 Calling conventions for floating-point arguments for MIPS targets ...................227 Debugging on MIPS targets ..............................................................................228 Linking MIPS with the GOFAST library ............................................................230 Full compatibility with the GOFAST library for MIPS .....................................231 Developing for the VR4100 processors...............................................................232 Compiler features for VR4100 processors ...........................................................233 Preprocessor symbols for VR4100 processors ..................................................233 ABI summary for VR4100 processors ................................................................234 xii ■ GNUPro Tools for Embedded Systems CYGNUS Contents Data types and alignment for VR4100 processors ............................................234 Register allocation for VR4100 processors ......................................................235 The stack frame for VR4100 processors ...........................................................236 Argument passing for VR4100 processors........................................................237 Function return values for VR4100 processors.................................................237 Assembler features for VR4100 processors .........................................................238 Linker issues for VR4100 processors ..................................................................239 Linker script for VR4100 processors ...............................................................239 Debugger issues for VR4100 processors .............................................................242 Target command options for VR4100 processors .............................................242 Special debugging commands for VR4100 boards ............................................244 Stand-alone simulator issues for VR4100 processors ...........................................245 Producing S-records for VR4100 boards .........................................................246 Downloading to the DDB board for VR4100 boards.........................................246 Developing for the VR4300 processors...............................................................248 Compiler features for the VR4300 processors .....................................................249 Preprocessor symbols for VR4300 processors ..................................................249 Data types and alignment for VR4300 processors ............................................250 Argument passing for VR4300 processors........................................................250 Function return values for VR4300 processors.................................................251 Register allocation for VR4300 processors ......................................................252 Assembler issues for the VR4300 processors ......................................................253 Linker issues for the VR4300 processors ............................................................254 Linker script for VR4300 processors ...............................................................254 Debugger issues for VR4300 processors .............................................................257 Target command options for VR4300 processors .............................................257 Special commands for VR4300 processors .......................................................258 Stand-alone simulator features for VR4300 processors ........................................260 Producing S-records for VR4300 processors ...................................................261 Downloading to the DDB board for VR4300 processors ...................................261 Developing for the VR5xxx processors ...............................................................263 Compiler issues for the VR5xxx processors ........................................................264 Preprocessor issues for VR5xxx processors .....................................................265 Attributes for VR5xxx processors ....................................................................265 ABI issues for the VR5xxx processors ................................................................266 CYGNUS GNUPro Tools for Embedded Systems ■ xiii Contents 032 ABI summary for VR5xxx processors ........................................................266 EABI summary for VR5xxx processors ............................................................269 The stack frame for VR5xxx processors ...........................................................270 Parameter assignment to registers for VR5xxx ................................................272 Structure passing for VR5xxx .........................................................................274 Varargs handling for VR5xxx .........................................................................274 Function return values for VR5xxx .................................................................275 Software floating-point for VR5xxx .................................................................275 Assembler issues for the VR5xxx processors ......................................................276 Symbols and registers for the VR5xxx .............................................................277 Assembler directives for the VR5xxx ...............................................................278 MIPS synthetic instructions for the VR5XXX .....................................................279 Linker issues for VR5xxx processors ..................................................................286 Linker script for VR5xxx targets .....................................................................286 Debugger features for the VR5XXX processors .....................................................288 Simulator features for the VR5XXX processors .....................................................289 Mitsubishi development ...................................................................................291 Developing for the D10V targets .......................................................................292 Compiler support for D10V targets ....................................................................293 Preprocessor symbols for D10V targets ..........................................................293 ABI summary for D10V targets .........................................................................294 Data types and alignment for the D10V targets................................................294 CPU registers for the D10V targets ................................................................294 The stack frame for the D10V targets ..............................................................295 Argument passing for the D10V targets ...........................................................297 Function return values for the D10V targets ....................................................298 Assembler support for D10V targets ..................................................................299 Size modifiers for the D10V targets .................................................................299 Sub-instructions for the D10V targets .............................................................299 Special characters for the D10V targets ..........................................................300 Register names for the D10V targets ...............................................................301 Addressing modes for D10V targets ................................................................302 @word modifier for D10V targets ....................................................................303 Floating point for D10V targets ......................................................................303 Opcodes for D10V targets ..............................................................................303 Linker support for D10V targets ........................................................................304 xiv ■ GNUPro Tools for Embedded Systems CYGNUS Contents Linker script for D10V targets ........................................................................304 Debugger support for D10V targets ...................................................................307 Using the trace buffer for D10V targets ..........................................................307 Standalone simulator for D10V targets ...............................................................312 Overlays support for the D10V targets ...............................................................313 Sample runtime overlay manager for D10V targets ..........................................313 Linker script for D10V targets ........................................................................313 GDB overlay support for D10V targets ...........................................................320 Breakpoints for D10V targets .........................................................................321 Developing for the M32R/X/D targets................................................................323 Compiler support for M32R/X/D targets ............................................................324 Preprocessor symbol issues for M32R/X/D targets ...........................................325 M32R/X/D-specific compiling attributes ..........................................................325 ABI summary for M32R/X/D targets .................................................................327 Data types and alignment for M32R/X/D targets ..............................................327 Allocation rules for structures and unions for M32R/X/D targets ......................328 CPU registers for M32R/X/D targets ..............................................................329 The stack frame for M32R/X/D targets ............................................................330 Argument passing for M32R/X/D targets .........................................................332 Function return values for M32R/X/D targets ..................................................332 Startup code for M32R/X/D targets .................................................................333 Producing S-records for M32R/X/D targets .....................................................334 Assembler support for M32R/X/D targets ..........................................................335 Register names for M32R/X/D targets .............................................................336 Addressing modes for M32R/X/D targets.........................................................336 Floating point for M32R/X/D targets ..............................................................336 Pseudo opcodes for M32R/X/D targets ............................................................337 Opcodes for M32R/X/D targets .......................................................................337 Synthetic instructions for M32R/X/D targets ....................................................338 Writing assembler code for M32R/X/D targets .................................................338 M32R/X/D-specific assembler error messages .................................................340 Linker support for M32R/X/D targets ................................................................341 Linker script for M32R/X/D targets .................................................................341 Debugger support for M32R/X/D targets ............................................................344 Standalone simulator for M32R/X/D targets .......................................................345 Overlays for the M32R/X/D targets ...................................................................348 Linker script with overlays for M32R/X/D targets ............................................349 Example overlay program for M32R/X/D targets .............................................350 CYGNUS GNUPro Tools for Embedded Systems ■ xv Contents Debugging the overlay program for M32R/X/D targets ....................................351 GDB overlay support for M32R/X/D targets ....................................................355 Manual mode commands for M32R/X/D targets...............................................356 Auto mode commands for M32R/X/D targets ...................................................356 Debugging with overlays for M32R/X/D targets ...............................................356 Breakpoints for M32R/X/D targets ..................................................................357 Developing for the M32R/D targets ...................................................................358 Compiler support for M32R/D targets ................................................................359 M32R/D-specific attributes for compiling ........................................................360 ABI summary for M32R/D targets .....................................................................361 Data types and alignment for M32R/D targets .................................................361 Allocation rules for structures and unions for M32R/D targets .........................361 CPU registers for M32R/D targets..................................................................363 The stack frame for M32R/D targets ...............................................................364 Argument passing for M32R/D processors ......................................................365 Function return values for M32R/D processors ...............................................366 Startup code for M32R/D targets ....................................................................366 Assembler features for the M32R/D targets ........................................................368 Register names for the M32R/D targets ...........................................................369 Addressing modes for M32R/D targets ............................................................369 Floating point for M32R/D targets..................................................................369 Pseudo opcodes for M32R/D targets ...............................................................370 Opcodes for M32R/D targets ..........................................................................370 Synthetic instructions for M32R/D targets .......................................................371 Writing assembler code for M32R/D targets ....................................................372 Writing assembler code for M32R/D targets ....................................................374 Inserting assembly instructions into C code for M32R/D targets .......................376 M32R/D-specific assembler error messages ....................................................378 Producing S-records for M32R/D targets ........................................................378 Linker issues for M32R/D targets ......................................................................379 Linker script for the M32R/D targets ..............................................................379 Debugger issues with M32R/D targets ...............................................................382 Stand-alone simulator for M32R/D targets .........................................................384 Overlays for M32R/D targets ............................................................................387 Sample runtime overlay manager for M32R/D .................................................387 Linker script for overlays for the M32R/D targets ............................................388 Debugging the example program for M32R/D targets ......................................390 GDB overlay support for M32R/D targets .......................................................395 xvi ■ GNUPro Tools for Embedded Systems CYGNUS Contents Manual mode commands for M32R/D targets ..................................................395 Auto mode commands for M32R/D targets ......................................................395 Debugging with overlays for M32R/D targets ..................................................396 Breakpoints for M32R/D targets .....................................................................396 Motorola M68K development ..........................................................................397 Compiling for M68K targets .............................................................................398 Options for floating point for M68K targets.....................................................398 Floating point subroutines for M68K targets ...................................................399 Preprocessor macros for M68K targets ...........................................................399 Assembler options for M68K targets ..................................................................400 Assembler options for listing output for M68K targets......................................400 Assembler listing-control directives for M68K targets ......................................401 Calling conventions for M68K targets .............................................................401 Debugging on M68K targets .............................................................................403 NEC V850 development ...................................................................................405 Toolchain features for V850 ..............................................................................406 ABI summary for the V850 ...............................................................................408 Data types and alignment for V850 .................................................................408 Calling conventions for V850 .........................................................................408 Register allocation for V850 ...........................................................................409 Stack frame information for V850 ...................................................................410 Argument passing for V850 ............................................................................411 Function return values for V850 .....................................................................412 Compiler issues for V850 ..................................................................................413 V850-specific command-line options for GCC .................................................413 Preprocessor symbols for V850 ......................................................................414 Special data areas on the V850 .......................................................................414 depragmaize for V850 ...................................................................................415 depragmaize options ....................................................................................418 Structure conversion for V850 ........................................................................419 Assembler information for V850 .......................................................................421 Register names for V850 ................................................................................421 Addressing modes for V850 ............................................................................421 Floating point values for V850 .......................................................................422 Opcodes for V850 ..........................................................................................422 Assembler error messages for V850 ................................................................422 Linker information for V850 .............................................................................423 CYGNUS GNUPro Tools for Embedded Systems ■ xvii Contents Linker script for V850 ....................................................................................423 Producing S-records for V850 ........................................................................425 Debugger issues for V850 .................................................................................426 Stand-alone simulator issues for V850 ...............................................................427 PowerPC development .....................................................................................429 Compiling for PowerPC targets .........................................................................430 Floating point subroutines for PowerPC targets ..............................................437 Preprocessor macros for PowerPC targets......................................................437 Assembler options for PowerPC targets .............................................................438 Debugging PowerPC targets ..............................................................................440 The stack frame for PowerPC targets..............................................................441 Argument passing for PowerPC targets ..........................................................443 Function return values for PowerPC targets ...................................................443 Debugging programs with multiple threads .....................................................443 Simulator features for the PowerPC targets ........................................................446 Simulator-specific command line options for PowerPC targets .........................446 Simulator exceptions within GDB for PowerPC targets ....................................447 SPARC, SPARClite development .....................................................................449 Compiling for SPARC targets ...........................................................................451 Compiler options for SPARC targets ...............................................................451 Options for floating point for SPARC and SPARClite targets ............................452 Floating point subroutines for SPARC and SPARClite targets ..........................452 Preprocessor macros for SPARC targets .........................................................453 ABI summary for SPARC, SPARClite targets ....................................................454 Data type sizes and alignment for the SPARClite .............................................454 Calling conventions for SPARClite targets ......................................................455 Register usage for SPARClite targets ..............................................................455 Stack frame issues for the SPARClite targets ...................................................456 Assembler options for SPARC, SPARClite targets..............................................457 Assembler options for listing output for SPARC, SPARClite targets ..................458 Assembler listing-control directives for SPARC, SPARClite targets ..................459 Calling conventions for SPARC and SPARClite targets ....................................460 Linker usage for SPARC, SPARClite usage .......................................................461 Linker script for the SPARC, SPARClite targets...............................................462 Debugging SPARC and SPARClite targets .........................................................467 Loading on specific targets for SPARC, SPARClite ............................................469 xviii ■ GNUPro Tools for Embedded Systems CYGNUS Contents Toshiba TX39 development..............................................................................471 Hosts and targets for Toshiba TX39 processors ...............................................473 Compiler issues for TX39 targets .......................................................................474 ABI issues for the Toshiba TX39 targets ............................................................475 Data type sizes and alignments for TX39 targets ..............................................475 Subroutine calls for the TX39 .........................................................................476 The stack frame issues for TX39 targets ..........................................................477 Parameter assignment to registers for TX39 targets .........................................479 Structure passing for TX39 targets..................................................................480 Varargs handling for TX39 targets .................................................................480 Function return values for TX39 targets ..........................................................481 Assembler issues for TX39 targets .....................................................................482 Register names for TX39 targets .....................................................................482 Assembler directives for TX39 targets .............................................................483 Linker issues for TX39 targets ...........................................................................484 Linker script for TX39 targets.........................................................................484 Debugger issues for TX39 targets ......................................................................490 Simulator issues for TX39 targets ......................................................................491 Index.....................................................................................................................493 CYGNUS GNUPro Tools for Embedded Systems ■ xix Contents xx ■ GNUPro Tools for Embedded Systems CYGNUS 1 coXrrfro Hj,H??H?«Hj The following tools run on native operating systems and embedded targets: ■ gcc, the compiler ■ cpp, the C preprocessor ■ gas, the assembler ■ ld, the linker ■ binutils, the binary directory of utilities ■ gdb, the GNUPro Toolkit debugger ■ Cygnus Insight, the visual debugger ■ libstdc++, the support library for embedded targets and newlib, the C and C math library, developed by Cygnus ■ Source Navigator, a source code comprehension tool For help with using the tools, see “GNUPro tools for development” on page 2, “Targets for development” on page 3 and “Invoking the tools” on page 4. For help with specific targets, see GNUPro Tools for Embedded Systems. CYGNUS GNUPro Tools for Embedded Systems ■ 1 Using GNU tools on embedded systems rrrfQr?H¨Hfr|jHo The following GNUPro tools can be run on embedded targets. ■ gcc, the GNUPro Toolkit compiler (see “gcc, the GNU compiler” on page 5) ■ ccp, the GNU C preprocessor (see “cpp, the GNU preprocessor” on page 6) ■ gas, the GNUPro Toolkit assembler (see “gas, the GNU assembler” on page 6) ■ ld, the GNUPro Toolkit linker (see “ld, the GNU linker” on page 6) ■ binutils, the GNUPro Toolkit directory of utilities (see “binutils, the GNU binary utilities” on page 6); for the Cygwin binary utilities for Windows users, see “Cygwin utilities” on page 67 ■ gdb, the GNUPro Toolkit debugger (see “gdb, the debugging tool” on page 8) ■ Insight, the visual debugger (see “Insight, a visual debugger” on page 8) ■ Source Navigator, a source code comprehension tool (see “Source Navigator, a source comprehension tool” on page 9 and “Source-Navigator demonstration” on page 20) ■ libgloss, the support library for embedded targets and newlib, the C library developed by Cygnus (see “newlib, libstdc++, and libgloss, the GNUPro libraries” on page 9); for windows developers using the Cygwin functions, see “Cygwin functions” on page 80 2 ■ GNUPro Tools for Embedded Systems CYGNUS Targets for development #XHQr?H¨Hfr|jHo The following targets have support (see also “Embedded cross-configuration support” on page 45 and Table 1-Table 6 in GETTING STARTED). ■ For ARM 7/7T processors, see “ARM development” on page 97 ■ For Hewlett Packard’s processors, see “Hewlett Packard development” on page 123 ■ For Hitachi’s processors, see: ■ “Developing for Hitachi H8 targets” on page 132 ■ “Developing for Hitachi SH targets” on page 144 ■ For Linux development, see “Linux development” on page 153 ■ For LSI TinyRISC development, see “LSI TinyRisc development” on page 155 ■ For Matsushita’s processors, see: ■ “Matsushita MN10200 development” on page 170 ■ “Matsushita MN10300 development” on page 190 ■ For MIPS processors in general, see “MIPS development” on page 217 For specific information for MIPS targets, see: ■ “Developing for the V4100 processors” on page 232 ■ “Developing for the V4300 processors” on page 248 ■ ■ ■ ■ ■ ■ ■ ■ ■ * “Developing for the V5xxx processors” on page 263* For Mitsubishi’s D10V processor, see “Developing for the D10V targets” on page 292 For Mitsubishi’s M32R processors, see “Developing for the M32R/X/D targets” on page 323 and “Developing for the M32R/D targets” on page 358 For Motorola’s 68K processors, see “Motorola M68K development” on page 397 For NEC’s V850 processor, see “NEC V850 development” on page 405 For PowerPC processors in general, see “PowerPC development” on page 429 For SPARC and SPARClite processors, see “SPARC, SPARClite development” on page 449 For the Toshiba TX39 processor, see “Toshiba TX39 development” on page 471 For Windows development, see “Windows development with Cygwin: a Win32 porting layer” on page 27; support is for Microsoft’s Windows 95/98/NT4.0 The 5xxxx series includes the V5000 processor from NEC. CYGNUS GNUPro Tools for Embedded Systems ■ 3 Using GNU tools on embedded systems o¨recoX`Hrrf The following tools run on embedded and native targets. ■ gcc, the GNUPro Toolkit compiler (see “gcc, the GNU compiler” on page 5) ■ cpp, the GNUPro C preprocessor (see “cpp, the GNU preprocessor” on page 6) ■ gas, the GNUPro Toolkit assembler (see “gas, the GNU assembler” on page 6) ■ ld, the GNUPro Toolkit linker (see “ld, the GNU linker” on page 6) ■ binutils, the GNUPro Toolkit directory of utilities (see “binutils, the GNU binary utilities” on page 6) ■ gdb, the GNUPro Toolkit debugger (see “gdb, the debugging tool” on page 8) ■ libgloss, the support library for embedded targets and newlib, the GNUPro C library developed by Cygnus (see “newlib, libstdc++, and libgloss, the GNUPro libraries” on page 9) See the following documentation for more discussion on using the tools. ■ Insight, the GNUPro Toolkit visual debugger (see “Insight, a visual debugger” on page 8) ■ “Cross-development environment” on page 10 ■ “crt0, the main startup file” on page 13 ■ “The linker script” on page 17 ■ “Source-Navigator demonstration” on page 20 ■ “I/O support code” on page 36 ■ “Memory support” on page 37 ■ “Miscellaneous support routines” on page 38 4 ■ GNUPro Tools for Embedded Systems CYGNUS Invoking the tools gcc<`H6rj|cfH gcc invokes all the necessary GNU compiler passes for you with the following utilities. ■ cpp The preprocessor which processes all the header files and macros that your target requires. ■ gcc The compiler which produces assembly language code from the processed C files. For more information, see Using GNU CC in GNUPro Compiler Tools. ■ gas The assembler which produces binary code from the assembly language code and puts it in an object file. ■ ld The linker which binds the code to addresses, links the startup file and libraries to the object file, and produces the executable binary image. There are several machine-independent compiler switches, among which are, notably, (for C++), -fritti (for C++) and -T (for linking). -fno-exceptions You have four implicit file extensions: .c, .C, .s, and .S. For more information, see Using GNU CC in GNUPro Compiler Tools. When you compile C or C++ programs with GNU C, the compiler quietly inserts a call at the beginning of main to a gcc support subroutine called __main. Normally this is invisible—you may run into it if you want to avoid linking to the standard libraries, by specifying the compiler option, -nostdlib. Include -lgcc at the end of your compiler command line to resolve this reference. This links with the compiler support library libgcc.a. Putting it at the end of your command line ensures that you have a chance to link first with any of your own special libraries. __main is the initialization routine for C++ constructors. Because GNU C is designed to interoperate with GNU C++, even C programs must have this call: otherwise C++ object files linked with a C main might fail. For more information on gcc, see Using GNU CC in GNUPro Compiler Tool. CYGNUS GNUPro Tools for Embedded Systems ■ 5 Using GNU tools on embedded systems cpp<`H|H|r6Hr cpp merges in the #include files, expands all macros definitions, and processes the #ifdef sections. To see the output of cpp, invoke gcc with the -E option, and the preprocessed file will print on stdout. There are two convenient options to assemble handwritten files that require C-style preprocessing. Both options depend on using the compiler driver program, gcc, instead of calling the assembler directly. ■ Name the source file using the extension, .S (capitalized), rather than .s. The compiler recognizes files with this extension as assembly language requiring C-style preprocessing. ■ Specify the “source language” explicitly for this situation, using the option, -xassembler-with-cpp. For more information on cpp, see The C Preprocessor in GNUPro Compiler Tools. gas<`H#Hj,fH gas can be useful as either a compiler pass or a source-level assembler. When used as a source-level assembler, it has a companion assembly language preprocessor called gasp. gasp has a syntax similar to most other assembly language macro packages. gas emits a relocatable object file from the assembly language source code. The object file contains the binary code and the debug symbols. For more information on gas, see Using as in GNUPro Utilities. ld<`HfcoeH resolves the code addresses and debug symbols, links the startup code and additional libraries to the binary code, and produces an executable binary image. ld For an example of a linker script, see “The linker script” on page 17. For more information, see Using ld in GNUPro Utilities. binutils<`H,co#«¦cfccH The binary utilities in GNUPro Toolkit that are available on all hosts include ar, nm, objcopy, objdump, ranlib, readelf, size, strings, and strip. There are three binary utilities that are for use with Cygwin, the porting layer application for Win32 development: addr2line, windres, and dlltool. For more information on binutils, see “Overview of binutils, the GNU binary utilities” on page 317 in Using 6 ■ GNUPro Tools for Embedded Systems CYGNUS Invoking the tools binutils in GNUPro Utilities. The most important of the binary utilities are objcopy and objdump. ■ objcopy A few ROM monitors, such as a.out, load executable binary images, and, consequently, most load an S-record. An S-record is a printable ASCII representation of an executable binary image. S-records are suitable both for building ROM images for standalone boards and for downloading images to embedded systems. Use the following example’s input for this process. objcopy -O srec infile outfile infile in the previous example’s input is the executable binary filename, and outfile is the filename for the S-record. Most PROM burners also read S-records or some similar format. Use the following example’s input to get a list of supported object file types for your architecture. objdump -i For more information on S-records, see the discussions for FORMAT output-format with “MRI compatible script files for the GNU linker” on page 311 and the discussion for “BFD libraries” on page 305 in Using ld in GNUPro Utilities. For more discussion of making an executable binary image, see “objcopy utility” on page 329 in Using binutils in GNUPro Utilities. ■ objdump objdump displays information about one or more object files. The options control what particular information to display. This information is mostly useful to programmers who are working on the compilation tools, as opposed to programmers who just want their program to compile and work. When specifying archives, objdump shows information on each of the member object files. objfile... designates the object files to be examined. See “objdump utility” on page 335 in Using binutils in GNUPro Utilities. A few of the more useful options for commands are: -d, --disassemble and --prefix-addresses. -d --disassemble Displays the assembler mnemonics for the machine instructions from objfile. Only disassembles those sections that are expected to contain instructions. --prefix-addresses For disassembling, prints the complete address on each line, starting each output line with the address it’s disassembling. This is the older disassembly format. Otherwise, you only get raw opcodes. CYGNUS GNUPro Tools for Embedded Systems ■ 7 Using GNU tools on embedded systems gdb<`H?H,¦XXcoXrrf To run gdb on an embedded execution target, use a gdb backend with the gdb standard remote protocol or a similar protocol. The most common are the following two types of gdb backend. ■ A gdb stub This is an exception handler for breakpoints, and it must be linked to your application. gdb stubs use the gdb standard remote protocol. ■ An existing ROM monitor used as a gdb backend The most common approach means using the following processes. ■ With a similar protocol to the gdb standard remote protocol. ■ With an interface that uses the ROM monitor directly. With such an interface, gdb only formats and parses commands. For more information on debugging tools, see Debugging with GDB in GNUPro Debugging Tools and “Working with Cygnus Insight, the visual debugger” on page 149. HQ¦f?H,¦XXcoXr¦coH The following routines are always useful for debugging a project in progress. ■ print() Runs standalone in libgloss with no newlib support. Many times print() works when there are problems that make printf() cause an exception. ■ outbyte() Used for low-level debugging. ■ putnum() Prints out values in hex so they are easier to read. ocX`<#¨c¦#f?H,¦XXH GNUPro Toolkit provides the technology and tools for effective, efficient debugging sessions with the standard command-line based debugger, gdb. Also available is Cygnus Insight, a visual debugger with a graphical user interface supporting a range of host systems and target microprocessors, allowing development with complete access to the program state, including source and assembly level, variables, registers and memory. Insight adds a series of intuitive views into the debug process, and provides the developer with a wide range of system information. For more information on developing with Insight, see “Working with Cygnus Insight, the visual debugger” on page 149. 8 ■ GNUPro Tools for Embedded Systems CYGNUS Invoking the tools newlib<libstdc++<#o?libgloss<`Hr fc,#cH GNUPro Toolkit has three libraries: libgloss, newlib and libstdc++ (see GNUPro Libraries). newlib The Cygnus libraries, including the C library, libc, and the C math library, libm. libstdc++ The C++ library. libgloss libgloss, the library for GNU Low-level OS Support, contains the startup code, the I/O support for gcc and newlib (the C library), and the target board support packages that you need to port the GNU tools to an embedded execution target. The C library used throughout this documentation is newlib, however libgloss could easily be made to support other C libraries. Because libgloss resides in its own tree, it’s able to run standalone, allowing it to support GDB’s remote debugging and to be included in other GNU tools. Several functions that are essential to gcc reside in libgloss. These include the following functions. ■ crt0, the main startup script (see “crt0, the main startup file” on page 13) ■ ld, the linker script (see “The linker script” on page 17) ■ I/O support code (see “I/O support code” on page 36) r¦6H#¨cX#r<#r¦6H6rj|H`Hocrorrf Source Navigator is a source code comprehension tool with which developers can extract information from existing code in C, C++, Java, Tcl, [incr tcl] (the C++ extension for Tcl), FORTRAN, Cobol, and assembly programs, using this information to build project databases. The database represents internal program structures and relationships between program components. Source Navigator then uses this database to query symbols and relationships between components and graphically display them. For a demonstration of using Source Navigator, see “Source-Navigator demonstration” on page 20. For more information on Source Navigator, see the main “User’s Reference Guide” and “Programmer’s Reference Guide” documentation. CYGNUS GNUPro Tools for Embedded Systems ■ 9 Using GNU tools on embedded systems ra?H¨Hfr|jHoHo¨crojHo Using GNUPro Toolkit in one of the cross-development configurations usually requires some attention to setting up the target environment. A cross-development configuration can develop software for a different target machine than the development tools themselves (which run on the host)—for example, a SPARCstation can generate and debug code for a Motorola Power PC-based board. This process is known as embedded development. For GNUPro tools to work with a target environment (except for real-time operating systems, which provide full operating system support), set up the tools with the help of the following documentation. ■ To set up the C run-time environment, see “The C run-time environment (crt0)” on page 11. ■ To create stubs, or minimal versions of operating system subroutines for the C subroutine library, see “System calls” on page 171 in GNUPro C Library in GNUPro Libraries. ■ To understand the connection to the debugger, see “Specifying a debugging target” on page 151 in Debugging with GDB in GNUPro Debugging Tools . 10 ■ GNUPro Tools for Embedded Systems CYGNUS The C run-time environment (crt0) `H¦oacjHHo¨crojHo~crt0 To link and run C or C++ programs, you need to define a small module (usually written in assembler as ‘crt0.s’) to ensure that the hardware initializes for C conventions before calling main. There are some examples available in the sources of GNUPro Toolkit for ‘crt0.s’ code (along with examples of system calls with sub-routines). Look in the following path. installdir/gnupro-99r1/src/newlib/libc/sys installdir refers to your installation directory, by default ‘/usr/cygnus’. For example, look in ‘.../sys/h8300hms’ for Hitachi H8/300 bare boards, or in ‘.../sys/sparclite’ for the Fujitsu SPARClite board. More examples are in the following directory. installdir/gnupro-99r1/src/newlib/stub To write your own crt0.s module, you need the following information about your target. ■ A memory map, showing the size of available memory and memory location ■ Which way the stack grows ■ Which output format is in use At a minimum, your crt0.s modulemust do the following processes. ■ Define the symbol, start (_start in assembler code). Execution begins at this symbol. ■ Set up the stack pointer, sp. It is largely up to you to choose where to store your stack within the constraints of your target’s memory map. Perhaps the simplest choice is to choose a fixed-size area somewhere in the uninitialized data section (often called ‘bss’). Remember that whether you choose the low address or the high address in this area depends on the direction your stack grows. ■ Initialize all memory in the uninitialized-data (‘bss’) section to zero. The easiest way to do this is with the help of a linker script (see “Linker scripts” in Using ld in GNUPro Utilities). Use a linker script to define symbols such as ‘bss_start’ and ‘bss_end’ to record the boundaries of this section; then you can use a ‘for’ loop to initialize all memory between them in the ‘crt0.s’ module. ■ Call main. Nothing else will! A more complete ‘crt0.s’ module might also do the following processes. ■ Define an ‘_exit’ subroutine. This is the C name; in your assembler code. Use CYGNUS GNUPro Tools for Embedded Systems ■ 11 Using GNU tools on embedded systems ■ ■ ■ the label, __exit, with two leading underbars. Its precise behavior depends on the details of your system, and on your choice. Possibilities include trapping back to the boot monitor, if there is one; or to the loader, if there is no monitor; or even back to the symbol, start. If your target has no monitor to mediate communications with the debugger, you must set up the hardware exception handler in the ‘ crt0.s’ module. See “The GDB remote serial protocol” on page 158 in Debugging with GDB in GNUPro Debugging Tools for details on how to use the gdb generic remote-target facilities for this purpose. Perform other hardware-dependent initialization; for example, initializing an mmu or an auxiliary floating-point chip. Define low-level input and output subroutines. For example, the ‘crt0.s’ module is a convenient place to define the minimal assembly-level routines; see “System calls” on page 171 in GNUPro C Library in GNUPro Libraries. 12 ■ GNUPro Tools for Embedded Systems CYGNUS crt0, the main startup file crt0<`Hj#co#¦|QcfH The crt0 (C RunTime 0) file contains the initial startup code for embedded development. Cygnus provides a crt0 file for most platforms, although you may want to write your own crt0 file for each target. The crt0 file is usually written in assembler as crt0.S, and its object gets linked in first and bootstraps the rest of your application. The crt0 file defines a special symbol like _start, which is both the default base address for the application and the first symbol in the executable binary image. If you plan to use any routines from the standard C library, you’ll also need to implement the functions on which libgloss depends. The crt0 file accomplishes the following results. See “I/O support code” on page 36. ■ crt0 initializes everything in your program that needs it. This initialization section varies. ■ If you are developing an application that gets downloaded to a ROM monitor, there is usually no need for special initialization because the ROM monitor handles it for you. ■ If you plan to burn your code in a ROM, the crt0 file typically does all of the hardware initialization required to run an application. This can include things like initializing serial ports and running a memory check; however, results vary depending on your hardware. The following is a typical basic initialization of crt0.S. 1. Set up concatenation macros. #define CONCAT1(a, b) CONCAT2(a, b) #define CONCAT2(a, b) a ## b Later, you’ll use these macros. 2. Set up label macros, using the following example’s input. #ifndef __USER_LABEL_PREFIX__ #define __USER_LABEL_PREFIX__ _ #endif #define SYM(x) CONCAT1 (__USER_LABEL_PREFIX__, x) These macros make the code portable between coff and a.out. coff always has an __ (underline) prepended to the front of its global symbol names. a.out has none. 3. Set up register names (with the right prefix), using the following CYGNUS GNUPro Tools for Embedded Systems ■ 13 Using GNU tools on embedded systems example’s input. #ifndef __REGISTER_PREFIX__ #define __REGISTER_PREFIX__ #endif /* Use the right prefix for registers. */ #define REG(x) CONCAT1 (__REGISTER_PREFIX__, x) #define d0 REG (d0) #define d1 REG (d1) #define d2 REG (d2) #define d3 REG (d3) #define d4 REG (d4) #define d5 REG (d5) #define d6 REG (d6) #define d7 REG (d7) #define a0 REG (a0) #define a1 REG (a1) #define a2 REG (a2) #define a3 REG (a3) #define a4 REG (a4) #define a5 REG (a5) #define a6 REG (a6) #define fp REG (fp) #define sp REG (sp) Register names are for portability between assemblers. Some register names have a % or $ prepended to them. 4. Set up space for the stack and grab a chunk of memory. .set stack_size, 0x2000 . comm SYM (stack), stack_size This can also be done in the linker script, although it typically gets done at this point. 5. Define an empty space for the environment, using the following example’s input. .data .align 2 SYM (environ): .long 0 This is bogus on almost any ROM monitor, although it’s best generally set up as a valid address, then passing the address to main(). This way, if an application checks for an empty environment, it finds one. 6. Set up a few global symbols that get used elsewhere. .align 2 .text 14 ■ GNUPro Tools for Embedded Systems CYGNUS crt0, the main startup file .global .global .global .global SYM (stack) SYM (main) SYM (exit) __bss_start This really should be __bss_start, not SYM (__bss_start). __bss_start needs to be declared this way because its value is set in the linker script. 7. Set up the global symbol, start, for the linker to use as the default address for the .text section. This helps your program run. SYM (start): link a6, #-8 moveal #SYM (stack) + stack_size, sp ■ crt0 zeroes the .bss section Make sure the .bss section is cleared for uninitialized data, using the following example’s input. All of the addresses in the .bss section need to be initialized to zero so programs that forget to check new variables’ default values will get predictable results. moveal #__bss_start, a0 moveal #SYM (end), a1 1: movel #0, (a0) leal 4(a0), a0 cmpal a0, a1 bne 1b ■ Applications can get wild side effects from the .bss section being left uncleared, and it can cause particular problems with some implementations of malloc(). crt0 calls main() If your ROM monitor supports it, set up argc and argv for command line arguments and an environment pointer before the call to main(), using the following example’s input. For g++, the code generator inserts a branch to __main at the top of your main() routine. g++ uses __main to initialize its internal tables and then returns control to your main() routine. For crt0 to call your main() routine, use the following example’s input. First, set up the environment pointer and jump to main(). Call the main routine from the application to get it going, using the following example’s input with main (argc, argv, environ), using argv as a pointer to NULL. pea pea pea pea CYGNUS 0 SYM (environ) sp@(4) 0 GNUPro Tools for Embedded Systems ■ 15 Using GNU tools on embedded systems jsr SYM (main) movel d0, sp@-4 ■ crt0 calls (exit) After main() has run, the crt0 file cleans things up and returns control of the hardware from the application. On some hardware there is nothing to return to—especially if your program is in ROM— and if that’s the case, you need to do a hardware reset or branch back to the original start address. If you’re using a ROM monitor, you can usually call a user trap to make the ROM take over. Pick a safe vector with no sides effects. Some ROM’s have a built-in trap handler just for this case. Implementing (exit) here is easy.. First, with _exit, exit from the application. Normally, this causes a user trap to return to the ROM monitor for another run. Then, using the following example’s input, you proceed with the call. SYM (exit): trap #0 Both rom68k and bug can handle a user-caused exception of 0 with no side effects. Although the bug monitor has a user-caused trap that returns control to the ROM monitor, the bug monitor is more portable. 16 ■ GNUPro Tools for Embedded Systems CYGNUS The linker script `HfcoeH6c| In the following path, find the example linker scripts (hosttype signifies your host configuration and targettype signifies the embedded configuration to which you target): /usr/cygnus/hosttype/targettype/lib/ldscripts/ In that directory, there will be files with the .x, .xbn, .xn, .xr, .xs, and .xu extensions. These are examples of linker scripts The linker script accomplishes the following processes to result. ■ Sets up the memory map for the application. When your application loads into memory, it allocates some RAM, some disk space for I/O, and some registers. The linker script makes a memory map of this memory allocation which is important to embedded systems because, having no OS, you have the ability then to manage the behavior of the chip. ■ For g++, sets up the constructor and destructor tables. The actual section names vary depending on your object file format. For a.out and coff, the three main sections are .text, .data and .bss. ■ Sets the default values for variables used elsewhere. These default variables are used by sbrk() and the crt0 file, that, typically, _bss_start and _end call. There are two ways to ensure the memory map is correct. ■ By having the linker create the memory map by using the option, -Map. ■ By, after linking, using the nm utility to check critical addresses like start, bss_end and _etext. The following is an example of a linker script for an m68k-target board. 1. Use the STARTUP command, which loads the file so that it executes first. STARTUP(crt0.o) The m68k-coff configuration default does not link in crt0.o because it assumes that a developer has crt0. The config file controls this behavior in each architecture in a macro called STARTFILE_SPEC. If you have STARTFILE_SPEC set to NULL, gcc formats its command line and doesn’t add crt0.o. You can specify any filename with STARTUP, although the default is always crt0.o. If you use only ld to link, you control whether or not to link in crt0.o on the command line. If you have multiple crt0 files, you can leave STARTUP out, and link in crt0.o in the makefile or use different linker scripts. This option is useful with ininitializing CYGNUS GNUPro Tools for Embedded Systems ■ 17 Using GNU tools on embedded systems floating point values or with adding device support. 2. Using GROUP, load the specified file. GROUP(-lgcc-liop-lc) In this case, the file is a relocated library that contains the definitions for the low-level functions needed by libc.a. The file to load could have also been specified on the command line, but as it’s always needed, it might as well be here as a default. 3. SEARCH_DIR specifies the path in which to look for files. SEARCH_DIR(.) 4. Using _DYNAMIC, specify whether or not there are shared dynamic libraries. In the following example’s case, there are no shared libraries. __DYNAMIC = 0; 5. Set _stack, the variable for specifying RAM for the ROM monitor. 6. Specify a name for a section to which you can refer later in the script. In the following example’s case, it’s only a pointer to the beginning of free RAM space with an upper limit at 2M. If the output file exceeds the upper limit, MEMORY produces an error message. First, in this case, we set up the memory map of the board’s stack for high memory for both the rom68k and mon68k monitors. MEMORY { ram } : ORIGIN = 0x10000, LENGTH = 2M Setting up constructor and destructor tables for g++ 1. Set up the .text section, using the following example’s input. SECTIONS { .text : { CREATE_OBJECT_SYMBOLS *(.text) etext = .; __CTOR_LIST__ = .; LONG((__CTOR_END__ - __CTOR_LIST__) / 4 - 2) *(.ctors) LONG(0) __CTOR_END__ = .; __DTOR_LIST__ = .; LONG((__DTOR_END__ - __DTOR_LIST__) / 4 - 2) *(.dtors) LONG(0) __DTOR_END__ = .; 18 ■ GNUPro Tools for Embedded Systems CYGNUS The linker script *(.lit) *(.shdata) } > ram .shbss SIZEOF(.text) + ADDR(.text) : { *(.shbss) } In a coff file, all the actual instructions reside in .text for also setting up the constructor and destructor tables for g++. Notice that the section description redirects itself to the RAM variable that was set up in Step 5 (see page 18). 2. Set up the .data section. .talias : { } > ram .data : { *(.data) CONSTRUCTORS _edata = .; } > ram In a coff file, this is where all of the initialized data goes. CONSTRUCTORS is a special command used by ld. Setting default values for variables, _bss_start and _end Set up the .bss section: .bss SIZEOF(.data) + ADDR(.data) : { __bss_start = ALIGN(0x8); *(.bss) *(COMMON) end = ALIGN(0x8); _end = ALIGN(0x8); __end = ALIGN(0x8); } .mstack : { } > ram .rstack : { } > ram .stab . (NOLOAD) : { [ .stab ] } .stabstr . (NOLOAD) : { [ .stabstr ] } } In a coff file, this is where uninitialized data goes. The default values for _bss_start and _end are set here for use by the crt0 file when it zeros the .bss section. CYGNUS GNUPro Tools for Embedded Systems ■ 19 Using GNU tools on embedded systems r¦6Ha#¨cX#r?Hjro#cro The following documentation discusses the Source-Navigator source code comprehension tool, using a tutorial to demonstrate the usage of debugging the sources for a project, editing the source files and building the project, the monop game. In this tutorial, you will create two targets, monop and initdeck, and, with them, use many compiling, editing and debugging features of GNUPro Toolkit. The result is making and running the monop project’s game. ■ “Creating the Source-Navigator demonstration project” on page 21 ■ “Building the monop target” on page 22 ■ “Debugging and compiling the monop target” on page 24 ■ “Building the initdeck target” on page 30 ■ “Debugging the initdeck target” on page 32 Invoke Source-Navigator with the following input, using a shell window’s commandline interface from the /usr/cygnus/gnupro/sn99r1 directory. snavigator For more information about using Source-Navigator, see its online documentation from its Help menu. 20 ■ GNUPro Tools for Embedded Systems CYGNUS Source-Navigator demonstration H#coX`Hr¦6Ha#¨cX#r?Hjro#cro |rdH6 With Source-Navigator active, create a new project. 1. Choose File -> New Project... from the Symbol Browser and define a new project, calling it monop.proj. 2. Under Add Directory, click the “...” button to select the demos\monop directory. See Figure 1 for the result of defining the new project’s name in the Auto-Create Project window. Click OK to build the project. Figure 1: Creating a new project, monop.proj, from the demos\monop directory CYGNUS GNUPro Tools for Embedded Systems ■ 21 Using GNU tools on embedded systems ¦cf?coX`Hmonop#XH Having created a project, you must then build its target components. 1. Choose Tools -> Build Settings... to invoke the Build Settings window. 2. Enter monop as the name of the target. See Figure 2 for the result. Figure 2: Creating a monop target 3. Click Create. The Edit Target window appears. 4. In the Build Directory field, click the “...” button and select the build directory for the monop project (see Figure 3). Figure 3: Defining the project for building 5. From Project Files in the Edit Target window for the monop project, select cards.c, execute.c, getinp.c, houses.c, jail.c, misc.c, monop.c, morg.c, print.c, prop.c, rent.c, roll.c, spec.c, and trade.c files. 22 ■ GNUPro Tools for Embedded Systems CYGNUS Source-Navigator demonstration 6. Click the Add Files button to copy the files to the Target Files list. In Figure 4, see the result of moving the files from the Target Files pane to the Project Files pane. Figure 4: Adding the project’s files to the target NOTE: To execute the program correctly in UNIX, click the Link Rules tab. Enter xterm -e bmonop in the Command to launch Application field and click OK to close the Link Rules window. 7. Click OK to close the Edit Target window. Click Done to close the Build Settings window. The target is created. Now you need to debug and compile the program. See “Debugging and compiling the monop target” on page 24. CYGNUS GNUPro Tools for Embedded Systems ■ 23 Using GNU tools on embedded systems H,¦XXcoX#o?6rj|cfcoX`Hmonop#XH To ensure that a project can compile (or build), you must first run through a debugging process before using the make tool to create the project. 1. Select Tools -> Build from the menu bar. The Build window opens. 2. In Build Targets, select monop from the target list. See Figure 5. Click Start. Figure 5: Running a debugging process for the project before compiling 3. In this tutorial, Source-Navigator generates some errors from the build. For instance, lint needed to have a definition in the source code. See Figure 6. 24 ■ GNUPro Tools for Embedded Systems CYGNUS Source-Navigator demonstration Figure 6: Errors in the project CYGNUS GNUPro Tools for Embedded Systems ■ 25 Using GNU tools on embedded systems Creating the lint macro To ensure that a project can build, edit the macro errors that the debugger finds. 1. Choose Tools -> Build Settings... to start the Edit Target window. See Figure 7. 2. Double-click monop to edit it. 3. Click the Build Rules tab to modify the rules for the build. Figure 7: Modifying how the project builds 4. Because monop is written in C, double-click the C rule in the File Type column. The Build Rules Settings window appears. 5. Click the Defines tab. Enter lint in the text entry box. See Figure 8. 26 ■ GNUPro Tools for Embedded Systems CYGNUS Source-Navigator demonstration Figure 8: Defining the lint macro 6. Click New to create the macro. 7. Click OK to close the Build Rules Settings window. Click OK to close the Edit Target window. Click Done to close the Build Settings window. 8. Select Tools -> Build from the menu bar and select monop from the target list. 9. monop generates without errors. However, at runtime the program does not run because we still need to define the path to the cards pack. Creating the _PATH_CARDS macro Now, define the other macro, _PATH_CARDS, to continue making the project work. 1. Choose Tools -> Build Settings... to start the Edit Target window. 2. Double-click monop to edit it. 3. Click the Build Rules tab to modify the rules for the build. See Figure 9. CYGNUS GNUPro Tools for Embedded Systems ■ 27 Using GNU tools on embedded systems Figure 9: Modifying the project’s macros 4. Because monop is written in C, double-click the C rule. The Build Rules Settings window appears, as in Figure 10. 5. Click the Defines tab. 6. Enter the following input in the dialog below the Macro defines pane, replacing <project directory> with your path to the demos\monop directory: _PATH_CARDS="\"<project directory>/cards.pck\"" Figure 10: Re-defining a project’s macro Now, GNUPro Toolkit uses an appropriate definition for the card pack macro, when running the monop program. _PATH_CARDS, 28 ■ GNUPro Tools for Embedded Systems CYGNUS Source-Navigator demonstration 7. Click OK to close the Build Rules Settings window. Click OK to close the Edit Target window. Click Done to close the Build Settings window. 8. Select Tools -> Build from the menu bar and select monop from the target list. Click Start to perform the build. 9. _PATH_CARDS="\"<build directory>/cards.pack\"" is a macro. To ensure that this change is picked up at compile time, perform a clean build of the monop target project by selecting Tools -> Clean Build in the Build window (see Figure 11). A clean build is equivalent to the make clean command. Figure 11: Performing a clean build for a project 10. Click the Start button to perform the build. 11. Now, the monop project compiles without errors (see Figure 12). CYGNUS GNUPro Tools for Embedded Systems ■ 29 Using GNU tools on embedded systems Figure 12: A clean build of a project ¦cf?coX`Hinitdeck#XH Next, you need to create another target to initialize the cards in the monop game. 1. Choose Tools -> Build Settings... to invoke the Build Target window. 2. Enter initdeck as the name of the target (see Figure 13). Figure 13: Defining another target for a project 30 ■ GNUPro Tools for Embedded Systems CYGNUS Source-Navigator demonstration 3. Click Create. The Edit Target window appears (see Figure 14). 4. In the Build Directory field, click the “...” button and select the monop directory. 5. From Source Files, select the initdeck.c file and click the Add Files button to copy the file to the Target Files list. Figure 14: Creating a new target for a project 6. Click OK to close the Edit Target window. Click Done to close the Build Settings window, having defined and created the new target. CYGNUS GNUPro Tools for Embedded Systems ■ 31 Using GNU tools on embedded systems H,¦XXcoX`Hinitdeck#XH To ensure that a project can build with the new target, edit the macro errors that the debugger finds. 1. Build the target by selecting Tools -> Build from the menu bar of the Build window. Select initdeck from the target list, and click Start. 2. initdeck generates with errors. Again, we need to define the lint macro and the path to the cards. 3. Choose Tools -> Build Settings... to start the Build Settings window. 4. Double-click initdeck to edit it. 5. Click the Build Rules tab. Double-click the C rule. The Build Rules Settings window appears (see Figure 15). Click the Defines tab. Enter lint in the text entry box. Figure 15: Defining the lint macro for the new target 6. Click New to create the macro. Enter the following input in the dialog below the Macro defines pane, replacing <project directory> with your path to the demos\monop directory: _PATH_CARDS="\"<project directory>/cards.pck\"" 32 ■ GNUPro Tools for Embedded Systems CYGNUS Source-Navigator demonstration Figure 16: Defining the path for the new target Now, GNUPro Toolkit uses an appropriate definition for the card pack when running the monop program. 7. Click OK to close the Build Rules Settings window. Click OK to close the Edit Target window. Click Done to close the Build Settings window, having modified the target for the project. 8. Open a shell window and copy the cards.inp file in the demos\monop directory into the build directory (see Figure 17 for an example of the copy command in a Command.com shell window that a Windows NT developer could use; UNIX users would use the cp command in a shell window). Figure 17: Copying files for the project in a shell window 9. Select Tools -> Build from the menu bar and select initdeck from the target list. 10. To ensure that the macro changes are picked up at compile time, perform a clean build of the initdeck target by selecting Tools -> Clean Build (see Figure 18). CYGNUS GNUPro Tools for Embedded Systems ■ 33 Using GNU tools on embedded systems Figure 18: Performing a clean build for the new target for the project 11. Click the Start button to perform the build. 12. Now, initdeck compiles and links without errors. binitdeck is the name of the working executable. 13. Click the Run button to run binitdeck which creates the cards used in the game. A shell window opens to build the cards (see Figure 19) and closes after the build is complete. Figure 19: Rebuilding the new target for the project 14. From the Build Targets field of the Build window, select monop and click Run. A shell window opens and monop runs automatically. Enter the number of players and their names. See Figure 20 for an example in a shell window of a project that builds and is ready to run. Use the ? key to get playing options for monop. Oh, have fun. 34 ■ GNUPro Tools for Embedded Systems CYGNUS Source-Navigator demonstration Figure 20: A built project that’s ready to run CYGNUS GNUPro Tools for Embedded Systems ■ 35 Using GNU tools on embedded systems ¦||r6r?H Most applications use calls to the standard C library. However, when you initially link libc.a, you must still define several I/O functions. If you don’t plan on doing any I/O, you’re OK; otherwise, you need to create two I/O functions: open() and close(). These don’t need to be fully supported unless you have a file system, so they are normally stubbed out, using kill(). is also a sub-routine, or stub, since you can’t do process control on an embedded system, only needed by applications that do dynamic memory allocation. It uses the variable, _end, which is set in the linker script. sbrk() The following routines are also used for optimization. -inbyte Returns a single byte from the console. -outbyte Used for low-level debugging, takes an argument for print() and prints a byte out to the console (typically used for ASCII text). 36 ■ GNUPro Tools for Embedded Systems CYGNUS Memory support Hjr«¦||r The following routines are for dynamic memory allocation. sbrk() The functions, malloc(), calloc(), and realloc() all call sbrk() at their lowest levels. sbrk() returns a pointer to the last memory address your application used before more memory was allocated. caddr_t Defined elsewhere as char *. RAMSIZE A compile-time option that moves a pointer to heap memory and checks for the upper limit. CYGNUS GNUPro Tools for Embedded Systems ■ 37 Using GNU tools on embedded systems c6Hff#oHr¦¦||rr¦coH The following support routines are called by newlib, although they don’t apply to the embedded environment. isatty() Checks for a terminal device. kill() Simply exits. getpd() Can safely return any value greater than 1, although the value doesn’t effect anything in newlib. 38 ■ GNUPro Tools for Embedded Systems CYGNUS 2 ¨H¨cH©rQ¦||rH?#XH Qr6ra?H¨Hfr|jHo The following documentation describes programming practices and options for several of the embedded targets that Cygnus supports. Since the tools are evolving, new targets are frequently added (see also “Embedded cross-configuration support” on page 45 and Table 1 on page 45 through Table 5 on page 49 in GETTING STARTED). The following targets have support. ■ For ARM 7/7T processors, see “ARM development” on page 97 ■ For Hewlett Packard’s processors, see “Hewlett Packard development” on page 123 ■ For Hitachi’s processors, see: ■ “Developing for Hitachi H8 targets” on page 132 ■ “Developing for Hitachi SH targets” on page 144 ■ For Linux development, see “Linux development” on page 153 ■ For LSI TinyRISC development, see “LSI TinyRisc development” on page 155 ■ For Matsushita’s processors, see: ■ “Matsushita MN10200 development” on page 170 ■ “Matsushita MN10300 development” on page 190 ■ For MIPS processors in general, see “MIPS development” on page 217 CYGNUS GNUPro Tools for Embedded Systems ■ 25 Overview of supported targets for cross-development For specific information for the MIPS targets, see: ■ “Developing for the V4100 processors” on page 232 ■ ■ ■ ■ ■ ■ ■ ■ * ■ “Developing for the V4300 processors” on page 248 ■ “Developing for the V5xxx processors” on page 263* For Mitsubishi’s D10V processor, see “Developing for the D10V targets” on page 292 For Mitsubishi’s M32R processors, see: ■ “Developing for the M32R/X/D targets” on page 323 ■ “Developing for the M32R/D targets” on page 358 For Motorola’s 68K processors, see “Motorola M68K development” on page 397 For NEC’s V850 processor, see “NEC V850 development” on page 405 For PowerPC processors in general, see “PowerPC development” on page 429 For SPARC and SPARClite processors, see “SPARC, SPARClite development” on page 449 For the Toshiba TX39 processor, see “Toshiba TX39 development” on page 471 For Windows development, see “Cygwin: a free Win32 porting layer for UNIX applications” on page 27. Windows systems that have support are Windows 95/98/NT4.0. The 5xxxx series includes the VR5000 processor from NEC. 26 ■ GNUPro Tools for Embedded Systems CYGNUS 3 co?r©?H¨Hfr|jHo©c` «X©co;#co¤|rcoXf#«H CygwinTM, a full-featured Win32 porting layer for UNIX applications, is compatible with all Win32 hosts (currently, these are Microsoft’s Windows NT/95/98 systems). The following documentation discusses porting the GNU development tools to the Win32 host while exploring the development and architecture of the Cygwin library. ■ “Porting UNIX tools to Win32” on page 29 ■ “Initial goals of Cygwin” on page 30 ■ “Compatibility issues with Cygwin” on page 42 ■ “Setting up Cygwin” on page 46 ■ “Using GCC with Cygwin” on page 56 ■ “Debugging Cygwin programs” on page 58 ■ “Building and using DLLs with Cygwin” on page 60 ■ “Defining Windows resources for Cygwin” on page 63 ■ “Cygwin utilities” on page 67 ■ “Cygwin functions” on page 80 Cygwin was invented in 1995 by Cygnus as part of the answer to the question of how to port the GNU development tools to a Win32 host. The Win32-hosted GNUPro compiler tools that use the Cygwin library are available for a variety of embedded processors as well as a native version for writing Win32 applications. CYGNUS GNUPro Tools for Embedded Systems ■ 27 Windows development with Cygwin: a Win32 porting layer By basing this technology on the GNU tools, Cygnus provides developers with a high-performance, feature-rich 32-bit code development environment, including a graphical source-level debugger, Cygnus InsightTM (see “Working with Cygnus Insight, the visual debugger” on page 147). Cygwin is a dynamically-linked library (DLL) that provides a large subset of the system calls in common UNIX implementations. The current release includes all POSIX.1/90 calls except for setuid and mkfifo, all ANSI C standard calls, and many common BSD and SVR4 services (including Berkeley sockets). See also “Compatibility issues with Cygwin” on page 42. When the Free Software Foundation (FSF) first wrote the GNU tools in the mid-1980s, portability among existing and future UNIX operating systems was an important goal. By mid-1995, the tools had been ported to 16-bit DOS using the GO32 32-bit extender by DJ Delorie*. However, no one had completed a native 32-bit port for Windows NT and 95/98. It seemed likely that the demand for Win32-hosted native and cross-development tools would soon be large enough to justify the development costs involved. This project’s fulfillment and its ongoing challenges are testaments to the growth that Cygwin provides; for the individuals who have been responsible for creating the Cygwin porting layer; see “Acknowledgments for Cygwin” on page 40. * DJ Delorie, maintainer of the DJGPP Project (see http://www.delorie.com/djgpp). 28 ■ GNUPro Tools for Embedded Systems CYGNUS Porting UNIX tools to Win32 rcoX rrfrco¤ The first step in porting compiler tools to Win32 was to enhance them so that they could generate and interpret Win32 native object files, using Microsoft’s Portable Executable (PE) format. This proved to be relatively straightforward because of similarities to the Common Object File Format (COFF), which the GNU tools already supported. Most of these changes were confined to the Binary File Descriptor (BFD) library and to the linker. In order to support the Win32 Application Programming Interface (API), we extended the capabilities of the binary utilities to handle Dynamic-Linked Libraries (DLLs). After creating export lists for the specific Win32 API DLLs that are shipped with Win32 hosts, the tools were able to generate static libraries that executables could use to gain access to Win32 API functions. Because of redistribution restrictions on Microsoft's Win32 API header files, we wrote our own Win32 header files from scratch on an as-needed basis. Once this work was completed, we were able to build UNIX-hosted cross-compilers capable of generating valid PE executables that ran on Win32 systems. See also “Using GCC with Cygwin” on page 56. The next task was to port the compiler tools themselves to Win32. Previous experiences using Microsoft Visual C++ to port GDB convinced us to find another means for bootstrapping the full set of tools. In addition to wanting to use our own compiler technology, we wanted a portable build system. The GNU development tools’configuration and build procedures require a large number of additional UNIX utilities not available on Win32 hosts. So we decided to use UNIX-hosted cross-compilers to build our Win32-hosted native and cross-development tools. It made perfect sense to do this since we were successfully using a nearly identical technique to build our DOS-hosted products. The next obstacle to overcome was the many dependencies on UNIX system calls in the sources, especially in the GNU debugger GDB. While we could have rewritten sizable portions of the source code to work within the context of the Win32 API (as was done for the DOS-hosted tools), this would have been prohibitively time-consuming. Worse, we would have introduced conditionalized code that would have been expensive to maintain in the long run. Instead, Cygnus developers took a substantially different approach by writing Cygwin. See also “Debugging Cygwin programs” on page 58. CYGNUS GNUPro Tools for Embedded Systems ■ 29 Windows development with Cygwin: a Win32 porting layer occ#fXr#frQ«X©co The following documentation discusses the work in developing the Cygwin tools. ■ “Harnessing the power of the web for Cygwin” on page 31 ■ “The Cygwin architecture” on page 32 ■ “Files and filetypes for Cygwin” on page 33 ■ “Text mode and binary bode interoperability with Cygwin” on page 34 ■ “ANSI C library for Cygwin” on page 35 ■ “Process creation for Cygwin” on page 35 ■ “Signals with Cygwin” on page 36 ■ “Sockets with Cygwin” on page 37 ■ “The select function with Cygwin” on page 37 ■ “Performance issues with Cygwin” on page 37 ■ “Ported software with Cygwin” on page 38 ■ “Future work for Cygwin” on page 39 ■ “Proprietary alternatives to Cygwin” on page 40 ■ “Acknowledgments for Cygwin” on page 40 The original goal of Cygwin was simply to get the development tools working. Completeness with respect to POSIX.12 and other relevant UNIX standards was not a priority. Part of a definition of “working native tools” is having a build environment similar enough to UNIX to support rebuilding the tools themselves on the host system, a process we call self-hosting. The typical configuration procedure for a GNU tool involves running configure, a complex Bourne shell script that determines information about the host system. The script then uses that information to generate the Makefiles used to build the tool on the host in question. This configuration mechanism is needed under UNIX because of the large number of varying versions of UNIX. If Microsoft continues to produce new variants of the Win32 API as it releases new versions of its operating systems, it may prove to be quite valuable on the Win32 host as well. The need to support this configuration procedure added the requirement of supporting user tools such as sh, make, file utilities (such as ls and rm), text utilities (such as cat, tr), and shell utilities (such as echo, date, uname, sed, awk, find, xargs, tar, and gzip, among many others). Previously, most of these user tools had only been built natively (on the host on which they would run). As a result, we had to modify their configure scripts to be compatible with cross-compilation. 30 ■ GNUPro Tools for Embedded Systems CYGNUS Initial goals of Cygwin Other than making the necessary configuration changes, we wanted to avoid Win32-specific changes since the UNIX compatibility was to be provided by Cygwin as much as possible. While we knew this would be a sizable amount of work, there was more to gain than just achieving self-hosting of the tools. Supporting the configuration of the development tools would also provide an excellent method of testing the Cygwin library. Although we were able to build working Win32-hosted toolchains with cross-compilers relatively soon after the birth of Cygwin, it took much longer than we expected before the tools could reliably rebuild themselves on the Win32 host because of the many complexities involved. #oHcoX`H|r©HrQ`H©H,Qr«X©co Instead of keeping the Cygwin technology proprietary and developing it in-house, Cygnus chose to make it publicly available under the terms of the GNU General Public License (GPL), the traditional license for the GNU tools. Since its inception, we have made a new “GNU-Win32 beta release” available using ftp over the Internet every three or four months. Each release includes binaries of Cygwin and the development tools, coupled with the source code needed to build them. Unlike standard Cygnus products, these free releases come without any assurances of quality or support, although we provide a mailing list that is used for discussion and feedback. In retrospect, making the technology freely available was a good decision because of the high demand for quality 32-bit native tools in the Win32 arena, as well as significant additional interest in a UNIX portability layer like Cygwin. While far from perfect, the beta releases are good enough for many people. They provide us with tens of thousands of interested developers who are willing to use and test the tools. A few of them are even willing to contribute code fixes and new functionality to the library. As of the last public release, developers on the Net had written or improved a significant portion of the library, including important aspects such as support for UNIX signals and the TTY/PTY calls. In order to spur as much Net participation as possible, the Cygwin project features an open development model. Cygnus makes weekly source snapshots available to the general public in addition to the periodic full GNU-Win32 releases. A mailing lists for developers facilitates discussion of proposed changes to the library. In addition to the GPL version of Cygwin, Cygnus provides a commercial license for supported customers of the native Win32 GNUPro tools. CYGNUS GNUPro Tools for Embedded Systems ■ 31 Windows development with Cygwin: a Win32 porting layer `H«X©co#6`cH6¦H The following documentation discusses the architecture underlying the Cygwin tools. ■ “Files and filetypes for Cygwin” on page 33 ■ “Text mode and binary bode interoperability with Cygwin” on page 34 ■ “ANSI C library for Cygwin” on page 35 When a binary linked against the library is executed, the Cygwin DLL is loaded into the application’s text segment. Because we are trying to emulate a UNIX kernel that needs access to all processes running under it, the first Cygwin DLL to run creates shared memory areas that other processes using separate instances of the DLL can access. This is used to keep track of open file descriptors and assist fork and exec, among other purposes. In addition to the shared memory regions, every process also has a per-process structure that contains information such as process ID, user ID, signal masks, and other similar process-specific information. The DLL is implemented using the Win32 API, allowing it to run on all Win32 hosts. Because processes run under the standard Win32 subsystem, they can access both the UNIX compatibility calls provided by Cygwin as well as any of the Win32 API calls. This gives the programmer complete flexibility in designing the structure of their program in terms of the APIs used. For example, a project might require a Win32-specific GUI using Win32 API calls on top of a UNIX back-end that uses Cygwin. Early on in the development process, an important design decision was made to overcome the necessity to strictly adhere to existing UNIX standards like POSIX*, if it was not possible or if it would significantly diminish the usability of the tools on the Win32 platform. In many cases, an environment variable can be set to override the default behavior and force standards compliance. While Windows 95 and Windows 98 are similar enough to each other that developers can safely ignore the distinction when implementing Cygwin, Windows NT is an extremely different operating system. For this reason, whenever the DLL is loaded, the library checks which operating system is active so that it can act accordingly. In some cases, the Win32 API is only different for historical reasons. In this situation, the same basic functionality is available under 95/98 and NT, although the method used to gain this functionality differs. A trivial example is in our implementation of uname, the library examines the sysinfo.wProcessorLevel structure member to determine the processor type used for Windows 95/98. This field is not supported in NT, which has its own operating system-specific structure member called sysinfo.wProcessorLevel. * ISO/IEC 9945-1:1996 (ANSI/IEEE Std 1003.1, 1996 Edition); POSIX Part 1: System Application Program Interface (API) [C Language]. 32 ■ GNUPro Tools for Embedded Systems CYGNUS Initial goals of Cygwin Other differences between NT and 95/98 are much more fundamental in nature. The best example is that only NT provides a security model. Windows NT includes a sophisticated security model based on Access Control Lists (ACLs). Although some modern UNIX operating systems include support for ACLs, Cygwin maps Win32 file ownership and permissions to the more standard, older UNIX model. The chmod call maps UNIX-style permissions back to the Win32 equivalents. Because many programs expect to be able to find the /etc/passwd and /etc/group files, we provide utilities that can be used to construct them from the user and group information provided by the operating system. Under Windows NT, the administrator is permitted to chown files. There is currently no mechanism to support the setuid concept or API call. Although Cygnus hopes to support this functionality at some point in the future, in practice, the programs that have ported have not needed it. Under Windows 95/98, the situation is considerably different. Since a security model is not provided, Cygwin fakes file ownership by making all files look like they are owned by a default user and group ID. As under NT, file permissions can still be determined by examining their read/write/execute status. Rather than return an unimplemented error, under Windows 95/98, the chown call succeeds immediately without actually performing any action. This is appropriate since essentially all users jointly own the files when no concept of file ownership exists. It is important that we discuss the implications of our kernel, using shared memory areas to store information about Cygwin processes. Because these areas are not yet protected in any way, a malicious user could perhaps modify them to cause unexpected behavior in Cygwin processes. While this is not a new problem under Windows 95/98 (because of the lack of operating system security), it does constitute a security hole under Windows NT. This is because one user could affect the Cygwin programs run by another user by changing the shared memory information in ways that they could not in a more typical WinNT program. For this reason, it is not appropriate to use Cygwin in high-security applications. In practice, this will not be a major problem for most uses of the library. Files and filetypes for Cygwin Cygwin supports both Win32- and POSIX-style paths, using either forward or back slashes as the directory delimiter. Paths coming into the DLL are translated from Win32 to POSIX as needed. As a result, the library believes that the file system is a POSIX-compliant one, translating paths back to Win32 paths whenever it calls a Win32 API function. UNC pathnames (Universal Naming Conventions, which are paths that start with two slashes) are supported. See also “Cygwin’s compatibility with POSIX.1 standards” on page 43. CYGNUS GNUPro Tools for Embedded Systems ■ 33 Windows development with Cygwin: a Win32 porting layer The layout of this POSIX view of the Windows file system space is stored in the Windows registry. While the slash (‘/’) directory points to the system partition by default, this is easy to change with the Cygwin mount utility. In addition to selecting the slash partition, it allows mounting arbitrary Win32 paths into the POSIX file system space. Many people use the utility to mount each drive letter under the slash partition (that is, C:\ to /c, D:\ to /d, and so forth). The library exports several Cygwin-specific functions that can be used by external programs to convert a path or path list from Win32 toPOSIX or vice versa. Shell scripts and Makefiles cannot call these functions directly. Instead, they can do the same path translations by executing the “cygpath” utility. Win32 file systems are case preserving but case insensitive. Cygwin does not currently support case distinction because, in practice, few UNIX programs actually rely on it. While we could mangle file names to support case distinction, this would add unnecessary overhead to the library and make it more difficult for non-Cygwin applications to access those files. Symbolic links are emulated by files containing a magic cookie followed by the path to which the link points. They are marked with the System attribute so that only files with that attribute have to be read to determine whether or not the file is a symbolic link. Hard links are fully supported under Windows NT on NTFS file systems. On a FAT file system, the call falls back to copying the file, a strategy that works in many cases. The inode number for a file is calculated by hashing its full Win32 path. The inode number generated by the stat call always matches the one returned in d_ino of the dirent structure. It is worth noting that the number produced by this method is not guaranteed to be unique. However, we have not found this to be a significant problem because of the low probability of generating a duplicate inode number. Text mode and binary bode interoperability with Cygwin Interoperability with other Win32 programs such as text editors was critical to the success of the port of the development tools. Most Cygnus customers upgrading from the older DOS-hosted toolchains expected the new Win32-hosted ones to continue to work with their old development sources. Since UNIX and Win32 use different end-of-line terminators in text files, consequently, carriage-return newlines have to be translated by Cygwin into a single newline when reading in text mode. The Ctrl+z character is interpreted as a valid end-of-file character for a similar reason. This solution addresses the compatibility requirement at the expense of violating the POSIX standard that states that text and binary mode will be identical. Consequently, processes that attempt to lseek through text files can no longer rely on the number of 34 ■ GNUPro Tools for Embedded Systems CYGNUS Initial goals of Cygwin bytes read as an accurate indicator of position in the file. For this reason, an environment variable can be set to override this behavior. See also “Cygwin’s compatibility with POSIX.1 standards” on page 43, “Environment variables for Cygwin” on page 47 and “Text and binary modes” on page 51. ANSI C library for Cygwin We chose to include Cygnus’ own existing ANSI C* library, newlib, as part of the library, rather than write all of the GNU C libraries and math calls from scratch. newlib is a BSD-derived ANSI C library, previously only used by cross-compilers for embedded systems development. The reuse of existing free implementations of such things as the glob, regexp, and getopt libraries saved considerable effort. In addition, Cygwin uses Doug Lea’s free malloc implementation that successfully balances speed and compactness. The library accesses the malloc calls, using an exported function pointer. This makes it possible for a Cygwin process to provide its own malloc if required. For more information, see “Cygwin’s compatibility with ANSI standards” on page 42. r6H6H#croQr«X©co The following documentation discusses the process in the API with Cygwin tools. ■ “Signals with Cygwin” on page 36 ■ “Sockets with Cygwin” on page 37 ■ “The select function with Cygwin” on page 37 ■ “Performance issues with Cygwin” on page 37 ■ “Ported software with Cygwin” on page 38 The fork call in Cygwin is particularly interesting because it does not map well on top of the Win32 API. This makes it very difficult to implement. Currently, the Cygwin fork is a non-copy-on-write implementation similar to what was present in early versions of UNIX. The first thing that happens when a parent process forks a child process is that the parent initializes a space in the Cygwin process table for the child. It then creates a suspended child process using the Win32 CreateProcess call. Next, the parent process calls setjmp to save its own context and sets a pointer to this in a Cygwin shared memory area (shared among all Cygwin tasks). It then fills in the child’s .data and .bss sections by copying from its own address space into the suspended child’s address space. After the child’s address space is initialized, the child is run while the * ISO/IEC 9899:1990, Programming Languages (C). CYGNUS GNUPro Tools for Embedded Systems ■ 35 Windows development with Cygwin: a Win32 porting layer parent waits on a mutex. The child discovers it has been forked and longjumps using the saved jump buffer. The child then sets the mutex the parent is waiting on and blocks on another mutex. This is the signal for the parent to copy its stack and heap into the child, after which it releases the mutex the child is waiting on and returns from the fork call. Finally, the child wakes from blocking on the last mutex, recreates any memory-mapped areas passed to it from the shared area, and returns from fork itself. While we have some ideas as to how to speed up our fork implementation by reducing the number of context switches between the parent and child process, fork will almost certainly always be inefficient under Win32. Fortunately, in most circumstances, the spawn family of calls provided by Cygwin can be substituted for a fork/exec pair with only a little effort. These calls map cleanly on top of the Win32 API. As a result, they are much more efficient. Changing the compiler’s driver program to call spawn instead of fork was a trivial change and increased compilation speeds by 20-30% in our tests. However, spawn and exec present their own set of difficulties. Because there is no way to do an actual exec under Win32, Cygwin has to invent its own Process IDs (PIDs). As a result, when a process performs multiple exec calls, there will be multiple Windows PIDs associated with a single Cygwin PID. In some cases, stubs of each of these Win32 processes may linger, waiting for their Cygwin process to exit. Signals with Cygwin When a Cygwin process starts, the library starts a secondary thread for use in signal handling. This thread waits for Windows events used to pass signals to the process. When a process notices it has a signal, it scans its signal bitmask and handles the signal in the appropriate fashion. Several complications in the implementation arise from the fact that the signal handler operates in the same address space as the executing program. The immediate consequence is that Cygwin system functions are interruptible unless special care is taken to avoid this. We go to some lengths to prevent the sig_send function that sends signals from being interrupted. In the case of a process sending a signal to another process, we place a mutex around sig_send such that sig_send will not be interrupted until it has completely finished sending the signal. In the case of a process sending itself a signal, we use a separate semaphore/event pair instead of the mutex. sig_send starts by resetting the event and incrementing the semaphore that flags the signal handler to process the signal. After the signal is processed, the signal handler signals the event that it is done. This process keeps intraprocess signals synchronous, as required by POSIX. Most standard UNIX signals are provided. Job control works as expected in shells that support it. 36 ■ GNUPro Tools for Embedded Systems CYGNUS Initial goals of Cygwin Sockets with Cygwin Socket-related calls in Cygwin simply call the functions by the same name in Winsock, Microsoft’s implementation of Berkeley sockets. Only a few changes were needed to match the expected UNIX semantics; one of the most troublesome differences was that Winsock must be initialized before the first socket function is called. As a result, Cygwin has to perform this initialization when appropriate. In order to support sockets across fork calls, child processes initialize Winsock if any inherited file descriptor is a socket. Unfortunately, implicitly loading DLLs at process startup is usually a slow affair. Because many processes do not use sockets, Cygwin explicitly loads the Winsock DLL the first time it calls the Winsock initialization routine. This single change sped up GNU configure times by 30%. The select function with Cygwin The UNIX select function is another call that does not map cleanly on top of the Win32 API. Much to our dismay, we discovered that the Win32 select in Winsock only worked on socket handles. Our implementation allows select to function normally when given different types of file descriptors (such as sockets, pipes, handles, and a custom /dev/windows windows messages pseudo-device). Upon entry into the select function, the first operation is to sort the file descriptors into the different types. There are then two cases to consider. ■ The simple case is when at least one file descriptor is a type that is always known to be ready (such as a disk file). In that case, select returns immediately as soon as it has polled each of the other types to see if they are ready. ■ The more complex case involves waiting for socket or pipe file descriptors to be ready. This is accomplished by the main thread suspending itself, after starting one thread for each type of file descriptor present. Each thread polls the file descriptors of its respective type with the appropriate Win32 API call. As soon as a thread identifies a ready descriptor, that thread signals the main thread to wake up. This case is now the same as the first one since we know at least one descriptor is ready. So select returns, after polling all of the file descriptors one last time. Performance issues with Cygwin Early on in the development process, correctness was almost the entire emphasis and, as Cygwin became more complete, performance became a much important issue. It was known that the tools ran much more slowly under Win32 than under Linux on the same machine, but it was not clear at all whether to attribute this to differences in the CYGNUS GNUPro Tools for Embedded Systems ■ 37 Windows development with Cygwin: a Win32 porting layer operating systems or to inefficiencies in Cygwin. The lack of a working profiler has made analyzing Cygwin’s performance particularly difficult. Although the latest version of the library includes real itimer support, we have not yet found a way to implement virtual itimers. This is the most reliable way of obtaining profiling data since concurrently running processes aren’t likely to skew the results. We will soon have a combination of the GCC compiler and the GNU profile analysis tool, gprof, working with real itimer support which will help a great deal in optimizing Cygwin. Even without a profiler, we knew of several areas inside Cygwin that definitely needed a fresh approach. While we rewrote those sections of code, we used the speed of configuring the tools under Win32 as the primary performance measurement. This choice made sense because we knew process creation speed was especially poor, something that the GNU configure process stresses. These performance adjustments made it possible to configure completely the development tools under NT with Cygwin in only 10 minutes and complete the build in just under an hour on a dual Pentium Pro 200 system with 128 MB of RAM. This is reasonably competitive with the time taken to complete this task under a typical UNIX operating system running on an identical machine. Ported software with Cygwin In addition to being able to configure and build most GNU software, several other significant packages have been successfully ported to the Win32 host using the Cygwin library. Following is a list of some of the more interesting ones (most are not included in the distributions): ■ X11R6 client libraries, enabling porting many X programs to the existing free Win32 X servers (examples of successfully ported X applications include xterm, ghostview, xfig, and xconq) ■ xemacs and vim editors ■ GNU inetutils in order to run the inetd daemon as a Windows NT service to enable UNIX-style networking, using a custom NT login binary to allow remote logins with full user authentication; one can achieve similar results under Windows 95/98 by running inetd out of the autoexec.bat file, providing a custom 95/98-tailored login binary ■ KerbNet, the implementation by Cygnus of the Kerberos security system ■ CVS (Concurrent Versions System), a popular version control program based on RCS; Cygnus uses a Kerberos-enabled version of CVS to grant secure access to GNU source code for local and remote engineers ■ ncurses, a library that can be used to build a functioning version of the pager 38 ■ GNUPro Tools for Embedded Systems CYGNUS Initial goals of Cygwin ■ ■ ■ ■ ■ ssh (secure shell) client and server PERL 5 scripting language bash, tcsh, ash, and zsh shells; full job control is available in shells that support it Apache web server (some source-level changes were necessary) Tcl/Tk 8; also tix, itcl, and expect (Tcl/Tk needed non-trivial configuration changes) Typically, the only necessary source code modification involves specifying binary mode to open calls as appropriate. Because the Win32 compiler always generates executables that end in the standard .exe suffix, it is also often necessary to make minor modifications to makefiles so that make will expect the newly built executables to end with the suffix. ¦¦H©reQr«X©co Standards conformance is becoming a more important focus. Previous work includes getting all POSIX.1/90 calls implemented; except for mkfifo and setuid, they have been. X/Open Release 4* conformance may be a desirable goal, but it is not yet implemented. While the current version of the library passes most of the NIST POSIX test suite†, it performs poorly with respect to mimicking the UNIX security model, so there is still room for improvement. When considering how to implement the setuid functionality, there must be a secure alternative to the library’s usage of the shared memory areas. Cygwin does not yet support applications that use multiple Windows threads, even though the library itself is multi-threaded. This shortcoming through the use of locks at strategic points in the DLL is desired, as well as creating support for POSIX threads. Although Cygwin allows the GNU development tools that depend heavily on UNIX semantics to run successfully on Win32 hosts, it is not always desirable to use it. A program using a perfect implementation of the library would still incur a noticeable amount of overhead. As a result, an important future direction involves modifying the compiler so that it can optionally link against the Microsoft DLLs that ship with both Win32 operating systems, instead of Cygwin. This will give developers the ability to choose whether or not to use Cygwin on a per-program basis. * The X/Open Release 4 CAE Specification, System Interfaces and Headers, Issue 4, Vol. 2, X/Open Co, Ltd., 1994. † NIST POSIX test suite (see http://www.itl.nist.gov/div897/ctg/posix_form.htm). CYGNUS GNUPro Tools for Embedded Systems ■ 39 Windows development with Cygwin: a Win32 porting layer r|cH#«#fHo#c¨Hr«X©co In developing Cygwin, alternatives to writing a library either did not exist or were not mature enough for the intended purposes. Today, there are three proprietary alternatives to Cygwin, as the following documentation describes. ■ ■ ■ UWIN* (“UNIX for Windows”), as developed by David Korn for AT&T Laboratories. Its architecture and API appears to be quite similar to the Cygwin library. Its single biggest advantage over Cygwin is probably its more complete support for the UNIX security model. UWIN binaries are available for free non-commercial use, but its source code is not available. NuTCracker, by DataFocus, another proprietary product that is built on top of the Win32 subsystem. Version 4.0 of the product appears to be quite complete, including such features as support for POSIX threads. OpenNT from Softway Systems† takes a markedly different approach by providing a capable POSIX subsystem for Windows NT, implemented with the Windows NT source code close at hand. At least in principle, writing a separate POSIX subsystem should result in better performance because of the lack of overhead imposed when implementing a library on top of the Win32 subsystem. More importantly, by avoiding the compromises inherent in supporting both Win32 and POSIX calls in one application, it should be possible for OpenNT to conform more strictly to the relevant standards. However, there are two substantial drawbacks to OpenNT’s approach. The first is that it is not possible to mix UNIX and Win32 API calls in one application, a feature that is highly desirable when trying to do a full native Win32 port of a UNIX program gradually, one module at a time. The second drawback is that OpenNT does not and cannot support Windows 95/98, a requirement for many applications, including the GNUPro development tools. The lack of source code, coupled with the licensing fees associated with each of these commercial offerings, might still have required writing a library if there was the same challenge of porting today. 6eor©fH?XjHoQr«X©co There are many individuals who helped create Cygwin: Steve Chamberlain (who * UWIN (UNIX for Windows); Korn, David G. (originally from proceedings of the 1997 USENIX Windows NT Annual Technical Conference). † OpenNT: UNIX Application Portability to Windows NT via an Alternative Environment Subsystem; Walli, Stephen R. (originally from the 1997 USENIX Windows NT Workshop Proceedings). 40 ■ GNUPro Tools for Embedded Systems CYGNUS Initial goals of Cygwin wrote the original implementation of the library), Jeremy Allison, Doug Evans, Christopher Faylor, Philippe Giacinti, Tim Newsham, Sergey Okhapkin, Ian Taylor, Eric Bachalo, Chip Chapin, Kathleen Jones, Robert Richardson, Stan Shebs, Sonya Smallets, Ethan Solomita, and Stephan Walli. CYGNUS GNUPro Tools for Embedded Systems ■ 41 Windows development with Cygwin: a Win32 porting layer rj|#c,cfc«c¦H©c`«X©co The following documentation discuses the compatibility issues with Cygwin porting layer tools and the Cygwin library and its functionality. ■ “Cygwin’s compatibility with ANSI standards” (below) ■ “Cygwin’s compatibility with POSIX.1 standards” on page 43 ■ “Cygwin’s compatibility with other miscellaneous standards” on page 44 ■ “Cygwin utilities” on page 67 ■ “Cygwin functions” on page 80 «X©co6rj|#c,cfc«©c`#o?#? The following functions are compatible with ANSI standards. ■ stdio functions clearerr, fclose, feof, ferror, fflush, fgetc, fgetpos, fgets, fopen, fprintf, fputc, fputs, fread, freopen, fscanf, fseek, fsetpos, ftell, fwrite, getc, getchar, gets, perror, printf, putc, putchar, puts, remove, rename, rewind, scanf, setbuf, setvbuf, sprintf, sscanf, tmpfile, tmpnam, vfprintf, ungetc, vprintf, vsprintf. ■ string functions memchr, memcmp, memcpy, memmove, memset, strcat, strchr, strcmp, strcoll, strcpy, strcspn, strerror, strlen, strncat, strncmp, strncpy, strpbrk, strrchr, strspn, strstr, strtok, strxfrm. ■ stdlib functions abort, abs, assert, atexit, atof, atoi, atol, bsearch, calloc, div, exit, free, getenv, labs, ldiv, longjmp, malloc, mblen, mbstowcs, mbtowc, qsort, rand, realloc, setjmp, srand, strtod, strtol, strtoul, system, wcstombs, wctomb. ■ time functions asctime, gmtime, localtime, time, clock, ctime, difftime, mktime, strftime. ■ signals functions raise, signal. ■ ctype functions isalnum, isalpha, iscntrl, isdigit, isgraph, islower, isprint, ispunct, isspace, isupper, isxdigit, tolower, toupper. ■ math functions acos, asin, atan, atan2, ceil, cos, cosh, exp, fabs, floor, fmod, frexp, ldexp, log, log10, modf, pow, sin, sinh, sqrt, tan, tanh. 42 ■ GNUPro Tools for Embedded Systems CYGNUS Compatibility issues with Cygwin ■ Miscellaneous functions localeconv, setlocale, va_arg, va_end, va_start. «X©co6rj|#c,cfc«©c` u#o?#? The following functions are compatible with POSIX.1. ■ Process primitives fork, execl, execle, execlp, execv, execve, execvp, wait, waitpid, _exit, kill, sigemptyset, sigfillset, sigaddset, sigdelset, sigismember, sigaction, pthread_sigmask, sigprocmask, sigpending, sigsuspend, alarm, pause, sleep. ■ Process environment getpid, getppid, getuid, geteuid, getgid, getegid, setuid, setgid, getgroups, getlogin, getpgrp, setsid, setpgid, uname, time, times, getenv, ctermid, ttyname, isatty, sysconf. ■ Files and directories opendir, readdir, rewinddir, closedir, chdir, getcwd, open, creat, umask, link, mkdir, unlink, rmdir, rename, stat, fstat, access, chmod, fchmod, chown, utime, ftruncate, pathconf, fpathconf. ■ Input and output primitives pipe, dup, dup2, close, read, write, fcntl, lseek, fsync. ■ Device-specific and class-specific functions cfgetispeed, cfgetospeed, cfsetispeed, cfsetospeed, tcdrain, tcflow, tcflush, tcgetattr, tcgetpgrp, tcsendbreak, tcsetattr, tcsetpgrp. ■ Language-specific services for the C programming language abort, exit, fclose, fdopen, fflush, fgetc, fgets, fileno, fopen, fprintf, fputc, fputs, fread, freopen, fscanf, fseek, ftell, fwrite, getc, getchar, gets, perror, printf, putc, putchar, puts, remove, rewind, scanf, setlocale, siglongjmp, sigsetjmp, tmpfile, tmpnam, tzset. ■ Synchronization functions pthread_mutex_destroy, pthread_mutex_init, pthread_mutex_lock, pthread_mutex_trylock, pthread_mutex_unlock, sem_destroy, sem_init, sem_post, sem_trywait, sem_wait ■ System databases getgrgid, getgrnam, getpwnam, getpwuid. ■ Memory management mmap, mprotect, msync, munmap. ■ Thread management calls pthread_attr_getstacksize, pthread_attr_init, CYGNUS GNUPro Tools for Embedded Systems ■ 43 Windows development with Cygwin: a Win32 porting layer pthread_attr_setstacksize, pthread_create, pthread_equal, pthread_exit, pthread_self ■ Thread-specific data functions pthread_getspecific, pthread_key_create, pthread_key_delete, pthread_setspecific setuid and setgid are stubs that set ENOSYS and return 0. link will copy the file if it can’t implement a true symbolic linkcopy file in Win 95, and when link fails in Windows NT. chown is a stub in Win 95, always returning 0. fcntl doesn’t support F_GETLK; it returns -1 and sets errno to ENOSYS. lseek only works properly on binary files. «X©co6rj|#c,cfc«©c`r`Hjc6Hff#oHr¦ #o?#? The following functions are compatible with miscellaneous other standards. ■ Networking functions (standardized by POSIX 1.g, still in draft) accept, bind, connect, getdomainname, gethostbyaddr, gethostbyname, getpeername, getprotobyname, getprotobynumber, getservbyname, getservbyport, getsockname, getsockopt, herror, htonl, htons, inet_addr, inet_makeaddr, inet_netof, inet_ntoa, listen, ntohl, ntohs, rcmd, recv, recvfrom, rexec, rresvport, send, sendto, setsockopt, shutdown, socket, socketpair. Of these networking calls, rexec, rcmd and rresvport are implemented in MS IP stack but may not be implemented in other vendor stacks. ■ Other functions chroot, closelog, cwait, cygwin_conv_to_full_posix_path, cygwin_conv_to_full_win32_path, cygwin_conv_to_posix_path, cygwin_conv_to_win32_path, cygwin_posix_path_list_p, cygwin_posix_to_win32_path_list, cygwin_posix_to_win32_path_list_buf_size, cygwin_split_path, cygwin_win32_to_posix_path_list, cygwin_win32_to_posix_path_list_buf_size, cygwin_winpid_to_pid , dlclose, dlerror, dlfork, dlopen, dlsym, endgrent, ffs, fstatfs, ftime, get_osfhandle, getdtablesize, getgrent, gethostname, getitimer, getmntent, getpagesize, getpgid, getpwent, gettimeofday, grantpt, initgroups, ioctl, killpg, login, logout, lstat, mknod, memccpy, nice, 44 ■ GNUPro Tools for Embedded Systems CYGNUS Compatibility issues with Cygwin openlog, pclose, popen, ptsname, putenv, random, readv, realpath, regfree, rexec, select, setegi, setenv, seterrno, seteuid, setitimer, setmntent, setmode, setpassent, setpgrp, setpwent, settimeofday, sexecl, sexecle, sexeclp, sexeclpe, sexeclpe, sexecp, sexecv, sexecve, sexecvpe, sigpause, spawnl, spawnle, spawnlp, spawnlpe, spawnv, spawnve, spawnvp, spawnvpe, srandom, statfs, strsignal, strtosigno, swab, syslog, timezone, truncate, ttyslot, unlockpt, unsetenv, usleep, utimes, vfork, vhangup, wait3, wait4, wcscmp, wcslen, wprintf, writev initgroups does nothing. chroot, mknod, settimeofday, ENOSYS. and vhangup always return -1 and sets errno to seteuid, setegid, and settimeofday vfork CYGNUS always return 0 and sets errno to ENOSYS. just calls fork. GNUPro Tools for Embedded Systems ■ 45 Windows development with Cygwin: a Win32 porting layer HcoX¦|«X©co The following documentation discusses setting up the Cygwin tools. ■ “Installing the binary release for Cygwin” (below) ■ “Directory structure for Cygwin” on page 47 ■ “Environment variables for Cygwin” on page 47 ■ “Mount table” on page 50 ■ “Text and binary modes” on page 51 The following packages are included in the native Win32 release of GNUPro. ■ GNUPro development tools binutils, bison, byacc, dejagnu, diff, expect, flex, gas, gcc, gdb, itcl, ld, libstdc++, make, patch, tcl, tix, tk. ■ GNUPro unsupported tools ash, bash, bzip2, diff, fileutils, findutils, gawk, grep, gzip, m4, sed, shellutils, tar, textutils, time. o#ffcoX`H,co#«HfH#HQr«X©co The following procedures help when installing the binaries for the Cygwin tools. NOTE: This is not necessary unless your process begins with re-installing the GNUPro tools. 1. Load the GNUPro CD-ROM and run the installer. The installation process starts by asking for your install location. Once the installation is complete, there will be a new Program Files folder that you can use to obtain a shell from which you can run the tools. 2. Ensure that the ‘temp’ directory is in the proper place. Type mkdir -p /tmp to ensure that a ‘temp’ directory exists for programs that you expect to find one there. 3. Depending on how you intend to use the tools, various programs may need to be able to find ‘/bin/sh’ directory path. Use the ‘mkdir -p /bin’ declaration and put a copy of ‘sh.exe’ file there, removing the older version, if present. Use the ‘mount’ utility to specify a drive. If you should ever want to uninstall the tools, you may do so with “Add/Remove Programs” (accessed from the Start button’s Settings selection for Control Panel). 46 ■ GNUPro Tools for Embedded Systems CYGNUS Setting up Cygwin cH6r«¦6¦HQr«X©co Cygwin knows how to emulate a standard UNIX directory structure, to some extent. You should make sure that you always have /tmp both with and without the mount table translations, just in case. If you want to emulate the /etc directory (so that the UNIX declaration, ls -l, works), use the following example’s declarations as a guide. mkdir /etc/ cd /etc mkpasswd > /etc/passwd mkgroup > /etc/group NOTE: This only works fully under Windows NT. Under Windows 95/98, you may need to edit these files with a text editor. Further changes to your NT registry will not be reflected in /etc/passwd or /etc/group after this implementation, so you may want to regenerate these files periodically. You should also set your home directories to something other than ‘/’ to prevent unexplained delays in various programs. Cygwin comes with two shells: bash.exe and sh.exe. sh.exe is based on ash. The system is faster when ash is used as the non-interactive shell. In case of trouble with ash, make sh.exe point to bash.exe. o¨crojHo¨#c#,fHQr«X©co Before starting bash, you must set some environment variables, some of which can also be set or modified inside bash. You have a .bat file where the most important ones are set before initially invoking bash. The fully editable.bat file installs by default in \cygnus\cygwin-b20/cygnus.bat and the Start menu points to it. The most important environment variable is the CYGWIN variable. The CYGWIN variable is used to configure many global settings for the Cygwin runtime system. Initially you can leave CYGWIN unset or set it to tty using input like the following example’s syntax in a DOS shell, before launching bash. C:\Cygnus\> set CYGWIN=tty notitle strace=0x1 The PATH environment variable is used by Cygwin applications as a list of directories to search for executable files to run. Convert this environment variable, when a Cygwin process first starts, from Windows format (C:\WinNT\system32;C:\WinNT) to UNIX format (/WinNT/system32:/WinNT). Set the PATH environment variable so that, before launching bash, it contains at least the Cygnus bin directory: C:\cygnus\cygwin-b20\H-i586-cygwin32\bin. make uses an environment variable, MAKE_MODE, /bin/sh to run command lines. CYGNUS to decide if it uses Command.com or GNUPro Tools for Embedded Systems ■ 47 Windows development with Cygwin: a Win32 porting layer If you’re getting strange errors from make with the ‘/c not found’ message, set MAKE_MODE to UNIX with a declaration like the following example’s form. C:\> set MAKE_MODE=UNIX $ export MAKE_MODE=UNIX The HOME environment variable is used by UNIX shells to determine the location of your home directory. This environment variable is converted from Windows format (that is, C:\home\bob) to UNIX format (that is, /home/bob) when a Cygwin process first starts. The TERM environment variable specifies your terminal type. It is set it to cygwin. The LD_LIBRARY_PATH environment variable is used by the Cygwin function, dlopen (), as a list of directories to search for .dll files to load. This environment variable is converted from Windows format (that is, C:\WinNT\system32;C:\WinNT) to UNIX format (that is, /WinNT/system32:/WinNT) when a Cygwin process first starts. The CYGWIN environment variable is used to configure many global settings for the Cygwin runtime system, using the following options. NOTE: Each option is separated by others with a space. Many options can be turned ■ ■ ■ ■ ■ ■ off by prefixing with “no” (such as “nobar” or “bar” options). (no)binmode If set, unspecified file opens by default to binary mode (no CR/LF or Ctrl+Z translations) instead of text mode. This option must be set before starting a Cygwin shell to have an effect on redirection. On by default. (no)envcache If set, environment variable conversions (between Win32 and POSIX) are cached. Note that this is may cause problems if the mount table changes, as the cache is not invalidated and may contain values that depend on the previous mount table contents. Defaults to set. (no)export If set, the final values of these settings are re-exported to the environment as $CYGWIN again. (no)title If set, the title bar reflects the currently running program’s name. Off by default. (no)strip_title If set, strips the directory part off the window title. Off by default. (no)glob If set, command line arguments containing UNIX-style file wildcard characters (brackets, question mark, asterisk) are expanded into lists of files that match those wildcards. This is applicable only to programs running from a windows command 48 ■ GNUPro Tools for Embedded Systems CYGNUS Setting up Cygwin ■ ■ ■ line prompt. Set by default. (no)tty If set, Cygwin enables extra support (such as termios) for UNIX-like tty calls. Off by default. strace=n[:cache][,filename] Configures system tracing. Off by default, setting various bits in n (a bit flag) enables various types of system messages. Setting n to 1 enables most messages. Other values can be found in sys/strace.h. The :cache option lets you specify how many lines to cache before flushing the output; for example, use strace=1:20. The filename option lets you send the messages to a file instead of the screen. (no)ntea If set, use the full NT Extended Attributes to store UNIX-like inode information. WARNING: This may create additional large files on non-NTFS partitions. This option ■ CYGNUS only operates under Windows NT. Off by default. (no)reset_com If set, serial ports are reset to 9600-8-N-1 with no flow control when used. This is done at open time and when handles are inherited. Set by default. GNUPro Tools for Embedded Systems ■ 49 Windows development with Cygwin: a Win32 porting layer r¦o#,fH The mount utility controls a mount table for emulating a POSIX view of the Windows file system space. Use it to change the Windows path that uses ‘ /’and mount arbitrary Win32 paths into the POSIX file system space. Many people use the utility to mount each drive letter under the slash partition (such as C:\ to /c or D:\ to /d, and so forth). Executing mount without any arguments prints the current mount table to the screen. Otherwise, provide the Win32 path you would like to mount as the first argument and the POSIX path as the second argument. The following example demonstrates using the mount utility to mount the “C:/Cygnus/b20/H-i586-cygwin32/bin” directory to the “/bin” folder, and the network directory, \\pollux\home\joe\data to /data. This makes /bin/sh a valid shell, to satisfy make. /bin is assumed to already exist. c:\cygnus\> ls /bin /data ls: /data: No such file or directory c:\cygnus\> mount C:\cygnus\cygwin-b20\H-i586-cygwin32\bin /bin c:\cygnus\> mount \\pollux\home\joe\data /data Warning: /data does not exist! c:\cygnus\> mount Device Directory Type \\pollux\home\joe\data /data native C:\cygnus\cygwin-b20\H-i586-cygwin32\bin /bin native D: /d native \\.\tape1: /dev/st1 native \\.\tape0: /dev/st0 native \\.\b: /dev/fd1 native \\.\a: /dev/fd0 native C: / native c:\cygnus\> ls /bin/sh /bin/sh Flags text!=binary text!=binary text!=binary text!=binary text!=binary text!=binary text!=binary text!=binary The mount table is stored in the Windows registry (HKEY_CURRENT_USER/Cygnus Solutions/CYGWIN DLL setup/<v>/mounts), where <v> is the latest registry version associated with the Cygwin library. 50 ■ GNUPro Tools for Embedded Systems CYGNUS Setting up Cygwin Hª#o?,co#«jr?H The following documentation discusses some of the main distinction with text and binary modes with UNIX and Windows interoperability, and how Cygwin solves the problems. See also “Programming” on page 53, “File permissions” on page 53 and “Special file names” on page 54. On a UNIX system, when an application reads from a file it gets exactly what’s in the file on disk and the same is true for writing to the file. The situation is different in the DOS/Windows world where a file can be opened in one of two modes, either binary or text. In the binary mode, the system behaves exactly as in UNIX. However in text mode there are major differences: ■ On writing in text mode, a new line, NL (\n, ^J), is transformed into a carriage return/new line sequence, or CR (\r, ^M) NL. ■ On reading in text mode, a carriage return followed by a new line is deleted and a ^Z character signals the end of file. This can wreak havoc with the seek and fseek calls since the number of bytes actually in the file may differ from that seen by the application. The mode can be specified explicitly; see “Programming” on page 53. In an ideal DOS/Windows world, all programs using lines as records (such as bash, make, or sed) would open files (changing the mode of their standard input and output) as text. All other programs (such as cat, cmp, or tr) would use binary mode. In practice with Cygwin, programs that deal explicitly with object files specify binary mode (as is the case of od, which is helpful to diagnose CR problems). Most other programs (such as cat, cmp, tr) use the default mode. The Cygwin system gives us some flexibility in deciding how files are to open when the mode is not specified explicitly: ■ If the file appears to reside on a file system that is mounted (that is, if its pathname starts with a directory displayed by mount), then the default is specified by the mount flag. If the file is a symbolic link, the mode of the target file system applies. ■ If the file appears to reside on a file system that is not mounted (as can happen when the path contains a drive letter), the default mode is text, except if the CYGWIN environment variable contains binmode. WARNING! A file will be opened in binary mode if any of the following conditions hold: Binary mode is specified in the open call ■ CYGWIN contains binmode ■ The file resides in a binary mounted partition Pipes and non-file devices are always opened in binary mode. When a Cygwin program is launched by a shell, its standard input, output and ■ ■ ■ CYGNUS GNUPro Tools for Embedded Systems ■ 51 Windows development with Cygwin: a Win32 porting layer error are in binary mode if the CYGWIN variable contains tty, else in text mode, except if they are piped or redirected. When redirecting, the Cygwin shells uses the first three rules. For these shells, the relevant value of CYGWIN is that at the time the shell was launched and not that at the time the program is executed. Non-Cygwin shells always pipe and redirect with binary mode. With non-Cygwin shells the commands, cat filename | program and program < filename, are not equivalent when filename is on a text-mounted partition. To illustrate the various rules, the following example’s script deletes CRs from files by using the tr program, which can only write to standard output. #!/bin/sh # Remove \r from the files given as arguments for file in "$@" do CYGWIN=binmode sh -c "tr -d \\\"\\\r\\\" < ’$file’ > c:tmpfile.tmp" if [ "$?" = "0" ] then rm "$file" mv c:tmpfile.tmp "$file" fi done The script works irrespective of the mount because the second rule applies for the path, c:tmpfile.tmp. According to the fourth rule, CYGWIN must be set before invoking the shell. These precautions are necessary because tr does not set its standard output to binary mode. It would thus reintroduce \r when writing to a file on a text mounted partition. The desired behavior can also be obtained by using tr -d \r in a .bat file. UNIX programs that have been written for maximum portability will know the difference between text and binary files and act appropriately under Cygwin. For those programs, the text mode default is a good choice. Programs included in official Cygnus distributions should work well in the default mode. Text mode makes it much easier to mix files between Cygwin and Windows programs, since Windows programs will usually use the carriage return/line feed (CR/LF) format. Unfortunately you may still have some problems with text mode. First, some of the utilities included with Cygwin do not yet specify binary mode when they should; cat will not work, for instance, with binary files (input will stop at ^Z, CRs will be introduced in the output). Second, you will introduce CRs in text files you write, causing problems when moving them back to a UNIX system. If you are mounting a remote file system from a UNIX machine, or moving files back 52 ■ GNUPro Tools for Embedded Systems CYGNUS Setting up Cygwin and forth to a UNIX machine, you may want to access them in binary mode as the text files found there will normally be NL format anyway, and you would want any files put there by Cygwin programs to be stored in a format that the UNIX machine will understand. Be sure to remove CRs from all Makefiles and shell scripts and make sure that you only edit the files with DOS/Windows editors that can cope with binary mode files. NOTE: You can decide this on a disk by disk basis (for example, mounting local disks in text mode and network disks in binary mode). You can also partition a disk, for example by mounting c: in text mode, and c:\home in binary mode. Programming In the open() function call, binary mode can be specified with the flag, O_BINARY, and text mode with O_TEXT. These symbols are defined in fcntl.h. In the fopen() function call, binary mode can be specified by adding a ‘b’ to the mode string. There is no direct way to specify text mode. The mode of a file can be changed by the call, setmode(fd,mode) where fd is a file descriptor (an integer) and mode is O_BINARY or O_TEXT. The function returns, O_BINARY or O_TEXT, depending on the mode before the call, and EOF on error. File permissions On Windows 95/98 systems, files are always readable, and Cygwin uses the native read-only mode to determine if they are writable. Files are considered to be executable if the filename ends with .bat, .com or .exe, or if its content starts with #!. Consequently chmod can only affect the ‘w’ mode,whereas it silently ignores actions involving the other modes. Under NT, file permissions default to the same behavior as Windows 95/98. However, there is optional functionality in Cygwin that can make file systems behave more like on UNIX systems. This is turned on by adding the ‘ntea’ option to the CYGWIN environment variable. When the ‘ntea’ feature is activated, Cygwin will start with basic permissions, while storing POSIX file permissions in NT Extended Attributes. This feature works quite well on NTFS partitions because the attributes can be stored sensibly inside the normal NTFS filesystem structure. However, on a FAT partition, NT stores extended attributes in a flat file at the root of the partition called EA DATA. SF. This file can grow to extremely large sizes if you have a large number of files on the partition in question, slowing the system to a crawl. In addition, the EA DATA. SF file can only be deleted outside of Windows because of its in use status. For these reasons, the use of NT Extended Attributes is off by default in Cygwin. Finally, specifying ‘ntea’ in CYGNUS GNUPro Tools for Embedded Systems ■ 53 Windows development with Cygwin: a Win32 porting layer CYGWIN has no effect under Windows 95/98. Under NT, the ‘[ -w filename]’ test is only true if filename is writable across the board, such as with the ‘chmod +w filename’ call. Special file names The following documentation discusses some special file naming usage by Cygwin. ■ DOS devices Windows filenames invalid under Windows are also invalid under Cygwin. This means that base filenames such as AUX, COM1, LPT1 or PRN cannot be used in a regular Cygwin Windows or POSIX path, even with an extension (prn.txt). However the special names can be used as filename extensions (file.aux). You can use the special names as you would under DOS; for example you can print on your default printer with the command, cat filename > PRN (making sure to end with a Form Feed). ■ POSIX devices There is no need to create a POSIX /dev directory as it is simulated within Cygwin automatically. It supports the following devices: /dev/null, /dev/tty and /dev/comX (the serial ports). These devices cannot be seen with the command, ls /dev, although commands such as ‘ls /dev/tty’ work fine. ■ The .exe extension Executable program filenames end with .exe but the ‘.exe’ extension is not necessary in the command, so that traditional UNIX names can be used. To the contrary the ‘.bat’ and ‘.com’extensions cannot be omitted. As a side effect, the ‘ls filename’ gives information about filename.exe if filename.exe exists and filename does not. In the same situation, the function, call stat("filename" ...), gives information about filename.exe. The two files can be distinguished by examining their inodes, as the following example’s script demonstrates. C:\Cygnus\> a C:\Cygnus\> 445885548 a C:\Cygnus\> 432961010 b ls * a.exe b.exe ls -i a a.exe 435996602 a.exe ls -i b b.exe 432961010 b.exe The GCC compiler produces an executable named filename.exe when asked to produce filename. This allows many makefiles written for UNIX systems to work well under Cygwin. Unfortunately the install and strip commands do distinguish between filename and filename.exe. They fail when working on a non-existing filename even if filename.exe exists, thus breaking some makefiles. This problem can be solved by writing install and strip shell scripts 54 ■ GNUPro Tools for Embedded Systems CYGNUS Setting up Cygwin to provide the ‘.exe’extension when needed. ■ @pathname To circumvent the limitations on shell line length in the native Windows command shells, Cygwin programs expand their arguments starting with ‘@’ in a special way. If a file pathname exists, the argument, @pathname expands recursively to the content of pathname. Double quotes can be used inside the file to delimit strings containing blank space. In the following example compare the behaviors of the bash built-in echo and of the /bin/echo program. /Cygnus$ echo ’This is "a /Cygnus$ echo @mylist @mylist /Cygnus$ /bin/echo @mylist This is a long line /Cygnus$ rm mylist /Cygnus$ /bin/echo @mylist @mylist CYGNUS long" line’ > mylist GNUPro Tools for Embedded Systems ■ 55 Windows development with Cygwin: a Win32 porting layer coX©c`«X©co The following documentation discusses using the GNUPro compiler, GCC, with Cygwin. ■ “Console mode applications” (below) ■ “GUI mode applications” (below) rorfHjr?H#||fc6#cro Use GCC to compile, just like under UNIX. See Using GNU CC in the GNUPro Compiler Tools documentation for information on standard usage and options. The following example shows the usage practice for the shell’s console. C:\cygnus\> gcc hello.c -o hello.exe C:\cygnus\> hello.exe Hello, World C:\cygnus\> jr?H#||fc6#cro Cygwin allows you to build programs with full access to the standard Windows 32-bit API, including the GUI functions as defined in any Microsoft or off-the-shelf publication. However, the process of building those applications is slightly different, as you’ll be using the GNU tools instead of the Microsoft tools. For the most part, your sources won’t need to change at all. However, you should remove all __export attributes from functions and replace them. The following example’s script shows such implementation. int foo (int) __attribute__ ((__dllexport__)); int foo (int i) For most cases, you can just remove the __export attributes. For convenience sake, you might want to work around a misfeature in Cygwin’s libraries by including the following code fragment; otherwise, you’ll have to add a “-e _mainCRTStartup” declaration to your link line in your Makefile. #ifdef __CYGWIN__ WinMainCRTStartup() { mainCRTStartup(); } #endif The Makefile is similar to any other UNIX-like Makefile, and any other Cygwin Makefile. The only difference is that you use a “ gcc -mwindows” declaration to link your program into a GUI application instead of a command-line application. The 56 ■ GNUPro Tools for Embedded Systems CYGNUS Using GCC with Cygwin following example’s script shows such implementation: myapp.exe : myapp.o myapp.res gcc -mwindows myapp.o myapp.res -o $@ myapp.res : myapp.rc resource.h windres $< -O coff -o $@ NOTE: The use of windres is for compiling the Windows resources into a COFF-format .res file. That will include all the bitmaps, icons, and other resources you need, into one handy object file. Normally, if you omitted the “-O coff” declaration, it would create a Windows .res format file, but we can only link COFF objects. So, we tell windres to produce a COFF object, but for compatibility with the many examples that assume your linker can handle Windows resource files directly, we maintain the .res naming convention. For more information on windres, see Using binutils in the GNUPro Utilities documentation. CYGNUS GNUPro Tools for Embedded Systems ■ 57 Windows development with Cygwin: a Win32 porting layer H,¦XXcoX«X©co|rX#j When your programs don’t work properly, they usually have bugs (meaning there’s something wrong with the program itself that is causing unexpected results or crashes). Diagnosing these bugs and fixing them is made easy by special tools called debuggers. In the case of Cygwin, the debugger is GDB, the GNU debugger., a tool lets you run your program in a controlled environment so that you can investigate the state of your program while it is running or after it crashes. Before you can debug your program, you need to prepare your program for debugging. Add a ‘-g’ declaration to all the other flags you use when compiling your sources to objects. Consider the following example’s declarations. $ gcc -g -O2 -c myapp.c $ gcc -g myapp.c -o myapp What this does is add extra information to the objects (making them much bigger), telling the debugger about line numbers, variable names, and other useful things. These extra symbols and debugging data give your program enough information about the original sources so that the debugger can make debugging much easier for you. GDB is a command-line tool. To invoke it, use the ‘gdb myapp.exe’ declaration (substituting the executable file’s name for myapp) at the command prompt. Some text then displays about general usage agreements, then the prompt, (gdb), will appear to prompt you to enter commands. Whenever you see this prompt, it means that GDB is waiting for you to type in a command, like run or help. Use the ‘help’ command to get a list of all the commands to use, or see Debugging with GDB in the GNUPro Debugging Tools for a complete description of GDB and how to use it. If your program crashes and you’re trying to determine why it crashed, the best thing to do is type run and let your program run. After it crashes, you can use the ‘where’ command to determine where it crashed, or ‘info locals’ to see the values of all the local variables. There’s also the ‘print’ declaration that lets you examine individual variables or what pointers point to. If your program is doing something unexpected, you can use the ‘break’ command to tell GDB to stop your program when it gets to a specific function or line number. (gdb) break my_function (gdb) break 47 Now, using the ‘run’ command, your program will stop at that breakpoint, and you can use the other GDB commands to look at the state of your program at that point, to modify variables, and to step through your program’s statements one at a time. NOTE: Specify additional arguments to the ‘run’ command to provide command-line arguments to your program. These previous example’s case and the next 58 ■ GNUPro Tools for Embedded Systems CYGNUS Debugging Cygwin programs example’s case are the same as far as your program is concerned: $ myprog -t foo --queue 47 $ gdb myprog (gdb) run -t foo --queue 47 CYGNUS GNUPro Tools for Embedded Systems ■ 59 Windows development with Cygwin: a Win32 porting layer ¦cf?coX#o?¦coX©c`«X©co The following documentation discusses building and using dynamically linked libraries (DLLs) with Cygwin. ■ “Building DLLs” on page 61 ■ “Linking against DLLs” on page 62 DLLs are linked into your program at run time instead of build time. The following documentation describes the three parts to a DL: exports, code and data and the import library. ■ exports A list of functions and variables that the .dll file makes available to other programs, as a list of global symbols, with the rest of the contents hidden. Normally, you’d create this list by hand with a text editor; however, it’s possible to do it automatically from the list of functions in your code. The dlltool program creates the exports section of the .dll file from your text file of exported symbols. ■ code and data The parts you write: functions, variables, etc. All these are merged together, for instance, for building one big object file and linking it to a .dll file. They are not put into your .exe at all. ■ import library The import library is a regular UNIX-like .a library, but it only contains the tiny bit of information needed to tell the operating system how your program interacts with (or imports) the .dll as data. This information is linked into your .exe file. This is also generated by the ‘dlltool’ utility. 60 ■ GNUPro Tools for Embedded Systems CYGNUS Building and using DLLs with Cygwin ¦cf?coX The following documentation provides a simple example of how to build a .dll file, using a single file, myprog.c, for the program, myprog.exe, and a single file, mydll.c, for the contents of the .dll file, mydll.dll, then compiling everything as objects. gcc -c myprog.c gcc -c mydll.c Unfortunately, the process for building a .dll file is rather complicated with five run commands, like the following example’s declaration. ld --dll -o mydll.dll mydll.o -e _mydll_init@12 --base-file mydll.base dlltool --base-file=mydll.base --def mydll.def --output-exp mydll.exp --dllname \mydll.dll ld --dll -o mydll.dll mydll.o -e _mydll_init@12 --base-file mydll.base mydll.exp dlltool --base-file=mydll.base --def mydll.def --output-exp mydll.exp --dllname \mydll.dll ld --dll -o mydll.dll mydll.o -e _mydll_init@12 mydll.exp The extra steps give dlltool the opportunity to generate the extra sections (exports and relocation) that a .dll file needs. After this, you build the import library with the following commands such as the following example’s decalaration. dlltool --def mydll.def --dllname mydll.dll --output-lib mydll.a Now, when you build your program, you link against the import library, with declaration’s like the following example’s commands. gcc -o myprog myprog.o mydll.a NOTE: This usage linked with -e _rdll_init@12, telling the operating system what the DLL’s entry point is, a special function that coordinates bringing the .dll file to life within the operating system. The minimum function looks like the following example’s declaration. #include <windows.h> int WINAPI rdll_init(HANDLE h, DWORD reason, void *foo) { return 1; } CYGNUS GNUPro Tools for Embedded Systems ■ 61 Windows development with Cygwin: a Win32 porting layer coecoX#X#co If you have an existing DLL already, you need to build a Cygwin-compatible import library to link. Unfortunately, there is not yet any tool to do this automatically. However, you can get most of the way by creating a .def file with these commands (use a bash shell for the quoting to work properly with such linking). echo EXPORTS > foo.def nm foo.dll | grep ’ T _’ | sed ’s/.* T _//’ >> foo.def Once you have the .def file, you can create an import library from it, using a declaration similar to the following example’s form. dlltool --def foo.def --dllname foo.dll --output-lib foo.a 62 ■ GNUPro Tools for Embedded Systems CYGNUS Defining Windows resources for Cygwin HQcocoXco?r©Hr¦6HQr «X©co reads a Windows resource file (*.rc) and converts it to a res or coff file. The syntax and semantics of the input file are the same as for any other resource compiler; see any publication describing the Windows resource format for details. Also, see the windres documentation in Using binutils in GNUPro Utilities. The following example shows the usage of windres in a project. windres myapp.exe : myapp.o myapp.res gcc -mwindows myapp.o myapp.res -o $@ myapp.res : myapp.rc resource.h windres $< -O coff -o $@ What follows is a quick-reference to the syntax that windres supports. id ACCELERATORS suboptions BEG "^C" 12 "Q" 12 65 12 65 12 , VIRTKEY ASCII NOINVERT SHIFT CONTROL ALT 65 12 , VIRTKEY, ASCII, NOINVERT, SHIFT, CONTROL, ALT (12 is an acc_id) END SHIFT, CONTROL, ALT require VIRTKEY id BITMAP memflags "filename" memflags defaults to MOVEABLE id CURSOR memflags "filename" memflags defaults to MOVEABLE,DISCARDABLE id DIALOG memflags exstyle x,y,width,height styles BEG controls END id DIALOGEX memflags exstyle x,y,width,height styles BEG controls END id DIALOGEX memflags exstyle x,y,width,height,helpid styles BEG controls END memflags defaults to MOVEABLE exstyle may be EXSTYLE=number styles: CAPTION "string" CLASS id CYGNUS GNUPro Tools for Embedded Systems ■ 63 Windows development with Cygwin: a Win32 porting layer STYLE FOO | NOT FOO | (12) EXSTYLE number FONT number, "name" FONT number, "name",weight,italic MENU id CHARACTERISTICS number LANGUAGE number,number VERSIONK number controls: AUTO3STATE params AUTOCHECKBOX params AUTORADIOBUTTON params BEDIT params CHECKBOX params COMBOBOX params CONTROL ["name",] id, class, style, x,y,w,h [,exstyle] [data] CONTROL ["name",] id, class, style, x,y,w,h, exstyle, helpid [data] CTEXT params DEFPUSHBUTTON params EDITTEXT params GROUPBOX params HEDIT params ICON ["name",] id, x,y [data] ICON ["name",] id, x,y,w,h, style, exstyle [data] ICON ["name",] id, x,y,w,h, style, exstyle, helpid [data] IEDIT params LISTBOX params LTEXT params PUSHBOX params PUSHBUTTON params RADIOBUTTON params RTEXT params SCROLLBAR params STATE3 params USERBUTTON "string", id, x,y,w,h, style, exstyle params: ["name",] id, x, y, w, h, [data] ["name",] id, x, y, w, h, style [,exstyle] [data] ["name",] id, x, y, w, h, style, exstyle, helpid [data] [data] is optional BEG (string|number) [,(string|number)] (etc) END id FONT memflags "filename" memflags defaults to MOVEABLE|DISCARDABLE id ICON memflags "filename" memflags defaults to MOVEABLE|DISCARDABLE 64 ■ GNUPro Tools for Embedded Systems CYGNUS Defining Windows resources for Cygwin LANGUAGE num,num id MENU options BEG items END items: "string", id, flags: SEPARATOR: POPUP "string" flags BEG menuitems END flags:: CHECKED: GRAYED: HELP: INACTIVE: MENUBARBREAK: MENUBREAK id MENUEX suboptions BEG items END items:: MENUITEM "string": MENUITEM "string", id: MENUITEM "string", id, type [,state]: POPUP "string" BEG items END: POPUP "string", id BEG items END: POPUP "string", id, type BEG items END: POPUP "string", id, type, state [,helpid] BEG items END memflags defaults to MOVEABLE id RCDATA suboptions BEG (string|number) [,(string|number)] (etc) END STRINGTABLE suboptions BEG strings END strings:: id "string": id, "string" (User data) id id suboptions BEG (string|number) [,(string|number)] (etc) END id VERSIONINFO stuffs BEG verblocks END stuffs: FILEVERSION num,num,num,num: PRODUCTVERSION num,num,num,num: FILEFLAGSMASK num: FILEOS num: FILETYPE num: FILESUBTYPE num: verblocks:: BLOCK "StringFileInfo" BEG BLOCK BEG vervals END END: BLOCK "VarFileInfo" BEG BLOCK BEG vertrans END END CYGNUS GNUPro Tools for Embedded Systems ■ 65 Windows development with Cygwin: a Win32 porting layer vervals: VALUE "foo","bar" vertrans: VALUE num,num suboptions:: memflags: CHARACTERISTICS num: LANGUAGE num,num: VERSIONK num memflags are MOVEABLE/FIXED PURE/IMPURE PRELOAD/LOADONCALL DISCARDABLE 66 ■ GNUPro Tools for Embedded Systems CYGNUS Cygwin utilities «X©co¦cfccH Cygwin comes with a number of command-line utilities for managing the UNIX emulation portion of the Cygwin environment. While many of these reflect their UNIX counterparts, each was written specifically for Cygwin. See the corresponding documentation to the following Cygwin utilities. ■ “cygcheck” on page 68 ■ “cygpath” on page 69 ■ “kill” on page 70 ■ “mkgroup” on page 72 ■ “mkpasswd” on page 73 ■ “mount” on page 74 ■ “ps” on page 78 ■ “umount” on page 79 CYGNUS GNUPro Tools for Embedded Systems ■ 67 Windows development with Cygwin: a Win32 porting layer cygcheck USAGE cygcheck [-s] [-v] [-r] [-h] [program ...] DESCRIPTION cygcheck is a diagnostic utility that examines your system and reports the information that is significant to the proper operation of cygwin programs. It can give information about a specific program (or program) you are trying to run, general system information, or both. If you list one or more programs on the command line, it will diagnose the runtime environment of that program or programs. The cygcheck program should be used to send information about your system to Cygnus for troubleshooting (if your support representative requests it). When asked to run this command, include all the options plus any commands with which you are having trouble, saving the output so that you can mail it to Cygnus. Use the following declaration at the C:\Cygnus> prompt. cygcheck -s -v -r -h > tocygnus.txt You must at least give either an ‘-s’ option or a program name, signified in the usage as program. Use the following options with the cygcheck utility. ■ The -s option will give general system information. If you specify -s and list one or more programs on the command line, cygcheck reports on both specified programs. ■ The -v option causes the output to be more verbose. What this means is that cygcheck will report additional information which is usually not interesting, such as the internal version numbers of DLLs, additional information about recursive DLL usage, and if a file in one directory in the PATH also occurs in other directories on the PATH. ■ The -r option causes cygcheck to search your registry for information that is relevent to Cygnus programs. These registry entries are the ones that have “Cygnus” in the name. If you are concerned about privacy, you may remove information from this report, keeping in mind that doing so makes it harder for Cygnus to diagnose problems. ■ The -h option prints additional helpful messages in the report, at the beginning of each section. It also adds table column headings. While this is useful information, this functionality also adds significantly to the size of the report; if you want a compact report or if you know what everything is already, don’t use this option. 68 ■ GNUPro Tools for Embedded Systems CYGNUS cygpath cygpath USAGE cygpath [-p|--path] (-u|--unix)|(-w|--windows) filename cygpath [-v|--version] DESCRIPTION cygpath is a utility that converts Windows native filenames to Cygwin POSIX-style pathnames and reverse. Use it when a Cygwin program needs to pass a filename to a native windows program, or when Cygwin expects to get a filename from a native windows program. Use the long or short option names interchangeably. Use the following options with the cygpath utility. ■ The -p option means that you want to convert a path-style string rather than a single filename. For example, the PATH environment variable is semicolon-delimited in Windows, but colon-delimited in UNIX. By giving -p you are instructing cygpath to convert between these formats. Consider the following example’s usage. #!/bin/sh for i in ‘echo *.exe | sed ’s/\.exe/cc/’‘ do notepad ‘cygpath -w $i‘ done ■ ■ ■ CYGNUS The -u and -w options indicate whether you want a conversion from Windows to UNIX (POSIX) format (with -u) or a conversion from UNIX (POSIX) to Windows format (with -w). Give exactly one of these options. To give neither or both is an error. The -v option causes the output to be more verbose. The --version option prints the version of the utility. GNUPro Tools for Embedded Systems ■ 69 Windows development with Cygwin: a Win32 porting layer kill USAGE kill [-sigN] pid1 [pid2 ...] DESCRIPTION kill allows sending arbitrary signals to other Cygwin programs. The usual purpose is to end a running program from some other window when the keystroke combination, Ctrl+C, won’t work, but you can also send program-specified signals such as SIGUSR1 to trigger actions within the program, such as when enabling debugging or when re-opening log files. Each program defines the signals they understand. “pid” values are the Cygwin process ID values, not the Windows process ID values. To get a list of running programs and their Cygwin PIDs, use the Cygwin ps program (see “ps” on page 78). To send a specific signal, use the -sig[n,N] option, either with a signal number [n], or with a signal name [N] (minus the “SIG” part), like the following example’s input specifies, where ‘123’ replaces the n option as the signal number. kill 123 kill -1 123 kill -HUP 123 The following list provides the available signals, their numbers, and some commentary on them; the file, <sys/signal.h>, is the official source of this information. SIGHUP SIGINT SIGQUIT SIGILL SIGTRAP SIGABRT SIGEMT SIGFPE SIGKILL SIGBUS SIGSEGV SIGSYS SIGPIPE SIGALRM SIGTER SIGURG SIGSTOP SIGTSTP SIGCONT SIGCHLD SIGCLD 1 2 3 4 5 6 7 8 9 10 11 12 13 14 15 16 17 18 19 20 20 hangup interrupt quit illegal instruction (not reset when caught) trace trap (not reset when caught) used by abort EMT instruction floating point exception kill (cannot be caught or ignored) bus error segmentation violation bad argument to system call write on a pipe with no one to read it alarm clock software termination signal from kill urgent condition on IO channel sendable stop signal not from tty stop signal from tty continue a stopped process to parent on child stop or exit System V name for SIGCHLD 70 ■ GNUPro Tools for Embedded Systems CYGNUS kill SIGTTIN SIGTTOU SIGIO SIGPOLL SIGXCPU SIGXFSZ SIGVTALRM SIGPROF SIGWINCH SIGLOST SIGUSR1 SIGUSR2 CYGNUS 21 22 23 23 24 25 26 27 28 29 30 31 to readers pgrp upon background tty read like TTIN for output if (tp->t_local<OSTOP) input/output possible signal System V name for SIGIO exceeded CPU time limit exceeded file size limit virtual time alarm profiling time alarm window changed resource lost (eg, record-lock lost) user defined signal 1 user defined signal 2 GNUPro Tools for Embedded Systems ■ 71 Windows development with Cygwin: a Win32 porting layer mkgroup USAGE mkgroup <options> [domain] DESCRIPTION mkgroup prints group information to stdout. Use mkgroup to help configure your Windows system to be more UNIX-like, creating an initial /etc/group substitute (some commands need this file) from your system information. To initially set up your machine, use the following example’s declarations as a guide. mkdir /etc mkgroup > /etc/group This information is static. If you change the group information in your system, regenerate the group file for it to have the new information. mkgroup can use the following options. -l --local Prints pseudo group information if there is no domain. -d --domain Prints global group information from the domain specified (or from the current domain if there is no domain specified). -? --help Prints this message description. The -d and -l options allow you to specify where the information derives, either the default (or given) domain (with -d), or the local machine (with -l). 72 ■ GNUPro Tools for Embedded Systems CYGNUS mkpasswd mkpasswd USAGE mkpasswd <options> [domain] DESCRIPTION mkpasswd prints a /etc/passwd file to stdout. mkpasswd helps to configure your Windows system to be more UNIX-like by creating an initial /etc/passwd substitute (some commands need this file) from your system information. To initially set up your machine, use the following example’s declarations as a guide. mkdir /etc mkpasswd > /etc/passwd This information is static. If you change the user information in your system, regenerate the passwd file for it to have the new information. The following options are useful with mkpasswd. -l --local Print local accounts. -d --domain Print domain accounts (from current domain if no domain specified). -g --local-groups Print local group information too. -? --help Displays the following message: This program does only work on Windows NT The -d and -l options allow you to specify where the information derives, either the default (or given) domain (with -d), or the local machine (with -l). CYGNUS GNUPro Tools for Embedded Systems ■ 73 Windows development with Cygwin: a Win32 porting layer mount USAGE mount [-bf] <dospath> <unixpath> mount --reset mount DESCRIPTION Use mount to map your drives and share the simulated POSIX directory tree, much like the POSIX mount command or the DOS join command, making your drive letters appear as subdirectories somewhere else. In POSIX operating systems (like Linuxtm), there is no concept of drives, nor drive letters. All absolute paths begin with a slash instead of “c:” and all file systems appear as subdirectories (for example, you might buy a new disk and make it be the /disk2 directory). This practice is simulated by Cygwin to assist in porting POSIX programs to Windows. Just give the DOS/Windows equivalent path and where you want it to show up in the simulated POSIX tree, like the following example’s declarations (in which <release> is the version for your release). C:\Cygnus> C:\Cygnus> C:\Cygnus> C:\Cygnus> mount mount mount mount c:\ / c:\Cygnus\<release>\bin /bin d:\ /usr/data e:\mystuff /mystuff bash$ mount ’c:\’ / Since native paths use backslashes, and backslashes are special in most POSIX-like shells (like bash), you need to properly quote them if you are using such a shell. There are many opinions on what the proper set of mounts is, and the appropriate one for you depends on how closely you want to simulate a POSIX environment, whether you mix Windows and Cygwin programs, and how many drive letters you are using. If you want to be very POSIX-like, you may want to use declarations like the following example shows (in which <release> is the version for your release). C:\> C:\> C:\> C:\> mount mount mount mount c:\Cygnus\<release> / c:\ /c d:\ /d e:\ /cdrom To share Windows and Cygwin programs, create an identity mapping to eliminate problems of conversions between the two (see “cygpath” on page 69); for instance, use declarations like the following example shows. C:\> C:\> C:\> C:\> mount mount mount mount c:\ \ d:\foo /foo d:\bar /bar e:\grill /grill Repeat this process for all top-level subdirectories on all drives, but then 74 ■ GNUPro Tools for Embedded Systems CYGNUS mount you’d always have the top-level directories available as the same names in both systems. The -b and -t options change the default text file type for files found in that mount point. The default is text, which means that Cygwin will automatically convert files between the POSIX text style (each line ends with the ‘NL’ new line character) and the Windows text style (each line ends with a CR character and an LF character, or CRLF) as needed. The program can, and should, explicitly specify text or binary file access as needed, but not all do. If your programs are properly written with the differentiation between text and binary files, the default ( -t) is a good choice. You must use -t if you are going to mix files between Cygwin and Windows programs, since Windows programs will always use the CRLF format. If you are mounting a remote filesystem from a UNIX machine, use -b, as the text files found there will normally be NL format anyway, and you would want any files put there by Cygwin programs to be stored in a format that the UNIX machine will understand. If you use mount with no parameters, the current mount table will display for you. Using --reset will reset the mount table to its default set of entries, which may include floppy, tape or other drives. You do not need to set up mounts for most devices in the POSIX /dev directory (like /dev/null) as these are simulated automatically within Cygwin. CYGNUS GNUPro Tools for Embedded Systems ■ 75 Windows development with Cygwin: a Win32 porting layer passwd USAGE passwd [name] passwd [-x max] [-n min] [-i inact] [-L len] passwd {-l|-u|-S} name DESCRIPTION passwd changes passwords for user accounts. A normal user may only change the password for their own account, and the administrators may change the password for any account. passwd also changes account information, such as password expiration dates and intervals. ■ Password changes The user is first prompted for their old password, if one is present. This password is then encrypted and compared against the stored password. The user has only one chance to enter the correct password. The administrators are permitted to bypass this step so that forgotten passwords may be changed. The user is then prompted for a replacement password. passwd will prompt again and compare the second entry against the first. Both entries must match in order for the password to be changed. After the password has been entered, password aging information is checked to see if the user is permitted to change their password at this time. If not, passwd refuses to change the password and exits. ■ Password expiry and length The password aging information may be changed by the administrators with the -x, -n and -i options. The -x option is used to set the maximum number of days a password remains valid. After max days, the password is required to be changed. The -n option is used to set the minimum number of days before a password may be changed. The user will not be permitted to change the password until min days have elapsed. The -i option is used to disable an account after the password has been expired for a number of days. After a user account has had an expired password for inact days, the user may no longer sign on to the account. Allowed values for the above options are 0 to 999. The -L option sets the minimum length of allowed passwords for users, which doesn’t belong to the administrators’ group, to len characters. Allowed values for the minimum password length are 0 to 14. A value of 0 means ‘no restrictions’ in any of the previous cases. ■ Account maintenance User accounts may be locked and unlocked with the -l and -u flags. The -l option disables an account. -u re-enables an account and the 76 ■ GNUPro Tools for Embedded Systems CYGNUS passwd ■ CYGNUS account status may be given with the -S option. The status information is self explanatory. Limitations Users may not be able to change their password on some systems. GNUPro Tools for Embedded Systems ■ 77 Windows development with Cygwin: a Win32 porting layer ps USAGE ps [-aefl] [-u uid] DESCRIPTION ps gives the status of all the Cygwin processes running on the system (ps stands for process status). Due to the limitations of simulating a POSIX environment under Windows, there is little information to give. The PID column is the process ID you need to give to the kill command (see “kill” on page 70). The WINPID column is the process ID that displays for NT’s Task Manager program. When using ps, the following options are available. -a -e Shows processes of all users -f Shows process uids, ppids -l Shows process uids, ppids, pgids, winpids -u uid Lists processes owned by uid 78 ■ GNUPro Tools for Embedded Systems CYGNUS umount umount USAGE unmount <path> DESCRIPTION unmount removes a mount from the system. You may specify either the Windows path or the POSIX path. See “mount” on page 74 for information about the mount table. CYGNUS GNUPro Tools for Embedded Systems ■ 79 Windows development with Cygwin: a Win32 porting layer «X©coQ¦o6cro The following documentation discusses the Cygwin functions. ■ “cygwin_attach_handle_to_fd” on page 81 ■ “cygwin_conv_to_full_posix_path” on page 82 ■ “cygwin_conv_to_full_win32_path” on page 83 ■ “cygwin_conv_to_posix_path” on page 84 ■ “cygwin_conv_to_win32_path” on page 85 ■ “cygwin_detach_dll” on page 86 ■ “cygwin_getshared” on page 87 ■ “cygwin_internal” on page 88 ■ “cygwin_posix_path_list_p” on page 89 ■ “cygwin_posix_to_win32_path_list” on page 90 ■ “cygwin_posix_to_win32_path_list_buf_size” on page 91 ■ “cygwin_split_path” on page 92 ■ “cygwin_win32_to_posix_path_list” on page 93 ■ “cygwin_win32_to_posix_path_list_buf_size” on page 94 ■ “cygwin_winpid_to_pid” on page 95 These functions are specific to Cygwin itself, and probably will not have relations to any other library or standards. 80 ■ GNUPro Tools for Embedded Systems CYGNUS cygwin_attach_handle_to_fd cygwin_attach_handle_to_fd extern "C" int cygwin_attach_handle_to_fd(char *name, int fd, HANDLE handle, int bin, int access); Converts a Win32 handle into a POSIX-style file handle. fd may be -1 to make Cygwin allocate a handle; the actual handle is returned in all cases. CYGNUS GNUPro Tools for Embedded Systems ■ 81 Windows development with Cygwin: a Win32 porting layer cygwin_conv_to_full_posix_path extern "C" void cygwin_conv_to_full_posix_path(const char *path, char *posix_path); Converts a Win32 path to a POSIX path. If path is already a POSIX path, leaves it alone. If path is relative, then posix_path will be converted to an absolute path. posix_path must point to a buffer of sufficient size; use MAX_PATH if needed. 82 ■ GNUPro Tools for Embedded Systems CYGNUS cygwin_conv_to_full_win32_path cygwin_conv_to_full_win32_path extern "C" void cygwin_conv_to_full_win32_path(const char *path, char *win32_path); Converts a POSIX path to a Win32 path. If path is already a Win32 path, there is no change. If path is relative, then win32_path will be converted to an absolute path. win32_path must point to a buffer of sufficient size; use MAX_PATH if needed. CYGNUS GNUPro Tools for Embedded Systems ■ 83 Windows development with Cygwin: a Win32 porting layer cygwin_conv_to_posix_path extern "C" void cygwin_conv_to_posix_path(const char *path, char *posix_path); Converts a Win32 path to a POSIX path. If path is already a POSIX path, there is no change. If path is relative, then posix_path will also be relative. posix_path must point to a buffer of sufficient size; use MAX_PATH if needed. 84 ■ GNUPro Tools for Embedded Systems CYGNUS cygwin_conv_to_win32_path cygwin_conv_to_win32_path extern "C" void cygwin_conv_to_win32_path(const char *path, char *win32_path); Converts a POSIX path to a Win32 path. If path is already a Win32 path, there is no change. If path is relative, then win32_path will also be relative. win32_path must point to a buffer of sufficient size; use MAX_PATH if needed. CYGNUS GNUPro Tools for Embedded Systems ■ 85 Windows development with Cygwin: a Win32 porting layer cygwin_detach_dll extern "C" void cygwin_detach_dll(int dll_index); This function has unsupported functionality. A future release will provide more usage. 86 ■ GNUPro Tools for Embedded Systems CYGNUS cygwin_getshared cygwin_getshared shared_info * cygwin_getshared(void); Returns a pointer to an internal Cygwin memory structure containing shared information used by cooperating Cygwin processes. This function is intended for use only by system programs like mount and ps. CYGNUS GNUPro Tools for Embedded Systems ■ 87 Windows development with Cygwin: a Win32 porting layer cygwin_internal extern "C" DWORD cygwin_internal(cygwin_getinfo_types t, ...); Provides access to various internal data and functions. WARNING! Use care with this function; its results are unpredictable. 88 ■ GNUPro Tools for Embedded Systems CYGNUS cygwin_posix_path_list_p cygwin_posix_path_list_p extern "C" int posix_path_list_p(const char *path); Provides information if the supplied path is a POSIX-style path (such as POSIX names, forward slashes, or colon delimiters) or a Win32-style path (such as drive letters, reverse slashes, or semicolon delimiters). The return value is true if the path is a POSIX path. “_p” means predicate, a lisp term meaning that the function tells you something about the parameter. Rather than use a mode to say what the proper path list format is, we allow any, and give applications the tools they need to convert between the two. If a ‘ ;’ is present in the path list, it’s a Win32 path list. Otherwise, if the first path begins with a drive letter and colon (in which case it can be the only element, since, if it wasn’t, a ‘;’would be present), it’s a Win32 path list. Otherwise, it’s a POSIX path list. CYGNUS GNUPro Tools for Embedded Systems ■ 89 Windows development with Cygwin: a Win32 porting layer cygwin_posix_to_win32_path_list extern "C" void cygwin_posix_to_win32_path_list(const char *posix, char *win32); Given a POSIX path-style string (that is, /foo:/bar), converts to the equivalent Win32 path-style string (that is, d:\;e:\bar). Win32 must point to a sufficiently large buffer. char *_epath; char *_win32epath; _epath = _win32epath = getenv (NAME); /* If we have a POSIX path list, convert to win32 path list */ if (_epath != NULL && *_epath != 0 && cygwin_posix_path_list_p (_epath)) { _win32epath = (char *) xmalloc (cygwin_posix_to_win32_path_list_buf_size (_epath)); cygwin_posix_to_win32_path_list (_epath, _win32epath); } See also “cygwin_posix_to_win32_path_list_buf_size” on page 91. 90 ■ GNUPro Tools for Embedded Systems CYGNUS cygwin_posix_to_win32_path_list_buf_size cygwin_posix_to_win32_path_list_buf_size extern "C" int cygwin_posix_to_win32_path_list_buf_size(const char *path_list); Returns the number of bytes needed to hold the result of calling cygwin_posix_to_win32_path_list. CYGNUS GNUPro Tools for Embedded Systems ■ 91 Windows development with Cygwin: a Win32 porting layer cygwin_split_path extern "C" void cygwin_split_path(const char *path, char *dir, char *file); Splits a path into portions: the directory, dir, and the file, file. Both dir and file must point to buffers of sufficient size. char dir[200], file[100]; cygwin_split_path("c:/foo/bar.c", dir, file); printf("dir=%s, file=%s\n", dir, file); 92 ■ GNUPro Tools for Embedded Systems CYGNUS cygwin_win32_to_posix_path_list cygwin_win32_to_posix_path_list extern "C" void cygwin_win32_to_posix_path_list(const char *win32, char *posix); Given a Win32 path-style string (that is, d:\;e:\bar), converts it to the equivalent POSIX path-style string (that is, /foo:/bar). POSIX must point to a sufficiently large buffer. See also “cygwin_win32_to_posix_path_list_buf_size” on page 94. CYGNUS GNUPro Tools for Embedded Systems ■ 93 Windows development with Cygwin: a Win32 porting layer cygwin_win32_to_posix_path_list_buf_size extern "C" int cygwin_win32_to_posix_path_list_buf_size(const char *path_list); Informs how many bytes are needed for the results of cygwin_win32_to_posix_path_list. 94 ■ GNUPro Tools for Embedded Systems CYGNUS cygwin_winpid_to_pid cygwin_winpid_to_pid extern "C" pid_t cygwin_winpid_to_pid (int winpid); Given a Windows process ID, winpid, converts to the corresponding Cygwin process ID, if any. Returns -1 if Windows process ID does not correspond to a Cygwin process ID. extern "C" cygwin_winpid_to_pid (int winpid); pid_t mypid; mypid = cygwin_winpid_to_pid (windows_pid); CYGNUS GNUPro Tools for Embedded Systems ■ 95 Windows development with Cygwin: a Win32 porting layer 96 ■ GNUPro Tools for Embedded Systems CYGNUS ARM Development GNUPro® Toolkit is a complete solution for C and C++ development for ARM7/7T processors using both the 32-bit ARM instruction-set and the 16-bit THUMB instruction-set extensions. The tools include the compiler, interactive debugger, utilities and libraries; debugger and linker support is also included for the PID Series Evaluation board. The following documentation discusses cross-development with the ARM processors. ■ “ARM Specific Features” on page 98 ■ “Compiler Issues for ARM Targets” on page 101 ■ “ABI Summary for ARM Targets” on page 106 ■ “Assembler Issues for ARM Targets” on page 111 ■ “Linker Issues for ARM Targets” on page 114 ■ “Debugger Issues for ARM Targets” on page 116 ■ “Simulator Issues for ARM Targets” on page 117 ■ “Reducing Code Size on the ARM 7/7T” on page 119 Red Hat GNUPro Toolkit for Embedded Systems ■ 97 ARM Development ARM Specific Features The following documentation describes specific features of GNUPro Toolkit for ARM7 and ARM7T processors. The following targets are supported for ARM targets. ■ GNUPro Instruction Set Simulator; see also “Simulator Issues for ARM Targets” on page 117 ■ PID Series Evaluation board with the EmbeddedICE interface; see also “Connecting to the ARM7 PID Target” on page 100 Both big-endian and little-endian mode may be selected. The default is little endian. The following table shows the hosts supported by ARM targets. Table 1: ARM hosts CPU Operating system Vendor SPARC SPARC x86 x86 SunOS 4.1.4 Solaris 2.4-2.5.1 Windows 95 Windows NT Sun Sun Microsoft Microsoft The ARM7 tools support ELF and COFF object file formats. See also Chapter 4 of System V Application Binary Interface (Prentice Hall, 1990). Use ld (See Using ld in GNUPro Utilities) or objcopy (See Using binutils in GNUPro Auxiliary Development Tools) to produce S-records. For the Windows 95 and Windows NT toolchains, the libraries are in different locations. Therefore, the Windows 95and Windows NT hosted toolchains require environmental settings to function properly, as designated in the following example’s declaration (the<yymmdd> variable indicates the release date found on the CD). SET SET SET REM SET PROOT=C:\redhat\arm-<yymmdd> PATH=%PROOT%\H-i386-cygwin\BIN;%PATH% INFOPATH=%PROOT%\info Set TMPDIR to point to a ramdisk if you have one TMPDIR=%PROOT% The following strings are case sensitive under UNIX and Windows NT. ■ Command line options ■ Assembler labels ■ Linker script commands ■ Section names The following strings are not case sensitive under UNIX or Windows NT: ■ GDB commands ■ Assembler instructions and register names 98 ■ GNUPro Toolkit for Embedded Systems Red Hat File names are case sensitive under UNIX. Case sensitivity for Windows NT is dependent on system configuration; so, by default, file names under Windows NT are not case sensitive. Cross-development tools in GNUPro Toolkit normally have names that reflect the target processor and the object file format (ELF or COFF) output by the tools. This makes it possible to install more than one set of tools in the same binary directory, including both native and cross-development tools. The complete tool name is a three-part hyphenated string, as shown in Table 1. The first part indicates either a 32-bit ARM tool (arm), or a 16-bit THUMB tool (thumb). The second part indicates the file format output by the tool (elf or coff). The third part is the generic tool name (gcc). For example, the GCC compiler for the ARM7 is either arm-elf-gcc or arm-coff-gcc and the GCC compiler for the ARM7T is either thumb-elf-gcc or thumb-coff-gcc. Table 2: Supported tools and naming conventions Tool Description Tool Name ARM THUMB GCC compiler C++ compiler GAS assembler GLD linker Standalone simulator Binary utilities GDB debugger arm-elf-gcc arm-coff-gcc arm-elf-c++ arm-coff-c++ arm-elf-as arm-coff-as arm-elf-ld arm-coff-ld arm-elf-run arm-elf-run arm-elf-ar arm-elf-nm arm-elf-objcopy arm-elf-objdump arm-elf-ranlib arm-elf-size arm-elf-strings arm-elf-strip arm-coff-ar arm-coff-nm arm-coff-objcopy arm-coff-objdump arm-coff-ranlib arm-coff-size arm-coff-strings arm-coff-strip arm-elf-gdb arm-coff-gdb thumb-elf-gcc thumb-coff-gcc thumb-elf-c++ thumb-coff-c++ thumb-elf-as thumb-coff-as thumb-elf-ld thumb-coff-ld thumb-elf-run thumb-coff-run thumb-elf-ar thumb-elf-nm thumb-elf-objcopy thumb-elf-objdump thumb-elf-ranlib thumb-elf-size thumb-elf-strings thumb-elf-strip thumb-coff-ar thumb-coff-nm thumb-coff-objcopy thumb-coff-objdump thumb-coff-ranlib thumb-coff-size thumb-coff-strings thumb-coff-strip thumb-elf-gdb thumb-coff-gdb The binaries for a Windows NT hosted toolchain install with the .exe suffix, but the .exe suffix does not need to be specified when running the executable. Red Hat GNUPro Toolkit for Embedded Systems ■ 99 ARM Development Connecting to the ARM7 PID Target Use the following instructions to connect the ARM7 PID (process ID) board. The ARM PID board gets its power from a PC AT power supply, using the P8 and P9 connectors. The EmbeddedICE interface box requires a 9V DC 500 mA power supply with a center-positive connector, one of which should have been provided with the EmbeddedICE board. To establish a serial connection, use the following process. 1. Connect the serial port. The EmbeddedICE board needs to connect to the serial port of the host computer, which will be running GDB. A serial cable is supplied with the EmbeddedICE. It has three connectors, the one labeled ARM connects to the EmbeddedICE, the other two provide the option of connecting to either a Sun type (DB25) serial port or a PC type (DB 9) serial port, and they are labeled as such. Only one of these can be used at a time. EmbeddedICE comes with a short ribbon cable, which has a 14-pin header connector on each end. One end connects to the port on the front of the EmbeddedICE box. The other end connects to port PL1 on the ARM 7 processor daughtercard. 2. Test the serial connection. Run GDB on the host computer. Type target rdi serial port where serial port is the name of the serial port to which the EmbeddedICE connects. Examples are /dev/ttya on a UNIX system or com1 on a PC. This should return a few lines of information about the version of the EmbeddedICE. The following output is an example of the initialization and the subsequent output. (gdb) target rdi /dev/com3 EmbeddedICE Manager (ADP, ARM7TDI) 2.02 (Advanced RISC Machines SDT 2.10) Connected to ARM RDI target. At this point, use GDB commands. If a GDB error message returns, reset the EmbeddedICE box by pressing the small red button on the front, then check all power and cable connections as well as the host computer port configuration. For testing purposes, if you use a program to monitor the serial port to which the EmbeddedICE connects, you will see the version information that the EmbeddedICE emits on the serial line every time it is powered up or reset. 100 ■ GNUPro Toolkit for Embedded Systems Red Hat Compiler Issues for ARM Targets The following documentation describes ARM7 and ARM7T-specific features of the GNUPro compiler. ■ “ARM Compiler Options” (below) ■ “THUMB Compiler Options” on page 103 See also “Preprocessor Symbols for ARM and THUMB Targets” on page 104 and “ARM7/7T-specific Attributes” on page 105. For a list of available generic compiler options, see “GNU CC Command Options” on page 71 in Using GNU CC in GNUPro Compiler Tools. ARM Compiler Options The following options are specific to the arm-elf-gcc and arm-coff-gcc configurations. -mapcs-frame Generates a stack frame upon entry to a function, as defined in the ARM Procedure Calling Standard (APCS). -mno-apcs-frame Does not generate a stack frame upon entry to a function. The APCS specifies that the generation of stack frames is optional. Not generating stack frames produces slightly smaller and faster code. This is default setting. -mapcs-32 Produces assembly code conforming to the 32 bit version of the APCS. Default setting. -mapcs-26 Produces assembly code conforming to the 26 bit version of the APCS, as used by earlier versions of the ARM processor (ARM2, ARM3). -mapcs-stack-check Produces assembly code that checks the amount of stack space available upon entry to a function and which calls a suitable function if there is insufficient space available. -mno-apcs-stack-check Does not produce code to check for stack space upon entry to a function. This is default setting. -mapcs-reentrant Produces assembly code that is position independent and reentrant. -mno-apcs-rentrant Does not produce position independent, reentrant assembly code. This is default Red Hat GNUPro Toolkit for Embedded Systems ■ 101 ARM Development setting. -mshort-load-bytes Allows shorts to be loaded from non-aligned addresses without generating a memory access fault. Two byte values should be loaded by performing two individual byte loads and then merging the results. -mno-short-load-bytes On an ARM processor that supports half word, loads these instructions as default. Two byte values should be loaded using the most space efficient method. -mfpe Floating point instructions should be emulated by the ARM Floating Point Emulator code, which is supplied by the operating system. -mfpe=N Floating point instructions should be emulated by the ARM Floating Point Emulator code version, N; valid version numbers are 2 and 3, with 2 being default. -msoft-float Floating point instructions should be emulated by library calls; default setting. -mhard-float Floating point instructions can be performed in hardware. -mbig-endian Produces assembly code targeted for a big endian processor. -mlittle-endian Produces assembly code targeted for a little endian processor; default setting. -mwords-little-endian Produces assembly code targeted for a big endian processor, storing words in a little endian format, for backward compatibility with older versions of GCC. -mthumb-interwork Produces assembly code supporting calls between the ARM instruction set and the THUMB instruction set. -mno-thumb-interwork Does not produce code specifically intended to support calling between ARM and THUMB instruction sets; default setting. -msched-prolog Allows instructions in function prologues to be rearranged to improve performance; default setting. -mno-sched-prolog Does not allow the instructions in function prologues to be rearranged; this guarantees that function prologues will have a well-defined form, depending upon their nature. 102 ■ GNUPro Toolkit for Embedded Systems Red Hat -mcpu=XXXX Produces assembly code specifically for the indicated processor. The XXXX variable can be one of the following processors. ■ ■ ■ ■ ■ ■ ■ ■ ■ ■ ■ ■ ■ ■ ■ ■ ■ ■ ■ ■ ■ ■ ■ ■ ■ arm2 arm250 arm3 arm6 arm600 arm610 arm620 arm7 arm7m (the default arm7d arm7dm arm7di arm7dmi arm70 arm700 arm700i arm710 arm710c arm7100 arm7500 arm7500fe arm7tdmi arm8 strongarm strongarm110 setting) -march=XXXX Produce assembly code specifically for an ARM processor of the indicated architecture. The XXXX variable can be one of the following architectures. ■ ■ ■ ■ ■ ■ Red Hat armv2 armv2a armv3 armv3m armv4 (the armv4t default setting) GNUPro Toolkit for Embedded Systems ■ 103 ARM Development THUMB Compiler Options The following options are specific to the thumb-elf-gcc and thumb-coff-gcc configurations. -mtpcs-frame Generates a stack frame upon entry to a non-leaf function, as defined in the THUMB Procedure Calling Standard (TPCS). A leaf function is one which does not call any other function. -mno-tpcs-frame Does not generate a stack frame upon entry to a non-leaf function. The TPCS specifies that the generation of stack frames is optional, hence this pair of options. This is default setting. -mtpcs-leaf-frame Generates a stack frame upon entry to a leaf function, as defined in the TPCS. -mno-tpcs-leaf-frame Does not generate a stack frame upon entry to a leaf function. Default setting. -mbig-endian Produces assembly code targeting a big endian processor. -mlittle-endian Produces assembly code atrgeting a little endian processor. This is default setting. -mthumb-interwork Produces assembly code supporting calls between the ARM instruction set and the THUMB instruction set. -mno-thumb-interwork Does not produce code specifically intended to support calling between ARM and THUMB instruction sets. If such calls are used, they will probably fail. This is default setting. Preprocessor Symbols for ARM and THUMB Targets For specific supported preprocessor symbols for the arm-elf-gcc and arm-coff-gcc configurations, see Table 3 (below). For specific supported preprocessor symbols for the thumb-elf-gcc and thumb-coff-gcc configurations, see Table 4 on page 105. Table 3: ARM preprocessor symbols and conditions Symbol Condition arm __semi__ __APCS_32__ __APCS_26__ __SOFTFP__ Always defined. Always defined. If -mapcs-26 has not been specified. If -mapcs-26 has been specified. If -mhard-float has not been specified. 104 ■ GNUPro Toolkit for Embedded Systems Red Hat Table 3: ARM preprocessor symbols and conditions __ARMWEL__ __ARMEB__ __ARMEL__ __arm2 __arm250 __arm3 __arm6 __arm60 __arm600 __arm610 __arm620 __arm7 __arm7m __arm7d __arm7dm __arm7di __arm7dmi __arm70 __arm700 __arm700i __arm710 __arm710c __arm7100 __arm7500 __arm7500fe __arm7tdmi __arm8 __strongarm __strongarm110 If -mwords-little-endian has been specified. If -mbig-endian has been specified. If -mbig-endian has not been specified. If -mcpu=arm2 has been specified. If -mcpu=arm250 has been specified. If -mcpu=arm3 has been specified. If -mcpu=arm6 has been specified. If -mcpu=arm60 has been specified. If -mcpu=arm600 has been specified. If -mcpu=arm610 has been specified. If -mcpu=arm620 has been specified. If -mcpu=arm7 has been specified. If -mcpu=arm7m has been specified. If -mcpu=arm7d has been specified. If -mcpu=arm7dm has been specified. If -mcpu=arm7di has been specified. If -mcpu=arm7dmi has been specified. If -mcpu=arm70 has been specified. If -mcpu=arm700 has been specified. If -mcpu=arm700i has been specified. If -mcpu=arm710 has been specified. If -mcpu=arm710c has been specified. If -mcpu=arm7100 has been specified. If -mcpu=arm7500 has been specified. If -mcpu=arm7500fe has been specified. If -mcpu=arm7tdmi has been specified. If -mcpu=arm8 has been specified. If -mcpu=strongarm has been specified. If -mcpu=strongarm110 has been specified. Table 4: THUMB preprocessor symbols and conditions Symbol Condition thumb __thumb __ARMEB__ __ARMEL__ __THUMBEB__ __THUMBEL__ Always defined. Always defined. If -mbig-endian has been specified. If -mbig-endian has not been specified. If –mbig-endian has been specified. If -mbig-endian has not been specified. ARM7/7T-specific Attributes There are no ARM7/7T-specific attributes. See “Declaring attributes of functions” on Red Hat GNUPro Toolkit for Embedded Systems ■ 105 ARM Development page 234 and “Specifying attributes of variables” on page 243 in Using GNU CC in GNUPro Compiler Tools for more information regarding extensions to the C language family. 106 ■ GNUPro Toolkit for Embedded Systems Red Hat ABI Summary for ARM Targets The ARM7 tools adhere by default to the ARM Procedure Call Standard (APCS). The ARM7T tools adhere to the THUMB Procedure Call Standard (TPCS). The following ABI summary describes these standards. ■ “Data Types Sizes and Alignments for ARM Targets” (below) ■ “Subroutine Calls for ARM Targets” on page 106 ■ “The Stack Frame for ARM Targets” on page 107 ■ “C Language Calling Conventions for ARM Targets” on page 109 ■ “Function Return Values for ARM Targets” on page 110 Data Types Sizes and Alignments for ARM Targets See Table 4 for information regarding data types, size and alignment for ARM targets. Table 5: Data types, size and alignment for ARM targets Type Size (bytes) Alignment (bytes) char short int unsigned long long long float double pointer 1 byte 2 bytes 4 bytes 4 bytes 4 bytes 8 bytes 4 bytes 8 bytes 4 bytes 1 byte 2 bytes 4 bytes 4 bytes 4 bytes 8 bytes 4 bytes 8 bytes 4 bytes The following information is necessary for specifying data type sizes and alignment for ARM targets. ■ Alignment within aggregates (structs and unions) is shown in Table 4, with padding added if needed ■ Aggregates have alignment equal to that of their most aligned member ■ Aggregates have sizes which are a multiple of their alignment Subroutine Calls for ARM Targets The following tables describe the calling conventions for subroutine calls. Table 6: Parameter registers General-purpose Red Hat r0 through r3 GNUPro Toolkit for Embedded Systems ■ 107 ARM Development Table 7: Register usage Volatile Non-volatile Frame pointer Stack pointer Return address Program counter r0 through r3, r12 r4 through r10 r11 r13 r14 r15 IMPORTANT! Structures that are less than or equal to 32 bits in length are passed as values. Structures that are greater than 32 bits in length are passed as pointers. The Stack Frame for ARM Targets The following documentation describes ARM stack frames. ■ The stack grows downwards from high addresses to low addresses. ■ A leaf function need not allocate a stack frame if it does not need one. ■ A frame pointer need not be allocated. ■ The stack pointer shall always be aligned to 4 byte boundaries. ■ The stack pointer always points to the lowest addressed word currently stored on the stack. See Figure 1 on page 108 for an illustartion of how stack frames for functions appear when taking a fixed number of arguments. See Figure 2 on page 109 for an illustration of how stack frames for functions appear when taking a variable number of arguments. 108 ■ GNUPro Toolkit for Embedded Systems Red Hat Figure 1: ARM stack frames for functions that take a fixed number of arguments Before call: After call: FP local variables, local variables, register save area, High register save area, etc. memory etc. reserved space for largest arghument list SP arguments on stack FP register save area local variables alloca allocations Low memory Red Hat reserved space for largest arghument list SP GNUPro Toolkit for Embedded Systems ■ 109 ARM Development Figure 2: ARM stack frames for functions that take a variable number of arguments FP High memory Before call: After call: local variables, register save area, etc. local variables, register save area, etc. reserved space for largest argument lists arguments on stack SP FP save area for anonymous parms passed in registers (the size of this area may be zero). register save area local variables alloca allocations Low memory reserved space for largest argument lists SP C Language Calling Conventions for ARM Targets A floating point value occupies one, two, or three words, as appropriate to its type. Floating point values are encoded in IEEE 754 format, with the most significant word of a double having the lowest address. IMPORTANT! When targetting little-endian ARMs, the words that make up a double will be stored in big-endian order, while the bytes inside each word will be stored in little-endian order. 110 ■ GNUPro Toolkit for Embedded Systems Red Hat The C compiler widens arguments of type, float, to type, double, to support inter-working between ANSI C and classic C. Character, short, pointer and other integral values occupy one word in an argument list. Character and short values are widened by the C compiler during argument marshalling. A structure always occupies an integral number of words (unless this is overridden by the -mstructure-size-boundry command line option). Argument values are collated in the order written in the source program The first four words of the argument values are loaded into r0 through r3, and the remainder are pushed on to the stack in reverse order (so that arguments later in the argument list have higher addresses than those earlier in the argument list). As a consequence, a FP value can be passed in integer registers, or even split between an integer register and the stack. Function Return Values for ARM Targets The following documentation describes how different data types are returned. Floats and integer-like values are returned in register, r0. A type is integer-like if its size is less than or equal to one word and if the type is a structure, union or array, then all of its addressable sub-fields must have an offset of zero. For example, the following example’s declaration is integer-like in form. struct {int a:8, b:8, c:8, d:8;} The following example’s declaration is similar to the previous input. union {int i; char*p;} However, the following declaration is unlike the previous example declarations since it is possible to take the address of fields B, C or D, and their offsets from the start of the structure are not zero. struct {char A; char B; char c; char D;} Doubles and long long integers are returned in registers, r0 and r1. For doubles, r0 always contains the most significant word of the double. For long long values r0 only contains the most significant word if the target is big-endian. All other values are returned by placing them into a suitably sized area of memory provided for this purpose by the function’s caller. A pointer to this area of memory is passed to the function as a hidden first argument, generated at compile time like the following example’s declaration. LargeType t; t = func(arg); The previous declaration is implemented in a manner similar to the following example declaration. LargeType t; (void) func(&t,arg); Red Hat GNUPro Toolkit for Embedded Systems ■ 111 ARM Development Assembler Issues for ARM Targets The following documentation describes ARM7/7T-specific features of the GNUPro assembler. ■ “Register Names for the ARM7/7T Targets” on page 112 ■ “Floating Point Support for ARM Targets” on page 112 ■ “Opcodes for ARM Targets” on page 112 ■ “Synthetic Instructions for ARM Targets” on page 113 ■ “ARM7/7T-specific Assembler Error Messages” on page 113 The ARM7/7T syntax is based on the syntax in ARM’s ARM7 Architecture Manual. For a list of available generic assembler options, see “Command Line Options” on page 17 in Using as in GNUPro Auxiliary Development Tools. The following are ARM7/7T specific assembler command line options. -m[arm][1|2|250|3|6|7[t][d][m][i]] Select processor variant. -m[arm]v[2|2a|3|3m|4|4t] Select architecture variant. -mthumb Only allow Thumb instructions. -mall Allow any instruction. -mfpa10 Select the v1.0 floating point architecture. -mfpa11 Select the v1.1 floating point architecture. -mfpe-old Don't allow floating-point multiple instructions. -mno-fpu Don’t allow any floating-point instructions. -mthumb-interwork Mark the assembled code as supporting inter-working. -mapcs-32 Mark the code as supporting the 26 bit variant of the ARM procedure calling standard. This is the default. -mapcs-26 Mark the code as supporting the 26 bit variant of the ARM procedure calling standard. 112 ■ GNUPro Toolkit for Embedded Systems Red Hat -EB Assemble code for a big endian CPU. -EL Assemble code for a little endian CPU. This is the default. Assembler comments start with @ and extend to the end of the line. Register Names for the ARM7/7T Targets The following tables list the register names supported for the ARM7/7T, using the register name, register number format. Table 8: General registers r0: 0 r1: 1 r2: 2 r3: 3 r4: 4 r5: 5 r6: 6 r7: 7 r8: 8 r9: 9 r10: 10 r11: 11 r12: 12 r13: 13: r14: 14 r15: 15 Table 9: APCS names for the general registers a1: 0 a2: 1 a3: 2 a4: 3: v1: 4 v2: 5 v3: 6 v4: 7: v5: 8 v6: 9 sb: 9 v7: 10 sl: 10 fp: 11 ip: 12 sp: 13 lr: 14 pc: 15 Table 10: Floating point registers f0: 16 f1: 17 f2: 18 f3: 19 f4: 20 f5: 21 f6: 22 f7: 23 c0: 32 c1: 33 c2: 34 c3: 35 c4: 36 c5: 37 c6: 38 c7: 39 c8: 40 c9: 41 c10: 42 c11: 43 c12: 44 c13: 45 c14: 46 c15: 47 cr0: 32 cr1: 33 cr2: 34 cr3: 35 cr4: 36 cr5: 37 cr6: 38 cr7: 39 cr8: 40 cr9: 41 cr10: 42 cr11: 43 cr12: 44 cr13: 45 cr14: 46 cr15: 47 Floating Point Support for ARM Targets The assembler supports hardware floating point, but the compiler does not. Opcodes for ARM Targets For detailed information on the ARM7/7T machine instruction set, see ARM7 Series Red Hat GNUPro Toolkit for Embedded Systems ■ 113 ARM Development Instruction Manual. The GNU assembler implements all the standard opcodes. Synthetic Instructions for ARM Targets Synthesized instructions are pseudo instructions that correspond to two or more actual machine instructions. The GNU assembler supports the following synthesized instructions. .arm The subsequent code uses the ARM instruction set. .thumb The subsequent code uses the THUMB instruction set. .code 16 An alias for .thumb. .code 32 An alias for .arm. .force_thumb The subsequent code uses the THUMB instruction set, and should be assembled even if the target processor does not support THUMB instructions. .thumb_func The subsequent label is the name of function which has been encoded using THUMB instructions, rather than ARM instructions. .ltorg Start a literal pool. ARM7/7T-specific Assembler Error Messages The following assembler error messages are specific to ARM targets. Error: Unrecognized opcode An instruction is misspelled or there is a syntax error somewhere. Warning: operand out of range An immediate value was specified that is too large for the instruction. 114 ■ GNUPro Toolkit for Embedded Systems Red Hat Linker Issues for ARM Targets The following documentation describes ARM7/7T-specific features of the GNUPro linker. For a list of available generic linker options, see “Linker Scripts” on page 27 in Using ld in GNUPro Developemnt Tools. Linker Script for ARM Targets The GNU linker uses a linker script to determine how to process each section in an object file, and how to lay out the executable. The linker script is a declarative program consisting of a number of directives. For instance, the ENTRY() directive specifies the symbol in the executable that will be the executable’s entry point. For a complete description of the linker script, see “Linker Scripts” on page 27 in Using ld in GNUPro Development Tools. For the ARM7/7T tools, there are two linker scripts, one to be used when compiling for the simulator and one to be used when compiling for the evaluation board. The following example script is the sim.ld linker script for the simulator for ARM targets using COFF object file format. # Linker script for ARM COFF. # Based on i386coff.sc by Ian Taylor <[email protected]>. test -z "$ENTRY" && ENTRY=_start if test -z "${DATA_ADDR}"; then if test "$LD_FLAG" = "N" || test "$LD_FLAG" = "n"; then DATA_ADDR=. fi fi cat <<EOF OUTPUT_FORMAT("${OUTPUT_FORMAT}","${BIG_OUTPUT_FORMAT}", \ "${LITTLE_OUTPUT_FORMAT}") ${LIB_SEARCH_DIRS} ENTRY(${ENTRY}) SECTIONS { /* We start at 0x8000 because gdb assumes it (see FRAME_CHAIN). This is an artifact of the ARM Demon monitor using the bottom \ 32k as workspace (shared with the FP instruction emulator if \ present): */ .text ${RELOCATING+ 0x8000} : { Red Hat GNUPro Toolkit for Embedded Systems ■ 115 ARM Development *(.init) *(.text) *(.glue_7t) *(.glue_7) *(.rdata) ${CONSTRUCTING+ ___CTOR_LIST__ = .; __CTOR_LIST__ = . ; LONG (-1); *(.ctors); *(.ctor); LONG (0); } ${CONSTRUCTING+ ___DTOR_LIST__ = .; __DTOR_LIST__ = . ; LONG (-1); *(.dtors); *(.dtor); LONG (0); } *(.fini) ${RELOCATING+ etext = .;} } .data ${RELOCATING+${DATA_ADDR-0x40000 + (. & 0xfffc0fff)}} : { ${RELOCATING+ __data_start__ = . ;} *(.data) ${RELOCATING+ __data_end__ = . ;} ${RELOCATING+ edata = .;} ${RELOCATING+ _edata = .;} } .bss ${RELOCATING+ SIZEOF(.data) + ADDR(.data)} : { ${RELOCATING+ __bss_start__ = . ;} *(.bss) *(COMMON) ${RELOCATING+ __bss_end__ = . ;} } ${RELOCATING+ end = .;} ${RELOCATING+ _end = .;} ${RELOCATING+ __end__ = .;} .stab 0 ${RELOCATING+(NOLOAD)} : { [ .stab ] } .stabstr 0 ${RELOCATING+(NOLOAD)} : { [ .stabstr ] } } EOF 116 ■ GNUPro Toolkit for Embedded Systems Red Hat Debugger Issues for ARM Targets The following documentation describes ARM7/7T-specific features of the GNUPro debugger, GDB. There are two ways for GDB to talk to an ARM7/7T target. Each target requires that the program be compiled with a target specific linker script. ■ Simulator GDB’s built-in software simulation of the ARM7 processor allows the debugging of programs compiled for the ARM7/7T without requiring any access to actual hardware. For this simulator, the linker script, sim.ld, must be specified at compilation. To activate this mode in GDB type target sim as input. Then load the code into the simulator by typing load and then begin debugging. ■ Remote target board For a remote target board, the eval.ld linker script must be specified at compilation. To connect to the target board in GDB, use the target remote devicename command where devicename will be a serial device such as /dev/ttya for UNIX, or com2 for Windows NT. Then load the code onto the target board by typing the load command. After being downloaded, the program executes. IMPORTANT! When using the remote target, GDB does not accept the run command. However, since downloading the program has the side effect of setting the PC to the start address, you can start your program by typing the continue command. For the available generic debugger options, see Debugging with GDB in GNUPro Debugging Tools. There are no ARM7/7T-specific debugger command line options. Red Hat GNUPro Toolkit for Embedded Systems ■ 117 ARM Development Simulator Issues for ARM Targets The simulator supports the registers in Table 10. Table 11: Registers for the simulator for ARM targets Type Registers Volatile d0, d1, a0, a1 Saved d2, d3, a2, a3 Special purpose sp, pc, ccr, mdr, lar, lir Memory is 256K bytes starting at location, 0. The stack starts at the highest memory address and works downward. The heap starts at the lowest address after text, data and bss. There are no ARM7/7T-specific simulator command line options. Run on a Stand-alone Simulator for ARM 7/7T Targets The following script example shows, when debugging, how to target a stand-alone simulator for the ARM7/7T targets using COFF object file format; substitute elf with coff for input when using ELF object file format. C:\> arm-coff-gdb program GNU gdb 4.16-armT-970630 Copyright 1997 Free Software Foundation, Inc.GDB is free software, covered by the GNU General Public License, and you are welcome to change it and/or distribute copies of it under certain conditions. Type "show copying" to see the conditions. This version of GDB is supported for customers of Cygnus Solutions. Type "show warranty" for details. This GDB was configured as "--host=i686-pc-linux-gnu --target=arm-acorn-coff"... (gdb) target sim Connected to the simulator. (gdb) load Loading section .text, size 0x8e8 lma 0x8000 Loading section .data, size 0x2fc lma 0x408e8 Start address 0x8000 Transfer rate: 24352 bits in <1 sec. (gdb) break main Breakpoint 1 at 0x8048: file arm_stuff.c, line 2. 118 ■ GNUPro Toolkit for Embedded Systems Red Hat (gdb) break thumb_func Breakpoint 2 at 0x8060: file thumb_stuff.c, line 1. (gdb) run Starting program: /elmo/scratchme/nickc/work/released/arm/gcc/tests/program Breakpoint 1, 0x8048 in main () at arm_stuff.c:2 2 int main (void) { return 7 + thumb_func (7); } (gdb) disassemble Dump of assembler code for function main: 0x803c <main>: mov ip, sp 0x8040 <main+4>: stmdb sp!, {fp, ip, lr, pc} 0x8044 <main+8>: sub fp, ip, #4 0x8048 <main+12>: bl 0x8124 <__gccmain> 0x804c <main+16>: mov r0, #7 0x8050 <main+20>: bl 0x88b0 <__thumb_func_from_arm> 0x8054 <main+24>: add r0, r0, #7 0x8058 <main+28>: ldmdb fp, {fp, sp, lr} 0x805c <main+32>: bx lr End of assembler dump. (gdb) continue Continuing. Breakpoint 2, thumb_func (arg=7) at thumb_stuff.c:1 1 int thumb_func (int arg) { return 7 + arg; } (gdb) disassemble Dump of assembler code for function thumb_func: 0x8060 <thumb_func>: 3007 add r0, #7 0x8062 <thumb_func+2>: 4770 bx lr End of assembler dump. (gdb) quit The program is running. Quit anyway (and kill it)? (y or n) y IMPORTANT! The ARM add instruction at <main+24> occupies 4 bytes, whereas the THUMB add instruction at <thumb_func> occupies 2 bytes. Red Hat GNUPro Toolkit for Embedded Systems ■ 119 ARM Development Reducing Code Size on the ARM 7/7T The ARM7/7T processor supports two different instruction sets. It can run the standard ARM instruction set, where each instruction occupies 32 bits, and also the reduced size THUMB instruction set, where each instruction occupies 16 bits. THUMB instructions are more limited in what they can do compared to ARM instructions, but they can represent a considerable saving in the amount of space that instructions occupy. It is possible to switch dynamically between the two instruction sets, thus gaining both advantages. The GNUPro compilers are able to produce code for both the ARM and THUMB instruction sets, but only at a file level of granularity. You can choose whether individual functions should be encoded as either ARM or THUMB instructions, but you cannot specify that specific parts of a function should be ARM or THUMB. The other parts of the GNUPro tools (the assembler and linker and so on), all support mixing ARM and THUMB code at any level. GNUPro Toolkit has two compilers, one of which produces an ARM assembler, and the other produces a THUMB assembler. If you want to use just one instruction set to compile a program, you need no special procedures, other than selecting the correct compiler. If you want to use both instruction sets in a program, the separate ARM and THUMB parts of the program must be split into separate files and then compiled individually, with the -mthumb-interwork flag. When the assembled object files are linked together, the linker will generate special code to switch between the two instruction sets whenever a call is made from an ARM function to a THUMB function or vice versa. In the following procedures, the COFF object file format was used; replace elf with coff for input when using ELF object file format. 1. Create source code. Create the following sample source code and save it as arm_stuff.c. extern int thumb_func (int); int main (void) { return 7 + thumb_func (7); } Create the following sample source code and save it as thumb_stuff.c. int thumb_func (int arg) { return arg + 7; } 2. Compile and link from source code. Compile the ARM sample code with the following declaration. arm-coff-gcc -g -c -O2 -mthumb-interwork arm_stuff.c Then compile the THUMB sample code with the following declaration. thumb-coff-gcc -g -c -O2 -mthumb-interwork thumb_stuff.c Then link with the following declaration. arm-coff-gcc arm_stuff.o thub_stuff.o -o program The use of the -g and -O2 command line options are optional. They are used in the previous examples to make the output of the debugger easier to understand. 120 ■ GNUPro Toolkit for Embedded Systems Red Hat 5 H©fH#6e#??H¨Hfr|jHo The following documentation discusses cross-development with the Hewlett Packard processors. ■ “Compiling for HP targets” on page 124 ■ “Assembler options for HP targets” on page 126 ■ “Debugging for HP targets” on page 130 For more information, see HP Precision Architecture Instruction Set Manual (v1.1, 3rd edition). See Table 10 for naming conventions for the specific host platform. Table 10: Host naming conventions Canonical triplet name Platform hppa1.1-hp-hpux10 HP 9000/700, HP-UX B.10.01 hppa1.1-hp-hpux10.20 HP 9000/700, HP-UX B.10.20 hppa1.1-hp-hpux11 HP 9000/700, HP-UX B.11.0 CYGNUS GNUPro Tools for Embedded Systems ■ 123 Hewlett Packard development rj|cfcoXQr#XH The following ‘-m’ options are defined for the HPPA family of computers. -mpa-risc-1-0 Generate code for a PA 1.0 processor. -mpa-risc-1-1 Generate code for a PA 1.1 processor. -mbig-switch Generate code suitable for big switch tables. Use this option only if the assembler/linker complain about out of range branches within a switch table. -mjump-in-delay Fill delay slots of function calls with unconditional jump instructions by modifying the return pointer for the function call to be the target of the conditional jump. -mdisable-fpregs Prevent floating point registers from being used in any manner. This is necessary for compiling kernels which perform lazy context switching of floating point registers. If you use this option and attempt to perform floating point operations, the compiler will abort. -mdisable-indexing Prevent the compiler from using indexing address modes. This avoids some rather obscure problems when compiling MIG generated code under MACH. -mno-space-regs Generate code that assumes the target has no space registers. This allows GCC to generate faster indirect calls and use unscaled index address modes. Such code is suitable for level 0 PA systems and kernels. -mfast-indirect-calls Generate code that assumes calls never cross space boundaries. This allows GCC to emit code which performs faster indirect calls. This option will not work in the presence of shared libraries or nested functions. -mspace Optimize for space rather than execution time. Currently this only enables out of line function prologues and epilogues. This option is incompatible with PIC code generation and profiling. -mlong-load-store Generate 3-instruction load and store sequences as some-times required by the HP/UX 10 linker. This is equivalent to the ‘+k’ option to the HP compilers. -mportable-runtime Use the portable calling conventions proposed by HP for ELF systems. 124 ■ GNUPro Tools for Embedded Systems CYGNUS Compiling for HP targets -mgas Enable the use of assembler directives only GAS understands. -mschedule=cpu type Schedule code according to the constraints for the machine type (signified by the cpu type). The choices for cpu type are 700 for 7n0 machines, 7100 for 7n5 machines, and 7100 for 7n2 machines. 7100 is the default for cpu type. NOTE: The 7100LC scheduling information is incomplete and using 7100LC often leads to bad schedules. For now it’s probably best to use 7100 instead of for the 7n2 machines. 7100LC -mlinker-opt Enable the optimization pass in the HP/UX linker. NOTE: This makes symbolic debugging impossible. It also triggers a bug in the HP/UX 8 and HP/UX 9 linkers in which they give bogus error messages when linking some programs. -msoft-float Generate output containing library calls for floating point. WARNING: The requisite libraries are not available for all HPPA targets. Normally the facilities of the machine’s usual C compiler are used, but this cannot be done directly in cross-compilation. You must make your own arrangements to provide suitable library functions for cross-compilation. The embedded target hppa1.1-*-pro does provide software floating point support. -msoft-float changes the calling convention in the output file; therefore, it is only useful if you compile all of a program with this option. In particular, you need to compile libgcc.a, the library that comes with GCC, with -msoft-float in order for this to work. CYGNUS GNUPro Tools for Embedded Systems ■ 125 Hewlett Packard development Hj,fHr|croQr#XH To use the GNU assembler to assemble GCC output, configure GCC with the switch, --with-gnu-as (in GNUPro Toolkit distributions) or with the -mgas option. -mgas Compile using as to assemble GCC output. As a back end for GNU CC, as has been thoroughly tested and should work extremely well for the HPPA targets. It has been tested only minimally on hand-written assembly code and no one has tested it much on the assembly output from the HP compilers. The format of the debugging sections has changed since the original as port (version 1.3X) was released; therefore, you must rebuild all HPPA objects and libraries with the new assembler so that you can debug the final executable. The HPPA as port generates a small subset of the relocations available in the SOM and ELF object file formats. Additional relocation support will be added as it becomes necessary. as has no machine-dependent command-line options for the HPPA. «o#ª The assembler syntax closely follows the HPPA instruction set reference manual; assembler directives and general syntax closely follow the HPPA assembly language reference manual, with a few noteworthy differences. First, a colon may immediately follow a label definition. This is simply for compatibility with how most assembly language programmers write code. Some obscure expression parsing problems may affect hand written code which uses the spop instructions, or code which makes significant use of the ! line separator. is much less forgiving about missing arguments and other similar oversights than the HP assembler. as notifies you of missing arguments as syntax errors; this is regarded as a feature, not a bug. as Special characters for HPPA targets include the following. ; is the line comment character. ! can be used instead of a newline to separate statements. Since $ has no special meaning, you may use it in symbol names. Finally, as allows you to use an external symbol without explicitly importing the symbol. WARNING: In the future this allowance will be an error for HPPA targets. 126 ■ GNUPro Tools for Embedded Systems CYGNUS Assembler options for HP targets Qfr#coX|rco The HPPA family uses IEEE floating-point numbers. #Hj,fH?cH6c¨H as for the HPPA supports many additional directives for compatibility with the native assembler. The following documentation only briefly describes them. For detailed information on HPPA-specific assembler directives, see HP9000 Series 800 Assembly Language Reference Manual (HP 92432-90001). as does not support the following assembler directives described in the HP manual: .endm .enter .leave listoff liston locct macro Beyond those implemented for compatibility, as supports one additional assembler directive for the HPPA: .param. It conveys register argument locations for static functions. Its syntax closely follows the .export directive. The following are the additional directives in as for the HPPA: .block n .blockz n Reserve n bytes of storage, and initialize them to zero. .call Mark the beginning of a procedure call. Only the special case with no arguments is allowed. .callinfo [param=value, ...][flag, ...] Specify a number of parameters and flags that define the environment for a procedure. param may be any of frame (frame size), entry_gr (end of general register range), entry_fr (end of float register range), entry_sr (end of space register range). The values for flag are calls or caller (proc has subroutines), no_calls (proc does not call subroutines), save_rp (preserve return pointer), save_sp (proc preserves stack pointer), no_unwind (do not unwind this proc), hpux_int (proc is interrupt routine). .code Assemble into the standard section called $TEXT$, subsection $CODE$. .copyright “string” In the SOM object format, insert string into the object code, marked as a copyright string. .enter Not yet supported; the assembler rejects programs containing this directive. .entry Mark the beginning of a procedure. CYGNUS GNUPro Tools for Embedded Systems ■ 127 Hewlett Packard development .exit Mark the end of a procedure. .export name[,typ][,param=r] Make a procedure name available to callers. typ, if present, must be one of absolute, code (ELF only, not SOM), data, entry, data, entry, millicode, plabel, pri_prog, or sec_prog. param, if present, provides either relocation information for the procedure arguments and result, or a privilege level. param may be argw n (where n ranges from 0 to 3, and indicates one of four one-word arguments); rtnval (the procedure’s result); or priv_lev (privilege level). For arguments or the result, r specifies how to relocate, and must be one of no (not relocatable), gr (argument is in general register), fr (in floating point register), or ‘fu’ (upper half of float register). For priv_lev, r is an integer. .half n Define a two-byte integer constant n; synonym for the portable as directive, .short. .import name[,typ] Converse of .export; make a procedure available to call. The arguments use the same conventions as the first two arguments for .export. .label name Define name as a label for the current assembly location. .leave Not yet supported; the assembler rejects programs containing this directive. .origin lc Advance location counter to lc. Synonym for the {No value for ‘‘as’’} portable directive .org. .param name[,typ][,param=r] Similar to .export, but used for static procedures. .proc Use preceding the first statement of a procedure. .procend Use following the last statement of a procedure. label.reg expr Synonym for .equ; define label with the absolute expression expr as its value. 128 ■ GNUPro Tools for Embedded Systems CYGNUS Assembler options for HP targets .space secname[,params] Switch to section secname, creating a new section by that name if necessary. You may only use params when creating a new section, not when switching to an existing one. secname may identify a section by number rather than by name. If specified, the list params declares attributes of the section, identified by keywords. The keywords recognized are spnum=exp (identify this section by the number exp, an absolute expression), sort=exp (order sections according to this sort key when linking; exp is an absolute expression), unloadable (section contains no loadable data), notdefined (this section defined elsewhere), and private (data in this section not available to other programs). .spnum secnam Allocate four bytes of storage, and initialize them with the section number of the section named secnam. (You can define the section number with the HPPA .space directive.) .string “str” Copy the characters in the string str to the object file. See “Strings” on page 44 for information on escape sequences you can use in as strings. WARNING: The HPPA version of .string differs from the usual as definition: it does not write a zero byte after copying str. .stringz “str” Like .string, CYGNUS but appends a zero byte after copying str to object file.’ GNUPro Tools for Embedded Systems ■ 129 Hewlett Packard development H,¦XXcoXQr#XH For HPPA targets, GDB is called with the following input; see Table 10: “Host naming conventions” on page 123 for the actual canonical name for your platform to replace with <canonical triplet> . <canonical triplet>-gdb GDB needs to know the following specifications. ■ Specifications for what serial device connects your host to your HP board (the first serial device available on your host is the default). ■ Specifications for what speed to use over the serial device (if you are using a Unix host). 130 ■ GNUPro Tools for Embedded Systems CYGNUS 1 Hitachi Development The following docume■tation discusses cross-development with the Hitachi processors. ■ “Developing for Hitachi H8 Targets” on page 132 ■ “Compiling for H8/300, H8S and H8/300H Targets” on page 132 CYGNUS GNUPro Tools for Embedded Systems ■ 1 Hitachi Development Developing for Hitachi H8 Targets The Hitachi H8/300, H8S and H8/300H processors are part of the same toolchain; older versions of GNUPro Toolkit will not support the H8S and H8/300H processors. ■ “Compiling for H8/300, H8S and H8/300H Targets” on page 132 ■ “Assembler Options for H8/300, H8S and H8/300H Targets” on page 134 ■ “Calling Conventions for H8/300, H8S and H8/300H Targets” on page 135 ■ “Debugging for H8/300, H8S and H8/300H targets” on page 136 For more extensive documentation on the Hitachi H8/300, Hitachi Microsystems makes available the H8/300 Microcomputer User’s Manual (Semiconductor Design & Development Center, 1992); contact your Field Application Engineer for details. Cross-development tools in the GNUPro Toolkit are normally installed with names that reflect the target machine, so that you can install more than one set of tools in the same binary directory. The target name, constructed with the --target option to configure, is used as a prefix to the program name. For example, the compiler for the Hitachi H8/300 (called simply gcc in native configurations) is called with the following input. h8300-hms-gcc Compiling for H8/300, H8S and H8/300H Targets The Hitachi target family toolchain controls variances in code generation directly from the command line. When you run GCC, you can use command line options to choose whether to take advantage of the extra Hitachi machine instructions, and whether to generate code for hardware or software floating point. Using C++ for H8/300, H8S and H8/300H Targets There is support for the C++ language. This support may in certain circumstances add up to 5K to the size of your executables. The new C++ support involves new startup code that runs C++ initializers before main() is invoked. If you have a replacement for the file, crt0.o (or if you call main()), you must call __main() before calling main(). You may need to run these C++ initializers even if you do not write in C++ yourself. This could happen, for instance, if you are linking against a third-party library which itself was written in C++. You may not be able to tell that it was written in C++ because you are calling it with C entry points prototyped in a C header file. 2 ■ GNUPro Tools for Embedded Systems CYGNUS Compiling for H8/300, H8S and H8/300H Targets Without these initializers, functions written in C++ may malfunction. If you are not using any third-party libraries, or are otherwise certain that you will not require any C++ constructors, you may suppress them by adding the following definition to your program: int __main() {} When you run GCC, you can use command-line options to choose machine-specific details. For information on all the GCC command-line options, see “GNU CC command options” in Using GNU CC in GNUPro Compiler Tools. Compiler Options for H8/300 for H8/300, H8S and H8/300H Targets The following documentation discusses the compiler options. -ms Generate code for the H8S processor. -mh Generate code for the H8/300H chip. -mint32 Use 32-bit integers when compiling for the H8/300H. -g The compiler debugging option ‘-g’ is essential to see interspersed high-level source statements, since without debugging information the assembler cannot tie most of the generated code to lines of the original source file. Floating Point Subroutines for H8/300, H8S and H8/300H Targets The Hitachi H8/300 has no floating point support. Two kinds of floating point subroutines are useful with GCC: ■ Software implementations of the basic functions (floating-point multiply, divide, add, subtract), for use when there is no hardware floating-point support. ■ An implementation of the standard C mathematical subroutine library. See “Mathematical Functions (math.h)” in GNUPro Math Library in GNUPro Libraries. Predefined Preprocessor Macros for H8/300, H8S and H8/300H Targets GCC defines the following preprocessor macros for the Hitachi configurations. CYGNUS GNUPro Tools for Embedded Systems ■ 3 Hitachi Development ■ Any Hitachi H8/300 architecture: __H8300__ ■ The Hitachi H8/300H architecture: __H8300H__ Assembler Options for H8/300, H8S and H8/300H Targets To use the GNU assembler to assemble GCC output, configure gcc with the switch, --with-gnu-as (in GNUPro Toolkit distributions) or with the -mgas option. -mgas Compile using as to assemble GCC output. -Wa If you invoke as through the GNU C compiler (version 2), you can use the ‘-Wa’ option to pass arguments through to the assembler. One common use of this option is to exploit the assembler’s listing features. Assembler arguments that you specify with gcc -Wa must be separated from each other by commas like the options, -alh and -L, in the following example input separate from -Wa. h8300-hms-gcc -c -g -O -Wa,-alh, -L file.c -L The additional assembler option ‘-L’ preserves local labels, which may make the listing output more intelligible to humans. For example, in the following commandline, the assembler option, -ahl, requests a listing interspersed with high-level language and assembly language. h8300-hms-gcc -c -g -O -Wa,-alh, -L file.c ‘-L’ preserves local labels, while the compiler debugging option , -g, gives the assembler the necessary debugging information. Assembler Options for listing output for H8/300, H8S and H8/300H targets Use the following options to enable listing output from the assembler (the letters after -a may be combined into one option, such as -aln). -a By itself, -a requests listings of high-level language source, assembly language, and symbols. -ah Request a high-level language listing. 4 ■ GNUPro Tools for Embedded Systems CYGNUS Calling Conventions for H8/300, H8S and H8/300H Targets -al Request an output-program assembly listing. -as Request a symbol table listing. -ad Omit debugging directives from the listing. High-level listings require that a compiler debugging option, like -g, be used, and that assembly listings (-al) also be requested. Assembler Listing Control Directives for H8/300, H8S and H8/300H Targets Use the following listing control assembler directives to control the appearance of the listing output (if you do not request listing output with one of the -a options, the following listing-control directives have no effect). .list Turn on listings for further input. .nolist Turn off listings for further input. .psize linecount, columnwidth Describe the page size for your output (the default is 60, 200). as generates form feeds after printing each group of linecount lines. To avoid these automatic form feeds, specify 0 as linecount. The variable input for columnwidth uses the same descriptive option. .eject Skip to a new page (issue a form feed). .title Use as the title (this is the second line of the listing output, directly after the source file name and page number) when generating assembly listings. .sbttl Use as the subtitle (this is the third line of the listing output, directly after the title line) when generating assembly listings. -an Turn off all forms processing. Calling Conventions for H8/300, H8S and H8/300H Targets The Hitachi family passes the first three words of arguments in registers, R0 through CYGNUS GNUPro Tools for Embedded Systems ■ 5 Hitachi Development R2. All remaining arguments are pushed onto the stack, last to first, so that the lowest numbered argument not passed in a register is at the lowest address in the stack. The registers are always filled, so a double word argument, starting in R2, would have the most significant word in R2 and the least significant word on the stack. Function return values are stored in R0 and R1. Registers, R0 through R2, can be used for temporary values. When a function is compiled with the default options, it must return with registers, R3 through R6, unchanged. IMPORTANT! Functions compiled with different calling conventions cannot be run together without some care. Debugging for H8/300, H8S and H8/300H targets The Hitachi-configured GDB is called with the following input. h8300-hms-gdb GDB needs to know the following specifications. ■ Specifications for one of the following interfaces: target remote GDB’s generic debugging protocol, for using with the Hitachi low-cost evaluation board (LCEVB) running CMON. target hms Interface to H8/300 eval boards running the HMS monitor. target e7000 E7000 in-circuit emulator for the Hitachi H8/300. target sim ■ ■ Simulator, which allows you to run GDB remotely without an external device. Specifications for what serial device connects your host to your Hitachi board (the first serial device available on your host is the default). Specifications for what speed to use over the serial device (if you are using a Unix host). Use one of the following GDB commands to specify the connection to your target board. target interface port To run a program on the board, start up GDB with the name of your program as the argument. To connect to the board, use the command, target interface port, where interface is an interface from the previous list and port is the name 6 ■ GNUPro Tools for Embedded Systems CYGNUS Debugging for H8/300, H8S and H8/300H targets of the serial port connected to the board. If the program has not already been downloaded to the board, you may use the load command to download it. You can then use all the usual GDB commands. For example, the following example’s sequence connects to the target board through a serial port, and loads and runs a program (designated as prog for variable-dependent input in the following example) through the debugger. <your host prompt> h8300-hms-gdb prog (gdb) target remote /dev/ttyb ... (gdb) load ... (gdb) run target interface hostname: portnumber You can specify a TCP/IP connection instead of a serial port, using the syntax, hostname: portnumber (assuming your board, designated here as hostname, is connected so that this makes sense; for instance, the connection may use a serial line, designated by your variable portnumber input, managed by a terminal concentrator). GDB also supports set remotedebug n. You can see some debugging information about communications with the board by setting the variable, n, with the command, remotedebug. In comparison to the H8/300, the H8S has the following improvements. ■ Eight 16-bit expanded registers, and one 8-bit control register. ■ Normal mode supports the 64K-byte address space. ■ Advanced mode supports a maximum 16M-byte address space. ■ Addressing modes of bit-manipulation instructions improved. ■ Signed multiply and divide instructions. ■ Two-bit shift instructions. ■ Instructions for saving and restoring multiple registers. ■ A test and set instruction. ■ Basic instructions executing doublespeed. ■ The H8S uses a two-channel on-chip PC break controller (PBC) for debugging programs with high-performance self-monitoring, without using an in-circuit emulator. ■ The ROM is connected to the CPU by a 16-bit data bus, enabling both byte data and word data to be accessed in one state. This makes possible rapid instruction CYGNUS GNUPro Tools for Embedded Systems ■ 7 Hitachi Development ■ ■ ■ ■ high-speed processing. The H8S has eight 32-bit general registers, all functionally alike for both address registers and data registers. When a general register is used as a data register, it can be accessed as a 32-bit, 16-bit, or 8-bit register. When the general registers are used as 32-bit registers or address registers, they use the letters, ER (ER0 to ER7). The ER registers divide into 16-bit general registers designated by the letters, E (E0 to E7) and R (R0 to R7). These registers are functionally equivalent, providing a maximum 16 6-bit registers. The E registers (E0 to E7) are also referred to as extended registers. The R registers divide into 8-bit general registers, using the letters, RH (R0H to R7H) and RL (R0L to R7L). These registers are functionally equivalent, providing a maximum 16 8-bit registers. The control registers are the 24-bit program counter (PC), 8-bit extended control register (EXR), and 8-bit condition-code register (CCR). The H8S supports eight addressing modes; for more specific information, see Table 11. Table 1: Addressing modes # Addressing mode Symbol Rn Register direct 1 @ERn Register indirect 2 @(d:16,ERn) Register indirect with displacement 3 4 Register indirect with post-increment Register indirect with pre-decrement 5 Absolute address 6 Immediate 7 Program-counter relative 8 Memory indirect @(d:32,ERn) @ERn+ @¯ERn @aa:8 @aa:16 @aa:24 @aa:32 #xx:8 #xx:16 #xx:32 @(d:8,PC) @(d:16,PC) @@aa:8 The upper 8 bits of the effective address are ignored, giving a 16-bit address. H8S initiates exception handling by a reset, a trap instruction, or an interrupt. Simultaneously generated exceptions are handled in order of priority. Exceptions originate from various sources. Trap instruction exception handling is always 8 ■ GNUPro Tools for Embedded Systems CYGNUS Loading on Specific Targets for H8/300, H8S and H8/300H Targets accepted in the program execution state. Trap instructions and interrupts are handled as in the following sequence. 1. The program counter (PC), condition code register (CCR), and extend register (EXR) are pushed onto the stack. 2. The interrupt mask bits are updated. The T bit is cleared to 0. 3. A vector address corresponding to the exception source is generated, and program execution starts from that address. For a reset exception, use Step 2 and Step 3. Loading on Specific Targets for H8/300, H8S and H8/300H Targets Downloading is possible to H8/300 boards and E7000 in-circuit emulators. To communicate with a Hitachi H8/300 board, you can use the GDB remote serial protocol. See “The gdb remote serial protocol” in Debugging with GDB in GNUPro Debugging Tools for more details. IMPORTANT! The Hitachi LCEVB running CMON has the stub already built-in. Use the following GDB command if you need to explicitly set the serial device. device port The default, port, is the first available port on your host. This is only necessary on Unix hosts, where it is typically something like /dev/ttya. The following sample tutorial illustrates the steps needed to start a program under GDB control on an H8/300. The example uses a sample H8 program called ‘t.x’. The procedure is the same for other Hitachi chips in the series. First, hook up your development board. In the example that follows, we use a board attached to serial port, designated as COM1. 1. Call GDB with the gdb command followed by the name of your program as the argument, filename. gdb filename 2. GDB prompts you, as usual, with the following prompt. (gdb) 3. Use the following two special commands to begin your debugging session. ■ target hms port Specify cross-debugging to the Hitachi board, and then use with the next input to download your program to the board. CYGNUS GNUPro Tools for Embedded Systems ■ 9 Hitachi Development ■ load filename load displays the names of the program’s sections. (If you want to refresh GDB data on symbols or on the executable file without downloading, use the GDB commands, file, or symbol-file). For more information on the previous commands (specifically, load) see “Commands to specify files” in Debugging with GDB in GNUPro Debugging Tools. 4. The following message for this t.x file then appears. C:\H8\TEST> gdb t.x GDB is free software and you are welcome to distribute copies for details. GDB 4.15-96q1, Copyright 1994 Free Software Foundation, Inc... (gdb) target hms com1 Connected to remote H8/300 HMS system. (gdb) load t.x .text: 0x8000 .. 0xabde *********** .data: 0xabde .. 0xad30 * .stack: 0xf000 .. 0xf014 * At this point, you’re ready to run or debug your program. Now you can use all of the following GDB commands. break Set breakpoints. run Start your program. print Display data. continue Resume execution after stopping at a breakpoint. help Display full information about GDB commands. IMPORTANT! Remember that operating system facilities aren’t available on your development board. For example, if your program hangs, you can’t send an interrupt—but you can press the RESET switch to interrupt your program. Return to your program’s process with the (gdb) command prompt after your program finishes its hanging. The communications protocol provides no other way for GDB to detect program completion. In either case, GDB sees the effect of a reset on the development board as a normal “exit” command to the program To use the E7000 in-circuit emulator to develop code for either the Hitachi H8/300 or 10 ■ GNUPro Tools for Embedded Systems CYGNUS Developing for Hitachi SH Targets the H8/300H, use one of the following forms of the target e7000 command. target e7000 port speed Use this command if your E7000 is connected to a serial port. The port argument identifies what serial port to use (for example, COM2). The third argument, speed, is the line speed in bits per second (for example, input might be 9600). target e7000 hostname If your E7000 is installed as a host on a TCP/IP network, substitute the network name for hostname during the connection. GDB uses telnet to connect. The monitor command set makes it difficult to load large amounts of data over the network without using ftp. We recommend you try not to issue load commands when communicating over Ethernet; instead, use the ftpload command. Developing for Hitachi SH Targets The following documentation discusses cross-development with the Hitachi SH processor. ■ “Compiling on Hitachi SH targets” on page 141 ■ “Preprocessor macros for Hitachi SH targets” on page 143 ■ “Assembler options for Hitachi SH targets” on page 143 ■ “Calling conventions for Hitachi SH targets” on page 145 ■ “Debugging on Hitachi SH targets” on page 146 Cross-development targets using the GNUPro Toolkit normally install with names that reflect the target machine, so that you can install more than one set of tools in the same binary directory. The target name, constructed with the --target option to configure, is used as a prefix to the program name. For example, the compiler for the Hitachi SH (calling GCC in native configurations) is named sh-hms-gcc. For more documentation on the Hitachi SH, see SH Microcomputer User’s Manual (Semiconductor Design & Development Center, 1992) and Hitachi SH2 Programming Manual (Semiconductor and Integrated Circuit Division, 1994), from Hitachi SH Microsystems; contact your Field Application Engineer for details. Compiling on Hitachi SH Targets The Hitachi SH target family toolchain controls variances in code generation directly from the command line. When you run GCC, you can use command-line options to choose whether to take advantage of the extra Hitachi SH machine instructions, and whether to generate code for hardware or software floating point. CYGNUS GNUPro Tools for Embedded Systems ■ 11 Hitachi Development Compiler options for Hitachi SH targets When you run GCC, you can use command-line options to choose machine-specific details. For information on all the GCC command-line options, see “GNU CC Command Options” in Using GNU CC in GNUPro Compiler Tools. Compiler options for architecture/code generation for Hitachi SH targets -g The compiler debugging option -g is essential to see interspersed high-level source statements, since without debugging information the assembler cannot tie most of the generated code to lines of the original source file. -mshl Generate little-endian Hitachi SH COFF output. -m1 Generate code for the Hitachi SH-1 chip. This is the default behavior for the Hitachi SH configuration. -m2 Generate code for the Hitachi SH-2 chip. -m3 Generate code for the Hitachi SH-3 chip. -m3e Generate code for the Hitachi SH-3E chip. -mhitachi Use Hitachi’s calling convention rather than that for GCC. The registers, MACH and MACL, are saved with this setting (see “Calling conventions for Hitachi SH targets” on page 145). -mspace Generate small code rather than fast code. By default, GCC generates fast code rather than small code. -mb Generate big endian code. This is the default. -ml Generate little endian code. -mrelax Do linker relaxation. For the Hitachi SH, this means the jsr instruction can be converted to the bsr instruction. -mrelax replaces the obsolete option, -mbsr. -mbigtable Generate jump tables for switch statements using four-byte offsets rather than the 12 ■ GNUPro Tools for Embedded Systems CYGNUS Assembler options for Hitachi SH targets standard two-byte offset. This option is necessary when the code within a switch statement is larger than 32K. If the option is needed and not supplied, the assembler will generate errors. Floating point subroutines for Hitachi SH targets Two kinds of floating point subroutines are useful with GCC. ■ Software implementations of the basic functions (floating-point multiply, divide, add, subtract), for use when there is no hardware floating-point support. ■ General-purpose mathematical subroutines. The GNUPro Toolkit from Cygnus includes an implementation of the standard C mathematical subroutine library. See “Mathematical Functions (math.h)” in GNUPro Math Library in GNUPro Libraries. Preprocessor macros for Hitachi SH targets GCC defines the following preprocessor macros for the Hitachi SH configurations: Any Hitachi SH architecture: __sh__ Any Hitachi SH1 architecture: __sh1__ Any Hitachi SH2 architecture: __sh2__ Any Hitachi SH3 architecture: __sh3__ Any Hitachi SH3E architecture: __sh3e__ Hitachi SH architecture with little-endian numeric representation: __little_endian__ Big-endian numeric representation is the default in Hitachi SH architecture. Assembler options for Hitachi SH targets The following documentation discusses the assembler options for the Hitachi SH processor. General assembler options for Hitachi SH targets To use the GNU assembler to assemble GCC output, configure GCC with the switch, --with-gnu-as (in GNUPro Toolkit distributions) or with the -mgas option. CYGNUS GNUPro Tools for Embedded Systems ■ 13 Hitachi Development -mgas Compile using as to assemble GCC output. -Wa If you invoke as through the GNU C compiler (version 2), you can use the ‘-Wa’ option to pass arguments through to the assembler. One common use of this option is to exploit the assembler’s listing features. Assembler arguments that you specify with gcc -Wa must be separated from each other by commas like the options, -alh and -L, in the following example input separate from -Wa. h8300-hms-gcc -c -g -O -Wa,-alh, -L file.c -L The additional assembler option ‘-L’ preserves local labels, which may make the listing output more intelligible to humans. For example, in the following commandline, the assembler option, -ahl, requests a listing interspersed with high-level language and assembly language. h8300-hms-gcc -c -g -O -Wa,-alh, -L file.c ‘-L’ preserves local labels, while the compiler debugging option , -g, gives the assembler the necessary debugging information. Assembler options for listing output for Hitachi SH targets Use the following options to enable listing output from the assembler (the letters after ‘-a’ may be combined into one option, such as -aln). -a By itself, ‘-a’ requests listings of high-level language source, assembly language, and symbols. -ah Request a high-level language listing. -al Request an output-program assembly listing. -as Request a symbol table listing. -ad Omit debugging directives from the listing. High-level listings require that a compiler debugging option, like ‘-g’, be used, and that assembly listings (-al) also be requested. Assembler listing-control directives for Hitachi SH targets 14 ■ GNUPro Tools for Embedded Systems CYGNUS Calling conventions for Hitachi SH targets Use the following listing-control Hitachi SH assembler directives to control the appearance of the listing output (if you do not request listing output with one of the ‘-a’ options, the following listing-control directives have no effect). .list Turn on listings for further input. .nolist Turn off listings for further input. .psize linecount, columnwidth Describe the page size for your output (the default is 60, 200). as generates form feeds after printing each group of linecount lines. To avoid these automatic form feeds, specify 0 as linecount. The variable input for columnwidth uses the same descriptive option. .eject Skip to a new page (issue a form feed). .title Use as the title (this is the second line of the listing output, directly after the source file name and page number) when generating assembly listings. .sbttl Use as the subtitle (this is the third line of the listing output, directly after the title line) when generating assembly listings. -an Turn off all forms processing. Calling conventions for Hitachi SH targets The Hitachi SH passes the first four words of arguments in registers, R4 through R7. All remaining arguments are pushed onto the stack, last to first, so that the lowest numbered argument not passed in a register is at the lowest address in the stack. The registers are always filled, so a double word argument, starting in R7, would have the most significant word in R7 and the least significant word on the stack. Function return values are stored in R0 and R7. Registers, R0 through R7, as well as MACH and MACL can be used for temporary values. When a function is compiled with the default options, it must return with registers, R8 through R1, unchanged. The switch, -mhitachi SH, makes the MACH and MACL registers caller-saved, for compatibility with the Hitachi SH tool chain at the expense of performance. NOTE: Functions compiled with different calling conventions cannot be run together CYGNUS GNUPro Tools for Embedded Systems ■ 15 Hitachi Development without some care. Debugging on Hitachi SH targets The Hitachi SH-configured debugger, GDB, is called sh-hms-gdb. GDB needs to know the following specifications to talk to your Hitachi SH. ■ Specifications for one of the following interfaces: target remote GDB’s generic debugging protocol, for using with the Hitachi low-cost evaluation board (LCEVB) running CMON. target hms Interface to SH eval boards running the HMS monitor. target e7000 E7000 in-circuit emulator for the Hitachi SH. target sim ■ ■ Allows you to run GDB remotely with the simulator without an external device. Specifications for what serial device connects your host to your Hitachi board (the first serial device available on your host is the default). Specifications for what speed to use over the serial device (if you are using a Unix host). Use one of the following GDB commands for a connection to your target board. target interface port To run a program on the board, start up GDB with the name of your program as the argument. To connect to the board, use the command, target interface port, where interface is an interface from the previous list and port is the name of the serial port connected to the board. If the program has not already been downloaded to the board, you may use the load command to download it. You can then use all the usual GDB commands. For example, the following example’s sequence connects to the target board through a serial port, and loads and runs a program (designated as prog for variable-dependent input in the following example) through the debugger.. <your host prompt> sh-hms-gdb prog (gdb) target remote /dev/ttyb ... (gdb) load ... (gdb) run 16 ■ GNUPro Tools for Embedded Systems CYGNUS Debugging on Hitachi SH targets target interface hostname: portnumber You can specify a TCP/IP connection instead of a serial port, using the syntax, hostname: portnumber (assuming your board, designated here as hostname, is connected so that this makes sense; for instance, the connection may use a serial line, designated by your variable portnumber input, managed by a terminal concentrator). GDB also supports set remotedebug n. You can see some debugging information about communications with the board by setting the variable, n, with the command, remotedebug. CYGNUS GNUPro Tools for Embedded Systems ■ 17 Hitachi Development 18 ■ GNUPro Tools for Embedded Systems CYGNUS Linux Development The following documentation describes information pertinent to Linux systems using GNUPro Toolkit software. For specific information about Red Hat Linux, see the Red Hat Linux User’s Guide or the other documentation resources found at http://www.redhat.com, the Red Hat website.For information on other systems, see the following websites: ■ ■ http://www.linuxdoc.org/ http://www.linuxcentral.com/ GNUPro® Toolkit for Linux systems uses a similar installation procedure as other UNIX development environments with the following considerations. ■ The installer will create its own directory. If you need to install the files in another location, use the --prefix option in order to run the installer. See the Red Hat Linux User’s Guide or the man pages for details on the --prefix option. ■ You must use the rpm version 2.5.1.0 or later to ensure proper installation of the tools in GNUPro Toolkit. Find the version on the web using the following URL: http://www.redhat.com/support/ ■ Test the installation. Add the usr/redhat/redhat/H-i386-pc-linux-gnu/bin directory to your path. Consult your shell’s man page for directions. For example, with a csh or tcsh shell, use the following command at the prompt ( directory is the directory which you’ve just added). set path=(directory $path) The usr/redhat/H-i386-pc-linux-gnu/bin directory will now be in your path. Enter which gcc to see /usr/redhat/H-i386-pc-linux-gnu/bin as the full path; enter the command, gcc, for the GNU C compiler to run, and, enter gdb to invoke the GNUPro visual debugger, Insight. IMPORTANT! Red Hat When rebuilding the Linux kernel, be sure to specify the Red GNUPro Tools for Embedded Systems ■ 1 Linux Development ■ ■ ■ Hat-supplied version of gcc instead of the gcc version provided with GNUPro Toolkit. The compiler provided with Red Hat is specifically designed for kernel rebuilding. When using make, configure uses a different back-end for multiple thread implementations. Use OBJC_THREAFD_FILE=thr-pthreads for specifying the appropriate Objective C threads. The GNU linker tool has improved function and variable linking since the addition of a few supported targets (see “Embedded Cross-Configurations” on page 6 for the complete listing of targets). This linking allows for selecting specific functions and variables in an object file when configuring, whereby the linking selectively (or explicitly) includes those libraries in the linking instruction. See the linker documentation for specific information; for instance, see “Overview of ld, the GNU Linker” on page 5 and “Linker Scripts” on page 27 in Using ld in GNUPro Development Tools. The GNUPro visual debugger, Insight (formerly, gdbtk), continues to improve. ❒ There is support for Insight with Source-Navigator, the source code comprehension tool. ❒ The Function Browser window enables interaction with the Source Window for examining functions in source code by using a dialog box for entering text, and for declaring functions as static or as regular expressions. ❒ A new Threads window is available for working with threads. Threads functionality is not available for all target operating systems. ❒ There are improvements for C++ handling. However, when debugging C++ code, breakpoints and exceptions may not work and, so, the functionality of the Breakpoints window may be inoperable. ❒ Improvements made for faster variable display and update. IntrospectTM is a tracing facility that enables defining a trace experiment, starting and stopping trace data collection, and browsing the trace data. Tracepoint functionality is not available for all hosts and targets. The GNU debugger, gdb, is going through many changes in its emergence as version 5. Some of the changes that have been made include the following features. ❒ Remote protocol can now use 64-bit addresses for memory. Remote protocol can get more information about threads. ❒ There is control over overload and opaque type resolution for C++ programs. ❒ ■ 2 ■ GNUPro Tools for Embedded Systems Red Hat co«c6?H¨Hfr|jHo The following documentation describes information pertinent only to LSI TinyRISC processors using GNUPro Toolkit software. ■ “Compiler features for LSI TinyRISC” on page 2 ■ “ABI summary for LSI TinyRISC” on page 3 ■ “Assembler features for the LSI TinyRISC” on page 7 ■ “Linker features for the LSI TinyRISC” on page 8 ■ “Debugger features for the LSI TinyRISC” on page 11 ■ “Stand-alone simulator issues for LSI TinyRISC” on page 13 Red Hat GNUPro Tools for Embedded Systems ■ 1 LSI TinyRisc development rj|cfHQH#¦HQrco« The following features for the GNUPro compiler have support for the LSI TinyRISC processor. The following MIPS16-specific command-line options are supported. For a list of all the available generic compiler options, see “GNU CC command options” on page 67 in Using GNU CC in GNUPro Compiler Tools. -mips16 Compile code for the processor in mips16 mode. -mentry The ‘-mentry’ option tells the compiler to use the entry and exit pseudo-instructions for function entry and exit. The pseudo-instructions save and restore registers at function entry and exit. These work by triggering an unimplemented instruction trap. Your exception handler must handle these instructions correctly. This is a time/space tradeoff; code using the entry and exit instructions is smaller, but takes longer to execute. -EB -EL Any MIPS configuration of the compiler can select big-endian or little-endian output at run time. Use ‘-EB’ to select big-endian output and ‘-EL’ for little-endian. If neither ‘-EL’ nor ‘-EB’ are defined, big-endian is the default. See Figure 12 for the preprocessor symbols and the compiler options that define them. Table 12: Preprocessor symbols Symbol Compiler options that define symbol Only if ‘-mips16’ is used Only if ‘-ansi’ not used _mips Only if ‘-ansi’ not used _ _mips Always defined MIPSEB Only if ‘-ansi’ and ‘-EL’ are not used _MIPSEB Only if ‘-EL’ is not used _ _MIPSEB Only if ‘-EL’ is not used _ _MIPSEB_ _ Only if ‘-EL’ is not used MIPSEL Only if ‘-ansi’ is not used and ‘-EL’ is used _MIPSEL only if ‘-EL’ is used _ _MIPSEL only if ‘-EL’ is used _ _MIPSEL_ _ only if ‘-EL’ is used _mips16 mips 2 ■ GNUPro Tools for Embedded Systems Red Hat ABI summary for LSI TinyRISC ¦jj#«Qrco« The following documentation details the Application Binary Interface (ABI) for the LSI TinyRISC processor. ■ “Data type sizes and alignments for the LSI TinyRISC” (below) ■ “Register allocation definitions for the LSI TinyRISC” (below) ■ “Stack frame features for the LSI TinyRISC” on page 4 ■ “Calling conventions for LSI TinyRISC” on page 5 ##«|HcH#o?#fcXojHoQr`Hco« The following information defines the data type sizes and alignments. The stack is aligned on eight-byte boundaries. 1 byte 2 bytes int 4 bytes long 4 bytes long long 8 bytes float 4 bytes double 8 bytes long double 8 bytes pointer 4 bytes char short HXcH#ffr6#cro?HQcoccroQr`Hco« See Figure 13 for the register allocation definitions. Table 13: Register allocation definitions General purpose (Integer) register Usage Constant zero $0 Volatile $1 through $15, $24, $25 Saved $16 through $23, $30 Parameters $4 through $7 Kernel reserved $26, $27 Global pointer $28 Stack pointer $29 Frame pointer $30 Return address $31 IMPORTANT! Do not depend on the order of the registers shown in Figure 13. Instead, use GCC’s ‘asm( )’ extension and allow the compiler to schedule registers. Red Hat GNUPro Tools for Embedded Systems ■ 3 LSI TinyRisc development #6eQ#jHQH#¦HQr`Hco« The following specific issues for the stack frame have support for the LSI TinrRISC processor. See also Figure 3 (below). ■ The stack grows downwards from high addresses to low addresses. ■ A leaf function need not allocate a stack frame if it does not need one. ■ A frame pointer need not be allocated. ■ The stack pointer shall always be aligned to 8 byte boundaries. “n’ Figure 3: Stack frame for LSI TinyRISC Before call: High memory SP, FP After call: local variables, register save area, etc. local variables, register save area, etc. reserved space for largest argument list arguments on stack plus plus reserved area for parameter registers (4 words) reserved area for parameter registers (4 words) FP local variables register save area alloca allocations Low memory 4 ■ GNUPro Tools for Embedded Systems SP reserved space for largest arghument list Red Hat ABI summary for LSI TinyRISC #ffcoX6ro¨HocroQrco« The following documentation defines the calling conventions for the LSI TinyRISC processor. ■ “Argument passing for the LSI TinyRISC” (below) ■ “Function return values for the LSI TinyRISC” on page 6 Argument passing for the LSI TinyRISC When compiling in mips16 mode, the floating point registers are not available. A function compiled in mips16 mode expects floating point arguments in the general registers, and it returns a floating point value in the general registers. The compiler and the linker cooperate to make this happen transparently when a function compiled in mips16 mode calls a function compiled in mips32 mode, or vice-versa. If you write your own assembly language code, and plan to call between mips16 code and mips32 code, you must arrange for the function arguments and return values to be in the right place for both the caller and the callee. On the mips16, floating point values are returned as though they were integer values. A single precision floating point value is returned in general register ‘$2’. A double precision floating point value is returned in general registers ‘$2’ and ‘$3’. The compiler passes arguments to a function using a combination of integer general registers, and the stack. The number, type, and relative position of arguments in the calling functions argument list define the combination of registers and memory used. The general registers ‘$4..$7’ pass the first few arguments. If the function being called returns a structure or union, the calling function passes the address of an area large enough to hold the structure to the function in ‘$4’. The function being called copies the returned structure into this area before returning. The address in ‘$4’ becomes the first argument to the function for the purpose of argument register allocation. All user arguments are then shifted down by one. The compiler always allocates space on the stack for all arguments even when some or all of the arguments to a function are passed in registers. This stack space is a large enough structure to contain all the arguments. After promotion and structure return pointer insertion, the arguments are aligned according to normal structure rules. Locations used for arguments within the stack frame are referred to as the home locations. Whenever possible, arguments declared in variable argument lists, as with those defined using a ‘va_list’ declaration, are passed in the integer registers, even when they are floating-point numbers. If the first argument is an integer, remaining arguments are passed in the integer registers. Red Hat GNUPro Tools for Embedded Systems ■ 5 LSI TinyRisc development The compiler passes structures and unions as if they were very wide integers with their size rounded up to an integral number of words. The “fill bits” necessary for rounding up are undefined. A structure can be split so that a portion is passed in registers and the remainder passed on the stack. In this case, the first words are passed in ‘$4’, ‘$5’, ‘$6’, and ‘$7’ as needed, with additional words passed on the stack. The rules for assigning which arguments go into registers and which arguments must be passed on the stack can be explained by considering the list of arguments itself as a structure, aligned according to normal structure rules. Mapping of this structure into the combination of registers and stack is as follows; everything with a structure offset greater than or equal to 32 is passed on the stack. The remainder of the arguments are passed in ‘$4..$7’ based on their structure offset. Any holes left in the structure for alignment are unused, whether in registers or on the stack. Function return values for the LSI TinyRISC A function can return no value, an integral or pointer value, a floating-point value (single or double precision), or a structure; unions are treated the same as structures. A function that returns no value puts no particular value in any register. A function that returns an integral or pointer value places its result in register ‘$2’. A function that returns a floating-point value places its result in general register ‘$2’. The caller to a function that returns a structure or a union passes the address of an area large enough to hold the structure in register ‘$4’. The function returns a pointer to the returned structure in register ‘$2’. 6 ■ GNUPro Tools for Embedded Systems Red Hat Assembler features for the LSI TinyRISC Hj,fHQH#¦HQr`Hco« The following documentation defines the specific assembler options for the LSI TinyRISC processor. For a list of available generic assembler options, see “Command-line options” on page 21 in Using as in GNUPro Utilities. -mips16 Assemble code for the processor in mips16 mode. -EB -EL Any MIPS configuration of the assembler can select big-endian or little-endian output at run time. Use ‘-EB’ to select big-endian output, and ‘-EL’ for little-endian. The default is big-endian. For information about the MIPS instruction set, see MIPS RISC Architecture (Kane and Heindrich, Prentice-Hall). For an overview of MIPS assembly conventions, see “Appendix D: Assembly Language Programming” in the same volume. There are 32 64-bit general (integer) registers, named ‘ $0..$31’. There are 32 64-bit floating point registers, named ‘$f0..$f31’. For assembler mnemonics, see MIPS16 ASE Reference Manual. Red Hat GNUPro Tools for Embedded Systems ■ 7 LSI TinyRisc development coeHQH#¦HQr`Hco« For a list of available generic linker options, see “Linker scripts” on page 261 in Using ld in GNUPro Utilities. In addition, the following MIPS-specific command-line options have support. -EL Link objects for the processor in little endian mode. -EB Link objects for the processor in big-endian mode. coeH6c|Qrco« The GNU linker uses a linker script to determine how to process each section in an object file, and how to lay out the executable. The linker script is a declarative program consisting of a number of directives. For instance, the directive ‘ENTRY( )’ specifies which symbol in the executable is designated the executable’s “entry point”. Since linker scripts can be complicated to write, the linker includes one built-in script that defines the default linking process. Use the following linker script (‘lsi.ld’) when linking programs for the TinyRISC board. Also, use it to link programs for execution in the MIPS simulator. /* The following TEXT start address leaves space for the monitor workspace. */ ENTRY(_start) OUTPUT_ARCH("mips:4000") OUTPUT_FORMAT("elf32-bigmips", "elf32-bigmips", "elf32-littlemips") GROUP(-lc -llsi -lgcc) SEARCH_DIR(.) __DYNAMIC = 0; /* * Allocate the stack to be at the top of memory, since the * stack grows down */ PROVIDE (__stack = 0); /* PROVIDE (__global = 0); */ /* * * * * * * Initalize some symbols to be zero so we can reference them in the crt0 without core dumping. These functions are all optional, but we do this so we can have our crt0 always use them if they exist. This is so BSPs work better when using the crt0 installed with gcc. We must initalize them twice, so we multiple object file formats, as some prepend an 8 ■ GNUPro Tools for Embedded Systems Red Hat Linker features for the LSI TinyRISC * underscore. */ PROVIDE (hardware_init_hook = 0); PROVIDE (software_init_hook = 0); SECTIONS { . = 0xA0020000; .text : { _ftext = . ; *(.init) eprol = .; *(.text) PROVIDE (__runtime_reloc_start = .); *(.rel.sdata) PROVIDE (__runtime_reloc_stop = .); *(.fini) etext = .; _etext = .; } . = .; .rdata : { *(.rdata) } _fdata = ALIGN(16); .data : { *(.data) CONSTRUCTORS } . = ALIGN(8); _gp = . + 0x8000; __global = _gp; .lit8 : { *(.lit8) } .lit4 : { *(.lit4) } .sdata : { *(.sdata) } edata = .; _edata = .; _fbss = .; .sbss : { *(.sbss) *(.scommon) } .bss : { Red Hat GNUPro Tools for Embedded Systems ■ 9 LSI TinyRisc development _bss_start = . ; *(.bss) *(COMMON) } end = .; _end = .; } 10 ■ GNUPro Tools for Embedded Systems Red Hat Debugger features for the LSI TinyRISC H,¦XXHQH#¦HQr`Hco« GDB uses the MIPS remote debugging protocol to talk to a target via a serial port. To run a program on the TinyRISC board, start up GDB with the name of your program as the argument to the GDB call: mips-lsi-elf-gdb <program>, for example. Use the ‘target lsi <port>’ command to specify the connection to your target board, where ‘<port>’ is the name of the serial port connected to the board. If the program has not already been downloaded to the board, use the ‘load’ command to download it. You can then use all the usual GDB commands. For example, the following sequence connects to the target board through a Unix serial port, and loads and runs a program called ‘prog’ through the debugger. % mips-lsi-elf-gdb prog GDB is free software and . . . (gdb) target lsi /dev/ttyb (gdb) load prog (gdb) run On PC platforms, substitute the specific COM port: C:\> mips-lsi-elf-gdb prog GDB is free software and . . . (gdb) target lsi com3 (gdb) load prog (gdb) run |H6c#f6rjj#o?Qrco« GDB also supports the following special commands for MIPS targets. set remotedebug num show remotedebug For this to be useful, you must know something about the MIPS debugging protocol, also called ‘rmtdbg’. An informal description can be found in the GDB source files, specifically in the ‘remote-mips.c’ file . You can see some debugging information about communications with the board by setting the ‘remotedebug’ variable. If you set it to 1 using the ‘set remotedebug 1’ command, every packet is displayed. If you set it to 2, every character is displayed. You can check the current value at any time with the ‘show remotedebug’ command. set timeout seconds set retranjut show retransmit-timeout You can control the timeout used while waiting for a packet, in the MIPS Red Hat GNUPro Tools for Embedded Systems ■ 11 LSI TinyRisc development debugging protocol, with the ‘set timeout seconds’ command. The default is 5 seconds. Similarly, you can control the timeout used while waiting for an acknowledgment of a packet with the set retransmit-timeout seconds command. The default is 3 seconds. You can inspect both values with the ‘show timeout’ and ‘show retransmit-timeout’ commands. The timeout set by ‘set timeout’ does not apply when GDB is waiting for your program to stop. In that case, GDB waits forever because it has no way of knowing how long the program is going to run before stopping. 12 ■ GNUPro Tools for Embedded Systems Red Hat Stand-alone simulator issues for LSI TinyRISC #o?a#froHcj¦f#rc¦HQr co« Three run-time command-line options are available with the stand-alone simulator: -t, -v, and -m, as the following documentation describes. The ‘-t’ command-line option to the stand-alone simulator turns on tracing of all memory fetching and storing in the simulator, as the following example shows. C:\> mips-lsi-elf-run -t hello.xb C:\> The simulator writes the trace information to the file ‘trace.din’. The following example shows the first few lines of a trace file. 2 2 2 2 2 2 2 2 2 2 a0020000 a0020004 a0020008 a002000c a0020010 a0020014 a0020018 a002001c a0020020 a0020024 ; ; ; ; ; ; ; ; ; ; width width width width width width width width width width 4 4 4 4 4 4 4 4 4 4 ; ; ; ; ; ; ; ; ; ; load load load load load load load load load load instruction instruction instruction instruction instruction instruction instruction instruction instruction instruction ... The ‘-v’ command-line option prints some simple statistics, as the following example shows. % mips-lsi-elf-run -v hello.xb mips-lsi-elf-run hello Hello, world! 3 + 4 = 7 MIPS 32-bit simulator Big endian memory model 0x00200000 bytes of memory at 0xa0000000 Instruction fetches = 4138 Pipeline ticks = 4138 The ‘-m’ command-line option sets the size of the simulated memory area. The default size is 1048576 bytes (1 megabyte). The simulator rounds up the size you request to the next power of two. See the following example script for details. % mips-lsi-elf-run -v -m 200000 hello.xb mips-lsi-elf-run hello Hello, world! 3 + 4 = 7 MIPS 32-bit simulator Big endian memory model Red Hat GNUPro Tools for Embedded Systems ■ 13 LSI TinyRisc development 0x00040000 bytes of memory at 0xa0000000 Instruction fetches = 4138 Pipeline ticks = 4138 14 ■ GNUPro Tools for Embedded Systems Red Hat 9 #¦`c#?H¨Hfr|jHo The following documentation discusses developing with the MN10200 and MN10300 Matsushita processors. ■ “Matsushita MN10200 development” on page 170 ■ “Matsushita MN10300 development” on page 190 CYGNUS GNUPro Tools for Embedded Systems ■ 169 Matsushita development #¦`c#u®¤®®?H¨Hfr|jHo The following documentation discusses developing with the GNUPro tools for the MN10200 targets. ■ “Compiler options for MN10200” on page 171 ■ “ABI summary for MN10200” on page 172 ■ “Assembler features for the MN10200” on page 177 ■ “Linker features for MN10200” on page 179 ■ “Debugger issues for MN10200” on page 186 ■ “Simulator issues for MN10200” on page 187 ■ “CygMon usage with MN10200” on page 188 ■ “CygMon (Cygnus ROM monitor) for the MN10200 and MN10300 processors” on page 211 170 ■ GNUPro Tools for Embedded Systems CYGNUS Compiler options for MN10200 rj|cfHr|croQru®¤®® For a list of available generic compiler options, see “GNU CC Command Options”“GNU CC command options” on page 67 and “Option summary for GCC” on page 69 in Using GNU CC in GNUPro Compiler Tools. There are no MN10200-specific command-line compiler options. H|r6Hr«j,rfQru®¤®® By default, the compiler defines the preprocessor symbols with the ‘_ _MN10200_ _’ and ‘__mn10200_ _’ names. u®¤®®a|H6cQc6#c,¦H There are no MN10200-specific attributes. See “Declaring attributes of functions” on page 234 and “Specifying attributes of variables” on page 243 in Using GNU CC in GNUPro Compiler Tools for more information regarding extensions to the C language family. For a list of available generic compiler options, see “GNU CC command options” on page 67 in Using GNU CC in GNUPro Compiler Tools. CYGNUS GNUPro Tools for Embedded Systems ■ 171 Matsushita development ¦jj#«Qru®¤®® The following documentation discusses the MN10200 Application Binary Interface (ABI), including specifications such as executable format, calling conventions, and chip-specific requirements. ■ “Data type and alignment for MN10200” (below) ■ “CPU register allocation for MN10200” on page 173 ■ “Switches for MN10200” on page 173 ■ “The stack frame for MN10200” on page 174 ■ “Argument passing for the MN10200” on page 176 ■ “Function return values for the MN10200” on page 176 ##«|H#o?#fcXojHoQru®¤®® The following table shows the data type sizes. Table 14: Data type sizes for the MN10200 Type Size (bytes) 1 byte 2 bytes 2 bytes 4 bytes 4 bytes 4 bytes 4 bytes 4 bytes Pointer 4 bytes char short int long long long float double long double The stack is kept 2-byte aligned. Structures and unions have the same alignment as their most strictly aligned component. 172 ■ GNUPro Tools for Embedded Systems CYGNUS ABI summary for MN10200 HXcH#ffr6#croQru®¤®® The compiler allocates registers in the following order: d0, d1, a0, d2, d3, a1, a2. a3 is the stack pointer and is not an allocable register. is the frame pointer in functions which need a frame pointer; otherwise it is an allocable register. Table 15: CPU register allocation for MN10200 Type Registers Volatile d0, d1, a0 Saved d2, d3, a1, a2 Special purpose a3, ccr, mdr a2 The compiler does not generate code that uses ‘ ccr’. The special-purpose register ‘mdr’ is only used for integer division and modulo operations. ©c6`HQru®¤®® There are no MN10200 specific switches. CYGNUS GNUPro Tools for Embedded Systems ■ 173 Matsushita development `H#6eQ#jHQru®¤®® The stack frame has the following attributes for the MN10200. ■ The stack grows downwards from high addresses to low addresses. ■ A leaf function need not allocate a stack frame if it does not need one. ■ A frame pointer need not be allocated. ■ The stack pointer shall always be aligned to 2 byte boundaries. For stack frame information for the MN10200, see Figure 4 (below) for functions taking a fixed number of arguments and see Figure 5 on page 175 for functions taking a varaible number of arguments. Figure 4: MN10200 stack frames for functions that take a fixed number of arguments Before call: High memory After call: local variables, register save area, etc. local variables, register save area, etc. arguments on stack arguments on stack SP, FP register save area local variables alloca allocations Low memory arguments on stack SP, FP Stack frames for functions taking a variable number of arguments use a frame pointer (FP) that points to the same location as the stack pointer (SP). 174 ■ GNUPro Tools for Embedded Systems CYGNUS ABI summary for MN10200 Figure 5: MN10200 stack frames for functions that take a variable number of arguments Before call: High memory After call: local variables, register save area, etc. local variables, register save area, etc. arguments on stack arguments on stack SP, FP save area for 4 words passed in registers local variables alloca allocations Low memory CYGNUS arguments on stack SP, FP GNUPro Tools for Embedded Systems ■ 175 Matsushita development X¦jHo|#coXQr`Hu®¤®® d0 and d1 are used for passing the first two argument words, any additional argument words are passed on the stack. Any argument, more than 8 bytes in size, is passed by invisible reference. The callee is responsible for copying the argument if the callee modifies the argument. ¦o6croH¦o¨#f¦HQr`Hu®¤®® a0 is used to return pointer values. d0 and d1 are used for returning other scalars and structures less than or equal to 8 bytes in length. If a function returns a structure that is greater than 8 bytes in length, then the caller is responsible for passing in a pointer to the callee specifying a location for the callee to store the return value. This pointer is passed as the first argument word before any of the function’s declared parameters. 176 ■ GNUPro Tools for Embedded Systems CYGNUS Assembler features for the MN10200 Hj,fHQH#¦HQr`Hu®¤®® For a list of available generic assembler options, see “Command-line options” on page 21 in Using as in GNUPro Utilities. There are no MN10200 specific assembler command-line options. The MN10200 syntax is based on the syntax in Matsushita’s MN10200 Architecture Manual. The assembler does not support user defined instructions nor does it support synthesized instructions (pseudo instructions corresponding to two or more actual machine instructions). The MN10200 assembler supports ‘;’ (semi-colon) and ‘#’ (pound); both characters are line comment characters when used in column zero. The semi-colon may also be used to start a comment anywhere within a line. The following register names are supported for the MN10200: d0, d1, d2, d3, a0, a1, a2, a3, mdr, ccr. The following addressing modes work for the MN10200. ■ Register direct: Dm/Dn Am/An ■ Immediate value: imm8/regs imm16 imm24 ■ Register indirect: (Am)/(An) ■ Register indirect with displacement: (d8,Am)/(d8,An) (d8 is sign extended) (d16,Am)/(d16,An) (d16 is sign extended) (d24,Am)/(d24,An) (d8,pc) (d8 is signed extended) (d16,pc) (d16 is signed extended) (d24,pc) ■ Absolute: (abs16) (abs24) ■ (abs16 is zero extended) Register indirect with index: (Di,Am)/(Di,An) CYGNUS GNUPro Tools for Embedded Systems ■ 177 Matsushita development ‘m’, ‘n’, and ‘i’subscripts indicate, respectively: source, destination and index. The values of ‘m’, ‘n’ and ‘i' are from 0 to 3. For detailed information, see MN102000 Series Linear Addressing Version Instruction Manual. Although the MN10200 has no hardware floating point, the ‘.float’ and ‘.double’ directives generate IEEE-format floating-point values for compatibility with other development tools. For detailed information on the MN10200 machine instruction set, see MN10200 Series Instruction Manual. The GNU assembler implements all the standard MN10200 opcodes. The assembler does not support user defined instructions nor does it support synthesized instructions (pseudo instructions, corresponding to two or more actual machine instructions). u®¤®®a|H6cQc6#Hj,fHHrjH#XH The following warnings may appear for the MN10200. Error: Unrecognized opcode An instruction is misspelled or there is a syntax error somewhere. Warning: operand out of range An immediate value was specified that is too large for the instruction 178 ■ GNUPro Tools for Embedded Systems CYGNUS Linker features for MN10200 coeHQH#¦HQru®¤®® The following documentation describes MN10200-specific features of the GNUPro linker. For a list of available generic linker options, see “Linker scripts” on page 261 in Using ld in GNUPro Utilities. The GNU linker uses a linker script to determine how to process each section in an object file, and how to lay out the executable. The linker script is a declarative program consisting of a number of directives. For instance, the ‘ENTRY()’ directive specifies the symbol in the executable that will be the executable’s entry point. For the MN10200 tools, there are two linker scripts, one used when compiling for the simulator and one used when compiling for the evaluation board. is a special option for the MN10200 that enables the optimization linker pass to shorten branches. -relax The following example is sim.ld, the linker script for the simulator. /* Linker script for the MN10200 simulator. */ OUTPUT_FORMAT("elf32-mn10200", "elf32-mn10200", "elf32-mn10200") OUTPUT_ARCH(mn10200) ENTRY(_start) GROUP(-lc -leval -lgcc) SEARCH_DIR(.); /* Do we need any of these for elf? __DYNAMIC = 0; */ SECTIONS { /* Read-only sections, merged into text segment: */ . = 0x0; .interp : { *(.interp) } .hash : { *(.hash)} .dynsym : { *(.dynsym)} .dynstr : { *(.dynstr)} .gnu.version : { *(.gnu.version)} .gnu.version_d : { *(.gnu.version_d)} .gnu.version_r : { *(.gnu.version_r)} .rel.text : { *(.rel.text) *(.rel.gnu.linkonce.t*) } .rela.text : { *(.rela.text) *(.rela.gnu.linkonce.t*) } .rel.data : { *(.rel.data) *(.rel.gnu.linkonce.d*) } .rela.data : { *(.rela.data) *(.rela.gnu.linkonce.d*) } CYGNUS GNUPro Tools for Embedded Systems ■ 179 Matsushita development .rel.rodata : { *(.rel.rodata) *(.rel.gnu.linkonce.r*) } .rela.rodata : { *(.rela.rodata) *(.rela.gnu.linkonce.r*) } .rel.got : { *(.rel.got)} .rela.got : { *(.rela.got)} .rel.ctors : { *(.rel.ctors)} .rela.ctors : { *(.rela.ctors)} .rel.dtors : { *(.rel.dtors)} .rela.dtors : { *(.rela.dtors)} .rel.init : { *(.rel.init)} .rela.init : { *(.rela.init)} .rel.fini : { *(.rel.fini)} .rela.fini : { *(.rela.fini)} .rel.bss : { *(.rel.bss)} .rela.bss : { *(.rela.bss)} .rel.plt : { *(.rel.plt)} .rela.plt : { *(.rela.plt)} .init : { *(.init)} =0 .plt : { *(.plt)} .text : { *(.text) *(.stub) /* .gnu.warning sections are handled specially by elf32.em. */ *(.gnu.warning) *(.gnu.linkonce.t*) } =0 _etext = .; PROVIDE (etext = .); .fini : { *(.fini) } =0 .rodata : { *(.rodata) *(.gnu.linkonce.r*) } .rodata1 : { *(.rodata1) } /* Adjust the address for the data segment. We want to adjust up to the same address within the page on the next page up. */ . = ALIGN(256) + (. & (256 - 1)); .data : { *(.data) *(.gnu.linkonce.d*) CONSTRUCTORS } .data1 : { *(.data1) } .ctors : { ___ctors = .; /* gcc uses crtbegin.o to find the start of the constructors, so we make sure it is first. Because this is a wildcard, it 180 ■ GNUPro Tools for Embedded Systems CYGNUS Linker features for MN10200 doesn’t matter if the user does not actually link against crtbegin.o; the linker won’t look for a file to match a wildcard. The wildcard also means that it doesn’t matter which directory crtbegin.o is in. */ *crtbegin.o(.ctors) *(SORT(.ctors.*)) *(.ctors) ___ctors_end = .; } .dtors : { ___dtors = .; *crtbegin.o(.dtors) *(SORT(.dtors.*)) *(.dtors) ___dtors_end = .; } .got : { *(.got.plt) *(.got) } .dynamic : { *(.dynamic) } /* We want the small data sections together, so single-instruction offsets can access them all, and initialized data all before uninitialized, so we can shorten the on-disk segment size. */ .sdata : { *(.sdata) } _edata = .; PROVIDE (edata = .); __bss_start = .; .sbss : { *(.sbss) *(.scommon) } .bss : { *(.dynbss) *(.bss) *(COMMON) } . = ALIGN(32 / 8); _end = . ; PROVIDE (end = .); /* Stabs debugging sections. */ .stab 0 : { *(.stab) } .stabstr 0 : { *(.stabstr) } .stab.excl 0 : { *(.stab.excl) } .stab.exclstr 0 : { *(.stab.exclstr) } .stab.index 0 : { *(.stab.index) } .stab.indexstr 0 : { *(.stab.indexstr) } .comment 0 : { *(.comment) } /* DWARF debug sections. Symbols in the DWARF debugging sections are relative to the CYGNUS GNUPro Tools for Embedded Systems ■ 181 Matsushita development beginning of the section so we begin them at 0. */ /* DWARF 1 */ .debug 0 : { *(.debug) } .line 0 : { *(.line) } /* GNU DWARF 1 extensions */ .debug_srcinfo 0 : { *(.debug_srcinfo) } .debug_sfnames 0 : { *(.debug_sfnames) } /* DWARF 1.1 and DWARF 2 */ .debug_aranges 0 : { *(.debug_aranges) } .debug_pubnames 0 : { *(.debug_pubnames) } /* DWARF 2 */ .debug_info 0 : { *(.debug_info) } .debug_abbrev 0 : { *(.debug_abbrev) } .debug_line 0 : { *(.debug_line) } .debug_frame 0 : { *(.debug_frame) } .debug_str 0 : { *(.debug_str) } .debug_loc 0 : { *(.debug_loc) } .debug_macinfo 0 : { *(.debug_macinfo) } /* SGI/MIPS DWARF 2 extensions */ .debug_weaknames 0 : { *(.debug_weaknames) } .debug_funcnames 0 : { *(.debug_funcnames) } .debug_typenames 0 : { *(.debug_typenames) } .debug_varnames 0 : { *(.debug_varnames) } .stack 0x80000 : { _stack = .; *(.stack) } /* These must appear regardless of . */ } The following example shows eval.ld, the linker script for the MN10200 evaluation board. /* Linker script for the MN10200 Evaluation Board. It differs from the default linker script only in the addresses assigned to text and stack sections. */ OUTPUT_FORMAT("elf32-mn10200", "elf32-mn10200", "elf32-mn10200") OUTPUT_ARCH(mn10200) ENTRY(_start) GROUP(-lc -leval -lgcc) SEARCH_DIR(.); /* Do we need any of these for elf? __DYNAMIC = 0; */ SECTIONS { /* Read-only sections, merged into text segment: */ 182 ■ GNUPro Tools for Embedded Systems CYGNUS Linker features for MN10200 /* Start of RAM (leaving room for Cygmon data) */ . = 0x408000; .interp : { *(.interp) } .hash : { *(.hash)} .dynsym : { *(.dynsym)} .dynstr : { *(.dynstr)} .gnu.version : { *(.gnu.version)} .gnu.version_d : { *(.gnu.version_d)} .gnu.version_r : { *(.gnu.version_r)} .rel.text : { *(.rel.text) *(.rel.gnu.linkonce.t*) } .rela.text : { *(.rela.text) *(.rela.gnu.linkonce.t*) } .rel.data : { *(.rel.data) *(.rel.gnu.linkonce.d*) } .rela.data : { *(.rela.data) *(.rela.gnu.linkonce.d*) } .rel.rodata : { *(.rel.rodata) *(.rel.gnu.linkonce.r*) } .rela.rodata : { *(.rela.rodata) *(.rela.gnu.linkonce.r*) } .rel.got : { *(.rel.got)} .rela.got : { *(.rela.got)} .rel.ctors : { *(.rel.ctors)} .rela.ctors : { *(.rela.ctors)} .rel.dtors : { *(.rel.dtors)} .rela.dtors : { *(.rela.dtors)} .rel.init : { *(.rel.init)} .rela.init : { *(.rela.init)} .rel.fini : { *(.rel.fini)} .rela.fini : { *(.rela.fini)} .rel.bss : { *(.rel.bss)} .rela.bss : { *(.rela.bss)} .rel.plt : { *(.rel.plt)} .rela.plt : { *(.rela.plt)} .init : { *(.init)} =0 .plt : { *(.plt)} .text : { *(.text) *(.stub) /* .gnu.warning sections are handled specially by elf32.em. *(.gnu.warning) *(.gnu.linkonce.t*) } =0 _etext = .; PROVIDE (etext = .); CYGNUS */ GNUPro Tools for Embedded Systems ■ 183 Matsushita development .fini : { *(.fini) } =0 .rodata : { *(.rodata) *(.gnu.linkonce.r*) } .rodata1 : { *(.rodata1) } /* Adjust the address for the data segment. We want to adjust up to the same address within the page on the next page up. */ . = ALIGN(256) + (. & (256 - 1)); .data : { *(.data) *(.gnu.linkonce.d*) CONSTRUCTORS } .data1 : { *(.data1) } .ctors : { ___ctors = .; /* gcc uses crtbegin.o to find the start of the constructors, so we make sure it is first. Because this is a wildcard, it doesn’t matter if the user does not actually link against crtbegin.o; the linker won’t look for a file to match a wildcard. The wildcard also means that it doesn’t matter which directory crtbegin.o is in. */ *crtbegin.o(.ctors) *(SORT(.ctors.*)) *(.ctors) ___ctors_end = .; } .dtors : { ___dtors = .; *crtbegin.o(.dtors) *(SORT(.dtors.*)) *(.dtors) ___dtors_end = .; } .got : { *(.got.plt) *(.got) } .dynamic : { *(.dynamic) } /* We want the small data sections together, so single-instruction offsets can access them all, and initialized data all before uninitialized, so we can shorten the on-disk segment size. */ .sdata : { *(.sdata) } _edata = .; PROVIDE (edata = .); __bss_start = .; .sbss : { *(.sbss) *(.scommon) } .bss : 184 ■ GNUPro Tools for Embedded Systems CYGNUS Linker features for MN10200 { *(.dynbss) *(.bss) *(COMMON) } . = ALIGN(32 / 8); _end = . ; PROVIDE (end = .); /* Stabs debugging sections. */ .stab 0 : { *(.stab) } .stabstr 0 : { *(.stabstr) } .stab.excl 0 : { *(.stab.excl) } .stab.exclstr 0 : { *(.stab.exclstr) } .stab.index 0 : { *(.stab.index) } .stab.indexstr 0 : { *(.stab.indexstr) } .comment 0 : { *(.comment) } /* DWARF debug sections. Symbols in the DWARF debugging sections are relative to the beginning of the section so we begin them at 0. */ /* DWARF 1 */ .debug 0 : { *(.debug) } .line 0 : { *(.line) } /* GNU DWARF 1 extensions */ .debug_srcinfo 0 : { *(.debug_srcinfo) } .debug_sfnames 0 : { *(.debug_sfnames) } /* DWARF 1.1 and DWARF 2 */ .debug_aranges 0 : { *(.debug_aranges) } .debug_pubnames 0 : { *(.debug_pubnames) } /* DWARF 2 */ .debug_info 0 : { *(.debug_info) } .debug_abbrev 0 : { *(.debug_abbrev) } .debug_line 0 : { *(.debug_line) } .debug_frame 0 : { *(.debug_frame) } .debug_str 0 : { *(.debug_str) } .debug_loc 0 : { *(.debug_loc) } .debug_macinfo 0 : { *(.debug_macinfo) } /* SGI/MIPS DWARF 2 extensions */ .debug_weaknames 0 : { *(.debug_weaknames) } .debug_funcnames 0 : { *(.debug_funcnames) } .debug_typenames 0 : { *(.debug_typenames) } .debug_varnames 0 : { *(.debug_varnames) } /* Top of RAM is 0x43ffff, but Cygmon uses the top 4K for its stack. */ .stack 0x43f000 : { _stack = .; *(.stack) } /* These must appear regardless of . */ } CYGNUS GNUPro Tools for Embedded Systems ■ 185 Matsushita development H,¦XXHc¦HQru®¤®® There are two ways for GDB to talk to an MN10200 target. Each target requires that the program be compiled with a target specific linker script. ■ Simulator GDB’s built-in software simulation of the MN10200 processor allows the debugging of programs compiled for the MN10200 without requiring any access to actual hardware. For this target, the ‘sim.ld’ linker script must be specified at compilation. To activate this mode in GDB, use a ‘target sim’ command. Then load the code into the simulator by using the ‘ load’ command and debug it in the normal fashion. ■ Remote target board For this target, the ‘eval.ld’ linker script must be specified at compilation. To connect to the target board in GDB, use the ‘target remote <devicename>’ command where ‘<devicename>’ will be a serial device such as ‘/dev/ttya’ for Unix, or ‘com2’ for Windows NT. Then, load the code onto the target board by using a ‘load’ command. After being downloaded, the program executes. NOTE: When using the remote target, GDB does not accept the ‘run’ command. However, since downloading the program has the side effect of setting the PC to the start address, you can start your program by using a ‘continue’ command. For the available generic debugger options, see Debugging with GDB in GNUPro Debugging Tools. There are no MN10200-specific debugger command-line options. 186 ■ GNUPro Tools for Embedded Systems CYGNUS Simulator issues for MN10200 cj¦f#rc¦HQru®¤®® The simulator supports the following registers. ■ Volatile registers are d0, d1, a0, a1. ■ Saved registers are d2, d3, a2, a3. ■ Special purpose registers are pc, ccr, mdr. Memory is 256k bytes starting at location 0. The stack starts at the highest memory address and works downward. The heap starts at the lowest address after the text, data and bss. There are no MN10200-specific simulator command-line options. CYGNUS GNUPro Tools for Embedded Systems ■ 187 Matsushita development «Xro¦#XH©c`u®¤®® CygMon is a ROM monitor designed to be portable across a large number of embedded systems. ■ “Configuring CygMon for MN10200” (below) ■ “Building programs with MN10200 for using CygMon” on page 188 See also “CygMon (Cygnus ROM monitor) for the MN10200 and MN10300 processors” on page 211 for information on using CygMon. roQcX¦coX«XroQru®¤®® The following documentation explains how to configure, build, and load CygMon ROM monitor program under the Unix operating system. The following conventions have been used in this example configuration: ■ The Unix forward slash is the directory delimiter in all path descriptions. ■ ‘%’ is the Unix command prompt. ■ “source_dir” represents the complete path to the directory, which contains the source code. The user can install the source code in any directory. ■ “build_dir” represents the complete path to the user created build directory. The following steps show how to configure, build, and load CygMon ROM monitor program under the Unix operating system. 1. Create a build directory and use the ‘cd’ command to get to that directory. % cd build_dir 2. Configure the toolchain normally: % source_dir/configure —-target=mn10200-elf 3. Now use the following command to build a CygMON image in S-records that can be downloaded to a PROM burner or emulator. % make all-target-cygmon The S-record image will be in the following file. build_dir/mn10200-elf/cygmon/mn10200/cygmon.sre CygMon uses the single serial port on the MN10200 evaluation board. The default settings are 19200, n, 8, 1. ¦cf?coX|rX#j©c`u®¤®®Qr¦coX «Xro There is a special linker script for use with CygMon. The following example shows a 188 ■ GNUPro Tools for Embedded Systems CYGNUS CygMon usage with MN10200 final link command. % mn10200-elf-gcc hello.o -Teval.ld -o hello is the linker script. The user program is given a program memory area starting at the ‘0x408000’ address, and a stack growing down from the ‘0x43f000’ address. Space between the program memory and the stack pointer is used for the heap. eval.ld NOTE: The linker script should be specified after all other object files and libraries, the simplest way to ensure being to place it at the very end of the commandline. CYGNUS GNUPro Tools for Embedded Systems ■ 189 Matsushita development #¦`c#u®®®?H¨Hfr|jHo The following documentation discusses developing with the GNUPro tools for the MN10300 targets. ■ “Compiler features for MN10300” on page 191 ■ “ABI summary for MN10300” on page 192 ■ “Assembler features for MN10300” on page 197 ■ “Linker features for the MN10300” on page 200 ■ “Debugger features for MN10300” on page 207 ■ “Simulator information for MN10300” on page 208 ■ “Configuring, building and loading CygMon for MN10300” on page 209 ■ “CygMon (Cygnus ROM monitor) for the MN10200 and MN10300 processors” on page 211 190 ■ GNUPro Tools for Embedded Systems CYGNUS Compiler features for MN10300 rj|cfHQH#¦HQru®®® The following documentation describes MN10300-specific features of the GNUPro compiler. ■ “MN10300-specific command-line options” (below) ■ “Preprocessor symbols for MN10300” (below) ■ “MN10300-specific attributes” (below) u®®®a|H6cQc66rjj#o?afcoHr|cro For a list of available generic compiler options, see “GNU CC command options” on page 67 and “Option summary for GCC” on page 69 in Using GNU CC in GNUPro Compiler Tools. In addition, the following MN10300-specific command-line options are supported: -mmult-bug Generate code to work around bugs in the MN10300 multiply instruction. This is the default. -mno-mult-bug Do not generate code to work around bugs in the MN10300 multiply instruction. H|r6Hr«j,rfQru®®® By default, the compiler defines the ‘__MN10300__’ and ‘__mn10300__’ preprocessor symbols. u®®®a|H6cQc6#c,¦H There are no MN10300-specific attributes. See “Declaring attributes of functions” on page 234 and “Specifying attributes of variables” on page 243 in Using GNU CC in GNUPro Compiler Tools for more information regarding extensions to the C language family. CYGNUS GNUPro Tools for Embedded Systems ■ 191 Matsushita development ¦jj#«Qru®®® The following documentation describes the MN10300 Application Binary Interface (ABI). ■ “Data types sizes and alignments for MN10300” (below) ■ “Register allocation for MN10300” (below) ■ “Register usage for MN10300” on page 193 ■ “Switches for MN10300” on page 193 ■ “Stack frame information for MN10300 targets” on page 194 ■ “Argument passing for MN10300” on page 195 ■ “Function return values for MN10300” on page 195 ##«|HcH#o?#fcXojHoQru®®® Table 16 describes the size and alignment of the data types for the MN10300 processor. Table 16: Data types, sizes and alignment for the MN10300 Type Size (bytes) Alignment 1 byte 2 bytes 2 bytes 4 bytes 4 bytes 4 bytes 4 bytes 4 bytes Pointer 4 bytes char short int long long long float double long double 1 byte 2 bytes 4 bytes 4 bytes 8 bytes 4 bytes 8 bytes 8 bytes 4 bytes The following issues are also pertinent to the MN10300 processor. ■ The stack is kept 4-byte aligned. ■ Structures and unions have the same alignment as their most strictly aligned component. HXcH#ffr6#croQru®®® The compiler allocates registers in the following order: d0, d1, a0, a1, d2, d3, a2, a3. 192 ■ GNUPro Tools for Embedded Systems CYGNUS ABI summary for MN10300 HXcH¦#XHQru®®® Table 17 describes register usage for the MN10300 processor. Table 17: Register usage for MN10300 Type Registers Volatile d0, d1, a0, a1 Saved d2, d3, a2, a3 Special purpose sp, ccr, mdr, lar, lir * † Frame pointer a3 (if needed)‡ * † ‡ The compiler does not generate code that uses the ccr, lar or lir registers. mdr is only used for integer division and modulo operations. a3 is the frame pointer in functions which need a frame pointer; otherwise it is an allocatable register. ©c6`HQru®®® There are no switches that effect the ABI or calling conventions. There are two switches that control a particular aspect of code generation. See “MN10300-specific command-line options” on page 191. CYGNUS GNUPro Tools for Embedded Systems ■ 193 Matsushita development #6eQ#jHcoQrj#croQru®®®#XH The following documentation details stack frame usage for the MN10300 processor. ■ The stack grows downwards from high addresses to low addresses. ■ A leaf function need not allocate a stack frame if it does not need one. ■ A frame pointer need not be allocated. ■ The stack pointer shall always be aligned to 4 byte boundaries. For MN10300 stack frame information, see Figure 6 (below) for functions taking a fixed number of arguments and see Figure 7 on page 195 for functions taking a variable number of arguments. Figure 6: MN13000 stack frames for functions that take a fixed number of arguments Before call: High memory After call: local variables, register save area, etc. local variables, register save area, etc. arguments on stack arguments on stack SP, FP register save area local variables alloca allocations Low memory arguments on stack SP, FP Stack frames for functions taking a variable number of arguments use the following definitions. The frame pointer (FP) points to the same location as the stack pointer (SP). 194 ■ GNUPro Tools for Embedded Systems CYGNUS ABI summary for MN10300 Figure 7: MN10300 stack frames for functions that take a variable number of arguments Before call: High memory After call: local variables, register save area, etc. local variables, register save area, etc. arguments on stack arguments on stack SP, FP save area for 4 words passed in registers local variables alloca allocations Low memory arguments on stack SP, FP X¦jHo|#coXQru®®® ‘d0’ and ‘d1’ are used for passing the first two argument words, any additional argument words are passed on the stack. Any argument, more than 8 bytes in size, is passed by invisible reference. The callee is responsible for copying the argument if the callee modifies the argument. ¦o6croH¦o¨#f¦HQru®®® ‘a0’ is used to return pointer values. ‘d0’ and ‘d1’ are used for returning other scalars and structures less than or equal to 8 bytes in length. If a function returns a structure that is greater than 8 bytes in length, then the caller is CYGNUS GNUPro Tools for Embedded Systems ■ 195 Matsushita development responsible for passing in a pointer to the callee which specifies a location for the callee to store the return value. This pointer is passed as the first argument word before any of the function’s declared parameters. 196 ■ GNUPro Tools for Embedded Systems CYGNUS Assembler features for MN10300 Hj,fHQH#¦HQru®®® The following documentation describes MN10300-specific features of the GNUPro assembler. ■ “MN10300 command-line assembler options” (below) ■ “Syntax for MN10300” (below) ■ “Special characters for MN10300” (below) ■ “Register names for MN10300” (below) ■ “Addressing modes for MN10300” on page 198 ■ “Floating point for MN10300” on page 198 ■ “Opcodes for MN10300” on page 199 ■ “Synthetic instructions for MN10300” on page 199 ■ “MN10300-specific assembler error messages” on page 199 u®®®6rjj#o?afcoH#Hj,fHr|cro For a list of available generic assembler options, see “Command-line options” on page 21 in Using as in GNUPro Utilities. There are no MN10300 specific assembler command-line options. «o#ªQru®®® The MN10300 syntax is based on the syntax in Matsushita’s MN10300 Architecture Manual. The assembler does not support “user defined instructions” nor does it support synthesized instructions (pseudo instructions, which correspond to two or more actual machine instructions). |H6c#f6`##6HQru®®® The MN10300 assembler supports ‘;’ (semi-colon) and ‘#’ (pound). Both characters are line comment characters when used in column zero. The semi-colon may also be used to start a comment anywhere within a line. HXcHo#jHQru®®® The following register names are supported for the MN10300: d0, d1, d2, d3, a0, a1, a2, a3, sp, mdr, ccr, lir, and lar. CYGNUS GNUPro Tools for Embedded Systems ■ 197 Matsushita development ??HcoXjr?HQru®®® See Table 18 for the MN10300 assembler addressing modes. Table 18: MN10300 addressing modes Register direct Dm/Dn Am/An Immediate value imm8/regs imm16 imm32 imm40 imm48 Register indirect (Am)/(An) Register indirect with displacement (d8, Am)/(d8, An) (d16, Am)/(d16, An) ‘d8’ is sign extended ‘d16’ is sign extended (d32, Am)/(d32, An) (d8,pc) (d16,pc) ‘d8’ is sign extended ‘d16’ is sign extended (d32,pc) (d8,sp) (d16,sp) ‘d8’ is sign extended ‘d16’ is sign extended (d32,sp) Absolute (abs16) ‘abs16’ is zero extended (abs32) Register indirect with index (Di,Am)/(Di,An) m, n, and i are subscripts that indicate and i have values from 0 to 3. source, destination and index, respectively. m, n For detailed information, see MN10300 Series Instruction Manual. fr#coX|rcoQru®®® Although the MN10300 has no hardware floating point, the ‘.float’ and ‘.double’ directives generate IEEE-format floating-point values for compatibility with other development tools. 198 ■ GNUPro Tools for Embedded Systems CYGNUS Assembler features for MN10300 |6r?HQru®®® For detailed information on the MN10300 machine instruction set, see MN10300 Series Instruction Manual. The GNU assembler implements all the standard MN10300 opcodes. «o`Hc6co¦6croQru®®® The assembler does not support “user defined instructions” nor does it support synthesized instructions (pseudo instructions, which correspond to two or more actual machine instructions). u®®®a|H6cQc6#Hj,fHHrjH#XH The following error messages may happen for the MN10300. Error: Unrecognized opcode This instruction is misspelled or there is a syntax error somewhere. Warning: operand out of range An immediate value was specified that is too large for the instruction. CYGNUS GNUPro Tools for Embedded Systems ■ 199 Matsushita development coeHQH#¦HQr`Hu®®® The following documentation describes MN10300-specific features of the GNUPro linker. ■ “MN10300-specific linker options” (below) ■ “Linker script for the MN10300” (below) u®®®a|H6cQc6fcoeHr|cro For a list of available generic linker options, see “Linker scripts” on page 261 in Using ld in GNUPro Utilities. In addition, the following MN10300-specific command-line option is supported. -relax Enables the optimization linker pass to shorten branches. coeH6c|Qr`Hu®®® The GNU linker uses a linker script to determine how to process each section in an object file, and how to lay out the executable. The linker script is a declarative program consisting of a number of directives. For instance, the ‘ENTRY()’ directive specifies the symbol in the executable that will be the executable’s entry point. For a complete description of the linker script, see “Linker scripts” on page 261 in Using ld in GNUPro Utilities. For the MN10300 tools, there are two linker scripts, one to be used when compiling for the simulator and one to be used when compiling for the evaluation board. This is the ‘sim.ld’ linker script for the simulator. /* Linker script for the MN10300 simulator. */ OUTPUT_FORMAT("elf32-mn10300", "elf32-mn10300", "elf32-mn10300") OUTPUT_ARCH(mn10300) ENTRY(_start) GROUP(-lc -leval -lgcc) SEARCH_DIR(/usr/local/mn10300-elf/lib); /* Do we need any of these for elf? __DYNAMIC = 0; */ SECTIONS { /* Read-only sections, merged into text segment: */ /* Start of RAM (leaving room for Cygmon data) */ . = 0; 200 ■ GNUPro Tools for Embedded Systems CYGNUS Linker features for the MN10300 .interp : { *(.interp) } .hash : { *(.hash)} .dynsym : { *(.dynsym)} .dynstr : { *(.dynstr)} .gnu.version : { *(.gnu.version)} .gnu.version_d : { *(.gnu.version_d)} .gnu.version_r : { *(.gnu.version_r)} .rel.text : { *(.rel.text) *(.rel.gnu.linkonce.t*) } .rela.text : { *(.rela.text) *(.rela.gnu.linkonce.t*) } .rel.data : { *(.rel.data) *(.rel.gnu.linkonce.d*) } .rela.data : { *(.rela.data) *(.rela.gnu.linkonce.d*) } .rel.rodata : { *(.rel.rodata) *(.rel.gnu.linkonce.r*) } .rela.rodata : { *(.rela.rodata) *(.rela.gnu.linkonce.r*) } .rel.got : { *(.rel.got)} .rela.got : { *(.rela.got)} .rel.ctors : { *(.rel.ctors)} .rela.ctors : { *(.rela.ctors)} .rel.dtors : { *(.rel.dtors)} .rela.dtors : { *(.rela.dtors)} .rel.init : { *(.rel.init)} .rela.init : { *(.rela.init)} .rel.fini : { *(.rel.fini)} .rela.fini : { *(.rela.fini)} .rel.bss : { *(.rel.bss)} .rela.bss : { *(.rela.bss)} .rel.plt : { *(.rel.plt)} .rela.plt : { *(.rela.plt)} .init : { *(.init)} =0 .plt : { *(.plt)} .text : { *(.text) /* .gnu.warning sections are handled specially by elf32.em. *(.gnu.warning) *(.gnu.linkonce.t*) *(.gcc_except_table) } =0 _etext = .; PROVIDE (etext = .); .fini : { *(.fini) } =0 .rodata : { *(.rodata) *(.gnu.linkonce.r*) } .rodata1 : { *(.rodata1) } CYGNUS */ GNUPro Tools for Embedded Systems ■ 201 Matsushita development /* Adjust the address for the data segment. We want to adjust up to the same address within the page on the next page up. */ . = ALIGN(256) + (ALIGN(8) & (256 - 1)); .data : { *(.data) *(.gnu.linkonce.d*) CONSTRUCTORS } .data1 : { *(.data1) } .ctors : { ___ctors = .; *(.ctors) ___ctors_end = .; } .dtors : { ___dtors = .; *(.dtors) ___dtors_end = .; } .got : { *(.got.plt) *(.got) } .dynamic : { *(.dynamic) } /* We want the small data sections together, so single-instruction offsets can access them all, and initialized data all before uninitialized, so we can shorten the on-disk segment size. */ .sdata : { *(.sdata) } _edata = .; PROVIDE (edata = .); __bss_start = .; .sbss : { *(.sbss) *(.scommon) } .bss : { *(.dynbss) *(.bss) *(COMMON) } _end = . ; PROVIDE (end = .); /* Stabs debugging sections. */ .stab 0 : { *(.stab) } .stabstr 0 : { *(.stabstr) } .stab.excl 0 : { *(.stab.excl) } .stab.exclstr 0 : { *(.stab.exclstr) } .stab.index 0 : { *(.stab.index) } 202 ■ GNUPro Tools for Embedded Systems CYGNUS Linker features for the MN10300 .stab.indexstr 0 : { *(.stab.indexstr) } .comment 0 : { *(.comment) } /* DWARF debug sections. Symbols in the DWARF debugging sections are relative to the beginning of the section so we begin them at 0. */ /* DWARF 1 */ .debug 0 : { *(.debug) } .line 0 : { *(.line) } /* GNU DWARF 1 extensions */ .debug_srcinfo 0 : { *(.debug_srcinfo) } .debug_sfnames 0 : { *(.debug_sfnames) } /* DWARF 1.1 and DWARF 2 */ .debug_aranges 0 : { *(.debug_aranges) } .debug_pubnames 0 : { *(.debug_pubnames) } /* DWARF 2 */ .debug_info 0 : { *(.debug_info) } .debug_abbrev 0 : { *(.debug_abbrev) } .debug_line 0 : { *(.debug_line) } .debug_frame 0 : { *(.debug_frame) } .debug_str 0 : { *(.debug_str) } .debug_loc 0 : { *(.debug_loc) } .debug_macinfo 0 : { *(.debug_macinfo) } /* SGI/MIPS DWARF 2 extensions */ .debug_weaknames 0 : { *(.debug_weaknames) } .debug_funcnames 0 : { *(.debug_funcnames) } .debug_typenames 0 : { *(.debug_typenames) } .debug_varnames 0 : { *(.debug_varnames) } .stack 0x80000 : { _stack = .; *(.stack) } /* These must appear regardless of . */ } This is the ‘eval.ld’ linker script for the MN10300 evaluation board. /* Linker script for the MN10300 Series Evaluation Board. It differs from the default linker script only in the addresses assigned to text and stack sections. */ OUTPUT_FORMAT("elf32-mn10300", "elf32-mn10300", "elf32-mn10300") OUTPUT_ARCH(mn10300) ENTRY(_start) GROUP(-lc -leval -lgcc) SEARCH_DIR(/usr/local/mn10300-elf/lib); /* Do we need any of these for elf? __DYNAMIC = 0; */ CYGNUS GNUPro Tools for Embedded Systems ■ 203 Matsushita development SECTIONS { /* Read-only sections, merged into text segment: */ /* Start of RAM (leaving room for Cygmon data) */ . = 0x48008000; .interp : { *(.interp) } .hash : { *(.hash)} .dynsym : { *(.dynsym)} .dynstr : { *(.dynstr)} .gnu.version : { *(.gnu.version)} .gnu.version_d : { *(.gnu.version_d)} .gnu.version_r : { *(.gnu.version_r)} .rel.text : { *(.rel.text) *(.rel.gnu.linkonce.t*) } .rela.text : { *(.rela.text) *(.rela.gnu.linkonce.t*) } .rel.data : { *(.rel.data) *(.rel.gnu.linkonce.d*) } .rela.data : { *(.rela.data) *(.rela.gnu.linkonce.d*) } .rel.rodata : { *(.rel.rodata) *(.rel.gnu.linkonce.r*) } .rela.rodata : { *(.rela.rodata) *(.rela.gnu.linkonce.r*) } .rel.got : { *(.rel.got)} .rela.got : { *(.rela.got)} .rel.ctors : { *(.rel.ctors)} .rela.ctors : { *(.rela.ctors)} .rel.dtors : { *(.rel.dtors)} .rela.dtors : { *(.rela.dtors)} .rel.init : { *(.rel.init)} .rela.init : { *(.rela.init)} .rel.fini : { *(.rel.fini)} .rela.fini : { *(.rela.fini)} .rel.bss : { *(.rel.bss)} .rela.bss : { *(.rela.bss)} .rel.plt : { *(.rel.plt)} .rela.plt : { *(.rela.plt)} .init : { *(.init)} =0 .plt : { *(.plt)} .text : { *(.text) /* .gnu.warning sections are handled specially by elf32.em. *(.gnu.warning) *(.gnu.linkonce.t*) *(.gcc_except_table) 204 ■ GNUPro Tools for Embedded Systems */ CYGNUS Linker features for the MN10300 } =0 _etext = .; PROVIDE (etext = .); .fini : { *(.fini) } =0 .rodata : { *(.rodata) *(.gnu.linkonce.r*) } .rodata1 : { *(.rodata1) } /* Adjust the address for the data segment. We want to adjust up to the same address within the page on the next page up. */ . = ALIGN(256) + (ALIGN(8) & (256 - 1)); .data : { *(.data) *(.gnu.linkonce.d*) CONSTRUCTORS } .data1 : { *(.data1) } .ctors : { ___ctors = .; *(.ctors) ___ctors_end = .; } .dtors : { ___dtors = .; *(.dtors) ___dtors_end = .; } .got : { *(.got.plt) *(.got) } .dynamic : { *(.dynamic) } /* We want the small data sections together, so single-instruction offsets can access them all, and initialized data all before uninitialized, so we can shorten the on-disk segment size. */ .sdata : { *(.sdata) } _edata = .; PROVIDE (edata = .); __bss_start = .; .sbss : { *(.sbss) *(.scommon) } .bss : { *(.dynbss) *(.bss) *(COMMON) } _end = . ; PROVIDE (end = .); CYGNUS GNUPro Tools for Embedded Systems ■ 205 Matsushita development /* Stabs debugging sections. */ .stab 0 : { *(.stab) } .stabstr 0 : { *(.stabstr) } .stab.excl 0 : { *(.stab.excl) } .stab.exclstr 0 : { *(.stab.exclstr) } .stab.index 0 : { *(.stab.index) } .stab.indexstr 0 : { *(.stab.indexstr) } .comment 0 : { *(.comment) } /* DWARF debug sections. Symbols in the DWARF debugging sections are relative to the beginning of the section so we begin them at 0. */ /* DWARF 1 */ .debug 0 : { *(.debug) } .line 0 : { *(.line) } /* GNU DWARF 1 extensions */ .debug_srcinfo 0 : { *(.debug_srcinfo) } .debug_sfnames 0 : { *(.debug_sfnames) } /* DWARF 1.1 and DWARF 2 */ .debug_aranges 0 : { *(.debug_aranges) } .debug_pubnames 0 : { *(.debug_pubnames) } /* DWARF 2 */ .debug_info 0 : { *(.debug_info) } .debug_abbrev 0 : { *(.debug_abbrev) } .debug_line 0 : { *(.debug_line) } .debug_frame 0 : { *(.debug_frame) } .debug_str 0 : { *(.debug_str) } .debug_loc 0 : { *(.debug_loc) } .debug_macinfo 0 : { *(.debug_macinfo) } /* SGI/MIPS DWARF 2 extensions */ .debug_weaknames 0 : { *(.debug_weaknames) } .debug_funcnames 0 : { *(.debug_funcnames) } .debug_typenames 0 : { *(.debug_typenames) } .debug_varnames 0 : { *(.debug_varnames) } /* Top of RAM is 0x48100000, but Cygmon uses the top 4K for its stack. */ .stack 0x480ff000 : { _stack = .; *(.stack) } /* These must appear regardless of . */ } 206 ■ GNUPro Tools for Embedded Systems CYGNUS Debugger features for MN10300 H,¦XXHQH#¦HQru®®® The following documentation describes MN10300-specific features of the GNUPro debugger, GDB. For the available generic debugger options, see Debugging with GDB in GNUPro Debugging Tools. There are no MN10300-specific debugger command-line options. There are two ways for GDB to talk to an MN10300 target. Each target requires that the program be compiled with a target specific linker script. ■ Simulator GDB’s built-in software simulation of the MN10300 processor allows the debugging of programs compiled for the MN10300 without requiring any access to actual hardware. For this target the ‘sim.ld’ linker script must be specified at compilation. To activate this mode in GDB, use the ‘target sim’ command. Then, load the code into the simulator using the ‘load’ command and debug it in the normal fashion. ■ Remote target board For any given target, the ‘eval.ld’ linker script must be specified at compilation. To connect to the target board in GDB, use the ‘target remote <devicename>’ command, where ‘<devicename>’ will be a serial device such as ‘/dev/ttya’ (Unix) or ‘com2’ (Windows NT). Then, load the code onto the target board by using the load command. After being downloaded, the program executes. NOTE: When using a remote target, GDB does not accept the ‘run’ command. However, since downloading the program has the side effect of setting the PC to the start address, you can start your program by using the ‘continue’ command. CYGNUS GNUPro Tools for Embedded Systems ■ 207 Matsushita development cj¦f#rcoQrj#croQru®®® The simulator supports the following registers for the MN10300. ■ Volatile registers are d0, d1, a0, a1. ■ Saved registers are d2, d3, a2, a3. ■ Special purpose registers are sp, pc, ccr, mdr, lar, lir. Memory is 256k bytes starting at location, 0. The stack starts at the highest memory address and works downward. The heap starts at the lowest address after the text, data and bss. There are no MN10300-specific simulator command-line options. 208 ■ GNUPro Tools for Embedded Systems CYGNUS Configuring, building and loading CygMon for MN10300 roQcX¦coX<,¦cf?coX#o?fr#?coX «XroQru®®® The following documentation explains how to configure, build, and use the CygMon ROM monitor program under the Unix operating system. ■ “Configuring CygMon for MN10300” (below) ■ “Building user programs for MN10300 to run under CygMon” on page 210 See also “CygMon (Cygnus ROM monitor) for the MN10200 and MN10300 processors” on page 211 for general information on CygMon. roQcX¦coX«XroQru®®® The following conventions have been used in in the example configuration. ■ The Unix forward slash is the directory delimiter in all path descriptions. ■ The Unix the command prompt is shown as ‘%’. ■ “source_dir” represents the complete path to the directory, which contains the source code. ■ “build_dir” represents the complete path to the user created build directory. Use the following steps for configuring CygMon for the MN10300 processor. 1. Create a build directory and ‘cd’ to that directory. % cd build_dir 2. Then configure the toolchain normally: % source_dir/configure —-target=mn10300-elf 3. Now use the following command to build a CygMON image in S-records that can be downloaded to a PROM burner or emulator. % make all-target-cygmon The S-record image will be in the following directory: build_dir/mn10300-elf/cygmon/mn10300/cygmon. CygMon uses serial port 2 (connector CN2) on the MN10300 evaluation board. The default settings are 38400, n, 8, 1. CYGNUS GNUPro Tools for Embedded Systems ■ 209 Matsushita development ¦cf?coX¦H|rX#jQru®®®r¦o¦o?H «Xro There is a special linker script for use with CygMON for MN10300. An example of the final link command follows. % mn10300-elf-gcc hello.o -Teval.ld -o hello ‘eval.ld’ is the linker script. The user program is given a program memory area starting at address ‘0x48008000’, and a stack growing down from address ‘0x480ff000’. Space between the program memory and the stack pointer is used for the heap. NOTE: The linker script should be specified after all other object files and libraries (the simplest way to ensure this is to place it at the very end of the commandline). 210 ■ GNUPro Tools for Embedded Systems CYGNUS CygMon (Cygnus ROM monitor) for the MN10200 and MN10300 processors «Xro~«Xo¦jrocrQr`H u®¤®®#o?u®®®|r6Hr CygMon is a ROM monitor designed to be portable across a large number of embedded systems. It is also completely compatible with existing GDB protocols, thus allowing the use of a standard ROM monitor with existing GNU tools across a wide range of embedded platforms. CygMon has basic program handling and debugging commands, programs can be loaded into memory and run, and the contents of memory can be viewed. There are several more advanced options that can be included at compile time, such as a disassembler (This of course increases the code size significantly). Since CygMon contains a GDB remote stub, full debugging can be done from a host running GDB to a target running CygMon. Switching between CygMon monitor mode and GDB stub mode is designed to be transparent to the user, since CygMon can detect when GDB is communicating with the target and switch into stub mode. When GDB stops communicating with the target normally, it sends a termination packet which lets the stub know when to switch to the CygMon monitor mode. The command parser was written specifically for CygMon, to provide necessary functionality in limited space. All commands consist of words followed by arguments separated by spaces. Abbreviations of command names may be used. Any unique subset of a command name is recognized as being that command, so ‘du’ is recognized to be the ‘dump’ command. The user is prompted to resolve any ambiguities. Generally, a command with some or all of its arguments empty will either assume a default set of arguments or return the status of the operation controlled by the command. CygMon includes an API, which allows user programs, running under it, to use system calls for various functions. The available system calls allow access to the serial ports and on-board timer functions, if they are available. «Xro6rjj#o?fc The following documentation describes usage of all the commands that can be typed at the CygMon command prompt. Arguments in [brackets] are optional; arguments without brackets are required. NOTE: All commands can be invoked by typing enough of the command name to uniquely specify the command. Some commands have aliases, which are one letter abbreviations for commands which do not have unique first letters. Aliases for all commands are shown in the help screens. CYGNUS GNUPro Tools for Embedded Systems ■ 211 Matsushita development baud Usage: baud speed The baud command sets the speed of the active serial port. It takes one argument, which specifies the speed to which the port will be set. Example: baud 9600 Sets the speed of the active port to 9600 baud. break Usage: break [location] The break command displays and sets breakpoints in memory. It takes zero or one argument. With zero arguments, it displays a list of all currently set breakpoints. With one argument it sets a new breakpoint at the specified location. Example: break 4ff5 Sets a breakpoint at address ‘4ff5’. disassemble Usage: disassemble [location] The disassemble command disassembles the contents of memory. Because of the way breakpoints are handled, all instructions are shown and breakpoints are not visible in the disassembled code. The disassemble command takes zero or one argument. When called with zero arguments, it starts disassembling from the current (user program) ‘pc’. When called with a location, it starts disassembling from the specified location. When called after a previous call and with no arguments, it disassembles the next area of memory after the one previously disassembled. Example: disassemble 45667000 Displays disassembled code starting at location ‘45667000’. dump Usage: dump location The dump command shows a region of 16 bytes around the specified location, aligned to 16 bytes. Thus, ‘dump 65’ would show all bytes from ‘60’ through ‘6f’. Example: dump 44f5 Displays 16 bytes starting with ‘44f0’ and ending with ‘44ff’. 212 ■ GNUPro Tools for Embedded Systems CYGNUS CygMon (Cygnus ROM monitor) for the MN10200 and MN10300 processors go Usage: go [location] The go command starts user program execution. It can take zero or one argument. If no argument is provided, go starts execution at the current ‘pc’. If an argument is specified, go sets the ‘pc’ to that location, and then starts execution at that location. Example: go 40020000 Sets the ‘pc’ to 40020000, and starts program execution. help Usage: help [command] The help command without arguments shows a list of all available commands with a short description of each one. With a command name as an argument it shows usage for the command and a paragraph describing the command. Usage is shown as command name followed by names of extensions or arguments. Arguments in [brackets] are optional, plain text arguments are required. Note that all commands can be invoked by typing enough of the command name to uniquely specify the command. Some commands have aliases, which are one letter abbreviations for commands which do not have unique first letters. Aliases for all commands are shown in the help screen, which displays commands in the following format. command name: (alias, if any) description of command Example: help foo Shows the help screen for the ‘foo’ command. load Usage: load The load command switches the monitor into a state where it takes all input as S-records and stores them in memory. The monitor exits this mode when a termination record is hit, or certain errors (such as an invalid S-record) cause the load to fail. memory Usage: memory[.size] location [value] The memory command is used to view and modify single locations in memory. It can take a size extension, which follows the command name or partial command name CYGNUS GNUPro Tools for Embedded Systems ■ 213 Matsushita development without a space, and is a period followed by the number of bits to be viewed or modified. Options are 8, 16, 32, and 64. Without a size extension, the memory command defaults to displaying or changing 8 bits at a time. The memory command can take one or two arguments, independent of whether a size extension is specified. With one argument, it displays the contents of the specified location. With two arguments, it replaces the contents of the specified location with the specified value. Example: memory.8 45f6b2 57 Places the 8 bit value 57 at the ‘45f6b2’ location. port Usage: port [port number] The port command allows control over the serial port being used by the monitor. It takes zero or one argument. Called with zero arguments it displays the port currently in use by the monitor. Called with one argument it switches the port in use by the monitor to the one specified. It then prints out a message on the new port to confirm the switch. Example: port 1 Switches the port in use by the monitor to port 1. NOTE: The port command is only usable for the MN10300 processor, not the MN10200 processor. register Usage: register [register name] [value] The register command allows the viewing and manipulation of register contents. It can take zero, one, or two arguments. When called with zero arguments, the register command displays the values of all registers. When called with only the register name argument, it displays the contents of the specified register. When called with both a register name and a value, it places that value into the specified register. Example: register g1 1f Places the value 1f in the register ‘g1’. 214 ■ GNUPro Tools for Embedded Systems CYGNUS CygMon (Cygnus ROM monitor) for the MN10200 and MN10300 processors reset Usage: reset The reset command resets the board. step Usage: step [location] The step command causes one instruction of the user program to execute, then returns control to the monitor. It can take zero or one argument. If no argument is provided, step executes one instruction at the current pc. If a location is specified, step executes one instruction at the specified location. Example: step Executes one instruction at the current pc. terminal Usage: terminal type The terminal command sets the type of the current terminal to that specified in the type argument. The only available terminal types are vt100 and dumb. This is used by the line editor to determine how to update the terminal display. Example: terminal dumb Sets the type of the current terminal to a dumb terminal. transfer Usage: transfer The transfer or $ function transfers control to the GDB stub. This function does not actually need to be called by the user, as connecting to the board with GDB will call it automatically. The transfer command takes no arguments. The $ command does not wait for a return, but executes immediately. A telnet setup in line mode will require a return when executed by the user, as the host computer does not pass any characters to the monitor until a return is pressed. Disconnecting from the board in GDB automatically returns control to the monitor. unbreak Usage: unbreak location The unbreak command removes breakpoints from memory. It takes one argument, the CYGNUS GNUPro Tools for Embedded Systems ■ 215 Matsushita development location from which to remove the breakpoint. Example: unbreak 4ff5 Removes a previously set breakpoint at the ‘4ff5’ memory location. usage Usage: usage Shows the amount of memory being used by the monitor, broken down by category. Despite its name, it has nothing to do with the usage of any other command. version Usage: version The version command displays the version of the monitor. «Xro Currently, the only APIs that are supported are ‘read’ and ‘write’. read int read(int fd, char *ptr, int amt); Reads ‘amt’ bytes of data into ‘ptr’ from the current serial port. ‘fd’ is ignored. write int write(int fd, char *ptr, int amt); Writes ‘amt’ bytes of data from ‘ptr’ to the current serial port. If the program is running in GDB stub mode, the output will appear in GDB. ‘fd’ is ignored. 216 ■ GNUPro Tools for Embedded Systems CYGNUS 10 ?H¨Hfr|jHo The following documentation discusses cross-development with the MIPS family of processors. ■ “Compiling on MIPS targets” on page 219 ■ “Preprocessor macros for MIPS targets” on page 222 ■ “Assembler options for MIPS targets” on page 223 ■ “Debugging on MIPS targets” on page 228 ■ “Linking MIPS with the GOFAST library” on page 230 For information about a specific MIPS processor series, see the following documentation. ■ For VR 4100 processors, see “Developing for the V4100 processors” on page 232 ■ For VR 4300 processors, see “Developing for the V4300 processors” on page 248 ■ For the VR 5000 series processors, see “Developing for the V5xxx processors” on page 263 For documentation about the MIPS instruction set, see MIPS RISC Architecture, by Kane and Heindrich (Prentice-Hall). Cross-development tools in the GNUPro Toolkit are normally installed with names CYGNUS GNUPro Tools for Embedded Systems ■ 217 MIPS development that reflect the target machine, so that you can install more than one set of tools in the same binary directory. The target name, constructed with the --target option to configure, is used as a prefix to the program name. For example, the compiler for MIPS (using GCC in native configurations) is called by one of the following names, depending on which configuration you installed: mips-ecoff-gcc, if configured for big-endian byte ordering, and mipsel-ecoff-gcc, if configured for little-endian byte ordering. 218 ■ GNUPro Tools for Embedded Systems CYGNUS Compiling on MIPS targets rj|cfcoXro#XH The MIPS target family toolchain controls variances in code generation directly from the command line. When you run GCC, you can use command-line options to choose whether to take advantage of the extra MIPS machine instructions, and whether to generate code for hardware or software floating point. rj|cfHr|croQr#XH When you run GCC, you can use command-line options to choose machine-specific details. For information on all the GCC command-line options, see “GNU CC command options” on page 67 and “Option summary for GCC” on page 69 in Using GNU CC in GNUPro Compiler Tools. There are a great many compiler options for specific MIPS targets. Options for architecture and code generation are for all MIPS targets; see ““Options for architecture and code generation for MIPS targets”” (below). NOTE: The compiler options, -mips2, -mips3 and -mips4, cannot be used on the MIPS R3000. |croQr#6`cH6¦H#o?6r?HXHoH#croQr #XH The following options for architecture and code generation can be used on all MIPS targets. -g The compiler debugging option, -g, is essential to locate interspersed high-level source statements, since without debugging information the assembler cannot tie most of the generated code to lines of the original source file. -mcpu=r3000 -mcpu=cputype Since most MIPS boards are based on the MIPS R3000, the default for this particular configuration is -mcpu=r3000. In the general case, use -mcpu=r3000 on any MIPS platform to assume the defaults for the machine type, cputype, when scheduling instructions. The default, cputype, on other MIPS configurations is r3000, which picks the longest cycle times for any of the machines, in order that the code run at reasonable rates on any MIPS processor. Other choices for cputype are r2000, r3000, r4000, r6000, r4400, r4600, r4650, r8000, and orion. While picking a specific cputype will schedule things appropriately for that CYGNUS GNUPro Tools for Embedded Systems ■ 219 MIPS development particular chip, the compiler will not generate any code that does not meet level 1 of the MIPS ISA (Instruction Set Architecture) unless you use the -mips2, -mips3, or -mips4 switch. -mips1 Generate code that meets level 1 of the MIPS ISA. -mips2 Generate code that meets level 2 of the MIPS ISA. -mips3 Generate code that meets level 3 of the MIPS ISA. -mips4 Generate code that meets level 4 of the MIPS ISA. -meb Generate big endian code. -mel Generate little endian code. -mad Generate multiply-add instructions, which are part of the MIPS 4650. -m4650 Generate multiply-add instructions along with single-float code. -mfp64 Select the 64-bit floating point register size. -mfp32 Select the 32-bit floating point register size. -mgp64 Select the 64-bit general purpose register size. -mfp32 Select the 32-bit general purpose register size. -mlong64 Make long integers 64 bits long, not the default of 32 bits long. This works only if you’re generating 64-bit code. -G num Put global and static items less than or equal to num bytes into the small ‘.data’ or ‘.bss’ sections instead of into the normal ‘.data’ and ‘.bss’ sections. This allows the assembler to emit one-word memory reference instructions based on the global pointer (gp or $28),instead of on the normal two words used. By default, num is 8. When you specify another value, GCC also passes the ‘-G num’ switch to the assembler and linker. 220 ■ GNUPro Tools for Embedded Systems CYGNUS Compiling on MIPS targets rj|cfHr|croQrQfr#coX|rcoQr#XH The following options select software or hardware floating point. -msoft-float Generate output containing library calls for floating point. The mips-ecoff configuration of libgcc (an auxiliary library distributed with the compiler) includes a collection of subroutines to implement these library calls. In particular, this GCC configuration generates subroutine calls compatible with the US Software GOFAST R3000 floating point library, giving you the opportunity to use either the libgcc implementation or the US Software version. To use the ‘libgcc’ version, you need nothing special; GCC links with libgcc automatically after all other object files and libraries. Because the calling convention for MIPS architectures depends on whether or not hardware floating-point is installed, ‘-msoft-float’ has one further effect: GCC looks for sub-routine libraries in a subdirectory, ‘soft-float’, for any library directory in your search path. (NOTE: This does not apply to directories specified using the ‘-l’ option.) With GNUPro Toolkit, you can select the standard libraries as usual with the options, ‘-lc’ or ‘-lm’, because the soft-float versions are installed in the default library search paths. WARNING: Treat ‘-msoft-float’ as an all or nothing proposition. If you compile any program’s module with -msoft-float, it’s safest to compile all modules of the program that way—and it’s essential to use this option when you link. -mhard-float Generate output containing floating point instructions, and use the corresponding MIPS calling convention. This is the default. -msingle-float Generate code for a target that only has support for single floating point values, such as the MIPS 4650. fr#coX|rco¦,r¦coHQr#XH Two kinds of floating point subroutines are useful with GCC: ■ Software implementations of the basic functions Floating-point functionality for multiply, divide, add, subtract usage, used when there is no hardware floating-point support. When you indicate that no hardware floating point is available (with the GCC option, -msoft-float, GCC generates calls compatible with the US Software GOFAST library. If you do not have this library, you can still use software floating point; ‘libgcc’, the auxiliary library distributed with GCC, includes compatible—though slower—subroutines. CYGNUS GNUPro Tools for Embedded Systems ■ 221 MIPS development ■ General-purpose mathematical subroutines GNUPro Toolkit includes an implementation of the standard C mathematical subroutine library. See “Mathematical library overview” and “Mathematical functions (math.h)” in GNUPro Math Library in GNUPro Libraries. H|r6Hrj#6rQr#XH GCC defines the following preprocessor macros for the MIPS configurations. Any MIPS architecture: __mips__ MIPS architecture with big-endian numeric representation: __MIPSEB__ MIPS architecture with little-endian numeric representation: __MIPSEL__ 222 ■ GNUPro Tools for Embedded Systems CYGNUS Assembler options for MIPS targets Hj,fHr|croQr#XH To use the GNU assembler to assemble GCC output, configure GCC with the --with-gnu-as or the -mgas option. -mgas Compile using gas to assemble GCC output. -Wa If you invoke gas through the GNU C compiler (version 2), you can use the ‘-Wa’ option to pass arguments through to the assembler. One common use of this option is to exploit the assembler’s listing features. Assembler arguments that you specify with gcc -Wa must be separated from each other by commas like the options, -alh and -L, in the following example input separate from -Wa. mips-ecoff-gcc -c -g -O -Wa,-alh, -L file.c -L The additional assembler option ‘-L’ preserves local labels, which may make the listing output more intelligible to humans. For example, in the following commandline, the assembler option, -ahl, requests a listing interspersed with high-level language and assembly language. mips-ecoff-gcc -c -g -O -Wa,-alh, -L file.c ‘-L’ preserves local labels, while the compiler debugging option , -g, gives the assembler the necessary debugging information. Hj,fHr|croQrfccoXr¦|¦Qr #XH Use the following options to enable listing output from the assembler (the letters after ‘-a’ may be combined into one option, such as -aln). -a By itself, ‘-a’ requests listings of high-level language source, assembly language, and symbols. -ah Request a high-level language listing. -al Request an output-program assembly listing. -as Request a symbol table listing. -ad Omit debugging directives from the listing. High-level listings require that a compiler debugging option, like ‘-g’, be used, and CYGNUS GNUPro Tools for Embedded Systems ■ 223 MIPS development that assembly listings (-al) also be requested. Hj,fHfccoXa6rorf?cH6c¨HQr #XH Use the following listing-control assembler directives to control the appearance of the listing output (if you do not request listing output with one of the ‘-a’ options, the following listing-control directives have no effect). .list Turn on listings for further input. .nolist Turn off listings for further input. .psize linecount, columnwidth Describe the page size for your output (the default is 60, 200). as generates form feeds after printing each group of linecount lines. To avoid these automatic form feeds, specify 0 as linecount. The variable input for columnwidth uses the same descriptive option. .eject Skip to a new page (issue a form feed). .title Use as the title (this is the second line of the listing output, directly after the source file name and page number) when generating assembly listings. .sbttl Use as the subtitle (this is the third line of the listing output, directly after the title line) when generating assembly listings. -an Turn off all forms processing. |H6c#f#Hj,fHr|croQr#XH The MIPS configurations of gas support three special options, accepting one other for command-line compatibility. See “Command-line options” on page 21 in Using as in GNUPro Utilities for information on the command-line options available with all configurations of the GNU assembler. -G num This option sets the largest size of an object that will be referenced implicitly with the gp register. It is only accepted for targets that use ECOFF format. The default value for num is 8. -EB -EL Any MIPS configuration of gas can select big-endian or little-endian output at run 224 ■ GNUPro Tools for Embedded Systems CYGNUS Assembler options for MIPS targets time (unlike the other GNU development tools, which must be configured for one or the other). Use -EB to select big-endian output, and -EL for little-endian. -nocpp This option is ignored. It is accepted for command-line compatibility with other assemblers, which use it to turn off C-style preprocessing. With the GNU assembler, there is no need for -nocpp, because the GNU assembler itself never runs the C preprocessor. Hj,fH?cH6c¨HQr?H,¦XXcoXcoQrj#croQr #XH MIPS ECOFF using gas supports several directives for generating debugging information that are not supported by traditional MIPS assemblers: def file tag stabd dim scl type stabn endef size val stabs The debugging information generated by the three .stab directives can only be read by GDB, not by traditional MIPS debuggers (this enhancement is required to fully support C++ debugging); they are primarily used by compilers, not assembly language programmers. See “Assembler directives” on page 69 in Using as in GNUPro Utilities for full information on all GNU assembler directives. r,dH66r?H The assembler supports some additional sections for a MIPS ECOFF target besides the usual .text, .data and .bss. The sections have the following definitions. .rdata For readonly data .sdata For small data .sbss For small common objects When assembling for ECOFF, the assembler uses the $gp ($28) register to form the address of a small object. Any object in the .sdata or .sbss section is considered small in this sense. Using small ECOFF objects requires linker support, and assumes that the $gp register has been correctly initialized (normally done automatically by the startup code). NOTE: MIPS ECOFF assembly code must not modify the $gp register. CYGNUS GNUPro Tools for Embedded Systems ■ 225 MIPS development |croQr r,dH66r?H#XH The following options are for MIPS ECOFF object code targets. gcc -G For external objects, or for objects in the .bss section, you can use the gcc -G option to control the size of objects addressed using $gp; the default value is 8, meaning that a reference to any object eight bytes or smaller will use $gp. -G 0 Passing -G 0 to gas prevents gas from using the $gp register on the basis of object size (the assembler uses $gp for objects in .sdata or .sbss in any case). cH6c¨HQr r,dH66r?H#XH The following directives are for MIPS ECOFF object code targets. .comm .lcomm The size of an object in the .bss section is set by the .comm or .lcomm directive that defines it. .extern The size of an external object may be set with the .extern directive. Use the following input, for example. .extern sym, 4 This directive declares that the object at sym is 4 bytes in length, while leaving sym otherwise undefined. HXcH¦H?QrcoHXH#X¦jHoQr #XH Arguments on MIPS architectures are not split, so that, if a double word argument starts in R7, the entire word gets pushed onto the stack instead of being split between R7 and the stack. If the first argument is an integer, MIPS uses the subsequent registers for all arguments. The subsequent calling convention for MIPS architectures depends on whether or not hardware floating-point is installed. Even if it is, MIPS uses the registers for integer arguments whenever the first argument is an integer. MIPS uses the registers for floating-point arguments only for floating-point arguments and only if the first argument is a floating point. The subsequent calling convention for MIPS also depends on whether standard 32-bit mode or Cygnus 64-bit mode is in use; 32-bit mode only allows MIPS to use even numbered registers, while 64-bit mode allows MIPS to use both odd and even numbered registers. Functions compiled with different calling conventions cannot be run together without 226 ■ GNUPro Tools for Embedded Systems CYGNUS Assembler options for MIPS targets some care. MIPS passes the first four words of arguments in registers R4 through R7, which are also called registers A0 through A3. If the function return values are integers, they are stored in R2 and R3. HXcH¦H?QrQfr#coXa|rco#X¦jHoQr #XH If the first argument is a floating-point, MIPS uses the following registers for floating-point arguments. ■ In 32-bit mode, MIPS passes the first four words of arguments in registers F12 and F14. ■ In 64-bit mode, MIPS passes the first four words of arguments in registers F12 through F15. If the function return value is a floating-point, it’s stored in F0’. #ffcoX6ro¨HocroQrcoHXH#X¦jHoQr #XH The following conventions apply to integer arguments. R0 is hardwired to the value 0. R1, which is also called AT, is reserved as the assembler’s temporary register. R26 through R29 and R31 have reserved uses. Registers R2 through R15, R24, and R25 can be used for temporary values. When a function is compiled with the default options, it must return with R16 through R23 and R30 unchanged. #ffcoX6ro¨HocroQrQfr#coXa|rco#X¦jHo Qr#XH The following conventions apply to floating-point arguments. None of the registers has a reserved use. ■ In 32-bit mode, F0 through F18 can be used for temporary values. When a function is compiled with the default options, it must return with F20 through F30 unchanged. ■ In 64-bit mode, F0 through F19 can be used for temporary values. When a function is compiled with the default options, it must return with F20 through F31 unchanged. CYGNUS GNUPro Tools for Embedded Systems ■ 227 MIPS development H,¦XXcoXro#XH The MIPS-configured GDB uses the calling convention, mips-ecoff-gdb. GDB needs to know the following things to talk to your MIPS target. ■ Specifications for what serial device connects your host to your MIPS board (the first serial device available on your host is the default). ■ Specifications for what speed to use over the serial device. mips-ecoff-gdb uses the MIPS remote serial protocol to connect your development host machine to the target board. Use one of the following GDB commands to specify the connection to your target board. target mips port To run a program on the board, start up GDB with the name of your program as the argument. To connect to the board, use the command, target mips port, where port is the name of the serial port connected to the board. If the program has not already been downloaded to the board, you may use the load command to download it. You can then use all the usual GDB commands. For example, the following example’s sequence connects to the target board through a serial port, and loads and runs a program (designated as prog for variable-dependent input in the following example) through the debugger. <your host prompt> mips-ecoff-gdb prog (gdb) target remote /dev/ttyb ... (gdb) load ... (gdb) run target mips hostname: portnumber You can specify a TCP/IP connection instead of a serial port, using the syntax, hostname: portnumber (assuming your board, designated here as hostname, is connected so that this makes sense; for instance, the connection may use a serial line, designated by your variable portnumber input, managed by a terminal concentrator). GDB also supports the special command, set mipsfpu off, for MIPS targets. If your target board does not support the MIPS floating point coprocessor, you should use the command, set mipsfpu off (found in your .gdbinit file). This tells GDB how to find the return value of functions returning floating point values. It also allows 228 ■ GNUPro Tools for Embedded Systems CYGNUS Debugging on MIPS targets GDB to avoid saving the floating point registers when calling functions on the board. If you neglect to use the command, set mipsfpu off, some calls will fail, such as print strlen ("abc"). set remotedebug n You can locate some debugging information about communications with the board by setting the remotedebug variable. If you set it to 1 using set remotedebug 1, every packet will be displayed. If you set it to 2, every character will be displayed. You can check the current value at any time with the command, show remotedebug. CYGNUS GNUPro Tools for Embedded Systems ■ 229 MIPS development coecoX©c``H fc,#« The GOFAST library is available with two interfaces. -msoft-float output places all arguments in registers, which (for subroutines using double arguments) is compatible with the interface identified as “Interface 1: all arguments in registers” in the GOFAST documentation. For information about US Software’s floating point library, read US Software GOFAST R3000 Floating Point Library (United States Software Corporation). For full compatibility with all GOFAST subroutines, you need to make a slight modification to some of the subroutines in the GOFAST library. If you purchase and install the GOFAST library, you can link your code to that library in a number of different ways, depending on where and how you install the library. To focus on the issue of linking, the following examples assume you’ve already built object modules with appropriate options (including -msoft-float). This is the simplest case; it assumes that you’ve installed the GOFAST library as the file, fp.a, in the same directory where you do development, as shown in the GOFAST documentation. $ mips-ecoff-gcc -o prog prog.o...-lc fp.a In a shared development environment, the following example may be more realistic. IMPORTANT! The following documentation assumes you’ve installed the GOFAST library as user-dir/libgofast.a, where ‘userdir’ is an apporpriate directory on your development system. mips-ecoff-gcc -o program program.o... -lc -Luserdir -lgofast You can eliminate the need for a -L option with a little more setup, using an environment variable like the following example (the example assumes you use a command shell compatible with the Bourne shell): LIBRARY_PATH=userdir; export LIBRARY_PATH mips-ecoff-gcc -o program program.o...-lc -lgofast The GOFAST library is installed in the directory, userdir/libgofast.a, and the environment variable, LIBRARY_PATH, instructs GCC to look for the library in userdir. (The syntax shown here for setting the environment variable is the Unix Bourne Shell, /bin/sh, syntax; adjust as needed for your system.) NOTE: All the variations on linking with the GOFAST library explicitly include ‘-lc’ before the GOFAST library. ‘-lc’ is the standard C subroutine library; normally, you don’t have to specify this subroutine, since linking with the GOFAST library is automatic. When you link with an alternate software floating-point library, however, the order of linking is important. In this situation, specify ‘-lc’ to the left of the GOFAST library, to ensure that standard library subroutines also use the GOFAST floating-point code. 230 ■ GNUPro Tools for Embedded Systems CYGNUS Linking MIPS with the GOFAST library ¦ff6rj|#c,cfc«©c``H fc,#«Qr The GCC calling convention for functions whose first and second arguments have type, float, is not completely compatible with the definitions of those functions in the GOFAST library, as shipped. The following functions are affected: fpcmp fpmul fpacos fpatan2 fpadd fpdiv fpasin fppow fpsub fpfmod fpatan Since the GOFAST library is normally shipped with source, you can make these functions compatible with the gcc convention by adding the following instruction to the beginning of each affected function, then rebuilding the library. move $5,$6 CYGNUS GNUPro Tools for Embedded Systems ■ 231 MIPS development H¨Hfr|coXQr`HVu®®|r6Hr The following documentation describes developing with the VR4100 MIPS processors. ■ “Compiler features for V4100 processors” on page 233 ■ “ABI summary for V4100 processors” on page 234 ■ “Assembler features for V4100 processors” on page 238 ■ “Linker issues for V4100 processors” on page 239 ■ “Debugger issues for V4100 processors” on page 242 ■ “Stand-alone simulator issues for V4100 processors” on page 245 The following documentation can serve as additional resource for working with the VR4100 processors. ■ ■ ■ ■ ■ ■ ■ DDB-VR4100 Evaluation Board (NEC document #U11852EU1V0UM00, September 1996) VR4100 MIPS Microprocessor User’s Manual (MIPS Technologies, Inc., 1995) MIPS R4000 User’s Manual (Joseph Heinrich, Prentice-Hall, 1993, ISBN 0-13-105925-4) MIPS RISC Architecture (Gerry Kane & Joe Heinrich, Prentice-Hall, 1992, ISBN 0-13-590472-2) Address Allocation for Private Internets, RFC 1918 (de Groot, G. J. and Lear, E., February 1996) System V Application Binary Interface (Prentice-Hall, 1991, ISBN 0-13-880170-3) System V Application Binary Interface MIPS Processor Supplement (Prentice-Hall, 1991, ISBN 0-13-880170-3) 232 ■ GNUPro Tools for Embedded Systems CYGNUS Compiler features for V4100 processors rj|cfHQH#¦HQrVu®® |r6Hr For a list of available generic compiler options, see “GNU CC command options” on page 67 and “Option summary for GCC” on page 69 in Using GNU CC in GNUPro Compiler Tools. In addition, the following VR4100-specific command-line options are supported: -EL Compile code for the processor in little endian mode. -EB Compile code for the processor in big-endian mode. H|r6Hr«j,rfQrVu®®|r6Hr See Table 19 (below) for preprocessors symbols and their definitions with the GNU compiler options. Table 19: Preprocessors symbols and their definitions for VR4100 processors Symbol Compiler options which define the symbol mips Only if ‘-ansi’ not used. _mips Only if ‘-ansi’ not used. __mips Always defined. __mips_soft_float Always defined. MIPSEB Only if ‘-ansi’ and ‘-EL’ are not used. _MIPSEB Only if ‘-EL’ is not used. __MIPSEB Only if ‘-EL’ is not used. __MIPSEB__ Only if ‘-EL’ is not used. R4100 Only if ‘-ansi’ not used. _R4100 Always defined. MIPSEL Only if ‘-ansi’ is not used and ‘-EL’ is used. _MIPSEL Only if ‘-EL’ is used. __MIPSEL Only if ‘-EL’ is used. __MIPSEL__ Only if ‘-EL’ is used. NOTE: If neither ‘-EL’ or ‘-EB’ are defined, big-endian is the default. CYGNUS GNUPro Tools for Embedded Systems ■ 233 MIPS development ¦jj#«QrVu®®|r6Hr The following documentation discusses the Application Binary Interface (ABI) issues for the VR4100 processors. ■ “Data types and alignment for V4100 processors” (below) ■ “Register allocation for V4100 processors” on page 235 ■ “The stack frame for V4100 processors” on page 236 ■ “Argument passing for V4100 processors” on page 237 ■ “Function return values for V4100 processors” on page 237 GNUPro Toolkit for the MIPS16 does not comply with the proposed MIPS Embedded Application Binary Interface (EABI) because that EABI has not yet been finalized. ##«|H#o?#fcXojHoQrVu®®|r6Hr See Table 20 for the data type sizes and alignments for VR4100 processors. Table 20: Data type sizes and alignments for VR4100 processors Data type Size char 1 byte short 2 bytes int 4 bytes long 4 bytes long long 8 bytes float 4 bytes double 8 bytes long double 8 bytes pointer 4 bytes 234 ■ GNUPro Tools for Embedded Systems CYGNUS ABI summary for V4100 processors HXcH#ffr6#croQrVu®®|r6Hr See for register allocation for the VR4100 processors. Table 21: Register allocation for the VR4100 processors General purpose (integer) register Usage Constant zero Volatile Saved Parameters Kernel reserved Global pointer Stack pointer Frame pointer Return address $0 $1 through $15, $24, $25 $16 through $23, $30 $4 through $7 $26, $27 $28 $29 $30 $31 NOTE: Do not depend on this order. Instead, use GCC’s ‘asm( )’ extension and allow the compiler to schedule registers. CYGNUS GNUPro Tools for Embedded Systems ■ 235 MIPS development `H#6eQ#jHQrVu®®|r6Hr The stack frame specifics for the VR4100 processors have the following guidelines. See Figure 8 on page 236 for stack frame specifics for the VR4100 processors. ■ ■ ■ ■ The stack grows downwards from high addresses to low addresses. A leaf function need not allocate a stack frame if it does not need one. A frame pointer need not be allocated. The stack pointer shall always be aligned to 8 byte boundaries. Figure 8: Stack frame guidelines for the VR4100 processors Before call: High memory SP, FP After call: local variables, register save area, etc. local variables, register save area, etc. reserved space for largest arghument list arguments on stack plus plus reserved area for parameter registers (4 words) reserved area for parameter registers (4 words) F local variables register save area alloca allocations Low memory 236 ■ GNUPro Tools for Embedded Systems S reserved space for largest arghument list CYGNUS ABI summary for V4100 processors X¦jHo|#coXQrVu®®|r6Hr The compiler passes arguments to a function using a combination of integer general registers, and the stack. The number, type, and relative position of arguments in the calling functions argument list define the combination of registers and memory used. The general registers ‘$4..$7’ pass the first few arguments. If the function being called returns a structure or union, the calling function passes the address of an area large enough to hold the structure to the function in ‘$4’. The function being called copies the returned structure into this area before returning. The address in ‘$4’ becomes the first argument to the function for the purpose of argument register allocation. All user arguments are then shifted down by one. The compiler always allocates space on the stack for all arguments even when some or all of the arguments to a function are passed in registers. This stack space is a large enough structure to contain all the arguments. After promotion and structure return pointer insertion, the arguments are aligned according to normal structure rules. Locations used for arguments within the stack frame are referred to as the home locations. Floating point numbers are handled the same way as integers of equivalent size. The compiler passes structures and unions as if they were very wide integers with their size rounded up to an integral number of words. The “fill bits” necessary for rounding up are undefined. A structure can be split so that a portion is passed in registers and the remainder passed on the stack. In this case, the first words are passed in ‘$4’, ‘$5’, ‘$6’, and ‘$7’ as needed, with additional words passed on the stack. The rules for assigning which arguments go into registers and which arguments must be passed on the stack can be explained by considering the list of arguments itself as a structure, aligned according to normal structure rules. Mapping of this structure into the combination of registers and stack is as follows: the first four words go into the integer registers $4..$7; everything else with a structure offset greater than or equal to 16 is passed on the stack. ¦o6croH¦o¨#f¦HQrVu®®|r6Hr A function can return “no value”, an integral or pointer value, a floating-point value (single or double precision), or a structure; unions are treated the same as structures. A function that returns no value puts no particular value in any register. A function that returns an integral, a pointer value, or a floating-point value places its result in register ‘$2’. The caller to a function that returns a structure or a union passes the address of an area large enough to hold the structure in register ‘$4’. The function returns a pointer to the returned structure in register ‘$2’. CYGNUS GNUPro Tools for Embedded Systems ■ 237 MIPS development Hj,fHQH#¦HQrVu®® |r6Hr For a list of available generic assembler options, see “Command-line options” on page 21 in Using as in GNUPro Utilities. -EB -EL Any MIPS configuration of the assembler can select big-endian or little-endian output at run time. Use ‘-EB’ to select big-endian output, and ‘-EL’ for little-endian. The default is big-endian. For information about the MIPS instruction set, see MIPS RISC Architecture (Kane and Heindrich, Prentice-Hall). For an overview of MIPS assembly conventions, see “Appendix D: Assembly Language Programming” in MIPS RISC Architecture. There are 32 64-bit general (integer) registers, named ‘$0’ through ‘$31’. For specific assembler mnemonics, see MIPS RISC Architecture or MIPS R4000 User’s Manual. 238 ■ GNUPro Tools for Embedded Systems CYGNUS Linker issues for V4100 processors coeHc¦HQrVu®®|r6Hr For a list of available generic linker options, see “Linker scripts” on page 261 in Using ld in GNUPro Utilities. In addition, the following VR4100-specific command-line options are supported. -EL Link objects for the processor in little endian mode. -EB Link objects for the processor in big-endian mode. coeH6c|QrVu®®|r6Hr The GNU linker uses a linker script to determine how to process each section in an object file, and how to lay out the executable. The linker script is a declarative program consisting of a number of directives. For instance, the ‘ENTRY( )’ directive specifies which symbol in the executable will be designated the executable’s entry point. Since linker scripts can be complicated to write, the linker includes one built-in script that defines the default linking process. The following ‘pmon.ld’ linker script should be used when linking programs for the NEC DDB- VR4100 board. It can also be used to link programs for execution in the MIPS simulator. /* The following TEXT start address leaves space for the monitor workspace. */ ENTRY(_start) OUTPUT_ARCH("mips:4000") OUTPUT_FORMAT("elf32-bigmips", "elf32-bigmips", "elf32-littlemips") GROUP(-lc -lpmon -lgcc) SEARCH_DIR(.) __DYNAMIC = 0; /* Allocate the stack to be at the top of memory, since the stack grows down */ PROVIDE (__stack = 0); /* PROVIDE (__global = 0); */ /*Initalize some symbols to be zero so we can reference them in the crt0 without core dumping. These functions are all optional, but we do this so we can have our crt0 always use them if they exist. This is so BSPs work better when using the crt0 installed with gcc. We have to initalize them twice, so we multiple object file formats, as some prepend an underscore. */ CYGNUS GNUPro Tools for Embedded Systems ■ 239 MIPS development PROVIDE (hardware_init_hook = 0); PROVIDE (software_init_hook = 0); SECTIONS { . = 0xA0020000; .text : { _ftext = . ; *(.init) eprol = .; *(.text) *(.mips16.fn.*) *(.mips16.call.*) PROVIDE (__runtime_reloc_start = .); *(.rel.sdata) PROVIDE (__runtime_reloc_stop = .); *(.fini) etext = .; _etext = .; } . = .; .rdata : { *(.rdata) } _fdata = ALIGN(16); .data : { *(.data) CONSTRUCTORS } . = ALIGN(8); _gp = . + 0x8000; __global = _gp; .lit8 : { *(.lit8) } .lit4 : { *(.lit4) } .sdata : { *(.sdata) } . = ALIGN(4); edata = .; _edata = .; _fbss = .; .sbss : { *(.sbss) *(.scommon) 240 ■ GNUPro Tools for Embedded Systems CYGNUS Linker issues for V4100 processors } .bss : { _bss_start = . ; *(.bss) *(COMMON) } end = .; _end = .; } CYGNUS GNUPro Tools for Embedded Systems ■ 241 MIPS development H,¦XXHc¦HQrVu®®|r6Hr The following documentation discusses debugging with VR4100 processors. To connect GDB to the DDB-VR4100 board, start GDB with the ‘ddb’ target. DDB boards are little-endian and use the PMON monitor. GDB uses the MIPS remote debugging protocol to talk to this target via a serial port. Additionally, the ‘ ddb’ target supports network downloading using the TFTP protocol. To run a program on the DDB-VR4100 board, start up GDB with the name of your program as the argument. To connect to the DDB-V R4100 board, for instance, use the ‘target ddb <port>’ command, where ‘<port>’ is the name of the serial port connected to the board. If the program has not already been downloaded to the board, you can use the ‘load’ command to download it. You can then use all the usual GDB commands. For example, the following example’s input connects the target board through a Unix serial port, and loads and runs a program called ‘ prog’ through the debugger. % mips64vr4100-elf-gdb prog GDB is free software and . . . (gdb) target ddb /dev/ttyb (gdb) load prog (gdb) run On PC platforms substitute the specific COM port, using the following example’s input. C:\> gdb prog GDB is free software and . . . (gdb) target ddb com3 (gdb) load prog (gdb) run You can speed up loading of programs on the DDB board by installing a network card on the board and using TFTP (trivial file transfer protocol) to download programs to the board. You must first configure the DDB board manually for network use. #XH6rjj#o?r|croQrVu®®|r6Hr The following documentation discusses debugger commands for targeting with VR4100 boards. target ddb <hostname>:<portnumber> On all GDB Unix host configurations, you can specify a TCP connection (for instance, to a serial line managed by a terminal concentrator) instead of a serial port, using the syntax ‘<hostname>:<portnumber>’. 242 ■ GNUPro Tools for Embedded Systems CYGNUS Debugger issues for V4100 processors target ddb <port> <remote-tftp-name> target ddb <hostname>:<portnumber> <remote-tftp-name> Specify a ‘<remote-tftp-name>’ in the target command to enable TFTP downloading in GDB. This name must be in the format: ‘<host>:<filename>’. Here ‘<host>’ is either the name or the IP address of the host system that is running a TFTP server (typically your host Unix workstation). Here ‘<filename>’ is the name of a temporary file that GDB will create during downloading. The directory containing the temporary file must be world-readable; the ‘ /tmp’ directory is usually a good choice. target ddb <port> <remote-tftp-name> <local-tftp-name> target ddb <hostname>:<portnumber> <remote-tftp-name> <local-tftp-name> You can also specify an optional ‘<local-tftp-name>’, which is a simple filename (without the ‘<host>’ prefix). This tells GDB the name of the temporary filename as seen by the host machine that is running GDB. This is necessary only if the name of the file as seen by the host machine is different from the name of that same file as seen via TFTP from the target board. This might be the case if the TFTP server is running on a different machine than the GDB host, and has a different name for the same temporary file because of NFS mounting or symbolic links. The following example shows input for a TFTP download. The host machine running the TFTP server has the IP address ‘192.168.1.1’. The temporary file that GDB will create for TFTP downloading is ‘/tmp/download.tmp’. % mips64vr4100-elf-gdb prog GDB is free software and . . . (gdb) target ddb /dev/ttyb 192.168.1.1:/tmp/download.tmp (gdb) load prog (gdb) run In the next example, both a remote TFTP name and a local TFTP are specified, because the TFTP server is running on a different machine, and has a different name for the same temporary file than the host machine that is running GDB. The name of the temporary file as seen by the TFTP server is ‘/mymachine/tmp/download.tmp’, but the name of that same file as seen by the host running GDB is ‘/tmp/download.tmp’. % mips64vr4100-elf-gdb prog GDB is free software and . . . (gdb) target ddb /dev/ttyb \ 192.168.1.1:/mymachine/tmp/download.tmp /tmp/download.tmp (gdb) load prog (gdb) run CYGNUS GNUPro Tools for Embedded Systems ■ 243 MIPS development |H6c#f?H,¦XXcoX6rjj#o?QrVu®®,r#? GDB also supports the following special commands for MIPS targets. set remotedebug num show remotedebug For this to be useful, you must know something about the MIPS debugging protocol, also called ‘rmtdbg’. An informal description can be found in the GDB source files, specifically in the file: ‘remote-mips.c’. You can see some debugging information about communications with the board by setting the ‘remotedebug’ variable. If you set it to 1 using ‘set remotedebug 1’, every packet is displayed. If you set it to 2, every character is displayed. You can check the current value at any time with the command ‘show remotedebug’. set timeout seconds set retransmit-timeout seconds show timeout show retransmit-timeout You can control the timeout used while waiting for a packet, in the MIPS debugging protocol, with the ‘set timeout seconds’ command. The default is 5 seconds. Similarly, you can control the timeout used while waiting for an acknowledgment of a packet with: set retransmit-timeout seconds The default is 3 seconds. You can inspect both values with ‘show timeout’ and ‘show retransmit-timeout’. The timeout set by ‘set timeout’ does not apply when GDB is waiting for your program to stop. In that case, GDB waits forever because it has no way of knowing how long the program is going to run before stopping. 244 ■ GNUPro Tools for Embedded Systems CYGNUS Stand-alone simulator issues for V4100 processors #o?a#froHcj¦f#rc¦HQr Vu®®|r6Hr The following documentation discusses the three run-time command-line options for the stand-alone simulator: -t, -v and -m. Before you can download a program to the DDB board, without GDB, the program must be converted into S-records. See also “Producing S-records for V4100 boards” on page 246. ■ The ‘-t’ command-line option to the stand-alone simulator turns on tracing of all memory fetching and storing in the simulator: C:\> run -t hello.xl C:\> The simulator writes the trace information to the file ‘trace.din’. Here are the first few lines of a trace file: 2 2 2 2 2 2 2 ■ 00000000a0020000 00000000a0020004 00000000a0020008 00000000a002000c 00000000a0020010 00000000a0020014 00000000a0020018 ; ; ; ; ; ; ; width width width width width width width 4 4 4 4 4 4 4 ; ; ; ; ; ; ; load load load load load load load instruction instruction instruction instruction instruction instruction instruction The ‘-v’ command-line option prints some simple statistics. C:\> run -v hello.xl Hello, world! 3 + 4 = 7 MIPS 64-bit simulator Big endian memory model 0x00100000 bytes of memory at 0x00000000A0000000 Instruction fetches = 20653 Pipeline ticks = 20653 ■ The ‘-m’ command-line option sets the size of the simulated memory area. The default size is 1048576 bytes (1 megabyte). The simulator rounds up the size you request to the next power of two. C:\> run -v -m 200000 hello.xl Hello, world! 3 + 4 = 7 MIPS 64-bit simulator Big endian memory model 0x00040000 bytes of memory at 0x00000000A0000000 Instruction fetches = 20341 Pipeline ticks = 20341 CYGNUS GNUPro Tools for Embedded Systems ■ 245 MIPS development r?¦6coXaH6r?QrVu®®,r#? The following documentation describes how to download and run directly on the DDB board. Before you can download a program to the DDB board, without GDB, the program must be converted into S-records. First, compile a little-endian executable (‘hello.xl’) using the ‘-EL’ option to GCC. mips64vr4100-elf-gcc -g hello.c -o hello.xl -EL Then, with the following command, read the contents of the ‘hello.x1’executable, convert the code and data into S-records, and put the result into the ‘hello.srec’ file. mips64vr4100-elf-objcopy -O srec hello.x1 hello.srec The following first few lines are from the resulting ‘hello.srec’ download. S00D000068656C6C6F2E7372656303 S31AA00200001024023CE00042340060824000688040AAAA0A3C5534 S31AA0020015554A3500008A44000880440000084400080944000011 S31AA002002A000005000A1500000000030020150000000014000497 S31AA002003F08000000001004023CE00042340060824010A0023C36 r©ofr#?coXr`H,r#?QrVu®®,r#? You can download programs to the DDB board for execution directly on the board, without GDB. The DDB board has a standalone ROM monitor called PMON that supports loading of programs via a serial port or Ethernet. Use the Unix ‘tip’ program to download a program to the DDB. In the following example, the DDB board is connected to serial port ‘/dev/ttya’ on a Unix host. % tip /dev/ttya NEC010> load tty0 Downloading from tty0, ^C to abort ~>hello.srec NEC010> g Downloading a program via Ethernet is similar. First, convert the program to S-records; see “Producing S-records for V4100 boards” (above). Then, copy the S-record file to a directory that is readable by all users, and use the ‘ chmod o+r ’ Unix command to make the S-record file readable. A good choice is a ‘/tmp’ directory, since it is likely to be already readable by all users. PMON uses the TFTP protocol to download programs via Ethernet. You must have a TFTP server running on your Unix host in order to use net downloads. This server can be installed by your system administrator. The following example shows a net download (‘%’ being a shell prompt). Substitute your Unix host’s name or IP address for ‘host’ in the ‘load’ command. % cp hello.srec /tmp % chmod o+r /tmp/hello.srec 246 ■ GNUPro Tools for Embedded Systems CYGNUS Stand-alone simulator issues for V4100 processors % tip /dev/ttya NEC010> load host:/tmp/hello.srec Downloading from host:/tmp/hello.srec, ^C to abort ~>hello.srec Entry address is a0020000 total = 0x7588 bytes NEC010> g CYGNUS GNUPro Tools for Embedded Systems ■ 247 MIPS development H¨Hfr|coXQr`HV®®|r6Hr The following documentation describes developing with the VR4300 MIPS processors. ■ “Compiler features for the V4300 processors” on page 249 ■ “Assembler issues for the V4300 processors” on page 253 ■ “Linker issues for the V4300 processors” on page 254 ■ “Debugger issues for V4300 processors” on page 257 ■ “Stand-alone simulator features for V4300 processors” on page 260 The following documentation serves as reference material for using the VR4300 MIPS processors. ■ DDB-VR4300 Evaluation Board (NEC document #U11852EU1V0UM00 September 1996) ■ VR4300 MIPS Microprocessor User’s Manual (MIPS Technologies, Inc. 1995) ■ MIPS R4000 User’s Manual (Joseph Heinrich, Prentice-Hall, 1993, ISBN 0-13-105925-4) ■ MIPS RISC Architecture (Gerry Kane & Joe Heinrich, Prentice-Hall, 1992, ISBN 0-13-590472-2) ■ Address Allocation for Private Internets, RFC 1918 (de Groot, G. J. and Lear, E. , February 1996) ■ System V Application Binary Interface (Prentice-Hall, 1991, ISBN 0-13-880170-3) ■ System V Application Binary Interface MIPS Processor Supplement (Prentice-Hall, 1991, ISBN 0-13-880170-3) 248 ■ GNUPro Tools for Embedded Systems CYGNUS Compiler features for the V4300 processors rj|cfHQH#¦HQr`HV®® |r6Hr The following documentation discusses the compiler features for the VR4300 processors. ■ “Preprocessor symbols for V4300 processors” on page 249 ■ “Data types and alignment for V4300 processors” on page 250 ■ “Argument passing for V4300 processors” on page 250 ■ “Function return values for V4300 processors” on page 251 ■ “Register allocation for V4300 processors” on page 252 For a list of available generic compiler options, “GNU CC command options” on page 67 and “Option summary for GCC” on page 69 in Using GNU CC in GNUPro Compiler Tools. In addition, the following VR4300-specific command-line options are supported. -EL Compile code for the processor in little endian mode. -EB Compile code for the processor in big-endian mode. The GNUPro Toolkit for the VR4300 does not comply with the proposed MIPS Embedded Application Binary Interface (EABI) because that EABI has not yet been finalized. H|r6Hr«j,rfQrV®®|r6Hr See Table 22 for preprocessor symbols and their definitions with the GNU compiler options. CYGNUS GNUPro Tools for Embedded Systems ■ 249 MIPS development Table 22: Preprocessors symbols and their definitions for the VR4300 processor Symbol Compiler options which define the symbol mips Only if ‘-ansi’ not used. _mips Only if ‘-ansi’ not used. __mips Always defined. __mips_soft_float Always defined. MIPSEB Only if ‘-ansi’ and ‘-EL’ are not used. _MIPSEB Only if ‘-EL’ is not used. __MIPSEB Only if ‘-EL’ is not used. __MIPSEB__ Only if ‘-EL’ is not used. R4300 Only if ‘-ansi’ not used. _R4300 Always defined. MIPSEL Only if ‘-ansi’ is not used and ‘-EL’ is used. _MIPSEL Only if ‘-EL’ is used. __MIPSEL Only if ‘-EL’ is used. __MIPSEL__ Only if ‘-EL’ is used. NOTE: If neither ‘-EL’ or ‘-EB’ are defined, big-endian is the default. ##«|H#o?#fcXojHoQrV®®|r6Hr See Table 23 (below) for data type sizes and alignments for VR4300 processors. Table 23: Data type sizes and alignments for VR4300 processors Data type Size char 1 byte short 2 bytes int 4 bytes long 4 bytes long long 8 bytes float 4 bytes double 8 bytes long double 8 bytes pointer 4 bytes The stack is aligned on eight-byte boundaries. X¦jHo|#coXQrV®®|r6Hr The compiler passes arguments to a function using a combination of integer general registers, floating-point registers, and the stack. The number, type, and relative position of arguments in the calling functions argument list define the combination of 250 ■ GNUPro Tools for Embedded Systems CYGNUS Compiler features for the V4300 processors registers and memory used. The general registers ‘$4..$7’ and the floating-point registers ‘$f12’ and ‘$f13’ pass the first few arguments. If the function being called returns a structure or union, the calling function passes the address of an area large enough to hold the structure to the function in ‘$4’. The function being called copies the returned structure into this area before returning. The address in ‘$4’ becomes the first argument to the function for the purpose of argument register allocation. All user arguments are then shifted down by one. The compiler always allocates space on the stack for all arguments even when some or all of the arguments to a function are passed in registers. This stack space is a large enough structure to contain all the arguments. After promotion and structure return pointer insertion, the arguments are aligned according to normal structure rules. Locations used for arguments within the stack frame are referred to as the home locations. Whenever possible, arguments declared in variable argument lists, as with those defined using a ‘va_list’ declaration, are passed in the integer registers, even when they are floating-point numbers. If the first argument is an integer, remaining arguments are passed in the integer registers. The compiler passes structures and unions as if they were very wide integers with their size rounded up to an integral number of words. The “fill bits” necessary for rounding up are undefined. A structure can be split so that a portion is passed in registers and the remainder passed on the stack. In this case, the first words are passed in ‘$4’, ‘$5’, ‘$6’, and ‘$7’ as needed, with additional words passed on the stack. The rules for assigning which arguments go into registers and which arguments must be passed on the stack can be explained by considering the list of arguments itself as a structure, aligned according to normal structure rules. Mapping of this structure into the combination of registers and stack is as follows: up to two leading floating-point (but not ‘va_list’) arguments can be passed in ‘$f12’ and ‘$f13’; everything else with a structure offset greater than or equal to 32 is passed on the stack. The remainder of the arguments are passed in ‘$4..$7’ based on their structure offset. Any holes left in the structure for alignment are unused, whether in registers or on the stack. ¦o6croH¦o¨#f¦HQrV®®|r6Hr A function can return no value, an integral or pointer value, a floating-point value (single or double precision), or a structure; unions are treated the same as structures. A function that returns no value puts no particular value in any register. A function that returns an integral or pointer value places its result in register ‘$2’. A function that returns a floating-point value places its result in floating-point register ‘$f0’. The caller to a function that returns a structure or a union passes the address of an area large enough to hold the structure in register ‘$4’. The function returns a pointer to the returned structure in register ‘$2’. CYGNUS GNUPro Tools for Embedded Systems ■ 251 MIPS development HXcH#ffr6#croQrV®®|r6Hr See Table 24 (below) for register allocations for VR4300 processors. Table 24: Register allocation for VR4300 processors General purpose (integer) register Usage Constant zero Volatile Saved Parameters Kernel reserved Global pointer Stack pointer Frame pointer Return address $0 $1 through $15, $24, $25 $16 through $23, $30 $4 through $7 $26, $27 $28 $29 $30 $31 See Table 25 (below) for floating point register usage for VR4300 processors. Table 25: Floating point register usage for VR4300 processors Floating point register Usage Volatile Parameter Saved $f0 through $f11 $f14 through $f19 $f12, $f13 $f20 through $f31 NOTE: Do not depend on this order. Instead, use GCC’s ‘asm( )’ extension and allow the compiler to schedule registers. 252 ■ GNUPro Tools for Embedded Systems CYGNUS Assembler issues for the V4300 processors Hj,fHc¦HQr`HV®® |r6Hr For a list of available generic assembler options, see “Command-line options” on page 21 in Using as in GNUPro Utilities. -EB -EL Any MIPS configuration of the assembler can select big-endian or little-endian output at run time. Use ‘-EB’ to select big-endian output, and ‘-EL’ for little-endian. The default is big-endian. For information about the MIPS instruction set, see MIPS RISC Architecture (Kane and Heindrich, Prentice-Hall). For an overview of MIPS assembly conventions, see “Appendix D: Assembly Language Programming” in MIPS RISC Architecture. There are 32 64-bit general (integer) registers, named ‘$0’ through ‘$31’. For specific assembler mnemonics, see MIPS RISC Architecture or MIPS R4000 User’s Manual. CYGNUS GNUPro Tools for Embedded Systems ■ 253 MIPS development coeHc¦HQr`HV®®|r6Hr For a list of available generic linker options, see “Linker scripts” on page 261 in Using ld in GNUPro Utilities. In addition, the following VR4300-specific command-line options are supported. -EL Link objects for the processor in little endian mode. -EB Link objects for the processor in big-endian mode. coeH6c|QrV®®|r6Hr The GNU linker uses a linker script to determine how to process each section in an object file, and how to lay out the executable. The linker script is a declarative program consisting of a number of directives. For instance, the ‘ENTRY( )’ directive specifies which symbol in the executable will be designated the executable’s entry point. Since linker scripts can be complicated to write, the linker includes one built-in script that defines the default linking process. This linker script (‘ddb.ld’) should be used when linking programs for the NEC DDB-VR4300 board. It can also be used to link programs for execution in the MIPS simulator. /* The following TEXT start address leaves space for the monitor workspace. */ ENTRY(_start) OUTPUT_ARCH("mips:4000") OUTPUT_FORMAT("elf32-bigmips", "elf32-bigmips", "elf32-littlemips") GROUP(-lc -lpmon -lgcc) SEARCH_DIR(.) __DYNAMIC = 0; /* Allocate the stack to be at the top of memory, since the stack grows down. */ PROVIDE (__stack = 0); /* PROVIDE (__global = 0); */ /* Initialize some symbols to be zero so we can reference them in the crt0 without core dumping. These functions are all optional, but we do this so we can have our crt0 always use them if they exist. This is so BSPs work better when using the crt0 installed with gcc. We have to initialize them twice, so we multiple object file formats, as some prepend an underscore. */ 254 ■ GNUPro Tools for Embedded Systems CYGNUS Linker issues for the V4300 processors PROVIDE (hardware_init_hook = 0); PROVIDE (software_init_hook = 0); SECTIONS { . = 0xA0100000; .text : { _ftext = . ; *(.init) eprol = .; *(.text) PROVIDE (__runtime_reloc_start = .); *(.rel.sdata) PROVIDE (__runtime_reloc_stop = .); *(.fini) etext = .; _etext = .; } . = .; .rdata : { *(.rdata) } _fdata = ALIGN(16); .data : { *(.data) CONSTRUCTORS } _gp = ALIGN(16) + 0x8000; __global = _gp; .lit8 : { *(.lit8) } .lit4 : { *(.lit4) } .sdata : { *(.sdata) } edata = .; _edata = .; _fbss = .; .sbss : { *(.sbss) *(.scommon) } .bss : { _bss_start = . ; *(.bss) CYGNUS GNUPro Tools for Embedded Systems ■ 255 MIPS development *(COMMON) } end = .; _end = .; } 256 ■ GNUPro Tools for Embedded Systems CYGNUS Debugger issues for V4300 processors H,¦XXHc¦HQrV®®|r6Hr To connect GDB to the DDB-VR4300 board start GDB with the ‘ddb’ target. DDB boards are little-endian and use the PMON monitor. GDB uses the MIPS remote debugging protocol to talk to this target via a serial port. Additionally, the ‘ ddb’ target supports network downloading using the TFTP protocol. To run a program on the DDB-VR4300 board, start up GDB with the name of your program as the argument. To connect to the DDB-VR4300 board, use the ‘target ddb <port>’ command , where ‘<port>’ is the name of the serial port connected to the board. If the program has not already been downloaded to the board, you can use the ‘load’ command to download it. You can then use all the usual GDB commands. For example, the following sequence connects to the target board through a Unix serial port, and loads and runs a program called ‘ prog’ through the debugger: mips64vr4300-elf-gdb prog GDB is free software and . . . (gdb) target ddb /dev/ttyb (gdb) load prog (gdb) run On PC platforms substitute the specific COM port: C:\> gdb prog GDB is free software and . . . (gdb) target ddb com3 (gdb) load prog (gdb) run You can speed up loading of programs on the DDB board by installing a network card on the board and using TFTP (trivial file transfer protocol) to download programs to the board. You must first configure the DDB board manually for network use. #XH6rjj#o?r|croQrV®®|r6Hr The following command options are available for the VR4300 processors. target ddb <hostname>:<portnumber> On all GDB Unix host configurations, you can specify a TCP connection (for instance, to a serial line managed by a terminal concentrator) instead of a serial port, using the ‘<hostname>:<portnumber>’ syntax. target ddb <port> <remote-tftp-name> target ddb <hostname>:<portnumber> <remote-tftp-name> Specify a ‘<remote-tftp-name>’ in the target command to enable CYGNUS TFTP GNUPro Tools for Embedded Systems ■ 257 MIPS development downloading in GDB. This name must be in the format: ‘<host>:<filename>’. Here ‘<host>’ is either the name or the IP address of the host system that is running a TFTP server (typically your host Unix workstation). Here ‘<filename>’ is the name of a temporary file that GDB will create during downloading. The directory containing the temporary file must be world-readable; the ‘ /tmp’ directory is usually a good choice. target ddb <port> <remote-tftp-name> <local-tftp-name> target ddb <hostname>:<portnumber> <remote-tftp-name> <local-tftp-name> You can also specify an optional ‘<local-tftp-name>’, which is a simple filename (without the ‘<host>’ prefix). This tells GDB the name of the temporary filename as seen by the host machine that is running GDB. This is necessary only if the name of the file as seen by the host machine is different from the name of that same file as seen via TFTP from the target board. This might be the case if the TFTP server is running on a different machine than the GDB host, and has a different name for the same temporary file because of NFS mounting or symbolic links. The following example shows a TFTP download. The host machine running the TFTP server has the ‘192.168.1.1’ IP address . The temporary file that GDB will create for TFTP downloading is the ‘/tmp/download.tmp’ file. mips64vr4300-elf-gdb prog GDB is free software and . . . (gdb) target ddb /dev/ttyb 192.168.1.1:/tmp/download.tmp (gdb) load prog (gdb) run In the next example both a remote TFTP name and a local TFTP are specified, because the TFTP server is running on a different machine, and has a different name for the same temporary file than the host machine that is running GDB. The name of the temporary file as seen by the TFTP server is ‘/mymachine/tmp/download.tmp’, but the name of that same file as seen by the host running GDB is ‘/tmp/download.tmp’. mips64vr4300-elf-gdb prog GDB is free software and . . . (gdb) target ddb /dev/ttyb \ 192.168.1.1:/mymachine/tmp/download.tmp /tmp/download.tmp (gdb) load prog (gdb) run |H6c#f6rjj#o?QrV®®|r6Hr GDB also supports the following special commands for MIPS targets. 258 ■ GNUPro Tools for Embedded Systems CYGNUS Debugger issues for V4300 processors set remotedebug num show remotedebug For this to be useful, you must know something about the MIPS debugging protocol, also called ‘rmtdbg’. An informal description can be found in the GDB source files, specifically in the file: ‘remote-mips.c’. You can see some debugging information about communications with the board by setting the ‘remotedebug’ variable. If you set it to 1 using ‘set remotedebug 1’, every packet is displayed. If you set it to 2, every character is displayed. You can check the current value at any time with the command ‘show remotedebug’. set timeout seconds set retransmit-timeout seconds show timeout show retransmit-timeout You can control the timeout used while waiting for a packet, in the MIPS debugging protocol, with the ‘set timeout seconds’ command. The default is 5 seconds. Similarly, you can control the timeout used while waiting for an acknowledgment of a packet with: set retransmit-timeout seconds The default is 3 seconds. You can inspect both values with ‘show timeout’ and ‘show retransmit-timeout’. The timeout set by ‘set timeout’ does not apply when GDB is waiting for your program to stop. In that case, GDB waits forever because it has no way of knowing how long the program is going to run before stopping. CYGNUS GNUPro Tools for Embedded Systems ■ 259 MIPS development #o?a#froHcj¦f#rQH#¦HQr V®®|r6Hr The following three run-time command-line options are for the stand-alone simulator: -t, -v, and -m. ■ The ‘-t’ command-line option to the stand-alone simulator turns on tracing of all memory fetching and storing in the simulator: C:\> run -t hello.xl C:\> The simulator writes the trace information to the file ‘trace.din’. The following example shows the first few lines of a trace file. 2 2 2 2 2 2 2 2 2 2 ■ 00000000a0020000 00000000a0020004 00000000a0020008 00000000a002000c 00000000a0020010 00000000a0020014 00000000a0020018 00000000a002001c 00000000a0020020 00000000a0020024 ; ; ; ; ; ; ; ; ; ; width width width width width width width width width width 4 4 4 4 4 4 4 4 4 4 ; ; ; ; ; ; ; ; ; ; load load load load load load load load load load instruction instruction instruction instruction instruction instruction instruction instruction instruction instruction The ‘-v’ command-line option prints some simple statistics. C:\> run -v hello.xl Hello, world! 3 + 4 = 7 MIPS 64-bit simulator Big endian memory model 0x00100000 bytes of memory at 0x00000000A0000000 Instruction fetches = 20653 Pipeline ticks = 20653 ■ The ‘-m’ command-line option sets the size of the simulated memory area. The default size is 1048576 bytes (1 megabyte). The simulator rounds up the size you request to the next power of two. C:\> run -v -m 200000 hello.xl Hello, world! 3 + 4 = 7 MIPS 64-bit simulator Big endian memory model 0x00040000 bytes of memory at 0x00000000A0000000 Instruction fetches = 20341 Pipeline ticks = 20341 260 ■ GNUPro Tools for Embedded Systems CYGNUS Stand-alone simulator features for V4300 processors r?¦6coXaH6r?QrV®®|r6Hr Before you can download a program to the DDB board, without GDB, the program must be converted into S-records. First, compile a little-endian executable (‘hello.xl’) using the ‘-EL’ option to GCC, as the following example input shows. mips64vr4300-elf-gcc -g hello.c -o hello.xl -EL The following command reads the contents of the ‘hello.x1’ file, converts the code and data into S-records, and puts the result into the ‘hello.srec’ file. mips64vr4300-elf-objcopy -O srec hello.x1 hello.srec The following example output shows the first few lines of the ‘hello.srec’ file. S00D000068656C6C6F2E7372656303 S31AA01000001024023CE00042340060824000688040AAAA0A3C5534 S31AA0100015554A3500008A44000880440000084400080944000011 S31AA010002A000005000A1500000000030020150000000014000497 S31AA010003F08000000001004023CE00042340060824010A0023C36 r©ofr#?coXr`H,r#?QrV®® |r6Hr You can download programs to the DDB board for execution directly on the board, without GDB. The DDB board has a standalone ROM monitor called PMON that supports loading of programs via a serial port or Ethernet. Use the Unix ‘tip’ program to download a program to the DDB. In the following example, the DDB board is connected to serial port ‘/dev/ttya’ on a Unix host. tip /dev/ttya NEC010> load tty0 Downloading from tty0, ^C to abort ~>hello.srec NEC010> g Downloading a program via Ethernet is similar. First, convert the program to S-records as described earlier. Then copy the S-record file to a directory that is readable by all users, and use the Unix command ‘chmod o+r ’ to make the S-record file readable. A good choice for a directory is ‘/tmp’, since it is likely to be already readable by all users. PMON uses the TFTP protocol to download programs via Ethernet. You must have a TFTP server running on your Unix host in order to use net downloads. This server can be installed by your system administrator. The following example shows a net download. Substitute your Unix host’s name or IP address for ‘host’ in the ‘load’ command: % cp hello.srec /tmp % chmod o+r /tmp/hello.srec CYGNUS GNUPro Tools for Embedded Systems ■ 261 MIPS development % tip /dev/ttya NEC010> load host:/tmp/hello.srec Downloading from host:/tmp/hello.srec, ^C to abort ~>hello.srec Entry address is a0100000 total = 0x7588 bytes NEC010> g 262 ■ GNUPro Tools for Embedded Systems CYGNUS Developing for the V5xxx processors H¨Hfr|coXQr`HSxxx|r6Hr The following documentation describes developing with VR5xxx MIPS processors. The actual development targets that have support are the 5000, 5400, 5432 and 5464 series processors. ■ “Compiler issues for the V5xxx processors” on page 264 CYGNUS ■ “ABI issues for the V5xxx processors” on page 266 ■ “Assembler issues for the V5xxx processors” on page 276 ■ “Linker issues for V5xxx processors” on page 286 ■ “Debugger features for the V5XXX processors” on page 288 ■ “Simulator features for the V5XXX processors” on page 289 GNUPro Tools for Embedded Systems ■ 263 MIPS development rj|cfHc¦HQr`HSxxx |r6Hr The following documentation discusses the compiler features and issues for the VR5xxx processors. ■ “Preprocessor issues for V5xxx processors” on page 265 ■ “Attributes for V5xxx processors” on page 265 For a list of available generic compiler options, “GNU CC command options” on page 67 and “Option summary for GCC” on page 69 in Using GNU CC in GNUPro Compiler Tools. The following VR5xxx-specific command-line options have support. -mcpu=vr5000 Targets the VR5xxx processors. This is the default setting for all VR5xxx processors. -mcpu=vr5400 Targets the VR5400 processor. -mabi=o64 Uses O32-extended for 64 bit registers. -mips2 Generates code for 32-bit registers. If combined with ‘-mabi=eabi’ this will use 32-bit mode EABI. If combined with one of the above ‘-mcpu’ options, the combination allows the use of those machine specific instructions, which are not reserved in 32-bit mode. -EL Generate little-endian code. -EB Generate big-endian code. If neither ‘-EL’ nor ‘-EB’ are defined, little-endian is the default. 264 ■ GNUPro Tools for Embedded Systems CYGNUS Compiler issues for the V5xxx processors H|r6Hrc¦HQrSxxx|r6Hr The compiler supports the following preprocessor symbols: __mips__ Defines the symbol when preprocessing. __R5400__ Defines the symbol when preprocessing if specifying ‘-mcpu=vr5400’ for VR5xxx processors. __R5000__ Defines the symbol when preprocessing if specifying ‘-mcpu=vr5000’ for VR5xxx processors, or if no other ‘-mcpu=’ option has been specified. __MIPSEB__ Defines the symbol when preprocessing if specifying ‘-EB’ for big-endian code. __MIPSEL__ Defines the symbol when preprocessing if specifying ‘-EL’ for little-endian code, or if not specifying ‘-EB’ for big-endian code. c,¦HQrSxxx|r6Hr There are no VR5xxx-specific attributes. See “Declaring attributes of functions” on page 234 and “Specifying attributes of variables” on page 243 in “Extensions to the C language family” in Using GNU CC in GNUPro Compiler Tools for more information. CYGNUS GNUPro Tools for Embedded Systems ■ 265 MIPS development c¦HQr`HSxxx|r6Hr The VR5xxx processors have the following issues for its ABI. ■ “The stack frame for V5xxx processors” on page 270 ■ “Parameter assignment to registers for V5xxx” on page 272 ■ “Structure passing for V5xxx” on page 274 ■ “Varargs handling for V5xxx” on page 274 ■ “Function return values for V5xxx” on page 275 VR5xxx supports two types of ABI depending on the value of the ‘-mabi=’ compiler flag (see also “Compiler issues for the V5xxx processors” on page 264). ■ O32 See “032 ABI summary for V5xxx processors” (below). ■ EABI See “EABI summary for V5xxx processors” on page 269. ®¤¦jj#«QrSxxx|r6Hr The following documentation describes the 032 ABI for VR5xxx processors. ■ “Calling conventions for V5xxx processors using 032” on page 267 ■ “Register allocation for V5xxx processors with 032 ABI” on page 268 Table 26 shows the size and alignment for all data types of V R5xxx processors with the 032 ABI. Table 26: Size and alignment for VR5xxx processors using 032 ABI Data type Size (bytes) 1 byte 2 bytes int 4 bytes long 4 bytes long long 8 bytes float 4 bytes double 8 bytes long double 8 bytes pointer 4 bytes char short Alignment (bytes) 1 byte 2 bytes 4 bytes 4 bytes 8 bytes 4 bytes 8 bytes 8 bytes 4 bytes The stack is aligned on eight-byte boundaries. 266 ■ GNUPro Tools for Embedded Systems CYGNUS ABI issues for the V5xxx processors Calling conventions for V5xxx processors using 032 The following documentation discusses the calling conventions for the VR5xxx processors. ■ “Argument passing for V5xxx processors using 032 ABI” (below) ■ “Function return values for V5xxx processors with 032 ABI” on page 268 Argument passing for V5xxx processors using 032 ABI The compiler passes arguments to a function using a combination of integer general registers, floating-point registers, and the stack. The number, type, and relative position of arguments in the calling functions argument list define the combination of registers and memory used. The general registers ‘$4’ through ‘$7’ and the floating-point registers ‘$f12’ and ‘$f13’ pass the first few arguments. If the function being called returns a structure or union, the calling function passes the address of an area large enough to hold the structure to the function in ‘$4’. The function being called copies the returned structure into this area before returning. The address in ‘$4’ becomes the first argument to the function for the purpose of argument register allocation. All user arguments are then shifted down by one. The compiler always allocates space on the stack for all arguments even when some or all of the arguments to a function are passed in registers. This stack space is a large enough structure to contain all the arguments. After promotion and structure return pointer insertion, the arguments are aligned according to normal structure rules. Locations used for arguments within the stack frame are referred to as the home locations. Whenever possible, arguments declared in variable argument lists, as with those defined using a ‘va_list’ declaration, are passed in the integer registers, even when they are floating-point numbers. If the first argument is an integer, remaining arguments are passed in the integer registers. The compiler passes structures and unions as if they were very wide integers with their size rounded up to an integral number of words. The “fill bits” necessary for rounding up are undefined. A structure can be split so that a portion is passed in registers and the remainder passed on the stack. In this case, the first words are passed in ‘$4’, ‘$5’, ‘$6’, and ‘$7’ as needed, with additional words passed on the stack. The rules for assigning which arguments go into registers and which arguments must be passed on the stack can be explained by considering the list of arguments itself as a structure, aligned according to normal structure rules. Mapping of this structure into the combination of registers and stack is as follows: up to two leading floating-point (but not ‘va_list’) arguments can be passed in ‘$f12’ and ‘$f13’; everything else with a structure offset greater than or equal to 32 is passed on the stack. The remainder CYGNUS GNUPro Tools for Embedded Systems ■ 267 MIPS development of the arguments are passed in ‘$4’ through ‘$7’, based on their structure offset. Any holes left in the structure for alignment are unused, whether in registers or on the stack. Function return values for V5xxx processors with 032 ABI A function can return no value, an integral or pointer value, a floating-point value (single or double precision), or a structure; unions are treated the same as structures. The following documentation describes the return values in more detail. ■ A function that returns no value puts no particular value in any register. ■ A function that returns an integral or pointer value places its result in a ‘$2’ register. ■ A function that returns a floating-point value places its result in a ‘$f0’ floating-point register. ■ The caller to a function that returns a structure or a union passes the address of an area large enough to hold the structure in a ‘$4’ register. The function returns a pointer to the returned structure in a ‘$2’ register. Register allocation for V5xxx processors with 032 ABI The following documentation describes register allocation for the VR5xxx processors using 032 ABI. See Table 27 for general purpose (integer) registers and their usage and see Table 28 for floating point registers and their usage. Table 27: General purpose (integer) registers and usage for VR5xxx with 032 ABI General purpose (integer) register Usage Constant zero Volatile Saved Parameters Kernel reserved Global pointer Stack pointer Frame pointer Return address 268 ■ GNUPro Tools for Embedded Systems $0 $1 through $15, $24, $25 $16 through $23, $30 $4 through $7 $26, $27 $28 $29 $30 $31 CYGNUS ABI issues for the V5xxx processors Table 28: Floating point registers and usage for V R5xxx with 032 ABI Floating point register Volatile Parameter Saved Usage $f0 through $f11, $f14 through $f19 $f12, $f13 $f20-$f31 NOTE: Do not depend on the order shown in Table 28. Instead, use the ‘asm( )’ compiler extension to schedule registers. ¦jj#«QrSxxx|r6Hr The following documentation describes the MIPS EABI for VR5xxx processors. ■ “Data type sizes and alignments for V5xxx using MIPS EABI” (below) ■ “Subroutine calls for V5xxx processors using MIPS ABI” Data type sizes and alignments for V5xxx using MIPS EABI Table 29 shows the size and alignment for all data types for VR5xxx processors using MIPS ABI. Table 29: Size and alignment for data types with VR5xxx processors using MIPS ABI Type Size (bytes) char 1 byte short 2 bytes int 4 bytes unsigned 4 bytes long (32-bit mode) 4 bytes long (64-bit mode) 8 bytes long long 8 bytes float 4 bytes double 8 bytes pointer (32-bit mode) 4 bytes pointer (64-bit mode) 8 bytes Alignment (bytes) 1 byte 2 bytes 4 bytes 4 bytes 4 bytes 8 bytes 8 bytes 4 bytes 8 bytes 4 bytes 8 bytes The following rules also apply for data types for VR5xxx processors using MIPS ABI. ■ ■ ■ CYGNUS Alignment within aggregates (structs and unions) is as above, with padding added if needed Aggregates have alignment equal to that of their most aligned member Aggregates have sizes which are a multiple of their alignment GNUPro Tools for Embedded Systems ■ 269 MIPS development Subroutine calls for V5xxx processors using MIPS ABI The following documentation describes the calling conventions for subroutine calls for VR5xxx processors using MIPS ABI. Table 30 shows the registers for passing parameters. Table 31 shows other register usage. Table 30: Parameter registers and their usagefor VR5xxx processors using MIPS ABI Parameter registers General-purpose Floating point (hard-float mode) r4 through r11 f12 through f19 Table 31: General registers and their usage for VR5xxx with 032 ABI General register usage Fixed 0 value Volatile Non-volatile Kernel reserved gp (SDA base) Stack pointer Frame pointer Return address r0 r1 through r15, r24, r25 r16 through r23, r30 r26, r27 r28 r29 r30 (if needed) r31 Use the following rules for subroutine calls. ■ General-purpose and floating-point parameter registers allocate independently. ■ Structures that are less than or equal to 32 bits pass as values. ■ Structures that are greater than 32 bits pass as pointers. In 32-bit mode, aggregates that are less than or equal to 32 bits pass as values. In 64-bit mode, aggregates that are less than or equal to 64 bits pass as values. Otherwise, larger aggregates pass as pointers. ■ ■ `H#6eQ#jHQrSxxx|r6Hr The following documentation describes the stack frame for VR5xxx processors. ■ ■ ■ ■ The stack grows downwards from high addresses to low addresses. A leaf function does not need to allocate a stack frame if it does not need one. A frame pointer does not need allocating. The stack pointer should always have alignment with 8 byte boundaries. See Figure 9 on page 271 for stack frames for functions that take a fixed number of 270 ■ GNUPro Tools for Embedded Systems CYGNUS ABI issues for the V5xxx processors arguments for VR5xxx processors. Figure 9: Stack frames for functions that take a fixed number of arguments for VR5xxx processors Before call: After call: High memory local variables, register local variables, register save area, etc. save area, etc. reserved space for arguments on stack arguments on stack SP, FP register save area local variables FP alloca allocations Low memory reserved space for arguments on stack SP* * If no ‘alloca’ region the frame pointer (FP) points to the same place as SP. See Figure 10 on page 272 for stack frames for functions that take a variable number of arguments for VR5xxx processors. CYGNUS GNUPro Tools for Embedded Systems ■ 271 MIPS development Figure 10: Stack frames for functions that take a variable number of arguments for VR5xxx processors Before call: After call: High memory local variables, register save area, etc. local variables, register save area, etc. reserved space for arguments on stack arguments on stack SP, FP save area for anonymous parms passed in registers (the size of this area may be zero) register save area local variables alloca allocations Low memory reserved space for arguments on stack SP* * If no ‘alloca’ region the frame pointer (FP) points to the same place as SP. ##jHH#cXojHorHXcHQrSxxx Consider the parameters in a function call as ordered from left (first parameter) to right. In this algorithm, ‘FR’ contains the number of the next available floating-point register (or register pair for modes in which floating-point registers hold only 32 bits). ‘GR’ contains the number of the next available general-purpose register. ‘STARG’ is the 272 ■ GNUPro Tools for Embedded Systems CYGNUS ABI issues for the V5xxx processors address of the next available stack parameter word. INITIALIZE Set GR=r4, FR=f12, and STARG to point to parameter word, 1. SCAN If there are no more parameters, terminate. Otherwise, select one of the following depending on the type of the next parameter: DOUBLE or FLOAT, SIMPLE ARG, LONG LONG, or STACK. DOUBLE or FLOAT If FR > f19, go to STACK. Otherwise, load the parameter value into the ‘FR’ floating-point register and advance ‘FR’ to the next floating-point register (or register pair in 32-bit mode). Then go to SCAN. SIMPLE ARG A SIMPLE ARG is one of the following types: ■ One of the simple integer types which will fit in 32 bits in 32-bit mode, or which will fit in 64 bits in 64-bit mode ■ A pointer to an object of any type ■ A struct or union small enough to fit in a register ■ A larger struct or union, which shall be treated as a pointer to the object or to a copy of the object; see “Structure passing for V5xxx” on page 274 for when copies are made If GR > r11, go to STACK. Otherwise, load the parameter value into the ‘GR’ general-purpose register and advance ‘GR’ to the next general-purpose register. Values shorter than the register size are sign-extended or zero-extended depending on whether they are signed or unsigned. Then go to SCAN. LONG LONG in 32-bit mode If GR > r10, go to STACK. Otherwise, if ‘GR’ is odd, advance ‘GR’ to the next register. Load the 64-bit ‘long long’ value into register pair, GR and GR+1. Advance ‘GR’ to ‘GR+2’ and go to SCAN. STACK Parameters not otherwise handled like DOUBLE or FLOAT, SIMPLE ARG, LONG LONG, or SCAN are passed in the parameter words of the caller’s stack frame. SIMPLE ARG, (see SIMPLE ARG definition), is considered to have size and alignment equal to the size of a general-purpose register, with simple argument types shorter than this sign- or CYGNUS GNUPro Tools for Embedded Systems ■ 273 MIPS development zero-extended to this width. Float arguments are considered to have size and alignment equal to the size of a floating-point register. In 64-bit mode, floats are stored in the low-order 32 bits of the 64-bit space allocated to them. ‘double’ and ‘long long’ are considered to have 64-bit size and alignment. Round ‘STARG’ up to a multiple of the alignment requirement of the parameter and copy the argument byte-for-byte into STARG, STARG+1, and son through STARG+size-1. Set ‘STARG’ to ‘STARG+size’ and go to SCAN. ¦6¦H|#coXQrSxxx Code that passes structures and unions by value is implemented specially. (In this documentaion, struct will refer to structs and unions inclusively.) Structs small enough to fit in a register are passed by value in a single register or in a stack frame slot which is the size of a register. Larger structs are handled by passing the address of the structure. In this case, a copy of the structure will be made if necessary in order to preserve the pass-by-value semantics. See also “Parameter assignment to registers for V5xxx” on page 272 See Table 32 for the rules for copies of large structs for VR5xxx processors. Table 32: Structure passing for the VR5xxx processors Parameter ANSI mode Normal param Callee copies if needed Varargs (...) param Caller copies K&R mode Caller copies Caller copies In the case of normal (non-varargs) large-struct parameters in ANSI mode, the callee is responsible for producing the same effect as if a copy of the structure were passed, preserving the pass-by-value semantics. Have the callee make a copy; however, in some cases, the callee can determine that a copy is unnecessary to produce the same results. In such cases, the callee can choose to avoid making a copy of the parameter. ##X`#o?fcoXQrSxxx No special changes are needed for handling varargs parameters other than the caller knowing that a copy is needed on struct parameters larger than a register (see Table 32). The varargs macros set up a two-part register save area, one part for the general-purpose registers and one part for floating-point registers. Maintain separate pointers for these two areas and for the stack parameter area. The register save area lies between the caller and callee stack frame areas. In the case of software floating-point, only the general-purpose registers need saving. Because the save area lies between the two stack frames, the saved register parameters are contiguous with parameters passed on the stack, simplifying the varargs macros. Only one pointer is needed, which advances from the register save area into the 274 ■ GNUPro Tools for Embedded Systems CYGNUS ABI issues for the V5xxx processors caller’s stack frame. ¦o6croH¦o¨#f¦HQrSxxx See Table 33 for data types and register usage for return values for VR5xxx processors. Table 33: Data types and register usage for return values for VR5xxx processors Type Register int short long long long r2 r2 r2 long long float double r2 through r3 (32-bit mode) r2 (64-bit mode) f0 f0 through f1 (32-bit mode) f0 (64-bit mode) struct/union * double * Structures and unions, up to the size of a long are returned in the same registers as longs. Larger structures and unions up to the size of long longs are returned in the same registers as long longs. They are aligned within the register according to the endianness of the processor; e.g., on a big-endian processor the first byte of the struct is returned in the most significant byte of ‘r2’, while on a little-endian processor the first byte is returned in the least significant byte of ‘r2’. Structures and unions larger than a long long are handled by the caller passing as a hidden first argument a pointer to space allocated to receive the return value. rQ©#HQfr#coXa|rcoQrSxxx For software floating-point implementations, floats shall be passed and returned like int, and double passes and returns like long long. This implies that, in 32-bit mode, float will pass in a single integer register and double will pass in an even/odd register pair. Similarly, float will return in a single register, r2, and double will return in a r2/r3 register pair. CYGNUS GNUPro Tools for Embedded Systems ■ 275 MIPS development Hj,fHc¦HQr`HSxxx |r6Hr The following documentation describes VR5XXX-specific features of the assembler. ■ “Symbols and registers for the V5xxx” on page 277 ■ “Assembler directives for the V5xxx” on page 278 ■ “MIPS synthetic instructions for the V5XXX” on page 279 For a list of available generic assembler options, see “Command-line options” on page 21in Using as in GNUPro Utilities. The assembler accepts the same set of 5xxx options as the compiler. -mcpu=vr5000 Targets the VR5000. Default setting. -mcpu=vr5400 Targets the VR5400. -mabi=o64 Uses O32 extended for 64 bit registers. -mips2 Generates code for 32-bit registers. If combined with ‘-mabi=eabi’ this will use 32-bit mode EABI. If combined with one of the above ‘-mcpu’ options, the combination allows the use of those machine specific instructions, which are not reserved in 32-bit mode. -EL Generates little-endian code. -EB Generates big-endian code. If neither ‘-EL’ nor ‘-EB’ are defined, little-endian is the default. For information about the MIPS instruction set, see MIPS RISC Architecture (Kane and Heindrich, Prentice-Hall). For an overview of MIPS assembly conventions, see “Appendix D: Assembly Language Programming” in MIPS RISC Architecture. There are 32 64-bit general (integer) registers, named ‘$0 through $31’. There are 32 64-bit floating-point registers, named ‘$f0 through $f31’. The ‘$0’ through ‘$31’ symbols refer to the general-purpose registers. 276 ■ GNUPro Tools for Embedded Systems CYGNUS Assembler issues for the V5xxx processors «j,rf#o?HXcHQr`HSxxx See Table 34 for definitions of symbols used as aliases for individual registers. Table 34: Symbols and registers for VR5XXX CYGNUS Symbol Register $at $kt0 $kt1 $gp $sp $fp $1 $26 $27 $28 $29 $30 GNUPro Tools for Embedded Systems ■ 277 MIPS development Hj,fH?cH6c¨HQr`HSxxx Table shows a complete list of the VR5XXX assembler directives. Table 35: VR5XXX assembler directives .abicalls .abort .aent .align .appfile .appline .ascii .asciiz .asciz .balign .balignl .balignw .bgnb .bss .byte .comm .common .common.s .cpadd .cpload .cprestore .data .dc .dc.b .dc.d .dc.l .dc.s .dc.w .dc.x .dcb .dcb.b .dcb.d .dcb.l .dcb.s .dcb.w .dcb.x .debug .double .ds .ds.b .ds.d .ds.l .ds.p .ds.s .ds.w .ds.x .dword .eject .else .elsec .end .endb .endc .endif .ent .equ .equiv .err .exitm .extern .fail .file .fill .float .fmask .format .frame .global .globl .gpword .half .hword .if .ifc .ifdef .ifeq .ifeqs .ifge .ifgt .ifle .iflt .ifnc .ifndef .ifne .ifnes .ifnotdef .include .insn .int .irep 278 ■ GNUPro Tools for Embedded Systems .irepc .irp .irpc .lcomm .lflags .linkonce .list .livereg .llen .loc .long .lsym .macro .mask .mexit .mri .name .noformat .nolist .nopage .octa .offset .option .org .p2align .p2alignl .p2alignw .page .plen .print .psize .purgem .quad .rdata .rep .rept .rva .sbttl .sdata .set .short .single .skip .space .spc .stabd .stabn .stabs .string .struct .text .title .ttl .verstamp .word .xcom .xdef .xref .xstabs .zero CYGNUS Assembler issues for the V5xxx processors «o`Hc6co¦6croQr`HSXXX For the VR5XXX, the assembler supports the typical MIPS synthetic instructions (macros). See Table 36 for a list of synthetic instructions supported by the assembler, as well as an example expansion of each instruction. The following information serves as a guide to the corresponding code in Table 36. R1 R2 R3 Integer registers F1 F2 F3 Floating point registers I1 I2 I3 Immediate integer values Table 36: MIPS synthetic instructions for the assembler for VR5XXX Instruction Expansion abs R1 R2 bgez R2,abs_1 move R1,R2 neg R1,R2 abs_1 addi R1,R2,I1 addiu R1,R2,I1 andi R1,R2,I1 li $at,I1 beq R1,$at,+I2 li $at,I1 beql R1,$at,+I2 slt $at,R1,R2 beqz $at,+I1 slti $at,R1,I1 beqz $at,+I2 slt $at,R1,R2 beqzl $at,+I1 slti $at,R1,I1 beqzl $at,+I2 sltu $at,R1,R2 beqz $at,+I1 sltiu $at,R1,I1 beqz $at,+I2 add R1 R2 I1 addu R1 R2 I1 and R1 R2 I1 beq R1 I1 I2 beql R1 I1 I2 bge R1 R2 I1 bge R1 I1 I2 bgel R1 R2 I1 bgel R1 I1 I2 bgeu R1 R2 I1 bgeu R1 I1 I2 CYGNUS GNUPro Tools for Embedded Systems ■ 279 MIPS development Table 36: MIPS synthetic instructions for the assembler for VR5XXX Instruction Expansion bgeul R1 R2 I1 sltu $at,R1,R2 beqzl $at,+I1 sltiu $at,R1,I1 beqzl $at,+I2 slt $at,R2,R1 bnez $at,+I1 slti $at,R1,I1+1 beqz $at,+I2 slt $at,R2,R1 bnezl $at,+I1 slti $at,R1,I1+1 beqzl $at,+I2 sltu $at,R2,R1 bnez $at,+I1 sltiu $at,R1,I1+1 beqz $at,+I2 sltu $at,R2,R1 bnezl $at,+I1 sltiu $at,R1,I1+1 beqzl $at,+I2 slt $at,R2,R1 beqz $at,+I1 slti $at,R1,I1+1 bnez $at,+I2 slt $at,R2,R1 beqzl $at,+I1 slti $at,R1,I1+1 bnezl $at,+I2 sltu $at,R2,R1 beqz $at,+I1 sltiu $at,R1,I1+1 bnez $at,+I2 sltu $at,R2,R1 beqzl $at,+I1 sltiu $at,R1,I1+1 bnezl $at,+I2 slt $at,R1,R2 bnez $at,+I1 slti $at,R1,I1 bnez $at,+I2 slt $at,R1,R2 bnezl $at,+I1 slti $at,R1,I1 bnezl $at,+I2 bgeul R1 I1 I2 bgt R1 R2 I1 bgt R1 I1 I2 bgtl R1 R2 I1 bgtl R1 I1 I2 bgtu R1 R2 I1 bgtu R1 I1 I2 bgtul R1 R2 I1 bgtul R1 I1 I2 ble R1 R2 I1 ble R1 I1 I2 blel R1 R2 I1 blel R1 I1 I2 bleu R1 R2 I1 bleu R1 I1 I2 bleul R1 R2 I1 bleul R1 I1 I2 blt R1 R2 I1 blt R1 I1 I2 bltl R1 R2 I1 bltl R1 I1 I2 280 ■ GNUPro Tools for Embedded Systems CYGNUS Assembler issues for the V5xxx processors Table 36: MIPS synthetic instructions for the assembler for VR5XXX Instruction Expansion bltu R1 R2 I1 sltu $at,R1,R2 bnez $at,+I1 sltiu $at,R1,I1 bnez $at,+I2 sltu $at,R1,R2 bnezl $at,+I1 sltiu $at,R1,I1 bnezl $at,+I2 li $at,I1 bne R1,$at,+I2 li $at,I1 bnel R1,$at,+I2 bgez R2,dabs_1 move R1,R2 dneg R1,R2 dabs_1: daddi R1,R2,I1 daddiu R1,R2,I1 bnez R3,ddiv_1 ddiv $zero,R2,R3 break 0x7 ddiv_1: daddiu $at,$zero,-1 bne R3,$at,ddiv_2 daddiu $at,$zero,1 dsll32 $at,$at,0x1f bne R2,$at,ddiv_2 nop break 0x6 ddiv_2 mflo R1 li $at,I1 ddiv $zero,R2,$at mflo R1 bnez R3,ddivu_1 ddivu $zero,R2,R3 break 0x7 ddivu_1: mflo R1 li $at,I1 ddivu $zero,R2,$at mflo R1 bltu R1 I1 I2 bltul R1 R2 I1 bltul R1 I1 I2 bne R1 I1 I2 bnel R1 I1 I2 dabs R1 R2 dadd R1 R2 I1 daddu R1 R2 I1 ddiv R1 R2 R3 ddiv R1 R2 I1 ddivu R1 R2 R3 ddivu R1 R2 I1 CYGNUS GNUPro Tools for Embedded Systems ■ 281 MIPS development Table 36: MIPS synthetic instructions for the assembler for VR5XXX Instruction Expansion div R1 R2 R3 bnez R3,div_1 div $zero,R2,R3 break 0x7 div_1: li $at,-1 bne R3,$at,div_2 lui $at,0x8000 bne R2,$at,div_2 nop break 0x6 div_2: mflo R1 li $at,I1 div $zero,R2,$at mflo R1 bnez R3,divu_1 divu $zero,R2,R3 break 0x7 divu_1: mflo R1 li $at,I1 divu $zero,R2,$at mflo R1 li R1,I1 daddu R1,R1,R2 li R1,I1 bnez R3,drem_1 ddiv $zero,R2,R3 break 0x7 drem_1: daddiu $at,$zero,-1 bne R3,$at,drem_2 daddiu $at,$zero,1 dsll32 $at,$at,0x1f bne R2,$at,drem_2 nop break 0x6 drem_2: mfhi R1 li $at,I1 ddiv $zero,R2,$at mfhi R1 bnez R3,dremu_1 ddivu $zero,R2,R3 break 0x7 dremu_1: mfhi R1 li $at,I1 ddivu $zero,R2,$at mfhi R1 div R1 R2 I1 divu R1 R2 R3 divu R1 R2 I1 dla R1 I1(R2) dli R1 I1 drem R1 R2 R3 drem R1 R2 I1 dremu R1 R2 R3 dremu R1 R2 I1 282 ■ GNUPro Tools for Embedded Systems CYGNUS Assembler issues for the V5xxx processors Table 36: MIPS synthetic instructions for the assembler for VR5XXX Instruction Expansion dsub R1 R2 I1 dsubu R1 R2 I1 jal R1 R2 jal R1 la R1 I1(R2) daddi R1,R2,-I1 daddiu R1,R2,-I1 jalr R1,R2 jalr R1 li R1,I1 daddu R1,R1,R2 ldc1 F1,I1(R1) ld R1,I1(R2) li R1,0x8066 dsll32 R1,R1,0xf li $at,0x8066 dsll32 $at,$at,0xf dmtc1 $at,F1 lui R1,0x4198 lui $at,0x4198 mtc1 $at,F1 ll R1,I1(R2) lwc1 F1,I1(R1) lwl R1,I1(R2) lwr R1,I1(R2) ori R1,R2,I1 nor R1,R1,$zero ori R1,R2,I1 bnez R3,rem_1 div $zero,R2,R3 break 0x7 rem_1: li $at,-1 bne R3,$at,rem_2 lui $at,0x8000 bne R2,$at,rem_2 nop break 0x6 rem_2: mfhi R1 li $at,I1 div $zero,R2,$at mfhi R1 bnez R3,remu_1 divu $zero,R2,R3 break 0x7 remu_1: mfhi R1 li $at,I1 divu $zero,R2,$at mfhi R1 l.d F1 I1(R1) ldc3 R1 I1(R2) li.d R1 I1 li.d F1 I1 li.s R1 I1 li.s F1 I1 lwc0 R1 I1(R2) l.s F1 I1(R1) lcache R1 I1(R2) flush R1 I1(R2) nor R1 R2 I1 or R1 R2 I1 rem R1 R2 R3 rem R1 R2 I1 remu R1 R2 R3 remu R1 R2 I1 CYGNUS GNUPro Tools for Embedded Systems ■ 283 MIPS development Table 36: MIPS synthetic instructions for the assembler for VR5XXX Instruction Expansion rol R1 R2 R3 negu $at,R3 srlv $at,R2,$at sllv R1,R2,R3 or R1,R1,$at sll $at,R2,I1 srl R1,R2,32-I1 or R1,R1,$at negu $at,R3 sllv $at,R2,$at srlv R1,R2,R3 or R1,R1,$at srl $at,R2,I1 sll R1,R2,32-I1 or R1,R1,$at sd R1,I1(R2) sdc1 F1,I1(R1) xor R1,R2,R3 sltiu R1,R1,1 xori R1,R2,I1 sltiu R1,R1,1 slt R1,R2,R3 xori R1,R1,0x1 slti R1,R2,I1 xori R1,R1,0x1 sltu R1,R2,R3 xori R1,R1,0x1 sltiu R1,R2,I1 xori R1,R1,0x1 slt R1,R3,R2 li $at,I1 slt R1,$at,R2 sltu R1,R3,R2 li $at,I1 sltu R1,$at,R2 slt R1,R3,R2 xori R1,R1,0x1 li $at,I1 slt R1,$at,R2 xori R1,R1,0x1 sltu R1,R3,R2 xori R1,R1,0x1 li $at,I1 sltu R1,$at,R2 xori R1,R1,0x1 slti R1,R2,I1 rol R1 R2 I1 ror R1 R2 R3 ror R1 R2 I1 sdc3 R1 I1(R2) s.d F1 I1(R1) seq R1 R2 R3 seq R1 R2 I1 sge R1 R2 R3 sge R1 R2 I1 sgeu R1 R2 R3 sgeu R1 R2 I1 sgt R1 R2 R3 sgt R1 R2 I1 sgtu R1 R2 R3 sgtu R1 R2 I1 sle R1 R2 R3 sle R1 R2 I1 sleu R1 R2 R3 sleu R1 R2 I1 slt R1 R2 I1 284 ■ GNUPro Tools for Embedded Systems CYGNUS Assembler issues for the V5xxx processors Table 36: MIPS synthetic instructions for the assembler for VR5XXX Instruction Expansion sltu R1 R2 I1 sne R1 R2 R3 sltiu R1,R2,I1 xori R1,R2,R3 sltu R1,$zero,R1 xori R1,R2,I1 sltu R1,$zero,R1 addi R1,R2,-I1 addiu R1,R2,-I1 sc R1,I1(R2) swc1 F1,I1(R1) swl R1,I1(R2) swr R1,I1(R2) teqi R1,I1 tgei R1,I1 tgeiu R1,I1 tlti R1,I1 tltiu R1,I1 tnei R1,I1 trunc.w.d F1,F2 trunc.w.s F1,F2 ldl R1,I1(R2) ldr R1,I1+7(R2) lb R1,I1(R2) lbu $at,I1+1(R2) sll R1,R1,0x8 or R1,R1,$at lbu R1,I1(R2) lbu $at,I1+1(R2) sll R1,R1,0x8 or R1,R1,$at lwl R1,I1(R2) lwr R1,I1+3(R2) sdl R1,I1(R2) sdr R1,I1+7(R2) sb R1,I1+1(R2) srl $at,R1,0x8 sb $at,I1(R2) swl R1,I1(R2) swr R1,I1+3(R2) xori R1,R2,I1 sne R1 R2 I1 sub R1 R2 I1 subu R1 R2 I1 swc0 R1 I1(R2) s.s F1 I1(R1) scache R1 I1(R2) invalidate R1 I1(R2) teq R1 I1 tge R1 I1 tgeu R1 I1 tlt R1 I1 tltu R1 I1 tne R1 I1 trunc.w.d F1 F2 R1 trunc.w.s F1 F2 R1 uld R1 I1(R2) ulh R1 I1(R2) ulhu R1 I1(R2) ulw R1 I1(R2) usd R1 I1(R2) ush R1 I1(R2) usw R1 I1(R2) xor R1 R2 I1 CYGNUS GNUPro Tools for Embedded Systems ■ 285 MIPS development coeHc¦HQrSxxx|r6Hr The following documentation describes VR5XXX-specific features when working with ld, the GNUPro linker. For a list of available generic linker options, see “Linker scripts” on page 261 in Using ld in GNUPro Utilities. There are no VR5XXX-specific command-line linker options. coeH6c|QrSxxx#XH The linker uses a linker script to determine how to process each section in an object file, and how to lay out the executable. The linker script is a declarative program consisting of a number of directives. For instance, the ‘ENTRY()’ directive specifies the symbol in the executable that will be the executable’s entry point. The following linker script is ‘ddb.ld’, a linker script for the VR5XXX. /* The following TEXT start address leaves space for the monitor workspace. */ ENTRY(_start) OUTPUT_ARCH("mips:4000") OUTPUT_FORMAT("elf32-bigmips", "elf32-bigmips", "elf32-littlemips") GROUP(-lc -lpmon -lgcc) SEARCH_DIR(.) __DYNAMIC = 0; /* Allocate the stack to be at the top of memory, since the stack grows down. */ PROVIDE (__stack = 0); /* PROVIDE (__global = 0); */ /* Initialize some symbols to be zero so we can reference them in the crt0 without core dumping. These functions are all optional, but we do this so we can have our crt0 always use them if they exist. This is so BSPs work better when using the crt0 installed with gcc. We have to initialize them twice, so we multiple object file formats, as some prepend an underscore. */ PROVIDE (hardware_init_hook = 0); PROVIDE (software_init_hook = 0); SECTIONS { . = 0xA0100000; .text : { 286 ■ GNUPro Tools for Embedded Systems CYGNUS Linker issues for V5xxx processors _ftext = . ; *(.init) eprol = .; *(.text) PROVIDE (__runtime_reloc_start = .); *(.rel.sdata) PROVIDE (__runtime_reloc_stop = .); *(.fini) etext = .; _etext = .; } . = .; .rdata : { *(.rdata) } _fdata = ALIGN(16); .data : { *(.data) CONSTRUCTORS } _gp = ALIGN(16) + 0x8000; __global = _gp; .lit8 : { *(.lit8) } .lit4 : { *(.lit4) } .sdata : { *(.sdata) } edata = .; _edata = .; _fbss = .; .sbss : { *(.sbss) *(.scommon) } .bss : { _bss_start = . ; *(.bss) *(COMMON) } end = .; _end = .; } CYGNUS GNUPro Tools for Embedded Systems ■ 287 MIPS development H,¦XXHQH#¦HQr`HSXXX |r6Hr The following documentation describes VR5XXX-specific features of the GNUPro debugger. There are three ways for GDB to talk to a VR5XXX target, depending upon the configuration of the specific evaluation board. ■ Simulator GDB’s built-in software simulation of the VR5XXX processor allows the debugging of programs compiled for the VR5XXX without requiring any access to actual hardware. To activate this mode in GDB type ‘ target sim’. Then load the code into the simulator by typing ‘load’ and debug it in the normal fashion. ■ Remote target board by serial connection To connect to the target board in GDB, using the command ‘target remote <devicename>’ where ‘<devicename>’ will be a serial device such as ‘/dev/ttya’ (Unix) or ‘com2’ (Windows NT). Then load the code onto the target board by typing 'load'. After being downloaded, the program can be executed. ■ Remote target board by ethernet connection Connecting to the ethernet port with GDB is very similar to connecting to a serial port. If the system administrator has assigned a host name to the board, you can use that name in the target command instead of the dotted IP address. It is important to specify the port number. The exact number is not important, but it must be the same number that you used to configure the board. No special GDB commands are necessary to perform fast downloading of programs via the ethernet. Simply use the normal ‘load’ command. GDB recognizes that the board is connected via ethernet, and will use a fast binary downloading method. For the available generic debugger options, see Debugging with GDB in GNUPro Debugging Tools. There are no VR5XXX-specific debugger command-line options. 288 ■ GNUPro Tools for Embedded Systems CYGNUS Simulator features for the V5XXX processors cj¦f#rQH#¦HQr`HSXXX |r6Hr The simulator implements the 64 bit MIPS ISA, which includes 32 64-bit integer registers and 32 64-bit floating-point registers. The user program is provided with a single 2mb block of memory at address ‘0xa0000000’ (shadowed at address ‘0x80000000’). The following general options, are supported by the simulator: --architecture=<machine> This selects a specific MIPS instruction set architectur (ISA). Valid ISAs are ‘mips:5000’ and ‘mips:5400’. By default the ‘mips:5000’ is simulated. --help This provides a complete list of options recognized simulators. Some specific options in the list may not be applicable to this simulator. --dinero-trace=[on|off] This creates a file called ‘trace.din’ that contains tracing information. Use the ‘--dinero-file’ switch (discussed below) to change the name of the output file. % mips64vr5xxxel-elf-run --dinero-trace hello Hello, world! 3 + 4 = 7 The resulting first 10 lines of the file produced by the previous output file’s input: 2 2 2 2 2 2 2 2 2 2 a0040004 a0040008 a004000c a0040010 a0040014 a0040018 a004001c a0040020 a0040024 a0040028 ; ; ; ; ; ; ; ; ; ; width width width width width width width width width width 4 4 4 4 4 4 4 4 4 4 ; ; ; ; ; ; ; ; ; ; load load load load load load load load load load instruction instruction instruction instruction instruction instruction instruction instruction instruction instruction --dinero-file=<file> This changes the name of the file to which trace information will be written. % mips64vr5xxxel-elf-run --dinero-trace --dinero-file=trace.out hello Placing trace information into file "trace.out" Hello, world! 3 + 4 = 7 CYGNUS GNUPro Tools for Embedded Systems ■ 289 MIPS development --profile-pc This option creates a file called ‘gmon.out’ that contains profiling information. This file can be used as input to gprof, the GNU profiler. % mips64vr5xxxel-elf-run --profile-pc hello Hello, world! 3 + 4 = 7 --profile-pc-frequency=<frequency> By default, the simulator samples the running program every 256 instructions. This option allows you to change this profiling frequency to some other number. Smaller numbers increasing the accuracy of the profile, but make the simulator run slightly slower. Also, because the counters used in the profile are only 16 bits, a high sampling frequency may cause the counters to overflow. % mips64vr5xxxel-elf-run --profile-pc --profile-pc-frequency=128 hello Hello, world! 3 + 4 = 7 --profile-pc-size=<size> By default, the simulator uses a profiling sample size of 131072 (128K). This option allows you to change the sample size. Increasing the sample size will make the profile more accurate, but will also increase the size of the profile output file, ‘gmon.out’. The simulator rounds the sample size up the next power of two. % mips64vr5xxxel-elf-run --profile-pc --profile-pc-size=20000 hello Hello, world! 3 + 4 = 7 290 ■ GNUPro Tools for Embedded Systems CYGNUS 11 c¦,c`c?H¨Hfr|jHo The following documentation discusses the D10V and M32R Mitsubishi processors. ■ “Developing for the D10V targets” on page 292 ■ “Developing for the M32R/X/D targets” on page 323 CYGNUS GNUPro Tools for Embedded Systems ■ 291 Developing for the D10V targets H¨Hfr|coXQr`Hu®#XH The following documentation discusses the D10V processor. ■ “Compiler support for D10V targets” on page 293 ■ “Preprocessor symbols for D10V targets” on page 293 ■ “ABI summary for D10V targets” on page 294 ■ “Assembler support for D10V targets” on page 299 ■ “Linker support for D10V targets” on page 304 ■ “Debugger support for D10V targets” on page 307 ■ “Standalone simulator for D10V targets” on page 312 ■ “Overlays support for the D10V targets” on page 313 292 ■ GNUPro Tools for Embedded Systems CYGNUS Compiler support for D10V targets rj|cfH¦||rQru®#XH For a list of available generic compiler options, see “GNU CC command options” on page 67 and “Option summary for GCC” on page 69 in Using GNU CC in GNUPro Compiler Tools. In addition, the following D10V-specific command-line options are supported: -mint16 -mint32 Makes ‘int’ data 16 or 32 bits. The default is ‘-mint16’. The GCC program chooses the appropriate runtime library based on the ‘ -mint16’ or ‘-mint32’ switch. -mdouble32 -mdouble64 Makes ‘double’ data 32 or 64 bits. The default is ‘-mdouble32’. The GCC program chooses the appropriate runtime library based on the ‘ -mdouble32’ or ‘-mdouble64’ switch. -maddac3 -mno-addac3 Enables (or disables) the use of ‘addac3’ and ‘subac3’ instructions. The ‘-maddac3’ switch also enables the ‘-maccum’ instruction. -mno-accum Enables (or disables) the use the 32-bit accumulators in compiler-generated code. -msmall-insns -mno-small-insns Enables (or disables) replacing 1 long instruction with 2 short instructions, where possible. The default is ‘-msmall-insns’. -mcond-move -mno-cond-move Enables (or disables) use of conditional moves. The default is ‘-mcond-move’. H|r6Hr«j,rfQru®#XH By default, the compiler defines the ‘_ _D10V_ _’ and ‘D10V’ preprocessor symbols. If the ‘-ansi’ switch is used with the GCC program for greater ANSI compatibility then only ‘_ _D10V_ _’ is defined. If ‘-mint32’ is used, ‘_ _INT_ _’ is defined as 32 and ‘_ _INT_MAX_ _’ as 2147483647; otherwise ‘_ _INT_ _’ is defined as 16 and ‘_ _INT_MAX_ _’ as 32767. CYGNUS GNUPro Tools for Embedded Systems ■ 293 ABI summary for D10V targets ¦jj#«Qru®#XH The following documentation discusses the Application Binary Interface (ABI) for the D10V processor. ■ “Data types and alignment for the D10V targets” (below) ■ “CPU registers for the D10V targets” on page 294 ■ “The stack frame for the D10V targets” on page 295 ■ “Argument passing for the D10V targets” on page 297 ■ “Function return values for the D10V targets” on page 298 ##«|H#o?#fcXojHoQr`Hu®#XH See Figure 37 (below) for the data type sizes for the D10V processors. Table 37: Data type sizes and alignment Data type Size char 1 byte short 2 bytes int 2 bytes unless ‘-mint32’, in which case 4 bytes long 4 bytes long long 8 bytes float 4 bytes double 4 bytes unless ‘-mdouble64’, in which case 8 bytes long double:8 bytes pointer 2 bytes The stack is aligned to a two-byte boundary. One byte is used for characters (including structure/unions made entirely of chars), and two byte alignment for everything else. HXcHQr`Hu®#XH The first four 16-bit words are passed in registers ‘r0’ through ‘r3’; the remaining words are passed on the stack (top of stack is the fifth word passed). Arguments that are at least 32 bits in size always start in an even register, which means there might be an unused register. If the argument is passed on the stack, there is no extra padding being done. If an argument would normally start in a register, but there are not enough registers to pass the entire argument, it is passed on the stack and remaining registers might be used to pass subsequent arguments. See Figure 38 for the order in which the compiler allocates registers for the D10V targets. 294 ■ GNUPro Tools for Embedded Systems CYGNUS The stack frame for the D10V targets Table 38: Register allocation for D10V processors Register type Register Volatile registers Saved registers Accumulators r2, r3, r4, r5, r6, r7, r12, r13 r6, r7, r8, r9, r10, r11 a0, a1 NOTE: Do not depend on this order. Instead, use GCC’s ‘asm( )’ extension and allow the compiler to schedule registers. Figure 39 (below) shows the register usage. Table 39: Register usage for D10V processors Register Usage r0 through r3 Function arguments/function return r4 Static chain register, not preserved across calls r5 Not preserved across calls r6 through r11 Preserved across calls r12 Not preserved across calls r13 Holds return address, not preserved across calls r14 Holds constant 0 r15 Stack pointer, preserved across calls a0 through a1 Preserved across calls The C compiler does not generate code that uses the control registers. It does not use the accumulators by default, unless you use the ‘-maccum’ or ‘-maddac3’ switches. `H#6eQ#jHQr`Hu®#XH ■ ■ ■ ■ The stack grows downwards from high addresses to low addresses. A leaf function need not allocate a stack frame if it does not need one. A frame pointer need not be allocated. The stack pointer shall always be aligned to 2 byte boundaries. Stack frames for functions that take a fixed number of arguments use the definitions shown in Figure 11 (below). The frame pointer (FP) points to the same location as the CYGNUS GNUPro Tools for Embedded Systems ■ 295 The stack frame for the D10V targets stack pointer (SP). Figure 11: D10V stack frames for functions that take a fixed number of arguments Before call: High memory After call: local variables, register save area, etc. local variables, register save area, etc. arguments on stack arguments on stack SP, FP register save area local variables alloca allocations Low memory arguments on stack SP, FP Stack frames for functions taking a variable number of arguments use the definitions shown in Figure 12 on page 297. The frame pointer (FP) points to the same location as the stack pointer (SP). 296 ■ GNUPro Tools for Embedded Systems CYGNUS Argument passing for the D10V targets Figure 12: D10V stack frames for functions that take a variable number of arguments Before call: After call: High memory local variables, register save area, etc. arguments on stack local variables, register save area, etc. arguments on stack SP, FP save area for 4 words passed in registers local variables alloca allocations Low memory arguments on stack SP, FP X¦jHo|#coXQr`Hu®#XH Arguments are passed to a function using first registers and then memory if the argument passing registers are used up. Items passed in registers that are more than 2 bytes must be passed starting in an even register, skipping the odd register if the odd register would have been the next register used. Unused argument registers have undefined values on entry. The following rules must be adhered to. ■ The first register values are passed in is ‘r0’ and the last register is ‘r3’. ■ For arguments that would normally start in a register, if there are not enough registers used for passing arguments to hold the argument, the argument will be passed entirely on the stack. CYGNUS GNUPro Tools for Embedded Systems ■ 297 Function return values for the D10V targets ¦o6croH¦o¨#f¦HQr`Hu®#XH Two byte integers are returned in register ‘r0’. Four byte integers and floating values are returned in registers ‘r0’ and ‘r1’. Eight byte integers and floating point values are returned in registers ‘r0’, ‘r1’, ‘r2’ and ‘r3’. By default, ‘int’ values are 2 bytes, and ‘double’ values are 4 bytes. The standard type ‘long’ is 4 bytes, and ‘long double’ is 8 bytes. 298 ■ GNUPro Tools for Embedded Systems CYGNUS Assembler support for D10V targets Hj,fH¦||rQru®#XH The following documentation describes the assembler usage for the D10V processor. ■ “Size modifiers for the D10V targets” (below) ■ “Sub-instructions for the D10V targets” (below) ■ “Special characters for the D10V targets” on page 300 ■ “Register names for the D10V targets” on page 301 ■ “Addressing modes for D10V targets” on page 302 ■ “@word modifier for D10V targets” on page 303 ■ “Floating point for D10V targets” on page 303 ■ “Opcodes for D10V targets” on page 303 For available assembler options, see “Command-line options” on page 21 in Using as in GNUPro Utilities. D10V processors use only one machine dependent option. -O (uppercase letter “O”) The D10V can often execute two sub-instructions in parallel. With -O, the assembler attempts to optimize its output by detecting when instructions can be executed in parallel. Syntax is based upon the syntax in Mitsubishi’s D10V Architecture manual. cHjr?cQcHQr`Hu®#XH The D10V assembler uses the instruction names in the D10V Architecture manual. However, the names in the manual are sometimes ambiguous. There are instruction names that can assemble to a ‘short’ or ‘long’ form opcode. The assembler always picks the smallest form it can. When dealing with a symbol that is not yet defined when a line is being assembled, it always uses the ‘long’ form. If you need to force the assembler to use either the ‘short’ or ‘long’ form of the instruction, you can append either ‘.s’ (‘short’) or ‘.l’ (‘long’) to it. For example, if you are writing an assembly program and you want to do a branch to a symbol that is defined later in your program, you can write ‘bra.s foo’. Both the object-file dumper disassembler and GDB’s disassembler appends ‘.s’ or ‘.l’ to instructions that have both ‘short’ and ‘long’ forms. ¦,aco¦6croQr`Hu®#XH The D10V assembler takes a series of instructions as input, either one-per-line, or in the special two-per-line format; see “Special characters for the D10V targets” on page 300. CYGNUS GNUPro Tools for Embedded Systems ■ 299 Special characters for the D10V targets Some of these instructions will be short-form or sub-instructions. Sub-instructions can be packed into a single instruction. The assembler does this automatically but works harder at optimization with the ‘-O’ option. It also detects when it should not pack instructions. For example, when a label is defined, the next instruction will never be packaged with the previous one. Whenever a branch-and-link instruction is called, it will not be packaged with the next instruction so the return address will be valid. The assembler automatically inserts Nop instructions when necessary. If you do not want the assembler to automatically make these decisions, you can control the packaging and execution type (parallel or sequential) with the special execution symbols; see also “Special characters for the D10V targets” (below). |H6c#f6`##6HQr`Hu®#XH The assembler supports the following special characters: ‘;’ (semi-colon) and ‘#’ (pound sign). Both characters are line comment characters when used in the zero column. The semi-colon may also be used to start a comment anywhere within a line. Sub-instructions may be executed in order, in reverse-order, or in parallel. Instructions listed in the standard one-per-line format will be executed sequentially. To specify the executing order, use the following symbols: ‘->’ Sequential with instruction on the left first. ‘<-’ Sequential with instruction on the right first. ‘||’ Parallel The D10V syntax allows either one instruction per line, one instruction per line with the execution symbol, or two instructions per line. The following examples describe the use of the syntax. abs a1 -> abs r0 Execute these sequentially. The instruction on the right goes into the right container and executes second. abs r0 <- abs a1 Execute these reverse-sequentially. The instruction on the right goes into the right container, and executes first. ld2w r2,@r8+||mac a0,r0,r7 These two instructions execute in parallel. ld2w r2,@r8+|| mac a0,r0,r7 Two-line format. These two instructions execute in parallel. 300 ■ GNUPro Tools for Embedded Systems CYGNUS Register names for the D10V targets ld2w r2,@r8+ mac a0,r0,r7 Two-line format. These two instructions execute sequentially. The assembler puts them in the proper containers. ld2w r2,@r8+ -> mac a0,r0,r7 Two-line format. These two instructions execute sequentially. Same as previous intructions but the second instruction always goes into right container. The ‘$’ (dollar sign) has no special meaning, and may be used in symbol names. HXcHo#jHQr`Hu®#XH You can use ‘r0’ through ‘r15’ as predefined symbols to refer to the D10V registers. You can also use ‘sp’ as an alias for ‘r15’. The accumulators are ‘a0’ and ‘a1’. There are special register-pair names that may optionally be used in opcodes that require even-numbered registers. Register names are not case sensitive. The following register pairs are used. r0 and r1 r2 and r3 r4 and r5 r6 and r7 r8 and r9 r10 and r11 r12 and r13 r14 and r15 st2wr2-r3, @r4 is a sample register pair instruction. D10V also has predefined symbols for the following control registers and status bits. See Figure 40 on page 302 for predefined symbols that are not recognized by the debugger or the disassembler. CYGNUS GNUPro Tools for Embedded Systems ■ 301 Addressing modes for D10V targets Table 40: Predefined symbols not recognized by the debugger or the disassembler Symbol Action psw Processor status word bpsw Backup processor status word pc Program counter bpc Backup program counter rpt_c Repeat count rpt_s Repeat start address rpt_e Repeat end address mod_s Modulo start address mod_e Modulo end address iba Instruction break address f0 Flag0 f1 Flag1 c Carry flag cr0 through cr15 Accepted as synonyms for these control registers ??HcoXjr?HQru®#XH The assembler understands the following addressing modes for the D10V. The symbol ‘Rn’ in the following examples refers to any of the specifically numbered registers or register pairs, but not the control registers. Rn Register direct @Rn Register indirect @Rn+ Register indirect with post-increment @Rn- Register indirect with post-decrement @-SP Register indirect with pre-decrement @(disp, Rn) Register indirect with displacement addr PC relative address (for branch or rep) #imm Immediate data (‘#’ is optional and ignored) 302 ■ GNUPro Tools for Embedded Systems CYGNUS @word modifier for D10V targets @wordjr?cQcHQru®#XH Any symbol followed by ‘@word’ will be replaced by the symbol’s value shifted right by 2. This is used in situations such as loading a register with the address of a function (or any other code fragment). For instance, if you want to load a register with the location of the function ‘main’, then jump to that location, use the following example’s code. ldir2,main@word jmpr2 fr#coX|rcoQru®#XH Although the D10V has no hardware floating point, the ‘.float’ and ‘.double’ directives generate IEEE floating-point numbers for compatibility with other development tools. |6r?HQru®#XH The assembler implements all the standard D10V opcodes. See “Size modifiers for the D10V targets” on page 299 for descriptions of the only changes. CYGNUS GNUPro Tools for Embedded Systems ■ 303 Linker support for D10V targets coeH¦||rQru®#XH For a list of available generic linker options, see “Linker scripts” on page 261 in Using ld in GNUPro Utilities. There are no specific linker command line options for the D10V processor. coeH6c|Qru®#XH The GNU linker uses a linker script to determine how to process each section in an object file, and how to lay out the executable. The linker script is a declarative program consisting of a number of directives. For instance, the ‘ENTRY()’ directive specifies which symbol in the executable will be designated the executable’s entry point. Since linker scripts can be complicated to write, the linker includes one built-in script that defines the default linking process. For the D10V tools, the following example deines the default script. OUTPUT_FORMAT(“elf32-d10v”, “elf32-d10v”, elf32-d10v”) OUTPUT_ARCH(d10v) ENTRY(_start) SEARCH_DIR( <installation directory path> ); SECTIONS { /* Read-only sections, merged into text segment: */ . = 0x2000004; .interp : { *(.interp) } .hash : { *(.hash) } .dynsym : { *(.dynsym) } .dynstr : { *(.dynstr) } .rel.text : { *(.rel.text) } .rela.text : { *(.rela.text) } .rel.data : { *(.rel.data) } .rela.data : { *(.rela.data) } .rel.rodata : { *(.rel.rodata) } .rela.rodata : { *(.rela.rodata) } .rel.got : { *(.rel.got) } .rela.got : { *(.rela.got) } .rel.ctors : { *(.rel.ctors) } .rela.ctors : { *(.rela.ctors) } .rel.dtors : { *(.rel.dtors) } .rela.dtors : { *(.rela.dtors) } .rel.init : { *(.rel.init) } .rela.init : { *(.rela.init) } .rel.fini : { *(.rel.fini) } .rela.fini : { *(.rela.fini) } .rel.bss : { *(.rel.bss) } 304 ■ GNUPro Tools for Embedded Systems CYGNUS Linker script for D10V targets .rela.bss : { *(.rela.bss) } .rel.plt : { *(.rel.plt) } .rela.plt : { *(.rela.plt) } .plt : { *(.plt) } .rodata : { *(.rodata) *(.gnu.linkonce.r*) } .rodata1 : { *(.rodata1) } /* Adjust the address for the data segment. */ . = ALIGN(4); .data : { *(.data) *(.gnu.linkonce.d*) CONSTRUCTORS } .data1 : { *(.data1) } .ctors : { *(.ctors) } .dtors : { *(.dtors) } .got : { *(.got.plt) *(.got) } .dynamic : { *(.dynamic) } /* We want the small data sections together, so single-instruction offsets can access them all, and initialized data all before uninitialized, so we can shorten the on-disk segment size. */ .sdata : { *(.sdata) } _edata = .; PROVIDE (edata = .); __bss_start = .; .sbss : { *(.sbss) *(.scommon) } .bss : { *(.dynbss) *(.bss) *(COMMON) } _end = . ; PROVIDE (end = .); /* Stabs debugging sections. */ .stab 0 : { *(.stab) } .stabstr 0 : { *(.stabstr) } .stab.excl 0 : { *(.stab.excl) } .stab.exclstr 0 : { *(.stab.exclstr) } .stab.index 0 : { *(.stab.index) } .stab.indexstr 0 : { *(.stab.indexstr) } .comment 0 : { *(.comment) } /* DWARF debug sections. Symbols in the .debug DWARF section are relative to the beginning of the section so we begin .debug at 0. It’s not clear yet what needs to happen for the others. */ .debug 0 : { *(.debug) } .debug_info 0 : { *(.debug_info) } .debug_abbrev 0 : { *(.debug_abbrev) } .debug_line 0 : { *(.debug_line) } .debug_frame 0 : { *(.debug_frame) } .debug_srcinfo 0 : { *(.debug_srcinfo) } .debug_aranges 0 : { *(.debug_aranges) } .debug_pubnames 0 : { *(.debug_pubnames) } CYGNUS GNUPro Tools for Embedded Systems ■ 305 Linker script for D10V targets .debug_sfnames 0 : { *(.debug_sfnames) } .line 0 : { *(.line) } /* These must appear regardless of . */ /* This sets the stack to the top of the simulator memory (i.e. top of 64K data space). */ .stack 0x2007FFE : { _stack = .; *(.stack) } .text 0x1000000 : { *(.init) *(.fini) *(.text) /* .gnu.warning sections are handled specially by elf32.em. */ *(.gnu.warning) *(.gnu.linkonce.t*) } =0 _etext = .; PROVIDE (etext = .); } Although this script is somewhat lengthy, it is a generic script that will support all ELF situations. In practice, sections like ‘.rela.dtors’ are unlikely to be generated when compiling using embedded ELF tools. 306 ■ GNUPro Tools for Embedded Systems CYGNUS Debugger support for D10V targets H,¦XXH¦||rQru®#XH To specify the D10V simulator as the download target, use the ‘target sim’ command. To specify the D10V board as the download target, use the ‘target remote <port name>’ command, where ‘<port name>’ designates the port to which the board is attached. On many Unix platforms, substitute the ‘tty’ device name, as the following example input shows. target remote /dev/ttya On PC platforms, substitute the specific COM port, as the following example input shows. target remote com3 For the available generic debugger options, see Debugging with GDB in GNUPro Debugging Tools. There are no D10V-specific debugger command line options. coX`H#6H,¦QQHQru®#XH The following description discusses using the trace buffer access in GDB. For the D10V, trace data means instruction tracing only. Tracing only works with the Dboard_D10V, not with the simulator. To start tracing, use the ‘trace’ command. While tracing is on, each time the program stops after being single-stepped or continued, GDB collects the trace buffer that accumulated. This data consists of a set of addresses and counts which represent the number of instructions executed linearly. GDB transfers the data from the target board and keeps it in a buffer managed by GDB. This buffer is called the ‘host-side trace buffer’ or just ‘trace buffer’ if there is no possibility of confusion with a target’s trace buffer. A host-side trace buffer consists of a set of numbered entries, each of which includes an address and a count. At any time, you may use the ‘info trace’ command to find out how many entries and what those entries contain. You also see whether tracing is currently enabled or disabled. You may also use ‘tdisassemble’ to display the instructions that are at the locations recorded in the trace buffer. By default, the command disassembles the entire trace buffer; if you supply two arguments, it disassembles only the entries whose numbers fall between the given bounds. Note that the arguments are the numbers assigned to entries in the trace buffer, not addresses. To end tracing, use the ‘untrace’ command. While tracing is off, the trace buffer is preserved unchanged and you may look at it at any time. However, if you re-enable CYGNUS GNUPro Tools for Embedded Systems ■ 307 Using the trace buffer for D10V targets tracing, GDB will erase the data already in the trace buffer to make space for recording a new instruction trace. The following test program (‘trace.c’) illustrates tracing. int a, c; main() { int b, d, i; a = 3; b = 4; c = 456 * (a + b); b += c; for (i = 0; i < 5; ++i) { a += d; d = b * a; } } The following example shows these commands in action (generated under Unix). (gdb) target remote /dev/ttyb Remote debugging using /dev/ttyb 0x1000000 in _start () (gdb) load Loading section .data, size 0x190 vma 0x2000004 Loading section .text, size 0x1a8 vma 0x1000000 Start address 0x1000000 Transfer rate: 3296 bits/sec. (gdb) break main Breakpoint 1 at 0x1000048: file trace.c, line 7. (gdb) continue Continuing. Breakpoint 1, main () at trace.c:7 7 a = 3; (gdb) trace Tracing is now on. 308 ■ GNUPro Tools for Embedded Systems CYGNUS Using the trace buffer for D10V targets (gdb) step 8 b = 4; (gdb) step 9 c = 456 * (a + b); (gdb) step 10 b += c; (gdb) info trace 8 entries in trace buffer: 0: 1 instruction at 0x1000048 1: 1 instruction at 0x100004c 2: 1 instruction at 0x1000050 3: 1 instruction at 0x1000054 4: 1 instruction at 0x1000058 5: 1 instruction at 0x100005c 6: 1 instruction at 0x1000060 7: 1 instruction at 0x1000064 Tracing is currently on. (gdb) untrace Tracing is now off. (gdb) tdisassemble Dump of trace from 0 to 8: 7 a = 3; 0x1000048 <main+8>: ldi.s 0x100004c <main+12>: st 0x1000050 <main+16>: ldi.s 9 c = 456 * (a + b); 0x1000054 <main+20>: ld 0x1000058 <main+24>: ld 0x100005c <main+28>: ldi.l 0x1000060 <main+32>: nop 0x1000064 <main+36>: st End of trace dump. r2, 0x3 || nop r2, @(0x196, r0)8 b = 4; r2, 0x4 -> st r2, @r11 r2, @(0x196, r0) r3, @r11 -> add r3, 0x1c8 || mul r2, @(0x194, r0) r2, r3 r2, r3 (gdb) Later we run through the loop, and then use the arguments to ‘tdisassemble’ to select CYGNUS GNUPro Tools for Embedded Systems ■ 309 Using the trace buffer for D10V targets portions of the buffer: (gdb) info trace 11 entries in trace buffer: 0: 8 instructions at 0x1000098 1: 3 instructions at 0x1000078 2: 12 instructions at 0x1000088 3: 3 instructions at 0x1000078 4: 12 instructions at 0x1000088 5: 3 instructions at 0x1000078 6: 12 instructions at 0x1000088 7: 3 instructions at 0x1000078 8: 12 instructions at 0x1000088 9: 4 instructions at 0x1000078 10: 1 instruction at 0x10000b8 Tracing is currently on. (gdb) tdisassemble 0 3 Dump of trace from 0 to 3: 14 d = b * a; 0x1000098 <main+88>: ld r2, @r11 || 0x100009c <main+92>: ld r3, @(0x196, r0) 0x10000a0 <main+96>: nop || mul 0x10000a4 <main+100>: st r2, @(0x2, r11) 11 for (i = 0; i < 5; ++i) 0x10000a8 <main+104>: ld r2, @(0x4, r11) 0x10000ac <main+108>: add3 r3, r2, 0x1 0x10000b0 <main+112>: st r3, @(0x4, r11) 0x10000b4 <main+116>: bra.s 0x1000078 <main+56> 0x1000078 <main+56>: ld r2, @(0x4, r11) 0x100007c <main+60>: cmpi.s r2, 0x5 || nop 0x1000080 <main+64>: brf0t.l 0x1000088 <main+72> 13 a += d; 0x1000088 <main+72>: ld r2, @(0x196, r0) 0x100008c <main+76>: ld r3, @(0x2, r11) 0x1000090 <main+80>: add r2, r3 || nop 0x1000094 <main+84>: st r2, @(0x196, r0) 14 d = b * a; 0x1000098 <main+88>: ld r2, @r11 || 0x100009c <main+92>: ld r3, @(0x196, r0) 0x10000a0 <main+96>: nop || mul 310 ■ GNUPro Tools for Embedded Systems nop r2, r3 || nop nop r2, r3 CYGNUS Using the trace buffer for D10V targets 0x10000a4 <main+100>: st r2, @(0x2, r11) 11 for (i = 0; i < 5; ++i) 0x10000a8 <main+104>: ld r2, @(0x4, r11) 0x10000ac <main+108>: add3 r3, r2, 0x1 0x10000b0 <main+112>: st r3, @(0x4, r11) 0x10000b4 <main+116>: bra.s 0x1000078 <main+56> || End of trace dump. nop (gdb) There are two GDB trace control variables: tracedisplay and tracesource. ■ ‘tracedisplay’ controls whether GDB displays trace data as it is accumulated; by default it does not. The command ‘set tracedisplay 1’ enables this feature. The data always accumulates, so it is always possible to do a ‘tdisassemble’ later to see the trace data all at once. ■ ‘tracesource’ controls the display of source lines corresponding to the trace buffer’s addresses; by default, this is enabled. The ‘set tracesource 0’ command will disable, and ‘tdisassemble’ will display only assembly language. CYGNUS GNUPro Tools for Embedded Systems ■ 311 Standalone simulator for D10V targets #o?#froHcj¦f#rQru®#XH The simulator supports the Dboard_D10V IMAP and DMAP registers. The IMAP0 and IMAP1 registers are initialized to ‘0x1000’, DMAP is initialized to ‘0’ (zero). To change the map registers, write to ‘0xff00’, ‘0xff02’, or ‘0xff04’ as specified in the D10V Architecture manual (section 9.3). The simulator allocates unified memory from ‘0x000000’ to ‘0x50ffff’ and ‘0xfe0000’ to ‘0xffffff’. This corresponds to IMAP segment numbers 0-2 and 127, and DMAP segment numbers 0-23 and 1015-1023. Any attempts to set the IMAP or DMAP registers to unallocated segments will currently result in simulator errors. Two run-time command line options are available with the simulator: -t and -v. ■ ‘-t’ turns on instruction level tracing, as shown in the following code segment example. % d10v-elf-run -t 0x00001d *L: ldi.s 0x00001d *R: nop 0x00001e B: ldi.s 0x00001f B: ldi.s 0x000020 B: ldi.s 0x000021 R: sub 0x000021 L: mv 0x000022 L: srli 0x000022 R: mv 0x000023 . . . ■ hello.x r0,0 --- 0x0000 :: 0x0000 F0=0 F1=0 C=0 r15,65534 --r2,34920 --r3,34952 --r3,r2 0x8888 r4,r3 --r4,2 0x0020 r1,r0 --- 0xfffe 0x8868 0x8888 0x8868 0x0020 0x0002 0x0000 :: :: :: :: :: :: :: 0xfffe 0x8868 0x8888 0x002 0x0020 0x0008 0x0000 F0=0 F0=0 F0=0 F0=0 F0=0 F0=0 F0=0 F1=0 F1=0 F1=0 F1=0 F1=0 F1=0 F1=0 C=0 C=0 C=0 C=0 C=0 C=0 C=0 ‘-v’prints some simple statistics, as shown in the following input segment example. % d10v-elf-run -v hello.xhello world! 3 + 4= 7 run hello.x executed 1458 instructions in the left container, 827 parallel, 15 nops executed 1450 instructions in the right container, 827 parallel, 810 nops executed 1344 long instructions executed 4252 total instructions 312 ■ GNUPro Tools for Embedded Systems CYGNUS Overlays support for the D10V targets ¨Hf#«¦||rQr`Hu®#XH Overlays are sections of code or data which are to be loaded as part of a single memory image, but are to be run or used at a common memory address. At run time, an overlay manager will copy the sections in and out of the runtime memory address. Such an approach can be useful, for example, when a certain region of memory is faster than another region. #j|fH¦ocjHr¨Hf#«j#o#XHQru®#XH A simple, portable runtime overlay manager is provided in the ‘examples’ directory. To access the examples directory, follow the instructions for installing the entire source tree. The full path uses ‘/usr/cygnus/d10v-<yymmdd>/src/examples’ where ‘<yymmdd>’is replaced with the release date found on the installation CD (99r1, in this case). The sample overlay manager may be used as is, or as a prototype to develop a 3rd party overlay manager (or adapt an existing one for use with the GDB debugger). It is intended to be extremely simple, easy to understand, but not particularly sophisticated. NOTE: Since the sample overlay manager copies overlay sections four bytes at a time, it is important that all sections begin on four byte boundaries at their load addresses as well as their runtime addresses. The overlay manager has a single entry point: a function called ‘OverlayLoad(ovly_number)’. It looks up the overlay in a table called ‘ovly_table’ to find the corresponding section’s load address and runtime address; then it copies the section from its load address into its runtime address. ‘OverlayLoad’ must be called before code or data in an overlay section can be used by the program. It is up to the programmer to keep track of which overlays have been loaded. The ‘_ovly_table’ table is built by the linker from information provided by the programmer in the linker script; see “Linker script for D10V targets” on page 304; the example program contains four overlay sections which are mapped into two runtime regions of memory. Sections ‘.ovly0’ and ‘.ovly1’ are both mapped into the region starting at ‘0x1001000’, and sections ‘.ovly2’ and ‘.ovly3’ are both mapped into the region starting at ‘0x1002000’. coeH6c|Qru®#XH To build a program with overlays requires a customized linker script. An example program is built with the script ‘ d10vtext.ld’, found in the ‘examples/overlay’ directory. This is just a modified version of the default linker script, with two parts added. CYGNUS GNUPro Tools for Embedded Systems ■ 313 Linker script for D10V targets SECTIONS { OVERLAY 0x1001000 : AT (0x8000) { .ovly0 { foo.o(.text) } .ovly1 { bar.o(.text) } } OVERLAY 0x1002000 : AT (0x9000) { .ovly2 { baz.o(.text) } .ovly3 { grbx.o(.text) } } [...] We give the ‘OVERLAY’ command two arguments. First, the base address where we want all of the overlay sections to link and run. Second, the address where we want the first overlay section to load. In the example, section ‘.ovly1’ will load at ‘0x8000 + SIZEOF(.ovly0)’. For more description of the ‘OVERLAY’ linker command, see “Overlay description” on page 283 in Using ld in GNUPro Utilities. The ‘OVERLAY’ command is really just a syntactic convenience. If you need finer control over where the individual sections will be loaded, you can use the syntax in the following code segement. SECTIONS { .ovly0 .ovly1 .ovly2 .ovly3 [...] 0x1001000 0x1001000 0x1002000 0x1002000 : : : : AT AT AT AT (0x8000) (0x9000) (0xA000) (0xB000) { { { { foo.o(.text) bar.o(.text) baz.o(.text) grbx.o(.text) } } } } The second addition to the linker script actually builds the table ‘_ovly_table’, which will be used by the sample runtime overlay manager. This table has several entries for each overlay, and must be located somewhere in the ‘.data’ section: .data : { [...] _ovly_table = .; LONG(ABSOLUTE(ADDR(.ovly0))); LONG(SIZEOF(.ovly0)); LONG(LOADADDR(.ovly0)); LONG(0); LONG(ABSOLUTE(ADDR(.ovly1))); LONG(SIZEOF(.ovly1)); LONG(LOADADDR(.ovly1)); LONG(0); LONG(ABSOLUTE(ADDR(.ovly2))); LONG(SIZEOF(.ovly2)); 314 ■ GNUPro Tools for Embedded Systems CYGNUS Linker script for D10V targets LONG(LOADADDR(.ovly2)); LONG(0); LONG(ABSOLUTE(ADDR(.ovly3))); LONG(SIZEOF(.ovly3)); LONG(LOADADDR(.ovly3)); LONG(0); _novlys = .; LONG((_novlys - _ovly_table) / 16); [...] } Our example program has four functions; ‘foo’, ‘bar’, ‘baz’, and ‘grbx’. Each is in a separate overlay section. Functions ‘foo’ and ‘bar’ are both linked to run at address ‘0x1001000’, while functions ‘baz’ and ‘grbx’ are both linked to run at ‘0x1002000’. The main program calls ‘OverlayLoad’ once before calling each of the overlaid functions, giving it the overlay number of the respective overlay. The overlay manager, using the table ‘_ovly_table’ that was built up by the linker script, copies each overlaid function into the appropriate region of memory before it is called. In order to compile and link the example overlay manager, enter the following input at the prompt, %. d10v-elf-gcc -g -Td10vdata.ld -oovlydata maindata.c ovlymgr.c Using GDB’s built-in overlay support, we can debug this program even though several of the functions share an address range. After loading the program, give GDB the command ‘overlay auto’. GDB then detects the actions of the overlay manager on the target, and can step into overlaid functions, show appropriate backtraces, etc. If a symbol is in an overlay that is not currently mapped, GDB will access the symbol from its load address instead of the mapped runtime address (which would currently be holding something else from another overlay). In the following example, functions ‘foo’ and ‘bar’ are in different overlays which run at the same address. We will use GDB’s overlay debugging to step into and debug them. (gdb) file ovlydata Reading symbols from ovlydata...done. (gdb) target sim Connected to the simulator. (gdb) load Loading section Loading section Loading section Loading section Loading section Loading section CYGNUS .ovly0, size 0x2c .ovly1, size 0x2c .ovly2, size 0x2c .ovly3, size 0x2c .data00, size 0x4 .data01, size 0x4 lma lma lma lma lma lma 0x8000 0x9000 0xa000 0xb000 0xc000 0xd000 GNUPro Tools for Embedded Systems ■ 315 Linker script for D10V targets Loading section .data02, size 0x4 lma Loading section .data03, size 0x4 lma Loading section .data, size 0x214 lma Loading section .text, size 0x6e0 lma Start address 0x1000000 Transfer rate: 19872 bits in <1 sec. 0xe000 0xf000 0x2000004 0x1000000 (gdb) overlay auto (gdb) overlay list No sections are mapped. (gdb) info address foo Symbol "foo" is a function at address 0x1001000, -- loaded at 0x8000 in overlay section .ovly0. (gdb) info symbol 0x1001000 foo in unmapped overlay section .ovly0 bar in unmapped overlay section .ovly1 (gdb) info address bar Symbol "bar" is a function at address 0x1001000, -- loaded at 0x9000 in overlay section .ovly1. (gdb) break main Breakpoint 1 at 0x1000048: file maindata.c, line 18. (gdb) run Starting program: ovlydata Breakpoint 1, main () at maindata.c:18 18 OverlayLoad(0); (gdb) next 19 OverlayLoad(4); (gdb) next 20 a = foo(1); (gdb) overlay list Section .ovly0, loaded at 00008000 - 0000802c, mapped at 01001000 - 0100102c Section .data00, loaded at 0000c000 - 0000c004, mapped at 02001000 - 02001004 (gdb) info symbol 0x1001000 foo in mapped overlay section .ovly0 bar in unmapped overlay section .ovly1 The overlay containing the ‘foo’ function is now mapped. (gdb) step 316 ■ GNUPro Tools for Embedded Systems CYGNUS Linker script for D10V targets foo (x=1) at foo.c:6 6 if (x) (gdb) x /i $pc 0x1001008 <foo+8>: ld r2, @r11 -> cmpeqi.s r2, 0x0 (gdb) print foo $1 = {long int (int)} 0x1001000 <foo> (gdb) print bar $2 = {long int (int)} 0x9000 <*bar*> GDB uses labels such as ‘<*bar*>’ (with asterisks) to distinguish overlay load addresses from the symbol’s runtime address (where it will be when used by the program). (gdb) disassemble Dump of assembler code 0x1001000 <foo>: 0x1001004 <foo+4>: 0x1001008 <foo+8>: 0x100100c <foo+12>: 0x1001010 <foo+16>: 0x1001014 <foo+20>: 0x1001018 <foo+24>: 0x100101c <foo+28>: 0x1001020 <foo+32>: 0x1001024 <foo+36>: 0x1001028 <foo+40>: End of assembler dump. for function foo: st r11, @-sp -> subi sp, 0x2 mv r11, sp -> st r2, @r11 ld r2, @r11 -> cmpeqi.s r2, 0x0 brf0t.l 0x100101c <foo+28> ld2w r2, @(0x1000, r0) bra.l 0x1001024 <foo+36> bra.l 0x1001024 <foo+36> ldi.s r2, 0x0 -> ldi.s r3, 0x0 bra.l 0x1001024 <foo+36> add3 sp, r11, 0x2 ld r11, @sp+ -> jmp r13 (gdb) disassemble bar Dump of assembler code 0x9000 <*bar*>: 0x9004 <*bar+4*>: 0x9008 <*bar+8*>: 0x900c <*bar+12*>: 0x9010 <*bar+16*>: 0x9014 <*bar+20*>: 0x9018 <*bar+24*>: 0x901c <*bar+28*>: 0x9020 <*bar+32*>: 0x9024 <*bar+36*>: 0x9028 <*bar+40*>: End of assembler dump. for function bar: st r11, @-sp -> subi sp, 0x2 mv r11, sp -> st r2, @r11 ld r2, @r11 -> cmpeqi.s r2, 0x0 brf0t.l 0x901c <*bar+28*> ld2w r2, @(0x1000, r0) bra.l 0x9024 <*bar+36*> bra.l 0x9024 <*bar+36*> ldi.s r2, 0x0 -> ldi.s r3, 0x0 bra.l 0x9024 <*bar+36*> add3 sp, r11, 0x2 ld r11, @sp+ -> jmp r13 Since the overlay containing ‘bar’ is not currently mapped, GDB finds ‘bar’ at its load address, and disassembles it there. (gdb) finish CYGNUS GNUPro Tools for Embedded Systems ■ 317 Linker script for D10V targets Run till exit from #0 foo (x=1) at foo.c:5 0x1000060 in main () at maindata.c:20 20 a = foo(1); Value returned is $3 = 324 (gdb) next 21 OverlayLoad(1); (gdb) next 22 OverlayLoad(5); (gdb) next 23 b = bar(1); (gdb) overlay list Section .ovly1, loaded at 00009000 - 0000902c, mapped at 01001000 - 0100102c Section .data01, loaded at 0000d000 - 0000d004, mapped at 02001000 - 02001004 (gdb) info symbol 0x1001000 foo in unmapped overlay section .ovly0 bar in mapped overlay section .ovly1 (gdb) step bar (x=1) at bar.c:6 6 if (x) (gdb) x /i $pc 0x1001008 <bar+8>: ld r2, @r11 -> cmpeqi.s r2, 0x0 Now ‘bar’ is mapped, and ‘foo’ is not. Even though the PC is at the same address as before, GDB recognizes that we are in ‘bar’ rather than ‘foo’. (gdb) disassemble Dump of assembler code 0x1001000 <bar>: 0x1001004 <bar+4>: 0x1001008 <bar+8>: 0x100100c <bar+12>: 0x1001010 <bar+16>: 0x1001014 <bar+20>: 0x1001018 <bar+24>: 0x100101c <bar+28>: 0x1001020 <bar+32>: 0x1001024 <bar+36>: 0x1001028 <bar+40>: End of assembler dump. for function bar: st r11, @-sp -> subi sp, 0x2 mv r11, sp -> st r2, @r11 ld r2, @r11 -> cmpeqi.s r2, 0x0 brf0t.l 0x100101c <bar+28> ld2w r2, @(0x1000, r0) bra.l 0x1001024 <bar+36> bra.l 0x1001024 <bar+36> ldi.s r2, 0x0 -> ldi.s r3, 0x0 bra.l 0x1001024 <bar+36> add3 sp, r11, 0x2 ld r11, @sp+ -> jmp r13 (gdb) finish Run till exit from #0 bar (x=1) at bar.c:5 318 ■ GNUPro Tools for Embedded Systems CYGNUS Linker script for D10V targets 0x100007c in main () at maindata.c:23 23 b = bar(1); Value returned is $4 = 309 In the next example, the ‘bazx’ and ‘grbxx’ variables are both mapped to the same runtime address. We will see that with the automatic overlay debugging mode, GDB always knows which variable is using that address. (gdb) info addr bazx Symbol "bazx" is static storage at address 0x2002000, -- loaded at 0xe000 in overlay section .data02. (gdb) info sym 0x2002000 bazx in unmapped overlay section .data02 grbxx in unmapped overlay section .data03 (gdb) info addr grbxx Symbol "grbxx" is static storage at address 0x2002000, -- loaded at 0xf000 in overlay section .data03. (gdb) break baz Breakpoint 2 at 0x1002008: file baz.c, line 6. (gdb) break grbx Breakpoint 3 at 0x1002008: file grbx.c, line 6. Note that the two breakpoints are actually set at the same address, yet GDB will correctly distinguish between them when it hits them. If only one overlay function has a breakpoint on it, GDB will not stop at that address in other overlay functions. (gdb) continue Continuing. Breakpoint 2, baz (x=1) at baz.c:6 6 if (x) (gdb) print &bazx $5 = (long int *) 0x2002000 (gdb) x /d &bazx 0x2002000 <bazx>:317 (gdb) print &grbxx $6 = (long int *) 0xf000 (gdb) continue Continuing. Breakpoint 3, grbx (x=1) at grbx.c:6 6 if (x) (gdb) print &grbxx CYGNUS GNUPro Tools for Embedded Systems ■ 319 GDB overlay support for D10V targets $7 = (long int *) 0x2002000 (gdb) x /d &grbxx 0x2002000 <grbxx>:435 (gdb) print &bazx $8 = (long int *) 0xe000 (gdb) x /d &bazx 0xe000 <*bazx*>:317 r¨Hf#«¦||rQru®#XH GDB provides special functionality for debugging a program that is linked using the overlay mechanism of ‘ld’, the GNU linker. In such programs, an overlay corresponds to a section with a load address that is different from its runtime address. GDB can provide ‘manual’ overlay debugging for any program linked in such a way (providing that the overlays all reside somewhere in memory). “Automatic” overlay debugging is also provided for the Cygnus Sample Overlay Manager. overlay overlay overlay overlay overlay manual map <section-name> unmap <section-name> list off The manual mode requires input from the user to specify what overlays are mapped into their runtime address regions at any given time. The command ‘OVERLAY MAP’ informs GDB that the overlay has been mapped by the target into its shared runtime address range. The command ‘overlay unmap’ informs GDB that the overlay is no longer resident in its runtime address region, and must be accessed from the load-time address region. If two overlays share the same runtime address region, then mapping one implies unmapping the other. overlay auto overlay list overlay off Automatic overlay debugging support in GDB works with the runtime overlay manager provided by Cygnus Solutions in the ‘ examples’ directory. When this mode is activated, GDB will automatically read and interpret the data structures maintained in target memory by the overlay manager. To learn what overlays are mapped at any time, use the command ‘overlay list’. Whenever the target program is allowed to run (e.g. by the ‘STEP’ command), GDB will refresh its overlay map by reading from the target’s overlay tables. The automatic mapping may be temporarily overridden by the commands ‘overlay map’ and ‘overlay unmap’, but these mappings will last only until the 320 ■ GNUPro Tools for Embedded Systems CYGNUS Breakpoints for D10V targets next time the target is allowed to run. To explicitly take control of GDB’s overlay mapping, switch to the ‘overlay manual’ mode. When GDB’s overlay support (either manual or auto) is active, GDB’s concept of a symbol’s address is controlled by which overlays are mapped into which memory regions. For instance, if you ‘PRINT’ a variable that is in an overlay which is currently mapped (i.e. located in its runtime address region) GDB will fetch the variable’s memory from the runtime address. If the variable’s overlay is currently not mapped, GDB will fetch it from its load-time address. Similarly, if you disassemble a function that is in an unmapped overlay, or use a symbol’s address to examine memory, GDB will fetch the memory from the symbol's load-time address range instead of the runtime range. If GDB’s output contains labels that are relative to an overlay’s load-time address instead of the runtime address, the labels will be distinguished like this: (gdb) overlay map .ovly0 (gdb) x /x foo 0x1001000 <foo>: 0x76bf81e5 (gdb) overlay unmap .ovly0 (gdb) x /x foo 0x8000 <*foo*>: 0x76bf81e5 The extra *’s around the label ‘foo’ may be interpreted as meaning that this is where ‘foo’ is presently, but not where it will be when it is in use by the target program. The ‘info address’ command can tell you what overlay a symbol is in, as well as where it is loaded and mapped. The ‘info symbol’ command can list all of the symbols that are mapped to an address. (gdb) info address foo Symbol "foo" is a function at address 0x1001000 -- loaded at 0x8000 in overlay section .ovly0. (gdb) info symbol 0x1001000 foo in mapped overlay section .ovly0 bar in unmapped overlay section .ovly1 H#e|rcoQru®#XH So long as the overlay sections are located in RAM rather than ROM, GDB can set breakpoints in them. The breakpoints work by inserting trap instructions into the load-time address region. When the overlay is mapped into the runtime region, the trap instructions are mapped along with it, and when executed, cause the target program to break out to the debugger. If the overlay regions are located in ROM, you CYGNUS GNUPro Tools for Embedded Systems ■ 321 Breakpoints for D10V targets can only set breakpoints in them after they have been mapped into the runtime region in RAM. 322 ■ GNUPro Tools for Embedded Systems CYGNUS Developing for the M32R/X/D targets H¨Hfr|coXQr`H¤ #XH The following documentation discusses the M32R/X/D processor. ■ “Compiler support for M32R/X/D targets” on page 324 ■ “ABI summary for M32R/X/D targets” on page 327 ■ “Assembler support for M32R/X/D targets” on page 335 ■ “Linker support for M32R/X/D targets” on page 341 ■ “Debugger support for M32R/X/D targets” on page 344 ■ “Standalone simulator for M32R/X/D targets” on page 345 ■ “Overlays for the M32R/X/D targets” on page 348 CYGNUS GNUPro Tools for Embedded Systems ■ 323 Compiler support for M32R/X/D targets rj|cfH¦||rQr¤ #XH For a list of available generic compiler options, see “GNU CC command options” on page 67 and “Option summary for GCC” on page 69 in Using GNU CC in GNUPro Compiler Tools. ■ “Preprocessor symbol issues for M32R/X/D targets” on page 325 ■ “M32R/X/D-specific compiling attributes” on page 325 ■ “Data types and alignment for M32R/X/D targets” on page 327 ■ “CPU registers for M32R/X/D targets” on page 329 ■ “The stack frame for M32R/X/D targets” on page 330 The following M32R/X-specific command-line options are supported. -m32r Generate code for the M32R processor (including M32R/D). -m32rx Generate code for the M32R/X processor. -mmodel=small Assume all objects live in the lower 16MB of memory (so that their addresses can be loaded with the ‘ld24’ instruction), and assume all subroutines are reachable with the ‘bl’ instruction. This is the default. The addressability of a particular object can be set with the ‘model’ attribute in the source code. See “M32R/X/D-specific compiling attributes” on page 325. -mmodel=medium Assume objects may be anywhere in the 32 bit address space (the compiler will generate ‘seth/add3’ instructions to load their addresses), and assume all subroutines are reachable with the ‘bl’ instruction. -mmodel=large Assume objects may be anywhere in the 32 bit address space (the compiler will generate ‘seth/add3’ instructions to load their addresses), and assume subroutines may not be reachable with the ‘bl’ instruction (the compiler will generate the much slower ‘seth/add3/jl’ instruction sequence). -msdata=none Disable use of the small data area. Variables will be put into one of ‘.data’, ‘bss’, or ‘.rodata’ (unless the ‘section’ attribute has been specified). This is the default. The small data area consists of sections ‘.sdata’ and ‘.sbss’. Objects may be explicitly put in the small data area with the ‘section’ attribute using one of these 324 ■ GNUPro Tools for Embedded Systems CYGNUS Preprocessor symbol issues for M32R/X/D targets sections. -msdata=sdata Put small global and static data in the small data area, but do not generate special code to reference them. This is normally only used to build system libraries. It enables them to be used with both ‘-msdata=none’ and ‘-msdata=use’. -msdata=use Put small global and static data in the small data area, and generate special instructions to reference them. -G num Put global and static objects less than or equal to ‘num’ bytes into the small data or bss sections instead of the normal data or bss sections. The default value of ‘num’ is 8. The ‘-msdata’ option must be set to one of ‘sdata’ or ‘use’ for this option to have any effect. All modules should be compiled with the same ‘-G num’ value. Compiling with different values of ‘num’ may or may not work; if it does not work, the linker will give an error message. Incorrect code will not be generated. H|r6Hr«j,rfc¦HQr¤ #XH By default, the compiler defines the ‘_ _M32R_ _’ preprocessor symbol. ¤ a|H6cQc66rj|cfcoX#c,¦H The following M32R/X/D-specific attributes are supported. Names may be surrounded with double-underscores to avoid namespace pollution. For example, __interrupt__ can also be used for interrupt. See “Declaring attributes of functions” on page 234 and “Specifying attributes of variables” on page 243 in “Extensions to the C language family” in Using GNU CC in GNUPro Compiler Tools for more information. interrupt Indicates the specified function is an interrupt handler. The compiler will generate prologue and epilogue sequences appropriate for an interrupt handler. model (<model-name>) Use this attribute on the M32R/X/D to set the addressability of an object, and the code generated for a function. The identifier ‘<model-name>’ is one of ‘small’, ‘medium’, or ‘large’, representing each of the code models. Small model objects live in the lower 16MB of memory (so that their addresses can be loaded with the ‘ld24’ instruction), and are callable with the ‘bl’ instruction. CYGNUS GNUPro Tools for Embedded Systems ■ 325 M32R/X/D-specific compiling attributes Medium model objects may live anywhere in the 32 bit address space (the compiler will generate ‘seth/add3’ instructions to load their addresses), and are callable with the ‘bl’ instruction. Large model objects may live anywhere in the 32 bit address space (the compiler will generate ‘seth/add3’ instructions to load their addresses), and may not be reachable with the ‘bl’ instruction (the compiler will generate the much slower ‘seth/add3/jl’ instruction sequence). 326 ■ GNUPro Tools for Embedded Systems CYGNUS ABI summary for M32R/X/D targets ¦jj#«Qr¤ #XH The following documentation discusses the Application Binary Interface (ABI) for the M32R/X/D processors. ■ “Data types and alignment for M32R/X/D targets” (below) ■ “Allocation rules for structures and unions for M32R/X/D targets” on page 328 ■ “CPU registers for M32R/X/D targets” on page 329 ■ “The stack frame for M32R/X/D targets” on page 330 ■ “Argument passing for M32R/X/D targets” on page 332 ■ “Function return values for M32R/X/D targets” on page 332 ■ “Startup code for M32R/X/D targets” on page 333 ■ “Producing S-records for M32R/X/D targets” on page 334 ##«|H#o?#fcXojHoQr¤ #XH Table 41 shows the data type sizes for M32R/X/D processors. Table 41: Data type sizes for M32R/X/D processors Type Size (bytes) 1 byte 2 bytes 4 bytes 4 bytes 8 bytes 4 bytes 8 bytes pointer 4 bytes char short int long long long float double The stack is aligned to a four-byte boundary. One byte is used for characters (including structure/unions made entirely of chars), two bytes for shorts (including structure/unions made entirely of shorts), and four-byte alignment for everything else. CYGNUS GNUPro Tools for Embedded Systems ■ 327 Allocation rules for structures and unions for M32R/X/D targets ffr6#cro¦fHQr¦6¦H#o?¦ocroQr ¤ #XH The following rules apply to the allocation of structure and union members in memory. ■ Structure and union packing can be controlled by attributes specified in the source code. In the absence of any attributes however, the following rules are obeyed: ■ Fields that are shorts are aligned to 2 byte boundaries. Fields that are ints, longs, floats, doubles and long longs are aligned to 4 byte boundaries. Char fields are not aligned. ■ Composite fields (ie ones that are themselves structures or unions) are aligned to greatest alignment requirement of any of their component fields. So if a field is a structure that contains a char, a short and an int, the field will be aligned to a 4-byte boundary because of the int. ■ Bit fields are packed in a big-endian fashion, and they are aligned so that they will not cross boundaries of their type. For instance, consider the following example’s structure. struct { int a:2, b:31;} s = { 0x1, 0x3}; Such input is stored in memory as the following code example shows. .byte .zero .byte .byte .byte .byte 0x40 3 0x0 0x0 0x0 0x6 So the ‘a’ field is stored in the top two bits of the first byte; with the most significant bit of ‘a’ being stored in the most significant bit of the byte. The bottom six bits of that byte and the next three bytes are all padding, so that the next bitfield ‘b’ does not cross a word boundary. Consider the following example’s structure. struct { short c:2, d:2, e:13; } s = { 0x2, 0x3, 0xf}; Such input is stored in memory as the following code example shows. .byte .zero .byte .byte ■ 0xb0 1 0x0 0x78 So ‘c’ and ‘d’ fields are both held in the same byte, but the ‘e’ field starts two bytes further on, so that it will not cross a two byte boundary. Fields in unions are treated in the same way as fields in structures. A union is aligned to the greatest alignment requirement of any of its members. 328 ■ GNUPro Tools for Embedded Systems CYGNUS CPU registers for M32R/X/D targets HXcHQr¤ #XH The following registers are specific to the M32R/X/D processors. r0 through r3 Used for passing arguments to functions. Additional arguments are passed on the stack (see below). ‘r0’, ‘r1’ is also used to return the result of function calls. The values of these registers are not preserved across function calls. r4 through r7 Temporary registers for expression evaluation. The values of these registers are not preserved across function calls. ‘r4’ is reserved for use as a temporary register in the prologue. ‘r6’ is also reserved for use as a temporary in the Position Independent Code (PIC) calling sequence (if ever necessary) and may not be used in the function calling sequence or prologue of functions. ‘r7’ is also used as the static chain pointer in nested functions (a GNU C extension) and may not be used in the function calling sequence or prologue of functions. In other contexts it is used as a temporary register. r8, r9, r10, r11 Temporary registers for expression evaluation. The values of these registers are preserved across function calls. r12 Temporary register for expression evaluation. Its value is preserved across function calls. It is also reserved for use as potential “global pointer”. r13 (fp) Reserved for use as the frame pointer if one is needed. Otherwise it may be used for expression evaluation. Its value is preserved across function calls. r14 (lr) Link register. This register contains the return address in function calls. It may also be used for expression evaluation if the return address has been saved. r15 (sp) Stack pointer. accumulator This register is not preserved across function calls. psw The carry bit of the ‘psw’ is not preserved across function calls. CYGNUS GNUPro Tools for Embedded Systems ■ 329 The stack frame for M32R/X/D targets `H#6eQ#jHQr¤ #XH Stack frames for M32R/X/D processors use the following functionality. ■ The stack grows downwards from high addresses to low addresses. ■ A leaf function need not allocate a stack frame if it does not need one. ■ A frame pointer need not be allocated. ■ The stack pointer shall always be aligned to 4-byte boundaries. ■ The register save area shall be aligned to a 4-byte boundary. Stack frames for functions that take a fixed number of arguments use the definitions and allocations shown in Figure 13. The frame pointer (FP) points to the same location as the stack pointer (SP). Figure 13: M32R/X/D stack frames for functions that take a fixed number of arguments Before call: High memory After call: local variables, register save area, etc. local variables, register save area, etc. arguments on stack arguments on stack SP, FP register save area local variables alloca allocations Low memory 330 ■ GNUPro Tools for Embedded Systems arguments on stack SP, FP CYGNUS The stack frame for M32R/X/D targets Stack frames for functions taking a variable number of arguments use the definitions and allocations shown in Figure 14. The frame pointer (FP) points to the same location as the stack pointer (SP). Figure 14: M32R/X/D stack frames for functions that take a variable number of arguments Before call: High memory After call: local variables, register save area, etc. local variables, register save area, etc. arguments on stack arguments on stack SP, FP save area for anonymous parms passed in registers (the size of this area may be zero) local variables alloca allocations Low memory CYGNUS arguments on stack SP, FP GNUPro Tools for Embedded Systems ■ 331 Argument passing for M32R/X/D targets X¦jHo|#coXQr¤ #XH Arguments are passed to a function using first registers and then memory if the argument passing registers are used up. Each register is assigned an argument until all are used. Unused argument registers have undefined values on entry. The following rules must be adhered to. ■ An argument, if it is less than or equal to 8 bytes in size, is passed in registers if available. However, if such an argument is a composite structure (one with more than one field and greater than 4 bytes in size) it is also passed on the stack, in addition to being passed in the registers. An argument, which is greater than 8 bytes in size, is always passed by reference, which means that a copy of the argument is placed on the stack and a pointer to that copy is passed in the register. ■ If a data type would overflow the register arguments, then it is passed in registers and memory. A ‘long long’ data type passed in ‘r3’ would be passed in ‘r3’ and in the first 4 bytes of the stack. ■ Arguments passed on the stack begin at ‘sp’ with respect to the caller. ■ Each argument passed on the stack is aligned on a 4 byte boundary. ■ Space for all arguments is rounded up to a multiple of 4 bytes. ¦o6croH¦o¨#f¦HQr¤ #XH Integers, floating point values, and aggregates of 8 bytes or less are returned in register ‘r0’ (and ‘r1’ if necessary). Aggregates larger than 8 bytes are returned by having the caller pass the address of a buffer to hold the value in ‘r0’ as an “invisible” first argument. All arguments are then shifted down by one. The address of this buffer is returned in ‘r0’. 332 ■ GNUPro Tools for Embedded Systems CYGNUS Startup code for M32R/X/D targets #¦|6r?HQr¤ #XH Before the ‘main’ function can be called, code must be run that does four things: ■ Contain symbol ‘_start’ ■ Initialize the stack pointer ■ Zeros the ‘bss’ section ■ Runs constructors for any global objects that have them The default startup code is shown in the following example. It is part of the ‘libgloss/m32r/crt0.S’ file in the source tree. The best way to write your own startup code is to take the following example and modify it to suit your needs. .text .balign 4 .global _start _start: ld24 sp, ldi fp, # Clear the BSS. # for most of it, ld24 r2, ld24 r3, sub r3, mv r4, srli r4, ldi r1, addi r2, beqz r4, .Lloop1: st r1, addi r4, bnez r4, .Lendloop1: and3 r4, addi r2, beqz r4, .Lloop2: stb r1, addi r2, addi r4, bnez r4, .Lendloop2: _stack #0 Do it in two parts for efficiency: longwords first then the remaining 0 to 3 bytes. __bss_start ; R2 = start of BSS _end ; R3 = end of BSS + 1 r2 ; R3 = BSS size in bytes r3 #2 ; R4 = BSS size in longwords (rounded down) #0 ; clear R1 for longword store #-4 ; account for pre-inc store .Lendloop1 ; any more to go? @+r2 #-1 .Lloop1 ; yep, zero out another longword ; decrement count ; go do some more r3, #3 ; get no. of remaining BSS bytes to clear #4 ; account for pre-inc store .Lendloop2 ; any more to go? @r2 #1 #-1 .Lloop2 ; yep, zero out another byte ; bump address ; decrement count ; go do some more # Run code in the .init section. # This will queue the .fini section to be run with atexit. bl CYGNUS __init GNUPro Tools for Embedded Systems ■ 333 Producing S-records for M32R/X/D targets # Call main, then exit. bl bl main exit # If that fails just loop. .Lexit: bra .Lexit r?¦6coXaH6r?Qr¤ #XH The following command reads the contents of ‘hello.x’, converts the code and data into S-records, and puts the result into ‘hello.srec’. m32r-elf-objcopy -O srec hello.x hello.srec The following example shows the first few lines of the resulting ‘hello.srec’ S-record. S00D000068656C6C6F2E7372656303 S11801002D7F2E7F1D8FF000E0006DF4FE0000FEFE001B281F54 S11801158D2EEF2DEF1FCEEF1000006D00F000E20075C0E300C8 S118012A75F4032214835402610042FCF000B0840003216244B4 S118013FFFB094FFFF84C300034204F000B08400042102420148 334 ■ GNUPro Tools for Embedded Systems CYGNUS Assembler support for M32R/X/D targets Hj,fH¦||rQr¤ #XH For a list of available generic assembler options, see “Command-line options” on page 21 in Using as in GNUPro Utilities. In addition, the following M32R/X/D-specific command-line options are supported. -m32rx Support the extended m32rx instruction set -O Try to combine instructions in parallel (m32rx only) -warn-explict-parallel-conflicts -no-warn-explict-parallel-conflicts -Wp -Wnp Warn (or don’t warn with -no-warn-explict-parallel-conflicts or -Wnp) when parallel instructions conflict. The default is to issue the warning. -warn-unmatched-high -no-warn-unmatched-high –Wuh –Wnuh Warn (or don’t warn with -no-warn-unmatched-high or –Wnuh) if a ‘high’ or ‘shigh’ relocation has no matching ‘low’ relocation. The default is no warning. Syntax for M32R/X/D is based on the syntax in Mitsubishi’s M32R Family Software Manual. The M32R/X/D assembler supports ‘;’ (semi-colon) and ‘#’ (pound). Both characters are line comment characters when used in column zero. The semi-colon may also be used to start a comment anywhere within a line. || Specify that two instructions are executed in parallel by placing them on the same line, separated by ‘||’. Use the following example’s input, for instance. mv r1,r2 || mv r2,r1 These two instructions are executed in parallel. A new syntax has been added to explicitly allow specifying two instructions executed sequentially. -> Specify that two instructions are executed sequentially by placing them on the same line, separated by ‘->’. This is useful when assembling with optimization CYGNUS GNUPro Tools for Embedded Systems ■ 335 Register names for M32R/X/D targets turned on and you explicitly want to state that two instructions are to be executed sequentially and not in parallel. Use the following example’s input, for instance. mv r1,r2 -> ld r1,@r2 The ‘mv r1,r2’ instruction is first executed, and then the ‘ld r1,@r2’ instruction is executed. HXcHo#jHQr¤ #XH You can use the predefined symbols ‘r0’ through ‘r15’ to refer to the M32R/X/D registers. You can also use ‘sp’ as an alias for ‘r15’, ‘lr’ as an alias for ‘r14’, and ‘fp’ as an alias for ‘r13’. The M32R/X/D also has predefined symbols for the control registers and status bits described in Figure 42 (below). Table 42: Symbols and usage for M32R/X/D processors Symbol Usage cr0 through cr15 psw cbr spi spu bpc Control registers Processor status word (alias for ‘cr0’) Condition bit register (alias for ‘cr1’) Interrupt stack pointer (alias for ‘cr2’) User stack pointer (alias for ‘cr3’) Backup program counter (alias for ‘cr6’) ??HcoXjr?HQr¤ #XH The assembler understands the following addressing modes for the M32R/X/D. The ‘Rn’ symbol in the following examples refers to any of the specifically numbered registers or register pairs, but not the control registers. Table 43: Symbols and addressing modes for the M32R/X/D processors Symbol Addressing Mode Rn Register direct @Rn Register indirect @Rn+ Register indirect with post-increment @RnRegister indirect with post-decrement @-Rn Register indirect with pre-decrement @(disp, Rn) Register indirect with displacement addr PC relative address (for branch or rep) #imm Immediate data fr#coX|rcoQr¤ #XH Although the M32R/X/D has no hardware floating point, the ‘.float’ and ‘.double’ 336 ■ GNUPro Tools for Embedded Systems CYGNUS Pseudo opcodes for M32R/X/D targets directives generate IEEE-format floating-point values for compatibility with other development tools. H¦?rr|6r?HQr¤ #XH M32R/X/D processors use one pseudo opcode. .debugsym <label> Create a ‘<label>’ label with the value of the next instruction that follows the pseudo opcode. Unlike normal labels, the label created with ‘.debugsym’ does not force the next instruction to be aligned to a 32-bit boundary (in other words, it does not generate a nop, if the previous instruction is a 16-bit instruction, and the instruction that follows is also a 16-bit instruction). |6r?HQr¤ #XH For detailed information on the M32R/X/D machine instruction set, see M32R Family Software Manual. The GNU assembler implements all the standard M32R/X/D opcodes. The assembler does not support the ‘:8’ or ‘:24’ syntax for explicitly specifying the size of the branch instruction. Instead, the assembler supports the ‘.s’ suffix to specify a short branch, and the ‘.l’ suffix to specify a long branch. For example, ‘bra label:8’ becomes ‘bra.s label’ and ‘bra label:24’ becomes ‘bra.l label’. The assembler does not support the ‘:8’ or ‘:16’ syntax for explicitly specifying the size of an immediate constant. Instead, the assembler supports the ‘ldi8’ and ‘ldi16’mnemonics. For example, ‘ldi r0, 1:8’ becomes ‘ldi8 r0, 1’ and ‘ldi r0, 1:16’ becomes ‘ldi16 r0, 1’. CYGNUS GNUPro Tools for Embedded Systems ■ 337 Synthetic instructions for M32R/X/D targets «o`Hc6co¦6croQr¤ #XH Synthetic instructions are aliases for existing instructions. They provide an additional and often simpler way to specify an instruction. Table 44: Synthetic instructions for M32R/X/D processors Synthetic Instruction Real Instruction bc.s label bc.l label bcl.s label bcl.l label bl.s label bl.l label bnc.s label bnc.l label bncl.s label bncl.l label bra.s label bra.l label ldi8 reg, #const ldi16 reg, #const push reg pop reg bc label [8-bit offset] bc label [24-bit offset] bcl label [8 bit offset] bcl label [24 bit offset] bl label [8-bit offset] bl label [24-bit offset] bnc label [8-bit offset] bnc label [24-bit offset] bncl label [8 bit offset] bncl label [24 bit offset] bra label [8-bit offset] bra label [24-bit offset] ldi reg, #const [8-bit constant] ldi reg, #const [16-bit constant] st reg, @-sp ld reg, @sp+ ccoX#Hj,fH6r?HQr¤ #XH The best way to write assembler code is to write a small C program, compile it with the ‘-S’ flag, and study the assembler code GCC produces. The assembler code in the following example (‘hello.s’) is from the ‘hello.c’ example. It was created with ‘m32r-elf-gcc -S -O2 hello.c’. See Using as in GNUPro Utilities for more information on GNU assembler directives, or pseudo-opcodes. See the M32R Family Software Manual for more information on the instruction set, and syntax. gcc2_compiled.: .section .rodata .balign 4 .LC0: .string"hello world!\n" .balign 4 .LC1: .string"%d + %d = %d\n" .section .text .balign 4 .globalmain .type main,@function main: 338 ■ GNUPro Tools for Embedded Systems CYGNUS Writing assembler code for M32R/X/D targets ; BEGIN PROLOGUE ; vars= 0, regs= 2, args= 0, extra= 0 push r8 push lr ; END PROLOGUE ld24 r8,#a ldi r4,#3 st r4,@(r8) ld24 r0,#.LC0 bl printf ld24 r0,#.LC1 ld r1,@(r8) ld24 r4,#c ldi r2,#4 add3 r3,r1,#4 st r3,@(r4) bl printf ; EPILOGUE pop lr pop r8 jmp lr .Lfe1: .size main,.Lfe1-main .comma,4,4 .commc,4,4 .ident"GCC: (GNU) 2.7-m32r-970408" To assemble the ‘hello.s’ file, use the following input. m32r-elf-as hello.s -o hello.o The following are some tips for assembler programmers. ■ To clear the ‘CBR’ register, just one instruction can be used: cmp Rx,Rx total 2 bytes Where ‘Rx’, is an arbitrary register. Note the operation does not destroy the contents of ‘Rx’. The previous code example is smaller than the following code: ldi Rx,#1 cmpi Rx,#0 ■ total 6 bytes and destroys ‘Rx’. To set the ‘CBR’ register, there are several methods. First, try using the following example’s input. ldi Rx,#-1 addv R0,R0 total 4 bytes Alternatively, try using the following example’s input. ldi Rx,#-2 addx R0,R0 total 4 bytes The previous code examples are smaller than the following code example: ldi Rx,#0 cmpi Rx,#1 CYGNUS total 6 bytes GNUPro Tools for Embedded Systems ■ 339 M32R/X/D-specific assembler error messages ■ To set a comparison result to a register, there are some idioms for the M32R. For instance, try using the following example’s input. (a) ‘... flag = (x == 0);...’ cmpui Rx,#1 mvfc Rx,CBR total 4 byte (b) ‘... flag = !(x op 0); ...’ To get the inverted result of comparison, first set ‘CBR’ using one of the methods above, then, try using the following example’s input. subx Rx,Rx addi Rx,#1 total 4 byte The previous example will provide better results than than the following code. mvfc Rx,CBR xor3 Rx,Rx,#1 total 6-byte NOTE: The ‘subx Rx,Rx’ operation is equivalent to the following code. mvfc Rx,CBR neg Rx,Rx ¤ a|H6cQc6#Hj,fHHrjH#XH The following error messages may occur for M32R/X/D processors during assembly implementation. Error: bad instruction The instruction is misspelled or there is a syntax error somewhere. Error: expression too complex Error: unresolved expression that must be resolved The instruction contains an expression that is too complex; no relocation exists to handle it. Error: relocation overflow The instruction contains an expression that is too large to fit in the field. 340 ■ GNUPro Tools for Embedded Systems CYGNUS Linker support for M32R/X/D targets coeH¦||rQr¤ #XH For a list of available generic linker options, see “Linker scripts” on page 261 in Using ld in GNUPro Utilities. In addition, the following M32R/X/D-specific command-line option is supported. --defsym _stack=0xnnnn Specify the initial value for the stack pointer. This assumes the application loads the stack pointer with the value of ‘_stack’ in the start up code. The initial value for the stack pointer is defined in the linker script with the PROVIDE linker command. This allows the user to specify a new value on the command line with the standard linker option ‘—defsym’. coeH6c|Qr¤ #XH The GNU linker uses a linker script to determine how to process each section in an object file, and how to lay out the executable. The linker script is a declarative program consisting of a number of directives. For instance, the ‘ENTRY()’ directive specifies the symbol in the executable that will be the executable’s entry point. Since linker scripts can be complicated to write, the linker includes one built-in script that defines the default linking process. For the M32R/X/D tools, the following example shows the default script. Although this script is somewhat lengthy, it is a generic script that will support all ELF situations. In practice, generation of sections like ‘.rela.dtors’ are unlikely when compiling using embedded ELF tools. OUTPUT_FORMAT("elf32-m32r", "elf32-m32r", "elf32-m32r") OUTPUT_ARCH(m32r) ENTRY(_start) SEARCH_DIR( <installation directory path>); SECTIONS { /* Read-only sections, merged into text segment: */ . = 0x200000; .interp : { *(.interp) } .hash : { *(.hash) } .dynsym : { *(.dynsym) } .dynstr : { *(.dynstr) } .rel.text : { *(.rel.text) } .rela.text : { *(.rela.text) } .rel.data : { *(.rel.data) } .rela.data : { *(.rela.data) } .rel.rodata : { *(.rel.rodata) } .rela.rodata : { *(.rela.rodata) } CYGNUS GNUPro Tools for Embedded Systems ■ 341 Linker script for M32R/X/D targets .rel.got : { *(.rel.got) .rela.got : { *(.rela.got) .rel.ctors : { *(.rel.ctors) .rela.ctors : { *(.rela.ctors) .rel.dtors : { *(.rel.dtors) .rela.dtors : { *(.rela.dtors) .rel.init : { *(.rel.init) .rela.init : { *(.rela.init) .rel.fini : { *(.rel.fini) .rela.fini : { *(.rela.fini) .rel.bss : { *(.rel.bss) .rela.bss : { *(.rela.bss) .rel.plt : { *(.rel.plt) .rela.plt : { *(.rela.plt) .init : { *(.init) .plt : { *(.plt) .text : { *(.text) /* .gnu.warning sections are handled specially elf32.em. */ *(.gnu.warning) *(.gnu.linkonce.t*) } =0 } } } } } } } } } } } } } } } =0 } by _etext = .; PROVIDE (etext = .); .fini : { *(.fini) } =0 .rodata : { *(.rodata) *(.gnu.linkonce.r*) } .rodata1 : { *(.rodata1) } /* Adjust the address for the data segment. We want to adjust up to the same address within the page on the next page up. */ . = ALIGN(32) + (ALIGN(8) & (32 - 1)); .data : { *(.data) *(.gnu.linkonce.d*) CONSTRUCTORS } .data1 : { *(.data1) } .ctors : { *(.ctors) } .dtors : { *(.dtors) } .got : { *(.got.plt) *(.got) } .dynamic : { *(.dynamic) } /* We want the small data sections together, so single-instruction offsets can access them all, and 342 ■ GNUPro Tools for Embedded Systems CYGNUS Linker script for M32R/X/D targets initialized data all before uninitialized, so we can shorten the on-disk segment size. */ .sdata : { *(.sdata) _edata = .; PROVIDE (edata = .); __bss_start = .; .sbss : { *(.sbss) *(.scommon) .bss : { *(.dynbss) *(.bss) *(COMMON) _end = . ; PROVIDE (end = .); /* Stabs debugging sections. */ .stab 0 : { *(.stab) .stabstr 0 : { *(.stabstr) .stab.excl 0 : { *(.stab.excl) .stab.exclstr 0 : { *(.stab.exclstr) .stab.index 0 : { *(.stab.index) .stab.indexstr 0 : { *(.stab.indexstr) .comment 0 : { *(.comment) } } } } } } } } } } /* DWARF debug sections. Symbols in the .debug DWARF section are relative to the beginning of the section so we begin .debug at 0. It’s not clear yet what needs to happen for the others. */ .debug .debug_srcinfo .debug_aranges .debug_pubnames .debug_sfnames .line 0 0 0 0 0 0 : : : : : : { { { { { { *(.debug) *(.debug_srcinfo) *(.debug_aranges) *(.debug_pubnames) *(.debug_sfnames) *(.line) } } } } } } PROVIDE (_stack = 0x3ffffc); } CYGNUS GNUPro Tools for Embedded Systems ■ 343 Debugger support for M32R/X/D targets H,¦XXH¦||rQr¤ #XH GDB’s built-in software simulation of the M32R/X/D processor allows the debugging of programs compiled for the M32R/X/D without requiring any access to actual hardware. Activate this mode in GDB by typing ‘target sim’. Then load code into the simulator by typing ‘load’ and debug it in the normal fashion. For the available generic debugger options, see Debugging with GDB in GNUPro Debugging Tools. There are no M32R/X/D specific debugger command-line options. Cygnus Insight™ is the graphic user interface (GUI) for the GNUPro debugger. See “Working with Cygnus Insight, the visual debugger” on page 149 in GETTING STARTED. 344 ■ GNUPro Tools for Embedded Systems CYGNUS Standalone simulator for M32R/X/D targets #o?#froHcj¦f#rQr¤ #XH The simulator supports the general-registers (r0 to r15), control-registers (psw, cbr, spi, spu, and bpc), and the accumulator. The simulator allocates a contiguous chunk of memory starting at the ‘0’ address. The default memory size is 8 MB. Three run-time command-line options are available with the simulator: -t, -v, and -p. WARNING! Simulator cycle counts are not intended to be extremely accurate in the ■ following script examples. Use them with caution. The ‘-t’ command-line option to the stand-alone simulator turns on instruction level tracing as shown in the following segment. % m32r-elf-run -t hello.x 0x00011c 0x000120 0x000122 0x000124 0x000128 0x00012c 0x00012e 0x000130 0x000132 0x000134 0x000136 0x000138 . . . ■ ld24 sp,0x100000 ldi fp,0 nop ld24 r2,0x75c0 ld24 r3,0x75f4 sub r3,r2 mv r4,r3 srli r4,0x2 ldi r1,0 addi r2,-4 nop dr <- 0x100000 dr <- 0x0 dr dr dr dr dr dr dr <<<<<<<- 0x75c0 0x75f4 0x34 0x34 0xd 0x0 0x75bc The ‘-v’ command-line option prints some simple statistics. % m32r-elf-run -v hello.x hello world! 3 + 4= 7 Total: 3808 insns Fill nops: 609 ■ The ‘-p’ command prints profiling statistics. % m32r-elf-run -p hello.x Hello world! 3 + 4= 7 Instruction Statistics Total: 3796 insns add: 75: ***** add3: 123: ******** and: 3: CYGNUS GNUPro Tools for Embedded Systems ■ 345 Standalone simulator for M32R/X/D targets and3: or: or3: addi: bc8: bc24: beq: beqz: bgez: bgtz: blez: bltz: bnez: bl8: bl24: bnc8: bne: bra8: bra24: cmp: cmpu: cmpui: jl: jmp: ld: ld-d: ldb: ldb-d: ldh-d: ldub: lduh-d: ld-plus: ld24: ldi8: ldi16: mv: neg: nop: sll: sll3: slli: srai: srli: st: st-d: stb: stb-d: sth: 61: 28: 3: 222: 9: 3: 23: 131: 8: 2: 42: 6: 252: 11: 82: 52: 1: 29: 9: 28: 34: 2: 7: 100: 93: 277: 77: 6: 38: 23: 23: 158: 55: 163: 5: 282: 26: 584: 3: 7: 25: 25: 35: 52: 195: 27: 4: 25: **** * *************** * ******** ** ***************** ***** *** * * ** ****** ****** ****************** ***** ** * * ********** *** *********** ******************* * **************************************** * * ** *** ************* * * 346 ■ GNUPro Tools for Embedded Systems CYGNUS Standalone simulator for M32R/X/D targets sth-d: 11: st-plus: 13: st-minus: 164: *********** sub: 52: *** trap: 2: Memory Access Statistics Total read: 1891 accesses Total write: 491 accesses QI QI HI HI SI SI UQI UHI USI read: 83: ** write: 31: * read: 38: * write: 36: * read: 528: ***************** write: 424: ************** read: 23: read: 23: read: 1196: **************************************** Model m32r/d timing information: CYGNUS Taken branches: Untaken branches: Cycles stalled due to branches: Cycles stalled due to loads: Total cycles (approx): 532 237 1064 670 4946 Fill nops: 584 GNUPro Tools for Embedded Systems ■ 347 Overlays for the M32R/X/D targets ¨Hf#«Qr`H¤ #XH Overlays are sections of code or data, which are to be loaded as part of a single memory image, but are to be run or used at a common memory address. At run time, an overlay manager will copy the sections in and out of the runtime memory address. This approach can be useful, for example, when a certain region of memory is faster than another section. A simple, portable runtime overlay manager is provided in the ‘examples’ directory. To access the examples directory follow the instructions for installing the entire source tree. The full path will be: ‘/usr/cygnus/m32r-<yymmdd>/src/examples’. Replace ‘<yymmdd>’ with the release date found on the CD. The sample overlay manager may be used as is, or as a prototype to develop a 3rd party overlay manager (or adapt an existing one for use with the GDB debugger). It is intended to be extremely simple, easy to understand, but not particularly sophisticated. The overlay manager has a single entry point as a function called ‘OverlayLoad(ovly_number)’. It looks up the overlay in a table called ‘ovly_table’ to find the corresponding section’s load address and runtime address; then it copies the section from its load address into its runtime address. ‘OverlayLoad’ must be called before code, or data in an overlay section can be used by the program. It is up to the programmer to keep track of which overlays have been loaded. The ‘_ovly_table’ table is built by the linker from information provided by the programmer in the linker script; see the example with “Linker script with overlays for M32R/X/D targets” on page 349. The example program contains four overlay sections, which are mapped into two runtime regions of memory. Sections ‘.ovly0’ and ‘.ovly1’ are both mapped into the region starting at ‘0x300000’, and sections ‘.ovly2’ and ‘.ovly3’ are both mapped into the region starting at ‘0x380000’. 348 ■ GNUPro Tools for Embedded Systems CYGNUS Linker script with overlays for M32R/X/D targets coeH6c|©c`r¨Hf#«Qr¤ #XH To build a program with overlays requires a customized linker script. Our example program is built with the script ‘ m32rtext.ld’, found in the ‘examples/overlay’ directory. This is just a modified version of the default linker script, with two parts added. The first added part describes the overlay sections, and must be located in the ‘SECTIONS’ block, before the ‘.text’ and ‘.data’ sections. Here we use the new linker command ‘OVERLAY’, which allows the specification of groups of sections sharing a common runtime address range. SECTIONS { OVERLAY 0x300000 : AT (0x400000) { .ovly0 { foo.o(.text) } .ovly1 { bar.o(.text) } } OVERLAY 0x380000 : AT (0x480000) { .ovly2 { baz.o(.text) } .ovly3 { grbx.o(.text) } } [...] The ‘OVERLAY’ command has two arguments: first, the base address where all of the overlay sections link and run; second, the address where the first overlay section loads. In the example, the ‘.ovly1’ section will load at ‘0x400000 + SIZEOF(.ovly0)’. For a full description of the ‘ OVERLAY’ linker command, see “Output section type” on page 281 and “Overlay description” on page 283 in Using ld in GNUPro Utilities. The ‘OVERLAY’ command is really just a syntactic convenience. If you need finer control over where the individual sections will be loaded, you can use the following example’s syntax. SECTIONS { .ovly0 .ovly1 .ovly2 .ovly3 [...] 0x300000 0x300000 0x380000 0x380000 : : : : AT AT AT AT (0x400000) (0x410000) (0x420000) (0x430000) { { { { foo.o(.text) bar.o(.text) baz.o(.text) grbx.o(.text) } } } } The second addition to the linker script actually builds the ‘_ovly_table’ table, which CYGNUS GNUPro Tools for Embedded Systems ■ 349 Example overlay program for M32R/X/D targets will be used by the sample runtime overlay manager. This table has several entries for each overlay, and must be located somewhere in the ‘.data’ section: .data : { [...] _ovly_table = .; LONG(ABSOLUTE(ADDR(.ovly0))); LONG(SIZEOF(.ovly0)); LONG(LOADADDR(.ovly0)); LONG(0); LONG(ABSOLUTE(ADDR(.ovly1))); LONG(SIZEOF(.ovly1)); LONG(LOADADDR(.ovly1)); LONG(0); LONG(ABSOLUTE(ADDR(.ovly2))); LONG(SIZEOF(.ovly2)); LONG(LOADADDR(.ovly2)); LONG(0); LONG(ABSOLUTE(ADDR(.ovly3))); LONG(SIZEOF(.ovly3)); LONG(LOADADDR(.ovly3)); LONG(0); _novlys = .; LONG((_novlys - _ovly_table) / 16); [...] } ª#j|fHr¨Hf#«|rX#jQr¤ #XH The example program has four functions: foo, bar, baz, and grbx. Each is in a separate overlay section. The ‘foo’ and ‘bar’ functions are both linked to run at the ‘0x300000’ address, while the ‘baz’ and ‘grbx’ functions are both linked to run at the ‘0x380000’ address. The main program calls ‘OverlayLoad’ once before calling each of the overlaid functions, giving it the overlay number of the respective overlay. The overlay manager, using the table ‘_ovly_table’, that was built up by the linker script, copies each overlayed function into the appropriate region of memory before it is called. In order to compile and link the example overlay manager, use the following example’s input. m32r-elf-gcc -g -Tm32rdata.ld -oovlydata maindata.c ovlymgr.c 350 ■ GNUPro Tools for Embedded Systems CYGNUS Debugging the overlay program for M32R/X/D targets H,¦XXcoX`Hr¨Hf#«|rX#jQr¤ #XH Using GDB’s built-in overlay support, it is possible to debug this program even though several of the functions share an address range. After loading the program, give GDB the ‘overlay auto’ command. GDB then detects the actions of the overlay manager on the target, and can step into overlayed functions, showing appropriate backtraces, etc. If a symbol is in an overlay that is not currently mapped, GDB will access the symbol from its load address instead of the mapped runtime address (which would currently be holding something else from another overlay). In the following example, the ‘foo’ and ‘bar’ functions are in different overlays which run at the same address. The example shows the use of GDB’s overlay debugging to step into and debug them. (gdb) file ovlydata Reading symbols from ovlydata...done. (gdb) target sim Connected to the simulator. (gdb) load Loading section .ovly0, size 0x28 lma 0x400000 Loading section .ovly1, size 0x28 lma 0x400028 Loading section .ovly2, size 0x28 lma 0x480000 Loading section .ovly3, size 0x28 lma 0x480028 Loading section .data00, size 0x4 lma 0x440000 Loading section .data01, size 0x4 lma 0x440004 Loading section .data02, size 0x4 lma 0x4c0000 Loading section .data03, size 0x4 lma 0x4c0004 Loading section .init, size 0x1c lma 0x208000 Loading section .text, size 0xa3c lma 0x20801c Loading section .fini, size 0x14 lma 0x208a58 Loading section .rodata, size 0x24 lma 0x208a6c Loading section .data, size 0x374 lma 0x208ab0 Loading section .ctors, size 0x8 lma 0x208e24 Loading section .dtors, size 0x8 lma 0x208e2c Start address 0x20801c Transfer rate: 30240 bits in <1 sec. (gdb) overlay auto (gdb) overlay list No sections are mapped. (gdb) info address foo Symbol “foo” is a function at address 0x300000, CYGNUS GNUPro Tools for Embedded Systems ■ 351 Debugging the overlay program for M32R/X/D targets loaded at 0x400000 in overlay section .ovly0. (gdb) info symbol 0x300000 foo in unmapped overlay section .ovly0 bar in unmapped overlay section .ovly1 (gdb) info address bar Symbol “bar” is a function at address 0x300000, loaded at 0x400028 in overlay section .ovly1. (gdb) break main Breakpoint 1 at 0x20839c: file maindata.c, line 12. (gdb) run Starting program: ovlydata Breakpoint 1, main () at maindata.c:12 12 if (!OverlayLoad(0)) (gdb) next 14 if (!OverlayLoad(4)) (gdb) next 16 a = foo(1); (gdb) overlay list Section .ovly0, loaded at 00400000 - 00400028, mapped at 00300000 - 00300028 Section .data00, loaded at 00440000 - 00440004, mapped at 00340000 - 00340004 (gdb) info symbol 0x300000 foo in mapped overlay section .ovly0 bar in unmapped overlay section .ovly1 The overlay containing the ‘foo’ function is now mapped. (gdb) step foo (x=1) at foo.c:5 5 if (x) (gdb) x /i $pc 0x300008 <foo+8>: ld r4, @fp || nop (gdb) print foo $1 = {int (int)} 0x300000 <foo> (gdb) print bar $2 = {int (int)} 0x400028 <*bar*> GDB uses labels such as ‘<*bar*>’ (with asterisks) to distinguish overlay load addresses from the symbol’s runtime address (where it will be when used by the 352 ■ GNUPro Tools for Embedded Systems CYGNUS Debugging the overlay program for M32R/X/D targets program). (gdb) disassemble Dump of assembler code for function foo: 0x300000 <foo>: st fp,@-sp -> addi sp,-4 0x300004 <foo+4>: mv fp,sp -> st r0,@fp 0x300008 <foo+8>: ld r4,@fp || nop 0x30000c <foo+12>: beqz r4,0x30001c <foo+28> 0x300010 <foo+16>: ld24 r4,0x340000 <foox> 0x300014 <foo+20>: ld r5,@r4 -> mv r0,r5 0x300018 <foo+24>: bra 0x300020 <foo+32> -> bra 0x300020 <foo+32> 0x30001c <foo+28>: ldi r0,0 -> bra 0x300020 <foo+32> 0x300020 <foo+32>: add3 sp,sp,4 0x300024 <foo+36>: ld fp,@sp+ -> jmp lr End of assembler dump. (gdb) disassemble bar Dump of assembler code 0x400028 <*bar*>: 0x40002c <*bar+4*>: 0x400030 <*bar+8*>: 0x400034 <*bar+12*>: 0x400038 <*bar+16*>: 0x40003c <*bar+20*>: 0x400040 <*bar+24*>: 0x400044 <*bar+28*>: 0x400048 <*bar+32*>: 0x40004c <*bar+36*>: End of assembler dump. for function bar: st fp,@-sp -> addi sp,-4 mv fp,sp -> st r0,@fp ld r4,@fp || nop beqz r4,0x400044 <*bar+28*> ld24 r4,0x340000 <foox> ld r5,@r4 -> mv r0,r5 bra 0x400048 <*bar+32*> -> bra 0x400048 <*bar+32*> ldi r0,0 -> bra 0x400048 <*bar+32*> add3 sp,sp,4 ld fp,@sp+ -> jmp lr Since the overlay containing ‘bar’ is not currently mapped, GDB finds ‘bar’ at its load address, and disassembles it there. (gdb) finish Run till exit from #0 foo (x=1) at foo.c:5 0x2083cc in main () at maindata.c:16 16a = foo(1); Value returned is $3 = 324 (gdb) next 17if (!OverlayLoad(1)) (gdb) next 19if (!OverlayLoad(5)) (gdb) next 21b = bar(1); (gdb) overlay list Section .ovly1, loaded at 00400028 - 00400050, mapped at 00300000 - 00300028 CYGNUS GNUPro Tools for Embedded Systems ■ 353 Debugging the overlay program for M32R/X/D targets Section .data01, loaded at 00440004 - 00440008, mapped at 00340000 - 00340004 (gdb) info symbol 0x300000 foo in unmapped overlay section .ovly0 bar in mapped overlay section .ovly1 (gdb) step bar (x=1) at bar.c:5 5 if (x) (gdb) x /i $pc 0x300008 <bar+8>: ld r4,@fp || nop Now ‘bar’ is mapped, and ‘foo’ is not. Even though the PC is at the same address as before, GDB recognizes that we are in ‘bar’ rather than ‘foo’. (gdb) disassemble Dump of assembler code for function bar: 0x300000 <bar>: st fp,@-sp -> addi sp,-4 0x300004 <bar+4>: mv fp,sp -> st r0,@fp 0x300008 <bar+8>: ld r4,@fp || nop 0x30000c <bar+12>: beqz r4,0x30001c <bar+28> 0x300010 <bar+16>: ld24 r4,0x340000 <barx> 0x300014 <bar+20>: ld r5,@r4 -> mv r0,r5 0x300018 <bar+24>: bra 0x300020 <bar+32> -> bra 0x300020 <bar+32> 0x30001c <bar+28>: ldi r0,0 -> bra 0x300020 <bar+32> 0x300020 <bar+32>: add3 sp,sp,4 0x300024 <bar+36>: ld fp,@sp+ -> jmp lr End of assembler dump. (gdb) finish Run till exit from #0 bar (x=1) at bar.c:5 0x208400 in main () at maindata.c:21 21b = bar(1); Value returned is $4 = 309 Also in this example, the ‘bazx’ and ‘grbxx’ variables are both mapped to the same runtime address. We will see that with the automatic overlay debugging mode, GDB always knows which variable is using that address. (gdb) info addr bazx Symbol “bazx” is static storage at address 0x3c0000, loaded at 0x4c0000 in overlay section .data02. (gdb) info sym 0x3c0000 bazx in unmapped overlay section .data02 grbxx in unmapped overlay section .data03 (gdb) info addr grbxx Symbol “grbxx” is static storage at address 0x3c0000, 354 ■ GNUPro Tools for Embedded Systems CYGNUS GDB overlay support for M32R/X/D targets loaded at 0x4c0004 in overlay section .data03. (gdb) break baz Breakpoint 2 at 0x380008: file baz.c, line 5. (gdb) break grbx Breakpoint 3 at 0x380008: file grbx.c, line 5. The two breakpoints are actually set at the same address, yet GDB will correctly distinguish between them when it hits them. If only one overlay function has a breakpoint on it, GDB will not stop at that address in other overlay functions. (gdb) cont Continuing. Breakpoint 2, baz (x=1) at baz.c:5 5 if (x) (gdb) print &bazx $5 = (int *) 0x3c0000 (gdb) x /d &bazx 0x3c0000 <bazx>: 317 (gdb) print &grbxx $6 = (int *) 0x4c0004 (gdb) cont Continuing. Breakpoint 3, grbx (x=1) at grbx.c:5 5 if (x) (gdb) print &grbxx $7 = (int *) 0x3c0000 (gdb) x /d &grbxx 0x3c0000 <grbxx>: 435 (gdb) print &bazx $7 = (int *) 0x4c0000 (gdb) x /d &bazx 0x4c0000 <*bazx*>: 317 r¨Hf#«¦||rQr¤ #XH GDB provides special functionality for debugging a program that is linked using the overlay mechanism of the GNU linker. In such programs, an overlay corresponds to a CYGNUS GNUPro Tools for Embedded Systems ■ 355 Manual mode commands for M32R/X/D targets section with a load address that is different from its runtime address. GDB can provide ‘manual’ overlay debugging for any program linked in such a way (providing that the overlays all reside somewhere in memory). Automatic overlay debugging is also provided. #o¦#fjr?H6rjj#o?Qr¤ #XH The following commands are for manual mode for the overlay manager. overlay overlay overlay overlay overlay manual map <section-name> unmap <section-name> list off The manual mode requires input from the user to specify what overlays are mapped into their runtime address regions at any given time. The ‘overlay map’ command informs GDB that the overlay has been mapped by the target into its shared runtime address range. The ‘ overlay unmap’ command informs GDB that the overlay is no longer resident in its runtime address region, and must be accessed from the load-time address region. If two overlays share the same runtime address region, then mapping one implies unmapping the other. ¦rjr?H6rjj#o?Qr¤ #XH The following commands are for automatic mode for the overlay manager. overlay auto overlay list overlay off Automatic overlay debugging support in GDB works with the runtime overlay manager provided in the ‘examples’ directory. When this mode is activated, GDB will automatically read and interpret the data structures maintained in target memory by the overlay manager. To learn what overlays are mapped at any time, use the ‘overlay list’ command. Whenever the target program is allowed to run (by the ‘step’ command), GDB will refresh its overlay map by reading from the target’s overlay tables. The automatic mapping may be temporarily overridden by the ‘overlay map’ and ‘overlay unmap’ commands, but these mappings will last only until the next time the target is allowed to run. To explicitly take control of GDB’s overlay mapping, switch to the ‘overlay manual’ mode. H,¦XXcoX©c`r¨Hf#«Qr¤ #XH When GDB’s overlay support (either manual or auto) is active, GDB’s concept of a symbol’s address is controlled by which overlays are mapped into which memory 356 ■ GNUPro Tools for Embedded Systems CYGNUS Breakpoints for M32R/X/D targets regions. For instance, if you ‘print’ a variable that is in an overlay which is currently mapped (located in its runtime address region) GDB will fetch the variable’s memory from the runtime address. If the variable’s overlay is currently not mapped, GDB will fetch it from its load-time address. Similarly, if you disassemble a function that is in an unmapped overlay, or use a symbol’s address to examine memory, GDB will fetch the memory from the symbol's load-time address range instead of the runtime range. If GDB’s output contains labels that are relative to an overlay’s load-time address instead of the runtime address, the labels will be distinguished like the following example’s input shows. (gdb) overlay map .ovly0 (gdb) x /x foo 0x300000 <foo>: 0x2d7f4ffc (gdb) overlay unmap .ovly0 (gdb) x /x foo 0x400000 <*foo*>: 0x2d7f4ffc The asterisks (*) around the ‘foo’ label may be interpreted as meaning that this is where ‘foo’ is, but not where it will be when it is in use by the target program. The ‘INFO ADDRESS’ command can tell you what overlay a symbol is in, as well as where it is loaded and mapped. The ‘INFO SYMBOL’ command can list all of the symbols that are mapped to an address. (gdb) info addr foo Symbol "foo" is a function at address 0x300000, -- loaded at 0x400000 in overlay section .ovly0. (gdb) info symbol 0x300000 foo in mapped overlay section .ovly0 bar in unmapped overlay section .ovly1 H#e|rcoQr¤ #XH So long as the overlay sections are located in RAM rather than ROM, GDB can set breakpoints in them. The breakpoints work by inserting trap instructions into the load-time address region. When the overlay is mapped into the runtime region, the trap instructions are mapped along with it, and when executed, cause the target program to break out to the debugger. If the overlay regions are located in ROM, you can only set breakpoints in them after they have been mapped into the runtime region in RAM. CYGNUS GNUPro Tools for Embedded Systems ■ 357 Developing for the M32R/D targets H¨Hfr|coXQr`H¤#XH The following documentation discusses the M32R/D processor. ■ “Compiler support for M32R/D targets” on page 359 ■ “ABI summary for M32R/D targets” on page 361 ■ “Assembler features for the M32R/D targets” on page 368 ■ “Linker issues for M32R/D targets” on page 379 ■ “Debugger issues with M32R/D targets” on page 382 ■ “Stand-alone simulator for M32R/D targets” on page 384 ■ “Overlays for M32R/D targets” on page 387 358 ■ GNUPro Tools for Embedded Systems CYGNUS Compiler support for M32R/D targets rj|cfH¦||rQr¤#XH The following documentation discusses the GNU compiler usage for M32R/D processors. See also “M32R/D-specific attributes for compiling” on page 360. By default, the compiler defines the ‘_ _M32R_ _’ preprocessor symbol. For a list of available generic compiler options, see “GNU CC command options” on page 67 in Using GNU CC in GNUPro Compiler Tools. The following M32R/D-specific command-line options have support. -mmodel=small Assume all objects live in the lower 16MB of memory (so that their addresses can be loaded with the ‘ld24’ instruction), and assume all subroutines are reachable with the ‘bl’ instruction. This is the default. The addressability of a particular object can be set with the ‘model’ attribute in the source code. See “M32R/D-specific attributes for compiling” on page 360. -mmodel=medium Assume objects may be anywhere in the 32 bit address space (the compiler will generate ‘seth/add3’ instructions to load their addresses), and assume all subroutines are reachable with the ‘bl’ instruction. -mmodel=large Assume objects may be anywhere in the 32 bit address space (the compiler will generate ‘seth/add3’ instructions to load their addresses), and assume subroutines may not be reachable with the ‘bl’ instruction (the compiler will generate the much slower ‘seth/add3/jl’ instruction sequence). -msdata=none Disable use of the small data area. Variables will be put into one of ‘.data’, ‘bss’, or ‘.rodata’ (unless the ‘section’ attribute has been specified). This is the default. The small data area consists of sections ‘.sdata’ and ‘.sbss’. Objects may be explicitly put in the small data area with the ‘section’ attribute using one of these sections. -msdata=sdata Put small global and static data in the small data area, but do not generate special code to reference them. This is normally only used to build system libraries. It enables them to be used with both ‘-msdata=none’ and ‘-msdata=use’ options. -msdata=use Put small global and static data in the small data area, and generate special instructions to reference them. CYGNUS GNUPro Tools for Embedded Systems ■ 359 M32R/D-specific attributes for compiling -G num Put global and static objects less than or equal to ‘num’ bytes into the small data or bss sections instead of the normal data or bss sections. The default value of ‘num’ is 8. The ‘-msdata’ option must be set to one of ‘sdata’ or ‘use’ for this option to have any effect. All modules should be compiled with the same ‘-G num’ value. Compiling with different values of ‘num’ may or may not work; if it does not work, the linker will give an error message. Incorrect code will not be generated. ¤a|H6cQc6#c,¦HQr6rj|cfcoX The following M32R/D-specific attributes are supported. Names may be surrounded with double-underscores to avoid namespace pollution. For example ‘__interrupt__’ can also be used for ‘interrupt’. See also “Declaring attributes of functions” on page 234 and “Specifying attributes of variables” on page 243 in “Extensions to the C language family” in Using GNU CC in GNUPro Compiler Tools. interrupt Indicates the specified function is an interrupt handler. The compiler will generate prologue and epilogue sequences appropriate for an interrupt handler. model (<model-name>) Use this attribute on the M32R/D to set the addressability of an object, and the code generated for a function. The identifier ‘<model-name>’ is one of ‘small’, ‘medium’, or ‘large’, representing each of the code models. Small model objects live in the lower 16MB of memory (so that their addresses can be loaded with the ‘ld24’ instruction), and are callable with the ‘bl’ instruction. Medium model objects may live anywhere in the 32 bit address space (the compiler will generate ‘seth/add3’ instructions to load their addresses), and are callable with the ‘bl’ instruction. Large model objects may live anywhere in the 32 bit address space (the compiler will generate ‘seth/add3’ instructions to load their addresses), and may not be reachable with the ‘bl’ instruction (the compiler will generate the much slower ‘seth/add3/jl’ instruction sequence). 360 ■ GNUPro Tools for Embedded Systems CYGNUS ABI summary for M32R/D targets ¦jj#«Qr¤#XH The following documentation describes the Application Binary Interface (ABI) for the M32R/D processor. ■ “Data types and alignment for M32R/D targets” (below) ■ “Allocation rules for structures and unions for M32R/D targets” (below) ■ “CPU registers for M32R/D targets” on page 363 ■ “The stack frame for M32R/D targets” on page 364 ■ “Argument passing for M32R/D processors” on page 365 ■ “Function return values for M32R/D processors” on page 366 ■ “Startup code for M32R/D targets” on page 366 ##«|H#o?#fcXojHoQr¤#XH See Table 45 for the data type sizes for the M32R/D processor. Table 45: Data type sizes for the M32R/D processor Type Size (bytes) 1 byte 2 bytes 4 bytes 4 bytes 8 bytes 4 bytes 8 bytes pointer 4 bytes char short int long long long float double The stack is aligned to a four-byte boundary. One byte is used for characters (including structure/unions made entirely of chars), two bytes for shorts (including structure/unions made entirely of shorts), and four-byte alignment for everything else. ffr6#cro¦fHQr¦6¦H#o?¦ocroQr ¤#XH The following rules apply to the allocation of structure and union members in memory. ■ Structure and union packing can be controlled by attributes specified in the source code. In the absence of any attributes however, the following rules are obeyed: ■ Fields that are shorts are aligned to 2 byte boundaries. Fields that are ints, longs, CYGNUS GNUPro Tools for Embedded Systems ■ 361 Allocation rules for structures and unions for M32R/D targets ■ ■ floats, doubles and long longs are aligned to 4 byte boundaries. Char fields are not aligned. Composite fields (ie ones that are themselves structures or unions) are aligned to greatest alignment requirement of any of their component fields. So if a field is a structure that contains a char, a short and an int, the field will be aligned to a 4-byte boundary because of the int. Bit fields are packed in a big-endian fashion, and they are aligned so that they will not cross boundaries of their type. So for example this structure: struct { int a:2, b:31;} s = { 0x1, 0x3}; is stored in memory as: .byte .zero .byte .byte .byte .byte 0x40 3 0x0 0x0 0x0 0x6 So the ‘a’ field is stored in the top two bits of the first byte; with the most significant bit of ‘a’ being stored in the most significant bit of the byte. The bottom six bits of that byte and the next three bytes are all padding, so that the next bitfield ‘b’ does not cross a word boundary. This structure: struct { short c:2, d:2, e:13; } s = { 0x2, 0x3, 0xf}; is stored in memory as: .byte .zero .byte .byte ■ 0xb0 1 0x0 0x78 So fields ‘c’ and ‘d’ are both held in the same byte, but field ‘e’ starts two bytes further on, so that it will not cross a two byte boundary. Fields in unions are treated in the same way as fields in structures. A union is aligned to the greatest alignment requirement of any of its members. 362 ■ GNUPro Tools for Embedded Systems CYGNUS CPU registers for M32R/D targets HXcHQr¤#XH The following documentation details the registers for M32R/D processors. r0 through r3 Used for passing arguments to functions. Additional arguments are passed on the stack (see “The stack frame for M32R/D targets” on page 364). ‘r0’, ‘r1’ is also used to return the result of function calls. The values of these registers are not preserved across function calls. r4 through r7 Temporary registers for expression evaluation. The values of these registers are not preserved across function calls. ‘r4’ is reserved for use as a temporary register in the prologue. ‘r6’ is also reserved for use as a temporary in the Position Independent Code (PIC) calling sequence (if ever necessary) and may not be used in the function calling sequence or prologue of functions. ‘r7’ is also used as the static chain pointer in nested functions (a GNU C extension) and may not be used in the function calling sequence or prologue of functions. In other contexts it is used as a temporary register. r8, r9, r10, r11 Temporary registers for expression evaluation. The values of these registers are preserved across function calls. r12 Temporary register for expression evaluation. Its value is preserved across function calls. It is also reserved for use as potential “global pointer”. r13 (fp) Reserved for use as the frame pointer if one is needed. Otherwise it may be used for expression evaluation. Its value is preserved across function calls. r14 (lr) Link register. This register contains the return address in function calls. It may also be used for expression evaluation if the return address has been saved. r15 (sp) Stack pointer. accumulator This register is not preserved across function calls. psw The carry bit of the ‘psw’ is not preserved across function calls. CYGNUS GNUPro Tools for Embedded Systems ■ 363 The stack frame for M32R/D targets `H#6eQ#jHQr¤#XH Stack frame information follows for the M32R/D processor. ■ The stack grows downwards from high addresses to low addresses. ■ A leaf function need not allocate a stack frame if it does not need one. ■ A frame pointer need not be allocated. ■ The stack pointer shall always be aligned to 4-byte boundaries. ■ The register save area shall be aligned to a 4-byte boundary. See Figure 15 for stack frames for functions that take a fixed number of arguments for the M32R/D processor. Figure 15: Stack frames for functions that take a fixed number of arguments for the M32R/D processor Before call: High memory After call: local variables, register save area, etc. local variables, register save area, etc. arguments on stack arguments on stack SP, FP register save area local variables alloca allocations Low memory arguments on stack SP, FP FP points to the same location as SP. See Figure 16 for stack frames for functions that take a variable number of arguments 364 ■ GNUPro Tools for Embedded Systems CYGNUS Argument passing for M32R/D processors for the M32R/D processor. Figure 16: Stack frames for functions that take a variable number of arguments for the M32R/D processor Before call: High memory After call: local variables, register save area, etc. local variables, register save area, etc. arguments on stack arguments on stack SP, FP save area for anonymous parms passed in registers (the size of this area may be zero local variables alloca allocations Low memory arguments on stack SP, FP X¦jHo|#coXQr¤|r6Hr Arguments are passed to a function using first registers and then memory if the argument passing registers are used up. Each register is assigned an argument until all are used. Unused argument registers have undefined values on entry. The following rules must be adhered to. ■ An argument, if it is less than or equal to 8 bytes in size, is passed in registers if available. However, if such an argument is a composite structure (one with more than one field and greater than 4 bytes in size) it is also passed on the stack, in addition to being passed in the registers. An argument, which is greater than 8 bytes in size, is always passed by reference, which means that a copy of the CYGNUS GNUPro Tools for Embedded Systems ■ 365 Function return values for M32R/D processors ■ ■ ■ ■ argument is placed on the stack and a pointer to that copy is passed in the register. If a data type would overflow the register arguments, then it is passed in registers and memory. A ‘long long’ data type passed in ‘r3’ would be passed in ‘r3’ and in the first 4 bytes of the stack. Arguments passed on the stack begin at ‘sp’ with respect to the caller. Each argument passed on the stack is aligned on a 4 byte boundary. Space for all arguments is rounded up to a multiple of 4 bytes. ¦o6croH¦o¨#f¦HQr¤|r6Hr Integers, floating point values, and aggregates of 8 bytes or less are returned in register ‘r0’ (and ‘r1’ if necessary). Aggregates larger than 8 bytes are returned by having the caller pass the address of a buffer to hold the value in ‘r0’ as an “invisible” first argument. All arguments are then shifted down by one. The address of this buffer is returned in ‘r0’. #¦|6r?HQr¤#XH Before the ‘main’ function can be called, code must be run that does four things: ■ Contain ‘_start’ symbol ■ Initialize the stack pointer ■ Zeros the ‘bss’ section ■ Runs constructors for any global objects that have them The default startup code is shown in the following example of the ‘libgloss/m32r/crt0.S’ file. The best way to write your own startup code is to take this and modify it to suit your needs. .text .balign 4 .global _start _start: ld24 sp, ldi fp, # Clear the BSS. # for most of it, ld24 r2, ld24 r3, sub r3, mv r4, srli r4, ldi r1, addi r2, beqz r4, _stack #0 Do it in two parts for efficiency: longwords first then the remaining 0 to 3 bytes. __bss_start ; R2 = start of BSS _end ; R3 = end of BSS + 1 r2 ; R3 = BSS size in bytes r3 #2 ; R4 = BSS size in longwords (rounded down) #0 ; clear R1 for longword store #-4 ; account for pre-inc store .Lendloop1 ; any more to go? 366 ■ GNUPro Tools for Embedded Systems CYGNUS Startup code for M32R/D targets .Lloop1: st addi bnez .Lendloop1: and3 addi beqz .Lloop2: stb addi addi bnez .Lendloop2: r1, @+r2 r4, #-1 r4, .Lloop1 ; yep, zero out another longword ; decrement count ; go do some more r4, r3, #3 ; get no. of remaining BSS bytes to clear r2, #4 ; account for pre-inc store r4, .Lendloop2 ; any more to go? r1, r2, r4, r4, @r2 #1 #-1 .Lloop2 ; yep, zero out another byte ; bump address ; decrement count ; go do some more # Run code in the .init section. # This will queue the .fini section to be run with atexit. bl __init # Call main, then exit. bl bl main exit # If that fails just loop. .Lexit: bra .Lexit CYGNUS GNUPro Tools for Embedded Systems ■ 367 Assembler features for the M32R/D targets Hj,fHQH#¦HQr`H¤ #XH The following documentation discusses the assembler issues for the M32R/D processor. ■ “Register names for the M32R/D targets” on page 369 ■ “Addressing modes for M32R/D targets” on page 369 ■ “Floating point for M32R/D targets” on page 369 ■ “Pseudo opcodes for M32R/D targets” on page 370 ■ “Opcodes for M32R/D targets” on page 370 ■ “Synthetic instructions for M32R/D targets” on page 371 ■ “Writing assembler code for M32R/D targets” on page 372 ■ “Writing assembler code for M32R/D targets” on page 374 ■ “Inserting assembly instructions into C code for M32R/D targets” on page 376 ■ “M32R/D-specific assembler error messages” on page 378 For a list of available generic assembler options, see “Command-line options” on page 21 in Using as in GNUPro Utilities. In addition, the following M32R/D-specific command-line options are supported. -warn-unmatched-high -no-warn-unmatched-high –Wuh –Wnuh Warn (or do not warn using -no-warn-unmatched-high or –Wnuh), if a ‘high’ or ‘shigh’ relocation has no matching ‘low’ relocation. The default is no warning. The M32R/D assembler syntax is based on the syntax in Mitsubishi’s M32R Family Software Manual. The M32R/D assembler supports ‘;’ (semi-colon) and ‘#’ (pound). Both characters are line comment characters when used in column zero. The semi-colon may also be used to start a comment anywhere within a line. 368 ■ GNUPro Tools for Embedded Systems CYGNUS Register names for the M32R/D targets HXcHo#jHQr`H¤#XH You can use the ‘r0’ through ‘r15’ predefined symbols to refer to the M32R/D registers. You can also use ‘sp’ as an alias for ‘r15’, ‘lr’ as an alias for ‘r14’, and ‘fp’ as an alias for ‘r13’. The M32R/D also has predefined symbols for the following control registers and status bits. Table 46: Predefined symbols and usage for M32R/D processors Symbol Usage cr0 through cr15 psw cbr spi spu bpc Control registers Processor status word (alias for ‘cr0’) Condition bit register (alias for ‘cr1’) Interrupt stack pointer (alias for ‘cr2’) User stack pointer (alias for ‘cr3’) Backup program counter (alias for ‘cr6’) ??HcoXjr?HQr¤#XH See Table 47 for the addressing modes for the M32R/D. The ‘Rn’ symbol in refers to any of the specifically numbered registers or register pairs, but not the control registers. Table 47: Symbols and addressing modes for the M32R/D processors Symbol Addressing mode Rn Register direct @Rn Register indirect @Rn+ Register indirect with post-increment @RnRegister indirect with post-decrement @-Rn Register indirect with pre-decrement @(disp, Rn) Register indirect with displacement addr PC relative address (for branch or rep) #imm Immediate data fr#coX|rcoQr¤#XH Although the M32R/D has no hardware floating point, the ‘.float’ and ‘.double’ directives generate IEEE-format floating-point values for compatibility with other development tools. CYGNUS GNUPro Tools for Embedded Systems ■ 369 Pseudo opcodes for M32R/D targets H¦?rr|6r?HQr¤#XH M32R/D processors use one pseudo opcode. .debugsym <label> Create a label ‘<label>’ with the value of the next instruction that follows the pseudo op. Unlike normal labels, the label created with ‘.debugsym’ does not force the next instruction to be aligned to a 32-bit boundary (i.e., it does not generate a nop, if the previous instruction is a 16-bit instruction, and the instruction that follows is also a 16-bit instruction). |6r?HQr¤#XH For detailed information on the M32R/D machine instruction set, see M32R Family Software Manual. The assembler implements all the standard M32R/D opcodes. The assembler does not support the ‘:8’ or ‘:24’ syntax for explicitly specifying the size of the branch instruction. Instead, the assembler supports the ‘.s’ suffix to specify a short branch, and the ‘.l’ suffix to specify a long branch. For example, ‘bra label:8’ becomes ‘bra.s label’ and ‘bra label:24’ becomes ‘bra.l label’. The assembler does not support the ‘:8’ or ‘:16’ syntax for explicitly specifying the size of an immediate constant. Instead, the assembler supports the ‘ldi8’ and ‘ldi16’ mnemonics . For example, ‘ldi r0, 1:8’ becomes ‘ldi8 r0, 1’ and ‘ldi r0, 1:16’ becomes ‘ldi16 r0, 1’. 370 ■ GNUPro Tools for Embedded Systems CYGNUS Synthetic instructions for M32R/D targets «o`Hc6co¦6croQr¤#XH Synthetic instructions are aliases for existing instructions. They provide an additional and often simpler way to specify an instruction. See Table 48 for the synthetic instructions for the M32R/D processors. Table 48: Synthetic instructions for M32R/D processors Synthetic instruction Real instruction bc.s label bc.l label bl.s label bl.l label bnc.s label bnc.l label bra.s label bra.l label ldi8 reg, #const ldi16 reg, #const push reg pop reg CYGNUS bc label [8-bit offset] bc label [24-bit offset] bl label [8-bit offset] bl label [24-bit offset] bnc label [8-bit offset] bnc label [24-bit offset] bra label [8-bit offset] bra label [24-bit offset] ldi reg, #const [8-bit constant] ldi reg, #const [16-bit constant] st reg, @-sp ld reg, @sp+ GNUPro Tools for Embedded Systems ■ 371 Writing assembler code for M32R/D targets ccoX#Hj,fH6r?HQr¤#XH The best way to write assembler code is to write a small C program, compile it with the ‘-S’ flag, and study the assembler code GCC produces. The assembler code in the following example (‘hello.s’) is from the ‘hello.c’ example. It was created with ‘m32r-elf-gcc -S -O2 hello.c’. See Using as in GNUPro Utilities for more information on GNU assembler directives, or pseudo-opcodes. See the M32R Family Software Manual for more information on the instruction set, and syntax. gcc2_compiled.: .section .rodata .balign 4 .LC0: .string"hello world!\n" .balign 4 .LC1: .string"%d + %d = %d\n" .section .text .balign 4 .globalmain .type main,@function main: ; BEGIN PROLOGUE ; vars= 0, regs= 2, args= 0, extra= 0 push r8 push lr ; END PROLOGUE ld24 r8,#a ldi r4,#3 st r4,@(r8) ld24 r0,#.LC0 bl printf ld24 r0,#.LC1 ld r1,@(r8) ld24 r4,#c ldi r2,#4 add3 r3,r1,#4 st r3,@(r4) bl printf ; EPILOGUE pop lr pop r8 jmp lr .Lfe1: .size main,.Lfe1-main .comma,4,4 .commc,4,4 372 ■ GNUPro Tools for Embedded Systems CYGNUS Writing assembler code for M32R/D targets .ident"GCC: (GNU) 2.7-m32r-970408" To assemble the ‘hello.s’ file, use the following input. m32r-elf-as hello.s -o hello.o The following are some tips for assembler programmers. ■ To clear the ‘CBR’ register, just one instruction can be used: cmp Rx,Rx total 2 bytes Where ‘Rx’, is an arbitrary register. Note the operation does not destroy the contents of ‘Rx’. The previous code example is smaller than the following code: ldi Rx,#1 cmpi Rx,#0 ■ total 6 bytes and destroys ‘Rx’. To set the ‘CBR’ register, there are several methods. First, try using the following example’s input. ldi Rx,#-1 addv R0,R0 total 4 bytes Alternatively, try using the following example’s input. ldi Rx,#-2 addx R0,R0 total 4 bytes The previous code examples are smaller than the following code example: ldi Rx,#0 cmpi Rx,#1 ■ total 6 bytes To set a comparison result to a register, there are some idioms for the M32R. For instance, try using the following example’s input. (a) ‘... flag = (x == 0);...’ cmpui Rx,#1 mvfc Rx,CBR total 4 byte (b) ‘... flag = !(x op 0); ...’ To get the inverted result of comparison, first set ‘CBR’ using one of the methods above, then, try using the following example’s input. subx Rx,Rx addi Rx,#1 total 4 byte The previous example will provide better results than than the following code. mvfc Rx,CBR xor3 Rx,Rx,#1 total 6-byte NOTE: The ‘subx Rx,Rx’ operation is equivalent to the following code. mvfc Rx,CBR neg Rx,Rx CYGNUS GNUPro Tools for Embedded Systems ■ 373 Writing assembler code for M32R/D targets ccoX#Hj,fH6r?HQr¤#XH The best way to write assembler code is to write a small C program, compile it with the ‘-S’ flag, and study the assembler code GCC produces. See Using as in GNUPro Utilities for more information on assembler directives, or pseudo-opcodes. See the M32R Family Software Manual for more information on the instruction set, and syntax. The following example shows the ‘hello.s’ assembler code from the ‘hello.c’ example. It was created with ‘m32r-elf-gcc -S -O2 hello.c’. gcc2_compiled.: .section .rodata .balign 4 .LC0: .string"hello world!\n" .balign 4 .LC1: .string"%d + %d = %d\n" .section .text .balign 4 .globalmain .type main,@function main: ; BEGIN PROLOGUE ; vars= 0, regs= 2, args= 0, extra= 0 push r8 push lr ; END PROLOGUE ld24 r8,#a ldi r4,#3 st r4,@(r8) ld24 r0,#.LC0 bl printf ld24 r0,#.LC1 ld r1,@(r8) ld24 r4,#c ldi r2,#4 add3 r3,r1,#4 st r3,@(r4) bl printf ; EPILOGUE pop lr pop r8 jmp lr .Lfe1: .size main,.Lfe1-main .comma,4,4 .commc,4,4 374 ■ GNUPro Tools for Embedded Systems CYGNUS Writing assembler code for M32R/D targets .ident"GCC: (GNU) 2.7-m32r-970408" To assemble the ‘hello.s’ file, enter: m32r-elf-as hello.s -o hello.o The following are some tips for assembler programmers: ■ To clear the ‘CBR’ register, just one instruction can be used: cmp Rx,Rx total 2 bytes Where ‘Rx’, is an arbitrary register. Note the operation does not destroy the contents of ‘Rx’. The previous code example is smaller than the following code: ldi Rx,#1 cmpi Rx,#0 ■ total 6 bytes and destroys ‘Rx’. To set the ‘CBR’ register, there are several methods: ldi Rx,#-1 addv R0,R0 total 4 bytes or ldi Rx,#-2 addx R0,R0 total 4 bytes The previous code examples are smaller than the following code example: ldi Rx,#0 cmpi Rx,#1 ■ total 6 bytes To set a comparison result to a register, there are some idioms for the M32R. For instance: (a) ‘... flag = (x == 0);...’ cmpui Rx,#1 mvfc Rx,CBR total 4 byte (b) ‘... flag = !(x op 0); ...’ To get the inverted result of comparison, first set ‘CBR’ using one of the methods above, then: subx Rx,Rx addi Rx,#1 total 4 byte rather than the following code mvfc Rx,CBR xor3 Rx,Rx,#1 total 6-byte Note: The ‘subx Rx,Rx’ operation is equivalent to: mvfc Rx,CBR neg Rx,Rx CYGNUS GNUPro Tools for Embedded Systems ■ 375 Inserting assembly instructions into C code for M32R/D targets oHcoX#Hj,f«co¦6crocor6r?HQr ¤#XH Assembly code can be embedded in C or C++ code with the ‘asm’ keyword. There are two forms of ‘asm’: simple and extended. The syntax uses the following form. asm ("assembly code"); For instance, consider the following example’s input. asm ("nop"); C string concatenation works with ‘asm’ so more complicated expressions can be spread out over several lines. asm ( ".global foo\n" "foo:\n" ".word 42\n" ); This example creates a variable called ‘foo’ with the value of 42, and is obviously intended to be compiled outside of any function definition. Another way to write that would be: asm ("\ .global foo foo: .word 42 "); WARNING! The simple form is only for cases where the compiler doesn’t need to know what values are being used and what values are being modified by the assembly code. This is because the contents of the assembly code are hidden from GCC’s data-flow analysis. GCC does not parse the assembly code, it merely copies it verbatim to the output file. Using the extended form of ‘asm’, you can specify the operands of the instruction using C expressions. You need not guess which registers or memory locations will contain the data you want to use. Its syntax has the following form. asm ("assembly code" : outputs : inputs : clobbers);s The inputs and clobbers are optional in an extended asm. The outputs are optional too, but then the asm is no longer an “extended asm” and is rather a “simple asm”. ‘outputs’ is a comma separated list of C expressions that are the results of the assembly code. The syntax is a string containing the “operand constraint” followed by a C expression in parentheses. ‘inputs’ syntax is identical to the syntax of ‘outputs’. ‘clobbers’ is a comma separated list of registers that are modified by the assembly 376 ■ GNUPro Tools for Embedded Systems CYGNUS Inserting assembly instructions into C code for M32R/D targets code but aren’t listed in the outputs. If memory is or may be modified, specify “memory” in the ‘clobbers’ section. The following example shows an ‘asm’ statement that adds two values together. int add (int arg1, int arg2) { asm ("add %0, %1" : "+r" (arg1) : "r" (arg2)); return arg1; } The statement was constructed with the following procedure. 1. The text to create the assembler instruction is the first part of the ‘asm’ statement, as in the following example. "add r1, r2" 2. The registers containing the arguments, however, if unknown to the programmer, are given placeholders, as in the following example. "add %0, %1" 3. Specify the values of these placeholders in numerical order, starting from 0, immediately after the assembler instruction, as in the following example. "add %0, %1" arg1 arg2 This is wrong in several ways. First, the syntax specifies, that C variables and expressions must be enclosed in parentheses, as in the following example. "add %0, %1" (arg1) (arg2) Second, there must be a colon between the assembler text and the placeholders, as in the following example. "add %0, %1" : (arg1) (arg2) Third, each placeholder should be separated from the next by a comma, as in the following example. "add %0, %1" : (arg1) , (arg2) 4. Specify the constraints for the placeholders. These constraints use the same syntax as the constraints found on machine patterns in the ‘ m32r.md’ file. A constraint is a sequence of letters enclosed within double quotes that specifies what kind of thing the placeholder can be. For a complete list of letters, see “Simple constraints” on page 257. Both arguments should be in registers (since the add instruction only takes register arguments), so it now resembles the following example’s input. "add %0, %1" : "r" (arg1) , "r" (arg2) Use extra constrain on (arg1) to let the compiler know that not only is (arg1) used as an input to the instruction, but that it is also used to hold the instruction’s output. This is done in two parts. First, the constraint must include the ‘ +’ character to show that the register is both CYGNUS GNUPro Tools for Embedded Systems ■ 377 M32R/D-specific assembler error messages read and written by the instruction (use the following example’s input). "add %0, %1" : "+r" (arg1) , "r" (arg2) Second, the syntax specifies that all placeholders that are outputs of the instruction must be specified first; then a colon must appear and then any placeholders that are just inputs can appear, as in the following example’s input. The comma is removed, since the colon takes its place. "add %0, %1" : "+r" (arg1) : "r" (arg2) That is the complete ‘asm’ statement. For more information on extended asm, see “Alternate keywords” on page 274 in Using GNU CC in GNUPro Compiler Tools. ¤a|H6cQc6#Hj,fHHrjH#XH The following error messages may occur for M32R/X/D processors during assembly implementation. Error: bad instruction The instruction is misspelled or there is a syntax error somewhere. Error: expression too complex Error: unresolved expression that must be resolved The instruction contains an expression that is too complex; no relocation exists to handle it. Error: relocation overflow The instruction contains an expression that is too large to fit in the field. r?¦6coXaH6r?Qr¤#XH The following command reads the contents of the ‘hello.x’ file, converts the code and data into S-records, and puts the result into the ‘hello.srec’ file. m32r-elf-objcopy -O srec hello.x hello.srec The first few lines of ‘hello.srec’ are in the following example. S00D000068656C6C6F2E7372656303 S11801002D7F2E7F1D8FF000E0006DF4FE0000FEFE001B281F54 S11801158D2EEF2DEF1FCEEF1000006D00F000E20075C0E300C8 S118012A75F4032214835402610042FCF000B0840003216244B4 S118013FFFB094FFFF84C300034204F000B08400042102420148 378 ■ GNUPro Tools for Embedded Systems CYGNUS Linker issues for M32R/D targets coeHc¦HQr¤#XH For a list of available generic linker options, see “Linker scripts” on page 261 in Using ld in GNUPro Utilities. In addition, the following M32R/D-specific command-line option is supported. --defsym _stack=0xnnnn Specify the initial value for the stack pointer. This assumes the application loads the stack pointer with the value of ‘_stack’ in the start up code. The initial value for the stack pointer is defined in the linker script with the PROVIDE linker command. This allows the user to specify a new value on the command line with the standard linker option ‘—defsym’. coeH6c|Qr`H¤#XH The GNU linker uses a linker script to determine how to process each section in an object file, and how to lay out the executable. The linker script is a declarative program consisting of a number of directives. For instance, the ‘ENTRY()’ directive specifies the symbol in the executable that will be the executable’s entry point. Since linker scripts can be complicated to write, the linker includes one built-in script that defines the default linking process. For the M32R/D tools, the following example shows the default script. Although the script is somewhat lengthy, it is a generic script that will support all ELF situations. In practice, generation of sections like ‘.rela.dtors’ are unlikely when compiling using embedded ELF tools. OUTPUT_FORMAT("elf32-m32r", "elf32-m32r", "elf32-m32r") OUTPUT_ARCH(m32r) ENTRY(_start) SEARCH_DIR( <installation directory path>); SECTIONS { /* Read-only sections, merged into text segment: */ . = 0x200000; .interp : { *(.interp) } .hash : { *(.hash) } .dynsym : { *(.dynsym) } .dynstr : { *(.dynstr) } .rel.text : { *(.rel.text) } .rela.text : { *(.rela.text) } .rel.data : { *(.rel.data) } .rela.data : { *(.rela.data) } .rel.rodata : { *(.rel.rodata) } .rela.rodata : { *(.rela.rodata) } CYGNUS GNUPro Tools for Embedded Systems ■ 379 Linker script for the M32R/D targets .rel.got : { *(.rel.got) .rela.got : { *(.rela.got) .rel.ctors : { *(.rel.ctors) .rela.ctors : { *(.rela.ctors) .rel.dtors : { *(.rel.dtors) .rela.dtors : { *(.rela.dtors) .rel.init : { *(.rel.init) .rela.init : { *(.rela.init) .rel.fini : { *(.rel.fini) .rela.fini : { *(.rela.fini) .rel.bss : { *(.rel.bss) .rela.bss : { *(.rela.bss) .rel.plt : { *(.rel.plt) .rela.plt : { *(.rela.plt) .init : { *(.init) .plt : { *(.plt) .text : { *(.text) /* .gnu.warning sections are handled specially elf32.em. */ *(.gnu.warning) *(.gnu.linkonce.t*) } =0 } } } } } } } } } } } } } } } =0 } by _etext = .; PROVIDE (etext = .); .fini : { *(.fini) } =0 .rodata : { *(.rodata) *(.gnu.linkonce.r*) } .rodata1 : { *(.rodata1) } /* Adjust the address for the data segment. We want to adjust up to the same address within the page on the next page up. */ . = ALIGN(32) + (ALIGN(8) & (32 - 1)); .data : { *(.data) *(.gnu.linkonce.d*) CONSTRUCTORS } .data1 : { *(.data1) } .ctors : { *(.ctors) } .dtors : { *(.dtors) } .got : { *(.got.plt) *(.got) } .dynamic : { *(.dynamic) } /* We want the small data sections together, so single-instruction offsets can access them all, and 380 ■ GNUPro Tools for Embedded Systems CYGNUS Linker script for the M32R/D targets initialized data all before uninitialized, so we can shorten the on-disk segment size. */ .sdata : { *(.sdata) _edata = .; PROVIDE (edata = .); __bss_start = .; .sbss : { *(.sbss) *(.scommon) .bss : { *(.dynbss) *(.bss) *(COMMON) _end = . ; PROVIDE (end = .); /* Stabs debugging sections. */ .stab 0 : { *(.stab) .stabstr 0 : { *(.stabstr) .stab.excl 0 : { *(.stab.excl) .stab.exclstr 0 : { *(.stab.exclstr) .stab.index 0 : { *(.stab.index) .stab.indexstr 0 : { *(.stab.indexstr) .comment 0 : { *(.comment) } } } } } } } } } } /* DWARF debug sections. Symbols in the .debug DWARF section are relative to the beginning of the section so we begin .debug at 0. It’s not clear yet what needs to happen for the others. */ .debug .debug_srcinfo .debug_aranges .debug_pubnames .debug_sfnames .line 0 0 0 0 0 0 : : : : : : { { { { { { *(.debug) *(.debug_srcinfo) *(.debug_aranges) *(.debug_pubnames) *(.debug_sfnames) *(.line) } } } } } } PROVIDE (_stack = 0x3ffffc); } CYGNUS GNUPro Tools for Embedded Systems ■ 381 Debugger issues with M32R/D targets H,¦XXHc¦H©c`¤#XH For the available generic debugger options, see Debugging with GDB in GNUPro Debugging Tools. There are no M32R/D specific debugger command-line options. Cygnus Insight™ is the graphic user interface (GUI) for the GNUPro debugger. See “Working with Cygnus Insight, the visual debugger” on page 149 in GETTING STARTED. There are three ways for GDB to talk to an M32R/D target: through the built-in simulator, through a remote target board with a remote stub linked directly to the user program and through a remote target board with the remote stub already loaded independently. See the following documentation for details. ■ Simulator GDB’s built-in software simulation of the M32R/D processor allows the debugging of programs compiled for the M32R/D without requiring any access to actual hardware. Activate this mode in GDB by using the ‘target sim’ command. Then load code into the simulator by using the ‘load’ command and debug it in the normal fashion. ■ Remote target board, with remote stub linked directly to user program The program being debugged must have the remote debugging protocol subprogram linked directly into it, to use this mode. The program is then downloaded to the target board by GDB, using the ‘target mon2000 <devicename>’ command where ‘<devicename>’ will be a serial device such as ‘/dev/ttya’ (Unix) or ‘com2’ (Windows 95). After being downloaded, the program must be running and it must execute the following function calls into the remote debugging subprogram: set_debug_traps(); breakpoint(); If GDB is running on a Unix host computer, start the target program by simply using the ‘run’ command at the ‘(gdb)’ prompt. Then GDB must be interrupted by using several Ctrl-c (^C) characters. However, if GDB is being run on a Microsoft Windows 95 host computer, you must exit from GDB and connect to the M32R/D EVA target board with a terminal program such as Kermit or HyperTerminal. Use the Return key to get the ROM monitor’s ‘ok’ prompt; then use the ‘go’ command and use the Return key, as the following example input shows. ok go Then exit from the terminal program and start up GDB again. It is then possible to connect GDB to the target using GDB’s remote protocol, with the command ‘target remote <devicename>’ where ‘<devicename>’, as before, is the name 382 ■ GNUPro Tools for Embedded Systems CYGNUS Debugger issues with M32R/D targets ■ of a serial device. The debugging session can then proceed. GDB will initially report that the program has received a ‘SIGTRAP’ while executing the call to the ‘breakpoint( )’ function . From there you can continue or single-step to get back into your own program. Remote target board, remote stub already loaded independently In this mode, it is assumed that the remote protocol subprogram is already running on the target board. With the remote stub already running on the target board, use the ‘gdb’command to start the debugging, then use the ‘target remote <devicename>’ command, where ‘<devicename>’ will be a serial device such as ‘/dev/ttya’(Unix) or ‘com2’ (Windows 95), and then download your program and begin debugging it. Downloading is from six to seven times faster using this method. NOTE: When using the remote target, GDB does not accept the ‘run’ command. However, since downloading the program has the side effect of setting the PC to the start address, you can start your program by using the ‘continue’ command. CYGNUS GNUPro Tools for Embedded Systems ■ 383 Stand-alone simulator for M32R/D targets #o?a#froHcj¦f#rQr¤ #XH The simulator supports the ‘r0’ to ‘r15’ general-registers, the ‘psw’, ‘cbr’, ‘spi’, ‘spu’, ‘bpc’ control-registers, and the accumulator. The simulator allocates a contiguous chunk of memory starting at the ‘0’ address. Default memory size is 8 MB. Three run-time command-line options are available with the simulator: -t, -v, and -p. WARNING! Simulator cycle counts are not intended to be extremely accurate in the ■ following script examples. Use them with caution. The ‘-t’ command-line option to the stand-alone simulator turns on instruction level tracing as shown in the following segment: % m32r-elf-run -t hello.x 0x00011c 0x000120 0x000122 0x000124 0x000128 0x00012c 0x00012e 0x000130 0x000132 0x000134 0x000136 0x000138 . . . ■ ld24 sp,0x100000 ldi fp,0 nop ld24 r2,0x75c0 ld24 r3,0x75f4 sub r3,r2 mv r4,r3 srli r4,0x2 ldi r1,0 addi r2,-4 nop dr <- 0x100000 dr <- 0x0 dr dr dr dr dr dr dr <<<<<<<- 0x75c0 0x75f4 0x34 0x34 0xd 0x0 0x75bc The ‘-v’ command-line option prints some simple statistics: % m32r-elf-run -v hello.x hello world! 3 + 4= 7 Total: 3808 insns Fill nops: 609 ■ The ‘-p’ command prints profiling statistics. % m32r-elf-run -p hello.x Hello world! 3 + 4= 7 Instruction Statistics Total: 3796 insns add: 75: ***** add3: 123: ******** and: 3: 384 ■ GNUPro Tools for Embedded Systems CYGNUS Stand-alone simulator for M32R/D targets and3: or: or3: addi: bc8: bc24: beq: beqz: bgez: bgtz: blez: bltz: bnez: bl8: bl24: bnc8: bne: bra8: bra24: cmp: cmpu: cmpui: jl: jmp: ld: ld-d: ldb: ldb-d: ldh-d: ldub: lduh-d: ld-plus: ld24: ldi8: ldi16: mv: neg: nop: sll: sll3: slli: srai: srli: st: st-d: stb: stb-d: sth: CYGNUS 61: 28: 3: 222: 9: 3: 23: 131: 8: 2: 42: 6: 252: 11: 82: 52: 1: 29: 9: 28: 34: 2: 7: 100: 93: 277: 77: 6: 38: 23: 23: 158: 55: 163: 5: 282: 26: 584: 3: 7: 25: 25: 35: 52: 195: 27: 4: 25: **** * *************** * ******** ** ***************** ***** *** * * ** ****** ****** ****************** ***** ** * * ********** *** *********** ******************* * **************************************** * * ** *** ************* * * GNUPro Tools for Embedded Systems ■ 385 Stand-alone simulator for M32R/D targets sth-d: 11: st-plus: 13: st-minus: 164: *********** sub: 52: *** trap: 2: Memory Access Statistics Total read: 1891 accesses Total write: 491 accesses QI QI HI HI SI SI UQI UHI USI read: 83: ** write: 31: * read: 38: * write: 36: * read: 528: ***************** write: 424: ************** read: 23: read: 23: read: 1196: **************************************** Model m32r/d timing information: Taken branches: Untaken branches: Cycles stalled due to branches: Cycles stalled due to loads: Total cycles (approx): 532 237 1064 670 4946 Fill nops: 584 386 ■ GNUPro Tools for Embedded Systems CYGNUS Overlays for M32R/D targets ¨Hf#«Qr¤#XH Overlays are sections of code or data, which are to be loaded as part of a single memory image, but are to be run or used at a common memory address. At run time, an overlay manager will copy the sections in and out of the runtime memory address. This approach can be useful, for example, when a certain region of memory is faster than another section. See the following documentation for more details on using overlays for the M32R/D processor. ■ “Sample runtime overlay manager for M32R/D” (below) ■ “Linker script for overlays for the M32R/D targets” on page 388 ■ “Debugging the example program for M32R/D targets” on page 390 ■ “GDB overlay support for M32R/D targets” on page 395 ■ “Manual mode commands for M32R/D targets” on page 395 ■ “Auto mode commands for M32R/D targets” on page 395 ■ “Debugging with overlays for M32R/D targets” on page 396 ■ “Breakpoints for M32R/D targets” on page 396 #j|fH¦ocjHr¨Hf#«j#o#XHQr¤ A simple, portable runtime overlay manager is provided in the ‘examples’ directory. To access the examples directory, use the following path (‘<yymmdd>’ is replaced with the release date found on the CD). /usr/cygnus/m32r-<yymmdd>/src/examples The sample overlay manager may be used as is, or as a prototype to develop a third party overlay manager (or adapt an existing one for use with the GDB debugger). It is intended to be extremely simple, easy to understand, and not particularly sophisticated. The overlay manager has a single entry point: the ‘OverlayLoad(ovly_number)’ function. It looks up the overlay in a ‘ovly_table’ table to find the corresponding section’s load address and runtime address; then it copies the section from its load address into its runtime address. ‘OverlayLoad’ must be called before code, or data in an overlay section can be used by the program. It is up to the programmer to keep track of which overlays have been loaded. The ‘_ovly_table’ table is built by the linker from information provided by the programmer in the linker script; see “Linker script for overlays for the M32R/D targets” on page 388. The example program contains four overlay sections, which are mapped into two CYGNUS GNUPro Tools for Embedded Systems ■ 387 Linker script for overlays for the M32R/D targets runtime regions of memory. Sections ‘.ovly0’ and ‘.ovly1’ are both mapped into the region starting at ‘0x300000’, and sections ‘.ovly2’ and ‘.ovly3’ are both mapped into the region starting at ‘0x380000’. coeH6c|Qrr¨Hf#«Qr`H¤#XH To build a program with overlays requires a customized linker script. An example program is built with the ‘m32rtext.ld’ script, found in the ‘examples/overlay’ directory. It is a modified version of the default linker script, with two parts added. The first added part describes the overlay sections, and must be located in the ‘SECTIONS’ block, before the ‘.text’ and ‘.data’ sections. It uses the ‘OVERLAY’ linker command, which allows the specification of groups of sections sharing a common runtime address range. SECTIONS { OVERLAY 0x300000 : AT (0x400000) { .ovly0 { foo.o(.text) } .ovly1 { bar.o(.text) } } OVERLAY 0x380000 : AT (0x480000) { .ovly2 { baz.o(.text) } .ovly3 { grbx.o(.text) } } [...] The ‘OVERLAY’ command has two arguments: first, the base address where all of the overlay sections link and run; second, the address where the first overlay section loads. In the example, the ‘.ovly1’ section will load at ‘0x400000 + SIZEOF(.ovly0)’. For a full description of the ‘OVERLAY’ linker command, see “Output section type” on page 281 and “Overlay description” on page 283 in Using ld in GNUPro Utilities. The ‘OVERLAY’ command is really just a syntactic convenience. For finer control over where the individual sections will load, use the following example’s syntax SECTIONS { .ovly0 .ovly1 .ovly2 .ovly3 [...] 0x300000 0x300000 0x380000 0x380000 : : : : AT AT AT AT (0x400000) (0x410000) (0x420000) (0x430000) 388 ■ GNUPro Tools for Embedded Systems { { { { foo.o(.text) bar.o(.text) baz.o(.text) grbx.o(.text) } } } } CYGNUS Linker script for overlays for the M32R/D targets The second addition to the linker script actually builds the ‘_ovly_table’ table, which the sample runtime overlay manager uses. This table has several entries for each overlay, and must be located somewhere in the ‘.data’ section. .data : { [...] _ovly_table = .; LONG(ABSOLUTE(ADDR(.ovly0))); LONG(SIZEOF(.ovly0)); LONG(LOADADDR(.ovly0)); LONG(0); LONG(ABSOLUTE(ADDR(.ovly1))); LONG(SIZEOF(.ovly1)); LONG(LOADADDR(.ovly1)); LONG(0); LONG(ABSOLUTE(ADDR(.ovly2))); LONG(SIZEOF(.ovly2)); LONG(LOADADDR(.ovly2)); LONG(0); LONG(ABSOLUTE(ADDR(.ovly3))); LONG(SIZEOF(.ovly3)); LONG(LOADADDR(.ovly3)); LONG(0); _novlys = .; LONG((_novlys - _ovly_table) / 16); [...] } The example program has four functions; ‘foo’, ‘bar’, ‘baz’, and ‘grbx’. Each is in a separate overlay section. Functions ‘foo’ and ‘bar’ are both linked to run at address ‘0x300000’, while functions ‘baz’ and ‘grbx’ are both linked to run at ‘0x380000’. The main program calls ‘OverlayLoad’ once before calling each of the overlaid functions, giving it the overlay number of the respective overlay. The overlay manager, using the ‘_ovly_table’ table that was built up by the linker script, copies each overlayed function into the appropriate region of memory before it is called. In order to compile and link the example overlay manager, use the following example’s input. m32r-elf-gcc -g -Tm32rdata.ld -oovlydata maindata.c ovlymgr.c CYGNUS GNUPro Tools for Embedded Systems ■ 389 Debugging the example program for M32R/D targets H,¦XXcoX`HHª#j|fH|rX#jQr¤ #XH Using GDB’s built-in overlay support, we can debug this program even though several of the functions share an address range. After loading the program, give GDB the command ‘overlay auto’. GDB then detects the actions of the overlay manager on the target, and can step into overlayed functions, show appropriate backtraces, etc. If a symbol is in an overlay that is not currently mapped, GDB will access the symbol from its load address instead of the mapped runtime address (which would currently be holding something else from another overlay). In the following example, the ‘foo’ and ‘bar’ functions are in different overlays that run at the same address. We will use GDB’s overlay debugging to step into and debug them. (gdb) file ovlydata Reading symbols from ovlydata...done. (gdb) target sim Connected to the simulator. (gdb) load Loading section .ovly0, size 0x28 lma 0x400000 Loading section .ovly1, size 0x28 lma 0x400028 Loading section .ovly2, size 0x28 lma 0x480000 Loading section .ovly3, size 0x28 lma 0x480028 Loading section .data00, size 0x4 lma 0x440000 Loading section .data01, size 0x4 lma 0x440004 Loading section .data02, size 0x4 lma 0x4c0000 Loading section .data03, size 0x4 lma 0x4c0004 Loading section .init, size 0x1c lma 0x208000 Loading section .text, size 0xa3c lma 0x20801c Loading section .fini, size 0x14 lma 0x208a58 Loading section .rodata, size 0x24 lma 0x208a6c Loading section .data, size 0x374 lma 0x208ab0 Loading section .ctors, size 0x8 lma 0x208e24 Loading section .dtors, size 0x8 lma 0x208e2c Start address 0x20801c Transfer rate: 30240 bits in <1 sec. (gdb) overlay auto (gdb) overlay list No sections are mapped. (gdb) info address foo Symbol “foo” is a function at address 0x300000, 390 ■ GNUPro Tools for Embedded Systems CYGNUS Debugging the example program for M32R/D targets loaded at 0x400000 in overlay section .ovly0. (gdb) info symbol 0x300000 foo in unmapped overlay section .ovly0 bar in unmapped overlay section .ovly1 (gdb) info address bar Symbol “bar” is a function at address 0x300000, loaded at 0x400028 in overlay section .ovly1. (gdb) break main Breakpoint 1 at 0x20839c: file maindata.c, line 12. (gdb) run Starting program: ovlydata Breakpoint 1, main () at maindata.c:12 12 if (!OverlayLoad(0)) (gdb) next 14 if (!OverlayLoad(4)) (gdb) next 16 a = foo(1); (gdb) overlay list Section .ovly0, loaded at 00400000 - 00400028, mapped at 00300000 - 00300028 Section .data00, loaded at 00440000 - 00440004, mapped at 00340000 - 00340004 (gdb) info symbol 0x300000 foo in mapped overlay section .ovly0 bar in unmapped overlay section .ovly1 The overlay containing the ‘foo’ function is now mapped. (gdb) step foo (x=1) at foo.c:5 5 if (x) (gdb) x /i $pc 0x300008 <foo+8>: ld r4, @fp || nop (gdb) print foo $1 = {int (int)} 0x300000 <foo> (gdb) print bar $2 = {int (int)} 0x400028 <*bar*> GDB uses labels such as ‘<*bar*>’ (with asterisks) to distinguish overlay load addresses from the symbol’s runtime address (where it will be when used by the CYGNUS GNUPro Tools for Embedded Systems ■ 391 Debugging the example program for M32R/D targets program). (gdb) disassemble Dump of assembler code for function foo: 0x300000 <foo>: st fp,@-sp -> addi sp,-4 0x300004 <foo+4>: mv fp,sp -> st r0,@fp 0x300008 <foo+8>: ld r4,@fp || nop 0x30000c <foo+12>: beqz r4,0x30001c <foo+28> 0x300010 <foo+16>: ld24 r4,0x340000 <foox> 0x300014 <foo+20>: ld r5,@r4 -> mv r0,r5 0x300018 <foo+24>: bra 0x300020 <foo+32> -> bra 0x300020 <foo+32> 0x30001c <foo+28>: ldi r0,0 -> bra 0x300020 <foo+32> 0x300020 <foo+32>: add3 sp,sp,4 0x300024 <foo+36>: ld fp,@sp+ -> jmp lr End of assembler dump. (gdb) disassemble bar Dump of assembler code 0x400028 <*bar*>: 0x40002c <*bar+4*>: 0x400030 <*bar+8*>: 0x400034 <*bar+12*>: 0x400038 <*bar+16*>: 0x40003c <*bar+20*>: 0x400040 <*bar+24*>: 0x400044 <*bar+28*>: 0x400048 <*bar+32*>: 0x40004c <*bar+36*>: End of assembler dump. for function bar: st fp,@-sp -> addi sp,-4 mv fp,sp -> st r0,@fp ld r4,@fp || nop beqz r4,0x400044 <*bar+28*> ld24 r4,0x340000 <foox> ld r5,@r4 -> mv r0,r5 bra 0x400048 <*bar+32*> -> bra 0x400048 <*bar+32*> ldi r0,0 -> bra 0x400048 <*bar+32*> add3 sp,sp,4 ld fp,@sp+ -> jmp lr Since the overlay containing ‘bar’ is not currently mapped, GDB finds ‘bar’ at its load address, and disassembles it there. (gdb) finish Run till exit from #0 foo (x=1) at foo.c:5 0x2083cc in main () at maindata.c:16 16a = foo(1); Value returned is $3 = 324 (gdb) next 17if (!OverlayLoad(1)) (gdb) next 19if (!OverlayLoad(5)) (gdb) next 21b = bar(1); (gdb) overlay list Section .ovly1, loaded at 00400028 - 00400050, mapped at 00300000 - 00300028 392 ■ GNUPro Tools for Embedded Systems CYGNUS Debugging the example program for M32R/D targets Section .data01, loaded at 00440004 - 00440008, mapped at 00340000 - 00340004 (gdb) info symbol 0x300000 foo in unmapped overlay section .ovly0 bar in mapped overlay section .ovly1 (gdb) step bar (x=1) at bar.c:5 5 if (x) (gdb) x /i $pc 0x300008 <bar+8>: ld r4,@fp || nop Now ‘bar’ is mapped, and ‘foo’ is not. Even though the PC is at the same address as before, GDB recognizes that we are in ‘bar’ rather than ‘foo’. (gdb) disassemble Dump of assembler code for function bar: 0x300000 <bar>: st fp,@-sp -> addi sp,-4 0x300004 <bar+4>: mv fp,sp -> st r0,@fp 0x300008 <bar+8>: ld r4,@fp || nop 0x30000c <bar+12>: beqz r4,0x30001c <bar+28> 0x300010 <bar+16>: ld24 r4,0x340000 <barx> 0x300014 <bar+20>: ld r5,@r4 -> mv r0,r5 0x300018 <bar+24>: bra 0x300020 <bar+32> -> bra 0x300020 <bar+32> 0x30001c <bar+28>: ldi r0,0 -> bra 0x300020 <bar+32> 0x300020 <bar+32>: add3 sp,sp,4 0x300024 <bar+36>: ld fp,@sp+ -> jmp lr End of assembler dump. (gdb) finish Run till exit from #0 bar (x=1) at bar.c:5 0x208400 in main () at maindata.c:21 21b = bar(1); Value returned is $4 = 309 The ‘bazx’ and ‘grbxx’ variables are now both mapped to the same runtime address. With the automatic overlay debugging mode, GDB always knows which variable is using an address. (gdb) info addr bazx Symbol “bazx” is static storage at address 0x3c0000, loaded at 0x4c0000 in overlay section .data02. (gdb) info sym 0x3c0000 bazx in unmapped overlay section .data02 grbxx in unmapped overlay section .data03 (gdb) info addr grbxx Symbol “grbxx” is static storage at address 0x3c0000, CYGNUS GNUPro Tools for Embedded Systems ■ 393 Debugging the example program for M32R/D targets loaded at 0x4c0004 in overlay section .data03. (gdb) break baz Breakpoint 2 at 0x380008: file baz.c, line 5. (gdb) break grbx Breakpoint 3 at 0x380008: file grbx.c, line 5. The two breakpoints are actually set at the same address, yet GDB will correctly distinguish between them when it hits them. If only one overlay function has a breakpoint on it, GDB will not stop at that address in other overlay functions. (gdb) cont Continuing. Breakpoint 2, baz (x=1) at baz.c:5 5 if (x) (gdb) print &bazx $5 = (int *) 0x3c0000 (gdb) x /d &bazx 0x3c0000 <bazx>: 317 (gdb) print &grbxx $6 = (int *) 0x4c0004 (gdb) cont Continuing. Breakpoint 3, grbx (x=1) at grbx.c:5 5 if (x) (gdb) print &grbxx $7 = (int *) 0x3c0000 (gdb) x /d &grbxx 0x3c0000 <grbxx>: 435 (gdb) print &bazx $7 = (int *) 0x4c0000 (gdb) x /d &bazx 0x4c0000 <*bazx*>: 317 394 ■ GNUPro Tools for Embedded Systems CYGNUS GDB overlay support for M32R/D targets r¨Hf#«¦||rQr¤#XH GDB provides special functionality for debugging a program that is linked using the overlay mechanism of ld, the GNU linker. In such programs, an overlay corresponds to a section with a load address that is different from its runtime address. GDB can provide ‘manual’ overlay debugging for any program linked in such a way (providing that the overlays all reside somewhere in memory). Automatic overlay debugging is also provided. #o¦#fjr?H6rjj#o?Qr¤#XH The following commands are for manual mode for the overlay manager. overlay overlay overlay overlay overlay manual map <section-name> unmap <section-name> list off The manual mode requires input from the user to specify what overlays are mapped into their runtime address regions at any given time. The ‘overlay map’ command informs GDB that the overlay has been mapped by the target into its shared runtime address range. The ‘ overlay unmap’ command informs GDB that the overlay is no longer resident in its runtime address region, and must be accessed from the load-time address region. If two overlays share the same runtime address region, then mapping one implies unmapping the other. ¦rjr?H6rjj#o?Qr¤#XH The following commands are for automatic mode for the overlay manager. overlay auto overlay list overlay off Automatic overlay debugging support in GDB works with the runtime overlay manager provided in the ‘examples’ directory. When this mode is activated, GDB will automatically read and interpret the data structures maintained in target memory by the overlay manager. To learn what overlays are mapped at any time, use the ‘overlay list’ command. Whenever the target program is allowed to run (by the ‘step’ command), GDB will refresh its overlay map by reading from the target’s overlay tables. The automatic mapping may be temporarily overridden by the ‘overlay map’ and ‘overlay unmap’ commands, but these mappings will last only until the next time the target is allowed to run. To explicitly take control of GDB’s overlay mapping, switch to the ‘overlay manual’ mode. CYGNUS GNUPro Tools for Embedded Systems ■ 395 Debugging with overlays for M32R/D targets H,¦XXcoX©c`r¨Hf#«Qr¤#XH When GDB’s overlay support (either manual or auto) is active, GDB’s concept of a symbol’s address is controlled by which overlays are mapped into which memory regions. For instance, if you ‘print’ a variable that is in an overlay which is currently mapped (located in its runtime address region) GDB will fetch the variable’s memory from the runtime address. If the variable’s overlay is currently not mapped, GDB will fetch it from its load-time address. Similarly, if you disassemble a function that is in an unmapped overlay, or use a symbol’s address to examine memory, GDB will fetch the memory from the symbol's load-time address range instead of the runtime range. If GDB’s output contains labels that are relative to an overlay’s load-time address instead of the runtime address, the labels will be distinguished like the following example’s input shows. (gdb) overlay map .ovly0 (gdb) x /x foo 0x300000 <foo>: 0x2d7f4ffc (gdb) overlay unmap .ovly0 (gdb) x /x foo 0x400000 <*foo*>: 0x2d7f4ffc The asterisks (*) around the ‘foo’ label may be interpreted as meaning that this is where ‘foo’ is, but not where it will be when it is in use by the target program. The ‘INFO ADDRESS’ command can tell you what overlay a symbol is in, as well as where it is loaded and mapped. The ‘INFO SYMBOL’ command can list all of the symbols that are mapped to an address. (gdb) info addr foo Symbol "foo" is a function at address 0x300000, -- loaded at 0x400000 in overlay section .ovly0. (gdb) info symbol 0x300000 foo in mapped overlay section .ovly0 bar in unmapped overlay section .ovly1 H#e|rcoQr¤#XH So long as the overlay sections are located in RAM rather than ROM, GDB can set breakpoints in them. The breakpoints work by inserting trap instructions into the load-time address region. When the overlay is mapped into the runtime region, the trap instructions are mapped along with it, and when executed, cause the target program to break out to the debugger. If the overlay regions are in ROM, you can only set breakpoints in them after they have been mapped into the runtime region in RAM. 396 ■ GNUPro Tools for Embedded Systems CYGNUS 12 rrrf#I?H¨Hfr|jHo The following documentation discusses cross-development with the Motorola 68000 processor (M68K). ■ “Compiling for M68K targets” on page 398 ■ “Preprocessor macros for M68K targets” on page 399 ■ “Assembler options for M68K targets” on page 400 ■ “Debugging on M68K targets” on page 403 Cross-development tools in the GNUPro Toolkit are normally installed with names that reflect the target machine, so that you can install more than one set of tools in the same binary directory. The target name, constructed with the ‘--target’ option to configure, is used as a prefix to the program name. For example, the compiler for the Motorola M68K (GCC in native configurations) is called, depending on which configuration you have installed, by m68k-coff-gcc or m68k-aout-gcc declarations. CYGNUS GNUPro Tools for Embedded Systems ■ 397 Motorola M68K development rj|cfcoXQrI#XH The Motorola M68K target family toolchain controls variances in code generation directly from the command line when compiling. When you run gcc, you can use command-line options to choose whether to take advantage of the extra Motorola M68K machine instructions, and whether to generate code for hardware or software floating point. For information on all the gcc command-line options, see “GNU CC Command Options” in Using GNU CC in GNUPro Compiler Tools. -g The compiler debugging option, -g, is essential to see interspersed high-level source statements, since without debugging information the assembler cannot tie most of the generated code to lines of the original source file. -m5200 Generate code for the Coldfire 5200 processors. -m68000 Generate code for the Motorola m68000. -m68020 Generate code for the Motorola m68020. -m68030 Generate code for the Motorola m68030. -m68040 Generate code for the Motorola m68040. Also enables code generation for the 68881 FPU by default. -m68060 Generate code for the Motorola m68060. Also enables code generation for the 68881 FPU by default. -m68332 Generate code for the Motorola cpu32 family, of which the Motorola m68332 is a member. |croQrQfr#coX|rcoQrI#XH -msoft-float Generate output containing library calls for floating point. The Motorola configurations of libgcc include a collection of subroutines to implement these library calls. -m68881 Generate code for the Motorola m68881 FPU. 398 ■ GNUPro Tools for Embedded Systems CYGNUS Compiling for M68K targets fr#coX|rco¦,r¦coHQrI#XH The following two kinds of floating point subroutines are useful with GCC. ■ Software implementations of the basic functions (floating-point multiply, divide, add, subtract), for use when there is no hardware floating-point support. ■ General-purpose mathematical subroutines, included with implementation of the standard C mathematical subroutine library. See “Mathematical Functions (math.h)” in GNUPro Math Library in GNUPro Libraries. H|r6Hrj#6rQrI#XH GCC defines the following preprocessor macros for the Motorola M68K configurations. ■ Any Motorola M68K architecture: __mc68000__ ■ Any Motorola m68010 architecture: __mc68010__ ■ Any Motorola m68020 architecture: __mc68020__ ■ Any Motorola m68030 architecture: __mc68030__ ■ Any Motorola m68040 architecture: __mc68040__ ■ Any Motorola m68060 architecture: __mc68060__ ■ Any Motorola m68332 architecture: __mc68332__ ■ Any Motorola m68881 architecture: __HAVE_68881__ CYGNUS GNUPro Tools for Embedded Systems ■ 399 Motorola M68K development Hj,fHr|croQrI#XH To use the GNU assembler, GAS, to assemble GCC output, configure GCC with the --with-gnu-as or the -mgas declarations. -mgas Compile using as to assemble GCC output. -Wa If you invoke GAS through the GNU C compiler (version 2), you can use the -Wa option to pass arguments through to the assembler. One common use of this option is to exploit the assembler’s listing features. Assembler arguments that you specify with gcc -Wa must be separated from each other (and the -Wa) by commas, like the options, -alh and -L, in the following example input, separate from -Wa. m68k-coff-gcc -c -g -O -Wa,-alh, -L file.c -L The additional assembler option, -L, preserves local labels, which may make the listing output more intelligible to humans. For example, in the following commandline, the assembler option ,-ahl, requests a listing with interspersed high-level language and assembly language. m68k-coff-gcc -c -g -O -Wa,-alh,-L file.c -L preserves local labels, while the compiler debugging option, -g, gives the assembler the necessary debugging information. Hj,fHr|croQrfccoXr¦|¦QrI #XH Use the following options to enable listing output from the assembler. The letters after ‘-a’ may be combined into one option, such as ‘-al’. -a By itself, ‘-a’ requests listings of high-level language source, assembly language, and symbols. -ah Requests a high-level language listing. -al Request an output-program assembly listing. -as Requests a symbol table listing. -ad Omits debugging directives from listing. High-level listings require a compiler 400 ■ GNUPro Tools for Embedded Systems CYGNUS Assembler options for M68K targets debugging option like -g, and assembly listings (such as -al) requested. Hj,fHfccoXa6rorf?cH6c¨HQrI #XH Use the following listing-control assembler directives to control the appearance of the listing output (if you do not request listing output with one of the ‘-a’ options, the following listing-control directives have no effect). .list Turn on listings for further input. .nolist Turn off listings for further input. .psize linecount, columnwidth Describe the page size for your output (the default is 60, 200). as generates form feeds after printing each group of linecount lines. To avoid these automatic form feeds, specify 0 as linecount. The variable input for columnwidth uses the same descriptive option. .eject Skip to a new page (issue a form feed). .title Use as the title (this is the second line of the listing output, directly after the source file name and page number) when generating assembly listings. .sbttl Use as the subtitle (this is the third line of the listing output, directly after the title line) when generating assembly listings. -an Turn off all forms processing. #ffcoX6ro¨HocroQrI#XH The Motorola M68K pushes all arguments onto the stack, last to first, so that the lowest numbered argument not passed in a register is at the lowest address in the stack. Function return values for integers are stored in D0 and D1. A7 has a reserved use. Registers A0, A1, D0, D1, F0, and F1 can be used for temporary values. When a function is compiled with the default options, it must return with registers D2 through D7 and registers A2 through A6 unchanged. If you have floating-point registers, registers F2 through F7 must also be unchanged. NOTE: Functions compiled with different calling conventions cannot be run together CYGNUS GNUPro Tools for Embedded Systems ■ 401 Motorola M68K development without some care. 402 ■ GNUPro Tools for Embedded Systems CYGNUS Debugging on M68K targets H,¦XXcoXroI#XH The M68K-configured GDB is called by m68k-coff-gdb or m68k-aout-gdb declarations. GDB needs to know the following specifications to talk to your Motorola M68K. ■ Specifications for wanting to use one of the following interfaces: target rom68k ROM monitor for the IDP board. target cpu32bug ROM monitor for other Motorola boards, such as the Motorola Business Card Computer, BCC. target est EST Net/300 emulator. target remote ■ ■ GDB’s generic debugging protocol. Specifications for what serial device connects your host to your M68K board (the first serial device available on your host is the default). Specifications for what speed to use over the serial device. Use the following gdb commands to specify the connection to your target board. target interface serial-device To run a program on the board, start up gdb with the name of your program as the argument. To connect to the board, use the command, target interface serial-device, where interface is an interface from the previous list of specifications and serial-device is the name of the serial port connected to the board. If the program has not already been downloaded to the board, you may use the load command to download it. You can then use all the usual gdb commands. For example, the following sequence connects to the target board through a serial port, and loads and runs programs, designated here as prog, through GDB. <your host prompt> m68k-coff-gdb prog GDB is free software and... (gdb) target cpu32bug /dev/ttyb ... (gdb) load ... (gdb) run target m68k hostname: portnumber You can specify a TCP/IP connection instead of a serial port, using the syntax, hostname: portnumber (assuming your board, designated here as hostname, is CYGNUS GNUPro Tools for Embedded Systems ■ 403 Motorola M68K development connected, for instance, to use a serial line, designated by portnumber, managed by a terminal concentrator). GDB also supports set remotedebug n declarations.You can see some debugging information about communications with the board by setting the remotedebug variable. 404 ■ GNUPro Tools for Embedded Systems CYGNUS 13 IS®?H¨Hfr|jHo The following documentation discusses the NEC V850 family of processors for GNUPro tools. ■ “Toolchain features for V850” on page 406 ■ “ABI summary for the V850” on page 408 ■ “Compiler issues for V850” on page 413 ■ “Assembler information for V850” on page 421 ■ “Linker information for V850” on page 423 ■ “Debugger issues for V850” on page 426 ■ “Stand-alone simulator issues for V850” on page 427 For more specific information on the V850 processor, see V850 User’s Manual, V851 Hardware User’s Manual (NEC document #U10954EU1V0UM00, January 1996), V850_EVA (Revision C), and System V Application Binary Interface (Prentice Hall, 1990). CYGNUS GNUPro Tools for Embedded Systems ■ 405 NEC V850 development rrf6`#coQH#¦HQrIS® The following documentation describes the main features of the tools addressing the V850 family of processors. ■ The V851 version of the V850 family of processors is supported with the GNUPro tools. ■ The V850 tools support the ELF object file format. To produce S-records, use ‘ld’ (see Using ld in GNUPro Utilities for more information) or ‘objcopy’ (see Using binutils in GNUPro Utilities for more information). ■ For the V850 processor, file names are case sensitive under UNIX. Case sensitivity for Windows 95 and Windows NT is dependent on system configuration. By default, file names under Windows 95 and Windows NT are not case sensitive for the V850 processor. ■ The following case sensitive issues under UNIX, Windows 95, and Windows NT apply to the V850 processor. ■ command line options ■ assembler labels ■ linker script commands ■ section names ■ The following case sensitive issues under UNIX, Windows 95, or Windows NT do not apply to the V850 processor. ■ GDB commands ■ assembler instructions and register names ■ GNUPro Toolkit includes tools for converting legacy source code, originally written for other compilers, into GNUPro compiler (GCC) compliant code. ■ For the Windows 95/NT toolchain, the libraries install in different locations. Therefore, the Windows 95/NT hosted toolchain requires the following environmental settings to function properly. Assume the release is installed in C:\USR\CYGNUS. The ‘<yymmdd>’ variable indicates the release date found on the CD. SET SET SET SET REM SET PROOT=C:\usr\cygnus\V850-<yymmdd> PATH=%PROOT%\H-i386-cygwin32\BIN;%PATH% GCC_EXEC_PREFIX=%PROOT%\H-i386-cygwin32\lib\gcc-lib\ INFOPATH=%PROOT%\info Set TMPDIR to point to a ramdisk if you have one TMPDIR=%PROOT% NOTE: The trailing back slash (\) in ‘GCC_EXEC_PREFIX’ is necessary. 406 ■ GNUPro Tools for Embedded Systems CYGNUS Toolchain features for V850 ■ ■ ■ Programs may be developed for and debugged on the GNUPro Instruction Set Simulator. The ICE (In-circuit Emulator) for V8511 is in development. Cross-development tools in the Cygnus GNUPro Toolkit normally have names that reflect the target processor and the object file format output by the tools (ELF). This makes it possible to install more than one set of tools in the same binary directory, including both native and cross-development tools. The complete tool name is a three-part hyphenated string. The first part indicates the processor or processor family (‘V850’). The second part indicates the file format output by the tool (elf). The third part is the generic tool name (‘gcc’). For example, the GCC compiler for the NEC V850 family of processors is ‘V850-elf-gcc’. The V850 package includes the supported tools shown in Table 49. Table 49: Descriptions of tools and their names for the V850 processor Tool Description Tool Name GCC compiler V850-elf-gcc G++ compiler V850-elf-g++ C++ compiler V850-elf-c++ C++ demangler V850-elf-c++filt GAS assembler V850-elf-as GNU linker V850-elf-ld Standalone simulator V850-elf-run Binary utilities V850-elf-ar V850-elf-nm V850-elf-objcopy V850-elf-objdump V850-elf-ranlib V850-elf-size V850-elf-strings V850-elf-strip GDB debugger V850-elf-gdb GDBTk visual debugger (Windows 95/NT only) V850-elf-gdbtk IMPORTANT: The binaries for a Windows 95/NT hosted toolchain are installed with an ‘.exe’ suffix. However, the ‘.exe’ suffix does not need to be specified when running the executable. 1 See IE-703000-MC-A In-circuit Emulator for V851 User’s Manual (from NEC Electronics Inc.) for details. CYGNUS GNUPro Tools for Embedded Systems ■ 407 NEC V850 development ¦jj#«Qr`HIS® The following documentation discusses the ABI for the V850 processor. ■ Data types and alignment for V850 (below) ■ Calling conventions for V850 (below) ■ “Register allocation for V850” on page 409 ■ “Stack frame information for V850” on page 410 ■ “Argument passing for V850” on page 411 ■ “Function return values for V850” on page 412 ##«|H#o?#fcXojHoQrIS® The following list describes the data types and their alignment sizes for the V850 processor. 1 byte char 2 bytes short 4 bytes int 4 bytes long 4 bytes long long 4 bytes float 4 bytes double long double 8 bytes pointer 4 bytes The stack is aligned to a four byte boundary. One byte is used for characters (including structure/unions made entirely of chars), and two byte alignment for everything else. Basic data types shorter than a word are promoted to a word when passed as arguments or return values. #ffcoX6ro¨HocroQrIS® GCC will use up to four registers for passing parameters (‘r6-r9’). A parameter may be split between registers and memory if it does not fit within the remaining available parameter registers. Alignment of parameters within the parameter list is the same as their basic alignment. This implies that ‘doubles’ and ‘long long’ types need not be 8-byte aligned in parameter lists. Calling a ‘varargs’ or ‘stdarg’ function does not change how parameters are passed. However, the callee will flush all parameter registers back to a caller allocated 408 ■ GNUPro Tools for Embedded Systems CYGNUS ABI summary for the V850 parameter flush back area in the stack. This allows the callee to then treat all parameters as if they had been passed in the stack. The caller is responsible for allocating the 16-byte parameter flush back area at the bottom of the current stack. The callee is free to use that 16-byte area for any purpose in a non-varargs or a non-stdarg function. Structures greater than 8 bytes in length, passed by value, are automatically converted into pass-by-invisible-reference structures (i.e. the compiler arranges to pass a pointer instead of the entire structure). The callee must make a copy of the structure if the callee modifies the pass-by-invisible reference structure. Values are returned in the same manner as the GHS compilers, including the use of ‘r6’ as a return-structure-pointer when returning large structures. ‘r31’, also known as ‘lp’ (link pointer), is used as a return pointer during a call instruction; the callee is responsible for saving ‘r31’ into the stack if the callee performs any additional function calls or uses ‘r31’ as a scratch register. Stack arguments are located at increasing addresses from ‘entry_sp’. The ‘varargs’ flush back area uses: entry_sp entry_sp + 4 entry_sp + 8 entry_sp + 12 (r6) (r7) (r8) (r9). The callee can use the flush back area for any purposes if the callee does not use ‘varargs’ or ‘stdarg’ facilities. HXcH#ffr6#croQrIS® Fixed registers are never available for register allocation in the compiler. By default the following registers are fixed in GCC: r0 (zero), r1 and r3 (sp), r4 (gp), r30 (ep). Caller saved registers can be used by the compiler to hold values that do not live across function calls. The caller saved registers are r2, r5 through r19, and r31. Callee saved registers retain their value across function calls. The callee saved registers are r20 through r29. NOTE: ‘r6-r9’ are parameter registers and ‘r10’, ‘r11’ are function return registers. ‘r31’ is the return pointer. ‘r29’ is used as the frame pointer in some functions. GCC will always create a frame pointer when not optimizing. The frame pointer will be eliminated when optimizing, except for functions which allocate dynamic stack space (functions which call ‘alloca’). Interrupt functions can never have a frame pointer; so, when compiling an interrupt function, you must either specify optimization (using the ‘-O’ option) or by explicitly making the compiler not generate CYGNUS GNUPro Tools for Embedded Systems ■ 409 NEC V850 development a frame pointer (by using the ‘-fomit-frame-pointer’ option). Interrupt functions can not use ‘alloca’ calls, nor can they have very large stacks (less than 32K, in size). #6eQ#jHcoQrj#croQrIS® The following documentation discusses the stack frame for the V850 processor’s usage, especially for the debugging processes. See for descriptions of the stack frame. ■ The stack grows downwards from high addresses to low addresses. ■ A leaf function need not allocate a stack frame if it doesn’t need one. ■ A frame pointer need not be allocated. ■ The stack pointer shall always be aligned to 4 byte boundaries. ■ The register save area shall be aligned to a 4 byte boundary. Figure 17: Stack frame for V850 Before call: High memory After call: local variables, register save area, etc. local variables, register save area, etc. arguments on stack arguments on stack SP, FP register save area local variables FP alloca allocations Low memory * arguments on stack SP* FP points to the same location as SP. Stack frames for functions that take a variable number of arguments have usage as 410 ■ GNUPro Tools for Embedded Systems CYGNUS ABI summary for the V850 Figure 18 describes. Figure 18: Stack frames for functions taking a variable number of arguments Before call: High memory After call: local variables, register save area, etc. local variables, register save area, etc. arguments on stack arguments on stack SP, FP save area for anonymous parms passed in registers (the size of this area may be zero) register save area local variables alloca allocations Low memory arguments on stack SP* X¦jHo|#coXQrIS® Arguments are passed to a function using (1) registers and (2) memory, if the argument passing registers are depleted. Each register is assigned an argument until all are used. Unused argument registers have undefined values on entry. Use the following rules. ■ Quantities of size 8 bytes or less are passed in registers if available, then as CYGNUS GNUPro Tools for Embedded Systems ■ 411 NEC V850 development ■ ■ ■ ■ ■ ■ ■ memory. Larger quantities are passed by reference. Arguments passed by reference are passed by making a copy of the argument on the stack and passing a pointer to that copy. If a data type would overflow the register arguments, then it is passed in registers and memory. A ‘long long’ data type passed in ‘r9’ would be passed in ‘r9’ and in the first 4 bytes of the stack. Arguments passed on the stack begin at ‘sp’ with respect to the caller. Each argument passed on the stack is aligned on a 4 byte boundary. Space for all arguments is rounded up to a multiple of 4 bytes. The first argument register is ‘r6’. The last argument register is ‘r9’. A call to a function, procedure, or subroutine uses a ‘jarl’ routine, a ‘lp’ instruction which saves the return address in ‘r31’ (‘lp’). The return uses a ‘jump[r31]’ instruction. ¦o6croH¦o¨#f¦HQrIS® Scalar or pointer return values are returned in ‘r10’ and sign-extended or zero-extended to 32 bits for types smaller than 32 bits. ■ 32-bit floating point values are returned in ‘r10’. ■ 64-bit floating point values are returned in the register pair ‘r10’, and ‘r11’. To call a function which returns a structure or union in C and C++, the address of a temporary of the return type is passed by the caller in ‘r6’. The function returns the structure value by copying the return value to the address pointed to by ‘r6’, and copies ‘r6’ into ‘r10’ before returning to the caller. 412 ■ GNUPro Tools for Embedded Systems CYGNUS Compiler issues for V850 rj|cfHc¦HQrIS® The following documentation discusses the compiler for the V850 processor. ■ V850-specific command-line options for GCC (below) ■ “Preprocessor symbols for V850” on page 414 ■ “Special data areas on the V850” on page 414 ■ “depragmaize for V850” on page 415 ■ “Structure conversion for V850” on page 419 ■ “Structure conversion for V850” on page 419 IS®a|H6cQc66rjj#o?afcoHr|croQr For a list of available generic compiler options, refer to “GNU CC Command Options” in Using GNU CC in GNUPro Compiler Tools. In addition, the following V850-specific command-line options are supported: -mep -mno-ep Enables (or disables with -mno-ep) the checking of pointers in the basic blocks and, if using a pointer, copies the pointer into the Element Pointer (‘r30’) to use the shorter SLD and SST instructions for that basic block. Default is ‘-mep’ when using optimization. -mprolog-function -mno-prolog-function Enables (or disables with -mno-prolog-function) the use of external functions to save and restore the registers in the function prologue. Default is ‘-mprolog-function’ when using optimization. For more detailed information on the use of the following three compiler options, see “Special data areas on the V850” on page 414. -msda=<n> Enables automatic placement of static / global data in the small data area (‘sda’) off of Global Pointer (‘r4’), providing data access with one instead of two 32-bit instructions. -mtda=<n> Enables automatic placement of static / global data in the tiny data area (‘tda’) off of Element Pointer (‘r30’), providing data access with one 16-bit instruction instead of two 32-bit instructions. -mzda=<n> Enables automatic placement of static / global data in the zero data area (‘zda’) off CYGNUS GNUPro Tools for Embedded Systems ■ 413 NEC V850 development of Zero Register (‘r0’), providing data access with one instead of two 32-bit instructions. H|r6Hr«j,rfQrIS® By default, the compiler defines the preprocessor symbols as ‘__v850__’, ‘__v851__’, and ‘__v850’. |H6c#f?###H#ro`HIS® There are 3 distinct data areas on the v850, ‘zda’ (zero data area), ‘sda’ (small data area), and ‘tda’ (tiny data area). ‘zda’ variables are stored in the ‘.zdata’ and ‘.zbss’ sections, which together must be no more than 64K bytes, unless the bottom area of the address map is reserved for an internal ROM/PROM in which case the limit is 32K. The linker puts them in memory at negative offsets of -1 to -32K from 0, and if no internal ROM/PROM is present, from 0 to +32K as well (so that the zero pointer, ‘r0’, can be used to point to the variables). ‘sda’ variables are stored in the ‘.sdata’ and ‘.sbss’ sections, which together must be no more than 64K bytes. The runtime startup code is responsible for loading up the ‘gp’ pointer with an address within the region. ‘tda’ variables are stored in the ‘.tdata’ section, which must be no more than 256 bytes. The runtime startup code is responsible for loading up the ‘ ep’ pointer with an address within the region. The ‘-mep’ switch also uses the ‘ep’ pointer, but restores it after it is done. It is also possible to use GCC attribute extension to the C language to explicitly specify which data area will contain a given variable. For example, the syntax: int __attribute((zda)) fred; will put the integer variable ‘fred’ into the zero data area. If no special attributes or switches are used, it normally takes two 32-bit instructions to reference any global/static variable (one to get the high bits of the address into a register, and the other to do the memory reference). Both ‘zda’ and ‘sda’ static/global references take one 32-bit instruction, while ‘tda’ references take one 16-bit instruction. Thus, you can put the most frequently used variables in the tiny data area and put most of the remaining variables into either the zero or small data areas to cut down on the size of the code space. The variable ‘<n>’ in the ‘-mzda=<n>’, ‘-msda=<n>’, and ‘-mtda=<n>’ compiler options indicates variable size in bytes. Variables that aren’t put into a specific section with an attribute, and whose size is less than or equal to ‘<n>’ bytes, are put into the indicated data section. For ‘-mtda=<n>’, the maximum ‘<n>’ is 256 bytes. For 414 ■ GNUPro Tools for Embedded Systems CYGNUS Compiler issues for V850 ‘-mzda=<n>’, the maximum ‘<n>’ is 32768 bytes. The maximum for ‘-msda=<n>’ is 65536 bytes. You can combine these switches, and the compiler first looks at ‘tda’, then ‘sda’, and finally ‘zda’. The following example’s input shows the appropriate declaration to provide. -mtda=4 -msda=256 This combination would indicate all static or global variables less than or equal to 4 bytes, which would become ‘tda’ references, while all static or global variables less than 4 and greater than or equal to 256 bytes become ‘sda’ references. Consider the following code. struct fred { int a, int b; }; int main (void) { return fred.a + fred.b; } If compiled with no options, the compiler will put the ‘fred’ structure into the normal data section of the program. This means that it will take two 32-bit instructions to fetch the contents of ‘fred.a’ and another two 32-bit instructions to fetch the contents of ‘fred.b’ for the program. If the program is compiled with a ‘-msda=8’ declaration, then the compiler will put the ‘fred’ structure into the small data area (since ‘fred’ is 8 bytes in length, and the ‘-msda=8’ option tells the compiler to put all variables of size 8 or less into the small data area). Now it will only take one 32-bit instruction to fetch ‘fred.a’ and one to fetch ‘fred.b’ for compiling. If the program had been compiled with the ‘-mtda=8’ declaration, then ‘fred’ would have been put into the tiny data area, and fetching ‘fred.a’ would have required only one 16-bit instruction. As an alternative, the following code has been changed. struct __attribute__ ((zda)) fred { int a; int b; }; int main (void) { return fred.a + fred.b; } When this code is compiled (with or without any special command line options), the ‘fred’ structure is placed into the zero data area and fetching either ‘fred.a’ or ‘fred.b’ requires one 32-bit instruction apiece. The default behaviour is to place variables into the (ordinary) data section. Adding forces that particular variable to go into the zero data area, but has no effect on other variables. Specifying ‘-mzda=<n>’ on the command line forces all variables whose size is less than or equal to ‘ <n>’ bytes into the zero data area. It is up to the programmer to determine what value to use for ‘<n>’. If the value is too large then too many variables will be put into the zero data area and error messages will be produced by the linker (after all, the ‘ zda’ only has room for 32K bytes of data). ‘__attribute__ ((zda))’ depragmaizeQrIS® depragmaize modifies source code and associated header files. depragmaize converts uses of certain pragmas in C code to uses of equivalent GCC attributes. Pragmas, CYGNUS GNUPro Tools for Embedded Systems ■ 415 NEC V850 development often used to implement vendor specific features, are in many circumstances very difficult to maintain both in the compiler and in the source code that maintains them. For those machine-specific features affecting declarations or symbols, attributes are a much better way to implement these features, again both for the compiler maintainer and for the source code maintainer. GCC has a well defined mechanism for adding new attributes to the compiler. For more information about GCC’s attributes, see Using GNU CC (on the Cygnus website, using the following URL to locate the documentation that you require) or use the ‘gcc.info’ on-line help file. http://www.cygnus.com/pubs/gnupro/2_GNUPro_Compiler_Tools/Using_GNU_CC/ In order to convert a particular source file, the source file must contain C code compilable by GCC (which, of course, includes ANSI C code as well as any GCC extensions). depragmaize only converts a limited set of pragmas; see “Conversions” on page 416 for a current list. is intended to be simple to use. The following descriptions for suggestions of the conversion process will answer most questions. For instance, see “depragmaize options” on page 418 for the options that depragmaize accepts. Table 50: Conversions depragmaize XXX is ‘tda’, ‘sda’, or ‘zda’. depragmaize will add the ‘__attribute__((section("tda")))’ pragma to the appropriate symbols between the start and end pragmas. If the ‘-R’ option is specified, depragmaize will also remove these pragmas from the source. #pragma ghs interrupt To the function containing the pragma, __attribute__((interrupt)), depragmaize will add __attribute__((interrupt)). If the ‘-R’ option is specified, depragmaize will also remove this pragma from the source. #pragma ghs startXXX #pragma ghs endXXX To do the conversion, depragmaize makes use of GCC to find all the parts of the source that need changing. That’s why the source code must be compatible with the GCC compiler source code in order for depragmaize to convert it. Unfortunately, most real source code is not just compilable. Usually, some number of compile time options must be passed to the compiler in order for the particular source code to be properly compiled by the compiler. Also, source code is often compiled under a number of different sets of compile time options to produce different executables. See the following documentation for further discussion of such issues. In the simplest case (if your source code is very simple) you would invoke depragmaize as the following example declaration suggests (where ‘<file.c>’ is the name of the source code file to be converted). depragmaize <file.c> depragmaize and ‘<file.c>’ must be 416 ■ GNUPro Tools for Embedded Systems in the current working directory. depragmaize CYGNUS Compiler issues for V850 will convert ‘file.c’ and any header files that the file.c includes, if those header files reside in the current working directory. The actual conversions done are described in the following discussions. depragmaize only converts files that are in the current working directory unless the ‘-d’ option is used. depragmaize will save a copy of the unconverted source file in ‘file.c.save’ unless the ‘-N’ option is used. Any number of source files can be specified on a single invocation of depragmaize. If a source file, or set of source files, uses header files that are not in the current working directory, and those header files also must be converted, specify with the ‘-d’ option. For instance, the following declaration specifies that ‘depragmaize’ should convert ‘file.c’ and any headers used by ‘file.c’ if those headers are in the current working directory or in ‘other_directory’. depragmaize -d other_directory file.c Often your source code will require some compile time options to successfully compile. -c "-DMACRO1=1 -I../include_files" file.c The previous declaration will pass ‘-DMACRO1=1’ and ‘-I../include_files’ to GCC. Typically the kinds of options that will need to be passed to GCC will be ‘-D’ options and ‘-I’ options. Someone familiar with building the source code involved will need to determine the exact list of options required to compile that source. NOTE: Options like ‘-O’ and ‘-g’ are not required for proper conversion, though it will not hurt the process if they are specified. For some source code, the list of symbols actually seen by the compiler is affected by the options given to the compiler. For instance, use the following example to generate symbol lists. #ifdef MACRO1 int a; #else int b; #endif If ‘MACRO1’ is defined on the command line, the compiler will see the symbol ‘a’, but not ‘b’; and the opposite if ‘MACRO1’ is not defined. depragmaize can only convert code actually seen by the compiler. In a case like this depragmaize must be invoked twice, once with ‘MACRO1’ defined, once without such a declaration. Of course if ‘MACRO1’ does not make code converted, you need not use this definition. For some source code, the actual conversion required will depend on the command line arguments. The most likely example of this would be cases where the tokens of the ‘#pragmas’ changed, depending on the command line arguments. Unfortunately, the complexity of the conversions required by these cases is beyond depragmaize’s ability to handle automatically. You will need to make these conversions by hand first, CYGNUS GNUPro Tools for Embedded Systems ■ 417 NEC V850 development and then let depragmaize handle the other more common cases. Finally, because of the possibility that some source code may need to be run through depragmaize more than once to effect complete conversion, and depragmaize does not remove the pragma’s from the source code until the ‘ -R’ option is specified. If your source code does not need to be run through depragmaize more than once, you can use ‘-R’ on that invocation, otherwise use ‘-R’ on the last invocation. depragmaize r|cro The following documentation discusses the depragmaize options. The following example shows the standard approach for a depragmaize declaration. depragmaize [options...] file... Each file and any header files it includes are converted. Files and headers are only converted if they reside in the current directory or a directory specified by the -d option. For each file that is converted, and for which some change is actually made, depragmaize will create a copy of the original unconverted file under the name XXX.save, where XXX is the name of the converted file (so ‘file.c’ is saved under ‘file.c.save’). If XXX.save already exists, depragmaize will not overwrite it, and simply does not do this copy. The ‘-N’ option tells depragmaize not to make these copies. -V -v --version Print the version of specifies that ‘depragmaize’ should convert ‘file.c’ and any headers used by ‘file.c’ if those headers are in the current working directory or in ‘other_directory’. being used. This option also causes somewhat more verbose messages to be printed. -q --quiet --silent Don’t print warning and informational messages (only print errors). -n --nochange Don’t actually convert the source files, just print messages about what would be done. -c “STRING” --compiler-options “STRING” Pass “STRING” as options to the compiler during the compilation part of the conversion process. STRING should be a space separated list of options for the compiler used. Use the 418 ■ GNUPro Tools for Embedded Systems CYGNUS Compiler issues for V850 following example’s declaration. depragmaize -c "-DMACRO1 -DMACRO2" t1.c -R --remove_pragmas This option causes depragmaize to remove the pragmas from the source in addition to converting them attributes. -d <DIRECTORY> --directory <DIRECTORY> Add ‘<DIRECTORY>’ to the list of directories containing files which can be converted. The current directory is always on this list. Files are not converted unless they are in a directory on this list. -x <FILENAME> --exclude <FILENAME> Do not convert ‘<FILENAME>’. -p <COMPILER> --file_name <COMPILER> Use COMPILER as the compiler for the compilation part of the conversion process. By default ‘gcc’ is used. COMPILER should be the name of an executable and it must work with a version of GCC which is compatible with depragmaize. This is only useful for specifying a a GNU compiler program that is compatible with depragmaize , unless that is not on your PATH. -N --nosave Don’t keep a copy of the original source. -k --keep Keep a copy of the intermediate file. Only useful for debugging depragmaize. ¦6¦H6ro¨HcroQrIS® Structure conversion is done, using the GCC offset-info option. The ‘-offset-info output-file’ option simplifies access to C struct’s from the assembler. For each member of each structure, the compiler will output a ‘.equ’ directive to associate a symbol with the member’s offset in bytes into the structure. The symbol itself is the concatenation of the structure’s tag name and the member’s name, separated by an underscore. This option will output to the specified ‘output-file’ an assembler ‘.equ’ directive for each member of each structure found in each compilation. The ‘.equ’ directives for the structures in a single header file can be obtained as follows, where ‘m.h’ is the header containing the structures, and ‘m.s’ CYGNUS GNUPro Tools for Embedded Systems ■ 419 NEC V850 development is where the directives are output. gcc -fsyntax-only -offset-info m.s -x c m.h The following is a short example of output produced by the ‘-offset-info’ option. input file (for example m.h): struct W { double d; int i; }; struct X { int a; int b; struct Y { int a; int b; }; struct Y y; struct Y yy[10]; struct Y* p; }; output file (for example m.s): .equ W_d,0 .equ W_i,8 .equ Y_a,0 .equ Y_b,4 .equ X_a,0 .equ X_b,4 .equ X_y,8 .equ X_yy,16 .equ X_p,96 The ‘-offset-info’ option has the following caveats. ■ No directives are output for bit-field members. ■ No directives are output for members who’s offsets (as measured in bits) is greater than the word size of the host. ■ No directives are output for members who’s offsets are not constants. This can happened only in structures which use some gcc specific extensions which allow for variable sized members. 420 ■ GNUPro Tools for Embedded Systems CYGNUS Assembler information for V850 Hj,fHcoQrj#croQrIS® The following documentation discusses the assembler issues for the V850 tools. ■ “Register names for V850” on page 421 (below) ■ “Addressing modes for V850” on page 421 (below) ■ “Floating point values for V850” on page 422 ■ “Opcodes for V850” on page 422 ■ “Assembler error messages for V850” on page 422 For a list of available generic assembler options, see “Command-line options” on page 21 in Using as in GNUPro Utilities. There are no V850-specific assembler command-line options. The V850 syntax is based on the syntax in NEC’s V850 User’s Manual. HXcHo#jHQrIS® You can use the predefined symbols ‘r0’ through ‘r31’ to refer to the V850 registers. V850 also has predefined symbols for the following general registers. ep gp hp lp sp tp zero element ptr, synonym for ‘r30’ global ptr, synonym for ‘r4’ synonym for ‘r2handler stack ptr, ’ link ptr, synonym for ‘r31’ stack ptr, synonym for ‘r3’ text ptr, synonym for ‘r5’ zero register, synonym for ‘r0’ ??HcoXjr?HQrIS® The assembler understands the following addressing modes for the V850. The symbol ‘Rn’ in the following examples refers to any of the specifically numbered registers or register pairs, but not the control registers (where n signifies the actual number to specify; see the V850 User’s Manual for actual specifications). Rn Register direct. [Rn] Register indirect. <expr> Immediate data (angle brackets are not part of the syntax). CYGNUS GNUPro Tools for Embedded Systems ■ 421 NEC V850 development disp[Rn] Register indirect with displacement. cccc Condition code (c, e, ge, gt, h, l, le, lt, n, nc, ne, nh, nl, ns, nv, nz, p, s, sa, t, v, or z). fr#coX|rco¨#f¦HQrIS® Although the V850 has no hardware floating point, the assembler supports software floating point. The ‘.float’ and ‘.double’ directives generate IEEE-format floating-point values for compatibility with other development tools. |6r?HQrIS® For detailed information on the V850 machine instruction set, see V850 User’s Manual. The assembler implements all the standard V850 opcodes. Hj,fHHrjH#XHQrIS® The following messages output as assembler error messages. Error: bad instruction The instruction is misspelled or there is a syntax error somewhere. Error: expression too complex Error: unresolved expression that must be resolved The instruction contains an expression that is too complex; no relocation exists to handle it. Error: relocation overflow The instruction contains an expression that is too large to fit in the field. 422 ■ GNUPro Tools for Embedded Systems CYGNUS Linker information for V850 coeHcoQrj#croQrIS® The following documentation discusses the linker tools for the V850 processor. See also “Producing S-records for V850” on page 425. For a list of available generic linker options, see “Linker scripts” on page 261 in Using ld in GNUPro Utilities. In addition, the following V850-specific command-line option has supported:. --defsym _stack=0xnnnn Specifies the initial value for the stack pointer, if the application loads the stack pointer with the value of ‘_stack’ in the start up code. The initial value for the stack pointer is defined in the linker script with the PROVIDE linker command. This allows the user to specify a new value on the command line with the standard ‘—defsym’ linker option. coeH6c|QrIS® The GNU linker uses a linker script to determine how to process each section in an object file, and how to lay out the executable. The linker script is a declarative program consisting of a number of directives. For instance, the ‘ENTRY()’ directive specifies the symbol in the executable that will be the executable’s entry point. Since linker scripts can be complicated to write, the linker includes one built-in script that defines the default linking process. For the V850 tools, the following example shows the default script: OUTPUT_FORMAT("elf32-v850", "elf32-v850", "elf32-v850") OUTPUT_ARCH(v850) ENTRY(_start) SEARCH_DIR( <installation directory path>); SECTIONS { /* Read-only sections, merged into text segment: */ . = 0x200000; .interp : { *(.interp) } .hash : { *(.hash) } .dynsym : { *(.dynsym) } .dynstr : { *(.dynstr) } .rel.text : { *(.rel.text) } .rela.text : { *(.rela.text) } .rel.data : { *(.rel.data) } .rela.data : { *(.rela.data) } .rel.rodata : { *(.rel.rodata) } .rela.rodata : { *(.rela.rodata) } .rel.got : { *(.rel.got) } .rela.got : { *(.rela.got) } CYGNUS GNUPro Tools for Embedded Systems ■ 423 NEC V850 development .rel.ctors : { *(.rel.ctors) } .rela.ctors : { *(.rela.ctors) } .rel.dtors : { *(.rel.dtors) } .rela.dtors : { *(.rela.dtors) } .rel.init : { *(.rel.init) } .rela.init : { *(.rela.init) } .rel.fini : { *(.rel.fini) } .rela.fini : { *(.rela.fini) } .rel.bss : { *(.rel.bss) } .rela.bss : { *(.rela.bss) } .rel.plt : { *(.rel.plt) } .rela.plt : { *(.rela.plt) } .init : { *(.init) } =0 .plt : { *(.plt) } .text : { *(.text) /* .gnu.warning sections are handled specially by elf32.em. */ *(.gnu.warning) *(.gnu.linkonce.t*) } =0 _etext = .; PROVIDE (etext = .); .fini : { *(.fini) } =0 .rodata : { *(.rodata) *(.gnu.linkonce.r*) } .rodata1 : { *(.rodata1) } /* Adjust the address for the data segment. We want to adjust up to the same address within the page on the next page up. */ . = ALIGN(32) + (ALIGN(8) & (32 - 1)); .data : { *(.data) *(.gnu.linkonce.d*) CONSTRUCTORS } .data1 : { *(.data1) } .ctors : { *(.ctors) } .dtors : { *(.dtors) } .got : { *(.got.plt) *(.got) } .dynamic : { *(.dynamic) } /* We want the small data sections together, so single-instruction offsets can access them all, and initialized data all before uninitialized, so we can shorten the on-disk segment size. */ .sdata : { *(.sdata) 424 ■ GNUPro Tools for Embedded Systems } CYGNUS Linker information for V850 _edata = .; PROVIDE (edata = .); __bss_start = .; .sbss : { *(.sbss) *(.scommon) } .bss : { *(.dynbss) *(.bss) *(COMMON) } _end = . ; PROVIDE (end = .); /* Stabs debugging sections. */ .stab 0 : { *(.stab) } .stabstr 0 : { *(.stabstr) } .stab.excl 0 : { *(.stab.excl) } .stab.exclstr 0 : { *(.stab.exclstr) } .stab.index 0 : { *(.stab.index) } .stab.indexstr 0 : { *(.stab.indexstr) } .comment 0 : { *(.comment) } /* DWARF debug sections. Symbols in the .debug DWARF section are relative to the beginning of the section so we begin .debug at 0. It’s not clear yet what needs to happen for the others. */ .debug 0 : { *(.debug) } .debug_srcinfo 0 : { *(.debug_srcinfo) } .debug_aranges 0 : { *(.debug_aranges) } .debug_pubnames 0 : { *(.debug_pubnames) } .debug_sfnames 0 : { *(.debug_sfnames) } .line 0 : { *(.line) } PROVIDE (_stack = 0x3ffffc); } Although this script is somewhat lengthy, it is a generic script that will support all ELF situations. In practice, generation of sections like ‘.rela.dtors’ are unlikely when compiling using embedded ELF tools. r?¦6coXaH6r?QrIS® The following command reads the contents of ‘hello.x’, converts the code and data into S-records, and puts the result into ‘hello.srec’. v850-elf-objcopy -O srec hello.x hello.srec Here are the first few lines of ‘hello.srec’: S00D000068656C6C6F2E7372656303 S31A00100000000220A6FF0000A880AEFFFF401E2000231E0000403B S31A00100015F610003EF6A86E402611002426A8EE40361000263637 S31A0010002AA86E403E1000273EE06EE7319105460700000636011C S31A0010003F00E731B1FD80FFA200031EF4FF0032003A004280FF6E CYGNUS GNUPro Tools for Embedded Systems ■ 425 NEC V850 development H,¦XXHc¦HQrIS® GDB’s built-in software simulation of the V850 processor allows the debugging of programs compiled for the V850 without requiring any access to actual hardware. Activate this mode in GDB by typing ‘target sim’. Then load code into the simulator by typing ‘load’ and debug it in the normal fashion. There are no V850-specific debugger command-line options. For all available debugger options, see Debugging with GDB in GNUPro Debugging Tools. 426 ■ GNUPro Tools for Embedded Systems CYGNUS Stand-alone simulator issues for V850 #o?a#froHcj¦f#rc¦HQrIS® The simulator supports the general registers, ‘r0’ through ‘r31’, ‘PC’ (program counter, low 24 bits only), and ‘PSW’ (low 5 bits only). It does not support any of the additional system registers or memory mapped registers. Registers are all uninitialized at startup. There are no V850-specific stand-alone simulator command-line options. CYGNUS GNUPro Tools for Embedded Systems ■ 427 NEC V850 development 428 ■ GNUPro Tools for Embedded Systems CYGNUS 14 r©H?H¨Hfr|jHo The following documentation discusses cross-development with the PowerPC targets. ■ “Compiling for PowerPC targets” on page 430 ■ “Assembler options for PowerPC targets” on page 438 ■ “Debugging PowerPC targets” on page 440 Cross-development tools in the GNUPro Toolkit are normally installed with names that reflect the target machine, so that you can install more than one set of tools in the same binary directory. The target name, constructed with the ‘ --target’ option to configure, is used as a prefix to the program name. For example, the compiler for the PowerPC (GCC in native configurations) is called, depending on which configuration you have installed, by powerpc-eabi-gcc. The following processors are supported for the PowerPC targets. 403Gx 505 601 602 603 603(e) 604 604(e) 750 821 860 Extended support packages are available for the PowerPC MBX 8xx, Cogent 860, ADS 8xx target boards (where xx designates the 800 series processors). CYGNUS GNUPro Tools for Embedded Systems ■ 429 PowerPC development rj|cfcoXQrr©H#XH The PowerPC target family toolchain controls variances in code generation directly from the command line. When you run GCC, you can use command-line options to choose whether to take advantage of the extra PowerPC machine instructions, and whether to generate code for hardware or software floating point or you can use command-line options to choose machine-specific details. These -m options are defined for the PowerPC. -mpower -mno-power -mpower2 -mno-power2 -mpowerpc -mno-powerpc -mpowerpc-gpopt -mno-powerpc-gpopt -mpowerpc-gfxopt -mno-powerpc-gfxopt GNU CC supports two related instruction set architectures for the IBM RS/6000 and PowerPC. The POWER instruction set are those instructions supported by the rios chip set used in the original RS/6000 systems and the PowerPC instruction set is the architecture of the Motorola MPC5xx, MPC6xx, MCP8xx and the IBM 4xx microprocessors. The PowerPC architecture defines 64-bit instructions, but they are not supported by any current processors. Neither architecture is a subset of the other. However there is a large common subset of instructions supported by both. An MQ register is included in processors supporting the POWER architecture. You use these options to specify which instructions are available on the processor you are using. The default value of these options is determined when configuring GNU CC. Specifying the ‘-mcpu=cpu_type’ overrides the specification of these options. We recommend you use the ‘-mcpu=cpu_type’ option rather than any of these options. The ‘-mpower ’ option allows GNU CC to generate instructions that are found only in the POWER architecture and to use the MQ register. Specifying ‘-mpower2’ implies ‘-power ’ and also allows GNU CC to generate instructions that are present in the POWER2 architecture but not the original POWER architecture. The ‘-mpowerpc’ option allows GNU CC to generate instructions that are found only in the 32-bit subset of the PowerPC architecture. Specifying ‘-mpowerpc-gpopt’ implies ‘-mpowerpc’ and also allows GNU CC to use the 430 ■ GNUPro Tools for Embedded Systems CYGNUS Compiling for PowerPC targets optional PowerPC architecture instructions in the General Purpose group, including floating-point square root. Specifying ‘-mpowerpc-gfxopt’ implies ‘-mpowerpc’ and also allows GNU CC to use the optional PowerPC architecture instructions in the Graphics group, including floating-point select. If you specify both ‘-mno-power’ and ‘-mno-powerpc’, GNU CC will use only the instructions in the common subset of both architectures plus some special AIX common-mode calls, and will not use the MQ register. Specifying both ‘-mpower ’ and ‘-mpowerpc’ permits GNU CC to use any instruction from either architecture and to allow use of the MQ register; specify this for the Motorola MPC601. -mnew-mnemonics -mold-mnemonics Select which mnemonics to use in the generated assembler code. ‘-mnew-mnemonics’ requests output that uses the assembler mnemonics defined for the PowerPC architecture, while ‘-mold-mnemonics’ requests the assembler mnemonics defined for the POWER architecture. Instructions defined in only one architecture have only one mnemonic; GNU CC uses that mnemonic irrespective of which of these options is specified. PowerPC assemblers support both the old and new mnemonics, as will later POWER assemblers. Current POWER assemblers only support the old mnemonics. Specify ‘-mnew-mnemonics if you have an assembler that supports them, otherwise specify ‘-mold-mnemonics’. The default value of these options depends on how GNU CC was configured. Specifying ‘-mcpu=cpu_type’ sometimes overrides the value of these option. Unless you are building a cross-compiler, you should normally not specify either ‘-mnew-mnemonics’ or ‘-mold-mnemonics’, but should instead accept the default. -mcpu=cpu_type Set architecture type, register usage, choice of mnemonics, and instruction scheduling parameters for machine type cpu_type. Supported values for cpu_type are ‘rs6000’, ‘rios1’, ‘rios2’, ‘rsc’, ‘601’, ‘602’, ‘603’, ‘603e’, ‘604’, ‘604e’, ‘620’, ‘power ’, ‘power2’, ‘powerpc’, ‘403’, ‘505’, ‘801’, ‘821’, ‘823’, ‘860’ and ‘common’. The ‘-mcpu=power ’, ‘-mcpu=power2’, and ‘-mcpu=powerpc’ specify generic POWER, POWER2 and pure PowerPC (i.e., not MPC601) architecture machine types, with an appropriate, generic processor model assumed for scheduling purposes. Specifying ‘-mcpu=rios1’, ‘-mcpu=rios2’, ‘-mcpu=rsc’, ‘-mcpu=power ’, or ‘-mcpu=power2’ enables the ‘-mpower ’ option and disables the ‘-mpowerpc’ option; ‘-mcpu=601’ enables both the ‘-mpower ’ and ‘-mpowerpc’ options; ‘-mcpu=602’, ‘-mcpu=603’, ‘-mcpu=603e’, ‘-mcpu=604’, ‘-mcpu=620’; ‘-mcpu=403’, ‘-mcpu=505’, ‘-mcpu=821’, ‘-mcpu=860’ and ‘-mcpu=powerpc’ enable the ‘-mpowerpc’ option and disable the ‘-mpower ’ option; ‘-mcpu=common’ disables both the ‘-mpower ’ and ‘-mpowerpc’ options. CYGNUS GNUPro Tools for Embedded Systems ■ 431 PowerPC development IBM AIX versions 4 or greater selects ‘-mcpu=common’ by default, so that code will operate on all members of the IBM RS/6000 and PowerPC families. In that case, GNU CC will use only the instructions in the common subset of both architectures plus some special AIX common-mode calls, and will not use the MQ register. GNU CC assumes a generic processor model for scheduling purposes. Specifying ‘-mcpu=rios1’, ‘-mcpu=rios2’, ‘-mcpu=rsc’, ‘-mcpu=power ’, or ‘-mcpu=power2’ also disables the ‘new-mnemonics’ option. Specifying ‘-mcpu=601’, ‘-mcpu=602’, ‘-mcpu=603’, ‘-mcpu=603e’, ‘-mcpu=604’, ‘-mcpu=620’, ‘-mcpu=403’, or ‘-mcpu=powerpc’ also enables the ‘new-mnemonics’ option. Specifying ‘-mcpu=403’, ‘-mcpu=821’, or ‘-mcpu=860’ also enables the ‘-msoft-float’ option. -mtune=cpu_type Set the instruction scheduling parameters for machine type, cpu_type, but do not set the architecture type, register usage, choice of mnemonics like ‘-mcpu=cpu_type’ would. The same values for cpu_type are used for ‘-mtune=cpu_type’ as for ‘-mcpu=cpu_type’. The ‘-mtune=cpu_type’option overrides the ‘-mcpu=cpu_type’ option in terms of instruction scheduling parameters. -mfull-toc -mno-fp-in-toc -mno-sum-in-toc -mminimal-toc Modify generation of the TOC (Table Of Contents), which is created for every executable file. The ‘-mfull-toc’ option is selected by default. In that case, GNU CC will allocate at least one TOC entry for each unique non-automatic variable reference in your program. GNU CC will also place floating-point constants in the TOC. However, only 16,384 entries are available in the TOC. If you receive a linker error message that saying you have overflowed the available TOC space, you can reduce the amount of TOC space used with the ‘-mno-fp-in-toc’ and ‘-mno-sum-in-toc’ options. ‘-mno-fp-in-toc’ prevents GNU CC from putting floating-point constants in the TOC and ‘-mno-sum-in-toc’ forces GNU CC to generate code to calculate the sum of an address and a constant at run-time instead of putting that sum into the TOC. You may specify one or both of these options. Each causes GNU CC to produce very slightly slower and larger code at the expense of conserving TOC space. If you still run out of space in the TOC even when you specify both of these options, specify ‘-mminimal-toc’ instead. This option causes GNU CC to make only one TOC entry for every file. When you specify this option, GNU CC will produce code that is slower and larger but which uses extremely little TOC space. You may wish to use this option only on files that contain less frequently executed 432 ■ GNUPro Tools for Embedded Systems CYGNUS Compiling for PowerPC targets code. -msoft-float -mhard-float Generate code that does not use or does use the floating-point register set. Software floating point emulation is provided if you use the ‘-msoft-float’ option, and pass the option to GNU CC when linking. -mmultiple -mno-multiple Generate code that uses (does not use) the load multiple word instructions and the store multiple word instructions. These instructions are generated by default on POWER systems, and not generated on PowerPC systems. Do not use ‘-mmultiple’ on little endian PowerPC systems, since those instructions do not work when the processor is in little endian mode. -mstring -mno-string Generate code that uses (does not use) the load string instructions and the store string word instructions to save multiple registers and do small block moves. These instructions are generated by default on POWER systems, and not generated on PowerPC systems. WARNING: Do not use -mstring on little endian PowerPC systems, since those instructions do not work when the processor is in little endian mode. -mupdate -mno-update Generate code that uses (or does not use) the load or store instructions that update the base register to the address of the calculated memory location. These instructions are generated by default. If you use ‘-mno-update’, there is a small window between the time that the stack pointer is updated and the address of the previous frame is stored, which means code that walks the stack frame across interrupts or signals may get corrupted data. -mfused-madd -mno-fused-madd Generate code that uses (does not use) the floating point multiply and accumulate instructions. These instructions are generated by default if hardware floating is used. -mno-bit-align -mbit-align On System V.4 and embedded PowerPC systems do not and do force structures and unions containing bit fields aligned to the base type of the bit field. For example, by default a structure containing nothing but 8 unsigned bitfields of length 1 would be aligned to a 4 byte boundary and have a size of 4 bytes. By CYGNUS GNUPro Tools for Embedded Systems ■ 433 PowerPC development using -mno-bit-align, the structure would be aligned to a 1 byte boundary and be one byte in size. -mno-strict-align -mstrict-align On System V.4 and embedded PowerPC systems do not (do) assume that unaligned memory references will be handled by the system. -mrelocatable -mno-relocatable On embedded PowerPC systems generate code that allows (does not allow) the program to be relocated to a different address at runtime. If you use -mrelocatable on any module, all objects linked together must be compiled with -mrelocatable or -mrelocatable-lib. -mrelocatable-lib -mno-relocatable-lib On embedded PowerPC systems generate code that allows (does not allow) the program to be relocated to a different address at runtime. Modules compiled with ‘-mreloctable-lib’ can be linked with either modules compiled without ‘-mrelocatable’ and ‘-mrelocatable-lib’ or with modules compiled with the ‘-mrelocatable’ options. -mno-toc -mtoc On System V.4 and embedded PowerPC systems do not (do) assume that register 2 contains a pointer to a global area pointing to the addresses used in the program. -mno-traceback -mtraceback On embedded PowerPC systems do not (do) generate a trace-back tag before the start of the function. This tag can be used by the debugger to identify where the start of a function is. -mlittle -mlittle-endian On System V.4 and embedded PowerPC systems compile code for the processor in little endian mode. The ‘-mlittle-endian’ option is the same as ‘-mlittle’. -mbig -mbig-endian On System V.4 and embedded PowerPC systems compile code for the processor in big endian mode. The ‘-mbig-endian’ option is the same as ‘-mbig’. -mcall-sysv On System V.4 and embedded PowerPC systems compile code using calling conventions that adheres to the March 1995 draft of the System V Application Binary Interface, PowerPC processor supplement. This is the default unless you configured GCC using ‘powerpc-*-eabiaix’. -mcall-sysv-eabi Specify both ‘-mcall-sysv’ and ‘-meabi’ options. 434 ■ GNUPro Tools for Embedded Systems CYGNUS Compiling for PowerPC targets -mcall-sysv-noeabi Specify both ‘-mcall-sysv’ -mcall-aix and ‘-mnoeabi’ options. On System V.4 and embedded PowerPC systems compile code using calling conventions that are similar to those used on AIX. This is the default if you configured GCC using ‘powerpc-*-eabiaix’. -mcall-solaris On System V.4 and embedded PowerPC systems, compile code for the Solaris operating system. -mcall-linux On System V.4 and embedded PowerPC systems, compile code for the Linux operating system. -mprototype -mno-prototype On System V.4 and embedded PowerPC systems assume that all calls to variable argument functions are properly prototyped. Otherwise, the compiler must insert an instruction before every non prototyped call to set or clear bit 6 of the condition code register (CR) to indicate whether floating point values were passed in the floating point registers in case the function takes a variable arguments. With ‘-mprototype’, only calls to prototyped variable argument functions will set or clear the bit. -msim On embedded PowerPC systems, assume that the startup module is called sim-crt0.o and the standard C libraries are libsim.a and libc.a. This is default for ‘powerpc-*-eabisim’ configurations. -mmvme On embedded PowerPC systems, assume that the startup module is called mvme-crt0.o and the standard C libraries are ‘libmvme.a’ and ‘libc.a’. -memb On embedded PowerPC systems, set the PPC_EMB bit in the ELF flags header to indicate that eabi extended relocations are used. -mads On embedded PowerPC systems, assume that the startup module is called ‘crt0.o’ and the standard C libraries are ‘libads.a’ and ‘libc.a’. -myellowknife On embedded PowerPC systems, assume that the startup module is called ‘crt0.o’ and ‘libyk.a’ and ‘libc.a’ are the standard C libraries. -meabi -mno-eabi On System V.4 and embedded PowerPC systems do (do not) adhere to the Embedded Applications Binary Interface (EABI) which is a set of modifications to the System V.4 specifications. Selecting -meabi means that the stack is aligned to an 8 byte boundary, a function __eabi is called to from main to set up the EABI CYGNUS GNUPro Tools for Embedded Systems ■ 435 PowerPC development environment, and the ‘-msdata’ option can use both r2 and r13 to point to two separate small data areas. Selecting -mno-eabi means that the stack is aligned to a 16 byte boundary, do not call an initialization function from main, and the ‘-msdata’ option will only use r13 to point to a single small data area. The ‘-meabi’ option is on by default if you configured GCC using one of the ‘powerpc*-*-eabi*’ options. -msdata=eabi On System V.4 and embedded PowerPC systems, put small initialized const global and static data in the ‘.sdata2’ section, which is pointed to by register r2. Put small initialized non-const global and static data in the ‘.sdata’ section, which is pointed to by register r13. Put small uninitialized global and static data in the ‘.sbss’ section, which is adjacent to the ‘.sdata’ section. The ‘-msdata=eabi’ option is incompatible with the ‘-mrelocatable’ option. The ‘-msdata=eabi’ option also sets the ‘-memb’ option. -msdata=sysv On System V.4 and embedded PowerPC systems, put small global and static data in the ‘.sdata’ section, which is pointed to by register r13. Put small uninitialized global and static data in the ‘.sbss’ section, which is adjacent to the ‘.sdata’ section. The ‘-msdata=sysv’ option is incompatible with the ‘-mrelocatable’ option. -msdata=default -msdata On System V.4 and embedded PowerPC systems, if ‘-meabi’ is used, compile code the same as ‘-msdata=eabi’, otherwise compile code the same as ‘-msdata=sysv’. -msdata-data On System V.4 and embedded PowerPC systems, put small global and static data in the ‘.sdata’ section. Put small uninitialized global and static data in the ‘.sbss’ section. Do not use register r13 to address small data however. This is the default behavior unless other ‘-msdata’ options are used. -msdata=none -mno-sdata On embedded PowerPC systems, put all initialized global and static data in the ‘.data’ section, and all uninitialized data in the ‘.bss’ section. -G num On embedded PowerPC systems, put global and static items less than or equal to num bytes into the small data or bss sections instead of the normal data or bss section. By default, num is 8. The ‘-G num’ switch is also passed to the linker. All modules should be compiled with the same ‘-G num’ value. 436 ■ GNUPro Tools for Embedded Systems CYGNUS Compiling for PowerPC targets -mregnames -mno-regnames On System V.4 and embedded PowerPC systems, do (do not) emit register names in the assembly language output using symbolic forms. Floating point subroutines for PowerPC targets The following two kinds of floating point subroutines are useful with GCC. ■ Software implementations of the basic functions (floating-point multiply, divide, add, subtract), for use when there is no hardware floating-point support. ■ General-purpose mathematical subroutines, included with implementation of the standard C mathematical subroutine library. See “Mathematical Functions” in GNUPro Math Library in GNUPro Libraries. Preprocessor macros for PowerPC targets GCC defines the following preprocessor macros for the PowerPC configurations. ■ Any PowerPC architecture: __powerpc-eabi__ CYGNUS GNUPro Tools for Embedded Systems ■ 437 PowerPC development Hj,fHr|croQrr©H#XH To use the GNU assembler to assemble GCC output, configure GCC with the --with-gnu-as or the -mgas declaration. -mgas Compile using GAS to assemble GCC output. -Wa If you invoke the GNU assemblerthrough the GNU C compiler (version 2), you can use the -Wa option to pass arguments through to the assembler. One common use of this option is to exploit the assembler’s listing features. Assembler arguments that you specify with gcc -Wa must be separated from each other (and the -Wa) by commas, like the options, -alh and -L, in the following example input, separate from -Wa. powerpc-eabi-gcc -c -g -O -Wa,-alh, -L file.c -L The additional assembler option, -L, preserves local labels, which may make the listing output more intelligible to humans. For example, in the following commandline, the assembler option ,-ahl, requests a listing with interspersed high-level language and assembly language. powerpc-eabi-gcc -c -g -O -Wa,-alh,-L file.c -L preserves local labels, while the compiler debugging option, -g, gives the assembler the necessary debugging information. Use the following options to enable listing output from the assembler. The letters after ‘-a’ may be combined into one option, such as ‘-al’. -a By itself, ‘-a’ requests listings of high-level language source, assembly language, and symbols. -ah Requests a high-level language listing. -al Request an output-program assembly listing. -as Requests a symbol table listing. -ad Omits debugging directives from listing. High-level listings require a compiler debugging option like -g, and assembly listings (such as -al) requested. Use the following listing-control assembler directives to control the appearance of the listing output (if you do not request listing output with one of the ‘-a’ options, the 438 ■ GNUPro Tools for Embedded Systems CYGNUS Assembler options for PowerPC targets following listing-control directives have no effect). .list Turn on listings for further input. .nolist Turn off listings for further input. .psize linecount, columnwidth Describe the page size for your output (the default is 60, 200). gas generates form feeds after printing each group of linecount lines. To avoid these automatic form feeds, specify 0 as linecount. The variable input for columnwidth uses the same descriptive option. .eject Skip to a new page (issue a form feed). .title Use as the title (this is the second line of the listing output, directly after the source file name and page number) when generating assembly listings. .sbttl Use as the subtitle (this is the third line of the listing output, directly after the title line) when generating assembly listings. -an Turn off all forms processing. CYGNUS GNUPro Tools for Embedded Systems ■ 439 PowerPC development H,¦XXcoXr©H#XH The PowerPC-configured GDB is called by powerpc-eabi-gdb declaration. GDB needs to know the following specifications to talk to PowerPC targets. ■ Specifications for what you want to use one, such as target remote, GDB’s generic debugging protocol. ■ Specifications for what serial device connects your PowerPC board (the first serial device available on your host is the default). ■ Specifications for what speed to use over the serial device. Use the following GDB commands to specify the connection to your target board. target powerpc serial-device To run a program on the board, start up GDB with the name of your program as the argument. To connect to the board, use the following command. target interface serial-device interface designates an interface from the previous list of specifications and serial-device is the name of the serial port connected to the board. If the program has not already been downloaded to the board, you may use the load command to download it. You can then use all the usual GDB commands. For example, the following sequence connects to the target board through a serial port, and loads and runs programs through GDB. (gdb) target powerpc com1 ... breakinst () ../sparc-stub.c:975 975 } (gdb) s main () hello.c:50 50 writer(1, “Got to here\n”); (gdb) target powerpc hostname: portnumber You can specify a TCP/IP connection instead of a serial port, using the syntax, hostname: portnumber (assuming your board, designated here as hostname, is connected, for instance, to use a serial line, designated by portnumber, managed by a terminal concentrator). GDB also supports set remotedebug n. You can see some debugging information about communications with the board by setting the variable, remotedebug. 440 ■ GNUPro Tools for Embedded Systems CYGNUS Debugging PowerPC targets The stack frame for PowerPC targets The following information applies to the stack frame for the PowerPC. ■ The stack grows downwards from high addresses to low addresses. ■ A leaf function need not allocate a stack frame if it does not need one. ■ A frame pointer need not be allocated. ■ The stack pointer shall always be aligned to 4 byte boundaries. ■ The register save area shall be aligned to a 4 byte boundary. Stack frames for functions taking a fixed number of arguments use the definitions in Figure 19. Figure 19: PowerPC stack frames for functions taking a fixed number of arguments Before call: High memory After call: local variables, register save area, etc. arguments on stack local variables, register save area, etc. arguments on stack SP, FP* register save area local variables alloca allocations Low memory arguments on stack SP, FP* * FP points to the same location as SP. Stack frames for functions that take a variable number of arguments use the definitions in Figure 20. CYGNUS GNUPro Tools for Embedded Systems ■ 441 PowerPC development Figure 20: PowerPC stack frames for functions taking a variable number of arguments Before call: High memory After call: local variables, register save area, etc. local variables, register save area, etc. arguments on stack arguments on stack SP, FP save area for anonymous parms passed in registers (the size of this area may be zero) local variables alloca allocations arguments on stack Low memory SP, FP Argument passing for PowerPC targets Table 51 shows the general purpose registers, floating point registers, and the stack frame offset. Table 51: Parameter passing example register General purpose registers Floating-point registers Stack frame offset r3: c f1: ff 08: ptr to t r4: d f2: gg 0c: (padding) r5: e f3: hh 10: nn (lo) 442 ■ GNUPro Tools for Embedded Systems CYGNUS Debugging PowerPC targets General purpose registers Floating-point registers Stack frame offset r6: f f4: ii r7: g f5: jj r8: h f6: kk r9: ptr to ld f7: ll r10: ptr to s f8: mm 14: nn (hi) Function return values for PowerPC targets Integers, floating point values, and aggregates of 8 bytes or less are returned in register ‘r0’ (and ‘r1’ if necessary). Aggregates larger than 8 bytes are returned by having the caller pass the address of a buffer to hold the value in ‘r0’ as an “invisible” first argument. All arguments are then shifted down by one. The address of this buffer is returned in ‘r0’. Debugging programs with multiple threads Programs with multiple threads can be debugged using either the visual debugger, GDBTk, or the GDB command line interface. The following discussion describes how to debug multiple threads using the GDB command line. In some operating systems, a single program may have more than one thread of execution. The precise semantics of threads differ from one operating system to another, but in general the threads of a single program are related to multiple processes, except that they share one address space (that is, they can all examine and modify the same variables). On the other hand, each thread has its own registers and execution stack, and perhaps private memory. GDB provides the following functions for debugging multi-thread programs ■ thread threadno, a command to switch among threads ■ info threads, a command to inquire about existing threads ■ thread apply [threadno][all] args, a command to apply a command to a list of threads ■ thread-specific breakpoints The GDB thread-debugging facility allows you to observe all threads while your program runs, but whenever GDB takes control, one thread in particular is always the focus of debugging. This thread is called the current thread. Debugging commands show program information from the perspective of the current thread. For debugging purposes, GDB associates its own thread number, always a single integer, with each thread in your program. CYGNUS GNUPro Tools for Embedded Systems ■ 443 PowerPC development info threads Display a summary of all threads currently in your program. GDB displays for each thread (in the following order): 1. The thread number assigned by GDB. 2. The target system’s thread. 3. The current stack frame summary for that thread. An asterisk ‘*’ to the left of the GDB thread number indicates the current thread. Use the following example for clarity. (gdb) info threads * 2 thread 2 breakme () at /eCos/packages/kernel/v1_1/tests/thread_gdb.c:91 Name: controller, State: running, Priority: 0, More: <none> 1 thread 1 Cyg_HardwareThread::thread_entry (thread=0x1111aaa2) at /eCos/packages/kernel/v1_1/src/common/thread.cxx:68 Name: Idle Thread, State: running, Priority: 31, More: <none> thread <threadno> Make thread number ‘<threadno>’the current thread. The command argument, ‘<threadno>’, is the internal GDB thread number, as shown in the first field of the ‘info threads’ display. GDB responds by displaying the system identifier of the thread you selected, and its current stack frame summary, as in the following output. (gdb) thread 2 [Switching to thread 2] #0 change_state (id=0, newstate=0 ’\000’) at /eCos/kernel/current/tests/bin_sem2.cxx:93 93 if (PHILO_LOOPS == state_changes++) Current language: auto; currently c++ thread apply [<threadno>][<all>] <args> The thread apply command allows you to apply a command to one or more threads. Specify the numbers of the threads that you want affected with the command argument ‘<threadno>’, where ‘<threadno>’ is the internal GDB thread number, as shown in the first field of the ‘info threads’ display. To apply a command to all threads, use the ‘thread apply all args’ declaration. Whenever GDB stops your program, due to a breakpoint or a signal, it automatically selects the thread where that breakpoint or signal happened. When your program has multiple threads, you can choose whether to set breakpoints on all threads, or on a particular thread. break <linespec> thread <threadno> 444 ■ GNUPro Tools for Embedded Systems CYGNUS Debugging PowerPC targets If ‘<linespec>’ specifies source lines, then there are several ways of writing them. Use the qualifier ‘thread <threadno>’ with a breakpoint command to specify that you only want GDB to stop the program when a particular thread reaches this breakpoint. ‘<threadno>’ is one of the numeric thread identifiers assigned by GDB, shown in the first column of the ‘info threads’ display. If you do not specify ‘thread <threadno>’ when you set a breakpoint, the breakpoint applies to all threads of your program. You can use the thread qualifier on conditional breakpoints as well; in this case, place ‘thread <threadno>’ before the breakpoint condition, as the following example shows. (gdb) break frik.c:13 thread 28 if bartab > lim Whenever your program stops under GDB for any reason, all threads of execution stop; not just the current thread. This allows you to examine the overall state of the program, including switching between threads, without worrying that things may change. Conversely, whenever you restart the program, all threads start executing. This is true even when single stepping with commands like ‘step’ or ‘next’. In particular, GDB cannot single-step all threads in lockstep. Since thread scheduling is up to your debugging target’s operating system (not controlled by GDB), other threads may execute more than one statement while the current thread completes a single step. In general other threads stop in the middle of a statement, rather than at a clean statement boundary, when the program stops. You might even find your program stopped in another thread after continuing or even single stepping. This happens whenever some other thread runs into a breakpoint, a signal, or an exception before the first thread completes whatever you requested. CYGNUS GNUPro Tools for Embedded Systems ■ 445 PowerPC development cj¦f#rQH#¦HQr`Hr©H #XH The GNUPro simulator allows execution of a program compiled for the PowerPC target CPU on any supported host computer. It includes a simulator module for the target CPU instruction set, memory, and may also include simulated peripheral devices such as serial I/O and timers. Altogether, these features allow developers to test their PowerPC programs, without need for an actual board with that CPU. The PowerPC simulator is capable of matching the instruction timing characteristics of different PowerPC CPUs, and can provide detailed instruction dispatch and cache profiling information. This can be handy for performance analysis, but is not necessary for simply testing programs. The simulator can also model devices, which will eventually allow programs compiled for hardware targets to be run on the simulator. The PowerPC simulator includes support for 32, 32-bit general-purpose registers and 32, 32-bit floating-point registers, as well as most special purpose registers. The user program is provided with a single block of memory at address ‘0x00000000’. The default size of this block is 1MB, but another size can be specified at simulator startup. the Simulator-specific command line options for PowerPC targets There are several PowerPC-specific options that are available, using a --help command. See Example 1. Example 1: Simulator commands C:\> powerpc-eabi-run -–help Usage: psim [ <psim-option> ... ] <image> [ <image-arg> ... ] Where <image> Name of the PowerPC program to run. <image-arg> Argument to be passed to <image> <psim-option> See below. The following are valid <psim-option>s: -c<count> Limit the simulation to <count> iterations -i or -i2 Print instruction counting statistics 446 ■ GNUPro Tools for Embedded Systems CYGNUS Simulator features for the PowerPC targets -I -e -E -f -h -m -n -o -r -t Print execution unit statistics <os-emul> Specify an OS or platform to model <endian> Specify the endianness of the target <file> Merge <file> into the device tree -? -H Give more detailed usage <model> Specify the processor to model (604) <nr-smp> Specify the number of processors in SMP simulations <dev-spec> Add device <dev-spec> to the device tree <ram-size> Set RAM size in bytes (OEA environments) [!]<trace> Enable (disable) <trace> option For information on the PowerPC PSIM simulator, see http://sourceware.cygnus.com/psim/ Simulator exceptions within GDB for PowerPC targets If you invoke the simulator within GDB, using the ‘target sim’ command, you may encounter some ambiguities when processing signals and exceptions. The ambiguities discussed in this documentation are not a problem when you are using the standalone simulator. In such a case, the standalone simulator is the only target program that can handle the exception. When an exception is raised in the simulator, GDB does not know whether the simulated program is intended to handle the exception, or if GDB is intended to handle it. For example, suppose you are debugging a ROM monitor in the simulator invoked from GDB (we’ll call this GDB1), and you have downloaded an application to it from a second GDB session (GDB2). The second GDB session, GDB2, would simply consider the simulated target as a remote target and nothing more. Now suppose that in GDB2 you set a breakpoint in the program. The breakpoint will be physically set in GDB1. So when the breakpoint is reached, instead of the breakpoint being handled by the ROM monitor as if it was a real target, the breakpoint will be interpreted by GDB1 as if you had asked GDB1 to set a breakpoint in the ROM monitor code. This may not be your intention. To solve this, you can tell GDB1 not to process breakpoints itself, but to let the simulated target process them. To do this, use the following command: handle SIGxxxx pass nostop noprint ‘SIGxxxx’ is one of the signals listed by GDB when you use the ‘info handle’ command to the GDB console prompt. For example, the ‘handle SIGTRAP pass nostop noprint’ command tells GDB not to stop the simulated target at a breakpoint, or even to print that it has been stopped. Instead, the command tells GDB to pass the information back to the program. You can modify the command to use with other signals and exceptions. CYGNUS GNUPro Tools for Embedded Systems ■ 447 PowerPC development IMPORTANT! If you use the previous command, you will no longer be able to set breakpoints in the ROM monitor code. You may be able to work around this problem by using conditional breakpoints. See Debugging with GDB in GNUPro Debugger Tools for how to use conditional breakpoints. 448 ■ GNUPro Tools for Embedded Systems CYGNUS 15 <fcH ?H¨Hfr|jHo The following documentation discusses cross-development with the SPARC and SPARClite targets. For the GCC compiler in particular, special configuration options allow use of special software floating-point code for the SPARC MB86930 processor, as well as defaulting commnd-line options using special Fujitsu SPARClite features. For the Fujitsu SPARClite, there is support for the ex930, ex932, ex933, ex934, and the ex936 boards. See the following documentation for more specific discussion concerning the SPARC and SPARClite targets. ■ “Compiling for SPARC targets” on page 451 ■ “Preprocessor macros for SPARC targets” on page 453 ■ “Assembler options for SPARC, SPARClite targets” on page 457 ■ “Linker usage for SPARC, SPARClite usage” on page 461 ■ “Debugging SPARC and SPARClite targets” on page 467 ■ “Loading on specific targets for SPARC, SPARClite” on page 469 Cross-development tools in the GNUPro Toolkit are normally installed with names that reflect the target machine, so that you can install more than one set of tools in the same binary directory. The target name, constructed with the ‘--target’ option to configure, is used as a prefix to the program name. For example, the compiler for the SPARC (GCC in native configurations) is called, depending on which configuration CYGNUS GNUPro Tools for Embedded Systems ■ 449 SPARC, SPARClite development you have installed, by sparc-coff-gcc or sparc-aout-gcc declarations. The compiler for the SPARClite (GCC in native configurations) is called, depending on which configuration you have installed, by sparclite-coff-gcc or sparclite-aout-gcc. See SPARClite User’s Manual (Fujitsu Microelctronics, Inc., Semiconductor Division, 1993) for full documentation of the Fujitsu SPARClite family, architecture, and instruction set. 450 ■ GNUPro Tools for Embedded Systems CYGNUS Compiling for SPARC targets rj|cfcoXQr#XH The SPARC target family toolchain controls variances in code generation directly from the command line. When you run GCC, you can use command-line options to choose whether to take advantage of the extra SPARC machine instructions, and whether to generate code for hardware or software floating point. ■ “Compiler options for SPARC targets” (below) ■ “Options for floating point for SPARC and SPARClite targets” on page 452 ■ “Floating point subroutines for SPARC and SPARClite targets” on page 452 ■ “Preprocessor macros for SPARC targets” on page 453 rj|cfHr|croQr#XH When you run GCC, you can use command-line options to choose machine-specific details. For information on all the compiler command-line options, see “GNU CC command options” on page 67 and “Option summary for GCC” on page 69 in Using GNU CC in GNUPro Compiler Tools. -g The compiler debugging option, -g, is essential to see interspersed high-level source statements, since without debugging information the assembler cannot tie most of the generated code to lines of the original source file. -mvh Generate code for the SPARC version 8. The only difference from version 7 code is the compiler emits the integer multiply (smul and umul) and integer divide (sdiv and udiv) instructions that exist in SPARC version 8 and not version 7. -mf930 Generate code for the Fujitsu SPARClite chip, MB86930. This chip is equivalent to the combination, -msparclite -mno-fpu. -mf930 is the default when the compiler configures specifically to the Fujitsu SPARClite processor. -mf934 Generate code specifically intended for the SPARC MB86934, a Fujitsu SPARClite chip with a floating point . This option is equivalent to -msparclite. -mflat Does not register windows in function calls. -mlittle-endian-data Compile code for the processor in little endian data mode with big endian instructions. The default is big endian data with big endian instructions. CYGNUS GNUPro Tools for Embedded Systems ■ 451 SPARC, SPARClite development -msparclite The SPARC configurations of GCC generate code for the common subset of the instruction set: the version 7 variant of the SPARC architecture. -msparclite, on automatically for any of the Fujitsu SPARClite configurations, gives you SPARClite code. This adds the integer multiply (smul and umul, just as in SPARC version 8), the integer divide-step (divscc), and scan (scan) instructions that exist in SPARClite but not in SPARC version 7. Using -msparclite when you run the compiler does not, however, give you floating point code that uses the entry points for US Software’s GOFAST library. |croQrQfr#coX|rcoQr#o?fcH #XH The following command line options are available for both the SPARC and the Fujitsu SPARClite configurations of the compiler. See “SPARC options” on page 187 in Using GNU CC in GNUPro Compiler Tools. -mfpu -mhard-float Generate output containing floating point instructions as the default. -msoft-float -mno-sfpu Generate output containing library calls for floating point. The SPARC configurations of libgcc include a collection of subroutines to implement these library calls. In particular, the Fujitsu SPARClite configurations generate subroutine calls compatible with the US Software goFast.a floating point library, giving you the opportunity to use either the libgcc implementation or the US Software version. To use the US Software library, include the appropriate call on the GCC command line. To use the libgcc version, you need nothing special; GCC links with libgcc automatically, after all other object files and libraries. fr#coX|rco¦,r¦coHQr#o?fcH #XH The following two kinds of floating point subroutines are useful with GCC. ■ Software implementations of the basic functions (floating-point multiply, divide, add, subtract), for use when there is no hardware floating-point support. When you indicate that no hardware floating point is available (with either of the GCC options, -msoft-float or -mno-fpu), the Fujitsu SPARClite configurations 452 ■ GNUPro Tools for Embedded Systems CYGNUS Compiling for SPARC targets ■ of GCC calls compatible with the US Software GOFAST library. If you do not have this library, you can still use software floating point; libgcc, the auxiliary library distributed with GCC, includes compatible, although slower, subroutines. General-purpose mathematical subroutines, included with implementation of the standard C mathematical subroutine library. See “Mathematical functions (math.h)” in GNUPro Math Library in GNUPro Libraries. H|r6Hrj#6rQr#XH GCC defines the following preprocessor macros for the SPARC configurations. ■ Any SPARC architecture: __sparc__ ■ Any Fujitsu SPARClite architecture for Intel x86 machines: __sparclite86x__ ■ Any Fujitsu SPARClite architecture: __sparclite__ CYGNUS GNUPro Tools for Embedded Systems ■ 453 SPARC, SPARClite development ¦jj#«Qr<fcH #XH The following documentation discusses the Application Binary Interface (ABI) issues for the SPARC or SPARClite processors. ■ “Data type sizes and alignment for the SPARClite” (below) ■ “Calling conventions for SPARClite targets” on page 455 ■ “Register usage for SPARClite targets” on page 455 ■ “Stack frame issues for the SPARClite targets” on page 456 ##«|HcH#o?#fcXojHoQr`HfcH The following table shows the size and alignment for all data types for SPARClite processors. Table 52: SPARClite data types, and their sizes and alignments. Date type Size (bytes) Alignment (bytes) char short int long long long float double pointer 1 byte 2 bytes 4 bytes 4 bytes 8 bytes 4 bytes 8 bytes 4 bytes 1 byte 2 bytes 4 bytes 4 bytes 8 bytes 4 bytes 8 bytes 4 bytes 454 ■ GNUPro Tools for Embedded Systems CYGNUS ABI summary for SPARC, SPARClite targets #ffcoX6ro¨HocroQrfcH#XH The calling convention follows the sparc register windows model. The first six words of integer arguments are passed in the ‘o0’ through ‘o5’ registers, referenced in the callee as the ‘i0’ through ‘i5’ integer arguments. Additional integer arguments are passed on the runtime stack at offset ‘%sp’ +60. Values that are at least 32 bits are aligned to an even word boundary. Integer return values are placed in ‘i0’ through ‘i5’ integer arguments. Structures and unions are returned by setting up an area to receive the values, and setting ‘%sp’ +64 to the address of the area. HXcH¦#XHQrfcH#XH Table 53 shows the register usage for SPARClite targets. Table 53: Register allocation for SPARClite targets Register type Allocation Volatile registers r2, r3, r4, r5, r6, r7, r12, r13 Saved registers r1, r14, r8, r9, r10, r11 Accumulators a0, a1 Table 54 shows the register usage for SPARClite targets. Table 54: Register usage for SPARClite targets Register Usage %g0 %g1 through %g4 %g5 %g6 through %g7 %o0 through %o5 %o6 %o7 %l0 through %l7 %i0 through %i5 %i6 through %i7 %i6 Holds constant 0 Free global registers for application usage Available for application use Reserved for the kernel Input/output registers (for function calls made from this function) Stack pointer Return address Local registers Input/output registers (for this function call) Functions do not have to preserve value for the caller Frame pointer From the caller’s point of view, the following registers are volatile when doing a call (that is, the content of these registers cannot be assumed to be preserved across the call): %o0 through %o5, %y, and %g1 through %g4. CYGNUS GNUPro Tools for Embedded Systems ■ 455 SPARC, SPARClite development #6eQ#jHc¦HQr`HfcH#XH The following stack frame issues are specific to the SPARClite processors. ■ The stack grows downwards from high addresses to low addresses. ■ A leaf function need not allocate a stack frame if it doesn’t need one. ■ A frame pointer need not be allocated. ■ The stack pointer shall always be aligned to 8 byte boundaries. See Figure 21, “SPARClite stack frames for functions that take a fixed number of arguments,” on page 456 for settings for SPARClite targets. Figure 21: SPARClite stack frames for functions that take a fixed number of arguments Before call: After call: High memory arguments 7 ... arguments 7 ... spill for arguments 1-6. spill for arguments 1-6. struct return ptr struct return ptr register window save area (16*4) prev reg window save area (16*4) SP FP temporary space as required space for maximum args outgoing (minimum = 6) omitted for leaf functions struct return ptr Low memory 456 ■ GNUPro Tools for Embedded Systems register window save area (16*4) SP CYGNUS Assembler options for SPARC, SPARClite targets Hj,fHr|croQr< fcH#XH To use the GNU assembler, to assemble GCC output, configure GCC with the --with-gnu-as or the -mgas option. The syntax is based on the BSD 4.2 assembler. For information about the SPARC assembler, see SPARC Architecture, Assembly Language Programming (Richard D. Paul, Prentice Hall). For information about the SPARC instruction set, see The SPARC Architecture Manual: Version 8 (SPARC International, Inc, Prentice Hall). The following assembler options are for the SPARC target processors. -mgas Compile using the GNU assembler to assemble GCC output. -Wa If you invoke the GNU assembler through the GNU C compiler (version 2), you can use the -Wa option to pass arguments through to the assembler. One common use of this option is to exploit the assembler’s listing features. Assembler arguments that you specify with gcc -Wa must be separated from each other (and the -Wa) by commas, like the options, -alh and -L, in the following example input, separate from -Wa. sparc-coff-gcc -c -g -O -Wa,-alh, -L file.c -L The additional assembler option, -L, preserves local labels, which may make the listing output more intelligible to humans. For example, in the following commandline, the assembler option ,-ahl, requests a listing with interspersed high-level language and assembly language. sparc-coff-gcc -c -g -O -Wa,-alh,-L file.c -L preserves local labels, while the compiler debugging option, -g, gives the assembler the necessary debugging information. The following assembler options are for the SPARClite target processors. --little-endian-data Selects little endian data and big endian instructions to be output at runtime. The default is big endian data with big endian instructions. CYGNUS GNUPro Tools for Embedded Systems ■ 457 SPARC, SPARClite development Hj,fHr|croQrfccoXr¦|¦Qr< fcH#XH Use the following options to enable listing output from the assembler. The letters after ‘-a’ may be combined into one option, such as ‘-al’. -a By itself, ‘-a’ requests listings of high-level language source, assembly language, and symbols. -ah Requests a high-level language listing. -al Request an output-program assembly listing. -as Requests a symbol table listing. -ad Omits debugging directives from listing. High-level listings require a compiler debugging option like -g, and assembly listings (such as -al) requested. 458 ■ GNUPro Tools for Embedded Systems CYGNUS Assembler options for SPARC, SPARClite targets Hj,fHfccoXa6rorf?cH6c¨HQr< fcH#XH Use the following listing-control assembler directives to control the appearance of the listing output (if you do not request listing output with one of the ‘-a’ options, the following listing-control directives have no effect). .list Turn on listings for further input. .nolist Turn off listings for further input. .psize linecount, columnwidth Describe the page size for your output (the default is 60, 200). gas generates form feeds after printing each group of linecount lines. To avoid these automatic form feeds, specify 0 as linecount. The variable input for columnwidth uses the same descriptive option. .eject Skip to a new page (issue a form feed). .title Use as the title (this is the second line of the listing output, directly after the source file name and page number) when generating assembly listings. .sbttl Use as the subtitle (this is the third line of the listing output, directly after the title line) when generating assembly listings. -an Turn off all forms processing. CYGNUS GNUPro Tools for Embedded Systems ■ 459 SPARC, SPARClite development #ffcoX6ro¨HocroQr#o?fcH #XH The SPARC passes the first six words of arguments in registers R8 through R13. All remaining arguments are stored in a reserved block on the stack, last to first, so that the lowest numbered argument not passed in a register is at the lowest address in the stack. The registers are always filled, so a double word argument starting in R13 would have the most significant word in R13 and the least significant word on the stack. Function return values are stored in R8. Register R0 is hardwired so that it always has the value 0. R14 and R15 have reserved uses. Registers R1 through R7 can be used for temporary values. When a function is compiled with the default options, it must return with registers R16 through R29 unchanged. NOTE: Functions compiled with different calling conventions cannot be run together without some care. 460 ■ GNUPro Tools for Embedded Systems CYGNUS Linker usage for SPARC, SPARClite usage coeH¦#XHQr<fcH ¦#XH The following documentation describes SPARC-specific features of the GNUPro linker. For a list of available generic linker options, see “Linker scripts” on page 261 in Using ld in GNUPro Utilities. There are no SPARC-specific command-line linker options. The GNU linker uses a linker script to determine how to process each section in an object file, and how to lay out the executable. The linker script is a declarative program consisting of a number of directives. For instance, the ‘ ENTRY()’ directive specifies the symbol in the executable that will be the executable’s entry point. CYGNUS GNUPro Tools for Embedded Systems ■ 461 SPARC, SPARClite development coeH6c|Qr`H<fcH#XH The following ‘elfsim.ld’ linker script links programs for running on a simulator. /* Linker script for running ELF programs in the Sparc simulator */ OUTPUT_FORMAT("elf32-sparc", "elf32-sparc", "elf32-sparc") OUTPUT_ARCH(sparc) STARTUP(traps.o) INPUT(erc32-crt0.o) ENTRY(trap_table) GROUP(-lc -lerc32 -lgcc) /* -lerc32 used to be -lsim */ SEARCH_DIR(.) /* Do we need any of these for elf? __DYNAMIC = 0; */ /* * The memory map looks like this: * +--------------------+ <- low memory * | .text | * | _stext | * | _etext | * | ctor list | the ctor and dtor lists are for * | dtor list | C++ support * | _end_text | * +--------------------+ * | .data | initialized data goes here * | _sdata | * | _edata | * +--------------------+ * | .bss | * | __bss_start | start of bss, cleared by crt0 * | _end | start of heap, used by sbrk() * +--------------------+ * | heap space | * | _ENDHEAP | * | stack space | * | __stack | top of stack * +--------------------+ <- high memory */ /* * User modifiable values: * * _CLOCK_SPEED in Mhz (used to program the counter/timers) * * _PROM_SIZE size of PROM (permissible values are 4K, 8K, 16K 462 ■ GNUPro Tools for Embedded Systems CYGNUS Linker usage for SPARC, SPARClite usage * 32K, 64K, 128K, 256K, and 512K) * _RAM_SIZE size of RAM (permissible values are 256K, 512K, * 1MB, 2Mb, 4Mb, 8Mb, 16Mb, and 32Mb) * * These symbols are only used in assembler code, so they only need to * be listed once. They should always be refered to without SYM(). */ _CLOCK_SPEED = 10; _PROM_SIZE = 4M; _RAM_SIZE = 256K; _RAM_START = 0x02000000; _RAM_END = _RAM_START + _RAM_SIZE; _STACK_SIZE = (16 * 1024); _PROM_START = 0x00000000; _PROM_END = _PROM_START + _PROM_SIZE; /* * Base address of the on-CPU peripherals */ _ERC32_MEC = 0x01f80000; /* * Setup the memory map for the SIS simulator. * stack grows up towards low memory. */ /* MEMORY { rom : ORIGIN = 0x00000000, LENGTH = 4M ram (rwx) : ORIGIN = 0x02000000, LENGTH = 2M } */ __stack = _RAM_START + _RAM_SIZE - 4 * 16; __trap_stack = (_RAM_START + _RAM_SIZE - 4 * 16) - _STACK_SIZE; SECTIONS { /* Read-only sections, merged into text segment: */ /* . = 0x2000000 + SIZEOF_HEADERS; */ . = 0x2000000; .interp CYGNUS : { *(.interp) } GNUPro Tools for Embedded Systems ■ 463 SPARC, SPARClite development .hash : { *(.hash)} .dynsym : { *(.dynsym)} .dynstr : { *(.dynstr)} .gnu.version : { *(.gnu.version)} .gnu.version_d : { *(.gnu.version_d)} .gnu.version_r : { *(.gnu.version_r)} .rel.text : { *(.rel.text) *(.rel.gnu.linkonce.t*) } .rela.text : { *(.rela.text) *(.rela.gnu.linkonce.t*) } .rel.data : { *(.rel.data) *(.rel.gnu.linkonce.d*) } .rela.data : { *(.rela.data) *(.rela.gnu.linkonce.d*) } .rel.rodata : { *(.rel.rodata) *(.rel.gnu.linkonce.r*) } .rela.rodata : { *(.rela.rodata) *(.rela.gnu.linkonce.r*) } .rel.got : { *(.rel.got)} .rela.got : { *(.rela.got)} .rel.ctors : { *(.rel.ctors)} .rela.ctors : { *(.rela.ctors)} .rel.dtors : { *(.rel.dtors)} .rela.dtors : { *(.rela.dtors)} .rel.init : { *(.rel.init)} .rela.init : { *(.rela.init)} .rel.fini : { *(.rel.fini)} .rela.fini : { *(.rela.fini)} .rel.bss : { *(.rel.bss)} .rela.bss : { *(.rela.bss)} .rel.plt : { *(.rel.plt)} .rela.plt : { *(.rela.plt)} .init : { *(.init)} =0 .text : { *(.text) *(.stub) /* .gnu.warning sections are handled specially by elf32.em. */ *(.gnu.warning) *(.gnu.linkonce.t*) } =0 _etext = .; PROVIDE (etext = .); .fini : { *(.fini) } =0 .rodata : { *(.rodata) *(.gnu.linkonce.r*) } .rodata1 : { *(.rodata1) } /* Adjust the address for the data segment. We want to adjust up to the same address within the page on the next page up. */ 464 ■ GNUPro Tools for Embedded Systems CYGNUS Linker usage for SPARC, SPARClite usage . = ALIGN(0x10000) + (. & (0x10000 - 1)); .data : { *(.data) *(.gnu.linkonce.d*) CONSTRUCTORS } .data1 : { *(.data1) } .ctors : { *(.ctors) } .dtors : { *(.dtors) } .plt : { *(.plt)} .got : { *(.got.plt) *(.got) } .dynamic : { *(.dynamic) } /* We want the small data sections together, so single-instruction offsets can access them all, and initialized data all before uninitialized, so we can shorten the on-disk segment size. */ .sdata : { *(.sdata) } _edata = .; PROVIDE (edata = .); . = ALIGN(0x8); __bss_start = .; .sbss : { *(.sbss) *(.scommon) } .bss : { *(.dynbss) *(.bss) *(COMMON) } . = ALIGN(32 / 8); _end = . ; PROVIDE (end = .); /* Stabs debugging sections. */ .stab 0 : { *(.stab) } .stabstr 0 : { *(.stabstr) } .stab.excl 0 : { *(.stab.excl) } .stab.exclstr 0 : { *(.stab.exclstr) } .stab.index 0 : { *(.stab.index) } .stab.indexstr 0 : { *(.stab.indexstr) } .comment 0 : { *(.comment) } /* DWARF debug sections. CYGNUS GNUPro Tools for Embedded Systems ■ 465 SPARC, SPARClite development Symbols in the DWARF debugging sections are relative to the beginning of the section so we begin them at 0. */ /* DWARF 1 */ .debug 0 : { *(.debug) } .line 0 : { *(.line) } /* GNU DWARF 1 extensions */ .debug_srcinfo 0 : { *(.debug_srcinfo) } .debug_sfnames 0 : { *(.debug_sfnames) } /* DWARF 1.1 and DWARF 2 */ .debug_aranges 0 : { *(.debug_aranges) } .debug_pubnames 0 : { *(.debug_pubnames) } /* DWARF 2 */ .debug_info 0 : { *(.debug_info) } .debug_abbrev 0 : { *(.debug_abbrev) } .debug_line 0 : { *(.debug_line) } .debug_frame 0 : { *(.debug_frame) } .debug_str 0 : { *(.debug_str) } .debug_loc 0 : { *(.debug_loc) } .debug_macinfo 0 : { *(.debug_macinfo) } /* SGI/MIPS DWARF 2 extensions */ .debug_weaknames 0 : { *(.debug_weaknames) } .debug_funcnames 0 : { *(.debug_funcnames) } .debug_typenames 0 : { *(.debug_typenames) } .debug_varnames 0 : { *(.debug_varnames) } /* These must appear regardless of . */ } 466 ■ GNUPro Tools for Embedded Systems CYGNUS Debugging SPARC and SPARClite targets H,¦XXcoX#o?fcH #XH The SPARC-configured GDB is called by sparc-coff-gdb or sparc-aout-gdb declarations. The SPARClite-configured GDB is called by sparclite-coff-gdb or sparclite-aout-gdb declarations. GDB needs to know the following specifications to associate with your SPARC or Fujitsu SPARClite targets. ■ Specifications for what you want to use one, such as target remote, GDB’s generic debugging protocol. ■ Specifications for what serial device connects your SPARC board (the first serial device available on your host is the default). ■ Specifications for what speed to use over the serial device. Use the following GDB commands to specify the connection to your target board. target sparclite serial-device To run a program on the board, start up GDB with the name of your program as the argument. To connect to the board, use the following command. target interface serial-device interface is an interface from the previous list of specifications and serial-device is the name of the serial port connected to the board. If the program has not already been downloaded to the board, you may use the load command to download it. You can then use all the usual GDB commands. For example, the following sequence connects to the target board through a serial port, and loads and runs programs, designated here as prog, through GDB. (gdb) target sparclite com1 [SPARClite appears to be alive] breakinst () ../sparc-stub.c:975 975 } (gdb) s main () hello.c:50 50 writer(1, “Got to here\n”); (gdb) target sparclite hostname: portnumber You can specify a TCP/IP connection instead of a serial port, using the syntax, hostname: portnumber (assuming your board, designated here as hostname, is CYGNUS GNUPro Tools for Embedded Systems ■ 467 SPARC, SPARClite development connected, for instance, to use a serial line, designated by portnumber, managed by a terminal concentrator). GDB also supports set remotedebug n. You can see some debugging information about communications with the board by setting the variable, remotedebug. 468 ■ GNUPro Tools for Embedded Systems CYGNUS Loading on specific targets for SPARC, SPARClite r#?coXro|H6cQc6#XHQr< fcH The SPARC eval boards use a host-based terminal program to load and execute programs on the target. This program, pciuh, replaced the earlier ROM monitor, which had the shell in the ROM. To use the GDB remote serial protocol to communicate with a Fujitsu SPARClite board, link your programs with the “stub” module, sparc-stub.c; this module manages the communication with GDB. See “The GDB remote serial protocol” on page 158 in Debugging with GDB in GNUPro Debugging Tools for more details. CYGNUS GNUPro Tools for Embedded Systems ■ 469 SPARC, SPARClite development 470 ■ GNUPro Tools for Embedded Systems CYGNUS 16 r`c,# p?H¨Hfr|jHo The following documentation discusses developing with the TX39 processor. ■ “Compiler issues for TX39 targets” on page 474 ■ “ABI issues for the Toshiba TX39 targets” on page 475 ■ “Assembler issues for TX39 targets” on page 482 ■ “Linker issues for TX39 targets” on page 484 ■ “Debugger issues for TX39 targets” on page 490 ■ “Simulator issues for TX39 targets” on page 491 GNUPro Toolkit allows development for Toshiba’s TX39 processor with the compiler, interactive debugger, the utilities and the libraries; debugger and linker support is also available for the JMR-TX3904 evaluation board. For the hosts and targets to use with the Toshiba TX39, see “Hosts and targets for Toshiba TX39 processors” on page 473. For the Windows 95/NT systems, the libraries install in different locations, and require the following environmental settings; the input assumes the tools are in C:\CYGNUS. <yymmdd> signifies the current release. SET SET SET REM SET CYGNUS PROOT=C:\cygnus\tx39-<yymmdd> PATH=%PROOT%\H-i386-cygwin32\BIN;%PATH% INFOPATH=%PROOT%\info Set TMPDIR to point to a ramdisk if you have one TMPDIR=%PROOT% GNUPro Tools for Embedded Systems ■ 471 Toshiba TX39 development Cross-development tools in GNUPro Toolkit normally have names that reflect the target processor and the object file format output by the tools. This makes it possible to install more than one set of tools in the same binary directory, including both native and cross-development tools. The complete tool name is a four-part hyphenated string. For example, the GCC compiler for the Toshiba TX39 is ‘mips-tx39-elf-gcc’. The first part indicates the processor family (‘mips’). The second part indicates the processor (‘tx39’). The third part indicates the file format output by the tool (‘elf’) since the TX39 tools support the ELF object file format. The fourth part is the generic tool name (for instance, ‘gcc’). The binaries for a Windows 95/NT hosted toolchain install with the ‘.exe’ suffix. However, there is no need to specify the ‘.exe’ when running the tools; see Table 55 for the tools that the TX39 processor can use, along with the names for usage. Table 55: .GNUPro supported tools for TX39 targets Tool description GNUPro compiler (gcc) GNUPro C++ compiler (g++) GNUPro assembler (gas, or as) Java compiler (gcj) GNUPro linker (ld) Standalone simulator GNU binary utilities (ar, nm, objcopy, objdump, ranlib, size, strings and strip) GNUPro debugger (gdb) 472 ■ GNUPro Tools for Embedded Systems Tool name mips-tx39-elf-gcc mips-tx39-elf-c++ mips-tx39-elf-as mips-tx39-elf-gcj mips-tx39-elf-ld mips-tx39-elf-run mips-tx39-elf-ar mips-tx39-elf-nm mips-tx39-elf-objcopy mips-tx39-elf-objdump mips-tx39-elf-ranlib mips-tx39-elf-size mips-tx39-elf-strings mips-tx39-elf-strip mips-tx39-elf-gdb CYGNUS r#o?#XHQrr`c,# p|r6Hr GNUPro tools have support for use with the TX39 processor from the hosts shown in Table 56. Table 56: Hosts for TX39 processors Host Vendor SunOS 4.1.4 (SPARC) Solaris 2.5.1-2.6 (SPARC) Windows NT (x86) Windows 95 (x86) Sun Sun Microsoft Microsoft For information specific to the TX39 processor, see Chapter 4, System V Application Binary Interface (Prentice Hall, 1990.). To produce S-records, use the GNU linker (see Using ld in GNUPro Utilities) or ‘objcopy’ (see Using binutils in GNUPro Utilities). TX39 targets can port to the following targets which run in big-endian mode. ■ GNUPro Instruction Set simulator ■ JMR-TX3904 evaluation board The board has two serial ports, one on the front panel and one near the back of the board. The JMR-TX3904 board is a PCI card. It can get power through either a PCI card-edge connector or a small 4-pin power connector on the front corner of the board. This power connector is not a standard PC power connector even though it looks like one. Use the following guidelines for a serial connection. 1. Connect the serial port. The board has two serial ports, one on the front panel (not used by the CygMon ROM monitor) and one near the back of the board (the board labeled ‘PJ1’ is the port used by the GDB loader stub; this port connects to the ribbon cable that comes with the board, which converts the 10-pin header connector to a 9-pin male DB-style connector). This connector requires a null modem cable to communicate with a standard PC COM port, which communicates at 38400 baud/8 databits/1 stopbit/no parity. 2. Test the serial connection. Run a terminal-emulator such as Kermit, Terminal or HyperTerminal on Windows NT computers. Configure the terminal emulator to use the serial port to which the serial cable attaches, and set the baud rate to 38400. You should see a ‘cygmon>’ prompt (signifying the CygMon (Cygnus ROM Monitor) when you press Enter. If no prompt is evident, check the cables and connectors. A breakout box may be used to determine if the cables are correct. CYGNUS GNUPro Tools for Embedded Systems ■ 473 Toshiba TX39 development rj|cfHc¦HQr p#XH The following documentation describes TX39-specific features of the GNUPro compiler. For a list of available generic compiler options, see “GNU CC command options” on page 67 and “Option summary for GCC” on page 69 in Using GNU CC in GNUPro Compiler Tools. In addition, the following TX39-specific command-line options are supported: -msoft-float This option is on by default. It causes the compiler to generate output containing library calls for floating point operations. There are no TX39-specific attributes. See “Declaring attributes of functions” on page 234 and “Specifying attributes of variables” on page 243 in Using GNU CC in GNUPro Compiler Tools for more information. The compiler supports the following preprocessor symbols: __mips__ __R3000__ Each of these is always defined. __MIPSEB__ For the endian compilation mode. __mips_soft_float For the floating point compilation mode. 474 ■ GNUPro Tools for Embedded Systems CYGNUS ABI issues for the Toshiba TX39 targets c¦HQr`Hr`c,# p#XH The following documentation describes the MIPS EABI, to which the TX39 tools adhere by default. ■ “Data type sizes and alignments for TX39 targets” (below) ■ “Subroutine calls for the TX39” on page 476 ■ “Parameter assignment to registers for TX39 targets” on page 479 ■ “Structure passing for TX39 targets” on page 480 ■ “Varargs handling for TX39 targets” on page 480 ■ “Function return values for TX39 targets” on page 481 ##«|HcH#o?#fcXojHoQr p#XH Table 57 shows the size and alignment for all data types. The following attributes also apply to the TX39 processor. ■ Alignment within aggregates (structs and unions) uses the sizes shown in Table 57, with padding added if needed ■ Aggregates have alignment equal to that of their most aligned member ■ Aggregates have sizes which are a multiple of their alignment Table 57: Data type sizes and alignment Type Size (bytes) 1 byte short 2 bytes int 4 bytes unsigned 4 bytes long 4 bytes long long 8 bytes float 4 bytes double 8 bytes pointer 4 bytes char CYGNUS Alignment (bytes) 1 byte 2 bytes 4 bytes 4 bytes 4 bytes 8 bytes 4 bytes 8 bytes 4 bytes GNUPro Tools for Embedded Systems ■ 475 Toshiba TX39 development ¦,r¦coH6#ffQr`H p For the calling conventions for subroutine calls, see Table 58 for parameter registers for passing parameters and Table 59 for other register usage. The following usage also applies to the TX39 processor. ■ General-purpose and floating point parameter registers are allocated independently. ■ Structures that are less than or equal to 32 bits are passed as values. ■ Structures that are greater than 32 bits are passed as pointers. Table 58: Parameter registers for TX39 targets Parameter registers General-purpose Floating point r4 through r11 f12 through f19 Table 59: Register usage for TX39 targets Register usage Fixed 0 value Volatile Non-volatile Kernel reserved General purpose (SDA base) Stack pointer Frame pointer Return address r0 r1 through r15, r24, r25 r16 through r23, r30 r26, r27 r28 r29 r30 (if needed) r31 476 ■ GNUPro Tools for Embedded Systems CYGNUS ABI issues for the Toshiba TX39 targets `H#6eQ#jHc¦HQr p#XH The following documentation describes the TX39 stack frame. ■ The stack grows downwards from high addresses to low addresses. ■ A leaf function need not allocate a stack frame if it does not need one. ■ A frame pointer need not be allocated. ■ The stack pointer shall always be aligned to 8 byte boundaries. See Figure 22 for settings for functions that take a fixed number of arguments. See Figure 23 for settings for functions that take a variable number of arguments. Figure 22: TX39 stack frames for functions that take a fixed number of arguments Before call: High memory After call: local variables, register save area, etc. local variables, register save area, etc. reserved space for largest argument list arguments on stack SP, FP register save area local variables FP alloca allocations Low memory reserved space for largest argument list SP* * If no ‘alloca’ region, the frame pointer (FP) points to the same place as the stack pointer (SP). CYGNUS GNUPro Tools for Embedded Systems ■ 477 Toshiba TX39 development Figure 23: TX39 stack frames for functions that take a variable number of arguments Before call: High memory After call: local variables, register save area, etc. local variables, register save area, etc. reserved space for largest argument list arguments on stack SP, FP save area for anonymous parms passed in registers (the size of this area may be zero) register save area local variables FP alloca allocations Low memory SP * reserved space for largest argument list * If no ‘alloca’ region, the frame pointer (FP) points to the same place as the stack pointer (SP). 478 ■ GNUPro Tools for Embedded Systems CYGNUS ABI issues for the Toshiba TX39 targets ##jHH#cXojHorHXcHQr p#XH Consider the parameters in a function call as ordered from left (first parameter) to right. In the following algorithm, ‘FR’ contains the number of the next available floating-point register (or register pair for modes in which floating-point registers hold only 32 bits). ‘GR’ contains the number of the next available general-purpose register. ‘STARG’ is the address of the next available stack parameter word. INITIALIZE Set ‘GR=r4’, ‘FR=f12’, and ‘STARG’ to point to parameter word 1. SCAN If there are no more parameters, terminate. Otherwise, select one of the following depending on the type of the next parameter: DOUBLE or FLOAT, SIMPLE ARG, LONG LONG in 32-bit mode, or STACK. DOUBLE or FLOAT If ‘FR > f19’, go to ‘STACK’. Otherwise, load the parameter value into the ‘FR’ floating-point register and advance ‘FR’ to the next floating-point register (or register pair in 32-bit mode). Then go to ‘SCAN’. SIMPLE ARG A SIMPLE ARG is one of the following types: ■ One of the simple integer types which will fit into a general-purpose register ■ A pointer to an object of any type ■ A struct or union small enough to fit in a register ■ A larger struct or union, which shall be treated as a pointer to the object or to a copy of the object; for when copies are made, see “Structure passing for TX39 targets” on page 480. If ‘GR > r11’, go to ‘STACK’. Otherwise, load the parameter value into general-purpose register ‘GR’ and advance ‘GR’ to the next general-purpose register. Values shorter than the register size are sign-extended or zero-extended depending on whether they are signed or unsigned. Then go to ‘SCAN’. LONG LONG in 32-bit mode If ‘GR > r10’, go to ‘STACK’. Otherwise, if ‘GR’ is odd, advance ‘GR’ to the next register. Load the 64-bit ‘long long’ value into register pair ‘GR’ and ‘GR+1’. Advance ‘GR’ to ‘GR+2’ and go to ‘SCAN’. STACK Parameters not otherwise handled in the previous discussions for register assignments are passed in the parameter words of the caller’s stack frame. CYGNUS GNUPro Tools for Embedded Systems ■ 479 Toshiba TX39 development SIMPLE ARGs, as previously defined, have size and alignment equal to the size of a general-purpose register, with simple argument types shorter than this sign- or zero-extended to this width. Float arguments have size and alignment equal to the size of a floating-point register. In 64-bit mode, floats are stored in the low-order 32 bits of the 64-bit space allocated to them. ‘double’ and ‘long long’ are considered to have 64-bit size and alignment. Round ‘STARG’ up to a multiple of the alignment requirement of the parameter and copy the argument byte-for-byte into ‘STARG’, ‘STARG+1’, on up to ‘STARG+size-1’. Set ‘STARG’ to ‘STARG+size’ and go to ‘SCAN’. ¦6¦H|#coXQr p#XH Code that passes structures and unions by value implements in a special manner. (In further discussions, “struct” will refer to structs and unions.) Structs small enough to fit in a register pass by value in a single register or in a stack frame slot the size of a register. Larger structs are handled by passing the address of the structure. In this case, a copy of the structure will be made if necessary in order to preserve the pass-by-value semantics. Copies of large structs use the rules in Table 60. Table 60: Struct rules fior TX39 processors Parameter type ANSI mode K&R mode Normal param Callee copies if needed Caller copies Varargs (...) param Caller copies Caller copies In the case of normal (non-varargs) large-struct parameters in ANSI mode, the callee is responsible for producing the same effect as if a copy of the structure were passed, preserving the pass-by-value semantics. This may be accomplished by having the callee make a copy, but in some cases the callee may be able to determine that a copy is not necessary in order to produce the same results. In such cases, the callee may choose to avoid making a copy of the parameter. ##X`#o?fcoXQr p#XH No special changes are needed for handling varargs parameters other than the caller knowing that a copy is needed on struct parameters larger than a register (see discussion with “Structure passing for TX39 targets” about copying). The varargs macros set up a two-part register save area, one part for the general-purpose registers and one part for floating-point registers, maintaining separate pointers for these two areas and for the stack parameter area. The register save area lies between the caller and callee stack frame areas. In the case of software floating-point, only save the general-purpose registers. Because the save area lies between the two stack frames, the saved register parameters 480 ■ GNUPro Tools for Embedded Systems CYGNUS ABI issues for the Toshiba TX39 targets are contiguous with parameters passed on the stack to simplify the varargs macros. Only one pointer is necessary, advancing from the register save area into the caller’s stack frame. ¦o6croH¦o¨#f¦HQr p#XH Data types and register usage use the return values shown in Table 61. Structures and unions that will fit into two general-purpose registers return in ‘r2’ or, if necessary, in ‘r2’ and ‘r3’ registers. They align within the register according to the endianness of the processor; for example, on a big-endian processor the first byte of the struct is returned in the most significant byte of ‘r2’, while on a little-endian processor the first byte is returned in the least significant byte of ‘r2’. The caller handles larger structures and unions, by passing, as a hidden first argument, a pointer to space allocated to receive the return value. Table 61: Function return values for TX39 processors Type Register int short long long long float double CYGNUS r2 r2 r2 r2 through r3 (32-bit mode) f0 f0 through f1 (32-bit mode) GNUPro Tools for Embedded Systems ■ 481 Toshiba TX39 development Hj,fHc¦HQr p#XH The following documentation describes TX39-specific features of the GNUPro assembler. ■ “Register names for TX39 targets” (below) ■ “Assembler directives for TX39 targets” on page 483 For a list of available generic assembler options, see “Command-line options” on page 21 in Using as in GNUPro Utilities. For information about the MIPS instruction set, see MIPS RISC Architecture, (Kane and Heindrich, Prentice-Hall); for an overview of MIPS assembly conventions, see “Appendix D: Assembly Language Programming” in the same volume. HXcHo#jHQr p#XH There are 32 64-bit general (integer) registers, named ‘$0 through $31’. There are 32 64-bit floating-point registers, named ‘$f0 through $f31’. The symbols ‘$0’ through ‘$31’ refer to the general-purpose registers. See Table 62 for the symbols used as aliases for individual registers. Table 62: Symbol aliases for registers Symbol Register $at $kt0 $kt1 $gp $sp $fp $1 $26 $27 $28 $29 $30 482 ■ GNUPro Tools for Embedded Systems CYGNUS Assembler issues for TX39 targets Hj,fH?cH6c¨HQr p#XH The following list shows the TX39 assembler directives. .abicalls .abort .aent .align .appfile .appline .ascii .asciiz .asciz .balign .balignl .balignw .bgnb .bss .byte .comm .common .common.s .cpadd .cpload .cprestore .data .dc .dc.b .dc.d .dc.l .dc.s .dc.w .dc.x .dcb CYGNUS .dcb.b .dcb.d .dcb.l .dcb.s .dcb.w .dcb.x .debug .double .ds .ds.b .ds.d .ds.l .ds.p .ds.s .ds.w .ds.x .dword .eject .else .elsec .end .endb .endc .endif .ent .equ .equiv .err .exitm .extern .fail .file .fill .float .fmask .format .frame .global .globl .gpword .half .hword .if .ifc .ifdef .ifeq .ifeqs .ifge .ifgt .ifle .iflt .ifnc .ifndef .ifne .ifnes .ifnotdef .include .insn .int .irep .irepc .irp .irpc .lcomm .lflags .linkonce .list .livereg .llen .loc .long .lsym .macro .mask .mexit .mri .name .noformat .nolist .nopage .octa .offset .option .org .p2align .p2alignl .p2alignw .page .plen .print .psize .purgem .quad .rdata .rep .rept .rva .sbttl .sdata .set .short .single .skip .space .spc .stabd .stabn .stabs .string .struct .text .title .ttl .verstamp .word .xcom .xdef .xref .xstabs .zero GNUPro Tools for Embedded Systems ■ 483 Toshiba TX39 development coeHc¦HQr p#XH The following documentation describes TX39-specific features of the GNUPro linker. For available generic linker options, see “Linker scripts” on page 261 in Using ld in GNUPro Utilities. There are no TX39-specific command-line linker options. coeH6c|Qr p#XH There are two linker scripts for the JMR3904, the ‘jmr3904app.ld’ script and the ‘jmr3904dram.ld’ script. The first addresses the standard SRAM that comes with the board used in the tutorial examples. In order to execute programs that are larger than what can run in the 512 Kb of SRAM that is standard on the JMR-TX3904 board, an alternative ‘jmr3904dram.ld’ linker script is included. This script will load the program in the memory mapped to the optional DRAM; a 72-pin SIMM module (up to 16 Mb) must be properly installed on the JMR-TX3904 board in order for the program to execute in this case. ‘-Tjmr3904dram.ld’ is the option for using this linker script. /* Linker script for jmr3904app.ld forJMR 3904 board */ ENTRY(_start) OUTPUT_ARCH("mips:3000") OUTPUT_FORMAT("elf32-bigmips", "elf32-bigmips", "elf32-littlemips") GROUP(-lc -ljmr3904 -lgcc -lgcjcoop) SEARCH_DIR(.) __DYNAMIC = 0; PROVIDE (_mem_size = 0x100000); /* JMR3904 comes as standard with 512k of RAM */ /* PROVIDE (__global = 0); */ /* * Initalize some symbols to be zero so we can reference them * in the crt0 without core dumping. These functions are all * optional, but we do this so we can have our crt0 always use * them if they exist. * This is so BSPs work better when using the crt0 installed * with gcc. * We have to initalize them twice, so we multiple object file * formats, as some prepend an underscore. */ PROVIDE (hardware_init_hook = 0); PROVIDE (software_init_hook = 0); SECTIONS 484 ■ GNUPro Tools for Embedded Systems CYGNUS Linker issues for TX39 targets { */ . = 0x88000000; /* This is NOT the address which fits with the monitor from jmr. */ /* It fits the Cygmon ROMS */ .text : { _ftext = . ; *(.init) eprol = .; *(.text) *(.mips16.fn.*) *(.mips16.call.*) PROVIDE (__runtime_reloc_start = .); *(.rel.sdata) PROVIDE (__runtime_reloc_stop = .); *(.fini) etext = .; _etext = .; } . = .; .rdata : { *(.rdata) } _fdata = ALIGN(16); .data : { *(.data) CONSTRUCTORS } . = ALIGN(8); _gp = . + 0x8000; __global = _gp; .lit8 : { *(.lit8) } .lit4 : { *(.lit4) } .sdata : { *(.sdata) } . = ALIGN(4); edata = .; _edata = .; _fbss = .; .sbss : { *(.sbss) *(.scommon) CYGNUS GNUPro Tools for Embedded Systems ■ 485 Toshiba TX39 development } .bss : { _bss_start = . ; *(.bss) *(COMMON) } end = .; _end = .; /* DWARF debug sections. Symbols in the DWARF debugging sections are relative to the beginning of the section so we begin them at 0. */ /* DWARF 1 */ .debug .line 0 : { *(.debug) } 0 : { *(.line) } /* GNU DWARF 1 extensions */ .debug_srcinfo 0 : { *(.debug_srcinfo) } .debug_sfnames 0 : { *(.debug_sfnames) } /* DWARF 1.1 and DWARF 2 */ .debug_aranges 0 : { *(.debug_aranges) } .debug_pubnames 0 : { *(.debug_pubnames) } /* DWARF 2 */ .debug_info .debug_abbrev .debug_line .debug_frame .debug_str .debug_loc .debug_macinfo 0 0 0 0 0 0 0 : : : : : : : { { { { { { { *(.debug_info) } *(.debug_abbrev) } *(.debug_line) } *(.debug_frame) } *(.debug_str) } *(.debug_loc) } *(.debug_macinfo) } /* SGI/MIPS DWARF 2 extensions */ .debug_weaknames 0 : { *(.debug_weaknames) } .debug_funcnames 0 : { *(.debug_funcnames) } .debug_typenames 0 : { *(.debug_typenames) } .debug_varnames 0 : { *(.debug_varnames) } } The following example shows the ‘jmr3904app.ld’ linker script. /* Linker script for jmr3904app.ld forJMR 3904 board */ ENTRY(_start) OUTPUT_ARCH("mips:3000") OUTPUT_FORMAT("elf32-bigmips", "elf32-bigmips", "elf32-littlemips") 486 ■ GNUPro Tools for Embedded Systems CYGNUS Linker issues for TX39 targets GROUP(-lc -ljmr3904 -lgcc -lgcjcoop) SEARCH_DIR(.) __DYNAMIC = 0; PROVIDE (_mem_size = 0x100000); /* JMR3904 comes as standard with 512k of RAM */ /* PROVIDE (__global = 0); */ /* * Initalize some symbols to be zero so we can reference them * in the crt0 without core dumping. These functions are all * optional, but we do this so we can have our crt0 always use * them if they exist. * This is so BSPs work better when using the crt0 installed * with gcc. * We have to initalize them twice, so we multiple object file * formats, as some prepend an underscore. */ PROVIDE (hardware_init_hook = 0); PROVIDE (software_init_hook = 0); SECTIONS { /* Load everything into DRAM, except for the stack. */ . = 0x88000000; Put stack in SRAM /* This is NOT the address which fits with the monitor from jmr. */ /* It fits the Cygmon ROMS */ .text : { _ftext = . ; *(.init) eprol = .; *(.text) *(.mips16.fn.*) *(.mips16.call.*) PROVIDE (__runtime_reloc_start = .); *(.rel.sdata) PROVIDE (__runtime_reloc_stop = .); *(.fini) etext = .; _etext = .; } . = .; .rdata : { *(.rdata) } _fdata = ALIGN(16); CYGNUS GNUPro Tools for Embedded Systems ■ 487 Toshiba TX39 development .data : { *(.data) CONSTRUCTORS } . = ALIGN(8); _gp = . + 0x8000; __global = _gp; .lit8 : { *(.lit8) } .lit4 : { *(.lit4) } .sdata : { *(.sdata) } . = ALIGN(4); edata = .; _edata = .; _fbss = .; .sbss : { *(.sbss) *(.scommon) } .bss : { _bss_start = . ; *(.bss) *(COMMON) } end = .; _end = .; /* Put stack in SRAM (8 Kb); this size is the same as the stack from the original script (when everything was in SRAM). */ __stack = 0x8000A000; /* DWARF debug sections. Symbols in the DWARF debugging sections are relative to the beginning of the section so we begin them at 0. */ /* DWARF 1 */ .debug .line 0 : { *(.debug) } 0 : { *(.line) } /* GNU DWARF 1 extensions */ .debug_srcinfo 0 : { *(.debug_srcinfo) } .debug_sfnames 0 : { *(.debug_sfnames) } 488 ■ GNUPro Tools for Embedded Systems CYGNUS Linker issues for TX39 targets /* DWARF 1.1 and DWARF 2 */ .debug_aranges 0 : { *(.debug_aranges) } .debug_pubnames 0 : { *(.debug_pubnames) } /* DWARF 2 */ .debug_info .debug_abbrev .debug_line .debug_frame .debug_str .debug_loc .debug_macinfo 0 0 0 0 0 0 0 : : : : : : : { { { { { { { *(.debug_info) } *(.debug_abbrev) } *(.debug_line) } *(.debug_frame) } *(.debug_str) } *(.debug_loc) } *(.debug_macinfo) } /* SGI/MIPS DWARF 2 extensions */ .debug_weaknames 0 : { *(.debug_weaknames) } .debug_funcnames 0 : { *(.debug_funcnames) } .debug_typenames 0 : { *(.debug_typenames) } .debug_varnames 0 : { *(.debug_varnames) } } CYGNUS GNUPro Tools for Embedded Systems ■ 489 Toshiba TX39 development H,¦XXHc¦HQr p#XH The following documentation describes TX39-specific features of the GNUPro debugger. For the available generic debugger options, see Debugging with GDB in GNUPro Debugging Tools. There are no TX39 specific debugger command-line options. There are two ways for GDB to convey to a TX39 target. ■ Simulator: GDB’s built-in software simulation of the TX39 processor allows the debugging of programs compiled for the TX39 without requiring any access to actual hardware. To activate this mode in GDB type ‘target sim’. Then load the code into the simulator by typing ‘load’ and debug it in the normal fashion. ■ Remote target board by serial connection: To connect to the target board in GDB, using the ‘target remote <devicename>’ command, where ‘<devicename>’ will be a serial device such as ‘/dev/ttya’ (Unix) or ‘com2’ (Windows NT). Then load the code onto the target board by using the ‘load’ command at the prompt. After being downloaded, the program can execute. 490 ■ GNUPro Tools for Embedded Systems CYGNUS Simulator issues for TX39 targets cj¦f#rc¦HQr p#XH The following documentation describes TX39-specific features of the GNUPro simulator. The TX39 simulator includes support for 32, 32 bit general-purpose registers. The user program is provided with a single 2Mb block of memory at address ‘0xa0000000’ (shadowed at address ‘0x80000000’). The following general options are supported by the simulator. --help The following example shows how the MIPS-specific options list, when using the ‘--help’ option. mips-tx39-elf-run -–help –-board=jmr3904 Usage: mips-tx39-elf-run [options] program [program args] Options: --dinero-trace [on|off Enable dinero tracing --dinero-file FILE Write dinero trace to FILE --board none|jmr3904|jmr3904pal|jmr3904debug Customize simulation for a particular board. --sockser-addr SOCKET ADDRESS Set serial emulation socket address --hw-info, --info-hw List configurable hw regions --hw-trace [on|off] --trace-hw Trace all hardware devices --hw-device DEVICE Add the specified device --hw-file FILE Add the devices listed in the --board=BOARD Specifies that the simulator be tailored to model a specified hardware board. For the TX39, the ‘--board=jmr3904’ option will add support for the peripherals of the JMR-TX3904 evaluation board, including the TX3904 CPU’s on-board interrupt controller, timers, serial I/O modules, and the board’s actual RAM & ROM memory layouts are matched by the simulator. CYGNUS GNUPro Tools for Embedded Systems ■ 491 Toshiba TX39 development 492 ■ GNUPro Tools for Embedded Systems CYGNUS o?Hª Symbols #include .bss 17 files, with preprocessor 6 .bss section 15, 19 .C 5 .c 5 .data 17, 19 .S 5 .s 5 .text 17 .text section 18 __main 5 __start 13 _bss_start 17 _bss_start and _end 19 _DYNAMIC, for shared dynamic libraries _end 17, 19, 21 ‘/’ for directory paths 34 Numerics 32-bit extender 28 A 7 Access Control Lists a.out CYGNUS 33 18 ANSI C library 35 ANSI C standard calls 28 APCS 101, 107 argv 15 ARM assembler error messages 114 assembler issues 112 attributes 106 compiler issues 101 data type sizes and alignment 107 debugger issues 117 developing with 32-bit, 16-bit CPUs function return values 111 linker issues 115 preprocessor symbols 105 Procedure Calling Standard (APCS) reducing code size 120 register names 113 simulator issues 118 stack frame 108 subroutine calls 108 synthetic instructions 114 as 2 ASCII text 21 assembler 2, 4, 6 97 101 GNUPro Tools for Embedded Systems ■ 493 Index B Berkeley sockets 28 binaries 6 binary utilities 2, 4, 6 binutils 2, 4 breakpoints 8 BSD and SVR4 services bug 16 bug monitor 16 built-in trap handler 16 files, building example 61 allocating a handle 81 ANSI compliance 42 Apache web server 39 binary linking 32 buffers 90 C programming language 43 compatibility 42 configuration 31 console mode applications 56 converting a path 82 converting a POSIX path to a Win32 path converting paths 84 CreateProcess call 35 creators 40 CVS 38 cygcheck 68 cygpath 69 cygwin_conv_to_full_win32_path 83 cygwin_conv_to_win32_path 85 cygwin_detach_dll 86 cygwin_getshared 87 cygwin_internal 88 cygwin_posix_path_list_p 89 cygwin_posix_to_win32_path_list 90 .dll 28 C C language-specific services, for Cygwin with POSIX compliance 43 C library 2, 4, 9 C run-time environment 10 C subroutine library 10 C++ constructors 5 class-specific functions, for Cygwin with POSIX compliance 43 coff file 19 compiler 2, 4, 5 compiler options 293 concatenation macros 13 constructor and destructor tables 17 constructor and destructor tables for G++ 18 CONSTRUCTORS 19 cpp 5 CREATE_OBJECT_SYMBOLS 18 cross-development configurations 10 crt0 (C RunTime 0) file 13 crt0 file 17 crt0 files, multiple 17 crt0, the main startup script 9 crt0.s 11 ctype functions, ANSI/Cygwin compliance 42 CygMon MN10200, MN10300 211 Cygnus Insight 28 cygpath 34 Cygwin 27 494 ■ GNUPro Tools for Embedded Systems 85 cygwin_posix_to_win32_path_list_buf_size 91 cygwin_win32_to_posix_path_list 93 cygwin_win32_to_posix_path_list_buf_size 94 cygwin_winpid_to_pid 95 debugger 58 directory structure 47 DLL’s entry point 61 DLLs, building and using 60 dlltool 60 ENOSYS 44 environment variables 47 file descriptors 37 file utilities 30 fork call 35 global symbols 60 GNU inetutils 38 GNUPro Toolkit Index GNU profile analysis tool 38 GPL 31 group ID 33 GUI mode applications 56 installing the binaries 46 internal data and functions, accessing KerbNet 38 kernel 33 kill 70 library 42 Linux 37 Makefile 56 Microsoft DLLs 39 mkgroup 72 mkpasswd 73 mount 74, 87 mount table 50 mount utility 50 ncurses 38 NuTCracker 40 options, turned off ("no") 48 paths (Win32 and POSIX styles) 33 paths, splitting 92 performance 37 PERL 5 39 POSIX paths 93 POSIX signal requirements 36 POSIX standards 32 POSIX.1 compliance 43 POSIX-style path 89 process IDs 36 ps 78, 87 RCS 38 registry version 50 shared information 87 shell utilities 30 shells 39 signals 36, 70 socket-related calls 37 ssh 38 standards 44 storing inode data 49 CYGNUS 88 Tcl/Tk 8 39 text utilities 30 umount 79 UNC pathnames 33 uninstalling 46 Unix select function 37 Unix standards, matching 30 utilities 67 vim editors 38 Windows resource file 63 windres 63 Winsock DLL 37 X applications 38 X/Open Release 4 39 X11R6 client libraries 38 xemacs and vim editors 38 Cygwin functions 80 Cygwin library 31 Cygwin memory structure 87 Cygwin processes 87 Cygwin utilities 67 CYGWIN variable 47 cygwin_attach_handle_to_fd 81 cygwin_conv_to_full_posix_path 82 cygwin_conv_to_full_win32_path 83 cygwin_conv_to_posix_path 84 cygwin_conv_to_win32_path 85 cygwin_detach_dll 86 cygwin_getshared 87 cygwin_internal 88 cygwin_posix_path_list_p 89 cygwin_posix_to_win32_path_list 90, 91 cygwin_posix_to_win32_path_list_buf_size cygwin_split_path 92 cygwin_win32_to_posix_path_list 93 cygwin_win32_to_posix_path_list_buf_size 91 94 D for assembler 7 D10V ABI 294 addressing modes argument passing -d, 302 297 GNUPro Tools for Embedded Systems ■ 495 Index assembler usage 299 data type sizes and alignment 294 development 292 function return values 298 predefined symbols 301 preprocessor symbols 293 register allocation 295 register names 301 register usage 295 registers 301 size modifiers 299 special characters 300 stack frame 295 sub-instructions 299 data 19 debugger 2, 4 debugging 8 debugging with stubs (subroutines) 8 debugging, low-level 8 debugging, porting to Win32 hosts 29 designers of Cygwin 40 destructor tables 17 Device-specific functions, for Cygwin with POSIX compliance 43 -disassemble 7 DLL, linking against with Cygwin 62 DLLs and Cygwin 28 dlltool 60 dynamic libraries 18 dynamic memory allocation 22 E option 6 EABI, PowerPC 435 embedded development, definition 10 embedded targets 2 embedded targets, using tools with 1 embedded tools 4 exception handler 12 exception handler for breakpoints 8 -E 496 ■ GNUPro Tools for Embedded Systems executable binary image, making exit 16 7 F file extensions 5 Files and directories for Cygwin with POSIX compliance 43 -fno-exceptions 5 fork call 35 FORMAT output-format 7 -fritti 5 Fujitsu SPARClite 449 G 4, 5 2, 4, 5 4 getpd(), for returning value 23 global symbol names 13 global symbols 14 GNU General Public License (GPL) and Cygwin tools 31 GO32 28 GROUP, for loading 18 gas gcc gdb H Hewlett Packard assembler command-line options 126 assembler directives 127 assembler issues 126 assembler syntax 126 compiler issues 124 compiler options 125 floating point 127 floating-point numbers 127 HP/UX 10 linker 124 HP/UX 8 linker 125 HP/UX 9 linker 125 rebuilding objects and libraries 126 SOM and ELF object file formats 126 syntax 126 GNUPro Toolkit Index hex values, printing out in 8 Hitachi crt0.o 133 E7000 in-circuit emulator as target 142 H8/300, introduction 132 H8/300H compiler options 133 Hitachi H8/300 assembler issues 126, 147 C++ initializers 133 compiler issues 126, 132, 135, 147 debugger commands 138, 150 debugger issues 130, 138 E7000 in-circuit emulator 138, 141, 142, 150 floating point subroutines 134 GDB remote serial protocol 141 serial devices 138, 150 Hitachi SH compiler issues 144 compiler options 145 compiling 145 debugger issues 150 preprocessor macros 146 subroutines 146 targets 144 HKEY_CURRENT_USER 50 HOME for Cygwin 48 I I/O support code 9, 21 idt/mips, configuring 218 -inbyte 21 inetutils 38 Input and output primitives for Cygwin with POSIX compliance 43 Insight 28 isatty(), for checking for a terminal device 23 L 2, 4, 5 the GNU linker 6 ld, the linker script 9 LD_LIBRARY_PATH environment variable for Cygwin 48 libc 9 libgcc.a 5 libgloss 2, 4, 8, 9 libm 9 libraries 5, 9 linker 2, 4 linker script 17 Linux installation 154 kernel, rebuilding 154 --prefix option 154 testing 154 loader 12 low-level debugging 21 LSI TinyRISC ABI issues 157 argument passing 159 assembler issues 161 calling conventions 159 compiler issues 156 data type sizes and alignments 157 debugger commands 165 debugger issues 165 function return values 160 linker issues 162 register allocation 157 simulator issues 167 stack frame issues 158 ld ld, M configuration macros 13 main 11, 14 main() 5, 15 malloc() 15 m68k-coff K 21 kill(), for exiting kill() CYGNUS 23 17 GNUPro Tools for Embedded Systems ■ 497 Index functions, ANSI/Cygwin compliance 42 math library 9 MB86930 processor 449 MEMORY 18 memory 14 Memory management for Cygwin with POSIX compliance 43 memory map 17 MIPS assembler issues 223 assembler options 224 calling conventions 227 code generation 219 compiling 219 configuring 222 debugging 228 development 217 ECOFF 225 ECOFF object code 225 ECOFF object code targets 226 ECOFF target 225 floating point subroutines 221 GCC options 219 GOFAST library 230 integer arguments 227 preproccesor macros 222 preprocessor macros 222 registers 227 registers for floating-point arguments 227 software or hardware floating point 221 MN10200 ABI summary 172 assembler error messages 178 attributes 171 compiler options 171 CPU register allocation 173 debugger issues 186 development 170 linker issues 179 simulator issues 187 using CygMON 188 math 498 ■ GNUPro Tools for Embedded Systems MN10200, MN10300 CygMon command list MN10300 ABI summary 192 assembler addressing modes 198 assembler error messages 199 assembler issues 197 attributes 191 compiler issues 191 data types sizes and alignments 192 debugger issues 207 development 190 linker issues 200 opcodes 199 preprocessor symbols 191 register allocation 192 register names 197 register usage 193 simulator support 208 stack frame issues 194 using CygMON 209 Motorola 68K assembler directives 400, 401 assembler issues 400 calling conventions 401 compiling 397 configurations 399 debugging 403 debugging issues 403 developing with 397 floating point subroutines 398, 399 preprocessor macros 399 Motorola m68k gas 457 mount 74 mount table 50 mount utility 50 211 N NEC V850 ABI issues 408 addressing modes 421 GNUPro Toolkit Index argument passing 411 assembler error messages 422 assembler issues 421 calling conventions 408 compiler issues 406, 413 data areas 414 data types, alignment sizes 408 debugging issues 426 depragmaize 415, 415 depragmaize options 418 development 405 features, general 406 floating point 422 function return values 412 linker tools 423 opcodes 422 predefined symbols 421 preprocessor symbols 414 producing S-records 425 register allocation 409 registers 421 simulator issues 427 stack frame 410 structure conversion 419 networking functions for Cygwin 44 newlib 2, 4, 8, 9, 23 nm utility 17 -nostlib 5 O 7 7 object file, with assembler 6 object files, linking to C library OS Support 9 -outbyte 21 outbyte() 8 objcopy objdump P PA systems and kernels PE format 29 CYGNUS 124 5 PID 78 PIDs and Cygwin 36 porting layer for UNIX applications 27 porting UNIX compiler tools to Win32 29 POSIX path 93 POSIX.1/90 calls 28 POSIX.12 30 POWER 430 PowerPC 430 ADS 8xx 429 argument passing 443 assembler issues 457 assembler listing output 438 assembler listing-control 438 assembler options 438 Cogent 860 429 compiler options 430 compiling issues 430 debugging issues 440 debugging, multiple threads 443 Embedded Applications Binary Interface 435 function return values 443 gas 438 MBX 8xx 429 preprocessor macros 437 simulator 446 stack frame issues 441 subroutines 437 supported versions 429 Table Of Contents, executable files 432 prefix 13 -prefix-addresses 7 preprocessing 6 print() 8 Process environment for Cygwin 43 process ID 78, 95 Process primitives for Cygwin 43 process status 78 PROM burners 7 ps program 78 pseudo-opcodes for M32R targets 338, 372 GNUPro Tools for Embedded Systems ■ 499 Index PTY calls 31 putnum() 8 R RAM space 18 RAM variable 19 register names 13 ROM monitor 8, 14, 16 ROM monitors 7 rom68k 16 rom68k and mon68k monitors 18 S 17, 21 for specifying paths 18 section names 17 sections 19 sections, main 17 serial device Hitachi H8/300 130, 138, 150 signals functions, ANSI/Cygwin compliance sockets 28 Source Navigator demonstration 20 SPARC assembler listing output 458 assembler listing-control 459 assembler options 457 calling compiler 450 calling conventions 460 compiler debugging option 451 compiler options 451 compiling 451 configuring for a debugger 467 debugging 467 documentation 450 eval boards 469 evaluation boards 469 floating point options 452 MB86934 451 sbrk() SEARCH_DIR, 42 500 ■ GNUPro Tools for Embedded Systems pciuh 469 registers 460 ROM monitor 469 US Software’s GOFAST library 452 version 7 code 451 version 8 451 SPARC, SPARClite ABI issues 454 compiler 451 debugging issues 467 floating point 452 floating pointsubroutines 452 linker issues 461 preprocessor macros 453 supported versions 449 SPARClite calling conventions 455 data type size and alignment 454 MB86930 451 register usage 455 stack frame issues 456 S-records 7 stack space 14 start 15 STARTFILE_SPEC 17 STARTUP command 17 stdio functions, ANSI/Cygwin compliance 42 stdlib functions, ANSI/Cygwin compliance 42 stdout 6 string functions, ANSI/Cygwin compliance 42 stub 21 Stubs 10 subroutines 10 support library 2, 4 support routines 23 SVR4 and BSD services 28 switches 5 SYM 15 System databases for Cygwin with POSIX compliance 43 GNUPro Toolkit Index T -T U 5 --target option 132 Tcl/Tk 39 THUMB compiler options 104 preprocessor symbols 105 Procedure Calling Standard (TPCS) 104 time functions, ANSI/Cygwin compliance 42 Toshiba TX39 ABI issues 475 assembler directives 483 assembler issues 482 compiler issues 474 compiler options 474 data type size, alignment 475 debugger issues 490 debugging targets 490 GNUPro Instruction Set simulator 473 --help 491 hosts 473 JMR-TX3904 evaluation board 471, 473 linker issues 484 MIPS EABI 475 parameter assignment to registers 479 parameter registers 476 preprocessor symbols 474 register names 482 register usage 476 simulator issues 491 struct 480 struct rules 480 structures and unions 480 subroutine calls 476 supported tools 472 unions 480 varargs parameters 480 Windows 95/NT installation (.exe suffix) 472 TPCS 104, 107 trap handler 16 TTY/PTY calls 31 CYGNUS uninitialized data 19 UNIX applications, porting to Windows 27 V variables, default values for 17 Visual C++ to port GDB 29 VR4100 ABI 234 additional resources 232 arguments, passing 237 assembler issues 238 compiler 233 DDB-VR4100 board 242 debugging issues 242 function return values 237 linker issues 239 NEC DDB-VR4100 board 239 preprocessors symbols 233 register allocation 235 simulator issues 245 S-records 245 stack frame 236 VR4300 assembler issues 253 compiler issues 249 data type sizes and alignments 250 DDB-VR4300 board 257 debugger issues 257 development 248 function return values 251 linker issues 254 preprocessor symbols 249 register allocations 252 W Win32 API calls 32 path with Cygwin 89 GNUPro Tools for Embedded Systems ■ 501 Index paths 93 porting UNIX compiler tools 29 Windows 95/98 lack of operating system security Windows and Cygwin Windows registry 50 WINPID 78 27 33 502 ■ GNUPro Tools for Embedded Systems GNUPro Toolkit