1
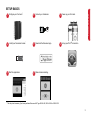
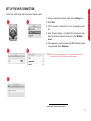
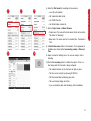
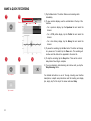
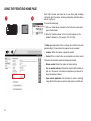
SONOSCOUT SETUP GUIDE 2013 Copyright © Brüel & Kjær. All rights reserved WHAT IS IN THIS GUIDE? • What is in Sonoscout? ...................................................................... 2 Measurements are controlled on your Apple® iPad® and a simple user interface lets you mark events and replay time histories promptly after recording. • Setup Basics..................................................................................... 3 • Configure Your Front-end ................................................................. 4 • Connect Your Transducer ................................................................ 7 • Power-up Your Front-end ................................................................. 8 • Install Your Sonoscout License ........................................................ 9 • Download the Sonoscout App ........................................................ 10 Apple support information • Set up the Wi-Fi Connection........................................................... 11 To find out more about using apps on your mobile device, check out the following websites: • www.apple.com/support/ipad/assistant/application • www.apple.com/support/ipad • support.apple.com/manuals/ipad • support.apple.com/manuals/iphone • Start Using the App ........................................................................ 12 • Make a Quick Recording ................................................................ 14 • Updating Front-end Firmware......................................................... 15 • Using the Front-end Home Page .................................................... 16 • Charging Your Battery .................................................................... 18 This Setup Guide will help you get started using your Sonoscout. * Sonoscout is compatible with iPad 2 or later running iOS 6 or later. 1 Sonoscout Setup Guide Sonoscout is an intuitive mobile device app* that combines with a wireless data acquisition unit to form a complete and highly portable system for quick grab-and-go recordings and immediate measurement validation. WHAT IS IN SONOSCOUT? The Sonoscout app is available for download via the App StoreSM or Inside the Sonoscout Kit case iTunes®. To record sound and vibration data with the app, you need to have the following LAN-XI hardware: an input module, a battery module 1) LAN-XI Battery Module Type 2831-A (including mains charger) and a wireless LAN frame. You will also need a Sonoscout license. 2) LAN-XI Input Module (4-, 6- or 12-channel module) with license You can use your pre-existing LAN-XI modules and add Sonoscout 3) Car Utility Socket Cable AO-0546 License BZ-5950-L and Wireless LAN Frame Type 3660-A-200 or 4) 1-module Wireless LAN Frame Type 3660-A-200 acquire a Sonoscout Kit which includes all of the above inventory in one portable case. 5) Compartments for all system accessories, such as a mobile device The System is pre-configured (including Sonoscout License BZ-5950-L) and ready to use. Simply set up your mobile device and Sonoscout app. Recommended accessories Available from Brüel & Kjær • LAN-XI Notar BZ-7848-A: To record data to an SD card 5 • 4 3 1 2 Apple iPad UL-1029 • Sound Calibrator Type 4231: To calibrate acoustic transducers • Calibration Exciter Type 4294: To calibrate vibration transducers • Sound Quality HATS Type 4100-D: For sound quality testing • Binaural Recording Headset Type 4965: For real-time audio • 4-channel CAN-2-Analogue Converter ZH-0700 • Transducers (as required) Available from third parties • Suction Mount: To attach iPad to car windscreen • Cradle for iPad Both available from RAM Mounts® (www.rammount.com) NOTE: Sonoscout Kits are not delivered with mobile devices. 2 SETUP BASICS 4 7 Configure your front-end.* Install your Sonoscout license.* Start the application. 2 5 8 Connect your transducer. Download the Sonoscout app. 3 6 Power-up your front-end. Sonoscout Setup Guide 1 Set up your Wi-Fi® connection. Make a basic recording. * This step is not necessary if you have purchased Sonoscout Kit Type 3663-A-040, 3663-A-060 or 3663-B-120. 3 CONFIGURE YOUR FRONT-END Front-end configuration is only needed if you purchased your LAN-XI modules separately (not in a Sonoscout Kit). What do you need? What do you do? 1) LAN-XI Wireless LAN Frame Type 3660-A-200: referred to as the “Frame” Front-end configuration is a 2-step process: 2) LAN-XI Battery Module Type 2831-A: referred to as the “Battery” Step 2: Connect the Frame Step 1: Connect the Input Module to the Battery* 3) LAN-XI Module: referred to as the “Input Module” 4) An SD card if using LAN-XI Notar BZ-7848-A NOTE: Type 3660 must have firmware version 2.1.0.190 or later to use the Sonoscout app. All pre-configured systems have the correct firmware installed. If you are using an earlier firmware version, please see “Updating Frontend Firmware” on page 15 for instructions. * 4 If you have LAN-XI Notar BZ-7848-A, you may need to insert the SD card before connecting the Frame. Normally, this is done at the factory. B Front-end Configuration Step 1: Connect the Input Module to the Battery The Battery provides mobile power to the Front-end during recording. A) Place the Battery “behind” the Input Module so that the type number text on both of modules is facing the same direction, and the Battery is to the left of the Module. B) Remove the hex key from the Input Module. C) Using the hex key, push out the four spring-loaded screws around the Input Module. D) Fasten the screws to the Battery module and place the hex key back into place. C D 5 Sonoscout Setup Guide A E F Front-end Configuration Step 2: Connect the Frame E) If you have LAN-XI Notar BZ-7848-A, ensure that the memory card is inserted in the mini-SD slot at the back of the Input Module*. F) Align the prongs on the Frame with the holes at the back of the assembled Input Module and Battery unit. Insert carefully. Magnets hold the Frame into place. To ensure connection during use, you should screw the Frame securely into place. G) At the side of the Frame is a hex key, remove it and pull open the Frame. H) Using the hex key, turn the captive screw in the middle of the Frame until it is tightened. I) Close the Frame and place the hex key back into place. G H * 6 Use of an SD card is not mandatory. You can also stream recorded data directly to your mobile device’s internal storage. Both microphones and accelerometers, or any other voltage input*, can be used. LEMO, BNC and SMB connections are supported – all depending on your Input Module’s front panel. 1 When connecting the Transducer, do it gently to avoid damaging threads. In the case of microphones, make sure that you do not touch the diaphragm with anything as it is very delicate. 1) Assemble your Transducer and Preamplifier, if necessary. 2) Connect the relevant cable (plus adaptor, where necessary) to the Transducer. Transducer connection examples 2 3) Connect the cable to the Front-end. Turn the cable end into place. With LEMO connections, align the red dot at the cable end with the red dot on the Front-end connector. Front panel connector compatibility • LAN-XI BNC connectors are compatible with any RG58 5 cable • LAN-XI LEMO connectors are LEMO 1B – use either Brüel & Kjær’s: – LEMO 0B to LEMO 1B Connector Cable AO-0419 3 LEMO 6-ch. LEMO 12-ch. SMB 6-ch. BNC – LEMO 1B to LEMO 1B Extension Cable AO-0414 • 1 1 1 7 2 2 2 8 3 3 3 9 4 4 4 10 5 5 5 11 6 6 6 12 connectors such as Farnell® 1212896/Tyco Electronics® 1-1337475-0 BNC SMB LAN-XI SMB connectors are compatible with RF/Coax SMB * For CAN data support, use 4-channel CAN to Analogue Converter ZH-0700 7 Sonoscout Setup Guide CONNECT YOUR TRANSDUCER POWER-UP YOUR FRONT-END Power up the Front-end by moving the power switch on the Battery to Active. The Input Module’s display will initially show an IP address of 0.0.0.0. LAN-XI modules are pre-configured to use DHCP by default, so you only need to power it on and after about five seconds, the Frontend’s built-in DHCP server will provide an IP address. Setting your old module to use DHCP (dynamic IP addressing) For wireless communication, the Front-end must use dynamic IP addressing using DHCP. If you are using a LAN-XI module that did not come bundled in the Sonoscout Kit, and have a static IP address, you must reset the module to be a DHCP client. To reset the module: 1) Press and release the Control button on the front of the Input Module to display the menu. 2) Scroll down the menu by pressing the button once for each menu item. 1 2 3 Press Control to scroll 3) Stop scrolling at LAN Reset. Press and hold the Control button for 5 seconds. NOTE: You can also check the module’s firmware version using the display menu. Simply scroll down to Module Info in the menu and press and hold the Control button until the display changes. If the “Ver.” is earlier than 2.1.0.190, then you must update the firmware. See page 15 for update instructions. 8 Hold 5 seconds License installation is only needed if you did not purchase a Sonoscout Kit. What do you need? 1 2 • License text file (on USB memory stick from Brüel & Kjær or saved on a PC or mobile device using, for example, Evernote®) • Wireless device with Web browser (PC or mobile device) • Password for your Front-end What do you do? 3 4 1) Enable your wireless device for wireless network/Wi-Fi connection. From the available wireless/Wi-Fi networks available, select the BK3660A-xxxxxx* access point. 2) The access point is a secure network using WPA2-PSK and requires a key (password). Enter 3660xxxxxx*. 3) Open a Web browser and from the Front-end’s display, enter the displayed IP address in the browser’s address line (for example: 192.168.1.229) and press <Enter>. 4) The Front-end’s unique Web page will open. Click Licenses in the side menu. 5 5) Open the text file with your license string and copy the string. Paste it into the License key(s) box on the Web page and click Add. The following licenses will be added for correct operation of Sonoscout: • BZ-5950 (Sonoscout) • BZ-5951 (LAN-XI input channel streaming) • BZ-7848-A (LAN-XI Notar, if installed) * xxxxxx are the last six digits in the Front-end’s serial number 9 Sonoscout Setup Guide INSTALL YOUR SONOSCOUT LICENSE DOWNLOAD THE SONOSCOUT APP To download the app, you must be connected to the Internet and have an Apple ID. See your mobile device’s user manual or the Apple website (http://appleid.apple.com) for information on Apple IDs. NOTE: The Sonoscout app is free of charge. Download directly on your mobile device 1 From your device’s Home screen, tap the App Store icon. 2 With the App Store open, tap in the Search field and enter Sonoscout. 3 Tap Search on the keyboard. 4 After the Sonoscout app is displayed, tap FREE, then tap INSTALL APP. Download via iTunes (for example, on a remote PC) You can download the app on your PC and then when possible, synchronize your iTunes library over Wi-Fi. This requires that your mobile device is synchronized with iTunes. If it is not, see Settings > General > iTunes Wi-Fi Sync on your mobile device for instructions. 1 10 Start iTunes on the PC. 2 From the menu bar, select Store > Home. 3 With the App Store open, enter Sonoscout in the Search field. 4 After the Sonoscout app is displayed, click FREE to start download. 5 When your mobile device and PC are on the same Wi-Fi, you can “sync” iTunes. Connect your mobile device with the Sonoscout System network. 1) From your mobile device’s Home screen, tap the Settings icon. 1 2 2) Select Wi-Fi. 3) If Wi-Fi connection is switched off, turn it on by tapping the on/off icon. 4) Under Choose a Network... all available Wi-Fi networks are listed. Select the Sonoscout System’s access point, called BK3660Axxxxxx*. 5) The access point is a secure network using WPA2-PSK and requires a key (password). Enter 3660xxxxxx*. 3 4 NOTE: The Sonoscout System network is a closed, secure network. Once connected, you will not be able to access the Internet. 5 * xxxxxx is the Front-end’s serial number 11 Sonoscout Setup Guide SET UP THE WI-FI CONNECTION START USING THE APP 1 Start the app 2 1) From your Home screen, select the Sonoscout app icon. The application will start and open in the Recording task – see the bottom of the user interface for the task icon . • If the app has not detected the Front-end, the Status line will be blank Swipe Set up the hardware and recording 2) From the left edge of the screen, swipe toward the centre to open the Settings menu to set up the hardware (all Front-end channels will have default settings). 3 4 5 3) If you have TEDS transducers connected, tap Detect and the app will automatically fill in the details. NOTE: Tap ? at the top of the user interface and select Help for instructions on setting up the hardware manually. Manual setup is necessary with LANXI Notar as it does not currently support all TEDS transducers. 4) Select the recording file location: – Save to the SD card on the Front-end*: tap Streaming to Off – Save to your mobile device: keep Streaming set to On (default) 5) Set the Frequency Range. Data are sampled at 2.56 times this frequency. The default is 25.6 kHz * 12 Only available when used with LAN-XI Notar BZ-7848-A 6) Select the File format the recording will be saved as: 8 – .wav: Wave file (default) – .hdf: Hierarchical data format – .pti: PULSE Time file – .bkc: Brüel & Kjær common file 7) Enter a Project name and Base filename. – Project name: The name of the folder where the file will be written. The default is “Streaming”. – Base name: File name used for all recorded files. The default is “Test”. 10 9 8) In Add to Base name, define a file extension. This is appended to the Base name. Select either Incrementing number or Date and Time. 9) Swipe to close the Settings menu. You are now ready to start a recording. 10)Tap the Pre-recording button to initialise the system. There is a short delay whilst the front-end is being configured: – The enabled channels on the Front-end will light up green Swipe – The time counter will light up (showing 00:00:00.0) – The Peak Level Meter will display green bars – The Level History display will initiate – If you are streaming data, data streaming starts immediately 13 Sonoscout Setup Guide 7 6 MAKE A QUICK RECORDING 1 1) Tap the Rec button. The button flashes and recording starts immediately. 2 2) To view real-time displays, use the sub-task tabs at the top of the interface. Channel selection – For a spectrum display, tap the Spectrum tab and select the channel. – For a RPM profile display, tap the Profile tab and select the channel. – For a time history display, tap the History tab and select the channel. 3) To pause the recording, tap the Rec button. The button will change to a pause icon. To restart, tap the Pause icon. The recording will continue and the data will be appended to the same file. 3 4 5 4) To stop the recording, tap the Stop button. There will be a short delay before file writing is complete. 5) If you are streaming, data streaming will continue until you tap the Stop Streaming button. Tap to pause Tap to restart 14 For detailed instructions on use of the app, including user interface descriptions, in-depth setup instructions and file handling and display tips, simply tap ? at the top of the screen and select Help. Brüel & Kjær continually updates LAN-XI firmware and provides the updates in zip files on the Brüel & Kjær website (www.bksv.com). Once the file is downloaded from the Internet, install the update via the Front-end’s home page. To download and install firmware updates, you must use a PC (Apple Safari® and iOS systems do not support zip files). Step 1: Download the Firmware Update Step 2: Install the Firmware Update A) Go to www.bksv.com. F) Connect the PC to the Front-end’s wireless access point. B) Select Service > User Support > Downloads. G) Open a Web browser and enter the IP address from the Front-end’s display into the address line. C) In the Step 1 box, select LAN-XI. D) In the Step 2 box, select LAN-XI Software Updates. H) On your Front-end’s home page, click Firmware. I) Click Browse... and navigate to the saved file. E) Click the latest firmware filename and Save the zip file to any location on your PC. J) Click Start update. 15 Sonoscout Setup Guide UPDATING FRONT-END FIRMWARE USING THE FRONT-END HOME PAGE 1 2 Each LAN-XI module and frame has its own home page containing information about the module, including configuration, calibration history, self-test, log file, etc. To access the home page: 6ch. Input 6ch. Module Input 50Module KHz 50 KHz Type Type 3050-A-060 3050-A-060 1) With your mobile device connected to the Front-end’s access point, open a Web browser. 2) Enter the IP address shown in the Front-end’s display into the browser’s address line, (for example: 192.168.1.229). The Main page looks similar to the one shown here with the Front-end’s general settings. The two links on the page can be set as needed: • Location: Where the module is physically located • Contact: Who to contact, either an email address or phone number The buttons at the bottom provide the following functionality: 16 • Reboot module: Reboot the module to factory settings • Turn on module indicator: Enables the module’s LED indicators to light up in the case of multi-module configurations (not relevant for single stand-alone modules) • Open recorder application: Use this button to control a recording using LAN-XI Notar and/or access the data stored on the SD card 2 1) The Network page allows you to set a static IP address (not recommended with wireless connection) or obtain a new DHCP IP address. 2) The Synchronization page shows the current synchronization method in use (not relevant for single stand-alone modules). 3) The Status page shows the status of the Front-end, including selftest status, temperature, power, etc. 4) The Firmware page shows the Front-end’s current firmware and provides detailed information on firmware updates. NOTE: It is not possible to download or open files such as firmware updates using Apple Safari (the default browser on iPad). 3 4 17 Sonoscout Setup Guide 1 CHARGING YOUR BATTERY To check the charge level, press the Status button on the Battery. The status indicators are as shown to the left. Each LED bar is equal to approximately 1.5 hours operation. 0 – 20% 1 20 – 40% Flashing LEDs 40 – 60% 60 – 80% 80 – 90% Solid LED Fully charged There are two ways you can charge the Battery: • DC charge: using Battery Charger ZG-0858. To utilize in-vehicle cigarette lighters, use the included Car Utility Socket Cable AO-0546 • AC charge: using Battery Charger ZG-0469* (input range: 100 – 240 V AC, 50 – 60 Hz) 2 With either option, it takes approximately three hours for the Battery to be fully charged. 1) Ensure the Battery’s power switch is in the Active position. 2) Plug the charge cable into the Frame’s charge input connector. * 18 Included with the Battery Apple, iPad, iTunes and Safari are trademarks of Apple Inc., registered in the U.S. and other countries. App Store is a service mark of Apple Inc. · Wi-Fi is a registered trademark of Wi-Fi Alliance · EVERNOTE is a registered trademark of Evernote Corp. in the U.S. and/or other countries · Ram Mounts is a registered trademark of National Products Inc. · iTunes is for legal or rightholder-authorized copying only. Don’t steal music. ËBR-8031---&Î Local representatives and service organisations worldwide BR 8031–11 HEADQUARTERS: Brüel & Kjær Sound & Vibration Measurement A/S DK-2850 Nærum · Denmark Telephone: +45 7741 2000 · Fax: +45 4580 1405 · www.bksv.com · [email protected]