1
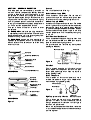
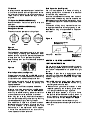
G2962, G2994,
Manual-tilt Bratt Pans
G2965 and G2995
Auto-tilt Bratt Pans
USERS INSTRUCTIONS
SECTION 1 - GENERAL DESCRIPTION
SECTION 2 - CONTROLS and OPERATION
SECTION 3 - COOKING HINTS
SECTION 4 - CLEANING and MAINTENANCE
These appliances have been CE-marked on the basis of compliance with the Low Voltage and EMC
Directives for the voltages stated on the Data Plate.
IMPORTANT
The appliance MUST ONLY be installed by a competent person in compliance with the Installation and
Servicing Instructions and National Regulations in force at the time. Particular attention MUST be paid to the
following:
Gas Safety (Installation and Use) Regulations.
Health and Safety at Work Act.
Furthermore if a need arises to convert the appliance for use with another gas, a competent person must be
consulted. Those parts protected by the manufacturer MUST NOT be adjusted by the user.
Regular servicing by a qualified person is recommended to ensure the continued safe and efficient
performance of the appliance. Users should be conversant with the appropriate provisions of the Fire
Precautions Act and the requirements of the Gas Safety Regulations
Upon receipt of this manual, the installer should instruct a responsible person (or persons) as to the correct
operation and maintenance of the unit.
This equipment is designed FOR PROFESSIONAL USE ONLY and be operated by QUALIFIED persons. It is
the responsibility of the supervisor or equivalent to ensure that the user wears SUITABLE PROTECTIVE
CLOTHING. Attention should also be drawn to the fact that some parts of the appliance will, by necessity,
become VERY HOT and could cause burns if touched accidentally.
PREVENTATIVE MAINTENANCE CONTRACT
In order to obtain maximum performance from this unit we would recommend that a Maintenance Contract be
arranged with AFE SERVICELINE. Visits may then be made at agreed intervals to carry out adjustments and
repairs. A quotation for this service will be given upon request to the contact numbers below.
Falcon Foodservice Equipment
HEAD OFFICE AND WORKS
Wallace View, Hillfoots Road, Stirling. FK9 5PY. Scotland.
AFE SERVICELINE CONTACT PHONE - 01438 363 000
FAX - 01438 369 900
T100480 Ref. 1
SECTION 1 - GENERAL DESCRIPTION
The bratt pans are thermostatically controlled to
maintain desired temperatures. Safety features
include a flame-failure cut-off device and a high
temperature limit device to cut off gas to main burner
if pan temperature goes too high. A tilt-switch to shut
off gas to main burner if pan is moved even slightly
from fully lowered position is also fiited as standard.
A red light indicates electricity supply to appliance is
on. This is required to operate the controls.
The pan is made of cast-iron to retain an even
temperature.
On G2962/G2994 models, the pan tilting mechanism
is operated by the front handwheel. The handle can
be stored away when not in use by pulling away from
wheel and folding in toward centre.
On G2965/G2995 models, the tilting mechanism is
operated by foot bellows which in turn activates an
electric actuator. The bellows can be folded away
when not in use.
Controls
The unit is fitted with the following:
Mains Indicator Lamp (RED)
This is located on control panel. The red neon will
glow continuously when mains electricity has been
switched on and current is being supplied to unit.
Indicator Lamp (AMBER)
Located on control panel next to red neon. The amber
neon will glow continuously when user thermostat has
been set and heat is being supplied to pan. Neon will
go out when selected temperature has been reached
and heat cut back. Thermostat will cycle on and off to
maintain temperature. This indicated by neon going
on and off.
Multi-Functional Gas Control
This is located behind bottom front drop-down door
and combines burner ON and OFF push buttons,
flame failure device and gas governor.
The push buttons are identified by their symbols
(see Figure 2 below).
Main burner button
Pilot button
Sightglass
Handwheel (G2962 only)
Change-over switch
(G2965 only)
Thermostat
Drop down door
G2962/G2965
Tilt switch (G2965 only)
Figure 2
Piezo igniter button
Off button
Piezo Unit
This is located alongside multi-functional control
behind bottom front drop-down door and is a push
button piezo spark type which does not require a
battery (see Figure 2).
User's Thermostat
Sightglass
Handwheel
(G2994 only)
This is located on front control panel and has a
variable temperature range up to 190 oC when
medium depth frying (see Figure 3).
Amber indicator
Change-over switch
(G2995 only)
Thermostat
Drop down door
G2994/G2995
Figure 1
Tilt switch
(G2995 only)
Red indicator
Figure 3
High Temperature Limit Device
Thermostat
Control (off position)
This is factory pre-set and is not accessible to
operator. In event of user thermostat failure,
the high temperature limit device will shut-off gas to
both main and pilot burners.
Should this device operate and therefore, render the
unit unusable. The appliance should be serviced by a
qualified engineer.
A safety tilt switch operates when pan is raised from
fully horizontal position to shut off gas to main burner.
If main burner comes on or remains on when pan is
raised, the unit should be serviced by a qualified
engineer.
Tilt Operation (G2962 and G2994 only)
Use handwheel on front control panel to raise and
lower pan.
Tilt Operation (G2965 and G2995 only)
Change Over Switch
The switch controls operation or tilting of pan.
Hand Operation (See Figure 6)
The unit is equipped with a means of raising or
lowering pan by hand in the event of an electrical
failure of the tilting mechanism.
A handle is located behind the drop down door and
this should be inserted along the tube located to the
RH side behind door. Once handle engages in clutch,
anti-clockwise rotation will raise and clockwise lower
the pan.
This method of tilting is only intended for use in an
emergency and because of the high gearing, is slow.
Note: Electric tilting is not possible with drop down
door open.
HAND TILTING
PU
Figure 6
OFF
HEAT
OD
NW
Tilt Switch
Tube
Manual operation handle
(G2965/95 only)
TILT
Figure 4
Foot Bellows
Two foot bellows are located on a swinging arm under
unit for raising or lowering pan. Pressure on either
bellows sends a signal to a pneumatically operated
microswitch which in turn operates lifting device.
Note: The drop down door must be closed to operate
the bellows.
FIgure 5
Electric Operations (see Figure 5)
The bellows are marked UP and DOWN and are
located below unit. The foot bellows should be swung
out to the front and allowed to drop to the floor.
The change-over switch should be set to tilt and pan
can then be raised or lowered by pressing the
appropriate bellow.
Light pressure is sufficient to operate the bellows.
Pressure should be removed from the UP bellow
when pan is fully raised and from the DOWN bellow
when fully lowered. Maintaining pressure under such
circumstances can cause excessive clutch wear.
When tilting pan to empty, watch that contents pour
from the lip and stop raising to stall pouring. Pouring
can be stopped by slightly lowering the pan.
The mechanism is fitted with a thermal overload.
Excessive raising and lowering will cause this to cut
out. The overload is self re-setting and the
mechanism will be operational within approx.
1 minute. The overload should not cut out during
normal operation of the mechanism.
Piezo igniter
Gas control
Manual operation
mechanism
(G2965/95 only)
SECTION 2 - LIGHTING and OPERATION
LIGHTING INSTRUCTIONS
The gas control valve is fitted with a safety interlock.
After pressing the OFF button on control, a period of
3 minutes will elapse before it is possible to light
burner.
Warning: If pilot flame is extinguished either
intentionally or otherwise, NO ATTEMPT should be
made to relight gas until at least 3 minutes have
elapsed.
1. Switch ON electricity supply to pan. Ensure pan is
fully lowered. On G2965/95 models only,
set changeover switch to heat.
2. Press and hold gas control pilot button in while
repeatedly pressing and releasing igniter button
until pilot lights. Check through sight hole.
3. Keep pilot button pressed in fully for a further
20 seconds before release. Pilot should remain lit
but if it goes out, push gas control OFF button in
and wait for three minutes. Repeat from Step 2.
4. Push gas control main burner button to right.
5. Set thermostat to desired setting. Main burner will
now light
TO SHUT DOWN
1. For short periods - Turn thermostat to OFF.
2. For long periods - Push gas control OFF button in.
Turn thermostat OFF and isolate mains supply.
Note:
PAN MUST BE IN FULLY LOWERED POSITION
BEFORE ATTEMPTING TO LIGHT APPLIANCE.
SECTION 3 - COOKING HINTS
It is important that care is taken when using such a
large open pan which contains hot oil that may
splash.
Griddling and Shallow Frying
(Oil depth of 6mm and less)
Set control to preferred setting and allow to heat up.
When neon goes out, temperature has been reached.
Note for frying
Leave pan lid open to allow steam to escape.
Thermostat must be switched ON before main burner
will light from pilot.
Boiling
Put 12.5mm to 25mm salt in pan, bake at medium to
medium high, 4 or 5 settings for 20 to 25 minutes.
Pan should be left with salt in until cool before
removal.
Dress with oil. Heat to burn oil in then re-oil. This will
form a skin on pan which should not need scoured but
filled with warm water and boiled up, emptied out and
rinsed with clean warm water then re-oil pan and
stainless steel rim.
This should be repeated any time the skin is broken.
G2962 and G2965 - Maximum of 21 litres
G2994 and G2995 - Maximum of 32 litres
Seasoning The Pan
Note
Cold water should never be poured directly onto a hot
pan surface as this could cause the casting to crack.
Always use warm water.
Using the Bratt Pan
The bratt pan can be used for various cooking
methods. For example:-
Method
Griddling
Shallow Frying
Deep Frying
Boiling
Simmering
Stewing
Type of food
Pancakes
Fillets of fish
Pineapple fritters
Lobster
Soups
Beef casserole
Thermostat settings are 1 (95oC) to 5 (195oC).
The setting is dependent on many factors, ie.
Volume of food, temperature of the food item(s) and
personal preference.
Deep Frying (Oil depths of 40mm and above)
Maximum depth of oil which can be used in this
appliance is 50mm.
G2962 and G2965 - 14 litres (maximum)
G2994 and G2995 - 21 litres (maximum)
Set control to 4 or 5 until desired temperature is
reached. Use of a hand-held temperature probe is
advantageous when deep frying in a bratt pan.
Maximum depth of fluid which can be safely used in
this appliance is 75mm.
Pour liquid into pan. Set control to 5 and bring to boil.
Simmering and Stewing
Pour liquid into pan. Set control to 5 and bring to boil.
Turn down to simmer, actual setting will depend on
volume and density of what is being cooked.
General - All Models
The pan should be covered when not being used.
The lid should also be closed when boiling, simmering
or stewing. This has various advantages:
It keeps food safe from foriegn bodies.
It will retain flavour.
It will shorten cooking times.
The lid should not be down when frying, as it is
important that steam is allowed to escape.
The pan should NEVER BE OVERFILLED and an
allowance should always be made for expansion and
foaming of the food being cooked.
G2962 and G2994
When tilting pan to empty, turn tilting handle slowly
and watch that pan contents pour from pouring lip.
When handle is not being used, hinge it back into
recessed portion of handwheel by pulling forward
slightly then hinging to the recess.
High Temperature Limit Device
The pan is fitted with a high temperature limit device
which is designed to shut off the burner if operating
thermostat fails or if the pan overheats. This may also
trip if the thermostat is set too high for shallow frying
or with a dry pan. If this device trips, the pan must be
checked by an engineer.
SECTION 4 - CLEANING
TURN OFF ELECTRICITY SUPPLY TO UNIT
Allow appliance to cool before cleaning commences.
The stainless steel external body of the appliance
should be cleaned with soapy water as often as
necessary. Rinse with clean warm water and dry off.
To retain the finish of the stainless steel, this should
be done by rubbing in the direction of the grain finish.
The pan interior should be cleaned at the end of each
day, rinsed with warm water, dried off and lightly oiled
using a good quality vegetable cooking oil.
NEVER HOSE DOWN THE APPLIANCE.