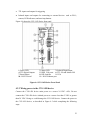
1
Machine Vision Based Examination Evaluation in
Thapar University
Thesis submitted in partial fulfillment of the requirement for the award of
degree of
Master of Engineering
in
Electronics Instrumentation and Control
By:
Shruti Bansal
(80751022)
Under the supervision of:
Dr. Mandeep Singh
Assistant Professor
EIED.
JULY 2009
ELECTRICAL AND INSTRUMENTATION ENGINNERING
DEPARTMENT
THAPAR UNIVERSITY
PATIALA – 147004
i
ii
Abstract
Optical Mark Recognition (OMR) is the automated process of capturing the data which is
in the form of bubbles, squares or tick marks. This technique is widely used in various
applications like exam evaluation, automated attendance marking, voting and community
surveys etc. Though the technique usually makes use of commercially available dedicated
OMR scanners, but it has its own drawbacks.
The present work proposes to automate
the same using machine vision for exam evaluation. A standardized sheet is designed for
conducting any type of exam. Special marks on the sheet ensure the sheet is not skewed
or folded. Every mark on the sheet is recognized using the unique alphanumeric character
assigned to it. This is done by pattern matching in Machine Vision Assistant 7.1 and
LabVIEW 7.1. The accuracy attained by the system for 100 samples is 98.45%.
iii
Organization of Thesis
The first chapter briefly introduces basic concepts of Machine Vision, its superiority over
human vision based on performance and capabilities and its diverse application areas.
The second chapter discusses the history of Optical Mark Recognition and the work that
has been already carried out in this field.
The third chapter formulates the problem and discusses the proposed solution.
The fourth chapter gives an overview of hardware setup and detailed description of vision
workstation.
The fifth chapter discusses the implementation of various tools of application software
and its extension to automate the process of automatic mark recognition. The results
obtained by the experiments are also tabulated in the same chapter.
Finally, thesis is concluded in sixth chapter with future scope.
iv
Table of contents
Declaration
i
Acknowledgement
ii
Abstract
iii
Organization of thesis
iv
Table of contents
v
List of figures
vii
List of tables
ix
List of abbreviations
x
Chapter 1
Machine Vision: A Niche in Automation
1.1 Introduction
1
1.2 The Advent of Machine Vision
1
1.3 Machine vision System
2
1.4 Human vision versus Machine vision
3
1.5 Applications of Machine vision systems
4
Chapter 2
Optical Mark Recognition
2.1 Introduction
5
2.2 When to Use OMR
5
2.3 History
6
2.4 Mechanism
7
2.5 Applications
9
2.6 Other forms of OMR
10
2.7 Literature Survey
13
v
Chapter 3
Problem Definition and Proposed Solution
3.1 Problem Definition
16
3.2 Proposed Solution
17
Chapter 4
Hardware Description & Configuration
4.1 Image Acquisition
20
4.2 Vision Workstation
22
Chapter 5
Software Development
5.1 Introduction
27
5.2 Vision Assistant: An overview
29
5.3 Developing the script
36
5.4 Creating LabVIEW from Vision Assistant
54
5.5 Results
66
5.6 Problems Encountered
73
Chapter 6
Conclusion and Future Scope
6.1 Conclusion
75
6.2 Future Scope
75
References
76
vi
List of figures
Fig. 2.1 IBM 805 Test Scoring Machine
6
Fig. 2.2 The three units of OMR system
9
Fig. 2.3 Example of Barcode Symbols
11
Fig. 2.4 Examples of data matrix code
12
Fig. 3.1 Basic components used in image acquisition and processing
18
Fig. 3.2 Flow Chart
19
Fig. 4.1 Mounting camera for image acquisition
20
Fig. 4.2 The inner view of box with sheet placed inside
21
Fig. 4.3 The slit is shown to insert and remove the paper
22
Fig. 4.4 CVS-1450 Series Front Panel
23
Fig. 4.5 Wiring Power to the CVS-1450 Device
24
Fig. 4.6 Basic Hardware Setup
25
Fig. 5.1 Acquiring images in Vision Assistant
30
Fig. 5.2 Image Browser
31
Fig. 5.3 Processing an image
32
Fig. 5.4 Color Plane Extraction
37
Fig. 5.5 Extracting Green plane from image
38
Fig. 5.6 Example - Source Image along with its histogram
39
Fig. 5.7 Linear LUT
40
Fig. 5.8 Image After applying LUT
40
Fig. 5.9 Brightness Adjustment
41
Fig. 5.10 Pattern Orientation and Multiple Instances
42
Fig. 5.11 Examples of lighting conditions
43
Fig. 5.12 Examples of Blur and Noise
43
Fig. 5.13 Correlation Procedure
45
Fig. 5.14 OMR sheet with “special marks” highlighted
49
Fig. 5.15 Templates in Exam Code and Student-ID
49
Fig. 5.16 Answers Section
50
Fig. 5.17 Special Mark is matched in test image with a score of 942
53
vii
Fig. 5.18 All the special marks are detected in test image
53
Fig. 5.19 LabVIEW Code of corresponding Vision Assistant Script file. (I)
56
Fig. 5.20 LabVIEW Code of corresponding Vision Assistant Script file. (II)
57
Fig. 5.21 Part of the Block Diagram containing code of verification of Exam Code
and Student
58
Fig. 5.22 Sub-VI to identify exam code and student ID
59
Fig. 5.23 SubVI to convert numeric array to 9-digit number
59
Fig. 5.24 A part of block diagram for reading the answers section
60
Fig. 5.25 A part of the block diagram for matching the answers with answer key 61
Fig. 5.26 (a) Online Verification of placement of the sheet
62
Fig. 5.26 (b).The user is prompted to enter the lower and upper range of roll
numbers and the exam code.
63
Fig. 5.26 (c) The user is then asked to input the correct answer string
63
Fig. 5.26 (d) Online verification of validity of roll number
64
Fig. 5.26 (e) Online verification of validity of exam code
64
Fig. 5.26 (f) Front panel showing roll number, exam code, answers and
total marks obtained.
65
Fig. 5.27 Images of improperly placed sheets
66
Fig. 5.28 Images of Sheets
67
Fig. 5.29 First prototype of OMR sheet
73
viii
List of tables
Table 1 Machine Vision versus Human Vision: Performance criteria
5
Table 2 Results of 100 samples tested by the system
70
ix
List of abbreviations
MV
Machine Vision
CCD
Charged Coupled Device
CMOS
Complementary Metal Oxide Semiconductor
LabVIEW
Laboratory Virtual Instrument Engineering Workbench
OMR
Optical Mark Recognition
IBM
International Business Machines Corporation
OCR
Optical Character Recognition
UPC
Universal Product Code
FPGA
Field Programmable Gate Array
SDK
Software Development Kit
TU
Thapar University
NI
National Instruments
IEEE
Institute for Electrical and Electronic Engineers
CVS
Compact Vision System
LED
Light Emitting Diode
DIP
Dual in-line Package
PLC
Programmable Logic Controller
CAT 5
Category 5
DCAM
Digital Camera
MAX
Measurement and Automation Explorer
IMAQ
Image Acquisition
RGB
Red Green Blue
HSL
Hue Saturation Lumination
RT
Real Time
VI
Virtual Instrument
ROI
Region of Interest
x
Chapter 1
Machine Vision: A Niche in Automation
1.1
Introduction
In today’s era when life has become tremendously fast, man is becoming highly
dependent on automated machines. And in the process of automation, the very much
talked of machine vision has its own significance. Machine Vision (MV) is a subfield of
artificial intelligence wherein the power of vision is imparted to the machines.
Machine vision has been defined by the Machine Vision Association of the Society of
Manufacturing Engineers and the Automated Imaging Association as “The use of devices
for optical, non-contact sensing to automatically receive and interpret an image of a real
scene in order to obtain information and/or control machines or process” [1].
1.2 The Advent of Machine vision
Machine vision was first marketed as a new, must-see technology for manufacturing
automation in the early 1980s, a lesser player amid the hype surrounding artificial
intelligence and automated robotic assembly [2]. The aim of designing a mechanical
system - hardware and software, which would imitate the human eye was captivating in
concept but created expectations that could not be immediately met. Initially it was
plagued by the problems like complex programming requirements, difficult installations,
mediocre functionality and low reliability. And therefore, the technology could not be
implemented to develop a system successfully.
But the recent years have been proved bright for machine vision. Because of the reduced
cost and complexity of the systems, and increased functionality, this technology is seen to
have created a niche in the automation industry. Ten years ago, MV systems cost $40,000
to $60,000, while today they run in the $5,000 to $20,000 range. They also offer vastly
improved performance, with much richer data at much higher speeds.
1
1.3 Machine vision System
The camera-based automatic vision system has three basic components:
·
Digital camera (Sensor) : The function of the digital camera is to capture the
images and transfer it to the image processor in real-time. Charge Coupled
Devices (CCD) camera have led the MV industry for a long time but every month
the technology gap between Complementary Metal Oxide Semiconductor
(CMOS) and CCD is getting narrower which makes it necessary to appropriately
choose one of the two. For MV applications that require high resolution and low
noise, CCD camera is used, whereas the need of high speed at low cost is fulfilled
by CMOS technology. In our application, since we can not compromise with
resolution therefore, we have used CCD camera instead of CMOS camera.
·
Image processor: For this purpose, we make use of computer, laptop or digital
image processor. Processing is done on the images to reduce the noise and extract
the data with the maximum accuracy. Software tools available for the purpose is Laboratory Virtual Instrument Engineering Workbench (LabVIEW) and Vision
Assistant. An image is composed of a number of pixels of varying brightness or
color. And processing is done by changing the values of these pixels.
·
Display unit: It is mainly a screen having pixels to display the grabbed images. A
personal computer or laptop is used for this purpose. Sometimes storage of
captured images is also done with computer for offline analysis.
2
1.4 Human Vision versus Machine Vision
Though, at present machine vision has found applications in vast areas, it is not yet a
substitute for human vision. Even after much advancement in the field, it has not yet
begun to duplicate the eye-brain capacity of human beings. It would require a large
parallel processing system to replace the human vision system considering the fact that
our eye can process about 10 images per second and retina of eye act like 1000 layers of
image processors, thus processing 10,000 million spatial data points per second per eye
10
[1]. Along with that, human brain possesses 10
cells (neurons), which are
interconnected with each other and each cell in itself is a microprocessor. And all this can
work simultaneously. Hence, no wonder that MV is still considered primitive in
comparison to human vision system.
Human vision system is a robust, flexible and easy-to train inspection system, but it is not
fast, accurate and reliable which introduces the need of machine vision. It comes into
play when visual inspection and measurements are fast, repetitive, precise and detailed.
Its high-speed processing capability gives it unquestioned superiority when it comes to
inspecting the parts on today's fast-paced production lines. Although human inspectors
can keep pace with visual inspection demands at a rate of a few hundred items per
minute, but they tend to get fatigued and hence miss flaws. With machine vision,
thousands of parts often run past a camera per minute and resolve a dozen features on
each piece for product conformance -- all in a matter of milliseconds. Also, MV systems
ensure repeatable results and can run continuously 24 hours a day, seven days a week.
The performance of the two systems is tabulated as follows in Table 1.
Performance Criteria
Machine Vision
Human Vision
Resolution
Limited by pixel array size
High resolution capability
Processing speed
Fraction of second per
Real-time processing
image
Discrimination
Accuracy
Limited to high contrast
Very sensitive
images
discrimination
Accurate for
Accurate at distinguishing
3
discriminating quantitative
qualitative differences; may
differences; accuracy
decrease at high volumes
remains consistent at high
production volumes
Operating cost
High for low volume; lower
Lower than machine at low
than human vision at high
volume
volume
Overall
Best at high production
Best at low or moderate
volume
volume
Table: 1 Machine Vision versus Human Vision: Performance criteria
1.5 Applications of Machine vision systems
By adding the intelligence of artificial “sight” to the machines, it has been made possible
to do the sophisticated quality control tasks more quickly and accurately. Unlike earlier
versions of MV systems, today’s modern MV systems are capable of offering more
reliability and ease of use.
Today MV systems have been incorporated in a gamut of applications like –
·
Contact-less inspection, measurement and orientation of objects,
·
Automated multi-robot manufacture of complex assemblies
·
Controlling autonomous vehicles and plant safety systems.
·
Medical imaging
·
Monitoring pharmaceuticals and food beverage industry.
·
Semi-conductor fabrication
·
Document analysis
·
Inspection of Printed Circuit Boards, silicon wafers and Integrated Circuits.
·
Object sorting
And the list of numerous fields where MV has taken control is endless.
4
Chapter 2
Optical Mark Recognition
2.1 Introduction
Optical mark recognition (OMR) is the automated process of capturing the data which
is in form of some marks like bubbles, squares & horizontal or vertical tick. This is
done by contrasting reflectivity at predetermined positions on the sheet. When we
shine a beam of light onto the paper, the scanner is able to detect the marked region as
it reflects less light than the unmarked area on the paper. In order to be detected by the
scanner, the mark should be significantly darker than the surrounding area on paper
and it should be properly placed.
This technology is different from optical character recognition in the respect that
recognition engine is not required in this case. Marks are constructed in such a way
that there is a very little chance of not being able to read the mark properly. Therefore
just the detection of presence of marks is only required. One of the most familiar
applications of OMR is multiple choice question examinations, where students mark
their answers and personal information by darkening the circles on a pre-printed
sheet. This sheet is then evaluated using image scanning machine.
2.2 When to Use OMR
OMR based evaluation is essentially preferred over the manual methods when
·
A large volume of data is to be collected and processed in short period of time.
·
Data is to be collected from large number of sources simultaneously
·
Questionnaires consists of multiple choice questions or selection of categories
·
Survey collectors are limited
·
Very high accuracy is required
5
2.3 History
IBM 805 Test Scoring Machine
The concept of evaluating the exams/tests using machines dates back to early 1930s.
A high school science teacher in Michigan, named R. B. Johnson, devised a machine
for his own use to record student test answers and to compare them to an answer key
set up on his machine. International Business Machines Corporation (IBM) learned of
Johnson’s device and hired him as an engineer to work in their Endicott, New York
laboratory. IBM bought the rights to his invention and the machine was soon in
market by the name of “IBM 805 Test Scoring Machine”.
Tests to be scored by the machine were answered by marking spaces on separate
answer sheets which had a capacity of 750 response positions, or 150 five-choice or
300 true-false questions. The answer sheets were dropped into the 805 for processing
as shown in Figure 2.1.
Figure 2.1 IBM 805 Test Scoring Machine
6
Inside the 805 was a contact plate with 750 contacts (electric fingers) corresponding
to the 750 answer positions. Each contact allowed one unit of current to flow when a
pencil mark was pressed against it. A scoring key separated the contacts into two
groups, the "rights" and the "wrongs." When an answer sheet was inserted, an amount
of current equal to the total rights and total wrongs was allowed to flow. When the
operator manipulated the controls, the 805 indicated the scores. The IBM 805's speed
was limited only by the operator's ability to insert sheets in the machine and record
the scores. An experienced operator could record scores on answer sheets at the rate
of about 800 sheets per hour. The IBM 805 was withdrawn from marketing in January
1963.[3]
Optical Mark recognition
In 1930’s Richard Warren, who was then working at IBM, experimented to replace
conductivity method of IBM 805 by optical mark sense system. But the first
successful OMR machine was developed by Everett Franklin Lindquist.
Lindquist's first optical mark recognition scanner used a mimeograph paper-transport
mechanism directly coupled to a magnetic drum memory. Although it was not a
general purpose computer, it made extensive use of computer technology.
During the same period, IBM also developed a successful optical mark-sense testscoring machine, which was commercialized as the IBM 1230 Optical mark scoring
reader. This and a variety of related machines allowed IBM to migrate a wide variety
of applications developed for its mark sense machines to the new optical technology.
These applications included a variety of inventory management and trouble reporting
forms, most of which had the dimensions of a standard punched card.
OMR has been used in many situations as mentioned below. The use of OMR in
inventory systems was a transition between punch cards and bar codes and is not used
as much for this purpose [4]. OMR is still used extensively for surveys and testing
though.
2.4 Mechanism of OMR
A typical OMR machine consists of three main units as shown in Figure 2.2
7
·
Feeding Unit – The use of feeding unit is to pick up sheets one by one that are
piled in the hopper and lets the sheet go through photoelectric conversion unit
at a fixed speed and regular interval. Then it carries the sheets to the acceptstacker if the sheet has been read properly without any discrepancies or it is
carried to reject stacker otherwise.
·
Photoelectric Conversion Unit- The photoelectric conversion unit irradiates
light to the surface of the sheet by some light source like lamp, and then
converts the intensity of reflection of light to an electric signal by lens and
sensor and inputs the signal to the image memory. The electric signal is
recognized as ‘0’ for the bright white light and ‘1’ for the dark light according
to the strength of the reflected light. There are two processors in this unit:
recognition processor and control processor. The recognition processor reads
the mark from the image, recognizes it and send the corresponding signal to
control processor. The control processor produces data, and at the same time
controls all units of OMR system
·
Recognition Control Unit - Mark recognition is a kind of pattern recognition
technique. This technique has repeatedly been improved and has steadily
brought about good results. The recognition process was based on a hardwired logic in the early days. The process is now conducted by software with a
recognition-specialized processor or a microcomputer. Recognition by
software has brought about more flexibility in the recognition process,
increase in the reading methods, advancement in accuracy of reading, and
simultaneous input of different types of sheets.
The two recognition modes namely Alternative Mode and Bit Mode are employed
during recognition process.
Alternative Mode is used when only answer is expected for a question. In this mode,
the OMR recognizes the only one entered mark in the block of mark positions on the
sheet, converts the mark to a code, and produces it. In case, two marks are found in
one block, depth comparison among the marks is conducted, and the deepest mark is
8
chosen. If no difference in depth is detected among the marks, a read-error is to be
reported.
Bit mode is used when there are plural answers for one question. All of the
information in the block of mark positions on the sheet are recorded and coded as a
series of bits.
Figure 2.2 Three Units of OMR system
2.5 Applications
Apart from the OMR being used in examination evaluation, it has many other
applications.
·
Automated Attendance marking [5]
·
Lotteries
·
Voting
9
·
Product evaluation
·
Community Surveys
·
Consumer Surveys
·
Geo-coding
·
Time sheets/Inventory Counts
2.6 Other forms of OMR
Optical Character Recognition
The technique of converting handwritten or printed text into computer usable form is
termed as optical character recognition or OCR.
The beginnings of OCR can be traced back to 1809 when the first patents for devices
to aid the blind were awarded. In 1912 Emmanuel Goldberg patented a machine that
read characters, converted them into standard telegraph code, and then transmitted
telegraphic messages over wires without human intervention. In 1914 Fournier
D'Albe invented an OCR device called the opto-phone that produced sounds. Each
sound corresponded to a specific letter or character. After learning the character
equivalent for various sounds, visually impaired people were able to "read" the
printed material. Developments in OCR continued throughout the 1930s, becoming
more important with the beginnings of the computer industry in the 1940s. OCR
development in the 1950s attempted to address the needs of the business world [6].
Recognition of cursive text is an active area of research, with recognition rates even
lower than that of hand-printed text. Higher rates of recognition of general cursive
script will likely not be possible without the use of contextual or grammatical
information. For example, recognizing entire words from a dictionary is easier than
trying to parse individual characters from script. Reading the Amount line of a cheque
(which is always a written-out number) is an example where using a smaller
dictionary can increase recognition rates greatly. Knowledge of the grammar of the
language being scanned can also help determine if a word is likely to be a verb or a
noun, for example, allowing greater accuracy. The shapes of individual cursive
10
characters themselves simply do not contain enough information to accurately (greater
than 98%) recognize all handwritten cursive script.
Bar Codes
Bar Codes are the zebra-striped marks of various widths and spacing which is
optically readable by machines. Two examples of linear barcode of different
symbology are shown in Figure 2.3. These can be read by either barcode readers or
scanned from an image by special software.
(a)
(b)
Figure 2.3 (a) Universal Product Code (UPC) - A barcode symbol.
(b) European Article Number (EAN) -13 barcode symbol.
The first use of barcodes was to label railroad cars, but it gained popularity only after
it was implemented to automate supermarket checkout systems. The simplicity,
universality and low cost of barcodes has widened the application area of barcodes.
Since 20th century, barcodes - especially UPC – have slowly become an essential part
of modern civilization. Some common applications include·
The tracking of item movement, including rental cars, airline luggage, nuclear
waste, mail and parcels.
·
Used on automobiles and its spare parts.
·
Document Management – Using barcode it is easier to separate and index the
documents that have been imaged in batch scanning applications.
·
Many tickets now have barcodes that need to be validated before allowing the
holder to enter sports arenas, cinemas, theatres, fairgrounds, transportation etc
·
Recently, researchers have placed tiny barcodes on individual bees to track the
insects' mating habits.
11
·
Since 2005, airlines use an International Air Transport Association (IATA) standard bar code on boarding passes (BCBP), and since 2008 bar codes sent
to mobile phones enable electronic boarding passes.
Matrix Codes
The data matrix code is a 2-D barcode as shown in Figure 2.4 which contains
information in black and white cells arranged either in a square or rectangle pattern. A
matrix code can store as much as 2335 alphanumeric characters. The size of data
encoded can ranges from few bytes to 2 kilobytes, but the length of encoded data
depends on the dimension of symbol used.
Data Matrix symbols are square in shape and they are made of cells: each cell
representing a bit. According to the notations used, a “0” is a “light” module and “1”
is a dark module or vice versa. Every Data Matrix is composed of two solid adjacent
borders in an "L" shape which is also called finder pattern. And the two other borders
consists of alternating dark and light cells which are called timing pattern. The
information is encoded in rows and columns of cells enclosed in these borders. The
finder pattern is used to locate and orient the symbol while the timing pattern provides
a count of the number of rows and columns in the symbol. Symbol sizes vary from
8×8 to 144×144 depending on the amount of information to be stored.
Figure 2.4 Examples of data matrix code
There are various other versions of matrix codes which are used some specific
domains for example Aztec code is used in land transport and airlines, MaxiCode for
tracking and managing the shipment of packages, Quick Response code (QR code) is
used in Japan for mobile tagging, SemaCode stores URLs. The high capacity color
barcodes is a new system where colored triangles are used instead of black and white
12
lines or cells. This has enhanced the amount of information that can be stored by the
symbols.
2.7 Literature Survey
·
Chinnasarn et al, in his paper “An image-processing oriented optical mark
reader” presented a system which was based on Personal Computer-type
microcontroller and image scanner. The system operations can be
distinguished in two modes: learning mode and operation mode. In the
learning mode, the model corresponding to each type of answer sheet is
constructed by extracting all significant horizontal and vertical lines in the
blank-sheet image. Then, every possibly cross-line will be located to form
rectangular area. In the operation mode, each sheet fed into the system has to
be identified by matching the horizontal lines detected with every model. The
data extraction from each area can be performed based on the horizontal and
vertical projections of the histogram. For the answer checking purpose, the
number of black pixels in each answer block is counted, and the difference of
those numbers between the input and its corresponding model is used as
decision criterion. Finally, the database containing a list of subjects, students,
and scores can be created. This is the first image-based OMR technique [7].
·
Hussmann S. et al, presented his paper “Low Cost and high speed Optical
mark reader based on Intelligent line Camera” in 2003. This paper
describes the design and implementation of an OMR prototype system for
marking multiple-choice tests automatically. Parameter testing is carried out
before the platform and the multiple-choice answer sheet has been designed.
Position recognition and position verification methods have been developed
and implemented in an intelligent line scan camera. The position recognition
process is implemented into a Field Programmable Gate Array (FPGA),
whereas the verification process is implemented into a micro-controller. The
verified results are then sent to the Graphical User Interface (GUI) for answers
checking and statistical analysis [8]. The developed prototype system could
read 720 forms/hour and the overall system cost was much lower than
13
commercially available OMR products. However, the resolution and overall
system design was not satisfying and lead to further investigation [9].
·
Hussmann S. et al, presented his paper “A high speed optical mark reader
hardware implementation at low cost using programmable logic” in 2005.
It has described the development of a low-cost and high speed OMR system
prototype for marking multiple choice questions. The novelty of this approach
is the implementation of the complete system into a single low-cost Field
Programmable Gate Array (FPGA) to achieve the high processing speed.
Effective mark detection and verification algorithms have been developed and
implemented to achieve real-time performance at low computational cost. The
OMR is capable of processing a high-resolution CCD linear sensor with
3456 pixels at 5000 frame/s at the effective maximum clock rate of the sensor
of 20 MHz (4×5 MHz). The performance of the prototype system is tested for
different marker colours and marking methods [9].
·
Deng H. et al, presented his paper “A low-cost OMR solution for
educational applications” in 2008. It aims at eliminating the drawbacks of
current OMR technique and designing the low-cost OMR (termed as
LCOMR). The new technique is capable of processing thin papers and lowprinting precision answer sheets. The system key techniques and relevant
implementations, which include the image scan, tilt correction, scanning error
correction, regional deformation correction and mark recognition, are
presented. This new technique is proved robust and effective by the processing
results of large amount of questionnaires. More than 15 schools in china have
adopted this new technique. The school teachers are capable of designing
questionnaires by themselves and the supervisor of schools can adopt this
technique to investigate the effect of learning and teaching easily and quickly.
LCOMR partially resolves the drawbacks of traditional OMR techniques and
improves it usability [10].
14
·
Pegasus Imaging Corporation [11] presented a Software Development Kit
(SDK) for OMR recognition from document images. The SDK supported
template recognition mode and free recognition mode. An OMR field is
defined as a rectangle area containing a specified number of columns and rows
of bubbles to be evaluated. The SDK can scan the region horizontally and then
vertically to locate the bubbles apart from the spaces between them. Then,
based on the bubble shape specified, it scans the discrete areas of the bubbles,
counting dark pixels to determine which bubble areas qualify as "filled in".
The Pegasus’ technique can support the plain paper’s printing and design, but
in the application in the school, the multi-choice answer recognition success
rate can not achieve the requirements of the examination.
15
Chapter 3
Problem Definition and Proposed Solution
3.1 Problem Definition
This is a well-known fact that Thapar University (TU) has impressively grown in size and
activities during the last five decades of its existence and is still growing at the same
pace. At present, there are around 30-35 courses which are being offered by the
University. Admissions to Bachelor of Engineering (B.E.)/Bachelor of Technology
(B.Tech.) courses is mainly through All India Engineering Entrance Examination, but for
the students carrying diploma degree get admission into these courses through LEET-TU
exam which is conducted by the university. Apart from this, it also conducts entrance
exams for the students who have not qualified Graduate Aptitude Test for Engineering
(GATE) in the Masters of Engineering (M.E.)/Masters of Technology (Mtech) programs,
and for admissions in Masters of Science (M.Sc.), Masters of Computer Application
(MCA) and integrated Masters of Business Administration (MBA).
Till now, all the entrance exams have been evaluated manually which proves to be a
tedious task considering the large number of candidates appearing for the exams. In the
present work, we propose to automate the evaluation system of these exams.
Hopefully, this will not only reduce the burden of checking the bulk of papers but it will
also ensure accuracy and impartiality. Also, this work can be further extended to evaluate
quizzes especially of courses where students are numbering more than 100.
16
3.2 Proposed Solution
In spite, of commercially available OMR scanners, the process of automation here will be
accomplished using custom designed machine vision based evaluation due to the
following reasons:
·
Though the initial cost of purchasing the machine vision hardware is more
than OMR scanners, but since we already have the infrastructure available
all we need to do is to develop the software. And the operational cost of
both of these is more or less same. Moreover, machine vision setup being
multi-purpose; this is a win-win situation.
·
OMR scanners available in market are not flexible enough to be
customized according to our needs.
·
Camera, used in machine vision setup, for acquiring digital images has a
faster response than a scanner. The reason being cameras take a snapshot
while scanners scan the paper row by row to get its image.
·
Because of fast response time, we can online verify the placement of sheet
using machine vision setup. Whereas, in scanners, scanning has to be
repeated again and again until the paper is not placed correctly.
For the purpose of image acquisition, we make use of IEEE 1394 digital camera. National
Instruments Vision Assistant 7.1 software in conjunction with LabVIEW is used for
image processing and analysis. The general layout of the process is given in Figure 3.1.
17
Image acquisition
using IEEE 1394
CCD camera in
presence of light.
Vision workstation
NI CVS 1450
( Can act as a standalone device)
Light
source
Image processing and
analysis using Vision
assistant 7.1 and
LabVIEW
Display of results
Figure 3.1 Basic components used in image acquisition and processing
Measures will be taken to eliminate the effect of ambient light so as to ensure consistency
in images. Also, it is proposed to online verify the proper placement of sheet. The
operator will be signaled to replace the sheet in this case. And in case of any discrepancy
of data, the sheet will be discarded.
The data contained in Exam Code, Roll number and Answers Section will be analyzed
using pattern matching. The LabVIEW Code will be developed so as to display this data
along-with the total marks obtained by the student.
The flow chart depicting the sequence of work to be carried is shown in Figure 3.2.
18
Start
Input exam code,
range of valid roll
numbers &
answer key
Valid Roll
number
and exam
code?
No
Place the sheet under
the camera
Yes
Acquire an
Image
Read answers
section using
pattern matching
Color Plane Extraction
Verify the answers
with answer key
input by the user
Brightness and Contrast
adjustment
Readjust
Output
the marks
obtained
All special
marks
present?
No
No
All sheets
Evaluated?
Yes
Read exam code and roll
number using pattern
matching
Yes
Stop
Figure 3.2 Flow Chart
19
Chapter 4
Hardware description & Configuration
In order to evaluate an OMR sheet, first of all it is required to capture a faithful image of
the sheet. NI IEEE 1394 digital camera are used for this purpose. This camera can be
interfaced with the development computer using NI CVS 1450. Each step of setting up
the hardware is discussed in detail one by one.
4.1 Image Acquisition
The most important issue that occurs while acquiring the image is to grab a sharp and
clear image. Also, it is very important to minimize the effect of ambient light. For this a
black box is made using black chart paper which has four walls and no roof. The camera
is mounted on the top of a stand so that it captures complete view of sheet. The distance
of sheet and camera has to be optimized for best results because there are no options of
zooming in while taking the picture. The setup is shown in Figure 4.1.
Figure 4.1 Mounting camera for image acquisition
20
Since four sides of black box are black, the interference of ambient light has been
minimized. But to acquire a bright picture, it was required to place a bulb inside the box.
This can be illustrated in following Figure 4.2.
Figure 4.2 The inner view of box with sheet placed inside.
For the ease of placing the paper and removing it, a slit was cut out on the lower side of
one of the walls which is shown in Figure 4.3.
21
Figure 4.3 The slit is shown to insert and remove the paper.
4.2 Vision Workstation
NI CVS-1450 Series devices are easy-to-use, distributed, real-time imaging systems that
acquire, process, and display images from IEEE 1394 cameras. The CVS-1450 Series
also provides multiple digital input/output (I/O) options for communicating with external
devices to configure and start an inspection and to indicate results. An Ethernet
connection between the CVS-1450 device and a development computer allows us to
display measurement results and status information and to configure the CVS-1450
device settings. When configured, the CVS-1450 device can run applications without a
connection to the development computer.
4.2.1 Hardware overview
The CVS-1450 device front panel consists of
·
VGA connector,
·
RS-232 serial port
·
10/100 Ethernet connector
·
Three IEEE 1394a ports
·
LEDs for communicating system status
·
DIP switches that specify startup options
22
·
TTL inputs and outputs for triggering
· Isolated inputs and outputs for connecting to external devices such as PLCs,
sensors, LED indicators, and start/stop buttons
Figure 4.4 shows the CVS-1450 Series front panel
.
1. Power LED
4. TTL Digital Outputs
7. Reset Button
10. RS-232 Serial
2. Status LED
3. Isolated Digital Input
5. IEEE 1394 ports 6. TTL I/O and Isolated I/O
8. DIP Switches
9. VGA
11. RJ-45 Ethernet port
Figure 4.4 CVS-1450 Series Front Panel
4.2.2 Wiring power to the CVS-1450 device
Connect the CVS-1450 device main power to a source 24 VDC ±10%. Do not
connect the CVS-1450 device isolated power to a source less than 5 VDC or greater
than 30 VDC. Doing so could damage the CVS-1450 device. Connect the power to
the CVS-1450 device, as described in Figure 4.5 while completing the following
steps:
23
·
Plug the 4-position connector from the power supply into the power
receptacle on the CVS-1450 device.
·
Plug the power cord into the power supply.
·
Plug the power cord into an outlet.
1. 4-Position Power Connector
3. Power Supply Cord (to Outlet)
2. NI Desktop Power Supply
Figure 4.5 Wiring Power to the CVS-1450 Device
4.2.3 Connecting camera and monitor to CVS-1450
·
The real-time view as seen by the camera can be displayed on a monitor screen
which is connected to VGA port of NI CVS 1450 through VGA cable of the
monitor. This is done in order to adjust the placement of the sheet, diameter of
aperture and sharpness of the image before taking the image.
·
The camera is connected to CVS – 1450 through IEEE 1394 cable which is
illustrated through Figure 4.6.
24
1. VGA cable
2. IEEE 1394 cable
Figure 4.6 Basic Hardware Setup
4.2.4 Connecting CVS-1450 to the main computer
An Ethernet connection between the CVS-1450 device and a development computer
allows us to display measurement results and status information and to configure the
CVS-1450 device settings. When configured, the CVS-1450 device can run applications
without a connection to the development computer [12].
The standard CAT-5 Ethernet cable is used to connect the CVS-1450 device to an
Ethernet network. If the development computer is already configured on a network, the
CVS-1450 device is configured on the same network. If the development computer is not
connected to a network, the two can be directly connected using a CAT-5 cable. The IP
address for the main computer is set to be 192.168.0.2 and for CVS 1450, it is set to be
192.168.0.5
Configuring the IP address of CVS using LabVIEW Real-Time
To set up an IP address for the CVS-1450 device, complete the following steps:
·
Open the Measurement & Automation Explorer (MAX) configuration software by
double-clicking the MAX icon on the desktop, or navigate to MAX by selecting
Start » Programs » National Instruments » Measurement & Automation.
25
·
Expand the Remote Systems branch of the configuration tree, and click
192.168.10.12 to display the Network Settings window. This IP address is
assigned to all unconfigured CVS-1450 devices.
·
In the Network Settings window, enter a name for the device in the Name field
and a description of the device in the Comment field. Device names are limited to
15 characters with no spaces or special characters. The first and last characters
must be alphanumeric.
·
Click Apply.
·
When prompted, click Yes to reboot the CVS-1450 device. This initialization
process takes several minutes. While the CVS-1450 device is rebooting, an icon
appears next to the device name to indicate that the CVS-1450 device is
disconnected. The MAX status bar also indicates the connection status of the
CVS-1450 device.
26
Chapter 5
Software Development
5.1 Introduction
Programming the CVS-1450 device requires NI-IMAQ for IEEE 1394 cameras driver
software to control the hardware and one of the following application software packages
to process images.
·
NI Vision Builder for Automated Inspection (AI) 2.0 or later—Allows the
configuration of solutions to common inspection tasks
·
LabVIEW Real-Time (RT) Module 7.0 or later with the Vision Development
Module 7.0 or later—Provides customizable control over acquisition hardware
and algorithms.
In present work, application code has been developed using Vision Development Module
7.1 and LabVIEW 7.1.
·
NI-IMAQ for IEEE 1394 cameras driver software
NI-IMAQ for IEEE 1394 Cameras is the interface path between the application
software and the CVS-1450 device. NI-IMAQ for IEEE 1394 Cameras includes
an extensive library of VIs. These VIs includes routines for video configuration,
continuous and single-shot image acquisition and trigger control. The NI-IMAQ
for IEEE 1394 Cameras driver software performs all functions necessary for
acquiring and saving images but does not perform image analysis. NI-IMAQ for
IEEE 1394 Cameras features both high-level and low-level functions. A function
that acquires images in single shot, or continuous mode is an example of a highlevel function. A function that requires advanced understanding of the CVS-1450
device and image acquisition, such as configuring an image sequence, is an
example of a low-level function.
27
·
LabVIEW RT with the Vision Development Module (NI Application
Software)
The LabVIEW Real-Time Module combines LabVIEW graphical programming
with the power of RT Series hardware, such as the CVS-1450 Series, enabling us
to build a deterministic, real-time system. Using the Vision Development Module,
imaging novices and experts can program the most basic or complicated image
applications without knowledge of particular algorithm implementations. Then it
can be used in LabVIEW to add functionality to the generated VI. The Vision
Development Module is an image acquisition, processing, and analysis library of
more than 270 functions for the following common machine vision tasks:
·
Thresholding
·
Particle analysis
·
Gauging
·
Particle measurement
·
Grayscale, color, and binary image display
NI Vision Assistant, which is included with the Vision Development Module, is
an interactive prototyping tool for machine vision and scientific imaging
developers. With Vision Assistant, various image processing functions can be
quickly tested and vision applications can be prototyped very easily. Using the
Vision Assistant LabVIEW VI creation wizard, the LabVIEW VI block diagrams
can be created that perform the prototype created in Vision Assistant.
28
5.2 Vision Assistant: An overview
5.2.1 Acquiring Images
Vision Assistant offers three types of image acquisitions: snap, grab, and sequence. A
snap acquires and displays a single image. A grab acquires and displays a continuous set
of images, which is useful while focusing the camera. A sequence acquires images
according to settings that are specified and sends the images to the Image Browser. Using
Vision Assistant, images can be acquired with various National Instruments digital and
analog IMAQ devices. Vision Assistant provides specific support for several Sony, JAI,
and IEEE 1394 cameras. IMAQ devices can be configured in National Instruments
Measurement & Automation Explorer (MAX). The sequence can be stopped at any
frame, capture the image, and send the image to the Image Browser for processing.
Opening the Acquisition window
Complete the following steps to acquire images.
1. Click Start»Programs»National Instruments Vision Assistant 7.1.
2. Click Acquire Image in the Welcome screen to view the Acquisition functions,
as shown in Figure 2.4.
If Vision Assistant is already running, click the Acquire Image button in the
toolbar. We must have one of the following device and driver software
combinations to acquire live images in Vision Assistant.
·
National Instruments IMAQ device and NI-IMAQ 3.0 or later
·
IEEE 1394 industrial camera and NI-IMAQ for IEEE 1394 Cameras 1.5 or
later.
3. Click Acquire Image (IEEE 1394) from the options available as shown in Figure
5.1. The Parameter window displays the IMAQ devices and channels installed on
the computer.
29
Figure 5.1 Acquiring Images in Vision Assistant
1. Make Image Active
2. Store Acquired Image in Browser Button
3. Acquisition Functions
Snapping an image
1. Click File»Acquire Image.
2. Click Acquire Image in the Acquisition function list.
3. Select the appropriate device and channel.
4. Click the Acquire Single Image button to acquire a single image with the IMAQ
device and display it.
5. Click the Store Acquired Image in Browser button to send the image to the
Image Browser.
6. Click Close to exit the Parameter window.
7. Process the image in Vision Assistant.
30
5.2.2 Managing Images
1. Select Start»Programs»National Instruments Vision Assistant 7.1.
2. To load images, click Open Image in the Welcome screen.
1. Image Browser
2. Image Location
3. Browse Buttons
4. Thumbnail/Full-Size Toggle
5. Close Selected Image(s)
6. Image Size
7. Image Type
8. File Format
Figure 5.2 Image Browser
3. Navigate to select the image which we want to process. If analysis is to be done
on more than one image then there is Select All Files option also available in
Vision Assistant. It previews the images in the Preview Image window and
displays information about the file type.
4. Click OK. Vision Assistant loads the image files into the Image Browser, as
shown in Figure 5.2. The Image Browser provides information about the selected
image such as image size, location, and type. We can view new images in either
31
thumbnail view, as shown in Figure 5.2 or in full-size view, which shows a single
full-size view of the selected image.
5. Click the Thumbnail/Full-Size View Toggle button to view the first image in full
size.
1. Reference Window
4. Script Window
2. Zoom Ratio
5. Processing Window
3. Image Size
Figure 5.3 Processing an Image
6. Double-click on one of the selected images to begin processing it. Vision
Assistant loads the image into the Processing window, as shown in Figure 5.3.
7. Now, image is ready for processing as per requirements. We can apply various
functions on image that are available in processing function window as shown in
figure given above. These processing steps get recorded in the Script window.
The script records the processing operations and all its parameters. If we want to
run the same operation on other images, we can save the script and use it again.
32
8. Select File»Save Script and name the script.
9. To run script on other images follow the steps given below:
a. Load the image.
b. Select File»Open Script
c. Click the Run Once button in the script window.
10. Select File»Exit to close Vision Assistant.
5.2.3 Image Processing Functions
The various functions available in Vision Assistant that can be used for image processing
and analysis are listed below. The following gives an overview of available functions in
Vision Assistant 7.1.
Image analysis functions
Vision Assistant provides the following image analysis functions [13]:
·
Histogram counts the total number of pixels in each grayscale value and graphs the
result.
·
Line Profile returns the grayscale values of the pixels along a line that is drawn with
the Line Tool from the Tools palette and graphs the result.
·
Measure calculates measurement statistics associated with a region of interest in the
image.
·
3D View displays an image using an isometric view.
·
Image Mask builds a mask from an entire image or region of interest.
·
Geometry modifies the geometrical representation of an image.
·
Image Buffer stores and retrieves images from buffers.
·
Get Image opens a new image from a file.
Color image processing functions
Vision Assistant provides the following set of functions for processing and analyzing
color images:
·
Color Operators applies an arithmetic operation between two images or between an
image and a constant.
33
·
Extract Color Planes extracts the Red, Green, or Blue (RGB) plane or the Hue,
Saturation, or Luminance (HSL) plane of a color image.
·
Color Threshold applies a threshold to the three planes of an RGB or HSL image.
·
Color Location locates colors in an image.
·
Color Matching compares the color content of one or multiple regions in an image to
a reference color set.
·
Color Pattern Matching searches for a color template in an image.
Grayscale image processing and analysis functions
Vision Assistant provides the following functions for grayscale image processing and
analysis:
·
Lookup Table applies predefined lookup table transformations to the image to modify
the dynamic intensity of regions in the image with poor contrast.
·
Filters include functions for smoothing, edge detection, and convolution.
·
Gray Morphology modifies the shape of objects in grayscale images using erosion,
dilation, opening, and closing functions.
·
FFT Filters applies a frequency filter to the image.
·
Threshold isolates the pixels we specify and sets the remaining pixels as background
pixels.
·
Operators perform basic arithmetic and logical operations between two images or
between an image and a constant.
·
Conversion converts the current image to the specified image type.
·
Centroid computes the energy center of a grayscale image or an area of interest on a
grayscale image.
Binary processing and analysis functions
Vision Assistant provides the following functions for binary processing and analysis:
·
Basic Morphology performs morphology transformations that modify the shape of
objects in binary images.
·
Adv. Morphology performs high-level operations on particles in binary images.
34
·
Particle Filter filters objects based on shape measurements.
·
Invert Binary Image reverses the dynamic of an image that contains two different
grayscale populations.
·
Shape Matching finds image objects that are shaped like the object specified by the
template.
·
Particle Analysis computes more than 80 measurements on objects in an image,
including the area and perimeter of the objects.
·
Circle Detection separates overlapping circular objects and classifies them according
to their radii.
Machine vision functions
Vision Assistant provides the following machine vision functions:
·
Edge Detection finds edges along a line that we draw with the Line Tool.
·
Find Straight Edge finds points along the edge of an object and then finds a line
describing the edge.
·
Find Circular Edge locates the intersection points between a set of search lines
within a circular area, or annulus, and then finds the best fit circle.
·
Clamp finds edges within a rectangular region of interest (ROI) drawn in the image
and measures the distance between the first and last edge.
·
Pattern Matching locates regions of a grayscale image that match a predetermined
template. Pattern Matching can find template matches regardless of poor lighting,
blur, noise, shifting of the template, and rotation of the template.
·
Caliper computes measurements such as distances, areas, and angles—based on
results returned from other machine vision and image processing functions [14].
35
5.3 Developing the script
Once the desired image is loaded in the Processing window as shown in Figure 5.3, we
follow the steps discussed below to develop the script.
5.3.1 Extracting color planes from image
Grayscale images are the images in which the value of each pixel is a single sample, that
is, it carries only intensity information. Such images are composed exclusively of gray
shade varying from black at the weakest intensity to white at the strongest. A color image
is encoded in memory as either a red, green, and blue (RGB) image or a hue, saturation,
and luminance (HSL) image. Color image pixels are a composite of four values. RGB
images store color information using 8 bits each for the red, green and blue planes. HSL
images store color information using 8 bits each for hue, saturation and luminance.
The camera can provide a color or monochrome signal. The choice of which to choose
depends on the type of image to be processed; often grayscale intensity information is
adequate to extract all necessary information from an image, but in some cases the color
information is critical. There are applications which sort identically shaped objects by
color and others where the grayscale contrast is too low to accurately identify objects.
Since the color information is redundant in our application so we extract color plane from
the acquired 32-bit colored image to make it an 8-bit grayscale image.
To convert any color to a grayscale representation of its luminance, first one must obtain
the values of its red, green, and blue (RGB) primaries in linear intensity encoding, by
gamma expansion. Then, add together 30% of the red value, 59% of the green value, and
11% of the blue value (these weights depend on the exact choice of the RGB primaries,
but are typical). Regardless of the scale employed (0.0 to 1.0, 0 to 255, 0% to 100%,
etc.), the resultant number is the desired linear luminance value; it typically needs to be
gamma compressed to get back to a conventional grayscale representation.
Color images are often built of several stacked color channels, each of them representing
value levels of the given channel. For example, RGB images are composed of three
independent channels for red, green and blue primary color components; CMYK images
have four channels for cyan, magenta, yellow and black ink plates, etc.
36
Figure 5.4 Color Plane Extractions
An example of color channel splitting of a full RGB color image is shown in Figure 5.4.
The column at left shows the isolated color channels in natural colors. While at right
there are their grayscale equivalences.
To perform color plane extraction in Vision Assistant, we execute the following steps.
1. Click Color»Extract Color Plane or select Extract Color Plane in the Color tab
of the Processing Functions Palette.
2. Select the color plane to be extracted.
3. Click OK to add this step to the script.
The choice of color plane to be extracted is made by trying all of them one by one and
selecting the one which gives the best image thereafter. We have selected to extract green
plane from the image. Figure 5.5 shows how the image looks after applying this function.
37
Figure 5.5 Extracting Green Plane from Image
5.3.2 Brightness, Contrast, Gamma adjustment
This function is used to alter the brightness, contrast, and gamma of an image.
·
Brightness—Brightness of the image. Brightness is expressed in gray levels,
centered at 128. Higher values (up to 255) result in a brighter image, and
lower values (down to 0) result in a darker image.
·
Contrast—Contrast of the image, expressed as an angle. A value of 45°
specifies no change in contrast. Higher values (up to 89°) increase contrast,
and lower value (down to 1°) decrease contrast.
·
Gamma—Gamma value used in Gamma Correction. The higher the Gamma
coefficient, the stronger the intensity correction.
Reset—Reverts Brightness, Contrast, and Gamma to neutral default settings.
38
We use LUT transformations to improve the contrast and brightness of an image by
modifying the dynamic intensity of regions with poor contrast. A LUT transformation
converts input gray-level values in the transformed image. It applies the transform T(x)
over a specified input range [rangemin, rangemax] in the following manner:
T(x) = dynamicMin if x £ rangeMin
f(x) if rangeMin < x £rangeMax
dynamicMax if x > rangeMax
where,
x represents the input gray-level value;
dynamicMin = 0 (8-bit images) or the smallest initial pixel value (16-bit and floating
point images);
dynamicMax = 255 (8-bit images) or the largest initial pixel value (16-bit and floating
point images);
dynamicRange = dynamicMax – dynamicMin
f(x) represents the new value.
The function scales f(x) so that f(rangeMin) = dynamicMin and f(rangeMax) =
dynamicMax. f(x) behaves on [rangeMin, rangeMax] according to the method we select .
The following example uses the source image shown in Figure 5.6. And it is seen that in
the linear histogram of the source image, the gray-level intervals [0, 49] and [191, 254]
do not contain significant information.
Figure: 5.6 Example - Source Image along with its histogram
39
Using the linear LUT transformation as shown in Figure 5.7, any pixel with a value less
than 49 is set to 0, and any pixel with a value greater than 191 is set to 255. The interval
[50, 190] expands to [1, 254], increasing the intensity dynamic of the regions with a
concentration of pixels in the grey-level range [50, 190].
Figure: 5.7 Linear LUT
The LUT transformation produces image shown in Figure 5.8. The linear histogram of
the new image contains only the two peaks of the interval [50, 190].
Figure: 5.8 Image After applying LUT
1. Click Image»Brightness or select Brightness in the Image tab of the
Processing Functions palette.
2. Modify the Brightness, Contrast and Gamma values with the slide or by
manually entering the value.
3. Click OK to add the step to the script.
During our project we have applied the following values to these functions as
shown in Figure 5.9
Brightness:
118
40
Contrast:
51.50
Gamma:
1
Figure 5.9 Brightness Adjustments
5.3.3 Pattern Matching
Pattern matching quickly locates regions of a grayscale image that match a known
reference pattern, also referred to as a model or a template. It finds template matches
regardless of lighting variations, blur, noise and geometric transformations like shifting,
rotation and scaling of the template. For pattern matching, first of all a template is created
that represents the object we are searching for. Then the pattern matching tool searches
for the instances of the template in each acquired image, and calculates the score for each
match. This score relates how closely the template resembles the located matches.
When to Use
Pattern matching algorithms are some of the most important functions in machine vision
because of their use in varying applications. Pattern matching can be used in the
following three general applications:
41
·
Alignment – It is used to determine the position and orientation of a known object
by locating fudicials.
·
Gauging – It is used to measure lengths, diameters, angles and other critical
dimensions. If the measurements fall outside set tolerance levels, the component
is rejected.
·
Inspection – It detects simple flaws, such as missing parts or unreadable print.
Pattern Matching Tool
In automated machine vision applications, the visual appearance of materials or
components under inspection can change because of varying factors such as part
orientation, scale changes and lighting conditions. Therefore pattern matching tool must
be reliable under all these conditions. It should be able to locate reference patterns despite
these changes. The following sections describe common situations in which the pattern
matching tool needs to return accurate results.
·
Pattern Orientation and Multiple Instances – A pattern matching algorithm
needs to locate the reference pattern in an image even if the pattern in the image is
rotated or scaled. When a pattern is rotated or scaled in an image, the pattern
matching tool can detect the – the pattern in the image, its position, its orientation
and multiple instances of the pattern in the image.
Figure 5.10 (a) shows a template image. Figure 5.10 (b) shows a template match
shifted in the image. Figure 5.10 (c) shows a template match rotated in the image.
Figure 5.10 (d) shows a template match scaled in the image. Figures 5.10 (b) to
5.10 (d) also illustrates multiple instances of the template.
Figure 5.10 Pattern Orientation and Multiple Instances
42
·
Ambient Lighting Conditions - A pattern matching algorithm needs the ability to
find the reference pattern in an image under conditions of uniform lighting
changes in the lighting across the image. Figure 5.11 illustrates the typical
conditions under which pattern matching works correctly. Figure 5.11 (a) shows
the original template image. Figure 5.11 (b) shows a template match under bright
light. Figure 5.11 (c) shows a template match under poor lighting.
Figure 5.11 Examples of lighting conditions
·
Blur and Noise Condition - A pattern matching algorithm needs the ability to
find patterns that have undergone some transformation because of blurring or
noise. Blurring usually occurs because of incorrect focus or depth of field
changes. Figure 5.12 illustrates typical blurring and noise conditions under which
pattern matching works correctly. Figure 5.12 (a) shows the original template
image. Figure 5.12 (b) shows the changes on the image caused by blurring. Figure
5.12 (c) shows the changes on the image caused by noise.
Figure 5.12 Examples of Blur and Noise
Pattern Matching Techniques
Most pattern-matching algorithms are successful, regardless of surrounding conditions
such as poor lighting and template shift. While traditional pattern-matching techniques
have certain time constraints and other limitations, newer techniques relying on "image
43
understanding" are faster and have applications in precision alignment, gauging,
inspection, vision-guided motion, and icon verification.The traditional pattern matching
techniques include normalized cross-correlation, pyramidal matching, and scale-invariant
matching.
·
Normalized Cross-correlation – This is one of the most common ways to find a
template—the pattern being searched for in an image. Consider a sub-image w(x,
y) of size K×L within an image f(x, y) of size M×N, where K £ M and L £ N. The
correlation between w(x, y) and f(x, y) at a point (i, j) is given by
L -1 K -1
C (i, j) =
åå w( x, y) f ( x + i, y + j )
x =0 y =0
where, i = 0,1,.. M – 1 ,
j = 0,1 …. N – 1, and the summation is taken over the region in the image
where w and f overlap.
Figure 5.13 illustrates the correlation procedure. Assume that the origin of the
image f is at the top left corner. Cross-correlation is the process of moving the
template or sub-image w around the image area and computing a value C, which
corresponds to how well the template matches the image in that area.
44
Figure 5.13 Correlation Procedure
The value C is obtained by multiplying each pixel in the template by the image
pixel it overlaps and then summing the results over all the pixels of the template.
The maximum value of C indicates the position at which the template image w
best matches f. Correlation values are not accurate at the borders of the image.
Basic correlation is very sensitive to amplitude changes such as intensity in the
image and in the template. For example, if the intensity of the image f is doubled,
so are the values of c. The sensitivity can be overcome by computing normalized
correlation coefficient, which is defined as
45
where w (calculated only once) is the average intensity value of the pixels in the
template w. The variable f is the average value of f in the region coincident with
the current location of w. The value of R lies in the range -1 to 1 and is
independent of scale changes in the intensity values of f and w.
This method can prove time-consuming, and does not meet the speed requirements of
many applications.
·
Pyramidal Matching – The computation time of pattern matching can be
improved by reducing the size of the image and the template. In pyramidal
matching, both the image and the template are sampled to smaller spatial
resolutions. For instance, by sampling every other pixel, the image and the
template can be restored to one-fourth of their original sizes. Matching is first
performed on the reduced images. Because the images are smaller, matching is
faster. When matching is complete, only areas with high match score need to be
considered as matching areas in the original image.
·
Scale-Invariant Matching - Normalized cross-correlation is a good technique for
finding patterns in an image when the patterns in the image are not scaled or
rotated. Typically, cross-correlation can detect patterns of the same size up to a
rotation of 5° to 10°. Extending correlation to detect patterns that are invariant to
scale changes and rotation is difficult. For scale-invariant matching, you must
repeat the process of scaling or resizing the template and then perform the
correlation operation. This adds a significant amount of computation to your
matching process. Normalizing for rotation is even more difficult. If a clue
regarding rotation can be extracted from the image, you can simply rotate the
46
template and perform the correlation. However, if the nature of rotation is
unknown, looking for the best match requires exhaustive rotations of the template.
A correlation in the frequency domain can also be carried out. If the template and
image are the same size, this approach is more efficient than performing
correlation in the spatial domain. In the frequency domain correlation is obtained
by multiplying the FFT of the image by the complex conjugate of the FFT of the
template. Normalized cross-correlation is considerably more difficult to
implement in the frequency domain.
New pattern matching methods rely on “Image Understanding” techniques to interpret
template information. Image understanding refers to processing techniques that generate
information about the features of a template. These methods include geometric modeling
of images, efficient non-uniform sampling of images, and extraction of template
information that is independent of both rotation and scale.
Image-understanding techniques reduce the amount of information needed to fully
characterize an image or pattern, which greatly accelerates the search process. In
addition, extracting useful information from a template and removing redundant and
noisy information provides a more accurate search.
A new pattern-matching technique takes advantage of non-uniform sampling. Most
images contain information that is redundant, so using all the information in the image to
match patterns is both time-intensive and inaccurate. By sampling an image and
extracting a few points that represent its overall content, the accuracy and speed of
pattern matching is greatly improved.
Pattern Matching versus Geometric Matching
Geometric matching is specialized to locate templates that are characterized by distinct
geometric or shape information. The geometric matching algorithm is designed to find
objects that have distinct geometric information. The fundamental characteristics of some
objects may make other searching algorithms more optimal than geometric matching. For
example, the template image in some applications may be defined primarily by the
texture of an object, or the template image may contain numerous edges and no distinct
47
geometric information. In these applications, the template image does not have a good set
of features for the geometric matching algorithm to model the template. Instead, the
pattern matching algorithm would be a better choice.
In some applications, the template image may contain sufficient geometric information,
but the inspection image may contain too many edges. The presence of numerous edges
in an inspection image can slow the performance of the geometric matching algorithm
because the algorithm tries to extract features using all the edge information in the
inspection image. In such cases, if we do not expect template matches to be scaled or
occluded, we should use pattern matching to solve the application.
In the present work, the OMR sheet is evaluated using this tool.
First of all the four corner marks and the centre mark (as shown in Figure 5.14), is
located using Pattern matching. If all of them get located, it indicates that the sheet has
been placed correctly.
48
Figure 5.14 OMR sheet with ‘special marks’ highlighted
The exam code and student ID number is also read using the same technique. Special
care has been taken that there is a unique symbol below every column of the two codes in
order to remove any ambiguity. For simplification, the symbols are “EXAM – Code” and
“ID Number”. The templates are made including these symbols as shown in Figure 5.15.
Figure 5.15 Templates in Exam Code and Student ID
49
Also, the answers section is evaluated by making templates including question number
with them. An example is shown in Figure 5.16
Figure 5.16 Answer Section
Pattern matching tool in Vision Assistant is performed on grayscale images only. Below
are discussed few parameters that we need to know before applying pattern matching.
Template Tab
·
Create Template - It learns the selected ROI and saves the result as a template
image file.
·
Load from File - It launches a dialog box in which we can browse to a template
image file and specify that file as the search template.
·
Template Path - It displays the location of the template image file.
50
Settings Tab
·
Number of Matches to Find – It specifies the number of valid matches we expect
the pattern matching function to return.
·
Minimum Score - It specifies the minimum score an instance of the template can
have to be considered a valid match. This value can range from 0 to 1000, where a
score of 1000 indicates a perfect match.
·
Sub-pixel Accuracy - When enabled, it returns the match with sub-pixel accuracy.
·
Search for Rotated Patterns- When selected, searches for the template in an
image regardless of rotation and shift of the template. When unselected, this
option searches for the image regardless of shifting along the x-axis and y-axis.
o
Angle Range—Angles at which we want to search for the template image.
The function searches for the template image at angles ranging from the
positive angle to the negative angle.
o
Mirror Angle—When enabled, this function searches for the template
image in the angle range, which we have specified in Angle Range, and in
the mirror of that angle range.
Results
Displays the following information after searching the image for the template:
Centre X – X- coordinate of each object that matches the template.
Centre Y – Y- coordinate of each object that matches the template.
Score – Score of each valid match. Score values can range from 0 to 1000, where a score
of 1000 indicates a perfect match.
Angle – It gives the rotation angle of each object that matches the template at the current
match location. Angles are expressed in degrees. This output is valid only when you
select rotation-invariant matching.
51
Steps involved for Pattern Matching
1. Click Machine Vision»Pattern Matching, or select Pattern Matching from the
Machine Vision tab in the Processing Functions palette.
a. Click Create Template, select an ROI, and click OK. Enter a File name
for the template and click OK.
or
b. Click Load from File, browse to the appropriate template file, and click
OK.
By default, the centre of the template is used as the focal point of the template.
We can change the location of the focal point to any position in the template.
Change the focal point of the template by dragging the red pointer in the template
image or adjusting the Match Offset values.
2. Click the Settings tab.
3. Modify Number of Matches to Find, Minimum Score, and Sub-pixel
Accuracy as necessary.
4. Select Search for Rotated Patterns to indicate that the match can be a rotated
version of the template. The amount of rotation can be restricted by specifying an
acceptable angle range. You also can include the mirrored angle range by
enabling Mirror Angle.
5. Click OK to save this step to the script.
For our work, first we created the five templates of special marks from a reference sheet
and save them on disk. Then we load the same templates in test sheets to see with what
score do they match with present special marks. The threshold score for these templates
is 900 which means that if the score obtained is lower than 900 the pattern will not be
matched. We can see in Figure 5.17, the first template matches with a score of 942. And
Figure 5.18 shows the script along with the five marks detected. For each template there
is a separate pattern matching tool added.
52
Figure 5.17 Special Mark is matched in test image with a score of 942.
Figure 5.18 All the special marks are detected in test image
53
The problem here occurred was, for each digit of exam code and student ID to be read,
there was a need to add numerous number of blocks of pattern matching in the script. To
simplify this, we convert this script into LabVIEW code and extend it according to our
requirements.
5.4 Creating LabVIEW from Vision Assistant
LabVIEW or Laboratory Virtual Instrument Engineering Workbench is graphical
programming language software used for data acquisition and instrument control. The
programs that take a long time using conventional programming languages can be
completed in hours using LabVIEW. The LabVIEW programs are called virtual
instruments (VIs) because their appearance and operation imitate actual instruments. A VI
has two main parts:
Front panel – It is the interactive user interface of a VI. The front panel can contain
knobs, push buttons etc. which are the interactive input controls and graphs, LED’s etc.
which are indicators. Controls simulate instrument input devices and supply data to block
diagram of the VI. Indicators simulate output devices and display the data that block
diagram generates. The front panel objects have corresponding terminal on the block
diagram
Block diagram – It is the VI’s source code, constructed in LabVIEW’s graphical
programming language, G. The block diagram is the actual executable program. The
components of the block diagram are lower level VIs, built in functions, constants and
program execution control structures. Wires are used to connect the objects together to
indicate the flow of data between them. The data that we enter into the front panel
controls enter the block diagram through these terminals and after execution the output
data flow to indicator terminals where they exit the block diagram, re-enter the front
panel and appear in front panel indicators giving us final results.
Various steps involved in Vision Assistant to create LabVIEW:
1. Click Tools>> Create LabVIEW VI.
2. Browse path for creating a new file in VI.
54
3. Click Next.
4. If we want to create LabVIEW of current script click on Current script
option or else click on Script file option and give the path for the file in the
field given for browsing. Click Next.
5. Select image source (Image File).
6. Click Finish.
The Vision Assistant script as shown in Figure 5.18 converted into its corresponding
LabVIEW code is shown (in parts) in Figure 5.19 and Figure 5.20.
55
Figure 5.19 LabVIEW Code of corresponding Vision Assistant Script file. (I)
56
Figure 5.20 LabVIEW Code of corresponding Vision Assistant Script file. (II)
57
The LabVIEW code that has been converted by Vision Assistant only matches the special
marks. We have programmed it in such a way that it proceeds to check the exam code
and student ID only when it matches those special marks which ensures that sheet is
placed properly. For this we have used flat sequence structure. The next frame of flat
sequence structure containing the verification of exam code and student ID is shown in
Figure 5.21. In this, we have used a Sub-VI which reads exam code and student ID. Its
Block diagram is shown in Figure 5.22. The result of this Sub-VI is a numeric array read
as Exam Code and Student ID. But this array of numbers has to be used as a single
number of 9 digits. So another Sub-VI as shown in Figure 5.23 is used to convert the
numeric array into a numeric value. After this, the validity of exam code and Student ID
is verified across the values which are input by the user at the prompt in the beginning.
Figure 5.21 Part of the Block Diagram containing code of verification of Exam Code
and Student
58
Figure 5.22 Sub-VI to identify exam code and student ID
Figure 5.23 SubVI to convert numeric array to 9-digit number
59
The remaining part of VI code contains reading the answers section as shown in Figure
5.24 and matching it with answer key entered by the user at the start of running the code
as shown in Figure 5.25. This whole VI is run in a while loop until user wants to stop the
acquisition.
Figure 5.24 A part of block diagram for reading the answers section
60
Figure 5.25 A part of the block diagram for matching the answers with answer key.
61
The front panel of the VI is shown in Figure 5.26 (a-g). It shows how the user interacts
with the program.
Figure 5.26 (a) Online Verification of placement of the sheet.
62
Figure 5.26 (b) The user is prompted to enter the lower and upper range of roll
numbers and the exam code.
Figure 5.26 (c) The user is then asked to input the correct answer string.
63
Figure 5.26 (d) Online verification of validity of roll number
Figure 5.26 (e) Online verification of validity of exam code.
64
Figure 5.26 (f) Front panel showing roll number, exam code, answers and total
marks obtained.
65
5.5 Results
The designed system has been tested 100 times with 12 different sheets at different times
of the day. The effect of variation of ambient light was seen to be very less. In few of the
attempts the user was asked to replace the sheet as the sheet was either skewed or was
folded as the system could not find the five special marks necessary to proceed further
evaluations. Images of improperly placed sheets are shown in Figure 5.27 (a) and (b).
(a)
(b)
Figure 5.27 Images of improperly placed sheets
Images of the sheets taken at various occasions are shown in Figure 5.28 (a-j). And the
accuracy of the recognition of the marks is tabulated in Table 2.
66
(a)
(b)
(c)
(d)
Figure 5.28 Images of Sheets (a-d)
67
(e)
(f)
(g)
(h)
Figure 5.28 Images of Sheets (e-h)
68
(i)
(j)
Figure 5.28 Images of Sheets (i,j)
69
Table 2 Results of 100 samples tested by the system
* Fixed Exam Code for all sheets is 607213451
** The wrong digits detected are in italics
Sample Sheet Special Correct
Exam
Code Read
marks
Roll
detected number
1
(a)
All
222001381 607213421
2
(b)
All
222001388 607293451
3
(c)
All
222001389 607213451
4
(d)
3
222001391
5
(e)
All
222001393 607213451
6
(f)
All
222001392 607213451
7
(g)
4
222001394
8
(h)
4
222001396
9
(i)
All
222001397 607213451
10
(j)
All
222001398 607213451
11
(a)
All
222001381 607213451
12
(b)
All
222001388 607213451
13
(c)
4
222001389
14
(d)
4
222001391
15
(e)
All
222001393 607213451
16
(f)
All
222001392 607213451
17
(g)
2
222001394
18
(h)
All
222001396 607213451
19
(i)
All
222001397 607213451
20
(j)
All
222001398 607213451
21
(a)
4
222001381
22
(b)
All
222001388 607213459
23
(c)
All
222001389 607213451
24
(d)
All
222001391 607213451
25
(e)
All
222001393 607213451
26
(f)
All
222001392 607213451
27
(g)
3
222001394
28
(h)
4
222001396
29
(i)
All
222001397 607213451
30
(j)
All
222001398 607213451
31
(a)
All
222001381 607213451
32
(b)
All
222001388 607213451
33
(c)
All
222001389 607213751
34
(d)
4
222001391
35
(e)
All
222001393 607213451
36
(f)
3
222001392
37
(g)
All
222001394 687213451
38
(h)
All
222001396 607254651
Questions %Accuracy
Roll
read
number
correctly
read
222001381
60
98.7
222001389
60
97.4
222001389
59
98.7
222001393
60
100
222001392
58
97.4
222089394
60
96.15
222001398
60
100
222001381
60
100
222220388
58
93.5
222001393
59
98.7
222001392
57
96.15
222001396
60
100
222001397
60
100
222881398
58
94.8
222001388
59
97.4
222001389
59
98.7
222001391
60
100
222001393
60
100
222001892
60
98.7
222001397
58
97.4
222001398
58
97.4
222001381
59
98.7
222001388
60
100
222001389
60
98.7
222001393
58
97.4
942001394
60
96.15
222001396
60
96.15
70
Sample Sheet Special
marks
detected
39
(i)
All
40
(j)
2
41
(a)
4
42
(b)
4
43
(c)
All
44
(d)
All
45
(e)
All
46
(f)
All
47
(g)
All
48
(h)
All
49
(i)
All
50
(j)
All
51
(a)
All
52
(b)
All
53
(c)
All
54
(d)
4
55
(e)
2
56
(f)
3
57
(g)
All
58
(h)
All
59
(i)
4
60
(j)
All
61
(a)
All
62
(b)
All
63
(c)
All
64
(d)
All
65
(e)
All
66
(f)
All
67
(g)
All
68
(h)
All
69
(i)
All
70
(j)
All
71
(a)
All
72
(b)
All
73
(c)
4
74
(d)
4
75
(e)
3
76
(f)
3
77
(g)
2
78
(h)
All
79
(i)
All
80
(j)
All
Correct
Roll
number
222001397
222001398
222001381
222001388
222001389
222001391
222001393
222001392
222001394
222001396
222001397
222001398
222001381
222001388
222001389
222001391
222001393
222001392
222001394
222001396
222001397
222001398
222001381
222001388
222001389
222001391
222001393
222001392
222001394
222001396
222001397
222001398
222001381
222001388
222001389
222001391
222001393
222001392
222001394
222001396
222001397
222001398
Questions %Accuracy
Exam
Roll
read
Code Read number
correctly
read
607213451 222001397
59
98.7
607213451 222001389
55
93.5
607213451 222001391
60
100
607213451 222001393
60
100
607213451 222001392
59
98.7
607213451 222091394
60
98.7
607213451 222001396
58
97.4
607213451 222001397
60
100
607213451 222991398
60
97.4
607213451 222001381
60
100
607213451 222001388
60
100
607213451 222001389
60
100
607213451 222001394
58
97.4
607213451 222001396
59
98.7
607213451 222001398
59
98.7
607213451 222001391
60
98.7
607213451 222001388
60
100
607213451 222001389
60
100
607213451 222001391
59
98.7
607213451 222001393
58
97.4
607213451 222001392
60
100
607213451 222001394
60
100
607213451 222001396
60
100
607213451 222001397
60
100
607213451 222001398
60
100
607213451 292007281
60
96.15
907613759 222001388
60
94.8
607213451 222001396
58
97.4
607213451 222001397
59
98.7
71
Sample Sheet Special
marks
detected
81
(a)
All
82
(b)
All
83
(c)
All
84
(d)
3
85
(e)
All
86
(f)
All
87
(g)
2
88
(h)
All
89
(i)
All
90
(j)
All
91
(a)
All
92
(b)
All
93
(c)
All
94
(d)
All
95
(e)
All
96
(f)
All
97
(g)
All
98
(h)
All
99
(i)
All
100
(j)
All
Correct
Roll
number
222001381
222001388
222001389
222001391
222001393
222001392
222001394
222001396
222001397
222001398
222001381
222001388
222001389
222001391
222001393
222001392
222001394
222001396
222001397
222001398
Questions %Accuracy
Exam
Roll
read
Code Read number
correctly
read
607213451 222001381
59
98.7
607293451 222001389
60
97.4
607213451 222001389
59
98.7
607213451 222001686
60
96.15
607213451 222001392
58
97.4
607213451 222001396
60
100
607213451 222089394
60
96.15
607213451 222001398
60
100
607213421 222001381
60
98.7
607213451 222001388
60
100
607213451 222001389
59
98.7
607213451 222001391
57
96.15
607213451 222001393
60
100
607213451 222001392
58
97.4
607213751 222001394
60
98.7
607213451 222991396
60
97.4
607213451 222001397
60
100
607213451 222001398
60
100
Total number of samples in which sheets were incorrectly placed = 26
Total number of samples in which sheet was read = 100-26 = 74
No. of marks on each sheet = 9+9+60 = 78
Total no. of marks in 100 samples = 78 * 74 = 5772
Number of marks incorrectly detected = 89
Overall Accuracy = No. of marks correctly detected / Total No of marks in 100
samples
= (5772 – 89 ) / 5772 = 98.45%
72
5.6 Problems Encountered
The major problems that we faced during our project are discussed below.
1) The first design of sheet that was made is shown in Figure 5.29. In this prototype,
we could not read exam code and Roll number. To read a digit at a particular
number’s place, it was required to assign unique alphanumeric symbol to each
digit. Also to increase the visibility and distinguish ability of the camera, the size
of symbols had to be big. Therefore, due to space constraints we had to decrease
the number of questions and width of exam code and roll number.
Figure 5.29 First prototype of OMR sheet
73
2) During the first attempt, we made use of ambient light. But the problem that arose
was the templates made at different times were not uniform because of which the
accuracy of system was very low. To remedy this, we made use of carton covered
with black chart paper and placed the sheet inside it. But it was too dark inside to
capture a bright and clear image so we had to put a Compact Fluorescent Lamp
inside it.
3) And the height of box made it inconvenient to place and remove the sheet.
Therefore a slit was cut in the chart paper to make this job easier.
4) Earlier the medium that we were using was a sharpened HB pencil but it was
replaced by a gel pen because the pencil marks reflected light when the image was
taken.
5) There are no options in the camera to zoom out so this is the reason that height of
lens has to be optimized. It should high enough to capture the complete view of
the sheet and low enough to capture all the details required to evaluate the sheet.
74
Chapter 6
Conclusion and Future Scope
6.1 Conclusions
The process of examination evaluation requires a very high degree of accuracy which
may not be possible during manual evaluation as a human being tends to get fatigued
due to monotonous nature of the job.
To overcome this problem, many efforts have been made by the researchers across the
globe for last many years. A similar effort has been made in this work to develop an
accurate and automatic examination evaluation. We have used Vision Workstation NI
CVS 1450 equipment along with high resolution 1394 camera and LabVIEW to
obtain the desired results. The setup has been tested for 100 sheets containing 60
questions each. In the process of final evaluation after optimizing the parameters like
level of illumination, placement of lens and design of OMR sheet, we get an overall
efficiency of 98.45% for this system. Though this accuracy is not acceptable in
general, but considering this to be the first attempt in this area using camera instead of
traditional scanner, it may be concluded that the project has been by and far
successful. It gives us a relative advantage of data acquisition and online warning in
case of improper positioning of paper which are not possible in case of traditional
scanner.
6.2 Future Scope
Though we have achieved an accuracy of 98.6% by optimizing various parameters, it
is required that for the task as sensitive as exam evaluation an accuracy of 100% can
not be compromised with. Therefore to achieve this, further optimization is required.
Also, the issues like stains, smudges, blurred regions & improper filling of circles
have not been taken care of. This work can be further extended to minimize the errors
due to them.
75
References
1. Nellie Zuech, Understanding and Applying Machine Vision, Second Edition,
Vision Systems International Yardley, Pennsylvania, 2000.
2. George Fabel, Machine Vision systems looking better all the time (Oct 1997
article),
Quality
Digest,
online
magazine.
http://www.qualitydigest.com/oct97/html/machvis.html
3. IBM archives< exhibits< IBM special products (Vol. 1) http://www03.ibm.com/ibm/history/exhibits/specialprod1/specialprod1_9.html
4. Palmer, Roger C., The Basics of Automatic Identification [Electronic version].
Canadian Datasystems, 21 (9), p. 30-33, Sept 1989.
5. Greenfield, Elizabeth, OMR and Bar Code technologies: empowering
education, Technological Horizons in Education Journal, Feb 1992.
6. Schantz, Herbert F. The History of OCR, Optical Character Recognition.
Manchester Center, VT: Recognition Technologies Users Association, 1982.
7. K. Chinnasarn Y. Rangsanseri “An image-processing oriented optical mark
reader” Applications of digital image processing XXII, Denver CO,1999.
8. Stephen Hussmann, Leona Chan, C. Fung, M. Albrecht, “Low Cost and high
speed Optical mark reader based on Intelligent line Camera”, Proceedings of
the SPIE AeroSense 2003, optical pattern recognition XIV, Orlando, Florida,
USA, vol. 5106, 2003. p. 200–08.
9. Stephen Hussmann and Peter Weiping Deng, A high speed optical mark
reader hardware implementation at low cost using programmable logic,
ScienceDirect, Real-Time imaging, Volume 11, Issue 1,2005.
76
10. Hui Deng, Feng Wang, Bo Liang, “A low-cost OMR solution for educational
applications” Parallel and Distributed processing with Applications 2008,
ISPA ’08, International Symposiun, Dec 2008
11. Pegasus
ICR/OCR/OMR
component
for
Win32
and
.net,
http://www.pegasustools.com
12. IMAQ NI CVS-1450 series user manual
13. LabVIEW Machine Vision and Image Processing Course Manual
14. NI Vision Assistant tutorial manual.
77