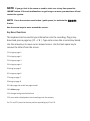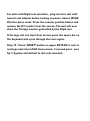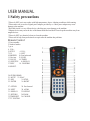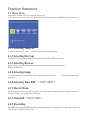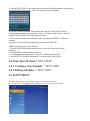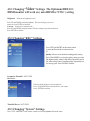
1
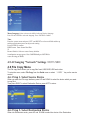
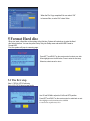
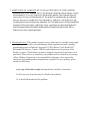
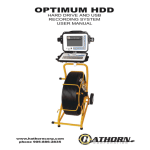
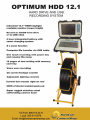
Optimum HDD 12.1
Step 1: Adjust command module support stand to upright position (see insert)
Step 2: Place command module on support stand (see insert)
Step 3: Plug patch cable into side of control module.
Step 4: Open latches on side of control module and lower lid.
Step 5: Press “ON” button (top right corner) Wait for unit to power up.
Step 6: Press right arrow key, move curser to “SETUP”
Step7: Press “ENTER” button on upper keypad (see fig 1)
Step8: Press right arrow key, move curser to “REC” on top of screen.
Step 9: Press “ENTER” and select record quality by moving up and down arrows. HQ
is the highest resolution, SLP is the lowest. Press “ENTER” to select resolution.
Resolution will always remain were you last set it.
Step 10: Press down arrow key to “REC Device” then press “ENTER”. Select were you
want to record to by using the up and down arrow keys. “ HDD” stands for Hard
Drive. “USB#1” stands for USB stick. Do not use USB#2. Once you have selected
were you want to record press “ENTER” key. Record destination will always remain
were you last set it.
Step 11: Press “HOME” Key. (looks like a house)
Step 12: Press right or left arrow keys and navigate to “VIDEO IN”. Press “ENTER”
key to bring up display. Picture should be on screen with LOGO and reel type.
Step 13: Open Aluminum door on UPPER panel. (bottom left) Plug key board into
keyboard port. (flat side up)
Step 14: Press space bar or enter key on keyboard to select reel type.
For units with Rigid reel selection , plug reel into unit with special reel adaptor
before turning on power. Select (RIGID 00) then press reset. Press the counter
position button and remove the HT counter from the screen. The unit will now show
the footage counter generated by the Rigid reel.
Step 15 : Press “RESET” button on upper KEYPAD to lock in reel type and clear LOGO
from screen. 3 second press (see fig 1) System will default to last reel selected.
RECORDING and WATCHING VIDEO
Press “RECORD” button on keypad, red light will come on while recording, also an
indicator will show on the top left corner of the screen. If you pause the recording
the red light will flash. To stop PAUSE recording press the “PAUSE” button again. To
stop the recording press the stop button.
To view your recordings press the “HOME” button on keypad. Press right arrow
button and navigate to “BROWSER”. Press the “ENTER” button. Press the up and
down arrow buttons to navigate to the drive you recorded to. (USB or HDD) Once you
have selected the drive press the “ENTER” button. Navigate to the “MY
RECORDINGS” file. Press the “ENTER BUTTON”. Use the up and down arrows to
navigate to the recording you wish to select.
TO play the selected recording press the “PLAY” button. Press “STOP” button and
the screen will return to the last menu. You can also pause the recording with the
“PAUSE” button.
To rename or delete the recording press the “INFO” button. Select the task you wish
to perform then press “ENTER”
RENAME: Use the up, down, right and left arrow buttons to move to the letters or
numbers you wish. Then press “ENTER” over each letter. Select “OK” when you have
named your recording. NOTE. The name you use must have a number in the front of
it. Example 123 John street
DELETE: Use the down arrow button and select delete. Press the “ENTER” button
and confirm delete.
NOTE
If you get lost in the menu or need to start over at any time press the
“HOME” button. If the unit malfunctions or get hung on a menu you must turn off and
restart the system.
NOTE Press the counter reset button ( quick press ) to activate the zoom
feature
Use the arrow keys to move around the screen.
Key Board Functions
The keyboard can be used to type information into the recording. Plug in key
board and press a page key ( F1 – F 8 ) . Type onto screen like a normal key board.
Use the arrow keys to move curser around screen. Use the back space key to
remove the letters from the screen.
F1 brings up page 1
F2 brings up page 2
F3 brings up page 3
F4 brings up page 4
F5 brings up page 5
F6 brings up page 6
F7 brings up page 7
F8 brings up page 8
F9 hides page and recalls last page viewed
F10 deletes page
F11 changes back ground behind text
F12 saves what is displayed on the viewed page into the memory
For F11 and F12 press function key and corresponding key F9 or F10
Example – A company name and address can be saved on a page into memory then shown at the
beginning of each survey when that page is displayed.
Space bar skips a space
Back Space key to move backwards on line and delete letters
Arrow keys move curser around page
Enter key toggles reel selection only at start up before reset key is pressed, then the last setting is
saved to memory
Escape key toggles overlay contrast
Pause/ Break key Toggles speaker and Mic on and off , speaker symbol on screen means speaker is
active and mic is turned off. The system always defaults to Mic off on power up.
OPTIMUM HDD
CHARGING CIRCUITS
CHARGING THE BATTERY
Use only the power supply that came with the unit. A different power supply may damage the unit or not
allow charging of the battery.
IF THE UNIT IS POWERED OFF THE GREEN LIGHT WILL FLASH ON THE KEYPAD
EVEN FLASHING- Battery is being charged properly
RAPID FLASHING- Battery is hot and will start charging once it has cooled. Usually happens after
running the battery down and charging right away.
LONG GREEN SHORT OFF- Battery is fully charged
IF THE UNIT IS POWERED ON, THE ON SCREEN DISPLAY WILL SHOW STATE OF CHARGE
EVEN ANIMATION OF BATTERY BARS filling up battery - The battery is being charged properly
BATTERY FLASHING WITH ONE BAR - The battery is hot and will begin charging once it has cooled.(
May take up to one hour or more to cool )
BATTERY FLASHING EMPTY- The battery needs charging and should be charged ASAP
For units with Rigid reel selection , plug reel into unit with
special reel adaptor before turning on power. Select (RIGID
00) then press reset. Press the counter position button and
remove the HT counter from the screen. The unit will now
show the footage counter generated by the Rigid reel.
If the logo will not clear from screen press the space bar on
the keyboard and cycle through the reels again.
Step 15 : Press “RESET” button on upper KEYPAD to lock in
reel type and clear LOGO from screen. 3 second press (see
fig 1) System will default to last reel selected.
USER MANUAL
1 Safety precautions
.
* Please do NOT put it near a place with high-temperature, dust or vibrating conditions while running.
* Please make sure to use the original power adaptor provided by us. Other power adapter may cause
damage to the machine.
* Hard disk inside is a very delicate device, shocking may cause damage to the machine.
* Magnet devices may cause the loss of the datum inside the hard disk. Please keep the machine away from
magnet devices.
* Please do NOT use chemical solvent to clean the machine.
* Please ask for help from professionals to repair after the machine has problems.
Remote Control
1. Power standby
2. Number buttons
3. go to
4. VOL+
5. SETUP
6. VOL7. UP
8. LEFT
9. BROWER 10. Fast backward
11. Previous 12. SLOW
13. PAUSE
14. TIMER
15. SUBTITLE 16. REPLAY
17.COPY
18. CONFIRM
19.SELECT.
20.GUIDE(HOME)
21. MUTE 22. PLAY
23. REC
24. STOP
25. ENTER
26. RIGHT
27. OPTION
28. Fast forward
29. NEXT
30. AUDIO
31. DISPLAY
32. REPEAT
33. RETURN
34.ZOOM
35 TIMESHIFT 36. CM SKIP
37 TV SYSTEM
Function Instruction
4.1 Home Menu
Power on the AV HDD system, you can see the loading page.
After a few second, the system will enter a guide menu. To enter this menu, press HOME KEY on the remote control
4.1.1 Selecting Video In
To select an input source, select
Video In button on the guide menu page.
4.1.2 Selecting file Copy
To enter the “File copy” Menu allows you to copy files from ,USB, ,HDD to each other.
4.1.3 Selecting Browser
Select Browser button on the guide menu page to browser movie files stored either on a
HDD, or a USB device.
4.1.4 Selecting Setup
To enter the setup menu, select “Setup” Key on the remote control or select
menu page.
Setup button on the guide
4.1.5 Selecting Time REC * NOT USED *
4.2 Video In Menu
The Video in menu allows you to look, record or review the content being lined in the unit. When you come in
the Video in Menu, you would see the follow page:
4.2.1 Timeshift * NOT USED *
4.2.2 Recording
Press REC key to start the OTR(one touch recording) function. Press repeatedly to set OTR length (30 mins / 60
mins / 90 mins / 120 mins / 180 mins /Off).
4.3 Browser Menu
The Browser menu allows you browse and play movie files stored on a HDD or an external
USB \Card device.
To enter the menu, select Browser from the Home menu.
Press UP or DOWN ARROWS to select the device on
which the media is stored. Choose from HDD, USB
(for media
stored on an external flash disk PRESS ENTER
4.3.1 Browsing All/Music/Photo/Movies
Use the left and right navigation arrows to select the All/Music/Photo/Movies tab.
Press UPand DOWN to select the folder(s) containing
your all files(Beside Music ,Photo and Movie).
Enter the folder press UP and DOWN to select
the file you want to view and press ENTER to
play.
4.3.2 File Edit Menu
Press UP and DOWN to select the file or folder,
press DELETE key to display the Edit tab.
Return Select to return to the main screen.
Rename To rename a file, do the following:
1. Press UP and DOWN on the remote control to select the Rename tab from the menu bar.
2. Press ENTER on the remote control. The name entry screen appears.
3. Use the navigation arrows to select letters and numbers. Select CAPS to toggle
between uppercase and lowercase letters. Press <- to delete a letter. Press -> to insert
a space. Press ENTER to input each letter or number.
4. Once you have entered the new name, select OK and press ENTER to confirm all
changes.
If you want to cancel the naming during the process, press RETURN.
Delete To delete a title, do the following:
1. Press UP and DOWN on the remote control to select the Delete tab from the
menu bar.
2. Press ENTER to confirm and delete the file.
3. A confirmation message appears. Press UP or DOWN and select OK.
4. Press ENTER to delete the selected file. To cancel delete, select Return .
4.4 Timer Record Menu * NOT USED *
4.4.1 Creating a New Schedule * NOT USED*
4.4.2 Editing Schedules * NOT USED*
4.5 SETUP MENU
The Setup Menu allows you to configure video, record and system settings.
To enter the menu, select Setup from the Guide menu or select on the remote control.
4.5.1 Changing “Video” Settings The Optimum HDD 12.1
HDMI monitor will work on ( auto HDMI or NTSC ) setting
Brightness
Select to set brightness levels.
Press UP and DOWN to adjust brightness. The new setting is previewed
onscreen. Press ENTER to confirm.
Contrast Select to set contrast levels.
Press UP and DOWN to adjust contrast. The new setting is previewed onscreen.
Press ENTER to confirm.
4.5.2 Changing “REC” Settings
Press LEFT and RIGHT on the remote control
to select the Record tab from the menu bar.
23
Quality Select to set the default recording quality setting.
Press UP and DOWN to select the quality setting you requi
The highest quality setting is HQ which requires the most st
The other settings reduce recording quality sequentially but
less storage space. Press ENTER to confirm.
Permanent Timeshift NOT USED
Rec Device
Select to adjust the device to be recorded in.
Press UP and DOWN to select the device you require.
Press ENTER to confirm.
TimeShift Device NOT USED
4.5.3 Changing “System” Settings
Press LEFT and RIGHT on the remote control to select the System tab from the menu.
Menu Language Select to choose the OSD (On Screen Display) language.
Press UP and DOWN to select the language. Press ENTER to confirm.
.
Time
Enter the system menu and press LEFT and RIGHT to select each field and the up
and down navigation arrows to adjust each setting.
Press ENTER to confirm.
HDD Format Enter format Hard Disc
25
Restore Default Select to restore factory defaults.
A confirmation message appears. Select CONFIRM and press RETURN to
restore all settings to defaults.
4.5.4 Changing “Network” Settings NOT USED
4.6 File Copy Menu
The File copy Menu allows you to copy files fromt,USB,CARD,HDD each other.
To enter the menu, select File Copy from the Guide menu or select ‘ ‘ COPY ’ ’ key on the remote
control.
4.6.1 Step 1. Select Source Device
When you enter the File copy interface, press UP and DOWN to select the device which your want
to copy first.
Then press RIGHT to select Destination Device, press LEFT to return.
4.6.2 Step 2. Select Destination Device
When into Destination sector, press UP and DOWN to select the device of the Destination.
Then press RIGHT to next step,
and press LEFT to return.
4.6.3 Step 3. Select copy files or folders
At Source sector, press UP and DOWN to select and press Play to select file or folders which you
want to copy. When you succeed to select, at the file or folder name right side will display .
Then press RIGHT to next step, and press LEFT to return.
4.6.4 Step 4. Select the folders of Destination
At Destination sector, press UP and DOWN to select the folders of destination.
Then press RIGHT to next step, and press LEFT to return.
4.6.5 Step 5. Copy Status
At Pop menu, select OK to copy, select No to cancel.
When copy succeed, the system will display “File Copy Completed!”; if failed, the system will display
“File Copy failed!”
When the File Copy completed! You can select “OK”
to browser files, or select “No” return Video.
5 Format Hard disc
When you insert a Hard disc on the system at the first time, System will remind you to enter the Hard
disc format interface. You can also press “Setup” Key into Setup menu and select HDD Format to
Format HDD.
First, the system will jump to a warning page.
Press LEFT and RIGHT on the remote control to select your wish.
When highlight move the OK button, Press to enter the next step.
Otherwise, select cancel to return.
5.1 The first step
Step 1: FAT32 & NTFS Partitioning
Use a 100% FAT 32 drive for best results
Use UP and DOWN to adjust the Fat32 and NTFS partition.
Press LEFT and RIGHT on the remote control to select back or next.
When highlight move the Next button, Press ENTER
to enter the next step. Otherwise, select
back button to return.
5.2 The second step
Step 2: Hard disk format
Press LEFT and RIGHT on the remote control
to select back or format.
When highlight move the Format button, Press ENTER to start.
Otherwise, select back button to back.
5.3 Congratulation page
When complete the format, the system will display the congratulation page.
Select OK button and Press ENTER to exit.
6 Network Setting * NOT USED* SPECS
RECORDABLE DEVICES SUPPORTED:
.BUILT IN HDD(Fat32)
.USB HDD(Fat32)
VIDEO RECORDING FORMAT
.HQ/SP/LP/EP/SLP mode: MPEG-2 MP@ML
AUDIO RECORDING FORMAT
.HQ/SP/LP/EP/SLP mode: MP2 2-chanel
VIDEO RECORDING MODE
Mode 80 GB HDD 120 GB HDD 160 GB HDD 320 GB HDD
HQ
16 hrs
24 hrs
33 hrs
66 HRS
SP
32 hrs
48 hrs
66 hrs
120 HRS
LP
48 hrs
72 hrs
99 hrs
EP
64 hrs
96 hrs
132 hrs
SLP
96 hrs
144 hrs
198 hrs
Note: The specifications and design of this product are subject to change without notification.
Hathorn Corporation
SEWER CAMERA LIMITED WARRANTY
www.hathorncorp.com
1. Limited Warranty Coverage. This Limited Warranty consists of a Warranty, which
provides one full year of coverage under our manufacturer’s standard new product
warranty. Hathorn Corporation warrants to the original purchaser of the product
herein registered that the product shall function properly for a period of one year from
the original date of purchase under normal and proper usage. This one year Limited
Warranty covers malfunctions resulting from defects in materials or workmanship
only. If the Hathorn Corporation product fails to function properly under normal and
proper usage due to defects in materials or workmanship during the period of this
Limited Warranty, Hathorn will repair, adjust or replace defective parts as Hathorn
deems appropriate.
This Limited Warranty is only available to the original purchaser; it is not transferable under
any circumstances.. This Limited Warranty applies only to Hathorn Corporation sewer
camera systems that are distributed in the United States and Canada and purchased from a
Hathorn Corporation authorized dealer. This Limited Warranty does not apply to Hathorn
brand products imported and sold in the U.S.A. by unauthorized dealers, distributors or other
sellers.
2. Not Covered. This one year Limited Warranty does not cover damage or malfunctions
stemming from other than normal and proper usage. This Extended Limited Warranty
also does not cover the following: (a) intentional or accidental misuse or abuse
(including, but not limited to, damage to push rod from excessive force), (b) failure to
follow operating or maintenance instructions, (c) repairs by any individual or entity
other than an authorized Hathorn Corporation Repair Center, (d) product components,
accessories or consumables not manufactured by Hathorn Corporation (e) product
tampering, (f) droppage, (g) battery leakage if equipped, , (h) media cards. Hathorns
responsibility under this Limited Warranty is limited to the repair, adjustment or
replacement of defective parts as determined by Hathorn Corporation in its sole
discretion. Routine cleaning and normal cosmetic wear and tear are not covered by
this Limited Warranty.
3. LIMITATION OF LIABILITY. BY YOUR ACCEPTANCE OF THIS LIMITED
WARRANTY, YOU AGREE THAT HATHORN CORPORATION SHALL HAVE
NO LIABILITY TO YOU FOR ANY DAMAGES RESULTING FROM DELAY
OR LOSS OF USE OF THE PRODUCT IN SERVICE OR REPAIR. HATHORN
SHALL HAVE NO LIABILITY FOR GENERAL, SPECIAL, INCIDENTAL OR
CONSEQUENTIAL DAMAGES ARISING OUT OF BREACH OF THIS LIMITED
WARRANTY.HATHORN CORPORATION ASSUMES NO RESPONSIBILITY
FOR WARRANTIES EITHER EXPRESSED OR IMPLIED BEYOND THAT
WHICH IS CONTAINED HEREIN.
4. Obtaining Service. If the product requires service, please pack it carefully using ample
packing material in order to prevent damage during shipment and mail it postage
prepaid and insured to Hathorn Corporation 75 West Beaver Creek Road Unit 7 ,
Richmond Hill Ontario, Canada , L4B1K6 and include proof of purchase of the
Product ( invoice ).The Product can also be shipped to the dealer from where it was
purchased. When service is completed, your product will be returned to you postage
collect. Hathorn Corporation is not responsible for damages or loss incurred in
connection with mailing and/or transportation of product. In your package, please
include the following:
(a) A copy of the sales receipt showing the date and place of purchase.
(b) All accessory items that may be related to the problem.
(c) A detailed description of the problem.