1
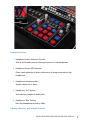
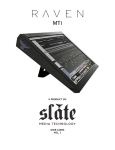
MTX Monitor Controller
MTX ANALOG ELECTRONICS USER MANUAL
Version 1
Updated 3/26/2015
RAVEN MTX MONITOR CONTROLLER USER MANUAL 1 Updated 3/26/2015
Contents
IMPORTANT SAFETY NOTES BEFORE YOU START ............................... 3 WARRANTY INFORMATION ................................................ 5 ANALOG MONITOR CONTROLLER .......................................... 8 RAVEN MTX Monitor Controller overview ........................................................................................................... 8 LEFT CONTROL MODULE ................................................ 9 Headphone Section ................................................................................................................................................ 9 Talkback Controls ................................................................................................................................................ 10 Creating an Auto Talk track to trigger the talkback mic .............................................................................. 11 Surround Speaker Selection ............................................................................................................................... 12 Cue 2 & Studio Section ....................................................................................................................................... 12 Studio Output ....................................................................................................................................................... 13 RIGHT CONTROL MODULE .............................................. 14 Speaker Select ...................................................................................................................................................... 14 SOURCE Inputs ...................................................................................................................................................... 16 Stereo and Surround Modes ................................................................................................................................ 18 Multi-Source Mode ............................................................................................................................................... 19 Talkback Selection ............................................................................................................................................... 19 CUE System ........................................................................................................................................................... 19 CUE Sources .......................................................................................................................................................... 19 RAVEN MTX ANALOG REAR PANEL ........................................ 20 Aux Module ............................................................................................................................................................ 21 Stereo Module ....................................................................................................................................................... 22 Surround Module .................................................................................................................................................. 23 RAVEN MTX MONITOR CONTROLLER USER MANUAL 2 Important Safety Notes Before You Start
This symbol indicates that dangerous voltage constituting a risk of electric shock is
present within your RAVEN MTX.
This symbol indicates there are important operating and maintenance instructions
in the literature accompanying your RAVEN MTX.
1. Read these instructions.
2. Keep these instructions.
3. Regard all warnings.
4. Follow all instructions.
5. Do not use this apparatus near water.
6. Do not block any ventilation openings. Install in accordance to the
manufacturer’s instructions.
7. Do not install near any heat sources such as radiators, heat registers,
stoves, or other apparatus (including amplifiers) that produce heat.
8. Protect the power cord from being walked on or pinched particularly at
plugs, convenience receptacles, and the point where they exit from the
device.
RAVEN MTX MONITOR CONTROLLER USER MANUAL 3 9. Only use attachments/ accessories specified by the manufacturer.
10.
Unplug this apparatus during lightning storms or when unused for long
periods of time.
11.
Do not stick metal objects or conductive material in the device, power
chord, or power inlet.
12.
Make sure you connect the earth ground wire to prevent electric shock. A
cable with a three-pronged grounded AC Plug must be connected to a threepronged AC outlet.
Power Source
Operate your RAVEN MTX only from the power source included.
Moving
Make sure the product is turned off, unplugged, and all cables have been removed.
Servicing
Servicing of the RAVEN MTX is to be done by qualified service personnel only. To
reduce the risk of electric shock, do not perform any servicing other than that
contained in the operating instructions unless you are qualified to do so.
Damage Requiring Service
Unplug the device from the power outlet and refer servicing to qualified service
personnel under the following conditions:
•
When power supply is damaged
•
If liquid has been spilled or objects have fallen into the RAVEN MTX.
•
If your RAVEN MTX has been exposed to rain or water.
•
If your RAVEN MTX has been dropped or damaged in any way.
•
When your RAVEN MTX exhibits a distinct change in performance.
RAVEN MTX MONITOR CONTROLLER USER MANUAL 4 Warranty Information
Hardware Limited Warranty
A. Limited Warranty
Slate Media Technology (SMT) warrants that its hardware will be free from defects in
materials and workmanship, for one (1) year after it has been acquired by the first
user when given normal, proper and intended usage. SMT will repair or replace
nonconforming product (or a component thereof) that is returned to SMT within the
warranty term at no charge.
This warranty applies to products purchased anywhere in the world. You may have
additional consumer rights under local laws. SMT will provide the minimum warranty
term required by applicable law.
B. Warranty Recipient
The limited warranty applies only to genuine SMT products when sold by an SMT
reseller, distributor or dealer.
C. Exclusions from Warranty
This warranty does not cover problems caused by your acts, the acts of others, or
events beyond SMT’s reasonable control.
SMT does not warrant that use of SMT products will be uninterrupted or error-free.
This limited warranty does not apply to expendable components and is void if the
product serial numbers have been removed. SMT has no obligation under this
warranty to repair or replace products damaged as a result of 1) normal wear and
tear, 2) improper or unauthorized use or repair, 3) customer fault or negligence, 4)
RAVEN MTX MONITOR CONTROLLER USER MANUAL 5 natural or manmade disaster, or 5) causes external to the products including, but not
limited to, exposure to moisture, extreme temperatures, power outages, or other
customer site conditions.
D. Limitation On and Exclusion of Damages for Breach of Warranty
You may recover from SMT and its suppliers only direct damages up to the amount you
paid for the product.
You cannot recover for loss of present or prospective profits, data loss, business
damage, or any other consequential, special, indirect or incidental damages.
E. Warranty Procedures
For information regarding your warranty, please contact Slate Media Technology or
your local authorized reseller, distributor, or dealer. Product registration at
www.slatemt.com is required in order to process a warranty claim. You will be
required to provide proof-of-purchase to validate your claim.
Hardware may require return-to-factory, and customer is responsible for properly
packing and labeling and insuring any warranty returns for shipment to Slate Media
Technology. Customer is responsible for any damage or loss incurred due to improper
packaging or labeling. Customer is required to pay shipping/handling one way for
warranty product returns and applicable custom duties, V.A.T. and other associated
taxes and charges for international service.
RAVEN MTX MONITOR CONTROLLER USER MANUAL 6 Audio Interface Cabling & Initial Setup
If you mount your computer audio interface in the integrated 19” rack under the
RAVEN MTX you will need the following cables for interfacing:
●
RAVEN MTX MAIN INPUTS, analog inputs 1-8: DB-25 (approximately 18”) to the
connector style best suited for your audio interface
●
RAVEN MTX Speaker and Studio outputs: DB-25 to XLRM, or whatever connector
type best suited for your speakers system or patch bay
Make Sure Power is turned to “OFF” position before making any connections. It is also
best to switch speakers and amplifiers to the off position until all connections have
been made. Always power up the RAVEN MTX before powering up speakers and
amplifiers to avoid a “popping” sound.
1. Connect one end of the DB25 to the RAVEN MTX’s analog I/O section labeled
“MAIN INPUTS.”
2. Connect the other end of the cable to the outputs of your chosen
interface/converter.
3. Connect a DB25 cable to the Speaker Output of the RAVEN MTX.
4. Plug main speakers (A) into XLR outs 1 and 2, Left and Right respectively.
5. With speakers in “OFF” position, turn on RAVEN MTX audio electronics.
6. Turn speakers on.
7. To hear your audio in a typical DAW setup, select Speaker A, and Source: Mix 1
on the right Control Module. Mix 1 receives input from audio interface outputs
1,2.
RAVEN MTX MONITOR CONTROLLER USER MANUAL 7 Analog Monitor Controller
RAVEN MTX Monitor Controller overview
The RAVEN MTX is a full featured monitor controller that facilitates high fidelity,
intuitive and flexible listening on studio speakers, headphones, and CUE systems.
Multiple inputs can be routed to multiple output destinations. The standard RAVEN
MTX configuration operates in stereo (and mono), whereas an optional surround
module enables the RAVEN MTX to operate in 5.1 or 7.1 surround.
Left Control Module
RAVEN MTX MONITOR CONTROLLER USER MANUAL 8 Headphone Section
1. Headphone Source Selection Encoder:
Selects which audio source is being monitored on the headphones.
2. Headphone Source LED Indicator:
Gives visual indication of what audio source is being monitored on the
headphones.
3. Headphone volume encoder:
Adjusts volume up or down.
4. Headphone “ON” Button:
Activates the headphone audio path.
5. Headphone “DIM” Button:
Dims the headphone section by 20db.
Lighting, Metering, and Talkback Controls
RAVEN MTX MONITOR CONTROLLER USER MANUAL 9 1. Lights:
Selects illumination state for inactive pushbuttons. Customize the look of your
RAVEN MTX! All inactive pushbutton controls in the RAVEN MTX monitoring
section have two illumination options:
•
When LIGHTS button is ON, all inactive buttons will illuminate RED
•
When LIGHTS button is OFF, all inactive buttons will not illuminate
2. Talkback:
Injects the talkback microphone signal into the CUE system.
•
Input:
o Internal talkback mic located in the meter bridge - a high fidelity
electret condenser with built-in compression for clear sound.
o External Talkback Mic input.
•
Output:
o Press and hold – keeps the talkback ON as long as TALKBACK is
pressed.
o Quick momentary press – Toggles TALKBACK ON. Toggles OFF with
another single press
o Auto Talk – hands free means for toggling TALKBACK
automatically: mic ON when the DAW transport is stopped, and
mic OFF when the DAW transport is playing back. Keeps
communication open and frees up your hands in between takes.
RAVEN MTX MONITOR CONTROLLER USER MANUAL 10 •
Auto Talk functionality requires an audio signal feed from your DAW
that plays at a steady level when the DAW transport is playing, and
stops when the DAW transport stops. When RAVEN MTX's Auto Talk
circuit detects the presence of this signal (DAW transport PLAY) the
talkback automatically mic shuts off. When no audio signal is present
at RAVEN MTX's Auto Talk input (DAW transport STOP) RAVEN MTX's
talkback mic automatically turns on. Viola! Hands-free talkback.
Creating an Auto Talk track to trigger the talkback mic
1. Make a new track in your DAW and name it Auto Talk.
2. Record a constant audio signal onto the Auto Talk track. An appropriate
Auto Talk signal is a constant sound with little or no change in amplitude
such as a test tone, white noise, or SMPTE time code, or a note on a
synthesizer. It really can be anything, as long as it's a steady
sound. Record this constant sound onto a dedicated track in your
DAW. The audio in the track must be equal in length to the total session
time (where the audio starts in your session to where the audio ends).
3. Route the Auto Talk track to the RAVEN MTX’s Auto Talk input. Route
the Auto Talk track's output to its own analog output in your audio
interface and patch that analog output to RAVEN MTX's Auto Talk input,
channel 8 on the Aux I/O DB25.
4. Engage RAVEN MTX's Auto Talk circuit. The Talkback mic should turn on
right away. This button is located on the lower right of Control Module
Right.
5. Adjust the Auto Talk track level so that it is outputting approximately 25dB.
RAVEN MTX MONITOR CONTROLLER USER MANUAL 11 6. Press play on the DAW and see if RAVEN MTX's talkback mic turns off. If
the talkback mic does not turn off, try increasing the Auto Talk track
output level in your DAW and make sure it's a constant signal with little
variation in amplitude.
Surround Speaker Selection
RAVEN MTX can manage standard 5.1 and 7.1 speaker configurations, based on user
preference or desired standard.
L = Left Front
R = Right Front
SL = Surround Left
SR = Surround Right
C = Center
LFE = Low Frequency Extension
RL = Rear Left
RR = Rear Right
In 7.1 mode, SL, SR, RL, RR speaker locations can be defined by the user, based on a
chosen standard or preference.
Cue 2 & Studio Section
1. CUE 2 & Studio rotary source selector:
Selects which audio source is being monitored on CUE 2 & Studio.
2. CUE 2 & Studio Indicator LED:
Gives visual indication of which source is selected in CUE 2 and Studio.
3. CUE 2 & Studio Volume:
Adjusts Volume for CUE 2 and Studio audio paths.
4. CUE 2 and Studio “ON” Button:
RAVEN MTX MONITOR CONTROLLER USER MANUAL 12 Toggles Cue 2 and Studio audio paths off and on.
5. Mix 1 to Studio:
Sends Mix1 source to Studio outputs.
Studio Output
STUDIO output is a feed for speakers set up in a live tracking room and has many
applications.
1. Monitoring without headphones:
Performers can monitor the audio without headphones and/or the engineer can
Talkback to people in the live room who are not wearing phones.
A classic technique for recording group vocals without headphones is to record
the performance twice and flip the phase of the duplicate performance to
cancel out the reference audio while leaving the recorded performances
intact. If the levels are matched in recording and playback and the tracks are
panned to the same position in the mix, the reference audio that played from
the studio speakers during recording will be largely cancelled out between the
combined tracks.
2. Recording room ambience onto previously recorded tracks:
Assign the tracks you want fed to the Studio speakers to DAW outputs 5, 6, 7,
or 8. Chose the associated CUE output as the Studio Source on the Control
Module Left. Using a microphone and preamp set up in the room, record the
sound of the room back into your DAW.
3. Additional Talkback Com feed:
Since Talkback can be assigned separately to CUE and STUDIO, the Studio
Output can serve as a discrete Talkback feed.
4. Additional stereo headphone feed:
RAVEN MTX MONITOR CONTROLLER USER MANUAL 13 Feed to headphone amp. Talkback is injected when the STUDIO button is
engaged in the Talkback section of Control Module Right.
Right Control Module
Speaker Select
Stereo Speaker Outputs:
RAVEN MTX sends attenuated audio to multiple pairs of speakers. In stereo
mode, RAVEN MTX can send to three external speakers (A, B, & C) plus onboard “Betty” Laptop Reference™ speakers.
SPEAKER C Subwoofer Mode:
RAVEN MTX MONITOR CONTROLLER USER MANUAL 14 1. SPEAKER C normally operates as a discrete stereo speaker output, just like
SPEAKER A and B. But SPEAKER C can also act as a subwoofer On/Off selector
and be paired with SPEAKER A, B or both.
2. Activate SPEAKER C Subwoofer Mode by holding down SPEAKER A and then
SPEAKER C. Thereafter, SPEAKER C output toggles On and Off with each
momentary press, while SPEAKER A remains On. SPEAKER C Subwoofer Mode
can also be paired with SPEAKER B by the same method.
3. To deactivate SPEAKER C subwoofer mode, press and hold Speakers A and C
together. If SPEAKER C has also been paired with B, un-pair them by the same
above method.
Surround Speaker Outputs (optional surround module required):
1. In surround mode, RAVEN MTX can control two sets of 5.1 or 7.1 surround
speakers on SPEAKER A and B outputs.
•
Surround Speaker Configuration and SPEAKER MUTE / SOLO
•
Speaker MUTE / SOLO
2. Whether operating in stereo or surround mode, any connected SPEAKER can be
individually muted or soloed via the Speaker Mute buttons. A momentary press
will mute the selected speaker, while a 2 second hold will solo that speaker.
One can also mute or solo multiple speakers simultaneously by pressing two
buttons at once. You may wish to solo two surround channels at the same time
or perhaps solo the L, C, and R speakers together.
3. In Stereo mode, only the top two buttons are functional. In Surround mode, all
speakers up to 7.1 can be muted individually. Normally the buttons will be
blue, and they will turn purple when surround mode is activated.
RAVEN MTX MONITOR CONTROLLER USER MANUAL 15 4. When the Surround Module is connected, the surround speakers are connected
to OUTPUT1 DB25.
SOURCE Inputs
RAVEN MTX’s source inputs are designed to integrate seamlessly with an 8-output
DAW interface simply by connecting the interface’s first 8 outputs (often a
standard DB25 to DB25 cable) to RAVEN MTX’s Input1 DB25. No patching will be
required to instantly go back and forth between tracking and mixing, in Stereo or
Surround (optional).
1.
MIX 1:
Monitors the main analog stereo output of the DAW
Inputs:
•
MAIN INPUTS DB25, channels 1&2
Output options:
•
MASTER
•
Console headphones
•
CUE 1 (always on, except in surround mode)
•
STUDIO (selectable)
•
Pre Fade Source Through (a non-attenuated output of the
SOURCE selected)
•
2.
Mix 1 becomes L, R in surround mode
MIX 2:
Monitors an alternate analog stereo output from the DAW
Main Inputs A:
•
MAIN INPUTS DB25, channels 3&4
Output options:
RAVEN MTX MONITOR CONTROLLER USER MANUAL 16 •
MASTER
•
Console headphones
•
CUE 2
•
STUDIO
•
Pre Fade Source Through
•
CUE A/B, C/D
Function:
Headphone CUE sends, four analog mono sources, two stereo
pairs, or a combination thereof.
Main Inputs B, C, D:
•
MAIN INPUTS DB25, channels 5,6 & 7,8
Output Options:
3.
•
MASTER
•
CUE A, B, C, D
•
Console headphones
•
CUE 2
•
STUDIO
•
Pre Fade Source Through
AUX:
Monitors any additional stereo analog +4 line level source such as master
record and playback devices.
Inputs:
•
Aux I/O DB25 channels 5,6
Output options:
•
MASTER
•
Console headphones
•
CUE (Aux select)
RAVEN MTX MONITOR CONTROLLER USER MANUAL 17 4.
•
STUDIO
•
Pre Fade Source Through
DIGI:
Monitors stereo digital sources up to 24 bit, 96kHz
Input:
•
Digital TOSLINK optical, or SPDIF RCA input on RAVEN MTX
Aux I/O module
Outputs:
5.
•
MASTER
•
STUDIO
•
Pre Fade Source Through
iDock:
Monitors two stereo sources: 30 pin iDock for iPod, iPhone 4 and prior, or
1/8th stereo input for other devices.
IMPORTANT:
When a plug is inserted into the 1/8th” jack, the iDock audio signal is
interrupted.
Available outputs:
•
MASTER
•
STUDIO
•
Pre Fade Source Through
Stereo and Surround Modes
RAVEN MTX is designed to seamlessly switch between stereo and surround monitoring
modes by receiving the stereo SOURCE and CUE inputs on the same DB25 Inputs as the
SURROUND inputs. By connecting the first 8 outputs of your DAW interface to RAVEN
RAVEN MTX MONITOR CONTROLLER USER MANUAL 18 MTX’s DB25 Input1, no patching is required to instantly switch between stereo
tracking, overdubbing and mixing mode and a surround mixing or voiceover mode. Of
course RAVEN MTX easily interfaces with a patch bay as well.
Multi-Source Mode
RAVEN MTX can monitor multiple stereo sources simultaneously. Simultaneously press
the inputs you wish to monitor at the same time. Press any single source button to
monitor only that input and automatically deactivate the other previously selected
inputs, including multiple sources.
Talkback Selection
When STUDIO button is active, talkback is injected into stereo STUDIO feeds.
When CUE button is active, talkback signal is injected into all eight CUE feeds.
CUE System
RAVEN MTX’s CUE system integrates with multichannel artist CUE systems, providing 8
channels of pristine, customizable analog audio sources to artist headphones. RAVEN
MTX’s CUE routing and outputs integrate easily with preexisting multichannel cue
systems. When combined with a third party headphone mixing system, RAVEN MTX’s
two stereo sources and 4 mono sources allow the performers to personalize their
headphone monitor mix.
CUE Sources
CUE1:
CUE 1 is always fed directly from MIX 1, typically the DAW main stereo outputs.
CUE 1 is the leftmost knob on the RAVEN MTX CUE MIXER.
CUE2:
RAVEN MTX MONITOR CONTROLLER USER MANUAL 19 CUE 2 source is switchable between 4 stereo sources: MIX 2, iDOCK, DIGI, or
AUX. The source selection is called CUE 2 & STUDIO SOURCE and is located on
the Control Module Left.
RAVEN MTX Analog Rear Panel
RAVEN MTX audio connections are made on a 2-rack space unit that connects to the
back of the main chassis.
1. AC Inlet:
Connect your power cable to this connector
2. Aux Module:
Connections for power and activation of Meter bridge, iDock, Aux Module, DAC
inputs, and external talkback mic.
3. Stereo Module:
Connections for Left/Right control modules and input/output of all stereo
signals.
4. Surround Module:
Connections for surround outputs and surround 2 inputs.
RAVEN MTX MONITOR CONTROLLER USER MANUAL 20 Aux Module
1. Meter Bridge:
Connect the ribbon cables to these slots to activate RAVEN MTX meter bridge.
2. iDock I/O:
Connect the iDock ribbon cable to allow signal to flow from iDock to monitoring
section.
3. AUX I/O:
Provides additional source and functionality via the following inputs and
outputs on the DB25 connector.
•
XLRM - Source Out Left (unattenuated pass-through of selected Main
source(s)
•
XLRM - Source Out Right (unattenuated pass-through of selected Main
source(s)
•
XLRM - iDock Out Left (boosts iDock audio source to +4)
•
XLRM - iDock Out Right (boosts iDock audio source to +4)
•
XLRF - Aux In Left
•
XLRF - Aux In Right
•
XLRM - Slate Out (line level talkback out for "slating" takes)
•
XLRF - Auto Talk trigger input (threshold at approximately -37dB)
RAVEN MTX MONITOR CONTROLLER MANUAL 21 4. DAC Inputs:
Connect stereo digital devices into these connectors, Optical Toslink or SPDIF,
24 bit, 96kHz. When both SPDIF And Optical digital inputs are connected,
SPDIF input will override Optical. The optical digital input is great for listening
to the audio output of your Mac Pro, for example, instead of using the
computer's low level 1/8th" jack.
5. External Talkback Mic:
Connect the dynamic mic of your choosing to use for talkback. Adjust gain by
the control to the left.
Stereo Module
1. Left and Right Control Module Connections:
Plug your left and Right Ethernet cables into their respective slots to give
power and signal to the Left and Right control modules.
2. Cue Out:
Eight channel outputs for the Cue system.
3. Stereo Speaker Output:
DB25 connector for speaker output. Use with a DB25 to XLR male snake and
plug speakers into lines 1 and 2 for Mix1 stereo.
4. Main inputs:
DB25 connection for connecting your audio interface.
RAVEN MTX MONITOR CONTROLLER MANUAL 22 NOTE:
The Main Input connection is Surround ready. This slot is also the connection
for Surround1 mix.
Surround Module
1. Stereo SPKR A/ SURR L,R – Alternate ¼” stereo outputs.
2. Surround Speaker Output – DB25 connection for surround signals 1-8.
3. Surround 2 Input – DB25 connection for the Surround2 source input.
RAVEN MTX MONITOR CONTROLLER MANUAL 23