1
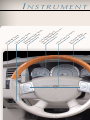
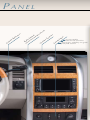
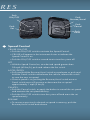
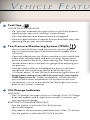
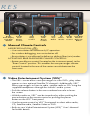
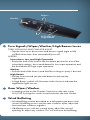
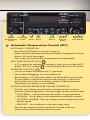
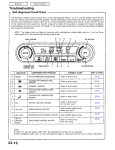
2009 | Aspen
Quick Reference Guide
5v
ad
In
ht
ve
lig
rte
Sw
itc
h
Co
nt
ro
lS
w
In
itc
(N str
he
on um
s
-H en
yb t C
rid lu
Sh ste
ow r
n)
ed
ve
ch
(B a s S
eh h i g
ind e r n a
St / H l / W
ee i g
rin h i p
g Be er
W a /
he m
el s
Sp
) Le
e
W urn
rS
(B d j u
w
eh s
itc
ind t a
h
St b l e
ee P
rin e
g da
W ls
he S
el w
)
it
T
A
11
He
r
Instrument
• Power Outlet
• Heated Seat Switches
• Electronic Stability Program
(ESP) Off Switch
Pa
h
itc
Sw
at
e
Co
ne
l
nt
ro
ls
o
im
Cl
A
(T ud
ou io
ch S
-S ys
cr te
ee m
n
Ra
di
Co
lu
m
n
Sh
ift
Le
ve
r
Sh
ow
n)
Panel
V e h i c l e F e at u
AUTO
Rotate
Headlight
Switch
Rotate
Dimmer
Push
Fog Lights
Headlight Switch
Automatic Headlights/Parking Lights/Headlights
•Rotate the headlight switch to the first detent for parking lights and the second detent for headlights.
•Rotate the headlight switch to “A” for AUTO headlights.
•When set to “A” (AUTO), the system automatically turns the
head lights on or off based on ambient light levels.
Instrument Panel Dimmer
•Rotate the dimmer control to the extreme bottom position to fully dim the instrument panel lights and prevent the interior lights from illuminating when a door is open.
•Rotate the dimmer control up to increase the brightness of the
instrument panel when the parking lights or headlights are on.
•Rotate the dimmer control up to the next detent position to fully brighten the odometer and radio displays when the parking lights or headlights are on. Refer to your multimedia or navigation user manual for radio display dimming.
•Rotate the dimmer control up to the last detent position to turn
on the interior lights.
Fog Lights
•Turn the headlights or parking lights on and push the headlight switch once to turn the fog lights on. Push the switch a second time to turn the fog lights off. Fog lights will not operate when the high beams are on.
•A fog light symbol will illuminate in the cluster to indicate the fog lights are on.
res
Push
ON/OFF
Push
Set
Speed Control
Push
Resume/Accel
Push
Cancel
Push
Decel
Cruise On/Off
•Push the ON/OFF switch to activate the Speed Control.
•CRUISE will appear in the instrument cluster to indicate the
Speed Control is on.
•Push the ON/OFF switch a second time to turn the system off.
Set
•With the Speed Control on, at a desired speed greater than
25 mph (40 km/h), push and release the Set switch.
Accel/Decel
•Push and hold the Resume/Accel switch to accelerate or push and hold the Decel switch to decelerate the vehicle; release the switch to save the new set speed.
•Once a speed is set, pushing the Resume/Accel switch once or
Decel switch once will increase or decrease the set speed
approximately 1 mph (2 km/h).
Cancel
•Push the Cancel switch, or apply the brakes to cancel the set speed and maintain the set speed memory.
•Push the ON/OFF switch to turn the system off and erase the set speed memory.
Resume
•To resume a previously selected set speed in memory, push the Resume/Accel switch and release.
V e h i c l e F e at u
Fuel Cap
Loose Gas Cap Message
•If a “gas cap” odometer message (shown as gASCAP) appears, tighten the gas cap until a “clicking” sound is heard.
•Press the odometer reset button to turn the message off.
•If the message continues to appear for more than three days after tightening the gas cap, see your dealer.
Tire Pressure Monitoring System (TPMS)
•If one or more of the four road tire pressures are low, the Tire
Pressure Monitoring Light will illuminate and an audible chime
will sound.
•Check the inflation pressure of each road tire on your vehicle and inflate to the recommended cold pressure value, shown on the placard located in the driver’s door opening. The TPMS display should not be used as a tire pressure gauge when adjusting your tire pressure.
•The light will turn off once the updated tire pressure has been recognized. The vehicle may need to be driven for up to
10 minutes above 15 mph (25 km/h) before the light will turn off.
•Temperature changes can affect tire pressures causing the TPMS light to turn on. Colder temperatures will decrease tire
pressure and warmer temperatures will increase tire pressure.
•If a spare tire is in use on the vehicle, the TPMS light may turn on. Refer to your Owner’s Manual.
Oil Change Indicator
Message
•If an “oil change” message (shown as CHAngE Oil or Oil Change Required) appears and a single chime sounds, it is time for your next required oil change.
Resetting Light After Servicing
•Turn the ignition switch to the ON/RUN position
(do not start engine).
•Fully depress the accelerator pedal three times within 10 seconds.
•Turn the ignition switch to the OFF/LOCK position.
res
Rotate
Rotate
Rear Wiper/ Front
Blower
Push Rear
Control
Washer
Slide
Temp
Control
Rotate
Rear
Blower
Control
Push
A/C
Button
Rotate Push Rear
Air
Recirc. Mode Window
Modes Control Defroster
Button
Manual Climate Controls
Air Recirculation
•Use recirculation for maximum A/C operation.
•For window defogging, turn recirculation off.
•Recirculation is not allowed in defrost or defrost/floor (mix) modes.
Activating Rear Passenger Climate Controls
•Rotate rear blower control, located on the instrument panel, to the “Rear Control” position. This enables the rear passenger climate controls located in the rear of the center console between the
front seats.
Video Entertainment System (VES)™
•The VES™ screen allows rear passengers to view DVDs, play video games or view optional Satellite TV channels. Additionally, VES™ allows passengers to listen to radio, satellite radio or CDs using the
supplied headphones through the vehicle’s audio system.
•Push the release button in the rear overhead console to lower
the screen.
•With the radio on, VES™ can be turned on by either pushing the power button on the remote control or pushing the power button on the VES™ front panel.
•Use the remote control or VES™ front panel to select either radio, CD, Satellite radio, Satellite Video or DVD.
•Refer to your Video Entertainment System (VES)™ User’s Manual for further details.
Wipers
Washer
Pull Lever for
High Beams
Turn Signals/Wiper/Washer/High Beams Lever
Turn Signals/Lane Change Assist
•Tap the lever up or down once and the turn signal (right or left)
will flash three times then automatically turn off.
Wipers
Intermittent, Low and High Operation
•Rotate the end of the lever to the first detent position for one of five intermittent settings, the second detent for low wiper operation and the third detent for high wiper operation.
Washer
•Push the end of the lever in and hold for as long as spray is desired.
High Beams
•Pull the lever toward you past the detent to activate the
High Beams.
•A High Beam symbol will illuminate in the cluster to indicate the High Beam lights are on.
Rear Wiper/Washer
•A rotating switch on the Climate Control turns the rear wiper ON/OFF. Pushing this switch inward activates the rear washer.
Wind Buffeting
•Wind buffeting can be described as a helicopter-type percussion sound. If buffeting occurs with the rear windows open, adjust the front and rear windows together.
•If buffeting occurs with the sunroof open, adjust the sunroof
opening, or adjust any window. This will minimize the buffeting.
Clock Setting
Non-Touch-Screen Radios
•Press and hold the TIME button until the hours blink; turn the
TUNE/SCROLL control knob to set the hours.
•Press the TUNE/SCROLL control knob until the minutes begin to blink; turn the TUNE/SCROLL control knob to set the minutes.
•Press the TUNE/SCROLL control knob to save the time change.
Touch-Screen Radios
•Turn the radio ON.
•Touch the screen where the time is displayed.
•Touch the screen where “User Clock” is displayed
(Navigation Radio Only).
•To adjust the hours, touch either the hour forward button
or the hour backward button.
•To adjust the minutes, touch either the minute forward button
or the minute backward button.
•To save the new time setting, touch the screen where the word “Save” is displayed.
Driver Power Seat Adjustment
•The recline switch, located on the outboard side of the seat,
controls seatback adjustment.
•The seat switch controls forward/back, up/down, and
tilt adjustment.
Driver Memory Seat
•The memory seat feature allows you to save two different driver seating positions. The memory seat switches are located on the driver’s door panel. With the key in the ON/RUN position,
push
, then push 1 or 2 within five seconds.
•Push 1 or 2 to recall the saved positions.
•Key Fobs may be programmed to automatically recall position 1 or 2 when UNLOCK is pushed.
•Refer to Owner’s Manual for further details.
Push
AUTO
Button
Push Rear
Climate Control
Button
Push
Passenger/Rear
Temp. Control
Push
Push
Push Push
On/Off- Driver Temp. Air
A/C
Rotate Blower Control Recirc. Button
Control
Push
Mode
Buttons
Push Rear
Window
Defroster
Button
Automatic Temperature Control (ATC)
Rotate Rear
Wiper/Push
Rear Washer
Automatic Operation
•Press the AUTO button to turn the system on.
•Select the desired temperature by pushing the Temperature Control buttons (Driver & Passenger).
•The system will maintain the set temperature automatically.
Air Conditioning (A/C)
•A/C compressor operation is automatic when you press the AUTO button. The A/C symbol
is not displayed when in AUTO mode.
Air Recirculation
•Use recirculation for maximum A/C operation.
•For window defogging, turn recirculation off.
•Recirculation is not allowed in defrost or defrost/floor (mix) modes. If recirculation is selected when the mode control is in defrost or defrost/floor (mix), the recirculation symbol will flash three times indicating recirculation is not available.
ACTIVATING REAR PASSENGER CLIMATE CONTROLS
•Push the rear climate controls button, located on the instrument panel to cycle through the four rear passenger climate control modes:
•AUTO REAR – System automatically adjusts rear temperature.
•MANUAL – Driver adjusts rear temperature and blower speed.
•CONTROL IN REAR – Rear passengers control temperature and blower speed.
•REAR OFF – No ventilation in rear passenger area.
•The rear passenger climate controls are located in the rear
of the center console between the front seats.
Power
Liftgate
Unlock
Lock
Remote
Start
Key Fob
Locking And Unlocking The Doors/Liftgate
•Press the LOCK button once to lock all the doors and liftgate.
•Press the UNLOCK button once to unlock the driver’s door only and twice within five seconds to unlock all the doors and liftgate.
•All doors can be programmed to unlock on the first press of the
UNLOCK button.
•Refer to Owner’s Manual for programming.
Power Liftgate
•The liftgate may be opened or closed manually or by pressing the LIFTGATE button twice within five seconds.
Panic Alarm
•Press the PANIC button once to turn the panic alarm on.
•Wait approximately three seconds and press the button a second time to turn the panic alarm off.
Remote Start
•Press the REMOTE START button
twice within five seconds.
•To drive the vehicle, press the UNLOCK button, insert the key in the
ignition and turn to the ON/RUN position.
•With remote start, the engine will only run for 15 minutes (timeout)
unless the ignition key is placed in the ON/RUN position.
•The vehicle must be started with the key after two consecutive timeouts.
This guide has been prepared to help you get quickly acquainted with your
new Chrysler and to provide a convenient reference source for common
questions. However, it is not a substitute for your Owner’s Manual.
For complete operational instructions, maintenance procedures and
important safety messages, please consult your Owner’s Manual,
Navigation User Manual, Multimedia User Manual and other
Warning Labels in your vehicle.
Not all features shown in this guide may apply to your vehicle.
For additional information on accessories to help personalize your vehicle,
visit www.mopar.com or your local Chrysler dealer.
81-316-0992
Aspen
First Printing
Quick Reference Guide
www.chrysler.com
Chrysler is a registered trademark of Chrysler LLC.