1
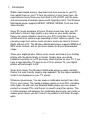
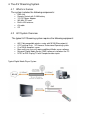
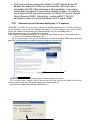
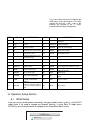
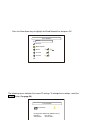
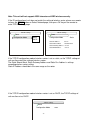
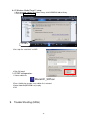
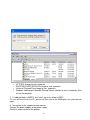
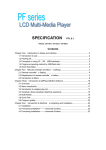
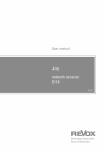
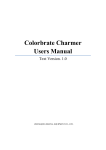
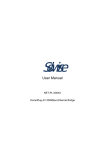
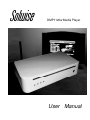
Solwise
DMP1120w Media Player
User Manual
Table of Contents
1. Introduction………………………………………………………………….…..2
1.1 Hardware……….……………………………………………..…………4
1.2 Application features….………………………………………………..….4
1.3 Device Compatibility………………………………………………………..4
2. Terminology………………………………………………………………….….5
3. DMP Overview………………………………………………………………….6
4. The A/V Streaming system……………………………………………………7
4.1 What’s in the box……………………………………………..…………7
4.2 A/V System Overview………………………………………………..….7
5. DMP Setup……………………………………………………………………….12
5.1 Indicators………………………………………………………………..…12
5.2 Cable Connections…………………………………………………..…..12
5.3 Memory Cards………………………………………………………..….13
5.4 Power up……………………………………………………………..…..14
5.5 Remote Control…………………………………………………………..15
6. Operation Setup Section………………………………………….…………..16
6.1 Wire Setup………………………………………………………….……16
6.2 Wireless Setup……………………………………………………..……18
6.3 Playback Options……...……………………………………………..……20
6.4 Device Setup………………………………………………………..……21
7. Content Navigation Modes…………………………………………………….22
7.1 List Mode…………………………………………………………….……23
7.2 Audio Preview Mode……………………………………………….……23
7.3 Photo Preview Mode……………………………………………….……23
7.4 Video Preview Mode………………………………………………….…24
8. Content Play Modes…………………………………………………………...24
8.1 Audio Play Mode…………………………………………………..…….24
8.2 Photo Play Mode……………………………………………………..….24
8.3 Video Play Mode……………………………………………………..….24
8.4 Subtitle Support…………………………………………………………….25
9. Trouble Shooting…………………….………………………………………...27
-1-
1. Introduction
Watch downloaded movies, download and store movies on your PC
then watch them on your TV from the comfort of your living room. No
need to burn movies from your hard disk to CD or DVD, just the ease
and convenience of wireless access with fingertip control. The Wireless
Multimedia player supports MPEG1, MPEG2, MPEG4, DivX and Xvid
video formats.
Enjoy PC music anywhere at home. Stream music files from your PC
and listen to them in high quality in any room on your audio system.
Keep your music collection stored on your PC's hard disk. Use your
remote control to select songs according to artist, album or genre. You
can play songs from online music services, and even listen to Internet
Radio without a PC. The Wireless Multimedia player supports WMA and
MP3 music formats, and so you have access to all your downloaded
songs.
Share your digital photos. Relax on the couch and look at your holiday
photos with the whole family or friends. Simply store your photo
collections centrally on a PC and enjoy them anytime on your TV. If you
have a high-definition TV input on an LCD or plasma TV, your digital
photos will be brought to life!
Smart and simple: The Wireless Multimedia player is easily installed,
thanks to a user-friendly step-by-step approach. All the steps needed to
install it are displayed on your TV screen.
Wireless convenience. You can access multimedia content from other
PCs in your house. The media manager works on most PCs, including
older types. So with just one Wireless Media player you can access
content on several PCs, and there's no need to copy files across. The
2.4 GHz wireless link between the multimedia player and your router or
access point means you don't have to lay cables or drill holes through
walls.
-2-
Important Notice
This DMP (Digital Media Player) operates with a PC using either
Windows XP SP2 or Windows Vista. Windows Media Player 11 must
be installed, you may be required to upgrade version 11 on Windows XP,
instructions below.
It will also connect and play media from any DNLA compliant NAS
(Network attached storage) server.
Note:The OS version of computer must be windows XP SP2(Windows XP Service
Pack 2) or Windows Vista. If your Winows XP OS version of computer is SP1,
please update to SP2.
Refer to website: http://www.microsoft.com/windowsxp/sp2/default.mspx
Mac users and Linux users can also use the DMP, but you will need to
download some Media Player software. Some examples in the table
below. Any UPnP or DNLA compliant software should be ok.
Server
Allegro Media Server
Cidero Internet
Radio Station Server
(Java)
Cyber Media Gate
(Java)
Cyberlink Digital
Home Enabler Kit
Elgato Eyeconnect
Fuppes
Geexbox
GMediaServer
MediaTomb
MythTV
Nero MediaHome
On2Share
49.95
Free
Free
Free
Free
Free
79.99
19.95
Orb
Free
X
X
Rhapsody
12.99/mo
nth
X
X
19.99
X
Free
39.95
Free
X
X
Free
Free
SimpleCenter
Premium
Tversity
TwonkyMedia
uShare
Windows Media
Connect
Yahoo Music Jukebox
Price
39.95
Windows Mac Linux Music Photo Video Transcoding
X
X
X
Free
X
X
X
X
X
X
Free
X
X
X
X
X
X
79.95
X
X
X
X
X
X
X
X
X
X
X
X
X
X
X
X
X
X
X
X
X
X
X
X
X
X
X
X
X
X
X
X
X
X
X
X
X
X
X
X
X
X
X
X
X
X
X
X
X
X
X
X
X
X
X
X
X
X
X
X
X
X
X
-3-
X
X
X
X
X
X
X
1.1 Hardware
External Interfaces
• Ethernet (10/100)
• 802.11g WiFi
• USB2.0 FS HOST
• Flash card reader MS/SD/MMC/CF
• AV outputs
Video
• Composite (yellow RCA)
• SCART interface.
• Y/PbPr/YCbCr
Audio
• L/R Stereo (RW RCAx2)
• Digital audio out (Optical output)
1.2 Application Features
Browse for and play back content stored on PCs or other DLNA servers on the network,
or from local media
• Network content browsing dependent on DLNA media server's "presentation" of the
available content
• Local content browsing (Thumb drive, Flash cards) based on simple hierarchical folder
organization (file system)
1.2.2 Trick mode support
• Multi speed FF/FR/Skip ahead/Skip back
• Pause/Play/Stop
• Zoom/Rotate on photos
1.2.3 File Search
1.2.4 Photo Slideshow
1.2.5 Music+Photo Slideshow
Device setup
- Control over most aspects of device operation
- Accessed through "Setup" button on remote control
- Networking
• Simple, intuitive - "leads" user through initial connect process
• Prioritizes on Wired; if no Wired, then attempts to connect via Wireless
• Automatically identifies and auto prompts user on SSID select and security key entry
when connecting to a secure network
• Networking
• Display
- 4:3 or 16:9 format
- PAL or NTSC
- 480i/480p output
• Three display/viewing modes:
- Preview Mode.
• Video – highlighted video file in list plays in preview window.
• Photo – highlighted photo file in list displays in preview window, along with basic file
information.
-4-
• Music – highlighted music file in list plays, with ID3 tag info displayed in preview
window.
- List Mode
- Thumbnail Mode
1.3 Device Compatibility
1.3.1 Display resolution
- Standard Definition AV processing and output (480i/480p)
- NTSC or PAL
1.3.2 File format support
- Files can be from USB, Flash cards, or over the network. Only caveat is some network
media servers limit what file types they make available.
Video
• MPEG1/MPEG2/MPEG4(SP)/MPEG4(ASP)/ MJPEG
• DIVX(3.x,3.x,5.x,6.0)/XVID(include GMC and QPEL)
- Audio
• PCM/WAV/MP3/AAC
• JPEG (max. 5120x3840)
1.3.3 DLNA Media Player
-Network Protocols
• TCP/IP stack
• UPnP
• DHCP
• Static IP
• Auto IP
• DLNA v1.0 player/control point
• Works with DLNA-compliant Media Servers
• Tested with Microsoft WMP11, WMP10+WMC2.0, Philips PMM, TwonkyVision, ORB
and Tversity
• Can interoperate with up to 5 servers at the same time
Networks
- 802.11 WiFi
• .11b/g
• WEP or WPA2 security
- 802.3 Ethernet
• Supports 10/100Mb connectivity to either 10 Mbit or 100 Mbit networks
2. Terminology
A/V
EN
EN cable
MAC
NC
O/S
PC
PCA
PCB
R/C
RGW
WiFi
Audio/Visual
Ethernet
10/100BaseT En patch cable(straight through type)
The unique 12 character hexadecimal address of an EN device
No Connection
Operating System
Pentium based Personal Computer running XP O/S
Printed Circuit Assembly
Print Circuit Board
Remote Control (infrared)
Router Gateware
802.11a/b/g/n Wireless Ethernet
-5-
3. DMP Overview
Front View:
Side View:
Back View
-6-
4. The A/V Streaming System
4.1
What’s in the box
The system includes the following components:
4.2
DMA Unit
Remote Control with 2 AAA battery
12V DC Power Adapter
Wifi Mini PCI card
Built in Wifi antenna
AV cable
CD
A/V System Overview
The typical A/V Streaming system requires the following equipment:
802.11b/g compatible wireless router with10/100 Ethernetport(s)
A PC running Vista, XP Home or Professional Operating system
Or a DNLA compliant server
Mac and Linux users will require additional Media server software
Microsoft Digital Media Server (DMS) software installed on the PC
NTSC or PAL Display/TV with Composite video inputs
Typical Digital Media Player System
-7-
Hint:Using a wireless connection for both the DMP and the Server PC
doubles the media data traffic over the connection. While this rate is
achievable with 802.11b/g technology in ideal conditions, it can cause
undesirable interruptions in some movie viewing situations. To avoid this,
use a wired network connection between the Server PC and the wireless
Router/Gateway (RGW). Alternatively, a wireless 802.11 AD HOC
connection can be set up directly between the PC and the DMA.
4.3.1
Download and install Windows Media player 11 (If Required)
IMPORTANT: The DMA uses your wireless network and Windows Media player 11 to access the pictures
on your computer. If you do not have Windows Media player 11 on your computer, or you have an earlier
version, the software CD packed with your DMA automatically lets you install Media player 11.
Begin the download. You must be connected to the Internet.
If you already have Windows Media player 11, or higher, on your computer. Go to set up media sharing.
[1] Let me install Windows Media player now
[2] Your browser opens and you are connected to the Microsoft Windows Media player download
page: http://www.microsoft.com/windows/windowsmedia/player/11/default.aspx.
3
[3] Click Download NOW.
Do not close the Windows Media player installer window during the installation.
TIP—if an error screen appears, click OK on the error, then click Cancel on the Digital Picture Frame
Installer screen. Restart the installation by ejecting the CD and reloading it.
Continue with the download of Windows Media player 11.
-8-
4
[4] Click Run to start the download.
The download usually takes less than a minute with high-speed Internet access. Dial-upconnections take
longer.
A progress screen appears as the installation files are downloaded to your computer. TIP—if the
progress screen does not appear, click Click here if your download did not begin
5
[5] Click Run again.
A progress screen appears as the installation files are extracted on your computer.
[6] In the Validate your copy of Windows screen, click to confirm that you have a valid copy of
Microsoft Windows operating system.
[7] In the Thank you screen, click I accept to accept the supplemental license for Windows Media
player 11.
The installation begins. A progress screen appears and monitors the installation. The Windows Media
player 11 Welcome screen opens.
4.3.2
Set up Windows Media player 11
Windows Media player is installed! Now choose your settings.
[1] On the Welcome screen, select Custom Settings .
We strongly recommend that you select Custom Settings If you choose Express settings, the setup will
take significantly longer.
[2] Click Next.
[3] In the following setup screens (Select Privacy Options; Customize the Installation Options; Select
the Default Music and Video Player ), we recommend that you accept all options as they are presented,
and then click Next.
[4] If the Choose an Online Store screen appears select, Don’t set up a store now. We strongly
recommend that you. Do not choose to set up a store now. If you do, the setup will take significantly longer
(up to an hour).
[5] Click Finish.
A progress screen monitors the setup. When the setup is complete, Windows Media
player 11 opens and displays available media files.
4.3.3 Share media in Windows Media player 11
Set up Media Sharing so your frame and Windows Media player recognize each other.
[1] Open Windows Media player 11 (if you already had Windows Media player 11 Installed and
-9-
bypassed the installation.
[2] Click the Library button in the top menu bar.
[3] Select Media share from the drop-down menu.
DMA SERVER
[4] In the Media Sharing screen, select Share my media.
[5] Click OK
4.3.4
Add media files to share
[1] Click Menu Library, click Submenu Add to Library.
[2] Then click Advanced Option.
Click Here
[3] Click Add button to select folder of media files.
- 10 -
5. DMP Setup
5.1 Indicators
- 11 -
5.2 Cable connection options
5.2.1 Connect the TV using one of the cables.
YUV Cable
RCA Cable
SCART Cable
5.2.2 Audio connections options
- 12 -
Optical Wire
L/R Cable
5.2.3 Power connection
Adapter
5.3 Memory cards
Memory Card Support – Many popular memory cards are supported:
CF - Compact Flash I and II Type
SD(TM) - Secure Digital Card
MS - Memory Stick(R)
MS Pro - Memory Stick PRO(R)
MMC - Multimedia Card(TM)
You will find that most cameras have CF, SD, MS or MMC formats.
SD slot
CF slot
MS/MS Pro/SD/MMC
COMPACT Flash (Type I & Type II)
Content can be audio, photo or video, and will appear in the Media Sources list once the
memory card is inserted and recognized.
- 13 -
Media Sources
Networks
Computer01:Owener
SERVER
CF Card
CF Card
USB DEVICE
Item 0
5.4
Media Sources
Power up
Connect the DMP power adapter. Power on the display, and point the remote control towards
the front panel of the DMP unit and press the POWER button on the R/C. When on servers
are available or set up, the display will appear as follows:
Media Sources
Networks
Computer01:Owner
SERVER
Computer02
Item 0
Media Sources
To set up the network connection, refer to the Network Connection Setup section.
The DMP unit provides memory card support. If a memory card with content is installed, it will be identified in the
Media Sources display.
5.5 DMP Remote
The DMA Remote control (R/C) uses infrared so it must be aimed toward the front of the DMP
enclosure. The remote has the following keys and functions for navigating the Setup interface
- 14 -
To use the remote control unit to operate the
DMP player, insert two batteries (size AAA)
making sure that the + and – ends of the
batteries are matched to the +/– marks
printed inside the battery compartment.
ITEM
KEY ID
DESCRIPTION
ITEM
KEY ID
DESCRIPTION
Toggles between available audio
languages
This button toggles between available
subtitle languages
1
POWER
Power device on/off
15
AUDIO
2
Digits
0-9:Press to enter number
directly
16
SUBTITLE
3
VOL-
Decrease volume
17
ROTATE
Rotate the photo display
4
UP
Cursor up/ move up one entry
18
ZOOM
Zoom video or photo
5
PLAY/PAUS
E
Play or pause a file
19
SETUP
Enter SETUP menu
6
LEFT
Cursor left/ Skip up one page
or top of top page
20
DISPLAY
Toggle time counter on/off
7
PREV
Go to previous file
21
REV
Fast reverse
8
NEXT
Go to next file
22
FWD
Fast forward
9
DEFAULT
Restore setup setting as
default setting.
23
DOWN
Cursor down/ move down one entry
10
HOME
Return to main menu
24
RIGHT
Cursor right/ Skip down one page or
bottom of last page
11
REPEAT
Select repeat mode
25
STOP
Stop playing
12
M-SLIDE
Enable slide show mode
26
OK
Confirms selection of an item in the
menu
13
SLOW
27
VOL+
Increase volume
14
RESUME
28
MUTE
Mute volume
Press SLOW during playback
to obtain a slow motion
playback
Remember where you stopped
viewing a media file and press
the key to resume play at that
point
6. Operation Setup Section
6.1 Wired Setup
If you are using a wired network connection, and your network router system is set for DHCP
mode, there is no need to change any Network Settings. If using Static IP mode, press
SETUP key on the remote control to navigate to the Setup Main Menu screen.
- 15 Setup Main Menu
Exit Setup
Press the Down Arrow key to highlight the Wired Network line and press OK.
Select Network
Cancel
Referesh
Wired Network
Defaut
Server02
Server03
The following screen indicates the current IP settings. To change these settings, select the
TCP/IP Button (See page 20):
Select Network
Wired Network
IP onfiguration:- 16Automatic
[DHCP/Auto IP]
IP Address:
192.168.0.4
Subnet Mask:
255.255.255.0
Once connected, available server(s) active on the network will be displayed as below. the
“Networks” line on the Media Sources page.
Media Sources
Networks
Computer01:Owener
SERVER
Computer02
Available Server
Item 0
Media Sources
NOTE: Some servers require newly discovered DMA devices on the network to be authorized.
Check the server software interface on the PC to make sure the new DMA device has been
properly authorized.
6.2
Wireless setup
To setup a wireless network connection, from the Network Setup screen select the
Wireless Type A or B/G by moving the cursor down to the desired Wireless network type and
press OK:
- 17 -
Select Network
Cancel
Wired Network
List Wireless B/G Networks
List Wireless A Networks
The DMP will search for available advertised Network names and display them. Move
the cursor highlight down to the desired Network name and press OK:
Select Network
Cancel
Referesh
Wired Network
Defaut
Server02
Server03
Note: The previously used network will appear at the top of the list.
If the selected wireless network has security enabled the Pass- phrase entry screen will
popup where you may enter the pass- phrase. Alternatively, selecting the SECURITY button
will bring up the Pass -phrase entry screen. Enter the Pass -phrase character string and
highlight OK button and press OK key.
Enter WPA Passphrase
Select Network
PASSWORD
Default
Secure wireless infrastructure network [WPA TKIP]
802.11b/g channel 4
Shift
Erase
Cancel
IP configuration: Automatic [DHCP/Auto IP]
OK
- 18 -
IP Address:
Subnet Mask:
Security
192.168.3.114
255.255.255.0
TCP/IP
OK
Note. This unit will not support ASCII characters of WEP wireless security
If the IP configuration of unit does not match the setting of wireless router, please use remote
to focus the TCP/IP button on Select Network page, then press OK key on the remote to
enter TCP/IP Settings page.
TCP/IP Settings
TCP/IP Settings
Done
Configuration Mode
Done
Configuration Mode
Static
DHCP
Static
Static IP Address
0.0.0.0
Static Subnet Mask
255.255.255.0
Static Gateway Address 0.0.0.0
Static DNS Address
0.0.0.0
If the TCP/IP configuration mode of wireless router is set as static, so the TCP/IP settings of
unit must be match the setting of wireless router.
The Static Subnet Mask, Static Gateway Address and Static Dns Address’s settings
according wireless router setting.
Static IP Address should be in the same range as the router
If the TCP/IP configuration mode of wireless router is set as DHCP, the TCP/IP settings of
unit must be set as DHCP.
TCP/IP Settings
Done
Configuration Mode
- 19 -
DHCP
Press UP/DOWN key on the remote to select Done and press OK key back to Select Network
page. Select OK button to connect network. Once connected, available server(s) active on
the network will be displayed.
Set up Menu
6.3 Playback Options
Setup Main Menu
Playback Options
Exit Setup
Back
Playback Options
Music Playback Mode
Play Folder
Select Network
Video Playback Mode
Play Single
Network Setup
Slideshow Playback Mode
Play Folder
Device Setup
Slideshow Transition
Cross Mode
Device Status
Slideshow Interval
3 seconds
Music Playback Mode
There are four available settings:
Single
Play Folder
Play Single
Repeat Folder
Repeat
Video Playback Mode
There are four available settings:
Single
Play Folder
Play Single
Repeat Folder
Repeat
Slideshow Playback Mode
There are two available settings: Play Folder
Repeat Folder
Slideshow Transition
This unit is setting the JPEG file slide show mode, as shown below: Full Screen Top to
Bottom
Bottom toTop T/B to Center Center toT/B Blind: Top to Bottom Left to Right
Right to Left L/R to Center Center to L/R Implode Blind Left to Right Cross Fade
Random
Slideshow Interval
This unit is setting interval time among the showing picture to next picture on slide show
mode, as shown below: 1 Second 3 Seconds 5 Seconds 10 Seconds Manual
- 20 -
Transition
6.4 Device Setup
Setup Main Menu
Device Setup
Exit Setup
Back
Playback Options
TV Type
Select Network
TV Display
16:9(HDTV)
Video Output
SCART-RGB
Network Setup
Device Setup
Device Status
NTSC
SPDIF Output
Off
Screen Save
3 seconds
Font Size
Normal
Restore Factory Defaults
TV Type
There are three available settings:
Mutisync
TV Display
There are three available settings:
4:3 Full Screen
Video Output
There are two available settings:
YCbCr
NTSC
PAL
4:3 Letter Box
16:9 (HDTV)
SCART-RGB
SPDIF Output
There are three available settings: Off
SPDIF/RAW SPDIF/PCM
SPDIF/RAW:
Set to this selection will output the raw bit stream signal of Dolby® Digital or DTS from
the optical jack. In order to enjoy Dolby® Digital DTS media files, this unit’s digital output jack
must be connected to the digital-input jack of a Dolby® Digital or DTS compatible receiver or
processor.
SPDIF/PCM:
PCM stands for Pulse Code Modulation and is digital audio. Connecting this unit to an
amplifier with a built-in D/A converter can play the same digital audio format media files.
Additionally, 2-channel analogue audio will output from the audio output jacks of amplifier.
Screen Saver
There are four available settings:
Never
3 Minutes
5 Minutes
15 Minutes
Restore Factory Defaults
When you select this item and press OK key, then all the initial settings will be restored to the
factory default settings.
7. Content Navigation Modes
Once a content source is selected, the directory format presented is determined by that
- 21 -
source. Use the remote control (R/C) cursor keys to navigate through the content directories.
The content can be displayed in List Mode, List/ Preview Mode or Thumbnail mode. These
display form at modes are selectable by pressing the DISPLAY key.
Preview Mode List Mode Thumbnail Mode
SELECT FOLDER
PREVIEW MODE
All Pictures
Default
Picture01
Back
Picture02
Music
Date 2006/10/05
SIZE 1024x768
Picture03
Video
Picture04
Pictures
Picture05
Playlists
Picture06
Picture07
Picture08
Item 14 …Media Connect\Music\All Pictures
LIST MODE
THUMBNAIL MODE
All Pictures
All Music
Who’s Got My Back?
Back
Yesterday Once More
The Earth
Music01
Music02
Where are you
Say You Say ME
Item 14 …Dows Media Connect\Music\All Music
Item0
…Media Connect\Music\All Pictures
The R/C key functions for content navigation vary slightly depending on the display mode: List mode,
Audio Preview, Photo Preview and Video modes. The R/C functions for each of these modes are
shown in the following sections.
7.1
List Mode
All Music
Who’s Got My Back?
Yesterday Once More
The Earth
Music01
Music02
Where are you
- 22 -
7.2
Audio Preview Mode
All Music
Who’s Got My Back?
Artist: Paul Simon
Album:
Track: 06
Year: 1986
Time: 4:40
Elapsed: 0:24
Yesterday Once More
The Earth
Music01
Music02
Where are you
Say You Say ME
The Day You Went Away
Item 14
7.3
…Dows Media Connect\Music\All Music
Photo Preview Mode
All Pictures
Picture01
Date 2006/10/05
SIZE 1024x768
Picture02
Picture03
Picture04
Picture05
Picture06
Picture07
Picture08
Item 14
7.4
…Media Connect\Music\All Pictures
Video Preview Mode
All Video
Video01
0:48
AV 20050601
Movie02
file 2006-08-2
file 2006-08-05
Die Hard
- 23 -
8. Content Play Modes
The R/C key functions vary slightly depending on which play mode is active. These R/C
functions are shown below in each of the play modes: Audio, Photo and Video play modes.
8.1
Audio Play Mode
Use UP/DOWN/LEFT/RIGHT key select music flie, then press PLAY/PAUSE or OK key to
play the music file.
All Pictures
Artist: Bon Jovl
Album: Crush
Track: 01
Year:
Item 132 EQ: standard
8.2
2000
0:05
Photo Play Mode
Use UP/DOWN/LEFT/RIGHT key select JPEG flie, then press PLAY/PAUSE or OK key to
show the photo on the TV screen.
Note: To play music with photo slide show, Browse into the desired audio folder and press
the M-Slide key to toggle MUSIC SLIDE SHOW feature on and off. The photo zoom mode is
disabled when music-slide show is active.
8.3
Video Play Mode
Use UP/DOWN/LEFT/RIGHT key select Video flie, then press PLAY/PAUSE or OK key to
Play the Video file.
We recommend you have each movie in separate folders on your PC, please use
folder view on the DMP to see the movie.
Note: The unit can automatically remember where you stopped viewing a media file, press
the RESUME key to resume play at that point.
- 24 -
8.4 Subtitle Support
The device can support SRT, SMI,TXT,SUB,SSA, ASS subtitles for AVI files, please use our
attached Rename tool to transfer subtitle refer below guidance
1.4.1 Rename Tool user guide:
1. Run RenameTOOL.EXE
2. Click Converter Menu, click Submenu subtitle converter(or PRESS Ctrl+O), the "Select Subtitle
file" window will be show.
3. Click open button. show "open file" dialog
4. select subtitle files
5. The list1 will be show the selected files. Press >> to confirm selected item.
6. Press Converter button
7.The subtitle file will be converter to AVI file.
For example: Movie001.srt to Movie001_srt..avi
If a TV series, please input the files according the series order, our software will add
1,2,3 numbers for TV series.
Note:Please click check box shown below if subtitles of a TV series you will need to
batch convert.
Click Here
- 25 -
8.4.2 Windows Media Player11 setup
1.After converted subtitle, Click Menu Library, click SUBMENU Add to Library.
2.Then click Advanced Option.
Click Here
3.Set “skip files small than” as 0 KB
4.Click OK to quit.
1.4.2 DMP unit operation:
1. Select subtitle file
.
?
Movie001_SRT.avi
2.Press Subtitle key to make sure subtitle file is selected.
3.Select video file(MOVIE001.avi) to play.
4.OK!
9. Trouble Shooting (FAQs)
- 26 -
Frequently asked questions
1. I already have Windows Media player on my computer. Do I have to install it again?
You must have Windows Media player 11, or greater, so your DMA can access the files on
your computer.
Check your Windows Media player version number. (Right-click in the top menu bar, then
select >help:about Windows Media Player.) If your version is earlier than 11, upgrade to
version 11.
2. I lost my Internet connection in the middle of my setup. What should I do?
Reconnect to the Internet and repeat the installation and setup.
3. I lost my wireless connection in the middle of the setup. What should I do?
Make sure your wireless connection is live and repeat setup.
4. I can’t find my network. Why?
Is your network set up not to broadcast SSID? If so, you must enter your wireless network
information manually. The person who set up your network can help you with this
information.
Does your network have security enabled (WEP or WPA)? If so, follow the instructions on
Page 16.
5. I can’t find my network computer. Why?
Make sure your router and your computer are on.
Make sure your computer is on your wireless network. See the documentation that came
with your router and your computer.
Is Media sharing enabled in Windows Media player 11? See Page 10.
Is your DMP allowed to share content with your computer? See Page 10.
6. If PC can’t find the DMA?
Maybe your firewall or windows setting problem, Please do as below step:
Click Start, Run “services.msc”, you will see below:
- 27 -
HTTP SSL change to start, automatic
SSDP DISCOVERY SERVICE change to start, automatic
Universal Plug and Play change to start, automatic
Windows media player Network Sharing Service change to start & automatic, then
restart the computer
7. If I add the folder in WMP11, but I can’t see in this folder in DMA?
Pls. turn off then turn on the PC, and turn off then turn on the DMA again, let system refresh
again
8. No reaction to the supplied remote control.
Connect the power adapter to the power supply.
Point the remote control at the product.
- 28 -
Insert the batteries correctly. Insert new batteries in the remote control.
9. No video signal on the TV screen.
Turn the TV on.
Set the TV to the correct external input.
Set the video output connection on the rear of the product to the correct position and restart
the product.
Make sure that the TV supports the video signal of the product. Press the Default key on
the supplied remote control to restore the video output signal to the factory default values.
10. No sound signal from loudspeaker of audio system or TV.
Turn the audio system on.
Set the audio system to the correct external input.
Increase the volume level of audio system.
Check whether the volume of product is set to “0”. Check whether the AV cable is properly
connected to the port. Check whether the media file is damaged.
11. Cannot find the wired network.
Turn the other wired network devices on.
Use a straight network cable (Ethernet, UTP5e) to make a connection from the product to
the wired network.
- 29 -
- 30 -
Solwise
Solwise Ltd
17 Priory Tec Park
Hessle
HU13 9PB
Tel 0845-458 4558
Support 0845-458 5819
- 31 -