1
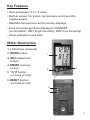
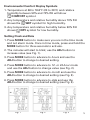
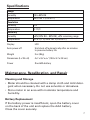
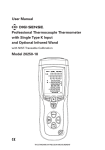
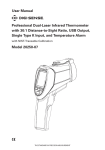
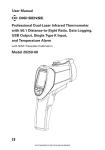
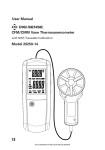
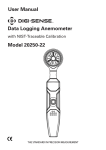
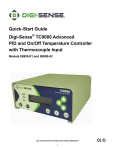
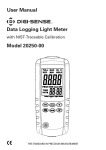
User Manual
Thermohygrometer Indicator
with NIST-Traceable Calibration
Model 20250-30
THE STANDARD IN PRECISION MEASUREMENT
Introduction
The Digi-Sense Thermohygrometer Indicator
(Model 20250-30) is designed for indoor applications, and
displays temperature, humidity, and time. Advanced
features include °C/°F unit selection, Max/Min reading for
temperature and humidity, environmental comfort
indicators, and clock with alarm and date. The instrument
is fully tested and calibrated to NIST-traceable standards.
Careful use of this meter will provide years of reliable
service.
Unpacking
Check individual parts against the list of items below.
If anything is missing or damaged, please contact your
instrument supplier immediately.
1. Indicator
2. One AAA (1.5 V) battery, installed
3. C-clip for mounting
4. User manual
5. NIST-traceable calibration report with data
2
Key Features
• User-selectable °C or °F units
• Built-in sensor for indoor temperature and humidity
measurement
• Max/Min temperature and humidity displays
• Environmental symbols displayed: COMFORT
(comfortable), WET (high humidity), DRY (low humidity)
• Clock with alarm and date
Meter Description
1. LCD (three readouts)
2. MODE button
1
3. ADJ adjustment
button
4. MEMO memory
button
4
2
5. °C/°F button
(on back of unit)
3
6. RESET button
(on back of unit)
6
5
3
Setup and Operation
Button Functions
1. MODE switches from clock to alarm function
2. ADJ sets clock, alarm, and date
3. MEMO displays Max/Min temperature and humidity
readings
4. °C/°F changes temperature display unit of measure
5. RESET clears all settings and memory data
Display
1. The screen is divided into three parts:
a. Section one displays time, date, and alarm
b. S
ection two displays temperature readings
(in either °C or °F)
c. S
ection three displays relative humidity % and
comfort indicator symbols
View Current Time and Date
1. Press the ADJ button to toggle between viewing
time and date.
View Max/Min Temperature and Humidity
1. Press the MEMO button to toggle between
Current/Max/Min/Current.
2. Press the MEMO button for longer than two seconds
to clear the Max/Min memory.
4
Environmental Comfort Display Symbols
1. Temperature at 68 to 78.8°F (20 to 26°C) and relative
humidity between 50% and 70% RH will show
COMFORT symbol.
2. Any temperature and relative humidity above 70% RH
shows the
WET symbol for high humidity.
3. A
ny temperature and relative humidity below 50% RH
shows
DRY symbol for low humidity.
Setting Clock and Date
1. Press MODE button to make sure you are in the time mode
and not alarm mode. Once in time mode, press and hold the
MODE button for three seconds to activate.
2. The minutes will start to blink; use the ADJ button to
increase value (see Fig. 1).
3. Press MODE button to advance to hours and use the
ADJ button to change to desired setting.
4. Press MODE button to advance to 12- or 24-hour mode
and use the ADJ button to change value (see Fig. 2).
5. Press MODE button to advance to month and use the
ADJ button to change to desired setting (see Fig. 3).
6. Press MODE button to advance to date and use the
ADJ button to change to desired setting (see Fig. 3).
Fig. 1
Fig. 2
Fig. 3
5
Setup and Operation (continued)
Setting Alarm
1. Press MODE button to make sure
you are in the alarm mode and
not the time mode. Once in alarm
mode, press and hold the MODE
button for three seconds to activate.
2. The minutes will start to blink; use
the ADJ button to change to desired
setting (see Fig. 4).
3. Press the MODE button to advance
to hours and use the ADJ button to
change to desired setting.
Fig. 4
Activating the Alarm
1. Press the MODE button to advance
to turning the alarm on/off hours
and use the ADJ button to change
the value (see Fig. 5).
a. symbol indicates alarm is
active in chime mode.
b. symbol indicates the alarm
is active in sound mode.
2. Press the MODE button to exit.
Fig. 5
Changing Unit of Measure
1. T
emperature unit displayed can be changed from °C to °F
by pressing the °C/°F button on the back of the unit.
Reset Button
1. Press and hold RESET button on the back of the unit to
clear all information and default to the factory settings.
6
Specifications
Range
Humidity
10 to 90% RH
Temperature
32 to 120°F (0 to 50°C)
Resolution
Humidity
1%
Temperature
0.1°F/C
Accuracy
Humidity
±5% (40% RH ~ 80% RH), ±8% remaining range
Temperature
±1.8°F (1°C) 32 to 120°F (0 to 50°C)
Display
LCD
Auto power-off
Unit shuts off automatically after six minutes
to preserve battery life
Weight
3 oz (85 g)
Dimensions (L x W x H)
41⁄4 " x 21⁄4 "x 5⁄16 " (10.8 x 5.7 x 0.8 cm)
Power
One AAA battery
Maintenance, Recalibration, and Repair
Cleaning and Storage
• M
eter should be cleaned with a damp cloth and mild detergent when necessary. Do not use solvents or abrasives.
• Store meter in an area with moderate temperature and
humidity.
Battery Replacement
If the battery power is insufficient, open the battery cover
on the back of the unit and replace the AAA battery.
Close the cover securely.
7
Maintenance, Recalibration, and Repair (cont.)
It is recommended that Digi-Sense products are calibrated
annually to ensure proper function and accurate measurements; however, your quality system or regulatory body
may require more frequent calibrations. To schedule your
recalibration, please contact InnoCal, an ISO 17025
calibration laboratory accredited by A2LA.
Phone: 1-866-INNOCAL (1-866-466-6225)
Fax: 1-847-327-2993
E-mail: [email protected]
Web: InnoCalSolutions.com
For Product and Ordering Information, Contact:
Toll-Free: 1-800-323-4340
Phone: 1-847-549-7600
Fax: 1-847-247-2929
ColeParmer.com/Digi-Sense
1065DGMAN_20250-30 Rev.1
Toll-Free: 1-800-358-5525
Phone: 1-847-327-2000
Fax: 1-847-327-2700
Davis.com/Digi-Sense
Manual Part No. 00100-61