1
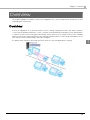
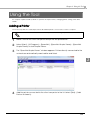
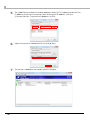
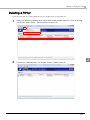
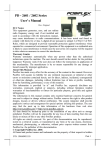
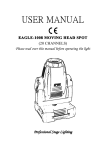
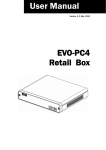
TM / BA /EU Printer Remote Configuration Tool User's Manual Overview Provides an overview of Remote Configuration Tool and describes the system requirements. Building the Environment Explains the procedures for building the environment. Using the Tool Provides information necessary for the use of Remove Configuration Tool. M00026904 Rev.E Cautions • No part of this document may be reproduced, stored in a retrieval system, or transmitted in any form or by any means, electronic, mechanical, photocopying, recording, or otherwise, without the prior written permission of Seiko Epson Corporation. • The contents of this document are subject to change without notice. Please contact us for the latest information. • While every precaution has taken in the preparation of this document, Seiko Epson Corporation assumes no responsibility for errors or omissions. • Neither is any liability assumed for damages resulting from the use of the information contained herein. • Neither Seiko Epson Corporation nor its affiliates shall be liable to the purchaser of this product or third parties for damages, losses, costs, or expenses incurred by the purchaser or third parties as a result of: accident, misuse, or abuse of this product or unauthorized modifications, repairs, or alterations to this product, or (excluding the U.S.) failure to strictly comply with Seiko Epson Corporation’s operating and maintenance instructions. • Seiko Epson Corporation shall not be liable against any damages or problems arising from the use of any options or any consumable products other than those designated as Original EPSON Products or EPSON Approved Products by Seiko Epson Corporation. Trademarks EPSON and ESC/POS are registered trademarks of Seiko Epson Corporation in the U.S. and other countries. MS-DOS, Microsoft, Win32, Windows, Windows Vista, and Windows Server are either registered trademarks or trademarks of Microsoft Corporation in the United States and other countries. Linux is the registered trademark or trademark of Linus Torvalds in the U.S.A. and other countries. CUPS and the CUPS logo are trademarks of Apple Inc. registered in the U.S.A. and other countries. Novell and openSUSE are trademarks of Novell, Inc. which is the founder and sponsor of the openSUSE Project and has been designated by the project. Ubuntu and Canonical are registered trademarks of Canonical Ltd. Copyright © 2010 - 2013 Seiko Epson Corporation. All rights reserved. 2 For Safety Key to Symbols The symbols in this manual are identified by their level of importance, as defined below. Read the following carefully before handling the product. Provides information that must be observed to avoid damage to your equipment or a malfunction. Provides important information and useful tips. Restriction of Use When this product is used for applications requiring high reliability/safety such as transportation devices related to aviation, rail, marine, automotive etc.; disaster prevention devices; various safety devices etc; or functional/precision devices etc, you should use this product only after giving consideration to including fail-safes and redundancies into your design to maintain safety and total system reliability. Because this product was not intended for use in applications requiring extremely high reliability/safety such as aerospace equipment, main communication equipment, nuclear power control equipment, or medical equipment related to direct medical care etc, please make your own judgment on this product’s suitability after a full evaluation. About this Manual Aim of the Manual This manual presents information that is necessary information for using the Remote Configuration Tool. Manual Content The manual is made up of the following sections: Chapter 1 Overview Chapter 2 Building the Environment Chapter 3 Using the Tool 3 Contents ■ For Safety .............................................................................................................................. 3 Key to Symbols........................................................................................................................................3 ■ Restriction of Use .................................................................................................................. 3 ■ About this Manual ................................................................................................................ 3 Aim of the Manual .................................................................................................................................3 Manual Content .....................................................................................................................................3 ■ Contents................................................................................................................................ 4 Overview ........................................................................................5 ■ Overview............................................................................................................................... 5 ■ System Requirements .......................................................................................................... 6 Administrator Computer........................................................................................................................6 Client Computer.....................................................................................................................................7 Building the Environment...............................................................9 ■ Building the Environment ..................................................................................................... 9 Firewall Settings.....................................................................................................................................10 Using the Tool ...............................................................................15 ■ Adding a Printer ................................................................................................................. 15 ■ Deleting a Printer................................................................................................................ 17 ■ Changing Printer Settings .................................................................................................. 18 ■ Statuses in Simple Viewer .................................................................................................. 19 4 Chapter 1 Overview Overview This chapter explains the features of Remote Configuration Tool, system requirements, and the procedure for building the environment. Overview Remote Configuration Tool is a function that is used to change settings and monitor the status of printers connected by parallel/serial/USB to client computers (POS and KIOSK terminals) from an administrator computer over the network using EpsonNet Simple Viewer (referred to as “Simple Viewer” in this manual) and a model-specific utility prepared for each TM/BA/EU printer. Printers for which dedicated utilities do not exist can be monitored, but settings cannot be changed. The printer status can be monitored in a list even when the customer application is running. 1 5 System Requirements Administrator Computer Support OS ❏ Windows 8 (32 bit / 64 bit) ❏ Windows 7 SP1 (32 bit / 64 bit) ❏ Windows Vista SP2 (32 bit / 64 bit) ❏ Windows XP SP3 (32 bit) ❏ Windows Server 2012 (64bit) ❏ Windows Server 2008 R2 SP1 ❏ Windows Server 2008 SP2 (32 bit / 64 bit) ❏ Windows Server 2003 SP2 (32 bit) Remote Configuration Tool ❏ EpsonNet Simple Viewer Ver. 2.00 or later ❏ Model-specific utilities 6 Chapter 1 Overview Client Computer Support OS Windows ❏ Windows 8 (32 bit / 64 bit) ❏ Windows 7 SP1 (32 bit / 64 bit) ❏ Windows Vista SP2 (32 bit / 64 bit) ❏ Windows XP SP3 (32 bit) ❏ Windows Server 2012 (64bit) ❏ Windows Server 2008 R2 SP1 ❏ Windows Server 2008 SP2 (32 bit / 64 bit) ❏ Windows Server 2003 SP2 (32 bit) 1 ❏ Windows Embedded Standard 7 SP1 (32 bit / 64 bit) ❏ Windows Embedded POSReady 7 (32 bit / 64 bit) ❏ Windows Embedded POSReady 2009 ❏ Windows Embedded for Point of Service 1.1 SP3 Linux ❏ Open SUSE 11.1 (32 bit / 64 bit) ❏ Ubuntu 9.04 (32 bit / 64 bit) Drivers To use Remote Configuration Tool, one of the following drivers is required. ❏ Advanced Printer Driver Ver 4.09 or later ❏ OPOS ADK Ver. 2.66 or later ❏ OPOS ADK for .NET Ver. 1.11.9 or later ❏ JavaPOS ADK Ver. 1.11.9 or later ❏ TM/BA Thermal Linux Driver Ver. 1.0.1.0 or later 7 8 Chapter 2 Building the Environment Building the Environment This chapter explains the procedure for building the environment for Remote Configuration Tool. Building the Environment Follow the steps below to build the environment. If multiple client computers will be monitored, build the environment on each computer. Building the environment on the administrator computer 1. Install the model-specific utilities Install the model-specific utilities. For the procedures for installing the model-specific utilities, refer to the user’s manual for each utility. 2 2. Install Simple Viewer Install Simple Viewer. For the procedure for installing Simple Viewer, refer to [EpsonNet Simple Viewer User’s Manual]. 3. Firewall settings (Page 10) Configure the firewall settings of the administrator computer. Building the environment on the client computer 4. Install the driver Install Advanced Printer Driver, UPOS Driver, or TM/BA Thermal Linux Driver. For the procedure for installing the driver, refer to [Software User’s Manual], [Advanced Printer Driver Ver.4 Install Manual], UPOS Driver's manual, or other respective manual. 5. Firewall settings (Page 10) Configure the firewall settings of the client computer. 9 Firewall Settings Administrator computer In Windows Firewall, check if Simple Viewer has been added as an exception. If you are using the firewall of a commercially available security program, check if Simple Viewer has been added to the applications that are allowed to communicate. If not, Simple Viewer may not be able to communicate with the network and find the printer. If you are using Windows Firewall, configure the firewall as described below. Windows 8 1 2 3 Select [Desktop] - [Settings] - [Control Panel] - [System and Security] - [Windows Firewall]. The settings window appears. Select [Turn Windows Firewall on or off] and remove the checkmark from [Block all incoming connections, including those in the list of allowed apps]. Click the [OK] button. You will return to the settings window. Select [Allow an app or feature through Windows Firewall]. Select the [EpsonNet Simple Viewer] checkbox in the [Allowed apps and features] list and click the [OK] button. If Simple Viewer does not appear in the list, add it from the [Allow another app] button. Windows 7 1 2 3 Select [Start] - [Control Panel] - [System and Security] - [Windows Firewall]. The settings window appears. Select [Turn Windows Firewall on or off] and remove the checkmark from [Block all incoming connections, including those in the list of allowed programs]. Click the [OK] button. You will return to the settings window. Select [Allow a program or feature through Windows Firewall]. Select the [EpsonNet Simple Viewer] checkbox in the [Allowed programs and features] list and click the [OK] button. If Simple Viewer does not appear in the list, add it from the [Allow another program] button. 10 Chapter 2 Building the Environment Windows Vista 1 2 3 Select [Start] - [Control Panel] - [Allow a program through Windows Firewall]. The “Windows Firewall Settings” window appears. Select the [General] tab and remove the checkmark from [Block all incoming connections]. Select the [Exceptions] tab and select the [EpsonNet Simple Viewer] checkbox in the [Program or port] list. If Simple Viewer does not appear in the list, add it from the [Add program] button. Windows XP 1 2 3 Select [Start] - [Control Panel] - [Windows Firewall]. The “Windows Firewall” window appears. Select the [General] tab and remove the checkmark from [Don’t allow exceptions]. Select the [Exceptions] tab and select the [EpsonNet Simple Viewer] checkbox in the [Programs and Services] list. If Simple Viewer does not appear in the list, add it from the [Add program] button. 11 2 Client Computer If Windows Firewall or the firewall of a commercially available security program is enabled, open the TCP2291 port. If this port is not open, it will not be possible to monitor or change settings on the printer. If you are using Windows Firewall, configure the port as described below. Windows 8 1 2 3 4 Select [Desktop] - [Settings] - [Control Panel] - [System and Security] - [Windows Firewall]. The settings window appears. Select [Turn Windows Firewall on or off] and remove the checkmark from [Block all incoming connections, including those in the list of allowed apps]. Click the [OK] button. You will return to the settings window. Select [Allow an app or feature through Windows Firewall]. Click the [Change settings] button and then the [Allow another app] button. The “Add an app” window appears. Click the [Browse] button and select EPuras.exe (For Advanced Printer Driver Ver.4.50 or later, select PCSVC.exe.). Click the [Add] button. EPuras.exe is located in the following directory: C\Program Files\EPSON\EPuras\EPuras.exe PCSVC.exe is located in the following directory: C\Program Files\EPSON\portcommunicationservice\PCSVC.exe 5 12 [EPuras] is added to the [Allowed apps and features] list. Click the [OK] button. Chapter 2 Building the Environment Windows 7 1 2 3 4 Select [Start] - [Control Panel] - [System and Security] - [Windows Firewall]. The settings window appears. Select [Turn Windows Firewall on or off] and remove the checkmark from [Block all incoming connections, including those in the list of allowed programs]. Click the [OK] button. You will return to the settings window. Select [Allow a program or feature through Windows Firewall]. Click the [Change settings] button and then the [Allow another program] button. The “Add a Program” window appears. Click the [Browse] button and select EPuras.exe (For Advanced Printer Driver Ver.4.50 or later, select PCSVC.exe.). Click the [Add] button. EPuras.exe is located in the following directory: C\Program Files\EPSON\EPuras\EPuras.exe PCSVC.exe is located in the following directory: C\Program Files\EPSON\portcommunicationservice\PCSVC.exe 5 2 [EPuras] is added to the [Allowed programs and features] list. Click the [OK] button. Windows Vista 1 2 3 4 Select [Start] - [Control Panel] - [Allow a program through Windows Firewall]. The “Windows Firewall Settings” window appears. Select the [General] tab and remove the checkmark from [Block all incoming connections]. Select the [Exceptions] tab and click the [Add port] button. The “Add a Port” window appears. Set [Name], [Port number] and [Protocol], and click the [OK] button. Item 5 Setting Name Set any name Port number 2291 Protocol TCP The port is added to the [Program or port] list. Click the [OK] button. 13 Windows XP 1 2 3 4 Select [Start] - [Control Panel] - [Windows Firewall]. The “Windows Firewall” window appears. Select the [General] tab and remove the checkmark from [Don’t allow exceptions]. Select the [Exceptions] tab and click the [Add Port] button. The “Add a Port” window appears. Set [Name], [Port number] and [Protocol], and click the [OK] button. Item 5 14 Setting Name Set any name Port number 2291 Protocol TCP The port is added to the [Programs and Services] list. Chapter 3 Using the Tool Using the Tool This chapter explains addition/deletion of printers in Simple Viewer, changing printer settings, and status details. Adding a Printer Follow the steps below to start Simple Viewer and add a printer connected to a client computer. Check the IP address of the client computer before starting this procedure. 1 2 3 Make sure that the client computer and printer are powered on. Select [Start] - [All Programs] - [EpsonNet] - [EpsonNet Simple Viewer] - [EpsonNet Simple Viewer] to start Simple Viewer. The “EpsonNet Simple Viewer” window appears. Printers directly connected to the network are automatically searched for and listed. 3 4 Add the printer connected to the client computer to the list. Select [Tool] - [Add Device to Search]. 15 5 16 The [Add Device to Search] window appears. Select [PC IP Address] and enter the IP address of the client computer. After entering the IP address, click the [Connect] button. The printer will appear in the list. 6 Select the printer to add and click the [OK] button. 7 The printer is added to the model name list window. Chapter 3 Using the Tool Deleting a Printer Follow the steps below to delete a printer from the Simple Viewer model name list. 1 2 Select the printer to delete from the Simple Viewer model name list. After selecting the printer, select [Tool] - [Remove Device from List]. 3 The printer is deleted from the Simple Viewer model name list. 17 Changing Printer Settings 1 2 Select the printer whose settings you change from the Simple Viewer model name list. After selecting the printer, select [View] - [Show Status Details]. The model-specific utility of the selected printer opens. You can check detailed information on the printer and change settings. For details on the settings and how to change them, refer to the user’s manual for the utility. The following window is for TM-T88 Utility. 18 Chapter 3 Using the Tool Statuses in Simple Viewer When Simple Viewer is started, the screen below appears. Printer information is normally not refreshed until the [Refresh] button is clicked. However, the information is automatically refreshed for printers connected via a driver that is supported by Remote Configuration Tool. The explanation of statuses below applies to the printers connected via a driver that is supported by Remote Configuration Tool. For detailed information on Simple Viewer, refer to [Epson Simple Viewer User’s Manual]. 3 Item Icon Explanation Operating normally. A warning has occurred. Check the status. An error has occurred. Check the status. Model Name Indicates the printer model. IP Address Indicates port + IP address as stored in the setting file. Example: [email protected] Location Blank MAC Address Blank Administrator Name Blank 19 Item Status Detail 20 Explanation Indicates details of the status. One of the following statuses appears. • Ready to print. • There is little paper for the receipt. • There is no paper for the receipt. • Error. • Auto-cutter error. • The Fatal error. • Recovering the error. • Printer is offline. • Cover open. • Cannot get the printer status. • Undefined status reply.