1
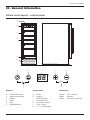
Drinks Cooler (300mm)
User & Installation Guide
LAM6911
LAMONA Appliances
Dear Customer,
Congratulations on your choice of drinks cooler which has been designed to give you excellent service.
The user manual will help you use your product quickly and safely.
•
•
•
•
•
Please make a note of your products serial number on the rear of this booklet, this is important should
you have any after sales queries. The serial number can be found on the rear of the product.
Please read this user manual before installing and using the appliance.
Always follow the safety instructions.
Keep this user manual within easy reach for future reference.
Please read any other documents supplied with the product.
Explanation of symbols
Throughout this user manual the following symbols are used:
Important information or useful tips about usage.
Warning for possible hazards to health and property.
Warning possibility of electric shock.
This product’s packaging material is recyclable. Help recycle it and protect the
environment by dropping it off in the municipal receptacles provided for this purpose.
Your product also contains a great amount of recyclable material. It is marked with this
label to indicate the used appliances that should not be mixed with other waste. This
way, the appliance recycling organised by your manufacturer will be done under the
best possible conditions, in compliance with European Directive 2002/96/EC on Waste
Electrical and Electronic Equipment. Contact your town hall or your retailer for the used
appliance collection points closest to your home. We thank you doing your part to protect
the environment.
02_
User manual LAM6911
Index
01 - Before using the drinks cooler
04
02 - Safety
04
General04
03 - General information
Drinks cooler layout / control panel
05
05
04 - Operating your drinks cooler
06
Power On/Off control
06
Unlocking the control panel
06
Interior light On/Off
06
Temperature display window
06
Temperature setting06
Selecting between Fahrenheit & Celsius 06
05 - Care and maintenance 07
Cleaning your drinks cooler 07
Power failure07
Absence & holidays
07
Moving your drinks cooler
07
Shelves07
Energy saving tips
07
06 - Installation
08
Before installation08
Integrated Installation
08
Installing the Handle 09
Reversing the Door Swing
09
Adjusting the plinth cover
10
Connection to the mains supply 10
07 - Troubleshooting
11
08 - Your Guarantee
13
Index _ 03
LAMONA Appliances
01 - Before using the Drinks Cooler
•
Please removed all packaging, stickers and films from the products surface and clean the product’s
surfaces with a damp cloth and mild deturgent before using for the first time.
•
We recommended that you leave you drinks cooler to stand for at least 24 hours before switching on
to allow compressor oil to settle.
02 - Safety
This appliance is for domestic purposes only
and is intended to be used exclusively for the
storage of sealed bottled drinks. Commercial use or
anything beyond it’s intended purpose will void the
guarantee.
•
Do not use outdoors.
•
Do not operate the appliance with a damaged
cord or plug, if the product malfunctions, or if
it is dropped or damaged in any manner.
The manufacturer shall not be liable for any damage
caused by improper use or handling errors
•
The use of attachments not recommended by
the manufacturer may be hazardous.
General
•
Place the unit on a dry level surface.
•
Do not operate if the housing is removed or
damaged.
•
A loose fit between socket and plug may cause
overheating and a distortion of the plug.
Contact a qualified electrician to replace any
loose or worn sockets.
•
Locate the unit away from direct sunlight and
sources of heat (stove, heater, radiator, etc.).
•
This appliance is CFC and HFC free.
•
Ensure that the ventilation openings to and
from a built-in appliance are never blocked or
covered and keep children and animals away
from the slots.
•
No liability will be accepted for any damage
incurred owing to misuse of the appliance or
as a result of repairs carried out by unqualified
personnel. In this case neither the guarantee
nor any other liability claims will apply.
This product is not intended to be used by persons
with physical, sensory or mental disorders or
unlearned or inexperienced people (including
children) unless they are supervised by a person
who will be responsible for their safety or who will
instruct them accordingly in the use of the product.
Children must be supervised to prevent them from
tampering with the product.
•
Use this appliance only as described in this
manual. Other uses not recommended may
cause fire, electric shock or personal injury.
•
To protect against the risk of electric shock, do
not immerse the unit, cord, or plug in water or
spray any other liquid nearby.
•
Unplug the appliance from the plug socket
when not in use, when moving from one
location to another and before cleaning.
•
To disconnect the appliance, grip the plug and
pull it from the wall outlet. Never pull out by
the cord.
•
Do not operate the appliance in the presence
of explosive or flammable gases.
•
Do not place the appliance or any of its parts
near an open flame, cooking or other heating
appliance.
04_ Before Using your drinks cooler
Do not operate any electrical appliance inside
the Drinks Cooler.
To reduce the risk of fire electric shock or
personal Injury, unplug or disconnect the
appliance from the power supply before moving or
cleaning the appliance.
User manual LAM6911
03 - General Information
Drinks cooler layout / control panel
a
b
c
d
a
a
b
b
c
c
d
d
e
f
e
e
f
f
g
i
j
h
i
k
j
k
°C
°F
°C
°F
°C/°F
m
l
Features
°C/°F
Control Panel
Dimensions
a. Interrior LED Light
b. Digital control panel
c.Handle
d.Shelf
e.Door
f. Adjustable feet
g.Power
h.Lighting
i.
Display window
j.
Temperature up
k. Temperature Down
l.
Lock / unlock
m. °C / °F Interchange
Height. 870 - 890mm
Width.150mm
Depth
570mm (inc handle)
m
General information _ 05
LAMONA Appliances
04 - Operating Your Drinks Cooler
For your drinks cooler work at optimum
efficiency it is recommended that the product is
installed in a domestic environment where the
ambient temperature is maintained between
22-25°C (72-77ºF)
If the ambient temperature is above or below
the recommended range, (for example; extreme
hot or cold conditions) this may cause interior
temperatures to fluctuate, and the temperature
range of 5-22°C may not be reached.
•
•
Interior light On/Off control
•
•
The Drinks Cooler will run continuously until
the required temperature range is achieved. This is
quite normal and not a cause for concern.
When you use the Drinks Cooler for the first
time or restart the Drinks Cooler after having been
turned off for a long time, there could be a few
degrees variance between the temperature you
select and the one indicated on the LED readout.
This is normal and it is due to the length of the
activation time. Once the Drinks Cooler is running
for a few hours everything will be back to normal.
If the unit is unplugged, power lost, or turned off
it is recomended you wait 3 to 5 minutes before
restarting the unit.
•
•
When the appliance is plugged in to a power
outlet, it powers on automatically.
Touch the power mark
and hold for 10
seconds to turn off (or turn on) the appliance.
No matter if it is under a locked or unlocked
situation, you can turn off the appliance by
touching the power mark
and holding for
10 seconds.
Unlocking the Control Panel
•
To unlock the control panel, touch the power
mark and lighting mark
with 2
fingers at the same time and hold for 3
seconds . When unlocked a ‘bleep’ sound will
be heard.
06_ Operating your drinks cooler
Under the unlocked situation, touch the light
mark
to turn on (or turn off) the interior
cool LED light
The light will be continuously on if it is not
turned off.
Temperature display window
•
The numbers in the digital difplay reflects
the current temprature within the cooler.
When setting or adjusting the temprature the
desired tempreture will be displayed for 10
seconds before returning back to the products
current temprerature.
Temperature setting
•
•
•
Power On/Off Control •
The control panel will be automatically locked
with a ‘bleep’ sound heard after 10 seconds
without being touched.
Under the locked situation, the control panel
will not react to any touching order for Lighting
On/Off and Temperature Setting.
•
•
The temperature setting range is 5-22ºC
Directly touch the
or
to set the drinks
temperature that you would like.
The first touch on
or
will recall the
previous set temperature displayed in the
digital window. If the appliance runs after a
power failure (or unplugging), the previous set
temperature does not exist and is replaced by
the default temperature of 12ºC
Touch the
to increase the set temperature
by 1ºC and touch
the to decrease the set
temperature by 1ºC
The digital number will change to display
the temperature inside the cabinet after 10
seconds without being touched.
Selecting between fahrenheit &
celsius display.
•
Touch the
with 2 fingers at the
same time and hold for 5 seconds, you can
interchange the Fahrenheit and Celsius
display.
User manual LAM6911
05 - Care and Maintenance
Cleaning Your Drinks Cooler
Moving Your Drinks Cooler
•
Turn off the power, unplug the appliance, and
remove all items including shelves and rack.
•
Remove all items.
•
To remove any of the shelves from the
compartment, open the door fully and slide
them out carefully taking care not to lose
the anti-vibration pads. Please ensure these
are replaced when the shelf is put back
(For further information please refer to the
‘Shelves‘ section listed below)
•
Securely tape down any loose items (shelves)
inside your appliance.
•
Turn the adjustable legs up to the base to
avoid damage.
•
Tape the door shut.
•
Protect the outside of the appliance with a
blanket, or similar item.
•
Wash the inside surfaces with a warm water
and baking soda solution. The solution should
be about 2 tablespoons of baking soda to a
litre of water.
•
Wash the shelves with a mild detergent
solution.
•
Wring excess water out of the sponge or cloth
when cleaning any area of the controls.
•
Wash the outside cabinet with warm water and
mild liquid detergent. Rinse well and wipe dry
with a clean soft cloth.
Power Failure
•
•
•
To prevent damaging the door gasket, make
sure the door is fully opened when pulling
shelves out of the compartment. (You may
need to pull the cooler forward to remove
shelves once it has been installed depending
upon size of unit gap)
•
The shelves are designed for 75cl Bordeaux
bottle storage. The maximum loaded amount
of bottles may vary according to the different
size or dimensions of bottles you store.
Most power failures are corrected within a few
hours and should not affect the temperature
of your appliance if you minimize the number
of times the door is opened. If the power is
going to be off for a longer period of time, you
need to take the proper steps to protect your
contents
Absence & Holidays
•
Shelves
For short holidays, leave the Drinks Cooler in
operation for periods of less than three weeks
For long absences or if the appliance will not
be used for several months, remove all items,
turn off the appliance and unplug. Clean
and dry the interior thoroughly. To prevent
odours and mould growth, leave the door open
slightly: blocking it open if necessary.
Energy Saving Tips
•
The Drinks Cooler should be located in the
coolest area of the room, away from heat
producing appliances, and out of direct
sunlight.
•
Ensure that the unit is adequately ventilated.
Never cover air vents.
•
Only open the door for as long as necessary.
Care and Maintenance _ 07
LAMONA Appliances
06 - Installation
Before installation
The product should only be installed by suitably
competent person.
The product must be installed in accordance
with all local regulations.
Prior to installation, visually check the product
for any damage/defects. Do not install if any issues
are found.
Damaged products may cause risks to your own
safety.
Let the appliance stand upright for
approximately 24 hours before connecting it to
the power source. This helps to reduce the
possibility of a cooling-system malfunction from
handling during transportation.
The appliance is intended for installation in
Howdens kitchen cabinets.
The following installation drawings are
representational and may not
match exactly with your appliance.
Integrated Installation
When integrating your Drinks Cooler into a fitted
kitchen sufficient space is required to allow the
Drinks Cooler to be fully ventilated and for the door
to be opened fully . The appliance may need to be
positioned off centre to overcome any door collision
issues.
Ensure your cabinet aperture meets the
minimum dimensions listed below.
CABINET OPENING DIMENSIONS
mm (Minimum)
Height
870
Width
305
Depth
525
Kitchen cabinets must be set level and fixed.
570mm (inc handle )
525mm
>875mm
870 - 890 mm
305mm
300mm
08_ Installation
User manual LAM6911
Installing the Handle
Gently pull the door gasket to one side to reveal the
two designated holes for handle installation.
Install the handle tightly as shown below with the
two screws, and washers provided.
Pull down to remove the glass door and place it on a
padded surface to prevent scratching it.
Remove the right top hinge (4), and right lower
hinge (2).
4
5
4
5
3
2
3
Reversing the Door Swing
2
1
This Drinks Cooler door can open from either1the
left or right-hand side. The unit is delivered with the
door opening from the left-hand side. Should you
wish to reverse the door swing, please follow the
reversal instructions below.
All parts removed must be saved to reinstall
the door
Open the glass door and remove the two screws
(1), under the right bottom corner of the glass door,
that are used to hold the right lower hinge (2), to the
door shaft assembly (3). Be careful to support the
glass door with both hands to prevent it dropping
after removing the screws.
4
3
2
3
2 top hinge (7), and left lower
Remove the left
hinge (8) from the component bag that includes
the instruction manual then install them at the
designated
positions at the left side of the cabinet
7
(pictured below)
7
8
8
5
3
2
Turn the glass door 180’ and reinstall
1
3
2
Installation _ 09
7
LAMONA Appliances
Adjusting The Plinth Cover
•
The adjustable plinth cover is located behind
the louvered plinth, and is held in position by
two screws.
the plug or if the plug is incorrect for your type of
socket, remove it and replace it with an appropriate
plug. Dispose of the old plug safely.
•
Loosen the two screws. Slide the adjustable
plinth down to cover the gap between the wine
cooler and the floor.
•
Retighten the screws.
As the colours of the wires in the mains lead of this
appliance may not correspond with the coloured
markings identifying the terminals in your plug,
proceed as follows: The GREEN / YELLOW wire is
the EARTH and must be connected to the terminal
which is marked with the letter ‘E‘ or by the earth
symbol
The BLUE wire is the NEUTRAL and must be
connected to the terminal which is marked with the
letter ‘N’ or coloured BLACK.
Connection to the mains supply
Check that the voltage marked on the product
corresponds with your supply voltage.
This Appliance Must Be Earthed
The wires in the mains lead are coloured in
accordance with the following code:
GREEN / YELLOW – EARTH
BLUE – NEUTRAL
BROWN- LIVE
Earth
(Green / Yellow)
Neutral
(Blue)
The BROWN wire is the LIVE wire and must be
connected to the terminal which is marked with the
Letter ‘L’ or coloured RED.
Always ensure that the plug cord grip is fastened
correctly, if in doubt consult a qualified electrician
who will be pleased to do this for you. This product
conforms to EC Directive 92/31 /EEC with respect
to Electromagnetic Compatibility.
Non-Rewireable Mains Plug
If your appliance is supplied with a non-rewireable
plug fitted to the mains lead, you will find that it
incorporates a fuse, the value of which is indicated
either on the base of the plug or on the fuse carrier.
Should the fuse need replacing, you must use an
ASTA approved one (conforming to BS1382) of the
same rating.
Earth
(Green / Yellow)
Live
(Brown)
If the fuse cover is lost, the plug must not he used
Neutral
until a replacement
is obtained from an electrical
supplier. (Blue)
If you need to remove the plug, cut it from the
mains lead and immediately dispose of it.
Never attempt to re-use this plug or insert it into a
socket outlet as there is a very great risk of an
electric shock.
This appliance is fitted with a plug which has a 13
amp fuse. Should the fuse fail, then it must be
replaced with an ASTA approved fuse (conforming to
BS1362) of the same rating. If you need to replace
10_ Connection to the mains supply
Live
(Brown)
User manual LAM6911
07 - Troubleshooting
TROUBLESHOOTING GUIDE
Symptoms
Possible Cause
Solutions
No cooling
•
Plug not put in correctly
Ensure the plug is in and the socket is switched on
•
Low voltage
Ensure normal voltage
•
Fuse blown
Replace the fuse with the recommended AMP rating
•
The Drinks Cooler is placed too close to
a heat source
Keep the Drinks Cooler away from sunshine or other heat
sources .
•
Bad ventilation
Place the Drinks Cooler in an area with good ventilation
and keep objects away from the fans
•
The door is not closed tightly, or opened
too frequently or for too long
Close the door tightly and do not open the door too
frequently or for too long.
Strange smell inside the
Drinks Cooler
•
Check contents for anything sour or
perishable.
Remove any perishable items and clean thoroughly.
Display light flashes
•
The set temperature is higher than the
inner temperature of the Drinks Cooler
Adjust the temperature accordingly
•
The Drinks Cooler is defrosting
This is a normal automatic function, and no repair is
needed
Frost is forming on the
cooling surface
•
There may be too much humidity or the
temperature is too low inside the case.
Disconnect the power to the Drinks Cooler and defrost
manually, reconnect the power once the frost has thawed.
The Drinks Cooler seems to
make noises
•
Noises may come from the working of
the compressor or refrigerant, which
is normal.
Some noises are normal and no cause for concern
however you may wish to try the following:
•
As each cycle ends, you may hear
gurgling sounds caused by the flow of
refrigerant.
•
Contraction and expansion of the inside
walls may cause popping and crackling
noises.
•
The drinks cooler is not level
Adjust the products feet to ensure the product is level
•
The door gasket may dirty.
Clean the door gasket with warm water
•
The shelves or bottles may be
misaligned
•
•
The temperature probe is out of order.
Consult your authorized service agent.
Temperature inside is not
cold enough
The door will not close
properly.
The display window is shown
with “HH” or “LL” instead
of a digital figure, and/or
with continuous ‘beep/buzz’
sound.
•
Check to assure that the appliance is level and not
touching the surrounding cabinetry.
•
Ensure no parts within the product are lose.
Re-adjust the shelves
If you cannot eliminate the problem after following the instructions in this section, consult your depot
or the authorized service agent. Never try to repair a nonfunctional product yourself.
Troubleshooting _ 11
LAMONA Appliances
08 - Your guarantee
Product Guarantee Details (UK only)
Your appliance has the benefit of a comprehensive manufacturer’s guarantee which covers the cost of
breakdown repairs. (Details of which are shown on your Proof of Purchase Document).
•
Any claim during the period of the guarantee (MUST BE ACCOMPANIED BY THE PROOF OF PURCHASE)
•
The product must be correctly installed and operated in accordance with the manufacturer’s
instructions and used for normal domestic purposes.
•
This guarantee does not cover accidental damage, misuse or alternations which are likely to affect the
product.
•
The guarantee is invalid if the product is tampered with, or repaired by any unauthorised person.
(The guarantee in no way affects your statutory or legal rights)
What to do if you need to report a problemPlease ensure you have ready:
•
The product’s model & serial numbers
•
Howdens Proof of Purchase document
•
Your full contact details
Call the Service Line on 0845 00 60 006
12_ Guarantee
User manual LAM6911
_ 13
LAMONA Appliances
Notes
14_
User manual LAM6911
Notes
_ 15
ISSUE v3-150113
If supplied, please stick your self adhesive product rating plate
here, or make a note of the product serial number below in the
box below for future reference.
Serial Number : ...........................................................................................