1
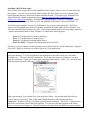
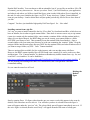
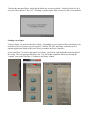
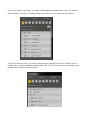
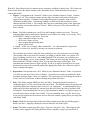
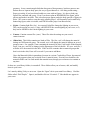
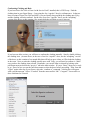
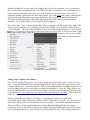
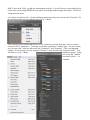
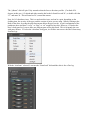
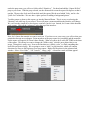
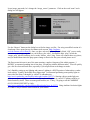
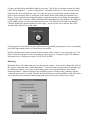
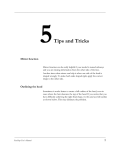
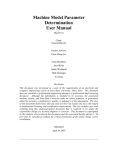
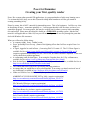
Poser for Dummies:
Creating your first, quality render
Poser, like so many other powerful 3D applications, is a program that has a fairly steep learning curve.
I’ve written this brief (okay, not so brief!) tutorial to help those brand new to Poser get started in
creating something lovely.
Please be aware, this is NOT a tutorial for intermediate users. This is for beginners. I will be very clear
in describing all steps – sometimes painfully so. I will assume that this is the first time you have ever
opened the program. For some people, this may be overkill, but for others, you may learn something
new and useful! Please note, this tutorial is based on a WINDOWS operating system. Much of the
tutorial is still applicable to a Mac OS, but you will need to figure your own way through the parts that
deal with Windows file structures.
What you will need to follow along:
• A computer (duh.) Sorry. Couldn’t resist.
• Poser, preferably Poser 6 or up. (Some of the lighting effects that I will use require Poser 6 or
higher.)
• A figure, rigged to be used in Poser. (I am using DAZ’s Victoria 4.2. The V4.2 base figure is
available for free at http://www.daz3d.com/i/3d-models/-/victoria-4-2?item=4783&_m=d)
(requires registration and adding to a cart. Never fear, no credit card info is required. A free cart
can be checked out without payment.)
• A conforming outfit for that figure. (I am using the Cupcake dress for V4 by evilinnocence,
available for free at http://www.evilinnocence.com/cupcake-for-v4.html)
• Hair for that figure (I am using “Flexy Hair” for V4 by outoftouch and bice, available for free at
http://www.outoftouch.de/OOT/freebies/index.html)
• The content that came with Poser, specifically the prop primitives.
• An image that you would like to use as a background. (I am using a re-tinted version of one of
my cloudscapes, available at http://karibous-stock.deviantart.com/#/d2smj9r)
• Other cool freebies I use in this tutorial (that you don’t have to use) are:
AMBIENT OCCLUSION LIGHT SET by Lully: (requires registration)
http://www.renderosity.com/mod/freestuff/details.php?item_id=55373
PD Christa by PDesign: (requires registration)
http://www.renderosity.com/mod/freestuff/details.php?item_id=58554
The Water Bearer by pixeluna: (requires registration)
http://www.renderosity.com/mod/freestuff/details.php?item_id=57859
Sue's Vases by Sue88: (requires registration)
http://www.renderosity.com/mod/freestuff/details.php?item_id=10741
Installing a DAZ3D base figure
Okay, I know some people swear by the Smith Micro Poser figures (James, Jessi, etc.) that come with
the program. I, for one, never use them, mainly because the DAZ figures are (in my opinion) much
better supported and have much better content available for them. If you have never installed a base
figure from DAZ, I highly recommend going to http://www.daz3d.com/i/3d-models/free-3dmodels?cat=382&_m=d, sorting by “most popular” and grabbing the Victoria 4.2, Michael 4, Aiko 4,
Hiro 4, Freak 4, She Freak V4, Kids 4, Girl 4, and Stephanie 4 Elite bases. They are all FREE. ☺
You will need to install the Victoria 4.2 (or Michael 4, if you need a male figure) first. DAZ base
figures must be installed to the base Poser runtime, located in the folder where Poser is installed. You
can create runtime folders anywhere you like – I have many runtimes that I use to keep things organized
– but the main runtime folder (Called “Runtime”) is found in the following place:
Poser 6: C:\Program Files\Curious Labs\Poser 6
Poser 7: C:\Program Files\e-frontier\Poser 7
Poser 8: C:\Program Files\Smith Micro\Poser 8
Poser Pro 2010: C:\Program Files\Smith Micro\Poser Pro 2010
Of course, if you are running a 64-bit operating system, all but Poser Pro will be found in the “Program
Files (x86)” folder, as all non-pro versions of poser are 32-bit applications.
**If you are running Poser Pro or Poser Pro 2010, there is ONE extra thing you must do. Find your
base poser directory. You will see that the Poser application is not called “Poser.exe” but rather,
“PoserPro.exe.” This gives the DAZ installer fits. To fix this, first make sure Windows is set up to
show file extensions. (Open your control panel, and select folder options. In the “view” tab, make sure
“hide extensions for known file types” is UNCHECKED.)
Then, open notepad. Save a blank file to your main poser folder – the one that holds PoserPro.exe.
(Call it whatever you want.) Then, in the folder, change the name of the notepad text file to
“Poser.exe”. Windows will ask if you want to change the file extension. Tell it YES. You now have a
fake Poser.exe file that will fool the DAZ installers. You can leave this fake program in the folder
forever, and pretty much ignore it. The DAZ installer will require it for the addition of any base figure.
Run the DAZ installer. You can choose to add an uninstaller, but (if you are like me and have 300+ GB
of content), you may choose not to. Be sure you select “Poser,” (not DAZ Studio) as your application,
and when it asks where you’d like to install the figure, point it at the folder where Poser is installed. At
the end, if it asks you to initialize the figure, say YES. It may also leave “Update Victoria/Michael”
icons on your desktop. I tend to delete these and just update periodically, but feel free to leave them if
you like.
Congrats! You have just installed a high-quality DAZ base figure! So… Now what?
Installing content from a zip file:
Let’s say you want to install content like the free “Flexy Hair” by Outoftouch and Bice, which does not
have an installer, but is rather a zipped content folder. Since there is not one correct way to zip content
(some zips contain only the runtime folder, some contain a container folder with the runtime inside it,
others are even buried deeper), the BEST thing you can do is unzip your content folder to a folder
OUTSIDE your library to start. Then, manually locate the runtime folder found inside it. Open a
second window with your main poser directory in it (the one containing the “runtime” folder. Drag the
unzipped folder into the main poser directory (NOT into the runtime folder) and when Windows asks if
you want to merge folders, say YES. Voila. Content installed!
There are unzip utilities available for free on the internet, and even one that comes with Poser.
However, the BEST content installer I have EVER found costs a measly $10, and is worth every dime
and then some. The “Content Installer” by ahudson on Renderosity installs content from .zip, .rar, and
even DAZ’s .exe installers! It can be found here:
http://www.renderosity.com/mod/bcs/index.php?ViewProduct=61876&keyword=content+installer. If
you are planning on installing more than a few content items, this is one purchase I HIGHLY
recommend making.
So, now onto the actual use of Poser!
Deleting the
Default
figure
Start by opening Poser. If a figure (other than the one you want to work with) appears in the scene by
default, click somewhere on it to select it. You will know you have it selected because the figure’s
name will appear under the “preview” tab. The selected body part will appear immediately next to it. If
the entire figure is selected, then the word “body” will appear instead of the name of a body part.
To delete the unwanted figure, simply hit the delete key on your keyboard. A dialog will ask if you’re
sure you want to delete it. Hit “yes.” Deleting a complex figure from a scene may take a few moments.
Loading a new figure
To load a figure, you must use the Poser Library. Depending on your version of Poser, the library may
look like as series of pictures, or a file explorer. In Poser Pro 2010, the library is actually run in a
separate application (Adobe AIR), but it closely resembles the Poser 8 Interface.
If you open Poser 7 or earlier, and cannot see a library, you need to click the handle on the far right of
the screen. This will pop open the library tab. You can further expand the library by clicking the
“expand” icon (to the left of the “x” button) in the library window.
If you are in Poser 8, your library is actually a Flash program run within Poser. (If you do not have
Flash installed, you will get a message telling you to install it, or you cannot use your library!)
If you are in Poser Pro 2010, your library will look nearly identical to the Poser 8 Library, but it is
actually run in a separate application called Adobe AIR. (You will even notice a second icon in your
taskbar when you have your library open.)
What ALL Poser libraries have in common are the categories available to choose from. The Library tab
shows (inside Poser) the usable contents of the “Runtime/Library” folder that holds all your poser
content and models.
• Figures: Corresponds to the “character” folder in your “Runtime/Libraries” folder. Contains
“.crz” and “.cr2” files, which are unique because they can contain a hierarchy of body parts
rigged to move together. Characters can be things like people or animals, or they can be
conforming clothing items. Conforming clothing is a character file that conforms to a base
character and moves with it. For example, there may be a conforming jacket or hair figure that
you can add to a scene and conform to Victoria. When Vicky moves, her jacket and hair will
move with her.
•
Poses: This folder contains pose (.pz2) files, and frequently confuses new users. The most
important thing to know about poses is that they never ADD a new “thing” to your scene. They
just MODIFY a “thing” in your scene. Poses can:
o apply a material to a figure or prop
o move/scale a figure or prop
o inject morphs and spin morph dials
o open a python script
A “morph,” by the way, is exactly what it sounds like – it’s a dial attached to a figure that
modifies it in some way, usually by moving it or altering its geometry.
The reason the pose folder is often the most confusing to new users is because you see things,
click on them, and see no result. For example, you might go into the folder, see a picture of a
piece of clothing, and click on it... and nothing happens! This is because you are looking at a
POSE file for adding a texture to the clothing. This means you have to go into the figure or prop
library and first LOAD the clothing. Then, you can apply the texture to that figure. Also
remember that material poses are figure specific. If you try to apply a material pose to a figure
that doesn't have the correct material groups (like applying the texture for a shirt onto a pair of
shoes), nothing will happen.
•
Expressions: Corresponds to the “face” folder in your “Runtime/Libraries” folder. Expressions
(.fc2 files) are just poses for the faces of figures. A general pose usually just modifies the body
of a figure (raising a figure’s arms, for example). The expression poses will change the smile on
Vicky’s face to a fierce frown, without affecting the position of her arms.
•
Hair: This folder contains PROP hair files (.hr2 files.) Remember that hair can also be a
conforming figure (.cr2 file, found in the character folder). The difference between prop hair and
conforming figure hair is that prop hair is one piece, no “body parts.” A conforming hair figure
might consist of a head and pony tail, whereas prop hair will just be one blob of geometry with
no sub-parts. When installing hair, be sure you pay attention to whether it is figure or a prop, as
you will need to locate it in the correct folder. If you are installing from a .zip file, this is easy,
as you can just explore the file structure and see where the content is going before you unzip into
your library folder.
•
Hands: Much like the Expressions folder, this folder contains poses that specifically apply to
hands (.hdz files.) Applying a hand pose does not affect the rest of the figure.
•
Props: This folder contains prop files (.ppz.) Props are “one-piece” only. Where figures (like
Victoria) can be rigged to have body parts that all move together, a prop is just one block of
geometry. It may contain morph dials that alter parts of that geometry, but these parts are not
broken down as separate body parts, the way a figure/character is. One thing worth noting…
Props get twitchy if you have them loaded to a scene with no figures. It is best to load your
figures first, and then add a prop. Even if you do not plan on RENDERING the figure, add it
anyway and make it invisible. This is because props appear under the body-part list of figures in
Poser. (If I want to render a scene that only contains props, I will frequently load a small bellybutton-ring figure, make it invisible, and THEN load the props I am interested in.)
•
Lights: Contains light files (.ltz). As expected, light files change the lighting in your scene.
They can be used in two ways, 1) they can REPLACE the current lighting in your scene, or 2)
they can be ADDED to the current lighting in your scene.
•
Camera: Contains camera files (.cmz.) These files alter the settings on your scene’s
camera/cameras.
•
(Materials): This folder contains two kinds of files. The first, .mt5, will change the material
settings on ONE material group. The second, .mc6, will change the material settings on several
groups at once. For example, if am examining the material for skirt’s belt buckle in the Material
room, I can use a .mt5 file to change just the appearance of the belt buckle. If I use a .mc6 file, I
will alter ALL the materials in the skirt. If the .mc6 file contains data on material groups that
don’t exist in the skirt, Poser will even ask if you want to add them.
I have the Materials folder in parentheses because in versions 7 and older of Poser, the material
folder only appears when you are inside Poser’s material room. Even in Poser 8 and Pro, the
materials folder can’t be used outside the material room, though you can browse its contents at
any time.
So there are your library folders, in a nutshell. These folders allow you to browse, add, and modify
items in your scene.
Let’s start by adding Vicky to our scene. Open the “figure” tab in your main Poser library. Find the
folder called “DAZ People.” Open it, and double click on “Victoria 4.2” She should now appear in
your scene.
TIP: If you ALWAYS want to have this figure loaded when you open Poser, go into the Edit/General
Preferences menu of Poser. From the “Document” tab, make sure “Launch to preferred state” is ticked,
and click the “Set Preferred State” button. Now, poser will always open with Vicky in your scene, ready
to go!
Using Pose Files:
The default skin on Vicky has her undies painted right on her. Since this might not work with our
clothing, I am going to start by changing her to a different skin. By default, Vicky comes with a few
skins. Open the Pose tab in your library and locate the “DAZ’s Victoria 4” folder. Inside this, there is a
sub-folder called “MATerials Sample-Res.” Open it, and select the “!All_Natural_NG” pose. This skin
doesn’t have any, er, private parts, but at least loses the painted-on bikini. Alternately, there are a few
zillion textures for V4 available online for free. Fore example, “PD Christa” by PDesigns, available at
rederosity’s freebie page (http://www.renderosity.com/mod/freestuff/details.php?item_id=58554) is a
nice one.
There are also many free “morphs” for Victoria’s face that will alter her features, giving her a different
appearance. The “PD Christa” freebie contains one such morph. I will inject only the facial morph,
using the “!!Head INJ” pose. At this point, I will avoid changing Vicky’s body geometry because it will
make adding clothing much easier.
Once you have Vicky’s texture and facial morph loaded, it’s time to move onto loading and conforming
her clothing.
Conforming Clothing and Hair:
If you have Poser Pro 2010 or Poser 8 with Service Pack 3 installed, this is VERY easy. Find the
clothing item in your figure library – I am using the free “cupcake” dress by evilinnocence. In the two
latest versions of Poser (Pro 2010 and 8SP3), you can literally drag-and-drop the clothing onto Vicky,
and the clothing will auto-conform! (In the case of our free “cupcake” dress, use the “morphing”
version of the dress, as this contains a few morph dials that will help us pose it later on.)
If you have an older version, you will have to conform the clothing manually. Start by double-clicking
the clothing item. (As state above, in the case of our free “cupcake” dress, use the “morphing” version
of the dress, as this contains a few morph dials that will help us pose it later on.)This loads the clothing
in the scene. Next, to make the clothing actually move with Vicky, you will need to conform it. Make
sure you have the clothing item selected. Remember, you can tell what is selected by looking at the
pull-down menu just below the “preview” tab in the main window. If it says “Dress,” then you’re ready
to go. If not, be sure you use the pull-down menu to select the dress before proceeding. Then, from the
“figure” menu at the top of your screen, select the “conform to” command. A dialog box will appear
with a pull-down menu. Select “Victoria4” from the menu and hit “OK.” Congrats! You now have a
dress conformed to Victoria!
Much as the bald look is lovely and all, we might want Vicky to have some hair. Now, you could use
Poser’s Hair room to add dymanic hair… but I REALLY don’t recommend it. It’s a pain in the butt, is
hard to control, and usually doesn’t look very good. Instead, let’s pull up the free “Flexy Hair” by
outoftouch and bice, mentioned at the start of the tutorial. It is a hair figure (not a prop), which means it
will be found in the figure library, not in the hair library. The good news is conforming hair works
JUST like conforming clothing. Either drag-and-drop (Pro2010 and P8SP3) or add and conform
manually. Give it a shot and see if you can get the hair to conform!
Hey, look at that! Vicky is dressed and has hair! Don’t be alarmed if the hair texture looks funny. This
is just a preview rendering. If it really bugs you, go to the “display” menu and select “Element Style,”
“Texture Shaded.” That will change the display from a cartoon-like image of the hair to a more realistic
look. It will also use more system
resources, so if you have an older
video card, you may not want to
do this.
Posing, Props, Lighting, and Camera:
Now it’s time to bring Vicky to life. Let’s start by giving her a more life-like pose. Let me give you a
hint… Using the Translate/Pull tool and the morph dials on Vicky’s body parts is a good way to move
her into a custom pose… but it also requires a LOT of practice and patience to get right. A good way to
avoid becoming frustrated is to start with a pre-made pose and adjust it. There are TONS of great, free
poses (and non-free ones, too!) available on the internet. I’m going to use The Water Bearer pose pack
by pixeluna (http://www.renderosity.com/mod/freestuff/details.php?item_id=57859.) Then, if there are
body parts I want to “fine-tune” and move elsewhere, I can do so easily.
Start by opening the Pose folder in your library. Locate the pose (in this case found in the
waterBearer_poses folder.) Make sure you have Victoria 4 selected in your scene. (Use the pull-down
menu below the “preview” tab and select her if she isn’t already.) Then, double-click the desired pose
file in your library. Vicky should change poses, and her hair and clothing should come with her.
(Sometimes, there’s a quick delay in the preview window where her clothing and/or hair are floating in
space, but dragging the mouse across the preview window should fix this.) If the clothing and/or hair
DON’T move with Vicky, you did not conform them correctly. You will, however, notice that the skirt
of her dress is now sitting INSIDE her legs. And I’m not happy with the angle of her body. I’d like her
facing more toward us.
Let’s fix the second item first. Use the pull-down menu below the preview tab to select Victoria4. Use
the pull-down menu just next to that to select Vicky’s “Body”
This will bring up the controls that affect Vicky as a whole, not just one body part. Now we need to
examine Vicky’s “parameters.” To do this, we need the “parameters” window open. You may already
see it in your scene. It has two tabs at the top, “Parameters,” and “Properties.” This is an important
window. If it is not open, do so by using the “Windows” menu and selecting “Parameter Dials.” You
will then see Vicky’s “Body”
parameters appear. In this
box, locate the “rotation”
item and click the “+” to
expand it.
The “yRotate” dial will spin Vicky around so that she faces a direction you like. (I’m fond of 26
degrees in this case.) Go ahead and either turn the dial to the left until it reads 26°, or double-click the
“0°” and enter 26. This will turn her 26°, toward the camera.
Now, let’s fix that dress issue. This is a much trickier issue, and can be a pain, depending on the
clothing item, the severity of the pose, and the version of poser you are using. Start by looking at the
Body of the dress, by using the pull-down menus below the preview tab. A quick examination of the
parameters does not show a “sway” or “flare” or “sit” morph for her skirt. However, if I look at the
dress’s body part list, I can see there are different parts of her skirt listed. This is frequently the case
with poser dresses. If I select the “skirtfront” body part, it will allow me to move the skirt’s front away
from her legs.
With the “skirtfront” selected, I can turn the “Front-back” dial until the skirt is free of her leg.
What if I want to style her hair? Well, many conforming and prop hair figures have morph dials to do
exactly that. Go ahead and select the “FlexyV4” figure and “Neck” Body part. You will see a huge
range of morph dials for styling and fixing her hair. Play with them until you have something you like!
I am also going to raise Vicky’s head. I can select the Victoria4 object and “head” body part from the
pull-down menu, or just click in Vicky’s head. I’m going to use the “bend” morph dial and change it to
0. This lifts her head a little. Feel free to play with Vicky’s body part dials to see if you want to change
anything else.
The pose we use show’s Vicky holding a vase. Let’s face it, she looks pretty stupid WITHOUT the
vase. So, let’s add it! It’s also a freebie (Sue's Vases by Sue88,
http://www.renderosity.com/mod/freestuff/details.php?item_id=10741). Open the prop library and
locate the vase. Just proving that things frequently end up in unexpected places when they are unpacked
into our libraries, the vase is located in a folder called “Furniture House.” Double click on it, and it will
appear at Vicky’s feet. Now, let’s use the Translate/Pull tool (looks like a cross-hair with 4 arrows) and
drag the vase into the region we want it to go. Then, using the parameter dials (xTran, yTran, ZTran,
xRotate, yRotate, and zRotate), move the vase until it sits in the crook of her arm. This is the part that
requires some patience.
Tip: Use the camera track-ball to move around Vicky and check your position. Dragging on the ball
itself rotates the camera. The four-handed crosshair contol zooms in and out and pans left and right.
Holding <ctrl> while using the up/down controls on the four-handed crosshairs raises and lowers the
camera. Holding <ctrl> while using the track ball tilts the scene.
Okay, almost there. Did I mention that now would be a great time to save your scene? Because it
REALLY would. Use the file pull-down menu and save. ☺
Let’s make Vicky smile a little, shall we? To alter her facial expressions, select her head, and then open
the “Morphs | Expressions”/“Base” list in the parameters menu. You will see all the different things
Vicky can do with her expressions here. Play with them until you find an expression you like. I will use
the “Mouth Smile Simple” dial to make her look a little happier.
Now, let’s add a little background. There are lots of ways to do this. We could import a background
picture right into Poser, but this isn’t always the best way to achieve control. If you are lacking a fancy
background prop, there’s an easy way to achieve a similar result. Go into your base poser library and,
under the prop menu, you will see a folder called “Primitives.” Go ahead and add the “Square Hi-Res”
prop to your scene. With the prop selected, use the xRotate dial to turn the square 90-degrees so that is
upright. Then use the Scale and zTrans dials until the square fills the area behind Vicky, and is a few
“poser feet” behind her. We now have a place perfect for adding a background picture.
To add a texture or photo to this square, go into the Material Room. This is as easy as selecting the
“Material” tab at the top of your screen. Poser will pause a moment and then the interface will change.
We could use the simple tab to do what we want here, but let’s not. Instead, let’s learn a little about the
node system. Click on the “advanced” tab at the top of the interface.
Now, let’s choose the material we want to work on. If you hover over your scene, you will see that your
pointer has become an eyedropper. Point anywhere at the prop square we just added, and the materials
for the square will appear (if it wasn’t there already. What we want to do is add a PICTURE to the front
of the square. This means we want to change the “diffuse color” (which is now plain white) to an
image. Doing this is really easy. Next to the line that says “diffuse_color” is a little something that
looks like an electrical plug. We are going to create a “node” to plug into this, which will contain
directions for Poser to add a picture to our prop square. Right-click anywhere in the advanced-tab
window. Select “New Node”, “2-D Textures”, “image_map.” A brand new node will then appear!
In our image_map node, let’s change the “image_source” parameter. Click on the word “none” and a
dialog box will appear.
Use the “Browse” button on the dialog box to find an image you like. I’m using a modified version of a
cloudscape I have posted on my deviantart stock account. (http://karibousstock.deviantart.com/#/d2smj9r) Once you have selected a picture file and clicked “OK” you are ready
to connect your image_map node to your diffuse color value. Just find the little “plug” beside the
“image_map” title bar, and drag it over to the “diffuse_color” plug. Poser will connect these two places,
and you should then notice the prop square change so that it now has your selected picture on it!
The Poser material room is one of the most amazing, complex, fun parts of the whole program. I
HIGHLY recommend spending lots of time here, just playing with the different nodes. You will quickly
get a feel for what each node does, especially if you stop between each change to render.
Let’s finish by setting up our lighting and camera. Lighting is a HUGE portion of what makes a render
look realistic. Frankly, the default Poser lights stink. I recommend purchasing some quality lights to
start with (like Shiny 1 through 4 by vikike176 at Renderosity,
http://www.renderosity.com/mod/bcs/index.php?vendor=380315). Starting with pre-made light sets
gives you a chance to dissect what the artist has made and duplicate it yourself. Lighting could be an
entire tutorial by itself! There are some good freebies, too. Today, I’m going to use the AMBIENT
OCCLUSION LIGHT SET by Lully,
http://www.renderosity.com/mod/freestuff/details.php?item_id=55373. Using Ambient Occlusion lights
is a GREAT way to achieve some realism in your renders.
Go into your light library and find the light set you want. (The freebie I’m using is located in a folder
called “Lully-LightSet-1.”) I chose “06-Spot2 AO” and double-clicked on it. This erases the current
lights from the scene and adds new ones. If I wanted to keep my current lights and just add the new
ones to what was already there, I could click on the double-check-mark button at the bottom of my
library. If you feel the need to change the angles or intensities on any of your lights, just rotate them
using the light “ball” controller. Think of the light ball as something like a pin-cushion. By sliding the
“pins” (lights) around, you move the lights in your scene. The slider below the light is its intensity.
Carefully sliding this control brightens or dims a light. (Just be careful you are moving the yellow
intensity slider, and NOT a nearby light!)
For the purpose of this tutorial, the basic light controls are probably a good place to focus. I personally
left all the light controls alone, as I felt my scene was well-lit.
Finally, remember those camera controls I told you about earlier, when we were posing the vase? Use
them! Zoom in on the part of your scene that you want to focus on. Change the angle! Do whatever
looks good to you. When you are done, SAVE YOUR SCENE.
Rendering
By default, Poser will render what you see in the preview window. If you want to change this, click on
the “render” menu and select “render dimensions.” You can see there are places here to manually type
in a different resolution. One of my favorite things to do is to use the third option, click “match
document window” (which will bring up the resolution you are currently seeing), and then, with the
“constrain aspect ratio” box ticked, enter the desired resolution you want in height or width. This allows
you to increase your resolution without changing the parts of the scene visible to your camera.
When you are satisfied with the dimensions, you may then choose to do a test render. The default
render settings are very low and will render quickly, but will look pretty lousy. It’s a good way to check
your scene for obvious errors, however. To do this, select “Render” from the “render” menu, or click on
the camera icon in the upper right region of the preview window. What we get isn’t bad, but it isn’t
great, either.
I know I can improve this with render settings. In the Render menu, select “Render Settings.” Be sure
you are using the Firefly render engine (it is a tab in the Render Settings menu). Select the “Manual
Settings” radio button. Then, depending on your version of Poser, things may look a little different than
what I’ve shown. The important boxes to check are “Cast Shadows” and “Raytracing.” If you have
poser 7 and up, turn “Irradiance caching” up as high as it will go (if your system will support it – this
will slow your render down.). If you have an older system, turning your bucket size down to 32 or even
16 will help keep you from running into memory issues. (The “bucket” is the size square that Poser
calculates chunks of your render in.) I have a ridiculously fast machine, and I still usually use a bucket
size of 64 or 32. I like to tick “smooth polygons,” though if you end up with very weird bulging in hardedged props, you may need to un-check this box. Clicking “use displacement maps” allows poser to
utilize advanced displacement materials. You may not have any in the scene, but it’s not a bad idea to
check it anyway. I also like to use a post-filter of 2 (gaussian) to soften my portrait renders. You can
see the complete dialog box below:
When you are done, click “Save Settings.” Then, go ahead and render again. And look at what a
difference it makes!
z
Notice the subtle shadows around her eyes and fingers, and the overall feeling of quality that was
missing from the other render.
Well, there you have it! A poser scene from the ground up! Hope this was helpful!!