1
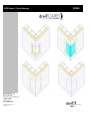
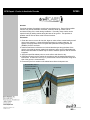
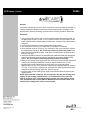
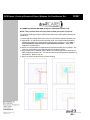
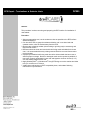
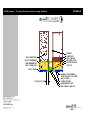
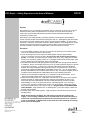
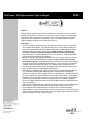
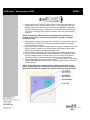
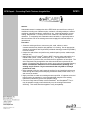
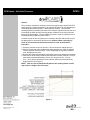
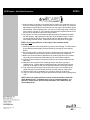
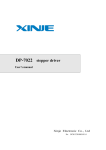
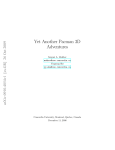
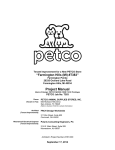
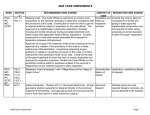
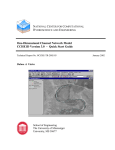
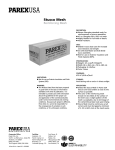
dryvitCARE™ EIFS Repair Procedures DS498 Index of Documents DC001 Recommendations for Periodic Cleaning of Dryvit Finishes and Coatings DC002 EIFS Repair - Small Holes, Impact or Hail Damage Repair Using RapidPatch™ DC003 EIFS Repair – Impact Damage DC004 EIFS Repair – Corner Damage DC005 EIFS Repair – Cracks in Aesthetic Reveals DC006 EIFS Repair – Cracks DC007 EIFS Repair – Cracks at Corners of Doors, Windows, Air Conditioners, Etc. DC008 EIFS Repair – Floor Line Location in wood Frame Construction DC009 EIFS Repair – Terminations at Sealant Joints DC009A EIFS Repair – Overlay Sealant Joints using Sealant DC010 EIFS Repair – Adding Expansion Joints Around Windows DC011 EIFS Repair – EIFS System Installed Tight to Shingles DC012 EIFS Repair – Reattachment of EIFS DC013 EIFS Repair – Correcting Finish Texture Irregularities DC014 EIFS Repair – Frozen and Delaminating Finish DC015 EIFS Repair – Hot Knife Procedure Recommendations for Periodic Cleaning of Dryvit Finishes and Coatings DC001 Introduction The long-term appearance of any exterior wall depends primarily on the attention given to periodic cleaning. Dryvit's DPR and other textured acrylic finishes offer many advantages for ease of cleaning and maintenance compared to other types of exterior wall claddings. Brick, for example, requires the use of strong acidic cleaners to remove even the accumulation of routine dirt that works its way into the pores of the brick. Use of such acidic cleaners can cause many problems. It is strongly recommended that you contact the manufacturer of any cladding material for proper cleaning instructions. Testing has verified that Dryvit DPR finishes are most effectively and safely cleaned with the use of general cleaning compounds, followed by a mildly pressurized water rinse. Acidic cleaners are not recommended for routine cleaning of Dryvit finishes. The only condition that MAY warrant use of acidic cleaners is efflorescence, which is discussed later. The following products are general-purpose cleaners the manufacturers of which indicate are suitable for cleaning of Dryvit finishes: Company Prosoco 3741 Greenway Circle Lawrence, KS 66046 (800) 255-4255 Shore Corporation 2917 Spruce Way Pittsburgh, PA 15210 (800) 860-4978 ABR Products, Inc. th 9720 S. 60 Street Franklin, WI 53132 (414) 421-4125 The Clean-Up Group 3000 Gulf Shore Blvd. N. Naples, FL (239) 455-2225 General Purpose Cleaner Enviro Klean® EIFS Clean 'N Prep 2600 EIFScrub Building Wash 3 CitraShield BioCide Choice of Cleaning Compounds The above list should be considered a starting point in selection of the appropriate cleaning compound. Every building will have its own set of specific challenges and requirements. These general-purpose cleaners will be satisfactory for many buildings coated with Dryvit finishes. However, some environments may present unique circumstances and require Recommendations for Periodic Cleaning of Dryvit Finishes and Coatings DC001 more specialized cleaning agents. In these cases, Dryvit recommends consulting the cleaning product manufacturer for suggestions specific to the job at hand. Testing the cleaning compound on a small and isolated area of the actual finish surface is always advised prior to commencing on a large scale. Usage instructions from manufacturers of cleaning solutions for general cleaning of Dryvit finishes typically include the following information: Preparation Protect people, vehicles, property and all surfaces not intended for cleaning from splash, residue, fumes, rinse and wind drift. Read the cleaning solution manufacturer's instructions for the proper dilution appropriate for the surface cleanliness/condition of the textured finish. Mix cleaning solution in accordance with those manufacturer's instructions. Test the prepared mixture on all surfaces that may come into contact with it during application and rinsing. Contact the manufacturer of the cleaning solution for more information and cautions for use. Check all equipment for compatibility with the type of cleanser used. Surface and Air Temperatures Cleaning effectiveness is diminished when surface and air temperature falls below 10 °C (50 °F). For best results, allow wall surface to warm to a temperature above 10 °C (50 °F), prior to initiating cleaning. Protection Protect grass and plantings by covering or with spray from sprinklers. Adjacent surfaces may need additional protection as well. Always contact the cleaning product manufacturer for more information about protection precautions they recommend. Garden Hoses and Pressurized Water Cleaning Equipment – General Information Leaning a ladder against any wall coated with Dryvit finishes can cause damage. It is normally most economical and efficient to use pressurized water for the cleaning/rinsing operation. The simplest method of delivering pressurized water is to use a garden hose. This is sufficient on most residential applications to both prewet the wall surface and rinse away applied cleaning solutions. Some commercially available pressurized water delivery systems feature a pressure gun and nozzle equipped with a control switch. Recommendations for Periodic Cleaning of Dryvit Finishes and Coatings DC001 This setup permits the operator to apply cleaning solutions to a wall over 30.5 m (100 ft) from the base unit. Other systems have two separate hoses - one with plain water and the other with a cleaning solution. Portable equipment has many advantages for cleaning building exteriors. Units may be on wheels, skids, trailers, or pick-up truck beds. More elaborate systems include pumps, engines, and water storage tanks fixed on truck beds. Whatever method you select, it is safest and least potentially damaging to the Dryvit finish and the wall surface if both equipment and personnel are kept on the ground. The tip angle of the nozzle should be appropriate for the distance between the area being cleaned and the nozzle tip. A 10° angle tip may be appropriate when the surface being cleaned is 30.5 m (100 ft) above the nozzle, but not when the surface being cleaned is .61–1.5 m (2 - 5 ft) away from the tip of the nozzle. For close proximity cleaning, tip angles of 45° or greater must be used to prevent damage to the finish. Water used for rinsing must be cold. Hot or even warm water will cause softening of the finish, and may result in damage to or removal of finish. The pressurized water rinse must not be harsh enough to erode the finish. Such degradation will reduce the longterm performance of the finish. Seek the equipment manufacturer's advice and use care when using this type of pressure near sealant joints and wood trim as well. Misdirected, high-pressure spray can damage most materials and surfaces! Caution should be taken regarding high pressure rinsing with specialty applications such as Custom Brick™. Cleaning solutions used with this method should be compatible with the equipment. Some equipment manufacturers are careful to recommend that only specific cleaning compounds be pumped through their equipment. Many proprietary cleaning solutions may be subject to periodic change in formulation. It is suggested, therefore, that each product being considered be sample tested on a panel or inconspicuous wall area and judged on a trial basis before being used more extensively. Water Presoak It is necessary to thoroughly wet the area to be cleaned prior to the application of the cleaning solution itself. The wall surface to be cleaned must be wet when the cleaning solution is applied. Lower elevations should also be saturated with water in order to prevent absorption of run-off from above, which can cause "clean streaking". Recommendations for Periodic Cleaning of Dryvit Finishes and Coatings DC001 Cleaning Solution Application Application of cleaning solutions can be accomplished using a low-pressure sprayer, 30 to 50 psi (200 to 350 kPa), or through a pressurized water cleaning unit. The pressure used must be adequate to coat the finish surface with the cleaning solution and not more. Chemicals in the cleaner provide the cleaning action, not the force of the water spray used to apply the cleaner. Light scrubbing with a soft bristle brush may be necessary. Follow the cleaning solution manufacturer's instructions for application and scrubbing. Some solution manufacturers recommend application from the bottom, upward, to avoid "clean streaking". Application in vertical sections is also typically recommended, because this allows re-rinsing clean sections below the vertical section being cleaned. Follow the solution manufacturer's recommendations for dwell time on the wall surface prior to rinsing. (Dwell time is the period of time the cleaning solution is left on the wall prior to rinsing off.) Heat, direct sunlight and wind will affect the drying time and reaction rate of cleaning solutions. Ideally, the cleaning crew should be working on shaded areas to avoid rapid evaporation. Caution: Never use high pressure to apply cleaning solutions, as the solution may be driven through the finish and into the base coat, and become the source of future staining. Wear protective goggles, rubber gloves, and NIOSH-approved dust-mist respirator as needed to avoid breathing mists. Read MSDS on all cleaning products for specific protection information. Pressurized Water Rinsing Rinse the wall with large amounts of clean, pressurized water from top to bottom before the cleaning solution can dry. All wall areas below the cleaned area must also be rinsed down thoroughly in a vertical section. Failure to completely flush the cleaned area and all wall areas below of the cleaning solution may leave residues that may emerge upon exposure to precipitation. Rinse all equipment thoroughly after each use. Higher pressures should be used for this pressurized water rinse, as long as it does not damage the finish. Pressure should normally be kept below 600 psi. The higher pressure is needed to remove surface contaminants that have been lifted by the chemical action of the cleaning solution, and also to remove any residue of the cleaning solution itself. This is why it is important not to use high pressure unit the cleaning solution has been applied (by low pressure or mild scrubbing) and allowed to act for the appropriate dwell time. Use of pressurized clean water alone to clean a finish will require higher water pressures to remove the surface contaminants, which increases the likelihood of damaging the finish. Without application of a cleaning solution, the pressure required to clean the finish will usually require such force that the surface of Recommendations for Periodic Cleaning of Dryvit Finishes and Coatings DC001 the finish is abraded or removed. This must be avoided. Finish damaged by such "power washing" techniques alone can void product performance warranties. Cleaning of Mildew and Algae Growth Mildew and algae are commonly found on dirty, exterior wall surfaces that receive little sunlight. These organisms can grow wherever food (dirt) and favorable temperatures and humidity are found. Some cleaners work on mildew only. Others can also be effective on algae. Still others can effectively clean both organisms, while also being effective for general purpose cleaning. It is safe to assume that if there is mildew and algae, there is also dirt. In such cases, the more comprehensive cleaner is necessary to effectively clean the wall surface. If recoating is planned, such cleaning MUST be performed. Caution: Never add ammonia to a bleach solution. Read manufacturer's MSDS prior to use. Company Prosoco, Inc. (800) 255-4255 The Clean-Up Group (239) 455-2225 Mildew & Algae Cleaner Contact Prosoco for best choice; several products available CitraShield BioCide Other Common Stains Many manufacturers of cleaning products offer compounds that are specifically formulated for removal of other common sources of staining. This includes mud, various metals, egg, efflorescence, oil, grease, and smoke/soot. Dryvit recommends contacting a manufacturer of cleaning products for their suggestions on cleaners appropriate for Dryvit finishes with these less common stains. Unknown Stains Unknown stains present unique challenges. As discussed, effective cleaning products and techniques are specific to the type of stain being cleaned. Laboratory tests of unknown stains may be necessary to determine their composition. Experimental cleaning without laboratory analysis in such cases may aggravate the initial stain, or result in other stains that are also difficult to remove. Bottom line is that if you do not know the nature of a stain, it is best to consult a qualified expert who can determine what it is, prior to proceeding further. Recommendations for Periodic Cleaning of Dryvit Finishes and Coatings DC001 Removal of Efflorescence Efflorescence can occur whenever the substrate beneath the Dryvit finish contains cement. It is caused by the migration of water through the cementitious material and interaction with salts present in it. The water containing the salts works its way to the surface of the finish where the water evaporates and leaves the salts – efflorescence behind. It is more easily noticed on darker surfaces. Efflorescence on the finish surface is more an aesthetic than a performance issue for the finish. However, the source of the water migration should be determined since it can mean a more serious problem exists elsewhere. It can be unsightly. It is preferable to use general cleaning compounds and pressurized water to remove light efflorescence deposits. In rare instances, an extremely dilute (1 part in 20) acidic cleaning solution may be required to remove heavy efflorescence. Consult a manufacturer for their recommendations under such circumstances. As with all cleaning solutions, prewet the finish with water prior to application of the diluted acid cleaner. Light scrubbing with a soft bristle brush may be necessary as well, to remove heaviest accumulation. NEVER APPLY ACID SOLUTIONS BY HIGH PRESSURE SPRAY APPLICATION. Rinse cleaned areas as quickly as possible with pressurized clean water, as described previously under Pressurized Water Rinsing. All acid residue must be completely rinsed away to avoid the possibility of adhesion problems of primers, paints/finishes, or sealants. Read cleaning solution manufacturer's MSDS prior to use. Summary All buildings need to be cleaned and the exterior inspected periodically for damage and deterioration. This is an expected part of the life cycle cost of any structure. Buildings coated with Dryvit acrylic finishes are no exception. An advantage to Dryvit products is that they can generally be cleaned from the ground, and with non-caustic cleaning compounds, thereby resulting in less exposure to harsh or potentially harmful cleaners for other building components, occupants and landscaping. EIFS Repair – Small Holes or Impact/Hail Damage Repair Using RapidPatch™ DC002 General: Holes or other damage less than 76 mm x 76 mm (3" x 3") in size can be easily repaired using Dryvit RapidPatch product. The product needs to be applied at a thickness of 19 mm – 25 mm (3/4" – 1") to allow proper heat generation for rapid cure. Under normal conditions, finish can be applied the same day. Procedure: 1. With a sharp utility knife, cut through and remove the lamina, exposing a neat uniformsized area of insulation slightly larger than the damaged area. Using a disk grinder or belt sander with a 20 grit aluminum oxide disk or belt, remove the finish around the cut, exposing the reinforced base coat approximately 76 mm (3") around the damage area. 2. Cut out the loose, damaged foam to reveal fresh foam. Cutting off the foam all the way to substrate is not recommended. When foam in the damaged area is well bonded to the substrate, care must be taken to expose as little of the substrate as possible and prevent rupturing the surface of the substrate. The area to be patched should be round or rectangular in shape and between 19 mm and 25 mm (3/4" and 1") in depth. Deeper patches should be filled with a piece of EPS so the patch thickness is within this range. RapidPatch material may be used to adhere the EPS filler to the substrate. 3. Precisely mask the surrounding finish with masking tape. 4. Mix the RapidPatch and apply the mixture to the damaged area with a margin trowel to a depth of approximately 3.2 mm (1/8") below the existing base coat surface. Also add a thin layer of material on the exposed base coat surrounding the patch. Cut a piece of ® Detail Mesh to the proper size and place over the wet RapidPatch overlapping the existing base coat a minimum of 25 mm (1"). Add additional RapidPatch material to completely fill the damaged area, cover the mesh and feather onto the surrounding base coat. If the material appears initially loose, wait a short time until it stiffens up and level off any imperfections with additional RapidPatch mixture as needed. 5. When the patching material in the damaged area is stiff enough, use a clean, damp margin trowel to smooth out the surface. This may be repeated until a satisfactory surface is achieved. The trowel must be clean and damp prior to each smoothing. 6. Let RapidPatch set for at least 60 minutes, depending on ambient conditions. 7. If necessary, again, precisely mask the surrounding existing finish with masking tape. 8. Apply the new finish over the patched area and texture to match the surrounding finish. NOTE: Do not sand the patched area prior to finish application. 9. If the entire wall is to be refinished, it is not necessary to mask off and apply finish at this stage. Refer to the procedure for repairing texture variations for complete details. NOTE: Because RapidPatch is specifically designed to compensate for drying shrinkage, it may b used to repair damaged areas up to 76 mm x 76 mm x 25 mm (3" x 3" x 1"). EIFS Repair –Impact Damage DC003 General: This procedure describes the method to repair impact damage. Impact damage can result from landscaping activities, vandalism, severe hail, etc. Procedures: 1. Mask off an area slightly larger than the damaged area. Using a sharp utility knife, hand or circular saw with a carborundum blade, cut into the EIFS down to the substrate, outside of damaged area. Remove the damaged EIFS exposing a neat uniform size area slightly larger than the damage area. 2. Grind off finish a minimum 76 mm (3") to expose the existing base coat layer. CAUTION: Care should be taken not to damage the reinforcing mesh with the grinder. The edges of the finish should be sharp, clean and non-tapered beyond the cut out area. 3. Using the appropriate fasteners and/or adhesive install EPS. Ensure overall tightness at the cut line and sliver if necessary. 4. Apply new base coat (cementious/noncementious) and mesh overlapping onto existing exposed base coat layer approximately 64 mm (2 1/2"). Ensure that the newly applied base coat is flat and is seated approximately 1.6 mm (1/16") below the surface of the existing finish. Allow to fully dry (minimum. 24 hours). 5. If necessary again precisely mask off the existing finish. Apply new finish and blend new finish into existing finish. While the finish is still wet, remove the masking tape and feather the edges of the patch so they will blend with the surrounding area. Use a brush, nail, toothpick or similar tool to blend the edges of the patch and to precisely match the texture of the patch with the surrounding area. Proper execution of this step is critical to the success of the patch. NOTE: Environmental conditions, dirt, and exposure will alter the existing color slightly. A final coating of Weathercoat™ is recommended on the total wall surface to ensure color uniformity between patched areas and existing finish coat. If patched areas are acceptable or Weathercoat is not specified, then color matching the existing finish coat is recommended. ALTERNATIVE REPAIR METHOD (Using Noncementitious Base Coat) To avoid the grinding procedure outlined in #2 and avoid a visible patch, complete #3 and: 1. Ensure that the existing finish coat is clean, dry and firmly bonded to the base coat. 2. Apply NCB; in conjunction with reinforcing mesh, onto newly installed insulation board and overlap onto existing finish coat a minimum of 64 mm (2 1/2"). Only a noncementitious base coat can be used with this procedure. Allow patch locations to completely dry. 3. NCB is not recommended for applications on surfaces that will receive sealant. Any of Dryvit’s cementitious base coats may be used in those locations. 4. Apply a tight coat of Freestyle finish or NCB over existing texture and blend in patch locations with skim coat. The wall will need to be skimmed and refinished to a natural break. Allow to fully dry. 5. Apply new finish coat and texture to match existing. EIFS Repair –Corner Damage DC004 General: Corner damage may be caused by impact from objects such as carts, cars or vandalism. Repair involves removing and replacement of materials in the affected area. Procedure: 1. Using a sharp utility knife, hand or circular saw with a carborundum blade, cut approximately 76 mm (3") along each side of the corner down to the substrate. With a margin trowel or similar tool, carefully remove the sections. 2. Examine the piece removed to determine if there is any damaged to the sheathing. 3. If any damage to the substrate is present, repair prior to EIFS application. 4. Grind off excessive finish coat minimum 76 mm (3") on each side of the cut out section to expose the existing base coat layer. Do not cut into reinforcing mesh with grinder. The edges of the finish should be sharp, clean and non-tapered from the finish down to the base coat layer. 5. Install new insulation board to the substrate tight against EPS with the appropriate adhesive or fasteners. Sliver all gaps to ensure there is no space between EPS boards. Do not use base coat to fill gaps between EPS board joints. 6. Mask off the existing finish coat. Apply a layer of Dryvit Corner Mesh™ embedded in base coat over newly installed EPS section overlapping minimum 64 mm (2 1/2") onto existing base coat. 7. Install a continuous piece of reinforcing mesh (Standard or Standard Plus™) wrapping around the corner and extended past opposite side exposed EPS and lap onto existing base coat and mesh minimum 64 mm (2 1/2"). Ensure that the base coat between the old and the new is flat and seated approximately 1.6 mm (1/16") below the surface of the existing finish coat. Allowing a 1.6 mm (1/16") recess is necessary so the finish coat, when applied, will become overall flush with the existing finish coat. Allow to fully dry. 8. Precisely mask off the existing finish. Apply new finish and blend new texture into existing texture. NOTE: Environmental conditions, dirt and exposure will alter the existing color slightly. A final coating of Weathercoat™ is recommended on the total wall surface to ensure color uniformity between patched areas and existing finish coat. If patched areas are acceptable or Weathercoat not specified, then color matching the existing finish coat is recommended. EIFS Repair –Corner Damage DC004 ALTERNATIVE REPAIR METHOD (Using Noncementitious Base Coat) To avoid the grinding procedure outlined in #4 and avoid a visible patch, complete #5 and: 1. Ensure that the existing finish coat is clean, dry and firmly bonded to the base coat. 2. Apply NCB; in conjunction with reinforcing mesh, onto newly installed insulation board and overlap onto existing finish coat a minimum of 64 mm (2 1/2"). Only a noncementitious base coat can be used with this procedure. Allow patch locations to completely dry. 3. NCB is not recommended for applications on surfaces that will receive sealant. Any of Dryvit’s cementitious base coats may be used in those locations. ® 4. Apply a tight coat of Freestyle finish or NCB over existing texture and blend in patch locations with skim coat. The wall will need to be skimmed and refinished to a natural break. Allow to fully dry. 5. Apply new finish coat and texture to match existing. EIFS Repair –Corner Damage DC004 DC005 EIFS Repair –Cracks in Aesthetic Reveals General: Cracks at the base of aesthetic reveals can sometimes occur. Some of the possible reasons may include substrate movement, excessive build up of base coat or accidental cutting of the mesh during installation. Generally, these cracks can be repaired easily by adding sealant along the base of the groove. This provides a weather seal as well as stress relief at those locations. Procedure: 1. Clean the area to remove all dust, dirt, algae or other surface contamination as well as any loose material. A general all-purpose cleaner is usually adequate. For specific recommendations refer to DryvitCARE published cleaning procedures (DC#001) for EIFS surfaces. 2. Install a small closed cell backer rod or bond breaker tape along the base of the groove, to provide the proper sealant joint geometry and to avoid 3-sided adhesion. Small intermittent dabs of sealant may be used to maintain position until the sealant is applied. 3. Apply the specified sealant primer to each surface and allow it to dry. 4. Install and properly tool the sealant in accordance with the sealant manufacturer’s instructions. A minimum 6.4 mm (1/4”) contact area to the EIFS surface along each side of the groove is recommended. 5. Protect the joint from weather until sealant has achieved adequate cure. Bond Breaker Tape or Closed Cell Backer Dryvit Compatible Sealant 1/4" Minimum EIFS Repair –Cracks DC006 General: Cracks can sometimes occur as a result of structural movement, water penetration or improper application. Repair involves removal and replacement of materials in the affected area. Before proceeding, the exact cause of cracks should be determined. Procedure: 1. Using a sharp utility knife, hand or circular skill saw with a carborundum blade, cut an approximate 76 mm x 76 mm (3" x 3") square into EIFS at crack location, down to the substrate. With a margin trowel or similar tool, carefully remove the section in one piece. 2. Verify that the substrate is undamaged and structurally sound. 3. Cut out minimum 76 mm (3") on each side of crack down to substrate. 4. Grind off finish minimum 76 mm (3") on each side of the cut out section to expose the existing base coat layer. Do not cut into reinforcing mesh with grinder. The edges of the finish should be sharp, clean and non-tapered from the finish down to the base coat layer. 5. Install new insulation board to the substrate tight against EPS with the appropriate adhesive or fasteners. Sliver all gaps to ensure there is no space between EPS boards. Do not use base coat to fill gaps between EPS board joints. 6. Mask off the existing finish, apply base coat and mesh on new insulation board and overlap onto existing exposed base coat layer approximately 64 mm (2 1/2"). Ensure that the base coat between the old and the new is flat and seated approximately 1.6 mm (1/16") below the surface of the existing finish coat. Allowing a 1.6 mm (1/16") recess is necessary so the finish coat, when applied, will become overall flush with the existing finish coat. Allow to fully dry. 7. Precisely mask off the existing finish. Apply new finish and blend new texture into existing texture. NOTE: Environmental conditions, dirt and exposure will alter the existing color slightly. A final coating of Weathercoat™ is recommended on the total wall surface to ensure color uniformity between patched areas and existing finish coat. If patched areas are acceptable or Weathercoat not specified, then color matching the existing finish coat is recommended. EIFS Repair –Cracks DC006 ALTERNATIVE REPAIR METHOD (Using Noncementitious Base Coat) To avoid the grinding procedure outlined in #4 and avoid a visible patch, complete #5 and: 1. Ensure that the existing finish coat is clean, dry and firmly bonded to the base coat. 2. Apply NCB in conjunction with reinforcing mesh, onto newly installed insulation board and overlap onto existing finish coat a minimum of 64 mm (2 1/2"). Only a noncementitious base coat can be used with this procedure. Allow patch locations to completely dry. 3. NCB is not recommended for applications on surfaces that will receive sealant. Any of Dryvit’s cementitious base coats may be used in those locations. ® 4. Apply a tight coat of Freestyle finish or NCB over existing texture and blend in patch locations with skim coat. The wall will need to be skimmed and refinished to a natural break. Allow to fully dry. 5. Apply new finish coat and texture to match existing. EIFS Repair –Cracks at Corners of Doors, Windows, Air Conditioners, Etc. DC007 General: Cracks can sometimes occur as a result of structural movement, water penetration or improper application. Repair involves removal and replacement of materials in the affected area. Before proceeding, the exact cause of the cracks should be determined. Procedure: 1. Using a sharp utility knife, hand or circular saw with a carborundum blade, cut into EIFS down to substrate approximately 152 mm (6") along jamb and sill or jamb and head depending on crack location. These cuts should be long enough to totally remove the cracked area. Make vertical and horizontal cuts so that a square piece of EPS is removed. 2. With a margin trowel or similar tool, carefully remove the section in one piece. 3. Verify that the substrate is undamaged and structurally sound. 4. Grind off finish minimum 76 mm (3") on each side of the cut out section to expose the existing base coat layer. Do not cut into reinforcing mesh with grinder. The edges of the finish should be sharp, clean and non-tapered from the finish down to the base coat layer. ® 5. Attach pieces of Detail Mesh to the substrate for EPS edge wrap. 6. Install a new continuous “L” shaped piece of insulation board tight against the existing EIFS. Attach the new EPS to the substrate using the appropriate adhesive or fasteners. Sliver all gaps to ensure overall tightness and hold EPS back minimum 19 mm (3/4") from frame to allow for proper sealant joint application. 7. Mask off the existing finish coat. Install a 229 mm x 300 mm (9" x 12") piece of Detail Mesh embedded in base coat at a 45-degree angle. Apply base coat and Standard mesh overlapping onto existing exposed base coat layer approximately 64 mm (2 1/2"). Ensure that the base coat between the old and the new is flat and seated approximately 1.6 mm (1/16") below the surface of the existing finish coat. Allowing a 1.6 mm (1/16") recess is necessary so the finish coat, when applied, will become overall flush with the existing finish coat. Allow to fully dry. 8. Precisely mask off the existing finish. Apply new finish and blend new texture into existing texture. NOTE: Environmental conditions, dirt and exposure will alter the existing color slightly. A final coating of Weathercoat™ is recommended on the total wall surface to ensure color uniformity between patched areas and existing finish coat. If patched areas are acceptable or Weathercoat not specified, then color matching the existing finish coat is recommended. EIFS Repair –Cracks at Corners of Doors, Windows, Air Conditioners, Etc. DC007 ALTERNATIVE REPAIR METHOD (Using Non-Cementitious Base Coat) NOTE: This procedure does not apply when sealant joint repair is involved. To avoid the grinding procedure outlined in #4 and avoid a visible patch, complete #5 and #6 and: 1. Ensure that the existing finish coat is clean, dry and firmly bonded to the base coat. 2. Apply NCB; in conjunction with reinforcing mesh, onto newly installed insulation board and overlap onto existing finish coat a minimum of 64 mm (2 1/2"). Only a non-cementitious base coat can be used with this procedure. Allow patch locations to completely dry. 3. NCB is not recommended for applications on surfaces that will receive sealant. Any of Dryvit’s cementitious base coats may be used in those locations. 4. Apply a tight coat of Freestyle finish or NCB over existing finish texture and blend in patch locations with skim coat. The wall will need to be skimmed and refinished to a natural break. Allow to fully dry. 5. Apply new finish coat and texture to match existing. EIFS Repair – Floor Line Location in Wood Frame Construction DC008 General: Delamination bulges or cracks at or near the floor line in wood frame construction are generally caused by cross grain shrinkage in dimensional lumber. Structural or other movement not attributable to cross grain shrinkage can also cause floor line cracking. Repair generally involves removal and replacement of materials. If structural movement is expected to be present, an expansion joint should be incorporated. Procedure: 1. Cut into the EIFS horizontally a minimum 76 mm (3") above and below the floor line down to the substrate using a circular saw with a carborundum blade. Remove the cut area. 2. Grind off the existing finish approximately 76 mm (3") minimum on each side of the cut out section to expose the existing base coat layer. Do not cut into the reinforcing mesh with the grinder. The edge of the finish should be sharp, clean, and non-tapered. 3. Examine the substrate at the floor line. If an expansion gap exists, continue with step 4. If the substrate is not gapped, go to step 5 for repair without a gap in the EIFS. 4. Using appropriate adhesive or fasteners, install new insulation board to the substrate tight against the existing EPS. Ensure overall tightness at the cut line and sliver, if necessary. A minimum 19 mm (3/4") space should be maintained between the top and bottom EPS at the floor line. EPS edges at the 19 mm (3/4") gap must be ® wrapped with Detail Mesh embedded in base coat. You can either install two pieces of Detail Mesh horizontally and install insulation board on top, or install pre-wrapped pieces of insulation board and add pieces of Detail Mesh where the individual pieces abut. 5. Cut insulation board to fit tightly into the repair area. Sand the edges of the insulation board for a precise fit. Attach the insulation board to the substrate using the appropriate adhesive or fasteners. Make sure that the face of the new insulation board is flush with the existing insulation board. 6. Mask off the existing finish. Apply base coat and mesh on the face of new insulation board and overlap on existing exposed base coat layer approximately 64 mm (2 1/2"). Ensure that the newly applied base coat that overlaps the existing is flat and is seated approximately 1.6 mm (1/16") below the surface of the existing finish coat. Allowing a 1.6 mm (1/16") inches recess is necessary so the finish, when applied, will become overall flush with the existing finish. Allow to fully dry. 7. Precisely mask off the existing finish. Apply new finish and blend new texture into existing texture. DO NOT APPLY TEXTURED FINISH ONTO RETURN. Apply Weathercoat™ or Weatherprime® to the return edges of base coat that will receive sealant. 8. Install closed cell backer rod, sealant primer, and Dryvit compatible sealant in accordance with manufacturer’s instructions. EIFS Repair – Terminations at Sealants Joints DC009 General: This procedure involves correcting and preparing the EIFS surface for installation of new sealant. Procedure: 1. Using an appropriate tool, cut the sealant as close as possible to the EIFS surface without damaging it. 2. You should be able to grasp the sealant and backer rod in one hand and with constant tension, slice the sealant away from the EIFS. 3. Remove any remaining sealant (wire brushing or grinding may be necessary) and inspect EIFS surface. 4. Surfaces should be clean and sound with reinforcing mesh embedded in the base coat. It is recommended that any existing textured finish be removed from areas to receive sealant. 5. Improperly embedded reinforcing mesh should be skimmed with the base coat, to achieve proper coverage. Broken or damaged mesh can be repaired by addition of new mesh, properly embedded in base coat and lapped a minimum 64 mm (2 1/2") over the existing adjacent base coat. ® ® 6. Apply Weatherprime or Weathercoat along EIFS edge to receive sealant and allow to dry for a minimum of 72 hours. 7. Install closed cell backer rod, EIFS compatible primer, and sealant following manufacturer’s specifications. EIFS Repair – Overlay Sealant Joints using Sealant DC009A General: This procedure involves correcting and preparing the EIFS surface and installation of new sealant (overlay sealant joint) over existing sealant joints. Procedure: 1. Using an appropriate tool, cut the existing sealant down the middle to the backer rod without damaging it. 2. Grind back and remove a minimum of 9.5 mm (3/8") of EIFS existing textured finish along both sides of joint to expose the base coat. Clean any dust/debris from EIFS surface areas about to receive sealant. 3. Provide a means of protecting the existing EIFS textured finish beyond the exposed base coat for the overlay joint. Install overlay sealant gauge minimum of 6.4 mm (1/4") thickness extending out to both sides of sealant joint. Masking tape and thickness gauges may be used to achieve the proper sealant depth if necessary. 4. Apply a bond breaker tape over the existing sealant joint. ® 5. Apply Weatherprime or Weathercoat™ along EIFS base coat surface to receive sealant and allow to dry for a minimum of 72 hours. 6. Apply sealant primer and sealant per product specification (See DS153). Tool sealant as necessary to obtain a uniform flat strip over old joint and onto each side of joint a minimum of 9.5 mm (3/8"). Sealant depth after tooling should be a minimum of 6.4 mm (1/4") thick and a maximum depth of 9.5 mm (3/8"). Allow sealant to tack up prior to removal of thickness gauges and masking tape if used. EIFS Repair – Overlay Sealant Joints using Sealant SOLID SUBSTRATE DRYVIT REINFORCING MESH EMBEDDED IN DRYVIT BASE COAT DC009A FRAMING SUBSTRATE EIFS ADHESIVE EPS INSULATION EXISTING SEALANT WITH SLIT DRYVIT FINISH 9.5 MM (3/ 8") MIN. MASKING TAPE REMOVED AFTER SEALANT HAS CURED (MIN 16 HOURS) TOOLING SPACER BOND BREAKER TAPE NEW OVERLAY SEALANT EIFS Repair – Adding Expansion Joints Around Windows DC010 General: Dryvit Systems, Inc. recommends an expansion joint of a minimum of 19 mm (3/4 in) be left between the EIF system and penetrations to the system such as windows and doors. A sealant joint accommodates differential movement between dissimilar materials while maintaining a weather seal. Depending on the actual geometry of abutting materials, various options are available to provide a proper weather seal including rectangular, fillet, etc. Rectangular joints with sealant and backer rod provide optimal contour and the most movement capability. This procedure describes a method for cutting back the EIFS to allow installation of a rectangular joint. Angle beads with bond breaker tape or triangular backer rod allow for some movement but are primarily intended to function as weather seals in joints with minimal movement. Procedure: 1. Cut into the EIFS a minimum 152 mm (6") away from the perimeter of the window frame down to the substrate and remove the cut area. 2. Grind off existing finish coat to expose the existing base coat layer approximately 76 mm (3") minimum from the cut edge. Do not cut into the reinforcing mesh with the grinder. To maintain a constant minimum overlap of 64 mm (2 1/2"), cutting into the mesh forces you to extend the grinding further out. The edges of the finish should be sharp, clean, and non-tapered from the finish down to the base coat layer. 3. Reinstall new insulation board tight against the existing EPS with the appropriate adhesive or fasteners. Ensure overall tightness at the cut line by sanding the EPS edges for a precise fit and sliver if necessary. A 19 mm (3/4") minimum width space should be maintained between the newly installed EPS and the window frame. EPS edges at the 19 mm (3/4") gap must be wrapped with Detail Mesh® embedded in base coat. You can either install a piece of Detail Mesh first and install insulation board on top, or install pre-wrapped pieces of insulation board and add pieces of Detail Mesh where the individual pieces abut. 4. NCB is not recommended for applications on surfaces that will receive sealant. Any of Dryvit’s cementitious base coats may be used in those locations. 5. Mask off the existing finish coat. Apply base coat and mesh on the face of new insulation board and overlap on existing exposed base coat layer approximately 64 mm (2 1/2"). Ensure that the newly applied base coat that overlaps the existing is flat and is seated approximately 1.6 mm (1/16") below the surface of the existing finish coat. Allowing a 1.6 mm (1/16") recess is necessary so the finish coat, when applied, will become overall flush with the existing finish coat. Allow to fully dry. DO NOT APPLY TEXTURED FINISH ONTO RETURN. Apply Weathercoat™ or Weatherprime® to the return edges of base coat that will receive sealant. 6. Precisely mask off the existing texture. Apply new finish coat and blend new texture into existing texture. NOTE: Environmental conditions, dirt and exposure will alter the existing color slightly. A final coating of Weathercoat is recommended on the total wall surface to ensure color uniformity between patched areas and existing finish coat. If patched areas are acceptable, or Weathercoat not specified, then color matching the existing finish coat is recommended. EIFS Repair – EIFS System Installed Tight to Shingles DC011 General: This procedure describes the method for obtaining the required minimum 51 mm (2") clearance of the EIFS termination to roof assembly, when it has been installed tight to the shingles and not properly back wrapped. Dryvit recommends that the system be held up from the shingles by a minimum of 51 mm (2") to allow repairs to the roof without damage occurring to the system (See Figure 1). Procedure: 1. Cut into the EIFS a minimum 152 mm (6") above the roofline, using a circular saw with a carborundum blade. The blade should be set to a depth that is slightly less than the combined thickness of the lamina and EPS to avoid damaging underlying materials. Remove cut area. (See Figure 2) NOTE: Allow for a minimum of 51 mm (2") clearance between the EIFS termination and the roof assembly. 2. Verify adequacy of existing flashing and correct as necessary. Ensure appropriate overlap of EIFS onto flashing is maintained. 3. Grind off existing finish coat approximately 76 mm (3") minimum above the cut out section to expose the existing base coat layer. Do not cut into the reinforcing mesh with the grinder. Accidentally cutting into the reinforcing mesh while grinding the finish off will make a small patch become larger. As you are trying to maintain a constant minimum overlap of 64 mm (2 1/2"), cutting into the mesh forces you to extend the grinding outward further. The edges of the finish should be sharp, clean, and non-tapered from the finish down to the base layer. ® 4. Install a piece of Detail Mesh parallel to the roof first and install insulation board on top. Install new insulation board tight against the existing with the appropriate adhesive or fasteners. Sliver all gaps to ensure overall tightness. A minimum 51 mm (2") space should be maintained between roof and the new insulation. All insulation board must be properly back wrapped. You can either install a piece of Detail Mesh parallel to the roof first and install insulation board on top, or install pre-wrapped pieces of insulation board and add pieces of Detail Mesh where the individual pieces butt. (See Figure 3). 5. Mask off the existing finish coat. Apply base coat and mesh on new insulation board and overlap on existing exposed base coat layer approximately 64 mm (2 1/2"), Ensure that the base coat between the old and the new is flat and is seated approximately 1.6 mm (1/16") below the surface of the finish coat. Allowing a 1.6 mm (1/16") recess is necessary so the finish coat, when applied, will become overall flush with the existing finish coat. Allow to fully dry. EIFS Repair – EIFS System Installed Tight to Shingles DC011 6. Precisely mask off the existing texture. Apply new finish coat and blend new texture into existing texture. NOTE: Environmental conditions, dirt and exposure will alter the existing color slightly. A final coating of Weathercoat is recommended on the total wall surface to ensure color uniformity between patched areas and existing finish coat. If patched areas are acceptable, or Weathercoat not specified, then color matching the existing finish coat is recommended. ALTERNATIVE REPAIR METHOD (Using Noncementitious Base Coat) To avoid the grinding procedure outlined in #3 and avoid a visible patch, complete #4 and: 1. Ensure that the existing finish coat is clean, dry and firmly bonded to the base coat. 2. Apply NCB; in conjunction with reinforcing mesh, onto newly installed insulation board and overlap onto existing finish coat a minimum of 51 mm (2"). Only a noncementitious base coat can be used with this procedure. Allow patch locations to completely dry. 3. NCB is not recommended for applications on surfaces that will receive sealant. Any of Dryvit’s cementitious base coats may be used in those locations. 4. Apply a tight coat of Freestyle finish or NCB over existing texture and blend in patch locations with skim coat. The wall will need to be skimmed and refinished to a natural break. Allow to fully dry. 5. Apply new finish coat and texture to match existing. DC011 EIFS Repair – EIFS System Installed Tight to Shingles Figure 1 Figure 2 Figure 3 EIFS Repair – Reattachment of EIFS DC012 General: This procedure describes a method to reattach an EIFS cladding that may have become separated from the underlying substrate. This can occur when substrates are not properly prepared or have otherwise become compromised during the service life of the building. Repair involves adding mechanical fasteners to anchor the EIFS back to the substrate and refinishing the affected areas. The fastening schedule will need to resist structural loads (i.e. wind) and has to be properly evaluated for the specific building. The contractor should verify that the proposed fastening method and schedule meets specific building and local code requirements. It may be necessary to engage an engineer familiar with local requirements. Procedure: 1. Thoroughly evaluate existing conditions to ensure the complete extent of the problem is known and causes determined and properly addressed prior to proceeding with reattachment. This procedure should only be used when it is determined that the EIFS and underlying materials are sound and in serviceable condition. Extensive cracking, delamination or other severe condition may indicate a different solution. 2. The fasteners must be installed into a structural substrate. When the sheathing is gypsum, cement board or other non nail-base material, the fasteners must be installed into the underlying framing. In this case the first step is to locate and mark the location of the framing members. 3. Using Wind Devil plates (Wind-lock Corp.) with a fastener of appropriate length and type for the substrate, reattach the existing EIF system at a minimum pattern of 406 mm x 406 mm (16" x 16"). This may need to be adjusted depending on design wind loads as well as whether the wall surface lays flat. If fasteners are spaced too far apart, some “pillowing” may be visible between attachment points. Power driven fasteners are also available. 4. Install the fasteners so that the washer surface is slightly below the plane of the finish surface but not more than 1.6 mm (1/16"). ® 5. Over each fastener, embed a piece of Detail Mesh minimum 229 mm x 229 mm (9"x 9") in NCB™ base coat material and feather out edges onto surrounding surface. Allow the material to fully dry (minimum 24 hours). DC012 EIFS Repair – Reattachment of EIFS ® 6. Apply a tight coat of Freestyle finish or NCB over the entire wall surface to a natural break (corner, reveal, sealant joint, etc.). This application fills in the existing texture to provide a flat, smooth surface for application of new finish. The skim coat should only be applied at the minimum thickness required to fill the texture. Excessively thick layers may result in poor curing and potential blistering. NOTE: Cementitious materials are not recommended for skimming over existing acrylic finishes. Dryvit recommends that only NCB or Freestyle products be used. 7. Allow material to fully dry and inspect the surface for any imperfections that may show through the finish (such as dimpling at fasteners heads, trowel marks, etc.) and correct as needed. 8. Apply new finish to match surrounding areas as specified. If adjacent colors and texture need to be matched, it is recommended that samples of the existing material be submitted to get the best possible match. 9. This procedure should yield a wall surface without any visible repair patches. ® ® 10. For some finely textured finishes such as Sandblast and Sandpebble Fine, it may be possible to apply new finish directly over the existing finish without skimming, however, trial areas should be applied to verify acceptability. ® 11. Colored aggregated finishes such as Stone Mist and Ameristone™ can be over sprayed with additional material without re-skimming, after the patch areas are properly primed. NOTE: Exact matches to existing finishes on adjacent wall areas are not always possible because of the effects of weathering and texture variations. Repairs should always be extended to a natural break to minimize this effect. EIFS Repair – Correcting Finish Textures Irregularities DC013 General: Undesirable texture inconsistencies in the EIFS finish can result from a variety of conditions including use of different tools, mechanic or floating technique, weather conditions, substrate conditions, scaffold lines, etc. Although applying a colored coating, Weathercoat™, will help correct color variations, it will not hide texture variations. To completely hide unwanted texture variations, it is generally best to skim the surface to fill in the existing texture and reapply the textured finish to a natural break. Procedure: 1. Clean the existing surface to remove any dirt, mold, mildew, or other contaminants that may interfere with adhesion of a coating. Use an appropriate cleaner in accordance with DryvitCARE published cleaning procedures (DC#001) for EIFS surfaces. 2. Inspect the wall surface and perform any needed repairs (cracks, sealant repair, damage, etc.). ® 3. Apply a tight coat of Freestyle finish or NCB™ over the entire wall surface to a natural break (corner, reveal, sealant joint, etc.). This application fills in the existing texture to provide a flat, smooth surface for application of new finish. The skim coat should only be applied at the minimum thickness required to fill the texture. Excessively thick layers may result in poor curing and potential blistering. NOTE: Cementitious materials are not recommended for skimming over existing acrylic finishes. Dryvit recommends that only NCB or Freestyle products be used. 4. Allow material to fully dry and inspect the surface for any imperfections that may show through the finish (such as dimpling at fastener heads, trowel marks, etc.) and correct as needed. 5. Apply new finish to match surrounding areas as specified. If adjacent colors and texture need to be matched, it is recommended that samples of the existing material be submitted to get the best possible match. ® ® 6. For some finely texture finishes such as Sandblast and Sandpebble Fine, it may be possible to apply new finish directly over the existing finish without skimming. Trial areas should be applied to verify acceptability. EIFS Repair – Correcting Finish Textures Irregularities DC013 7. Although it may be sometimes possible to overspray colored aggregated finishes ® such as, Stone Mist and Ameristone™ without re-skimming, a trial area should always be applied to verify acceptability. If necessary, the existing surface may be skimmed with a tight coat of Freestyle or NCB. NOTE: Exact matches to existing finishes on adjacent wall areas are not always possible because of the effects of weathering to color and texture. Repairs should always be extended to a natural break to minimize this effect. Existing EIFS Finish Dryvit NCB or Freestyle Skim Coat New Dryvit Finish EIFS Repair – Frozen and Delaminating Finish DC014 General: Localized spalling, blistering or delamination of finish can occur for a number of reasons including application outside recommended procedures, improper curing or inadequate substrate preparation. Repair involves removal of damaged materials and application of new finish. Procedure: 1. Using a power washer, remove the existing finish to expose the base coat layer. You may encounter areas of finish that may be difficult to remove. These areas should be thoroughly saturated with hot water until soft and then scrape away finish with margin trowel or similar tool. 2. Examine the exposed areas of base coat for damage such as holes, breaks, excessive mesh pattern, etc. and repair per Dryvit’s recommended repair procedure for penetration-type damage. 3. If efflorescence is present on the base coat it must be removed. To remove efflorescence, use an appropriate cleaner in accordance with DryvitCARE published cleaning procedures (DC#001) for EIFS surfaces. 4. If the repair extends onto existing finish the wall may need to be skimmed with ® NCB™ or Freestyle to a natural break. This provides a smooth level surface for the application of finish. 5. Apply new finish and texture to match existing finish. DC015 EIFS Repair – Hot Knife Procedure General: This procedure describes a method to provide the required edge wrap for the EPS when repairing a system termination in an existing EIFS wall. By not disturbing the surrounding base coat and finish, a visible patch is avoided. This simplifies patching/repairs by eliminating the task of removing the original finish from the area surrounding the patch and thus avoiding texture variations on the face of the wall that may be objectionable. This procedure may also be used for repairing holes or installing/repairing expansion joints in EIFS. A certain amount of care and judgment is necessary with this method and may not be appropriate for all situations and personnel. Caution: Minor cracking may occur at corners when the hot knife procedure is used at penetrations. Procedure: 1. Precisely mark the area to be removed. All lines should be straight and true. 2. Using a circular saw with a carborundum blade precisely cut along the marked lines through the lamina and EPS. Use a straightedge as a guide to maintain neat, straight and true cuts. 3. Remove the lamina and insulation board taking care not to damage the substrate. 4. Insert the hot knife blade just behind the lamina and carefully melt out a cavity in the insulation board approximately 76 mm (3") deep by 3.2 mm - 4.8 mm (1/8" - 3/16") wide for placing the base coat and reinforcing mesh behind the original lamina. (See Figure 1) NOTE: Take care not to disturb the flat plane of the existing lamina, as this may result in a bulge in the final repair. Figure 1 EIFS Repair – Hot Knife Procedure DC015 5. When repairing an opening in an existing wall or repairing an expansion joint, cut a piece of reinforcing mesh of sufficient size to ensure a 64 mm (2 1/2") minimum lap behind the original lamina and returning onto the edge of the insulation board and substrate. When repairing holes, cut a piece of reinforcing mesh of sufficient size to ensure a 64 mm (2 1/2") minimum lap behind the original lamina and onto the face of the insulation board in the patch surface. 6. For patches, cut a piece of insulation board and sand to fit as tight as possible into the opening. Apply adhesive to the back of the insulation board. Place it into the opening so that the surface is flush and level with the surface of the surrounding insulation board. Install EPS slivers as required to fill any gaps. NOTE: Do not apply adhesive on the edges of the insulation board. Procedure: 7. Precisely mask the surrounding finish to protect it from damage. For best results, ensure that the masking tape precisely follows the cut edge of the remaining lamina. 8. Use a margin trowel or similar tool to work a sufficient amount of base coat into the void created by the hot knife to allow full reinforcing mesh embedment. 9. NCB is not recommended for applications on surfaces that will receive sealant. Any of Dryvit’s cementitious base coats may be used in those locations. 10. Carefully insert one edge of reinforcing mesh into the void and embed into the base coat. 11. Repeat the above steps for the remaining sides of the patch, opening or expansion joint. Ensure that the existing basecoat is pressed flat around the perimeter of the patch so that it is flat and level with the surrounding surface. 12. Fully embed the reinforcing mesh into the base coat on the remainder of the patch, leaving the surface smooth and free of trowel marks or rough areas. 13. Allow the base coat to completely cure, usually a minimum of 24 hours. 14. Check to ensure masking is in place and that it will protect the surrounding finish coat. NOTE: Base coat surfaces that will receive sealant should be coated with ® either Weatherprime or Weathercoat™ prior to sealant application. For patches in visible areas, the final finish should be color matched to the surrounding finish. DC015 EIFS Repair – Hot Knife Procedure Figure 2 15. Apply the finish coat to the face of the patch. Do not apply textured finish over the base coat in areas where sealant/caulking will be installed; refer to DS153. 16. While the finish is still wet, remove the masking tape and feather the edges of the patch so they will blend with the surrounding area. Use a brush, nail, toothpick or similar tool to blend in the edges of the patch, and match the texture with the surrounding area. Proper execution of this step is critical to the success of the patch. 17. A slight color variation will exist after the patch has dried. This should become less noticeable over time as environmental conditions take control. For more information on Dryvit Systems or Continuous Insulation, visit these links. Issued: 11/2013