1
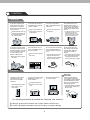
55cm (22”) LCD TV COMBINATION WITH DVD PLAYER AND DVB-T INSTRUCTION MANUAL TFTV5532LED CONTENTS Safety Precautions Power Supply .................................................................................................................................................... 1 Installation Use ......................................................................................................................................................... 2 and Maintenance ....................................................................................................................................... 3 Safety Instructions ......................................................................................................................... 4~5 Important User Guidance Information Names of each part (Front View) / Accessories. ............................................................................................... 6 Names of each part (Back View) ....................................................................................................................... 7 Mounting on a Desktop / Installation Precautions ............................................................................................. 8 Installing an Antenna ......................................................................................................................................... 9 Remote control ...........................................................................................................................................10~11 Precautions / How to use remote control ......................................................................................................... 12 Basic Use Powering the LCD TV / Selecting input source ................................................................................................13 Application Operating the Menu ....................................................................................................................................... 14 Customizing the PICTURE Settings .............................................................................................................. 15 Customizing the SOUND Settings ................................................................................................................. 16 Customizing the TIMER Settings ................................................................................................................... 17 Customizing the SETUP Settings .................................................................................................................. 18 Customizing the LOCK Settings .................................................................................................................... 19 Customizing the CHANNEL Settings ......................................................................................................... 20~21 USB Mode ..................................................................................................................................................... 22 DVD operation ........................................................................................................................................... 23~28 Disc care ........................................................................................................................................................ 29 Maintenance and Service Trouble shooting ............................................................................................................................................. 30 Specifications ................................................................................................................................................. 31 Safety Precautions Power Supply Warnings Do not touch the power plug with wet hands. Doing so may result in electric shock. Do not bend the power cord excessively or place heavy objects on it. Doing so may result in fire or electric shock. Do not use a damaged power cord or plug or a loose outlet. Do not plug several devices into the same outlet. Doing so may cause the outlet to overheat and start a fire. Doing so may result in fire or electric shock. Insert the power plug fully into the outlet. A loose or improperly inserted power plug may result in fire. Be sure to ground the unit. Failing to do may lead to electric shock when a short circuit overload occurs. If necessary, install a ground fault circuit breaker. Never ground to a telephone line, lightning rod, or metal gas pipe. (doing so may result in fire, elect rick shock or other hazards.) Cautions When disconnecting the power cord from an AC outlet, always grasp it by the plug. Pulling on the cord can damage the internal wire and may result in fire. Always unplug the unit before cleaning. The purpose of these precautions is to ensure user safety and prevent property damage. Be sure to read and observe all safety precautions. Not doing so may result in fire or electric shock. 1 Installation Warnings Do not place containers with liquids such as flower vases, soft drink cans, or medicine bottles or small metallic objects on top of the unit. If liquid enters the unit or any metal object fall into the unit, it may result in short-circuit, fire, or electric shock. Do not place a burning candle burning anti-mosquito incense, or lighted cigarette on top of the unit. do not place the unit near any heat source such as a fireplace or space heater. Doing so poses a serious risk of fire. Do not use or store flamm albe or combustible materials near the unit. Do not place the unit where it is exposed to rain, excessive moisture or grease. Doing so may result in fire, electric shock, malfunction or deformation. Doing so may result in fire or explosion. Do not run power cords near heat producing appliances such as radiators, stoves, or irons. Do not place the unit in a poorly ventilated enclosure, such as a cabinet. Doing so poses a serious risk of fire. The excessive heat could melt the insulation and expose live wires, resulting in fire or electric shock Do not place the unit on an unstable surface, such as a wobbly stand or sloped table, or on any surface whose area is smaller than the bottom area of the unit. If a child climbs on the unit, it could topple and fall onto the child, resulting in serious injury to the child or damage to the unit. Place the unit on a flat stable surface. Do the antenna away from high voltage power lines and communication cables and make sure it is installed securely. If the antenna touches a power line, contact with the antenna could result in fire, electric shock, serious injury, or death. Cautions Warnings Install the unit at an adeq uate distance from the wall to ensure sufficient ventilation. It the temperature inside the unit rises, it may result in fire Do not cover the unit with a tablecloth, curtain, or other material. Be sure to place the unit on a level surface. If the temperature inside the unit rises, it may result in fire. Form a drip loop where the coaxial antenna cable enters your building to prevent rainwater from travelling along the cable and coming in contact with the antenna input terminal. If rainwater finds its way inside the unit, it may result in fire or electric shock. The following precautions are divided into “Warnings” and “Cautions”. Warning: Ignoring this precaution may result in death or serious injury. Caution: Ignoring this precaution may result in injury or property damage. 2 Safety Precautions Use and Maintenance Warnings Disconnect the power cord from the wall outlet during an electrical storm. Not doing so may result in fire or electric shock. Do not allow children to climb or hang on the unit. Do not insert any metal objects, such as a screwdriver paper clip, or bent wire into the ventilation openings or A/V terminals. The unit could topple over on to a child and result in serious injury. Doing so poses a serious risk of fire or electric shock. Never disassemble or modify the unit in anyway. Do not attempt to service the unit yourself. Doing so may result in fire or electric shock. If the unit requires repair, contact the service centre. Cautions Warnings When not using the unit for long periods of time, disconnect the power cord from the wall outlet. Dust could accumulate over time on the unit and cause it to generate heat and ignite or deteriorate insulation, which in turn may result in an electrical fire. When moving the unit be sure to turn off the unit and unplug the power cord from the wall outlet. Always use two or more people to lift or move the unit. Wipe off any moisture, dirt, or dust on the power plug pins with a clean dry cloth. If the unit is dropped, it could be damaged or other wise cause injury. If you notice any unusual odours or smoke around the unit, immediately disconnect the unit from the outlet and contact the service centre. Moving the unit with the power cord connected to the outlet may cause damage to the cord,resulting in fire or electric shock. Failure to do so may result in fire or electric shock. It is advisable to clean the interior of the unit at least once a year. Contact the store of purchase or service centre for information. Continuing to use the unit without cleaning off the dust build-up inside it may result in fire or electric shock. Failure to do so may result in fire or electric shock. 3 When removing the batteries from the remote control, make sure children do not swallow them. Keep the batteries out of the reach of infants and children. If a child has swallowed a battery, seek medical attention immediately. Always turn off the unit and unplug the power cord when cleaning the unit. Use a soft dry cloth to clean the unit. Never clean with industrial strength polish, wax, benzene, paint thinner, air freshener, lubricant, detergent, or other such chemicals. Also, do not clean with a damp cloth. Safety Precautions Important Safety Instructions Warnings and Precautions To prevent any injuries, the following safety precautions should be observed in the installation, use, servicing and maintenance of this equipment. Before operating this equipment, please read this manual completely, and keep it near by for future reference. 1) Read these instructions. 2) Keep these instructions. 3) Heed all warnings. 4) Follow all instructions. 5) Do not use this apparatus near water. 6) Clean only with a dry cloth. 7) Do not block any of the ventilation openings. Install in accordance with the manufacturer's instructions. 8) Do not install near any heat sources such as radiators, heat registers, stoves, or other apparatus (including amplifiers) that produce heat. 9) Do not defeat the safety purpose of the polarized or grounding type plug. A polarized plug has two blades with one wider than the other. A grounding type plug has two blades and a third grounding prong. The wide blade or the third prong is provided for your safety. When the provided plug does not fit into your outlet, consult an electrician for replacement of the obsolete outlet. 10) Protect the power cord from being walked on or pinched particularly at plugs, convenience receptacles, and the point where they exit from the apparatus. 11) Only use the attachments / accessories specified by the manufacturer. 12) Use only with a cart, stand, tripod, bracket, or table specified by the manufacturer, or sold with the apparatus. When a cart is used, use caution when moving the cart/apparatus combination to avoid injury from tip over 4 Safety Precautions Important Safety Instructions 13) Unplug this apparatus during lightning storms or when unused for long periods of time. 14) Refer all servicing to qualified service personnel. Servicing is required when the apparatus has been damaged in any way, such as power supply cord or plug is damaged, liquid has been spilled or objects have fallen into the apparatus, the apparatus has been exposed to rain or moisture, does not operate normally, or has been dropped. Apparatus shall not be exposed to dripping or splashing and no objects filled with liquids, such as vases, shall be placed on the apparatus The lightning flash with an arrowhead symbol, within an equilateral triangle is intended to alert the user to the presence of uninsulated “dangerous voltage” within the product's enclosure that may be of sufficient magnitude to con· stitute a risk of electric shock to persons. The exclamation point within an equilateral triangle is, intended to alert the user to the presence of Important operating and maintenance (servicing)instructions in the literature accompanying the appliance. CAUTION: TO REDUCE THE RISK OF ELECTRIC SHOCK, DO NOT REMOVE COVER (OR BACK), NO USER-SERVICABLE PARTS INSIDE. REFER SERVICING TO QUALIFIED SERVICE PERSONAL. 5B-En Apparatus with Class 1 construction shall be connected to a Mains socket outlet with a protective earthing connection. WARNING TO PREVENT DAMAGE WHICH MAY RESULT IN FIRE OR ELECTRIC SHOCK HAZARD, DO NOT EXPOSE THIS APPLIANCE TO RAIN OR MOISTURE. Caution: - These servicing instructions are for use by qualified service personnel only. To reduce the risk of electric shock, do not perform any servicing other than that contained in the operating instructions unless you are qualified to do so. - Any changes or modifications not expressly approved by the party responsible for compliance could void the user's authority to operate the equipment. 5 User Guidance Information Names of each part Front View 1 2 3 4 5 6 7 Please insert a 12cm disc according to the silk 8 1 MENU button - OSD Menu Display Button 2 CH+/- button - Channel/Program +,- Button 3 VOL+/- button - Volume +,- Button 4 TV/AV button - Input Source Select Button 5 Play / Pause the disc playing 6 Eject the disc 7 POWER button 9 8 LED Indicator 9 Remote Control Window Accessories The configuration of the components may look different from the following illustration. User’s Guide Power Cable Adaptor Remote Control 6 User Guidance Information Names of each part L-in AV 2 R-in 11 10 9 AV 2 L-in USB 1 2 3 4 5 R-in 6 7 8 1 DC POWER IN(DC 12V 5A) 5 PC AUDIO IN 9 YPbPr 2 USB 6 AV2 IN 10 AV1 3 HDMI 7 HEADPHONE OUT 11 RF 4 VGA(D-Sub 15PIN) 8 COAX OUT 4 Power Connecting 1. Connect the small round plug on the power adaptor cable to the power input socket at the rear of the set. 2. Connect the mains cable between the power adaptor and the mains supply. Mains cable 7 Power adaptor User Guidance Information Mounting on a Desktop Your LCD TV can be mounted on a Desktop as shown in the figure above. This is not a floor-standing unit. Installation Precautions Wall Mounting Please secure enough space for safe use. (Please refer to A and B.) Installation of the LCD TV in an improperly ventilated location can cause a fire or damage to the LCD TV due to increased temperature. A (Mounting on a wall) Contact your dealer to purchase the "Adjustable-angle wall mount" required for wall-mounted installation. Using the Stand Do not install on an unstable location with support area smaller than the LCD TV. Please refer to the desktop stand manual for details of installation. B (Using the Stand) 8 User Guidance Information Installing an Antenna AV 2 L-in R-in Wall Jack with F-Connector Coaxial (Round) Antenna Cable external Antenna Press TV/AV button on the remote control to display the input source menu, press press button to confirm. Then you can receive the signal. 9 / button to select TV, then User Guidance Information Remote Control Functions of remote control buttons The remote control is Infra Red (IR). Point it towards the front of the LCD TV. The remote control may not work correctly if it is operated out of range or out of angle. Buttons for Basic operating TV-MENU Press to display the OSD menu. TV/AV Display the input source menu. CH+/Channel/Program +/-. VOL+/Volume +/-. DTV Switch to DTV source. DVD-SETUP Press to display the DVD menu. EXIT Press to exit the OSD menu. DISPLAY Press to display the current mode’s information. Press to display the disc’s information in DVD mode. OK THUMBSTICK Allows you to navigate the on-screen menus and adjust the system settings to your preference. POWER Turn the TV on/standby Buttons for TELETEXT operating You could use the functions of the buttons only in TELETEXT. TV/TXT Turn off/on the Teletext display. CANCEL Cancel the Teletext display. REVEAL Reveal any hidden text. HOLD Hold or carry on the current subpage. SIZE Press to see top half of page double size, Press again to see the bottom half of page double size. Press again for normal size. SUBPAGE Press to subpage, again to cancel. INDEX Go to index. Colour buttons Short cuts-follow the coloured links in the text. NUMBER BUTTONS Choose channel directly. Press number buttons and press OK button to play the channel. Number buttons for DVD. Pressing “-/--”button to display “SELECT 10+”, and press a number button to play the program. Return to the previous channel viewed. 10 User Guidance Information Remote Control Buttons for DVD operating You could use the functions of the buttons only in DVD mode. : Load/eject DVD disc. : Play/pause DVD program. : Stop DVD program. : DVD fast forward. : DVD fast reverse : DVD previous chapter. : DVD next chapter. LANGUAGE Select DVD disc language. ZOOM Adjust picture size in DVD mode. SUBTITLE Select DVD disc subtitle. MENU (PBC) DVD play list/Disc menu ANGLE Select DVD picture angle. TITLE DVD title. GOTO Play your favourite title/chapter/track. PROGRAM Edit the program and play. SLOW Play DVD programs at slow speed. REPEAT Repeat playing the title or chapter. A-B Select and play the preferable paragraph of DVD program by pressing this key twice at the beginning and end of it. PICTURE Press repeatedly to cycle through the available video picture modes. SOUND Press to cycle through the different sound settings. NICAM/A2 Nicam/A2 select. MUTE Press to mute the sound. Press again or press VOL+ to un-mute. SLEEP Shutdown timer. INFO Means information, to display brief information concerning the current channel you are viewing. SUBTITLE To switch the dialog at the bottom of the screen. CHANNEL LIST Display the programs list. EPG To show the Electronic Program Guide during no-menu state only. TV/RADIO Disc menu change between TV and Radio FAV Display the favourite program list. 11 User Guidance Information Precautions Avoiding Remote Control Problems 1. Check the polarity (+, -) of the batteries in the remote control. 2. Check that the batteries have power. 3. Check that the LCD TV is powered and that it is properly plugged in. 4. Check if any three-wavelength lamp, special fluorescent or neon sign is turned on near the LCD TV. Inserting Batteries in the Remote Control 1. Open the cover completely. 2. Insert the two supplied batteries (AA, 1.5V). Ensure that the polarities (+ and -) of the batteries are aligned correctly. 3. Slide back the cover. CAUTION : Risk of explosion if battery is replaced by an incorrect type. Dispose of used batteries according to the national code (Recycling program). How to use remote control The remote control should be operated within 30 feet (7m) and 30 to the left and the right of the IR receiver at the front of the LCD TV. Used batteries should be disposed properly. 12 Basic Use Power the LCD TV Power on/off • To turn the LCD TV on: • To turn the LCD TV off: • To turn on/off by remote control: Press "POWER" button on the LCD TV. Press "POWER" button on the LCD TV. Press the button on remote control. Selecting Input Source • • You can select between the TV signal and the input signal of other equipment connected to the TV. Use this function to switch to the input source you wish to view. Press button on the remote control. Use to move to the desired input source. Press to select. DTV ATV AV 1 AV 2 YPbPr DVD VGA HDMI USB 13 Application Operating the Menu 1. 2. 3. Press the POWER button to turn the LCD TV on. Press the TV-MENU button on the remote control, the on screen menu will appear. Use the and buttons to select your main menu option. PICTURE MENU: SOUND MENU: Allows you to make adjustments to your picture settings. Allows you to customize the sound options and effects. (Select TV source for example) (Select TV source for example) TIMER MENU: OPTION MENU: Allows you to set up a variety of timer options. Allows you to setup a variety of setup options. (Select TV source) (Select TV source) LOCK MENU: CHANNEL MENU: Allows you to set up a variety of lock options. Allows you to search channels and set up a variety of channel options. (Select TV source) (Select TV source) 4. Use the / buttons to select an option of the sub-menu, and press the While in adjusting mode, use the 5. / to change the value of the item. Press the EXIT button to exit the menu. Note: Only when you input the suitable signal, the relevant items can be activated. 14 button. Application Customising the PICTURE Settings Tint Quit Back Quit Select Back Use the and buttons to select the PICTURE menu (as the picture above), press menu. Press or Direction buttons to change the settings. Select button to enter the The PICTURE menu includes the following options : Picture Mode Cycles among picture display modes: Standard, Dynamic, Soft, Personal. Contrast Controls the difference between the brightest and darkest regions of the picture. Brightness Controls the overall brightness of the picture. Colour Control the colour. Sharpness Increase this setting to see crisp edges in the picture; decrease it for soft edges. Tint Controls the tint. Color Temperature Cycles among colour modes: User,Warm, Medium, User. When you select “User” mode, you could adjust the colours below (Red, Green, Blue) by yourself. Aspect Ratio Cycles among screen display modes: Auto, 4:3, 16:9, Zoom1, Zoom2. Noise Reduction Reduce the noise point of the picture when you turn on the function by selecting “On”. PC Set up (only exist in PC-RGB mode) Press button to enter the submenu to adjust the picture of the screen. Size Quit Back Select 15 Application Customising the SOUND Settings Quit Back Select Use the and buttons to select the SOUND menu (as the picture above), press menu. Press or Direction buttons to change the settings. button to enter the The SOUND menu includes the following options : Sound Mode Allows you to select among: Standard, Music, Movie, Sports and Personal. Treble (Could be adjusted when the sound mode is User) Controls the relative intensity of higher pitched sounds. Bass (Could be adjusted when the sound mode is User) Controls the relative intensity of lower pitched sounds. Balance To adjust the balance of the left and right sound track, or turn off the volume of the left and right sound track. Auto Volume Control the volume of the program automatically when you turn on the function by selecting “On”. Surround Sound Turn on/off the surround sound function by selecting “on”/“off”. 16 Application Customising the TIMER Settings Quit Back Select Use the and buttons to select the TIMER menu (as the picture above), press menu. Press or Direction buttons to change the settings. button to enter the The TIMER menu includes the following options : Clock Use the Off Time Press button to enter the submenu, you could set the time when the TV set will be turned off automatically, you could also set the frequency. On Time Press button to enter the submenu, you could set the time when the TV set will be turned on automatically, you could also set the frequency, volume and program. Sleep Timer Allows you to setup the sleep timer among: 5min, 10min, 15min, 30min, 45min, 60min, 90min, 120min, 180min, 240min and off. Auto Sleep Turn on/off the auto sleep function. TimeZone Allows you to select the time zone. and buttons to select the position, and use the 17 and button to set the time. Application Customising the SETUP Settings Restore Setting Quit Use the and menu. Press the Back Select buttons to select the OPTION menu (as the picture above), press or Direction buttons to change the settings. The SETUP menu includes the following options: Language Allows you to select menu language. Audio Language (Could be selected in TV mode) Allows you to select audio language. Subtitle Language (Could be selected in TV mode) Allows you to select subtitle language. Country Display the current Country. Restore Factory Default Press button to restore factory default. 18 button to enter the Application Customising the LOCK Settings LOCK Lock Channel Off Change Password Block Program On Block Parental Guidance Quit Back Select Use the and buttons to select the LOCK menu (as the picture above), press menu. Note: You should enter the code to operate the menu.(original code is 0000) button to enter the The LOCK menu includes the following options : Lock Channel When turn on, the user can not manual search and program edit. Change Password Press Block Program Press button to enter the submenu as the right picture, select a program, and press GREEN button to block it. Parental Guidance Cycles among ages:4, 5, 6.... 18, or you could turn the function off. button to enter the submenu, and you could change the password here. 19 Application Customising the CHANNEL Settings Scan Scan Scan Quit Use the menu. and Back Select buttons to select the CHANNEL menu (as the picture above), press button to enter the The CHANNEL menu includes the following options : Auto Scan (Recommended) Press button to start auto tuning (ATV and DTV signals). When the tuning procedure is complete, the channels will be automatically allocated to their correct channel number positions. DTV Manual Scan Press button to enter the submenu. Press or button to select a channel and press OK button to start search. ATV Manual Scan Press Storage To Current CH Search Fine-Tune Skip Frequency button to enter the submenu. Select a position to store the program. Select a program you want to tuning. Press and buttons to manual search. Press and buttons to fine-tune. Select “Yes” to skip the program when you scan the programs by CH+/Display the current channel’s frequency. Press RED button to save all the setups you have changed. 20 Application Customising the CHANNEL Settings Program Edit: Press button to enter the submenu as the following picture. Delete: Select a program, and press RED button to delete the program. Rename: Select a program, and press GREEN button, then you could use and buttons to select the position of the program’s name you want to change, and press and buttons to change the character, press or button to confirm the change. Move: Select a program, and press YELLOW button, then you could use and buttons to change the position of the program, press YELLOW again to confirm the change. Skip: Select a program, and press BLUE button to sign the program, while the program have been signed, it will be skipped when you scan programs by CH+/-. FAV: Select a program, press FAV button to set the program as the favourite channel. Note: The function of “RENAME” and “MOVE” could not be used in DTV source. 21 Other Functions USB MODE USB Your LCD TV is equipped with a simplified function multimedia player that allows you to play certain kind of files from any external storage device connected to your TV via USB (for example, an external hard disk). From this mode, you may display pictures, listen to MP3 music, or even play some video formats. Insert an USB device into the USB port at the connection panel. Press SOURCE, use the UP/DOWN buttons to select USB and press OK button to access USB mode. The compatible audio, video and photo files will be displayed at the following interface. NOTE: The USB multimedia player is an additional feature of this LCD TV, therefore only the essential playback functions will be available (Play, Pause Stop,...). When playing some MPEG-4 video file (AVI) you may find some AV delay during the high quantity of resources that video decompression consumes from the system, The range of compatible video formats is limited, please use a video player to play specific video files. * USB: Can read Mp3, Mpg, Divx files and so on. 22 Application DVD Operation Press the Power button on the TV or the remote control, then press the TV/AV button to select DVD mode. If there is no disc in the DVD player the screen will show "NO DISC". Place a disc Insert Disc according to picture next to disc slot. Do not touch the playing surface. Hold the disc around the outside with your fingers and place the disc into the slot. The player will automatically draw the disc into the player. To "Eject" the disc, press the " " button on the TV or the AUTO EJECT button on the remote control. Play The contents of each disc vary, as to how the disc was authored and what features are included. Some discs start playing as soon as they have been read, some need "Play" selecting in the Menu. Different play modes are offered, such as Menu Play, Sequence Play and other modes. Menu Play 1. Compatible with DVD, SVCD or VCD2.0. 2. If the disc is a DVD, ROOT MENU will appear on the screen. If it is SVCD or VCD 2.0, please press the Menu button to see the menu. 3. When a DVD disc is loaded, press the Arrows buttons to highlight the menu item you want to choose. With SVCD or VCD 2.0, press the numeric buttons to select a track to play. 4. Press ENTER or Play to start when highlighted. 5. Return to Menu when Playing: When playing a DVD disc press the Menu button to return to the "ROOT" menu. When playing a SVCD or VCD, and PBC is "on" press the Menu or Return button to return to the disc menu. Title Play 1. Compatible with DVD discs only. 2. During DVD playback, press Title button to display the DVD title content. 3. Press the Arrow buttons to highlight the title you want to choose, and press Enter; also you can press numeric buttons to choose. 4. The DVD player begins with the chapter 1 of the chosen title. Sequence Play 1. Compatible with DVD, SVCD, VCD, CD, HD-CD, WMA, Digital Audio disc / JPEG discs. 2. When a SVCD or VCD disc is loaded and PCB is "on", press the MENU button once switches the PBC "off".The player can now playback in sequence mode. To turn the PBC back on press the MENU button again. 3. Except for SVCD or VCD discs, when in stop state, press the Play button, the player will play in the "Sequence" mode. This is for all compatible discs. Program Play 1. Compatible with DVD, SVCD, VCD, CD, HD-CD, WMA, Digital Audio disc / JPEG discs. 2. The Program Playback option allows you to enter the order in which you want chapters or tracks to play, maximum to 16. 3. Program Menu: If PBC is on, this operation will turn PBC off while the chapters / tracks play in programmed order. 4. According to the highlight, use the Numeric buttons to enter the chapters / tracks in the order you want them to play. Then press Play or use Arrow buttons to highlight the "PLAY" item and press Enter. The chapters / tracks will play in the programmed order. You can program maximum 16 titles / chapters / tracks. 23 Application DVD Operation 5. According to the Direction Indicator on the menu, you can press Arrow buttons to highlight where you want to enter. 6. During Program Playback, if program button is repressed, the program order and the contents will be displayed on the screen, and the Program Playback will be stopped; also you can press Stop and Play to resume normal playback. 7. Notes: To clear the program order, use Arrow buttons to highlight the "CLEAR" item, then press Enter. To modify the program order, use Arrow buttons to highlight the item you are changing and enter the new chapter / track you want to program directly. 8. The program indicator in the screen and the playing chapter / track illuminate. Additional operation Selecting Tracks 1 . Compatible with DVD, SVCD, VCD, CD, HD-CD, WMA, Digital Audio disc / JPEG discs. 2. When playing a DVD disc, press Numeric buttons on the menu or title page to select tracks; During DVD playback, you can input desired title numbers directly. 3. During sequence playback of a SVCD or VCD disk, press the numeric buttons to select tracks. (During Program Playback and when the PBC is on, you can only press Prev / Next button to select) 4. As for CD, HD-CD, discs, press Numeric buttons directly to select tracks. 5. When playing WMA, Digital Audio disc / JPEG discs, press Numeric buttons to select different tracks on current track list. Skipping Tracks 1. Compatible with DVD, SVCD, VCD, CD, HD-CD, WMA, Digital Audio disc / JPEG discs. 2. To skip forward to the beginning of the next title / chapter / track on a disc, press Next on the remote or the right side of the player. 3. To skip backward to the beginning of the preceding title / chapter/track on a disc, press Prev on the remote or the right side of the player. Multispeed Fast/Slow Motion Play 1. Compatible with DVD, SVCD, VCD, CD, HD-CD, WMA, Digital Audio disc / JPEG discs. 2. Press the Multispeed Fast/Slow button on the remote during play to search through a disc. Multispeed Fast/Slow has four speeds: x2, x4, x8, x20. With each consecutive press of the button, the search speed increases. If you press the button five times, Fast Multispeed Fast/Slow cycles back to normal play. 3. During DVD play, when Multispeed Fast/Slow gets to the beginning of the next title / chapter, it resumes normal play; During SVCD or VCD play with PBC on, when Fast Forward Play gets to the beginning of the next track, it resumes normal play. Multiphase Slow Motion Play 1. Compatible with DVD, SVCD, VCD, CD, HD-CD, WMA, Digital Audio disc / JPEG discs. 2. Multiphase Slow has six speeds: 1/2, 1/3, 1/4, 1/5, 1/6, 1/7 of the normal Speed play when pressing the "Slow" button consecutively when playing discs. 3. When you press Play or the "Slow" button 7 times the player returns to normal play. Freeze Frame 1. Compatible with DVD, SVCD, VCD, CD, HD-CD, WMA, Digital Audio disc / JPEG discs. 2. During CD, HD-CD, WMA or Digital Audio disc / JPEG playback, press Pause once to freeze playback; Press Play button to resume normal playback. Using the Repeat Feature 1. Compatible with DVD, SVCD, VCD, CD, HD-CD, WMA, Digital Audio disc / JPEG discs. 24 Application DVD Operation 2. While a disc is playing, press Repeat button once and the repeat banner appears to show current repeat mode. a) In SVCD, VCD, CD, HD-CD, WMA or Digital Audio disc/JPEG sequence playback mode. Press Repeat button again to turn on repeat mode. Press the button again on the remote to turn to the next repeat mode. There are three repeat options: Off,Track Repeat and Disc Repeat. With each consecutive press of the button, the repeat mode switches. If you press the button four times, repeat mode cycles back to Off. b) In DVD playback, press Repeat button again to turn on repeat mode. There are three repeat options Off, Chapter Repeat and Title Repeat. With each consecutive press of the button, the repeat mode switches. If you press the button four times, repeat mode cycles back to Off. c) In WMA, Digital Audio disc /JPEG playback, press Repeat button again to turn on repeat mode There are four repeat options: Off,Track Repeat, Directory Repeat, and Disc Repeat. With each consecutive press of the button, the repeat mode switches. If you press the button five times, repeat mode cycles back to Off. Using the Display Feature 1. Compatible with DVD, SVCD, VCD, CD, HD-CD, WMA, Digital Audio disc discs. 2. Loading and playing DVDs (two pages) - Press DISPLAY button once to show the first page: - "Disc Type,Title * / * (the playing title / total titles), Chapter * / * (the playing chapter / total chapters), Elapsed Time of the Disc". - Press the button again to show the second page: - "Language */* (the serial number of playing language / the amount of optional languages) or Off, Language Type,Audio Type, Subtitle * / * (the serial number of playing subtitle /the amount of optional subtitles) or Off,Angle * / * (the serial number of playing angle / the amount of optional angles) or Off". - Press the button for the third time, the display menu fades out. 3. Loading and playing SVCD discs (two pages) - Press Display button once to show the first page: - "Disc Type,Track * / * (the playing track / total tracks), Mute, PBC, Repeat Mode, Elapsed Time of the Playing Track". - Press the button again to show the second page: - "Language * / * (the serial number of playing language/ the amount of optional languages) or Off, Language Type,Audio Type, Subtitle * / * (the serial number of playing subtitle / the amount of optional subtitles) or Off". - Press the button for the third time, the display menu fades out. 4. Loading and playing VCD - Press Display button once to show the first page: - "Disc Type,Track * / * (the playing track / total tracks), Mute, PBC, Repeat Mode, Elapsed Time of the Playing Track". - Press the button again, the display menu fades out. 5. Loading and playing CD, HD-CD, WMA, Digital Audio / JPEG discs - Press Display button once to show the first page: - "Disc Type,Track * / * (the playing track / total tracks), Mute, Repeat Mode, Elapsed Time of the Playing Track". - Press the button again, the display menu fades out. Using the Search Feature 1. Compatible with DVD, SVCD, VCD, CD, HD-CD discs. 2. You can use Search feature to select a title/ chapter/track number or go to a specific point in a title. First, press GOTO button on the remote controller to bring up the search menu and enter the edit state. Secondly, press Arrow buttons to highlight the title / chapter/ track number or the time option;Thirdly, use Numeric buttons to enter the title / chapter/ track you want to play or the elapsed time you want to go to in that title. At last, press ENTER button to start playback. For example, entering 01:23:56 will start playback one hour, twenty-three minutes and fifty-six seconds into the title. 25 Application 3. Notes a)This feature does not work in Program Play mode. b) If PBC is on, it will turn off automatically when Search Playback starts. c) When playing WMA, MP3 / JPEG discs, Search Feature does not work. Changing the Sound track or Language 1. Compatible with DVD SVCD, VCD, CD, HD-CD, WMA, Digital Audio disc /JPEG discs. 2. Press the LANGUAGE button to display current sound track. a) Press the button to switch sound tracks. b) Press the button again on the remote to turn to next sound track. 3. When playing a SVCD or VCD disc, there are five sound tracks: Stereo (L/R), L/L, R/R, L/L Auto A/D Detect, and R/RAutoA/D Detect. With each consecutive press of the button, the sound track switches. If you press the button six times, sound track cycles back to Stereo. 4. When playing a CD, HD-CD, WMA, Digital Audio disc, there are three: Stereo (L/R), L/L, and R/R. 5. When playing a DVD or SVCD disc, press LANGUAGE button to display current language, press the button again to turn to next language if the disc has different languages. Subtitles 1. Compatible with DVD, SVCD discs. 2. Press the Subtitle button on the remote once, and the subtitle info banner appears. 3. When a DVD or SVCD is recorded with subtitles, you can use the Subtitle feature to view the subtitles on-screen. By default, subtitles are off. The info banner will display Subtitle Off. 4. To display subtitles, press the Subtitle button again. The default language with its responding serial number will be displayed in the info banner and subtitles will be displayed in that language. There are 8 supported subtitles: Chinese, English, Japanese, French, Spanish, Portuguese, Germany and Latin. With each consecutive press of the Subtitle button, the subtitle switches. For example, "Language Icon: [1 English DTS 6CH] or [Off]" (the availability of the subtitles are disc-dependent).To turn subtitles off, press the Subtitle button until Subtitle Off is displayed. Mute the Audio Output 1. Compatible with DVD, SVCD, VCD, CD, HD-CD, WMA, Digital Audio disc / JPEG discs. 2. Pressing the Mute button allows you to reduce sound to an inaudible level, and the icon of "MUTE" will be displayed on screen. Press the button again or press the Vol +/- button to return to the normal condition. 3. If the player has no sound, check that the "Mute" is not on. Zoom In the Video Image 1. Compatible with DVD, SVCD, VCD, JPEG discs. 2. The Zoom Function allows you to enlarge the video image. 3. Press Zoom repeatedly to activate the function and choose the required zoom factor: Zoom 1, Zoom 2, Zoom 3, Zoom 4, Zoom 1 /2, Zoom 1 /3, Zoom 1/4, Zoom Off. Repeat a Specific Segment on the Disc that You Define 1. Compatible with DVD, SVCD, VCD, CD, HD-CD, WMA, Digital Audio disc. 2. During normal or fast playback, press the A-B button once. REPEAT "A" appears on the screen. This indicates the start point of the loop. 3. Press A-B again, REPEAT A-B will be shown, this indicates the end point of the loop. 4. The segment will now be repeated until you press the "REPEAT" button again to turn off the feature. 5. Press A-B again to cancel the loop points. 6. When playing a SVCD, VCD, or CD disc, you can repeat a specific segment only in one track. When the next track begins, A-B Repeat turns off automatically. 7. When playing a DVD disc, you can repeat a specific segment only in one title. Digital Audio Disc 1. Compatible with Digital Audio discs 2. The player will search the disc directory automatically and display the contents on screen. 26 Application DVD Operation 3. The player will then start to play the first track, of the selected directory. 4. To change directories use the direction buttons. DVD System Operation System operation will define the setting of the set; these definitions will be stored until you change them again. General Steps of Setup Menu 1. Pause or Stop the player. Press DVD SETUP on the remote control. The main menu will be shown as below. 2. Press the / buttons to select the Icon of the desired section, e.g. “TV System" and press button to open that section. 3. Press / to select the desired feature and again press button to open that section. 4. Press / to select the desired feature and then press "OK" to select the new setting. 5. To exit the menu, press "DVD SETUP" or to select EXIT SETUP and then press "OK" When launching the setup routine, the pressing of the following buttons will turn off the setup menu, while the choices that have been changed will be saved. Menu specification 1. SYSTEM SETUP The system setup options are illustrated below: SOURCE Select the source of the information you want to play: AUTO, DISC, CARD, USB. TV SYSTEM According to the Colour system of your TV, select proper TV TYPE. PASSWORD The password option is initialized as locked. You cannot set the ratings limit or change the password. To enable these features you must unlock the Password. The default password is "0000". Using the / button, move the highlight to "PASSWORD", press the button and enter "0000". You will see the padlock symbol open. You may now change the RATING or put in a new password number. If the Lock symbol is BLUE you must press the button to enter the lock field, the lock symbol will change to YELLOW, you may now enter a new 4 digit number. Please remember or write down the new Password and keep safe. 27 Application DVD Operation RATING The Rating feature is a rating limit feature, like movie ratings. This helps you to control what DVD the family watches. There are 8 levels of selection, from KIDS SAFE to ADULT. Adult is the "play all" selection. 2. LANGUAGE SETUP The language setup options are illustrated below: - OSD LANGUAGE: The OSD will display in the language you choose. -AUDIO LANG: If the disc you are playing has the language you choose, it will output audio in that language. - SUBTITLE LANG: If the disc you are playing has the language you require you may select this either in the Menu or using the "SUBTITLE" button on the Remote control. You may also switch this OFF. - MENU LANG: If the disc you are playing has the language you require you may select this. 3. AUDIO SETUP -TONE: Use the / button to move the scroll and adjust the tone. 4. DIGITAL SETUP The video setup options are illustrated below: - DYNAMIC RANGE: Use the / button to move the scroll and adjust the dynamic range. - DUAL MONO: Choose the mode of the audio output. -There are four modes: STEREO, MONO L, MONO R, MIX MONO. 28 Application Disc Care Disc Care About Disc Terms Title Generally, pictures or music compressed on a DVD are divided into several sections, "title". Chapter The smaller section unit of picture or music in a DVD under the title, usually one title is comprised of one or more chapters and each of them is numbered for easy searching, but some discs may not have a recording chapter. Track A segment of picture or music on a CD, Each track is numbered for searching. Care of Disc Video disc contains high-density compressed data that needs proper handling. 1. Hold the disc with fingers by outer edge and/or the centre spindle hole. Do not touch the discs surface. 2. Do not bend or press the disc. 3. Do not expose the disc to direct sunlight or heating sources, Store discs in cabinet vertically, and in dry condition. Prevent exposure to: Direct sunlight Heat or exhaust from a heating device Extreme humidity Clean the disc surface with a soft, dry cleaning cloth, Wipe the disc surface gently and radically from centre toward the outer edge. Do not apply thinner, alcohol, chemical solvent, or sprays when cleaning. Such cleaning fluids will permanently damage the disc surface. 29 Maintenance and Service Trouble shooting Do not use other functions that are not mentioned in this user’s manual. In case a problem occurs with your LCD TV, please take the following steps first. If you still have the problem, turn the power off and contact your dealer or an authorized service centre. Problem Action The screen does not appear. Is the power plug pulled out? Insert the power plug. Press the power button of the remote control. The screen appears too slowly after the power is turned on. This problem occurs for a brief time in the process of image elimination processing in order to hide temporary screen noise that occurs when the power is turned on. But if the screen does not come after 1 minute contact your dealer or an authorized service centre. Screen is too bright or too dark Perform brightness adjustment or Contrast adjustment. Screen is too large or too small Adjust the screen size. Stripes appear on the screen and it shakes. Stop using wireless telephones, hair driers and electric drills. The screen does not move Press the PAUSE button. Check if the Pause button is pressed on external equipment. Screen appears, Voice is not heard 1. Press the "MUTE" button. 2. Increase the sound level by pressing volume adjustment button. 3. Check if sound terminal of external input is connected properly. 4. Check if audio cables are connected properly. 5. Select and check the other input. If the sound still does not work and the other channels are the same after you have done as the above, contact your dealer or an authorized service centre. Remote control does not work 1. Check if main power is On. 2. Check that the batteries of the remote controller were loaded properly. 3. Check to see if any obstacle exists between the LCD TV and the remote control, then remove it, if any. 4. If the batteries have no power, replace them with two new batteries. This LCD TV is for household use and registered as harmless on electromagnetic waves. Therefore, you can use it in every location as well as residential areas. 30 Maintenance and Service Specifications LCD Panel Panel Size 22” TFT LCD Brightness 300 Contrast Ratio 800:1 Max. Resolution Input Connector Output Connector 1920 x 1080 VIDEO 1 YPbPr 1 AUDIO (L/R) 1 PC/AUDIO(L/R) 1 HDMI 1 RF 1 HEADPHONE 1 COAX 1 Power Source DC 12V 5A Power Consumption 60W The cabinet design and electronics specifications will be modified without prior notice for improving the performance. 31 PALSONIC 1 JOYNTON AVENUE WATERLOO NSW 2017 AUSTRALIA TEL: (02) 9313 7111 FAX: (02) 9313 7555 www.palsonic.com.au PALSONIC CUSTOMER SERVICE TELEPHONE AUSTRALIA: 1300 657 888