1
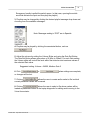
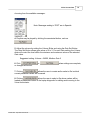
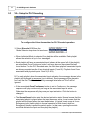
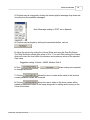
Engineered Bus Door Systems
CLASS Diagnostic Software
User Manual
Revision 3.30 B
© 2003-2007 Vapor Bus International
CLASS Diagnostic Software
© 2003-2007 Vapor Bus International
U.S. Patents are applicable and/or pending to products described and illustrated herein.
Vapor reserves the right to discontinue products or change product specifications or designs at any time without
notification.
All rights reserved. No parts of this work may be reproduced in any form or by any means - graphic, electronic, or
mechanical, including photocopying, recording, taping, or information storage and retrieval systems - without the
written permission of the publisher.
Products that are referred to in this document may be either trademarks and/or registered trademarks of the
respective owners. The publisher and the author make no claim to these trademarks.
While every precaution has been taken in the preparation of this document, the publisher and the author assume no
responsibility for errors or omissions, or for damages resulting from the use of information contained in this document
or from the use of programs and source code that may accompany it. In no event shall the publisher and the author be
liable for any loss of profit or any other commercial damage caused or alleged to have been caused directly or
indirectly by this document.
1010 Johnson Drive
Buffalo Grove, Illinois 60089 USA
Phone: 847.777.6400
Fax: 847.520.2222
Internet: www.vapordoors.com
Contents
I
Table of Contents
Part I Definitions
1
Part II Product ID
2
Part III Toolbar Buttons
4
Part IV Controls Window
5
Part V Voice Annunciator
5
1 VA - Setup for...................................................................................................................................
CLASS
7
2 VA - Setup for...................................................................................................................................
Stand-Alone
9
3 VA - Setup for
...................................................................................................................................
PLC Encoding
11
4 VA - Message
...................................................................................................................................
Play & Download
13
5 VA - Wiring ................................................................................................................................... 14
Part VI Reference - CLASS Wiring
15
1 Sensor Wiring
................................................................................................................................... 15
2 CLASS 2 Main
...................................................................................................................................
Connector (P1)
16
3 CLASS 3 Main
...................................................................................................................................
Connector (P1)
17
CLASS 3 Input
..........................................................................................................................................................
Wiring
18
4 Switch Connections
................................................................................................................................... 19
Type 14
Type 22
Type CZ
..........................................................................................................................................................
..........................................................................................................................................................
..........................................................................................................................................................
19
19
20
5 RJ45 to DB9F
...................................................................................................................................
Adapter Wiring
21
Part VII Revisions
22
© 2003-2007 Vapor Bus International
I
1
1
CLASS Diagnostic Software
Definitions
· DFO (Door Fully Open) is determined by activation of a switch or sensor when the
door reaches the fully open position.
· The Drunk Alarm mode is activated by a specific input (IN2 or /IN2).
When activated, if the door is both fully closed and is not enabled, the
appropriate sensors will be activated for short bursts at recurring intervals.
Any targets seen at those times will be annunciated by means of a specific
output (OUT2 MSU for CLASS 2, /DA-O for CLASS 3)
The Drunk Alarm Mode activation will be temporarily ignored any time the
door is not fully closed or is enabled - during that time normal operation of the
sensors will take place.
· The MSU is the Middle Sensor Unit.
· TARGET: An object detected by CLASS' sensing system.
Fixed Target: a Target that is part of CLASS' "fixed" environment, i.e., always
present. Fixed Targets may be permanently programmed by the installer or
may be automatically determined by CLASS at turn-on
Acquired Target: a Target that is not "fixed"; typically a passenger.
· TTO (Touch To Open) is an operational state of the CLASS controller. In the TTO
state, the door has been unlocked or authorized (typically the Green Light is on)
and CLASS is waiting for a target detection (or a signal from 5 degree switch that
the door has been pushed open beyond its activation point). Upon either of those
events, CLASS will issue a Door Open Request.
See No 5° Open for an exception to the above.
Normally, Panel Sensors are active in the TTO state; the MSU may also be
activated depending on MSU TTO Mode
· The Status Light will be turned on when CLASS detects an error condition. (Note
CLASS will continue to function.)
© 2003-2007 Vapor Bus International
Definitions
2
Product ID
Connected to CLASS 2 Controller:
To initiate communication: Press the CLASS 2 Mode Button
Connected to CLASS 3 Controller:
To initiate communication: If the Cancel/OK button says "OK",
press it to continue. Otherwise, press the CLASS 3 Mode Button
© 2003-2007 Vapor Bus International
2
3
CLASS Diagnostic Software
Connected to Voice Annunciator:
To initiate communication: If the Cancel/OK button says "OK",
press it to continue. Otherwise, press the Voice Annunciator Mode Button
If, instead of connecting, the warning message is seen, it indicates that there is
something in the computer running the CLASS Diagnostic that is preventing access
to the COM (serial) port. This is usually caused by some other software program
(such as a PDA or Blackberry interface) having "grabbed" the COM port. It is NOT a
problem with the CLASS Diagnostic, and must be rectified by the user before the
CLASS Diagnostic program can be used. Typically this is solved by closing the
program using the port and restarting the CLASS Diagnostic.
© 2003-2007 Vapor Bus International
Product ID
3
Toolbar Buttons
© 2003-2007 Vapor Bus International
4
5
4
CLASS Diagnostic Software
Controls Window
The diagnostic's various "windows", such as Parameters, Scope Setup, etc., are
known as controls
To select any control, use the Menu Bar to select either:
FileèNew
or
WindowèNew Window
Then double-click on the desired control.
5
Voice Annunciator
The Voice Annunciator User Interface is composed of two major sections:
a Setup section at the top, and a Message Play & Download section at the
bottom.
© 2003-2007 Vapor Bus International
Voice Annunciator
· For Voice Annunciator setup with CLASS, see VA - Setup for CLASS
6
7
· For Voice Annunciator Stand-Alone operation, see VA - Setup for StandAlone 9
· For Voice Annunciator setup with a PLC, see VA - Setup for PLC Encoding
· For playing and saving messages, see VA - Message Play & Download
· For Wiring, see VA - Wiring
© 2003-2007 Vapor Bus International
14
13
11
7
5.1
CLASS Diagnostic Software
VA - Setup for CLASS
To configure the Voice Annunciator for operation with a CLASSä controller:
1. Select CLASS Mode from the
Mode Selector drop-down list as shown:
· When CLASS Mode is selected, eight playlists will be available. Each playlist
allows the selection of up to four messages.
· Each playlist will have an associated CLASS controller input (shown at the upper
left of the playlist), an associated Once/Continuous button, and may have an
associated Normal/Invert button.
2. For each playlist, when the associated CLASS controller input activates, the
messages shown in the playlist will be played in sequence (top to bottom). Each
message will be played in turn until the first "End" is reached. Any message listed
after an "End" will be ignored.
Note: Input 4 (Playlist 8) is not controlled by CLASS. It is an independent input and
can be connected to non-CLASS systems. Typical usage is to connect it to the door
Emergency. See VA - Wiring 14 for I4 (Input 4) connection details.
· If the associated Once/Continuous button is set to Continuous, the message
sequence will play continuously as long as the associated input is active.
Otherwise the sequence will play once per input activation. Click the button to
change it.
· The Normal/Invert button sets the desired activation state: Normal means that the
associated playist is played when the input becomes active, Invert means that the
playlist will be played when the input deactivates. (A typical Invert usage is for an
Emergency input switch which in normal operation is held closed; when an
© 2003-2007 Vapor Bus International
Voice Annunciator
8
Emergency handle is pulled the switch opens. In that case, opening the switch
would de-activate the input and thus play the playlist.)
3. Playlists may be changed by clicking the desired playlist message drop-down and
choosing from the available messages:
Note: Messages ending in "ESP" are in Spanish.
4. Playlists may be played by clicking the associated button, such as
.
5. Adjust the volume by setting the Volume Slider and using the Gain Set Button.
The Gain Set Button allows gain values of 0 (Min) to 3(Max). For each Gain setting,
the Volume slider will control the level within the minimum and maximum values of
the selected Gain value.
Suggested setting: Volume = 24000, Medium Gain 2
6. Click
or changes will be lost.
or
when settings are complete,
7. Clicking
allows the user to create and/or select a file in which
current parameter values will be saved.
8. Clicking
allows the user to select a file whose values will be
loaded as parameter values in the laptop diagnostic for editing and/or saving to the
Voice Annunciator.
© 2003-2007 Vapor Bus International
9
5.2
CLASS Diagnostic Software
VA - Setup for Stand-Alone
To configure the Voice Annunciator for Stand-Alone operation:
1. Select Individual from the
Mode Selector drop-down list as shown:
· When Individual Mode is selected, four playlists will be available. Each playlist
allows the selection of up to four messages.
· Each playlist will have an associated input (shown at the upper left of the playlist),
an associated Once/Continuous button, and may have an associated Normal/
Invert button.
2. For each playlist, when the associated input activates, the messages shown in the
playlist will be played in sequence (top to bottom). Each message will be played in
turn until the first "End" is reached. Any message listed after an "End" will be
ignored.
· If the associated Once/Continuous button is set to Continuous, the message
sequence will play continuously as long as the associated input is active.
Otherwise the sequence will play once per input activation. Click the button to
change it.
· The Normal/Invert button sets the desired activation state: Normal means that the
associated playist is played when the input becomes active, Invert means that the
playlist will be played when the input deactivates. (A typical Invert usage is for an
Emergency input switch which in normal operation is held closed; when an
Emergency handle is pulled the switch opens. In that case, opening the switch
would de-activate the input and thus play the playlist.)
3. Playlists may be changed by clicking the desired playlist message drop-down and
© 2003-2007 Vapor Bus International
Voice Annunciator
10
choosing from the available messages:
Note: Messages ending in "ESP" are in Spanish.
4. Playlists may be played by clicking the associated button, such as
.
5. Adjust the volume by setting the Volume Slider and using the Gain Set Button.
The Gain Set Button allows gain values of 0 to 3. For each Gain setting, the Volume
slider will control the level within the minimum and maximum values of the selected
Gain value.
Suggested setting: Volume = 24000, Medium Gain 2
6. Click
or changes will be lost.
or
when settings are complete,
7. Clicking
allows the user to create and/or select a file in which
current parameter values will be saved.
8. Clicking
allows the user to select a file whose values will be
loaded as parameter values in the laptop diagnostic for editing and/or saving to the
Voice Annunciator.
© 2003-2007 Vapor Bus International
11
5.3
CLASS Diagnostic Software
VA - Setup for PLC Encoding
To configure the Voice Annunciator for PLC Encoded operation:
1. Select Encoded I1 I2 from the
Mode Selector drop-down list as shown:
· When Individual Mode is selected, five playlists will be available. Each playlist
allows the selection of up to four messages.
· Each playlist will have an associated input (shown at the upper left of the playlist),
an associated Once/Continuous button, and may have an associated Normal/
Invert button. For the PLC Encoded case, the first three playlists' associated inputs
are binary-encoded results of two physical inputs (I1 and I2). Playlists 4 and 5 are
associated with physical inputs 3 and 4 (I3 & I4).
2. For each playlist, when the associated input activates, the messages shown in the
playlist will be played in sequence (top to bottom). Each message will be played in
turn until the first "End" is reached. Any message listed after an "End" will be
ignored.
· If the associated Once/Continuous button is set to Continuous, the message
sequence will play continuously as long as the associated input is active.
Otherwise the sequence will play once per input activation. Click the button to
change it.
· The Normal/Invert button sets the desired activation state: Normal means that the
associated playist is played when the input becomes active, Invert means that the
playlist will be played when the input deactivates. (A typical Invert usage is for an
Emergency input switch which in normal operation is held closed; when an
Emergency handle is pulled the switch opens. In that case, opening the switch
would de-activate the input and thus play the playlist.)
© 2003-2007 Vapor Bus International
Voice Annunciator
12
3. Playlists may be changed by clicking the desired playlist message drop-down and
choosing from the available messages:
Note: Messages ending in "ESP" are in Spanish.
4. Playlists may be played by clicking the associated button, such as
.
5. Adjust the volume by setting the Volume Slider and using the Gain Set Button.
The Gain Set Button allows gain values of 0 to 3. For each Gain setting, the Volume
slider will control the level within the minimum and maximum values of the selected
Gain value.
Suggested setting: Volume = 24000, Medium Gain 2
6. Click
or changes will be lost.
or
when settings are complete,
7. Clicking
allows the user to create and/or select a file in which
current parameter values will be saved.
8. Clicking
allows the user to select a file whose values will be
loaded as parameter values in the laptop diagnostic for editing and/or saving to the
Voice Annunciator.
© 2003-2007 Vapor Bus International
13
5.4
CLASS Diagnostic Software
VA - Message Play & Download
Playing Messages:
Select the Message to be played in the Play Messages drop-down selector. The
message will play when selected.
Saving Custom Messages:
Custom messages must be externally created; allowable file formats are as follows:
· Audio Sample Rates (KHz): 8.000, 11.025, 22.050, 44.100
· Audio Sample Sizes: 8 bit, 16 bit
· Channels: 1 (Mono)
· Audio Format: PCM
· File type: RIFF WAV
· Maximum file size: <1MB
· Maximum custom message storage space (total for all custom messages): 1MB
Messages initially provided are 11.025KHz, 16 bit, and do not subtract from custom
message storage space.
To save a custom message:
1. Either type the file name in the Wave File to Download... box or Click the
Browse button and select the wav file you wish to upload.
2. Adjust the Wave Name as desired (maximum sixteen characters)
3. Click Download to Annunciator.
4. Wait for the Download Finished notification. The custom message is now
saved.
Deleting Custom Messages:
· Click Delete Top User Sample and select Yes on the Proceed pop-up to delete
the last sample saved. If there are no user samples, nothing will be deleted.
· Click Delete All User Samples and select Yes on the Proceed pop-up to delete
all user-saved samples. If there are no user samples, nothing will be deleted.
© 2003-2007 Vapor Bus International
Voice Annunciator
5.5
VA - Wiring
© 2003-2007 Vapor Bus International
14
15
CLASS Diagnostic Software
6
Reference - CLASS Wiring
6.1
Sensor Wiring
Panel Sensors (P4 & P6):
Pin #
Wire Colors
1
2
3
4
5
Red
Green or Orange*
Black
White or Brown*
Shield
Center Sensor (P5):
Pin #
Wire Colors
6
Red
5
Green or Orange*
4
Black
3
White or Brown*
2
Shield
Signal
POWER
SEND
GROUND
ECHO
SHIELD
Signal
POWER
SEND
GROUND
ECHO
SHIELD
* Sensor Cable may be Red, Black, Orange, Brown, Shield
or Red, Black, Green, White, Shield
Pin insertion view shown above.
Top right is #1, top left is #3
Bottom right is #4, bottom left is #6
© 2003-2007 Vapor Bus International
Reference - CLASS Wiring
6.2
CLASS 2 Main Connector (P1)
© 2003-2007 Vapor Bus International
16
17
6.3
CLASS Diagnostic Software
CLASS 3 Main Connector (P1)
Refer to TB08-03-192 (CLASS™ Installation and Setup User Manual) for signal
details.
© 2003-2007 Vapor Bus International
Reference - CLASS Wiring
6.3.1
18
CLASS 3 Input Wiring
Inputs to CLASS 3 are treated differently than inputs to CLASS 2. Inputs to CLASS 3
have more flexibility and require no special firmware settings (such as NPN mode).
Where CLASS 2 had 4 individual inputs, CLASS 3 has 4 pairs of inputs. Each pair
has one of the pair designed for a signal switched to +V; the other is designed for a
signal switched to GND. (Note that +V can be 12V or 24V nominal.)
Inputs to CLASS 3 are named functionally, and in each pair include a "/" as the first
character of the name for the input designed for a signal switched to GND.
The names
DFO &
DAI &
DNC &
ENA &
are:
/DFO
/DAI
/DNC
/ENA
(IN1 & /IN1)
(IN2 & /IN2)
(IN3 & /IN3)
(IN4 & /IN4)
There are four possible variations of input connection types. The following table
shows the four types and how inputs to CLASS 3 are to be connected for various
input types. Note that unlike CLASS 2, each input is unique, that is, any input can be
utilized with any of the four possible connection types.
In the table, the input designed for a signal switched to +V is designated as INx,
where x represents 1 to 4.
The input designed for a signal switched to GND is designated as /INx.
Actuation Type
Connect
Switch to:
Switch closes to +V when active
INx
Switch closes to GND when active /INx
Switch opens from +V when active INx
Switch opens from GND when
/INx
active
Also
Connect:
/INx to GND
INx to +V
Examples:
1. Enable provides +24V when green light is on:
connect Enable to ENA
2. DNC switch closes to GND when door is fully closed:
connect DNC-N.O to /DNC
3. DFO switch opens from +24V when door is fully open:
conect DFO-N.O. to DFO; connect GND to /DFO
© 2003-2007 Vapor Bus International
Safe
End:
/INx
INx
-
19
CLASS Diagnostic Software
6.4
Switch Connections
6.4.1
Type 14
Type 14 Double-Break Snap-Action Switch
Operation:
When the plunger is released, the shorting bar connects NC1 to NC2.
When the plunger is pressed, the shorting bar moves, disconnecting NC1 from NC2,
and connects NO3 to NO4.
6.4.2
Type 22
Type 22 Snap-Action Switch (with or without roller follower)
© 2003-2007 Vapor Bus International
Reference - CLASS Wiring
6.4.3
Type CZ
S.P.D.T Limit Switch Type CZ (may also be configured with roller follower)
© 2003-2007 Vapor Bus International
20
21
6.5
CLASS Diagnostic Software
RJ45 to DB9F Adapter Wiring
Typical DB9 Female to RJ45 Female Modular Adapter:
Wiring for CLASS™ Interface:
Vapor Part Number: 50520029-01
© 2003-2007 Vapor Bus International
Reference - CLASS Wiring
7
Revisions
Version A
-Initial Release
Version B
- Added Load/Save Config to VA Setup Screens
© 2003-2007 Vapor Bus International
22