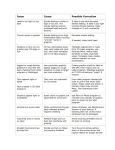
1
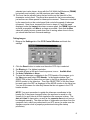
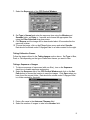
WAO 24-Inch Telescope and WallCam
User Manual
Version 1.1
June 2002
AJK and JPW
Revision Log
1) Version 1.0 — 05/31/2002 AJK and JPW.
2) Version 1.1— 06/20/2002 CAL
2
Table of Contents
REVISION LOG......................................................................................................................................2
TABLE OF CONTENTS.........................................................................................................................3
STARTUP PROCEDURE ......................................................................................................................4
USING MOVE .........................................................................................................................................5
SETTING TELESCOPE COORDINATES ....................................................................................................5
FINDING YOUR TARGET .........................................................................................................................5
TELESCOPE LIMITS ...............................................................................................................................6
USING MAXIM........................................................................................................................................7
FOCUSING THE TELESCOPE ..................................................................................................................7
TAKING IMAGES ....................................................................................................................................8
TAKING CALIBRATION FRAMES..............................................................................................................9
TAKING A SEQUENCE OF IMAGES ..........................................................................................................9
SHUTDOWN PROCEDURE ................................................................................................................11
TROUBLESHOOTING .........................................................................................................................12
1. THE TELESCOPE DOES NOT MOVE WHEN GIVEN MOVE COMMANDS...............................................12
2. THE FILTER IN USE DISPLAYED IN MAXIM IS NOT THE SAME AS THE ACTUAL FILTER IN USE. .............12
3. I PUSHED THE EMERGENCY STOP BUTTON AND WHEN RELEASED, THE TELESCOPE KEEPS
TRYING TO MOVE. ...............................................................................................................................12
4. I PUSHED THE EMERGENCY STOP BUTTON AND WHEN RELEASED, THE TELESCOPE DOES NOT
MOVE WHEN GIVEN MOVE COMMANDS...............................................................................................13
5. I CANNOT GET ALL THREE SPEEDS ON EITHER THE UPSTAIRS OR DOWNSTAIRS CONSOLE TO WORK.
..........................................................................................................................................................13
6. I RAN THE TELESCOPE INTO THE SIDE OF THE DOME.......................................................................13
7. I RAN THE INSTRUMENT INTO THE FLOOR OF THE DOME..................................................................13
8. THE DOME WON T ROTATE.............................................................................................................13
9. MOVE IS LOST! I CAN T SET THE COORDINATES! AUUGGGHHHH! ..................................................14
3
Startup Procedure
1.
2.
3.
4.
Open the dome and remove telescope cover.
Turn on the Optec MaxFilter and Apogee camera (yellow extension cord).
Turn on the power strip for the MOVE and Apogee computers.
Start up both the MOVE and Apogee computers and log in as observer
(password: @wallace. ).
5. Turn on the power strip to the electronics box.
6. Open MaxIm on the Apogee computer.
7. In MaxIm, initialize camera and filter: go to View menu and select CCD
Control Window. In the control window, select Setup tab and click the
Restart button. Click Cooler On. Take note of the ambient temperature and
set desired camera temperature (usually 30° C below ambient) in the New (C)
box (make sure Num Lock is on). Click Set.
8. While the camera is cooling, check to make sure that the internal clocks of the
MOVE and Apogee computers are synchronized. Double-click the Win-sync
true time icon near the clock on the toolbar and check to make sure the
computer clocks match the network time. Select the Update tab and click the
Update PC Clock Now button.
9. Restart MOVE computer in MS-DOS mode. To do this, go to the Start menu
and click Shut Down. Choose the Restart in MS-DOS option.
10. Start MOVE. On MOVE computer, type the following commands at the DOS
prompt:
cd..
cd move
move
11. Turn on tracking in MOVE: type tr at the MOVE prompt.
12. Set coordinates in MOVE (see Using MOVE chapter).
13. Point the telescope at a 5th magnitude star and focus the telescope (see
Using MaxIm chapter).
14. Take data! J
4
Using MOVE
Setting Telescope Coordinates
The telescope coordinates should be set every night the telescope is in use. The
procedure for setting the coordinates is as follows:
1. Select a bright star from a chart. Note its RA, DEC, and magnitude.
2. Type pp at the MOVE prompt. MOVE will ask if the star you are looking for is
near the current position, or near some other position. Follow the instructions
on the screen to choose the near other position option. Next MOVE will ask
for a magnitude range for the star, which the user can input based on the star
chosen in Step 1.
3. MOVE will display information about a given star, and ask if this is the correct
star. If the RA and DEC match those of the star in Step 1, follow the
instructions on the screen to move the telescope to that star. If the RA and
DEC do not match, follow the instructions to try for another star until the
correct star is found.
4. Once the telescope has moved to the star, look in the finderscope to check
whether the star is within the crosshairs. If not, use the hand paddle in the
dome to move the telescope until the star falls on the crosshairs of the
finderscope. There are 3 speeds for the paddle: slew (fastest speed), set
(medium speed), and guide (slowest speed). If they are not labeled on the
paddle: slew is on the far right, set is in the middle, and guide is on the far left.
After using the hand paddle, remember to switch the speed back to
guide or the downstairs control panel will not work properly.
5. Once the star is centered, go downstairs and take an image in MaxIm (the
procedure for this can be found in Using MaxIm) using the APOGEE
computer. Using the downstairs control console, center the star in the image.
Remember to keep the control panel speed on guide after moving or the
upstairs paddle will not work correctly. The image itself is about 10x10
arcminutes — dont use slew to center the star or the star will be out of the
field of view of the detector within one move. When the star is centered in the
image, its pixel coordinates should be (512, 512) within about 4 pixels.
6. Once the star is centered in the image, type uc at the MOVE prompt. MOVE
will ask Update to these coordinates? Check to make sure you are still on
the right star and follow the instructions on the screen to update the
coordinates.
Finding your target
For focusing purposes, the pp command can be used to point to a random 5th
magnitude star. See step 2 outlined in the Setting Telescope Coordinates
section above. Follow the instructions on the screen to choose the near current
position option.
5
When observing, follow this procedure to point at an object. Tracking should be
on. If not, type tr at the MOVE prompt.
1. At the MOVE prompt, type co. You can then manually enter the RA and DEC
you wish to observe, following the instructions on the screen.
2. Following steps 4 and 5 outlined in the Setting Telescope Coordinates
section above, center the object in the finderscope and using MaxIm before
taking data.
Telescope Limits
There are three sets of telescope limits: ± HA limits (~ -9 hrs and +5 hrs), a
horizon limit, and ± focus limits. When a limit is triggered, MOVE will display a
warning for that particular limit.
1. HA Limits
When either HA limit is triggered, the HA motion will stop but the telescope can
continue to move in declination. The telescope cannot be moved in HA beyond
that point. Moves can be made only in the opposite direction until the limit is no
longer triggered.
2. Horizon Limit
The horizon limit will trigger when the telescope tube is parallel to the ground.
When MOVE is properly functioning, the telescope cannot be pointed below the
horizon. When the limit is triggered, MOVE will stop all telescope motion.
Telescope moves away from the horizon limit must be made with the upstairs
hand paddle while the limit override button on the upstairs control console is
held down until the limit is no longer triggered.
NOTE: If MOVE is malfunctioning for some reason, the horizon limit may not be
triggered properly and there is a chance that the telescope could be moved
beyond the horizon to hit the floor of the dome. You should visually check the
telescope position whenever the dome needs to be moved.
3. Focus Limits
When either focus limit is triggered, the focus mechanism will stop. The focuser
cannot be moved beyond that point in the direction of the limit. Moves can be
made only in the opposite direction until the limit is no longer triggered.
6
Using MaxIm
Focusing the Telescope
1. Take an image of the star that will be used to focus. See the Taking Images
section below.
2. Click on the Focus tab on the CCD Control Window in MaxIm.
3. Turn off the Dark control. Turn on the Continuous mode to take a series of
images that can be stopped by clicking Abort. This mode is used to get fast
updates while adjusting the focus.
4. For a 5th magnitude star, enter in an exposure time of 1 second using the
Seconds field.
5. Set the Delay to 10 seconds so that there is a brief pause between exposures
so the image can be inspected and have time to adjust the focus.
6. To speed up the focus download, select a subframe from the image taken in
step 1. To do this, point the mouse just to the top-left of the star, hold down
the left mouse button and drag to create a rectangle around the star. The
subframe settings will be automatically entered.
7. Click Start Focus. Only the selected part of the image will be downloaded.
8. Click on the Inspect tab in the CCD Control Window.
9. The Inspect tab will show a three-dimensional representation of the star
image. The narrower the star the sharper the focus. The X, Y position of the
7
selected star is also shown, along with the Full-Width Half Maximum (FWHM)
horizontally and vertically, and the maximum pixel value (Max).
10. The focus can be adjusted using the two buttons on the lower left of the
downstairs control panel. There are three speeds for the focus mechanism,
just as there are three speeds for telescope movement. These are controlled
by the same knob on the control panel that controls the speed of telescope
movement. Near focus, increment the focus in steps of 5 until the graph
displayed under the Inspect tab shows a narrow peak, the FWHM values are
as small as possible, and Max is as large as possible. Note that the Max
value will usually bounce up and down due to seeing; when close to focus,
you should take the best of several readings.
Taking Images
1. Bring up the Settings tab of the CCD Control Window and check the
settings.
2.
3.
4.
5.
6.
Click the Reset button to make sure the entire CCD chip is selected.
Set Binning to 1 for highest resolution.
To enable a beep at the end of each exposure, turn on Audible Alert.
Set Auto Calibration to None.
To save the telescope coordinates in the FITS header of the images, go to
the View menu and select FITS Header. In the header window, type
OBJECTRA in the Key Name box and type in the RA as displayed on the
MOVE monitor in the value box. Then type OBJECTDEC in the Key Name
box and type in the DEC as displayed on the MOVE monitor in the value box.
You can do the same for other Key Names that do not appear in the FITS
header window.
NOTE: You must remember to update the telescope coordinates in the
header file (if they have changed) before the exposure is saved to a file.
Usually it is a good idea to do this step before the exposure is taken. The
date and time of observation, as well as the exposure time do not have to
be changed manually. The date and time of observation are taken from the
computer clock, which is synchronized to an NTP server (so make sure the
Apogee computer clock is properly synchronized during the startup
procedure).
8
7. Select the Expose tab of the CCD Control Window.
8. Set Type to Normal and enter the exposure time using the Minutes and
Seconds fields, set Delay to 1 second, and choose the appropriate filter
using the Filter Selection drop down menu.
9. Click Expose and the image will be downloaded about 45 seconds after the
exposure is taken.
10. To save the image, click on the File pull down menu and select Save As.
Data should be stored under D:\Apogee Data\ in a folder created for the night.
Taking Calibration Frames
Follow the steps outlined in the Taking Images section above. Set Type to Bias,
Dark, or Flat depending on the type of calibration frames you want to take.
Taking a Sequence of Images
1. To take a sequence of exposures (with one filter), turn on the Sequence
check box to enable exposure sequencing.
2. Select the Sequence tab of the CCD Control Window and click on the Set
Path button to choose the location to save the images. Click Open when you
have found the correct folder. Data should be stored under D:\Apogee Data\
in a folder created for the night.
3. Enter a file name in the Autosave Filename field.
4. Select the number of images to take in the Number field.
9
5. To start the first sequence of the night, enter 1 for the Start at field. Images
will be saved as Filename001.fit, Filename002.fit, and so on.
6. DO NOT TURN ON ENABLE TRICOLOR!
NOTE: Before starting a sequence of images, you should check that the number
in the Start at field is correct or data files may get overwritten.
10
Shutdown Procedure
1. Save all data and select the Setup tab of the CCD Control Window in
MaxIm. Click on Shutdown. When it asks if the cooler should be turned off,
click YES.
2. Exit from MaxIm and port data over to TITANIA. Double-click on the Network
Neighborhood icon on the Windows desktop. Select TITANIA from the
Network window and choose the folder to place your data in. If Windows
prompts for a password, type @wallace. . Select the folder containing your
data and drop the folder into the folder youve selected in TITANIA. Once the
data is on TITANIA, the data can be retrieved from campus by mounting
TITANIA.
3. Once the data is ported over successfully, shut down the Apogee computer
using the Start button in Windows.
4. Turn off both downstairs monitors.
5. Close the dome and replace telescope cover.
6. Turn off the Optec MaxFilter and Apogee camera.
7. Exit out of MOVE by typing qu at the command prompt. It will ask if you really
want to exit, follow the instructions to exit.
8. Type exit at the DOS prompt and Windows will start. Shut down the MOVE
computer using the Start button in Windows. Turn off the monitor.
9. SPRINT as quickly as you can downstairs and turn off the power strip to both
computers. The MOVE computer has a tendency to restart on its own about
10 seconds after shutdown.
10. Turn off the power strip to the electronics box.
11. GO HOME AND SLEEP! J
11
Troubleshooting
1. The telescope does not move when given MOVE commands.
Check the MOVE display to see if any limits are triggered. If so, see the
Telescope Limits section in the Using MOVE chapter.
If that doesnt fix the problem, check that both the upstairs and downstairs
EMERGENCY STOP buttons arent triggered by lifting up the buttons.
Check that there is power to the motors by making sure that the power strip for
the electronics box is turned on.
Check that the motor drives are rapidly flashing green and not slowly flashing. If
the drives are slowly flashing, flip the rocker switch on each motor drive controller
cable until the drives are rapidly flashing green.
If all else fails, try rebooting the MOVE system. First, exit MOVE by typing qu at
the command prompt. Then type exit at the DOS prompt and Windows will start
up again. Click on the Start button and select Shutdown from the menu.
Choose Restart in the Shutdown window. Turn off the power strip for the
electronics box. Once you have logged in to the MOVE computer, turn on the
power strip for the electronics box ONLY when the red lights over the connectors
of both drives are no longer lit. Then follow the procedure to start MOVE.
If all of the above fails, call Chelsey and buy her some pie. She likes pie.
2. The filter in use displayed in MaxIm is not the same as the actual filter in
use.
Turn the Optec MaxFilter off and on, then reboot the Apogee computer. Follow
the procedure to start up MaxIm and instrument initialization.
If the problem persists, go to the CCD Control Window in Maxim and choose
the Setup tab. Click Shutdown (it will ask if you want to turn off the cooler;
choose Yes) and click on the pulldown menu next to the Filter button in the
Setup tab. Select No Filter/None and click Restart to restart the CCD camera.
You will have to click Cooler On again as well. Now filters will have to be
changed manually by using the Optec MaxFilter filter selection paddle upstairs.
3. I pushed the EMERGENCY STOP button and when released, the
telescope keeps trying to move.
Push the EMERGENCY STOP button. Hit ENTER on the MOVE computer to
abort all current commands. Once all commands have been aborted, pull the
12
EMERGENCY STOP button back out. You can now proceed to move the
telescope.
4. I pushed the EMERGENCY STOP button and when released, the
telescope does not move when given MOVE commands.
Hit ENTER on the MOVE computer to abort all current commands. Reset the
motor drives by flipping the rocker switches on the motor drive controller cables
until the drive lights are rapidly flashing green. You can now proceed to move
the telescope.
5. I cannot get all three speeds on either the upstairs or downstairs
console to work.
If you are using the upstairs hand paddle, make sure that the downstairs control
console is set on GUIDE.
If you are using the downstairs control console, make sure that the upstairs hand
paddle is set on GUIDE.
6. I ran the telescope into the side of the dome.
Push the EMERGENCY STOP button on either the upstairs or downstairs control
consoles to abort all telescope moves. Drag the telephone into a corner and call
Chelsey and buy her some pie. She likes pie. Cower in the corner until she
arrives. BE VERY AFRAID!
7. I ran the instrument into the floor of the dome.
DONT PANIC. BREATHE BREATHE BREATHE NOW RUN AROUND
IN CIRCLES SCREAMING AND SHOUTING. Now push the EMERGENCY
STOP BUTTON on either the upstairs or downstairs control console to abort all
telescope moves. Call Chelsey and buy her some pie. She likes pie.
8. The dome wont rotate.
If the dome stops rotating in a specific direction, try rotating it in the opposite
direction a small amount and proceed with the direction you want.
If that doesnt work, try helping by physically pushing the dome in the direction
of movement.
If its really cold out and you think the dome might be frozen, call Chelsey for help
and buy her some pie she likes pie.
13
9. MOVE is lost! I cant set the coordinates! Auuggghhhh!
If the telescope coordinates displayed in MOVE are obviously not where the
telescope is pointed, follow the Setting Telescope Coordinates section in the
Using MOVE chapter to reset the telescope coordinates except you will have to
use the hand paddle to center a known star on the image. Once centered, type
re at the MOVE prompt to reset the coordinates by manually entering in the
J2000 coordinates for that star.
If the MOVE display does not appear right away upon startup and basically says
the telescope is lost, follow the instructions on the screen to move the telescope
near the home sensors. MOVE will then move the telescope North and West to
find the home sensors; once the home sensors are found, MOVE will start up
normally. The telescope coordinates will need to be reset, just follow the Setting
Telescope Coordinates section in the Using MOVE chapter.
14