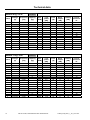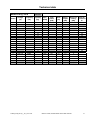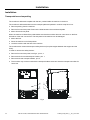
1
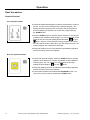
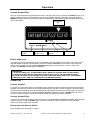
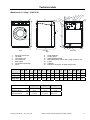
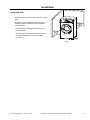
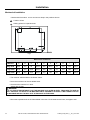
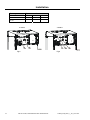
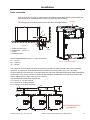
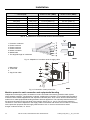
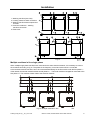
HIGH SPIN INDUSTRIAL WASHER EXTRACTORS 8kg 11kg 14kg ORIGINAL INSTALLATION, MAINTENANCE AND USER'S MANUAL 540889 Publication date: 1 Jul 2011 Contents Contents Safety precautions ............................................................................................................ 4 Operation............................................................................................................................ 8 Symbols on the machine.................................................................................................................................8 Version Xcontrol, Version Xcontrol Plus .........................................................................................................9 Before washing .............................................................................................................................................10 Opening the drum door .................................................................................................................................10 Placing the laundry into the machine............................................................................................................10 Closing the drum door...................................................................................................................................10 Program selections .......................................................................................................................................10 Wash programs overview .............................................................................................................................11 Add detergents..............................................................................................................................................11 Start the washer............................................................................................................... 12 Version Xcontrol............................................................................................................................................12 Version Xcontrol Plus....................................................................................................................................13 End of wash cycle .........................................................................................................................................13 Power cut ......................................................................................................................... 13 Version Xcontrol............................................................................................................................................13 Version Xcontrol Plus....................................................................................................................................13 How to open the door by failure....................................................................................................................13 First service at technical problem.................................................................................. 14 Technical data.................................................................................................................. 16 Connections ..................................................................................................................................................16 Machines 8-11-14 kg / 18-25-30 lb ...............................................................................................................17 Installation........................................................................................................................ 20 Transportation and unpacking ......................................................................................................................20 Siting and floor ..............................................................................................................................................21 Mechanical installation..................................................................................................................................22 Water connections ........................................................................................................................................23 Drain connection ...........................................................................................................................................25 Venting ..........................................................................................................................................................26 Liquid soap connection .................................................................................................................................26 Electrical connection .....................................................................................................................................27 Electronic controller with blue pcb and graphical display ............................................................................27 Electrical installation .....................................................................................................................................28 General .........................................................................................................................................................28 Residual current device (RCD) .....................................................................................................................29 Supply protection device...............................................................................................................................29 Supply cable .................................................................................................................................................29 Machine protective earth connection and equipotential bonding..................................................................30 Multiple machines in line single phase .........................................................................................................31 Maintenance and adjustments ....................................................................................... 32 Checking and maintenance daily..................................................................................................................32 Checking and maintenance every three months ..........................................................................................32 Checking and maintenance every six months ..............................................................................................33 Replacement of door rubber .........................................................................................................................34 Adjusting of out of balance switch ................................................................................................................34 Belt replacement and adjusting tension........................................................................................................34 Water filters...................................................................................................................................................34 Tightening moments .....................................................................................................................................35 Replacement washer fuses ..........................................................................................................................35 Trouble shooting aids ..................................................................................................... 36 Unblocking of the door lock in case of emergency .......................................................................................36 Error indication shown on display .................................................................................................................36 List of recommended spare parts .................................................................................................................37 540889_PUB_DATE_1_JUL_2011.DOC INSTALLATION, MAINTENANCE AND USER' MANUAL 3 Safety Precautions Safety precautions WARNING - SAVE THESE INSTRUCTIONS FOR LATER USE. Failure to comply with the instructions may lead to incorrect use of the appliance, and may result in risk of fire, bodily injuries or death and/or damage to the laundry and/or the appliance. WARNING - Read the IMPORTANT SAFETY INSTRUCTIONS in this manual carefully before operating the appliance. Improper use of the appliance may cause risk of fire, electrical shock or serious body injuries or death as well as serious damage to the appliance. This English version is the original version of this manual. Without this version, the instructions are incomplete. Before installation, operation and maintenance of the machine read carefully the complete instructions, i.e. this “Installation, maintenance and user's manual”, “Programming manual” and “Spare parts manual”. The Programming manual and Spare parts manual are not delivered with a machine by default. You shall ask the supplier / manufacturer to obtain Programming manual and Spare parts manual. Follow the instruction written in manuals and keep the manuals in a proper place by the machine for later use. Safety instructions included in manuals for personnel operating the appliance must be printed and posted on a visible place near the machine in the laundry room. The washer extractor is designed for fabrics washing only, other objects can damage the washer and can cause damage or injuries. If the machine is used for special applications follow the instructions and warning to avoid person injury. The manufacturer is not responsible for the damage to the fabrics that are washed by an inappropriate washing method. Always follow the instructions and/or warnings that are stated on the fabrics, washing products or cleaning products mentioned by the manufacturer. The washer must be set up in accordance with the instructions. All drain, inlet, electrical connections, ventilation, groundings and other connections must be done in according to the installation manual, in compliance with the local standards done by qualified technicians with proper authorization. The valid standards for connecting to the local power network (TT,TN,IT,…) must be followed. In the standard execution, the appliance may not be suitable for connecting to an IT supply system. Contact your commercial distributor for assistance. All appliances are produced according the EMC-directive (Electro-Magnetic-Compatibility). They can be used in restricted surroundings only (comply minimally with class A requirements). For safety reasons there must be kept the necessary precaution distances with sensitive electrical or electronic device(s). Do not change the parameters of the frequency inverter. This can cause serious injury, fire, washer damage, etc. During transportation and storage never use excessive forces on the packing because components can be damaged protruding the contour line of the appliance. Use copper conductors only. This appliance must be connected to a supply circuit to which no lighting units or general-purpose receptacles are connected. Any changes concerning the installation which are not described in this Installation Manual must be approved by the supplier or manufacturer. Otherwise, the supplier and manufacturer are not responsible for potential injuries to operators or for any damages. Interventions in the appliance execution or functions are not allowed, and the manufacturer refuses any responsibility in such cases. The washer extractor must be installed on level. If not, the washer may become unbalanced during extraction and, although fitted with an unbalance safety, the washer may become seriously damaged what may result in bodily injuries. Never put the washer in operation when the transporting braces are not removed. The washer should always be tested before use. It is possible that there are residues of products used during the production process in the new washer. These residues could cause stains on your laundry. Therefore, you must first run at least 1 hot wash with old rags before using for your normal laundry. Keep the appliance top and surface and the area around clean and clear of combustible or flammable products. The use of hypochlorite will cause corrosion which may cause component failure under certain circumstances. The warranty of the machine cannot be accepted in case corrosion was caused by chlorine and chlorine compounds impact. The washer extractor is not designed for work which may create an explosive atmosphere inside the machine and will not be used for this purpose. Do not expose the washer extractor to the weather, extreme low or high temperature and humidity. Do not store flammable materials around the appliances. Define the dangerous areas in the laundry room and obstruct an admission to them during appliances operating. 4 INSTALLATION, MAINTENANCE AND USER' MANUAL 540889_PUB_DATE_1_JUL_2011.DOC Safety Precautions Do not wash articles that have been previously cleaned in, wash in soaked in, or spotted with gasoline, dry-cleaning solvents, or other flammable or explosive substances as they give off vapors that could ignite or explode. Such fabrics must first be washed by hand and air dried. Do not add gasoline, dry-cleaning solvents, or other flammable or explosive substances to the wash water. These substances give off vapors that could ignite or explode. Under certain conditions, hydrogen gas may be created in the hot water system that has not been used for two or more weeks. HYDROGEN GAS IS EXPLOSIVE. If the hot water system has not been used for such period open all hot water taps and let the water run out for few minutes. This will release any accumulated gas. As this gas is flammable, do not smoke or use open flames during this time. TEMPERATURE IN WASHING MACHINE TUB: The electronic controller uses the temperature sensor in the tub to control the temperature of the washing bath. There are a lot of things that have influence on the temperature measurement. Therefore the temperature control of the washing bath is not very precise. Always strictly comply with the instructions that are written on the laundry chemicals-, laundry aids-, dry-cleaning solvents- and disinfectants packaging to avoid personal injury. Keep these agents out of the reach of children, preferably in a locked cabinet. Do not tamper the washer-extractor controls and do not bypass the safety instructions and the warnings. By danger turn off the main switch or other emergency disconnection devices. Do not put some part on the soap dispenser lid to held it open by filling or when the machine operates. Do not open the soap dispenser lid after the machine is started. The discharge or splashing of hazardous liquid can cause serious scalding and burning. Do not operate the appliance when parts are broken or missing or when covers are open. The appliance must not be operated until the fixed guards are put correctly in place. The appliance must not be stored, installed or exposed to the weather, extreme low or high temperature and humidity levels. Do not hose down the washer. NEVER allow the appliance to get wet. Check the functioning of the door lock mechanism on regular base. NEVER bypass the doorlock mechanism. Disconnect the power and close all water and steam supply before cleaning, servicing and at the end of each operating day. Out of the venting at the back of the washer can escape warm vapor or and hot air. Do not cover the vent but protect it sufficiently. It serves air gap and as a vapor outlet to prevent pressure building in the washer. Do not repair or replace any part of the appliance or attempt any servicing unless specifically recommended in the service manual or published user-repair instructions that you understand and have the skills to carry out. Only qualified service personnel may open the appliance to carry out servicing. Information contained in this manual is intended for use by a qualified service technician familiar with proper and safe procedures to be followed when repairing an electrical appliance. All tests and repairs should be performed by a qualified service technician equipped with proper tools and measuring devices. All component replacements should be made by a qualified service technician using only factory approved replacement parts. Improper assembly or adjustment may occur if service or repair is attempted by persons other then qualified service technicians or if parts other then approved replacement parts are used. Improper assembly or adjustment can create hazardous conditions. There can be a risk of injury or electrical shock while performing services or repairs. Injury or electrical shock can be serious or even fatal. Consequently, extreme caution should be taken while performing voltage checks on individual components or a product. PLEASE NOTE: Except as necessary to perform a particular in servicing a product, the electrical power supply should ALWAYS be disconnected when servicing a product. All industrial (OPL - On Premise Laundry) washers are designed for use in Laundry with professionally trained attendants. Before the appliance is removed from service or discarded, remove the door. Any Water or Steam Leaks Must Be Repaired Immediately. Closed supply immediately. If any problems or failures should arise, immediately contact your dealer, serviceman or manufacturer. The manufacturer reserves the right to change the manuals without previous notice. Norm IEC335 is applied for machines with a net usable cage volume between 60 and 150 l. Norm EN60204-1 is used for a net usable cage volume above 150 l. 540889_PUB_DATE_1_JUL_2011.DOC INSTALLATION, MAINTENANCE AND USER' MANUAL 5 Safety Precautions ! WARNING DO NOT TOUCH THE DOORGLASS UNTIL CYCLE HAS BEEN COMPLETED. DO NOT OPEN DOOR UNTIL CYLINDER REMAINS STOPPED AND WATER HAS BEEN DRAINED FROM CYLINDER. DO NOT PUT ARTICLES SOILED WITH EXPLOSIF SOLVENTS AND/OR DANGEROUS CHEMICAL PRODUCTS IN THE MACHINE. THIS MACHINE SHOULD NOT BE USED BY CHILDREN. DO NOT LET CHILDREN PLAY IN, ON, OR AROUND THE MACHINE. BEFORE TURNING THE MACHINE „ON“, MAKE SURE THAT THERE ARE NO PEOPLE OR ANIMALS PRESENT IN OR AROUND THE MACHINE. ! WARNING ORIGINAL OR IDENTICAL PARTS MUST BE USED FOR REPLACEMENT IN THIS MACHINE. AFTER SERVICING REPLACE AND SECURE ALL PANELS IN THE ORIGINAL WAY. TAKE THESE MEASURES FOR CONTINUED PROTECTION AGAINST ELECTRICAL SHOCK, INJURY, FIRE AND/OR PROPERTY DAMAGE. ! WARNING LOOKING AT THE MACHINE FROM THE FRONT VIEW THE DRUM ROTATION DURING EXTRACTION MUST BE CLOCKWISE. ! WARNING THIS APPLIANCE MUST BE CONNECTED TO A GROUNDED METAL, PERMANENT WIRING SYSTEM, AND ADDITIONALLY AN EQUIPMENT-GROUNDING CONDUCTOR MUST BE RUN WITH THE CIRCUIT CONDUCTORS AND CONNECTED TO THE EQUIPMENT-GROUNDING TERMINAL OR LEAD ON THE APPLIANCE. ! WARNING IN ORDER TO MINIMIZE THE RISK OF FIRE, ELECTRICAL SHOCK AND INJURY, THIS WASHER MUST BE PROPERLY GROUNDED. NEVER PLUG IN OR DIRECT-WIRE AN APPLIANCE UNLESS IT IS PROPERLY GROUNDED IN ACCORDANCE WITH ALL LOCAL AND NATIONAL CODES. IF MORE APPLIANCES IN THE SAME LOCATION, MUTUAL GROUNDING MUST BE APPLIED WHERE POSSIBLE. ! WARNING THE WASHER EXTRACTOR IS INTENDED TO BE PERMANENTLY CONNECTED, IT MUST BE SECURED MOUNTED TO A NON-COMBUSTIBLE, ADEQUATE FLOOR STRUCTURE. A CONCRETE FOUNDATION IS REQUIRED. METAL REINFORCED WOOD FLOORS ARE NOT ALLOWED DUE TO THE RISK OF FIRE AND EXCESSIVE VIBRATIONS. NEVER INSTALL THE WASHER ON AN UPPER FLOOR OR OVER A BASEMENT WITHOUT A LOAD SUPPORT DESIGNED BY A STRUCTURAL ENGINEER. ! WARNING ALTHOUGH THE APPLIANCE MAY BE IN THE “OFF” POSITION, THERE IS STILL ELECTRICAL POWER TO THE SWITCH SUPPLY TERMINALS. 6 INSTALLATION, MAINTENANCE AND USER' MANUAL 540889_PUB_DATE_1_JUL_2011.DOC Safety Precautions ! WARNING WHEN POWER SUPPLY HAS BEEN SWITCHED OFF WAIT FOR AT LEAST 10 MINUTES BEFORE STARTING INSPECTION OR SERVICING THE WASHER. BEFORE STARTING INSPECTION OF FREQUENCY INVERTER, CHECK FOR RESIDUAL VOLTAGE ACROSS MAIN CIRCUIT TERMINALS + AND -. THIS VOLTAGE MUST BE BELOW 30 VDC BEFORE YOU CAN ACCESS THE INVERTER FOR INSPECTION. ! WARNING DO NOT ALLOW CHILDREN TO PLAY ON, IN OR AROUND THE APPLIANCE AT ANY TIME. CLOSE SUPERVISION OF CHILDREN IS NECESSARY WHEN THE APPLIANCE IS USED NEAR CHILDREN. NEVER PERMIT CHILDREN TO OPERATE THE APPLIANCE. ! WARNING IF THE DOOR SAFETY LOCK DOES NOT WORK, DO NOT USE WASHER UNTIL THE DOOR LOCK MECHANISM IS REPAIRED. ! WARNING FOLLOW ALL VALID BASIC SAFETY RULES AND LAWS. THE INSTRUCTIONS IN THIS MANUAL CANNOT ACCOUNT FOR EVERY POSSIBLE DANGEROUS SITUATION. THEY MUST BE GENERALLY UNDERSTOOD. CAUTION AND CARE ARE FACTORS WHICH CAN NOT INCLUDED IN THE DESIGN OF THE APPLIANCE AND ALL PERSONS WHO INSTALL, OPERATE OR MAINTAIN THE APPLIANCE MUST BE QUALIFIED AND FAMILIAR WITH THE OPERATING INSTRUCTIONS. IT IS UP TO THE USER TO TAKE PROPER CARE WHEN OPERATING THE APPLIANCE. WARNING DO NOT REMOVE WARNING SIGNS PLACED ON THE APPLIANCE. OBSERVE SIGNS AND LABELS TO AVOID PERSONAL INJURIES. SAFETY LABELS APPEAR AT CRUCIAL LOCATIONS ON THE APPLIANCE. FAILURE TO MAINTAIN LEGIBLE SAFETY LABELS COULD RESULT IN INJURY TO THE OPERATOR OR SERVICE TECHNICIAN. ! ! WARNING IF THE INSTALLED APPLIANCE OPERATE WITH COIN, TOKEN OR SIMILAR OPERATION FOR USE IN SELF-SERVICE SITUATIONS, THEN THE OWNER-INSTALLER MUST PROVIDE A REMOTE-LOCATED EMERGENCY STOP DEVICE. THIS DEVICE MUST BE PLACED IN SUCH A WAY THAT IT IS EASY AND SAFELY ACCESSIBLE FOR THE USERS. THE EMERGENCY STOP DEVICE TAKES CARE THAT AT LEAST THE CONTROL CIRCUIT OF THE APPLIANCE IS INTERRUPTED. 540889_PUB_DATE_1_JUL_2011.DOC INSTALLATION, MAINTENANCE AND USER' MANUAL 7 Operation Operation Symbols on the machine Caution, dangerous electrical tension, electrical devices Caution, other danger, read and follow written instructions Warm water inlet (red color of the label) Soft cold water inlet (light blue color of the label) Caution - Increased temperature Do not close or cover The machine hot air outlet Hard cold water inlet (dark blue of the label) The holes to be drilled not punched In case of emergency press the emergency button to stop the machine Steam 8 INSTALLATION, MAINTENANCE AND USER' MANUAL 540889_PUB_DATE_1_JUL_2011.DOC Operation Version Xcontrol Version Xcontrol Plus START (ADVANCE function for the OPL version) (1) START (ADVANCE function) CONFIRM THE SELECTION STOP (program interruption) CANCEL THE SELECTION CONFIRM THE SELECTION MOVE UP CANCEL THE SELECTION MOVE DOWN MOVE UP SELECTION OF ADDITIONAL FUNCTIONS MOVE DOWN INFO OPL version: program information Coin operated version: User's Manual DECREASING THE TIME SEQUENCE INCREASING THE TIME SEQUENCE INFO (overview of available wash programs and program information) SERVIS (servicing information) DELAYED START FUNCTION (the delay starts running upon the pressing of the "start" button ) 0 to 9 (1) OPL NUMERIC KEYPAD version - washers are designed for professionally trained attendants. 540889_PUB_DATE_1_JUL_2011.DOC INSTALLATION, MAINTENANCE AND USER' MANUAL 9 Operation Before washing Sort the linen according on the temperature and the instructions of the manufacturer of the fabrics. Check if there aren‘t any strange objects between the linen like nails, screws, needles, etc. in order not to damage the washer-extractor or the linen. Turn sleeves of shirts, blouses, etc. inside out. To get a better washing result, you have to unfold the fabrics and mix the bigger and smaller pieces of fabrics. Opening the drum door Open the door by pulling on the door handle. Placing the laundry into the machine CAUTION! The optimal washing load is determined by the filling factor. The proper filling factor is determined by the type of linen and other factors. Cotton textiles normally require a filling factor of 1:10-1:13, which is a full drum load. Put the linen in the drum depending on the maximum capacity of the washer. Do not overload the washer extractor. Overloading the machine can lead to a bad wash result. Half washing loads can obstruct a proper function. Synthetics and blended fabrics usually require a filling factor of 1:18-1:20, which is half drum load. Loading more will reduce the wash result and can damage the linen. Closing the drum door Close the door with the door handle, making sure the door is properly latched before operating the washer. Program selections Choose one of the available wash programs, best corresponding to the quality of the garments and allowed wash temperature in the wash load. The Xcontrol version The Xcontrol Plus version up" and " : choose the wash program by the arrow buttons " : enter the wash program number utilizing the numeric keypad. down". The selection of the program determines the temperature and the time for washing and rinsing. NOTE! For locking a program mode, changing factory settings and possibilities of program changes and setup - see Programming manual. 10 INSTALLATION, MAINTENANCE AND USER' MANUAL 540889_PUB_DATE_1_JUL_2011.DOC Operation Wash programs overview Wash program 1 Hot wash intensive 90°C Wash program 2 Warm wash intensive 60°C Wash program 3 Coloured wash intensive 40°C Wash program 4 Bright wash intensive 30°C Wash program 5 Woollens 15°C Wash program 6 Hot wash 90°C ECONOMY level Wash program 7 Warm wash 60°C ECONOMY level Wash program 8 Coloured wash 40°C ECONOMY level Wash program 9 Bright wash 30°C ECONOMY level Wash program 10 Eco hot wash 90°C ECONOMY level Wash program 11 Eco warm wash 60°C ECONOMY level Wash program 12 Eco color wash 40°C ECONOMY level Wash program 13 Eco bright wash 30°C ECONOMY level Wash program 14 Extraction low speed Wash program 15 Extraction high speed Only Xcontrol Plus: Wash program 16 Sport 60°C Only Xcontrol Plus: Wash program 17 Mops 60°C Only Xcontrol Plus: Wash program 18 Horse cloths 40°C Only Xcontrol Plus: Wash program 19 Jeans 60°C Only Xcontrol Plus: Wash program 20 Starching - Add detergents Fill the soap dispenser on the top of the washer extractor depending of the chosen program. ● Pre-wash in the soap dispenser ● Main wash in the soap dispenser ● Main wash in the soap dispenser ● Fabric softener or starch in the soap dispenser : detergent for the pre-wash. : detergent for the main wash. : liquid detergent for the main wash or liquid bleach etc. : fabric softener or starch for the last rinse. NOTE! It is advisable to use only detergents with „foam breaker“, which can easily be found in retail shops. The dosage of soap to use is generally mentioned on the packing. An overdose of detergent can lead to poor wash results and „suds“, overflow which can damage the machine. Take care that the lid of the soap dispenser is closed if the machine starts. 540889_PUB_DATE_1_JUL_2011.DOC INSTALLATION, MAINTENANCE AND USER' MANUAL 11 Operation Start the washer Version Xcontrol Coin operated models ● Choose the required wash program. Insert the correct amount of coins in the slot - the sum must correspond to the selected program. The display shows the remaining sum to be paid. After the payment is done, the display prompts the user to start the program utilizing the START button. ● Push the START button to start the washer extractor. If you have by mistake chosen a different wash program, you can change the choice within the first 150 seconds utilizing the arrow buttons " up" and " down". When a more expensive washing program was chosen, the value will be shown to add. When you don‘t add more coins, the chosen program at the start will be executed. ● During the washing cycle you can follow the actual washing sequence and the remaining time on the displays. Non-coin operated models ● Choose the required program. Press the START button to start the operation of the machine. If you have by mistake chosen a different wash program, you can change the choice within the first step utilizing the arrow buttons " up" and " down". ● During the washing cycle you can follow the actual washing sequence and the remaining time on the displays. ● If the machine operator has enabled the ADVANCE function, you can move to the next step by pressing the START button. 12 INSTALLATION, MAINTENANCE AND USER' MANUAL 540889_PUB_DATE_1_JUL_2011.DOC Operation Version Xcontrol Plus After you have selected the required wash program, start the wash cycle by pressing the START button. If you enter a number that does not correspond to any of the available programs, the display shows the message INVALID. During the wash cycle the user can follow the progress of the wash sequence and the remaining wash cycle time on the display. Progression bar 35 Min. Prog 2: WARM WASH Wash program number Wash program name Remaining time wash Units program End of wash cycle The wash cycle time is counted down to zero on the display. After the completion of the wash cycle, the door lock gets deactivated (it unlocks) and the display shows the message UNLOAD. Open the door and remove the laundry from the machine. The message UNLOAD disappears and the machine is ready to start a new program. The SELECT CYCLE option is displayed. ! WARNING! IF, AFTER A POWER CUT, THE MACHINE DOOR CANNOT BE OPENED AND THE MACHINE IS FITTED WITH AN AUTOMATIC UNLOCKING CIRCUIT, WAIT UNTIL THE UNLOCKING CIRCUIT UNLOCKS THE DOOR LOCK. BEFORE YOU OPEN THE DOOR, MAKE SURE THAT THE DRUM IS COMPLETELY STILL AND THAT THE WATER HAS DRAINED FROM IT. Power cut Version Xcontrol If a power cut occurs and the door is closed and locked, the wash program will, after the power supply has been restored, automatically continue in the program beginning from the step in which the program was interrupted. If the machine is fitted with an automatic unlocking circuit and if during the power cut the door lock gets unlocked (and the door remains closed), the message Continue / Unload is displayed. Press the START button in order to continue the wash program. If the door has been opened, the wash program gets cancelled. Version Xcontrol Plus If a power cut occurs and the door remains closed, the message Continue / Unload is displayed after the power supply is restored. Press the START button in order to continue the wash program. If the door has been opened, the wash program gets cancelled. How to open the door by failure See Installation and maintenance manual. 540889_PUB_DATE_1_JUL_2011.DOC INSTALLATION, MAINTENANCE AND USER' MANUAL 13 Operation First service at technical problem 14 N° E2 Failure message No Drain Failure Action Fault occurrence Drain failure Full Stop + tumble Draining sequence E3 Tilt Fault Out of balance Full stop + tumble Whole cycle E4 Imbalance Out of balance : Normal Skip + continue spin After 5 attempts to spin E5 Tilt High Sp Out of balance : high spin Full stop + safety time >500 or 750 RPM E6 Door Coil Door switch failure Full stop + safety time Whole cycle E7 Door Switch Door solenoid switch failure Full stop + safety time Whole cycle E8 Door Start Door lock check at start Don’t start failure At start up E9 Door Unload Door lock switch closed Don’t start failure End cycle E11 No Fill Fill failure Full stop + request for Continue While filling E12 Overfill Overfill failure Full stop + tumble While filling E13 No Heating Heating failure Full stop + tumble While heating E14 Heat Time Heating time failure Full stop + request for Continue While heating E15 Too Hot Too Hot Full stop + tumble While heating E21 Overflow Overflow failure Full stop + tumble Wash step E24 Level Sens Defective level sensor Continue + Don’t start Before start up E25 Temp Sensor Defective temperature sensor Continue + Don’t start Before start up E26 Mitsub code Undefined frequency inverter error code Full stop + tumble Whole cycle E27 Comm fault Communication fault inverter Full stop + safety time Whole cycle E28 THT time / E.OL THT Time out / E.OL Full stop + safety time At spin sequence E29 OV3 time / E.OP OV3 Time out / E.OP Full stop + safety time At spin sequence E31 Load Parr Initialization fault inverter Don’t start At initialization E32 Verify Parr Verification fault inverter Don’t start At loading parameters E35 Wrong Softw Wrong software version Don’t start New software version E37 No Drain Sp Drain failure at the Spray Sequence Full stop + tumble Spray Sequence E39 Out of Soap The Soap Supplies are running Out of Soap For Info only Wash step E41 Service Due Service Due Warning E42 Connection No Network Connection For Info only Open door = reset For Info only INSTALLATION, MAINTENANCE AND USER' MANUAL End cycle Data Transfer Networking 540889_PUB_DATE_1_JUL_2011.DOC Operation E43 Voltage Par Wrong Voltage Range Selection E80 Time Out Input16 On Hold Signal Failure Soap Dispensing System E81 No Reheat Heating Failure E82 No Refill Refill failure Full stop + request for Continue Wash Step Abnormal Cycle Termination Make correct selection Configuration menu Full stop + tumble. Whole cycle Full stop + tumble. Wash Step (Traceability only) (Traceability only) E83 Cycle Fail No successful wash cycle termination Info that the wash cycle has to be repeated. E85 Real Time Clock, No Battery or battery low power For Info only. RTC Low Batt MITS ERR Specific Mitsubishi Inverter Alarm Full stop + safety time Whole cycle MEMORY ERR Full stop + safety time Any time Memory Error E550 TRACEYBILITY WRITE Internal memory Error data for traceability For Info only Traceability function, whole cycle E551 TRACEYBILITY FULL Internal Traceability memory is full For Info only Traceability function, whole cycle E600E628 SOFTW ERR Software Error Full stop + safety time Any time E300E353 E500E525 540889_PUB_DATE_1_JUL_2011.DOC (Traceability only) End cycle (Traceability only) INSTALLATION, MAINTENANCE AND USER' MANUAL 15 Technical data Technical data 8 kg / 18 lb 11 kg / 25 lb 14 kg / 30 lb Innerdrum volume diameter litres mm 75 530 105 620 135 620 Drum speed wash extraction rpm 49 1165 49 1075 49 1075 Heating electricity steam hot water kW bar °C 6/9 1-8 90 6 / 9 / 12 1-8 90 9 / 12 1-8 90 400 400 400 175 200 240 < 65 < 65 < 65 8 kg / 18 lb 11 kg / 25 lb 14 kg / 30 lb BSP DN20 3/4" DN20 3/4" DN20 3/4" kPa 100-800 100-800 100-800 kPa 300-500 300-500 300-500 l/min 20 20 20 outer Ø mm Flow amount with drain valvel/min 76 76 76 210 210 210 DN15 1/2" DN15 1/2" DN15 1/2" 100-800 100-800 G-factor Weight, net kg Sound pressure level dB (A) Tab.1 Connections Water valves connection Water pressure Rec. water pressure Capacity Drain valve Steam valve connection BSP Steam pressure kPa 16 100-800 Tab.2 INSTALLATION, MAINTENANCE AND USER' MANUAL 540889_PUB_DATE_1_JUL_2011.DOC Technical data Machines 8-11-14 kg / 18-25-30 lb Front Left side Rear side Fig.1 1. 2. 3. 4. 5. 6. 7. Electrical connection Hot water Cold water hard Cold water soft Main switch Connection liquid soap Drain 8. 9. 10. 11. 12. 13. 14. A B C D E 8 kg / 18 lb 710 726 1115 790 11 kg / 25 lb 795 761 1225 14 kg / 30 lb 795 911 1225 Soap dispenser Control panel Button CENTRALSTOP Door opening: 8 kg / 18 lb: ø 330, 11-14kg / 25-30lb : ø 410 Fuses USB port Electrical connection to liquid soap pumps F G H 355 230 88 792 342 230 942 342 230 I J K L M N O 920 1010 103 208 293 390 1020 24 88 1030 1120 103 208 379 475 1130 24 88 1030 1120 103 208 379 475 1130 24 Tab.3 Frequency of the dynamic force Floor load at max extraction 8 kg / 18 lb 11 kg / 25 lb 14 kg / 30 lb 19,4 17,9 17,9 Hz kN 1,9 ±0.5 Tab.4 540889_PUB_DATE_1_JUL_2011.DOC 2,2 ±0.5 2,6 ±0.5 INSTALLATION, MAINTENANCE AND USER' MANUAL 17 Technical data Machine 8 kg / 18 lb not standard Phase Voltage [V] Frequency [Hz] Capacity [kg] 1 1 3 3 3 3 3 3 3 3 3 3 3 3 200-240 200-240 200-240 200-240 200-240 380-415 + N 380-415 + N 380-415 + N 380-415 440-480 380-415 440-480 380-415 440-480 50/60 50/60 50/60 50/60 50/60 50/60 50/60 50/60 50/60 50/60 50/60 50/60 50/60 50/60 8 8 8 8 8 8 8 8 8 8 8 8 8 8 Machine 11 kg / 25 lb Total power [kW] Fuse [A] Motor output [kW] Heating [kW] Internal protection IP 0,85 5,2 0,85 6,7 9,7 0,85 6,7 9,7 0,85 0,85 6,7 7,7 9,7 9,7 10 32 10 25 32 16 16 20 10 10 16 16 20 16 0,75 0,75 0,75 0,75 0,75 0,75 0,75 0,75 0,75 0,75 0,75 0,75 0,75 0,75 0 4,6 0 6 9 0 6 9 0 0 6 7 9 9 43 43 43 43 43 43 43 43 43 43 43 43 43 43 Total power [kW] Fuse [A] Motor output [kW] Heating [kW] Internal protection IP 16 32 16 25 32 40 16 16 20 25 10 10 16 16 20 16 25 25 1,1 1,1 1,1 1,1 1,1 1,1 1,1 1,1 1,1 1,1 1,1 1,1 1,1 1,1 1,1 1,1 1,1 1,1 0 4,6 0 6 9 12 0 6 9 12 0 0 6 7 9 9 12 12 43 43 43 43 43 43 43 43 43 43 43 43 43 43 43 43 43 43 1165 1165 1165 1165 1165 1165 1165 1165 1165 1165 1165 1165 1165 1165 Tab.5 not standard Phase Voltage [V] Frequency [Hz] Capacity [kg] 1 1 3 3 3 3 3 3 3 3 3 3 3 3 3 3 3 3 200-240 200-240 200-240 200-240 200-240 200-240 380-415 + N 380-415 + N 380-415 + N 380-415 + N 380-415 440-480 380-415 440-480 380-415 440-480 380-415 440-480 50/60 50/60 50/60 50/60 50/60 50/60 50/60 50/60 50/60 50/60 50/60 50/60 50/60 50/60 50/60 50/60 50/60 50/60 11 11 11 11 11 11 11 11 11 11 11 11 11 11 11 11 11 11 18 Spin [RPM] Spin [RPM] 1075 1075 1075 1075 1075 1075 1075 1075 1075 1075 1075 1075 1075 1075 1075 1075 1075 1075 Tab.6 1,2 5,4 1,2 6,8 9,8 12,8 1,2 6,8 9,8 12,8 1,2 1,2 6,8 7,8 9,8 9,8 12,8 12,8 INSTALLATION, MAINTENANCE AND USER' MANUAL 540889_PUB_DATE_1_JUL_2011.DOC Technical data Machine 14 kg / 30 lb not standard Phase Voltage [V] Frequency [Hz] Capacity [kg] 1 1 3 3 3 3 3 3 3 3 3 3 3 3 3 3 3 3 3 3 3 3 200-240 200-240 200-240 200-240 200-240 200-240 200-240 380-415 + N 380-415 + N 380-415 + N 380-415 + N 380-415 + N 380-415 440-480 380-415 440-480 380-415 440-480 380-415 440-480 380-415 440-480 50/60 50/60 50/60 50/60 50/60 50/60 50/60 50/60 50/60 50/60 50/60 50/60 50/60 50/60 50/60 50/60 50/60 50/60 50/60 50/60 50/60 50/60 14 14 14 14 14 14 14 14 14 14 14 14 14 14 14 14 14 14 14 14 14 14 540889_PUB_DATE_1_JUL_2011.DOC Spin [RPM] Total power [kW] 1075 1075 1075 1075 1075 1075 1075 1075 1075 1075 1075 1075 1075 1075 1075 1075 1075 1075 1075 1075 1075 1075 Tab.7 1,6 5,7 1,6 7,1 10,1 13,1 14,9 1,6 7,1 10,1 13,1 14,9 1,6 1,6 7,1 8,1 10,1 10,1 13,1 13,1 14,9 14,9 Fuse [A] Motor output [kW] 16 32 16 25 32 40 50 16 16 20 25 32 10 10 16 16 20 16 25 25 32 32 1,5 1,5 1,5 1,5 1,5 1,5 1,5 1,5 1,5 1,5 1,5 1,5 1,5 1,5 1,5 1,5 1,5 1,5 1,5 1,5 1,5 1,5 Electrical Internal heating protection [kW] IP INSTALLATION, MAINTENANCE AND USER' MANUAL 0 4,6 0 6 9 12 13,8 0 6 9 12 13,8 0 0 6 7 9 9 12 12 13,8 13,8 43 43 43 43 43 43 43 43 43 43 43 43 43 43 43 43 43 43 43 43 43 43 19 Installation Installation Transportation and unpacking The machine is delivered complete with feet etc. packed inside the machine in the drum. The machine is delivered bolted onto the transport pallet and packed in a shrink-wrap foil or box. Remove packing from the machine. Remove front and rear panel. Remove the bolts between the machine and pallet. Mount front and rear panel. When the machine is lifted off the pallet: Make sure that the machine does not come down on the floor with either of the rear corners first. The side panel of the machine can be damaged. Mount the feet. Place the machine on its final position. Level the machine with the feet of the machine. The machine also comes with transport safety devices (four plate angles between the support and the drum). In order to remove the safety devices: Remove front and rear panel, see fig.2., pos.3, 4. Remove both front metal transport holders, pos. 1. Remove both rear transport holders, pos. 2. The machine may not be moved with the transport holders removed. Save the transport securities for future use. Fig.2 20 INSTALLATION, MAINTENANCE AND USER' MANUAL 540889_PUB_DATE_1_JUL_2011.DOC Installation Siting and floor Install the machine close to a floor drain or open drain. In order to make installation and servicing the machine easier the following clearances are recommended: • At least 500 mm between the machine and the wall behind • and min. 50 mm on both sides of the machine whether installed next to the wall or other machines. Fig.3 540889_PUB_DATE_1_JUL_2011.DOC INSTALLATION, MAINTENANCE AND USER' MANUAL 21 Installation Mechanical installation • Mark and drill 2 holes ø 10 mm and 50 mm deep in the positions shown. - Position of feet - Drilling points for expander bolts Fig.4 Mechanical installation Machine A B C D E F G H I J 8 kg / 18 lb 530 444 95 129,5 375 167,5 40 118 710 691,5 11 kg / 25 lb 618 444 88,5 129,5 455 170 35 118 795 691,5 14 kg / 30 lb 618 564 88,5 159,5 515 140 60 118 795 841,5 Tab.8 • The machine shall be lifted in the bottom frame. • Place the machine over the two drilled holes. • Check that the machine is in level. Adjust with the feet. ! WARNING! IT IS OF UTMOST IMPORTANCE THAT THE MACHINE IS PLACED IN LEVEL, FROM SIDE TO SIDE AS WELL AS FRONT TO REAR. IF THE MACHINE IS NOT PROPERLY LEVELED, IT MAY RESULT IN OUTOF-BALANCE WITHOUT A REAL OUT OF BALANCE IN THE DRUM. • Mount the expander bolts in the holes drilled in the floor. Fit the washers and nuts, and tighten well. 22 INSTALLATION, MAINTENANCE AND USER' MANUAL 540889_PUB_DATE_1_JUL_2011.DOC Installation Water connections All intake connections to the machine are to be fitted with manual shut-off valves and filters, to facilitate installation and servicing. Water pipes and hoses should be flushed clean before installation. After installation hoses should hang in gentle arcs. All connectors present on the machine must be connected up. The table shows the possible connection options, which will depend on the water types to be connected to the machine. Check the machine plates too. All water connectors must be connected up, otherwise the wash program will not function correctly. Hoses are to be of an approved type and grade and comply with IEC 61770. Machines shall be connected with new water hoses. Re-used water hoses must not be used. The water pressure data: see - Technical data - Connections ! WARNING! IF THE WATER PRESSURE IS BELOW THE MIN. VALUE, THE WASH RESULT CAN NOT BE GUARANTEED FOR CERTAIN PROGRAM. 540889_PUB_DATE_1_JUL_2011.DOC INSTALLATION, MAINTENANCE AND USER' MANUAL 23 Installation Water type Water connection cold and hot cold soft and cold hard and hot 1 2 3 cold - hot cold soft cold hard hot Tab.9 2 waters Fig.5 24 INSTALLATION, MAINTENANCE AND USER' MANUAL 3 waters Fig.6 540889_PUB_DATE_1_JUL_2011.DOC Installation Drain connection Connect a 76 mm (3") pipe or rubber hose to the machine’s drain pipe, ensuring a downward flow from the machine. Avoid sharp bends which may prevent proper draining. The drainage pipe should be located over a floor drain, drainage channel. Venting Fig.7 1. Waste channel cover 2. Drain elbow ∅ 76 mm / 3“ 3. Clamp 4. Waste channel 100436 Recommended distances for 8-11-14 kg / 18-25-30 lb x1 = 112 mm x2 = >100 mm x3 = >20 mm Fig.8 Drain connection The main drain channel-pipe must have the capacity to be able to handle the total output of all connected machines. In a drainpipe, a deodorized must be provided every twenty meter, fig.9., pos.1 to assure the good working of the drain pipe. If the main drain pipe cannot be sufficiently deodorized, install a deodorizer per machine. Every time a machine is coupled on the drainpipe, the diameter of the tube or the width of the waste channel must be more. See, fig.9., D1, D2, D3. The recommended drain pipes diameter are: D1 = 75 mm / 3“ for one machine D2 = 100 mm / 4“ for two machines D3 = 125 mm / 5“ for three machines Fig.9 Recommended drain pipe diameters 100437 540889_PUB_DATE_1_JUL_2011.DOC INSTALLATION, MAINTENANCE AND USER' MANUAL 25 Installation Venting ! WARNING VAPOURS ESCAPE FROM THE MACHINE THROUGH THE AIR VENT OPENING! SEE (FIG.8). DO NOT COVER! Liquid soap connection General : Always use liquid soap pumps with a flow rate that can bring the requested quantity in less than 30sec. Important : Start pumping immediately after the water valves are open. The incoming water dilutes the liquid soap and brings it into the tub assembly. Caution: The machines are produces in two versions: Without liquid soap (standard version) With liquid soap (according to the request) Secure the location of the wiring and hoses in such a way that they can not be pinched, damaged or rubbed. Before you start to use liquid soap, check with your liquid soap supplier whether the liquid soap is harmless and inert to PP and PVC material in order to avoid a problem that manufacturer is not responsible for. The washer has provisions for connecting external dosing of liquid soaps. On the back side, a plastic hose connection part is present, fig.10., pos.1. to connect the liquid soap hoses. Depending of the number of liquid soap pumps that will be used, drill holes (max. 8) of Ø 8 mm / 0.315“ in the plastic hose connection part for each pump. On the plastic hose connection part is also a 3 nipples of Ø 12 mm / ½“. Use this nipple ONLY for entering diluted soap. Drill with Ø 11.5 mm / 0.45“. By default, these nipples are closed. Drill only the ones that will be used. Take care that the drill particles are carefully removed so that they can not clog up the hoses and openings. check that the hose connections are tight (check the clamps)! any leakage of chemicals may cause serious body injuries as well as serious damage to the washer. if one of the nipples are open, close and secure the opening with an appropriate cover. 26 INSTALLATION, MAINTENANCE AND USER' MANUAL 540889_PUB_DATE_1_JUL_2011.DOC Installation Electrical connection label Fig.10 Electrical connection The power supply of the liquid soap supply system has to be connected to an external electrical source. Only authorized workers with a valid qualification must execute the electrical connection on the machine according to the valid local standards. The correct connection way can be found on the wiring diagram that is located inside the cabinet in a plastic bag. Do not connect the liquid soap pump system in the washer. Electronic controller with blue pcb and graphical display For electric connection of supply control signals is available on the back side of the machine the terminal box with LED signalization of activation of the respective pump, (see fig.10., pos.2). Above the terminal box there is a label for electric connection, fig.10. Detail connection of signals could be also found on the electric scheme of the machine. Signals for supply pumps control are 24V AC. Maximum current for control circuits of pumps must be limited to 10mA. Lead the cable for connection of pumps control signals through the plastic cable bushing, pos.3. After connection of conductors to the respective positions of the connector “P” (screw clamps), fix up the cable by tightening the cable bushing) against disconnection and close the box with the cover. For details about liquid soap supply system programming, see Programming manual. 540889_PUB_DATE_1_JUL_2011.DOC INSTALLATION, MAINTENANCE AND USER' MANUAL 27 Installation Electrical installation General The machine has been designed for connecting to the electrical network according the specification of your order. Before connection check the electrical data stated on the data plate, if they correspond to your electrical network. An individual branch circuit needs to be used for each machine. The way of the connection is described in fig.11. For electrical protection, there must be installed a residual current device (RCD) and a circuit breaker in the electrical installation of the building (laundry switchboard). For correct selection see below. IMPORTANT: – If the machine is not equipped with a main switch then supply disconnecting devices need to be provided in the installation for all electrical supplies connected to the machine, in accordance with EN 60204-1 standard, point 5.3. – Make sure the supply voltage is always within the limits specified in the chapter “TECHNICAL DATA” in all circumstances. When you have long distances in the electrical installation, it may be necessary to use bigger cables to reduce the voltage drop. – When the machine is connected near a large capacity power supply transformer (500kVA or more, wiring length shorter than 10 m) or there is a power capacitor switch-over, a power supply improving reactor must be installed. If you do not install this, the inverter may get damaged. Contact your sales office for more info. ! WARNING! GROUNDING: IN EVENT OF MALFUNCTION OR BREAKDOWN OR LEAKAGE CURRENT, THE GROUNDING WILL REDUCE THE RISK OF ELECTRICAL SHOCK AND SERVE AS A PROTECTING DEVICE, BY PROVIDING A PATH OF LEAST RESISTANCE OF ELECTRICAL CURRENT. THEREFORE IT IS VERY IMPORTANT AND THE RESPONSIBILITY OF THE INSTALLER TO ASSURE THE WASHER IS ADEQUATELY GROUNDED AT THE POINT OF INSTALLATION TAKING INTO CONSIDERATIONS THE NATIONAL AND LOCAL CONDITIONS AND REQUIREMENTS. 1. Residual current device (RCD) 2. Laundry electrical switchboard 3. Supply protection device 4. Washing machine 5. Phase conductors 6. Protective conductor 7. Main switch inlet terminal switchboard 8. Neutral conductor Fig.11 Machine connection to electrical network (with a residual current device) 28 INSTALLATION, MAINTENANCE AND USER' MANUAL 540889_PUB_DATE_1_JUL_2011.DOC Installation Residual current device (RCD) In some countries an RCD is known as an “earth leakage trip” or “Ground Fault Circuit Interrupter” (GFCI) or an “Appliance Leakage Current Interrupter” (ALCI) or “earth (ground) leakage current breaker”. Specifications: – Tripping current: 100mA (if locally not available/allowed use a 30mA trip current, preferably selective type with small time delay set) – Install max. 2 machines on each RCD (for 30mA, only 1 machine) – Type B. There are components inside the machine which make use of DC voltages and therefor a “type B” RCD is necessary. For information only: Type B is better preformance than type A, and type A is better than type AC. When locally allowed, there must always be installed an RCD. In some power network earthing systems (IT, TN-C,…), an RCD might not be allowed (see also IEC 60364). Some washer control circuits are supplied with a separating transformer. Therefore the RCD may not detect faults in the control circuits (but the fuse(s) of the separating transformer will). Supply protection device A supply protection device basically protects the machine and wiring against overloads and short circuits. As supply protection device, you can use either (glow-wire) fuses or (automatic) circuit breakers. See “Technical data” for the rating of the nominal current and other specifications of the supply protection device. In this table there is specified that the protection must be the “slow” type, for circuit breakers this means curve D. Although not recommended, if for some reason you can not use a slow type, select the protection device with 1 step higher nominal current rating to avoid disconnecting during start-up. Supply cable The supply cable is not delivered with the machine. Specifications: – conductors with copper cores – stranded conductors are strongly recommended (flexible wiring) to avoid conductor breaking because of vibration – THE CROSS SECTION DEPENDS ON THE USED SUPPLY PROTECTION DEVICE. SEE TABLE 10., FOR THE MINIMAL CROSS SECTION – As short as possible, directly from the supply protection device to the washer without branching off. – No plug or extension cords: The machine is intended to be permanently connected to the electrical network Connection: – Insert the cable through the hole in the on the rear panel, insure a strain relief (turnbuckle) is used so that the supply cable can not move. – Strip the conductor ends according fig.12. – The protective conductor must be longer so that when the cable is pulled out accidentally, this conductor is disconnected the last one! – With stranded conductors, use “wire end tubes” with an insulated sleeve (6) for L1/U, (L2/V), (L3/W), (N) conductors. Make sure there can not be make accidental contact, since the supply cable stays under voltage even when the main switch is off. – Crimp a ring terminal (eyelet) to the protection conductor for good fixation to the PE terminal. – Connect the supply cable conductors to the incoming terminals (main switch (1)) marked with L1/U, (L2/V), (L3/W), (N), and the terminal (copper screw) marked with PE, see fig.13. – Provide a sag in the cable, in front of the cable strain relief. This will avoid ingress of condensed water into the machine, see fig.13. 540889_PUB_DATE_1_JUL_2011.DOC INSTALLATION, MAINTENANCE AND USER' MANUAL 29 Installation Power supply protection device nominal current (US) Automatic circuit breakers Fuses 16A (15A) 10A (10A) 20A (20A) 16A (15A) 25A (-) 20A (20A) 40A (40A) 32A (30A) 63A(-) 50A (50A) 80A 63A 100A 80A 125A 100A Min. phase conductor section in mm2 (AWG) Min. Protection conductor section in mm2 (AWG) 1,5 mm² (AWG 15) 2,5 mm² (AWG 13) 4 mm² (AWG 11) 6 mm² (AWG 9) 10 mm² (AWG 7) 16 mm² 25 mm² 35 mm² 1,5 mm² (AWG 15) 2,5 mm² (AWG 13) 4 mm² (AWG 11) 6 mm² (AWG 9) 10 mm² (AWG 7) 16 mm² 16 mm² 25 mm² Tab.10 Manufacturer’s recommended minimal conductor section 1. Protection conductor 2. Phase conductor 3. Phase conductor 4. Phase conductor 5. Neutral conductor 6. Molded tube 7. The stripped length of conductors Fig.12 Adaptation of conductor ends of supply cable 1. Main switch 2. Turnbuckle 3. 4. Sag of inlet cable Fig.13 Connection of main power inlet Machine protective earth connection and equipotential bonding Independent of the supply cable, the washer must be connected to the laundry protective earth system with a separate conductor. The protection conductor, enabling this connection, is not included with the washer. If there are other washers/appliances with exposed conductive parts, which can be touched simultaneously, make sure to make equipotential bonding between all these appliances. The external protective terminal for this purpose is located on the rear panel of the machine frame, (fig.14., pos.3). The minimum protection conductor’s cross section depends on the supply cable cross section and can be found in table 10. However, for the protection purposes with the supply cable section of min. 4 mm2 we recommend to select a larger conductor section, i.e. 6 mm². 30 INSTALLATION, MAINTENANCE AND USER' MANUAL 540889_PUB_DATE_1_JUL_2011.DOC Installation 1. Washing machine (rear view) 2. Laundry protective earth connection 3. Washing machine external protective terminal 4. Protective conductor - washing machine connection 5. Earth mark Fig.14 Multiple machines in line single phase When multiple single phase machines are connected to the same electrical network, it is necessary to connect the machines according to fig.15. The phase of the frequency control and motor which is connected to the terminal inside the machine, has to be connected alternatively for the first machine with the first phase L1 of the network, the second machine with the second phase L2, ... The fourth machine must again be connected to the first phase L1. This assures a better load of the electrical network. Fig.15 Multiple machines in line 540889_PUB_DATE_1_JUL_2011.DOC INSTALLATION, MAINTENANCE AND USER' MANUAL 31 Maintenance and adjustments Maintenance and adjustments ! WARNING! ALWAYS FOLLOW SAFETY INSTRUCTIONS! DO NOT BYPASS ANY SAFETY DEVICES OR THEIR PARTS. ANY INTERFERENCE TO THE MACHINE FUNCTIONS AND CONSTRUCTION ARE PROHIBITED! USE THE PROPER CHEMICAL AGENTS WHICH AVOID CALCIUM SEDIMENTS ON HEATING ELEMENTS AND OTHER MACHINE PARTS. DISCUSS THIS ISSUE WITH YOUR SUPPLIER OF WASHING PRODUCTS. THE MANUFACTURER OF THE MACHINE IS NOT RESPONSIBLE FOR THE DAMAGE OF HEATING ELEMENTS AND OTHER MACHINE PARTS DUE TO CALCIUM SEDIMENTS. DO NOT OPERATE THE MACHINE WITH BROKEN / MISSING PARTS OR OPENED COVERS! BEFORE MAINTENANCE WORK DISCONNECT THE MACHINE POWER SUPPLY! WHEN THE MAIN SWITCH IS TURNED OFF THE INLET TERMINALS OF THE MACHINE MAIN SWITCH ARE STILL UNDER CURRENT! THAT IS THE WAY TO AVOID INJURIES. When replacing any parts of the machine, exchange them with original parts obtained from your dealer or ordered through the spare parts manual. Checking and maintenance daily 1. Remove the linen or other parts (paperclips, needles, …) that are left lying in the drum to avoid injuries and damage to the rubber door seal, seals, glass etc. 2. Clean the door seal from any remaining detergent and other foreign matter. Do not use solvents, acids or grease to clean the rubber door gasket! 3. Clean the top and body when water or detergent traces are on the machine. Use a damped cloth, do not use abrasive cleaners. Dry with a soft cloth. 4. Hoppers must be cleaned at the end of each working day. Remove sediments inside the reservoir by means of a plastic spatula and splash by water. 5. Check water and possible steam inlets for leakage. 6. At the end of the working day, open the machine door to allow airing out the machine and to prolong the door gasket life service. We recommend to shut off all electrical power inlets and main water inlets. Checking and maintenance every three months 1. Check if the drain valve is not leaking during the wash process. It is also important that the valve opens properly afterwards (drain valve opens when electrical power falls out). Wash out the drain if the water doesn’t drain fluent. 2. Check for the belt tightness or possible damage; therefore remove the machine rear cover. 3. Check the tightness of the bolts according to chapter “Tightening moments”. 4. Check visually all hoses and connection inside the machine for leaking. 5. Make sure that the control components are protected against moisture and dust during the clean up. Wipe and clean up the machine inside. 6. On machines with electric heating check the tightening of the contacts of heating elements terminals and other power terminals (main switch, fuse disconnectors, contactors). 7. Tighten the contacts of heating elements terminals on machines with electrical heating. 32 INSTALLATION, MAINTENANCE AND USER' MANUAL 540889_PUB_DATE_1_JUL_2011.DOC Maintenance and adjustments Checking and maintenance every six months 1. The filters in the water connection at the valves need to be cleaned. Turn off the tap. Unscrew the hoses at the back of the appliance. Take out the filter at the center with pointed pliers, clean and re-insert. When re-attaching the hoses, make sure that the seals are seated correctly. Check water inlets for leaks. Tighten the connections or replace the seals of the inlet hose if necessary. ! WARNING! BEFORE REMOVING TOP OR BACK PANEL OF THE MACHINE, SWITCH POWER OFF AND WAIT FOR AT LEAST 10 MINUTES. BEFORE STARTING INSPECTION OF FREQUENCY INVERTER, CHECK FOR RESIDUAL VOLTAGE ACROSS MAIN CIRCUIT TERMINALS + AND -. THIS VOLTAGE MUST BE BELOW 30VDC BEFORE YOU CAN ACCESS THE INVERTER FOR INSPECTION. 2. Remove dirt and dust, clean, and verify functionality from: – the cooling fin of the inverter – the motor cooling fins – the internal ventilator of the inverter (if present) – the external ventilator (if present) – the external air relieves of the machine 540889_PUB_DATE_1_JUL_2011.DOC INSTALLATION, MAINTENANCE AND USER' MANUAL 33 Maintenance and adjustments Replacement of door rubber 1. Open the door. Remove the door glass with rubber from the door frame by pushing it towards the drum. Do it carefully, do not damage the glass. 2. Remove the gasket from the glass. 3. Place a new rubber gasket with wider groove on the glass with the edge up. 4. Moisten the seal groove for door with soap water. Place a smooth cord in the groove all around. Tighten up the margin by cord and fit the unit to the door opening. Hold one end of the cord firmly on the door. Pull the other cord end towards the center of the glass for the rubber edge properly fit in. Important note: After the door seal replacement it can happen that the door seal pressure is too high on the door lock side as well as on the hinge side. If this happens, follow the service instructions mentioned above. Adjusting of out of balance switch The out of balance switch is an important component which must - if correctly adjusted - stop the machine when excessive movement and shaking occur due to an unbalance caused by improper distribution of linen in the washing drum. The adjustment of the vibration switch has ALWAYS to be executed at the installation of the washer. It is recommended that once a year a qualified worker verifies the vibration switch petting. ATTENTION! DO NOT USE THE MACHINE IF THIS FUNCTION DOESN’T WORK PROPERLY! THIS FUNCTIONAL TEST CAN ONLY BE EXECUTED BY A QUALIFIED TECHNICIAN WITH PROPER AUTHORIZATION. ! Belt replacement and adjusting tension ! WARNING! MAKE SURE THE MACHINE IS DISCONNECTED FROM POWER SUPPLY BY USE AND SECURE THE DISCONNECTING DEVICE. On a new machine and after a belt replacement, make an inspection of the belt tightness: 1. After first 24 hrs of operation 2. After first 80 hrs of operation 3. Every 6 months or every 1000 operation hours - which ever comes first. The belts are accessible from the rear of the machine. If the belts are too tight or too loose, the durability will be shortened. If too loose they can be slipping on the pulley and can cause a noisy operation and generate excessive wear with fast breaking as consequence. In such cases correcting the belts tension is necessary. The belt tension can be verified with an approximate method. ! ATTENTION! TO CHANGE THE BELTS: NEVER USE A CROWBAR, SCREW DRIVER OR ALIKE TO TAKE OFF THE BELTS OVER THE PULLEY! Water filters Machines are equipped with filters on water inlets. It is necessary to clean up the filters occasionally to avoid a prolongation of filling the machine with water. Intervals of cleaning depend on the quality of the water, for example foreign particles in the water line. ! WARNING! BEFORE YOU START CLEANING THE WATER FILTERS, CHECK IF ALL WATER INLET TO THE MACHINE IS CLOSED. 34 INSTALLATION, MAINTENANCE AND USER' MANUAL 540889_PUB_DATE_1_JUL_2011.DOC Maintenance and adjustments Tightening moments The recommended torque values for standardized steel bolts: M6 8.8: C = 10 Nm M8 8.8: C = 25 Nm M10 8.8: C = 45 Nm M12 8.8: C = 80 Nm M16 8.8: C = 200 Nm Replacement washer fuses Fuse values The correct values of fuses can be found in the vicinity of the fuse holders and on the electrical scheme and delivered with the machine. When a fuse is blown, you can replace it with the same value but in NO case a higher value. If the fuse blows again, do not change it, but find the cause of the failure. Contact your commercial distributor for help if necessary. 540889_PUB_DATE_1_JUL_2011.DOC INSTALLATION, MAINTENANCE AND USER' MANUAL 35 Trouble shooting aids Trouble shooting aids Unblocking of the door lock in case of emergency If the power blackout takes too long, you can make an emergency unblocking of the door lock. The emergency door opening has been described as follows: ! WARNING! BEFORE THE EMERGENCY DOOR OPENING TURN OFF THE MACHINE MAIN SWITCH! NEVER OPEN THE DOOR WHILE DRUM IS STILL RUNNING! NEVER OPEN THE DOOR IF “TOO HOT” IS INDICATED! RISK OF BURN OR SCALD INJURIES! NEVER OPEN THE DOOR IF THE MACHINE PARTS FEELS TOO WARM! NEVER OPEN THE DOOR, UNTIL THERE IS NO WATER IN THE DRUM! IN THE OPPOSITE CASE, IT WILL FLOW OUT AFTER OPENING THE DOOR. 1. Verify if all condition are present to safely open the door. 2. Softly push the washing unit to back. 3. Put your fingers over the edge of the front panel at the door lock side. 4. Push the emergency door opening button. 5. Open the door if all safety conditions are fulfilled. Error indication shown on display See User's manual, chapter 5. See Programming manual, chapter “Troubleshooting”. 36 INSTALLATION, MAINTENANCE AND USER' MANUAL 540889_PUB_DATE_1_JUL_2011.DOC Trouble shooting aids List of recommended spare parts – drain valve – 2-way inlet valve – 3-way inlet valve – 4-way inlet valve – steam valve – door lock – fuses – thermostat sensor – motor contactor – heating contactor – heating element – V-belts – door seal Find more detailed information and order codes in the spare parts catalogue for individual machines at your dealer. 540889_PUB_DATE_1_JUL_2011.DOC INSTALLATION, MAINTENANCE AND USER' MANUAL 37 IMPORTANT ! MACHINE TYPE: PROGRAMMER: Electronic timer INSTALLATION DATE: INSTALLATION CARRIED OUT BY: SERIAL NUMBER: ELECTRICAL DETAILS: .............VOLT...............PHASE............HZ NOTE: ANY CONTACTS WITH YOUR DEALER REGARDING MACHINE SAFETY, OR SPARE PARTS, MUST INCLUDE THE ABOVE IDENTIFICATION. MAKE CERTAIN TO KEEP THIS MANUAL IN A SECURE PLACE FOR FUTURE REFERENCE. DEALER: