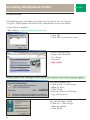
1
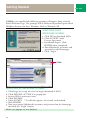
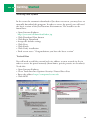
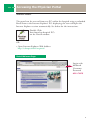
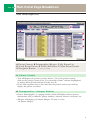
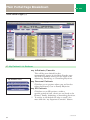
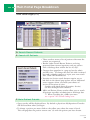
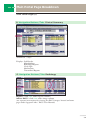
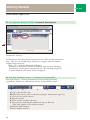
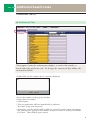
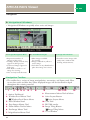
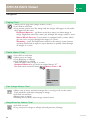
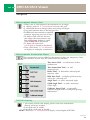
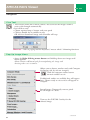
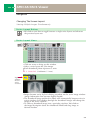
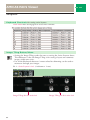
ECMC
Physician Portal
Physician User Guide
W E S T E R N
H O S P I T A L
N E W
O F
Y O R K ’ S
C H O I C E
ECMC Physician Portal
Table of Contents
1. GETTING STARTED
1 Introduction
1.1 Recommended Hardware
1.1 Minimum Required Software
1.1 Contact information
1.2 Initial Setup External Access
1.2 Digital Certificate Download
1.4 Installing Java Update
1.4 Trusted Sites
2. ACCESSING THE PHYSICIAN PORTAL
2
Internal Access
2.1 External Access
3. MAIN PORTAL PAGE BREAKDOWN & FUNCTIONALITY
3
Patient Context Area (A)
3
Demographics/Allergies Buttons (B)
3.1 My Patient Lists (C)
3.2 Search Recent Patients (D)
3.2 Search All Patients (E)
3.2 Main Patient Datalet (F)
3.3 Navigation Buttons/Tabs (G)
3.4
Clinical Summary (G)
3.4
Radiology: Amicas PACS (G)
3.5
Scanned Documents (G)
3.5 Datalet Toolbar Icons/Column Functionality (H)
4. ADDITIONAL SEARCH LINKS
4 Preferences Tab (A)
4.1 Links (B)
4.1
Hubnet (Internal)
4.1
Micromedex (Internal)
4.1
Up to Date (Internal)
4.1
Google Health (Internal & External)
4.1 Support
4.1
Helpdesk
4.1
Digital Certificate Download instructions
4.1
Portal User Guide – Electronic Access
5. AMICAS PACS Viewer
5
Access
5.1 Navigation
W E S T E R N N E W Y O R K ’ S
H O S P I T A L O F C H O I C E
Getting Started
Introduction
The ECMC Physician Portal is designed to provide you with the most
current information on your hospital patients while keeping you up to date
on ECMC news and developments that may be of importance to your
medical practice. The portal is a direct link to ECMC electronic medical
records and enables you to access up-to-the-minute patient data from the
hospital or any other remote and secure location. Within seconds you can
view nearly any document critical to patient conditions and outcomes.
1
Getting Started
Recommended Hardware:
• Pentium III 500-MHz Processor or higher
• 512 Mb RAM or higher
• Monitor – 256 colors, 1024x768 resolution or higher
• Higher-speed Internet connection (DSL, Power Link, etc)
• Mouse or other pointing device and keyboard
Minimum Software Requirements:
• Operating System – Windows 2000, XP, ME-Millennium Edition
• Internet Explorer 5.5 with the latest JVM and Associated viewer plug-ins
Contact Information
Tech support is available 24/7 should you have questions or encounter
any problems with your physician portal. Please contact the ECMC Help
Desk at 716-898-4477 or email the support staff at [email protected].
1.1
Getting Started
Initial Setup External Access
Digital Certificate Download
(Required to view Portal)- Internet Explorer
1. Open a web browser
2. Enter http://ecmcapp2.ecmc.edu/certsrv in the address bar
3. You will receive the following prompt
4. Enter your assigned user name and password
(provided by IT department, it is not your Meditech user name)
5. Click Request a certificate link.
6. Click User Certificate link.
7. Click Submit no further ID information required.
8. Answer YES to any prompts that appear.
9. Click Install this Certificate link.
10. Answer YES to any prompts that appear..
11. You should receive a message stating your new certificate has been
successfully installed
12. You now log into the portal using the following web address
https://ecmcportal.ecmc.edu
13. Answer OK or YES to any prompts that appear.
14. Portal Welcome Page Launches
***See External Access instructions on page #8 for logging into the portal after this
initial setup procedure is complete. Downloading the digital certificate is a one
time per computer occurance.
1.2
Getting Started
If JAVA is not installed the following prompts will appear along with the
Portal Welcome Page. The prompts will be different dependant upon which
Windows System you have, Windows 2000 vs Windows XP
WINDOWS 2000
RESPONSE SCREEN
a. Click YES to download JAVA
b. Click ACCEPT under
License Agreement
c. Installation begins. Click
FINISH when completed.
d. Enter(Meditech) username and
password on the Homepage
e. Click “Login”
Click
WINDOWS XP RESPONSE SCREEN
a. Click beige bar at top of screen to begin download of JAVA
b. Click INSTALL ACTIVE X in popup box
c. Answer YES to nonsecure items
d. Click INSTALL
e. Click ACCEPT ** It will take approx. 40 seconds to download.
f. Click FINISH
g. Now enter portal (Meditech) username and password on the homepage
and click the “Login” button.
Make sure popups are not blocked
1.3
Getting Started
Installing Java Update
In the event the automatic download of Java does not occur, you may have to
manually download this program. In order to access the portal, you will need
the latest version of the Java Runtime Environment. The installer can be
found here:
• Open Internet Explorer
http://java.com/en/download/index.jsp
• Click Download Now button
• Click Begin Download
• Accept the default settings
• Click Next
• Click Finish
• Click Verify installation
• Final screen states “Congratulations you have the latest version”
Trusted Sites
You will need to add the external web site address to your trusted site list in
order to access the portal remotely (from home, private practice or elsewhere).
To do this:
• Open Internet Explorer
• Go to Tools>Internet Options>Security>Trusted Sites>Sites
• Enter the address https://ecmcportal.ecmc.edu
• Click ADD
1.4
Accessing the Physician Portal
Internal Access
The portal can be accessed from any PC within the hospital using a preloaded
Portal Icon or the Internet Explorer. PCs displaying the icon will open the
Internet Explorer session automatically. See below for the instructions.
Double Click
Icon found on hospital PC’s
on the Novell window
OR
• Open Internet Explorer Web Address
http://valcopas:8080/ercportal
Portal Welcome Page
Login with
Meditech
Username
Password
ALL CAPS
2
Accessing the Physician Portal
External Access
The following steps will allow you to log into the portal, after the Digital
Certificate, JAVA update and Trusted Site information has been installed.
• Open Internet Explorer
Web Address https://ecmcportal.ecmc.edu
• Click OK
• Click YES to nonsecure items
• Portal Welcome Page
• Login with Meditech
User Name
Password
• ALL CAPS
If your system is not running the most recent Java runtime one of these pop ups appear:
Java (for Windows XP)
• Click Install > Click Accept
• Allow @ 40sec
• Click Finish
• Bottom toolbar on Welcome
Page will say done
Java (for Windows 2000)
• Click Yes > Click Accept
• Allow download
• Click Finish
2.1
Main Portal Page Breakdown
Main Portal Page (A-B)
A
G
B
F
C
D
E
A Patient Context, B Demographics Allergies, C My Patient List
D Search Recent Patient, E Search All Patients, F Main Patient Datalet
G Navigation Buttons (see below for details)
A. Patient Context
• This will display the patient you have chosen. To set the patient context,
click on the patient’s name in the “Last name,First Name” column (highlighted
in yellow) from the Main Patient Datalet area (E).
• If you click anywhere else on the name line the patient context area will not
display the patient you chose.
B. Demographics / Allergies Buttons
• Patient Demographics is a popup window which will display relevant patient
information such as addresses, phone numbers, alternate contacts, insurance, etc.
• Allergies will display any known allergies. If none, it states
“no known allergies”
3
Main Portal Page Breakdown
Main Portal Page (C)
A
G
B
F
C
D
E
C. My Patient List Buttons
My Patients Lists
my InPatients/Consults
This will be your default list that
automatically appears in the Main Datalet area>
You will see patients where you are listed as the
Admitting, Attending, or Consulting Physician.
my Personal Patients
Click here to see patients where you are listed as
either the Primary Care or Family Physician.
my ER Patients
Click here to see ER patients, within a
specific period of time, where you are listed as the
Primary, Family, Admitting or Attending physician.
** To restore to the default list after a search, you
must click the “my Inpatients/Consults” button.
continued
3.1
Main Portal Page Breakdown
Main Portal Page (D-F)
B
A
G
F
C
D
E
D. Search Recent Patients
E. Search All Patients
• These searches return a list of patients who meet the
criteria you requested.
• Results under Search Recent Patients are being
generated from current inpatients and any patient
with a discharge date within the last 45 days.
• Current dates populate in a pop-up box for admit
and ER visits. To change the date, left click in dotted
box and a calendar appears to input your new search
date. Click OK then Execute
• Location & Service search buttons require you to
left click in the dotted pop-up box and an additional
screen appears where you make your choice of
services or locations to view.
Searches with check boxes (Location, Service)
can have multiple items checked.
• MR# and Patient Name searches allow you to search
all patients regardless of admission or discharge date
*** When searching for a MR# you must
use a capital “M” and all leading zeros.
F. Main Patient Datalet
• Query results will be displayed here. By default a physicians MyInpatients/Consults
will be listed here when you login.
• To choose a patient you must click on the yellow area where the name is listed.
This will populate the patient context area (A) with the patient you have chosen.
continued
3.2
Main Portal Page Breakdown
Main Portal Page (G)
B
A
G
F
C
D
E
G. Navigation Buttons/Tabs
• Patient List - Patient list results (search or default results)
• Clinical Summary –Represents a current study of the patient over the
last 7 days. For a more detailed historical view, visit the correspondoing
datalet areas. (i.e.Clicking on the Lab button will by default show 30
days of info whereas the Clinical Summary Lab is only 7 days.)
Contains lab results, microbiology, radiology reports, vital signs,
current medications, and transcribed reports - WITHIN LAST 7 DAYS
• Visit History - Lists all previous visits for a given patient. Contains info
on when patient was seen, admitted, and/or discharged; reason for visit
and attending physician. – WITHIN LAST 365 DAYS.
• Vital Signs - Lists an inpatient’s vitals signs and how and where they
were taken – WITHIN LAST 14 DAYS
• Microbiology – Microbiology procedure results for all inpatient visits,
clinic visits, procedures, and recent antibiotics will be listed if
the patient is an inpatient for the current visit – 30 DAYS
• Lab - Lab tests and results are listed for all inpatient visits, clinic visits,
and procedures – 30 DAYS
• Pathology - Pathology results are listed – 30 DAYS
• Radiology - Diagnostic imaging procedures and reports are listed.
– 30 DAYS (up to 180 days)
• Medications - Current medications and medication history are
displayed – 30 DAYS
• Reports - Transcribed reports are listed here (except radiology reports
which are listed under Radiology) – 30 DAYS (up to 90 days)
• Orders - Displays all completed and outstanding orders – 30 DAYS
• Scanned Documents - Displays a list of documents scanned in for a
patient. Document list can be filtered like other datalets. – 30 DAYS
** The length of time for each section can be adjusted under
Preferences Tab or on the datalet toolbar .
3.3
Left click ‘status’ to
view micro report.
Right click on
comment to view pop-up
box with entire text.
To view reports
pop-up blockers
must be disabled on
your browser under
the Tools function.
Left click the ‘view’
link to open the
document to view
continued
Main Portal Page Breakdown
Main Portal Page (G)
G. Navigation Buttons/Tabs Clinical Summary
(within last 7 days)
Displays: Lab Results
Microbiology
Radiology Reports
Vital Signs
Medications
Transcribed Reports
G. Navigation Buttons/Tabs Radiology
Reports / click view under reports column
Amicas PACS / click view under image column
(see separate instructions for viewing the PACS images, located on home
page under Support Links / PACS User Manual)
continued
3.4
Getting Started
Main Portal Page (G-H)
G. Navigation Buttons/Tabs Scanned Documents
(within last 30 days)
All documents that have been scanned into the Valco system are located
here. The list can be filtered by selecting a category from the datalet
toolbar drop down box.
Click “View” and the document will open.
Examples: ED records (facesheets),billing, legal consent, discharge
instructions, GI outpatient procedures,etc. As scanning progresses
to other hospital units more items will appear.
H. Datalet Toolbar Icons / Column Functionality
Icon Description – Nearly all datalets have the sorting/searching
capabilities. Below are explanations for the various datalet icons.
A
B
C
D E
F
A. Go to the first/last row
B. Filter the rows by what is selected (category, medication type, etc.)
C. Text area for search criteria
D. Execute search
E. Clear search and show all rows
F. Text area for entering the number of days to filter by
(This only applies to the current screen)
G. Execute filter request
H. Print datalet contents
3.5
G
H
Additional Search Links
Preferences Tab (A)
A. Preference Tab
The length of time the information displays in each of the datalets is
listed under the preference tab. To change the amount of days follow the
instructions below:
• Right-click on the number that is currently displayed
• Erase the number in the pop-up window
• Enter the new number
• Click Update
• The new preference will not immediately be effective.
You must re-log into the portal.
• Alternative: use the datalet toolbar while in a specific patient search and change
the preference by typing in the number of days you want to search in the blank
Days box. Then click on green arrow/
4
Additional Search Links
Links(B)/Support(C)
B. Links
The following websites can be accessed from the Links Tab
• Hubnet (Internal Access Only)
Hospitals & UB Library Resource Network
• Micromedex (Internal Access Only)
• Up to Date (Internal Access Only)
A search engine designed to quickly answer clinical questions that arise
in daily practice. Must click Accept on License screen.
• Google Health (Internal and External Access)
A quick search tool for medical information
C. Support
• Helpdesk Contact Information
Phone: 716-898-4477
website email address: [email protected]
• Digital Certificate Installation (electronic access)
• Physician Portal User Guide (electronic access)
4.1
AMICAS PACS Viewer
Access
Access from Physician Portal
• Choose Radiology from Navigation Buttons
• Window is divided into radiology reports and radiology orders
• Images are available for viewing in meditech once they are in taken status
• Reports are available only from final status or resulted
• Click View under Report column to view a dictated report
• Click View under Image column to view images
5
AMICAS PACS Viewer
Access
The following screens may appear upon the initial installation of the Amicas Viewer
1st time accessing the Radiology Images
• Click View
• Downloading and Installing Java
pop-up appears
• This will show a continuous running bar
• Click the X button
Digital Signature Verification Screen
• Click Run
Installing AMICAS Viewer Screen
• The center of the screen continues
to circulate
• Allow approximately 30 seconds for
download
Digital Signature Error Screen
• Click Run again
AMICAS Viewer now installed
• The next screen to appear will be
the PACS Image Window
5.1
AMICAS PACS Viewer
Navigation
The Image Window
Increase image size to fit the full screen of PC:
• Windows 2000> go to View>Choose Full Screen
• Return to original size> go to View> Choose Full Screen again
• Windows XP> go to Tools> Choose Full Screen
• Return to original size> move cursor to very top of screen until toolbar reappears> go to
tools> choose Full Screen again
A. Patient Name and Study Information
• Patient MR # / Patient Name / Study date & time
• Study Accessories / Modality / Demographics
• View Report Icon
continued
5.2
AMICAS PACS Viewer
Navigation
B. Navigational Windows
• Navigational Windows to quickly select series and images
A
B
C
A. Image Navigation Bars
B. Thumbnail Images
C. Image Information
• Represents number of
• Mini images available
images in that series.
• If image already viewed, they
appear in dark grey bar.
• Unviewed images appear in
light grey.
• Left click to scroll to # of
image for viewing.
• Also see keyboard shortcuts
• Describes active image with
for viewing.
• Image bordered in yellow is
active image.
• Left click on any thumbnail to
place that image into viewer.
study time, window and
leveling measurements..
Navigation Toolbar
• The toolbar has a variety of image manipulation, annotation, and layout tools. How
to use these tools and how they affect displayed images will be described in depth
throughout this training material.
1
2
3 4 5
6 7
8
9
10 11 12
13
1. Amicas Dashboard
8. Measurement Mouse Tool & Menu
2. Window/Level Mouse Tool
9. Series Layout Button
3.
4.
5.
6.
7.
Window/Level Preset Menu
Auto Window/Level
Page Images Mouse Tool
Zoom Mouse Tool & Menu
Pan Image Mouse Tool
Magnification Mouse Tool
Series Layout Menu
10. Cine Tool
11. DICOM overlay
12. Image Tiling Button
Image Tiling Menu
13. Close Window
continued
5.3
AMICAS PACS Viewer
Navigation:
Manipulating Images
Amicas Dashboard Menu
• Report – lets you view a report for currently open study. Also allows you to choose
other available reports by clicking Launch
Report Viewer and choosing study to view.
• Preferences – lets you customize your workstation’s local viewing preferences.
• About – displays info about the version of
Lightbeam you are running
(ex.WindowsXP)
These 4 options allow you adjust your
navigation toolbar and thumbnails by
displaying them or removing them.
Window/Level Mouse Tool
• Tool allows the adjustment to the brightness (window)
and contrast (level) of the image
• left click on tool
• Drag mouse pointer over image to adjust
• To return to the original displayed image see W/L menu below. Click on the
system generated radio button.
• If W/L becomes such that you are no longer able to view, tap the
number ‘0’ on the keyboard (not NumPad) to restore image
Window/Level Menu
• Auto changes pixels
• System Generated – displays original
image
• If the auto or last manual radio buttons
are high lighted it is because you were
adjusting the window/level. To retrieve
original imaging back, click on the system
generated radio button.
• ROI W/L allows you to encircle an area on
the image and adjust the window/level.
Auto Window/Level
• left click button to optimize the W/L for image currently in view
• To return to original W/L choose system generated button from
window/level menu.
continued
5.4
AMICAS PACS Viewer
Navigation
Paging Tool
• Allows you to page thru images within a series.
• Left click on tool icon
• Drag mouse pointer over the image and the images will appear in the order
they appear in the series.
Keyboard shortcuts – up/down arrow keys move you from image to
image. Right/left arrow keys move you through the images within a series.
Mouse Wheel shortcut: if your mouse is equipped with a center wheel,
you can use it to page through the images in a series.
Skimming – press and hold mouse wheel or the mouse’s center button
and drag cursor left-to-right or top-to-bottom to quickly skim through
all images in a series.
Zoom Mouse Tool
• Left click on tool icon
• Move cursor to image
• Drag Right/up to enlarge
• Drag Left/down to shrink
* This will affect every image in a series.
• Keyboard Shortcut to get back to original image “C”
• Or click zoom arrow for menu
choose center + fill
Pan Image Mouse Tool
• Allows you to move around an image that is too big to fit on the screen.
Tool would be used after enlarging an image.
• left click on tool icon
• Move cursor to image
• Holding mouse down, move image around screen
Magnification Mouse Tool
• left click on tool
• Drag cursor over image to enlarge selected portions of image
continued
5.5
AMICAS PACS Viewer
Navigation
Measurement Mouse Tool
• Allows you to add temporary measurement to an image.
• L click on ruler or “L” on keyboard activates this tool.
• L click/hold down on Image where measuring will begin
• Drag measurement line to desired position.
• If additional measurements required,
continue repeating previous 2 steps
• To delete: click once on the box
that shows the measurement and
line will become dashed vs solid
Click DELETE on Keyboard
• To delete all annotaions:
ctrl+A/Delete button on keyboard.
• New: Click letter “U” on keyboard
to display or undisplay annotations.
Measurement Annotation Menu
These annotations can be added to the image but they are temporary. Once
your windows session ends the annotations are removed.
Keyboard
Shortcuts
Y
T
P
R
A
B
Text Arrow Tool – to add arrows with or
without text
Text Annotation Tool – to add
annotated text
Probe Tool – to determine selected pixel
intensity value
ROI Stats Tool – to display pixel intensity
values for a selected area
Angle Tool – to add a measured angle
Cobb Angle Tool – to add a measured
Cobb angle
Calibrate Image Tool – to manually
calibrate images with no valid pixel spacing
information
DICOM Overlay
• The overlay feature will display patient and series information
directly on image window.
• Left click once to enable.
• Left click a 2nd time to disable.
NEW:• Click letter “o” on keyboard to display and undisplay DICOM.
continued
5.6
AMICAS PACS Viewer
Navigation
Cine Tool
• This feature works like a movie camera. You can have the images within a
series cycle through automatically.
• Left click on tool
• Choose options loop vs bounce and your speed
• Click on double bar in middle to stop
OR click on thumbnail image and controller will stop
Shortcuts – refer to paging tool for keyboard / mouse wheel / skimming functions
Pop-Up Image Menu
• Access by Right clicking mouse button and holding down over image until
menu appears.
Menu contains additional tools for manipulating the image and
choosing other series or studies.
Allows you to choose another study and Compare
the Images side by side on viewport.
Click this compare studies button
on main toolbar to exit
If additional studies are available they will appear
here. Choose study to view and it will appear in
viewport.
Invert Images: Temporarily reverses pixels
for all images in a series
Turns on the DICOM Overlay for the
selected image
continued
5.7
AMICAS PACS Viewer
Navigation
Changing The Screen Layout
Viewing Multiple Images Simultaneously
Series Layout Button
• left click on tool box to toggle between a single series layout and whatever
the previous layout was
Series Layout Menu
• Click on arrow to bring up this window
• Select a series layout for your images
• Each thumbnail photo represents a series
∑
Ex. 1 Series 2x1 (2 columns / 1 row)
Light
shading
means
active
viewbox.
• Images become active by Left clicking anywhere on the active image window
(image information line becomes lightly shaded)
• The thumbnail image outlined in yellow will automatically become active in
activet viewbox. Left clicking through the thumbnail images will change the
image in the active viewbox.
• To add any thumbnail image into a particular viewbox, Left click on
the image description above the thumbnail. Hold and drag image to
desired viewbox.
5.8
AMICAS PACS Viewer
Navigation
Keyboard Shortcuts for setting series layouts
Num Lock must be engaged to access these controls
Image Tiling Button/Menu
• Setting the Image Tiling works the same as setting the Series Layouts above.
The difference is that the Image Tiling is for setting a layout on numerous
images within one series.
• Use of the Keyboard shortcuts / mouse wheel & skimming can be used to
maneuver through your images.
Ex. 2 Series Layout is 2x1 (2 columns x 1 row)
Image Tiling for this series1x2
5.9
Image Tiling for this series 2x2
AMICAS PACS Viewer
Navigation
Keyboard Shortcuts
Study Navigation
Advance to next image
Right Arrow
Page Up
Return to previous image
Left Arrow
Page Down
Skip series
Down Arrow
Up Arrow
Return to previous series
Group a viewport
Ctrl-Left Click
Mouse Wheel shortcut: if your mouse is
equipped with a center wheel, you can
use it to page through all images in a
series.
Skimming – press and hold mouse
wheel or the mouse’s center button and
drag cursor left-to-right or top-to-bottom
to quickly skim through all images in
a series
+ and – keys launch comparison studies
Exit Study
Ctrl-X
Window and Level:
J
K
1
2
3
4
5
-
Window up
Window down
W/L Preset 1
W/L Preset 2
W/L Preset 3
W/L Preset 4
W/L Preset 5
Last Manual
Tool
A
B
C
F
L
O
P
R
S
T
Y
Z
I
M
6
7
8
9
0
Level up
Level down
W/L Preset 6
W/L Preset 7
W/L Preset 8
Auto Preset
System Generated
Selection
Activates Add Angle
Activates Add Cobb Angle
Center and Zoom image after an image was enlarged
Sets image at full resolution
Activates Measurement mouse tool
Sets DICOM overlay
Activates Probe tool
Activates ROI statistics
Sharpens pixels
Activates Text tool
Activates Arrow tool
Flips image horizontally
continued
5.10
AMICAS PACS Viewer
Navigation
Keyboard Shortcuts
Temporary Mouse Modes
Shift-Left Click
Alt-Left Click
Shift-Alt-Left Click
Ctrl-Shift-Left Click
5.11
Activate paging mode
Activate pan mode
Activate probe mode
Activate W/L mode