1
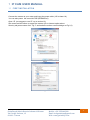
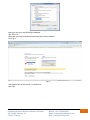
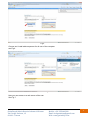
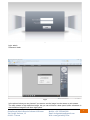
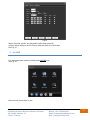
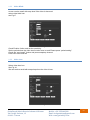
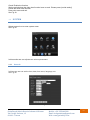
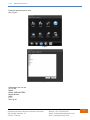
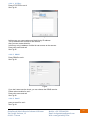
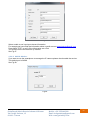
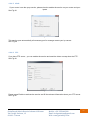
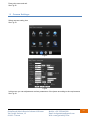
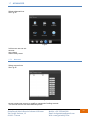
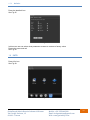
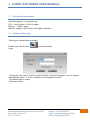
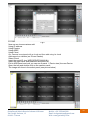
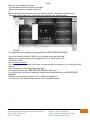
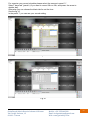
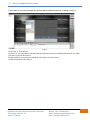
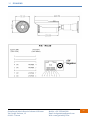
IP-ZEN42W-2.0
IP-VRX36W-2.0
INDEX 1
IP CAM USER MANUAL
1.1
FIRST INSTALLATION
2
1.2
RECORD
7
1.3
ALARM
8
1.3.1
Video Motion:
1.3.2
Video Blind:
10
1.3.3
Video Loss:
10
1.4
1.4.2
Encode:
12
1.4.3
Network:
13
1.4.4
Network Service:
14
1.5
GUI Display:
18
1.6
Camera Settings:
19
1.7
ADVANCED
20
1.7.1
Account:
20
1.7.2
Auto Maintain:
21
1.7.3
Default:
22
INFO
22
1.8.1
LOG:
23
1.8.2
Version:
23
MOBILE APP
24
CLIENT SOFTWARE USER MANUAL
25
2.1
System Requirements
25
2.2
Software Running
25
2.3
Software Interface
26
2.4
How to add new Device
27
2.5
How to set record plan
30
2.6
USERS
32
2.7
How to playback the video
33
TECHNICAL SPECIFICATION IP-ZEN42W-2.0
34
DRAWING
35
TECHNICAL SPECIFICATION IP-VRX36W-2.0
4.1
5
11
11
3.1
4
SYSTEM
General:
1.9
3
9
1.4.1
1.8
2
2
36
DRAWING
37
DECLARATION OF CONFORMITY
38
GasiaShopdiMariaRosariaLubranodiGiunno
ViaGiorgioPerlasca,13
81100–Caserta
Mobile:+393358466280
Email:[email protected]
Web:www.gasiashop.com
1
1 IP CAM USER MANUAL
1.1 FIRST INSTALLATION
Connect the camera to your router and insert the power cable (12V at least 1A)
You can also power the cam with POE (IEEE802.3af)
Open I.E. (we suggest to use I.E. up to version 10)
Set control activex before to access the camera (Go to internet option,select
Security tab,press custom livel ”Fig.1” and make the activex control settings as Fig.2,3)
Fig.1
Fig.2
GasiaShopdiMariaRosariaLubranodiGiunno
ViaGiorgioPerlasca,13
81100–Caserta
Mobile:+393358466280
Email:[email protected]
Web:www.gasiashop.com
2
Fig.3
Now you can go to the following ip address:
192.168.1.10
After that you need to downoad end install the activex software
See Fig.4
Fig.4
click right button of the mouse ,on yellow bar
see Fig.5
GasiaShopdiMariaRosariaLubranodiGiunno
ViaGiorgioPerlasca,13
81100–Caserta
Mobile:+393358466280
Email:[email protected]
Web:www.gasiashop.com
3
Fig.5
Choose and install add component for all user of the computer
see Fig.6
Fig.6
Now you can access to a web server of the cam
See Fig.7
GasiaShopdiMariaRosariaLubranodiGiunno
ViaGiorgioPerlasca,13
81100–Caserta
Mobile:+393358466280
Email:[email protected]
Web:www.gasiashop.com
4
Fig.7
login: admin
Password: blank
Fig.8
In the picture below you can choose if you want to see the image in main stream or sub stream.
The main stream is high definition image, but you can will have a slow speed ,while substream is
slow definition image but will have high speed
GasiaShopdiMariaRosariaLubranodiGiunno
ViaGiorgioPerlasca,13
81100–Caserta
Mobile:+393358466280
Email:[email protected]
Web:www.gasiashop.com
5
You can access to a web server also through cloud.See following instruction:
Open I.E. and go to :www.xmeye.net ,and .
select english language.
See Fig.9
Fig.9
Now you can choose to access by user or by device.
If you choose by user you need to register your account.(following a video instruction)
In this way you can register some ipcamera on your account without to remember a serial id.
See Fig.10
Fig.10
If you want to access with device put the serial ID
For Serial ID please see section 6.2
Now you can access to a remote config of your camera by select DEVICE CONFIG button
See Fig.11
GasiaShopdiMariaRosariaLubranodiGiunno
ViaGiorgioPerlasca,13
81100–Caserta
Mobile:+393358466280
Email:[email protected]
Web:www.gasiashop.com
6
Fig.11
1.2 RECORD
Fig.12
In this page we can set the snapshot when the camera detect the motion
Please press snapshot icon
See Fig.12
GasiaShopdiMariaRosariaLubranodiGiunno
ViaGiorgioPerlasca,13
81100–Caserta
Mobile:+393358466280
Email:[email protected]
Web:www.gasiashop.com
7
Fig.13
Select the week, period, and flag detect option than press OK
In figure below we have set for to have snap shot 24h on 24 h all days.
See Fig.13
1.3 ALARM
For setting the alarm section, please press ALARM icon
See Fig.14
Fig.14
Now we have some alarm to set:
GasiaShopdiMariaRosariaLubranodiGiunno
ViaGiorgioPerlasca,13
81100–Caserta
Mobile:+393358466280
Email:[email protected]
Web:www.gasiashop.com
8
1.3.1 Video Motion: Select “Video Motion” icon to set and able the funtion
In this section we can able the motion detect and set the sensitivity.
We can set the region of image where the ip cam have to detect the motion and organize the plan
when the motion detect have to work by press period setting button
See Fig.15,16
Fig.15
Fig.16
After that we can receive the email with snap shot attached.
For this function please check “send email”
Note: for send email please fill all information in email option (see
Press ok to exit and save.
GasiaShopdiMariaRosariaLubranodiGiunno
ViaGiorgioPerlasca,13
81100–Caserta
Mobile:+393358466280
Email:[email protected]
Web:www.gasiashop.com
9
1.3.2 Video Blind: we can receive email with snap shot if the video is obscured
select video blind icon
see Fig.17
Fig.17
Check Enable funtion and set the sensitivity .
Set the period when the video loss function have to work.Please press “period setting”
Check the “send email” funtion and press snapshop channel
Press ok to save and exit
1.3.3 Video Loss: Select video loss icon.
See Fig.14
We can receive email with snap shop when the video is loss.
Fig.18
GasiaShopdiMariaRosariaLubranodiGiunno
ViaGiorgioPerlasca,13
81100–Caserta
Mobile:+393358466280
Email:[email protected]
Web:www.gasiashop.com
10
Check Enable the function.
Set the period when the video loss function have to work. Please press “period setting”
Check the send email function
Press ok to save and exit.
See Fig.18
1.4
SYSTEM
Select system icon to enter system menu
See Fig.19
Fig.19
In this section we can adjustment various parameters
1.4.1 General: In this menu we can set the time, date, time zone, language, etc.
See Fig.20
Fig.20
GasiaShopdiMariaRosariaLubranodiGiunno
ViaGiorgioPerlasca,13
81100–Caserta
Mobile:+393358466280
Email:[email protected]
Web:www.gasiashop.com
11
Time zone: please set the time zone according your zone
System Time: We can set the date and time
Date Format: We can choose the format date
1.4.2 Encode: In this menu we can set the resolution of the camera in main stream and in sub stream.
See Fig.21
Fig.21
The first column is the Main Stream.In the resolution label, we can set the maximum resolution of
the camera
Fsp is the max frame rate/sec
In bit rate Type we can set the tipology of bit rate.
The default it is set to VBR (VARIABEL BIT RATE)
In static configuration of , we can save various profile.
The second column is the sub stream.
You can set the same data, but we suggest to set low profile.
In this way you can have high speed
Press ok to save and exit
GasiaShopdiMariaRosariaLubranodiGiunno
ViaGiorgioPerlasca,13
81100–Caserta
Mobile:+393358466280
Email:[email protected]
Web:www.gasiashop.com
12
1.4.3 Network: Press network icon
See Fig.21
Fig.21
In this menu we can to set the network parameter like ip address, http port etc.
See Fig.22
Fig.22
GasiaShopdiMariaRosariaLubranodiGiunno
ViaGiorgioPerlasca,13
81100–Caserta
Mobile:+393358466280
Email:[email protected]
Web:www.gasiashop.com
13
1.4.4 Network Service: Press the network service icon.
See. Fig.23
Fig.23
Fig.24
In this menu we can set:
IP FILTER
DDNS
EMAIL PARAMETERS
Mobile Monitor
UPnP
FTP
See Fig.24
GasiaShopdiMariaRosariaLubranodiGiunno
ViaGiorgioPerlasca,13
81100–Caserta
Mobile:+393358466280
Email:[email protected]
Web:www.gasiashop.com
14
1.4.4.1 IP Filter: Press IP FILTER to set it
See Fig.24
Fig.25
In this menu you can create once black list by IP address.
This ip address can’t access to the camera.
Also you can create white list.
In this way only ip address of white list can access to the camera
Press ok to save and exit
See Fig.25
1.4.4.2 DDNS: Press DDNS to set it.
See Fig.24
Fig.26
If you don’t want use the cloud, you can choose the DDNS service
Please select enable for set it
Press ok to save and exit
See Fig.26
1.4.4.3 Email: press to email for set it
See Fig.24
GasiaShopdiMariaRosariaLubranodiGiunno
ViaGiorgioPerlasca,13
81100–Caserta
Mobile:+393358466280
Email:[email protected]
Web:www.gasiashop.com
15
Fig.27
Select enable to set it and put relevant information.
For example we have filled the information about a gmail account [email protected]
Press MAIL TEST to verify if the information are corret.
You should receive the mail from ip camera.
See Fig.27
1.4.4.4 Mobile Monitor: If you want to use the smartphone to manage the IP camera please check enable the service.
The default porti s 34599.
See Fig.28
Fig.28
GasiaShopdiMariaRosariaLubranodiGiunno
ViaGiorgioPerlasca,13
81100–Caserta
Mobile:+393358466280
Email:[email protected]
Web:www.gasiashop.com
16
1.4.4.5 UPnP: If your router have the upnp service, please check to enable the service on your router and your
ipcam
See Fig.24
Fig.29
This service open automatically all necessary port for manage remote your ip camera.
See. Fig.29
1.4.4.6 FTP: If you have FTP server , you can enable the service and send the video or snap shoot via FTP.
See Fig.24
Fig.30
Please press Enable to activate the service and fill the relevant information about your FTP server
See Fig.30
GasiaShopdiMariaRosariaLubranodiGiunno
ViaGiorgioPerlasca,13
81100–Caserta
Mobile:+393358466280
Email:[email protected]
Web:www.gasiashop.com
17
1.5 GUI Display:
Press GUI DISPLAY icon
See Fig.31
Fig.31
Fig.32
In this menu you can modify the name of you IP CAM, for example instead cam01 you can write
“garden”
You can choose the time , title cam ect . must show
If you want to cover a part of the image ,please check the region cover , select the number 1 for
first cover press on setting button.
Now you can move your cover part.
You can cover maximum 4 part of the image.Each cover par can be size adjastment.
GasiaShopdiMariaRosariaLubranodiGiunno
ViaGiorgioPerlasca,13
81100–Caserta
Mobile:+393358466280
Email:[email protected]
Web:www.gasiashop.com
18
Press ok to save and exit.
See Fig.32
1.6 Camera Settings:
Select camera setting icon
See Fig.33
Fig.33
Fig.34
In this menu you can adjastments various parameters of the ipcam according to the requirements
See Fig.34
GasiaShopdiMariaRosariaLubranodiGiunno
ViaGiorgioPerlasca,13
81100–Caserta
Mobile:+393358466280
Email:[email protected]
Web:www.gasiashop.com
19
1.7 ADVANCED
Select advanced icon
See Fig.35
Fig.35
In this menu we can set:
account
auto reboot
restore fatory reset.
1.7.1 Account: Select account icon
See Fig.35
Fig.36
we can create new account or modify a password of exiting account.
The various account can have different permit.
GasiaShopdiMariaRosariaLubranodiGiunno
ViaGiorgioPerlasca,13
81100–Caserta
Mobile:+393358466280
Email:[email protected]
Web:www.gasiashop.com
20
For example you can create an account that can only see the remote camera but can’t modify
nothing.
See Fig.36
1.7.2 Auto Maintain: Select auto maintain icon
See Fig.35
Fig.37
In this section you can set the autoreboot of ipcamera in specific day of the week or every day at a
certain time
Press ok to save and exit
See Fig.37
GasiaShopdiMariaRosariaLubranodiGiunno
ViaGiorgioPerlasca,13
81100–Caserta
Mobile:+393358466280
Email:[email protected]
Web:www.gasiashop.com
21
1.7.3 Default: Press the daefault icon
See Fig.35
Fig.38
In this menu we can select what parameter we want to restore to factory value
Press ok to save and exit
See Fig.38
1.8 INFO
Press info icon
See Fig.39
Fig.39
GasiaShopdiMariaRosariaLubranodiGiunno
ViaGiorgioPerlasca,13
81100–Caserta
Mobile:+393358466280
Email:[email protected]
Web:www.gasiashop.com
22
1.8.1 LOG: In this menu we can read the log file.
Select log icon
See Fig.39
Fig.40
we can search by date and time
See Fig.40
1.8.2 Version: select version icon
See Fig.39
Fig.41
GasiaShopdiMariaRosariaLubranodiGiunno
ViaGiorgioPerlasca,13
81100–Caserta
Mobile:+393358466280
Email:[email protected]
Web:www.gasiashop.com
23
in this section we can to know the serial ID tha we hato put in smartphone app or I.E. to manage
the IP CAM with cloud.
See Fig.41
1.9 MOBILE APP
For mobile remote video surveillance please get the following app from your play store or app
store:
XMEYE
See Fig.41
Fig.41
Add new camera in the app and put the relevant serial ID
For serial ID please see section 6.2
GasiaShopdiMariaRosariaLubranodiGiunno
ViaGiorgioPerlasca,13
81100–Caserta
Mobile:+393358466280
Email:[email protected]
Web:www.gasiashop.com
24
2 CLIENT SOFTWARE USER MANUAL
2.1 System Requirements
Operating system:over window xp
CPU:Inter Pentium 4 2.4G or higher
Memory:512M or more
Monitor : support 1024*768 and the higher resolution
2.2 Software Running
Running as administrator and login
Double-click The shortcut
Login
to run the software。
Fig.1
Choose the user name ,enter the password click to enter the program. you can choose
“automatically login,” so it will not appear on the window next time.
The default user is :super
Password: blank
GasiaShopdiMariaRosariaLubranodiGiunno
ViaGiorgioPerlasca,13
81100–Caserta
Mobile:+393358466280
Email:[email protected]
Web:www.gasiashop.com
25
2.3 Software Interface
Below you can see the main page of the software interface.
Following essential tips:
Fig.2
1) Device tree
Show each equipment and group
2) Preview Display Window
Real-time preview of the device channel
3) Tab bar
Contain the function of the different software models:
System :Device Manager (you can add or modify device)
Local Settings (you can set folder where storage picture and video, schedule
records,DDNS,ecc.)
Remote Setting (you can entry on the setting menu about the IPCAM)
Users (you can add other user with different permission)
Log (you can see all events)
PTZ:
you can manage the PTZ camera,add preset,tour,pattern ecc.
Playback: you can play the video to storage on folder
Note:In this section you can play only local video because tha ip cam haven’t
the
disk or memory card
4) Event Log: In this panel you can view all events by type , date , device , user and
description
GasiaShopdiMariaRosariaLubranodiGiunno
ViaGiorgioPerlasca,13
81100–Caserta
Mobile:+393358466280
Email:[email protected]
Web:www.gasiashop.com
26
2.4 How to add new Device
Select tab System in panel number 3
Select Device Manager
Will show the popup (see picture below)
Fig.3
Select add area and choose the name
In the following picture we have choose “gasiashop area”
Fig.4
After that you have create AREA you can select ADD new device
See folowing picture
GasiaShopdiMariaRosariaLubranodiGiunno
ViaGiorgioPerlasca,13
81100–Caserta
Mobile:+393358466280
Email:[email protected]
Web:www.gasiashop.com
27
Fig.5
Now we can choose various add:
Using IP address
Using Domine
Using ARSP
Using Cloud
Our camera is equipped with a cloud and then add using its cloud
Add name to a camera (es. IPcam Garden)
Select Cloud
Insert the serial ID (see WEB SERVER MANUAL)
Insert the login name and password and press OK
Exit to ADD panel and now you can see in panel 1 (Device tree) the new Device
Open the tree and double click on the camera name
The image will show in the select panel (see picture below)
GasiaShopdiMariaRosariaLubranodiGiunno
ViaGiorgioPerlasca,13
81100–Caserta
Mobile:+393358466280
Email:[email protected]
Web:www.gasiashop.com
28
Fig.6
Now you can mange your device.
You can take the remote device in two way:
Select remote device in panel nembrer 3
or
press right button of the mouse on your device in panel 1 and select remote device
The panel setting about your remote device will show (see picture below)
Fig.7
For detail about che camera settings please see WEB SERVER MANUAL
If you don’t want to use the CMS you can manage your cam whit web
Please open internet explore (we suggest to use I.E. up to version 10)
Set activx control
Go to: www.xmeye.net
You can register an account.In this way you can add all your camera, or you can login with
serial id
Inser serial id an verify code than press login.
For serial ID please see WEB SERVER MANUAL section 6.2
For the first time you have to install the control activx software.Refer to WEB SERVER
MANUAL
Please set your protection area in I.E. to allow the installation
For how to use the web browers please refer to specific manual
GasiaShopdiMariaRosariaLubranodiGiunno
ViaGiorgioPerlasca,13
81100–Caserta
Mobile:+393358466280
Email:[email protected]
Web:www.gasiashop.com
29
Fig.7.1
2.5 How to set record plan
For schedule records on time please selet system and local setting in panel number 3
Will show the following screen
Fig.8
In this section “setting tab”, tab “a” you can choose the target folder where do you store
the video file or screen shot. (panel b and c) when you select manual record in main
screen
In the same tab also you can change the language and other minor setting.
Now we can set detail about our schedule.
Please select record schedule tab (tab d)
In this tab we can select is overwrite or stop when the space storage is full (panel e)
In panel “f” you can set how long have to be the video file, the dafault setting is 60min
In Panel “m” you can choos drive storage where you want to save the video file
GasiaShopdiMariaRosariaLubranodiGiunno
ViaGiorgioPerlasca,13
81100–Caserta
Mobile:+393358466280
Email:[email protected]
Web:www.gasiashop.com
30
For organize your record schedule please select the camera in panel “L”.
Select “days tab” (panel h) If you want to record 24h on 24h, and press the arrow to
desider day.
Otherwise you can choose the blank tab for set the time.
See the fig.10
In the panel “i” you can see your record setting.
Fig.9
Fig.10
GasiaShopdiMariaRosariaLubranodiGiunno
ViaGiorgioPerlasca,13
81100–Caserta
Mobile:+393358466280
Email:[email protected]
Web:www.gasiashop.com
31
2.6 USERS
In panel 3 select system , than select user.
Fig.11
The screen below aloow to create an various group with different permissions.
For example group administrator are all user that have permissions of admnistrator.
If you want to create a new user please select user tab
Fig.12
Now you can add new user or change the password
GasiaShopdiMariaRosariaLubranodiGiunno
ViaGiorgioPerlasca,13
81100–Caserta
Mobile:+393358466280
Email:[email protected]
Web:www.gasiashop.com
32
2.7 How to playback the video
If you want to see your storage file, please select playback button in panel number3
Fig.13
Selecttab“n”localdevice
Inpanel“p”youcanchoosethedayandthetimeabouttherecordthatyouwanttosee,after
youhavetopressthesearch.
Inthispanelyoucanalsodownloadthefilesthatyouhavefound
Doubleclickthefileforplayit
GasiaShopdiMariaRosariaLubranodiGiunno
ViaGiorgioPerlasca,13
81100–Caserta
Mobile:+393358466280
Email:[email protected]
Web:www.gasiashop.com
33
3 TECHNICAL SPECIFICATION IP-ZEN42W-2.0
CAMERA
Image Sensor
Resolution
Effective Pixels
TV System
Electronic Shutter Time
IMX222
1080P
1920(H)*1080(V)
PAL/NTSC
Auto: PAL 1/1-1/10000Sec; NTSC 1/1-1/10000Sec
Sync System
Usable Illumination
S/N Ratio
Video Output
LENS
Focus Length
Focus Control
Lens Type
Pixels
NIGHT VISION
Infrared LED
Infrared Distance
IR Power On
NETWORK
Ethernet
Internal
0.01Lux
38.5db
Network
Protocol
RTSP/FTP/PPPOE/DHCP/DDNS/NTP/UPnP
ONVIF
Support ONVIF 2.0
POE
Support
2.8-12mm (3 MP)
Manual
Manual
2,0 MPX
¢5X42PCS
40M
CDS Auto Control
RJ-45 (10/100Base-T)
CAMERA FEATURES
Day/Night
IR cut filter with auto switch, IR sensor
Compression
H.264 compression ,dual stream ( 0.1M-6Mpbs adjustable)
Motion Detection
GENERAL
Housing
Support
Weatherproof , IP66
Anti-cut Bracket
YES, 3-Axis
IR Cut Filter
YES
Operation Temperature -10 ~ +50 RH95% Max
Storage Temperature
-20
~ +60
Power Source
DC 12V/2A
Weight
1.85kgs
RH95% Max
GasiaShopdiMariaRosariaLubranodiGiunno
ViaGiorgioPerlasca,13
81100–Caserta
Mobile:+393358466280
Email:[email protected]
Web:www.gasiashop.com
34
3.1 DRAWING
GasiaShopdiMariaRosariaLubranodiGiunno
ViaGiorgioPerlasca,13
81100–Caserta
Mobile:+393358466280
Email:[email protected]
Web:www.gasiashop.com
35
4 TECHNICAL SPECIFICATION IP-VRX36W-2.0
CAMERA
Image Sensor
Resolution
Effective Pixels
TV System
Electronic Shutter Time
IMX222
1080P
1920(H)*1080(V)
PAL/NTSC
Auto: PAL 1/1-1/10000Sec; NTSC 1/1-1/10000Sec
Sync System
Usable Illumination
S/N Ratio
Video Output
LENS
Focus Length
Focus Control
Lens Type
Pixels
NIGHT VISION
Infrared LED
Infrared Distance
IR Power On
NETWORK
Ethernet
Internal
0.01Lux
38.5db
Network
Protocol
RTSP/FTP/PPPOE/DHCP/DDNS/NTP/UPnP
ONVIF
Support ONVIF 2.0
POE
Support
2.8-12mm (3 MP)
Manual
Manual
2,0 MPX
¢5X36PCS
30M
CDS Auto Control
RJ-45 (10/100Base-T)
CAMERA FEATURES
Day/Night
IR cut filter with auto switch, IR sensor
Compression
H.264 compression ,dual stream ( 0.1M-6Mpbs adjustable)
Motion Detection
GENERAL
Housing
Support
Weatherproof , IP66
Anti-cut Bracket
YES, 3-Axis
IR Cut Filter
YES
Operation Temperature -10 ~ +50 RH95% Max
Storage Temperature
-20
~ +60
Power Source
DC 12V/2A
Weight
0.85kgs
RH95% Max
GasiaShopdiMariaRosariaLubranodiGiunno
ViaGiorgioPerlasca,13
81100–Caserta
Mobile:+393358466280
Email:[email protected]
Web:www.gasiashop.com
36
4.1 DRAWING
GasiaShopdiMariaRosariaLubranodiGiunno
ViaGiorgioPerlasca,13
81100–Caserta
Mobile:+393358466280
Email:[email protected]
Web:www.gasiashop.com
37
5 DECLARATION OF CONFORMITY
GasiaShopdiMariaRosariaLubranodiGiunno
ViaGiorgioPerlasca,13
81100–Caserta
Mobile:+393358466280
Email:[email protected]
Web:www.gasiashop.com
38