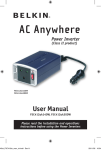
1
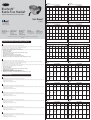
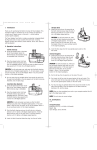
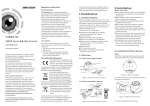
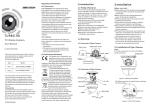
I. Important Information for Safe Use
En
III. Operation (continued)
Driving
Check the regulations affecting the use of hands-free devices where you drive. Only use the Headset when and where it
is safe to do so.
Fr
Driving
Check the regulations affecting the use of hands-free devices where you drive. Only use the Headset when and where it is safe
to do so.
De
Driving
Check the regulations affecting the use of hands-free devices where you drive. Only use the Headset when and where it is safe to do so.
Nl
Driving
Check the regulations affecting the use of hands-free devices where you drive. Only use the Headset when and where it is safe to do so.
It
Driving
Check the regulations affecting the use of hands-free devices where you drive. Only use the Headset when and where it is safe to do so.
Es
Driving
Check the regulations affecting the use of hands-free devices where you drive. Only use the Headset when and where it is safe to do so.
II.
Controls and Functions
LED indicator
LED indicator
LED indicator
LED indicator
LED indicator
LED indicator
Main
Main
Main
Main
Main
Main
Volume +
Volume +
Volume +
Volume +
Volume +
Volume +
En
Keypad
• One push button to switch the Headset on/off, to select PAIRING
mode, or to initiate or answer a call
• Two switches to control receive-volume
multifunction button
multifunction button
multifunction button
multifunction button
multifunction button
multifunction button
Fr
Keypad
• One push button to switch the Headset on/off, to select PAIRING
mode, or to initiate or answer a call
• Two switches to control receive-volume
De
Keypad
• One push button to switch the Headset on/off, to select PAIRING
mode, or to initiate or answer a call
• Two switches to control receive-volume
De
Wearing the Headset
• The Headset can be worn on either ear, by changing the orientation of the ear hook.
• To remove the ear hook, carefully lever it from the back of the Headset by hand.
• The ear hook can be replaced either way up. Note the indentation in the center to properly orient the ear hook on the Headset.
• With the user controls facing the user and the LED at the top, the closed loop of the ear hook should “point” right for operation on the right ear, and
left for the left ear.
• To place on the ear, hold the Headset in the hand and push the open end of the hook slightly away from the Headset body.
Nl
Wearing the Headset
• The Headset can be worn on either ear, by changing the orientation of the ear hook.
• To remove the ear hook, carefully lever it from the back of the Headset by hand.
• The ear hook can be replaced either way up. Note the indentation in the center to properly orient the ear hook on the Headset.
• With the user controls facing the user and the LED at the top, the closed loop of the ear hook should “point” right for operation on the right ear, and
left for the left ear.
• To place on the ear, hold the Headset in the hand and push the open end of the hook slightly away from the Headset body.
Es
Wearing the Headset
• The Headset can be worn on either ear, by changing the orientation of the ear hook.
• To remove the ear hook, carefully lever it from the back of the Headset by hand.
• The ear hook can be replaced either way up. Note the indentation in the center to properly orient the ear hook on the Headset.
• With the user controls facing the user and the LED at the top, the closed loop of the ear hook should “point” right for operation on the right ear, and
left for the left ear.
• To place on the ear, hold the Headset in the hand and push the open end of the hook slightly away from the Headset body.
It
Wearing the Headset
• The Headset can be worn on either ear, by changing the orientation of the ear hook.
• To remove the ear hook, carefully lever it from the back of the Headset by hand.
• The ear hook can be replaced either way up. Note the indentation in the center to properly orient the ear hook on the Headset.
• With the user controls facing the user and the LED at the top, the closed loop of the ear hook should “point” right for operation on the right ear, and
left for the left ear.
• To place on the ear, hold the Headset in the hand and push the open end of the hook slightly away from the Headset body.
IV. Preparing the Headset for Use—Pairing
Nl
Microphone
Microphone
Microphone
Microphone
Microphone
Microphone
Volume Volume Volume Volume Volume Volume Charging connector
Charging connector
Charging connector
Charging connector
Charging connector
Charging connector
Shown configured for wearing on the right ear / Shown configured for wearing on the
right ear / Shown configured for wearing on the right ear / Shown configured for wearing
on the right ear / Shown configured for wearing on the right ear / Shown configured for
wearing on the right ear
II.
En
Fr
De
Nl
Es
It
Keypad
• One push button to switch the Headset on/off, to select PAIRING
mode, or to initiate or answer a call
• Two switches to control receive-volume
Es
Keypad
• One push button to switch the Headset on/off, to select PAIRING
mode, or to initiate or answer a call
• Two switches to control receive-volume
It
Keypad
• One push button to switch the Headset on/off, to select PAIRING
mode, or to initiate or answer a call
• Two switches to control receive-volume
Controls and Functions / Sounds
In order to make operation easier, the Headset generates several sounds:
Switch-on tone / Switch-off tone / Pairing tone / Reset tone / Confirmation tone / Error tone / Alert tone / Mute tone / Ring tone
In order to make operation easier, the Headset generates several sounds:
Switch-on tone / Switch-off tone / Pairing tone / Reset tone / Confirmation tone / Error tone / Alert tone / Mute tone / Ring tone
En
PIN Code: The PIN code for the Headset is preset to 1234. It will be needed for pairing.
Before the Headset can communicate, it must be paired to the companion device it will be used with, such as a mobile phone. This is to ensure the Headset
only communicates with the device chosen by the user and not any other Bluetooth devices in range.
Pairing information is stored by the Headset and can be changed at any time.
The exact process to pair the Headset will also depend on the device it is paired with. The user manual for that device will give instructions on how to do
this. In all cases, the Headset will need to be put into PAIRING mode, which is described here:
1. If the Headset is on, switch it off.
2. Press and hold the main button.
3. When the short tone is heard, keep the button pressed until the pairing melody is generated.
4. The LED will alternately flash red/green.
5. Follow instructions for the companion device to pair to the Headset.
6. When prompted on the companion device, enter the PIN code for the Headset.
7. When paired, the Headset will give a short confirmation tone and switch to STANDBY, ready for operation.
Fr
PIN Code: The PIN code for the Headset is preset to 1234. It will be needed for pairing.
Before the Headset can communicate, it must be paired to the companion device it will be used with, such as a mobile phone. This is to ensure the Headset
only communicates with the device chosen by the user and not any other Bluetooth devices in range.
Pairing information is stored by the Headset and can be changed at any time.
The exact process to pair the Headset will also depend on the device it is paired with. The user manual for that device will give instructions on how to do
this. In all cases, the Headset will need to be put into PAIRING mode, which is described here:
1. If the Headset is on, switch it off.
2. Press and hold the main button.
3. When the short tone is heard, keep the button pressed until the pairing melody is generated.
4. The LED will alternately flash red/green.
5. Follow instructions for the companion device to pair to the Headset.
6. When prompted on the companion device, enter the PIN code for the Headset.
7. When paired, the Headset will give a short confirmation tone and switch to STANDBY, ready for operation.
In order to make operation easier, the Headset generates several sounds:
Switch-on tone / Switch-off tone / Pairing tone / Reset tone / Confirmation tone / Error tone / Alert tone / Mute tone / Ring tone
De
In order to make operation easier, the Headset generates several sounds:
Switch-on tone / Switch-off tone / Pairing tone / Reset tone / Confirmation tone / Error tone / Alert tone / Mute tone / Ring tone
In order to make operation easier, the Headset generates several sounds:
Switch-on tone / Switch-off tone / Pairing tone / Reset tone / Confirmation tone / Error tone / Alert tone / Mute tone / Ring tone
In order to make operation easier, the Headset generates several sounds:
Switch-on tone / Switch-off tone / Pairing tone / Reset tone / Confirmation tone / Error tone / Alert tone / Mute tone / Ring tone
III. Operation
En
Wearing the Headset
• The Headset can be worn on either ear, by changing the orientation of the ear hook.
• To remove the ear hook, carefully lever it from the back of the Headset by hand.
• The ear hook can be replaced either way up. Note the indentation in the center to properly orient the ear hook on the Headset.
• With the user controls facing the user and the LED at the top, the closed loop of the ear hook should “point” right for operation on the right ear, and
left for the left ear.
• To place on the ear, hold the Headset in the hand and push the open end of the hook slightly away from the Headset body.
Fr
Wearing the Headset
• The Headset can be worn on either ear, by changing the orientation of the ear hook.
• To remove the ear hook, carefully lever it from the back of the Headset by hand.
• The ear hook can be replaced either way up. Note the indentation in the center to properly orient the ear hook on the Headset.
• With the user controls facing the user and the LED at the top, the closed loop of the ear hook should “point” right for operation on the right ear, and
left for the left ear.
• To place on the ear, hold the Headset in the hand and push the open end of the hook slightly away from the Headset body.
PIN Code: The PIN code for the Headset is preset to 1234. It will be needed for pairing.
Before the Headset can communicate, it must be paired to the companion device it will be used with, such as a mobile phone. This is to ensure the Headset
only communicates with the device chosen by the user and not any other Bluetooth devices in range.
Pairing information is stored by the Headset and can be changed at any time.
The exact process to pair the Headset will also depend on the device it is paired with. The user manual for that device will give instructions on how to do
this. In all cases, the Headset will need to be put into PAIRING mode, which is described here:
1. If the Headset is on, switch it off.
2. Press and hold the main button.
3. When the short tone is heard, keep the button pressed until the pairing melody is generated.
4. The LED will alternately flash red/green.
5. Follow instructions for the companion device to pair to the Headset.
6. When prompted on the companion device, enter the PIN code for the Headset.
7. When paired, the Headset will give a short confirmation tone and switch to STANDBY, ready for operation.
Nl
PIN Code: The PIN code for the Headset is preset to 1234. It will be needed for pairing.
Before the Headset can communicate, it must be paired to the companion device it will be used with, such as a mobile phone. This is to ensure the Headset
only communicates with the device chosen by the user and not any other Bluetooth devices in range.
Pairing information is stored by the Headset and can be changed at any time.
The exact process to pair the Headset will also depend on the device it is paired with. The user manual for that device will give instructions on how to do
this. In all cases, the Headset will need to be put into PAIRING mode, which is described here:
1. If the Headset is on, switch it off.
2. Press and hold the main button.
3. When the short tone is heard, keep the button pressed until the pairing melody is generated.
4. The LED will alternately flash red/green.
5. Follow instructions for the companion device to pair to the Headset.
6. When prompted on the companion device, enter the PIN code for the Headset.
7. When paired, the Headset will give a short confirmation tone and switch to STANDBY, ready for operation.
Indicator
En LED
A red/green LED is used to indicate various functions.
LED Color
Effect in Current Mode
Steady ON
™
Bluetooth
Hands-Free Headset
F8V9017
For use with mobile
phones enabled with
Bluetooth™ technology.
LED Color
Slow
Flashing
Fast
Flashing
...with 2
blinks
Steady OFF
OFF-mode
Switched
OFF and on
charge,
battery low
STAND BYmode and
battery low
TALK or
INCOMING
CALL and
battery low
TALK and
muted and
battery low
Green
Switched
OFF and on
charge,
battery high
STAND BYmode and
battery
lhigh
TALK or
INCOMING
CALL and
battery high
TALK and
muted and
battery high
Red and
Green
PAIRING
mode
Indicator
De LED
A red/green LED is used to indicate various functions.
LED Color
Belkin Components, Ltd.
Express Business Park
Shipton Way • Rushden •
NN10 6GL
United Kingdom
Tel: +44 (0) 1933 35 2000
Fax: +44 (0) 1933 31 2000
Belkin Components B.V.
Starparc Building
Boeing Avenue 333
1119 PH Schiphol-Rijk
The Netherlands
Tel: +31 (0) 20 654 7300
Fax: +31 (0) 20 654 7349
Belkin GmbH
Hanebergstrasse 2
80637 München • Germany
Tel: +49 (0) 89 143 405-0
Fax: +49 (0) 89 143 405-100
Tech Support
US: 310.898.1100 ext. 2263
800.223.5546 ext. 2263
Europe: 00 800 223 55 460
Australia: 1800 666 040
© 2003 Belkin Corporation. All rights reserved. All trade names are registered trademarks of respective manufacturers listed.
P74195ea
Fast
Flashing
...with 2
blinks
Steady OFF
OFF-mode
Switched
OFF and on
charge,
battery low
STAND BYmode and
battery low
TALK or
INCOMING
CALL and
battery low
TALK and
muted and
battery low
Green
Switched
OFF and on
charge,
battery high
STAND BYmode and
battery
lhigh
TALK or
INCOMING
CALL and
battery high
TALK and
muted and
battery high
PAIRING
mode
Es
PIN Code: The PIN code for the Headset is preset to 1234. It will be needed for pairing.
Before the Headset can communicate, it must be paired to the companion device it will be used with, such as a mobile phone. This is to ensure the Headset only
communicates with the device chosen by the user and not any other Bluetooth devices in range.
Pairing information is stored by the Headset and can be changed at any time.
The exact process to pair the Headset will also depend on the device it is paired with. The user manual for that device will give instructions on how to do this. In all
cases, the Headset will need to be put into PAIRING mode, which is described here:
1. If the Headset is on, switch it off.
2. Press and hold the main button.
3. When the short tone is heard, keep the button pressed until the pairing melody is generated.
4. The LED will alternately flash red/green.
5. Follow instructions for the companion device to pair to the Headset.
6. When prompted on the companion device, enter the PIN code for the Headset.
7. When paired, the Headset will give a short confirmation tone and switch to STANDBY, ready for operation.
It
PIN Code: The PIN code for the Headset is preset to 1234. It will be needed for pairing.
Before the Headset can communicate, it must be paired to the companion device it will be used with, such as a mobile phone. This is to ensure the Headset only
communicates with the device chosen by the user and not any other Bluetooth devices in range.
Pairing information is stored by the Headset and can be changed at any time.
The exact process to pair the Headset will also depend on the device it is paired with. The user manual for that device will give instructions on how to do this. In all
cases, the Headset will need to be put into PAIRING mode, which is described here:
1. If the Headset is on, switch it off.
2. Press and hold the main button.
3. When the short tone is heard, keep the button pressed until the pairing melody is generated.
4. The LED will alternately flash red/green.
5. Follow instructions for the companion device to pair to the Headset.
6. When prompted on the companion device, enter the PIN code for the Headset.
7. When paired, the Headset will give a short confirmation tone and switch to STANDBY, ready for operation.
Indicator
Es LED
A red/green LED is used to indicate various functions.
LED Color
•
•
•
If the Headset stops operating, first ensure it is charged by charging it for five hours.
If the Headset remains non-functional, it may be reset by the following method: Press and hold the volume-down button, and at the same time, plug in the charger
as though to place the unit on charge.
The Headset will reset itself and be left in OFF mode.
•
De
•
•
•
If the Headset stops operating, first ensure it is charged by charging it for five hours.
If the Headset remains non-functional, it may be reset by the following method: Press and hold the volume-down button, and at the same time, plug in the charger
as though to place the unit on charge.
The Headset will reset itself and be left in OFF mode.
•
If the Headset stops operating, first ensure it is charged by charging it for five hours.
If the Headset remains non-functional, it may be reset by the following method: Press and hold the volume-down button, and at the same time, plug in the charger
as though to place the unit on charge.
The Headset will reset itself and be left in OFF mode.
Steady OFF
OFF-mode
TALK and
muted and
battery low
Green
Switched
OFF and on
charge,
battery high
STAND BYmode and
battery
lhigh
TALK or
INCOMING
CALL and
battery high
TALK and
muted and
battery high
PAIRING
mode
TALK and
muted and
battery low
Green
Switched
OFF and on
charge,
battery high
STAND BYmode and
battery
lhigh
TALK or
INCOMING
CALL and
battery high
TALK and
muted and
battery high
PAIRING
mode
Note: When on charge with the Headset not switched OFF, the LED flashing sequence is not
changed, but the LED color will change from red to green as the battery reaches full charge.
Effect in Current Mode
Steady ON
Alternate
Blinking
Es
•
If the Headset stops operating, first ensure it is charged by charging it for five hours.
If the Headset remains non-functional, it may be reset by the following method: Press and hold the volume-down button, and at the same time, plug in the charger
as though to place the unit on charge.
The Headset will reset itself and be left in OFF mode.
En Key Press
•
If the Headset stops operating, first ensure it is charged by charging it for five hours.
If the Headset remains non-functional, it may be reset by the following method: Press and hold the volume-down button, and at the same time, plug in the charger
as though to place the unit on charge.
The Headset will reset itself and be left in OFF mode.
Fast
Flashing
...with 2
blinks
Steady OFF
OFF-mode
Switched
OFF and on
charge,
battery low
STAND BYmode and
battery low
TALK or
INCOMING
CALL and
battery low
TALK and
muted and
battery low
Green
Switched
OFF and on
charge,
battery high
STAND BYmode and
battery
lhigh
TALK or
INCOMING
CALL and
battery high
TALK and
muted and
battery high
PAIRING
mode
Note: When on charge with the Headset not switched OFF, the LED flashing sequence is not
changed, but the LED color will change from red to green as the battery reaches full charge.
Effect in Current Mode
Steady ON
Alternate
Blinking
Slow
Flashing
Fast
Flashing
...with 2
blinks
Steady OFF
OFF-mode
Red
Switched
OFF and on
charge,
battery low
STAND BYmode and
battery low
TALK or
INCOMING
CALL and
battery low
TALK and
muted and
battery low
Green
Switched
OFF and on
charge,
battery high
STAND BYmode and
battery
lhigh
TALK or
INCOMING
CALL and
battery high
TALK and
muted and
battery high
PAIRING
mode
Note: When on charge with the Headset not switched OFF, the LED flashing sequence is not
changed, but the LED color will change from red to green as the battery reaches full charge.
Fr Key Press
Key Press
OFF
Effect in Current Mode
INCOMING
PAIRING
STANDBY
Key Press
TALK
OFF
CALL
Short
(less than
3 sec.)
Medium
(3-10 sec.)
Switch on and
go into
STANDBY
mode
Long
(more than
3 sec.)
Switch on
and go into
PAIRING
mode
Exit PAIRING
mode and got
to STANDBY
Initiate a call
Answer a call
End current
call (Not
possible when
microphone is
muted)
Short
(less than
3 sec.)
Exit PAIRING
mode, reset
PAIRING data
and switch
OFF
Switch OFF
Headset
Switch OFF
Headset
Mute and unmute the
microphone
Medium
(3-10 sec.)
Switch on and
go into
STANDBY
mode
Mute and unmute the
microphone
Long
(more than
3 sec.)
Switch on
and go into
PAIRING
mode
De Key Press
Effect in Current Mode
INCOMING
PAIRING
STANDBY
CALL
TALK
Exit PAIRING
mode and got
to STANDBY
Initiate a call
Answer a call
End current
call (Not
possible when
microphone is
muted)
Exit PAIRING
mode, reset
PAIRING data
and switch
OFF
Switch OFF
Headset
Switch OFF
Headset
Mute and unmute the
microphone
Mute and unmute the
microphone
Nl Key Press
OFF
Effect in Current Mode
INCOMING
PAIRING
STANDBY
Key Press
OFF
TALK
CALL
Short
(less than
3 sec.)
Medium
(3-10 sec.)
Switch on and
go into
STANDBY
mode
Long
(more than
3 sec.)
Switch on
and go into
PAIRING
mode
Exit PAIRING
mode and got
to STANDBY
Initiate a call
Answer a call
End current
call (Not
possible when
microphone is
muted)
Short
(less than
3 sec.)
Exit PAIRING
mode, reset
PAIRING data
and switch
OFF
Switch OFF
Headset
Switch OFF
Headset
Mute and unmute the
microphone
Medium
(3-10 sec.)
Switch on and
go into
STANDBY
mode
Mute and unmute the
microphone
Long
(more than
3 sec.)
Switch on
and go into
PAIRING
mode
Es Key Press
Effect in Current Mode
INCOMING
PAIRING
STANDBY
CALL
TALK
Exit PAIRING
mode and got
to STANDBY
Initiate a call
Answer a call
End current
call (Not
possible when
microphone is
muted)
Exit PAIRING
mode, reset
PAIRING data
and switch
OFF
Switch OFF
Headset
Switch OFF
Headset
Mute and unmute the
microphone
Mute and unmute the
microphone
It Key Press
Key Press
OFF
Short
(less than
3 sec.)
Medium
(3-10 sec.)
Switch on and
go into
STANDBY
mode
Long
(more than
3 sec.)
Switch on
and go into
PAIRING
mode
It
•
•
Slow
Flashing
Red
Effect in Current Mode
INCOMING
PAIRING
STANDBY
Key Press
OFF
TALK
CALL
•
•
OFF-mode
TALK or
INCOMING
CALL and
battery low
Red and
Green
Note: When on charge with the Headset not switched OFF, the LED flashing sequence is not
changed, but the LED color will change from red to green as the battery reaches full charge.
Nl
•
•
...with 2
blinks
TALK or
INCOMING
CALL and
battery low
Fr
If the Headset stops operating, first ensure it is charged by charging it for five hours.
If the Headset remains non-functional, it may be reset by the following method: Press and hold the volume-down button, and at the same time, plug in the charger
as though to place the unit on charge.
The Headset will reset itself and be left in OFF mode.
Fast
Flashing
STAND BYmode and
battery low
Key Press
•
•
Slow
Flashing
Switched
OFF and on
charge,
battery low
Red and
Green
Steady OFF
STAND BYmode and
battery low
LED Color
Red
V. Troubleshooting
En
Alternate
Blinking
...with 2
blinks
Indicator
It LED
A red/green LED is used to indicate various functions.
Effect in Current Mode
Steady ON
Fast
Flashing
Switched
OFF and on
charge,
battery low
Red and
Green
Note: When on charge with the Headset not switched OFF, the LED flashing sequence is not
changed, but the LED color will change from red to green as the battery reaches full charge.
IV. Preparing the Headset for Use—Pairing (continued)
Slow
Flashing
Red
LED Color
Slow
Flashing
Red
Red and
Green
Alternate
Blinking
Indicator
Nl LED
A red/green LED is used to indicate various functions.
Effect in Current Mode
Alternate
Blinking
Effect in Current Mode
Steady ON
Red and
Green
Note: When on charge with the Headset not switched OFF, the LED flashing sequence is not
changed, but the LED color will change from red to green as the battery reaches full charge.
Steady ON
Belkin Corporation
501 West Walnut Street
Compton • CA • 90220 • USA
Tel: 310.898.1100
Fax: 310.898.1111
Alternate
Blinking
Red
Experience the freedom of wireless communication
User Manual
Indicator
Fr LED
A red/green LED is used to indicate various functions.
Exit PAIRING
mode and got
to STANDBY
Initiate a call
Answer a call
End current
call (Not
possible when
microphone is
muted)
Short
(less than
3 sec.)
Exit PAIRING
mode, reset
PAIRING data
and switch
OFF
Switch OFF
Headset
Switch OFF
Headset
Mute and unmute the
microphone
Medium
(3-10 sec.)
Switch on and
go into
STANDBY
mode
Mute and unmute the
microphone
Long
(more than
3 sec.)
Switch on
and go into
PAIRING
mode
Effect in Current Mode
INCOMING
PAIRING
STANDBY
CALL
TALK
Exit PAIRING
mode and got
to STANDBY
Initiate a call
Answer a call
End current
call (Not
possible when
microphone is
muted)
Exit PAIRING
mode, reset
PAIRING data
and switch
OFF
Switch OFF
Headset
Switch OFF
Headset
Mute and unmute the
microphone
Mute and unmute the
microphone