1
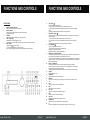
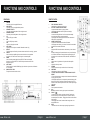
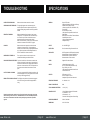
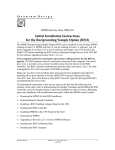
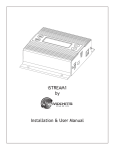
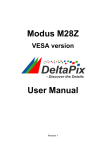
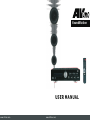
SoundStation
USER MANUAL
www.AVuno.com
www.AVuno.com
TABLE OF CONTENTS
Section
Page
1.
INTRODUCTION AND SAFETY INFORMATION
2
2.
FUNCTIONS AND CONTROLS
4
•
•
•
•
3.
CONNECTIONS
•
•
•
•
•
4.
8
Audio Sources
Speaker Connections
Antenna – am/fm
Power Connection
Headphones
OPERATING INSTRUCTIONS
•
•
•
•
www.AVuno.com
Front Panel
Rear Panel
Display
Remote Control
10
Remote Control
Selecting Audio Sources
USB Playback
Tuner Operation
5.
TROUBLESHOOTING
12
6.
SPECIFICATIONS
13
www.AVuno.com
| Page 1
SAFETY INFORMATION
INTRODUCTION
SAFETY INFORMATION
•
Read the manual before use and retain for future reference
Thank you for choosing an AVuno product.
•
Heed any warnings on the appliance and in the instruction manual.
•
Following the safety instructions and operating guidelines as laid out in the manual.
We are sure that it will give you many years of trouble free enjoyment. However to ensure the finest
possible performance it is recommended that you read this manual before use and keep it in a safe
place for future reference.
•
Do not use this apparatus or remote control near water and keep liquids and beverages out
of reach in case of spillage.
•
Unplug from the wall before cleaning and clean only with a soft dry cloth. The same applies
when cleaning the remote control.
•
Keep well ventilated and do not cover or block ventilation openings. – see fig. below.
•
Do not place near heat sources or other equipment that may produce heat.
•
Protect the power cord from accidental damage. Make sure it cannot be pinched, knotted
or walked upon.
•
Unplug during lightning storms or when unused for extended periods of time.
•
Refer all servicing to qualified personnel. There are no user serviceable parts. Should a
problem occur unplug and call an engineer for service assistance.
•
If an outdoor antenna is to be used make sure it is located away from power lines.
•
If you transfer the receiver from a cold to a warm place, allow it to reach room
temperature before switching on as there may be a risk of condensation
www.AVuno.com
The Soundstation is a high quality 80 watts per channel (RMS) receiver suitable for use in
commercial applications (such as bars and shops) or at home in a domestic situation.
It has a USB player capable of playing music directly from a USB device and an AM/FM tuner with 64
presets and RDS display
There are 4 dedicated music inputs, one of which can be switched for use with a turntable.
Two microphone inputs are provided for speech reproduction, each with independent volume control.
The two pairs of speaker outputs, A and B, can be used simultaneously if required.
The big central volume control gives precise adjustment and control while bass, treble and balance
are menu controlled and shown on the large fluorescent display.
With a full function remote control and elegant modern styling this is an ideal one box solution for most
everyday applications.
| Page 2
www.AVuno.com
| Page 3
FUNCTIONS AND CONTROLS
FUNCTIONS AND CONTROLS
6
FRONT PANEL
1
2
3
4
5
REMOTE CONTROL SENSOR
Sensor to receive signal from remote control.
DIGITAL DISPLAY
Displays tuner and MP3 information as well as volume levels
and input selection etc.
VOLUME
Large central control for adjusting the volume output level.
USB / TUNER / EXIT
Allows selection of the USB player or Tuner.
The Exit function cancels USB/Tuner selection and allows a choice of external inputs.
DVD / AM-FM /
Selects the signal from the DVD input
In Tuner mode allows selection of AM or FM band
When using the USB player it allows pause and playback of the selected track.
7
8
9
10
11
12
13
14
15
16
17
18
19
20
www.AVuno.com
| Page 4
CD / SCAN - /
Selects the signal from the CD input
In Tuner mode the tuner searches down the band one step at a time.
If you hold it down for 3 seconds it automatically scans down the band until a signal is
found.
In USB player mode it skips back a track each time it is pressed.
AUX-PHONO / SCAN+ /
Selects the signal from the AUX/PHONO input dependent on the position of the selector on
the rear panel (12).
In Tuner mode the tuner searches up the band one step at a time.
If you hold it down for 3 seconds it automatically scans up the band until a signal is
found.
In USB player mode it skips forward a track each time it is pressed.
VCR / MEMORY /
Selects the signal from the VCR input
In tuner mode this is used to memorize stations and
store them to one of the 64 presets.
In USB player mode it is used to stop playback.
MENU / A-B-C-D / FOLDER-TRACK
The MENU button allows access to a menu where you can adjust bass, treble, balance and
other functions such as maximum volume and switch on levels.
In radio mode the A-B-C-D button is used when storing presets into groups or for recalling a
preset from a group. In USB player mode it allows you to choose folders and the tracks from
within the selected folder.
MUTE / 1-8 / RANDOM
Pressing the MUTE button cuts the volume output, pressing it again restores it.
When in tuner mode 1-8 allows you to select any of the 8 presets within the 4 groups of
presets allowed for either the AM or FM band.
In USB player mode it allows playback of tracks on the USB device in a random order.
POWER
Switches the unit on or off.
POWER LED
LED illuminates when the unit is powered on.
STANDBY
Puts the unit on standby, the unit should be put on standby for short periods of time
only.
USB
Allows connection of an external USB device.
MIC 1
Allows connection of a microphone.
MIC 1 VOL
Adjusts the volume level from microphone input 1.
MIC 2
Allows connection of a second microphone.
MIC 2 VOL
Adjusts the volume level from microphone input 2.
HEADPHONE
Allows the connection of headphones for private listening.
A
Switches on the speakers connected to speaker output A at the rear of the unit.
www.AVuno.com
| Page 5
FUNCTIONS AND CONTROLS
FUNCTIONS AND CONTROLS
REAR PANEL
REMOTE CONTROL
1
2
3
4
5
6
7
8
9
10
11
12
13
FM COAX
Connection point for the supplied FM antenna.
AM LOOP ANT
Connection point for the supplied AM loop antenna.
SPEAKER OUTPUT B
Connection point for loudspeakers B, left and right channels.
SPEAKER OUTPUT A
Connection point for loudspeakers A, left and right channels.
CD
Input for a CD player or similar.
DVD
Input for a DVD player or similar.
VCR
Input from a video player or similar.
AUX / PHONO
Input from an aux line input or a turntable. Selectable via switch (12).
REC OUT
Fixed level output not affected by the master volume control ideal for recording purposes.
PRE OUT
Used to send the pre amplifier signal to an external device such as an equalizer
or processor. Can also be used to send a signal to an external amplifier.
AMP IN
Used to feed the processed signal from the PRE OUT back into the amplifier
Note when not using the PRE OUT / AMP IN facility make sure that the two RCA
bridges are in place..
AUX / PHONO
Sets the input level of the AUX/PHONO input (8) to either line or phono level, to facilitate the
use of a turntable.
MAINS OUTPUT LEAD
Exit point for the mains lead from the unit.
1
2
3
4
5
6
7
8
9
10
11
12
VCR / AUX-PHONO / CD / DVD
Allows selection of the relevant music source.
A-D / POP / CLASSIC / P+BASS / C+BASS
In tuner mode allows access to a group of presets.
In USB player mode allows selection of preset tonal settings.
AUTO / RANDOM
In tuner mode holding this button for a few seconds automatically
scans and stores stations to presets sequentially.
In USB player mode it allows playback of the tracks on the attached
USB device in a random fashion.
AM-FM / FOLDER / TRACK
In tuner mode it selects between the AM and FM bands.
In USB player mode it allows you to choose a folder and the tracks within
that folder from an attached USB device.
RDS
Displays the RDS information about the radio station you have selected.
ID3
Pressing this button gives information about the music you are listening to
on the attached USB device. Pressing this button repeatedly gives you
information such as artist name, track title, album title, folder details and
filenames.
MENU
Allows access to the general menu of options within this amplifier.
VOL +/Adjusts the volume up or down.
STANDBY
Switches the unit to standby .or switches it back on from standby.
USB/TUNER
Allows selection of the tuner or the USB player.
1-8 / JAZZ / ROCK / BASS / BASS 2 / J+BASS / R+BASS / EQ OFF /
REPEAT
In Tuner mode these buttons correspond to the 8 selections available within
the four groups of 8 presets.
In USB player mode buttons 1-6 correspond to preset tonal settings, while
button 7 turns the EQ off and button 8 activates the repeat function. The
REPEAT function allows the repeat of all the tracks, folder repeat or single
track repeat .
MEMORY
Used to preset the radio stations.
13
14
15
www.AVuno.com
| Page 6
In USB player mode it is used to play or pause the track selected.
SCAN + -/
In tuner mode used to search up and down the band. Pressing once
searches one step at a time. Holding it down for 3 seconds makes it
automatically search for stations, stopping when it finds one with sufficient
signal strength.
In USB player mode it moves forward and back through tracks on an
attached USB device.
MUTE
This buttons cuts out the volume output, pressing it again restores it.
www.AVuno.com
| Page 7
CONNECTIONS
CONNECTIONS
CONNECTING AUDIO SOURCES
CONNECTING THE FM & AM ANTENNAS
•
Using the lead supplied with the music source (in the majority of cases it's 2 RCA phono plugs
to 2 RCA phono plugs) connect the output of the source device to the relevant input on the
receiver. For example take the output of a CD player and plug it into the CD input on the
receiver and you can listen to it by selecting the CD button on the remote or front panel. This
applies to any audio source you wish to connect.
CONNECTNG THE SPEAKERS
•
•
•
•
•
•
•
•
•
CONNECTING THE POWER
Loosen the binding posts
Strip about 5mm from the outer insulation of the speaker cable and insert into the binding
post.
Tighten the knobs on the binding posts securely, ensuring that the cables are not touching
and are connected so that the polarities on the speaker terminals match the polarity on the
receiver. i.e “+ to +” and “- to - “
Alternatively you could connect the speakers to the receiver using banana plugs again
ensuring the wires are not touching and that the polarities on the receiver and speaker match.
Position the speakers for maximum enjoyment. It is recommended that the speakers are set 2
to 3 metres apart and are at a 45 degree angle to the central listening point in the room.
•
•
•
•
•
| Page 8
Please ensure that you connect all your other electronic components and are certain that the
speakers are correctly attached before switching on the unit.
Make sure that the power cord is plugged in completely and then switch on.
USING HEADPHONES
•
www.AVuno.com
The FM and AM antennas connect to their respective inputs at the rear of the receiver.
The AM loop antenna should be fully unwound and by pressing on the spring loaded tabs you
can insert the bare ends into the socket. Releasing the tabs secures the connection of the
antenna.
The FM antenna plugs into the coaxial socket .
The antennas should then be positioned until the best possible signal is obtained.
Using headphones can give you the privacy to enjoy music without disturbing others.
However it is advised that care be taken when doing so.
When using headphones you must always make sure that the volume is turned down before
you put them on, then you can adjust the volume to the desired level.
It is always advised not to listen at high levels or for extended periods of time.
If it causes ringing in the ears then it is recommended to discontinue use.
www.AVuno.com
| Page 9
OPERATING INSTRUCTIONS
OPERATING INSTRUCTIONS
REMOTE CONTROL
TUNER
•
•
•
•
•
Insert the batteries into the remote control making sure to align the battery polarities correctly.
Point the remote control at the front panel of the unit and select your desired function.
The remote control will work up to a maximum of 6m from the unit and at a 30 degree angle
left or right to the perpendicular.
For best performance ensure there is no obstacle between the remote control and the unit and
where possible try not to expose the remote sensor to direct lighting.
Remember batteries can leak so remove them if the remote control is not going to be in use
for an extended period of time. Avoid contact with liquids as this could damage the remote
control.
•
Pressing the USB / TUNER button twice, on either the remote control or front panel of the unit
turns on the tuner section.
•
To listen to another source just select it from the remote control or if you are using the front
panel controls just press the USB / TUNER button a third time to EXIT this mode and then
select the required source from the front panel selections.
•
The tuner is AM / FM with RDS facilities.
•
To start enjoying your tuner simply select the band you require AM or FM and press the scan
+ or scan – button to tune the radio up or down the band. Pressing the scan button once
tunes one step at a time, however holding the scan button down for 3 seconds or so makes
the tuner search through the band automatically. Once a station has been found it will stop,
allowing you to listen. Depress the scan button for 3 seconds again to continue searching for
other stations.
•
There are 64 presets available 32 on AM and 32 on FM. Each of these 32 presets consists of
four groups A, B, C or D and each of these groups is made up of 8 presets each.
•
You can automatically preset all available radio stations by pressing and holding the AUTO
button on the remote control. The tuner will scan the band selected and preset any detected
stations sequentially.
•
To manually preset your stations using the remote first tune in the desired station. Choose the
group A – D from the keypad that you wish to store it in. Press the MEMORY button,
“MEMORY” will appear in the digital display. Next assign it a position 1 – 8 using the keypad
on the remote. Once this is done “OK” will appear in the display to confirm the station has
been stored.
•
To manually preset your stations using the front panel controls first tune in the desired station.
Choose the group A – D using the “A/B/C/D” button pressing it until the desired group
appears. Press the MEMORY button, “MEMORY” will appear in the digital display. Using the
1 -8 button, press it repeatedly until the desired position appears in the display and store it by
pressing the MEMORY button “OK” will appear in the display to confirm the station has been
stored.
•
To recall your presets at anytime simply select the group A – D and the desired preset, sit
back and enjoy.
SELECTING A SOUND SOURCE
•
•
Select the sound source you require from the front panel controls or the remote control DVD,
CD VCR, AUX / PHONO or USB / TUNER.
Adjust the volume to the desired level and by pressing the menu button you can adjust the
bass, treble and balance to suit your needs.
USB PLAYBACK
•
•
•
•
•
•
To select the USB player press the USB/TUNER button until the display shows “USB INPUT”
If no USB device is connected it will read “USB NOT READY”.
If a USB devise is detected it will start playback at track 1 on the device. By pressing the ID3
button on the remote you can get the display to show different information about the track
playing. Pressing it repeatedly displays either the folder name, the folder and track number
playing, the track title, artist name, album title or the filename of the track.
If the device contains several folders with different tracks you can choose which folder you
want to play by pressing the FOLDER/TRACK button on the remote or front panel. “CHOOSE
FOLDER” appears in the display and you can then flick through the folders using the NEXT
and PREVIOUS buttons. To play a track from the desired folder simply press the
FOLDER/TRACK button again, “CHOOSE TRACK” appears in the display and you can then
skip through the tracks using the NEXT and PREVIOUS buttons.
The USB player can handle USB devices with FAT32 or FAT16 format.
Note also that even though the player can handle over 65,000 folders or songs, the 3 digit
display means that when the song count exceeds 999, the count will start again from 1.
www.AVuno.com
| Page 10
www.AVuno.com
| Page 11
TROUBLESHOOTING
SPECIFICATIONS
NO RECEPTION FROM RADIO
Make sure that the relevant antenna is connected.
GENERAL
HISSING AND NOISE FROM RADIO
This generally happens when a weak stereo signal is
received, adjust the antenna to improve reception and if it
persists consider getting an external one fitted by a qualified
installer
REMOTE NOT WORKING
Make sure batteries are fitted correctly and are in proper
working order. If not replace with new ones. Make sure you
are not too far away from the unit and that there are no
obstructions between the remote and the unit itself.
Make sure that the source you are trying to control has been
selected on the remote device? Check and try again.
Stereo Hi Fi Receiver
USB input for playback of MP3 files with ID3 tags
RDS AM/FM Tuner with 64 Presets
4 Stereo Inputs (DVD, CD, AUX/PHONO, VCR)
Record Output
Pre Out and Amp In Facility
2 Mic Inputs with Independent Volume Control
Digital Display
Menu Driven Control of Bass Treble and Balance
Handheld Remote Control
2 Groups of Speaker Outputs A/B
Headphones Output
NO AUDIO
Make sure that the unit is powered on and that the mute
indicator on the front panel is off. Ensure speakers are
attached to the unit and that the front panel speaker selectors
are on. Check that the both the RCA bridges between the
PRE OUT and AMP IN sockets are inserted.
OUTPUT
80 + 80 W RMS @ 4 ?
PROTECTION
Short, Overload and Surge Protection Circuits
USB PLAYER
MP3 File playback via USB Device (Not Included)
Maximum Number of Indexed Folders 65.534
Maximum Number of Indexed Files 65.534
Maximum Number of Folder Levels 8
TUNER
Digital AM / FM with 64 Presets
INPUTS
4 Stereo Music Inputs via 2 x RCA
(DVD, CD, AUX/PHONO selectable & VCR)
Amp In Facility via 2 x RCA
2 Mic Inputs with Independent Volume Control
via 6.3mm Mono Jack
OUTPUTS
REC output via 2 x RCA
PRE OUT facility via 2 x RCA
Headphone Output via 6.3mm Stereo Jack
FREQUENCY RESPONSE
20 – 20000Hz ± 1db
SIGNAL TO NOISE RATIO
88db
TOTAL HARMONIC DISTORTION
≤ 0.04 % (1W)
SPEAKER OUTPUT
2 Pairs Of Speaker Outputs A / B Selectable
A or B selected 4 – 16 ?
A & B selected 8 – 16 ?
Connection via Binding Posts or Banana Plugs
POWER REQUIREMENTS
230V AC, 200W Max
DIMENSIONS
435 x 105x 335 mm
NOISE WHEN TV TURNED ON
The tv may be too close to the unit, this may be more
noticeable when listening to an AM radio station.
SOUND NOT MATCHING THE VIDEO If you have the audio from a video source connected to the
receiver and the sound from the receiver is not matching the
sound from the video device, then simply make sure that the
audio source is connected to the VCR or DVD input and that
the correct source is selected via the remote or the front
panel
NO TITLES ON MP3 PLAYBACK
If you have not tagged the MP3 it will play the track but no file
info can be displayed. The only way to prevent this is to make
sure all your files are tagged correctly
WRONG TITLES ON MP3 PLAYBACK The USB player only reads the info that has been tagged to
the file. If this is wrong then the file info displayed will be
wrong.
Should the problem persist, switch the unit off, unplug it from the mains supply and call your
dealer to arrange a service of the unit. Remember there are no user serviceable parts inside
and under no circumstances should this unit be opened by anyone other than a qualified
engineer.
www.AVuno.com
| Page 12
www.AVuno.com
| Page 13