1
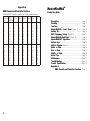
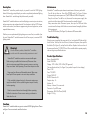
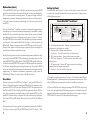
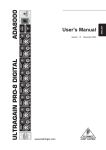
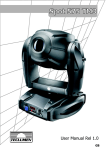
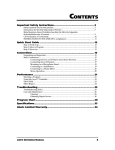
TM
MasterMind96ATM
Product
User Guide
MasterMind96ATM controllers provide
simple yet powerful control of DMX lighting fixtures.
Now with audio input, improved programming convenience,
and expanded show memory, MasterMind96ATM controllers
answer the call for compact, convenient
DMX lighting control.
Geni Electronics Co., Ltd.
THANK YOU!
ã Copyright 1999 Geni Electronics Co., Ltd.
Product specifications may be subject to change.
For more information, please visit our web site:
http://www.geni.com.tw. Thank you!
Thank you for buying a Geni
product. For best results, please
carefully read and follow the
directions in this product user manual.
Congratulations!
You made a good choice. You have one of the best compact DMX controllers on the
market. Geni's MasterMindTM controllers make great light shows easily. And they
now come with audio input, so your show can run in sync with the music.
You can rely on Geni Electronics Co., Ltd., for more excellent lighting products. We
design and manufacture strobes, effects, and mirrored projectors. And new
products are being launched regularly. For information, please visit our web site at
http://www.geni.com.tw. We work hard to keep you, our customer, satisfied.
You can get some of the best quality, best priced products on the market from
Geni. So next time, turn to Geni for more great lighting equipment. Always get
the best -- with Geni.
Thank you!
Geni Electronics Co., Ltd.
Main Office/Factory Address:
No. 12, Alley 12, Lane 732
Chung Cheng Road, Yung Kang
Tainan Hsien, Taiwan
Tel: 886-6-253-8513
Fax: 886-6-253-8685
Showroom Address:
Taipei World Trade Center, Room 3A-04
No. 5, Section 5, Hsin Yi Road
Taipei, Taiwan
Tel: 886-2-2722-2910
Fax: 886-2-2722-2918
Get the best -- get Geni!
Geni Quality Sets the Standard
Appendix A
MasterMind96ATM
DMX Channels and Controller Functions
MasterMind96ATM controller functions relate to DMX channels as follows.
Projector
No.
1
2
3
4
5
6
7
8
9
10
11
12
13
14
15
16
11
DMX
Address
1
7
13
19
25
31
37
43
49
55
61
67
73
79
85
91
Shutter
1
1
7
13
19
25
31
37
43
49
55
61
67
73
79
85
91
Color
2
2
8
14
20
26
32
38
44
50
56
62
68
74
80
86
92
Gobo1
3
3
9
15
21
27
33
39
45
51
57
63
69
75
81
87
93
Gobo2
4
4
10
16
22
28
34
40
46
52
58
64
70
76
82
88
94
Pan
5
5
11
17
23
29
35
41
47
53
59
65
71
77
83
89
95
Tilt
6
6
12
18
24
30
36
42
48
54
60
66
72
78
84
90
96
Product User Guide
Description....................................................................Page 1
Warning.........................................................................Page 1
Functions.........................................................................Page 1
MasterMind96ATM Front Panel (Figure 1)..............Page 2
Setting Up.......................................................................Page 3
DMX Equipment Setup (Figure 2)..........................Page 3
MasterMind96ATM Back Panel (Figure 3)....................Page 4
TM
MasterMind96A
Operation......................................Page 5
Motion Keys....................................................................Page 5
Motion Diagram (Figure 4)..........................................Page 5
Make a Show................................................................Page 6
Run a Show...................................................................Page 7
Modify a Show.............................................................Page 8
Action Tips......................................................................Page 9
Maintenance...................................................................Page 10
Troubleshooting.............................................................Page 10
Product Specifications.................................................Page 10
Appendix A
DMX Channels and Controller Functions....Page 11
Maintenance
Description
TM
MasterMind controllers provide simple yet powerful control of DMX lighting
fixtures. Either make a simple display, or make a complicated professional lighting
TM
show. MasterMind controllers get the job done easily, smoothly.
MasterMindTM controllers feature a user-friendly design, convenient pre-set motions,
six show memories, rate and speed control. New functions in the April 1999 release
include audio control, simultaneous programming of several projectors, and an
expanded show memory.
Whether you are a professional lighting designer on a small set, or a mobile dj on
TM
the road, MasterMind controllers answer the call for compact, convenient DMX
lighting control.
Warning!
TM
Like all electronic products, MasterMind controllers
must be used with common safety precautions in mind.
TM
MasterMind controllers contain no user-serviceable parts.
Refer servicing to qualified technicians only. Disconnect from
electric mains power supply before removing covers or servicing.
Keep case closed while operating. Do not insert objects into slots.
l
l Keep
away from flames and flammable material. Keep away
from liquids. Never operate in rain or in damp conditions.
l If
the controller is dropped or struck, disconnect mains power
supply immediately. Have a qualified engineer inspect for safety
before operating.
l Read
user manual instructions thoroughly before operating.
Follow the instructions. Never remove warning or informative
labels from the unit.
TM
MasterMind controllers require almost no maintenance. However, you should:
! Turn off the unit after use. Turn off the POWER switch (T in Figure 1) before
disconnecting the mains power cord. (The POWER switch LED will extinguish.)
! Keep the unit clean. Turn off the unit, disconnect the mains power supply, then
wipe the unit with a damp cloth. Do not immerse the controller in liquid.
! Keep connections clean. Disconnect power, then wipe the DMX and Audio
connections with a damp cloth. Make sure connections are thoroughly dry before
linking equipment.
! Press the "PUSH" button (D in Figure 3) to disconnect XLR canon cables.
Troubleshooting
If electric power is supplied, the power switch is "on," and product LEDs do not light,
check the fuse. To do so, first turn off the unit, disconnect the power, then open the
fuse holder (G in Figure 3), and pull out the old fuse. Replace it with a new fuse of
the same specification, T1A/250V 20mm. If the controller fails to operate properly,
refer servicing to a qualified technician.
Product Specifications
Name: MasterMind96A
Model: DMX-96A
Voltage: 120V~60Hz; 230V~50Hz (CE Approved)
(See specification sticker (A in Figure 3) on product for specific item voltage.)
Power: 15W
Fuse: T1A/250V
Output: DMX 512
DMX512 channels: 96
Projector keys: 16
Motions: 14
Memory: 6 shows, 55 scenes each
Connector: 3-pin XLR canon
Dimensions: 483x133x72mm (LxWxH)
Weight: 2.55 kg
Functions
MasterMindTM controllers offer easy, precise control of DMX lighting fixtures. Please
see Figure 1 for an overview of controller functions.
1
10
Action Tips
Press the AUDIO key (W in Figure 1) to activate an audio show. The show will
progress to the beat of the music. In audio mode, the beat replaces rate as the
trigger of scene changes.
Press the CHASE key (X in Figure 1) to get manual override of your original show
rate and speed settings. In chase mode, the rate and speed of scenes equal current
rate and speed slider settings -- not the original show rate and speed settings.
Press the MANUAL keys (Y and Z in Figure 1) to get manual override of your original
show DMX channel settings. For example, press the MANUAL key under the
COLOR slider to change colors during a show. Or press the MANUAL key under the
GOBO 1 slider to change gobos during a show.
Other tips:
Follow Spot - While a show is running, press the MANUAL key (Z in Figure 1) under
the joystick, then press a PROJECTOR key (A in Figure 1). (The selected
PROJECTOR key LED will light.) Adjust the SHUTTER, COLOR, and GOBO keys to
make a spotlight. Use the joystick to make the projected lightbeam follow someone.
The original show will continue simultaneously, but without the selected projector.
Press the MANUAL key under the joystick again to return to the original show.
Overlay Effects - While a show is running, press a MOTION key (B in Figure 1).
TM
MasterMind controllers will merge the pre-programmed show with the newly
activated motion, creating some surprising effects. Press the MOTION key again to
return to the original show.
Dramatic Effects - Make some short, dramatic shows. In the midst of a longer show,
run these short, dramatic shows at will for variety. Or make a show with a sudden
climactic stop, to draw an event to a dramatic ending.
PROJECTOR
1
9
96A
10
11
12
13
14
15
8
H
B
I
C
B
J
D
E
F
16
Clear
lnsert
G
L
M
Delete
N
G
1
2
3
C
4
5
6
Down
Up
H
I
Run
J
O
N
D
F
K
PROJECTOR
Cut Output
E
A
MOTION
M A S T E R M I N D
5
3
6
7
A 4
2
RATE
SPEED
Fade
P
SHUTTER
1
CONTROL
Q
COLOR
2
R
GOBO 1
3
S
POWER
GOBO 2
4
T
L
1
2
3
4
U
PAN
TILT
NI
SHOW
Once a show is programmed and running, on-the-spot changes add variety.
MasterMindTM controllers provide helpful override functions to add variety while a
show is running. (Override functions are listed in Figure 1 as W, X, Y, and Z.) When
activated, override function LEDs light up and remain lit. Press once to activate and
once again to deactivate override functions.
MasterMind96ATM Front Panel
6
5
M
Enter
K
W
X
AUDIO
CHASE
Z
Y
MANUAL
MANUAL
MANUAL
MANUAL
MANUAL
Figure 1
A. Projector keys - Activate up to 16 6-channel lighting fixtures.
B. Motion keys - Activate 14 pre-programmed motions.
C. Show keys - Activate up to six, 55-scene show memories.
D. Cut Output - Stop all output during a show.
E. Clear - Deactivate a projector during programming.
F. Insert - Insert a scene into a show memory.
G. Delete - Delete a scene from a show memory.
H. Down - Move down one scene in a show.
I. Up - Move up one scene in a show.
J. Run - Activate a show in memory.
K. Enter - Save scenes into a show memory.
L. Fade - Choose between smooth or abrupt movements.
M. Size - Choose motion size, from 1 (small) to 4 (large).
N. Rate - Determine the time between motions.
O. Speed - Determine the speed of motions.
P. Shutter - The first DMX channel.
Q. Color - The second DMX channel.
R. Gobo 1 - The third DMX channel.
S. Gobo 2 - The fourth DMX channel.
T. Power - On/Off switch.
TM
U. Pan - The fifth DMX channel, pan (X-axis) on Shiva-200R projectors.
TM
V. Tilt - The sixth DMX channel, tilt (Y-axis) on Shiva-200R projectors.
W. Audio - Activate audio control.
X. Chase - Override show rate and speed for manual control.
Y. Manual - Override show DMX channel settings for manual control.
Z. Manual - Override show pan and tilt settings; switch for simultaneous
programming.
TM
MasterMind controllers give you have the power to create.
9
2
Run a Show (Cont.)
Setting Up
TM
Your package should include one MasterMind controller, one IEC mains power
cord, one product user guide, and the guide DMX512: The Basics. Follow the
steps below to set up your system.
determines the time between scenes. Speed determines the pace at which scenes
progress. Press the AUDIO key (W in Figure 1) to activate an audio show. The show
will progress to the beat of the music. In audio mode, the beat replaces rate as the
trigger of scene changes.
DMX Equipment Setup
MasterMind
Controller
To
Power
TM
DMX
Output
To Audio
Multi-tracker
Unit 1
Unit 2
Unit 3
Unit 4
DMX DMX
IN
OUT
DMX DMX
IN
OUT
DMX DMX
IN
OUT
DMX DMX
IN
OUT
1st Cable
3rd Cable
2nd Cable
To
Power
To
Power
4th Cable
To
Power
Terminate
DMX signal on last
unit according to
product
user
manuals.
To
Power
Note: Drawing is for reference only. Actual socket positions are not shown.
Figure 2
Link up to 16 projectors maximum, or, with repeated DMX settings, up to 64 projectors.
TM
1) Mount the MasterMind controller onto a suitable rack. Fasten securely. Use 3pin XLR data cables to link the controller to DMX lighting equipment, as shown in
Figure 2. Insert the male XLR connector on the first cable into the MasterMindTM
controller DMX output socket (E in Figure 3).
2) Set DMX dip switches on your lighting fixtures. Note that MasterMindTM controller
functions relate to DMX addresses as illustrated in Appendix 1. If DMX dip
switches are not set properly, controller and projector DMX channels will not match.
Refer to product user manuals and the guide DMX512: The Basics for
information.
(Setting DMX channels cleverly can help you overcome some problems. To operate
four-channel mirrored projectors like Shiva-250TM with MasterMind96ATM
controllers, advance the DMX addresses on projectors two values. The first two
DMX channels on the controller will be empty, projector color and gobo channels
will be operated on GOBO1 and GOBO2 sliders, and the joystick will align with
projector pan and tilt functions -- a major benefit.)
3) If audio control is desired, connect two output cables from your music multitracker to the audio input jacks (C in Figure 3) on the MasterMind96ATM controller.
4) Make sure your electric power supply and the controller's specified electric input
are the same. Plug the female connector of the IEC mains power cord into the
3
To halt a show in progress, press the CUT OUTPUT key (D in Figure 1). Press the
CUT OUTPUT key again to continue the show.
Modify a Show
Once a show has been saved to memory, modifications are made easily through
four functions: Show Review, Delete, Insert, and Cover.
1. The Show Review function consists of two keys, DOWN and UP (H and I
respectively in Figure 1). These keys allow you to review a show, one scene at a time.
With a SHOW key LED lit, press the UP key to review from the most recently
activated scene to the last scene. Press the DOWN key to review from the most
recently activated scene to the first scene. When all scenes have been shown,
pressing UP or DOWN keys will result in no change. Either the last (in UP) or first
scene (in DOWN) will be shown.
2. The Delete function cuts out a scene that you do not want. When reviewing a
show, stop at the scene that you do not want. Press the DELETE key (G in Figure 1).
The undesired scene will be erased from the show memory.
3. The Insert function allows you to interject a scene between two other scenes.
When reviewing a show, using the UP key, for example, stop at the scene that
should precede a new scene. Press the INSERT key (F in Figure 1). (The INSERT key
LED will light.) Make one or more new scenes using steps 3-7 in Make a Show.
Then press the INSERT key again. (The INSERT key LED will extinguish.) The new
scene or scenes will appear just after the scene you stopped at, and just before the
original following scene.
4. The Cover function allows you to modify gobos, colors, and motions in a show.
Simply use the UP and DOWN keys (H and I in Figure 1) to locate a scene. Press the
PROJECTOR key (A in Figure 1) of the fixture that should be changed. (Its LED will
blink.) Make a change to the gobo, color or motion. Press the PROJECTOR key
again (Its LED will remain lit), and press the ENTER key (K in Figure 1) to save the
change. The modification will cover the undesired aspect of the old scene.
8
Make a Show (Cont.)
Setting Up (Cont.)
7. Press the ENTER key (K in Figure 1) briefly to save this scene, or press the ENTER
key for three seconds to save this scene and begin the next scene from this position.
(This is a recommended time-saving option. The projected images will briefly
disappear, then reappear, indicating readiness for the next scene.) Repeat steps 3,
4, 5, 6 and 7 above to increase your show length. Up to 55 scenes can be saved in
one SHOW.
controller power input socket (F in Figure 3) and plug the power cord's male
connector into a properly grounded electric power supply socket. Supply power to
all of the lighting equipment.
MasterMind96ATM Back Panel
A
TM
Note that MasterMind controllers now provide simultaneous programming of
several projectors. To activate simultaneous programming, first establish a starting
position: direct the projected images where desired with the joystick and choose
your gobo and color for several projectors one-by-one, as in steps 4 - 6 above.
Press the ENTER key for three seconds. (This establishes the projection positions in
your first scene.) Then press the MANUAL key (Z in Figure 1) under the joystick. (Its
LED will light.) Program movements, either with MOTION keys or with the joystick.
Change colors, gobos, and shutter settings, as desired. All projected images will
maintain the same distance apart while moving.
To make the settings of one unit under simultaneous programming differ from other
units, press the desired PROJECTOR key, and change the gobos, colors, etc. (The
selected PROJECTOR key LED will blink. Other PROJECTOR key LEDs will remain
lit.) Press the selected PROJECTOR key again. (Its LED will stop blinking and remain
lit.) If desired, change other projector settings the same way. Then press the ENTER
key for three seconds. Repeat these steps to make more scenes using simultaneous
programming. To deactivate simultaneous programming, simply press the
MANUAL key (Z in Figure 1) under the joystick. (Its LED will turn off.)
Run a Show
To see your show, press the SHOW key (C in Figure 1), then press the RUN key (J in
Figure 1). (Selected show and active projector LEDs will light.) To deactivate a show,
press either SHOW or RUN keys again. (Pressing the SHOW key again deactivates
both RUN and SHOW keys. Pressing the RUN key again deactivates the RUN key
only.) To run many shows, one after the other, press all desired SHOW keys, then
press RUN. The shows will run, cycling from left to right, and from left to right again.
(The active SHOW key LED will light. Selected but not active SHOW key LEDs will
blink.)
Name
Model
Voltage
Power
Fuse
Output
MASTER MIND 96
DMX-96A
230V~50HZ
15W
T1A/250V
DMX 512
Made in Taiwan
Geni Electronics Co.
Serial No.
B
Warning:
l This appliance must be grounded (earthed). Disconnect
from mains power supply before removing covers or
servicing.
l Supply electric power only after linking DMX cables and
setting DMX dip switch addresses.
l Never operate in rain or damp conditions. Keep away from
fire or flammable material.
l If the unit suffers a heavy blow or is dropped, disconnect
mains power supply immediately. Have a qualified engineer
inspect for safety before operating.
l Read user manual thoroughly before operating. Never
remove warning or informative labels from the unit.
AUDIO INPUT
C
L
POWER INPUT
R
F
DMX OUTPUT
D
E
DMX 512
SIGNAL LINK
G
1. Ground
2. -Signal
3. +Signal
Figure 3
A - Product specification label - Look here for important product
specifications, including electric voltage.
B - Warning sticker - Follow cautionary advice.
C - Audio input - Connect to multi-tracker for audio control.
D - XLR connector release - Press to release connected cables.
E - DMX output connector - Use XLR connectors with cables to link
lighting fixtures.
F - IEC power socket - Connect IEC power mains cord to matching,
properly grounded electric power supply.
G - Fuse box - Open this to find an extra fuse.
5) Turn on the controller power switch (T in Figure 1). Small lights called LEDs will
flash as MasterMindTM controllers perform a pre-programmed test sequence. When
all but the LED above the power switch turns off, the controller is ready for use.
6) Check your DMX dip switch settings by pressing a PROJECTOR key and moving
shutter, color, and gobo sliders. If DMX settings are correct, controller functions will
operate related functions on appropriate lighting fixtures. For example, moving the
COLOR slider (Q in Figure 1) will make projected colors change.
The rate and speed of a running show can be adjusted by pressing the CHASE key
(X in Figure 1) and moving RATE and SPEED sliders (N and O in Figure 1). Rate
7
4
MasterMind96ATM Operation
Motion Keys (Cont.)
Now that the controller and lighting projectors are linked, DMX switches are set,
and electric power is on, you are ready for action. What next?
Press the
key to make motions progress from starting point to ending point, then
quickly back to the starting point. Press the
key again to change the direction of
the motion.
TM
TM
First, it helps to understand MasterMind functions. In general, MasterMind
functions are implied by their names. Press PROJECTOR key 1 to activate the first
projector. Move the SHUTTER slider to adjust the shutter. Move the COLOR slider to
change colors, etc. It's basically very simple. At the same time, though, it is very
specific. If you press the INSERT key when no show is activated, nothing happens.
You must be editing an existing show to operate the insert function.
Press the 1, 2, 3, 4 key (M in Figure 1) to set motion sizes, where 1 is small and 4 is
large. Press the FADE key (L in Figure 1) to determine whether motions are smooth
or jerky. When keys are pressed, related LEDs light to indicate active settings.
Make a Show
TM
There are seven easy steps to making a show with MasterMind controllers.
TM
For a general overview of functions, please review Figure 1, MasterMind96A
Front Panel. For a step-by-step guide on making a show, please see Making a
Show. And to understand what motions will appear when you press the MOTION
keys, please see Motion Keys.
1. Erase the previous show memory from the desired SHOW key: Simultaneously
press the desired SHOW key (C in Figure 1) and the DELETE key (G in Figure 1) for
three seconds.
Motion Keys
2. Press the desired SHOW key. The LED above the SHOW key will light.
MasterMindTM controller MOTION keys (B in Figure 1) correspond to motions in
Figure 4. Press MOTION key A, for instance, and the projected image will move in a
circular shape; Press MOTION key B, and the image will move in a square shape.
Movement methods correspond to the two keys in the far right in the motion area.
Activate a motion, then press the
key to make motions progress from starting
point to ending point, and from ending point to starting point, at the same speed.
Motion Key
A
Motion Diagram
B
C
D
E
F
G
Motion
Method
Motion Key
or
H
Motion
Method
or
or
or
or
or
or
I
J
K
L
M
N
random
or
or
or
or
or
or
or
3. Select rate and speed settings. (Tip: Put the RATE slider (N in Figure 1) on 1 and
the SPEED slider (O in Figure 1) on 9. Changes will appear quickly.) Rate and speed
settings can be programmed for each scene, or you can just leave them at one
setting. If you plan to use audio control, rate and speed will be irrelevant, since in
audio control movements are triggered by the music.
4. Choose a projector: Press the desired PROJECTOR key (A in Figure 1). The
projector LED will blink. (Tip: If your lighting fixture has a shutter, open the shutter.
Otherwise, you will not see color, gobo or other changes.)
5. Use the joystick to position the projected image. Select colors and gobos by
moving related sliders (P, Q, R, S in Figure 1). Select motions by pressing MOTION
keys (B in Figure 1). (See Motion Keys.) Once you have the desired movement,
color, and gobo, press the activated PROJECTOR key again. (The PROJECTOR key
LED will stop blinking and remain lit.)
6. Activate other projectors and program them by repeating steps 4-5 above. To
deactivate a projector, press the CLEAR key (E in Figure 1) while the projector LED
key is blinking. (The LED of the deactivated projector will turn off.)
Figure 4
5
6