1
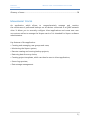
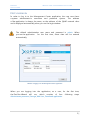
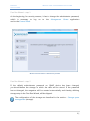
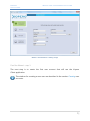
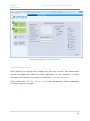
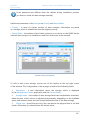
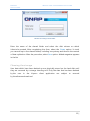
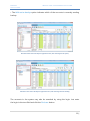
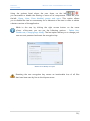
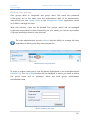
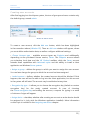
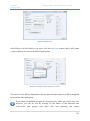
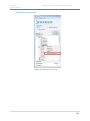
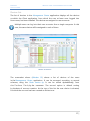
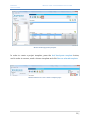
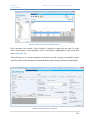
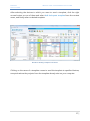
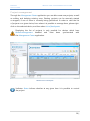
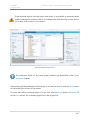
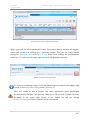
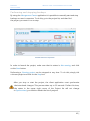
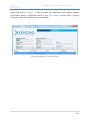
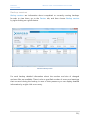
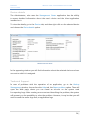
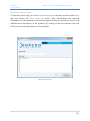
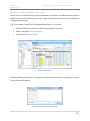
Xopero Backup and synchronization in one application Management Center User Manual XOPERO BACKUP AND SYNCHRONIZATION IN ONE APPLICATION Contents Management Center ...............................................................................................................................2 Installing.......................................................................................................................................................2 First logging in ...........................................................................................................................................5 Storage space management (storage)........................................................................................... 10 Cleaning the storage ........................................................................................................................ 13 Server logs................................................................................................................................................ 15 Management ........................................................................................................................................... 17 Displaying user accounts and groups ........................................................................................ 18 Adding user groups .......................................................................................................................... 21 Creating user accounts .................................................................................................................... 22 Assigning new device ...................................................................................................................... 25 Device list ............................................................................................................................................. 27 Remote backups management .................................................................................................... 30 Project templates ..................................................................................................................... 30 Sending a template to the client application ................................................................. 36 Project management............................................................................................................... 38 Creating and editing a project ............................................................................................ 40 Performing and stopping backups .................................................................................... 43 Restoring files ..................................................................................................................................... 44 User logs ............................................................................................................................................... 48 Backup sessions ................................................................................................................................. 50 Remote setting the core limit and the bandwidth of an account ................................... 52 Remote device relogging ............................................................................................................... 53 Device details ...................................................................................................................................... 54 Technical Support.............................................................................................................................. 54 Sending server logs ................................................................................................................. 55 Remote sending application logs....................................................................................... 56 1| XOPERO BACKUP AND SYNCHRONIZATION IN ONE APPLICATION Glosarry of terms ................................................................................................................................... 58 MANAGEMENT CENTER An application which allows to comprehensively manage and monitor the correctness of performed backups on all devices connected to a QNAP network drive. It allows you to remotely configure client applications and create new user accounts as well as to manage the Xopero service. It is intended for Xopero software administrators. Key features of the application: • Creating and managing user groups and users, • Monitoring the Xopero system, • Remote creating and running backup projects, • Restoring data from any device, • Creating project templates, which can then be sent to client applications, • Server logs preview, • Data storage management. 2| XOPERO BACKUP AND SYNCHRONIZATION IN ONE APPLICATION INSTALLING In order to install the Management Center, you have to download it from the QNAP panel, shared on your QNAP device. After its launch a window may appear on your screen - Security warning. Window 1 Security warning After clicking the Run button, the process of installing the application will run. To confirm its launch, select the Next button. If for some reason you want to stop the installation, click Cancel, which automatically results in terminating the installer. 2| XOPERO BACKUP AND SYNCHRONIZATION IN ONE APPLICATION Window 2 Setup wizard As soon as you start the installation process, the progress bar will appear. Window 3 Installation progress window 3| XOPERO BACKUP AND SYNCHRONIZATION IN ONE APPLICATION Once the installation is complete a final screen will be displayed. In order to close it, select the Finish button. The Management Center application will run automatically. Window 4 Information about the installation process completion 4| XOPERO BACKUP AND SYNCHRONIZATION IN ONE APPLICATION FIRST LOGGING IN In order to log in to the Management Center application, the user must have a system administrator’s username and password system. The address of the application is always the same, as the address of the QNAP network drive and is displayed automatically when you run the login window. The default administrative user name and password is admin. When you run the application for the first time, these data will be entered automatically. Window 5 Logging in to the Management Center application When you are logging into the application, as a user, for the first time, the First Run Wizard will run, which consists of four following steps: Administrator password, Storage, Add User, Download application. 5| XOPERO BACKUP AND SYNCHRONIZATION IN ONE APPLICATION First Run Wizard – step 1 At the beginning, for security reasons, it has to change the administrator password, which is necessary to log on to the Management Center application and to the Control Panel. Window 6 First Run Wizard – Administrator password First Run Wizard – step 2 If the default administrator password on QNAP device has been changed, you should define the storage in which the data will be stored. If the password has not changed, the magazine will be created automatically and thereby defining storage step in the First Run Wizard, will be skipped. The configuration of the storage are described in the section – Storage space management (storage). 6| XOPERO BACKUP AND SYNCHRONIZATION IN ONE APPLICATION Window 7 First Run Wizard – defining storage First Run Wizard – step 3 The next step is to create the first user account that will use the Xopero Client application. The window for creating a new user are described in the section Creating user accounts. 7| XOPERO BACKUP AND SYNCHRONIZATION IN ONE APPLICATION Window 8 First Run Wizard - creating first user account First Run Wizard – step 4 After defining the storage and creating the first user account, the administrator should download and install the Client application on the computer, on which the data is to be secured, by clicking on the button - Get client application. After closing the First Run Wizard, to run the Management Center application you have to log in to it again. 8| XOPERO BACKUP AND SYNCHRONIZATION IN ONE APPLICATION Window 9 First Run Wizard - download the Client application After logging into the application a window basic options of the program appears: Backup Management - clicking on this button will redirect us to a window where it is possible to manage groups and user accounts. From this point we can also perform remote configurations of client applications or restore data. Additionally, we are also able to view the user logs and create backup templates. Server Logs - administrator may inspect the logs of each server services, which are responsible for the proper working of the Xopero application. Storage Manager - in the storage window, the user is able to configure additional application data storages, which are located on a network drive QNAP, as well as to manage the existing ones. The following window appears only when you log in to an admin account. The reminding group administrators will be immediately redirected to the Backup Management window. 9| XOPERO BACKUP AND SYNCHRONIZATION IN ONE APPLICATION Window 10 The main dashboard of the application STORAGE SPACE MANAGEMENT (STORAGE) During the *.qpkg package installation (described in the Xopero Installation Manual), a data storage is created. It is used for storing data that have been backed up by the users of the Xopero application. To view information about the defined data storages, click on the Storage Manager button in the main dashboard of the application (Window 10). Access to data storages and its related options are available only for the main administrative account - admin. If the default administrator password on QNAP device has been changed, the application will ask for a new password. The created storage is displayed on the list, in line with the Auto description. Its size depends on how much space is available on the volume, so after occupying the part of the volume by other files, the storage will be reduced automatically. 10 | XOPERO BACKUP AND SYNCHRONIZATION IN ONE APPLICATION If the password was different than the default during installation process, you have to create the data storage manually. Additional parameters of the Storage are Priority and Shared folder: • Priority – in case of a larger number of data storages, information are saved in a storage, which is available and has the highest priority. • Shared folder - the address of the folder is placed on a volume on the QNAP device with the data storage. It is available to read from all devices in the network. Window 11 Storage management To edit or add a new storage, choose one of the options in the top right corner of the window. The configuration of the storage consists of the following fields: • Description - a text information about the storage, which is displayed in the Management Center application and the Control Panel, • Storage mode - two modes of data storage have been emphasized: automatic, where the size of the volume is adjusted automatically, depending on the available space, and manual, where the user himself defines the size of the data storage, • Cluster size - should be set only if the user knows the physical size of the disk cluster. Otherwise, you should leave the default value, 11 | XOPERO BACKUP AND SYNCHRONIZATION IN ONE APPLICATION • Priority - the order of the storages where data will be saved, it is determined according to the priority. As first, a storage with the highest priority among the available will be chosen, • Capacity – defines how much data can be placed in storage, • Used space - is displayed only when editing a storage. For a newly created storage, the amount of used space is 0 MB, • Shared folder – directory name on QNAP network drive, • Additional shared folder (replication) – additional shared folders enable data replication, which is parallel recording in several locations, thus user data security is increased. Setting the replication option is particularly recommended if you have on your QNAP network drive, two separate hard drives that do not use RAID function. If one drive fails, then it is possible to recover data from a second location. Window 12 Defining a new storage To create a folder on the device data store QNAP, use the Add option. 12 | XOPERO BACKUP AND SYNCHRONIZATION IN ONE APPLICATION Window 13 Creating a shared folder Enter the name of the shared folder and select the disk volume on which it has to be created. After completing the form, select the Create option. In total, you can add up to four shared folders, including one primary and three in the context of data replication. After the procedure, select Save option. Added magazine appears in the list. Cleaning the storage User data which have been backed up are physically stored on the hard disk until they are removed by a storage cleaning tool. Only the data that has been deleted by the user in the Xopero client application are subject to removal by the aforementioned tool. 13 | XOPERO BACKUP AND SYNCHRONIZATION IN ONE APPLICATION Window 14 Storage cleanup The Storage cleanup is launched automatically every 24 hours, however by using the options included in the Storage Manager, it is possible to manually run this feature. Window 15 The button which launches the storage cleaning The Storage cleanup option is highly overloading the QNAP drive, so it is best to run it at the time of the lowest usage. 14 | XOPERO BACKUP AND SYNCHRONIZATION IN ONE APPLICATION SERVER LOGS When we enter the main window and select Server logs, we gain access to the server logs of the Xopero application. Window 16 Server log launch Access to server logs and its associated options is available only for the main administrative account - admin. 15 | XOPERO BACKUP AND SYNCHRONIZATION IN ONE APPLICATION Window 17 Server logs view When the application is working correctly, there is no need to use this feature. If, however, there are problems with its work, it may be necessary to ask the application provider for technical assistance and send the server logs to him. In the event of work-related errors of the Xopero services, before contacting the technical support, you should restart the Xopero software from the App Center. The process of sending the application and server logs to the software provider has been described in section Technical Support. 16 | XOPERO BACKUP AND SYNCHRONIZATION IN ONE APPLICATION MANAGEMENT After returning to the main window and selecting Backup Management option, we will be redirected to the accounts and backups management window (Management Center). Window 18 Backup Management button By default, the first view that we should see is the Dashboard. In the chart below are shown information about completed and unenforced backups within the past 30 days for all users of Xopero. 17 | XOPERO BACKUP AND SYNCHRONIZATION IN ONE APPLICATION Window 19 Account and backup management If there has not been made a single backup, the application will not display any data. When you click on chosen username, a graph showing the status of backups performed by that user will be displayed. Displaying user accounts and groups On the left side of the Management Center window there is a tree of groups and users. It has several filtering options which are useful in the later use of the application. Above the tree, below the application logo the Show users field is located. The following options are described on it - All, Active session, With active backup. • The All option displays all accounts available on the device, divided into groups created by the administrator. In each group an unrestricted number of accounts can be assigned, however, they will be visible only when you click on a particular group and expand it. • With an Active session informs us which accounts are currently logged into the application on particular computers. 18 | XOPERO BACKUP AND SYNCHRONIZATION IN ONE APPLICATION • The With active backup option indicates which of the accounts is currently sending backup. Window 20 The view of the Xopero application users (after selecting the All option) Window 21 The view of the Xopero application users (after selecting Performs backup) The accounts in the system may also be searched by using the login. Just enter the login in the text field and click the Find user button. 19 | XOPERO BACKUP AND SYNCHRONIZATION IN ONE APPLICATION Using the options listed above the user three, on the left , you can enable or disable the filtering of some of its components. These are, from the left: Group, Users, Show disabled groups and users. This option allows you to disable the view on unnecessary for us elements of the tree in order to obtain a better overview of the application. While in the tree, by clicking the right mouse button on the name of one of the users, you can use the following options - Delete User, Disable user, Change group, Modify. The last option allows you to change your user account password and reset the encryption key. Window 22 The Modify user option Resetting the user encryption key causes an irretrievable loss of all files that have been sent by him to the Xopero server. 20 | XOPERO BACKUP AND SYNCHRONIZATION IN ONE APPLICATION Adding user groups User groups allow to categorize and group users. The name and password of the group are at the same time the authorization data of its administrator, who can log into the Control Panel or the Management Center application, where he is able to manage his users. With this solution, users can be divided into groups, which will be managed by persons responsible for them. Depending on your needs, you can set any number of groups and assign them to user accounts. The main administrative account (admin) has the ability to manage all users, regardless of which group they were assigned to. Window 23 Add a new group button In order to create a new group, click the button highlighted in the screenshot above (Window 23). The Add group window will be displayed in which you need to define the group name and its password, which are both group administrator authorization data. Window 24 Adding a new group 21 | XOPERO BACKUP AND SYNCHRONIZATION IN ONE APPLICATION Creating user accounts After first logging into the Xopero system, the tree of groups and users contains only the default group, named admin. Window 25 Add user button To create a user account, click the Add user button, which has been highlighted in the screenshot above (Window 25). Then an Add user window will appear, where you must define authorization data, as well as configure additional settings: • Choose Account type - available account types are Endpoint and additionally, depending on the purchased license version, Server. The Endpoint account allows you to backup local data and the MS Outlook mailbox, while the Server account extends these capabilities with Advanced copies and the ability to install a client application on Windows Server systems. • Assign to group - defines the group to which you want to assign the user account. You can later change the group to which the account has been assigned. • Locked account – defines, whether the created account should be blocked. If this happens, the user will not be able to log into the client application, but his account in the system will still exist. The account may be unblocked at any time. • Encryption key type – it allows you to choose the encryption key (default or custom encryption key) for the newly created account. In case of choosing the Custom encryption key and adding the account, a request for typing in a series of minimum 6 signs will appear. • Assign device – describes, whether after creating an account an active device should be assigned to it (only with the Windows application installed). More information on this topic is included in the Assigning new device chapter. 22 | XOPERO BACKUP AND SYNCHRONIZATION IN ONE APPLICATION Window 26 Adding a user After filling in all the fields in the form, click the Add user button, which will create a new customer account with defined parameters. Window 27 Information about adding user accounts The user account will be displayed in the groups and users tree and it will be assigned to an earlier indicated group. If you have not defined the type of encryption key when you add a new user account, you can do this by clicking on the name of the selected user in the users and groups tree right click and selecting the option 23 | XOPERO BACKUP AND SYNCHRONIZATION IN ONE APPLICATION Define the encryption key. Window 28 Defining the encryption key 24 | XOPERO BACKUP AND SYNCHRONIZATION IN ONE APPLICATION Assigning new device The devices, which do not have any assigned account, inform the Management Center application, in a continuous mode (every 30 seconds), about it. Thanks to that you can easily connect a given device with the user account, without the need of having direct access to the chosen machine. All you need to do is find the account to which you wish to assign the given device. Window 29 Assign new device If you cannot find the device on the list, you should use the Enter device IP option. After clicking Add, the information about the completed assignment of the device will appear. 25 | XOPERO BACKUP AND SYNCHRONIZATION IN ONE APPLICATION Window 30 List of available devices In case when entering the IP address of the device does not allow for proper assignment, you should check if the Xopero QNAP service has been launched on a remote computer. If it is, you should restart or try to log in again directly from the given device to the chosen account. 26 | XOPERO BACKUP AND SYNCHRONIZATION IN ONE APPLICATION Device list The list of devices in the Management Center application displays all the devices on which the Client application, from which the user at least once logged into his account, has been installed. The devices are assigned to user accounts. Multiple users can log into their user accounts from a single computer. In this case, the same device will be assigned to each of them. Window 31 Device list The screenshot above (Window 31) shows a list of devices of the users in the Management Center application. It can be arranged according to several schemes, using the Order entries by. It can be sorted alphabetically, from A to Z or from Z to A, by the username. The second option is default sorting by the date of account creation. At the top of the list the user device is situated, for which the account has been created as the last one. 27 | XOPERO BACKUP AND SYNCHRONIZATION IN ONE APPLICATION Window 32 Sorting the device list You can find the following information in the device table: • User - login (name) of the user, • Device – the user's device name, • Remote management - information about whether the device can be controlled remotely using the Management Center application, • Total size of backuped files - the total size of files that have been sent from the device as backup, • Backuped files - the number of files, • Last action - type of the last performed action on a given device, • Last action date - the date of the last performed action, • Active session – marks the users who have performed any action in the client application, during the past 30 minutes, • Backup in progress? - Information about whether a backup is performed currently, • Restoring files? - information about whether the files from the device are currently being restored by the Management Center application, • Backups status - the status of the last five made backups. There is also a possibility to remove a device. Just click on the selected device with the right mouse button, and an options bar will be displayed. One of these options is the removal of the device - Delete device. A device can only be deleted when it is inactive. 28 | XOPERO BACKUP AND SYNCHRONIZATION IN ONE APPLICATION Removing a device results in deleting all data sent by it from the Xopero server. Window 33 The Delete device option The reminding options - Backup sessions, List of backupsets, Add backupsets template, Device settings, Device details, Restore data are described in the following sections of the user manual. 29 | XOPERO BACKUP AND SYNCHRONIZATION IN ONE APPLICATION Remote backups management The Management Center allows you to remotely manage user backups as well as their projects. Project templates A project template is a set of projects which can be sent to any device user. Each project in the template must have indicated data for backup and a name given. You can also configure additional settings, such as schedule or advanced options. Backup projects are described in detail in the Xopero User manual. You can edit the project after sending it to a chosen device. Please note that, the device to which a template will be sent, needs to have existing indicated data, otherwise, execution of the project will end with an error. Window 34 Project templates management button The Manage backup templates option is launched by clicking on the button highlighted in the screenshot above. A list of created templates will be displayed, and below a list of projects included in a chosen template. 30 | XOPERO BACKUP AND SYNCHRONIZATION IN ONE APPLICATION Window 35 Managing backup template In order to create a project template, press the Add backupsets template button, and in order to remove, mark a chosen template and click Remove selected template. Window 36 Buttons to create or delete a template project 31 | XOPERO BACKUP AND SYNCHRONIZATION IN ONE APPLICATION After clicking on Add backupsets template a Creating new backup template window will appear, in which you also have to specify the name of the template. Further backup configuration is related to a backup project which will be included in the created template. Window 37 Creating a new backup template Currently it is only possible to create local data backup projects. For each of the created projects, the user can define its name, set up a schedule, or choose the data he wants to backup. In case of project templates, after choosing the Local option, the catalog paths from our computer will be displayed. If we do not want to use this option, we can type in a chosen path in the text field, and click Add. The Local option allows only to indicate folders, not files. 32 | XOPERO BACKUP AND SYNCHRONIZATION IN ONE APPLICATION Another possibility is to employ pre-defined paths, which can be used on different operating systems. They refer to fixed system catalogs. Choosing this option is possible after clicking the Predefined button, and choosing an operating system (Windows XP or later). In addition, it is possible to apply filters to a created project, applied to: files and folders, Windows permission settings according to which the project will be created, and the following advanced options: • Without encryption - files included in the project will be sent to the QNAP disk unencrypted, • Without compression - the files will not be compressed before delivery, • File copies stored for: - specifying the number of versions created for a single file in the project. An alternative option is to specify the number of days to retain the backup version. • Backup type - allows you to specify how the files should be sent, whether they are to be sent in a differential or incremental way, and which method will be used during this process. After completing the configuration of the first backup within the template and the template name, you can save it by clicking the Save button, which is located in the lower right corner of the Create new backup template window. 33 | XOPERO BACKUP AND SYNCHRONIZATION IN ONE APPLICATION Window 38 Add a new project to the template button Each template can consist of any number of projects created by the user. In order add a new project to the template, click on the button highlighted in the screenshot above (Window 38). After clicking on it, a window appears, the same as while creating a template, except that the name of the template is already defined, and editing it becomes impossible. Window 39 Adding a project to a template 34 | XOPERO BACKUP AND SYNCHRONIZATION IN ONE APPLICATION 35 | XOPERO BACKUP AND SYNCHRONIZATION IN ONE APPLICATION Sending a template to the client application Sending a template to the client application is possible via the Devices tab, which can be accessed by clicking on the button marked in the screenshot below. Window 40 A button allowing to view the devices Next, you need to find the device to which you want to send a template on the list. By selecting a user, or a group from the tree on the left side of the application, we can view only the devices, which are assigned to the position chosen by us, for example, the devices of only one user. There is a possibility of sending a template to multiple devices at the same time. To do this, select multiple devices from the device list by holding down the CTRL key. Project templates can be sent only to devices which have remote management enabled, and are currently synchronized. 36 | XOPERO BACKUP AND SYNCHRONIZATION IN ONE APPLICATION After selecting the devices to which you want to send a template, click the right mouse button on one of them and select Add backupsets template from the context menu, and finally select a desired template. Window 41 Sending a template to the device Clicking on the name of a template causes to send the template to specified devices, except situations the projects from the template already exist on your computer. 37 | XOPERO BACKUP AND SYNCHRONIZATION IN ONE APPLICATION Project management Through the Management Center application you are able create new projects, as well as editing and deleting existing ones. Existing projects can be remotely started or stopped, if one of them is currently being performed. In order to view the list of projects on a given device, from where it is possible to manage them, please rightclick on the selected device, and then select List of backupsets. Displaying the list of projects is only possible for devices which have Remote management enabled and have been synchronized with the Management Center application. Window 42 List of backupsets Indicator Status informs whether at any given time it is possible to control the project. 38 | XOPERO BACKUP AND SYNCHRONIZATION IN ONE APPLICATION The List if backupsets consists of the following fields: • Backupset name - the project name defined by the user, • Number of files - the number of files, which so far have been sent within a chosen project • Next backup - the date of the next backup performed in accordance with the schedule, • Last backup - the date of the last performed backup project, • Status - the current status of the project, • Version limit: - a limit of versions set for the selected backup project, • Changed files - the number of files that have been modified between the two previous backups, • Changed data - the size of the data that have been modified between the last two backups, • Sent files- the number of files, which were sent during the last backup, • Sent data- the size of data that were sent during the last backup, • Errors – the number of errors that occurred during the last performed backup, • Warnings - the number of warnings that occurred during the last performed backup, • Edit - this column contains a button that allows to edit the project. 39 | XOPERO BACKUP AND SYNCHRONIZATION IN ONE APPLICATION Creating and editing a project To create a new project for a given device, go to the List of backupsets, and then click the Add backupset icon, which is displayed in the screenshot below. Window 43 Create a new backupset icon After clicking, a window for project edition will be displayed, the same as the add the project to the template window, but in this case there is no template Backupset name. Window 44 Creating a new project 40 | XOPERO BACKUP AND SYNCHRONIZATION IN ONE APPLICATION If the selected device is at the given time active, it is possible to remotely select a path intended for backup, that is to indicate the path directly on the device. To do this, click on the Remote button. Window 45 Remote path selection The particular fields of the new project wizard are described in the Project templates chapter. After setting all the parameters of the project, in order to save it, click the Save button in the lower right corner of the screen. You can also edit an existing project. To do that, click the More button (Window 46) in the Edit column. for a chosen project from the project list. 41 | XOPERO BACKUP AND SYNCHRONIZATION IN ONE APPLICATION Window 46 The button allowing project edition When you click the aforementioned button, the project edition window will appear, which will contain the settings for a selected project. They can be freely altered except for Backupset name and Type of copy fields. After making the modifications, click the Save button in the lower right corner of the displayed window. Window 47 Remove backupset button To remove an existing project, click the Delete button located in the upper right corner of the Backupset editing screen (Window 47). After you create or edit a project, the client application must synchronize the introduced changes. This process takes up to 30 seconds. If after this time, the status in the upper right corner of the Project list will not change to Synchronized, you need to refresh the list of projects. 42 | XOPERO BACKUP AND SYNCHRONIZATION IN ONE APPLICATION Performing and stopping backups By using the Management Center application it is possible to manually start and stop backups on users' computers. To do this, go to the project list, and then find the project you want to run or stop. Window 48 Start and stop button In order to launch the project, make sure that its status is Not running, and click on the Start button. Performing a Running project can be stopped at any time. To do this, simply tick a chosen project and click on the Stop icon. After you stop or start the project, the client application must synchronize the introduced changes. This process takes up to 30 seconds. If after this time, the status in the upper right corner of the Project list will not change to Synchronized, you need to refresh the list of projects. 43 | XOPERO BACKUP AND SYNCHRONIZATION IN ONE APPLICATION Restoring files The Management Center allows administrators to restore data sent by its users as backup. Files can be restored to the administrator’s or user’s computer. Data can be restored to the user's computer when the device has the Remote management option enabled and is Active. Window 49 The device tab - the context menu of a device In order to run the Data restore Wizard, you must go to the Devices tab, and then find a device on the list from which you want the data to be restored. After you right-click on a given device, a context menu will be displayed, from which you need to select Restore data. The screen will display the Restore data window, which contains a list of files uploaded by the user as a backup. 44 | XOPERO BACKUP AND SYNCHRONIZATION IN ONE APPLICATION Window 50 Restore data If there are many files on the user’s account, loading the window may take a while. This process is indicated by a progress bar. The administrator has the ability to filter the File in view of the project from which they were sent, or the latest version from or before the selected date. After selecting the files you want to restore, click the Download button. This will display the Restore data details window, where you can specify the device (the administrator’s or client’s computer), on which they are to be downloaded, as well as the location of the restored files. Additionally, you can specify the action that is to be taken by the application, in case when in the selected location there is a file with the same name as the restored one. 45 | XOPERO BACKUP AND SYNCHRONIZATION IN ONE APPLICATION Window 51 Details of the restoration After configuring the settings of the restored data location, click OK to begin the restoration process. Window 52 The restore status 46 | XOPERO BACKUP AND SYNCHRONIZATION IN ONE APPLICATION If the user whose data are restored, uses a personal encryption key, the application will ask to enter it. If the key is unknown for the user, downloading files will be impossible. Window 53 Device list with a chosen device, which data is restored Clicking on Details... in the Restore column will cause the progress window of file restore to reappear. 47 | XOPERO BACKUP AND SYNCHRONIZATION IN ONE APPLICATION User logs Client application logs are available by clicking on the Users logs button, which has been marked in the screenshot below (Window 54). Window 54 Users logs Application errors are marked in red. Warnings in yellow, and actions performed correctly in green. Above the list of logs filters are located, by which you can specify which logs are to be displayed. The available filters are: type of action, type of logs (error, warning, information) and the date from which you want them to be viewed. If the type of the log has a gray background, it means that this type of logs are not currently displayed on the list. After selecting a desired account from the tree on the left side of the window, the device filter will be activated, which is by default set to All. If you clear the selection button, by clicking on the device list, you can choose the ones that interests you, and then click on Filter. Only selected logs will be displayed. 48 | XOPERO BACKUP AND SYNCHRONIZATION IN ONE APPLICATION When you click on Details… in the log table, the application will display detailed information about a particular event. If the Show details column field is empty, this means that the log details are not available. Window 55 Detailed log of a performed backup 49 | XOPERO BACKUP AND SYNCHRONIZATION IN ONE APPLICATION Backup sessions Backup sessions are information about completed or currently running backups. In order to view them, go to the Devices tab, and then choose Backup sessions by right-clicking on a given device. Window 56 Backup session For each backup detailed information about the number and size of changed and sent files are available. There is also a specified number of errors and warnings that occurred during the backup, in case of their presence you can display detailed information by a right-click on an entry. 50 | XOPERO BACKUP AND SYNCHRONIZATION IN ONE APPLICATION Window 57 Error notification During performing backup on the user’s computer, information about the progress of the backup process ( are displayed in the Backup session window. Window 58 Backup sessions during sending data While being in the Backup sessions window you can stop the currently performed project by clicking the Stop ( ) button. 51 | XOPERO BACKUP AND SYNCHRONIZATION IN ONE APPLICATION Remote setting the core limit and the bandwidth of an account Client applications installed on users' computers may have set bandwidth limits as well as the number of cores, which they can use during backup. In order to set the limits for the device on which the application is installed, go to the Devices tab, and click the right mouse button on a given device, and select Device settings. From the menu, which will be expanded, you are able to select the Bandwidth limit, or the Core limit. Window 59 Bandwidth limit Window 60 Processor core Limit 52 | XOPERO BACKUP AND SYNCHRONIZATION IN ONE APPLICATION Remote device relogging The administrator has the ability to remotely relog the device to a chosen user account, which means that he can log out the device from one user account and log into another. In order to do that, you have to find a chosen device on the user account, and choose the Relogin client option. Window 61 Relogin the device to a chosen user account Window 62 Enter the password If a given device is already logged into a different account, the client application will be automatically relogged, in accordance to the administrator’s choice. In case if the last logging in had place a certain time ago, it is possible that the IP address of the device has been changed. In this case you should enter a new IP address. 53 | XOPERO BACKUP AND SYNCHRONIZATION IN ONE APPLICATION Device details The Administrator, who uses the Management Center application has the ability to access detailed information about the user's device and the client application installed on it. To view the details, go to the Devices tab, and then right-click on the selected device and choose the Device details option. Window 63 Device details In the appearing window you will find information about the selected device and user account to which it is assigned. Technical Support In case of problems with the operation of an application, go to the Backup Management window, choose from the Help tab, the Report problem option. Then will open the Web page, where you can create an account on the system used for reporting bugs. After creating an account and describing the problem, the system will present you the possibility to solve the problem. However, it may be that you will need to send the server logs and\ or application logs. 54 | XOPERO BACKUP AND SYNCHRONIZATION IN ONE APPLICATION Sending server logs To send the server logs, go to the Backup Management window, and then select Help tab and choose the Send server log option. After downloading the required information for the application window will appear where you should put your e-mail address and a description of the problem. By clicking on the Send button, the logs will be sent to the manufacturer of the software. Okno 1 Error reporting 55 | XOPERO BACKUP AND SYNCHRONIZATION IN ONE APPLICATION Remote sending application logs In the case of a malfunctioning Client application of Xopero, the administrator has the ability to inform the software producer about the problems by email or by using the bug reporting system. If it is necessary to send the Client application logs, you should: Find on the list the device on which the problem occurred, Select the option Device settings, Use the option Send report. Window 64 Send report After displaying this option, a request for additional information, necessary to report the problem, will appear. Window 65 Request for additional information 56 | XOPERO BACKUP AND SYNCHRONIZATION IN ONE APPLICATION After clicking the Send button, the data will be sent to the software producer. Delivery of the report or the client application logs should be performed only at the request of employees of the support work. 57 | XOPERO BACKUP AND SYNCHRONIZATION IN ONE APPLICATION GLOSARRY OF TERMS Project template – the project template is a set of backup projects. Each project may indicate other data and have their own unique features. The project template can be sent to any user device on which an Allow remote management option is marked. Backup project – a data set and the type of data which is to be subject to backup. For each project, it is also possible to specify the frequency of performing it, as well as additional advanced options. Data Storage - defined space on a QNAP network drive, in which the user data sent through the Xopero application is stored. Automatic data storage - an automatic data storage is a storage that automatically adapts its space to the space occupied on your QNAP disk. Thanks to it, if the space on the QNAP disk will be occupied and less space than it was previously defined will be available, the Xopero software will reduce the size of the storage by itself. Active device - a device which has performed any action within the last 30 minutes. This may lead to a situation where the Management Center device will be marked as active, while in reality it was turned off in less than 30 minutes from performing his last action. Host - the device on which the client application is installed and from which the user has at least once logged into his account. While the first login the device is being assigned to the user account. 58 |