1
StarOffice™ 7 Office Suite
A Sun™ ONE Software Offering
User's Guide
Sun Microsystems, Inc.
4150 Network Circle
Santa Clara, CA 95054
U.S.A. 650-960-1300
Part No. 817-1802-10
July 2003, Revision A
Copyrights and Trademarks
Copyright © 2003 Sun Microsystems, Inc., 4150 Network Circle, Santa Clara, California 95054. , U.S.A. All rights reserved.
Sun Microsystems, Inc. has intellectual property rights relating to technology embodied in the product that is described in this document. In particular, and without
limitation, these intellectual property rights may include one or more of the U.S. patents listed at http://www.sun.com/patents and one or more additional patents
or pending patent applications in the U.S. and in other countries.
This document and the product to which it pertains are distributed under licenses restricting their use, copying, distribution, and decompilation. No part of the
product or of this document may be reproduced in any form by any means without prior written authorization of Sun and its licensors, if any.
Third-party software, including font technology, is copyrighted and licensed from Sun suppliers.
This product is based in part on the work of the Independent JPEG Group and The FreeType Project.
Portions Copyright 2000 SuSE, Inc. Word for Word Copyright © 1996 Inso Corp. International CorrectSpell spelling correction system Copyright © 1995 by Lernout
& Hauspie Speech Products N.V. All rights reserved.
Sun, Sun Microsystems, the Sun logo, Java, Solaris, StarOffice, the Butterfly logo, the Solaris logo, and the StarOffice logo are trademarks or registered trademarks of Sun Microsystems, Inc. in the U.S. and other countries.
UNIX is a registered trademark in the U.S. and in other countries, exclusively licensed through X/Open Company, Ltd. Screen Beans and Screen Beans clipart characters are registered trademarks of A Bit Better Corporation.
Federal Acquisitions: Commercial Software - Government Users Subject to Standard License Terms and Conditions.
DOCUMENTATION IS PROVIDED "AS IS" AND ALL EXPRESS OR IMPLIED CONDITIONS, REPRESENTATIONS AND WARRANTIES, INCLUDING ANY
IMPLIED WARRANTY OF MERCHANTABILITY, FITNESS FOR FOR A PARTICULAR PURPOSE OR NON-INFRINGEMENT, ARE DISCLAIMED, EXCEPT TO
THE EXTENT THAT SUCH DISCLAIMERS ARE HELD TO BE LEGALLY INVALID.
Copyright © 2003 Sun Microsystems, Inc., 4150 Network Circle, Santa Clara, California 95054, Etats-Unis. Tous droits réservés.
Sun Microsystems, Inc. a les droits de propriété intellectuels relatants à la technologie incorporée dans ce produit. En particulier, et sans la limitation, ces droits de
propriété intellectuels peuvent inclure un ou plus des brevets américains énumérés à http://www.sun.com/patents et un ou les brevets plus supplémentaires ou
les applications de brevet en attente dans les Etats - Unis et les autres pays.
Ce produit ou document est protégé par un copyright et distribué avec des licences qui en restreignent l'utilisation, la copie, la distribution, et la décompilation.
Aucune partie de ce produit ou document ne peut être reproduite sous aucune forme, par quelque moyen que ce soit, sans l'autorisation préalable et écrite de Sun et
de ses bailleurs de licence, s'il y ena.
Le logiciel détenu par des tiers, et qui comprend la technologie relative aux polices de caractères, est protégé par un copyright et licencié par des fournisseurs de
Sun.
Ce produit repose en partie sur le travail de l’Independent JPEG Group et de The FreeType Project.
Portions Copyright 2000 SuSE, Inc. Word for Word Copyright © 1996 Inso Corp. Système de correction orthographique International CorrectSpell Copyright © 1995
de Lernout & Hauspie Speech Products N.V. Tous droits réservés.
Sun, Sun Microsystems, le logo Sun, Java, Solaris, StarOffice, le logo Butterfly, le logo Solaris et le logo StarOffice sont des marques de fabrique ou des marques
déposées de Sun Microsystems, Inc. aux Etats-Unis et dans d'autres pays.
UNIX est une marque déposée aux Etats-Unis et dans d'autres pays et licenciée exlusivement par X/Open Company, Ltd.
Les Screen Beans et les objets graphiques prédessinés Screen Beans sont des marques déposées de A Bit Better Corporation.
Acquisitions fédérales : logiciel commercial ; les utilisateurs gouvernementaux sont soumis aux conditions générales standard de la licence.
LA DOCUMENTATION est fournie « TELLE QUELLE » et TOUTES LES CONDITIONS, REPRÉSENTATIONS ET GARANTIES EXPRESSES OU TACITES, Y
COMPRIS TOUTE GARANTIE TACITE CONCERNANT LA QUALITÉ MARCHANDE, L'APTITUDE À UN USAGE PARTICULIER OU LA NON-VIOLATION
DE DROITS DE TIERS SERONT REJETÉES, EXCEPTÉ DANS LE CAS OÙ L'EXCLUSION OU LA LIMITATION DE TELLES GARANTIES NE SERAIT PAS AUTORISÉE PAR LA LÉGISLATION EN VIGUEUR.
Contents
1 StarOffice Documentation and Help
Using this Guide
23
Structure of this Guide
24
Icons and Conventions
25
Using the StarOffice Help
26
The StarOffice Help
Tips
23
26
27
Extended Tips
Help Agent
27
28
2 Working With StarOffice
The User Interface
29
29
Starting StarOffice
29
The StarOffice Window
30
Using Floating Toolbars
33
Opening and Saving Documents
Opening Documents
35
35
Using Microsoft Office and StarOffice
36
The Templates and Documents Dialog
39
3
Saving Documents
40
Changing the Title of a Document
41
Saving Documents in Other Formats
Changing Your Work Directory
42
Saving Documents Automatically
XML File Formats
42
43
Viewing File Properties
45
Sending Documents as E-mail
Printing a Document
41
46
46
Previewing a Page Before Printing
47
Printing Multiple Pages on One Sheet
Printing in Black and White
Printing Brochures
Spellcheck
48
48
50
50
Automatic Spellcheck
50
Checking Multilingual Texts
Starting the Spellcheck
51
52
Excluding Text From the Spellcheck
Selecting the Document Language
Using Automatic Functions
53
53
55
Using AutoCorrect and AutoFormat
55
Turning off Automatic URL Recognition
56
Creating a Letter Template With the AutoPilot
Inserting Hyperlinks
Editing Hyperlinks
Find & Replace
4
StarOffice™ 7 User's Guide
61
59
60
58
Finding a Word in Text
61
Searching for Whole Words Only
Match Case
62
62
Using Wildcards in Text Searches
Searching Backward
63
Current Selection Only
Searching for Styles
62
63
64
Searching for Special Formats
64
3 Creating Text Documents With StarOffice Writer
StarOffice Writer Features
Writing
65
65
65
Designing and Structuring
66
Desktop Publishing with StarOffice Writer
Calculations
66
Creating Drawings
66
Inserting Graphics
67
Flexible Application Interface
Drag&Drop
66
67
67
Extensive Help Functions
67
The StarOffice Writer Window
Entering and Formatting Text
68
69
Switching Insert Mode and Overwrite Mode
Using the Direct Cursor
69
70
Navigating and Selecting With the Keyboard
Inserting Special Characters
71
72
Contents
5
Inserting Protected Spaces, Hyphens and Conditional Separators
Emphasizing Text
73
Changing the Color of Text
74
Highlighting Text With a Brush
Rotating Text
74
75
Defining Borders for Pages
75
Defining Borders for Paragraphs
76
Defining Borders for Tables and Table Cells
Defining Borders for Objects
78
Making Text Superscript or Subscript
Changing the Case of Text
79
79
Moving and Copying Text in Documents
Resetting Font Attributes
77
80
80
Rearranging a Document by Using the Navigator
Quickly Applying Paragraph Styles
Using Sections
83
Inserting Sections
Editing Sections
82
83
85
Formatting Text With and Without Styles
85
Direct Formatting or Formatting With Styles
The Style Concept in StarOffice
86
Creating a Document Template
90
Page Styles Summary
92
Changing the Default Template
Templates and Styles
93
93
Creating New Styles From Selections
6
StarOffice™ 7 User's Guide
95
85
81
72
Applying Styles in Fill Format Mode
Updating Styles From Selections
96
96
Using Styles From Another Document or Template
Entering and Formatting Text Automatically
98
Turning Off AutoFormat and AutoCorrect
Automatically Check Spelling
Using AutoText
98
99
100
Displaying AutoText as a Help Tip
102
Adding Exceptions to the AutoCorrect List
Moving Text, Drawing Lines
103
103
Inserting, Editing, and Linking Text Frames
Using a Frame to Center Text on a Page
Animating Text
103
106
106
Drawing Lines in Text
107
Editing Text Objects With FontWork
Aligning Text to a Line
The Navigator
97
108
108
109
Jumping to a Specific Page
109
Jumping From One Reminder to Another
110
Jumping From One Object to Another in Text
Other Navigator Features
110
111
Indexes and Tables of Contents in StarOffice Writer
Defining Index or Table of Contents Entries
112
Editing or Deleting Index and Table Entries
113
Creating a Table of Contents
Creating Alphabetical Indexes
112
113
114
Contents
7
User-Defined Indexes
115
Creating a Bibliography
116
Updating, Editing and Deleting Indexes and Tables of Contents
Formatting an Index or a Table of Contents
Indexes Covering Several Documents
Headings and Numbering
118
119
119
Numbering and Numbering Styles
Adding Bullets
119
120
Adding Numbering
121
Outline Numbering
122
Creating Numbered or Bulleted Lists as You Type
Adding Chapter Numbers to Captions
Defining Number Ranges
124
124
125
Using Master Documents and Subdocuments
126
Changing the Outline Level of Numbered and Bulleted Lists
Modifying Numbering in a Numbered List
Adding Line Numbers
129
130
130
Tables in Text, Calculating in Text
Inserting Tables
117
132
132
Deleting Tables or the Contents of a Table
134
Inserting Text Before a Table at the Top of Page
Preparing Tables in Text Documents
Calculating in Text Documents
134
134
137
Calculating Complex Formulas in Text Documents
137
Calculating and Pasting the Result of a Formula in a Text Document
Displaying the Result of a Table Calculation in a Different Table
8
StarOffice™ 7 User's Guide
138
137
Calculating Across Tables
138
Calculating Cell Totals in Tables
Merging and Splitting Cells
139
140
Adding or Deleting a Row or Column to a Table Using the Keyboard
Repeating a Table Header on a New Page
Resizing Rows and Columns in a Table
141
142
Modifying the Behavior of Rows and Columns for Table
Copying Spreadsheet Areas to Text Documents
Images, Drawings, Clipart and FontWork
Positioning Objects
Adding Captions
141
143
144
145
145
145
Adding Chapter Numbers to Captions
Inserting a Graphic From a File
146
147
Inserting Graphics From StarOffice Draw or Impress
147
Inserting Graphics From the Gallery With Drag-and-Drop
Inserting a Scanned Image
148
Inserting a Calc Chart into a Text Document
Inserting a Horizontal Line
Headers, Footers and Footnotes
About Headers and Footers
148
148
149
150
150
Inserting Page Numbers in Footers
151
Inserting a Chapter Name and Number in a Header or a Footer
Defining Different Headers and Footers
153
Inserting Page Numbers of Continuation Pages
Formatting Headers or Footers
151
154
154
Inserting and Editing Footnotes or Endnotes
155
Contents
9
Spacing Between Footnotes
157
Page Numbers With Different Styles
158
Spellcheck, Dictionaries, Hyphenation
Checking Spelling Manually
Automatically Check Spelling
163
163
164
Removing Words From a User-Defined Dictionary
Hyphenation
Thesaurus
165
167
Form Letters, Business Cards and Labels
Creating a Form Letter
168
168
Creating and Printing Labels and Business Cards
Printing Address Labels
Newsletters
171
172
174
Creating a Newsletter From a Template
Further Information
181
Letters With Envelopes
182
Using a Ready-Made Letter Template
174
182
Creating a Letter Template Using the AutoPilot
Creating an Envelope
Summary
185
4 Creating Spreadsheets With StarOffice Calc
StarOffice Calc Features
Calculations
StarOffice™ 7 User's Guide
187
187
What-If Calculations
183
183
Creating and Printing a Letter With an Envelope
10
165
187
187
185
Database Functions
188
Arranging Data
188
Dynamic Charts
188
Opening and Saving Microsoft Files
Structure of a Spreadsheet
Rows and Columns
190
190
Multiple Sheets in a Document
Applying Multiple Sheets
Renaming Sheets
191
192
193
Values and Formulas as Cell Contents
Calculating in Spreadsheets
What Can a Cell Contain?
Text
188
193
194
195
195
Numbers
196
Cells in Currency Format
197
Calculating With Formulas
199
Calculating With Dates and Times
Inserting and Editing Notes
Handling Multiple Sheets
200
201
202
Navigating Through Sheets Tabs
Working With Multiple Sheets
Printing Spreadsheets
203
Formatting a Spreadsheet
204
202
202
Formatting Numbers With Decimals
Formatting Dates and Times
205
Formatting Cells and Sheets
205
204
Contents
11
Using AutoFormat for Tables
Layout of Spreadsheets
207
Designing Spreadsheets
Addressing Cells
206
207
209
Addresses and References, Absolute and Relative
Addressing by Name
211
Recognizing Names as Addressing
Only Copy Visible Cells
212
213
Using References in Formulas
214
References to Other Sheets and Referencing URLs
Using Charts
209
215
217
Editing Chart Titles
221
Editing Chart Legends
222
Adding Texture to Chart Bars
Editing Chart Axes
222
223
Database Functions in StarOffice Calc
Defining Database Ranges
Sorting Database Ranges
Filtering Database Ranges
223
224
225
225
Grouping Database Ranges and Calculating Subtotals
Transferring Data From a Data Source to a Spreadsheet
Evaluating Data With StarOffice Calc
DataPilot
230
Creating DataPilot Tables
231
Selecting DataPilot Output Ranges
Editing DataPilot Tables
12
StarOffice™ 7 User's Guide
230
233
233
226
228
Filtering DataPilot Tables
234
Updating DataPilot Tables
234
Deleting DataPilot Tables
Consolidating Data
234
235
Applying Goal Seek
237
Applying Multiple Operations
Using Scenarios
238
241
Validity of Cell Contents
242
Printing or Exporting Spreadsheets
Printing Sheet Details
245
245
Defining Number of Pages for Printing
Printing Sheets in Landscape Format
246
246
Printing Rows or Columns on Every Page
Saving and Opening Sheets in HTML
Importing and Exporting Text Files
AutoFill
247
248
249
250
Applying Sort Lists
250
Automatically Calculating Series
Managing Your Stock Portfolio
Selecting the Currency
Overview
251
252
253
253
Buying Shares
253
Portfolio Overview
Internet Update
254
255
History (Only for US Dollars)
Dividend Payment
255
256
Contents
13
Selling Shares
Stock Split
Movements
256
257
257
Brokerage Fees
258
Completing the Stocks Document
Further Information
260
Shift Plan (Duty Roster)
261
259
Creating a Shift Plan with a Template
Creating Individual Shift Plans
Calendar
261
263
266
Creating a Calendar with a Template
266
5 Creating Presentations With StarOffice Impress
StarOffice Impress Features
269
Creating Vector Graphics
Creating Slides
269
270
270
Creating Presentations
270
Publishing Presentations
Giving Presentations
A Basic Presentation
270
270
272
Creating a Presentation With the AutoPilot
272
Creating a Simple Presentation Without the AutoPilot
Switching Presentation Views
275
Incorporating Slide Show Effects
Showing a Presentation
Editing a Presentation
14
StarOffice™ 7 User's Guide
277
276
276
274
Changing the Slide Background Fill
277
Applying a Slide Design to a Master Slide
Presentation Styles
279
Zooming With the Keypad
281
Copying Slides From Other Presentations
Slide Transitions, Effects and Animation
Selecting Underlying Objects
282
284
Rehearse Timings of Slide Changes
Exporting, Printing and Presenting
Printing Presentations
281
284
Creating a Custom Slide Show
287
288
288
Printing a Slide to Fit a Paper Size
289
Exporting Presentations as Web Pages
290
Exchanging Data Through the Clipboard
Business Report
278
291
292
Creating a Business Report in Presentation Form
Creating a Slide Show
Presenting a Product
295
296
Creating a Presentation with a Template
296
Inserting, Deleting and Renaming Slides
297
Creating and Printing Handouts
Organizing and Printing Notes
Organization Chart
292
297
298
299
Creating Company Organization Charts
Further Information
299
304
Contents
15
6 Creating Drawings With StarOffice Draw
StarOffice Draw Features
Vector Graphics
305
305
305
Creating 3D Objects
306
Grids and Snap Lines
306
Connecting Objects to Show Relationships
Displaying Dimensions
Gallery
306
306
306
Graphic File Formats
306
Drawing Rectangles and Ellipses, Entering Text
Rotating Objects
310
Arranging and Aligning Objects
Drawing Sectors and Segments
Adding Text
308
310
312
313
Creating 3D Text
314
Drawing, Editing and Converting Curves and Objects
Drawing Graphics With the Draw Functions
Creating Round Corners
Drawing Curves
Editing Curves
315
315
316
316
318
Connecting Lines
320
Assembling 3D Objects
320
Converting Bitmap Images into Vector Graphics
Converting Text Characters into Drawing Objects
321
322
Converting 2D Objects to Curves, Polygons, and 3D Objects
Working With Objects
16
StarOffice™ 7 User's Guide
326
323
Duplicating Objects
326
Cross-Fading Two Objects
Grouping Objects
328
329
Combining Objects and Constructing Shapes
330
Graphic Objects in Drawings and Presentations
Adding Text to Bitmaps
332
Inserting, Editing, Saving Bitmaps
Inserting Bitmaps
333
333
Editing Bitmaps
334
Saving Bitmaps
334
Working With Colors
The Color Bar
332
335
335
Defining Custom Colors
Replacing Colors
335
336
Gradients and Patterns for Objects and Background
Creating Gradient Fills
338
Organizing the Attribute Tables
3D Globe
340
341
Creating Texture on a 3D Object
Using Illumination
Logo
337
341
343
348
Designing 3D Objects From Font Characters
Construction Drawing
349
351
Creating a Construction Plan
352
Contents
17
7 Advanced Tips for Working With StarOffice
Revision Marking Function
355
Recording and Displaying Changes
Accepting or Rejecting Changes
355
356
Comparing Versions of a Document
Merging Versions
355
357
357
Recording Changes
358
Protecting Records
359
Version Management
Data Sources in StarOffice
359
360
Registering an Address Book
361
Importing and Exporting Data in Text Format
Table Design
367
Form Design
368
Create, Use, and Edit Database Reports
369
Searching Tables and Form Documents
371
Searching With a Form Filter
365
371
Copying and Moving Data Using Drag-and-Drop
375
Dragging and Dropping Within a StarOffice Document
Inserting Objects From the Gallery
377
Copying Graphics From the Gallery
Adding Graphics to the Gallery
379
379
Copying Graphics Between Documents
380
Copying Drawing Objects Into Other Documents
Drag-and-Drop With the Data Source View
381
Copying Spreadsheet Areas to Text Documents
18
StarOffice™ 7 User's Guide
380
382
376
Inserting Data From Spreadsheets
383
Inserting Data From Text Documents
383
Modifying and Customizing the User Interface of StarOffice
Configuring StarOffice
385
Customizing Toolbars
385
Inserting, Moving and Deleting Icons on Toolbars
Saving Configurations With Documents
Changing Icon Views
Selecting Measurement Units
387
389
389
Switching Object Bars With the Context Menu
Changing Default Templates
Changing the Color of Text
389
390
392
Protecting Content in StarOffice
392
397
StarOffice Math Features
Creating a Formula
398
398
Typing a Formula Directly
398
Creating a Formula in the Commands Window
Individual Symbols
Formulas in Context
8 Appendix
386
388
Changing the Look of the User Interface
Recording a Macro
385
398
399
399
401
Writing Top to Bottom or Right to Left
Error Report Tool
401
402
Starting the Error Report Tool
402
Contents
19
Completing the Report
402
Sending the Error Report
What Data is Sent?
403
403
Sample Macros Provided
404
Calling the Sample Macros
404
Editing the Sample Macros
404
The Sample Macros
405
Accessibility in StarOffice
407
Assistive Tools in StarOffice
407
Requirements to use assistive tools in StarOffice
Supported Assistive Tools
Supported Input Devices
408
408
General Shortcut Keys in StarOffice
Using Shortcut Keys
409
409
Calling Menus With Shortcut Keys
409
Using Shortcut Keys to Control Dialogs
Shortcut Keys for Mouse Actions
Practical Text Input Fields
Interrupting Macros
407
409
410
410
411
List of General Shortcut Keys in StarOffice
Shortcut Keys Using the Function Keys
Shortcut keys in the Gallery
411
413
414
Navigating through StarOffice without a mouse
415
Editing Shortcut Keys in the Customize Toolbars dialog
Selecting Rows and Columns in a Table
Shortcut Keys for Drawing Objects
20
StarOffice™ 7 User's Guide
416
416
416
Shortcut Keys for StarOffice Writer
418
Function Keys for StarOffice Writer
418
Shortcut Keys for StarOffice Writer
419
Shortcut Keys for Paragraphs and Heading Levels
Shortcut Keys for Tables in StarOffice Writer
422
423
Shortcut Keys for Moving and Resizing Frames, Graphics and Objects
Shortcut Keys for Spreadsheets
425
Navigating in Spreadsheets
425
Function Keys Used in Spreadsheets
427
Formatting Cells Using Shortcut Keys
Using the DataPilot
428
428
Shortcut Keys for StarOffice Impress
430
Function Keys for StarOffice Impress
Shortcut Keys in Slide Shows
430
430
Shortcut Keys in the Drawing View
Shortcut Keys for StarOffice Impress
431
432
Navigating with the Keyboard in Slide View
Shortcut Keys for Drawings
433
433
Function Keys for Drawings
433
Shortcut Keys for Drawings
434
Shortcut Keys Specific to Drawings
435
Shortcut Keys for 3D Effects (Illumination tab)
9 Index
424
436
437
Contents
21
22
StarOffice™ 7 User's Guide
CHAPTER
1
1
StarOffice Documentation and Help
There are different ways of obtaining information about working with StarOffice:
The StarOffice User's Guide - This contains most of the answers to questions
about working with StarOffice.
StarOffice Help - You can get detailed answers to all questions at any time by
pressing F1, opening the Help menu or clicking the Help buttons. You can find
information on using the StarOffice Help starting on page 26.
Through the Internet, you can find further information, support newsgroups
and the latest news about StarOffice at www.sun.com.
Using this Guide
This User's Guide is designed for users who are already familiar with the basic
functions of their computer.
The User's Guide primarily describes the functions available in the Windows
version of StarOffice. There may be differences in certain functions on other operating system platforms.
23
Structure of this Guide
Chapter 1: StarOffice Documentation and Help
Introduction to the User's Guide and to StarOffice Help.
Chapter 2: Working With StarOffice
Overview of general topics of relevance to the whole of StarOffice.
Chapter 3: Creating Text Documents With StarOffice Writer
Instructions for word processing in StarOffice Writer.
Chapter 4: Creating Spreadsheets With StarOffice Calc
Instructions for using spreadsheets in StarOffice Calc.
Chapter 5: Creating Presentations With StarOffice Impress
Instructions for presentations in StarOffice Impress.
Chapter 6: Creating Drawings With StarOffice Draw
Instructions for drawing in StarOffice Draw.
Chapter 7: Advanced Tips for Working With StarOffice
Instructions for working with data sources, the gallery and copying between
different program modules.
In Appendix you will find additional information for specific groups of users, plus
a list of all keyboard shortcuts. At the end of the manual is an alphabetical index
to help you find the keywords that you need.
24
StarOffice™ 7 User's Guide
Icons and Conventions
Icons in the Documentation
There are three icons used to call your attention to additional helpful information.
The "Important!" icon points out important information regarding data and
system security.
The "Note" icon points out extra information: for example, alternative ways to
reach a certain goal.
The "Tip" icon points out tips for working with the program in a more efficient
manner.
The names of menu commands, icons, dialogs and other control elements of
StarOffice are hereafter printed in bold.
To delineate the steps for opening dialogs, a special shorthand is used. For
example, when you read "choose Tools - Options - StarOffice - User Data", this
means that you first choose the Tools menu on the menu bar, choose Options
from the submenu that then appears, then in the dialog choose StarOffice and
finally User Data.
Chapter 1
StarOffice Documentation and Help
25
Using the StarOffice Help
Different kinds of help are available in StarOffice. You can choose step-by-step
instructions in the StarOffice Help, Help Tips that pop up next to the mouse
pointer, or, similar to Help tips, more detailed explanations in Extended Tips.
The StarOffice Help
To access the StarOffice Help, use the Help - Contents menu or click the Help
buttons in the individual dialogs.
The StarOffice Help is context-sensitive. This means that, to get help about a
spreadsheet in StarOffice Calc, you first open a spreadsheet and only then look for
help, or select the help you need from the combo box at the top of the Help
window. The combo box at the top of the Help window limits the search function
to the chosen application.
Press F1 in the StarOffice Help window to see instructions how you can get the
most out of the StarOffice Help.
26
StarOffice™ 7 User's Guide
Tips
It is best to keep the Tips switched on (mark the menu Help - Tips).
If you pause with your mouse pointer on an icon in StarOffice, the icon name is
displayed as a Tip. You can also see Tips on other items in StarOffice such as when
you scroll through a table, the Tip appears on the row or column.
Showing or Hiding Tips
Choose Help - Tips.
Extended Tips
We recommend that you switch on the Extended Tips until you are familiar with
StarOffice.
This gives you a brief description of each item on the screen when you allow the
mouse pointer to rest there for a moment.
Chapter 1
StarOffice Documentation and Help
27
Turning extended tips on and off
Choose Help - Extended Tips to turn extended tips on and off. The
command is marked if the Extended Tips function is switched on.
Press Shift+F1 to turn Extended Tips on temporarily. The pointer
turns into the Extended Tips pointer. You now see the Extended Tips
for any element on the screen where you move the pointer. As soon
as you click with the mouse or press a key, it turns back into the
normal mouse pointer.
Help Agent
When you perform certain actions in StarOffice, the Help Agent
automatically appears. This is a small window in a corner of the
document.
The Help Agent normally remains visible for 30 seconds. When you click it, a help
window opens, providing some helpful advice about the current topic.
If you repeatedly ignore or close a Help Agent dealing with the same topic instead
of clicking it, it will not appear again for this topic. Resetting the Help Agent
restores it to the way it was when StarOffice was first installed.
Turning the Help Agent on and off
28
If there is a check mark next to the Help - Help Agent menu, the Help Agent
will appear when you perform certain actions in StarOffice.
In Tools - Options - StarOffice - General, you can activate and reset the Help
Agent and set its display duration.
StarOffice™ 7 User's Guide
CHAPTER
2
2
Working With StarOffice
This chapter starts with a general explanation of the most common features to
control StarOffice, such as toolbars, floating toolbars and dockable windows. This
is followed by information on functions that can be used in almost all the modules
of StarOffice, such as printing, spellcheck, and search and replace.
The User Interface
StarOffice offers some specialties not available in other programs:
Some of the StarOffice functions are accessed by right-clicking on an object.
Some of the icons on the StarOffice toolbars expand into a window with more
icons on it after you perform a long-click on the icon.
Some dialogs appear after you drag-and-drop an object with the mouse.
Starting StarOffice
Once you have installed the program under Windows, you will find the StarOffice 7
group on the Start menu under Programs. To start with a blank text document in
StarOffice Writer, click Text Document. To start with a blank spreadsheet in StarOffice Calc, click Spreadsheet, and so on. On other operating systems, the location of the
icons or links to start StarOffice depends on the window manager in use.
When working under Windows, you can use the StarOffice 7 Quickstarter. On the Windows task bar you will find an icon that you can either
double-click or right-click to open its context menu.
Right-clicking Quickstarter opens a submenu from which you can open a new,
blank document. Double-click Quickstarter to open the Templates and Documents dialog (see page 39).
29
The StarOffice Window
A text document is displayed and edited in the StarOffice Writer window. A
spreadsheet, presentation or drawing is displayed in a very similar window,
except the menus and icons change automatically depending on the context.
Toolbars in the StarOffice Window
30
Title Bar
Horizontal ruler
Menu Bar
Main Toolbar
Function Bar
Vertical scroll bar
Object Bar
Status Bar
StarOffice™ 7 User's Guide
The Title Bar
The title bar shows the name of StarOffice and usually the file name of the current
document. If you gave the document a title in File - Properties - Description, you
will see this instead of the file name.
The Menu Bar
At the top of the StarOffice window is the menu bar. Point with the mouse to a
command on the menu bar and press the left mouse button. The menu opens,
allowing you to choose a command from the submenu by clicking it.
The menus are organized into basic functions. On the Edit menu, for example, are
the functions you need to edit the current document (cut, copy, paste, undo
changes and so on), while on the View menu are functions that allow you to
control your view of the elements displayed on the screen.
The window containing the document you want to work on must be selected in
order to use the menu commands. Similarly, you must select an object in the
document to use the menu commands associated with the object.
The menus are context sensitive. This means that those menu items are available
that are relevant to the work currently being carried out. If the cursor is located
in a text, then all of those menu items are available that are needed to edit the
text. If you have selected graphics in a document, then you will see all of the
menu items that can be used to edit graphics.
You can see only the menu items that can currently be chosen. The other inactive
menu items are hidden. If you choose Tools - Options - StarOffice - View, you
can select the Inactive menu items box to see the inactive menu items as gray
items.
In StarOffice you can change and adapt the menu bar the way you like. You can
also modify many of the toolbars and the Status Bar (Tools - Configure, see
page 385).
The Toolbars
Below the menu bar is the Function Bar. This bar contains icons for several important commands and functions that you can use in StarOffice - to open a document
or print the current document, for example.
Chapter 2
Working With StarOffice
31
Immediately above the document is the Object Bar. This offers features
that are always appropriate to the current context. For example, if you
select a piece of normal text, you will see different icons than if the cursor
is positioned in a bulleted list or in a text table. If the cursor is positioned in
a bulleted list within a text table, for example, you can toggle the Object
Bar with an icon at the far right of the Object Bar.
On the left edge of the document is the Main Toolbar. This varies depending on
the document type (text, spreadsheet, presentation, drawing or formula).
It is easy to modify the toolbars. For example, if you would rather have the Main
Toolbar on the right edge of the document instead of on the left, hold down Ctrl
and drag it there. If you want to change the sequence of icons on a bar, you can
drag the icons to the new location while pressing the Alt key (in the Windows
version). You can find more information about adapting StarOffice starting on
page 385.
Many icons open floating toolbars. These icons have small triangles to indicate
that you can open the floating toolbar with a long click. These icons behave differently depending on whether you do a short or long click on them.
32
StarOffice™ 7 User's Guide
Using Floating Toolbars
The Insert icon is located at the top of the Main Toolbar of a text document. Longclick on this icon. This opens a floating toolbar containing further icons.
You now have a choice: either click the icon that you want to activate, or seize the
floating toolbar by its title bar and drag it away from the Main Toolbar while
holding down the mouse button. You first have to release the mouse button, otherwise you cannot seize the title bar with the mouse.
Now look at the icon at the top of the Main Toolbar with which you opened the
floating toolbar. You always see the icon from the floating toolbar that you used
last. If you click the Insert Graphics icon, you will see that icon at the top of the
Main Toolbar instead. A short click opens the directly visible function, whereas a
long click opens the floating toolbar again.
The Document Window
At the top left hand edge of the document window are the toolbars that you need
in your work, and that vary depending on the document type and context. At the
bottom edge is the Status Bar.
The Status Bar contains different fields displaying information appropriate to the
type of document. Some of these fields give you access to special functions, either
by double-clicking or by opening the relevant context menu. For more detailed
explanations, refer to StarOffice Help.
Chapter 2
Working With StarOffice
33
Docking Windows
To show or hide a docked window, click the arrow icon. To change to or from a
floating state, click the pushpin icon. A floating docked window may overlap
some of the underlying document. A fixed docked window does not overlap the
document.
A window docked by its left edge has the following icons:
Show
Click the Show icon to open a docked window.
Hide
Click the Hide icon to close a docked window.
Stick
Click the Stick icon to fix a floating docked window.
Floating
Click the Floating icon to change a fixed docked window to a floating
docked window.
On any window edge where another window is docked you will see two buttons
which allow you to show, hide or fix the window.
34
If you use the arrow button on the window edge to show the other window, the
window will remain visible until you manually hide it again (with the same
button).
If you show the window by clicking the window border, you activate the AutoHide function. The AutoHide function allows you to temporarily show a
hidden window by clicking on its edge. When you move the pointer outside of
the window area, it will become hidden again.
StarOffice™ 7 User's Guide
Opening and Saving Documents
There are various ways of loading or opening documents. For example, you can
use the Open dialog and the Templates and Documents dialog. To save the
current document, press Ctrl+S. If you want to use the current document as a
template, use the menu File - Templates - Save.
Opening Documents
To open a document that was saved before, you have several choices. You
can choose File - Open, click the Open File icon on the function bar, or use
the Ctrl+O shortcut keys.
You see the Open dialog. Under Windows, a system dialog is automatically
displayed when opening and saving StarOffice documents. Choose Tools Options - StarOffice - General and mark Use StarOffice dialogs. Then you will
see the StarOffice dialogs shown in this guide.
Chapter 2
Working With StarOffice
35
This dialog is described in detail in the StarOffice Help. However, here are a few
tips:
You can change the size of the dialog by dragging the borders of the dialog
with your mouse.
Click the Default Directory icon to go straight to your work directory. To
define your work directory, choose Tools - Options - StarOffice - Paths.
You can long-click or short-click the Up One Level icon. A short click takes
you one directory higher. A long click opens a submenu with a choice of
superordinate directories.
To only see files containing a certain name, enter the name with wildcards
in the File name combo box and press Enter. If you use *.txt for example,
only the files having .txt at the end of their names will be displayed. If you
use s* all names beginning with the letter s will be displayed.
Using Microsoft Office and StarOffice
StarOffice can open and save documents in the Microsoft Office file formats.
Opening a Microsoft Office File
36
Choose File - Open. Select a Microsoft Office file in the StarOffice file open
dialog.
MS Office file...
...will open in StarOffice module
MS Word, *.doc
StarOffice Writer
MS Excel, *.xls
StarOffice Calc
MS PowerPoint, *.ppt, *.pps
StarOffice Impress
StarOffice™ 7 User's Guide
Saving as a Microsoft Office File
1. Choose File - Save As.
2. In the File type box, select a Microsoft Office file format.
Always Save Documents in Microsoft Office Formats
1. Choose Tools - Options - Load/Save - General.
2. In the Standard file format area, first select a document type, then select the
file type for saving.
From now on, if you save a document, the File type will be set according to your
choice. Of course, you still can select another file type in the file save dialog.
Always Use StarOffice to Open Microsoft Office Files
The following applies to MS Windows only:
1. Exit StarOffice and the StarOffice Quickstarter.
2. Run the StarOffice Setup program.
3. In the StarOffice Setup, check the Modify option and click Next.
4. In the next dialog, click the Modify button.
5. In the next dialog, select or deselect the file types. Click OK and complete the
StarOffice Setup program.
Converting Many Microsoft Office Files into StarOffice Files
The Document Converter AutoPilot will convert all Microsoft Office files in a
folder into StarOffice documents. You can specify the folder to be read, and the
folder where the converted files are to be saved. You can limit the conversion to
specific file types, such as only Word files, or only templates.
Choose File - AutoPilot - Document Converter to start the AutoPilot.
Chapter 2
Working With StarOffice
37
Macros in Microsoft Office and StarOffice
Microsoft Office and StarOffice cannot run the same macro code. Microsoft Office
uses VBA (Visual Basic for Applications) code, and StarOffice uses StarBasic code
based on the StarOffice API (Application Program Interface) environment.
Although the programming language is the same, the objects and methods are
different.
If you use macros in one of the applications and want to use the same functionality
in the other application, you must edit the macros. StarOffice can load the macros
that are contained within Microsoft Office files and you can then view and edit the
macro code in the StarOffice Basic IDE editor.
You can choose to preserve or delete VBA macros
Open a Microsoft Office document that contains VBA macro code. Change only
the normal contents (text, cells, graphics), and do not edit the macros. Save the
document as a Microsoft Office file type. Open the file in Microsoft Office, and the
VBA macros will run as before.
You may delete the VBA macros from the Microsoft Office file on loading or on
saving.
38
Choose Tools - Options - Load/Save - VBA Properties to set the VBA macro
handling of StarOffice.
StarOffice™ 7 User's Guide
The Templates and Documents Dialog
The Templates and Documents dialog allows you to manage your templates and
sample documents.
To open the Templates and Documents dialog, do one of the following:
Choose File - New - Templates and Documents
Press Shift+Ctrl+N.
Double-click the StarOffice 7 Quickstarter icon on the task bar.
The dialog offers the following areas, which you can select by clicking in the left
field:
New Document - This is one way of creating a new, empty document.
Templates - Choose from the many ready-to-use document templates we have
prepared for you.
My Documents - A quick route to the documents in your work directory. To
define your work directory, choose Tools - Options - StarOffice - Paths.
Samples - The provided samples show you what you can do with StarOffice.
Chapter 2
Working With StarOffice
39
Saving Documents
To save your current document, use the Save command in the File menu,
the Save Document icon on the Function Bar, or just press Ctrl+S.
When you save a new document for the first time, a dialog will appear where you
can choose where you want to store the file.
Assign your text document a name when you save it the first time. Choose any
name you would like, according to the restrictions of your operating system.
Save your documents regularly as you work on them. The simplest way is to save
the current document by pressing Ctrl+S. This replaces the document on the data
medium with the current document.
Exporting Documents to PDF
You can export the current document as an Adobe PDF (Portable Document
Format) file. This format ensures that the formatting will be kept as intended even
if the user opens the document on another computer with another operating
system.
A PDF file can be opened by the Adobe PDF Reader software, which is available
for all operating systems for which you can get StarOffice. You cannot open a PDF
file in StarOffice, but you can export any StarOffice document to PDF.
40
StarOffice™ 7 User's Guide
To export the current document to PDF, do one of the following as applicable:
Click the Export Directly as PDF icon on the Function Bar.
Choose File - Export as PDF. Enter a name and click Export. This will open a
dialog with a choice of options.
Changing the Title of a Document
The title of the current document is displayed on the title bar of StarOffice.
When you create and save a document for the first time, the title is the same as the
file name.
How to change the title of the current document
1. Choose File - Properties. This opens the Properties of dialog.
2. Select the Description tab.
3. Type the new title in the Title box and click OK.
Saving Documents in Other Formats
1. Choose File - Save as. You will see the Save as dialog.
2. In the Save as type list box, select the desired format.
3. Enter a name in the File name box and click Save.
If you always want to save your StarOffice documents in another format, select
that format in Tools - Options - Load/Save - General in the Standard file format
area.
Chapter 2
Working With StarOffice
41
Changing Your Work Directory
When you start a dialog to open or save a document, StarOffice initially displays
your work directory. To change this directory:
1. Choose Tools - Options - StarOffice - Paths.
2. Click My Documents and click the Edit button, or double-click on My Documents.
3. In the Select Path dialog, choose the work directory you want and click OK.
You also use this procedure to change the directory displayed by StarOffice when
you want to insert a graphic. Choose Tools - Options - StarOffice - Paths Graphics, then follow step 3.
Saving Documents Automatically
To create a backup file every time you save a document
1. Choose Tools - Options - Load/Save - General.
2. Mark Always create backup copy.
If the Always create backup copy option is selected, the old version of the file is
saved to the backup directory whenever the latest version of the file is saved. If
this option is not selected, the old version of the file is overwritten by the latest
version.
42
The backup directory is {installpath}\user\backup. You can change the backup
directory by choosing Tools - Options - StarOffice - Paths, then change the
Backups path in the dialog.
The backup copy has the same name as the document, but the extension is .
BAK. If the backup folder already contains such a file, it will be overwritten
without warning.
StarOffice™ 7 User's Guide
To save automatically every n minutes
1. Choose Tools - Options - Load/Save - General.
2. Mark AutoSave every and select the time interval in the spin button.
3. Mark Prompt to save if you want to be asked prior to automatic saving
whether you want to save the document.
This command saves the current document as if you pressed Ctrl+S. If the document was saved previously, the latest version of the file will overwrite the old
version.
XML File Formats
StarOffice uses an XML file format as the default for saving and opening its documents.
XML file format names
StarOffice uses the following XML formats:
Application
File extension
StarOffice Writer
*.sxw
StarOffice Writer templates
*.stw
StarOffice Calc
*.sxc
StarOffice Calc templates
*.stc
StarOffice Impress
*.sxi
StarOffice Impress templates
*.sti
StarOffice Draw
*.sxd
StarOffice Draw templates
*.std
StarOffice Math
*.sxm
Master documents
*.sxg
These file name extensions allow better differentiation if you are searching though
a lot of files of different file types in a directory. The extension also clearly indiChapter 2
Working With StarOffice
43
cates that compressed XML files are involved that must first be unpacked before
being read.
If you want to work permanently with another file format, you can define that
format as the default. Choose Tools - Options - Load/Save - General to find
alternative file formats that can be selected for each StarOffice document type.
XML file structure
The StarOffice XML file formats are compressed according to the ZIP method. Use
an unpacking program of your choice to unpack the content of an XML file with its
subdirectories. You see a structure similar to the following illustration.
The text content of the document is located in content.xml.
By default, content.xml is stored without formatting elements like indentation
or line breaks to minimize the time for saving and opening the document. On
the Tools - Options - Load/Save - General tab page you can activate the use of
indentations and line breaks by clearing the check box Size optimization for
XML format (no pretty printing).
The file meta.xml contains the meta information of the document, which you
can enter under File - Properties.
If you save a document with a password, all XML files except meta.xml will be
encrypted.
44
The file settings.xml contains further information about the settings for this
document.
In styles.xml, you find the Styles applied to the document that can be seen in
the Stylist.
The meta-inf/manifest.xml file describes the structure of the XML file.
StarOffice™ 7 User's Guide
Additional files can be contained in the packed file format. For example, illustrations can be contained in a Pictures subdirectory, Basic code in a Basic subdirectory, and linked Basic libraries in further subdirectories of Basic.
Definition of the XML formats
The DTD (Document Type Description) files can be found in {installpath}
\share\dtd.
Note that the formats are subject to certain licenses. You can find notes on the
licenses at the start of the DTD files. More detailed information can be found on
the OpenOffice.org website.
Viewing File Properties
File properties, such as author name, subject, and keywords, help you manage and
identify your documents. StarOffice also tracks file statistics, including the number
of words and the number of pages in a document, and automatically adds the
statistics as part of the file property.
You can view file properties for the current document or for a document in the
Open dialog.
To view file properties for the current document:
Choose File - Properties.
To view file properties for a document listed in the Open dialog
(Windows only):
1. Choose File - Open.
2. Select a file in the list.
3. Right-click and choose Properties.
Chapter 2
Working With StarOffice
45
Sending Documents as E-mail
Working in StarOffice, you can send the current document as an e-mail attachment.
1. Choose File - Send - Document as E-mail.
StarOffice opens your default e-mail program. If you want to send it with
another e-mail program, you can select it with Tools - Options - StarOffice External Programs.
2. In your e-mail program, enter the recipient, subject and any text you want to
add, then send the e-mail.
Printing a Document
StarOffice has various options for printing the current document.
Click the Print File Directly icon on the Function Bar to print the current
document without the intervention of a dialog.
You control printing mainly with the Print dialog, which you open by choosing
File - Print, or with the shortcut keys Ctrl+P.
46
StarOffice™ 7 User's Guide
In this dialog, you can select a specific printer (if you have installed more than one
printer). Under Print range, you can determine how many pages you want to have
printed (or only certain pages), and how many copies you want.
By default StarOffice uses a "virtual printer" to ensure that the pages on the
screen look like the printed pages on paper. You can tell StarOffice to use the
printer metrics of your installed printer instead of the "virtual printer" for each
document type. Choose the menu Tools - Options - (name of document type) General.
If you use printer metrics, the selected printer defines the width and height of the
characters, and therefore also the line and page breaks.
Define printer options for the current print job by clicking the Options button in
the Print dialog. Define options that will apply for all future print jobs by choosing
Tools - Options - (name of document type) - Print.
You can print the current document "to file". When you print to a file, all the information that would otherwise be sent to the printer is initially written to a file. On
another computer, the file can then be copied directly to the printer connected to
it.
Previewing a Page Before Printing
1. Choose File - Page Preview.
2. Use the zoom icons on the Object Bar to reduce or enlarge the view of the
page.
3. Use the arrow keys or the arrow icons on the Object Bar to scroll through the
document.
Chapter 2
Working With StarOffice
47
Printing Multiple Pages on One Sheet
In Page Preview mode, you have the option to print multiple pages on one sheet.
1. Choose File - Page Preview.
2. Do one of the following:
To print two pages side by side on the same page, click the Page Preview:
Two Pages icon on the Object Bar.
To print multiple pages on the same page, click the Print options page view
icon on the Object Bar and set the options that you want.
3. Click the Print page view icon.
Print page view
Printing in Black and White
Printing text and graphics in black and white
1. Choose File - Print. The Print dialog opens.
2. Click on Properties. This opens the Properties dialog for your printer.
3. Select the option to print in black and white. For further information, refer to
the user's manual of your printer.
4. Confirm the Properties dialog and click OK in the Print dialog.
The current document will be printed in black and white.
Printing in black and white in StarOffice Impress and
StarOffice Draw
1. Choose Tools - Options - Presentation or Tools - Options - Drawing, as
appropriate.
2. Then choose Print.
48
StarOffice™ 7 User's Guide
3. Under Quality, select either Grayscale or Black & white and click OK.
When either of these options is selected, all presentations or drawings will be
printed without color. If you only want to print in black for the current printing
process, select the option in File - Print - Options.
Grayscale converts everything to a maximum of 256 gradations from black to
white. All text will be printed in black. A background set by Format - Page Background will not be printed.
Black & white converts everything into the two values black and white. All
borders around objects are printed black. All text will be printed in black. A
background set by Format - Page - Background will not be printed.
Printing only text in black and white
In StarOffice Writer you can choose to print color-formatted text in black and
white. You can specify this either for all subsequent text documents to be printed,
or only for the current printing process.
Printing all text documents with black and white text
1. Choose Tools - Options - Text Document or Tools - Options - HTML Document.
2. Then choose Print.
3. Under Contents, mark Print black and click OK.
All text documents or HTML documents will be printed with black text.
Printing the current text document with black and white text
1. Choose File - Print. This opens the Print dialog.
2. Click the Options button. This opens the Printer Options dialog.
3. Under Contents mark Print black and click OK.
The text document or HTML document now being printed will be printed in
black text.
Chapter 2
Working With StarOffice
49
Printing Brochures
StarOffice text documents consisting of more than one page can be printed automatically as a brochure. Two pages of a text document will be reduced in size and
printed next to each other on a page in landscape (horizontal) orientation. Most
printers require that you take out the paper after the first half of the printing
process and feed it in again with the blank side of the page facing upward. StarOffice will automatically print the pages so that you can read them as a brochure.
StarOffice automatically arranges the pages in such a way that you can read the
text continuously if you lay the pages together, fold them in the center and staple
them.
To use this function with the current document, choose File - Print. In the
dialog that opens, click the Options button. Mark the Brochure check box.
Spellcheck
StarOffice has an automatic spellcheck which can be active as you type, or which
you can start any time later.
Automatic Spellcheck
You can turn the automatic spellcheck on and off by choosing Tools - Spellcheck AutoSpellcheck. In StarOffice Writer and Calc, there is an icon on the Main
Toolbar. With automatic checking enabled, words recognized as incorrect are
highlighted with a wavy red underline.
A word is marked with an underline if all the following conditions are met:
50
A language must be assigned to the word, or to the Paragraph Style or the
document where the word is contained
A spellcheck module must be installed and enabled for the language of the
word
The word is not listed in the main spellcheck module
The word is not listed in any activated user dictionary
StarOffice™ 7 User's Guide
You can create any number of user dictionaries. You create and activate a user
dictionary on the tab page Tools - Options - Language Settings - Writing Aids.
When you proofread your text, the wavy underlines will draw your attention to
possible spelling mistakes. As long as the automatic spellcheck is activated, the red
markings can be seen on the screen but will not be printed.
The easiest way to correct a red-underlined word is to right-click it. This opens a
context menu that offers you several alternative words to choose from. If you click
one of the alternatives, the red-underlined word is replaced with the alternative.
You can also include the red-underlined word in your user dictionary through this
context menu.
When you replace a red-underlined word with an alternative word from the
context menu, the replacement is kept in memory for the remainder of the session.
If you repeat the same typing error, StarOffice automatically replaces the mistyped
word with the word stored in memory.
Checking Multilingual Texts
StarOffice Writer can manage spellchecking (plus thesaurus and hyphenation) in
multiple languages. In the StarOffice Setup program, during "Custom Installation"
and later with the "Modify" option, you can choose which language modules you
want to install.
The default language for your text document is set in Tools - Options - Language
Settings - Languages. You can also restrict this language setting to the current
document by selecting For the current document only. You can also associate a
language setting with a Paragraph Style (for example, by right-clicking in the paragraph and choosing Edit Paragraph Style and open the Font tab page). For individual words, you can set a language with a Character Style, or with the menu
Format - Character.
Chapter 2
Working With StarOffice
51
In Tools - Options - Language Settings - Writing Aids you can mark the option
Check in All Languages. Now the spellcheck will take all installed languages into
account. Words that are correctly typed in any of the installed languages are
regarded as correctly typed, irrespective of their language attribute.
In multilingual texts, the automatic spellcheck offers you another choice as well. In
the context menu of a red-underlined word that is marked as incorrect, you can
specify that the word or the whole paragraph is to be assigned another language.
The language of the underlined characters or all characters in the paragraph is
automatically assigned as a direct formatting attribute.
Starting the Spellcheck
To check your entire text for spelling mistakes, go to the Tools menu and choose
Spellcheck - Check. The Spellcheck dialog will only appear if there are words in
your text unknown to the Spellcheck. The various options to be seen in the Spellcheck dialog are described in detail in the StarOffice Help.
In the Spellcheck dialog, if you include an unrecognized word in a user dictionary,
you can at the same time define the permitted hyphens for the automatic hyphenation. Enter the hyphens in the word as an equals sign (=). (Note: placing the
equals sign at the end of the word means that this word will never be automatically hyphenated.)
52
StarOffice™ 7 User's Guide
Excluding Text From the Spellcheck
If you do not want certain areas, words or tables to be checked by the spellcheck
function because they are, for example, in a foreign language for which you have
no module, then specify [None] as the language. You can either use direct formatting to do this (select your text and then choose Format - Character - Font) or
modify the corresponding Style for the text (open the context menu and choose
Edit Paragraph Style).
Selecting the Document Language
The language you select for your document determines the dictionary used for
spellcheck, thesaurus and hyphenation, the decimal and thousands delimiter used
and the default currency format.
The language you select applies to the whole document.
Within the document, you can apply a separate language to any Paragraph
Style. This has priority over the language of the whole document.
You can assign a language to selected pieces of text in a paragraph, either by
direct formatting or with a Character Style. This assignment has priority over
the Paragraph Style and document language.
Selecting a language for the whole document
1. Choose Tools - Options. Go to Language Settings - Languages.
2. Under Default languages for documents, select the document language for all
newly created documents. If you mark For the current document only, your
choice will only apply to the current document. Close the dialog with OK.
Chapter 2
Working With StarOffice
53
Selecting a language for a Paragraph Style
1. Place the cursor in the paragraph whose Paragraph Style you want to edit.
2. Open the context menu and select Edit Paragraph Style. This opens the Paragraph Style dialog.
3. Select the Font tab.
4. Select the Language and click OK.
All paragraphs formatted with the current Paragraph Style will have the
selected language.
Applying a language directly to selected text
1. Select the text to which you want to apply a language.
2. Choose Format - Character. This opens the Character dialog.
3. Select the Font tab.
4. Select the Language and click OK.
In StarOffice Calc, choose Format - Cells and proceed accordingly.
Selecting a language for a Character Style
1. Open the Stylist and click on the Character Styles icon.
2. Click on the name of the Character Style to which you want to apply a different
language.
3. Then open the context menu in the Stylist and select Modify. This opens the
Character Style dialog.
4. Select the Font tab.
5. Select the Language and click OK.
Now you can apply the Character Style to your selected text.
54
StarOffice™ 7 User's Guide
Using Automatic Functions
StarOffice has several intelligent assistants to help you in your work, all of which
have names beginning with "Auto".
Here we introduce you to just a few of these auto-functions. For detailed explanations, refer to the StarOffice Help.
Using AutoCorrect and AutoFormat
StarOffice can format your documents as you type, and correct any typing errors
you may make. Once you have gotten used to using the AutoFormat and AutoCorrect functions while you type, you will be able to draft your documents much
more efficiently. Here are a couple of examples:
AutoCorrect functions are helpful if you often make the same typing errors. If, for
example, you tend to capitalize not only the first letter of some words but also the
second, simply select the AutoCorrect function that corrects mistakes of this sort
while you type.
AutoFormat formats your texts. One of the AutoFormat functions automatically
detects a paragraph beginning with a minus sign followed by a tab stop or space,
and reformats it as a bullet point. The automatic bulleting is then applied to subsequent paragraphs as well. Automatic bulleting ends when you do not enter any
text in a new paragraph, but only press Return.
To switch AutoFormat for text documents on and off, choose Format - AutoFormat. In the submenu, mark the While Typing command, if you want AutoFormat to work as you type. Alternatively, choose the menu command Apply later
on, to automatically format the whole document or the current selection afterwards.
The Apply and Edit Changes command reveals all document changes made
through AutoFormat. You then have the choice of accepting or rejecting all
changes or reviewing each change separately.
You set the options in Tools - AutoCorrect/AutoFormat. AutoCorrect offers many
functions that you can turn on and off individually for typing and post-processing.
The Replace and Exceptions lists depend on the text language.
Chapter 2
Working With StarOffice
55
Note the functions listed in the dialog. A detailed explanation of each function is
given in StarOffice Help. In addition to the functions shown here, you can also
select Custom Quotes. This means that all quotation marks that you enter as a
computer character with Shift+2 are automatically turned into correct typographer's quotes. You can choose the characters to be used for this purpose.
Turning off Automatic URL Recognition
When you enter text, StarOffice automatically recognizes a word that may be a
URL and replaces the word with a hyperlink. StarOffice formats the hyperlink
with direct font attributes (color and underline) the properties of which are
obtained from certain Character Styles.
If you do not want StarOffice to automatically recognize URLs as you are typing,
there are several ways of turning off this feature.
56
StarOffice™ 7 User's Guide
Undo URL Recognition
When you are typing and notice that a text has just been automatically
converted into a hyperlink, press Ctrl+Z to undo this formatting.
If you do not notice this conversion until later, select the hyperlink and choose
the menu command Format - Default.
Turn off URL Recognition
1. Load a document of the type for which you want to modify the URL recognition.
If you want to modify the URL recognition for text documents, open a text
document.
2. Choose Tools - AutoCorrect. (In StarOffice Writer, choose Tools AutoCorrect/AutoFormat.)
3. In the AutoCorrect dialog, select the Options tab.
4. If you unmark URL Recognition, words will no longer be automatically
replaced with hyperlinks.
In StarOffice Writer there are two check boxes in front of URL Recognition.
The box in the first column is for later post-editing and the box in the second
column is for AutoCorrect as you type.
Other AutoCorrect functions
The AutoCorrect dialog includes a Replace tab, containing many instances of
automatically replaced text. This is where you can enter your most frequent typos
and have AutoCorrect replace them with the right word. You can also use this
feature to enter characters that normally take time to enter from the keyboard. For
example, when you type (C), this is immediately turned into the copyright symbol,
provided the Use replacement table check box on the Options tab page is
marked.
On the Exceptions tab, you can enter exceptions for two types of automatic correction which are described below.
Chapter 2
Working With StarOffice
57
If you select the option to automatically start each sentence with a capital (uppercase) letter, then a lowercase "d" following "e.g." would be capitalized, for
example. You can enter "e.g." as an exception to prevent this type of correction.
If you select the option to automatically convert the second of two capital letters at
the beginning of a word to a lowercase letter, you can enter exceptions that are
correctly written with two capital letters, such as PC and CD.
These exceptions can also be automatically incorporated into the tab page. To do
this, use Add Automatically fields on the Exceptions tab page. If you have
selected these and you then use an idiom in your text that is automatically
corrected even though it isn't wrong, you need to immediately press the "Undo"
key Ctrl+Z. Doing this undoes the automatic "correction", and also sees to it that
this particular "correction" will not be made automatically again.
AutoCorrect can also be used to replace one word with another - for example,
"ASAP" with the text "as soon as possible" - although the StarOffice AutoText function is much better suited for such purposes.
Creating a Letter Template With the AutoPilot
If you are writing a personal letter, the AutoPilot and standard AutoTexts are not
essential, but in formal business correspondence these aids can save you a lot of
time and make your work much easier.
If you need to produce a standard letter, have a look at the supplied templates.
Simply press the shortcut keys Shift+Ctrl+N or choose File - New - Templates
and Documents.
Start the AutoPilot with the File - AutoPilot - Letter menu command.
58
StarOffice™ 7 User's Guide
In this short introduction, accept all the defaults provided by the AutoPilot. If you
want, you can click Next on every dialog page to familiarize yourself with this
AutoPilot.
Have a look through the AutoPilot pages for creating a letter template. You do not
have to enter data or modify options on each page, but you can if you want to.
Each page allows you to make modifications according to your preferences. Of
course, sender and recipient addresses can also be entered manually.
The sender information is automatically taken from the details that you entered at
the time of installation. You can change these details at any time by choosing
Tools - Options - StarOffice - User Data and entering new details.
You do not need to go through all the steps of the AutoPilot each time you want to
write a letter. Although the AutoPilot does produce a document that you can
immediately fill in, print, and send, the main purpose of the AutoPilot is to help
you create a customized document template.
The AutoPilot creates a template which can be edited and then used as a customized template for all your letters. This ensures that your correspondence will have
a consistent format. This also applies to other types of documents which can also
be created with the AutoPilot (for example, faxes).
Inserting Hyperlinks
You can insert hyperlinks in two ways: as text or as a button. In both cases, the
visible text can be different from the URL.
1. Display the Hyperlink Bar by choosing View - Toolbars - Hyperlink Bar. Type
the visible text in the left field and the full URL in the right field, including
http:// or file://.
2. Place the text cursor in the document at the point where you want to insert the
hyperlink. Click the Hyperlink icon on the Hyperlink Bar, or click Accept in
the Hyperlink dialog. The hyperlink is inserted as text.
3. If you want to insert the hyperlink as a button, click and hold the Hyperlink
icon and select As Button from the sub-menu, or select Button from the Form
list in the Hyperlink dialog.
If you would rather use the Hyperlink dialog instead of the Hyperlink Bar
to define the hyperlink, you can open it using the icon on the Function Bar.
Chapter 2
Working With StarOffice
59
If you wish to jump to a specific position in the same text document, enter a
bookmark at that position (Insert - Bookmark). If you wish to branch out to a cell
in a table, enter a name for the cell (Insert - Names - Define).
In the URL combo box, enter only the short form of the URL when jumping
within the same document: If the bookmark is called Target, enter Target. To
jump to another document, enter the complete URL.
StarOffice can automatically help you to write the URL: By entering
C:\Docu\File1.sdw#Target, StarOffice automatically inserts the correct way of
writing - file:///C:/Docu/File1.sdw%23Target.
Hyperlinks can also be inserted by drag-and-drop from the Navigator. Hyperlinks can refer to references, headings, graphics, tables, objects, directories or
bookmarks.
If you wish to insert in a text a hyperlink that refers to Table 1, drag the entry
Table 1 from the Navigator and drop it in the text. To do this, the Insert as
Hyperlink drag mode must be selected in the Navigator.
Editing Hyperlinks
Change the text of a hyperlink as follows
Option 1: Click on the hyperlink while keeping the Alt key pressed.
Option 2: Click on the HYP field on the Status Bar so that SEL appears in it.
Option 3: Move the cursor with the arrow keys to the hyperlink.
You can now edit the text without activating the hyperlink.
Change the URL of a hyperlink as follows
60
Option 1: As described above, move the cursor to the hyperlink and open
Hyperlink dialog (icon on the Function Bar).
Option 2: Open Hyperlink Bar (View - Toolbars - Hyperlink Bar). Click on the
hyperlink, do not release the mouse button and drag the hyperlink to the
hyperlink bar. The mouse pointer points to where you can drop the hyperlink.
Edit the URL on the Hyperlink Bar and press the Return key.
StarOffice™ 7 User's Guide
Change the attribute of all hyperlinks
Edit the color and formatting of hyperlinks in your document through the
"Internet Link" and "Visited Internet Link" character styles in the Stylist.
Edit a hyperlink button
If the hyperlink is a button, click on the border to select it, or press the Alt key
while clicking. Open the Properties dialog through the context menu. You can edit
the label text under "Caption," and modify the address in the "URL" field.
Switch off the automatic recognition of hyperlink
Switch the automatic recognition of hyperlinks on and off by choosing Tools AutoCorrect/AutoFormat - Options in the URL Recognition check box.
Find & Replace
The Find & Replace dialog in StarOffice Writer, Calc, Impress and Draw can find
variations of the search terms, or limit the search to certain places in the document,
such as the beginning of a word or the end of a paragraph.
Finding a Word in Text
Activate the Search function with Ctrl + F. Type the word you want to find and
press Enter.
Chapter 2
Working With StarOffice
61
StarOffice will start searching, moving from the cursor position downwards.
When the end of the document is reached, a dialog will appear asking if you want
to continue the search at the beginning of the document. Press the Enter key to
confirm. If the text string is found, it will be highlighted.
The Find & Replace dialog will remain open. You don't have to close the dialog
and you can move it to any place on the screen.
A useful feature is the multi-selection facility available in StarOffice, used in
conjunction with the Find All button. Suppose, for example, you want to set every
occurrence of the word "bold" in your text in bold type. Type the word in the
Search for box, then click Find All. All occurrences are now selected, and you can
click the Bold icon in the text Object Bar.
Searching for Whole Words Only
Select the Whole words only option if you only want to find whole words that
match the searched for word. For instance, if the word "in" is entered as the search
term in the Search for field, all instances of "in" or "In" as stand-alone words in the
text will be found. Words like "bin" or "chin" will not be found if this check box is
selected. If you are searching for regular expressions or Styles, do not select this
option.
Match Case
When this check box is selected, the search is case-sensitive to uppercase and
lowercase letters. So if you search for "in," it will be found, but not the word "In."
You can combine a Match case search with the Whole words only option.
Using Wildcards in Text Searches
You can use wildcards when you find and replace text in a document. For
example, "s*n" finds "sun" and "son".
1. Choose Edit - Find & Replace.
2. Select the Regular expressions check box.
62
StarOffice™ 7 User's Guide
3. In the Search for box, type the search term and the wildcard(s) that you want
to use in your search.
4. Click Find or Find All.
Regular Expression Examples
You can only search for regular expressions within paragraphs.
The wildcard for any string of characters is an asterisk. For example: "come*"
finds "come" "complete", and "completely".
The wildcard for a single character is a period (.). This is equivalent to the ?
wildcard when you search for file names.
The wildcard combination for several characters in succession is .* (period and
asterisk). This is equivalent to the * wildcard in file names.
The wildcard combination for the end of a paragraph is the dollar sign ($),
while the wildcard combination for the first character at the start of a paragraph is the caret and the period (^.).
Searching Backward
If you want to find a specific word that is used often in a particular part of a long
text, you would probably enter the word under Search for and then skip each
irrelevant location by repeatedly clicking the Find button. However, you might
click Find once too often by mistake. In this case, select Backward and click Find
again to return to the previous location found.
Current Selection Only
Select the Current selection only option if you do not want to search the entire
document. The search will be restricted to the selected text. If you select a text
before activating the Find command, the search will automatically take place only
within the selected range.
Chapter 2
Working With StarOffice
63
Searching for Styles
This option enables you to quickly reformat all or part of a text. For example, text
formatted with the Style "Heading 2" can be replaced with the Style "Heading 3."
Select the Paragraph Style in the list box under Search for. Then select the new
Paragraph Style in the Replace with field.
Start the replacement process with the Replace button. All matching strings found
in the text will be displayed one after the other. You can decide each time whether
or not to replace the string found in the text, to replace this and all other strings
found in the text, or to cancel the process.
Searching for Special Formats
Click the Format button to open a dialog in which to select the specific formats you
want to search for. For example, if you have manually centered a few lines in your
text, you can search for them using the options in the Text Format (Search) dialog.
If you want to replace the found attribute with another, first position the cursor in
the Replace with field. Next, click the Format button and then choose the replacement attribute. The chosen attributes will be listed under the Search for and
Replace with fields. If you do not indicate the replacement for the attribute found
in the text, the default settings are automatically applied.
Only formats that were entered directly will be found. If the formats are part of a
Style, you will only find the formats if you check the Including Styles box.
64
StarOffice™ 7 User's Guide
CHAPTER
3
3
Creating Text Documents With
StarOffice Writer
This section describes StarOffice Writer, the StarOffice word processing module.
Basic instructions are provided first, followed by more advanced instructions
using sophisticated functions.
For additional information on working with texts in StarOffice Writer refer to:
"The User Interface" section in chapter 2 on page 29. This section describes the
StarOffice menus, windows, floating toolbars, and so on.
Chapter 7 "Advanced Tips for Working With StarOffice " on page 355. This
chapter provides information about customizing the StarOffice user interface as
well as working with data sources (for example, for form letters) and about the
revision marking function.
StarOffice Writer Features
StarOffice Writer lets you design and produce text documents that can include
graphics, tables, or charts. You can then save the documents in a variety of
formats, including Microsoft Word, HTML, or even Adobe's Portable Document
Format (PDF).
Writing
StarOffice Writer lets you create both basic documents, such as memos, faxes,
letters , resumes and merge documents, as well as long and complex or multi-part
documents, complete with bibliographies, reference tables and indexes.
65
StarOffice Writer also includes such useful features as a spellchecker, a thesaurus,
AutoCorrect, and Hyphenation as well as a variety of templates for almost every
purpose. You can also create your own templates using the AutoPilots.
Designing and Structuring
StarOffice offers a wide variety of options to design documents. Use the Stylist to
create, assign and modify styles for paragraphs, individual characters, frames and
pages. In addition, the Navigator helps you to quickly move around inside your
documents, lets you look at your document in an outline view, and keeps track of
the objects that you have inserted into your document.
You can also create various indexes and tables in text documents. You can define
the structure and appearance of the indexes and tables according to your individual needs. Live hyperlinks and bookmarks let you jump directly to the corresponding items in the text.
Desktop Publishing with StarOffice Writer
StarOffice Writer contains numerous desktop publishing and drawing tools to
assist you in creating professionally styled documents, such as brochures, newsletters and invitations. You can format your documents with multi-column layouts,
text frames, graphics, tables, and other objects.
Calculations
Text documents in StarOffice have an integrated calculation function that helps
you execute sophisticated calculations or logical links. You can easily create a table
in a text document in order to perform calculations.
Creating Drawings
The StarOffice Writer drawing tool lets you create drawings, graphics, legends,
and other types of drawings directly in text documents.
66
StarOffice™ 7 User's Guide
Inserting Graphics
You can insert pictures with different formats into a text document, including
graphics with a JPG or GIF format. The most common formats can be edited
directly in a text document with the image editor. In addition, the Gallery provides
a collection of clipart graphics organized by theme.
Flexible Application Interface
The program interface is designed so that you can configure it according to your
preferences, including customizing icons and menus. You can position various
program windows, such as theStylist or the Navigator as floating windows
anywhere on the screen. You can also dock some windows to the edge of the
workspace.
Drag&Drop
The drag-and-drop feature enables you to work quickly and efficiently with text
documents in StarOffice. For example, you can drag-and-drop objects, such as
graphics from the Gallery, from one location to another in the same document, or
between active StarOffice documents.
Extensive Help Functions
You can use the extensive online Help system as a complete reference for StarOffice applications, including instructions for simple and complex tasks.
Chapter 3
Creating Text Documents With StarOffice Writer
67
The StarOffice Writer Window
Windows in StarOffice Writer
68
Insert floating toolbar
Form Functions floating toolbar
Insert Fields submenu
Navigator Window
Insert Object floating toolbar
Stylist Window
Draw Functions floating toolbar
Navigation Window
StarOffice™ 7 User's Guide
Entering and Formatting Text
You do not have to work in any particular sequence to enter or format text. You
can format text while you type (for example, with italics) or afterwards. You can
even split a section of text into two columns. You never have to delete and retype
text to alter the formatting.
To edit text, select it and then choose the relevant command, for example, by
clicking the Italic icon on the Object Toolbar. There is more than one method for
selecting text in a document: hold down the Shift key while pressing an arrow key,
or by holding down the left mouse button and dragging the mouse over the text
that you want to select. Similarly, there is often more than one way to choose a
command, for example, by selecting a menu command, clicking a toolbar icon, or
by using keyboard shortcuts (shortcut keys).
Switching Insert Mode and Overwrite Mode
With the keyboard:
Press Insert to toggle between overwrite mode and insert mode. The current mode
is displayed on the Status Bar.
With the mouse:
On the Status Bar, click on the area indicating the current mode in order to switch
to the other mode:
INSRT
Insert mode is enabled. The text cursor is a blinking vertical line. Click on the
area to enable the overwrite mode.
OVER
The overwrite mode is enabled. The text cursor is a blinking block. Click on the
area to enable insert mode.
Chapter 3
Creating Text Documents With StarOffice Writer
69
Using the Direct Cursor
The direct cursor allows you to enter text anywhere on a page.
To set the behavior of the direct cursor, choose Tools - Options - Text Document Formatting Aids.
1.
On the Main Toolbar, click the Direct Cursor On/Off.
2.
Click in a free space in the text document. The mouse pointer changes
to reflect the alignment that will be applied to the text that you type.
Align Left
Centered
Align Right
3.
70
Type your text. StarOffice automatically inserts the required number
of blank lines, and, if the options are enabled, tabs and spaces.
StarOffice™ 7 User's Guide
Navigating and Selecting With the Keyboard
You can navigate through a document and make selections with the keyboard.
Key
Function
+ Ctrl key
Right/left arrow keys
Moves the cursor one
Moves the cursor one word to
character to the left or to the left or to the right.
the right.
Up/down arrow keys Moves the cursor up or
down one line.
(Ctrl+Alt) Moves the current
paragraph up or down.
Home
Moves the cursor to the Moves the cursor to the beginbeginning of the current ning of the document.
line.
Home
Moves the cursor to the
beginning of the
contents in the current
cell.
Moves the cursor to the beginning of the contents of the
current cell. Press again to
move the cursor to the first cell
in the table. Press again to
move the cursor to the beginning of the document.
End
Moves the cursor to the
end of the current line.
Moves the cursor to the end of
the document
End
In a table
Moves to the end of the
contents in the current
cell.
Moves the cursor to the end of
the contents of the current cell.
Press again to move the cursor
to the last cell in the table.
Press again to move the cursor
to the end of the document.
PgUp
Scrolls up one page.
Moves the cursor to the
header.
PgDn
Scroll down one page.
Moves the cursor to the footer.
In a table
Chapter 3
Creating Text Documents With StarOffice Writer
71
Inserting Special Characters
This function allows you to insert special characters, such as check marks, boxes,
and telephone symbols, into your text.
To view a selection of all characters, choose Insert - Special Character.
In the large selection field click the desired character or several characters in
succession. The characters are displayed at the bottom of the dialog. When you
close the dialog with OK, all displayed characters in the selected font are
inserted in the current document.
In any text input field (such as the URL field of the Function Bar or in the input
fields in the Find&Replace dialog) you can press Shift+Ctrl+S to call the
Special Characters dialog.
Inserting Protected Spaces, Hyphens and
Conditional Separators
Non-breaking spaces
To prevent two words from being separated at the end of a line, press the Ctrl key
when you type a space between the words.
Non-breaking dash
An example of a non-breaking dash is a company name such as A-Z. Obviously
you would not want A- to appear at the end of a line and Z at the beginning of the
next line. To solve this problem, press Shift+Ctrl+ minus sign. In other words, hold
down the Shift and Ctrl keys and press the minus key.
Hyphen, dash
In order to enter longer dashes, you can find under Tools - AutoCorrect /AutoFormat - Options the Replace dashes option. This option replaces one or two
minus signs under certain conditions with a long dash (see StarOffice Help).
72
StarOffice™ 7 User's Guide
For additional replacements see the replacements table underTools - AutoCorrect
/AutoFormat - Replace. Here you can, among other things, replace a shortcut
automatically by a dash, even in another font.
Definite separator
To support automatic hyphenation by entering a separator inside a word yourself,
use the keys Ctrl+minus sign. The word is separated at this position when it is at
the end of the line, even if automatic hyphenation for this paragraph is switched
off.
Emphasizing Text
Here are a few examples of how to emphasize text in a document:
Select the text and apply a different font style or effect, such as bold.
Right-click in a paragraph, choose Paragraph, set the options that you want, for
example, the background color, and then click OK.
Select the text, and then choose Insert Frame.
Use the Text tools in the Draw Functions floating toolbar on the Main
Toolbar in conjunction with FontWork. To open the FontWork window,
choose Format - FontWork.
Chapter 3
Creating Text Documents With StarOffice Writer
73
Changing the Color of Text
Long-click the Font Color icon to activate a floating toolbar from which you can
choose from a range of colors.
Font Color
The following only applies to StarOffice Writer: If you click the icon with
a short-click while no text is selected, then the mouse pointer changes its
appearance and is displayed as a watering can. Use this watering can
symbol with the mouse key pressed to drag across a text area. This text
area takes the selected color. The function remains active for as long as
the icon is pressed, or until you click without dragging, or until you press
the Escape key.
The following applies to all modules (StarOffice Writer, Calc, Draw, Impress):
Select the text that is to take another color, then click the color you want on the
floating toolbar.
Highlighting Text With a Brush
Highlighting
There are two different procedures for highlighting a text.
If you click and hold the mouse button (long click) on the Highlighting icon, the
floating toolbar appears, allowing you to choose from the available background
colors. When you have selected a color, it will appear as the background to the
word at the cursor position. The currently selected color is the color of the icon.
If you short-click the icon, the mouse pointer becomes a paint can. A gray vertical
line appears below it, which you can use to select a text area as you would with a
cursor. The area is automatically highlighted with the color selected as a background on the Highlighting floating toolbar. The function remains active as long
as the Highlighting icon is active or until you press Escape.
If you select the No Fill entry on the Highlighting floating toolbar, the background color is removed from the selected text.
74
StarOffice™ 7 User's Guide
Rotating Text
You can only rotate text that is contained in a drawing object.
1.
On the Main Toolbar, open the Draw Functions floating toolbar.
2.
Select one of the Text tools.
3.
Drag in your document to draw the text object, and then type your
text.
4.
Click the edge of the object, and then click the Object Rotation Mode
icon.
5.
Drag one of the corner handles of the text object.
You can also right-click the text object, choose Position and Size, click the Rotation tab, and then enter a rotation angle or a new position for the object.
Defining Borders for Pages
You can only define borders for page styles, not individual pages. All changes
made to borders apply to all pages that use the same page style. Note that page
style changes cannot be undone by the Undo function in StarOffice.
Setting a Predefined Border Style
1. Choose Format - Page - Borders.
2. Select one of the default border styles in the Default area.
3. Select a line style and color for the selected border style in the Line area. These
settings apply to all border lines that are included in the selected border style.
4. Select the distance between the border lines and the page contents in the
Spacing to contents area.
5. Click OK to apply the changes.
Chapter 3
Creating Text Documents With StarOffice Writer
75
Setting a Customized Border Style
1. Choose Format - Page - Borders.
2. In the User-defined area select the edge(s) that you want to appear in a
common layout. Click on an edge in the preview to toggle the selection of an
edge.
3. Select a line style and color for the selected border style in the Line area. These
settings apply to all border lines that are included in the selected border style.
4. Repeat the last two steps for every border edge.
5. Select the distance between the border lines and the page contents in the
Spacing to contents area.
6. Click OK to apply the changes.
Defining Borders for Paragraphs
Setting a Predefined Border Style
1. Place the cursor in the paragraph for which you want to define a border.
2. Choose Format - Paragraph - Borders.
3. Select one of the default border styles in the Default area.
4. Select a line style and color for the selected border style in the Line area. These
settings apply to all border lines that are included in the selected border style.
5. Select the distance between the border lines and the page contents in the
Spacing to contents area. You can only change distances to edges that have a
border line defined.
6. Click OK to apply the changes.
Setting a Customized Border Style
1. Choose Format - Paragraph - Borders.
76
StarOffice™ 7 User's Guide
2. In the User-defined area select the edge(s) that you want to appear in a
common layout. Click on an edge in the preview to toggle the selection of an
edge.
3. Select a line style and color for the selected border style in the Line area. These
settings apply to all border lines that are included in the selected border style.
4. Repeat the last two steps for every border edge.
5. Select the distance between the border lines and the page contents in the
Spacing to contents area. You can only change distances to edges that have a
border line defined.
6. Click OK to apply the changes.
Defining Borders for Tables and Table Cells
Setting a Predefined Border Style
1. Select the table cells that you want to modify.
2. Click the Borders icon on the Table Object Bar to open the Borders window.
If the icon is not available, the Object Bar may be in the wrong context. Rightclick on the Object Bar and select Table Object Bar from the menu or click the
arrow icon at the far right of the Object Bar.
3. Click one of the predefined border style.
This adds the selected style to the current border style of the table cells. Select
the blank border style at the top left of the Borders window to clear all border
styles.
Setting a Customized Border Style
1. Select the table cells that you want to modify.
2. Choose Format - Table - Borders.
Chapter 3
Creating Text Documents With StarOffice Writer
77
3. In the User-defined area select the edge(s) that you want to appear in a
common layout. Click on an edge in the preview to toggle the selection of an
edge.
4. Select a line style and color for the selected border style in the Line area. These
settings apply to all border lines that are included in the selected border style.
5. Repeat the last two steps for every border edge.
6. Select the distance between the border lines and the page contents in the
Spacing to contents area.
7. Click OK to apply the changes.
Defining Borders for Objects
You can define borders around OLE objects, Plug-ins, diagrams/charts, graphics
and frames. The name of the menu to be used depends on the object selected.
Setting a Predefined Border Style
1. Select the object for which you want to define a border.
2. Click the Borders icon on the Object Bar to open the Borders window.
If the icon is not available, the Object Bar may be in the wrong context. Rightclick on the Object Bar and select the correct Object Bar from the menu or click
the arrow icon at the far right of the Object Bar.
3. Click one of the predefined border styles. This replaces the current border style
of the object with the selected style.
Setting a Customized Border Style
1. Select the table cells that you want to modify.
2. Choose Format - (object name) - Borders.
Replace (object name) with the actual name of the object type you selected.
3. In the User-defined area select the edge(s) that you want to appear in a common
layout. Click on an edge in the preview to toggle the selection of an edge.
78
StarOffice™ 7 User's Guide
4. Select a line style and color for the selected border style in the Line area. These
settings apply to all border lines that are included in the selected border style.
5. Repeat the last two steps for every border edge.
6. Select the distance between the border lines and the page contents in the
Spacing to Contents area.
7. Click OK to apply the changes.
Making Text Superscript or Subscript
1. Select the text that you want to make superscript or subscript.
2. Do one of the following:
Choose Format - Character - Position, and then select Superscript or
Subscript.
Press Ctrl+Shift+P to make the text superscript, and Ctrl+Shift+B to make
the text subscript.
Changing the Case of Text
You can change the case of text, format text with small capitals, or capitalize the
first letter of each word in a selection.
To capitalize text:
1. Select the text that you want to capitalize.
2. Do one of the following:
Choose Format - Case/Characters - Uppercase.
Choose Format - Character, click the Font Effects tab, and then select the
type of capitalization in the Effects box. "Capitals" capitalizes all of the
letters in the selection. "Title" capitalizes the first letter of each word in the
selection. "Small capitals" capitalizes every letter in the selection, but in a
reduced font size.
Chapter 3
Creating Text Documents With StarOffice Writer
79
To change text to lowercase:
1. Select the text that you want to change to lowercase.
2. Do one of the following:
Choose Format - Case/Characters - Lowercase.
Choose Format - Character, click the Font Effects tab, and then select
"Lowercase" in the Effects box.
Moving and Copying Text in Documents
1. Select the text that you want to move or copy.
2. Do one of the following:
To move the selected text, drag the text to a different location in the document and release. While you drag, the mouse pointer changes to include a
gray box.
To copy the selected text, hold down Ctrl while you drag. The mouse
pointer changes to include a plus sign (+).
Mouse Pointer Shape
Meaning
Moving
Copying
Resetting Font Attributes
80
You can quickly exit manual formatting by pressing the right-arrow key. For
example, if you are pressed Ctrl+B to apply the bold typeface to the text that
you type, press the right arrow to return to the default character format of the
paragraph.
To reset all direct formatting of existing text, select that text, then choose the
menu command Format - Default.
StarOffice™ 7 User's Guide
Rearranging a Document by Using the Navigator
You can move headings and subordinate text up
and down in a document text by using the Navigator. You can also promote and demote heading
levels. To use this feature, format the headings in
your document with one of the predefined
heading paragraph styles. To use a custom paragraph style for a heading, choose Tools - Outline
Numbering, select the style in the Paragraph
Style box, and then double-click a number in the
Levels list.
To quickly move the text cursor to a heading in the document, double-click the
heading in the Navigator list.
To move a heading up or down in the document:
1. On the Function Bar, click the Navigator icon.
2. On the Navigator, click the Content View icon.
Content View
3. Do one of the following:
Drag a heading to a new location in the Navigator list.
Click a heading in the Navigator list, and then click the Promote Chapter or
Demote Chapter icon.
To move the heading without the subordinate text, hold down Ctrl while you
drag or click the Promote Chapter or Demote Chapter icons.
Chapter 3
Creating Text Documents With StarOffice Writer
81
To promote or demote the level of a heading:
Select the heading in the Navigator list, and then click the Promote Level or
Demote Level icon.
To dock the Navigator, hold down Ctrl and drag the title bar to the edge of the
workspace. To undock the Navigator, hold down Ctrl and double-click a free area
in the icon area.
To change the number of heading levels that are displayed:
Click the Heading Levels Shown icon, and then select a number from the
list.
Quickly Applying Paragraph Styles
You can use the keyboard to quickly apply the same paragraph style to two
consecutive paragraphs.
To apply the paragraph style of the first paragraph to the
second paragraph:
1. Click at the end of the first paragraph.
2. Press Delete until the second paragraph is added to the end of the first paragraph.
3. Press Enter.
To apply the paragraph style of the second paragraph to the
first paragraph:
1. Click at the beginning of the second paragraph.
2. Press Backspace until the second paragraph is added to the end of the first
paragraph.
3. Press Enter.
82
StarOffice™ 7 User's Guide
Using Sections
Sections are named blocks of text, including graphics or objects, that you can use
in a number of ways:
To prevent text from being edited.
To show or hide text.
To reuse text and graphics from other StarOffice documents.
To insert sections of text that uses a different column layout than the current
page style.
A section contains at least one paragraph. When you select a text and create a
section, a paragraph break is automatically inserted at the end of the text.
You can insert sections from a text document, or an entire text document as a
section into another text document. You can also insert sections from a text document as links in another text document, or in the same document.
To insert a new paragraph immediately before or after a section, click in front or
behind the section, and then press Alt+Enter.
Sections and Columns
You can insert sections into an existing section. For example, you can insert a
section containing two columns into a section that contains one column.
A column layout that is defined in a page style is not applied to a section that you
insert into a page using that page style.
Inserting Sections
You can insert new sections, or links to sections in other documents into the
current document. If you insert a section as a link, the content of the link changes
when you modify the source document.
Chapter 3
Creating Text Documents With StarOffice Writer
83
To insert a new section:
1. Click in your document where you want to insert a new section, or select the
text that you want to convert to a section.
If you select a text that occurs within a paragraph, the text is automatically
converted into a new paragraph.
2. Choose Insert - Section.
3. In the New Section box, type a name for the section.
4. Set the options for the section, and then click Insert.
To insert a section as a link:
Before you can insert a section as link, you must first create sections in the source
document.
When you open a document that contains linked sections, StarOffice prompts you
to update the contents of the sections. To manually update a link, choose Tools Update - Links.
You can also insert linked sections in HTML documents. When you view the page
in a web browsers, the content of the sections corresponds to the content of the
sections at the time the HTML document was last saved.
1. Click in your document where you want to insert the linked section.
2. Choose Insert - Section.
3. In the New Section box, type a name for the section.
4. In the Link area, select the Link check box. Under Windows, you can also
select the DDE check box to automatically update the contents of the section
when the section in the source document is changed.
5. Click the browse button (...) next to the File name box.
6. Locate the document containing the section that you want to link to, and then
click Insert.
7. In the Section box, select the section that you want to insert.
8. Click Insert.
84
StarOffice™ 7 User's Guide
Editing Sections
You can protect, hide, and convert sections to normal text in your document.
1. Choose Format - Sections.
2. In the Section list, click the section you want to modify.
3. Do one of the following:
To convert a section into normal text, click Remove.
To make a section read-only, select the Protected check box in the Write
Protection area.
To hide a section, select the Hide check box in the Hide area.
4. Set the other options that you want, and then click OK.
Formatting Text With and Without
Styles
Use formatting to structure your text or to emphasize individual words, quotations or references.
Direct Formatting or Formatting With Styles
You apply text attributes such as bold, italics, font type, and font size with direct
formatting or with formatting Styles. A direct format is obtained by directly
applying a certain attribute to a text area. For example, by clicking the Bold icon
on the text Object Bar you directly apply the bold format to a selected text area. On
the other hand, you can use Styles to indirectly apply attributes to text. A Style is a
named set of default settings for formatting text.
Direct formatting is appropriate for one-time use. If, for example, you want to
make a word bold, just position the cursor in the word and click the Bold icon.
Styles allow you to apply the same format to selected blocks of text or to the entire
document. Whenever possible, use styles to format your document and not direct
formatting. When you change the formatting of a style, the formatting of all of the
text that uses the style is also changed.
Chapter 3
Creating Text Documents With StarOffice Writer
85
For example, you have formatted each heading in a document with a 24 point
Helvetica font. To change the font of all the headings in the document to 20-point
Times bold with direct formatting can be a lengthy process. Instead, apply one of
the predefined heading styles, for example "Head1", to the headings in your document. You can then update the formatting of all of the headings that use this style
by changing the formatting of the "Head1" style.
The Style Concept in StarOffice
Styles for characters, paragraphs, frames, numbered lists and pages (or cells in
table documents) are always saved with the document. If you want, you can copy
the Styles of a text document into another text document (see page 97).
You can turn any document and the Character, Paragraph, Frame, Numbering,
and Page Styles that it contains into a template (see the following pages). You can
then use any of these styles when you create a new document that is based on this
template.
When you start StarOffice for the first time, certain predefined Styles apply to all
document types. For example, when you create a new text document by choosing
File - New - Text Document, the styles of the default template are used. The Styles
contained in the the default template are available to all new documents. If you
want, you can turn any document into the default template (see page 93).
The following table contains a selection of Styles.
86
Style Type
Attribute Selection
Paragraph Styles
Indents and Spacing, Alignment, Hyphenation,
Tabs, Font, Language, Initials
Character Styles
Font, Font Size, Language
Frame Styles
Position, Anchoring, Borders
Page Styles
Header, Footer, Margins, Columns
Numbering Styles
Numbering Type, Outline, Bullets, Assigning
Numbering Styles
StarOffice™ 7 User's Guide
The Styles in the Stylist
Open the Stylist by choosing the Stylist command from the Format menu, by
pressing F11, or by clicking the Stylist icon on the Function Bar. All the Stylist
functions are explained in the StarOffice Help.
At the top of the Stylist are icons for selecting the Style type that you want to
display. These are, from left to right: Paragraph, Character, Frame, Page, and
Numbering Styles. The main area of the Stylist lists the available Styles for the
selected style type. Only the Styles for the active Style category, specified in the list
box at the bottom of the Stylist, are displayed.
For example, if the word "Automatic" is selected in the list box, StarOffice offers
the Styles that make sense in the current context. If you want to see all the Styles of
a Style type, select "All Styles" from the list box.
Paragraph Styles
To see a list of the available Paragraph Styles, click the Paragraph Styles
icon in the Stylist.
To apply a paragraph style, click in the paragraph that you want to format, and
then double-click an entry in the list of Paragraph Styles in the Stylist. To apply a
different format to the paragraph, double-click a different Paragraph Style.
Chapter 3
Creating Text Documents With StarOffice Writer
87
To format a paragraph as a heading:
1. Click in the paragraph that you want to format as a heading.
2. Choose Format - Stylist, or press F11 to open the Stylist.
3. Click the Paragraph Styles icon, and then double-click one of the heading
styles in the list, for example, "Heading 1".
To view or modify the formatting attributes that are associated with a heading
style, right-click the name of the style in the Stylist, and then choose Modify. Any
changes that you make to the style are applied to all of the paragraphs that use the
style.
You can also apply formatting changes to heading Paragraph Styles in the Hierarchical view of the Stylist. To change to the Hierarchical view, choose "Hierarchical"
in the lower list box of the Stylist. When you modify the format of a heading style
in this view, the formatting changes are automatically inherited by (applied to) all
of the heading styles that occur lower in the hierarchy. However, changes that you
make directly to a style override any inherited formatting styles. On the Organize
tab in the Paragraph Styles dialog, the name of the style that the current style is
derived from is listed in the Based on list box.
Character Styles
Character formatting styles can be applied to single words or to a selected text
range.
You can use or modify the predefined Character Styles, or you can define and use
custom styles. The best way to create a new Character Style is to right-click an
existing style in the Stylist and then choose New. You can then modify the style
and assign it a different name.
Hierarchical Styles
Styles can be hierarchically linked to each other, that is, you can derive a style
from an existing one, and then make changes to the derived style. When you
change the original style, the linked style is automatically updated.
For example, the Paragraph Style "text body" uses a 12-point "Times" font and the
derived style "indented text" uses the same font characteristics and differs only in
that it has a left indent. If you change the font in "text body" to 14-point "Thorn-
88
StarOffice™ 7 User's Guide
dale", the font in the "indented text" style is also changed to 14-point Thorndale.
However, if you change the left indent in "text body", the left indent in "indented
text" is not changed because in the hierarchy, the more closely associated format
always has priority.
Numbering Styles
You can create bulleted or numbered lists by clicking the Bullets On/Off or
Numbering On/Off icons in the Object Bar.
When working with Styles, the Stylist offers various Numbering Styles. You apply
these by double-clicking the name of the Style.
Creating New Character Styles or Paragraph Styles
You can create a new Style that is based on an existing Style as follows:
1. Apply the formatting that you want to use in a style to a text selection, for
example, by using the Text Object Bar or by choosing Format - Character or
Format - Paragraph.
2. Click in the paragraph or word containing the formatting that you applied, or
select a character that you formatted.
3. Depending on the style that you want to create, click the Paragraph Styles or
the Character Styles icon at the top of the Stylist.
4. At the top of the Stylist, click the New Style from Selection icon. The Create
Style dialog opens.
5. Enter a name for the new Style and click OK.
The new style is added to the "Custom Styles" group in the Stylist.
You can also create a new Style without using an existing Style as the starting
point:
1. Depending on the style that you want to create, click the Paragraph Styles or
the Character Styles icon at the top of the Stylist.
2. Right-click in the Stylist and then choose New.
3. Set the formatting options for the new style and then click OK.
Chapter 3
Creating Text Documents With StarOffice Writer
89
The following example shows you how to define a Paragraph Style for a subtitle.
This assumes that you have several subtitles in your text that you want to format
with a custom Paragraph Style.
1. Click in a paragraph in the text that you want to format with the new Paragraph Style.
2. Double-click a Paragraph Style in the Stylist, for example, "Heading 1".
3. Select the entire paragraph.
4. Apply any direct formatting that you want to use in the heading, for example,
choose Format - Character – Font, or click one of the formatting icons on the
Object Bar.
5. In the Stylist, click the New Style from Selection icon, enter a name for the new
Style in the dialog box, for example, "Head1", and then click OK.
To apply a Paragraph Style, click in the paragraph,
and then double-click a Style name in the Stylist. If
the Style is already applied in the document, you
can also click in the paragraph, and then select the
Style in the Apply Style box on the Object Bar.
Creating a Document Template
You can create a template to use as the basis for creating new text documents.
1. Create a document and add the content and formatting styles that you want.
You can also load styles from another text document by choosing Format Styles - Load.
2. Choose File - Templates - Save.
3. In the New Template box, type a name for the new template.
4. Select a template category in the Categories list.
5. Click OK.
To create a document based on the template, choose File - New - Templates and
Documents, select the template, and then click Open.
90
StarOffice™ 7 User's Guide
The Advantages of the Stylist
Above we have shown you how to apply the Styles in the Stylist to your text, and
you also know how to apply your own Styles. Styles have the advantage that they
do not have to be redefined every time. In this way, you can apply the desired
formatting to your document quickly and easily. But the Stylist offers you still
more possibilities.
Formatting Multiple Paragraphs
In the work described in this section, you applied the same Paragraph Style
"Heading 1" to several paragraphs. The Stylist can save you a lot of time on this
task:
1.
In the Stylist, select the Style you want to apply to multiple paragraphs
by clicking the Style once.
2.
At the top of the Stylist, click on the Fill Format Mode icon. The mouse
pointer changes to a symbol indicating this mode as soon as you move
back into the document.
3.
Click once on every paragraph in the text you want to apply the
selected Style to.
4.
Finally, to switch off this mode, click the Fill Format Mode icon again
or press the Escape key.
Easy Way to Change a Style
After having formatted all headings with the new "Head1" Style, you may decide
that it would look better if the headings were spaced with slightly wider gaps
between the letters. Select the longest heading and increase the defined spacing
until it fits onto one line without a break. Now you want all other headings to be
spaced in exactly the same way. In this case, simply modify one of the paragraphs
formatted with the "Head1" Style, and then add the changes to the Style in the
Stylist, making it valid for all paragraphs of this type. Here are the steps:
1.
In the text, select the longest heading formatted with the "Head1"
Style. Click three times in the heading to select the entire line.
Chapter 3
Creating Text Documents With StarOffice Writer
91
2.
Make the desired changes. To lock the character spacing, as in this
example, choose Format - Character, or choose Character from the
context menu for the selected line. In the Character dialog, click the
Position tab and in the Spacing list box select "Expanded". In the spin
button, increase the spacing to make the heading wider. Close the
dialog with OK.
3.
You have now additionally used direct formatting on one of the headings formatted with the Style "Head1". All direct and Style formatting
should now be added to the "Head1" Paragraph Style. This Style is still
selected in the Stylist.
4.
At the top of the Stylist, click the Update Style icon. All headings
formatted with "Head1" will be automatically reformatted with the
modified Style.
When creating a new Style, you can also make it adapt to any changes automatically. In the properties dialog for the Style, click the Organizer tab and mark
AutoUpdate. Now, if you change the formatting of, say, a paragraph formatted
with this Style, the formatting of all other paragraphs with the same Style will be
automatically changed as well.
Page Styles Summary
If you assign a Character Style or Paragraph Style, first select the text in which
want to use that Style and then double-click in the Stylist on the name of the Style.
The method is a bit different with Page Styles.
A Page Style is always a property of the first paragraph of a page. This can be the
first paragraph of the current page or the first paragraph of a previous page. Not
every first paragraph has the Page Style attribute. StarOffice Writer searches for
the Page Style attribute of the current page by starting at the cursor's position and
going back towards the beginning of the document, checking each first paragraph
of a page to see if it has a Page Style as attribute.
You can set another Page Style using, for example, the context menu of the field in
the Status Bar which displays the current Page Style. If you do this, StarOffice
Writer will search backwards until the first paragraph at the beginning of a page
has been found in which the current Page Style will be applied. This paragraph
will now be given the newly selected Page Style and this Style will be applied from
this point up to the end of the document or until a new first paragraph containing
another Page Style is found.
92
StarOffice™ 7 User's Guide
Changing the Default Template
The default template contains the default formatting information for new text
documents. If you want, you can create a new template and use it as the default
template.
1. Create a document and the content and formatting styles that you want.
2. Choose File - Templates - Save.
3. In the New Template box, type a name for the new template.
4. In the Categories list, select "Default", and then click OK.
5. Choose File - Templates - Organize.
6. In the category list, double-click the "Default" folder.
7. Right-click the template that you created, and choose Set as Default Template.
8. Click Close.
To reset the default template:
1. Choose File - Templates - Organize.
2. Right-click a folder in the category list, choose Reset Default Template - Text
Document.
3. Click Close.
Templates and Styles
A template is a document that contains specific formatting styles, graphics, tables,
object, and other information. A template is used as the basis for creating other
documents. For example, you can define paragraph and character styles in a document, save the document as a template, and then use the template to create a new
document with the same styles.
Unless you specify otherwise, every new StarOffice text document is based on the
"Default" template.
StarOffice has a number of predefined templates that you can use to create
different types or text documents, such as business letters.
Chapter 3
Creating Text Documents With StarOffice Writer
93
Viewing and Organizing Styles in Templates
1. Choose Format - Styles - Catalog, and then click Organizer.
2. In the category list, double-click a folder.
3. Double-click a template, and then double-click Styles.
You can also use the Template Management dialog to copy styles between
templates, documents, or between templates and documents.
94
To copy a style, drag it to another template or document.
StarOffice™ 7 User's Guide
Creating New Styles From Selections
You can quickly create a new style from an existing style that you have applied
manual formatting to.
1. Choose Format - Stylist.
2. Click the icon of the style type that you want to create.
3. Click in the document where you want to copy the style from, for example, in a
paragraph that you applied manual formatting to.
4. Click the New Style from Selection icon.
New Style from Selection
5. Type a name in the Style Name box.
6. Click OK.
To create a new style by drag-and-drop:
1. Choose Format - Stylist.
2. Click the icon of the style type that you want to create.
3. Select at least one character, or object, in the style that you want to copy. For
page and frame styles, select at least one character or object in the page or
frame.
4. Drag the character or object to the Stylist window and release.
Chapter 3
Creating Text Documents With StarOffice Writer
95
Applying Styles in Fill Format Mode
You can quickly apply styles, such as paragraph and character styles, in your
document by using the Fill Format Mode in the Stylist.
1.
Choose Format - Stylist.
2.
Click the icon of the style type that you want to apply.
3.
Click the style, and then click the Fill Format Mode icon.
4.
Move the mouse pointer to where you want to apply the style in the
document, and click. To apply the style to more than one item, drag to
select the items, and then release.
5.
Press Esc when finished.
Updating Styles From Selections
1. Choose Format - Stylist.
2. Click the icon of the style type that you want to update.
3. Click in the document where you want to copy the updated style from, for
example, in a paragraph that you applied manual formatting to.
4. In the Stylist, click the style that you want to update.
5. Click the Update Style icon.
Update Style
96
StarOffice™ 7 User's Guide
Using Styles From Another Document or Template
You can import styles from another document or template into the current document.
1. Choose Format - Styles - Load.
2. Use the check boxes at the bottom of the dialog to select the style types that you
want to import. To replace styles in the current document that have the same
name as the ones you are importing, select Overwrite.
3. Do one of the following:
Click an entry in the Categories list, then click the template containing the
styles that you want to use in the Templates list, and then click OK.
Click From File, locate the file containing the styles that you want to use,
and then click name, and then click Open.
Chapter 3
Creating Text Documents With StarOffice Writer
97
Entering and Formatting Text Automatically
This section deals with certain automatic functions that help you enter and format
text.
Turning Off AutoFormat and AutoCorrect
By default, StarOffice automatically corrects many common typing errors and
applies formatting while you type. To quickly undo an automatic correction or
completion, press Ctrl+Z. To turn off these features completely, choose Format AutoFormat - While Typing.
To remove a word from the AutoCorrect list:
1. Choose Tools - AutoCorrect/AutoFormat.
2. Click the Replace tab.
3. In the AutoCorrect list, select the word pair that you want to remove.
4. Click Delete.
To stop replacing quotation marks:
1. Choose Tools - AutoCorrect/AutoFormat.
2. Click the Custom Quotes tab
3. Clear the Replace check box(es).
To stop capitalizing the first letter of a sentence:
1. Choose Tools - AutoCorrect/AutoFormat.
2. Click the Options tab.
3. Clear the Capitalize first letter of every sentence check box.
98
StarOffice™ 7 User's Guide
To stop drawing a line when you type three identical
characters:
StarOffice automatically draws a line when you type three of the following characters and press Enter: - _ = * ~ #
1. Choose Tools - AutoCorrect/AutoFormat.
2. Click the Options tab.
3. Clear the Apply border check box.
Automatically Check Spelling
You can have StarOffice automatically check spelling while you type and underline possible misspelt words with a red wavy line.
To check spelling automatically while you type:
1. Choose Tools - Spellcheck - AutoSpellcheck, or click the AutoSpellcheck
On/Off icon on the Main Toolbar.
2. Right-click a word with a red wavy underline, and then choose a suggested
replacement word from the list, or from the AutoCorrect submenu.
If you choose a word from the AutoCorrect submenu, the underlined word and
the replacement word are automatically added to the AutoCorrect list for the
current language. To view the AutoCorrect list, choose Tools AutoCorrect/AutoFormat, and then click the Replace tab.
You can also add the underlined word to your custom dictionary by choosing
Add.
To exclude words from the spellcheck:
1. Select the words that you want to exclude.
2. Right-click and choose Character.
3. Click the Font tab, and then select [None] in the Language box.
Chapter 3
Creating Text Documents With StarOffice Writer
99
Using AutoText
StarOffice Writer allows you to store text, text with graphics, tables, and fields as
AutoText, so that you can quickly insert them in a document later on. If you want,
you can also store formatted text.
Creating an AutoText Entry
1. Select the text, text with graphics, table, or field that you want to save as an
AutoText entry. A graphic can only be stored if it is anchored as a character
and is preceded and followed by at least one text character.
2. Choose Edit - AutoText.
3. Select the category where you want to store the AutoText.
4. Type a name that is a longer than four characters. This allows you to use the
Display remainder of name as suggestion while typing AutoText option. If
you want, you can modify the proposed shortcut.
100
StarOffice™ 7 User's Guide
5. Click AutoText, and then choose New.
Inserting an AutoText Entry
1. Click in your document where you want to insert an AutoText entry.
2. Choose Edit - AutoText.
3. Select the AutoText that you want to insert, and then click Insert.
You can also type the shortcut for an AutoText entry, and then press F3, or longclick the Edit AutoText icon on the Main Toolbar, and then choose an AutoText
entry.
To quickly enter a math formula, type "FN", and then press F3. If you insert more
than one formula, the formulae are sequentially numbered. To insert dummy
text, type "DT", and then press F3.
Printing a List of AutoText Entries
1. Choose Tools - Macros - Macro.
2. In the Macro from list, double-click "Gimmicks".
3. Select "AutoText" and then click Run. A list of the current AutoText entries is
generated in a separate text document.
4. Choose File - Print.
Chapter 3
Creating Text Documents With StarOffice Writer
101
Using AutoText in Network Installations
You can store AutoText entries in different directories on a network.
For example, you can store "read-only" AutoText entries for your company on a
central server, and user-defined AutoText entries in a local directory.
To view the paths for the current AutoText directories, choose Tools - Options StarOffice - Paths, select AutoText, and then click Edit.
Two directories are listed here. The first entry is on the server installation and the
second entry is in the user directory. If there are two AutoText entries with the
same name in both directories, the entry from the user directory is used.
Displaying AutoText as a Help Tip
You can display an AutoText entry as a Help tip after you type three letters at the
beginning of a word that match a name in the AutoText list.
1. Choose Edit - AutoText, and then select Display remainder of name as
suggestion while typing.
2. Type the first three letters of a word that matches a name in the AutoText list,
and then press Enter to insert the displayed AutoText.
If more than one AutoText name matches the letters that you type, press Ctrl+Tab
to scroll forward through the list of available AutoText entries. To scroll backwards through the list, press Shift+Ctrl+Tab.
102
StarOffice™ 7 User's Guide
Adding Exceptions to the AutoCorrect List
You can prevent AutoCorrect from correcting specific abbreviations or words that
have mixed capital letters and lowercase letters.
To quickly undo an AutoCorrect replacement, press Ctrl+Z. This also adds the
word or abbreviation that you typed to the AutoCorrect exceptions list.
To add an exception to the AutoCorrect exceptions list
1. Choose Tools - AutoCorrect/AutoFormat, and then click the Exceptions tab.
2. Do one of the following:
Type the abbreviation followed by a period in the Abbreviations (no subsequent capital) box.
Type the word in the Words with TWo INitial CApitals box.
See also the functions for automatic numbering of headings, starting on page 119.
Moving Text, Drawing Lines
If you want your text to look good as well as read well, you can customize its
appearance for maximum impact.
Inserting, Editing, and Linking Text Frames
A text frame is a container for text and graphics that you can place anywhere on a
page. You can also use a frame to apply a column layout to text.
Chapter 3
Creating Text Documents With StarOffice Writer
103
Inserting Text Frames
1. Select the text that you want to include in the frame.
2. On the Main Toolbar, long-click the Insert icon, and rest the mouse pointer
over the Insert frame manually icon.
3. In the column preview, move the mouse pointer to select the number of
columns that you want in the frame, and then click.
4. Drag in the document to draw the frame.
Editing Text Frames
To edit the contents of a text frame, click in the frame, and make the changes that
you want.
To edit a frame, select the frame, right-click, and then choose a formatting option.
You can also right-click the selected frame, and choose Frame.
To resize a text frame, click an edge of frame, and drag one of the edges or corners
of the frame. Hold down Shift while you drag to maintain the proportion of the
frame.
104
StarOffice™ 7 User's Guide
Hiding Text From Printing
Any text frame can be set to a mode which allows viewing the text on screen, but
hides the text from printing.
1. Select the text frame (you see the eight handles).
2. Choose Format - Frame - Options.
3. In the Properties area, unmark the Print check box and click OK.
Linking Text Frames
You can link text frames so that their contents automatically flow from one frame
to another.
1.
Click the edge of a frame that you want to link. Selection handles
appear on the edges of the frame.
2.
On the Object Bar, click the Link icon.
3.
Click the frame that you want to link to.
You can only link frames if:
The target frame is empty.
The target frame is not linked to another frame.
The source and the target frames are in the same section. For example, you
cannot link a header frame to a footer frame.
The source frame does not have a next link.
The target or the source frame are not contained in each other.
When you select a linked frame, a line is displayed that connects the linked
frames.
You can only change the height of the last frame in a series of linked frames.
Chapter 3
Creating Text Documents With StarOffice Writer
105
Using a Frame to Center Text on a Page
1. Select the text that you want to center on the page.
2. Choose Insert - Frame.
3. In the Anchor area, select To page.
4. In the Size area, set the dimensions of the frame.
5. In the Position area, select "Center" in the Horizontal and Vertical boxes.
6. Click OK.
To hide the borders of the frame, select the frame, and then choose Format Frame. Click the Borders tab, and then click in the Set No Border box in the Line
Arrangement area.
To resize the frame, drag the edges of the frame.
Animating Text
You can only animate text that is contained in a drawing object, such as rectangles,
lines, or text objects. You can create a text container with any of the tools on Draw
Functions floating toolbar.
1. Select the drawing object containing the text that you want to animate.
2. Choose Format - Text, and then click the Text Animation tab.
3. In the Effect box, select the animation that you want.
4. Set the properties of the effect, and then click OK.
106
StarOffice™ 7 User's Guide
Drawing Lines in Text
You can incorporate lines into your text with custom angles, width, color, and
other attributes.
Create a horizontal line by applying the preset Paragraph Style Horizontal
Line. Place the cursor on a blank line and double-click the Horizontal Line
Style in the Stylist. If the entry for horizontal lines is not visible in the list of
Paragraph Styles, switch the view in the Stylist from "Automatic" to "All
Styles".
You can draw a line above, beside or below a paragraph by choosing Format Paragraph - Borders.
To define the line attributes and direction, use the Line drawing object as
follows:
1.
On the Main Toolbar, long-click the Show Draw Functions icon to
open the Draw Functions floating toolbar and click the Line icon.
The mouse pointer changes to a cross-hair symbol with a line
beside it.
2.
In your document, click where the line should begin. Hold down
the mouse button and drag to the point where you want the line to
end. If you also hold down the Shift key, you can draw only horizontal, vertical, and diagonal lines.
3.
Release the mouse button once the line has the desired direction
and length. You can then draw more lines. End this function by
pressing the Esc key or by clicking the Selection icon from the
Draw Functions floating toolbar.
4.
After clicking the Selection icon, you can select all of the lines at
the same time by clicking each line while holding down the Shift
key. This multiple selection enables you to assign all of them a
common color, width or other attribute.
The lines and other drawing objects that you insert in text are not defined in
HTML, and are therefore not exported directly into HTML format. Instead, they
are exported as graphics.
Chapter 3
Creating Text Documents With StarOffice Writer
107
Editing Text Objects With FontWork
The FontWork command allows you to wrap text around a variety of shapes, for
example, an arc or a slant. You can also align and reposition the text as well as add
shadows or create an outline. You can only use FontWork on text that is contained
in a text or drawing object. The effects are applied to all characters in the object.
1. Select a text object in your document.
2. Choose Format – FontWork.
3. Do one of the following:
To change the shape of the text, click a baseline shape
in the upper box, and then click a wrapping style in
the top row of buttons.
To change the alignment options of the text, the
orientation of the text flow, or to resize the text to fit
the text object frame, use the buttons in the second
row from the top.
To change the spacing options for the text, enter new
values in the Distance and Indent boxes.
To apply other text effects, including shadows, use
the buttons in the bottom row of the dialog.
You can change the size of the text object by dragging one the handles on the
object frame.
Aligning Text to a Line
To align text to a freeform line:
1. On the Main Toolbar, open the Draw Functions floating toolbar, and click the
Freeform Line tool.
2. In your document, drag to draw the line that you want to align the text to.
3. Double-click the line, and enter or paste the text.
4. Choose Format - FontWork.
5. In the first row of buttons, click the Rotate button.
108
StarOffice™ 7 User's Guide
To align text to a straight line:
1. On the Main Toolbar, open the Draw Functions floating toolbar, and click the
Line tool.
2. In your document, drag to draw the line that you want to align the text to.
3. Double-click the line, and enter or paste the text.
4. In the Line Style box on the Object Bar, select "Invisible".
The Navigator
The Navigator lets you quickly jump to specific parts or objects in your document
and provides information about the content of the document in a clear and understandable way.
In text documents, the Navigator provides you with complete lists of all objects
(for example, graphics), frames, sections, and tables in your document. Doubleclick an item in the Navigator to jump to it in your document.
The Navigator can do more than just navigate. For example, in texts with headings, you can rearrange the sequence of chapters and sub-chapters by dragging the
appropriate icons in the Navigator.
Activate the Navigator by clicking the icon in the Function Bar.
Jumping to a Specific Page
One of the functions of the Navigator is to allow you to jump quickly to a specific
page in a long document. You can even do this if the Navigator is not open double-click the current page number on the Status Bar and the Navigator opens.
Type the number of the page that you want to jump to in the box and then press
Enter. To close the Navigator, double-click the current page number on the Status
Bar again. You can also press Ctrl+Shift+F5 to open the Navigator and place the
cursor in the page number box.
You do not have to press Enter after you enter a page number. Instead, enter the
number, wait one or two seconds, and the page opens.
Chapter 3
Creating Text Documents With StarOffice Writer
109
Jumping From One Reminder to Another
In the Navigator, you can set temporary reminders that stay in effect until you
close the document. This method makes it easy to move between particular locations in the document, for example, if you want to look up or add something later.
1. Position the cursor in the text where you want to set a reminder.
2. Click the Set Reminder icon in the Navigator. The reminder is not visible in the
document.
3. If you want to jump to a reminder, select the Reminder entry in the Navigation
window (see the following section). You can now move through the reminders
by clicking the Previous and Next arrows.
Jumping From One Object to Another in Text
Clicking the Navigation icon in the Navigator or in the vertical scroll bar opens
the Navigation window. This works like a "mini navigator" which you can, for
example, use to move in your document from one graphic object to the next one or
to the previous one. To make the navigation arrows visible, drag the title bar of the
Navigation window out of the Navigator. Click the "Graphics" icon and then either
the Previous graphic or Next graphic arrows. This also works for tables, frames,
sections, and so on.
In the Navigation window, click the object type you want to jump to, and
then click one of the arrow icons to go to the previous or next object of this
type in your document.
If the navigation arrows in the scroll bar (in the lower right corner) appear
black, you can scroll through the pages of your document. If the arrows
appear blue, you can scroll to each object of the same category you have
selected last (for example, to each table or bookmark, and so on).
110
StarOffice™ 7 User's Guide
In the main section of the Navigator there are entries for Headings, OLE objects,
Hyperlinks, References, and so on. A plus sign in front of one of the entries means
that there are corresponding objects in the selected document and that you can
have the list of the objects of this type shown by clicking the plus sign or doubleclicking the entry. Double-click one of the object names to display it in the document and move the cursor to that position.
Other Navigator Features
The Navigator can help, for example, if you have an HTML page open. The Navigator tells you at a glance which hyperlinks the page contains.
The Content View in the Navigator helps you organize and rearrange chapters
with their sub-chapters, provided you have formatted them with the headings
Styles. For detailed instructions, refer to the StarOffice Help.
Chapter 3
Creating Text Documents With StarOffice Writer
111
Indexes and Tables of Contents in
StarOffice Writer
In your StarOffice Writer documents you can have any number of predefined or
user-defined indexes. For example, you can have a table of contents, alphabetical
index, illustration index or bibliography.
Defining Index or Table of Contents Entries
Defining Index Entries
1. Click in a word, or select the words in your document that you want to use as
an index entry.
2. Choose Insert - Indexes and Tables - Entry, and do one of the following:
To change the text that appears in the index, type the text that you want in
the Entry box. The text that you type here does not replace the selected text
in the document.
To add an index mark to similar words in your document, select Apply to
all similar texts.
To add the entries to a custom index, click the New User-defined Index
icon, enter the name of the index, and then click OK.
Defining Table of Contents Entries
The best way to generate a table of contents is to apply the predefined heading
paragraph styles, such as "Heading 1", to the paragraphs that you want to include
in your table of contents. You can also use custom paragraph styles, so long as you
assign them one of the predefined outline levels.
112
StarOffice™ 7 User's Guide
To use a custom paragraph style as a table of contents entry:
1. Choose Tools - Outline Numbering and click the Numbering tab.
2. Select the paragraph style that you want to include in your table of contents in
the Paragraph Style box.
3. In the Level list, click the hierarchical level that you want to apply the paragraph style to.
4. Click OK. You can now apply the style to headings in your document and
include them in your table of contents.
Editing or Deleting Index and Table Entries
Index entries are inserted as fields into your document. To view fields in your
document, choose View and ensure that Field Shadings is selected.
1. Place the cursor immediately in front of the index entry in your document.
2. Choose Edit - Index Entry, and do one of the following:
To change the entry, enter different text in the Entry box.
To remove the entry, click Delete.
To cycle through the index entries in your document, click the next or the previous
arrows in the Edit Index Entry dialog.
Creating a Table of Contents
The best way to generate a table of contents is to apply the predefined heading
paragraph styles, such as "Heading 1", to the paragraphs that you want to include
in your table of contents. After you apply these styles, you can then create a table
of contents.
1. Click in your document where you want to create the table of contents.
2. Choose Insert - Indexes and Tables - Indexes and Tables, and then click the
Index/Table tab.
3. Select "Table of Contents" in the Type box.
Chapter 3
Creating Text Documents With StarOffice Writer
113
4. Select any options that you want.
5. Click OK.
If you want to use a different paragraph style as a table of contents entry, select the
Additional Styles check box in the Create from area, and then click the (...) button
next to the check box. In the Assign Styles dialog, click the style in the list, and
then click the >> or the << button to define the outline level for the paragraph
style.
Updating a Table of Contents
Do one of the following:
Right-click in the table of contents and choose Update Index/Table.
Choose Tools - Update - All Indexes and Tables.
Creating Alphabetical Indexes
1. Click in your document where you want to insert the index.
2. Choose Insert - Indexes and Tables - Indexes and Tables.
3. On the Index/Table tab, select "Alphabetical Index" in the Type box.
4. If you want to use a concordance file, select Concordance file in the Options
area, click the File, and then locate an existing file or create a new concordance
file.
5. Set the formatting options for the index, either on the current tab, or on any of
the other tabs of this dialog. For example, if you want to use single letter headings in your index, click the Entries tab, and then select Alphabetical delimiter. To change the formatting of levels in the index, click the Styles tab.
6. Click OK.
7. To update the index, right-click in the index, and then choose Update
Index/Table.
114
StarOffice™ 7 User's Guide
User-Defined Indexes
You can create as many user-defined indexes as you want.
Creating a User-Defined Index
1. Select a word or words that you want to add to a user-defined index.
2. Choose Insert - Indexes and Tables - Entry.
3. Click the New User-defined Index button next to the Index box.
4. Type a name for the index in the Name box and click OK.
5. Click Insert to add the selected word(s) to the new index.
6. Click Close.
Inserting a User-Defined Index
1. Click in the document where you want to insert the index.
2. Choose Insert - Indexes and Tables - Indexes and Tables.
3. On the Index/Table tab, select the name of the user-defined index that you
created in the Type box.
4. Select any options that you want.
5. Click OK.
Chapter 3
Creating Text Documents With StarOffice Writer
115
If you want to use a different paragraph style as a table of contents entry, select
Styles, and then click the (...) button next to the box. Click the style in the list, and
then click the >> or the << button to define the outline level for the paragraph
style.
Creating a Bibliography
A bibliography is a list of works that you reference in a document.
Storing Bibliographic Information
StarOffice stores bibliographic information in a bibliography database, or in an
individual document.
To store information in the bibliography database:
1. Choose Tools - Bibliography Database.
2. Choose Insert - Record.
3. Type a name for the bibliography entry in the Short name box, and then add
additional information to the record in the remaining boxes.
4. Close the Bibliography Database window.
To store bibliographic information in an individual document:
1. Click in your document where you want to add the bibliography entry.
2. Choose Insert - Indexes and Tables - Bibliography Entry.
3. Select From document content and click New.
4. Type a name for the bibliography entry in the Short name box.
5. Select the publication source for the record in the Type box, and then add additional information in the remaining boxes.
6. Click OK.
7. In the Insert Bibliography Entry dialog, click Insert, and then Close.
When you save a document that contains bibliography entries, the corresponding
records are automatically saved in a hidden field in the document.
116
StarOffice™ 7 User's Guide
Inserting Bibliography Entries From the Bibliography Database
1. Click in your document where you want to add the bibliography entry.
2. Choose Insert - Indexes and Tables - Bibliography Entry.
3. Select From bibliography database.
4. Select the name of the bibliography entry that you want to insert in the Short
name box.
5. Click Insert and then click Close.
Updating, Editing and Deleting Indexes and Tables
of Contents
1. Place the cursor in the index or table of contents.
If you cannot place your cursor in the index or table of contents, choose Tools Options - Text Document - Formatting Aids, and then select Enable in the
Cursor in protected areas.
2. Right-click and choose an editing option from the menu.
You can also make changes directly to an index or table of contents. Right-click in
the index or table of contents, choose Edit Index/Table, click Index/Table tab, and
then clear the Protected from manual changes check box.
Chapter 3
Creating Text Documents With StarOffice Writer
117
Formatting an Index or a Table of Contents
You can apply different paragraph styles, assign hyperlinks to entries, change the
layout of indexes, and change the background color of indexes in the Insert Index
dialog.
To apply a different paragraph style to an index level:
1. Right-click in the index or table of contents, and then choose Edit Index/Table.
2. Click the Styles tab.
3. Click an index level in the Levels list.
4. Click the style that you want to apply in the Paragraph Style list.
5. Click the assign button <.
6. Click OK.
To assign hyperlinks to entries in a table of contents:
You can assign a cross-reference as a hyperlink to entries in a table of contents.
1. Right-click in the table of contents, and then choose Edit Index/Table.
2. Click the Entries tab.
3. Click the heading level that you want to assign hyperlinks to in the Level list.
118
StarOffice™ 7 User's Guide
4. In the Structure area, click in the box in front of E#, and then click Hyperlink.
5. Click in the box behind the E, and then click Hyperlink.
6. Repeat for each heading level that you want to create hyperlinks for, or click
the All levels button to apply the formatting to all levels.
Indexes Covering Several Documents
There are several ways to create an index that spans several documents:
Create an index in each individual document, copy and paste the indexes into a
single document, and then edit them.
Select each index, choose Insert - Section, and then enter a name for the index.
In a separate document, choose Insert - Section, select Link, click the browse
button (...), and then locate and insert a named index section.
Create a master document, add the files that you want to include in the index
as subdocuments, and then choose Insert - Index and Tables - Indexes and
Tables.
More information about master documents can be found starting on page 126.
Headings and Numbering
In long text documents, you can profit from the automatic functions for headings
and numbering.
Numbering and Numbering Styles
You can apply numbering to a paragraph manually or with a paragraph style.
To apply numbering manually, click in the paragraph, and then click the
Numbering On/Off icon on the Object Bar.
You cannot apply manual numbering to paragraphs that are listed under "Special
Styles" in the Stylist.
Chapter 3
Creating Text Documents With StarOffice Writer
119
To apply numbering with a paragraph style:
Paragraph styles give you greater control over numbering that you apply in a
document. When you change the numbering format of the style, all paragraphs
using the style are automatically updated.
1. Choose Format - Stylist, and then click the Paragraph Styles icon.
2. Right-click the paragraph style that you want to apply numbering to, and then
choose Modify.
3. Click the Numbering tab.
4. In the Numbering Styles box, select the type of numbering that you want to
use.
5. Click OK.
6. Apply the style to the paragraphs that you want to add numbering to.
Adding Bullets
1.
Select the paragraph(s) that you want to add bullets to.
2.
On the Text Object Bar, click the Bullets On/Off icon.
To change the formatting and the hierarchy of a bulleted list, click in
the list, and then click the Left arrow on the Text Object Bar. The
Numbering Object Bar appears.
To remove bullets, select the bulleted paragraphs, and then click the Bullets
On/Off icon on the Text Object Bar.
Formatting Bullets
To change the formatting of bulleted list, click the Edit Numbering icon on the
Numbering Object Bar, or choose Format - Numbering/Bullets.
For example, to change the bulleting symbol, click the Options tab, click the
browse button (...) next to Character, and then select a special character. You can
also click the Graphics tab, and then click a symbol style in the Selection area.
120
StarOffice™ 7 User's Guide
Adding Numbering
1.
Select the paragraph(s) that you want to add numbering to.
2.
On the Text Object Bar, click the Numbering On/Off icon.
To change the formatting and the hierarchy of a numbered list, click in
the list, and then click the Left arrow on the Text Object Bar. The
Numbering Object Bar appears.
To remove numbering, select the numbered paragraphs, and then click the
Numbering On/Off icon on the Text Object Bar.
Formatting a Numbered List
To change the formatting of numbered list, click the Edit Numbering icon on the
Numbering Object Bar, or choose Format - Numbering/Bullets.
For example, to change the numbering style, choose Format - Numbering/Bullets,
click the Numbering Type tab, and then click the style that you want to apply.
Chapter 3
Creating Text Documents With StarOffice Writer
121
Outline Numbering
You can modify the heading hierarchy or assign a level in the hierarchy to a
custom paragraph style. You can also also add chapter and section numbering to
heading paragraph styles. By default, the "Heading 1" paragraph style is at the top
of the outline hierarchy.
To add automatic numbering to a heading style:
1. Choose Tools - Outline Numbering, and then click the Numbering tab.
2. In the Paragraph Style box, select the heading style that you want to add a
chapter number to.
3. In the Numbers box, select the numbering style that you want to use, and then
click OK.
122
StarOffice™ 7 User's Guide
To use a custom paragraph style as a heading:
1. Choose Tools - Outline Numbering, and then click the Numbering tab.
2. Select the custom style in the Paragraph Style box.
3. Click the heading level that you want to assign to the custom paragraph style
in the Level list.
4. Click OK.
To rearrange the headings in a text document:
You can quickly rearrange the heading order, or change the heading hierarchy in a
text document by using the Navigator. You can choose to include or exclude the
subordinate text of a heading when you reorder the hierarchy.
1. Open a text document.
2. On the Function Bar, click the Navigator icon.
3. Do one of the following:
To change the order of a heading, drag the heading to a different location in
the list.
To move a heading down one level in the hierarchy, click the Demote Level
icon.
To move a heading up one level in the hierarchy, click the Promote Level
icon.
To move a heading to the beginning of the document, click the Promote
Chapter icon.
To move a heading to the end of the document, click the Demote Chapter
icon.
The numbering of affected headings is automatically updated.
Chapter 3
Creating Text Documents With StarOffice Writer
123
Creating Numbered or Bulleted Lists as You Type
StarOffice can automatically apply numbering or bullets as you type.
To enable automatic numbering and bulleting:
1. Choose Tools - AutoCorrect/AutoFormat, click the Options tab, and then select
Apply Numbering - Symbol.
2. Choose Format - AutoFormat, and ensure that While Typing is selected.
To create a numbered or bulleted list while you type:
1. Type 1., i., or I. to start a numbered list. Type * or - to start a bulleted list. You
can also type a right parenthesis after the number instead of a period , for
example, 1) or i).
2. Enter a space, type your text, and then press Enter. The new paragraph automatically receives the next number or bullet.
3. Press Enter again to finish the list.
Adding Chapter Numbers to Captions
You can include chapter numbers in captions.
Ensure that the text in your document is organized by chapters, and that the
chapter titles and, if you want, the section titles, use one of the predefined heading
paragraph styles. You must also assign a numbering option to the heading paragraph styles.
1. Select the item that you want to add a caption to.
2. Choose Insert - Caption.
3. Select a caption title from the Category box, and select a numbering style in the
Numbering box. You also can enter a caption text in this dialog. If you want,
enter text in the Caption box.
4. Click Options.
124
StarOffice™ 7 User's Guide
5. In the Levels box, select the number of heading levels to include in the chapter
number.
6. Type the character that you want to separate the chapter number(s) from the
caption number in the Separator box, and then click OK.
7. In the Caption dialog, click OK.
StarOffice can automatically add a caption when you insert an object, graphic, or
table. Choose Tools - Options - Text Document - General, and in the Caption
area, select Automatic. Click the ... button next to Object selection, select the
items for which you want StarOffice to insert a caption, and then click OK.
Defining Number Ranges
You can automatically number similar items, such as quotations, in your document.
1. Type the text that you want to assign numbering to, for example, "Quotation
Number ".
2. Choose Insert - Fields - Other, and then click the Variables tab.
Chapter 3
Creating Text Documents With StarOffice Writer
125
3. Click "Number range" in the Type list.
4. Type "Quotation" in the Name box.
5. Do one of the following:
Type a number in the Value box, or leave the box empty to use automatic
numbering.
Select the outline level where you want the numbering to restart in the Level
box.
6. Click Insert, and then click Close.
Using Master Documents and Subdocuments
A master document lets you manage large documents, such as a book with many
chapters, by acting as a container for individual StarOffice Writer files. The individual files are called subdocuments. You can also separate a large document that
is being worked on by several people into subdocuments and then add them to a
master document.
When you add an existing file as a subdocument to a master document or create a
new subdocument, a link to the subdocument is created. You cannot edit the
content of a subdocument in a master document.
Page, caption, footnote, endnote, and any other numbering that you have set in the
subdocuments, is carried over into the master document. For example, if the last
footnote in the first subdocument is footnote 6, then the first footnote in the next
subdocument will be footnote 7.
Styles that are used in subdocuments, such as paragraph styles, are automatically
imported into the master document after you save the master document. When
you modify the style in the master document, the style in the subdocument is
unaffected.
Use the same document template for the master document and its subdocuments.
When you modify or create a style, add it to the document template, and then
reload the master document to apply to the subdocuments.
When you print a master document, the contents of all subdocuments, indexes,
and any text that you entered are printed.
You can create a table of contents and index in the master document for all of the
subdocuments.
126
StarOffice™ 7 User's Guide
To create a master document:
1. Do one of the following:
Choose File - New - Master Document.
Open an existing document and choose File - Send - Create Master Document.
2. If you are creating a new master document, the first entry in the Navigator
should be a Text entry (see illustration). Type an introduction or enter some
text. This ensures that the styles that you define in the master document are
valid in the subdocuments.
3. In the Navigator, long-click the Insert icon, and do one of the following:
To insert an existing file as a subdocument, choose File, locate the file that you
want to include, and then click OK.
To create a new subdocument, choose New Document, type a name for the file,
and then click Save.
4. Choose File - Save.
Working With Master Documents
Use the Navigator for rearranging and editing the subdocuments in a master
document.
You would like to know the link for a subdocument? Position the mouse pointer in
the Navigator on the subdocument's name. The path information of the original
document will appear in a small window. If the file is no longer found under the
original path, the warning File not found is shown in red in addition to the path.
Chapter 3
Creating Text Documents With StarOffice Writer
127
To open a subdocument for editing, right-click the subdocument in the Navigator list, and then choose Edit.
To add text to a master document, right-click an item in the Navigator list, and
then choose Insert - Text. A text section is inserted before the selected item in
the master document where you can type the text that you want.
To delete a subdocument from the master document, right-click the subdocument in the Navigator list and choose Delete. The source file is not affected by
this command.
To reorder the subdocuments in a master document, drag a subdocument to a
new location in the Navigator list. You can also select a subdocument in the list,
and click the Move down or Move up icon.
To add an index, such as a table of contents, to a master document, right-click a
subdocument in the Navigator list, and then choose Insert - Index. The index is
inserted before the selected subdocument in the master document.
To update an index in a master document, select the index in the Navigator, and then click the Update icon.
To start each subdocument on a new page:
1. Ensure that each subdocument starts with a heading that uses the same paragraph style, for example "Heading 1".
2. In the master document, choose Format - Stylist, and click the Paragraph
Styles icon.
3. Right-click "Heading 1" and choose Modify.
4. Click the Text Flow tab.
5. In the Breaks area, select Enable, and then select Page in the Type box.
6. If you want each subdocument to start on an odd page, select With Page Style,
and select "Right page" in the box.
7. Click OK.
128
StarOffice™ 7 User's Guide
To save a master document as a StarOffice text document:
1. In the Navigator, click the Toggle icon.
2. In the Navigator list, double-click "Sections".
3. Right-click a section name and choose Edit.
4. Select all of the sections in the Section list, and then click Remove.
5. Click OK.
6. Choose File - Save as, set the file type to "StarOffice Text Document", and then
click Save.
Changing the Outline Level of Numbered and
Bulleted Lists
To move a numbered or bulleted paragraph down one outline level, click at the
beginning of the paragraph, and then press Tab.
To move a numbered or bulleted paragraph up one outline level, click at the
beginning of the paragraph, and then press Shift+Tab.
To insert a tab between the number or bullet and the paragraph text, click at
the beginning of the paragraph, and then press Ctrl+Tab.
Chapter 3
Creating Text Documents With StarOffice Writer
129
Modifying Numbering in a Numbered List
You can remove the numbering from a paragraph in a numbered list or change the
number that a numbered list starts with.
To remove the number from a paragraph in a numbered list:
1. Click in front of the first character of the paragraph that you want to remove
the numbering from.
2. Do one of the following:
To remove the number while preserving the indent of the paragraph,
press the Backspace key.
To remove the number and the indent of the paragraph, click the
Numbering on/off icon on the Object Bar. If you save the document in
HTML format, a separate numbered list is created for the numbered
paragraphs that follow the current paragraph.
To change the number that a numbered list starts with:
1. Click anywhere in the numbered list.
2. Choose Format - Numbering/Bullets, and then click the Options tab.
3. Enter the number you want the list to start with in the Start at box.
4. Click OK.
Adding Line Numbers
StarOffice can automatically count and add line numbers to the lines in an entire document or to selected paragraphs in your document. Line numbers are included when you
print your document, but not when you save the document as HTML. You can specify
the line numbering interval, the starting line number, and whether to count blank lines
or lines in frames. You can also add a separator between line numbers.
130
StarOffice™ 7 User's Guide
To add line numbers to an entire document:
1. Choose Tools - Line Numbering.
2. Select Show numbering, and then select the options that you want.
3. Click OK.
To add line numbers to specific paragraphs:
1. Choose Tools - Line Numbering.
2. Select Show numbering.
3. Press F11 to open the Stylist, and then click the Paragraph Styles icon.
4. Right-click the "Default" paragraph style and choose Modify.
All paragraph styles are based on the "Default" style.
5. Click the Numbering tab.
6. In the Line Numbering area, clear the Include this paragraph in line
numbering check box.
7. Click OK.
8. Select the paragraph(s) where you want to add the line numbers.
9. Choose Format - Paragraph, and then click the Numbering tab.
10. Select Include this paragraph in line numbering.
11. Click OK.
You can also create a paragraph style that includes line numbering, and apply it to
the paragraphs that you want to add line numbers to.
To specify the starting line number:
1. Click in a paragraph.
2. Choose Format - Paragraph, and then click the Numbering tab.
3. Select the Include this paragraph in line numbering check box.
4. Select Restart at the paragraph check box.
5. Enter a line number in the Start with box.
6. Click OK.
Chapter 3
Creating Text Documents With StarOffice Writer
131
Tables in Text, Calculating in Text
You can have tables and spreadsheets in your text documents. You can choose
either "normal" text tables, or spreadsheets imported from StarOffice Calc using
drag-and-drop or from a data source view.
Inserting Tables
There are several ways to create a table in a text document. You can insert a table
from the Insert floating toolbar, through a menu command, or from a StarOffice
Calc spreadsheet.
To insert a table from the Insert floating toolbar:
1. Place the cursor in your document where you want to insert the table.
2. On the Main Toolbar, long-click the Insert floating toolbar.
3. Rest the mouse pointer over the Insert table icon until the table grid appears.
4. In the table grid, drag to select the numbers of rows and columns that you
want, and then release.
To cancel, drag upwards or to the left until Cancel appears in the preview area of
the grid.
To insert a table with a menu command:
1. Place the cursor in your document where you want to insert the table.
2. Choose Insert - Table.
3. In the Size area, enter the number of rows and columns.
4. Select the options that you want, click OK.
132
StarOffice™ 7 User's Guide
Inserting a Table From a StarOffice Calc Spreadsheet
1. Open the StarOffice Calc spreadsheet containing the cell range that you want to
insert.
2. In the spreadsheet, drag to select the cells.
3. Choose Edit - Copy.
4. In your text document, do one of the following:
Choose Edit - Paste. The cell range is pasted as an OLE object. To edit the
contents of the cells, double-click the object.
Choose Edit - Paste Special, and choose from the following options:
Option
Is inserted as...
"StarOffice 7 Spreadsheet"
OLE object - as with Ctrl+V or dragand-drop
GDIMetaFile
Graphic
Bitmap
Graphic
HTML
HTML table
Unformatted text
Text only, tab stops as separators
Formatted text [RTF]
Text table
DDE link (only under Windows)
Table structure and contents, without
formatting. With updating
Drag-and-Drop a Cell Range From a StarOffice Calc Spreadsheet
1. Open the StarOffice Calc spreadsheet containing the cell range that you want to
insert.
2. In the spreadsheet, drag to select the cells.
3. Click in the selected cells and wait a moment.
4. Drag the selected cells into the text document.
Chapter 3
Creating Text Documents With StarOffice Writer
133
Deleting Tables or the Contents of a Table
You can delete a table from your document, or delete the contents of the table.
To delete a table, do one of the following:
Select from the end of the paragraph before the table to the start of the paragraph after the table, and then press Delete or Backspace.
Click in the table, press Ctrl+A, and then choose Format - Row - Delete.
To delete the contents of a table, click in the table, press Ctrl+A, and then press
Delete or Backspace.
Inserting Text Before a Table at the Top of Page
If you want to insert text before a table that is at the top of a page, click in the first
cell of the table, in front of any contents of that cell, and then press Enter.
Preparing Tables in Text Documents
Inserting Tables in Text Documents
134
1.
For this example, open a new text document with File - New - Text Document.
2.
Place your cursor at the position in the text document where you want to
insert a table.
3.
Long-click the Insert icon on the Main Toolbar to open a floating toolbar
which contains the Insert Table icon. Drag the floating toolbar into your
document.
StarOffice™ 7 User's Guide
4.
Click Insert Table and, keeping the mouse button pressed, drag to select
the desired amount of rows and columns. When you release the mouse
button, a table with the selected rows and columns will appear in your
document.
Formatting Tables in Text Documents
A new table inserted into a text document will be pre-formatted. The first row will
have the Paragraph Style "Table Heading," and all other rows will have the "Table
Contents" Style. Text entered in the first row will automatically be bold and
centered. The following describes various formatting options that determine the
overall appearance of a table.
With tables in text documents, the first thing to note is that not all cells have to be
sized according to the general grid of rows and columns. You can easily merge
neighboring cells into a single cell, or split individual cells horizontally or vertically. The relevant icons, called Merge Cells and Split Cells, can be found on the
Table Object Bar.
In the Table Format dialog, you can decide on formatting attributes for a table.
Open this dialog either with the menu command Format - Table or the Table
command in the context menu.
If you want to change the table background, for example, proceed as follows:
1.
Select the cells to which you want to assign a background color.
2.
Now, either choose Format - Table or click Table in the context menu of the
selected cells.
3.
In the Table Format dialog, click the Background tab.
Chapter 3
Creating Text Documents With StarOffice Writer
135
Notice the two list boxes at the top of the dialog. In the left box, you can
choose a color or graphics as the background. In the right box you can define
whether to apply the background to the selected cells, the whole row, or the
entire table. Cell formatting takes priority over row formatting.
4.
Click OK when you have made your choice.
You can design your tables with even greater impact using thematically appropriate backgrounds. Background colors and graphics are always inserted behind
text and values in a table.
Graphics and other objects can also be inserted into the table.
1. Place your cursor in the cell where you want the object to appear.
2. To insert graphics, choose Insert - Graphics - From File.
3. In the Insert Graphics dialog, select the desired graphics file. Click Open.
4. Click on the inserted graphic object and select the Graphics command in the
context menu (or double-click on the graphic object). In the Graphic dialog,
you can define various settings for the graphic and its function in the document.
136
StarOffice™ 7 User's Guide
Calculating in Text Documents
You can insert a calculation directly into a text document or into a table in a text
document.
1. Click in the document where you want to insert the calculation, and then press
F2. If you are in a table cell, type an equals sign =.
2. Type the calculation that you want to insert, for example, "=10000/12", and
then press Enter.
You can also click the Formula icon on the Formula Bar, and then choose a function for your formula.
Calculating Complex Formulas in Text Documents
You can use predefined functions in a formula, and then insert the result of the
calculation into a text document.
For example, to calculate the mean value of three numbers, do the following:
1. Click in the document where you want to insert the formula, and then press F2.
2. Click the Formula icon, and choose "Mean" from the list.
3. Type the first number, followed by a vertical slash (|), and repeat for the
second and third numbers.
4. Press Enter. The result is inserted as a field into the document.
To edit the formula, double-click the field in the document.
Calculating and Pasting the Result of a Formula in
a Text Document
If your text already contains a formula, for example "12+24*2", StarOffice can
calculate, and then paste the result of the formula in your document, without
using the Formula Bar.
1. Select the formula in the text. The formula can only contain numbers, operators, and currency symbols and cannot contain spaces.
Chapter 3
Creating Text Documents With StarOffice Writer
137
2. Choose Tools - Calculation, or press Ctrl+Plus Sign (+).
3. Place the cursor where you want to insert the result of the formula, and then
choose Edit - Paste, or press Ctrl+V.
If the formula is selected, it is replaced by the result.
Displaying the Result of a Table Calculation in a
Different Table
You can perform a calculation on cells in one table and display the result in a
different table.
1. Open a text document, insert a table with multiple columns and rows, and then
insert another table consisting of one cell.
2. Enter numbers into some of the cells of the large table.
3. Place the cursor in the table with the single cell, and then press F2.
4. In the Formula Bar, enter the function that you want to perform, for example,
"=SUM".
5. Click in a cell in the larger table that contains a number, press the plus sign (+),
and then click in a different cell containing a number.
6. Press Enter.
You can format the table with the single cell to display like normal text. Anchor
the table as a character, so that it will stay with the adjacent text when you insert
or delete text.
Calculating Across Tables
You can perform calculations that span across more than one table in a text document.
1. Open a text document, insert two tables, and type numbers in a few cells in
both tables.
2. Place your cursor in an empty cell in one of the tables.
138
StarOffice™ 7 User's Guide
3. Press F2.
4. In the Formula Bar, enter the function that you want to perform, for example,
"=SUM".
5. Click in a cell containing a number, press the plus sign (+), and then click in a
different cell containing a number.
6. Press Enter.
Calculating Cell Totals in Tables
1. Choose Insert - Table, and insert a table with one column and more than one
row into a text document.
2. Type a number in each cell of the column, but leave the last cell in the column
empty.
3. Place the cursor in the last cell of the column, and then click the Sum icon on
the Table Object Bar.
The Formula Bar appears, and StarOffice inserts a formula for calculating the
sum of the values in the current column. Individual cells are separated by a
vertical slash |.
4. If the formula is correct, press Enter, or click Apply in the Formula Bar. The
sum of the values in the current column is entered in the cell.
If you enter a different number anywhere in the column, the sum is automatically
updated.
Similarly, you can also quickly calculate the sum of a row of numbers.
To calculate the sum of a series of table cells:
1. Click in a blank cell in the table.
2. On the Formula Bar, click the Sum icon.
3. Click in the first cell of the series, drag to the final cell, and then release.
4. Press Enter.
Chapter 3
Creating Text Documents With StarOffice Writer
139
Merging and Splitting Cells
You can select adjacent cells, then merge them into a single cell. Conversely, you
can take a large cell that has been created by merging single cells, and divide it
back into individual cells.
The commands are different in StarOffice Writer and Calc.
Merging Cells in StarOffice Writer
1. Select the adjacent cells.
2. Choose Format - Cell - Merge.
Splitting Cells in StarOffice Writer
1. Place the cursor in the cell to be split.
2. Choose Format - Cell - Split.
A dialog allows you to split the cell into two or more cells, horizontally or vertically.
Merging Cells in StarOffice Calc
1. Select the adjacent cells.
2. Choose Format - Merge Cells - Define.
Canceling the merging of cells in StarOffice Calc
1. Place the cursor in the cell to be split.
2. Choose Format - Merge Cells - Remove.
140
StarOffice™ 7 User's Guide
Adding or Deleting a Row or Column to a Table
Using the Keyboard
You can add or delete rows or columns in table as well as split or merge table cells
using the keyboard.
To insert a new row in a table, place the cursor in a table cell, press Alt+Ins,
and then press the up or down arrow key. You can also move the cursor to the
last cell in the table, and then press Tab.
To insert a new column, place the cursor in a table cell, press Alt+Ins, and then
press the left or right arrow key.
To split a table cell instead of adding a column, press Alt+Ins, and then hold
down Ctrl while you press the left or right arrow key.
To delete a row, place the cursor in a table cell, press Alt+Del, and then press
the up or down arrow key.
To delete a column, place the cursor in a table cell, press Alt+Del, and then
press the left or the right arrow key.
To merge a table into an adjacent cell, place the cursor in the cell, press
Alt+Del, hold down Ctrl, and then press the left or the right arrow key.
Repeating a Table Header on a New Page
You can repeat a table header on each new page that the table spans.
1. Choose Insert - Table.
2. In the Options area, select the Header and the Repeat header check boxes.
3. Select the number of rows and columns for the table.
4. Click OK.
To repeat multiple table header rows:
1. Select the first row of the table.
2. Right-click and choose Cell - Split.
Chapter 3
Creating Text Documents With StarOffice Writer
141
3. In the Split area, enter the number of rows that you want to include in the
header.
4. In the Direction area, click in the Horizontally box. If you want the rows to
have equal heights, select the Into equal proportions check box.
5. Click OK.
Resizing Rows and Columns in a Table
You can resize the width of table cells and columns, as well as change the height of
table rows.
You can also distribute rows and columns evenly using the icons on the
Optimize floating toolbar on the Table Object Bar.
Changing the Width of Columns and Cells
To change the width of a column:
Do one of the following:
Rest the mouse pointer over the column dividing line until the pointer becomes
a separator icon, and then drag the line to a new location.
Rest the mouse pointer over the column dividing line on the ruler until the
pointer becomes a separator icon, and then drag the line to a new location.
Place the cursor in a cell in the column, hold down the Alt key, and then press
the left or the right arrow key.
To increase the distance from the left edge of the page to the edge of the table,
hold down Alt+Shift, and then press the right arrow key.
You can specify the behavior for the arrow keys by choosing Tools - Options Text Document - Table, and selecting the options that you want in the Keyboard
handling area.
142
StarOffice™ 7 User's Guide
To change the width of a cell:
Hold down Alt+Ctrl, and then press the left or the right arrow key
Changing the Height of a Row
To change the height of a row, place the cursor in a cell in the row, hold down
the Alt key, and then press the up or the down arrow key.
Modifying the Behavior of Rows and Columns for
Table
When you insert or delete cells, rows or columns in a table, the Behavior of
rows/columns options determine how the neighboring elements are affected. For
example, you can only insert new rows and columns into a table with Fixed row
and column dimensions if space permits.
To set the Behavior of rows/columns options for tables in text documents, choose
Tools - Options - Text Document - Table, or use the Fixed, Fixed/Proportional,
and Variable icons on the Table Object Bar. There are three display modes for
tables:
Fixed - changes only affect the adjacent cell, and not the entire table. For
example, when you widen a cell, the adjacent cell becomes narrower, but the
width of the table remains constant.
Fixed, proportional - changes affect the entire table, and wide cells shrink more
than narrow cells. For example, when you widen a cell, the adjacent cells
become proportionally narrower, but the width of the table remains constant.
Variable - changes affect the table size. For example, when you widen a cell,
the width of the table increases.
Chapter 3
Creating Text Documents With StarOffice Writer
143
Copying Spreadsheet Areas to Text Documents
1. Open both the text document and the spreadsheet.
2. Select the sheet area you want to copy.
3. Point to the selected area and press the mouse button. Keep the mouse button
pressed for a moment, then drag the area into the text document.
If the documents are not visible next to each other, first drag the mouse pointer
to the destination document button. Continue to hold down the mouse button.
The document is displayed, and you can move the mouse pointer within the
document.
4. Once the cursor is located in the place where you want to insert the sheet area,
release the mouse button. The sheet area is inserted as an OLE object.
5. You can select and edit the OLE object at any time.
6. To edit the OLE object, double-click on it.
Alternatively, select the object and choose Edit - Object - Edit or choose Edit
from the context menu. You edit the object in its own frame within the text
document, but you see the icons and menu commands needed for spreadsheets.
7. Choose Open to open the source document of the OLE object.
144
StarOffice™ 7 User's Guide
Images, Drawings, Clipart and
FontWork
You can insert images, graphics, drawings and clipart in your text document, or
you can distort text with FontWork.
Positioning Objects
You can use anchors to position an object, graphic, or frame in a document. An
anchored item remains in place, or moves when you modify the document. The
following anchoring options are available:
Anchoring
Effect
As character
Anchors the selected item as a character in the current text. If
the height of the selected item is greater than the current font
size, the height of the line containing the item is increased.
To character
Anchors the selected item to a character.
To paragraph
Anchors the selected item to the current paragraph.
To page
Anchors the selected item to the current page.
To frame
Anchors the selected item to the surrounding frame.
When you insert an object, graphic, or frame, an anchor icon appears where the
item is anchored. You can position an anchored item by dragging the item to
another location. To change the anchoring options of an item, right-click the item,
and then choose an option from the Anchor submenu.
Adding Captions
In text documents, you can add continuously numbered captions to graphics,
tables, and drawing objects.
You can edit the text and the number ranges for different captions.
When you insert a caption, the selected item and the caption text are placed in a
frame. To move both the selected item and the caption, select the frame, and then
drag. To update the caption numbering after you move the frame, press F9.
Chapter 3
Creating Text Documents With StarOffice Writer
145
Defining Captions
1. Select the item that you want to add a caption to.
2. Choose Insert - Caption.
3. Select the options that you want, and then click OK. If you want, you can also
enter different text in the Category box, for example "Figure".
You can edit caption text directly in the document.
A caption is formatted with the paragraph style that matches the name of the
caption Category. For example, if you use insert a "Table" caption, the "Table"
paragraph style is applied to the caption text.
StarOffice can automatically add a caption when you insert an object, graphic, or
table. Choose Tools - Options - Text Document - General, and in the Caption
area, select Automatic. Click the ... button next to Object selection, select the
items for which you want StarOffice to insert a caption, and then click OK.
1. Start the Fields dialog, by pressing Ctrl+F2 for example.
2. Click Insert and close the dialog box.
Adding Chapter Numbers to Captions
You can include chapter numbers in captions.
Ensure that the text in your document is organized by chapters, and that the
chapter titles and, if you want, the section titles, use one of the predefined heading
paragraph styles. You must also assign a numbering option to the heading paragraph styles.
1. Select the item that you want to add a caption to.
2. Choose Insert - Caption.
3. Select a caption title from the Category box, and select a numbering style in the
Numbering box. You also can enter a caption text in this dialog. If you want,
enter text in the Caption box.
4. Click Options.
146
StarOffice™ 7 User's Guide
5. In the Levels box, select the number of heading levels to include in the chapter
number.
6. Type the character that you want to separate the chapter number(s) from the
caption number in the Separator box, and then click OK.
7. In the Caption dialog, click OK.
StarOffice can automatically add a caption when you insert an object, graphic, or
table. Choose Tools - Options - Text Document - General, and in the Caption
area, select Automatic. Click the ... button next to Object selection, select the
items for which you want StarOffice to insert a caption, and then click OK.
Inserting a Graphic From a File
1. Click in the document where you want to insert the graphic.
2. Choose Insert - Graphics - From File.
3. Locate the graphic file that you want to insert, and then click Open.
By default, the inserted graphic is centered above the paragraph that you clicked
in.
Inserting Graphics From StarOffice Draw or
Impress
1. Open the document where you want to insert the object.
2. Open the Draw or Impress document containing the object that you want to
copy.
3. Hold down Alt and click and hold the object.
4. Drag to the document where you want to insert the object.
If a hyperlink is attached to the object in the original document, the hyperlink is
inserted instead of the object.
Chapter 3
Creating Text Documents With StarOffice Writer
147
Inserting Graphics From the Gallery With Dragand-Drop
You can drag-and-drop an object from the gallery into a text document, spreadsheet, drawing, or presentation.
To replace a gallery object that you inserted in a document, hold down Shift+Ctrl,
and then drag a different gallery object onto the object.
Inserting a Scanned Image
To insert a scanned image, the scanner must be connected to your system and the
scanner software drivers must be installed.
The scanner must support the TWAIN standard under Windows, or the SANE
standard under UNIX operating systems.
1. Click in the document where you want to insert the scanned image.
2. Choose Insert - Graphics - Scan, and choose the scanning source from the
submenu.
3. Follow the scanning instructions.
Inserting a Calc Chart into a Text Document
Inserting a Copy of a Calc Chart in a Text Document
1. Open the text document that you want to copy the chart to.
2. Open the spreadsheet containing the chart that you want to copy.
3. In the spreadsheet, click the chart. Eight handles appear.
4. Drag the chart from the spreadsheet to the text document.
You can resize and move the chart in the text document as you would any object.
To edit the chart data, double-click the chart.
The chart is not updated when you modify the chart data in the spreadsheet
containing the original chart.
148
StarOffice™ 7 User's Guide
Linking a Chart to Data in a Spreadsheet
When you insert chart data as a link to a spreadsheet, the chart is automatically
updated when the spreadsheet is changed.
1. Open a spreadsheet and copy the cell range that you want to use for your chart
data.
2. Open and text document, long-click the Insert icon, and then choose DDE
Link.
The linked data is inserted as a table in the text document.
3. Click in the table.
4. Choose Insert - Object - Chart.
5. Follow the instructions, and then click Create.
Inserting a Horizontal Line
1. Click in the document where you want to insert the line.
2. Choose Insert - Horizontal Line.
3. Click the line that you want to insert in the Selection list.
4. Click OK.
The inserted line is anchored to the current paragraph and centered between the
page margins. You can also insert one of these lines by dragging it from the Rulers
folder in the Gallery into the current document.
Chapter 3
Creating Text Documents With StarOffice Writer
149
Headers, Footers and Footnotes
Add headers and footers to your text pages. For example, in the header you may
insert a field to display the current chapter heading, and in the footer you may
enter a field to display the page number.
Insert footnotes or endnotes to add some remarks to your text.
About Headers and Footers
Headers and footers are areas in the top and the bottom page margins, where you
can add text or graphics. Headers and footers are added to the current page style.
Any page that uses the same style automatically receives the header or footer that
you add. You can insert fields, such as page numbers and chapter headings, in
headers and footers in a text document.
To add a header to a page, choose Insert - Header, and then select the page
style for the current page from the submenu.
To add a footer to a page, choose Insert - Footer, and then select the page style
for the current page from the submenu.
The page style for the current page is displayed in the Status Bar.
150
You can also choose Format - Page, click the Header or Footer tab, and then
select Header on or Footer on. Clear the Same content left/right check box if
you want to define different headers and footers for even and odd pages.
To use different headers or footers in your document, you must add them to
different Page Styles, and then apply the styles to the pages where you want
the headers or footer to appear.
StarOffice™ 7 User's Guide
Headers and Footers in HTML Documents
Some of the header and footer options are also available for HTML documents.
Headers and footers are not supported by HTML and instead are exported with
special tags, so that they can be viewed in a browser. Headers and footers are only
exported in HTML documents if they are enabled in Online Layout mode. When
you reopen the document in StarOffice, the headers and footers are displayed
correctly, including any fields that you inserted.
Inserting Page Numbers in Footers
1. Choose Insert - Footer and select the page style that you want to add the footer
to.
2. Choose Insert - Fields - Page Number.
If you want, you can align the Page Number field as you would text.
You can also add a page count to the footer, for example, in the form "Page 9 of
12":
1. Click in front of the Page Number field and type "Page ", click after the field,
enter a space and then type "of ".
2. Choose Insert - Fields - Page Count.
Inserting a Chapter Name and Number in a Header
or a Footer
Before you can insert chapter information into a header or footer, you must first
set the outline numbering options for the paragraph style that you want to use for
chapter titles.
To create a paragraph style for chapter titles:
1. Choose Tools - Outline Numbering.
2. In the Style box, select the paragraph style that you want to use for chapter
titles, for example, "Heading 1".
Chapter 3
Creating Text Documents With StarOffice Writer
151
3. Select the numbering style for the chapter titles in the Number box, for
example, "1,2,3...".
4. Type "Chapter" followed by a space in the Before box.
5. Enter a space in the After box.
6. Click OK.
To insert the chapter name and number in a header or a footer:
1. Apply the paragraph style that you defined for chapter titles to the chapter
headings in your document.
2. Choose Insert - Header or Insert - Footer, and then select the page style for the
current page from the submenu.
3. Click in the header or footer.
4. Choose Insert - Fields - Other and click the Document tab.
5. Click "Chapter" in the Type list and "Chapter number and name" in the Format list.
6. Click Insert and then click Close.
The header on every page that uses the current page style automatically displays
the chapter name and number. You can also insert other fields in your header or
footer, such as Date, Time, Page Number, Page Count, Subject, Title and Author.
152
StarOffice™ 7 User's Guide
Defining Different Headers and Footers
You can use different headers and footers on different pages in your document, so
long as the pages use different page styles. StarOffice provides several predefined
page styles, such as First page, Left page and Right page, or you can create a
custom page style.
You can also use the mirrored page layout if you want to add a header to a page
style that has different inner and outer page margins. To apply this option to a
page style, choose Format - Page, click the Page tab, and in the Layout settings
area, choose Mirrored in the Page layout box.
For example, you can use page styles to define different headers for even and odd
pages in a document.
1. Open a new text document.
2. Choose Format - Stylist and click the Page Styles icon in the Stylist.
3. Right-click "Right Page" in the list of page styles and choose Modify.
4. In the Page Styles dialog, click the Header tab.
5. Select Header on and click the Organizer tab.
6. In the Next Style box, select "Left Page".
7. Click OK.
8. In the Stylist, right-click "Left Page" in the list of page styles and choose
Modify.
9. In the Page Styles dialog, click the Header tab.
10. Select Header on and click the Organizer tab.
11. In the Next Style box, select "Right Page".
12. Click OK.
13. Double-click "Right Page" in the list of page styles to apply the style to the
current page.
14. Enter text or graphics in the header for the Left Page style. After the next page
is added to your document, enter text or graphics in the header for the Right
Page style.
Chapter 3
Creating Text Documents With StarOffice Writer
153
Inserting Page Numbers of Continuation Pages
You can easily insert the page number of the next page in a footer by using a field.
The page number is only displayed if the following page exists.
1. Choose Insert - Footer and select the page style that you want to add the footer
to.
2. Place the cursor in the footer and choose Insert - Fields - Other.
3. In the Fields dialog, click the Document tab.
4. Click 'Page' in the Type list and 'Next page' in the Select list.
5. Click a numbering style in the Format list.
If you select 'Text' in the Format, only the text that you enter in the Value box is
displayed in the field.
6. Click Insert to insert the field with the page number.
Formatting Headers or Footers
You can apply direct formatting to the text in a header or footer. You can also
adjust the spacing of the text relative to the header or footer frame or apply a
border to the header or footer.
1. Choose Format - Page and select the Header or Footer tab.
2. Set the spacing options that you want to use.
3. To add a border or a shadow to the header or the footer, click More. The
Border/Background dialog opens.
154
StarOffice™ 7 User's Guide
To add a separator line between the header or the footer and the content of the
page, click the bottom edge of the square in the Line arrangement window.
Click a line style in the Line box and select a color for the line.
To adjust the spacing between the content of the header or footer and the line,
clear the Synchronize box, and then enter a value in the Bottom box.
Inserting and Editing Footnotes or Endnotes
Footnotes reference more information about a topic at the bottom of a page and
endnotes reference information at the end of the document. StarOffice automatically numbers the footnotes that you insert in your document.
To insert a footnote or endnote:
1. Click in your document where you want to place the anchor of the note.
2. Choose Insert - Footnote.
Chapter 3
Creating Text Documents With StarOffice Writer
155
3. In the Numbering area, select the format that you want to use. If you select
Character, click the browse button (...) and select the character that you want to
use for the footnote.
4. In the Type area, select Footnote or Endnote.
5. Click OK.
6. Type the note.
You can also insert footnotes or endnotes by long-clicking the Insert icon
on the Main Toolbar and clicking the Insert Footnote icon.
On pages that use a multiple column layout, the footnote is at the base of the
column that contains the footnote anchor.
Editing Footnotes or Endnotes
To edit the text of a footnote or endnote, click in the note, or click the anchor for
the note in the text.
The mouse pointer changes to a hand when you rest it over a footnote or
endnote anchor in your document.
156
To change the format of a footnote, click in the footnote, press F11 to open the
Stylist, right-click "Footnote" in the list, and then choose Modify.
To jump from the footnote or endnote text to the note anchor in the text, press
PgUp.
To edit the numbering properties of a footnote or endnote anchor, click in front
of the anchor, and choose Edit - Footnote.
To change the formatting that StarOffice applies to footnotes and endnotes,
choose Tools - Footnotes.
To edit the properties of the text area for footnotes or endnotes, choose Format
- Page, and then click the Footnote tab.
To remove a footnote, delete the footnote anchor in the text.
StarOffice™ 7 User's Guide
Spacing Between Footnotes
If you want to increase the spacing between footnote or endnote texts, you can add
a top and bottom border to the the corresponding paragraph style.
1. Click in a footnote or endnote.
2. Choose Format - Stylist.
3. Right-click the Paragraph Style that you want to modify, for example, "Footnote", and choose Modify.
4. Click the Borders tab.
5. In the Default area, click the Set Top and Bottom Borders Only icon.
6. In the Line area, click a line in the Style list.
7. Select "White" in the Color box. If the background of the page is not white,
select the color that best matches the background color.
8. In the Spacing to contents area, clear the Synchronize check box.
9. Enter a value in the Top and Bottom boxes.
10. Click OK.
Chapter 3
Creating Text Documents With StarOffice Writer
157
Page Numbers With Different Styles
You want to create a text document without a page number on the title page, with
roman numerals (like I, II, III, IV, and so on) for the table of contents (you do not
know how many pages yet), and then you want to start the page numbering with
arabic numerals (like 1, 2, 3, and so on).
It is best to have page numbers in footers or headers, to make sure that the page
numbers do not change their position when text is inserted or deleted.
If you want different page number styles on your pages, you must use different
Page Styles and assign them to the pages.
1. Create Page Styles
2. Apply Page Styles
3. Edit Page Styles
Create Page Styles
1. Open the document in which you want to enter or change the page
numbers.
2. Open the Stylist.
3. Select the Page Styles view in the Stylist.
4. Call up the context menu of one of the Page Styles and select New.
The Page Style dialog opens. Click the Organizer tab. Enter a name for
the new Page Style in the Name text box.
158
StarOffice™ 7 User's Guide
5. Enter Title Page and press the Enter key. You can change the properties of the new Page Styles later.
6. In the context menu of the Stylist click the New command again and
define another new Page Style with the name Table of contents.
7. Repeat the whole procedure again for the new Main text Page Style.
Of course, the names used here are only meant as examples. Put in the
names you would like to use.
You have created three new Page Styles and can apply them to your document.
Applying Page Styles
1.
Place the cursor on the first page of your document. Double-click the Title
page entry in the Stylist.
So, now you have assigned the first page this Page Style. To confirm this,
check to see if Title page appears in the Page Style field on the Status Bar
below.
Chapter 3
Creating Text Documents With StarOffice Writer
159
If, however, you now scroll through the pages of your document, you may
notice that the Title page Page Style has been applied to every page. If all
the pages previously had the Default Page Style, they now all have the new
Title page Style.
Page Styles always apply to all preceding and following pages until a page
break with a change of Page Style is encountered.
160
2.
On the Organizer tab page of the Title page Style, if you enter a Next Style,
this means that after a page break (whether you enter it manually or it
occurs automatically) the Next Style will be taken as the Page Style. In the
example described here, for the Page Style Title page you can select the
Next Style Table of Contents. The Table of Contents Page Style is then
always applied to the next page after the title page.
3.
On the Organizer tab page of the Table of Contents Style, you should enter
the Table of Contents Style to be the Next Style. You may have more than
one page in your table of contents.
4.
Place the cursor at the beginning of the first line in your main text.
5.
Choose Insert - Manual Break.
6.
Set Type to Page Break. In the Style box, select the Main text Page Style.
Select Change page number, set the value in the spin box to 1 and click OK.
StarOffice™ 7 User's Guide
Editing Page Styles
To edit the Page Style with the name Main text in such a way that it has a footer
containing a centered page number, do the following:
1. Select the Main Text entry in the Stylist, open the context menu of that entry
and choose Modify.
You see the Page Style: Main Text.
2. Go to the Footer tab. Select the Activate Footer check box. Click OK.
An empty footer appears at the bottom of the page.
Place the cursor in the footer and choose Insert - Field - Page Numbers. The page
number appears in a gray field. To associate the word "Page" with the number,
place the cursor in front of the field and type "Page ".
Click the Center icon on the Object Bar to center the current paragraph.
Page Breaks as Paragraph Formats
When you inserted the manual break at the first paragraph of the main text, that
information was automatically stored as a format attribute of the first paragraph.
To check this for the first paragraph after the manual break, choose Format - Paragraph - Text Flow and look at the Breaks area.
Chapter 3
Creating Text Documents With StarOffice Writer
161
Changing the Format of Page Numbers
You can specify page numbers as a direct format or as a Page Style attribute. To
use direct formatting, proceed as follows:
1.
Double-click the field with the page number. You will now see the Edit
Fields: Document dialog.
2.
Select the field format and click OK.
Do not use the Offset box in Insert - Fields - Other - Document to change page
numbers. The offset is used, for example, at the end of a page to display the
number of the next page, that is, to offset the display.
162
StarOffice™ 7 User's Guide
Spellcheck, Dictionaries, Hyphenation
Checking Spelling Manually
You can manually check the spelling of a text selection or the entire document. The
spellcheck starts at the current cursor position, or at the beginning of the text selection.
1. Click in the document, or select the text that you want to check.
2. Choose Tools - Spellcheck - Check or press F7.
3. When a possible spelling error is encountered, the Spellcheck dialog opens
and StarOffice offers a suggested correction.
StarOffice first searches the user-defined dictionaries, and then the default
StarOffice dictionaries.
4. Do one of the following:
To accept the correction, click Replace.
Type a correction in the Word box, and then click Replace.
To check the spelling of the word that you typed, click the Check Word
button.
To add the word to a user-defined dictionary, click Add.
Chapter 3
Creating Text Documents With StarOffice Writer
163
To open the Spellcheck dialog in a document that does not have misspelled
words, type an misspelled word, and then choose Tools - Spellcheck - Check or
press F7.
Automatically Check Spelling
You can have StarOffice automatically check spelling while you type and underline possible misspelt words with a red wavy line.
To check spelling automatically while you type:
1. Choose Tools - Spellcheck - AutoSpellcheck, or click the AutoSpellcheck
On/Off icon on the Main Toolbar.
2. Right-click a word with a red wavy underline, and then choose a suggested
replacement word from the list, or from the AutoCorrect submenu.
If you choose a word from the AutoCorrect submenu, the underlined word and
the replacement word are automatically added to the AutoCorrect list for the
current language. To view the AutoCorrect list, choose Tools AutoCorrect/AutoFormat, and then click the Replace tab.
You can also add the underlined word to your custom dictionary by choosing
Add.
To exclude words from the spellcheck:
1. Select the words that you want to exclude.
2. Right-click and choose Character.
3. Click the Font tab, and then select [None] in the Language box.
164
StarOffice™ 7 User's Guide
Removing Words From a User-Defined Dictionary
1. Choose Tools - Options - Language Settings - Writing Aids.
2. Select the user-defined dictionary that you want to edit in the Book box, and
then click Edit.
3. Select the word that you want to delete in the Word list, and then click Delete.
Hyphenation
By default, StarOffice moves words that do not fit on a line to the next line. If you
want, you can use automatic or manual hyphenation to avoid this behavior:
Automatic hyphenation
Automatic hyphenation inserts hyphens where they are needed in a paragraph.
This option is only available for paragraph styles and individual paragraphs.
To automatically hyphenate text in a paragraph:
1. Right-click in a paragraph, and choose Paragraph.
2. Click the Text Flow tab.
3. In the Hyphenation area, select the Automatically check box.
4. Click OK.
To automatically hyphenate text in multiple paragraphs:
If you want to automatically hyphenate more than one paragraph, use a paragraph style.
For example, enable the automatic hyphenation option for the "Default" paragraph
style, and then apply the style to the paragraphs that you want to hyphenate.
1. Choose Format - Stylist, and then click the Paragraph Styles icon.
2. Right-click the paragraph style that you want to hyphenate, and then choose
Modify.
Chapter 3
Creating Text Documents With StarOffice Writer
165
3. Click the Text Flow tab.
4. In the Hyphenation area, select the Automatically check box.
5. Click OK.
6. Apply the style to the paragraphs that you want to hyphenate.
Manual Hyphenation
You can insert a hyphen where you want on a line, or let StarOffice search for the
words to hyphenate, and then offer a suggested hyphenation.
To quickly insert a hyphen, click in the word where you want to add the
hyphen, and then press Ctrl+Hyphen(-).
If you insert a manual hyphen in a word, the word is only hyphenated at the
manual hyphen. No additional automatic hyphenation is applied for this word.
A word with a manual hyphen will be hyphenated without regard to the
settings on the Text Flow tab page.
To manually hyphenate text in a selection:
1. Select the text that you want to hyphenate.
2. Choose Tools - Hyphenation.
3. When StarOffice encounters a word to hyphenate, do one of the following:
166
To accept the hyphenation suggestion, click Hyphenate.
To insert the hyphen in another part of the word, click the arrow buttons.
StarOffice™ 7 User's Guide
Preventing Hyphenation of Specific Words
1. Choose Tools - Options - Language Settings - Writing Aids
2. Select a dictionary in the User-defined dictionary list, and then click Edit.
If the list is empty, click New to create a dictionary.
3. In the Word box, type the word you want to exclude from hyphenation,
followed by an equal sign (=), for example, "pretentious=".
4. Click New, and then click Close.
To quickly exclude a word from hyphenation, select the word, choose Format Character, click the Font tab, and select "None" in the Language box.
Thesaurus
You can use the thesaurus to look up synonyms, and related words.
1. Click in the word that you want to look up.
2. Choose Tools - Thesaurus, or press Ctrl+F7.
3. In the Meaning list, select the definition that matches the context of the word.
4. Select the replacement word in the Synonym list.
5. Click OK.
To look up the word in a different language, click Language in the Thesaurus
dialog, select one of the installed languages, and then click OK. In the Thesaurus
dialog, click Search. The thesaurus may not be available for all installed languages.
If you applied a different language setting to individual words, or paragraphs, the
thesaurus for the applied language is used.
Chapter 3
Creating Text Documents With StarOffice Writer
167
Form Letters, Business Cards and Labels
You can write form letters and output them to printer or to files. Design business
cards and produce labels. Obtain the data from a data source registered in StarOffice, or enter the data directly with the help of the AutoPilot dialogs.
Creating a Form Letter
To create a form letter, you require a template document that contains one or more
placeholders, and access to a data source. Creating a form letter is a three-step
process:
1. Creating a template document
2. Specifying a data source and inserting placeholders
3. Printing or saving the output of a form letter
Creating a Template Document
The template document for the form letter contains the text content of the letter
and placeholders for data, such as the name of a recipient and addresses.
To create a template for a form letter:
1. Do one of the following:
Choose File - New - Templates and Documents and choose a template.
Choose File - New - Text document.
Choose File - Open and select the text document that you want to use as
form letter.
2. Add or edit the letter content, and adjust the layout of the letter.
3. Choose File - Save, but do not close the document.
168
StarOffice™ 7 User's Guide
Specifying a Data Source And Inserting Placeholders
The placeholder fields that you insert into your form letter are replaced with text
from the data source when you print the letter.
The first time you access one of the supplied form letter templates, you will automatically see the Address Data Source AutoPilot. After a few clicks, your
preferred address book is registered with StarOffice. To manually register an
address book, choose File - Autopilot - Address Data Source and follow the
instructions. You only need to register an address book once.
To insert placeholders from a data source into a form letter:
1. Choose View - Data Sources or press F4. The Data Source browser opens at the
top of the document window.
2. In the left pane of the Data Source browser, double-click the data source that
you want to use for your form letter.
3. Double-click Tables to expand the list of tables for the data source.
You can also use a query as a data source.
4. Select the table name that contains the data that you want to use in your form
letter. A list of the fields contained in the table appears in the right pane of the
data source browser.
5. Drag a column header for the field that you want to use as a placeholder to
where you want it to appear in your form letter and release. Repeat this step
for every field you want to add.
You can also add placeholders from the Database tab in the Fields dialog.
6. Choose File - Save, but do not close the document.
Printing or Saving the Output of a Form Letter
The final steps in creating a form letter are to merge the template document with
the data from the database, and output the letter.
Chapter 3
Creating Text Documents With StarOffice Writer
169
To specify the data to include in a form letter output:
1. Choose Tools - Mail Merge to open the Mail Merge dialog.
2. In the Records area, select the data range you want to include in the form letter.
3. To only include a subset of the data in your form letter, ctrl-click the corresponding row headers. If you want, you can also filter the data that you use in
the form letter.
To print the output of a form letter:
Select Printer in the Output area, and then click OK. The form letters are sent
to the printer as one print job. If you want to send each form letter to the
printer as a separate print job, select Single print jobs.
To save the output of a form letter:
1. Select File in the Output area.
2. Specify where you want to save the form letter files in the Path box.
3. Do one of the following:
Select a field to use for the file name in the Generate file name from box.
Enter a name in the Manual setting text box. StarOffice automatically generates a sequence number and adds the number to the end of the file name.
4. Click OK. A separate file is created for each form letter.
170
StarOffice™ 7 User's Guide
Creating and Printing Labels and Business Cards
Designing Business Cards Through a Dialog
Choose File - New - Business Cards to open the Business Cards dialog, which
allows you to choose how your business cards will look.
Designing Labels and Business Cards
You can design both labels and business cards through the Labels dialog.
1. Choose File - New - Labels to open the Labels dialog.
2. On the Labels tab, under Format, define the label format.
StarOffice Writer contains many formats of commercially available sheets for
labels, badges, and business cards. You can also add other, user-defined
formats.
3. On the Labels tab, under Inscription, you can choose what you want written
on the labels.
This often involves database fields, so that the labels can be printed with
varying content, when sending "Form Letters" for example. It is also possible to
have the same text printed on every label.
Use the Database and Table list boxes to select the database and table from
which the data fields are obtained. Click on the arrow button to transfer the
selected data field into the inscription area. Press Enter to insert a line break.
You can also enter spaces and any other fixed text.
On the Format tab you can define your own label formats, not covered by the
predefined formats. To to do this, select "User" from the Type list box. On the
Options tab, you can specify whether all labels or only certain ones are to be
created.
4. On the Options tab page, make sure that the Synchronize contents box is
selected. If this is selected, a label only has to be entered (on the top left label)
and edited once.
5. As soon as you click on New Document, you will see a small window with the
Synchronize Labels button. Enter the first label. When you click on the
Chapter 3
Creating Text Documents With StarOffice Writer
171
Synchronize Labels button, the current individual label is copied to all the
other labels on the sheet.
6. Click on New Document to create a new document with the settings you have
entered.
Printing Address Labels
To print address labels:
172
1.
Choose File - New - Labels to open the Labels dialog.
2.
Select the format of the label sheets you want to print on. Remember to mark
Synchronize contents on the Options tab. Click on New Document to close
the dialog.
3.
When you see the label document, open the data source view by pressing
the F4 key. Click the thumb tack icon at the edge of the data source view if it
covers the first label.
4.
In the data source view, select your address data source table.
5.
Drag the data fields needed for the Address individually into the top left
label. For example, click on the column header NAME and, keeping the
mouse button depressed, drag it into the label. This inserts a field. Put the
fields in order to complete the address in the first label at top left.
6.
Place the cursor at the last text position (after the last field) in the first label.
7.
Open the Fields dialog by pressing the shortcut keys Ctrl+F2, and go to the
Database tab.
StarOffice™ 7 User's Guide
8.
Select the type Next record, click on Insert and then on Close.
9.
You can now synchronize the labels. Click on the Synchronize Labels
button in the small window.
10. In the data source view, select the records for which you would like
address stickers, by clicking on the row headers to the left. Use the
Shift or Ctrl key in the usual way to select several records at the same
time.
11. On the Database Bar, click the Data to Fields icon.
12. You can then save and/or print the label document.
Chapter 3
Creating Text Documents With StarOffice Writer
173
Newsletters
This sections shows you how to use a text document to create a newsletter or
newspaper.
Creating a Newsletter From a Template
In the File menu choose New - Templates and Documents. On the left, doubleclick Miscellaneous. Double-click to open the Newspaper Template.
In a dialog you can now select the type of newspaper or newsletter you want to
create. Depending on the type, some variables will be differently pre-defined, for
example, the Headline.
Choose whether to format the newsletter for one-sided or double-sided printing.
Depending on your choice, the left and right margins will be set to accommodate a
binding space.
The document contains several elements that you could make good use of in your
newsletter. It contains, for example, an automatic page numbering system and a
field with the fixed date. You can see how to use linked text frames and how to
embed a frame for a table of contents.
You can now enter text and position graphic objects. Text with gray shading are
variables that you can double-click to modify. After you have finished creating the
document, you can save and print it. You can also use page styles to modify the
layout of your newsletter.
174
StarOffice™ 7 User's Guide
Creating Page Styles
If you want to include large graphics in your document, you should create a separate Page Style.
Open the Stylist and click the Page Styles icon. In the context menu,
choose New to open the Page Styles dialog. On the tab page Organize,
assign a descriptive name for the Style.
Next, click the Page tab and define the page format and margins. Mark the check
box Register-true and choose the reference Paragraph Style Text Body.
The register-true option aligns the baselines of all paragraphs using the Text
body Style so that when you print a double-sided page, the baselines of the
register-true paragraph have the same relative position in on the page. To define
another Paragraph Style as register-true, open the properties dialog for that Paragraph Style. For example, choose Modify in the Stylist context menu and select
Activate in the Register-true field of the Indents and Spacing tab.
Editing Headers
To edit a header, click in the header field in your document. With the context
menu Page, activate the Page Styles dialog. Click the Headers tab and choose
Options. In the Borders/Background dialog, choose a background color and click
OK, then confirm the following dialog as well.
Editing Columns
To change the number of columns or create a dividing line between columns, open
the Page Styles dialog through the Page context menu.
Click on the Columns tab. Change the number of columns in Amount box, and
modify the distance between the columns in the Spacing box. Make sure that the
Automatic Width field is selected.
To create a dividing line, select a narrow line from the Line list box under Separator, set the Height to 75%, and define the position as Centered. Click OK to
close the dialog.
Chapter 3
Creating Text Documents With StarOffice Writer
175
To add headings or subheadings that are more than a column wide into a
multi-column text, use a text frame. You can freely scale and position your
text frame on the page.
You can insert a frame with the Insert Frame icon on the Insert floating
toolbar. If you want, you can display the borders of the frame.
Editing Paragraph Styles
If you want to change the font, click the Paragraph Styles icon in the Stylist and
select the Paragraph Style you want to modify. You can also right-click in a paragraph and choose Modify from the context menu to open the Paragraph Styles
dialog.
Experiment with different font effects, for example drop caps. Click the respective
tab and select Show Drop Caps. You can even assign a Style to the drop caps in
the Character Styles list box under Contents.
A newsletter or newspaper requires a variety of main headings, subheadings,
and text wraps to make it easier to read. In the Paragraph Styles dialog of the
Stylist context menu, it would thus be a good idea to create several appropriate
Paragraph Styles (go to the Stylist - context menu - click New).
176
StarOffice™ 7 User's Guide
Working with Frames
A frame positioned over one or more columns can give the newspaper a less
crowded, more interesting appearance. Such a frame can contain text, graphics, or
even a chart.
Click the Insert icon on the main toolbar and from the floating toolbar, select the
Insert Frame Manually icon. The mouse pointer changes to a small cross which
you use to drag open a frame and position it over one or more columns in your
document.
Formatting a Frame
Put the cursor in the frame (deselect the frame first, then click inside it) and enter
your text or graphics. The appearance and properties of the frame can, of course,
be modified at any time. Select the frame by clicking it, call up the context menu
and click Frame. A dialog with several tabs will appear where you can, for
example, on the Borders tab, apply a colored shadow to the frame.
Anchoring Frames
In the Frame dialog, click the Type tab and select the type of anchor under the
heading Anchor to. If the frame is to always remain on the same page - which is
important for a table of contents, for example, - select Page. If you want the frame
to flow with the text, for example, for small symbols which always appear in the
margin accompanying a certain word in the text, select To Character. If you want
the frame to move in flowing text as a character, select As Character. To anchor a
frame to a specific paragraph, select Paragraph.
You can specify the type of anchor through the context menu. Alternatively, click the Change Anchor icon in the Object Bar to quickly change
the anchor.
Chapter 3
Creating Text Documents With StarOffice Writer
177
Defining a Frame Wrap
To define the frame wrap, open the Frame dialog (context menu - Frame), and
click the Wrap tab. Select the desired wrap style, and under Spacing, define the
spacing between the frame and text. Finally, select the option First Paragraph.
The First Paragraph field (or the menu command in the context menu) ensures
that when a graphic is positioned between two paragraphs, only the first paragraph wraps around the picture.
Defining a Wrap Region
If you want to make your newsletter more attractive with objects or graphics, you
can have the text flow around the object. For example, draw a polygon with the
Polygon icon in the Show Draw Functions floating toolbar. Place the polygon
over the text and assign the text the Wrap - Contour with its context menu.
You can also assign a wrap contour to 3D objects you define. Create a 3D object
with StarOffice Draw, copy it to the clipboard and paste it into the text document.
Open the context menu of the inserted object and choose Wrap - Contour.
In the context menu of an object with a wrap contour is the Wrap - Edit Contour
command. This command opens the Contour Editor where you can manually edit
the automatic contour. For more information on using this tool, refer to the
instructions in the StarOffice Help.
Linking Frames and Facilitating Text Flow
If you want your text to be continued like in a newspaper, from a frame on page 1
to a frame on page 4, and where the text flow from frame to frame is done automatically, you need to use linked frames.
Create two (or more) frames by opening the Insert floating toolbar, clicking Insert
Frame Manually), and then selecting the first frame (click the border of the frame).
Click the Link Frames icon on the Object Bar. Now, click the second frame.
To enter text in the linked frames, position the cursor in the first frame and type in
text or insert it from the clipboard.
If you want a text from a document to flow in the linked frames, first put the text
cursor in the first frame (first click the "normal" text to cancel the frame selection
and then click the frame).
178
StarOffice™ 7 User's Guide
You can insert text in frame as a copy or a link to a file (linked text is automatically
updated when the source file is changed). If you only want to insert a copy of the
source text, choose the menu command Insert - File.
If you want to insert a linked section of text from another file, choose Insert Section. In the Insert Section dialog, click Link, click the ... button, locate the file
that you want to link to, and then click Insert.
Using Colored Backgrounds
To assign a colored background to a paragraph, place the cursor in that paragraph
and click the Background Color icon on the Object Bar. On the floating color
palette, click the color that you want to use.
You can assign a background color to a Paragraph Style and then apply the style
to the paragraphs that you want to add a background color to.
If you want, you can also use a graphic as a background instead of color. Paragraph backgrounds can be specified in a Paragraph Style (to apply the background
to all the paragraphs using the style) or through Format - Paragraph (for individual paragraphs). In both cases, click the Background tab and select "graphics"
in the list box As to choose your graphic.
Chapter 3
Creating Text Documents With StarOffice Writer
179
Creating a Table of Contents
A table of contents can be created manually, but if the contents are altered, the
table of contents must be manually updated, as well. It is much more convenient
(and time-saving) to have the program create a table of contents for you.
The best way to generate a table of contents is to apply the predefined heading
paragraph styles, such as "Heading 1", to the paragraphs that you want to include
in your table of contents. After you apply these styles, you can then create a table
of contents.
1. Click in your document where you want to create the table of contents.
2. Choose Insert - Indexes and Tables - Indexes and Tables, and then click the
Index/Table tab.
3. Select "Table of Contents" in the Type box.
4. Select any options that you want.
5. Click OK.
If you want to use a different paragraph style as a table of contents entry, select the
Additional Styles check box in the Create from area, and then click the (...) button
next to the check box. In the Assign Styles dialog, click the style in the list, and
then click the >> or the << button to define the outline level for the paragraph
style.
180
StarOffice™ 7 User's Guide
Further Information
Using Automatic Hyphenation. When working with columns, it makes sense to
activate automatic hyphenation for every Paragraph Style (do so by calling up
the context menu of the Stylist and clicking Modify to access the Paragraph Style
dialog - click theText Flow tab). Enter a "3" for Characters at line end and Characters at line begin to ensure that hyphenated words have at least three characters at the beginning or end of a line. For text alignment in columns, choose
Justify on the Alignment tab.
Chapter 3
Creating Text Documents With StarOffice Writer
181
Letters With Envelopes
With StarOffice Writer, you can write a letter in no time. We will show you how
easy it is.
There are two really easy ways for you to get the result you want:
Use one of the many supplied letter templates
Use the AutoPilot to create a letter template that is tailored to your needs
Using a Ready-Made Letter Template
1. Press Shift+Ctrl+N to open the Templates and Documents dialog:
2. Select a template, for example, from the Personal Correspondence and Documents category.
3. Enter the details required for the various wildcards, such as the salutation.
Type in the remaining text.
Templates use your user data that you can enter and modify whenever you like in
Tools - Options - StarOffice - User Data.
182
StarOffice™ 7 User's Guide
Creating a Letter Template Using the AutoPilot
1. To start the AutoPilot, choose File - AutoPilot - Letter.
2. Select Personal Letter and then click Next. A second page with additional
options appears.
3. Select No Logo and click Next. A dialog appears where you can enter the
sender details. The sender address is shown on the page.
4. Under Show sender? select Yes. In the Position and size area, click the top
right symbol, and then click Next.
If the input field does not contain a sender, the AutoPilot cannot generate the
letter. In this case, click Cancel, choose Tools - Options - StarOffice, click the
User Data tab, and enter the necessary data.
5. Click Next until you arrive at the page with the footer options. Clear the Footer
on check box and click Next twice. On the page for saving the template, type
the name of the template in the Name field. If necessary, enter any additional
information in the Info field.
The template is stored in the template folder under the name you have entered.
1. Click Next again. Enter the printer trays if you want to use different paper
trays for the first and subsequent pages. This is useful if you want the first page
to be on letterhead paper.
2. Click Create.
StarOffice saves the document template in the template folder and opens a new,
untitled document that is generated from this template.
You can start to enter text and then print and save the document. However, if you
would like to keep on working on the layout of the document template or create
an envelope for it, close the new document without saving it and continue reading.
Creating an Envelope
This section describes how to create a template for an envelope and provides tips
for enhancing the design of your template(s).
Before you save the envelope, open the letter template.
Chapter 3
Creating Text Documents With StarOffice Writer
183
1. Choose File - Templates - Edit, locate the letter template you just created, and
open the template. The templates are in the {installpath}\user\template directory.
2. Choose Insert - Envelope.
3. On the Envelope and Format tab pages, specify the envelope format and where
you you want to place the addresses of the sender and the recipient. On the
Printer tab page, you can define the print settings for the envelope.
Inserting an Envelope into a Document
Click Insert - Envelope, and then click Insert. The envelope is inserted before the
first page of the active document (in this case, the envelope is inserted before the
first page of the personal letter template).
To edit the envelope format, right-click the envelope, choose Page, and then click
the Page tab. The Page Style: Envelope dialog opens where you can make your
changes.
184
StarOffice™ 7 User's Guide
Adjusting the Printer for the Printout
The method for printing envelopes depends on the type of printer that you use.
Some printers require a special cassette, while others have a multi-purpose tray
that can feed envelopes. If in doubt, consult the manual for your printer.
To specify the print options for the envelope, right-click the envelope, choose
Page, and then click the Page tab. Set the print options in the Paper Format area
and then close the Page Style: Envelope dialog.
Creating and Printing a Letter With an Envelope
Once you have created a customized template for personal letters, you will surely
want to try it out and write and print a letter.
1. Choose File - New - Templates and Documents.
2. Select your new template and click OK.
StarOffice creates a document based on the template (the template is not
changed when you work in your document).
3. Enter the text of your letter in the document.
4. Check if the addressee information on the envelope is correct.
5. If you plan to print or edit this document later on, save it and enter a name.
6. Place an envelope in your printer.
7. Choose File - Print and print page 1, which is your envelope.
8. Place normal letter paper in your printer, select the command File - Print
again, and print the second page. If your letter has more than one page of text,
you can specify which pages you want to print under Pages.
Summary
To create a document based on a certain template, choose File - New - Templates
and Documents, select the template you want and click Open.
To edit a template, choose File - New - Templates and Documents, select the
template you want and click Edit.
Chapter 3
Creating Text Documents With StarOffice Writer
185
186
StarOffice™ 7 User's Guide
CHAPTER
4
4
Creating Spreadsheets With StarOffice
Calc
StarOffice Calc is the spreadsheet module of StarOffice. It provides all the functions necessary for advanced use, lots of financial and statistical functions as well
as database functions, plus much more.
StarOffice Calc Features
StarOffice Calc is a spreadsheet application that you can use to calculate, analyze,
and manage your data. You can also import and modify Microsoft Excel spreadsheets.
Calculations
StarOffice Calc provides you with functions, including statistical and banking
functions, that you can use to create formulas to perform complex calculations on
your data.
You can also use AutoPilots to help you create your formulas.
What-If Calculations
An interesting feature is to be able to immediately view the results of changes
made to one factor of calculations that are composed of several factors. For
instance, you can see how changing the time period in a loan calculation affects the
interest rates or repayment amounts. Furthermore, you can manage larger tables
by using different predefined scenarios.
187
Database Functions
Use spreadsheets to arrange, store, and filter your data.
StarOffice Calc lets you drag-and-drop tables from databases, or lets you use a
spreadsheet as a data source for creating form letters in StarOffice Writer.
Arranging Data
With a few mouse-clicks, you can reorganize your spreadsheet to show or hide
certain data ranges, or to format ranges according to special conditions, or to
quickly calculate subtotals and totals.
Dynamic Charts
StarOffice Calc lets you present spreadsheet data in dynamic charts that update
automatically when the data changes.
Opening and Saving Microsoft Files
Use the StarOffice filters to convert Excel files, or to open and save in a variety of
other formats.
188
StarOffice™ 7 User's Guide
Toolbars and Windows in StarOffice Calc
Insert floating toolbar
Borders floating toolbar
Insert Cells floating toolbar
Background floating toolbar
Insert Object floating toolbar
Navigator window
Draw Functions floating
toolbar
Stylist window
Form Functions floating toolbar
Chapter 4
Creating Spreadsheets With StarOffice Calc
189
Structure of a Spreadsheet
A spreadsheet is made up of individual sheets. Each sheet contains various cells,
arranged in rows and columns. Each cell can contain either a formula or a text or
value.
A calculation can be entered directly as a formula, for example, =4 + 5. But the
main reason for using a spreadsheet is that its formulas can refer to other cells. An
example of such a formula might be =SUM(A1:A8). This calculates the sum of the
values in cells A1 through A8 and displays the result in the cell containing the
formula. Additional formulas may also be entered in cells A1 through A8, each
referring to other cells and their contents, and so on.
Open a new spreadsheet with the command File - New - Spreadsheet. It is named
"Untitled1" until you save it under a name of your own. If you look at the new, still
empty document, you will notice several typical elements, which are discussed in
the following sections.
Rows and Columns
On a spreadsheet, rows are numbered from 1 to 32000, and the columns are designated with the letters A through Z, AA through AZ, and so on; the last column is
labeled with the letters IV. Each cell on the sheet can be uniquely referenced by
row and column. For example, cell A1 is the first cell in the upper left corner of the
sheet.
These numbers and letters appear along the edge of the window. The row header
contains the row numbers, and the column header names the columns. If you click
on one of these areas, the entire row or column will be selected. To select the entire
sheet, click on the unlabeled button at the intersection of the row and column
headers at the top left.
Enter some text in cell A1. As you type, you will see that the text appears both in
the cell and in the input line of the formula bar. You will also notice that you can
enter more text than appears to fit in the cell.
190
StarOffice™ 7 User's Guide
In fact, any cell can accommodate text longer than the cell. The whole length of the
text is displayed and printed, provided the adjacent cells to the right are vacant. If
the cell to the right is not vacant, you will see a small triangle on the right hand
edge of the first cell, indicating that it contains more text than can be displayed.
(You can turn off these triangles by choosing Tools - Options - Spreadsheet View and unmarking Text overflow.)
If a number cannot be displayed in a cell because it is too long, you will see "###".
In this case, you will need to increase the column width. Set the width to "optimal"
by simply double-clicking the right divider in the column header.
You can use the common text edit functions. Notice, however, that the right and
left arrow keys will move the cell cursor to the next cell. If you double-click a cell
or have pressed the F2 key, you will enter the edit mode. The left and right arrow
keys will now position the text cursor within the cell. Press Ctrl+Enter to enter a
new line in the cell.
When you press the Enter key, the text in cell A1 is finished and the cursor moves
to cell A2. The active cell is always the one with the cell cursor and that is where
you can make entries and changes.
Multiple Sheets in a Document
At the lower edge of the sheet you find sheet tabs for switching between the
various sheets of your document.
Chapter 4
Creating Spreadsheets With StarOffice Calc
191
Applying Multiple Sheets
By default StarOffice displays three sheets "Sheet1" to "Sheet3", in each new
spreadsheet.
Insert sheet
In the context menu, use the Insert Sheet command to insert either a new sheet or
an existing sheet from another file.
Select multiple sheets
The sheet tab of the current sheet is always visible in white in front of the other
sheet tabs. The other sheet tabs are gray when they are not selected. By clicking
other sheet tabs while pressing Ctrl you can select more sheets.
Undo selection
In order to undo the selection of a sheet, click its sheet tab again while pressing the
Ctrl key. The sheet that is currently visible cannot be removed from the selection.
Write values simultaneously to multiple sheets
If multiple sheets are selected, all values entered into the active sheet are automatically inserted into the other selected sheets. For example, data entered in Sheet 1,
cell A1 is automatically entered into the same cell in Sheet 2.
192
StarOffice™ 7 User's Guide
Calculate function across multiple sheets
As an example, enter the formula as follows: =MEAN(Sheet1.A1:Sheet50.A1). In
the formula cell the mean is now shown across all the A1 cells of your 50 sheets.
Renaming Sheets
1. Click the name of the sheet that you want to change.
2. Open the context menu and choose the Rename command. A dialog box
appears where you can enter a new name.
3. Enter a new name for the sheet and click OK.
4. Alternatively, hold down the Alt-key and click on any sheet name and enter the
new name directly.
The name of a sheet may consist only of letters and numbers. Spaces are also
permitted.
The name of a sheet is independent of the name of the spreadsheet. You enter the
spreadsheet name when you save it for the first time as a file. The document can
contain up to 256 individual sheets, which can have different names.
Values and Formulas as Cell Contents
Individual cells can contain text, numbers, dates or formulas. You can specify or
modify the cell contents, and you can update them at any time by recalculating the
formulas with current data.
The box at the bottom right in the Status Bar always displays helpful information.
In a spreadsheet, this box can be used to permanently display the sum of all
selected cells. You can also display other values, such as the maximum value of all
selected cells. Use the context menu to change the value displayed in this box. In
case of an error, this box will display an error message.
Chapter 4
Creating Spreadsheets With StarOffice Calc
193
Calculating in Spreadsheets
The following is an example of a calculation in StarOffice Calc. It describes a
percentage calculation that you can perform in a spreadsheet:
1.
Position the cursor in cell A3.
2.
Enter the number 150 and press the Enter key. The cursor then moves down
to cell A4.
3.
Enter the number 16 in cell A4. This time, however, press the Tab key
instead of the Enter key. The cursor moves to the right to cell B4.
4.
Enter the following in cell B4:
=A3 * A4 / 100
If you start the input with an equals sign, you are indicating that you want
to enter a formula. You will see the formula in the input line of the Formula
Bar.
5.
Press Enter to finish the formula. You will see the result of the calculation
(16 percent of 150) in cell B4.
6.
Click on cell A3, enter 200, and press the Enter key. Notice that the calculation result is adjusted automatically.
7.
Click on cell B4, and then click at the end of the formula in the input line of
the Formula Bar. A blinking text cursor indicates that you can make a new
entry.
8.
Add "+ A3" (without the quotation marks) to the formula and press the
Enter key. The newly calculated value of the formula appears in cell B4: the
previous 16 percent of A3 plus the contents of A3.
StarOffice provides you with various sample spreadsheets and templates which
you can fill out and use according to your needs.
194
StarOffice™ 7 User's Guide
Besides the four basic arithmetic operations, you can enter other operators, nested
brackets and many other functions. The AutoPilot: Functions is there to help you
with the inputting of functions.
What Can a Cell Contain?
As you have already seen from a few examples, cells can contain different types of
content. In the following sections, you will find more information about cell
contents.
Text
When you enter text in a cell, you can use almost all of the editing and formatting
functions available in a text document. For example, to select a word, you can
double-click the word either in the input line or in a cell. If you select a different
font or other attribute from the Text Object Bar, the modifications will apply only
to the selected word.
Pressing the Ctrl+Enter keys inserts a manual line break. This shortcut only
works directly in the cell, not in the input line.
If you want the text to automatically break at the right border of the cell, proceed
as follows:
1. Select all the cells where you want the text to break at the right border.
2. In Format - Cells - Alignment, mark the Automatic line break option and click
OK.
Even with texts, you can do "calculations". For example, enter a text in cell A1 and
another text in A2. In cell A3, insert the formula "=CONCATENATE(A1;A2)" to
concatenate the two texts, in other words, to string them together.
You can format numbers as text in StarOffice Calc. Open the context menu of a cell
or range of cells and choose Format Cells - Numbers, then select "Text" from the
Category list. Any numbers subsequently entered into the formatted range are
interpreted as text. The display of these "numbers" is left-justified, just as with
other text.
Chapter 4
Creating Spreadsheets With StarOffice Calc
195
When numbers are formatted as text, they cannot be used in calculations or
formulas.
If you have already entered normal numbers in cells and have afterwards changed
the format of the cells to "Text", the numbers will remain normal numbers. They
will not be converted. Only numbers entered afterwards, or numbers which are
then edited, will become text numbers.
If you decide to enter a number directly as text, enter an apostrophe (') first. For
example, for years in column headings, you can enter '1999, '2000 and '2001. The
apostrophe is not visible in the cell, it only indicates that the entry is to be recognized as a text. This is useful if, for example, you enter a telephone number or
postal code that begins with a zero (0), because a zero (0) at the start of a sequence
of digits is removed in normal number formats.
Numbers
You can display one and the same figure in various ways, but internally it always
remains the same number.
For example, enter the number 12345.6789. The number is displayed with only two
decimal places in the sheet, that is, 12345.68. However, all four decimal places are
still remembered by the program.
You can select other display options by choosing Format - Cells. All the defined
formats are lists on the Numbers tab. A preview shows you how the result will
look. In this dialog you can define your own formats, that you can then apply to
numbers or other content of your spreadsheets.
There are various ways to enter integers starting with a zero:
196
Enter the number as text. The easiest way is to enter the number starting with
an apostrophe (for example, '0987). The apostrophe will not appear in the cell,
and the number will be formatted as text. Because it is in text format, however,
you cannot calculate with this number.
Format a cell with a number format such as \0000. This format can be assigned
in the Format code field under the Format - Cells - Numbers tab, and defines
the cell display as "always put a zero first and then the integer, having at least
three places, and filled with zeros at the left if less than three digits".
StarOffice™ 7 User's Guide
If you want to apply a numerical format to a column of numbers in text format (for
example, text "000123" becomes number "123"), do the following:
1. Select the column in which the digits are found in text format. Set the cell
format in that column as "Number".
2. Choose Edit - Find & Replace
3. In the Search for box, enter ^[0-9]
4. In the Replace with box, enter &
5. Check Regular expressions
6. Check Current selection only
7. Click Replace All
Cells in Currency Format
In StarOffice Calc you can give numbers any currency format. When you
click the Currency icon in the Object Bar to format a number, the cell is
given the default currency format set in StarOffice under Tools - Options Language Settings - Languages.
The international exchange of StarOffice Calc documents could lead to misunderstandings, if your StarOffice Calc document is loaded by a user who uses a
different default currency format.
In StarOffice Calc you can define that a number that you have formatted as
"1,234.50 €€ ", still remains in euro in another country and does not become dollars.
Chapter 4
Creating Spreadsheets With StarOffice Calc
197
You can change the currency format in the Format Cells dialog (choose Format Cells - Numbers tab) by two country settings. In the Language box select the basic
setting for currency symbol, decimal and thousands separators. In the Format box
you can select possible variations from the default format for the language.
198
For example, if the language is set to "Default" and you are using a german
locale setting, the currency format will be "1.234,00 €
€ ". A point is used before
the thousand digits and a comma before the decimal places. If you now select
the subordinate currency format "$ English (US)" from the Format box, you will
get the following format: "$ 1.234,00". As you can see, the separators have
remained the same. Only the currency symbol has been changed and
converted, but the underlying format of the notation remains the same as in the
locale setting.
If, under Language, you convert the cells to "English (US)", the Englishlanguage locale setting is also transferred and the default currency format is
now "$ 1,234.00".
StarOffice™ 7 User's Guide
Calculating With Formulas
All formulas begin with an equals sign. The formulas may contain numbers or
text, and other data is also possible such as format details. The formulas also
contain arithmetic operators, logic operators or function starts.
Remember that the basic arithmetic signs (+, -, *, /) can be used in formulas using
the "Multiplication and Division before Addition and Subtraction" rule. Instead
of writing =SUM(A1:B1) it is better to write =A1+B1.
Parentheses can also be used. The result of the formula =(1+2)*3 produces a
different result than =1+2*3.
Here are a few examples of StarOffice Calc formulas:
=A1+10
Displays the contents of cell A1 plus 10.
=A1*16%
Displays 16% of the contents of A1.
=A1 * A2
Displays the result of the multiplication of A1 and
A2.
=ROUND(A1;1)
Rounds the contents in cell A1 to one decimal place.
=EFFECTIVE(5%;12)
Calculates the effective interest for 5% annual
nominal interest with 12 payments a year.
=B8-SUM(B10:B14)
Calculates B8 minus the sum of the cells B10 to B14.
=SUM(B8;SUM(B10:B14))
Calculates the sum of cells B10 to B14 and adds the
value to B8.
=SUM(B1:B32000)
Sums all numbers in column B.
It is also possible to nest functions in formulas, as shown in the example. You can
also nest functions within functions. The Function AutoPilot assists you with
nested functions.
Chapter 4
Creating Spreadsheets With StarOffice Calc
199
Calculating With Dates and Times
In StarOffice Calc, you can perform calculations with dates and times, since they
are both taken from the internal clock of your computer. As an example, to find
out exactly how old you are in seconds or hours, follow these steps:
1. In a spreadsheet, enter your birthday in cell A1.
2. Enter the following formula in cell A3: =NOW()-A1
3. After pressing the Enter key you will see the result in date format. Since the
result should show the difference between two dates as a number of days, you
must format cell A3 as a number.
4. Place the cursor in cell A3, right-click to open a context menu and choose
Format Cells.
5. The Format Cells dialog appears. On the Numbers tab, the Number category
will appear already highlighted. The format is set to "Standard", which causes
the result of a calculation containing date entries to be displayed as a date. To
display the result as a number, set the number format to "-1,234" and close the
dialog with the OK button.
6. The number of days between today's date and the specified date is displayed in
cell A3.
7. Experiment with some additional formulas: in A4 enter =A3*24 to calculate the
hours, in A5 enter =A4*60 for the minutes, and in A6 enter =A5*60 for seconds.
Press the Enter key after each formula.
The time since your date of birth will be calculated and displayed in the various
units. The values are calculated as of the exact moment when you entered the last
formula and pressed the Enter key. This value is not automatically updated,
although "Now" continuously changes. In the Tools menu, the menu item Cell
Contents - AutoCalculate is normally active; however, automatic calculation does
not apply to the function NOW. This ensures that your computer is not solely
occupied with updating the sheet.
200
StarOffice™ 7 User's Guide
Inserting and Editing Notes
You can assign a note to each cell by choosing Insert - Note. The note is indicated
by a small red square, the note indicator, in the cell.
The note is visible whenever the mouse pointer is over the cell, provided you
have activated Help - Tips or - Extended Tips.
When you select the cell, you can choose Show Note from the context menu of
the cell. Doing so keeps the note visible until you deactivate the Show Note
command from the same context menu.
To edit a permanently visible note, just click in it. If you delete the entire text of
the note, the note itself is deleted.
To show or hide the note indicator, choose Tools - Options - Spreadsheet View and mark or unmark the Note indicator check box.
To display a help tip for a selected cell, use Data - Validity - Input Help.
Chapter 4
Creating Spreadsheets With StarOffice Calc
201
Handling Multiple Sheets
When working with a spreadsheet, you are not limited to just one sheet. In fact,
you can use up to 256 sheets laid on top of each other. Each sheet has its own
name displayed on a "sheet tab" at the bottom of the window.
You can append additional sheets or insert them in front of the current sheet.
Open the context menu of a sheet tab and choose the corresponding command.
Select Rename Sheet in the context menu to modify the name of a sheet.
Navigating Through Sheets Tabs
Use the navigation buttons to display all the sheets belonging to your
document. Clicking the button on the far left or the far right displays,
respectively, the first or last sheet tab. The middle buttons allow the
user to scroll forward and backward through all sheet tabs. To
display the sheet itself click on the sheet tab.
If there is insufficient space to display all the sheet tabs, you can increase it by
pointing to the separator between the scroll bar and the sheet tabs, pressing the
mouse button and, keeping the mouse button pressed, dragging to the right. In
doing so you will be sharing the available space between the sheet tabs and horizontal scroll bar.
Working With Multiple Sheets
Each sheet of a spreadsheet is independent of the other sheets in a spreadsheet
document. You can however, incorporate the same data into several sheets. If you
would like to insert data at the same location in the first three sheets, select all
three sheets together and enter the data in only one of the sheets.
To select several sheets together, click the sheet tabs of the sheets in question
whilst pressing the Ctrl key. All selected sheets now have white sheet tabs, as
opposed to the gray sheet tabs of the unselected sheets.
202
StarOffice™ 7 User's Guide
StarOffice Calc includes the name of the sheet in the reference. Instead of referring
to $A$1, StarOffice Calc refers to $Sheet1.$A$1.
If you want to address the first cell from both Sheet1 and Sheet2 in a single
reference, for example, summarize, the 3D formula will read =SUM
(Sheet1.A1:Sheet2.A1). The sum function has one addend here, namely, the
range from Sheet 1.A1 to Sheet 2.A1. In this range there are two cells (as long as
no more cells are included between Sheet 1 and Sheet 2). The simple formula
(not a 3D formula) would only list two addends: =SUM(Sheet1.A1;Sheet2.A1).
If you also want to include any subsequently inserted sheets found between
Sheet 1 and Sheet 2, the formula would then be =SUM(Sheet1.A1:Sheet2.B2).
The full address of a cell also contains the complete path and file name of the
spreadsheet document. So, in its full form, the reference to cell A1 in sheet1 of the
document "name.sxc" on drive C is "='file:///c:/name.sxc'#$sheet1.A1". Note the
single quotes surrounding the file name, and the # character that describes the
location within the file, in accordance with URL convention.
Printing Spreadsheets
If you click the Print File Directly icon in the Function Bar, all the sheets
in your document will be printed. However, if you have selected a print
range, then only that part will be printed. You can set the print range by
selecting the cells that you want to print, then use the Format - Print
Ranges - Define command. You can find further information on this topic
in the StarOffice Help.
If you only want to print the current sheet go to menu File - Print. In the Print
dialog, choose the Selection option and click OK. Only the current sheet will be
printed. If, however, you have selected a certain range of cells, only those cells will
be printed, and done so only in the column width shown in the sheet.
If you want to simultaneously print various sheets, for example, Sheet 1 and
Sheet 2, select both of them beforehand (hold down the Ctrl key and click the sheet
tabs). The white tabs are the selected ones. Now, go to the Print dialog and choose
the Selection option and only the selected sheets will be printed. After having
printed the desired sheets, remember to click the sheet you are working on while
holding down the Shift key so that only that sheet is selected. If you don't do this,
all modifications you then make will apply to all sheets.
Chapter 4
Creating Spreadsheets With StarOffice Calc
203
Formatting a Spreadsheet
A spreadsheet can always be improved by formatting the cell contents. Text and
numbers can be given certain formats, and the cells themselves can be formatted
with different colors, borders and other attributes.
You can either define the formats yourself, or you can use one of the many predefined formats. For cells, a wide selection of cell styles is provided and you can also
define your own cell styles in the same way you do text styles.
You may want to give certain values in your spreadsheets particular emphasis. For
example, in a table of turnovers you can show all the values above the average in
green, and all those below the average in red. You can do this with conditional
formatting (see page 263).
Formatting Numbers With Decimals
Enter a number into the sheet, for example, 1234.5678. This number will be
displayed in the default number format, with two decimal places. You will see
1234.57 when you confirm the entry. Only the display in the document will be
rounded off; internally, the number retains all four decimal places after the
decimal point.
To format numbers with decimals:
1. Set the cursor at the number and choose Format - Cells to start the Format
Cells dialog.
2. On the Numbers tab you will see a selection of predefined number formats. In
the bottom right in the dialog you will see a preview of how your current
number would look if you were to give it a particular format.
If you only want to modify the number of the decimal places displayed,
the easiest method is to use the Number Format: Add Decimal Place or
Number Format: Delete Decimal Place icons on the Object Bar.
204
StarOffice™ 7 User's Guide
Formatting Dates and Times
As you can see from the list of options from the previous example, you can format
the date and time in many different ways.
1. Set the cursor in the cell containing the date or time and choose Format - Cells
to start the Format Cells dialog.
2. In the Category list box, click on Date or Time to see a selection of predefined
number formats. In the middle right of the dialog you will see a preview of
how the date or time looks if you give it a particular format.
Formatting Years
The year in a date entry is often entered as two digits. Internally, the year is
managed by StarOffice as four digits, so that in the calculation of the difference
from 1/1/99 to 1/1/01, the result will correctly be two years.
Under Tools - Options - StarOffice - General you can define the century that
is used when you enter a year with only two digits. The default is 1930 to 2029.
This means that if you enter a date of 1/1/30 or higher, it will be treated internally
as 1/1/1930 or higher. All lower two-digit years apply to the 20xx century. So, for
example, 1/1/20 is converted into 1/1/2020.
Formatting Cells and Sheets
The distinction between direct and style formatting holds true for cells as well as
for text documents. You have the choice, for instance, between applying a
particular font size directly as direct formatting to a cell or defining a style to
apply the desired font size. For documents which you expect to work with extensively, it makes sense to use styles. It does not make sense to use styles for documents you only print and discard.
Chapter 4
Creating Spreadsheets With StarOffice Calc
205
Using AutoFormat for Tables
A quick way to format a sheet or a cell range is offered by the AutoFormat
function. In your spreadsheet first select the cells to which you want to
apply AutoFormatting, including the column and row headers and any
sum rows or columns. At least 3x3 cells must be selected before this
command can be chosen. Then open the AutoFormat dialog by choosing
Format - AutoFormat.
The preview shows an example of how each format you select in the Format field
will look. Click OK to apply the format to the selected range of cells.
If you do not see any change in color of the cell contents, then under Tools Options - Spreadsheet - View - Display or in the View menu, you may have
Value highlighting marked. In this case default colors will be used.
A format that you define yourself can be set as an AutoFormat:
1. Format a spreadsheet to your liking.
2. Select the whole sheet, for example, by clicking the empty button in the top left
corner (above the first row header).
3. Call up the AutoFormat dialog and click Add. A dialog appears in which you
give the new format a name.
The new format can then be used in other spreadsheets.
Use the More button to display additional options in the dialog. In the additional
section that is then displayed, you can choose which properties of the chosen
format are to be excluded from the automatic formatting. For example, if you
remove the check mark in front of Font, the font will not be taken into account by
the AutoFormat.
206
StarOffice™ 7 User's Guide
Layout of Spreadsheets
Your sheets do not have to have the look that StarOffice has defined. There are
various ways you can apply a different layout for spreadsheets and also for tables
in text documents.
Designing Spreadsheets
StarOffice helps you design your sheet in a variety of ways. For example, here are
three different views of the same sheet, varying only in layout:
This is a sample sheet without any special formatting, as it appears by default.
You can format the sheet with one of the AutoFormats. It requires no further
editing on your part.
Chapter 4
Creating Spreadsheets With StarOffice Calc
207
Here the example sheet has been formatted with certain cell attributes in the
Format - Cells dialog. In addition the view of the gridlines and sheet headers has
been deactivated in Tools - Options - Spreadsheet - View and a graphics file
loaded as background in Format - Page - Background.
An image that you load with Format - Page - Background is only visible in print
or in File - Page View.
If you want to have a background image displayed on screen as well, insert the
graphic image by choosing Insert - Graphics - From File. Then send the image
behind the cells by way of the context menu Arrangement - To the Background.
To later select the background image, use the Navigator.
Formatting Text in a Spreadsheet
1. Select the text you want to format.
2. Choose the desired text attributes from the Spreadsheet Object Bar. You can
also choose Format - Cells. The Format Cells dialog will appear in which you
can choose various text attributes on the Font tab page.
Formatting Numbers in a Spreadsheet
1. Select the cells containing the numbers you want to format.
2. To format numbers in the default currency format or as percentages, use the
icons on the Spreadsheet Object Bar. For other formats, choose Format - Cells.
You can choose from the preset formats or define your own on the Numbers
tab page.
208
StarOffice™ 7 User's Guide
Formatting Borders and Backgrounds for Cells and Pages
You can assign a format to any group of cells by first selecting the cells (for
multiple selection, hold down the Ctrl key when clicking), and then activating
the Format Cells dialog in Format - Cell. In this dialog, you can select attributes such as shadows and backgrounds.
To apply formatting attributes to an entire sheet, choose Format - Page. You
can define headers and footers, for example, to appear on each printed page.
Addressing Cells
Cells can be addressed directly by means of their rows and columns. You can use
absolute or relative referencing, or you can give cell ranges their own names.
Addresses and References, Absolute and Relative
Relative Addressing
The cell in column A, row 1 is addressed as A1. You can address a range of adjacent cells by first entering the coordinates of the upper left cell of the area, then a
colon followed by the coordinates of the lower right cell. For example, the square
formed by the first four cells in the upper left corner is addressed as A1:B2.
By addressing an area in this way, you are making a relative reference to A1:B2.
Relative here means that the reference to this area will be adjusted automatically
when you copy the formulas.
Absolute Addressing
Absolute references are the opposite of relative addressing. A dollar sign is placed
before each letter and number in an absolute reference, for example, $A$1:$B$2.
Chapter 4
Creating Spreadsheets With StarOffice Calc
209
StarOffice can convert the current reference, in which the cursor is positioned in
the input line, from relative to absolute and vice versa by pressing Shift +F4. If
you start with a relative address such as A1, the first time you press this key
combination, both row and column are set to absolute references ($A$1). The
second time, only the row (A$1), and the third time, only the column ($A1). If
you press the key combination once more, both column and row references are
switched back to relative (A1)
StarOffice Calc shows the references to a formula. If, for example you click the
formula =SUM(A1:C5;D15:D24) in a cell, the two referenced areas in the sheet will
be highlighted in color. For example, the formula component "A1:C5" may be in
blue and the cell range in question bordered in the same shade of blue. The next
formula component "D15:D24" can be marked in red in the same way.
When to Use Relative and Absolute References
What distinguishes a relative reference? Assume you want to calculate in cell E1
the sum of the cells in range A1:B2. The formula to enter into E1 would be: =SUM
(A1:B2). If you later decide to insert a new column in front of column A, the
elements you want to add would then be in B1:C2 and the formula would be in F1,
not in E1. After inserting the new column, you would therefore have to check and
correct all formulas in the sheet, and possibly in other sheets.
Fortunately, StarOffice does this work for you. After having inserted a new
column A, the formula =SUM(A1:B2) will be automatically updated to =SUM
(B1:C2). Row numbers will also be automatically adjusted when a new row 1 is
inserted. Absolute and relative references are always adjusted in StarOffice Calc
whenever the referenced area is moved. But be careful if you are copying a
formula since in that case only the relative references will be adjusted, not the
absolute references.
Absolute references are used when a calculation refers to one specific cell in your
sheet. If a formula that refers to exactly this cell is copied relatively to a cell below
the original cell, the reference will also be moved down if you did not define the
cell coordinates as absolute.
Aside from when new rows and columns are inserted, references can also change
when an existing formula referring to particular cells is copied to another area of
the sheet. Assume you entered the formula =SUM(A1:A9) in row 10. If you want
to calculate the sum for the adjacent column to the right, simply copy this formula
to the cell to the right. The copy of the formula in column B will be automatically
adjusted to =SUM(B1:B9).
210
StarOffice™ 7 User's Guide
There are various ways to copy a formula. One suggested method is:
1. Select the cell containing the formula.
2. Choose Edit - Copy, or press Ctrl+ C to copy it.
3. Select the cell into which you want the formula to be copied.
4. Choose Edit - Paste, or press Ctrl+V. The formula will be positioned in the new
cell.
If you want to copy a formula into multiple cells, there is a quick and easy way to
copy into adjacent cell areas:
1. Select the cell containing the formula.
2. Position the mouse on the bottom right of the highlighted border of the cell,
and continue holding down the mouse button until the pointer changes to a
cross-hair symbol.
3. With the mouse button pressed, drag it down or to the right over all the cells
into which you want to copy the formula.
4. When you release the mouse button, the formula will be copied into the cells
and automatically adjusted.
If you do not want values and texts to be automatically adjusted, then hold down
the Ctrl key when dragging. Formulas, however, are always adjusted accordingly.
Addressing by Name
A good way of making the references to cells and cell ranges in formulas legible is
to give the ranges names. For example, you can name the range A1:B2 Start. You
can then write a formula such as "=SUM(Start)". Even after you insert or delete
rows or columns, StarOffice still correctly assigns the ranges identified by name.
Range names must not contain any spaces.
For example, it is much easier to read a formula for sales tax if you can write "=
Amount * Tax_rate" instead of "= A5 * B12". In this case, you would name cell A5
"Amount" and cell B12 "Tax_rate."
In order to specify range names, you must first select the area, then choose the
command Insert - Names - Define, or the Ctrl + F3 key combination. Enter the
name for the first range and click Add. You can also name other cell ranges in this
Chapter 4
Creating Spreadsheets With StarOffice Calc
211
dialog by entering the name in the field and then selecting the respective cells. Use
the Define Names dialog to define names for formulas or parts of formulas you
need more often. Close the dialog with OK.
Recognizing Names as Addressing
StarOffice can correlate names with areas automatically, as long as you have
entered the row and column coordinates. Refer to the following illustration:
The automatic formula recognition allows you to enter, for example, the formula
=SUM(July) in cell B8. This formula can then be copied to the right. Cell C8 automatically shows the formula =SUM(August), cell D8 =SUM(September), and so
on. This feature also works for horizontal calculations. Try it by entering the
formula =SUM(London) in cell E4. The New York entry is a special case: Because
this name contains a space, it must be enclosed in single quotation marks: =SUM
('New York').
Automatic recognition does not work with formulas. You cannot enter the formula
=SUM(sum) in cell E8. Instead you must enter =SUM(B8:D8) or =SUM(E3:E6).
The latter formula will also be inserted automatically if you place the cursor in cell
E8 and click the Sum icon in the Formula Bar.
This function is active by default. If you want, you can turn it off under Tools Options - Spreadsheet Document - Calculate. Remove the check in the check box
in front of Automatically find column and row labels.
You can also define the names yourself with Insert - Names - Labels.
212
StarOffice™ 7 User's Guide
In order for names to be automatically recognized, they must consist of alphanumeric characters and the first character must be a letter. If you want to use nonalphanumeric characters (including spaces), enclose the names in single quotation marks ('). If a single quotation mark appears in a name, for example, Jan '97,
you must enter a backslash in front of the quotation mark (Jan \'97). This type of
referencing is not compatible with earlier versions of StarOffice.
StarOffice automatically recognizes a range of cells that belong together. To see
which cells make up a particular range, click in that range and press Ctrl and *
from the numeric key pad. The range will be highlighted.
Only Copy Visible Cells
Assume you have hidden a few rows or columns in a cell range. Now you want to
copy only the visible cells.
StarOffice behaves differently depending on how you hid the invisible cells and
what you intend to do with them.
Method and Action
Result
Cells were filtered by AutoFilters, standard
filters or advanced filters.
Only the visible cells are
copied.
Copy the visible cells using copy and paste
through the clipboard, or using the middle
mouse button, or by drag-and-drop while
pressing the Ctrl key.
Cells were filtered by AutoFilters, standard
filters or advanced filters.
All cells, including the hidden
ones, are moved.
Move the visible cells, using cut and paste
through the clipboard or by drag-and-drop
without pressing an additional key.
Cells were hidden using the Hide command in All cells, including the hidden
the context menu of the row or column headers, ones, are copied or moved.
or through an outline.
Copy or move the visible cells.
Chapter 4
Creating Spreadsheets With StarOffice Calc
213
Using References in Formulas
So far you have been introduced to formulas containing values, absolute and relative references, and references to named ranges. Occasionally we have also
mentioned the AutoPilot: Functions. Here is an example of references used in
formulas, with the help of the AutoPilot: Functions.
Consider the example from the previous topic. Now, use the functions AutoPilot
to calculate the average of monthly sales for each location.
214
1.
Position the cursor in cell B8, where you want the average to be displayed.
Activate the AutoPilot: Functions by clicking its icon on the Formula Bar.
2.
Select the AVERAGE function.
3.
Click Next in the AutoPilot: Functions. On the right half of the AutoPilot,
another input area will appear where you can enter the arguments of the
function.
StarOffice™ 7 User's Guide
4.
Click in the input field, in this case field "number 1." Enter either "B3:B6" or
"January" or use the mouse to select that range in the sheet. To do so, click
on the first cell B3, hold down the mouse button and drag to B6.
While you drag the mouse to mark the desired range, the AutoPilot dialog
will be automatically minimized so that only the active input field is visible.
You may also reduce or enlarge the dialog manually by clicking the
Shrink / Maximize button to the right of the input field.
5.
Click OK to close the AutoPilot. The formula will be calculated and the final
result will appear in cell B8.
References to Other Sheets and Referencing URLs
In a sheet cell you can show a reference to a cell in another sheet.
1. Open a new, empty spreadsheet.
2. By way of example, enter the following formula in cell A1 of Sheet1:
=Sheet2.A1
3. Click the Sheet 2 tab at the bottom of the spreadsheet. Set the cursor in cell A1
there and enter text or a number.
4. If you switch back to Sheet1, you will see the same content in cell A1 there. If
the contents of Sheet2.A1 change, then the contents of Sheet1.A1 also change.
Chapter 4
Creating Spreadsheets With StarOffice Calc
215
In the same way, a reference can also be made to a cell from another document.
Open another spreadsheet in addition to the current spreadsheet. The current
spreadsheet must have already been saved as a file.
1. If you have installed the samples you can, for example, by choosing File Open, open the Movie1 document from the spreadsheet samples.
2. Change back to the original spreadsheet. Set the cursor in a free cell and enter
an equals sign to indicate that you want to begin a formula.
3. Now switch to the document you have just loaded, Movie1. Click cell C3.
4. Switch back to the original spreadsheet. In the calculation row you will now see
how StarOffice Calc has added the reference to the formula for you. If you have
used the previous example, the following will now be located there:
='file:///C:/{installpath}/
share/samples/english/spreadsheets/Movie1.sdc'#$movievisits.C3
5. Confirm the formula by clicking the green check mark.
The reference to a cell of another document contains the name of the other
document in single inverted commas, then a hash #, then the name of the sheet
of the other document, followed by a point and the name of the cell. The name
of the sheet automatically receives a leading dollar sign, since the sheet has
absolute addressing.
If you examine the name of the other document in this formula, you will notice
that it is written as a URL. This means that you can also enter a URL from the
Internet. For example, if you found an Internet page containing current stock
exchange information in spreadsheet cells, you can load this page in StarOffice
Calc by using the following procedure:
1. In a StarOffice Calc document, position the cursor in the cell into which you
want to insert the external data.
2. Choose Insert - External Data. The External Data dialog appears.
3. Enter the URL of the document or Web page in the dialog. The URL must be in
the format: http://www.my-bank.com/table.html. The URL for local or local
area network files is the path seen in the File - Open dialog. Press Enter.
StarOffice loads the Web page or file in the "background", that is, without
displaying it. In the large list box of the External Data dialog, you can see the
name of all the sheets or named ranges you can choose from.
216
StarOffice™ 7 User's Guide
4. Select one or more sheets or named ranges. You can also activate the automatic
update function every "n" minutes and click OK.
The contents will be inserted as a link in the StarOffice Calc document.
5. Save your spreadsheet. When you open it again later, StarOffice Calc will
update the linked cells following an inquiry.
6. Under Tools - Options - Spreadsheet - General you can choose to have the
update, when opened, automatically carried out either always, upon request or
never. The update can be started manually in the dialog under Edit - Links.
Using Charts
Data from spreadsheets can be represented graphically in a chart. You can select
from a variety of charts suited for illustrating the structure of the data.
1.
Open a spreadsheet and enter some data with row and column headings.
2.
Select the data together with the headings.
3.
Long-click the Insert Object icon found in the Main Toolbar to display
the floating toolbar. Then click the Insert Chart icon. The mouse
pointer will change to a cross-hair symbol with a small chart symbol.
4.
In the spreadsheet, drag open a rectangle defining the initial location
and size of the chart.
5.
As soon as you release the mouse button, a dialog appears in which
you can make further entries. You can also click the Create button to
create a chart with the default settings.
Chapter 4
Creating Spreadsheets With StarOffice Calc
217
The example data show the number of times people of different age groups in
various cities go to the movie theater annually. Look for the document in your
samples folder.
If you would rather put the cities than the age groups on the horizontal axis, you
can "tilt" the chart: With the chart still selected, the Main Toolbar contains a Data
in Columns icon and a Data in Rows icon. Click on one of the icons.
You are free to make any changes to all objects of your own charts. You can either
double-click on the objects or, with the chart selected, choose the commands from
the Format menu. For example, if you double-click on a color preview in the
legend, you can reformat all data points of that data series. If you double-click the
background in the box of the legend, you can format the background of the
legend.
If you created the chart from the data of a StarOffice Calc spreadsheet, the data
series that you click on in the chart are highlighted in the table.
Suppose you placed the chart in your StarOffice Calc spreadsheet in the
background, and now you are wondering how to select it for further
editing.
Open the Show Draw Functions floating toolbar and select the first tool,
the Select arrow. Now you can click on the chart to select it.
218
StarOffice™ 7 User's Guide
In a StarOffice Calc chart, you can move a data series forward or backward. You
can arrange the series in such a way that the lowest 3D bars are placed in the foreground and the higher ones in the background. To change the arrangement in the
chart, use a command in the context menu of a data series or choose Format Arrangement. The corresponding cell ranges in the StarOffice Calc spreadsheet
will not be rearranged.
When you insert a chart in a presentation or drawing document with the
Insert Object - Insert Chart toolbar, it is displayed with a set of sample data.
When you insert a chart in a spreadsheet, you first select the cells in the
spreadsheet whose values should be displayed in the chart.
In StarOffice Writer documents, you can insert a chart obtained from the data
of a StarOffice Writer table. If you have not selected any data in a StarOffice
Writer table, choosing Insert - Object - Chart inserts a chart containing
sample data.
You can change the sample data values by double-clicking on the chart and
then choosing Edit - Chart Data. If you want to change the values of a chart
obtained from selected cells, you have to change the values in the table cells. If
the chart is in a text document, press F9 to update the chart.
An easy method to change the numbers in a chart is drag-and-drop: select any
table cell range, then drag and drop them at the chart. The chart updates with
the new values.
Modification of chart data is also possible if you, for example, have copied a
chart from a StarOffice Calc document into a StarOffice Writer document and
now double-click the chart in the StarOffice Writer document. Remember,
however, you are only editing the copy and not the original document.
You can change the type of chart any time. When you double-click on the chart
and choose Format - Chart Type, a dialog appears, presenting you with various
types to choose from.
Chapter 4
Creating Spreadsheets With StarOffice Calc
219
Try out the different options in the Chart Type dialog. You can also switch
between 2D and 3D representation. With the Columns chart type you can select a
Combination Chart of lines and columns.
220
The three-dimensional charts offer some special effects. For example, you can
adjust the illumination settings, such as light source, ambient light and color
filters.
3D charts can be rotated and tilted with the mouse for an optimal point of
view.
By choosing Insert - Statistics, you can apply statistical indicators to charts of
type "XY Chart". Indicators include standard deviations, with regression curves
and more. A single or double logarithmic representation of the axes can also be
set here.
In Line Charts you can use the data series symbols that are applied automatically by StarOffice Chart. You can also select symbols yourself from graphic
files or from the Gallery.
StarOffice™ 7 User's Guide
Opening Binary StarOffice Chart Files
There is a special read-only mode to open a binary Chart file that was saved by a
previous version of StarOffice. Double-click the file in your file manager or enter
the full name including the .sds extension in the Open file dialog. You can then
look at and print the chart.
To retrieve or edit the chart data of a StarOffice Chart .sds file, follow these steps:
1. Open a StarOffice Calc document.
2. Choose Insert - Object - OLE Object.
3. In the dialog, click Create from file. Click the Search button and select the .sds
file. The chart is inserted and selected.
4. The chart data can be retrieved or edited after clicking the Chart Data icon in
the Main Toolbar.
In a chart, you can select individual data series or data points by clicking on them,
then open the context menu to find numerous options for formatting the view.
Editing Chart Titles
To edit a chart title that you have inserted into a StarOffice document:
1. Double-click on the chart.
A gray border appears around the chart and the menu bar now contains
commands for editing the objects in the chart.
2. Double-click on the default title text. A gray border appears around the text
and you can now make changes. Press Enter to create a new line.
3. A single-click on the title allows you to move it with the mouse.
4. If you want to change the formatting of the main title, choose Format - Title Main Title. This opens the Title dialog.
5. Select one of the available tabs in the dialog to make modifications.
6. Click OK. In your document, click outside the chart to exit chart editing mode.
Chapter 4
Creating Spreadsheets With StarOffice Calc
221
Editing Chart Legends
To edit a chart legend:
1. Double-click on the chart.
A gray border appears around the chart and the menu bar now contains
commands for editing the objects in the chart.
2. Choose Format - Legend or double-click on the legend. This opens the Legend
dialog.
3. Choose from the available tabs to make modifications, then click OK.
To select the legend, first double-click on the chart (see step 1), then click on the
legend. You can now move the legend within the chart using the mouse.
If you move the legend over another object of the chart, you can no longer open
its Properties dialog by double-clicking on it. To open the Properties dialog
either use the Format menu or click once on the legend, then open the context
menu and select Object Properties. The same applies to all other objects of the
chart.
Adding Texture to Chart Bars
You can add texture to the bars in a graph or chart (instead of the default colors)
via bitmap graphics:
1. Enter edit mode by double-clicking on the chart.
2. Double-click on the bar you want to edit. All bars of this series are now
selected.
3. In the context menu choose Object Properties. Then choose the Area tab.
4. Click on Bitmap. In the list box select a bitmap as a texture for the currently
selected bars. Click OK to accept the setting.
222
StarOffice™ 7 User's Guide
Editing Chart Axes
To edit the axes of a chart that you have inserted:
1. Double-click on the chart.
A gray border appears around the chart and the menu bar now contains
commands for editing the objects in the chart.
2. Choose Format - Axis, then select the axis (or axes) that you would like to edit.
A dialog appears.
3. Select from the available sections and make the required changes (for example,
select the Scale tab if you want to modify the scale of the axis).
4. Click OK. In your document, click outside the chart to exit chart editing mode.
Database Functions in StarOffice Calc
Spreadsheets in StarOffice Calc are also able to manage records consisting of
several fields, as in a database. Think of each row of the StarOffice Calc spreadsheet as a record whose fields are arranged in individual columns. Then, for
example, you can sort or group the StarOffice Calc database by rows, look for key
words and calculate totals.
The database ranges in StarOffice Calc spreadsheets have nothing to do with the
databases and tables that you address in Tools - Data Sources and edit in the
data source browser F4.
In StarOffice Calc, you work with a spreadsheet that can contain several
sheets. You can combine several adjacent rows of a spreadsheet into a database range, for example, to sort them together. Furthermore, you can import
external files, for example files in dBase format, into a StarOffice Calc spreadsheet. The records from the dBase file would then become rows and the data
fields would become columns in a StarOffice Calc spreadsheet.
In the data source browser, on the other hand, you edit the dBase tables (or
other data source) directly, and you can perform SQL queries, for example.
Chapter 4
Creating Spreadsheets With StarOffice Calc
223
Defining Database Ranges
StarOffice Calc spreadsheets are also able to manage records consisting of several
fields, as in a database. A database range consists of the records selected for this
purpose. Think of each row of the spreadsheet as a record whose fields are
arranged in individual columns. Then you can sort or group the records by rows,
look for key words, and calculate totals.
The database ranges in StarOffice Calc spreadsheets have nothing to do with the
databases and spreadsheets that you address in Tools - Data Sources and edit in
the data source browser.
In the data source browser, you edit dBase (or other data source) files directly
and can perform SQL queries.
1. Select the area to be defined as a database range by choosing Data - Define
Range.
2. Enter a name for the range and click More.
3. Be sure to mark the check box Contains column labels so that the first row is
correctly taken into account. Click OK to close the dialog.
The selected range is now defined as a database range. Sort lists and filters you
have defined for the database range can now be updated.
224
StarOffice™ 7 User's Guide
Sorting Database Ranges
Select a range of cells and define these as a database range by choosing Data Define Range.
Set the cursor in the database range and choose Data - Sort. In the dialog that
appears, select the column to be sorted as the sort criterion and click OK.
You may specify up to two additional criteria, one to follow the other, for the sort
function. For instance, you can sort expenditures first by date, then by item if they
have the same date, and then by amount if they have the same date and item.
Filtering Database Ranges
To filter out certain records so that you can modify them, use the spreadsheet
filtering function. You can choose between using a dialog to specify the criteria
exactly (in which case range definitions are also possible), or creating an
AutoFilter that will help whenever you want to filter according to specific values
or text.
As an example, you want to see only those records in a list that occurred after
1/2/2000 and which have an amount in excess of 100 currency units.
Set the cursor in the database range and choose Data - Filter - Standard Filter
to open the dialog. Enter the following: Date > 1/2/2000 AND Amount > 100.
Chapter 4
Creating Spreadsheets With StarOffice Calc
225
In the dialog, you can select the existing contents of the data fields in the combo
boxes, but you can also enter the amount 100 directly.
If you click OK, you will now only see the records that meet all criteria. Choose
Data - Filter - Remove Filter to reset the view.
To display only records with a specific content using the AutoFilter:
1. Place the cursor in the database range.
2. Click on the AutoFilter icon on the Main Toolbar. The column headers of the
database range now contain small buttons.
3. Click on the button next to the desired field and select a criteria from the list.
Only records that contain that criteria are displayed.
On the Main Toolbar, reset the view with the AutoFilter icon.
Grouping Database Ranges and Calculating
Subtotals
If you want to expand the sample data and in order to use it, you will also want to
summarize and print the data in totals and subtotals. This can be done in just a
few steps:
1. Place the cursor in the database range.
2. Choose Data - Subtotals. The Subtotals dialog appears.
3. Specify the options for calculating the subtotals. For example, group by "Date"
(a subtotal is calculated for each new date), and calculate subtotals for
"Amount" using the function "Sum" (adds the subtotals).
226
StarOffice™ 7 User's Guide
As soon as you press Enter or click OK, the database range will be grouped with
subtotals. For every group of rows with an identical date, a subtotal is calculated.
The grand total is displayed at the bottom.
Notice the controls to the left of the row headers. They enable you to view which
records (rows) have been summarized. If you click on a minus sign, only the row
with the results is shown. The easiest way to control the display is with the small
digits above the group area. If you click on 1, only the grand total is displayed; 2
reveals the subtotals, and 3 shows all elements.
Chapter 4
Creating Spreadsheets With StarOffice Calc
227
Transferring Data From a Data Source to a
Spreadsheet
You can transfer any tables from the data source browser into your StarOffice Calc
spreadsheet.
There are two different methods for transferring data. You can open a database
file in dBase or text format directly through the File - Open dialog, in which case
you import the whole database table into a StarOffice Calc spreadsheet, or you can
use drag-and-drop.
Opening a Database File in StarOffice Calc
You can open a file in dBase or text format as a StarOffice Calc spreadsheet.
1.
Choose File - Open.
2.
In the dialog, go to the folder where the database file is located. Enter the
name of the file or go to the File type list box, select for example, "dBase"
and click the name. Click Open. If you want to open a text document, select
the file type "Text CSV".
3.
When importing from dBase you will see a dialog where you can choose the
character set of the file.
4.
After you confirm this dialog with OK, the database file is opened in the
StarOffice Calc spreadsheet.
The first row provides information on the type and length of the individual data
fields. This information is contained as dBase header in the file.
228
StarOffice™ 7 User's Guide
Before working on the data in the spreadsheet, we would like to introduce the
second method for transferring selected records from the data source view to the
StarOffice Calc spreadsheet.
Dragging and Dropping Copies into Spreadsheets
This method works with all formats, and you have the choice of transferring all or
only selected records into the spreadsheet document. To use this method you first
need to register the data source in StarOffice.
1. Choose Tools - Data Sources.
2. You will see the Data Source Administration dialog. Click New Data Source.
3. In the Database type field, select "dBase" to register a dBase database. Click the
... button and select the folder containing the database files in *.dbf format.
Click OK.
4. In the Name field, enter a name to be displayed for the data source.
5. Click Apply. Click the Tables tab. Put a check mark next to the names of the
tables you want to see in the data source view. Click OK.
6. Press F4 to open the data source browser.
7. Click on the plus sign next to "Tables" to view the existing tables in the database. In a dBase database, each *.dbf file in the directory is a table of its own.
8. Click the name of the table. The records are displayed in the data source
browser.
You can select the records and insert them into your spreadsheet.
1. To manually select a record that you want to transfer into the spreadsheet, click
the row header of the record (the gray field without text at the left). You can
click the first and last record row headers of a continuous range of records
Chapter 4
Creating Spreadsheets With StarOffice Calc
229
while pressing the Shift key, or you can hold down the Ctrl key and click the
desired records individually.
2. Drag the selected records to the row headers in the StarOffice Calc sheet where
the records are to be inserted. Then release the mouse button.
If you want to automatically transfer only some records from a database into the
spreadsheet, you can use the filters in the data source browser:
1. Place the cursor in the data field containing the data that is the same in all
filtered records. For example, to filter only records that have "Main Street" in
their address, place the cursor in a field containing "Main Street".
2. Click the AutoFilter icon.
3. Now you only see the records containing the precise text "Main Street".
4. Select the Main Street records and drag them into the spreadsheet document.
Release the mouse button at the cell where you want the first field to appear.
Evaluating Data With StarOffice Calc
StarOffice Calc provides you with several powerful tools for evaluating data. The
DataPilot allows you to produce any kind of sub-evaluation of your data. You can
analyze your data through consolidation, goal seek and multiple operations.
DataPilot
The DataPilot allows you to combine, compare and analyze large amounts of data.
You can view different summaries of the source data, and you can display the
details for areas of interest and create reports.
A table that has been created with the DataPilot is an interactive table. Data can be
arranged, rearranged or summarized according to different points of view.
As an example, you have a data analysis table containing your company's sales
figures, not only for specific product groups, but also for branches and years. Use
the DataPilot to quickly find the data you are interested in.
230
StarOffice™ 7 User's Guide
Creating DataPilot Tables
1. Position the cursor within a range of cells containing values, row and column
headings.
2. Choose Data - DataPilot - Start. The dialog Select Source appears. Choose
Current selection and confirm with OK. The table headings are shown as
buttons in the DataPilot dialog. Drag these buttons as required and drop them
into the layout areas "Column", "Row" and "Data".
3. Drag the desired buttons into one of the three areas.
Chapter 4
Creating Spreadsheets With StarOffice Calc
231
If the button is dropped in the Data area it will be given a caption that also shows
the formula that will be used to calculate the data.
By double-clicking on one of the fields in the Data area you can call up the
Data Field dialog.
Use the Data Field dialog to select the calculations to be used for the data. To
make a multiple selection, press the Ctrl key while clicking the calculations.
The order of the buttons can be changed at any time by simply moving them to
a different position in the area with the mouse.
Remove a button by dragging it back to the area of the other buttons at the
right of the dialog.
To open the Data Field dialog, double-click one of the buttons in the Row or
Column area. Use the dialog to select if and to what extent StarOffice calculates
display subtotals.
Exit the DataPilot dialog by pressing OK. A Filter button will now be inserted into
the table below the source data. Two rows further down the DataPilot table is
inserted. It has a bold outline.
232
StarOffice™ 7 User's Guide
Selecting DataPilot Output Ranges
Click the button More in the DataPilot dialog. The dialog will be extended.
You can select a named range in which the DataPilot table is to be created, from
the Results to box. If the results range does not have a name, enter the coordinates
of the upper left cell of the range into the field to the right of the Results to box.
You can also click on the appropriate cell to have the coordinates entered accordingly.
If you mark the Ignore empty rows check box, they will not be taken into account
when the DataPilot table is created.
If the Identify categories check box is marked, the categories will be identified by
their headings and assigned accordingly when the DataPilot table is created.
Editing DataPilot Tables
Click one of the buttons in the table that the DataPilot has created and hold the
mouse button down. A special symbol will appear next to the mouse pointer.
By dragging the button to a different position in the same row you can alter the
order of the columns. If you drag a button to the left edge of the table into the row
headings area, you can change a column into a row.
To remove a button from the table, just drag it out of the DataPilot table. Release
the mouse button when the mouse pointer positioned within the sheet has become
a 'not allowed' icon. The button is deleted.
To edit the DataPilot table, click a cell inside the DataPilot table and open the
context menu. In the context menu you find the command Start, which displays
the DataPilot dialog for the current DataPilot table.
By double-clicking on some buttons inside the DataPilot table you can hide the
subelements below it.
Chapter 4
Creating Spreadsheets With StarOffice Calc
233
Filtering DataPilot Tables
You can use filters to remove unwanted data from a DataPilot table.
Click the Filter button in the sheet to call up the dialog for the filter conditions.
Alternatively call up the context menu of the DataPilot table and select the Filter
command. The Filter dialog appears. Here you can filter the DataPilot table.
Updating DataPilot Tables
If the data of the source sheet has been changed, StarOffice recalculates the DataPilot table. To recalculate the tables, choose Data - DataPilot - Refresh. Do the same
after you have imported an Excel Pivot table into StarOffice Calc.
Deleting DataPilot Tables
In order to delete a DataPilot table, select any cell in the DataPilot table, then
choose Delete in the context menu.
234
StarOffice™ 7 User's Guide
Consolidating Data
During consolidation, the contents of the cells from several sheets will be
combined in one place.
1.
Open the document that contains the cell ranges to be consolidated.
2.
Choose Data - Consolidate to open the Consolidate dialog.
3.
From the Source data area box select a source cell range to consolidate with
other areas.
4.
If the range is not named, click in the field next to the Source data area. A
blinking text cursor appears. Type a reference for the first source data range
or select the range with the mouse.
5.
Click Add to insert the selected range in the Consolidation areas field.
6.
Select additional ranges and click Add after each selection.
7.
Specify where you want to display the result by selecting a target range from
the Copy results to box.
8.
If the target range is not named, click in the field next to Copy results to and
enter the reference of the target range. Alternatively, you can select the range
using the mouse or position the cursor in the top left cell of the target range.
9.
Select a function from the Function box. The function specifies how the
values of the consolidation ranges are linked. The "Sum" function is the
default setting.
10. Click OK to consolidate the ranges.
Chapter 4
Creating Spreadsheets With StarOffice Calc
235
If you prefer to retain links to the source ranges instead of copies, or if you want to
consolidate ranges in which the order of rows or columns varies, click the More
button in the Consolidate dialog.
1. Select Link to source data to insert the formulas that generate the results in the
target range, rather than the actual results. If you link the data, any values
modified in the source range are automatically updated in the target range.
The corresponding cell references in the target range are inserted in consecutive rows, which are automatically ordered and then hidden from view. Only
the final result, based on the selected function, is displayed.
2. Under Consolidate by, select either Row labels or Column labels if the cells of
the source data range are not to be consolidated corresponding to the identical
position of the cell in the range, but instead according to a matching row label
or column label.
To consolidate by row labels or column labels, the label must be contained in
the selected source ranges.
The text in the labels must be identical, so that rows or columns can be accurately
matched. If the row or column label does not match any that exist in the target
range, it will be appended as a new row or column.
The data from the consolidation ranges and target range will be saved when you
save the document. If you later open a document in which consolidation has been
defined, this data will again be available.
236
StarOffice™ 7 User's Guide
Applying Goal Seek
With the help of Goal Seek you can calculate a value that, as part of a formula,
leads to the result you specify for the formula. You thus define the formula with
several fixed values and one variable value and the result of the formula.
Goal Seek is best illustrated by means of an example:
To calculate annual interest, create a table with the values for the capital (C),
number of years (n), and interest rate (i). The formula is:
I = C * n* i / 100
You can also enter the formula using the variable names as entered in the headings cells:
= 'Capital (C)' * 'Years (n)' * 'Interest rate (i)' / 100
Each name must be spelled in the formula exactly as it is seen in the cell, and the
name must be enclosed in single quotes.
In this example, the investment capital of $150,000 and an interest rate of 7.5% is
calculated to result in annual interest income of $11,250. (The cells are formatted
after calculation.)
Start Goal Seek
Let us assume that the interest rate (7.5%) and the number of years (1) will remain
constant. However, you may want to know how much the investment would have
to be modified in order to attain a particular annual return. For this example,
calculate how much capital would be required if you want an annual return of
$15,000.
Chapter 4
Creating Spreadsheets With StarOffice Calc
237
1. Place the cursor in cell E5, and choose Tools - Goal Seek. The Goal Seek
dialog appears.
2. The correct cell is already entered in the field Formula Cell.
3. Place the cursor in the field Variable Cell. In the sheet, click in the cell (A5) that
contains the value to be changed.
4. Enter the expected result of the formula in the Target Value text box. In this
example, the value is 15,000. Click OK.
5. A dialog appears informing you that the Goal Seek was successful. The result is
indicated for you to use if you want to. Click Yes to enter the result in cell A5.
Applying Multiple Operations
Multiple Operations in Columns or Rows
If the data of a data range is arranged in columns or arranged in rows, select the
data range together with the cell or cell range next to or below it as the target
range. In the Column/Row field, enter the cell reference to the first cell in the data
range. In the Formula field, enter the cell reference to the cell with the formula that
applies to the data range.
Examples
You produce toys which you sell for $10 each. Each toy costs $2 to make, in addition to which you have fixed costs of $10,000 per year. How much profit will you
make in a year if you sell a particular number of toys?
Consider the following table:
238
A
B
1
Selling price
10
Annual sales Annual profit
2
Direct costs
2
500
-6000
3
Fixed costs
10000
1000
-2000
4
Quantity
2000
1500
2000
5
Profit
= B4*(B1 - B2) - B3
2000
6000
StarOffice™ 7 User's Guide
C
D
E
F
Calculating With One Formula and One Variable
1. To calculate the profit, first enter any number as the quantity (items sold) - in
this example 2000. The profit is found from the formula Profit=Quantity *
(Selling price - Direct costs) - Fixed costs. Enter this formula in B5.
2. In column D enter certain annual sales, one under the other; for example, in
steps of 500 from 500 to 5000.
3. Mark the range D2:E11, and thus the values in column D and the empty cells
alongside in column E.
4. Choose Data - Multiple operations.
5. With the cursor in the Formulas field, click cell B5.
6. Set the cursor in the Column field and click cell B4. This means that: B4, the
quantity, is the variable in the formula, which is replaced by the marked
column values.
7. Close the dialog with OK. You will see the profit in column E.
Calculating with Several Formulas Simultaneously
1. Delete column E.
2. Enter the following formula in C5: = B5 / B4. You are now calculating the
annual profit per item sold.
3. Select the range D2;F11, thus three columns.
4. Choose Data - Multiple Operations.
5. With the cursor in the Formulas field, mark cells B5 thru C5.
6. Set the cursor in the Columns field and click cell B4.
7. Close the dialog with OK. You will now see the profits in column E and the
annual profit per item in column F.
Chapter 4
Creating Spreadsheets With StarOffice Calc
239
Multiple Operations Across Rows and Columns
StarOffice allows you to carry out joint multiple operations for columns and rows
in so-called cross-tables. The formula cell has to refer to both the data range
arranged in rows and the one arranged in columns. Select the range defined by
both data ranges and call the multiple operation dialog. Enter the reference to the
formula in the Formula field. The Row field is used to enter the reference to the
first cell of the range arranged in rows, and the Column field the first cell of the
range arranged in columns.
Calculating with Two Variables
Consider columns A and B of the sample table above. You now want to vary not
just the quantity produced annually, but also the selling price, and you are interested in the profit in each case.
Expand the table. D2 thru D11 contain the numbers 500, 1000 and so on, up to
5000. In E1 through H1 enter the numbers 8, 10, 15 and 20.
A
B
1
Selling price
10
2
Direct costs
2
3
Fixed costs
4
5
C
D
E
F
8
10
500
-7000
-6000
10000
1000
-4000
-2000
Quantity
2000
1500
-1000
2000
Profit
= B4*(B1 - B2) - B3
2000
2000
6000
1. Select the range D1:H11.
2. Choose Data - Multiple Operations.
3. With the cursor in the Formulas field, click cell B5.
4. Set the cursor in the Rows field and click cell B1. This means that B1, the selling
price, is the horizontally entered variable (with the values 8, 10, 15 and 20).
5. Set the cursor in the Column field and click in B4. This means that B4, the
quantity, is the vertically entered variable.
6. Close the dialog with OK. You will see the profits in the range E2:H11. In some
cases you must first press F9 to update the table.
240
StarOffice™ 7 User's Guide
Using Scenarios
StarOffice Calc Scenarios are important aids for making numbers that are
dependent upon each other, and their resulting calculations, visible. Scenarios
allow you create a list of values to select from for a given cell or group of cells. The
contents of these cells change when you select different items from the list.
Modify specific basic requirements in the table and you will see the new result.
You can give a name to the scenario created in this manner and compare it with
other scenarios.
Using Ready-Made Scenarios
We have provided a ready-made example of scenarios for you to work with.
1. Choose File - New - Templates and Documents, and from the dialog open
Samples.
2. Open the spreadsheet examples.
Now you see the spreadsheet documents that come with the program.
3. Double-click the document with Recar in the name.
What you see is a sample spreadsheet in which several scenarios have been
created.
Areas in which the scenarios are located are surrounded by frames. Select the
appropriate scenario in the list box appearing at the top of every frame.
Scenarios can also be selected in the Navigator:
1. Open the Navigator with the F5 key or the Navigator icon on the Function Bar.
2. Click the Scenarios icon in the Navigator (the icon with the question and exclamation marks).
In the Navigator, you see the defined scenarios with the comments that were
entered when the scenarios were created.
Chapter 4
Creating Spreadsheets With StarOffice Calc
241
Creating Your Own Scenarios
To create a scenario, select all the cells that provide the data for the scenario. In our
example you can create an additional scenario called "High Dollar Rate":
1. Select the cells that are already highlighted by the frame of the existing
scenario. You can also select multiple cells distributed across the table. To select
multiple cells, hold down the Ctrl key as you click each cell. In our example,
however, select the range F18:F23.
2. Choose Tools - Scenarios. The Create Scenario dialog appears.
3. Enter "High Dollar Rate" as the name of the scenario and leave the other fields
unchanged with their default values. Close the dialog with OK. Your new
scenario is automatically activated.
4. Change the values in the frames to the values you want to apply to your new
scenario. In this case, modify the dollar rate and all other values that you
believe could be affected by it (for example, economic growth and sales prices).
The effects of your operating figures are then displayed.
If you want to know which values in the scenario affect other values, choose Tools
- Detective - Trace Dependents. You will see arrows to the cells that are directly
dependent on the current cell.
Validity of Cell Contents
For each cell, you can define in advance what type of contents is valid for that cell.
This allows you to guide users through data entry in StarOffice Calc by restricting
cells to receive specific values and ranges.
The validity rule is activated when a new value is entered. If an invalid value has
already been inserted into the cell, or if you insert a value in the cell either with
drag-and-drop or by copying and pasting, the validity rule will not take effect.
You can choose Tools - Detective at any time and choose the command Mark
Invalid Data to display which cells contain invalid values.
Additional details about data validity can be found in the StarOffice Help.
242
StarOffice™ 7 User's Guide
Using Cell Contents Validity
1.
Select the cells for which you want to define a new validity rule. You can
select multiple cells by clicking on all the cells while holding down the Ctrl
key.
The validity rule is a component of the cell format. To copy the validity rule to
other cells, choose Edit - Copy and Edit - Paste Special, and select "Formats."
2.
Choose Data - Validity. The Validity dialog appears.
3.
On the Criteria tab page, enter the conditions for new values entered into
cells. Values you have already entered will not be affected.
4.
In the Allow field, "All Values" is selected by default. To place a condition
on a cell entry, choose from one of the other options listed.
Chapter 4
Creating Spreadsheets With StarOffice Calc
243
5.
This choice already sets the first condition. If you choose "Whole Numbers",
values such as "12.5" are not allowed, even if they satisfy the other conditions. Choosing "Date" allows date information both in the local date format
as well as in the form of a serial date. Similarly, the "Time" condition permits
time values such as "12:00" or serial time numbers. "Text Length" stipulates
that cells are allowed to contain text only.
6.
After you have set the first condition under Allow, select the next condition
under Data. According to what you choose, additional text fields (Value,
Minimum and Maximum) may appear to further refine the condition.
7.
A few possible conditions resulting from this register could be as follows:
"Integer greater than 1", "Decimal between 10 and 12.5", "Date earlier than or
equal to 1/1/2000", "Time not equal to 00:00", "Text with a length of more
than 2 characters".
After you have determined the conditions for cell validity, you can use the other
two tabs in the dialog to create input help and error/invalid entry messages:
On the Input Help tab page, enter the title and the text of the tip, which will
then be displayed if the cell is selected.
On the Error Alert tab page, select the action to be carried out in the event of an
error.
If you select "Stop" as the action, invalid entries are not accepted, and the
previous cell contents are retained.
Select "Warning" or "Information" to display a dialog in which the entry can
either be canceled (the cell value will be retained) or accepted (even if the new
value violates the validity rule).
If you select "Macro", then by using the Browse button you can specify a macro
to be run in the event of an error.
To display the error message, mark the Show error message when invalid
values are entered. If the option is unmarked, no error message will be
displayed, even with an invalid entry.
244
StarOffice™ 7 User's Guide
Sample macro:
Function ExampleValidity(CellValue as String, TableCell as
String)
Dim msg as string
msg = "Invalid value: " & "'" & CellValue & "'"
msg = msg & " in table: " & "'" & TableCell & "'"
MsgBox msg ,16,"Error message"
End Function
After changing the action for a cell on the Error Alert tab page and closing the
dialog with OK, you must first select another cell before the change takes effect.
Printing or Exporting Spreadsheets
There are many print options to output your spreadsheets on paper. Another way
of distributing your data is to publish it on the Internet in HTML format.
Printing Sheet Details
When printing a sheet you can select which details are to be printed:
Row and column headers
Sheet grid
Notes
Objects and graphics
Charts
Drawing objects
Formulas
Chapter 4
Creating Spreadsheets With StarOffice Calc
245
To choose the details proceed as follows:
1. Select the sheet you want to print.
2. Choose Format - Page.
The command is not visible if the sheet was opened with write protection on. In
that case, click the Edit File icon on the Function Bar.
3. Select the Table tab. In the Print area mark the details to be printed and click
OK.
4. Print the document.
Defining Number of Pages for Printing
If a sheet is too large for a single printed page, StarOffice Calc will print the
current sheet evenly divided over several pages. Since the automatic page break
does not always take place in the optimal position, you can define the page distribution yourself.
1. Go to the sheet to be printed.
2. Choose View - Page Break Preview.
3. You will see the automatic distribution of the sheet across the print pages. The
automatically created print ranges are indicated by dark blue lines, and the
user-defined ones by light blue lines. The page breaks (line breaks and column
breaks) are marked as black lines.
4. You can move the blue lines with the mouse. You will find further options in
the Context menu, including adding an additional print range, removing the
scaling and inserting additional manual line and column brakes.
Printing Sheets in Landscape Format
In order to print a sheet you have a number of interactive options available under
View - Page Break Preview. Drag the delimiter lines to define the range of printed
cells on each page.
To print in landscape format, proceed as follows:
246
StarOffice™ 7 User's Guide
1. Go to the sheet to be printed.
2. Choose Format - Page.
The command is not visible if the sheet has been opened with write protection
on. In that case, click the Edit File icon on the Function Bar.
3. Select the Page tab. Select the Landscape paper format and click OK.
4. Choose File - Print. You will see the Print dialog.
Depending on the printer driver and the operating system, it may be necessary
to click the Properties button and to change your printer to landscape format
there.
5. In the Print dialog under Print range, select the pages to be printed:
All - All sheets will be printed.
Pages - Enter the pages to be printed. The pages will also be numbered from
the first sheet onwards. If you see in the Page Break Preview that Sheet1 will be
printed on 4 pages and you want to print the first two pages of Sheet2, enter 56 here.
Selection - Only the selection will be printed. If cells are selected, these are
printed. If no cells are selected, all those sheets whose names (at the bottom on
the sheet tabs) are selected will be printed. By pressing Ctrl while clicking a
sheet name you can change this selection.
If under Format - Print ranges you have defined one or more print ranges, only
the contents of these print ranges will be printed.
Printing Rows or Columns on Every Page
If you have a sheet that is so large that it will be printed multiple pages, you can
set up rows or columns to repeat on each printed page.
As an example, If you want to print the top two rows of the sheet as well as the
first column (A)on all pages, do the following:
1. Choose Format - Print Ranges - Edit. The Edit Print Ranges dialog appears.
2. Click the icon at the far right of the Rows to repeat area.
The dialog shrinks so that you can see more of the sheet.
Chapter 4
Creating Spreadsheets With StarOffice Calc
247
3. Select the first two rows and, for this example, click cell A1 and drag to A2.
In the shrunk dialog you will see $1:$2. Rows 1 and 2 are now rows to repeat.
4. Click the icon at the far right of the Rows to repeat area. The dialog is restored
again.
5. If you also want column A as a column to repeat, click the icon at the far right
of the Columns to repeat area.
6. Click column A (not in the column header).
7. Click the icon again at the far right of the Columns to repeat area.
Rows to repeat are rows from the sheet. You can define headers and footers to be
printed on each print page independently of this in Format - Page.
Saving and Opening Sheets in HTML
Saving Sheets in HTML
StarOffice Calc saves all the sheets of a Calc document together as an HTML document. At the beginning of the HTML document, a heading and a list of hyperlinks
are automatically added which lead to the individual sheets within the document.
Numbers are shown as written. In addition, in the <SDVAL> HTML tag, the exact
internal number value is written so that after opening the HTML document with
StarOffice you know you have the exact values.
1. To save the current Calc document as HTML, choose File - Save As.
2. In the Save as type list box, in the area with the other StarOffice Calc filters,
choose the file type "HTML Document (StarOffice Calc)".
3. Enter a File name and click Save.
248
StarOffice™ 7 User's Guide
Opening Sheets in HTML
StarOffice offers various filters for opening HTML files, which you can select
under File - Open in the Save as type list box:
Choose the file type "HTML Document (StarOffice Calc)" to open in StarOffice
Calc.
All StarOffice Calc options are now available to you. However, not all options
that StarOffice Calc offers for editing can be saved in HTML format.
Choose the file type "HTML Document" to open in StarOffice Writer/Web. This
is the default for HTML documents in StarOffice.
All the options of StarOffice Writer/Web are now available to you, such as
Show HTML source.
Choose "HTML Document (StarOffice Writer)" to open in StarOffice Writer.
All the options of StarOffice Writer are now available to you. Not all options
that StarOffice Writer offers for editing of documents can be saved in HTML
format.
Importing and Exporting Text Files
Comma separated values (CSV) files are text files that contain the cell contents of a
single sheet. Commas, semicolons, or other characters can be used as the field
delimiters between the cells. Text strings are put in quotation marks, numbers are
written without quotation marks.
Importing a CSV File
1. Choose File - Open.
2. In the Save as type field, select the format "Text CSV". Select the file and click
Open. When a file has the .csv extension, the file type is automatically recognized.
3. You will see the Import text files dialog. Click OK.
4. If the csv file contains formulas as formulas, clear the Formulas check box in
Tools - Options - Spreadsheet - View, so that you see the calculated results in
the table.
Chapter 4
Creating Spreadsheets With StarOffice Calc
249
Exporting Formulas and Values as CSV Files
1. Click the sheet to be written as a csv file.
2. If you want to export the formulas as formulas, for example, in the form =SUM
(A1:B5), proceed as follows:
Choose Tools - Options - Spreadsheet - View.
Under Display, mark the Formulas check box. Click OK.
If you want to export the calculation results instead of the formulas, do not
mark Formulas.
3. Choose File - Save as. You will see the Save as dialog.
4. In the File type field select the format "Text CSV".
5. Enter a name and click Save.
6. From the Export of text files dialog that appears, select the character set and
the field and text delimiters for the data to be exported, and confirm with OK.
Caution: If the numbers use commas as decimal separators or thousands separators, do not select the comma as the field delimiter. If the text contains double
quotation marks, you must select the single quotation mark as separator.
7. If necessary, after you have saved, clear the Formulas check box to see the
calculated results in the table again.
AutoFill
You can copy text, values and other cell contents to a spreadsheet with the mouse.
When you copy several values at once, StarOffice forms a logical series out of the
initial values, and if you copy certain text entered in sort lists, the list will be
continued accordingly.
Applying Sort Lists
Sort lists allow you to type one piece of information in a cell, then drag it to fill in a
consecutive list of items.
250
StarOffice™ 7 User's Guide
For example, enter the text "Jan" or "January" in an empty cell. Select the cell and
click the mouse on the lower right corner of the cell border. Then drag the selected
cell a few cells to the right or downwards. When you release the mouse button, the
highlighted cells will be filled with the names of the months.
The predefined series can be found under Tools - Options - Spreadsheet - Sort
Lists. You can also create your own lists tailored to your needs, such as a list of
your company's branch offices. When you use the information in these lists later
(for example, as headings), just enter the first name in the list and expand the entry
by dragging it with your mouse.
Automatically Calculating Series
1. Enter a number in a cell.
2. With the mouse, drag the bottom right corner of the cell downwards.
3. When you release the mouse button, the cells selected in this manner are filled
with numbers. The number you entered is increased by 1 in each case.
If you have selected two or more adjacent cells, that contain different numbers,
and you drag these together, any recognizable arithmetic pattern of the numbers is
continued.
An example: If A1 contains the number 1 and A2 the number 3, then joint copying
of the two cells by dragging downwards causes the series to continue with 5, 7, 9,
11 and so on.
1. First select the range in the table that you want to fill.
2. In the dialog, which you can open by choosing Edit - Fill - Series, select the
type of series. For example, select 2 as the starting value, 2 as the increment and
Growth as the Series type. The result in this case is a list of the powers of 2.
Chapter 4
Creating Spreadsheets With StarOffice Calc
251
You can also automatically fill in series of dates. For example, to insert the first
date of each month of the year as row headers:
1. Enter a date, such as "1/1/03", into a cell (without the quotation marks).
2. Select this cell and the 11 cells below it.
3. Choose Edit - Fill - Series.
4. In the dialog, select Month under Time unit. Click OK.
The first day of each month automatically appears in the selected cells.
Managing Your Stock Portfolio
This template will be of interest to anyone who owns shares. StarOffice Calc portfolio management offers you an overview of your shareholdings, any movements,
buying prices, market values and much more besides. In the following sections,
we explain how you can manage your own portfolio with StarOffice.
You can always find out the current daily stock prices for your shares from newspapers, but they are much more current if you get them online, over the Internet.
StarOffice comes with a template that you can fill with your data. You will find
the StarOffice Calc Stocks Manager file in File - New - Templates and Documents - Finances category.
First open the Stocks Manager template delivered with StarOffice. We will be
working with this document in the following section.
252
StarOffice™ 7 User's Guide
Selecting the Currency
In the Portfolio Currency dialog, in the list box, select the currency you prefer. In
this dialog, specify the currency for your portfolio as well as the stock exchange
used for an Internet update of the values.
To use more than one currency for your portfolio, create a second document
using the template.
Confirm your selection with OK.
Overview
Your portfolio management template consists of three components:
the actual portfolio overview,
the representation of individual movements (transactions),
and the fees charged for each transaction.
In order to work with the stocks manager, you first have to enter a few values in
your portfolio. For the purposes of this description we use the shares from
Airtrans Inc. (ticker number 123456), price $18, 300 shares.
Buying Shares
It is easy to apply this transaction to the portfolio overview using this template.
1. Click the Buying Shares button.
2. Enter the sample values in the boxes for the name of the stock, the ticker
symbol, the quantity and price.
3. Confirm your entries with OK.
A new line is created for this transaction in the portfolio overview where you can
see all the pertinent figures.
A new line is created on the Movements tab.
In your portfolio overview, you can take into account shares with a buying price
of zero (for example, free shares) or shares for the selling price. A separate dialog
alerts you to these shares.
Chapter 4
Creating Spreadsheets With StarOffice Calc
253
Portfolio Overview
The portfolio overview gives you a current overview of all individual positions in
your portfolio.
This tab page contains the following columns:
254
Column Header
Explanation
Name
This column displays the name and/or ticker symbol
for the stock.
Ticker Symbol
This is the unique stock identification code.
Quantity
Current number of shares
Each Purchased at
This contains the average purchase price per share,
taking into account the commission that was paid.
Example: You purchase 10 shares at 10 dollars each
and pay a commission of 20 dollars. The purchase
price of the shares (without commission) is thus 100
dollars (10 shares * 10 dollars). But the price you actually paid for the shares (taking into consideration the
commission) is 120 dollars (10 shares * 10 dollars + 20
dollars). If you divide this figure by the number of
shares purchased, you will find that the price you
paid per share was 12 dollars.
Current Price
Enter the current price of the stock here.
Buying Price
This tells you the total cost for buying the current
holdings, taking into consideration the commission
paid.
Selling Value
In this column you have the possible profit from
selling at the current stock price (market value) less
commissions.
Potential Profit (amount)
This displays the possible profit or loss if sold at the
current market price, taking into account the commission as an amount and the change as a percentage.
Profits Realized
In this column you can see profits already realized
from previous sales and dividends paid.
StarOffice™ 7 User's Guide
With Help Tips turned on, move the mouse pointer over the headers of the sheet.
Brief explanations of the functionality of the headers appear as you move the
mouse over them.
The Current Price column (the entries in this column are in different colors) is the
column where you edit the figures. All other columns are calculated automatically
or are filled in through the input screen.
Today, at the end of a positive fiscal year, you receive a new stock price for
Airtrans Inc. from the Internet. News of the dividend (distributed today), fixed at
$1.15 a share, has caused the stock price to rise to $37.60.
To apply the current stock price, click the cell containing the current price of
Airtrans Inc. and enter the new value. Confirm the entry. After you have
confirmed the entry, all figures associated with this value will be updated. Thus
you have an immediate overview of all information at your finger tips.
Internet Update
The Internet Update makes it even easier to apply the current values. (In our fictitious example, this is not possible. Please try it with shares for a real company).
Click the Internet Update button to update the values in your portfolio. To check
if the values are indeed the most current, position your mouse pointer on the
Current Price field. (The Help Tips must be active.) You will see the date and time
of the last update.
History (Only for US Dollars)
This is where you can see the price changes for specific shares over a certain
period of time.
1. Click the History button to open the dialog in which you specify the share
name, the start date and end date as well as the split.
2. Confirm with OK.
A new chart will be created with your settings.
Chapter 4
Creating Spreadsheets With StarOffice Calc
255
Dividend Payment
To take the dividend into consideration, click the Dividend Payment button.
Select the appropriate entry in the list box (in our example Airtrans Inc.)
In the Dividends/Stocks field, enter $1.15, or in the Total Dividends field enter
$345 (300 shares * $1.15).
Confirm your entries with OK.
The dividend that has been paid is added in the Realized Profits column and is
posted on the Transactions tab in the Dividend Paid column and in Realized
Profit. This is the current page view.
To switch back to the portfolio overview again, click the Sheet tab of the same
name.
Selling Shares
Since Airtrans Inc. has actually made some money, you've decided to sell 100
shares. We have placed a sell order at the current stock price with the brokerage
firm, and will proceed based on the execution of the order.
1. Click the Selling Shares button to accept this transaction into the portfolio
view.
2. Select the appropriate entry in the list box (in our example Airtrans Inc.)
3. The entry screen shows you all the relevant values for Airtrans Inc. as well as
an overview of fees that are payable as a result of these transactions.
4. In the Quantity field, change the setting to 100. The total number of shares of
Airtrans Inc. held in the account is 300, but only 100 shares are to be sold.
5. Confirm your entries with OK.
The profit created by this transaction is added into the Profits Realized column
and is recorded in a newly created line on the Movements tab page.
256
StarOffice™ 7 User's Guide
Stock Split
A stock split is the change from old shares to new shares, whereby the number of
shares usually doubles in a 1 to 2 split and the value gets cut in half. The point of
this is, among other things, to make shares at least appear cheaper.
1. In order to accommodate this action in the overview, click the Stock Split
button.
The Stock Split input mask will appear.
2. Fill out the fields: Name of Stock, Exchange Rate (old->new), Exchange Date.
3. Confirm with OK.
Movements
This gives you an overview of all transactions you have initiated for your account.
This page contains the following columns:
Column Header
Explanation
Name
This column displays the name and/or ticker symbol
for the stock.
Date
Date of the transaction
Quantity
Shares purchased are represented by positive numbers
and shares sold are represented by negative numbers.
Price
Actual buying or selling price
Commission
Costs of buying or selling
%
The current commission for the transaction calculated
as a percentage
Min.
Minimum commission applying to this transaction
Fixed
Fixed costs of this transaction
Paid
Commission actually paid for this transaction
Costs
Summary of costs (number of shares * current price +
fees)
Chapter 4
Creating Spreadsheets With StarOffice Calc
257
Column Header
Explanation
Proceeds
Proceeds realized (number of shares + selling price fees)
Bought
Number of shares purchased
Sold
Number of shares sold
On Hand
The number of shares purchased minus the number of
shares already sold
Costs of On Hand
Proportional costs for purchasing the remaining shares
held.
Proceeds Realized
The sales proceeds after deducting the commission
Dividends paid
The total amount of dividends paid
Profit Made
In this column you can see profits (hopefully) already
realized from previous sales, and dividends paid.
Brokerage Fees
In order to buy or sell stock, you need access to a market (stock exchange) where
the shares are traded. It is customary in the United States to submit your orders
through a brokerage company and pay fees to them. In many other countries,
banks and savings and loans companies are associated with such transactions.
Whether the order is placed through a bank or a brokerage company, you will
invariably pay a brokerage fee for each transaction. This page takes these fees into
account. Here you will find a breakdown of the brokerage fee to pay. Traditionally, this fee has been a percentage of the total value of the transaction, although
flat rate fees are now common in the United States. In our example, the fee is 1% of
the total transaction. Sometimes a minimum commission applies (in our example
$25). Your credit institution or brokerage company can provide you with this
information. Finally, a fixed amount is often charged in addition to other fees (for
example, telephone expenses). All of these fees are taken into consideration when
you calculate the actual return. This allows you to see the actual profit or loss you
have realized at any time, including fees.
258
StarOffice™ 7 User's Guide
Completing the Stocks Document
The document is now completely created and can be saved. In the following
section we use several examples to describe how you can make further adjustments to this sheet.
Protecting Sheets
If you want to prevent the values entered in a sheet from being modified by
another person, you must protect the sheet. To do this, display the Protect Sheet
dialog (Tools - Protect Document - Sheet). Enter a password, then click OK. You
can also protect the entire document. Then it is only possible to open it by entering
the password.
All cells in a newly created spreadsheet document have the "protected"
attribute. You can turn this attribute on and off on the Cell Protection tab page
of the Cell Attributes dialog, which you can open by choosing Format - Cells
or with the Format Cells context menu command.
The "Protected" attribute can be set or removed for each cell individually. In
any case, it does not take effect until you protect the entire sheet and/or the
entire document. You can apply this protection with Tools - Protect Document.
You can set a password for protecting the sheet and the document, but this is
not required. If a password is set, then protection can only be removed later by
entering the correct password. If no password is set, there is still effective
protection against your document being accidentally modified.
Sheet protection prevents modification of the contents of this specific sheet.
Document protection prevents the sheets from being inserted, deleted, resorted
or renamed.
If you have a document with confidential data that you want to protect from
being opened by unauthorized persons, you can protect it with a password.
The password for protection of the entire document is independent of the
Chapter 4
Creating Spreadsheets With StarOffice Calc
259
protection mechanism of cells, sheets and documents described above. To save
a document with a password, choose File - Save As and check the Save with
password box.
Creating a Reference
If you want to insert a value, say the result of your profits, into another sheet or
into another spreadsheet document, you must create a reference. Select the cell
where you want to insert the result and enter "=". Now select the cell that contains
the original result and press Enter. This cell can also be included in another
spreadsheet or in another file. The result is automatically inserted into the reference cell and is also updated if changes are made later.
You can drag the content of a cell to a cell in another document. You can either
choose to transfer a copy of the cell, as it now stands, into the other document or
create a link so that the other document always reflects the current content of the
cell.
Further Information
Protecting Documents
The document created with this template is protected by default. To edit the cells,
you need to disable the protection through Tools - Protect Document - Spreadsheet. You must repeat this step for every protected sheet in the document
including hidden sheets.
Inserting a Note
If you want to write a note to remind you to sell a certain share, select the relevant
cell and choose Insert - Note. A shadowed area appears in the document where
you can enter text. To make this note visible all the time, click in the relevant cell
(cells with notes have a small red dot in the corner, provided "Note Indicator" in
Tools - Options - Spreadsheet - View is marked), open the context menu and
choose Show Note. Otherwise, you only see the note when you move the mouse
pointer on to the cell.
260
StarOffice™ 7 User's Guide
Inserting a Sheet Into Another Document
Select the cell range and copy it to the clipboard (Copy icon on the Function Bar).
Open the document into which you want to insert the sheet (generally a text document) and insert the sheet (Insert command).
Displaying Formulas
To display the references in your spreadsheets, choose Tools - Options - Spreadsheet - View and mark Formulas. The best way to examine an individual formula
is to click the cell containing the formula and then click the AutoPilot: Functions
icon on the Formula Bar.
Using Print Ranges
Print ranges have been used in the sample document to print specifically targeted
cells.
Shift Plan (Duty Roster)
Using a variety of functions in StarOffice, you can produce a shift plan with a
minimum of effort. A shift plan is an extended timetable, combining the schedules
of several employees into a common spreadsheet.
Creating a Shift Plan with a Template
Open a document based on the shift plan template by choosing File - New Templates and Documents. Select Miscellaneous, then Shift Plan. Finally, click
Open and you will see the document.
Chapter 4
Creating Spreadsheets With StarOffice Calc
261
The following explains the document and not the template on which the document is based. If you want to make fundamental changes to the layout, open and
edit the template.
The StarOffice templates often contain protected areas so that you cannot change
them by mistake. If, however, you do want to change a template, you have to
first disable the protection. For spreadsheets, use the menu Tools - Protect Document.
The document consists of three sheets: Overall Plan, Individual Plan and
Personnel. Click the Personnel tab and enter the employee names and initials in
the respective columns.
Next, select the Overall Plan sheet. Enter the employee names in the cells and, if
necessary, change the predefined rows and columns. After the plan is completely
filled out, you can use the special functions of the Individual Plan.
Enter the initials of the employees in the cell to the right of the cell labeled Initials
and press the Enter key. This gives you an overview of the weekly shifts a
particular employee is scheduled to work.
This function can also be used to create a weekly shift plan for each employee.
Inserting a Date Row
The Overall Plan spreadsheet has only one row containing the days of the week.
To insert another row for dates, you need to disable the default sheet protection in
Tools - Protect Document - Spreadsheet. Then, select the cell Early shift and click
Row in the Insert menu. A new blank row appears below the days of the week.
Click the cell below Sunday, type the respective date and press Enter. Select the
cell and move the mouse pointer to the lower right corner of the cell. The mouse
pointer will turn into a cross-hair symbol. Now drag a red selection frame across
the newly inserted row to the column Saturday. As soon as you release the mouse
button, the dates for each day will appear in the selected row.
Applying Colored Shading for Columns
Weekends and holidays are not usually work days; therefore it makes sense to
distinguish these days from the rest. Select the columns Saturday and Sunday,
click the Background Color icon on the Object Bar, and choose the desired color
from the floating toolbar.
262
StarOffice™ 7 User's Guide
Creating Individual Shift Plans
Since every shift plan depends on the nature of the work in question, here we
merely describe how a shift plan might look. You will also see how to incorporate
other useful functions into your shift plan with a minimum of effort.
Open a new spreadsheet (File - New - Spreadsheet).
Enter the names of the employees in a column. Next, insert a row for the time
period (for example, Monday or 04/01/03). You can also insert two rows to
display both types of information.
To create sequences in a spreadsheet (for example, Mon., Tues., Wed.) use the Fill
Series and Sort List functions. Type "Mon" in a cell in the first row and then select
the cell. Move the mouse pointer to the lower right corner (the mouse pointer will
turn into a small cross symbol), and drag down over a range of cells. After you
release the mouse button, the range will be filled with the other days of the week.
You can create your own sort lists under Tools - Options - Spreadsheet - Sort
Lists.
Finally, assign a background color to the cells containing employee names and the
days of the week. You can use a different color to highlight the columns
"Saturday" and "Sunday".
Freezing Columns
Select the column to the right of the employee names by clicking on the column
header, and click Freeze in the Window menu. You can now scroll horizontally,
while the area to the left of the freeze line remains fixed. This enables you to
constantly view the column containing the employee names.
Conditional Formatting
With this function, you can display employee information simply by entering a
letter. This enables you, for example, to instantly find out if a particular employee
is present, sick, or on vacation.
First open the Stylist (click the icon in the Function Bar) and create three Cell
Styles. For the Cell Styles, choose names that correspond to the information you
want to represent. In this case, you could choose: "Sick," "Vacation" and "Present."
Chapter 4
Creating Spreadsheets With StarOffice Calc
263
Click in the Stylist, and open the context menu where you then click the New
command to activate the Cell Style dialog. On the Organize tab, enter the word
"Sick" and assign a background color to the Cell Style by way of the Background
tab page. Click OK and repeat this process for the two remaining Cell Styles.
Now select, with the mouse, the range to which you want the conditional formatting to apply. Choose Format - Conditional Formatting to open the Conditional
Formatting dialog.
For Condition 1 define: Cell value - equals-"s" (s=sick). In the Cell Style list box,
select the Style Sick.
The use of quotation marks is necessary to define conditions!
For Condition 2 define: Cell value - equals-"v" (v=vacation). In the Cell Style list
box, select the Style Vacation.
For Condition 3 define: Cell value - equals-"p" (p=present). In the Cell Style list
box, select the Style Present.
If you now enter a "v" (without quotation marks) in a cell in the previously
selected area and press the Enter or Arrow key, the cell will be displayed in the
defined color.
A maximum of three conditions is possible.
264
StarOffice™ 7 User's Guide
Defining Validity
To avoid invalid entries in the shift plan, you can define a validity condition.
Select the cells to which you want the validity condition to apply, and open the
Validity dialog (in the Data menu). On the Criteria tab, define the acceptable
entry criteria (in this example: Text length, equal and 1) in the appropriate lists
and fields.
Next, click on the Error Alert tab. Select the option Show error message when
invalid values are entered and click Stop in the Action list box. Under Error
message, enter an appropriate text (for example, "Only v (vacation), p (present), or
s (sick) are valid entries.") .
If a user were to now enter more than one letter in the corresponding cell in the
sheet, your defined message will appear: "Only v (vacation), p (present), or s (sick)
are valid entries."
Creating Input Help. In the Validity dialog, you can create your own help function for a previously selected area. Select the Input Help tab and check the box
Show input help when cell is selected. Enter a title in the respective field, and
enter the help text in the field below. This text is then displayed as a Help tip for
the user.
Chapter 4
Creating Spreadsheets With StarOffice Calc
265
Calendar
StarOffice allows you to create your own personal calendar. All you need do is
enter your data and click a few buttons. StarOffice takes care of everything else.
Creating a Calendar with a Template
Choose File - New - Templates and Documents. Select Templates - Miscellaneous and Monthly/Annual Calendar.
Click Open to display the calendar in the work area.
First, specify whether you want to create a calendar for a month or an entire year
and specify that under Calendar.
266
StarOffice™ 7 User's Guide
If you know some important dates in advance, such as birthdays and anniversaries, you can enter these directly into the calendar.
To do this, click Personal Data. Enter a descriptive text in the Event field, and
specify the Month and Day with the buttons.
Keep the text as short as possible, otherwise the full text may not be displayed in
the corresponding cell of the calendar.
Click Insert, and the event will be displayed in the list box. You can now specify
other dates, if you wish. To remove an event, select it and click Delete.
After you have entered all your important dates, click Create to display your
personal calendar.
Chapter 4
Creating Spreadsheets With StarOffice Calc
267
268
StarOffice™ 7 User's Guide
CHAPTER
5
5
Creating Presentations With StarOffice
Impress
Presentations are more than just drawings and graphics. Link several slides to
form a slide show. Animate the objects on your slides and assign special transition
effects between slides. Use the outline view mode to organize your slides in a hierarchical structure.
There are several ways to create a presentation:
You can start with the AutoPilot Presentation.
You can use the templates and sample documents supplied, which you modify
as necessary.
You can also begin with an empty document.
StarOffice Impress provides you with many features for creating your presentations, which are found in StarOffice Draw, too. We suggest that you also read the
chapter on StarOffice Draw starting on page 305 to find out about the complete
capabilities of StarOffice Impress.
StarOffice Impress Features
StarOffice Impress lets you create professional slide shows that can include charts,
drawing objects, text, multimedia and a variety of other items. If you want, you
can even import and modify Microsoft PowerPoint presentations.
For on-screen slide shows, animation, slide transitions and multimedia are a few
of the techniques you can use to make your presentation more exciting.
269
Creating Vector Graphics
Many of the tools for creating vector graphics in StarOffice Draw are available in
StarOffice Impress.
Creating Slides
StarOffice Impress provides you with templates to create professional-looking
slides. You can also assign a number of dynamic effects to your slides, including
animation and transition effects.
Creating Presentations
Several views are available when you design a slide show. For example, the Slide
view displays an overview of your slides in thumbnail form, while the Handout
view contains both the slide and the text you want to distribute to the audience.
StarOffice Impress also lets you rehearse the timing of your slide show.
Publishing Presentations
You can publish your slides on-screen, as handouts, or as HTML documents.
Giving Presentations
StarOffice Impress gives you the choice of running a slide show automatically or
manually.
Toolbars and Windows in StarOffice Impress
270
Zoom floating toolbar
Alignment floating toolbar
Text floating toolbar
Arrange floating toolbar
Rectangles floating toolbar
Insert floating toolbar
Ellipses floating toolbar
Effects window
3D Objects floating toolbar
Presentation window
Curves floating toolbar
Navigator window
Lines floating toolbar
Stylist window
Connectors floating toolbar
Color bar
StarOffice™ 7 User's Guide
Chapter 5
Creating Presentations With StarOffice Impress
271
A Basic Presentation
In this brief step-by-step example, we show you how to create a presentation
document. For more information on the dialogs used, refer to the StarOffice Help.
As with text documents, there are various ways to start creating your presentation:
Open the AutoPilot Presentation by choosing File - AutoPilot - Presentation.
The AutoPilot will start automatically each time you create a new presentation,
although you can switch off the automatic mode on the first page of the
AutoPilot, if desired. The AutoPilot is described in detail in the StarOffice Help.
If you turn off the AutoPilot in Tools - Options - Presentation - General, you
can start with a new, empty document (for example, by choosing File - New Presentation).
Alternatively you can open a new document, modify it, and save under a
different name. The supplied sample documents may be suitable for this
purpose.
Or you can use one of the many templates available in the Templates and
Documents dialog. You can open this dialog by pressing Shift+Ctrl+N.
Creating a Presentation With the AutoPilot
1.
Choose File - New - Presentation.
The AutoPilot Presentation opens automatically. The first page lets you start
with an empty presentation, a template or the last presentation opened. If
you click the From template option, StarOffice Impress collects all existing
presentation templates and displays them in the list box.
2.
For the purposes of this example, select the template "Introducing a New
Product" and click Next.
On page two of the AutoPilot dialog you can choose another Page Style if
you want.
On this page, you can select the presentation medium for your presentation:
Slide, Overhead, Screen or Paper. The dimensions, margins, and orientation
of your presentation will depend on your selection.
3.
To continue following this example, do not change the background or
medium of your presentation. Click Next.
Page three of the AutoPilot deals with the slide transition.
272
StarOffice™ 7 User's Guide
4.
In the first list box select the slide effect "Cross-Fade From Left". Select the
default "Medium" for the speed of change.
5.
Select Automatic as the presentation type. An automatic presentation flips
through the slides at a defined duration until the Escape key is pressed.
6.
Use the Duration of page spin box to determine how long each slide is
shown before the next one appears. Once you have finished your presentation, you can set a different duration for each slide individually.
7.
Use the Duration of pause spin box to determine how long the pause will be
at end of the presentation before it starts again. If the Show Logo check box
is marked, you will have the "Created with StarOffice" logo displayed on the
pause page.
The Default presentation type runs the presentation from beginning to end
using a manual slide transition (for example, a mouse click).
8.
Click Next.
9.
Enter additional text which you want to have appear in your presentation on
page four. Click Next.
On the final page of the AutoPilot you can determine the number of the
slides you want to have in your presentation. You also see the list of names
of all the slides in your presentation. If there are some slides you want to
remove from your presentation, click the page icon with the green check
mark next to the name. The check mark will disappear, which indicates that
that slide will not be included in your presentation. You can reverse this
action by clicking the page icon again.
10. If you click the plus sign in front of a slide, the headings from the first
outline level will be shown.
11. If you check the Create summary check box, the Auto Pilot will create an
additional last slide with a summary of all the titles of the previous slides in
the presentation. Normally this is not necessary, since most templates
already include such a page.
12. Click Create and your presentation will be created.
You can click Create on any of the AutoPilot pages. You don't always have to
go through all the pages of the Auto Pilot.
You can now edit, save, and print or run your presentation, and so on.
To start a presentation on a computer screen, press F9 key or click the Presentation icon on the Main Toolbar.
Chapter 5
Creating Presentations With StarOffice Impress
273
Creating a Simple Presentation Without the
AutoPilot
This section explains, with the help of a simple example, how to create a presentation based on one of the existing templates.
Open a new presentation document based on one of the supplied templates by
choosing File - New - Templates and Documents, or with Shift+Ctrl+N.
In the Templates and Documents dialog that now appears, click the
Templates icon on the left and then double-click "Presentation Backgrounds".
Double-click one of the templates, such as "Note Pad".
You now see a slide in which you can replace the predefined text with text of
your own.
If the document is in Master view mode when you open it, click on the Slide view
mode icon in the lower left corner of the document window. A document is
opened in the view in which it was last saved.
To create a second slide, click the Insert Slide command in the small Presentation window. (If the small Presentation window is not visible, click
the Presentation Box On/Off icon on the Object Bar). In the next dialog,
select a page layout and confirm with OK.
Alternatively you can also click in the area right of the "Slide 1" tab to create a new
slide, without any selection dialog. The new slide has the same layout as the
current slide.
274
1.
You will then see "Slide 2". After pressing OK, click once on the lower
text frame and delete it, for example, with the Delete key.
2.
Click in the text frame at the top and enter a title. Now you are going
to insert a 3D object.
3.
Long-click the 3D Objects icon to open its floating toolbar. Select the
Sphere icon.
4.
Click on the slide below the Live in 3D text, drag open a 3D rectangle,
and then release the mouse button. You now have a 3D sphere.
StarOffice™ 7 User's Guide
5.
Drag the sphere into the center of the slide and enlarge it by dragging
one of the handles in one of the corners.
6.
Assign an interesting color or color gradient to the sphere by way of
the list boxes on the Object Bar. In chapter 3D Globe on page 341, we
describe how to place a bitmap as a pattern on a 3D object, for
example, a world map from the Gallery.
You can now save your presentation by pressing the Ctrl+S shortcut keys and
specifying the name and location for the file.
Switching Presentation Views
To the right, above the vertical scroll bar, there are some icons for switching views
and for starting the presentation.
Drawing View
Outline View
Slide View
Notes View
Handout View
Start Slide Show
Chapter 5
Creating Presentations With StarOffice Impress
275
To the left of the horizontal scroll bar, you see (in the drawing view, notes view
and handout view) the following icons:
Slide View
Master View
Layer View
Navigation
Incorporating Slide Show Effects
In the Slide View mode, you can define transition effects to precede the display of
each slide:
1. Click on the second slide once to select it.
2. On the Object Bar under Transition, select "Automatic" and enter the desired
display time for the first slide, for example 00:01:00. That means that the second
slide will be displayed for one minute.
3. Select a desired effect from the Effects list on the Object Bar.
4. Click the small button to the left underneath the second slide to preview the
selected effects.
5. Save your presentation again using Ctrl+S.
Showing a Presentation
No doubt you would like to take a look at your finished presentation
now. To run it, click the Slide Show icon on the Main Toolbar, and the
presentation will start automatically in default mode, that is to say, in
full-screen mode.
If you click once, the second slide will be displayed (preceded by the defined transition effect). After the last slide, you will see a black slide. End the presentation by
pressing the Escape key (also used to stop the presentation before the end).
276
StarOffice™ 7 User's Guide
Editing a Presentation
Here we show you how to use StarOffice Impress to fine-tune your presentation.
Many of the methods available in StarOffice Draw can also be used in StarOffice
Impress. You can input text and convert it into 3D, turn objects into curves and
polygons, edit connectors and glue points and so on. You can also refer to the
StarOffice Draw chapter.
Changing the Slide Background Fill
You can change the background color or the background fill of the current slide or
all of the slides in your document. For a background fill, you can use hatching, a
gradient, or a bitmap image.
If you want to change the background fill for all of the
slides, click the Master View button in the lower left
corner of the workspace. To change the background
fill of a single slide, click the Slide View button in the
lower left corner of the workspace.
A background fill applied to a single slide overrides the master page background. However, objects on the master page remain visible. In StarOffice
Impress, you can hide the master page objects from the current slide by choosing
Format - Modify Layout, and clearing the Objects on background check box.
To use a color, gradient, or hatching pattern for the slide
background
1. Choose Format - Page, and then click on the Background tab.
2. In the Fill area, do one of the following:
Select Color, and then click a color in the list.
Select Gradient, and then click a gradient style in the list.
Select Hatching, and then click a hatching style in the list.
3. Click OK.
Chapter 5
Creating Presentations With StarOffice Impress
277
To use an image for the slide background
You can display an entire image as a slide background, or you can tile the image to
produce a patterned background.
1. Choose Format – Page, and then click on the Background tab.
2. In the Fill area, select Bitmap, and then click an image in the list.
If you want to use a custom image for the slide background, close the Page Setup
dialog, and then choose Format - Area. Click the Bitmaps tab, and then click
Import. Locate the image you want to import and click Open. When you return
to the Background tab, the image you imported will be in the Bitmap list.
3. Do one of the following:
To display the entire image as the background, clear the Tile check box in
the Position area, and then select AutoFit.
To tile the image on the background, select Tile, and set the Size, Position,
and Offset options for the image.
4. Click OK.
This modification is only valid for the current presentation document.
Applying a Slide Design to a Master Slide
A master slide determines the text formatting style for the title and outline and
the background design for individual slides, or for all of the slides in a presentation. You can change the appearance of a master slide by applying a new slide
design.
To apply a new slide design:
1. Select Format - Styles - Slide Design.
2. Click Load.
3. Under Categories, select a slide design category.
4. Under Templates, select a template with the design that you want to apply. To
preview the template, click More, and then select the Preview box.
278
StarOffice™ 7 User's Guide
5. Click OK.
6. Do one of the following:
To apply the slide design to all of the slides in your presentation, select the
Exchange background page check box, and then click OK.
To apply the slide design to the current slide only, clear the Exchange background page check box, and then click OK.
Presentation Styles
Along with the slide design you can also assign a whole
set of Presentation Styles to your slides. Open the
Stylist to see a list of the pre-defined Styles. You can
modify the existing Styles and you can create new
Styles.
The Styles Outline 1 through Outline 9 enable you to
give the outlined headings and topics on your slides a
uniform look.
1. Open a new, empty presentation with a slide
layout that allows outline levels. The slide layout
called "Title, Text" is suitable for this purpose.
The slide layout you choose determines the number of outline levels. If you
choose a slide layout which does not enable any outline, you will have no access
to outlines.
2.
Activate the outline view mode by choosing menu View - Workspace Outline View or by pressing F12.
Chapter 5
Creating Presentations With StarOffice Impress
279
One way to create a completely new presentation is in the Outline View mode. All
slide titles will appear in a list along with the headings and sub-topics. The hierarchy of the headings as well as the sequence of the slides can be easily modified.
1. If the preview window is not open, choose View - Preview. The Preview
window enables you to view the slide layout, including text, background, and
background objects. You can dock the Preview window at the window border
if you press the Ctrl key and drag the window to the border.
2. In addition, open the Stylist either by choosing Format - Stylist or with the F11
key.
3. The cursor is now blinking next to the small icon for slide 1. Enter the desired
text, for example First Page. This will be the title for slide 1.
4. If you press the Enter key, a small icon for slide 2 appears in the next line of the
Outline view. Enter a title for the second slide, for example, Second Page.
5. Press the Enter key again. You can now enter the text for the subtitle of slide 2
on the next line.
6. Now press the Tab key before you enter any text. By doing that, you ensure
that the text you then enter here will be a subtitle on slide 2.
7. You can also first start entering the text for the subtitle and then press the Tab
key. In a case like this where you have already entered text in the line, you will
see a message which warns you that with this action, you will delete slide 3 and
asks for a confirmation. Confirm it with OK.
280
StarOffice™ 7 User's Guide
8. Continue to enter more subtitles of the first level on page two. By pressing the
Tab key, you move the line down one level and with Shift + Tab one level up.
This enables you to even make a new slide out of a sub-topic.
The levels you create with these steps automatically contain the Presentation
Styles title, outline 1, outline 2, and so forth. These Styles can be modified by
having a new slide design assigned to them, for example, a new font, font size and
font color. You can, of course, edit these designs (for example, with the Stylist's
context menu).
Zooming With the Keypad
You can use the keypad to quickly enlarge or reduce the view on your slide.
To zoom in, press the Plus Sign.
To zoom out, press the Minus Sign.
To fit the page in the current view, press the Multiplication Sign.
To fit the selected object in the current view, press the Division Sign.
Copying Slides From Other Presentations
You can insert slides from another presentation into the current presentation. You
can also copy and paste slides between presentations.
To insert a slide from another presentation:
1. Open a presentation, and choose View - Workspace - Drawing View.
2. Choose Insert - File.
3. Locate the presentation file containing the slide that you want to insert, and
click Insert.
4. Click the plus sign next to the icon for the presentation file, and then select the
slide(s) that you want to insert.
5. Click OK.
Chapter 5
Creating Presentations With StarOffice Impress
281
To copy and paste slides between presentations:
1. Open the presentations that you want to copy and paste between.
2. In the presentation containing the slide(s) that you want to copy, choose View Workspace - Slides View.
3. Select the slide(s), and then choose Edit - Copy.
4. Change to the presentation where you want to paste the slide(s), and then
choose View - Workspace - Drawing View.
5. Select the slide that you want the copied slide to follow, and then choose Edit Paste.
Slide Transitions, Effects and Animation
Use slide transition effects and animation in your presentation to grab the attention of your audience.
Automatic Slide Transition
If you want to show a series of slides, use the slide transition effects to present
them in an interesting way. For example, the current slide can roll out of the
window while the new slides rolls in. This effect is called "roll from left".
The easiest way to assign slide transition effects is in Slide View. Click on the third
icon from the top in the scroll bar on the right of the presentation window or
choose View - Workspace - Slide View.
282
StarOffice™ 7 User's Guide
In the slide view, all slides which have a slide transition effect, have a small
button. Click this button to preview the selected effect.
The Slide Transition window is described in detail in the StarOffice Help.
Effects for Objects
The objects in your slide can have various effects, for example, they can roll into
your presentation from the left side, the text can be slowly drawn onscreen, and so
on.
1. All these effects can be assigned using the Drawing View (View Workspace - Drawing View).
2. Open the Effects window, for example by clicking the Effects icon in
the Main Toolbar.
3. First you must select the object to which you want to apply the effect.
Then open the Effects window and select the desired effect. Click the
Assign icon in the Effects window, or double-click the effect to assign
it.
4. You can also have your object faded in (Effects button) and, additionally, faded out (in the Effects window, on the Extras tab click the
Object Invisible icon) per mouse-click.
The Effects window is described in detail in the StarOffice Help.
Chapter 5
Creating Presentations With StarOffice Impress
283
Selecting Underlying Objects
To select an object that is covered by another object, hold down Alt and click
the object.
To select an object that is covered by several objects, hold down Alt and click
through the objects until you reach the underlying object. To cycle through the
objects in reverse order, hold down Alt+Shift when you click.
To select an object that is covered by another object using the keyboard, press
Tab to cycle through the objects on the slide. To cycle through the objects in
reverse order, press Shift+Tab.
Creating a Custom Slide Show
You can create a custom slide show to meet the needs of your audience using
slides within the current presentation. You can create as many custom slide shows
as you want. StarOffice also allows you to start slide shows from the current slide
as well as hide slides during a slide show.
To create a custom slide show:
1. Choose Slide Show - Custom Slide Shows, and then click New.
2. Enter a name for your slide show in the Name box.
3. Under Existing Slides, select the slides you want to add to your slide show,
and click the >> button. Hold down Shift to select a range of slides, or Ctrl to
select multiple slides.
4. You can change the order of the slides in your custom slide show, by dragging
and dropping the slides under Selected Slides.
284
StarOffice™ 7 User's Guide
To start a custom slide show:
1. Choose Slide Show - Custom Slide Show.
2. Select the show you want to start from the list.
3. Click Start.
To start the selected custom slide show when you click the Slide Show icon on
the Main Toolbar, or when you press F9, select Use Custom Slide Show.
Chapter 5
Creating Presentations With StarOffice Impress
285
Options for Running a Slide Show
To always start a slide show from the current slide:
1. Choose Tools - Options - Presentation - General.
2. In the Start presentation area, select the Always with current page check box.
Do not select this option if you want to run a custom slide show.
To hide a slide:
1. Choose View - Workspace - Slides View, and then select the slide(s) that you
want to hide.
2. Choose Slide Show - Show/Hide Slide.
The name of the hidden slide is highlighted in gray. The slide is not removed
from your document.
To show a hidden slide:
1. Choose View - Workspace - Slides View, and then select the hidden slide(s)
that you want to show.
The name of a hidden slide is highlighted in gray.
2. Choose Slide Show - Show/Hide Slide.
286
StarOffice™ 7 User's Guide
Rehearse Timings of Slide Changes
StarOffice assists you in defining the right rehearse timings for automatic slide
changes.
Prepare the slides, start the show using a special icon, tell your imaginary audience what you want to tell for the first slide, then advance to the next slide and so
on. StarOffice records the display time for each slide, so the next time you play the
show with automatic slide changes, the timing will be as recorded.
To record a show with rehearse timings:
1.
Open a presentation, and switch to Slide View.
2.
Start the show with the Rehearse Timings icon in the Object Bar. You
see the first slide and a timer in the bottom corner.
3.
When it's time to advance to the next slide, click the timer. Continue for
all slides in your presentation.
4.
StarOffice has recorded the display time for each slide. You may edit the
timings in the Object Bar. Save your presentation.
5.
If you want the whole presentation to auto-repeat, open the menu Slide
Show - Slide Show Settings. Click Auto and OK.
Chapter 5
Creating Presentations With StarOffice Impress
287
Exporting, Printing and Presenting
There are many possible ways of outputting finished presentation documents. You
can create presentations as files or print the pages in color, you can have high-resolution transparencies produced or transfer them to other applications and then use
them within those applications.
Printing Presentations
Default printer settings
To set the default printing options for StarOffice Impress, choose Tools Options - Presentation - Print.
Setting printer options for the current presentation
1. Choose File - Print.
2. Click Options, and then select the printer options.
These settings override the default printer options in Tools - Options - Presentation - Print for the current print job only.
288
StarOffice™ 7 User's Guide
Printing a range of slides
1. Choose View - Workspace - Slides View.
2. Hold down Shift, and click the range of slides that you want to print.
3. Choose File - Print.
4. In the Print range area, click Pages.
5. Ensure that the numbers of the selected slides appear in the Pages box, and
then click OK.
In StarOffice, you can print the current document by clicking the Print File
Directly icon in the Function Bar. The document will be printed immediately according to the printer default settings, without a dialog appearing.
To print in StarOffice, choose File - Print or press Ctrl+P. The Print dialog opens.
Use this to set your printing options, for example, whether to print a selected
range of pages, individual pages or all of the pages in the document.
Printing a Slide to Fit a Paper Size
You can reduce the size of a slide when you print, so that the slide can fit on a
printed page.
1. Open the document that you want to print.
2. In Drawing View, choose Format - Page, and then click the Page tab.
3. In Layout settings area, select the Fit object to paper format check box.
4. In the Paper format area, select a Format.
5. Click OK. The slide is resized to fit the printed page, while maintaining the
relative positions of the objects on the slide.
Chapter 5
Creating Presentations With StarOffice Impress
289
Exporting Presentations as Web Pages
When you choose the Web Page export file format, StarOffice Impress automatically starts an AutoPilot to help you produce an attractive HTML presentation. A
number of HTML pages are created that are connected to one another by hyperlinks and in which the graphics are saved as GIF or JPEG images. You can work on
these HTML pages in the text module of StarOffice to give them headings and
additional hyperlinks, for example.
1. Choose File - Export.
2. Select the file format HTML Document (StarOffice Impress).
3. Enter a file name and click Save.
4. This opens the HTML Export AutoPilot. This is described in detail in the
StarOffice Help.
In the HTML Export AutoPilot you can choose a variety of options. For example,
you choose if the presentation is displayed in frames, if graphic buttons are used
for navigation, or if the user can download the original StarOffice Impress presentation.
In addition to the export of default HTML documents and HTML documents with
frames, you can export Impress documents as WebCast and in the automatic mode.
290
StarOffice™ 7 User's Guide
During the WebCast export, scripts for web servers with Perl or ASP support are
generated automatically (examples can be found in {installpath}
\share\config\webcast). This allows a presenter (for example, during a telephone
press conference with accompanying slideshow over the Internet) to change the
slides on the viewers' browsers.
The automatic export also exports the settings for the viewing length of each page
in the presentation. A default HTML presentation is the result, in which the pages
are changed automatically.
The sounds played when changing slides can also be exported. The sound files are
copied in the target directory and played back when a HTML page is loaded.
Exchanging Data Through the Clipboard
Objects in a drawing or presentation document can also be copied to the clipboard
and then inserted elsewhere. The objects are stored as vector graphics on the clipboard using the following procedure:
1.
Select an object in the current document and copy it to the clipboard
with Ctrl+C.
2.
Switch to the application where you want to insert the object.
3.
Insert the contents of the clipboard at the desired location with
Ctrl+V.
Chapter 5
Creating Presentations With StarOffice Impress
291
Business Report
Here we explain how to create a business report for a presentation. In the
following example, we assume that you want to show the presentation on a
computer.
Creating a Business Report in Presentation Form
A template for a business report is provided, which you can fill out with your own
text and data.
1. Choose File - New - Presentation. The Presentation AutoPilot opens.
2. On the first page, select From Template.
3. Select "Presentations" in the list box and then click "Business Report" in the list
of templates.
4. Click Create.
5. Replace the text in the business report with your own text and then save the
file.
You can also print out the presentation or press F9 to run the presentation.
If you want to start from scratch with a completely new document, proceed as
follows:
1. Choose File - New – Presentation.
The Presentation AutoPilot opens.
2. Select Empty presentation and click Create.
The Modify Slide dialog opens where you can define the appearance of the
first slide.
3. Enter a name and select the desired layout, for example, Title slide.
292
StarOffice™ 7 User's Guide
4. The "title slide" opens. Click on the existing text and replace it with your own
text, for example "Energy Software" and "Annual Turnover 2000".
5. To insert another slide, click the area next to the tab at the bottom of the screen.
Assign a name for the new slide and choose a layout (in the context menu of
the slide tab, click Modify Slide).
Do not assign a name like "Slide2." If you later insert other slides or change the
order of the slides, you might become confused. Descriptive names like "Overview" or "Introduction" are more useful.
Insert additional slides, as necessary. The corresponding tabs appear at the
bottom of the screen. Click the tab of the slide you want to edit, for
example, Overview, and then click the Outline View icon above the
vertical scroll bar.
Chapter 5
Creating Presentations With StarOffice Impress
293
Entering Text in the Outline View
To establish an outline, use the Outline View mode. With the icons in the Object
Bar, you can either promote or demote an outline point one level, or move it up or
down in the hierarchy. You can also use icons in the Main Toolbar to determine
which outline levels you want to have displayed. In the Outline view, all slides in
the presentation document are listed hierarchically, and the title of each slide is
preceded by a slide icon.
Enter the desired text and use the icons in the Main Toolbar to structure your
outline. You can add a subsection to a slide by placing the cursor at the start of the
respective line and pressing the Tab key. Use the Shift + Tab key combination to
move the line up one level in the hierarchy. After you have finished editing the
presentation outline, click the Drawing View icon (directly above the Outline View
icon) to return to the drawing view.
Changing the Slide Layout
To change the slide layout, you must be in the Drawing View (the first icon in the
vertical scroll bar). Double-click the tab of the slide you want to modify and select
the desired layout from the pre-defined layouts.
Designing Slides
To design a slide, switch to the Drawing View.
If you want to change the font size and style of the title, for example, select it using
the Selection tool and assign new attributes from the Font and Font Size fields in
the Object Bar.
To apply a uniform background and recurring elements
(company name, subject) to all slides, click the Master
View icon to the left of the horizontal scroll bar. You do
not need to worry about the default texts in the master
view - these texts are not visible on the slides. The only
text visible on the slides is that which you enter yourself.
Using the Text floating toolbar on the Main Toolbar, in
this view you can open a frame for your background text.
Open the Stylist. Then, click the Presentation Styles icon.
Select a background style, and open the Modify dialog
through the context menu. Click the corresponding slide
tab and make your changes. By modifying the Background Style you can assign all slides the same background.
294
StarOffice™ 7 User's Guide
Creating a Slide Show
A few additional steps are necessary before your presentation is complete.
Defining or Changing Slide Order
To change the slide order, click the Slide View icon above the vertical
scroll bar. In this mode, all slides in the presentation document are
displayed in reduced size. Click the slide you want to move and drag it
with the mouse to the desired position. The position where the slide will be
inserted is indicated by a vertical black bar.
Creating Cross-Fade Effects
To apply cross-fade effects, you have to be in the Slide View or Drawing View.
Click on the slide when in the Slide View mode. Set the effect and transition
period that is to apply to the slide transition using the two left list boxes.
When you are in the Drawing View, choose Slide Show - Slide Transition. A
dialog appears in which you can define slide transition effects.
In the Slide Transition dialog, select the option Manual Transition. You can then
switch from one slide to the next in your presentation by clicking the mouse or
pressing the right arrow key.
Starting Presentations
To start a presentation, click the Slide Show icon on the Main Toolbar or
choose Slide Show - Slide Show. The on-screen presentation starts immediately.
Presentation settings can be adjusted under Slide Show - Slide Show Settings.
Chapter 5
Creating Presentations With StarOffice Impress
295
In this dialog, you can determine which slides to include in the presentation. Select
any other desired options, and click OK.
Presenting a Product
Do you need to create an impressive presentation to present a new product? Here
we show you how to do it. We will explain how to achieve a product presentation
using a template.
Creating a Presentation with a Template
1. Choose File - New - Templates and Documents.
2. Select the Templates category and double-click the Presentations folder.
3. Select the "Introducing a New Product" template and click Open.
4. Replace the title placeholder text with your own text. If you want, you can add
graphics to your document by choosing Insert - Graphics.
5. At the bottom of the screen, click the name of the second slide to make it the
active slide and then edit it.
296
StarOffice™ 7 User's Guide
If you have several slides, not all slide tabs may be visible. By clicking the arrow
icons on the horizontal scroll bar, you can "shift" the tabs to view them. You can
also expand the area in which the tabs are displayed. When you position the
mouse pointer on the scroll bar divider, the pointer changes to a double-headed
arrow, and you can move the divider while pressing the mouse button.
6. Edit the remaining slides of your presentation.
Once you have finished creating the presentation, start the presentation by
clicking the Slide Show icon on the Main Toolbar.
Inserting, Deleting and Renaming Slides
To insert a slide, select the slide that you want to insert a new slide after, and then
click the empty space between the tab and the horizontal scroll bar. The new slide
uses the page layout of the previous slide. You can also choose Insert Slide from
the context menu of the slide tab area. In the Insert Slide dialog, you can assign a
name to the new slide and define a layout.
If you want to delete a slide, click the tab at the bottom of the work area to activate
it and open the context menu. Choose Delete Slide. Confirm the subsequent
warning with Yes to delete the slide.
To rename a slide, activate the respective slide by clicking the name on the tab,
then press the Alt key and click the slide name again. The old name will be
selected and can then be overwritten.
Creating and Printing Handouts
If you want to provide handouts to help the audience follow your presentation,
you can use the Handout View mode. Since the handouts contain both the individual slides and space for notes, they can be a very helpful presentation aid.
In the vertical scroll bar, click the Handout View icon. Open the Modify
Slide dialog through the context menu (Slide - Modify Slide) to specify
how many slides are printed on a single sheet of paper.
Chapter 5
Creating Presentations With StarOffice Impress
297
Click OK to create the handouts. To print them, choose File - Print and click
Options to define the print settings.
Organizing and Printing Notes
Enter notes for individual slides in the Notes view. You can access the Notes view
using the Notes icon located at the right of the document window scroll bar.
To print slide notes:
1. Choose File - Print and click Options.
2. In the Printer Options dialog, select Notes in the Contents area and click OK.
3. In the Print dialog, select the slides that you want to print and click OK.
Remember to clear the Notes check box in the Printer Options dialog if you do not
want to include notes in the print out.
The settings in Printer Options apply only to the current document. If you want
specific settings for all presentations, choose Tools - Options - Presentation and
select the Print tab.
Using the Navigator You can move from slide to slide quickly by opening the
Navigator (function key F5). Double-click a slide title to jump to that slide.
298
StarOffice™ 7 User's Guide
Organization Chart
You can use an organization chart to show the organization of your company or
the structure of your homepage.
StarOffice provides a sample document of an organization chart. The Organization Chart can be found in the folder Samples - Presentations. The following
example can be adapted for your daily use.
Creating Company Organization Charts
First open the sample document Company Organization Chart (Choose File New - Templates and Documents, Samples icon, then the Presentations folder).
These flowcharts provide a fairly detailed overview of the structure of a sample
company. You can adapt this structure to match the organization of your own
company.
Chapter 5
Creating Presentations With StarOffice Impress
299
Delete the company name in the document background (switch to master view on
the horizontal scroll bar) and replace it with your own company's name. Change
the sample address at the bottom of the page, as well. Now, click in the various
frames of the organization chart, select the contents and overwrite them with your
own text.
Edit Jump Targets
In the bottom corners are areas for which you can define an interaction. To
edit or view the interaction, click (again in background mode) on the area
while pressing the Alt key and open the context menu where you can
choose the Interaction command.
The Interaction Gallery theme contains additional buttons you can drag to
your pages using the mouse. This way, your slides can contain interactive
objects without additional programming.
You can link your own graphic objects, 3D Objects and object groups with Interaction.
300
StarOffice™ 7 User's Guide
Modifying Object Size
If you want to change the object size, drag a selection frame around the respective
objects.
Instead of using a selection frame, you can also click on the individual objects
and press the Shift key at the same time to make a multiple selection.
After you have selected the objects, open the Position and Size dialog from the
context menu. On the tab page Size in the Size box, you can apply the same size to
all selected objects.
Creating Additional Objects
If you need additional objects, you can copy one and insert it as often as necessary.
Then, position the rectangles in your document and align them with the snap lines.
To display vertical and horizontal snap lines, click on the respective ruler and
drag a snap line from the ruler to the desired position.
Working with Connectors
In addition to the individual frames, connectors are important components of an
organization chart because they help represent the relationships within the organi-
Chapter 5
Creating Presentations With StarOffice Impress
301
zation. StarOffice provides a variety of connector types. Click on the Connectors
icon in the Main Toolbar, and a floating window with the available types appears.
You can link frames and connectors either from "edge to edge" or from "middle to
middle," or a combination of both. These possibilities are described below.
"Edge to Edge" Connectors
Click the desired connector, and then drag it to the first frame. A small symbol is
displayed on every edge of the frame. Put the mouse pointer on one of the
symbols (the symbol will be given a dashed-line border). Press the mouse button
and drag the connector to the desired frame. As soon as the mouse touches the
frame, symbols appear on each edge here as well. Continue dragging the
connector to the desired symbol - that symbol also receives a small, black border and release the mouse button.
If you move a frame that is connected to another frame, you will notice that the
connector also changes position. The connection line remains the same type, so
that for minor shifting of the frames, the connector usually does not have to be
edited. With major frame movements, however, it is often necessary to reedit,
because the connector may shift to a different position.
To change the position of a connector, click on it. Small points appear at both the
beginning and end of the connector. If you rest the mouse on one of the points, a
small square appears next to the mouse pointer. Press the mouse button and drag
to the frame.
302
StarOffice™ 7 User's Guide
"Middle to Middle" Connectors
If you select a connector from the Connectors floating toolbar and click in the
middle of one of the frames, a black, dashed-line border appears around the entire
frame. Press the mouse button and drag the connector into the middle of another
frame, which also receives a black border, and release the mouse button.
Editing Connectors
To change the properties of a connector, select it and click Connector in the
context menu to open the Connector dialog.
Choose the desired connector type from the list box. The Standard Connector is
the default. You can also modify the line skew and the line spacing in this dialog.
All changes will be shown in the small Preview window.
To apply a different color to the connector, right-click the connector and open the
Line dialog from the context menu.
Changing Font and Font Size
If you want to change the font or font size, use a Style. Changes made to a Style
are applied to all objects using that Style. Click in one of the frames and open the
Stylist. The Graphics Style Object with shadow is selected. In the context menu,
choose Modify to open the Graphics Style: Object with shadow dialog, and click
on the Font tab to define the font type and size. After you click OK, the new
settings are applied to the text in all of the frames.
Chapter 5
Creating Presentations With StarOffice Impress
303
Modifying Colors
To assign a different color to a frame, use the mouse to drag a selection
frame around the respective frame. Select Area in the context menu to
open the dialog of the same name.
Select a color on the Object Fill tab. Further design options are available with the
various color schemes in the Gradients tab. Choose one of the existing color gradients, all of which can also be edited and modified.
Further Information
Using a Snap Grid. To work with higher precision, you can use the grid function. To display a grid, select Use Snap Grid under Tools - Options - Presentation - Grid. In addition, you can also select Visible Grid to help you position the
objects more easily.
Editing Glue Points. By default, the connectors dock to the handles in the center
of the object borders. However, using the glue points, you can make the connectors dock to any point of an object. For detailed instructions on glue points, refer
to the StarOffice Help.
304
StarOffice™ 7 User's Guide
CHAPTER
6
6
Creating Drawings With StarOffice
Draw
Using StarOffice Draw, you can create drawings ranging from simple diagrams to
an interactive multi-page document.
You can create custom drawings or graphics in an empty document or work with
the templates and the sample graphics that are provided with StarOffice Draw. To
view the available templates, choose File - New - Templates and Documents. To
view the available graphics, choose Tools - Gallery.
You can draw and save vector graphics in StarOffice Draw. You can also export
these graphics as pixel graphics (bitmaps) or insert pixel graphics into your
drawing.
StarOffice Draw Features
StarOffice Draw lets you create simple and complex drawings and export them in
a number of common image formats. You can also insert tables, charts, formulas
and other items created in StarOffice programs into your drawings.
Vector Graphics
StarOffice Draw creates vector graphics using lines and curves defined by mathematical vectors. Vectors describe lines, ellipses, and polygons according to their
geometry.
305
Creating 3D Objects
You can create simple 3D objects such as cubes, spheres, and cylinders in StarOffice Draw and even modify the light source of the objects.
Grids and Snap Lines
Grids and snap lines provide a visual cue to help you align objects in your
drawing. You can also choose to snap an object to a grid line, snap line or to the
edge of another object.
Connecting Objects to Show Relationships
You can connect objects in StarOffice Draw with special lines called "connectors" to
show the relationship between objects. Connectors attach to glue points on
drawing objects and remain attached when the connected objects are moved.
Connectors are useful for creating organization charts and technical diagrams.
Displaying Dimensions
Technical diagrams often show the dimensions of objects in the drawing. In
StarOffice Draw, you can use dimension lines to calculate and display linear
dimensions.
Gallery
The Gallery contains images, animations, sounds and other items that you can
insert and use in your drawings as well as other StarOffice programs.
Graphic File Formats
StarOffice Draw can export to many common graphic file formats, such as BMP,
GIF, JPG, and PNG.
306
StarOffice™ 7 User's Guide
Toolbars and Windows in StarOffice Draw
Zoom floating toolbar
Effects floating toolbar
Text floating toolbar
Alignment floating toolbar
Rectangles floating toolbar
Arrange floating toolbar
Ellipses floating toolbar
Insert floating toolbar
3D Objects floating toolbar
Navigator window
Curves floating toolbar
Stylist window
Lines floating toolbar
Option bar
Connectors floating toolbar
Color bar
Chapter 6
Creating Drawings With StarOffice Draw
307
Drawing Rectangles and Ellipses,
Entering Text
StarOffice Draw has many functions for creating and editing vector graphics. In
this section, we introduce the most commonly used functions.
Open a new drawing document by choosing File - New - Drawing.
In addition to the blank drawing page, you will see the Main Toolbar on the left
and the Object Bar for drawings at the top of the work area. With the View - Toolbars command, you can also display the Option Bar and the Colors Bar at the
bottom edge of the window.
If you use these instructions to create a presentation document instead of a new
drawing document, you will notice one of the visible differences between StarOffice Impress and StarOffice Draw: The buttons at the top right above the scroll bar
(only in StarOffice Impress) indicate that you are in the drawing view, while the
buttons at the bottom left indicate that you are in the slide view.
The toolbars contain several floating toolbars. When opened, these toolbars
provide additional related icons. The floating toolbars are indicated by small triangles on icons and are opened by long-clicking the corresponding icon until the
floating toolbar appears. Since the toolbar is "floating", you can drag it away from
its original position and position it anywhere else in the work area.
1. Long-click the Rectangle icon to open the floating toolbar and click on
the Rectangle icon. The pointer changes to a cross-hair symbol with a
small square.
2. Draw a rectangle on the slide. It has preset attributes, including a blue
fill and a thin black line as a border. There are eight handles which you
can drag to change the size of the object.
308
StarOffice™ 7 User's Guide
By clicking once on any tool, you are making the tool available for only one
single task. Double-click the icon to allow it to remain active until you choose
another tool.
You can change the defaults, for example, blue as the filling color. Make sure that
no object is selected and choose a different color on the Object Bar as the new
default.
3.
Draw further shapes. Click the Ellipse icon and draw a few ellipses.
You can also draw a few 3D objects, as shown in the illustration.
4.
Click each of the objects and modify the fill color, line color, and the
line width using the list boxes and icons on the Object Bar.
Chapter 6
Creating Drawings With StarOffice Draw
309
Rotating Objects
You can rotate an object around its default pivot point (center point) or a pivot
point that you designate.
Select the object you want to rotate. On the Effects floating toolbar in
StarOffice Draw or on the Main toolbar in StarOffice Impress, click the
Rotate icon.
Move the pointer to a corner handle so that the pointer changes to a rotate
symbol. Drag the handle to rotate the object.
To change the pivot point, drag the small circle in the center of the object to a new
location.
To skew the object vertically or horizontally, drag one of the side handles.
Arranging and Aligning Objects
Arranging Objects
Each object that you place in your document is successively stacked on the preceding object. You can rearrange the stacking order of a selected object by rightclicking and choosing Arrange or by opening the
Arrange floating toolbar.
310
StarOffice™ 7 User's Guide
To arrange objects:
Right-click an object, choose Arrange and one of the following: Bring to Front,
Bring Forward, Send Backward or Send to Back.
To arrange a selected object behind an object:
1. Right-click and choose Arrange - Behind Object. The mouse pointer changes to
a hand.
2. Click the object you want to arrange the selected object behind.
To reverse the stacking order of two objects:
1. Shift-click to select both of the objects.
2. Right-click and choose Arrange - Reverse.
Aligning Objects
The Alignment floating toolbar enables you to
align objects relative to each other. You can also
right-click the objects to access the Alignment
command.
You can align individual objects relative to the page margins.
If you select three or more objects, you can also use the Distribution command
to distribute the vertical and horizontal spacing evenly between the objects.
Chapter 6
Creating Drawings With StarOffice Draw
311
Selected objects are distributed evenly along the horizontal axis (right edge, center,
left edge) or the vertical axis (top edge, center, bottom edge). The two outermost
objects are used as reference points and do not move when the Distribution
command is applied.
Drawing Sectors and Segments
The Ellipse floating toolbar contains tools for drawing ellipses and circles. You can
also draw segments and sectors of circles and ellipses.
To draw a sector of a circle or an ellipse:
1.
Open the Ellipses floating toolbar and click one of the Circle Pie or
Ellipse Pie icons. The mouse pointer changes to a cross hair with a
small icon of a sector.
2.
Position the pointer at the edge of the circle you want to draw and
drag to create the circle.
To create a circle by dragging from the center, press Alt while dragging.
3.
Release the mouse button when the circle has reached the size you
want. A line corresponding to the circle radius appears in the circle.
4.
Position the pointer where you want to place the first boundary of the
sector and click.
As the radius line that follows the pointer is constrained to the circle boundaries,
you can click anywhere in the document.
5.
Position the pointer where you want to place the second boundary of
the sector and click. The completed sector is displayed.
To draw a segment of a circle or ellipse, follow the steps for
creating a sector based on a circle. To draw an arc based on
an ellipse, choose one of the arc icons and follow the same
steps for creating a sector based on a circle.
312
StarOffice™ 7 User's Guide
Adding Text
There are three types of text you can add to a drawing or presentation: Text in a
text frame, text that behaves like a graphic (Fit Text to Frame) and text in a
Callout.
To add text to a drawing or presentation, open the Text floating toolbar on the
Main Toolbar.
For vertical text, you need to enable Asian language support in Tools - Options Language Settings - Languages.
Adding a Text Frame
1.
Click the Text icon and move the mouse pointer to where you want to
enter the text.
2.
Drag a text frame to the size you want in your document.
3.
Type or paste your text in the text frame. If you want, you can format
your text.
To resize, rotate or move the text frame, drag to select the text frame and apply the
changes.
If you want to edit the text, double-click it.
Fitting Text to Frames
1.
Click the Fit Text to Frame icon and move the mouse pointer to where
you want to enter the text.
2.
Drag a frame to the size you want in your document. Type or paste
your text in the text frame. The size of the frame determines the size of
the text.
Resizing the frame also resizes the text.
Chapter 6
Creating Drawings With StarOffice Draw
313
Callouts
1.
Click the Callouts icon and move the mouse pointer to where you
want the Callout to start.
2.
Drag to where you want to add the Callout text.
3.
Press Enter and type or paste your text.
4.
If you want to add an arrow to the Callout, right-click the Callout and
choose Line. Then, choose one of the Arrow styles and click OK. To
change other object properties of the Callout, right-click the Callout
and choose one of the commands.
Creating 3D Text
1. With the Select tool, drag a selection box around the text object you want to
convert to 3D.
2. Right-click and choose Convert - To 3D.
The text object is converted to a 3D text object.
You cannot edit the text in a 3D text object.
To rotate 3D text:
1. Select the 3D object to rotate.
2. Click the 3D object again so that the corner handles appear red or click the
Rotate icon on the on the Effects floating toolbar of the Main Toolbar in
StarOffice Draw or on the Main Toolbar in StarOffice Impress.
3. Move the pointer to a corner handle so that the pointer changes to a rotate
symbol.
4. Drag the handle to rotate the object. Press Shift while dragging to constrain the
rotation to the horizontal or the vertical axis.
To change the pivot point for the rotation, drag the small circle in the center of the
object to a new location.
314
StarOffice™ 7 User's Guide
You can edit the 3D effects applied to the text by clicking the 3D
Controller icon on the Main Toolbar. More information on the 3D Effects
tool is found in the StarOffice Help.
Drawing, Editing and Converting
Curves and Objects
With vector graphics in drawing and presentation documents, you can design
ellipses and rectangles, and also irregularly shaped curves forming open or closed
figures.
Drawing Graphics With the Draw Functions
Open Show Draw Functions on the Main Toolbar.
Show Draw Functions
When you select a function, the relevant icon appears on the Main Toolbar. You
can restart this function by clicking on it. A long-click opens the floating toolbar
from which you can select a different function.
Draw objects can be subsequently edited and modified. Drawing elements created
in this way are vector graphics, which you can scale freely without any loss of
quality. Drag the floating toolbar on to the screen as a separate window if you
want to draw several elements.
To create a rectangle, click the rectangle icon and move your cursor to the place in
the document where you want one corner of the rectangle to be. Press the mouse
button and hold it down while dragging to the opposite corner of the rectangle.
When you release the mouse button, the rectangle is inserted in the document. It is
selected, and you can edit its properties through the context menu.
If you want to open up draw objects from the center instead of dragging from
one corner to the other, hold down the Alt key while dragging. Holding down
the Shift key while dragging limits the created object. For example, instead of a
rectangle with sides of different length, you obtain a square.
Chapter 6
Creating Drawings With StarOffice Draw
315
To scale the objects, first select them by clicking on them with the selection tool.
You then see eight handles around the object. When you drag one of the four
corner handles, the opposite corner remains fixed while the other three corners
move. When you drag one of the side handles, the opposite side remains fixed.
To move draw objects, first select them. To select ,more than one object, press
the Shift key while clicking. Select text objects by clicking exactly on their edge.
While holding down the mouse button, drag the objects to the new location. If
you hold down Shift while dragging, the objects can only be positioned in
places compatible with the page margins and the other objects on the page.
Hold down Ctrl while dragging the draw object to copy the object.
To revert to normal text mode after creating and editing draw objects, click in an
area of the document containing no draw or other objects. If you are in a drawing
view, first exit this by clicking the Select icon.
Creating Round Corners
When you insert a rectangle or a callout box using the drawing functions and activate Edit Points, you see a small frame at the upper left corner of the object. The
frame indicates the amount by which the corners are rounded. When the frame is
positioned at the top left corner, no rounding occurs. When the frame is positioned
on the handle centered at the top of the object, the corners are rounded as much as
possible. You adjust the degree of rounding by moving the frame between these
two positions.
If you place the cursor on the box it changes to a hand symbol. You can
now drag the box to change the amount of rounding. An outline shows a
preview of the result.
Drawing Curves
The Curve tool lets you draw a curved line that consists of one or more line
segments. Each Bézier curve segment is defined by two data points
(endpoints) and one or two control points (handles) that you can drag to
adjust the arc of the curve. A control point is connected to a data point by a
control line. Moving a control point pulls the curve towards it, and changes
the shape of a curve.
316
StarOffice™ 7 User's Guide
A Bézier curve has three types of data points:
A symmetrical data point has the same line curvature on either side, and two
control lines that move together as a straight line.
A smooth data point has different line curvatures on either side, and two
control lines that move together as a straight line.
A corner data point has one or two control lines and joins different line
segments.
1.
Open the Curves floating toolbar, and select the Curves tool.
2.
Click where you want the curve to start, and drag a short distance in
the direction you want the curve to go. To create a straight line
segment, hold down Shift while you drag.
3.
Release the mouse.
4.
Move the pointer to where you want the curve segment to end and do
one of the following:
Click to draw the curve segment using the current arc.
Drag in any direction to define an arc for the curve, and then click.
If you want to close the shape and continue drawing the curve,
hold down Alt and click. You can then move your pointer to where
you want the curve to continue and draw a line.
5.
If you want, you can continue to add line segments by clicking and
dragging.
6.
Double-click to finish drawing the line. To create a closed shape,
double-click the starting point of the line.
To connect the endpoints of a line, or two different lines, choose View Toolbars - Option Bar, and then click the Snap to Object Points icon on
the Option Bar. Select a line tool, and drag a line from one endpoint to the
other. The line snaps to each endpoint.
Chapter 6
Creating Drawings With StarOffice Draw
317
Editing Curves
A curved line segment consists of two data points (endpoints) and two control
points (handles). A control line connects a control point to a data point. You can
change the shape of a curve by converting a data point to a different type, or by
dragging the control points to a different location.
You can also modify the properties of the line by selecting the line and choosing
Format - Line.
To view the data points and control points of a curved line, select the line,
and then click the Edit Points icon on the Object Bar. The data points are
represented by squares and the control points by circles. A control point
might overlay a data point.
To adjust a curved line segment:
1. Select a curved line, and then click the Edit Points icon on the Object Bar.
2. Do one of the following:
Drag a data point to resize the line. If a control point overlies the data
point, drag the control point until you can see the data point, and then
drag the data point.
Drag a control point. The curve pulls in the direction that you drag the
control point.
To split a curved line:
You can only split a curved line that has three or more data points.
1. Select a curved line, and then click the Edit Points icon on the Object Bar.
2. Select a data point, and then click the Split Curve icon on the Object Bar.
To create a closed shape:
1. Select a curved line, and then click the Edit Points icon on the Object Bar.
2. On the Object Bar, click the Close Bézier icon.
318
StarOffice™ 7 User's Guide
To convert a data point on a curved line:
1. Select a curved line, and then click the Edit Points icon on the Object Bar.
2. Click the data point you want to convert, and do one of the following:
To convert the data point to a smooth point, click the Smooth Transition
icon on the Object Bar.
To convert the data point to a symmetrical point, click the Symmetric Transition icon on the Object Bar.
To convert the data point to a corner point, click the Corner Point icon on
the Object Bar.
To add a data point:
1. Select a curved line, and then click the Edit Points icon on the Object Bar.
2. On the Object Bar, click the Insert Points icon.
3. Click the line where you want to add the point, and drag a short distance.
If a data point does not have a control point, select the data point, and then click
the Convert to Curve icon on the Object Bar.
To delete a data point:
1. Select a curved line, and then click the Edit Points icon on the Object Bar.
2. Click the point you want to delete.
3. On the Object Bar, click the Delete Points icon.
Chapter 6
Creating Drawings With StarOffice Draw
319
Connecting Lines
When you connect lines, lines are drawn between neigboring endpoints.
To connect lines:
1. Select two or more lines.
2. Right-click and choose Modify - Connect.
To create a closed object, right-click a line and choose Close Object.
You can only use the Close Object command on connected lines, Freeform Lines
and unfilled Curves.
Assembling 3D Objects
You can combine two or more 3D objects into a single object.
320
StarOffice™ 7 User's Guide
To combine 3D objects:
1. Insert a 3D object from the 3D Objects floating toolbar (for example, a cube).
2. Insert a second slightly larger 3D object (for example, a sphere).
3. Select the second 3D object (sphere) and choose Edit - Cut.
4. Double-click the first object (cube) to enter its group.
5. Choose Edit - Paste. Both objects are now part of the same group.If you want,
you can edit the individual objects or change their position within the group.
6. Double-click outside the group to exit the group.
You cannot intersect or subtract 3D objects.
Converting Bitmap Images into Vector Graphics
A vector graphic can be resized without losing the quality of the graphic. In [$officename] Draw and Impress, you can convert a bitmap image into a vector graphic.
1.
Select the bitmap image that you want to convert.
2.
Do one of the following:
3.
In StarOffice Draw, choose Modify - Convert - To Polygon.
In StarOffice Impress, right-click the object, and then choose
Convert - To Polygon.
Set the conversion options for the image, and then click OK. See
Convert to Polygon for a description of the conversion options.
The bitmap is converted into MetaFile format.
Chapter 6
Creating Drawings With StarOffice Draw
321
Converting Text Characters into Drawing Objects
You can convert text characters into curves that you can edit and resize as you
would any drawing object. Once you convert text into a drawing object, you can
no longer edit the content of the text.
To convert text into a drawing object:
1.
Select the text that you want to convert, and do one of the following:
In StarOffice Draw, choose Modify - Convert - To Curve.
In StarOffice Impress, right-click the object, and then choose
Convert - To Curve.
If your text contains more than one character, the converted text
becomes a grouped object. Double-click the group to edit individual
objects. Press Esc when finished.
322
StarOffice™ 7 User's Guide
2.
Now, click the Edit Points icon on the Object Bar. Click the object. You
can see all the Bézier points of the object. On the Object Bar, you can
find various icons for editing, inserting and deleting points.
Converting 2D Objects to Curves, Polygons, and 3D
Objects
You can convert two dimensional (2D) objects to create different shapes. StarOffice
can convert 2D objects to the following object types:
Curved object based on Bézier curves
Polygon object consisting of straight line segments
3D object with shading and a light source
3D rotation object with shading and a light source
To convert an object to a curved shape:
1. Select a 2D object on the slide.
2. Do one of the following:
In StarOffice Draw, choose Modify - Convert - To Curve.
In StarOffice Impress, right-click the object and choose Convert - To
Curve.
Chapter 6
Creating Drawings With StarOffice Draw
323
To modify the shape of the object, click the Edit Points icon on the Object Bar, and
drag the handles of the object (Figure 4). You can also drag the control points of a
handle to modify the shape of the curve (Figures 5 and 6).
To convert a 2D object to a polygon:
1. Select a 2D object on the slide.
2. Do one of the following:
In StarOffice Draw, choose Modify - Convert - To Polygon
In StarOffice Impress, right-click the object and choose Convert - To Polygon.
To modify the shape of the object, click the Edit Points icon on the Object Bar, and
drag the handles of the object.
To convert a 2D object to a 3D object:
1. Select a 2D object on the slide.
2. Do one of the following:
324
In StarOffice Draw, choose Modify - Convert - To 3D
In StarOffice Impress, right-click the object and choose Convert - To 3D
StarOffice™ 7 User's Guide
To modify the shape of the 3D object, click the Edit Points icon on
the Object Bar, and drag the handles of the object. To modify the
properties of the 3D object, choose Format - 3D Effects.
To convert a 2D object to a 3D rotational object:
A 3D rotation object is created by rotating the selected object around its vertical
axis.
1. Select a 2D object on the slide.
2. Do one of the following:
In StarOffice Draw, choose Modify - Convert - To 3D Rotation Object.
In StarOffice Impress, right-click the object and choose Convert - To 3D
Rotation Object
To modify the shape of the 3D object, click the
Edit Points icon on the Object Bar, and drag
the handles of the object. To modify the properties of the 3D object, choose Format - 3D
Effects.
You can rotate the 2D object before converting it to create a more complex shape.
Here we converted only basic objects, simple rectangles. Just imagine how much
you can do when you convert complex objects.
Chapter 6
Creating Drawings With StarOffice Draw
325
For example, drag a graphic object from the Gallery into your document and
convert the graphic object into a 3D object. StarOffice positions the parts contained
in the 3D object in various 3D levels corresponding to their arrangement in the
original graphic. For example, in 3D the stars from the European flag stand out
from the blue background of the flag.
You can convert just about all objects to 3D:
Groups can be converted as long as they contain convertible objects.
Bitmaps will be laid as a texture over a rectangular object of adequate size.
Draw objects with text on them display the text in raised form on their surface
(for example, a rectangle which you have double-clicked and put text on).
Working With Objects
You can select, copy, cut, and paste individual objects in a presentation or drawing
document in much the same way as words in text documents. You can also
perform actions specific to graphic objects. For example, you can duplicate, crossfade or group graphic objects. Any figure placed in the drawing areas is treated as
an object (circles, lines, and so on).
Duplicating Objects
You can create duplicate or multiple copies of an object. The copies can be identical or can differ in size, color, orientation and location.
326
StarOffice™ 7 User's Guide
The following example creates a stack of coins by making multiple copies of a
single ellipse.
1.
Use the Ellipse tool to draw a solid yellow ellipse.
2.
Select the ellipse and choose Edit - Duplicate.
3.
Enter the values shown on the following illustration.
Positive values shift the x-axis to the right and the y-axis down.
5.
Enter a negative value for the Width and Height so that the coins decrease in
size as you go up the stack.
6.
To define a color transition for the coins, select a color in the Start and End
boxes. The Start color is applied to the object that you are duplicating.
7.
Click OK to create the duplicates.
Objects created with the Duplicate command are not grouped.
Chapter 6
Creating Drawings With StarOffice Draw
327
Cross-Fading Two Objects
Cross-fading creates shapes and distributes them by uniform increments between
two drawing objects.
The cross-fading command is only available in StarOffice Draw. You can,
however, copy and paste cross-faded objects into StarOffice Impress.
To cross-fade two objects:
1. Hold down Shift and click each object.
2. Choose Edit - Cross-fading.
3. Enter a value to specify the number of objects between the start and end of the
cross-fade in the Increments box.
4. Click OK.
A group containing the two original objects and the specified number (increments)
of cross-faded objects is displayed.
You can edit the individual objects of a
group by selecting the group and pressing
F3. Press Ctrl+F3 to exit the group editing
mode.
328
StarOffice™ 7 User's Guide
Grouping Objects
You can combine several objects into a group so that they act as a single object.
You can move and transform all objects in a group as a single unit. You can also
change the properties (for example, line size, fill color) of all objects in a group as a
whole or for individual objects in a group. Groups can be temporary or assigned:
Temporary - group only lasts as long as all of the combined objects are selected.
Assigned - group lasts until it is ungrouped through a menu command.
Groups can also be grouped in other groups. Actions applied to a group do not
affect the relative position of the individual objects to each other in the group.
To group objects:
Select the objects you want to group and choose Modify - Group.
For example, you can group all of the objects in a company logo to move and
resize the logo as a single object.
After you have grouped objects, selecting any part of the group selects the entire
group.
Selecting Objects in a Group
You can select single objects in a group by entering the group. Double-click
a group to enter it and click on the object to select it. You can also add or
delete objects to and from a group in this mode. The objects that are not
part of the group are grayed out.
To exit a group, double-click anywhere outside it.
Chapter 6
Creating Drawings With StarOffice Draw
329
Combining Objects and Constructing Shapes
Combined drawing objects act as grouped objects, except that you cannot enter the
group to edit the individual objects.
You can only combine 2D objects.
To combine 2D objects:
1. Select two or more 2D objects.
2. Choose Modify - Combine.
Unlike groups, a combined object takes on the properties of the lowermost object
in the stacking order. You can split apart combined objects, but the original object
properties are lost.
When you combine objects, holes appear where the objects overlap.
In the illustration, the uncombined objects are on the left and the combined objects
on the right.
Constructing Shapes
You can construct shapes by applying the Shapes - Merge, Subtract and Intersect
commands to two or more drawing objects.
Shape commands only work on 2D objects.
Constructed shapes take on the properties of the lowermost object in the stacking
order.
330
StarOffice™ 7 User's Guide
To construct a shape:
1. Select two or more 2D objects.
2. Choose Modify - Shapes and one of the following:
Merge
Subtract
Intersect.
Shape Commands
In the following illustrations, the original objects are on the left and the modified
shapes on the right.
Shapes - Merge
Adds the area of the selected objects to the area of the lowermost object in the
stacking order.
Shapes - Subtract
Subtracts the area of the selected objects from the area of the lowermost object in
the stacking order.
Chapter 6
Creating Drawings With StarOffice Draw
331
Shapes - Intersect
The overlapping area of the selected objects creates the new shape.
The area outside the overlap is removed.
Graphic Objects in Drawings and Presentations
StarOffice Draw and StarOffice Impress use a vector graphic format. You can also
insert pixel graphics or bitmap graphics into your presentations or drawings and
export a document or selections of a document in a pixel graphic format.
Adding Text to Bitmaps
You can add text to a bitmap image and export the result as a graphic.
1.
Click where you want to insert the image.
2.
Choose Insert - Graphics and locate the image you want to insert.
3.
Click Open.
4.
Open the Text floating toolbar on the Main Toolbar and choose the
Fit Text to Frame tool.
5.
Drag a frame around the image. Type or paste your text in the frame.
The size of the frame determines the size of the text.
6.
Format the text the way you want.
The background of the text is automatically transparent.
332
StarOffice™ 7 User's Guide
7.
Drag a selection frame around the image and the text frame.
8.
Choose File - Export and ensure that the Selection check box is
selected.
9.
Select an image format and click Save. If prompted, set the image
properties and click OK.
If you select a bitmap object (for example, an inserted GIF or JEPEG image) in
StarOffice Impress or StarOffice Draw, you will automatically see the Graphics
Object Bar. This bar enables you to modify the color tone, brightness and contrast
of the bitmap object.
You can also change the transparency value of bitmap objects. At a higher transparency value the bitmap object becomes see-through, and you can discern objects
lying behind it. When you export your work into a graphic format, the transparency is only exported if the graphic format supports the transparency.
Inserting, Editing, Saving Bitmaps
Inserting Bitmaps
A bitmap image can be inserted in StarOffice Writer, StarOffice Calc, StarOffice
Draw and StarOffice Impress documents.
1. Choose Insert - Graphics - From File. In StarOffice Draw and StarOffice
Impress choose Insert - Graphics.
2. Select the file. In the File type box you can restrict the selection to certain file
types.
3. Check the Link box if you want a link to the original file.
If the Link box is marked, whenever the document is updated and loaded the
bitmap image is reloaded. The editing steps that you have carried out in the
local copy of the image in the document are re-applied and the image is
displayed.
If the Link box is not marked, you are always working with the copy created
when the graphic was first inserted.
To embed graphics that were first inserted as links, go to Edit - Links and click
the Break Link button.
4. Click Open to insert the image.
Chapter 6
Creating Drawings With StarOffice Draw
333
Editing Bitmaps
When you select the bitmap image, the Object Bar offers you the tools for editing
the image. Only a local copy is edited in the document, even if you have inserted
an image as a link.
The Object Bar may look slightly different depending to the module you are
using. The illustration shows the Object Bar in StarOffice Draw:
A number of filters are located on the Filter floating toolbar, which you can open
with the icon on the far left of the Object Bar:
Some of the filters open a dialog, which you can use to select, for
example, the intensity of the filter.
In StarOffice Draw and StarOffice Image, you can add text and
graphics, select these objects together with the bitmap, and export
the selection as a new bitmap image.
Saving Bitmaps
If you want to save in a format such as GIF, JPEG or TIFF, you must select and
export the bitmap image. This is only possible in StarOffice Draw and StarOffice
Impress.
1. Select the bitmap image. You can also select additional objects, such as text, to
be exported with the image by pressing the shift key while selecting or by
opening a selection frame around all objects.
2. Choose File - Export. The Export dialog opens.
3. In the File format field, select the file format you want, for example GIF or
JPEG.
4. If you only want to export the selected objects, mark the Selection box.
If Selection is not marked, the entire page of the document is exported.
5. Enter a name for the file and click Save.
334
StarOffice™ 7 User's Guide
Working With Colors
On the Object Bar is a list box where you can choose the color for a selected object
from a number of predefined colors. You can choose the color of the border line
independently of the color of the filling.
The Color Bar
You can show the Color Bar on the edge of a drawing or presentation. You can
color the selected object by clicking on a color, or by dragging and dropping a
color from the Color Bar onto an object. Choose View - Toolbars - Color Bar.
The Color Bar displays all predefined colors with their names in the same order as
in the list box of the Object Bar. If you define colors, these will appear at the end of
the Color Bar and the bottom of the list box.
The field at top left of the Color Bar is for the color "Invisible".
Defining Custom Colors
If you want, you can mix a custom color and add it to a color table.
To define a custom color
1. Choose Format - Area and click the Colors tab. A table of the predefined colors
is displayed.
Changes made to the standard color table are permanent and are saved automatically.
2. Click a color in the table that is similar to the one you want to mix. The color
appears in the upper preview box to the right of the table.
3. Select the RGB or CMYK color model in the box below the preview boxes.
Chapter 6
Creating Drawings With StarOffice Draw
335
The RGB color model mixes red, green and blue light to create colors on a
computer screen. In the RGB model, the three color components are additive
and can have values ranging from 0 (black) to 255 (white). The CMYK color
model combines Cyan (C), Magenta (M), Yellow (Y), and blacK (K, also used
for "Key") to create colors for printing. The four colors of the CMYK models are
subtractive and are defined as percentages. Black corresponds to 100 % and
white to 0 %.
4. Enter a numeric value in the boxes next to the color components. The new color
appears in the preview box directly above the color model box.
You can also create a color using a color spectrum. Click the Edit button to open
the Color dialog. Click a color and click OK. Use the Hue, Saturation, and Brightness boxes to adjust your color selection.
5. Do one of the following:
If you want to replace the color in the standard color table that your custom
color is based on, click Modify.
If you want to add your custom color to the standard color table, enter a
name in the Name text box and click Add.
Replacing Colors
You can replace colors in bitmaps with the Eyedropper tool.
Up to four colors can be replaced at once.
You can also use the Transparency option to replace the transparent areas of an
image with a color.
Similarly, you can use the Eyedropper to make a color on your image transparent.
336
StarOffice™ 7 User's Guide
To replace colors with the Eyedropper tool
Ensure that the image you are using is a bitmap (for example, BMP, GIF, JPG, or
PNG) or a metafile (for example, WMF).
1. Choose Tools - Eyedropper.
2. Click the Eyedropper icon and position the mouse pointer over the color you
want to replace in the image. The color appears in the box next to the
eyedropper icon.
3. Click the color in the image. The color appears in the first Source color box and
the check box next to the color is selected.
4. In the Replace with box, select the new color.
This replaces all occurrences of the Source color in the image.
5. If you want to replace another color while the dialog is open, select the check
box in front of Source color in the next row and repeat steps 3 to 5.
6. Click Replace.
If you want to expand or contract the color selection area, increase of decrease the
tolerance of the Eyedropper tool and repeat your selection.
Gradients and Patterns for Objects and
Background
The objects in your drawings and presentations do not have to have uniform
colors. They can also have color gradients, transparency gradients, patterns and
hatching effects. You can also define a color, a gradient or a pattern for a background that is visible in all slides of a presentation.
Chapter 6
Creating Drawings With StarOffice Draw
337
Creating Gradient Fills
A gradient fill is a incremental blend of two different colors or shades of the same
color that you can apply to a drawing object.
To apply a gradient:
1. Select a drawing object.
2. Choose Format - Area and select Gradient as the Fill type.
3. Select a gradient style from the list and click OK.
Creating Custom Gradients
You can define your own gradients, modify existing gradients as well as save and
load a list of gradient files.
You do not have to select an object to define a gradient.
338
StarOffice™ 7 User's Guide
To create a custom gradient:
1.
Choose Format - Area and click the Gradients tab.
2.
Select a gradient from the list to use as the basis for your new gradient and
click Add.
3.
Enter a name for the gradient in the text box and click OK. The name
appears at the end of the gradient list and is selected for editing.
4.
Set the gradient properties and click Modify to save the gradient.
5.
Click OK.
Using Gradients and Transparency
You can adjust the properties of a gradient as well as the transparency of a
drawing object with your mouse.
To adjust the gradient of a drawing object:
1. Select a drawing object with the gradient you want to modify.
2. Open the Effects floating toolbar on the Main toolbar.
3. Click the Gradient icon. A line joining the two color endpoints (small
boxes) of the gradient appears in the gradient fill of the object.
Chapter 6
Creating Drawings With StarOffice Draw
339
Depending on the gradient, you can drag one or both of the endpoints with the
mouse to change where the gradient starts, ends or even the angle of the gradient.
If the Color Bar is visible, you can also drag-and-drop colors onto the endpoints.
To adjust the transparency of an object, select the object and click the
Transparency icon on the Effects floating toolbar. A line joining two transparency endpoints (0% and 100%) appears in the object. Drag the
endpoints to define the transparency gradient.
Organizing the Attribute Tables
The icons Load Gradients List and Save Gradients List open dialogs for opening
and saving gradients. The current gradient list, for instance, might consist of all
gradients which you have defined for a certain project. Save the list, so that you
can reload it later, when you are working on the same project again. The same
procedure applies for loading and saving lists of hatching and bitmaps.
340
StarOffice™ 7 User's Guide
3D Globe
You can create a globe with StarOffice in just a few steps. You can rotate the
finished globe with the mouse.
Creating Texture on a 3D Object
Before we go on, please note: If you only need the globe shown here, and do not
want to learn how to create a similar one yourself with just a few clicks of the
mouse, we have prepared a finished globe for you. Open the Gallery and select the
3D Effects theme, where you will find what you are looking for. Drag the globe
into your document.
To create your own 3D globe, first open an empty drawing document, insert a
sphere and then apply the bitmap worldmap2.wmf from the Gallery as a texture
to the sphere. Then you can adjust the illumination.
1. Open an empty drawing document by choosing File - New - Drawing,
for example.
2. From the Main Toolbar, open the 3D Objects floating toolbar. Select
Sphere on the floating toolbar.
Chapter 6
Creating Drawings With StarOffice Draw
341
3. Drag open a square to create an exact globe. All 3D objects can be
opened in this way. If you prefer to create an oblong shape, press the
Shift key while dragging.
4. Open the Gallery.
5. Click the Maps theme.
6. Click the world map named worldmap2.wmf.
7. Hold down the Shift and Ctrl keys and drag the map of the world onto
the sphere. This lays the map of the world on the sphere as a texture.
8. If the Gallery hides the globe, close it. Alternatively, you can fix the
Gallery window so that it no longer overlaps with the document. At
the edge of the Gallery window click the Stick/Floating icon.
The texture is laid onto the sphere in its default size. Since the map of the world is
not the same size as the sphere, you must change the size.
342
1.
Click the sphere to select it.
2.
Display the context menu for the sphere and choose Area. The Area dialog
appears with the Area tab page.
3.
Select the Bitmap option, and remove the mark in the Tile box. Close the
dialog with OK.
StarOffice™ 7 User's Guide
Now you can see the world map as a texture on the sphere. StarOffice has automatically selected the most appropriate projection method, as you can see if you
rotate the globe.
In Tools - Options - StarOffice - View tab, mark the appropriate box if you want
3D objects to refresh during interaction.
Using Illumination
Now you need to provide illumination for the world globe. Select an overall blue
illumination, for example, so that the oceans will have a blue color, and a yellow
highlight that will shine on the side of the earth facing the sun.
1.
Select the world globe since the illumination preferences you set
always refer to the currently selected object.
2.
Open the 3D Effects window by clicking the 3D Controller icon at the
bottom of the Main Toolbar.
3.
In the 3D Effects window, click the Illumination button. That is where
you can change the default setting of the light source to "blue" and
move it down and to the left. Then click Assign. You can also have a
second light source in "yellow" shine on the earth from the above right.
Chapter 6
Creating Drawings With StarOffice Draw
343
3D Effects: Favorites
This is where you can see a few special effects that you can use on the 3D object. If
you want to save a few interesting effects so that they are available for selection on
this tab, file the appropriate 3D object in the Gallery, more specifically in the 3D
theme folder.
344
StarOffice™ 7 User's Guide
3D Effects: Geometry
In this section, you can control the degree to which the surface is geometrically
calculated and the quality of its display. For example, you can produce interesting
effects by reducing the number of segments in a sphere. You can also set the properties for 3D font here (for example, bevel and depth).
Chapter 6
Creating Drawings With StarOffice Draw
345
3D Effects: Shading
This is where you can specify the setting of the shader (flat, phong or Gouraud) to
be used to display the 3D object. Gouraud provides the best shading, but requires
the most computing time.
You can also specify a shadow for the 3D object here and select the camera
distance and focal length.
346
StarOffice™ 7 User's Guide
3D Effects: Illumination
You can control the illumination of the selected 3D object in a variety of ways. In
addition to the general ambient light, eight additional light sources are available,
all of which you can align, adjust for color, or turn on and off individually.
3D Effects: Textures and Material
With these two sections you control the appearance of the surface of 3D objects.
The numerous possibilities are presented for you in the StarOffice Help.
Chapter 6
Creating Drawings With StarOffice Draw
347
Logo
We have supplied a brief, step-by-step introduction showing you how to use 3D
text and procedures to create a logo.
The Workshop document is located in the Samples - Drawings folder. The
following section describes this sample document.
348
StarOffice™ 7 User's Guide
Designing 3D Objects From Font Characters
Open the Samples/Drawings/Workshop document. Switch to the "Step 1"
page.
Choose File - New - Drawing to create an empty draw document for this exercise.
So that you can see both documents side by side, change the task size of the
new, empty drawing document "Untitled1" and the document "Workshop", so
that you can see them both together on the screen.
Step 1: Create a text box containing a single capital letter. You can format it with a
character set of your choice. Then set the font size to about 400 pt. This font size is
just to let you check: when you convert to 3D the text will take up exactly the
space you have drawn for the text, independent of the font size you selected.
Draw the text box using the Text icon on the floating toolbar of the same name
from the Main Toolbar. Select the letter and then manually enter 400 in the Size
field on the Text Object Bar. You may then select another typeface, such as
bold.
Step 2: Select the text box with the letter and choose Convert - To 3D on the
Modify menu. You can modify the color of the object by selecting Area on the
Chapter 6
Creating Drawings With StarOffice Draw
349
Format menu. Of course it is also possible to assign a gradient or a bitmap graphic
to the object.
Step 3: The 3D object can be modified in a different way. Select the object and then
click the Format/ 3D Effects menu item. The options available include options for
setting the depth of the object and the focal length of the camera. In addition, you
can set the individual illumination and the texture model.
The sample object was given its special shape by adjusting the camera to an
extremely short focal length.
Step 4: Now let us add some handwriting to the logo. Insert a text box with the
name of the company and format as you like. If you want a border around the
handwriting, you will need to convert the text to a polygon. You can do this by
choosing Modify - Convert - To Polygon. Of course, the surface of the newly
created object can also be modified.
For a border around each letter of the company name, convert the text into
polygons. Then you can select a line width greater than 0.00 and a line style not
equal to "transparent" on the Object Bar to make the borders of each letter
visible. You would then assign different colors to the border and to the letters'
area.
Step 5: You can create a draw object as a background for the logo, for example an
ellipse. Choose Modify - Arrange to place the object all the way to the back.
Note that the you can also access the functions through the context menu
instead of menu commands, which makes for less work with the mouse.
Now you have a perfect 3D logo created with StarOffice in only five steps!
350
StarOffice™ 7 User's Guide
Construction Drawing
Here we explain how to produce a construction drawing with StarOffice.
StarOffice includes a sample document for a construction plan. The document
Airplane Engine is found under Samples - Drawings.
Chapter 6
Creating Drawings With StarOffice Draw
351
Creating a Construction Plan
Click the Rectangle icon and drag the floating toolbar into your work area. Then,
select Curves and Lines and Arrows and drag these floating toolbars into your
work area as well. Choose a tool with which to begin, for example, Rectangle, and
use it to drag open an area to represent the first surface. Finally, draw in the
details with the Line tool.
Using Snap Lines
It is advisable to use snap lines to help you position lines and objects more
precisely.
Snap lines are lines which are visible only on the screen and are used for the sole
purpose of precise positioning and alignment. You can create an unlimited
number of horizontal and vertical snap lines.
To display a snap line, click on a ruler and hold down the mouse button to drag it
into your document. To move the snap line, rest the mouse pointer on it until a
double arrow appears. Shift the line by holding down the mouse button and dragging the line to the desired position. If you want to delete a snap line, simply drag
it back onto the ruler. In StarOffice Draw, you can also position snap lines in a
numerically exact way using the Edit Snap Line command in the context menu of
the snap line.
Using Dimension Lines
With StarOffice you can insert dimension lines directly into your drawing.
Drag the snap lines from the ruler into your document and position them
so that there is a snap line over every major line in the drawing. Then, click
the Dimension Line icon on the Lines floating toolbar. The mouse pointer
will turn into a cross and you can drag a dimension line directly from one
side to the other, or, even better, from one snap line to another.
To obtain an absolutely horizontal or vertical dimension line or one at a 45°
angle, press the Shift key while dragging the dimension line.
352
StarOffice™ 7 User's Guide
To edit the look of dimension lines, select them, open the context menu and click
Dimensions. A dialog appears, where you can determine the appearance and
position of the dimension lines.
To increase the space between a dimension line and the measured object, move the
mouse pointer to one of the points on the dimension line. The mouse pointer will
turn into another icon, enabling you to either expand or reduce the space.
Protecting Objects
Click on some objects and try to move or scale them. You will find that this is not
possible for some of the objects. Some objects are protected against accidentally
moving or resizing them.
To protect an object, click and right-click the object, then choose Position and Size
from the context menu. On the Position and Size tab page, set your options in the
Protect area.
There is another way to protect objects. Use multiple layers, and set a layer to
Locked mode. See more about layers in the next section.
Working With Multiple Layers
The next step is to position the details in the motor drawing. It is a good idea to
use the layer function if you want to try out several different variations.
Chapter 6
Creating Drawings With StarOffice Draw
353
You can visualize layers as transparent sheets, one on top of the other, which
together form a complete picture. It is also possible to view individual layers.
To get a better overview, turn on the Layer view, by pressing the symbol
on the bottom left border of the work area. Alternatively, you can also
choose View - Layer (a check mark will appear in front of the command).
To insert a new layer, open the dialog Insert Layer. It can also be opened through
the context menu of the tabs arranged at the bottom of the screen. Enter a unique
name, for example, Sketch1. Repeat this procedure for another level and enter the
name as Sketch2.
Now click the Sketch1 tab and place the details of this level, for example, by dragging the desired clipart from the Gallery into your document.
After you have positioned the details on Sketch1, click the Sketch2 tab and
arrange elements there as well. You will notice that you can see the elements from
Sketch1. To change this, click the Sketch1 tab and call up the context menu and
select Modify Layer. In the Modify Layer dialog, remove the check from the
Visible check box and click OK to view only the Layout level and the Sketch2
level.
All layers are displayed by default. If you only want to view a particular layer,
clear the Visible check box in the Modify Layer dialog on all of the other layers.
After you completed your drawing, you can save and print the document.
354
StarOffice™ 7 User's Guide
CHAPTER
7
7
Advanced Tips for Working With
StarOffice
This section contains instructions on topics of interest to advanced users of StarOffice.
This includes information on the revision marking function (redlining) in StarOffice Writer and StarOffice Calc, working with data sources in StarOffice and
customizing the user interface of StarOffice.
Revision Marking Function
The revision marking function in StarOffice Writer and Calc highlights changes to
documents so that you can see who changed what and when. At any time, you can
choose which changes you want to integrate into the document and which should
stay as revision markings.
Recording and Displaying Changes
When several authors are working on the same text or spreadsheet, the review
function records and displays who made the various changes. On the final edit of
the document, it is then possible to look at each individual change and decide
whether it should be accepted or rejected.
For example: You are an editor and are delivering your latest report. But before
publication the report must be read by the senior editor and the proofreader, and
both will add their changes. The senior editor writes "clarify" after one paragraph
and crosses out another entirely. The proofreader corrects the spelling of your
document.
355
The edited document comes back to you, and you can incorporate or ignore the
suggestions of the two reviewers.
Let's say you also e-mailed a copy of the report to a good friend and colleague
who has done research on a similar topic in the past. You asked for a few suggestions, and the document is now returned by e-mail with your colleague's suggestions.
As all your colleagues and the managers in your company work with StarOffice,
you can produce a final version of the document from the results you get back.
Accepting or Rejecting Changes
When you edit a document in which others have made changes, you can accept or
reject the changes individually or all together.
1. If you have put multiple copies of the document in circulation, first merge these
into one document (see Merging Versions).
2. Open the document and choose Edit - Changes - Accept or Reject. The Accept
or Reject Changes dialog appears.
3. Select a change on the List tab. The change is selected and displayed in the
document and you can now enter your decision with one of the buttons.
If one author has modified another author's change, you will see the changes hierarchically arranged with a plus sign for opening up the hierarchy.
356
StarOffice™ 7 User's Guide
If the list of changes is too long, you can switch to the Filter tab in the dialog and
specify that you only want to see the changes of certain authors, or only the
changes of the last day, or that you want the list to be restricted in some other way.
Color-coded entries display the result of the filter that is set. Entries in black can be
accepted or rejected and match the filter criteria. Entries in blue do not themselves
match the filter criteria, but have subentries that are included by the filter. Gray
entries cannot be accepted or rejected and do not match the filter criterion. Green
entries do match the filter but cannot be accepted or rejected.
Comparing Versions of a Document
If one of the authors has made changes to a document without recording them,
you can compare the changed document to your original document.
1. Open your original document and then choose Edit - Compare Document.
2. A file selection dialog appears. Select the copy of the document and confirm the
dialog.
StarOffice combines both documents into your original document. All text
passages that occur in your document but not in the copy are identified as
having been inserted, and all text passages that are missing in your original
document are identified as deletions.
3. You can now accept the "insertions", in which case the relevant texts stay in
their original form, or you can accept the "deletions", in which case the marked
text contained in the copy is not inserted in your document.
Merging Versions
When a document has been edited by more than one person, it is possible to merge
the edited copies into the original. The only requirement is that the documents
differ only and exclusively in the recorded changes - all other original text must be
identical.
1. Open the original document into which you want to merge all copies.
2. Choose Edit - Changes - Merge Document. A file selection dialog appears.
Chapter 7
Advanced Tips for Working With StarOffice
357
3. Select the copy of the document from the dialog. If there have been no subsequent changes to the original document, the copy is merged into the original.
If changes have been made to the original document, an error dialog appears
that informs you that the merge is unsuccessful.
4. After you merge the documents you will see the recorded changes from the
copy in the original document.
Recording Changes
The review function is available in StarOffice for text documents and spreadsheet
documents. Not all changes are recorded. For example, the changing of a tab stop
from align left to align right is not recorded. However, all usual changes made by
a proofreader are recorded, such as additions, deletions, text alterations, and usual
formatting.
1.
To start recording changes, open the document to be edited and choose Edit Changes and then choose Record.
2.
Now start making your changes. You will note that all new text passages that
you enter are underlined in color, while all text that you delete remains
visible but is crossed out and shown in color.
3.
If you move to a marked change with the mouse pointer, you will see a reference to the type of change, the author, date and time of day for the change in
the Help Tip. If the Extended Tips are also enabled (on the Help menu), you
will also see any available comments on this change.
Changes in a spreadsheet document are highlighted by a border around the cells;
when you point to the cell you can see more detailed information on this change in
the Help Tips.
You can enter a comment on each recorded change by placing the cursor in the
area of the change and then choosing Edit - Changes - Comment. In addition to
Extended Tips, the comment is also displayed in the list in the Accept or Reject
Changes dialog.
To stop recording changes, choose Edit - Changes - Record again. The check mark
is removed and you can now save the document.
358
StarOffice™ 7 User's Guide
In a text document, you can highlight all lines that you have changed with an
additional colored marking. This can be in the form of a red line in the margin, for
example.
To change the settings for tracking changes, choose Tools - Options - Text Document - Changes or on the Tools - Options - Spreadsheet - Changes.
Protecting Records
To protect the changes made in a document during editing, choose Edit - Changes
- Protect Records. To turn off the function or to accept or reject changes it is necessary to enter the correct password first.
1. Choose Protect Records. This opens the Password dialog.
2. Enter a password consisting of at least 5 characters and confirm it. Click OK.
Version Management
The File menu contains a Versions command. The Versions function allows you to
save multiple versions of the same document in the same file.
You can choose to view individual versions of a document, or you can display the
differences between versions with color markings.
In the dialog to open a document, you can select from a combo box which version
of this document you want to open.
Chapter 7
Advanced Tips for Working With StarOffice
359
Data Sources in StarOffice
You can register various types of data sources in StarOffice. To "register a data
source" means to tell StarOffice how to access the data source, which name it
should have within StarOffice, and which tables of the database you want to
access from StarOffice.
To register a data source for viewing or editing in StarOffice, choose Tools - Data
Sources. This command opens the Data Source Administration dialog, which is
described in detail in the StarOffice Help.
To register a data source in StarOffice, click New Data Source in the top left corner
of the dialog. Then choose the type of data source in the Database type combo
box.
You can choose from the following database types (depending on the operating
system):
360
Database type
Meaning
Adabas
A slightly scaled-down version of the well-known relational
database system. Adabas is installed with its own setup
program.
JDBC
Link to databases contacted through a JDBC driver.
ODBC
Link to databases contacted through an ODBC driver.
MySQL
Link to MySQL databases contacted through MyODBC or
Connector/J3.
dBase
dBase files can be edited directly with the driver for direct
access in the file system.
StarOffice™ 7 User's Guide
Database type
Meaning
ADO
(Windows only) Link to databases contacted through the
ADO driver. This driver can access MS Access data files.
Text
You can register text files, such as comma-separated CSV files
(read-only).
Spreadsheet
You can register StarOffice Calc and MS Excel spreadsheets
(read-only).
Address Book
This address book driver allows you to register the system
address book or another address book source (read-only).
Choose View - Data Sources to view and edit the data sources, including
tables and queries.
In the Data Sources view, the left side contains the Data Sources Explorer and the
right side contains the table view.
In the Data Sources Explorer on the left you can open a data source by clicking the
plus sign in front of its name. This opens the subordinate "containers" for links,
queries and tables. As soon as you click a query or table, its contents appear in the
table view on the right.
You can create new tables, queries and links to forms and reports by clicking the
relevant entry in the Data Sources Explorer and right-clicking to open the context
menu.
Registering an Address Book
In StarOffice you can register different data sources. The contents of the data fields
are then available to you for use in various fields and controls. Your system
address book is such a data source.
Chapter 7
Advanced Tips for Working With StarOffice
361
StarOffice templates and AutoPilots use fields for the contents of the address book.
When activated, the general fields in the templates are automatically replaced with
the fields from the data source of your address book.
In order for the replacement to take place, you must tell StarOffice which address
book you use. The dialog asking for this information appears automatically the
first time you activate, for example, a business letter template. You can also call the
dialog by following the steps listed below.
Address Data Source AutoPilot
To call the Address Data Source AutoPilot, choose File - AutoPilot - Address Data
Source. For more information, see section Address Data Source in the StarOffice
Help.
Manual Registration of Existing Address Book
362
1.
Choose File - Templates - Address Book Source. The Templates: Address
Book Assignment dialog appears.
2.
In the Data source combo box, select the system address book or the data
source you want to use as an address book.
StarOffice™ 7 User's Guide
If you have not yet registered the system address book in StarOffice as the
data source, click the Administrate button. This takes you to the Data Source
Administration dialog, in which you can register your address book as a
new data source in StarOffice. You can find more information in the
following section, System Address Book as Data Source.
3.
In the Table combo box, select the database table you want to use as the
address book.
4.
Under Field assignment, match the fields for first name, company, department, and so on to the actual field names used in your address book.
For example, in the field "Tel: Home", select from your address book the field
that applies best, which may be called "Phone (Home)". When finished, close
the dialog with OK.
5.
Now your data source is registered in StarOffice as the address book. If you
now open a template from the Business Correspondence category, StarOffice can automatically insert the correct fields for a form letter.
System Address Book as Data Source
1.
Choose Tools - Data Sources to call the Data Source Administration dialog,
or you can choose File - Templates - Address Book Source and click the
Administrate button.
2.
Click the New Data Source button.
Chapter 7
Advanced Tips for Working With StarOffice
363
3.
Under Database type choose the Addressbook entry.
4.
Click the ... button to call the Data Source dialog.
5.
Select the data source and click OK.
If you selected "LDAP address book", the Data Source Administration
dialog will display a LDAP tab page, where you enter the LDAP server and
its parameters.
364
6.
Go to the Tables tab page. Mark the tables that should be visible in StarOffice.
7.
On the General tab page, enter a name for this data source in the Name
field. Close the dialog by clicking OK.
StarOffice™ 7 User's Guide
Importing and Exporting Data in Text Format
If you want to exchange data with a database that does not have an ODBC link
and does not allow dBase import and export, you can use a common text format.
Importing Data Into StarOffice
To exchange data in a text format use the StarOffice Calc import/export filter.
1. Export the desired data from the source database in a text format. The CSV text
format is recommended. This format separates data fields by using delimiters
such as commas or semi-colons, and separates records by inserting line breaks.
2. Choose File - Open and select "Text CSV" from the File type combo box. Select
the file and click Open.
3. The Text Import dialog appears. Decide which data to include from the text
document.
Once the data is in a StarOffice Calc spreadsheet, you can edit it as needed. You
have two ways of saving the data as a StarOffice data source:
Save the current StarOffice Calc spreadsheet in dBase format in the folder of a
dBase database. To do this, choose File - Save As, then select the File type
"dBase" and the folder of the dBase database.
Select the data range in the StarOffice Calc spreadsheet and drag the range to a
table container in the data source view. The table container is the "Tables" line
(see illustration) in the database explorer. An AutoPilot starts automatically.
Chapter 7
Advanced Tips for Working With StarOffice
365
Exporting in CSV Text Format
You can export the current StarOffice spreadsheet in a text format which can be
read by many other applications.
1. Choose File - Save as.
2. In File type select the filter "Text CSV". Enter a file name and click Save.
3. This opens the dBase Export dialog, in which you can select the character set,
field delimiter and text delimiter. Click OK. A warning informs you that only
the active sheet was saved.
366
StarOffice™ 7 User's Guide
Table Design
This section contains information about how to create a new database table in the
design view.
Open the data source view (F4). Open a data source by clicking the plus sign in
front of the name. You see the tables container, called "Tables". Open the table
container and click a table. Right-click the table name to open the context menu.
Choose New Table Design to create a new table.
In the Design view, you can now create the fields for your table.
Enter new fields in rows from top to bottom. Click the Field Name cell and
enter a field name for each data field.
In the next cell to the right, define the Field Type. When you click in the cell,
you can select a field type in the combo box.
Each field can only accept data corresponding to the specified field type. For
example, it is not possible to enter text in a number field. Memo fields in dBase
III format are references to internally-managed text files which can hold up to
64KB text.
You can enter an optional Description for each field. The text of the description
will appear as a tip on the column headings in the table view.
Chapter 7
Advanced Tips for Working With StarOffice
367
Field Properties
Enter properties for each selected data field. Depending on the database type,
some input facilities may not be available.
In the Default value box, enter the default contents for every new record. This
contents can be edited later.
In the Entry required box, specify whether or not the field may remain empty.
For the Length box, a combo box may be shown that provides the available
choices.
If you want to change the name or change the type of a data field, the table itself
must not be opened for data entry; open the table only in the design view.
Form Design
Any StarOffice document can be expanded into a form. Simply add one or more
form functions.
The Form icon of the Main Toolbar opens a floating toolbar by long
clicking the icon. This floating toolbar contains the basic functions needed
to edit a form. These functions can also be found in the Object Bar if you
select a form element in the document.
If you click a form element while in the editing mode, the Object Bar icons,
Format menu commands, and form context menus offer context-sensitive
editing functions.
In the form design you can include controls, apply properties to them,
define Form properties, and define subforms.
The Form Navigator icon on the Object Bar opens the Form Navigator.
The Open in Design Mode icon allows you to save a form document so
that it always opens in editing mode.
368
StarOffice™ 7 User's Guide
If there is an error when assigning properties to the objects contained in the form
(for example, when assigning a non-existent database table to an object), a corresponding error message appears. This error message may contain a More button.
If you click More, a dialog displaying more information about the current problem
appears.
Create, Use, and Edit Database Reports
The Report AutoPilot guides you through all necessary steps to create reports on
your database tables or queries. The Report AutoPilot offers a sequence of
dialogs, and in accordance to your selections in those dialogs, the report is built
and filled with data.
Create a Report With the AutoPilot
Call the Report AutoPilot with the menu File - AutoPilot - Report.
These are the main steps performed by the Report AutoPilot:
1. Select the database and the table or query
2. Edit the names that are printed for the database fields, if required
3. Choose how to group and sort the database fields
4. Choose a layout from one of the supplied templates
5. The report will be created either as a template or as a static report:
A report template can be re-used any time with the then current data.
A static report is a snapshot of the data at the time of creation of the report.
Use a Report
The report templates can be opened any time from the database explorer:
1. Press F4 to open the data source view.
2. In the data source explorer, click the "+" icon left of a database name to display
the database components.
Chapter 7
Advanced Tips for Working With StarOffice
369
3. Click the "+" icon left of the Links entry to display the links.
4. Double-click one of the report links to open the report as a new StarOffice
Writer document. These links have been added to the Links entry automatically by the Report AutoPilot.
Edit a Report
On the last dialog page of the Report AutoPilot, you can choose to edit the
report template before first use.
Later on, you can edit any report template from its context menu under the
Link entry in the data source view.
Feel free to edit the page styles for the first page and the following pages, the paragraph styles, the number formats, the printed field labels, and more. However,
you should not edit the report's SQL statement, database name, the hidden form
controls, and related information, unless you have a thorough understanding of
the database technology in use.
To edit the column width for a column in the report:
1. Open the report template in edit mode (see the previous section about how to
edit a report template).
2. Click into the main table area, where the data fields' contents will be filled in
later.
3. Open the context menu and choose the Table command.
4. In the next dialog, select the Columns tab page and edit the column width.
Close the dialog with OK.
5. Save the template by clicking the Save Document icon.
370
StarOffice™ 7 User's Guide
Searching Tables and Form Documents
In spreadsheets and documents in which form functions are used, you can
click the Find Record icon on the form bar to open a dialog to find any text
and values.
You can search in one or in all data fields. You can select whether the text must be
at the beginning, end or any location of the data field. You also can use the ? and *
wildcards, as in the Find & Replace dialog. You can find additional information
about the database search function in the StarOffice Help.
Searching With a Form Filter
1.
Open a form.
As an example, open an empty text document and press F4. Open the
bibliography database table biblio in the data source view. While
pressing Shift+Ctrl, drag a few column headers into the document so
that the form fields are created.
2.
Turn off the design mode.
To turn off the design mode, open the Form Functions floating toolbar
and click the Design Mode On/Off icon.
3.
On the Form toolbar, click the Form-based filters icon. The current
document is displayed with its inserted form functions as an empty
edit mask. At the bottom edge you will see the Filter Bar.
4.
Enter the filter conditions into one or several fields. Note that if you
enter filter conditions into several fields, the conditions will be joined
by the Boolean AND.
When formulating filter conditions, various operators and commands are available
to you. Apart from the relational operators, there are SQL-specific commands that
query the content of database fields. If you use these commands in the StarOffice
syntax, StarOffice automatically converts these into the corresponding SQL syntax.
You can also enter the SQL command directly. The following tables give an overview of the operators and commands:
Chapter 7
Advanced Tips for Working With StarOffice
371
Operator
Meaning
Condition is satisfied if...
=
equal to
... the content of the field is identical to the indicated
expression.
The operator = will not be displayed in the query
fields. If you enter a value without any operator, the
operator = will be automatically adopted.
<>
not equal to
... the content of the field does not correspond to the
specified expression.
>
greater than
... the content of the field is greater than the specified
expression.
<
less than
... the content of the field is less than the specified
expression.
>=
greater than or ... the content of the field is greater than or equal to
equal to
the specified expression.
<=
less than or
equal to
... the content of the field is less than or equal to the
specified expression.
StarOffice
command
SQL
command
Meaning
Condition is satisfied if...
IS EMPTY
IS NULL
is null
... The field name is empty. For
Yes/No fields with three states,
this command automatically
queries the undetermined state
(neither Yes nor No).
IS NOT EMPTY IS NOT NULL is not
empty
372
StarOffice™ 7 User's Guide
... the field name is not empty.
StarOffice
command
SQL
command
Meaning
Condition is satisfied if...
LIKE
LIKE
is an
element of
... the data field contains the indicated expression. The (*) placeholder indicates whether the
expression x occurs at the beginning of (x*), at the end of (*x) or
inside the field content (*x*). You
can enter as a placeholder in SQL
queries either the SQL % character
or the familiar (*) file system
placeholder in the StarOffice
interface.
(% placeholder
(placeholder *
for any number for any
number of
of characters
characters
placeholder ?
for exactly one Placeholder _
for exactly one
character)
character)
The * or % placeholder stands for
any number of characters. The
question mark (?) in the StarOffice
interface or the underscore (_) in
SQL queries is used to represent
exactly one character.
NOT LIKE
NOT LIKE
Is not an
element of
BETWEEN x
AND y
BETWEEN x
AND y
falls within ... the field name contains a value
the interval that lies between the two values x
and y.
[x,y]
NOT
BETWEEN x
AND y
NOT
BETWEEN x
AND y
... the field name contains a value
Does not
fall within that does not lie between the two
the interval values x and y.
[x,y]
IN (a; b; c...)
IN (a, b, c...)
contains a,
b, c...
... the field name contains one of
the specified expressions a, b, c,...
Any number of expressions can be
specified, and the result of the
query is determined by an Or link.
The expressions a, b, c... can be
either numbers or characters
NOT IN (a, b,
c...)
does not
contain a,
b, c...
... the field name does not contain
one of the specified expressions a,
b, c,...
Note that the
semicolons are
used as separators in all value
lists!
NOT IN (a; b;
c...)
Chapter 7
... the field name does not contain
the specified expression.
Advanced Tips for Working With StarOffice
373
StarOffice
command
SQL
command
Meaning
Condition is satisfied if...
= TRUE
= TRUE
has the
... the field name has the value
value True True.
= FALSE
= FALSE
has the
value false
... the field name has the value
false.
Examples
='Ms.'
returns field names with the field content "Ms."
LIKE 'g?ve'
returns field names with field content such as "give" and
"gave".
LIKE 'S*'
returns data fields with field contents such as "Sun".
BETWEEN 10 AND 20 returns field names with field content between the
values 10 and 20. (The fields can be either text fields or
number fields).
IN (1; 3; 5; 7)
returns field names with the values 1, 3, 5, 7. If the field
name contains an item number, for example, you can
create a query that returns the item having the specified
number.
NOT IN ('Smith')
returns field names that do not contain "Smith".
More information about wildcards and operators can be found in Query Design.
If you click the Apply filter icon on the Filter Bar, the filter is performed in
the database. You see the Form toolbar and can browse the records.
If you click on the Close button on the Filter Bar, the form is displayed
without a filter.
In the form, click the Apply Filter icon to change to the filtered view.
The filter that has been set can be removed by clicking Remove Filter/Sort
icon.
To connect several filter conditions with Boolean OR, click the Filter navigation icon on the Filter Bar. The Filter navigator window appears.
The filter conditions that have been set appear in the Filter navigator. As soon as a
filter is set, you see a blank filter entry at the bottom of the Filter navigator. You
374
StarOffice™ 7 User's Guide
can select this entry by clicking the word "Or". Once you have selected the blank
filter entry, you can enter additional filter conditions in the form. These conditions
are linked by Boolean OR to the previously defined conditions.
The context menu can be called for each entry in the Filter navigator. You can edit
the filter conditions in this area directly as text. If you wish to check if a field has
content or no content, you can select the filter conditions "empty" (SQL:"Is Null")
or "not empty" (SQL: "Is not Null"). It is also possible to delete the entry by using
the context menu.
You can move filter conditions in the Filter navigator by dragging and dropping,
or use the keys Ctrl+Alt+ArrowUp or Ctrl+Alt+ArrowDown. To copy filter conditions, drag them while holding down the Ctrl key.
Copying and Moving Data Using Dragand-Drop
An often very intuitive way to copy and move data in StarOffice is by dragging
and dropping with the mouse. This normally works within documents and from
one document to another.
In addition, several windows support drag-and-drop; for instance you can drag
graphics to and from the Gallery, drag colors from the Color Bar onto objects, and
you can copy objects from one document to another using the Navigator window.
Chapter 7
Advanced Tips for Working With StarOffice
375
Dragging and Dropping Within a StarOffice
Document
There are many options for moving or copying objects using drag-and-drop. Text
sections, drawing objects, graphics, form functions, hyperlinks, cell ranges, and
many more can be moved or copied with the mouse.
Note that the mouse pointer displays a plus sign when copying and an arrow
when creating a link or hyperlink.
Mouse Pointer
Description
Moving
Copying
Creating a link
If you press Ctrl or Shift+Ctrl while releasing the mouse button, you can control
whether the object is copied, moved, or a link is created.
If you drag objects out of the Navigator, you can specify in the submenu of
the Navigator's Drag Mode icon whether to copy the object, insert it as a
link or insert it as a hyperlink.
You can cancel a drag-and-drop operation in StarOffice at any time by pressing
the Esc key before releasing the mouse button.
376
StarOffice™ 7 User's Guide
Inserting Objects From the Gallery
You can insert an object in a document either as a copy or as a link. A copy of an
object is independent of the original object. Changes to the original object have no
effect on the copy. A link remains dependent on the original object. Changes to the
original object are also reflected in the link.
Inserting an object as a copy
1. Open the Gallery by clicking the Gallery icon on the Function Bar, or by
selecting Tools - Gallery.
2. Select a theme in the left area.
3. Select an object using a single click.
4. Drag the object into the document, or right-click to open the context menu and
select Insert and Copy.
Chapter 7
Advanced Tips for Working With StarOffice
377
Inserting an object as a link
1. Open the Gallery by clicking the Gallery icon on the Function Bar, or by
selecting Tools - Gallery.
2. Select a theme in the left area.
3. Select an object by a single click.
4. Drag the object into the document while pressing the Shift and Ctrl keys, or
right-click to open the context menu and select Insert and Link.
Inserting an object as a background graphic
1. Open the Gallery by clicking the Gallery icon on the Function Bar, or by
selecting Tools - Gallery.
2. Select a theme in the left area.
3. Select an object by a single click.
4. Open the context menu and choose Insert - Background - Page or Paragraph.
Inserting an object as a texture (pattern) for another object
1. Open the Gallery by clicking the Gallery icon on the Function Bar, or by
selecting Tools - Gallery.
2. Select a theme in the left area.
3. Select an object by a single click.
4. Drag the object on to the other object in the document while pressing Ctrl.
378
StarOffice™ 7 User's Guide
Copying Graphics From the Gallery
If you drag a graphic from the Gallery into a text, spreadsheet or presentation
document, the graphic will be inserted there.
If you release the graphic directly on a draw object, please note the following:
If you move the graphic (drag it without pressing any key, in which case no
additional symbol appears next to the mouse pointer), only the attributes are
copied from the graphic and applied to the draw object on which you release
the mouse button.
If you copy the graphic (drag it while holding down the Ctrl key, in which case
a plus sign appears next to the mouse pointer), the graphic will be inserted as
an object.
If you create a hyperlink (drag while holding down Shift and Ctrl, in which
case a linking arrow appears next to the mouse pointer), the drawing object is
replaced by the graphic from the Gallery, but the position and size of the
replaced draw object are retained.
Adding Graphics to the Gallery
You can place a graphic from a document such as an HTML page in the Gallery by
drag-and-drop.
1. Display the Gallery theme to which you want to add the graphic.
2. Position the mouse pointer above the graphic, without clicking.
3. If the mouse pointer changes to a hand symbol, the graphic refers to a hyperlink. In this case, click the graphic while pressing the Alt key to select it without
executing the respective link.
If the mouse pointer does not change to a hand symbol, you can simply click
the graphic to select it.
4. Once the graphic is selected, release the mouse button. Click again on the
graphic image, keeping the mouse button pressed for more than two seconds.
The graphic image is copied to the internal memory.
5. Without releasing the mouse button, drag the graphic into the Gallery.
Chapter 7
Advanced Tips for Working With StarOffice
379
Copying Graphics Between Documents
You can copy a graphic from one document to another by drag-and-drop. If you
plan to publish your document, please observe copyright laws and obtain the
consent of the authors.
1. Open the document in which you want to insert the graphic object.
2. Open the document from which you want to copy the graphic.
3. Click the graphic while pressing the Alt key, to select it without executing any
hyperlinks it may refer to.
4. Keep the mouse button pressed and wait a moment while the object is copied
to an internal memory.
5. Drag the graphic into the other document. If the documents are not visible side
by side, first move the mouse pointer to the button of the target document
while keeping the mouse button pressed. The document in question is then
displayed and you can move the mouse pointer into the document.
6. Release the mouse button as soon as the gray text cursor indicates the position
where you want to insert a copy of the picture.
7. If the graphic is connected with a hyperlink, the hyperlink and not the graphic
is inserted.
Copying Drawing Objects Into Other Documents
In StarOffice it is possible to copy drawing objects between text, spreadsheets and
presentation documents.
1. Select the drawing object or objects.
2. Copy the drawing object to the clipboard, for example, by using Ctrl+C.
3. Switch to the other document and place the cursor where the drawing object is
to be inserted.
4. Insert the drawing object, for example, by using Ctrl+V.
380
StarOffice™ 7 User's Guide
Inserting into a text document
An inserted drawing object is anchored to the
current paragraph. You can change the anchor by
selecting the object and clicking the Change Anchor
icon on the Object Bar. This opens a popup menu
where you can select the anchor type.
Inserting into a spreadsheet
An inserted drawing object is anchored to the current cell. You can change
the anchor between cell and page by selecting the object and clicking the
Change Anchor icon on the Object Bar.
Drag-and-Drop With the Data Source View
A fast way of copying from a data source into a text or spreadsheet document, or
of creating forms based on a data source, is by drag-and-drop.
Copying with Drag-and-Drop
If you want to reverse a drag-and-drop, position the cursor in your document and
choose Edit - Undo.
It is also possible to copy by drag-and-drop from a document into a data source:
A text table or the selected range of a spreadsheet can be dragged using dragand-drop to a table container in the data source explorer.
Plain text can be copied using drag-and-drop from one document to a data
field in the data source view.
Using data in a text document
You can insert a database field in a text document by dragging a field name from
the column header of the data source view into the document. This is especially
useful when designing form letters. Drag the desired fields - home address, form
of address, and so on - into your document.
Chapter 7
Advanced Tips for Working With StarOffice
381
To insert a complete record, select the corresponding header and drag it into the
document. When you release the mouse button, the Insert database columns
dialog appears, in which you can decide whether to use all database fields, and
whether to copy the data into the document as text, a table or fields. All currently
selected records will be inserted.
Applying data to a table document
You can insert one or more records into the current sheet of a spreadsheet by
selecting the rows in the data source view and dragging and dropping them into
the spreadsheet. The data is inserted at the place where you release the mouse
button.
Inserting controls in a text form
When you create a text form linked to a database, you can generate controls by
drag-and-drop from the data source view.
When you drag a database column into the text document, you insert a field. If
you hold down Shift+Ctrl while dragging, a text field is inserted, grouped with an
appropriate label field. The text field already contains all the database information
that you need for the form.
Copying Spreadsheet Areas to Text Documents
1. Open both the text document and the spreadsheet.
2. Select the sheet area you want to copy.
3. Point to the selected area and press the mouse button. Keep the mouse button
pressed for a moment, then drag the area into the text document.
If the documents are not visible next to each other, first drag the mouse pointer
to the destination document button. Continue to hold down the mouse button.
The document is displayed, and you can move the mouse pointer within the
document.
4. Once the cursor is located in the place where you want to insert the sheet area,
release the mouse button. The sheet area is inserted as an OLE object.
382
StarOffice™ 7 User's Guide
5. You can select and edit the OLE object at any time.
6. To edit the OLE object, double-click on it.
Alternatively, select the object and choose Edit - Object - Edit or choose Edit
from the context menu. You edit the object in its own frame within the text
document, but you see the icons and menu commands needed for spreadsheets.
7. Choose Open to open the source document of the OLE object.
Inserting Data From Spreadsheets
Use the clipboard to copy the contents of a single cell. You can also copy a
formula from a cell into the clipboard (for example, from the input line of the
Formula Bar) so that the formula can be inserted into a text.
To copy a cell range into a text document, select the cell range in the sheet and
then use either the clipboard or drag-and-drop to insert the cells into the text
document. You will then find an OLE object in the text document, which you
can edit further.
If you drag cells to the drawing view of a presentation document, the cells will
be inserted there as an OLE object. If you drag cells into the outline view, each
cell will form a line of the outline view. If you just drag the cells you will move
the cells. The cells will only be copied if you press the Shift key when dragging.
When you copy a cell range from StarOffice Calc to the clipboard, the drawing
objects, OLE objects and charts within this range are also copied. They are also
copied when you start a drag-and-drop action. However, the objects will be
inserted only if you drop them within the same document.
If you insert a cell range with an enclosed chart, the chart will keep its link to
the source cell range only if you copied the chart and the source cell range
together.
Inserting Data From Text Documents
You can insert text into other document types, such as spreadsheets and presentations. Note that there is a difference between whether the text is inserted into a text
frame, a spreadsheet cell, or into the outline view of a presentation.
If you copy text to the clipboard, you can paste it with or without text attributes. Use the shortcut keys Ctrl+C to copy and Ctrl+V to paste.
Chapter 7
Advanced Tips for Working With StarOffice
383
To select the format in which the clipboard contents will be pasted, long
click the Paste icon on the Function Bar, or choose Edit - Paste Special,
then select the proper format.
If a text document contains headings formatted with the Heading Paragraph
Style, choose File - Send - Outline to Presentation. A new presentation document is created, which contains the headings as an outline.
If you want to transfer each heading together with its accompanying paragraphs, select the File - Send - AutoAbstract to Presentation command. You
must have formatted the headings with a corresponding Paragraph Style to be
able to see this command.
Copying Text Using Drag-and-Drop
384
If you select text and drag it into a spreadsheet with drag-and-drop, it will be
inserted as text into the cell where you release the mouse.
If you drag text to the drawing view of a presentation, an OLE object is inserted
as a StarOffice plug-in.
If you drag the text to the outline view of a presentation, it will be inserted at
the cursor location.
StarOffice™ 7 User's Guide
Modifying and Customizing the User
Interface of StarOffice
You have a lot of freedom to configure menus, toolbars and keys to suit your preferences. For example, you can change the toolbars for all text documents or only
for the current text document. The same is true for spreadsheets, drawings, and
presentation documents, and for changing the menus and keystrokes.
Configuring StarOffice
You can customize your StarOffice to suit your needs.
You are free to change the items on the menu bar. You can delete items, add
new ones, copy items from one menu to another, rename them, and so on.
The toolbars may be freely configured. You can drag-and-drop icons (in
Windows) while holding down the Alt key.
You can change the shortcut keys as you want.
To change these, choose Tools - Configure to open the Configuration dialog.
Customizing Toolbars
To move a button on a toolbar:
Hold down Alt and drag the button to a new location in the toolbar.
To copy a button to another toolbar:
To copy a toolbar button, hold down Alt and drag the button to a different
toolbar.
Chapter 7
Advanced Tips for Working With StarOffice
385
To delete a button from a toolbar:
To delete a toolbar button, hold down Alt and drag the button off the toolbar.
To insert or delete a separator between buttons on a toolbar:
To insert or delete a dash between two toolbar buttons, hold down Alt and
drag one of the buttons slightly to the left or to the right.
To add a button to a toolbar:
Right-click on a toolbar and choose Visible Buttons and then select the button you
want to display.
You can also edit the list of Visible Buttons.
To add a button to the list of Visible Buttons:
1. Choose Tools - Configure, click on the Toolbars tab, and then click Customize.
2. In the Toolbars box, select the toolbar you want to change.
3. Select a button in the Available buttons box and click Add.
4. If you want, you can rearrange the Buttons in use list by selecting a button
name and clicking Move Up and Move Down.
5. Click OK.
Inserting, Moving and Deleting Icons on Toolbars
We will show you later how you to deal with all the functions possible in StarOffice (including custom macros) to connect a function as an icon in a toolbar.
1. Open a document of the type for which you want to modify the toolbar. For
example, if you want to modify the Text Object Bar for all text documents,
open a text document.
2. Open the context menu of the toolbar and select the Customize command. The
Customize Toolbars dialog appears.
386
StarOffice™ 7 User's Guide
3. Select the desired toolbar from the Toolbars list.
4. Select the desired function category and the function from the Available
buttons list and click Add.
5. If no suitable icon is displayed for this function, click the Icon button and select
an appropriate icon. Confirm with OK.
6. The new icon appears in the Buttons in use list. You can specify whether the
icon is visible on the toolbar by marking the corresponding check box next to
the icon name in the list.
7. If you wish to move this icon to a new position, click the Move Up or Move
Down buttons until the icon is in the desired location.
8. Click OK to apply the changes, or click the Default button to restore the
toolbar to its original configuration.
You can also move the icon to a new position directly on the toolbar by keeping
the Alt key pressed (only under Windows) while dragging it to the desired
location.
If you wish to remove an icon from a toolbar, drag it out of the toolbar while
keeping the Alt key pressed (only under Windows).
If the toolbar needs to be docked with another border, proceed as follows:
1. Hold the Ctrl key down and double-click a gray area of the toolbar. The toolbar
changes to a free window.
2. Drag the toolbar to its new position. If you release the mouse key while holding
down the Ctrl key, and if the toolbar is also over a window border, the toolbar
will dock with the window border.
Saving Configurations With Documents
You can set a global configuration so that it applies to all documents of this type,
or you can connect the configuration to a specific document, which must exist as a
file.
1. Load the document that you want to connect to the configuration, or open any
document of the same type.
Chapter 7
Advanced Tips for Working With StarOffice
387
2. Set the configuration. For example, select the toolbars you want to have visible
or define what is on the toolbars, menus or Status Bar, and so on. All such
configuration options are found under Tools - Configure.
3. Click Save in the dialog Tools - Configure. Another dialog appears in which
you can save the configuration.
4. In the File Type combo box, select <All files>.
5. In the large list box of the Save dialog, select the file you want to connect to the
configuration.
6. Click Save. A prompt appears, asking whether you want to replace the file or
not. This query concerns only the configuration connected to the document, not
the contents of the document.
7. Confirm overwrite.
The current configuration is now connected to the document that you selected in
the Save dialog.
As soon as you load or open this document, the saved configuration becomes
active. The global default configuration is restored when you load or open another
document that does not contain custom configuration information. You can select
manual settings at any time by choosing Tools - Configure and clicking the Reset
button.
Changing Icon Views
You can change the icon view between flat icons and 3D icons.
1. Choose Tools - Options - StarOffice .
2. On the View tab page, unmark the Flat buttons check box.
3. Click OK.
The preceding procedure also applies to the Large buttons option, in which you
can change the icon view between large and small icons.
388
StarOffice™ 7 User's Guide
Changing the Look of the User Interface
If you prefer a different operating system to the one currently used, with StarOffice you can at least change the windows and dialogs to suit your taste:
Choose Tools - Options - StarOffice - View. In the Look & Feel combo box, you
can choose an appearance reminiscent of Macintosh, X Window, or OS/2
windows. The "Standard" setting is the one shown in the illustrations in this
manual. It has the look of a Microsoft Windows application.
Selecting Measurement Units
You can select separate measurement units for StarOffice Writer, StarOffice
Writer/Web, StarOffice Calc, StarOffice Impress and StarOffice Draw documents.
1. Choose Tools - Options.
2. In the left list box, click on the document type for which you want to select the
measurement unit.
Click on Text Document if you want to select the measurement unit for StarOffice Writer.
3. Click on General.
4. On the General tab page, under Settings, there is a combo box for selecting the
measurement unit. Close the dialog with OK.
Switching Object Bars With the Context Menu
The Object Bar is context-dependent. If the cursor, for example, is pointed toward
a text table, the icon for editing the table is automatically prepared. If the cursor
points to a bullet, you will see an Object Bar with icons that are appropriate for
bullets.
If the cursor is in a bullet within a table, you can switch between the possible
Object Bars as follows:
Click on the last icon on the right side of the Object Bar.
Or open the context menu of the Object Bar. You will see a list of the possible
Object Bars where you can click on the desired toolbar.
StarOffice remembers which Object Bar you chose in the respective context and
shows this first the next time.
Chapter 7
Advanced Tips for Working With StarOffice
389
Changing Default Templates
When you open a new document with File - New, a blank document appears
based on a StarOffice template. You can edit, modify, or replace this template so
that the new document contains your customized Styles or other contents.
Modifying Default Templates
First, open either an existing StarOffice template and modify it, or open a new,
empty document and edit it as necessary to create the desired template.
You can define a document template for each StarOffice module. The following
describes how to proceed for text documents.
390
1.
Save the document by choosing File - Templates - Save and saving the
document in the Default category.
2.
Choose File - Templates - Organize.
3.
Double-click Default in the list on the left. You will see the userdefined templates in the directory {installpath}\user\template. Select
the template you have just saved and open the context menu or open
the submenu of the Commands button.
4.
Choose Set As Default Template. The next time you open a new text
document, the new document will be based on the new default
template.
StarOffice™ 7 User's Guide
Resetting Default Templates
To reset the modified text template to the original default template:
1. Choose File - Templates - Organize.
2. Open the context menu and choose Reset default template. In the submenu,
select the document type whose default setting you want to restore. Thereafter,
when you open an empty text document, it will again correspond to the StarOffice default template for text documents.
Using Custom Templates
There are several ways to make your work easier by using your own custom
templates. One of the most important is quick access to the templates. You can
store your templates in different locations in StarOffice. Opening a new document
with one of your templates will then differ accordingly.
Templates in the Template Folder
You can save a new template with File - Templates - Save or by selecting
"Template" file type in any Save dialog. Save the template in the {installpath}/
user/template directory to access through the File - New - From Templates and
Documents dialog. Opening the template applies the template formatting to a new
document.
You may need to update the view of the templates in the dialog before you can see
a newly created template. In this case, choose File - Templates - Organize and in
the submenu of the Commands button, choose Update.
To open the template for editing, choose File - Templates - Edit.
Chapter 7
Advanced Tips for Working With StarOffice
391
Changing the Color of Text
Long-click the Font Color icon to activate a floating toolbar from which you can
choose from a range of colors.
Font Color
The following only applies to StarOffice Writer: If you click the icon with a
short-click while no text is selected, then the mouse pointer changes its
appearance and is displayed as a watering can. Use this watering can
symbol with the mouse key pressed to drag across a text area. This text
area takes the selected color. The function remains active for as long as the
icon is pressed, or until you click without dragging, or until you press the
Escape key.
The following applies to all modules (StarOffice Writer, Calc, Draw, Impress):
Select the text that is to take another color, then click the color you want on the
floating toolbar.
Protecting Content in StarOffice
The following is an overview of the different ways of protecting contents in
StarOffice from being modified, deleted or viewed.
Protecting All Documents When Saving
All documents that are saved in XML format can be saved with a password. Documents that are saved with a password cannot be opened without the password.
The content is secured so that it cannot be read with an external editor. This
applies to content, graphics and OLE objects.
Turning on protection
Choose File - Save As and mark the Save with password check box. Save the document.
Turning off protection
Open the document, entering the correct password.
Choose File - Save As and clear the Save with password check box.
Information entered in File - Properties is not encrypted. This includes the name
of the author, creation date, word and character counts.
392
StarOffice™ 7 User's Guide
Protecting Revision Marking
With every change made in StarOffice Calc and StarOffice Writer, the review function records who made the change. This function can be turned on with protection,
so that it can only be turned off when the correct password is entered. Until then,
all changes will continue to be recorded. Acceptance or rejection of changes is not
possible.
Turning on protection
Choose Edit - Changes - Protect Records. Enter and
confirm a password of at least 5 characters.
Turning off protection
Choose Edit - Changes - Protect Records. Enter the
correct password.
Protecting Cell Ranges in StarOffice Calc
In StarOffice Calc you can protect sheets and the document as a whole. You can
choose whether the cells are protected against accidental changes, whether the
formulas can be viewed, whether the cells are visible or whether the cells can be
printed.
Protection can be provided by means of a password, but it does not have to be. If
you have assigned a password, protection can only be removed once the correct
password has been entered.
Note that the cell protection for cells with the Protected attribute is only effective
when you protect the whole table. In the default condition, every cell has the
Protected attribute. Therefore you must remove the attribute selectively for those
cells where the user may make changes. You then protect the whole table and save
the document.
Turning on protection For cells: Select cell range. Choose Format - Cells - Cell
Protection tab.
For the current sheet: Choose Tools - Protect Document Sheet.
For spreadsheet documents: Choose Tools - Protect
Document - Document.
Enter and confirm a password of at least 5 characters.
Chapter 7
Advanced Tips for Working With StarOffice
393
Turning off protection For the current sheet: Choose Tools - Protect Document Sheet.
For spreadsheet documents: Choose Tools - Protect
Document - Document.
Where a password has been assigned, enter the correct
password.
Protecting Sections in StarOffice Writer
Any section of a StarOffice Writer text document can be protected against changes
with a password.
Turning on protection Select the text. Choose Insert - Section - Section, then
under Write protection mark the Protect and With password check boxes. (If the section already exists: Format Sections.) Enter and confirm a password of at least 5
characters.
Turning off protection Choose Format - Sections - Section and under Write
protection clear the Protect check box. Enter the correct
password.
Protecting Cells in a StarOffice Writer Table
You can protect the contents of individual cells of a StarOffice Writer text table
from changes.
Turning on protection
Place the cursor in a cell or select cells. Choose Format Cell - Protect.
Turning off protection
Place the cursor in the cell or select the cells. First, if
necessary, choose Tools - Options - Text Document Formatting Aids and mark Cursor in protected areas Enable. Then choose Format - Cell - Unprotect.
Select the table in the Navigator, open the context menu
and select Table - Unprotect.
Use Shift+Ctrl+T to remove protection for the entire
current table or all selected tables.
394
StarOffice™ 7 User's Guide
Automatic Protection of Indexes and Tables
Tables of contents and indexes created automatically in a StarOffice Writer text are
automatically protected against accidental changes.
Turning on protection
Place the cursor in the index/table of contents.
From the context menu choose Edit Index/Table. On the
Index/Table tab page, mark Protected against manual
changes.
Turning off protection
Place the cursor in the index. First of all, if necessary,
under Tools - Options - Text Document - Formatting
Aids , mark Cursor in protected areas - Enable.
From the context menu choose Edit Index/Table. On the
Index/Table tab page, unmark Protected against
manual changes.
In the Navigator, select the index, then open the context
menu in the Navigator and select Index - Read-only.
Protecting Frames, Graphics, and OLE Objects
You can protect the content, position and size of inserted graphics. The same
applies to frames (in Writer) and OLE objects.
Turning on protection For example, for graphics inserted in Writer: Choose
Format - Graphics - Options tab. Under Protect, mark
Contents, Position and/or Size.
Turning off protection For example, for graphics inserted in Writer: Choose
Format - Graphics - Options tab. Under Protect, unmark
as appropriate.
Chapter 7
Advanced Tips for Working With StarOffice
395
Protecting Drawing Objects and Form Objects
The draw objects that you insert into your documents with the Draw Functions
floating toolbar can be protected from being accidentally moved or changed in
size. You can do the same with form objects inserted with the Form Functions
floating toolbar.
Turning on protection Choose Format - Position and Size - Position or Size
tab. Mark the Protect check box.
Turning off protection Choose Format - Position and Size - Position or Size
tab. Unmark the Protect check box.
Protect Access to Servers Through WebDAV and FTP
You can save some passwords for the duration of a session, or permanently to a
file protected by a master password. For example, passwords for accessing
WebDAV or FTP servers are stored permanently if you enter a master password
when prompted. Otherwise, they are only stored for the current session.
You must enter the master password to access a file or service that is protected by
a saved password. You only need to enter the master password once during a
session.
396
StarOffice™ 7 User's Guide
Recording a Macro
Information about macro programming in StarOffice is provided in another
section.
Record Macro
The Record Macro icon can be added to the Function Bar by the context menu
command Visible Buttons.
1. Open the document for which you want to record a macro.
2. Click the Record Macro icon or choose the menu command Tools - Macros Record Macro.
You see the small Recording dialog with just one button called Stop
Recording.
3. Perform the actions you want to be recorded in the document.
Press the Escape key to deselect an object, as the macro recorder currently does
not record this action by mouse click.
4. Click Stop Recording.
The Macro dialog appears, in which you can save and run the macro.
If you want to abort the recording without saving a macro, click the Close
button of the Recording dialog.
5. To save the macro, first select the object where you want the macro to be saved
in the Save macro in list box.
6. If you want the macro to be saved into a new library or module, click the New
Library or New Module button and enter a name for the library or module.
7. Enter a name for the new macro in the Macro name text box.
8. Click Save.
Chapter 7
Advanced Tips for Working With StarOffice
397
StarOffice Math Features
This section contains an overview of some of the important functions and capabilities that StarOffice Math offers.
StarOffice Math provides numerous operators, functions and formatting assistants
to help you create formulas. These are all listed in a selection window, in which
you can click the required element with the mouse to insert the object into your
work. There is an exhaustive reference list and numerous samples contained in the
Help.
Creating a Formula
As with charts and images, formulas are created as objects within a document.
Inserting a formula into a document automatically starts StarOffice Math. You can
create, edit and format the formula using a large selection of predefined symbols
and functions.
Typing a Formula Directly
If you are familiar with the StarOffice Math language, you can also type a formula
directly into the document. For example, type this formula into a text document: "a
sup 2 + b sup 2 = c sup 2". Select this text and choose Insert - Object - Formula.
The text will be converted into a formatted formula.
Formulas cannot be calculated in StarOffice Math because it is a formula editor
(for writing and showing formulas) and not a calculation program. Use spreadsheets to calculate formulas, or for simple calculations use the text document
calculation function.
Creating a Formula in the Commands Window
Use the StarOffice Math Commands window to describe and edit formulas. As
you make entries in the Commands window, you see them in the text. To maintain
an overview when creating long and complicated formulas, use the formula cursor
on the Main Toolbar. When this function is activated, the cursor location within
the function in the Commands window is reflected in the text window; the reverse
is also true. If you click a specific location in either one of the windows, you will
see it in the other one.
398
StarOffice™ 7 User's Guide
Individual Symbols
You can create your own symbols and import characters from other fonts. You can
add new symbols to the basic catalog of StarOffice Math symbols, or create your
own special catalogs. Numerous special characters are also available.
Formulas in Context
To make working with formulas easier, use the context menus, which can be called
up with a right mouse click. This applies especially to the Commands window.
This context menu contains all the commands that are found in the Selection
window, and also operators, and so on, which can be inserted into your formula
by mouse-click without having to key them into the Commands window.
Chapter 7
Advanced Tips for Working With StarOffice
399
400
StarOffice™ 7 User's Guide
8
Appendix
Writing Top to Bottom or Right to Left
StarOffice can be used for languages where the writing direction can be different
from the Western style of writing in horizontal lines from left to right:
In some languages text is allowed to be written in vertical columns from top to
bottom
In some languages text is allowed to be written in horizontal lines from right to
left
Both text directions can be used together, also mixed with the Western style, in the
same document.
To enable different text directions, as well as other special features available for
writing in the relevant languages:
1. Choose Tools - Options - Language Settings - Languages.
2. Click the Enabled check box for the required language support and close the
dialog with OK.
Now you will find some additional icons and tab pages in several places.
3. Again open Tools - Options - Language Settings - Languages and select your
preferred Asian or CTL (Complex Text Layout) language in the respective
boxes.
You can only write in Asian or CTL languages if an appropriate font is installed
on your computer. In addition, you need an IME (Input Method Editor) system
program to enter the non-ASCII characters.
401
To enter text in vertical columns open the Draw Functions toolbar from the
Main Toolbar and select the Vertical Text icon.
To enter text from right to left, choose an appropriate font and enter the respective characters. StarOffice will automatically use the direction from right to left.
For more information open the StarOffice Help and enter "Asian" or "CTL" as
search terms.
Error Report Tool
The Error Report Tool starts automatically when a program crash occurs. If the
program enters into an endless loop, so that it does not respond to mouse-clicks or
keypresses, you can also start the Error Report Tool manually.
The Error Report Tool gathers all necessary information that can help the program
developers to improve the code, so that in later versions this error can possibly be
avoided. Please help us to improve the software and send the generated error
report.
Sun Microsystems is committed to respecting your online privacy and recognizes
your need for appropriate protection and management of any personally identifiable information you share with us. See the statement at
http://www.sun.com/privacy/ on your online data privacy at Sun Microsystems.
Starting the Error Report Tool
With most program crashes the Error Report Tool will start automatically.
However, if the program seems to be stuck and the tool does not start automatically, you can start the tool manually:
Go to the {installpath}\program folder and start the crashrep.exe file.
Completing the Report
On the main Error Report Tool dialog, you can enter some additional information
that may help our developers to localize the error. For example, if the error only
appears after a change in your hardware or software environment, or if you
clicked on a button, please include that information.
402
StarOffice™ 7 User's Guide
Sending the Error Report
The Error Report Tool uses the HTTP PUT / SOAP protocol to send the report
data. You may optionally enter some descriptive text that will help us to identify
the context of the program crash. Then click the Send button.
You will not get an answer to your error report. If you need support, please visit
our Support Forum on the Internet.
You may choose to respond to questions that our developers may have about the
reported error. Mark the check box if you will allow us to contact you by e-mail,
should additional information be required. By default this box is not marked, so
you will not get any e-mail from us.
What Data is Sent?
The error report consists of several files. The main file contains information about
the error type, operating system name and version, memory usage, and the
description that you entered. You can click the Show Report button on the main
dialog of the Error Report Tool to view what will get sent in the main file.
In addition, relevant memory contents and stack traces are gathered by some
system standard tools ("dbhhelp.dll" on Windows systems, "pstack" on UNIX
systems). This information will be sent also.
Chapter 8
Appendix
403
Sample Macros Provided
We have provided a number of sample macros to help you in programming
macros but also to serve as useful aids that you can use immediately.
These macros are only available in English.
Calling the Sample Macros
1. Choose Tools - Macros - Macro. The Macro dialog appears.
2. In the Macro from box, double-click Gimmicks. The Gimmicks modules
appear.
3. Select the AutoText module, for example.
4. Click the Run button to run the module.
5. Press Shift+Ctrl+Q to abort a running macro.
Editing the Sample Macros
1. Follow the steps as described under "Calling the Sample Macros", but click the
Edit button instead of the Run button in the last step.
2. The Basic IDE appears. This is where you can view and edit the program code.
The following illustration shows a self-defined program code.
404
StarOffice™ 7 User's Guide
Instructions on how to use the Basic IDE can be found in the StarOffice Help. Call
the StarOffice Help and select the entry "Help about StarOffice Basic" in the top
left list box.
In the Basic IDE editor window, you can position the cursor on any keyword and
press F1 to get a descriptive Help about that keyword.
The Sample Macros
At the time of this writing, you can find the following sample macros in the
Gimmicks module.
AutoText
This macro opens an empty StarOffice Writer document and inserts a table in
which the names of all the AutoTexts are listed.
You can print the document to have a handy list of the available AutoTexts.
Chapter 8
Appendix
405
ChangeAllChars
Use this macro in a text document to replace all text and numbers with the characters "x" and "X". This can be helpful, for example, if you want to use the document
as a template but do not want the original text to be legible.
When you edit this macro, you can define other replacement characters in the
program code.
GetTexts
This macro carries out a search in the current document (text document, spreadsheet, or drawing) and compiles a list of the contents.
This sample helps you learn how to reference objects in the documents.
ReadDir
Use this macro to see how a StarOffice Drawing can be filled with contents and
how the contents of folders are read.
A dialog asks you to specify a folder and then the macro creates a graphic list of all
the files and subdirectories.
Userfields
You can manage several sets of user data with this macro and switch back and
forth between them. This is helpful when more than one person uses the same
StarOffice and each person wants to see his or her own user data in the fields.
406
StarOffice™ 7 User's Guide
Accessibility in StarOffice
The following accessibility features are part of StarOffice:
Support of external devices and applications
Access to all functions by keyboard. The keys that replace the mouse actions
are listed in the StarOffice Help
Improved readability of screen contents
Zooming of on-screen user interface for menus, icons, and documents
The user interface is scalable through your operating system settings. The
default font size for dialogs is 12pt, corresponding to a scale of 100%. You can
also change the font size for dialogs in Tools - Options - StarOffice - View.
The zoom factor of a document can be changed in View - Zoom, or by doubleclicking the zoom factor displayed in the Status Bar.
Please note that accessibility support relies on Sun Microsystems Java technology
for communications with assistive technology tools. This means that the first
program startup may take a few seconds longer, because the Java runtime environment has to be started as well.
Assistive Tools in StarOffice
StarOffice supports some assistive technology tools like screen magnification software, screen readers, and on-screen keyboards. Most of these tools communicate
with StarOffice by means of the the Java(TM) Access Bridge software, that uses the
Java Accessibility API, a part of the Java runtime environment.
Requirements to use assistive tools in StarOffice
Java Runtime Environment (JRE) version 1.4.1_01 and higher, or version
1.4.0_02 with the locale set to "en_us".
Most recent version of the software for your assistive tool
On Windows systems, Java Access Bridge software version 1.0.3 or higher
On UNIX(R) systems, the GNOME 2 desktop environment with the Java Access
Bridge software for GNOME
Chapter 8
Appendix
407
Supported Assistive Tools
On Windows systems, StarOffice directly supports most on-screen keyboard software. Additional support for assistive tools is provided by the Java Access Bridge
software. The following is a list of some assistive tools that use the Java Access
Bridge software to exchange data with StarOffice:
ZoomText Screen Magnifier (version 7.11 or higher)(Windows)
Gnopernicus Screen Reader and Magnifier, using GNOME Assistive Technology Service Provider Interface (at-spi) and Java Accessibility API software
GNOME On Screen Keyboard (GOK), using GNOME at-spi and Java Accessibility API software
Supported Input Devices
StarOffice provides the ability to use alternative input devices for access to all
functions of StarOffice.
Screen magnification software allow users with low vision to work in StarOffice with caret and focus tracking.
On-screen keyboards enable users to perform almost all data input and
commands with a mouse.
Screen readers allow visually impaired users to access StarOffice with text-tospeech and Braille displays.
When accessibility support in StarOffice is enabled, the Java Runtime Environment is loaded, and increases the startup time for StarOffice.
408
StarOffice™ 7 User's Guide
General Shortcut Keys in StarOffice
Using Shortcut Keys
A great deal of your application's functionality can be called up by using shortcut
keys. For example, the Ctrl+O shortcut keys are shown next to the Open entry in
the File menu. If you want to access this function by using the shortcut keys, press
and hold down the key Ctrl and then press the O key. Release both keys after the
dialog appears.
When operating your application, you can choose between using the mouse or the
keyboard for almost all of the operations available.
Calling Menus With Shortcut Keys
Some of the characters shown on the menu bar are underlined. You can access
these menus directly by pressing the underlined character together with the ALT
key. Once the menu is opened, you will again find underlined characters. You can
access these menu items directly by simply pressing the underlined character key.
Using Shortcut Keys to Control Dialogs
There is always one element highlighted in any given dialog - usually shown by a
broken frame. This element, which can be either a button, an option field, an entry
in a list box or a check box, is said to have the focus on it. If the focal point is a
button, pressing Enter runs it as if you had clicked it. A check box is toggled by
pressing the spacebar. If an option field has the focus, use the arrow keys to
change the activated option field in that area. Use the Tab key to go from one
element or area to the next one, use Shift + Tab to go in the reverse direction.
Pressing ESC closes the dialog without saving changes. If you place the focus on a
button, not only will you see the dotted line framing the name of the button, but
also a thicker shadow under the button selected. This indicates that if you exit the
dialog by pressing the Enter key, it is the equivalent of pressing that button itself.
Chapter 8
Appendix
409
Shortcut Keys for Mouse Actions
If you are using drag-and-drop, selecting with the mouse or clicking objects and
names, you can use the keys Shift, Ctrl and occasionally Alt to access additional
functionality. The modified functions available when holding down keys during
drag-and-drop are indicated by the mouse pointer changing form. When selecting
files or other objects, the modifier keys can extend the selection - the functions are
explained where applicable.
Practical Text Input Fields
410
You can open a context menu, which contains some of the most often-used
commands.
Use the shortcut keys Shift+Ctrl+S to open the Special Characters dialog to
insert one or more special characters.
Use Ctrl+A to select the entire text. Use the right or left arrow key to remove
the selection.
Double-click a word to select it.
A triple-click selects the entire line.
Use Ctrl+Del to delete everything from the cursor position to the end of the
word.
By using Ctrl and right or left arrow key, the cursor will jump from word to
word; if you also hold down the Shift key, one word after the other is selected.
INSRT is used to switch between the insert mode and the overwrite mode and
back again.
Drag-and-drop can be used within and outside of a text box.
The Ctrl+Z shortcut keys are used to undo modifications one step at a time; the
text will then have the status it had before the first change.
StarOffice has a very useful AutoComplete function which activates itself in
some text and list boxes. For example, enter c:\a into the URL field and the
AutoComplete function displays the first file or first directory found on the C:
drive that starts with the letter "a".
StarOffice™ 7 User's Guide
Use the down arrow key to scroll through the other files and directories. Use
the right arrow key to also display an existing subdirectory in the URL field.
Quick AutoComplete is available if you press the End key after entering part of
the URL. Once you find the program, document or directory you want, press
Enter.
Interrupting Macros
If you want to terminate a macro that is currently running, press Shift+ Ctrl+Q.
List of General Shortcut Keys in StarOffice
The shortcut keys are shown on the right hand side of the menu lists next to the
corresponding menu command.
Shortcut
Action
Enter key
Activates the focused button in a dialog
Esc
Terminates the action or dialog. If in StarOffice Help: goes
up one level. The cursor is positioned in the URL on the
Function Bar: returns the cursor to the document. If the URL
has been selected, you have to press the key twice.
Spacebar
Toggles the focused check box in a dialog
Arrow keys
Changes the active control field in an option section of a
dialog
Tab
Advances focus to the next section or element in a dialog.
Shift + Tab
Moves the focus to the previous section or element in a
dialog
Alt+Down Arrow
Opens the list of the control field currently selected in a
dialog. These shortcut keys apply not only to combo boxes
but also to icon buttons with pop-up menus. Close an
opened list by pressing the Escape key.
Del
Deletes the selected item(s) into the recycle bin.
Shift+Del
Deletes the selected item(s) without putting them in the
recycle bin.
Chapter 8
Appendix
411
412
Shortcut
Action
Backspace
When a folder is shown: goes up one level (goes back)
Ctrl + Tab
Switches to the next open document (except when positioned at the start of a header, instead a tab is inserted)
Shift + Ctrl + Tab
Moves to the previous document that is open.
Enter
If an OLE object is selected: Activates the selected OLE
object.
Enter
If a drawing object or text object is selected: Activates text
input mode
Ctrl + O
Opens a document
Ctrl + S
Saves the current document
Ctrl + N
Creates a new document
Shift+Ctrl+N
Opens Templates and Documents dialog
Ctrl + P
Prints document
Crtl + Q
Exits application
Ctrl + X
Cuts out the selected elements
Ctrl + C
Copies the selected items
Ctrl + V
Pastes from the clipboard
Ctrl + A
Selects all
Ctrl + Z
Undoes last action
Ctrl + Y
Redoes last action
Ctrl+F
Calls the Find & Replace dialog.
Ctrl+Shift+F
Searches for the last entered search term.
Ctrl+Shift+J
Toggles the view between fullscreen mode and normal mode
Ctrl+Shift+R
Redraws the document view.
Shift+Ctrl+I
Enable or disable the selection cursor in read-only text or in
the Help viewer.
Ctrl+I
The Italic attribute is applied to the selected area. If the
cursor is positioned in a word, this word is also marked in
italic.
StarOffice™ 7 User's Guide
Shortcut
Action
Ctrl+B
The Bold attribute is applied to the selected area. If the
cursor is positioned in a word, this word is also put in bold.
Ctrl+U
The Underlined attribute is applied to the selected area. If
the cursor is positioned in a word, this word is also underlined.
Ctrl+Shift+O
Sets the cursor on the Load URL field on the Function Bar.
Alt+O
In the Spelling dialog, the word that was originally marked
as unknown/incorrect (original) will be transferred to the
input box (word).
Shortcut Keys Using the Function Keys
Shortcut
F1
Action
Starts the StarOffice Help
In the StarOffice Help: jumps to main help page.
Shift + F1
Context Help
Shift+F2
Turns on Extended Tips for the currently selected command, icon
or control.
Ctrl+F4 or
Alt+F4
Closes the current document (close StarOffice when the last open
document is closed)
F6
Sets focus in next subwindow (for example, document/data
source view)
Shift+F6
Sets focus in previous subwindow
F10
Activates the first menu (File menu)
Shift+F10
Opens the context menu
Ctrl+F11
Opens the Style Catalog
Chapter 8
Appendix
413
Shortcut keys in the Gallery
Shortcut
Action
Tab
Moves between areas
Shift+Tab
Moves between areas (backwards)
Shortcut keys in the New Theme area of the Gallery:
Up arrow
Moves the selection up one
Down arrow
Moves the selection down
Ctrl+Enter
Opens the Properties dialog
Shift+F10
Opens a context menu
Ctrl+U
Refreshes the selected theme
Ctrl+R
Opens the Enter Title dialog
Ctrl+D
Deletes the selected theme
Insert
Inserts a new theme
Shortcut keys in the Gallery preview area:
414
Home
Jumps to the first entry
End
Jumps to the last entry
Left Arrow
Selects the next Gallery element on the left
Right Arrow
Selects the next Gallery element on the right
Up Arrow
Selects the next Gallery element above
Down Arrow
Selects the next Gallery element below
Page Up
Scroll up one screen
Page Down
Scroll down one screen
Ctrl+Shift+Insert
Inserts the selected object as a linked object into the
current document.
Ctrl+I
Inserts a copy of the selected object into the current document.
Ctrl+T
Opens the Enter Title dialog
Ctrl+P
Switches between themes view and object view
Spacebar
Switches between themes view and object view
StarOffice™ 7 User's Guide
Shortcut
Action
Enter
Switches between themes view and object view
Navigating through StarOffice without a mouse
Shortcut
Action
F6
Moves the cursor from top to bottom and from right to left through
every part of the StarOffice window.
Shift+F6
Moves the cursor in the opposite direction through every part of the
StarOffice window.
Ctrl+F6
Places the cursor in the document
Ctrl+Tab
Moves the cursor from top to bottom and from right to left through
every part of the StarOffice window.
Shift+Ctrl+ Moves the cursor in the opposite direction through every part of the
Tab
StarOffice window.
Left/Right Moves left/right to the next element in a horizontal bar
Arrows
Up/Down Moves up/down to the next element in a vertical bar
Arrow
Home
Moves to the first entry
End
Moves to the last entry
Enter
Press the Enter key to execute the command associated with the
icon.
Esc
Closes a menu or floating toolbar.
Chapter 8
Appendix
415
Editing Shortcut Keys in the Customize Toolbars
dialog
Shortcut
Action
+ key
Opens the list of available buttons for a button category.
- key
Closes the list of available buttons for a button category.
Spacebar
Toggles button visibility in Buttons in use list.
Insrt
Adds the icon selected in the left list box to the right list box.
Del
Removes the selected icon from the Buttons in use list.
Selecting Rows and Columns in a Table
Shortcut
Action
Spacebar
Toggles row selection, except when the row is in edit mode.
Ctrl+Spacebar
Toggles row selection
Shift+Spacebar
Selects the current column
Shortcut Keys for Drawing Objects
416
Shortcut
Action
Select the toolbar with F6. Use the
Down Arrow and Right Arrow to
select the desired toolbar icon and
press Ctrl+Enter.
Inserts a Drawing Object
Select the document with Ctrl+F6
and press Tab
Selects a Drawing Object
Tab
Selects the next Drawing Object
Shift+Tab
Chooses the previous Drawing Object
Ctrl+Home
Selects the first Drawing Object
Ctrl+End
Selects the last Drawing Object
StarOffice™ 7 User's Guide
Shortcut
Action
Esc
Ends Drawing Object selection
Esc (in Handle Selection Mode)
Exit Handle Selection Mode and return to
Object Selection Mode.
Up arrow
Moves the selected Drawing Object up
Down Arrow
Moves the selected Drawing Object down
Left Arrow
Moves the selected Drawing Object left
Right Arrow
Moves the selected Drawing Object right
Alt+Up/Down/Left/Right Arrow Moves the selected Drawing Object one
pixel (in Selection Mode)
Re-sizes a Drawing Object (in Handle Selection Mode)
Rotates a Drawing Object (in Rotation
Mode)
Opens the properties dialog for a Drawing
Object
Activates the Point Selection mode for the
selected drawing object
Spacebar
Select a point of a drawing object (in Point
Selection mode) / Cancel selection
The selected point blinks once per second.
Shift+Spacebar
Select an additional point in Point Selection
mode
Ctrl+Tab
Select the next point of the drawing object
(Point Selection mode)
In Rotation mode, the center of rotation can
also be selected.
Shift+Ctrl+Tab
Select the previous point of the drawing
object (Point Selection mode)
Ctrl+Enter
A new drawing object with default size is
placed in the center of the current view.
Chapter 8
Appendix
417
Shortcut
Action
Ctrl+Enter at the Selection icon
Activates the first drawing object in the
document.
Esc
Leave the Point Selection mode. The
drawing object is selected afterwards.
Edit a point of a drawing object (Point Edit
mode)
Up/down/left/right arrow
Move the selected point (the snap-to-grid
functions are temporarily disabled, but end
points still snap to each other).
Any text or numerical key
If a drawing object is selected, switches to
edit mode and places the cursor at the end of
the text in the drawing object. A printable
character is inserted.
Shortcut Keys for StarOffice Writer
You can use shortcut keys to quickly perform common tasks in StarOffice. This
section lists the default shortcut keys for StarOffice Writer.
You can also use the general shortcut keys in StarOffice.
Function Keys for StarOffice Writer
418
Shortcut
Action
F2
Formula Bar
Ctrl+F2
Insert Fields
F3
Complete AutoText
Ctrl+F3
Edit AutoText
F4
Open Data Source View
F5
Navigator on/off
Shift+F5
Select next frame
StarOffice™ 7 User's Guide
Shortcut
Action
Ctrl+Shift+F5
Navigator on
F7
Spellcheck
Ctrl+F7
Thesaurus
F8
Extension mode
Ctrl+F8
Field shadings on / off
Shift+F8
Additional Selection
F9
Update fields
Ctrl+F9
Show fields
Shift+F9
Calculate Table
Ctrl+Shift+F9
Update Input Fields
Ctrl+F10
Nonprinting Characters on/off
F11
Stylist on/off
Shift+F11
Create Style
Ctrl+Shift+F11
Update Style
F12
Numbering on
Ctrl+F12
Insert or edit Table
Shift+F12
Bullets on
Ctrl+Shift+F12
Numbering / Bullets off
Shortcut Keys for StarOffice Writer
Shortcut
Action
Ctrl+A
Select All
Ctrl+J
Justify
Ctrl+D
Double Underline
Ctrl+E
Centered
Ctrl+F
Find and Replace
Chapter 8
Appendix
419
420
Shortcut
Action
Ctrl+Shift+P
Superscript
Ctrl+L
Align Left
Ctrl+R
Align Right
Ctrl+Shift+B
Subscript
Ctrl+Y
Redo last action
Ctrl+1
Single Line Spacing
Ctrl+2
Double Line Spacing
Ctrl+5
1.5 Line Spacing
Ctrl+ Plus Key(+)
Calculates the selected text (for example, if 3487+3456 is
selected, it calculates the result). The result is copied to the
clipboard and can be pasted into the document.
Ctrl+Hyphen(-)
Custom hyphen; hyphenation set by you.
Ctrl+Shift+minus
sign (-)
Non-breaking dash (is not used for hyphenation)
Ctrl+multiplication
sign * (only on
number pad)
Run macro field
Ctrl+Space
Non-breaking spaces. Non-breaking spaces are not used
for hyphenation and are not expanded if the text is justified.
Shift+Enter
Line break without paragraph change
Ctrl+Enter
Manual page break
Ctrl+Shift+Enter
Column break in multicolumnar texts
Alt+Enter
Inserting a new paragraph without numbering
Alt+Enter
Inserting a new paragraph directly before or after a section
or a table.
Arrow Left
Move cursor to left
Shift+Arrow Left
Move cursor with selection to the left
Ctrl+Arrow Left
Go to beginning of word
StarOffice™ 7 User's Guide
Shortcut
Action
Ctrl+Shift+Arrow
Left
Selecting to the left word by word
Arrow Right
Move cursor to right
Shift+Arrow Right
Move cursor with selection to the right
Ctrl+Arrow Right
Go to end of word
Ctrl+Shift+Arrow
Right
Selecting to the right word by word
Arrow Up
Move up one line
Shift+Arrow Up
Selecting lines in an upwards direction
Arrow Down
Move cursor down one line
Shift+Arrow Down
Selecting lines in a downward direction
Home
Go to beginning of line
Shift+Home
Go and select to the beginning of a line
End
Go to end of line
Shift+End
Go and select to end of line
Ctrl+Home
Go to start of document
Ctrl+Shift+Home
Go and select text to start of document
Ctrl+End
Go to end of document
Ctrl+Shift+End
Go and select text to end of document
Ctrl+PageUp
Switch cursor between text and header
Ctrl+PageDown
Switch cursor between text and footer
Insert
Insert mode on/off
PageUp
Screen page up
Shift+PageUp
Move up screen page with selection
PageDown
Move down screen page
Shift+PageDown
Move down screen page with selection
Ctrl+Del
Delete text to end of word
Ctrl+Backspace
Delete text to beginning of word
Chapter 8
Appendix
421
Shortcut
Action
Ctrl+Shift+Del
Delete text to end of sentence
Ctrl+Shift+Backspace
Delete text to beginning of sentence
Ctrl+Tab
Next suggestion with Automatic Word Completion
Ctrl+Shift+Tab
Use previous suggestion with Automatic Word Completion
Alt+W
Spellchecker dialog: Call back the original unknown word
into the text box
Ctrl+ double-click or Use this combination to quickly dock or undock the NaviCtrl+Shift+F10
gator, Stylist or other windows.
Shortcut Keys for Paragraphs and Heading Levels
Shortcut
Action
Ctrl+Alt+U
p Arrow
Move the active paragraph or selected paragraphs up one paragraph.
Ctrl+Alt+
Down
Arrow
Move the active paragraph or selected paragraphs down one paragraph.
Tab
The heading in format "Heading X" (X = 1-9) is moved down one
level in the outline.
Shift+Tab
The heading in format "Heading X" (X = 2-10) is moved up one
level in the outline.
Ctrl+Tab
At the start of a heading: Inserts a tab stop. Depending on the
Window Manager in use, Alt+Tab may be used instead.
To change the heading level with the keyboard, first position the cursor in front
of the heading.
422
StarOffice™ 7 User's Guide
Shortcut Keys for Tables in StarOffice Writer
Shortcut
Action
Ctrl+A
If the active cell is empty: selects the whole table. Otherwise:
selects the contents of the active cell. Pressing again selects the
entire table.
Ctrl+Home
If the active cell is empty: goes to the beginning of the table. Otherwise: first press goes to beginning of the active cell, second press
goes to beginning of the current table, third press goes to beginning of document.
Ctrl+End
If the active cell is empty: goes to the end of the table. Otherwise:
first press goes to the end of the active cell, second press goes to
the end of the current table, third press goes to the end of the
document.
Ctrl+Tab
Inserts a tab stop (only in tables). Depending on the Window
Manager in use, Alt+Tab may be used instead.
Ctrl+Shift+
Arrow Up
Jump to start of table
Ctrl+Shift+
Arrow
Down
Jump to end of table
Alt+Arrow
Keys
Increases/decreases the size of the column/row on the
right/bottom cell edge
Alt+Shift+
Arrow Keys
Increase/decrease the size of the column/row on the left/top cell
edge
Alt+Ctrl+
Arrow Keys
Like Alt, but only the active cell is modified
Ctrl+Alt+
Like Alt, but only the active cell is modified
Shift+Arrow
Keys
Alt+Insert
3 seconds in Insert mode, Arrow Key inserts row/column,
Ctrl+Arrow Key inserts cell
Alt+Del
3 seconds in Delete mode, Arrow key deletes row/column,
Ctrl+Arrow key merges cell with neighboring cell
Chapter 8
Appendix
423
Shortcut
Action
Ctrl+Shift+T Removes cell protection from all selected tables. If no table is
selected, then cell protection is removed from all of the tables in
the document.
Shift+Ctrl+
Del
If nothing is selected, the contents of the next cell are deleted. If
cells are selected, the whole line of the selection will be deleted. If
all rows are selected completely or partially, the entire table is
deleted.
Alt+Enter
Inserting a new paragraph directly before or after a section or a
table.
Shortcut Keys for Moving and Resizing Frames,
Graphics and Objects
424
Shortcut
Action
Esc
Cursor is inside a text frame and no text is selected: Escape
selects the text frame.
Text frame is selected: Escape clears the cursor from the text
frame.
F2 or Enter or any
key that produces
a character on
screen
If a text frame is selected: positions the cursor to the end of
the text in the text frame. If you press any key that produces a
character on screen, and the document is in edit mode, the
character is appended to the text.
Alt+Arrow Keys
Move object.
Alt+Ctrl+Arrow
Keys
Resizes by moving lower right corner.
Alt+Ctrl+Shift+
Arrow Keys
Resizes by moving top left corner.
Ctrl+Tab
Selects the anchor of an object (in Edit Points mode).
StarOffice™ 7 User's Guide
Shortcut Keys for Spreadsheets
To fill a selected cell range with the formula that you entered on the Input line,
press Alt+Enter. Hold down Alt+Enter+Shift to apply the cell format of the input
cell to the entire cell range.
To create a matrix in which all the cells contain the same information as what you
entered on the Input line, press Shift+Ctrl+Enter. You cannot edit the components
of the matrix.
To select multiple cells in different areas of a sheet, hold down Ctrl and drag in the
different areas.
To select multiple sheets in a spreadsheet, hold down Ctrl, and then click the name
tabs at the lower edge of the workspace. To select only one sheet in a selection,
hold down Shift, and then click the name tab of the sheet.
To insert a manual line break in a cell, click in the cell, and then press Ctrl+Enter.
To delete the contents of selected cells, press Delete. This opens the Delete
Contents dialog, where you choose which contents of the cell you want to delete.
To delete the contents of selected cells without a dialog, press the Backspace key.
Navigating in Spreadsheets
Shortcut
Action
Ctrl + Home
Moves the cursor to the first cell in the sheet (A1).
Ctrl + End
Moves the cursor to the last cell on the sheet that contains
data.
Home
Moves the cursor to the first cell of the current row.
End
Moves the cursor to the last cell of the current row.
Ctrl + Left
Arrow
Moves the cursor to the left edge of the current data range. If
the column to the left of the cell that contains the cursor is
empty, the cursor moves to the next column to the left that
contains data.
Chapter 8
Appendix
425
Shortcut
Action
Ctrl + Right
Arrow
Moves the cursor to the right edge of the current data range. If
the column to the right of the cell that contains the cursor is
empty, the cursor moves to the next column to the right that
contains data.
Ctrl + Up Arrow Moves the cursor to the top edge of the current data range. If
the row above the cell that contains the cursor is empty, the
cursor moves up to the next row that contains data.
Ctrl + Down
Arrow
Moves the cursor to the bottom edge of the current data range.
If the row below the cell that contains the cursor is empty, the
cursor moves down to the next row that contains data.
Ctrl + Shift +
Arrow
Selects all cells containing data from the current cell to the end
of the continuous range of data cells, in the direction of the
arrow pressed. If used to select rows and columns together, a
rectangular cell range is selected.
Ctrl+ Page Up
Moves one sheet to the left.
In the page preview: Moves to the previous print page.
Ctrl + Page
Down
Moves one sheet to the right.
In the page preview: Moves to the next print page.
Alt + Page Up
Moves one screen to the left.
Alt + Page Down Moves one screen page to the right.
Ctrl + *
Selects the data range that contains the cursor. A range is a
where (*) is the
contiguous cell range that contains data and is bounded by
multiplication
empty row and columns.
sign on the
numeric key pad
Ctrl + /
where (/) is the
division sign on
the numeric key
pad
Enter - in a
selected range
426
StarOffice™ 7 User's Guide
Selects the matrix formula range that contains the cursor.
Moves the cursor down one cell in a selected range. To specify
the direction that the cursor moves, choose Tools - Options Spreadsheet - General.
Function Keys Used in Spreadsheets
Shortcut
Action
Ctrl+F1
Displays the note that is attached to the current cell
F2
Switches to Edit mode and places the cursor at the end of
the contents of the current cell. Press again to exit Edit
mode.
If the cursor is in an input box in a dialog that has a Minimize button, the dialog is hidden and the input box remains
visible. Press F2 again to show the whole dialog.
Ctrl+F2
Opens the AutoPilot for Functions.
Shift+Ctrl+F2
Moves the cursor to the Input line where you can enter a
formula for the current cell.
Ctrl+F3
Opens the Define Names dialog.
F4
Shows or Hides the Database explorer.
Shift+F4
Rearranges the relative or absolute references (for example,
A1, $A$1, $A1, A$1) in the input field.
F5
Shows or hides the Navigator.
Shift+F5
Traces dependents.
Shift+Ctrl+F5
Moves the cursor from the Input line to the Sheet area box.
F7
Checks spelling in the current sheet.
Ctrl+F7
Opens the Thesaurus if the current cell contains text.
Ctrl+F5
Traces precedents.
F8
Turns additional selection mode on or off. In this mode, you
can use the arrow keys to extend the selection. You can also
click in another cell to extend the selection.
Ctrl+F8
Highlights cells containing values.
F9
Recalculates all of the formulas in the sheet.
Ctrl+F9
Updates the selected chart.
F11
Opens the Stylist where you can apply a formatting style to
the contents of the cell or to the current sheet.
Shift+F11
Creates a document template.
Chapter 8
Appendix
427
Shortcut
Action
Shift+Ctrl+F11
Updates the templates.
F12
Groups the selected data range.
Ctrl+F12
Ungroups the selected data range.
Alt + Down Arrow Increases the height of current row.
Alt + Up Arrow
Decreases the height of current row.
Alt + Right Arrow
Increases the width of the current column.
Alt + Left Arrow
Decreases the width of the current column.
Alt + Shift + Arrow Optimizes the column width or row height based on the
Key
current cell.
Formatting Cells Using Shortcut Keys
Shortcut
Action
Ctrl+Shift+1 (not on the number pad)
Two decimal places, thousands separator
Ctrl+Shift+2 (not on the number pad)
Standard exponential format
Ctrl+Shift+3 (not on the number pad)
Standard date format
Ctrl+Shift+4 (not on the number pad)
Standard currency format
Ctrl+Shift+5 (not on the number pad)
Standard percentage format (two
decimal places)
Ctrl+Shift+6 (not on the number pad)
Standard format
Using the DataPilot
428
Shortcut
Action
Tab
Changes the focus by moving forwards
through the areas and buttons of the dialog.
Shift+Tab
Changes the focus by moving backwards
through the areas and buttons of the dialog.
StarOffice™ 7 User's Guide
Shortcut
Action
Up arrow
Moves the focus up one item in the current
dialog area.
Down arrow
Moves the focus down one item in the current
dialog area.
Left arrow
Moves the focus one item to the left in the
current dialog area.
Right arrow
Moves the focus one item to the right in the
current dialog area.
Home
Selects the first item in the current dialog area.
End
Selects the last item in the current dialog area.
Alt and the underlined character Copies or moves the current field into the
in the word "Row"
"Row" area.
Alt and the underlined character Copies or moves the current field into the
in the word "Column"
"Column" area.
Alt and the underlined character Copies or moves the current field into the
in the word "Data"
"Data" area.
Ctrl+Up Arrow
Moves the current field up one place.
Ctrl+Down Arrow
Moves the current field down one place.
Ctrl+Left Arrow
Moves the current field one place to the left.
Ctrl+Right Arrow
Moves the current field one place to the right.
Ctrl+Home
Moves the current field to the first place.
Ctrl+End
Moves the current field to the last place.
Alt+O
Displays the options for the current field.
Delete
Removes the current field from the area.
Chapter 8
Appendix
429
Shortcut Keys for StarOffice Impress
The following is a list of shortcut keys for StarOffice Impress.
Function Keys for StarOffice Impress
Shortcut
Action
F2
Edit text
F3
Edit group
Ctrl+F3
Exit group
Shift+F3
Duplicate
F4
Position and Size
F5
Navigator
F7
Spellcheck
Ctrl+F7
Thesaurus
F8
Edit Points
Ctrl+Shift+F8
Fit text to frame
F9 (or Ctrl+F2)
Start Slide Show
F11
Stylist
F12
Outline View
Ctrl+F12
Drawing View
Shortcut Keys in Slide Shows
Shortcut
Action
F9 (or Ctrl+F2)
Start Slide Show
Esc or Backspace or (-) Minus key End presentation
on the numerical keypad
Spacebar
430
StarOffice™ 7 User's Guide
Next animated object or next slide
Shortcut
Action
Enter or Arrow Down or N
Go to next slide
[number] - Enter
Type a number of a slide and press Enter to
go to the slide.
Arrow Left or Arrow Up or P
Go to the previous slide
Arrow Right
Go to the next slide
Pos 1
Jump to first slide in the slide show
End
Jump to the last slide in the slide show
Ctrl+Page Up
Go to the previous slide
Ctrl+Page Down
Go to the next slide
F5
Open the Navigator
B
Toggle screen to black
W
Toggle screen to white
Shortcut Keys in the Drawing View
Shortcut
Action
Plus(+) Key
Zoom in
Minus(-) Key
Zoom out
Times(×) Key
(number pad)
Fit page in window
Divide(÷) Key
(number pad)
Zoom in on current selection
Shift+Ctrl+G
Group selected objects
Shift+Ctrl+Alt+A
Ungroup selected group
Ctrl + click
Enter a group, so that you can edit the individual objects
of the group. Click outside the group to return to the
normal view.
Shift+Ctrl+K
Combine selected objects.
Chapter 8
Appendix
431
Shortcut
Action
Shift+Ctrl+K
Split selected object. This combination only works on an
object that was created by combining two or more objects.
Shift+Ctrl+ Plus key
Bring to Front
Shift+Ctrl+Plus key
Bring Forward
Shift+Ctrl+Minus
key
Send Backward
Shift+Ctrl+Minus
key
Send to Back
Shortcut Keys for StarOffice Impress
Shortcut
Action
Arrow key
Moves the selected object or the page view in the direction of
the arrow.
Crtl+Arrow Key
Move around in the page view.
Shift + drag
Constrains the movement of the selected object horizontally
or vertically.
Ctrl + drag (with
Copy when
moving option
active)
Hold down Ctrl and drag an object to create a copy of the
object.
Alt Key
Hold down Alt to draw or resize objects by dragging from the
center of the object outward.
Alt key+click
Select the object behind the currently selected object.
Alt+Shift+click
Select the object in front of the currently selected object.
Shift+click
Select adjacent items or a text passage. Click at the start of a
selection, move to the end of the selection, and then hold
down Shift while you click.
Shift+drag (when Hold down Shift while dragging to resize an object to mainresizing)
tain the proportions of the object.
Tab key
432
StarOffice™ 7 User's Guide
Select objects in the order in which they were created.
Shortcut
Action
Shift+Tab
Select objects in the reverse order in which they were created.
Escape
Exit current mode.
Enter
Activate a placeholder object in a new presentation (only if
the frame is selected).
Ctrl+Enter
Moves to the next text object on the slide.
If there are no text objects on the slide, or if you reached the
last text object, a new slide is inserted after the current slide.
The new slide uses the same layout as the current slide.
Navigating with the Keyboard in Slide View
Shortcut
Action
Escape
Moves the focus to the first slide.
Arrow key
Moves the focus to the next slide.
Spacebar
Makes the slide with the focus the current slide.
Shortcut Keys for Drawings
The following is a list of shortcut keys specific to Drawing documents.
Function Keys for Drawings
Shortcut
Action
F2
Add or edit text
F3
Opens group to edit individual objects
Ctrl+F3
Close group editor
Shift+F3
Opens the Duplicate dialog
F4
Opens the Position and Size dialog
Chapter 8
Appendix
433
Shortcut
Action
F5
Opens the Navigator
F7
Checks spelling
Ctrl+F7
Opens the Thesaurus
F8
Edit points on/off
Ctrl+Shift+F8
Fits to frame
F11
Opens Stylist
Shortcut Keys for Drawings
434
Shortcut
Action
Plus(+) Key
Zooms in
Minus(-) Key
Zooms out
Multiple(×) Key (number pad)
Zooms to fit entire page in screen
Divide (÷) Key (number pad)
Zooms in on the current selection
Ctrl+Shift+G
Groups selected objects
Shift+Ctrl+Alt+A
Ungroups selected group
Ctrl+Shift+K
Combines selected objects
Ctrl+Alt+Shift+K
Uncombines selected object
Ctrl+Shift++
Bring to front
Ctrl++
Bring forward
Ctrl+-
Send backward
Ctrl+Shift+-
Send to back
StarOffice™ 7 User's Guide
Shortcut Keys Specific to Drawings
Shortcut
Action
Arrow Key
Moves the selected object in the direction of
the arrow key.
Ctrl+Arrow Key
Moves the page view in the direction of the
arrow key.
Shift+ drag with mouse
The movement of the selected object is
constrained by multiples of 45 degrees.
Creates a copy of the dragged object when
Ctrl+Click while dragging an
object. Note: you must first enable mouse button is released.
the Copy when moving option in
Tools - Options - Drawing General to use this shortcut key.
Ctrl+Enter with keyboard focus
(F6) on an object in Main Toolbar
Inserts a drawing object of default size into
the center of the current view.
Shift+F10
Opens the context menu for the selected
object.
F2
Enters text mode.
Enter
Enters text mode if a text object is selected.
Ctrl+Enter
Enters text mode if a text object is selected. If
there are no text objects or if you have cycled
through all of the text objects on the page, a
new page is inserted.
Alt
Press the Alt key and drag with the mouse to
draw or resize an object from the center of
the object outward.
Alt + click on an object
Selects the object behind the currently
selected object.
Alt+Shift+click an object
Selects the object in front of the currently
selected object.
Shift key while selecting an object
Adds or removes object to or from the selection.
Shift+drag while creating or
resizing an object
Constrains the dimensions of the object to
multiples of 45 degrees.
Chapter 8
Appendix
435
Shortcut
Action
Tab
Cycles through the objects on the page in the
order in which they were created.
Shift+Tab
Cycles through the objects on the page in the
reverse-order in which they were created.
Esc
Exits current mode.
Shortcut Keys for 3D Effects (Illumination tab)
436
Shortcut
Action
Page Up
Changes the light source in the preview window.
Page Down
Changes the light source in the preview window.
Arrow keys
Moves the current light source in the direction of the arrow.
Spacebar
Enables the current light source and turns it on or off.
StarOffice™ 7 User's Guide
9
Index
3D charts
inserting 220
3D globe
constructing 341
3D objects
assembling 320
generating 323
3D rotation objects
generating 323
3D text
entering 314
rotating 314
A
automatic 212
by names 211
addressing cells
in spreadsheets 209
aligning
objects (guide) 311
alphabetical indexes
creating 114
anchoring
frames 177
objects (guide) 145
anchors
anchoring objects 145
absolute addresses
tables 209
absolute references
tables 209
accessibility
StarOffice assistive technology 407
StarOffice features 407
actions
defining for incorrect input 242
address book
registering 361
address labels
creating 172
addresses
absolute / relative 209
cells 203
animations
in presentations 282
appending
sheets 192
areas
from connected lines 320
arranging
objects (guide) 310
arrows
drawing in text 107
assembled objects
in 3D 320
assistants
auto-functions 55
assistive technology
StarOffice accessibility 407
addressing
437
attachments
bar charts
sending as e-mail 46
AutoAbstract
inserting 220
Basic
sending text to presentations 383
macro recording 397
recording macros 397
AutoComplete
text input 410
bibliography
creating 116
AutoCorrect
adding exceptions 103
URL recognition 56
bitmaps
adding text to 332
converting to polygons 321
inserting and editing 333
AutoFilters
copy visible cells only 213
AutoFormat
overview 55
sheets (guide) 207
tables 206
automatic addressing
black and white
printing 48
bookmarks
master documents 126
borders
tables 212
changing automatically 98
emphasizing text 73
for objects 78
for paragraphs 76
for tables 77
on pages 75
automatic hyphenation
in text 165
automatic saving
documents 42
automatic slide changes
brochures
rehearse timings 287
AutoNumbering
printing 50
brush
objects 145
copying Styles 96
highlighting text 74
AutoPilot
presentation 272
bullet lists
AutoText
as Help tip 102
in networks 102
using 100
using AutoComplete 102
axes
interrupting 130
turning on and off 120
bullets
automatic 124
business cards
creating 171
synchronizing 171
in charts 223
B
buttons
backgrounds
big/small 388
flat/3-D 388
toolbars 385
changing 277
slides 278
backups
automatically saving documents 42
438
StarOffice™ 7 User's Guide
C
calculating
across multiple text tables 138
formulas 190
in spreadsheets 194
in text 137
in text tables 139
in text with formulas 137
series 251
with formulas 199
callouts
drawings 314
capital letters
changing automatically 98
captions
automatic 124, 146
defining 145
deleting 145
editing 145
numbering 124, 146
objects 145
cell names
addressing 211
cells
adapting the width of 143
addresses 203
AutoFill 250
calculating series 251
changing text/number format 197
checking cells for validity 242
copying 213
currency formats 197
date formats 200
defining input help 242
enlarging and reducing in text tables 142
formatting 204
in text format 195
Internet references 215
merging 135, 140
notes 201
references 209
referencing 214
splitting 135, 140
time formats 200
validity 242
centering
text on page 106
changes
accepting or rejecting 356
comparing 357
marking 355
protecting 359
recording 355
recording (tutorial) 358
changing
headers 153
object size 316
size of text frames 103
Styles 91
toolbars 386
chapters
information in headers 151
names in headers 151
Character Styles
creating 89
characters
adding special 72
coloring 74, 392
convert to curve 322
languages selection 53
uppercase or lowercase 79
charts
bars with texture 222
binary formats 221
changing values in 219
editing axes 223
editing legends 222
editing titles 221
inserting in text 148
labeling 145
marking 218
selecting (guide) 218
selecting types 219
statistics 220
checking
automatic spellcheck 99, 164
for validity 242
circle segments
drawing 312
Chapter 9
Index
439
circles
connectors
drawing 315
clipboard
in drawings and presentations 291
colored shading
for columns 262
consolidating
data 235
contents
protecting 392
colors
color models 335
defining 335
fill format 74, 392
not printing 48
replacing 336
saving and exporting 335
column headers
in database ranges 224
columns
freezing 263
inserting in text tables by keyboard 141
multicolumn texts 83
on text pages 83
repeating when printing 247
combination charts
inserting 220
combining
cell ranges 235
objects 330
comments
on cells 201
on changes 358
comparing
documents 357
concordance files
indexes 114
configuration
saving with document 387
configuring
StarOffice 385
toolbars 386
connecting
lines 320
objects 330
440
editing 303
editing glue points 304
StarOffice™ 7 User's Guide
continuation pages
page numbers 154
control points
curves 316
converting
bitmaps to polygons 321
text to curve 322
to curve, polygon, 3D 323
copying
cells 213
draw objects 316
drawing objects between documents 380
Gallery 379
pages 281
sheet areas 144, 382
slides 281
Styles 96
text sections 80
copyright
entering symbol 57
corner points
drawing 317
corner rounding
customizing 316
covered objects
selecting 284
creating
address labels 172
new Styles from selections 95
tables of contents 113
cross-classified tables
multiple operations 240
cross-fading
effect 295
two objects (guide) 328
csv files
spreadsheet 249
csv text format
databases 365
currency formats
spreadsheet 197
cursor
placing directly 70
curves
drawing 316
editing 318
freehand drawing 316
custom dictionaries
removing words from 165
custom templates
using 391
customizing
toolbars 385
creating 367
databases
exporting 365
importing 365
in StarOffice Calc 223
text formats 365
DataPilot
creating and applying 231
deleting tables 234
editing tables 233
filtering tables 234
guide 230
inserting columns 233
preventing data overwriting 233
updating 234
dates
in cells 200
dBase data
inserting in spreadsheets 228
DDE links
D
dashes
replacing 72
data
consolidating 235
data source view
drag and drop 381
data sources
importing into spreadsheets 228
opening in spreadsheets 228
registering address book 361
reports 369
data tables
multiple operations in 238
database ranges
defining (guide) 224
filtering (guide) 225
grouping 226
sorting (guide) 225
subtotals 226
database reports
creating 369
database tables
inserting tables in 132
default formats
changing 44
numbers in tables 204
default templates
changing 390
defining 93
defaults
templates 93
deleting
captions 145
footnotes 155
tables 134
designing
database reports 369
database tables 367
dictionaries
thesaurus 167
dimension lines
using 352
direct cursor
entering text 70
Chapter 9
Index
441
languages 53
saving automatically 42
saving in other formats 41
sending as e-mail 46
displayed cells
copying 213
document templates
changing default templates 390
creating 90
document types
XML 43
documents
changing titles 41
comparing 357
exporting 41
languages 53
master documents 126
measurement units in 389
merging 357
opening 35
saving 40
saving automatically 42
saving in Microsoft format 41
saving with configuration 387
sending as e-mail 46
sub-documents 126
version management 359
doubling
objects 326
drafts
objects 326
E
e-mails
sending documents 46
editing
chart axes 223
chart legends 222
chart titles 221
curves 318
graphics 333
hyperlinks (guide) 60
index format 118
points 318
Styles 91
toolbars 386
effects
FontWork 108
in presentations 282
text animation 106
ellipse segments
drawing 312
printing 48
drag and drop
copying text 384
data source view 381
Gallery 379
graphics 380
mouse pointers 376
overview 376
drawing
circles 312
drawing objects
copying 316
copying between documents 380
drawing from the center 315
labeling 145
limiting 315
drawings
442
duplicating
StarOffice™ 7 User's Guide
encryption
contents 392
endnotes
edit 155
insert 155
spacing 157
text 150
entries
defining in index 112
defining in tables of contents 112
editing format 118
error bars
charts 220
error indicators
charts 220
error messages
defining for incorrect input 242
errors
reporting crashes 402
Excel
save as 41
exceptions
AutoCorrect (guide) 103
exporting
bitmaps 333
Microsoft Office documents 41
tables as text 249
tables in text format 365
XML 43
extended tips
in Help 27
extensions
file formats 43
extrusion objects
creating 324
eyedroppers
replacing colors 336
F
file formats
changing defaults 44
XML 43
files
properties 45
saving automatically 42
saving in other formats 41
sending as e-mail 46
fill format
colors 74, 392
fill format mode
copying formats 96
filtering
database ranges (guide) 225
filters
copy visible cells only 213
for XML 43
Navigator 374
finding
text 61
words 61
fitting
pages and printed pages 289
fixed rows or columns
printing 247
floating titles
headers 151
floating toolbars
using 33
font attributes
resetting 80
fonts
resetting 80
FontWork
applying text effects 108
footers
about 150
odd and even pages pages 150
printing on sheets 247
text 150
with page numbers 151
footnotes
deleting 155
edit 155
general settings 156
insert 155
navigation 155
organizing 155
spacing 157
text 150
form letters
creating 168
formats
AutoFormat for tables 206
cells 204
changing text/number 197
copying and pasting 96
currency formats in cells 197
number in table 204
page numbers 162
resetting 80
Chapter 9
Index
443
searching for 64
spreadsheets 204
transferring 91
formatting
applying 88
direct/indirect 85
editing 88
with adjacent paragraph format 82
with Styles 85
formatting styles
styles and templates 93
formatting Styles
importing 97
freeform lines
aligning text with 108
function bar
configuring 386
G
Gallery
adding graphics 379
copying 379
inserting 377
globe
constructing 341
glue points
connectors 304
forms
designing 368
formula bar
calculating formulas 190
examples in text 137
gradients
defining 338
graphics
changing paths 42
drag and drop 380
drawing 315
editing 333
inserting 333
inserting as characters 147
inserting by dialog 147
inserting from Draw 147
inserting from Gallery 377
inserting from Gallery into text 148
jumping to next 110
scanning 148
formula editor
in StarOffice Math 398
formulas
addressing by names 212
calculating 190
calculating directly in text 137
calculating in text 137
complex formulas in text 137
formula bar 190
in spreadsheets 194
in table cells 199
printing 245
saving as csv files 249
show in spreadsheets 261
grids
printing 245
grouping
database ranges 226
objects 329
frames
anchoring 177
around objects 78
around pages 75
around paragraphs 76
around tables 77
formatting 177
inserting for text 103
jumping to next 110
labeling 145
linking 103
444
StarOffice™ 7 User's Guide
groups
entering 329
objects 329
growth series
calculating 251
H
handles
of objects 308
scaling 316
automatic recognition (guide) 60
changing formats 60
editing 60
formatting 56
in tables of contents 118
inserting 59
handouts
printing a presentation 288
headers
about 150
changing 153
chapter information 151
formatting 154
inserting lines under 154
odd and even pages 150
printing on sheets 247
repeating in tables 141
text 150
headers and footers
HTML documents 150
headings
changing document titles 41
changing formats of 88
entering 88
numbering 122
own Paragraph Styles 122
rearranging 81
Help
using the 26
Help Agent
in Help 28
help tips
defining text for cell input 242
hidden cells
do not copy 213
highlighting text
brush 74
horizontal lines
inserting 149
HTML
in sheet cells 215
sheets 248
text sections 84
HTML export
of drawing objects 107
hyperlinks
as index entry 118
automatic formatting 56
hyphenation
for a word 52
in text 165
I
icons
changing views 388
illumination
using 343
illustrations
inserting 333
images
adding text to 332
editing bitmaps 333
inserting bitmaps 333
importing
bitmaps 333
tables as text 249
tables in text format 365
XML 43
indexes
alphabetical indexes 114
concordance files 114
creating bibliography 116
creating user-defined indexes 115
defining entries in 112
deleting 117
editing 117
editing index format 118
editing or deleting entries 113
master documents 126
multiple documents 119
updating 117
indicator lines
in text 107
input help
in cells 265
insert
Chapter 9
Index
445
endnotes 155
footnotes 155
printing sheets 246
languages
insert mode
documents 53
spellcheck in different 51
entering text 69
inserting
cell ranges 383
charts from StarOffice Calc 148
drawings 315
from Gallery into text 148
graphics 333
graphics by dialog 147
horizontal lines 149
hyperlinks 59
images 333
paragraphs before tables 134
sections 83
sheets from files 192
special characters 72
tables in text 132
interactive gradients
defining 338
interest computation
layouts
for spreadsheets 207
for tables 207
legends
drawings 314
in charts 222
rounding corners 316
letters
creating form letters 168
lexicon
thesaurus 167
limiting values
specifying on input 242
linear series
calculating 251
lines
aligning text with 108
changing automatically 98
connecting objects 320
drawing 316
drawing in text 107
inserting horizontal lines 149
numbering 130
under headers 154
example 237
international currency formats
spreadsheet 197
Internet addresses
turning off recognition of 56
intersecting
objects 330
polygons 330
links
changing formats 60
editing 60
formatting 56
inserting 59
K
keyboard
general commands 409
text tables 142
using in text 71
zooming 281
L
charts 220
lowercase
text 79
labels
creating 171
from database 172
synchronizing 171
landscape
446
logarithmic axes
StarOffice™ 7 User's Guide
M
macros
interrupting 411
recording 397
running when incorrect input 242
samples 404
magnifiers
cross-classified tables 240
multiple sheets
accessibility 407
mail merge
references to 203
multiplying
creating 168
main toolbar
objects 326
My Documents
configuring 386
manual hyphenation
in text 165
marginal numbers
text pages 130
marking
changes 355
master documents
bookmarks 126
indexes 126
master pages
changing background 277
defining 278
measurement units
documents 389
memo fields
dBase 367
menu bar
overview 31
merging
documents 357
objects 330
polygons 330
Microsoft Office
new users information 36
mouse pointers
when using drag and drop 376
moving
text sections 80
toolbars 387
multiple documents
indexes 119
multiple operations
applying 238
work directory 42
N
names
as addressing 212
as captions 145
in tables 211
sheets 193
names of chapters
in headers 151
natural language addressing
tables 212
navigating
in text 71
navigator
rearranging a document 81
networks
AutoText in 102
next page
page numbers 154
next style
Page Styles 153
notes
help text for cells 242
in presentations 298
inserting in cells 260
on cells 201
printing 245, 288
number formats
in cells 204
number ranges
defining 145
defining own ranges 125
numbering
automatic 124
automatic for captions 145
Chapter 9
Index
447
continuing 130
interrupting 130
lines 130
named 119
Numbering Styles 89, 119
of pages 158
on and off 121
raising the level of 129
text lines 130
Office
Microsoft Office and StarOffice 36
offset
page numbers 162
OLE objects
inserting tables in 132
opening
documents 35
sheets in HTML 248
numbers
changing in a chart 219
changing text/number format 197
formatting in tables 204
line numbering 130
O
object bars
configuring 386
moving 387
switching 389
objects
aligning (guide) 311
anchoring 145
arranging (guide) 310
captioning 145
captions 145
combining 330
connecting (guide) 330
connecting lines to 320
cross-fading two objects (guide) 328
defining borders 78
drawing from the center 315
duplicating 326
grouping 329
inserting from Gallery 377
intersecting 330
labeling automatically 124, 146
merging 330
moving by drag and drop 316
pivot points of 310
positioning 145
rotating 310
scaling 316
selecting 284
ODBC data
inserting in spreadsheets 228
448
StarOffice™ 7 User's Guide
organizing
templates (guide) 93
outline
sending to presentations 383
outline view
presentation mode 280
presentations in 294
outlines
printing 288
overviews
printing 48
overwrite mode
entering text 69
P
page breaks
as paragraph formats 161
page numbers
continuation pages 154
formats 162
inserting 158
page previews
printing 48
Page Styles
applying 159
changing 153
editing 161
next style 153
summary 92
page views
displaying 47
pages
continuation pages 154
copying 281
defining borders 75
fitting to printed pages 289
jumping to 109
numbers and count of 151
paragraph formats
applying 82
languages 53
page breaks 161
Paragraph Styles
creating 89
searching 64
paragraphs
bulleted (tutorial) 120
common formatting 91
defining borders 76
inserting before tables 134
numbering on/off 121
passwords
protecting contents 392
paths
work directory 42
PDF
exporting as PDF 40
performing calculations
in text tables 138
permitted cell contents
checking 242
pivot points
of objects 310
Pivot tables
importing to DataPilot tables 234
pixel graphics
inserting and editing 333
points
editing 318
polygons
intersecting 330
merging 330
subtracting 330
PowerPoint
save as 41
powers of 2
calculating a list 251
presentation
with AutoPilot 272
presentations
creating 274
exporting in HTML 290
printing (guide) 288
rehearse timings 287
saving automatically 42
saving in other formats 41
sending as e-mail 46
showing 276
Styles in 279
previews
print layouts 47
print layouts
checking 47
print previews
displaying 47
printing
black and white 48
brochures 50
column as table heading 247
defining options 47
details 245
fitting to paper 289
formulas 245
hiding text from printing 105
landscape 246
multiple pages per sheet 48
not printing text 105
only visible cells 213
presentations 288
presentations (guide) 288
previews 47
reduced 48
row as table heading 247
sheet counts 246
sheet details 245
sheet grids 245
sheet selection 246
sheets in landscape 246
Chapter 9
Index
449
sheets on multiple pages 247
small 48
spreadsheets 203
suppressing text from printing 105
to file 47
programming
sample macros 404
properties
files 45
protected contents
in StarOffice 392
protected spaces
inserting 72
protecting
contents 392
recorded changes 359
sheets 259
Q
quotation marks
changing automatically 98
R
ranges
combining 235
readers
accessibility 407
rearranging
headings 81
recognizing URLs
AutoCorrect 56
recording
changes (guide) 358
macros 397
records
dragging into spreadsheets 229
in spreadsheets 223
protecting 359
selecting 229
rectangles
rounding corners 316
red lines
in margins 359
450
StarOffice™ 7 User's Guide
red underlines
spellcheck 50
redlining
recording changes 355
references
absolute / relative 209
by name 211
calculating in text tables 138
in formulas 214
in table formulas 199
marking by color 209
master documents 126
to cells 209
to multiple sheets 203
URL in cells 215
registering
address book 361
regression curves
inserting in charts 220
regular expressions
searching (guide) 62
rehearse timings
defining 287
related words
thesaurus 167
relative addresses
tables 209
relative references
tables 209
remarks
on cells 201
removing
footnotes 155
renaming
sheets (tutorial) 193
repeated columns
printing 247
repeated rows
printing 247
repeating
table headings after page breaks 141
replacing
styles 64
reports
creating database reports 369
resetting
fonts 80
review function
comparing documents 357
recording changes 355
rotating
objects 310
text 75
round corners
customizing 316
rows
inserting in text tables by keyboard 141
repeating when printing 247
running titles
headers 151
S
saving
configuration with document 387
documents 40
documents automatically 42
documents in Microsoft Office format 41
documents in other formats 41
sheets in HTML 248
scaling
objects 316
text frames 103
scanning
graphics 148
scenarios
creating (guide) 242
using 241
screen magnifiers
accessibility 407
screen readers
accessibility 407
searching
for formats 64
Paragraph Styles 64
with wildcards 62
sections
columns in 83
editing 85
inserting text 83
remarks 83
sectors
drawing 312
segments
drawing 312
selecting
hidden objects 284
multiple spreadsheets 202
selections
of text 71
sending
AutoAbstract in presentations 383
documents as e-mail 46
outlines in presentations 383
separating dashes
in toolbars 385
separation
hyphenation 165
separators
conditional 72
in toolbars 385
series
calculating 251
sheet grids
printing 245
sheet references
to other sheets 215
sheet tabs
using 202
sheets
appending 192
AutoFormat 207
HTML 248
inserting from files 192
names 193
Chapter 9
Index
451
printing details 245
printing in landscape 246
printing on multiple pages 247
printing sheet counts 246
renaming tutorial 193
selecting 192
showing multiple 202
simultaneous multiple filling 192
shortcut keys
general 409
signs
convert to curves 322
size
changing of object size 308
slide designs
changing 278
master pages 278
slide shows
custom 284
slide transitions
in presentations 282
spelling
thesaurus 167
spreadsheet cells
referencing 214
spreadsheets
calculating 194
cell referencing 214
copying 261
copying areas to text documents 144, 382
filling from data source browser 228
formatting 204, 209
formatting text 208
layouts for 207
marking 202
saving automatically 42
saving in other formats 41
selecting 202
used as databases 223
Spreadsheets
slides
backgrounds 278
copying between documents 281
printing 288
snap grids
using 304
snap lines
using 352
sort lists
guide 250
sorting
database ranges (guide) 225
spaces
protected 72
spacing
endnotes/footnotes 157
special characters
inserting (tutorial) 72
spellcheck
automatic 50, 99, 164
452
dialog 163
disabling 99, 164
multilingual 51
starting 52
StarOffice™ 7 User's Guide
addressing cells in 209
SQL
placeholder 373
squares
drawing 315
StarOffice
configuring 385
Microsoft Office 36
StarOffice Calc
databases 223
StarOffice Chart
open read-only 221
statistical values
charts 220
stickers
from database 172
styles
replacing 64
searching 64
styles and templates (guide) 93
Stylist 87
types 86
updating automatically 92
updating from selections 96
Styles
changing 91
concept of 86
copying 96
creating 89
creating from selections 95
editing 88
example for creating 90
importing from files 97
loading from files 97
transferring 96
Stylist
advantages 91
creating new Styles from selections 95
styles 87
updating from selections 96
subscript
text 79
subtotals
database ranges 226
subtracting
polygons 330
suffixes
file formats 43
superscript
text 79
switching
object bars 389
switching between objects in text 110
synchronizing
labels 171
synonyms
thesaurus 167
system address book
registering 361
system dialog
for files 35
T
tab stops
inserting in numbering 129
table cells
enlarging in text 142
table design
data sources 367
table headings
repeating after page breaks 141
table mode
selecting 143
tables
adapting the width of 143
AutoFormat 206
combining 235
creating database tables 367
database ranges (guide) 224
defining borders 77
deleting 134
dividing cells in 143
exporting as text 249
formatting in text documents 135
importing as text 249
in text, from keyboard 142
inserting cell range 383
inserting in text documents 134
inserting text tables 132
jumping to next 110
labeling 145
merging cells 140
multiple operations in 238
number format 204
sending as e-mail 46
start of page 134
tables in text
calculating 139
tables of contents
creating 113, 180
defining entries in 112
deleting 117
editing 117f.
editing or deleting entries 113
hyperlink as entry 118
Chapter 9
Index
453
updating 113, 117
templates
changing default templates 390
creating document templates 90
creating from selections 95
customized 59
default templates 93
definitions 86
documents 390
for letters 58
organizing (guide) 93
templates and styles (guide) 93
updating from selections 96
using 391
text
3D 314
adapting to frames 313
aligning with lines 108
aligning with lines (FontWork) 108
animation 106
centering on page 106
changing to number 197
coloring 74, 392
concatenating in arithmetic formulas 195
convert to curve 322
copying by drag and drop 384
cursor 70
default templates 93
drawing graphics 315
emphasizing 73
entering 69
finding 61
formatting 85, 103
formatting automatically 98
headers 150
images 145
importing to spreadsheet 249
in a spreadsheet 208
in cells 195
in frames 73
inserting 69
inserting charts in 148
inserting graphics from Draw 147
inserting in image 332
inserting sections in 83
inserting special characters 72
454
StarOffice™ 7 User's Guide
languages selection 53
line numbers 130
multi-selection 62
multicolumn 83
navigating in 71
not printing 105
overwriting 69
performing calculations in 138
positioning in middle 106
printing in black 48
rotating 75
rotating text in a frame 313
saving automatically 42
saving in other formats 41
scanning graphics 148
sections 83
selecting 71, 85
sending as e-mail 46
slanting 108
slanting (FontWork) 108
spellcheck 163
subscript 79
superscript 79
tables 132
turning off automatic correction 98
uppercase or lowercase 79
without spellcheck 99, 164
text attributes
hyperlinks 60
text directions
languages 401
text effects
FontWork 108
text flow
from frame to frame 103
text formats
copying and pasting 96
databases 365
text frames
enlarging/reducing 103
entering text 313
inserting 103
labeling 145
linking 103
linking for text flow 178
moving 103
scaling 103
removing icons 386
separating dashes 385
totals
text input fields
input 410
in text tables 139
turning off automatic correction
text sections
copying 80
editing 85
moving 80
text tables
calculating 139
enlarging cells in 142
inserting rows or columns in 141
Writer 98
U
underlining
changing automatically 98
units
measurement units 389
updating
tables of contents 113
templates 391
textures
on chart bars 222
thesaurus
related words 167
time
in cells 200
timings
rehearse timings 287
tips
in Help 27
title bar
overview 31
title pages
centering text on 106
title rows
printing on all sheets 247
titles
changing 41
in charts 221
toolbars
buttons 385
configuring 386
customizing 385
editing 386
floating toolbars 33
moving 387
moving icons 386
opening 33
overview 31
updating from selections
Stylist 96
uppercase
text 79
uppercase letters
changing automatically 98
URL
in Calc 215
user-defined dictionaries
removing words from 165
user-defined indexes
creating 115
V
validity
cell contents 242
defining 265
values
changing in a chart 219
consolidating 235
limiting on input 242
vector graphics
converting bitmaps 321
vectorizing
bitmaps 321
versions
comparing documents 357
Chapter 9
Index
455
of a document 359
views
for text 165
words
icons 388
multiple sheets 202
automatic replacement on/off 98
disabling spellcheck 99, 164
do not hyphenate 165
finding 61
visible cells
copying 213
W
wavy underlines
spellcheck 50
what if
tables 238
wildcard search
guide 62
Word
save as 41
word completion
AutoText 102
word wrapping
456
StarOffice™ 7 User's Guide
work directory
changing 42
wrap regions
defining 178
X
XML
file formats 43
XY charts
statistics 220
Z
zooming
keyboard 281


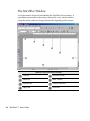


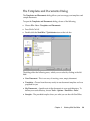
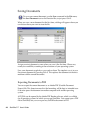


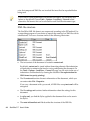
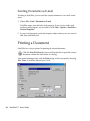


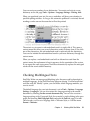
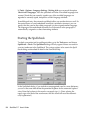

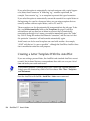

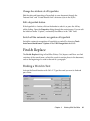


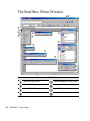
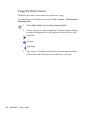
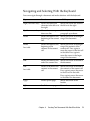


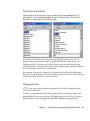
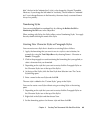


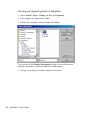
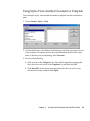


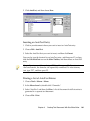
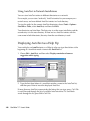

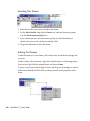


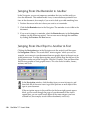


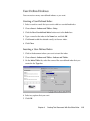


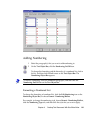
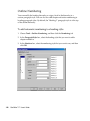


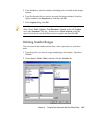


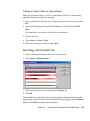

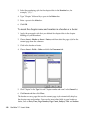
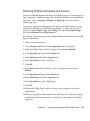

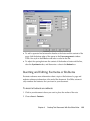

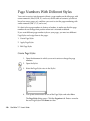
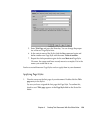
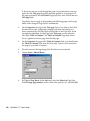
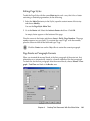

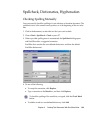

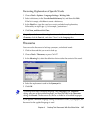
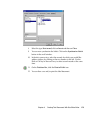
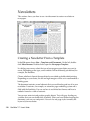
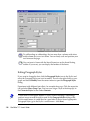
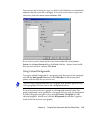
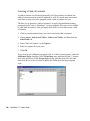

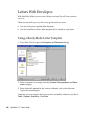
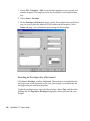


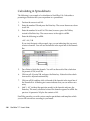


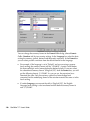


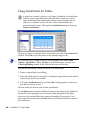


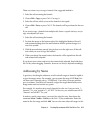
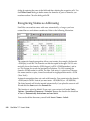

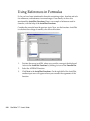


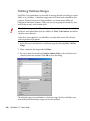
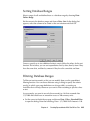


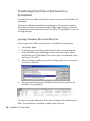
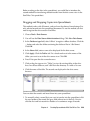
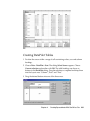
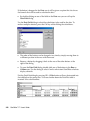


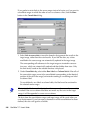

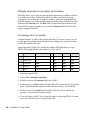

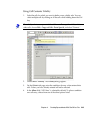


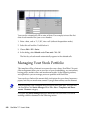


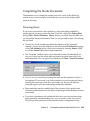
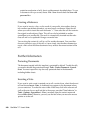


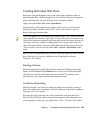

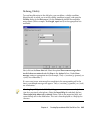
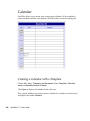
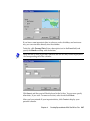


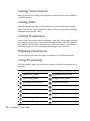
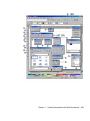

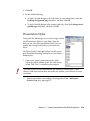
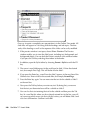


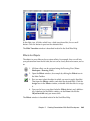


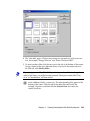


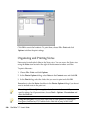


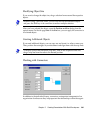

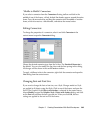
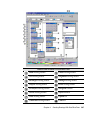
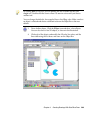


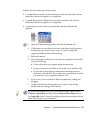

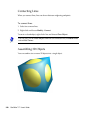

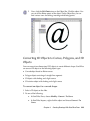
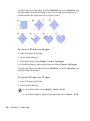


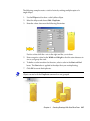


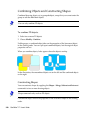
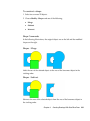


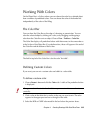

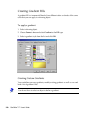

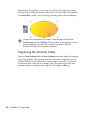

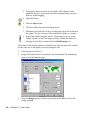


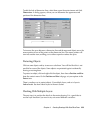
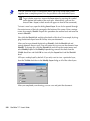
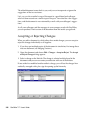
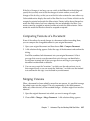

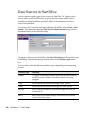
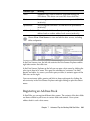

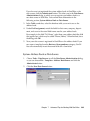
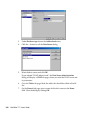
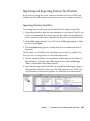

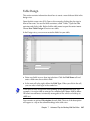
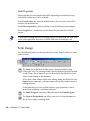
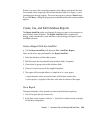


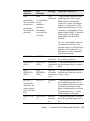
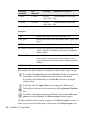


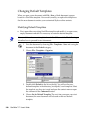


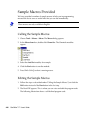
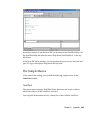


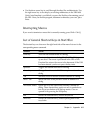

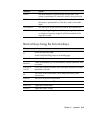


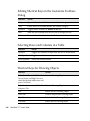
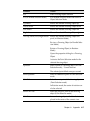


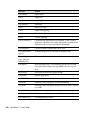


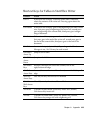
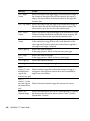
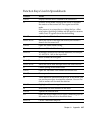


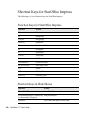


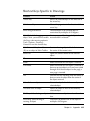


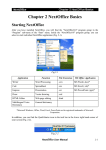
![Manuale dell`utente StarOffice[TM] 7](http://vs1.manualzilla.com/store/data/006154672_1-c0705c844e4eb62be470df7803978e6d-150x150.png)