1
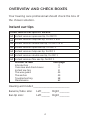
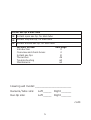
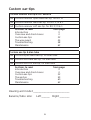
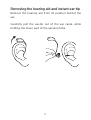
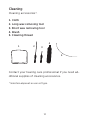
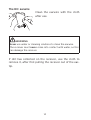
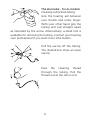
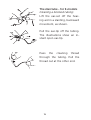
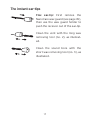
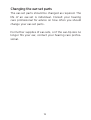
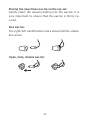
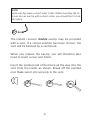
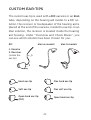
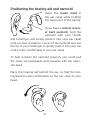
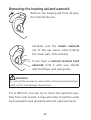
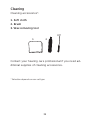
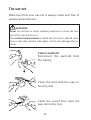
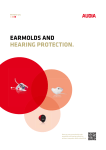
USER MANUAL
EAR-SETS FOR
WIDEX BTE HEARING AIDS
CONTENTS
INTRODUCTION. . . . . . . . . . . . . . . . . . . . . . . . . . . . . . . . . . . . . . . . 3
OVERVIEW AND CHECK BOXES . . . . . . . . . . . . . . . . . . . . . . . . . . 4
INSTANT EAR-TIPS . . . . . . . . . . . . . . . . . . . . . . . . . . . . . . . . . . . . . 8
Left/right identification . . . . . . . . . . . . . . . . . . . . . . . . . . . . . . . . . 9
Positioning the hearing aid and instant ear-tip . . . . . . . . . . . . 10
Removing the hearing aid and instant ear-tip . . . . . . . . . . . . . 11
Cleaning . . . . . . . . . . . . . . . . . . . . . . . . . . . . . . . . . . . . . . . . . . . . . . 12
Changing the ear-set parts . . . . . . . . . . . . . . . . . . . . . . . . . . . . . 19
CUSTOM EAR-TIPS . . . . . . . . . . . . . . . . . . . . . . . . . . . . . . . . . . . . 22
Left/right identification . . . . . . . . . . . . . . . . . . . . . . . . . . . . . . . . 23
Positioning the hearing aid and custom ear-tip. . . . . . . . . . . . 24
Removing the hearing aid and custom ear-tip. . . . . . . . . . . . . 25
Cleaning . . . . . . . . . . . . . . . . . . . . . . . . . . . . . . . . . . . . . . . . . . . . . . 26
Changing the ear-set parts . . . . . . . . . . . . . . . . . . . . . . . . . . . . . 33
CUSTOM EARMOLDS . . . . . . . . . . . . . . . . . . . . . . . . . . . . . . . . . . 35
Left/right identification . . . . . . . . . . . . . . . . . . . . . . . . . . . . . . . . 36
Positioning the hearing aid and earmold . . . . . . . . . . . . . . . . . 37
Removing the hearing aid and earmold . . . . . . . . . . . . . . . . . . 38
Cleaning . . . . . . . . . . . . . . . . . . . . . . . . . . . . . . . . . . . . . . . . . . . . . . 39
Changing the ear-set parts . . . . . . . . . . . . . . . . . . . . . . . . . . . . . 43
THE WAX GUARD . . . . . . . . . . . . . . . . . . . . . . . . . . . . . . . . . . . . . 44
Changing the wax guard . . . . . . . . . . . . . . . . . . . . . . . . . . . . . . . 45
THE ANCHOR . . . . . . . . . . . . . . . . . . . . . . . . . . . . . . . . . . . . . . . . . 49
TROUBLESHOOTING . . . . . . . . . . . . . . . . . . . . . . . . . . . . . . . . . . 58
Ear-tips and earmolds with an earwire . . . . . . . . . . . . . . . . . . . 58
Ear-tips and earmolds with a tube . . . . . . . . . . . . . . . . . . . . . . . 60
MAINTENANCE . . . . . . . . . . . . . . . . . . . . . . . . . . . . . . . . . . . . . . . 62
2
INTRODUCTION
This booklet provides an overview of different ear-set
solutions available for Widex behind-the-ear (BTE)
hearing aids. An ear-set consists of an ear-tip or earmold attached to a tube or an earwire. The ear-set is
used to channel sound from the behind-the-ear hearing
aid into the ear canal.
WARNING
This booklet contains important information and instructions
regarding your ear-set, and complements the user instructions
for your hearing aid. In addition to the user instructions for your
hearing aid, please be sure to read the sections in this booklet
that apply to your ear-set solution before you start using the
hearing aid.
NOTE
Your ear-set may not look exactly as illustrated in this booklet. We
also reserve the right to make any changes considered necessary.
3
OVERVIEW AND CHECK BOXES
Your hearing care professional should check the box of
the chosen solution.
Instant ear-tips
Instant receiver ear-tip & RIC earwire
❑
❑
❑
❑
❑
❑
❑
Instant receiver open ear-tip, for RIC M
Instant receiver tulip ear-tip, for RIC P & M
Instant receiver double ear-tip, for RIC P & M
Instant receiver open ear-tip, for RIC 1
Instant receiver tulip ear-tip, for RIC 1
Instant receiver double ear-tip, for RIC 1
Instant receiver flex ear-tip, for RIC 1
Sections to read
Introduction
Overview and check boxes
Instant ear-tips
The wax guard
The anchor
Troubleshooting
Maintenance
from page
3
4
8
44
49
58
62
Hearing aid model: ______________________
Earwire/tube size:
Left _____ Right ______
Ear-tip size:
Left _____ Right ______
4
Instant ear-tip & élan tube
❑ Instant open ear-tip, for élan tube
❑ Instant tulip ear-tip, for élan tube
❑ Instant double ear-tip, for élan tube
Sections to read
Introduction
Overview and check boxes
Instant ear-tips
The anchor
Troubleshooting
Maintenance
from page
3
4
8
49
60
62
Hearing aid model: ______________________
Earwire/tube size:
Left _____ Right ______
Ear-tip size:
Left _____ Right ______
cont.
5
Custom ear-tips
Custom receiver ear-tip & RIC earwire
❑ Custom receiver open hard ear-tip, for RIC M
❑ Custom receiver hard ear-tip, for RIC P, M & 1
❑ Custom receiver soft ear-tip, for RIC P, M & 1
Sections to read
Introduction
Overview and check boxes
Custom ear-tips
The wax guard
Troubleshooting
Maintenance
from page
3
4
22
44
58
62
Custom ear-tip & élan tube
❑ Custom open hard ear-tip, for élan tube
❑ Custom flex hard ear-tip, for élan tube
❑ Custom flex soft ear-tip, for élan tube
Sections to read
Introduction
Overview and check boxes
Custom ear-tips
The anchor
Troubleshooting
Maintenance
from page
3
4
22
53
60
62
Hearing aid model: ______________________
Earwire/tube size:
Left _____ Right ______
6
Custom earmolds
Custom receiver earmold & RITE earwire
❑ Custom hard earmold, Regular sound bore, for RITE
❑ Custom hard earmold, Output Extender, for RITE
Sections to read
Introduction
Overview and check boxes
Custom earmolds
The wax guard
Troubleshooting
Maintenance
from page
3
4
35
44
58
62
Custom earmold & classic tube
❑ Custom open hard classic mold, for classic tube
❑ Custom flex hard classic mold, for classic tube
❑ Custom flex soft classic mold, for classic tube
Sections to read
Introduction
Overview and check boxes
Custom earmolds
Troubleshooting
Maintenance
from page
3
4
35
60
62
Hearing aid model: ______________________
Earwire/tube size:
Left _____ Right ______
7
INSTANT EAR-TIPS
The instant ear-tip is used with a RIC earwire or an élan
tube, depending on the hearing aid model. In a RIC solution, the receiver or loudspeaker of the hearing aid is
placed at the end of the earwire. In an élan solution, the
receiver is located inside the hearing aid housing. Under “Overview and Check Boxes”, you can see which
solution has been chosen for you.
élan m-models
RIC
1. Earwire
2. Receiver
élan 9-models
1
2
Open ear-tip
Double ear-tip
Tulip ear-tip
Flex ear-tip
8
Left/right identification
The illustration shows an earwire. Earwires/tubes are available in different
lengths for the right and left ear, respectively. The individual size is printed
on the earwire/tube (see arrow). Red
print indicates that it is for the right ear,
and blue print that it is for the left ear.
9
Positioning the hearing aid and instant
ear-tip
The illustrations show an open ear-tip, but the same
procedure is used for the other instant ear-tip types.
Place the hearing aid behind the ear, so that the earwire/tube rests comfortably on the ear, close to your
head.
Insert the ear-tip into the ear canal while holding the
lower part of the earwire/tube.
If you have a tulip ear-tip, make sure that the larger leaf
is positioned over and overlaps the smaller leaf.
An anchor is used for some instant ear-tips to help
secure the ear-set in the ear. Please refer to page 49 for
further information.
10
Removing the hearing aid and instant ear-tip
Remove the hearing aid from its position behind the
ear.
Carefully pull the ear-tip out of the ear canal, while
holding the lower part of the earwire/tube.
11
Cleaning
Cleaning accessories*.
1. Cloth
2. Long wax removing tool
3. Short wax removing tool
4. Brush
5. Cleaning thread
4
1
2
3
5
Contact your hearing care professional if you need additional supplies of cleaning accessories.
* Selection depends on ear-set type.
12
The ear-set
Make sure that your ear-set is always clean and free of
earwax, moisture and the like.
WARNING
Never use alcohol or other cleaning solutions to clean the earset, as this can discolour it.
13
The RIC earwire
Clean the earwire with the cloth
after use.
WARNING
Never use water or cleaning solutions to clean the earwire.
The receiver must never come into contact with water, as this
can damage the receiver.
If dirt has collected on the receiver, use the cloth to
remove it, after first pulling the receiver out of the eartip.
14
The élan tube - for m-models
Cleaning a blocked tubing:
Grip the hearing aid between
your thumb and index finger.
With your other hand grip the
tubing and pull straight apart
as indicated by the arrow. Alternatively, a small tool is
available for removing the tubing. Contact your hearing
care professional if you want more information.
Pull the ear-tip off the tubing.
The illustrations show an open
ear-tip.
Pass the cleaning thread
through the tubing. Pull the
thread out at the other end.
15
The élan tube - for 9-models
Cleaning a blocked tubing:
Lift the ear-set off the hearing aid in a slanting, backward
movement, as shown.
Pull the ear-tip off the tubing.
The illustrations show an instant open ear-tip.
Pass the cleaning thread
through the tubing. Pull the
thread out at the other end.
16
The instant ear-tips
Flex ear-tip: First remove the
NanoCare wax guard (see page 45),
then use the wax guard holder to
push the receiver out of the ear-tip.
Clean the vent with the long wax
removing tool (no. 2), as illustrated.
Clean the sound bore with the
short wax removing tool (no. 3), as
illustrated.
17
Open, tulip, double & flex ear-tip:
If necessary, the ear-tip can be rinsed
thoroughly in lukewarm water, after
disconnecting it from the rest of the
ear-set. Allow it to dry overnight.
WARNING
Never use cleaning solutions to clean the ear-tip, as this can discolour it.
Ear-tips in which a receiver is inserted use a wax
guard. Please refer to page 44.
18
Changing the ear-set parts
The ear-set parts should be changed as required. The
life of an ear-set is individual. Consult your hearing
care professional for advice on how often you should
change your ear-set parts.
For further supplies of ear-sets, or if the ear-tip size no
longer fits your ear, contact your hearing care professional.
19
Placing the new/clean ear-tip on the ear-set
Gently insert the earwire/tubing into the ear-tip. It is
very important to ensure that the ear-tip is firmly secured.
Flex ear-tip:
The right/left identification mark should still be visible.
See arrow.
Open, tulip, double ear-tip:
20
NOTE
Some ear-tips have a short inner collar. When inserting the receiver into an ear-tip with a short collar, you should feel it click
into place.
The instant receiver double ear-tip may be provided
with a vent. If a closed solution has been chosen, the
vent will be blocked by a vent block.
When you replace the ear-tip, you will therefore also
need to insert a new vent block.
Insert the pointed end of the block all the way into the
vent from the inside, as shown. Break off the pointed
end. Make sure it sits securely in the vent.
21
CUSTOM EAR-TIPS
The custom ear-tip is used with a RIC earwire or an élan
tube, depending on the hearing aid model. In a RIC solution, the receiver or loudspeaker of the hearing aid is
placed at the end of the earwire, inside the ear-tip. In an
élan solution, the receiver is located inside the hearing
aid housing. Under “Overview and Check Boxes”, you
can see which solution has been chosen for you.
élan m-models
RIC
1. Earwire
2. Receiver
(inside the
ear-tip)
élan 9-models
1
2
Hard ear-tip
Flex hard ear-tip
Soft ear-tip
Flex soft ear-tip
Open hard ear-tip
(RIC)
Open hard ear-tip
22
Left/right identification
Earwires/tubes are available in different lengths for
the right and left ear, respectively. The individual size
is printed on the earwire/tube. Red print indicates that
it is for the right ear, and blue print that it is for the left
ear.
The hard ear-tip has ”Widex” printed on it
(see arrow). Red print indicates that it is
for the right ear, and blue print that it is for
the left ear.
Similarly, the soft ear-tip will have either a red or a blue
dot.
23
Positioning the hearing aid and custom
ear-tip
Insert the ear-tip into the ear canal while holding the
lower part of the earwire/tube. It may also help to pull
the outer ear backwards and upwards with the opposite hand.
Place the hearing aid behind the ear, so that the hearing aid and earwire/tube rest comfortably on the ear,
close to your head.
A trimmed integrated anchor is used in the élan solution for 9-model hearing aids to help keep the ear-tip
correctly positioned. Please refer to page 57 for further
information.
24
Removing the hearing aid and custom ear-tip
Remove the hearing aid from its position behind the
ear.
Take hold of the extraction cord and carefully pull the
custom ear-tip out of the ear canal.
CAUTION
Do not pull the earwire/tubing to remove your hearing aid. Use
the extraction cord.
25
Cleaning
Cleaning accessories*.
1. Cloth
2. Brush
3. Wax removing tool
4. Cleaning thread
3
1
4
2
Contact your hearing care professional if you need additional supplies of cleaning accessories.
* Selection depends on ear-set type
26
The ear-set
Make sure that your ear-set is always clean and free of
earwax, moisture and the like.
WARNING
Never use alcohol or other cleaning solutions to clean the earset, as this can discolour it.
27
The RIC earwire
Clean the earwire with the
cloth after use.
WARNING
Never use water or cleaning solutions to clean the earwire, as it
can damage it.
The receiver must never come into contact with water, as this
can damage the receiver.
CAUTION
Never attempt to disconnect the earwire from the custom eartip as this can break the connection between the earwire and
the ear-tip.
28
The élan tube - for m-models
Cleaning a blocked tubing:
Grip the hearing aid between
your thumb and index finger.
With your other hand grip the
tubing and pull straight apart
as indicated by the arrow. Alternatively, a small tool is
available for removing the tubing. Contact your hearing
care professional if you want more information.
Carefully pull the custom eartip off the tubing, wriggling
the tip of the tubing gently.
Pass the cleaning thread
through the tubing. Pull the
thread out at the other end.
29
The élan tube - for 9-models
Cleaning a blocked tubing:
Lift the ear-set off the hearing aid in a slanting, backward
movement, as shown.
Carefully pull the custom eartip off the tubing, wriggling
the tip of the tubing gently.
Pass the cleaning thread
through the tubing. Pull the
thread out at the other end.
30
The custom ear-tips
With RIC earwire
If dirt has collected on the custom ear-tip, remove and discard the wax guard (see page
45). Do not attempt to clean the
wax guard. Use the small brush or cloth to remove any
remaining debris from the opening of the ear-tip.
If your custom hard ear-tip is
provided with a vent, use the
wax removing tool to clean the
vent.
The custom soft ear-tip may be provided with an exterior vent. Use the small brush to clean the vent.
CAUTION
Never attempt to disconnect the earwire from the custom eartip as this can break the connection between the earwire and
the ear-tip.
31
With élan tube
If necessary, the ear-tips used with
élan tubing can be rinsed thoroughly in lukewarm water after disconnecting it from the rest of the earset. Allow it to dry overnight.
Ear-tips in which a receiver is inserted use a wax
guard. Please refer to page 44.
32
Changing the ear-set parts
RIC earwire:
Changing an earwire requires special tools and experience. We recommend that you consult your hearing
care professional when the earwire needs replacement.
WARNING
Do not attempt to change the earwire yourself as this can
break the connection to the receiver or the hearing aid.
If the ear-tip no longer fits your ear, contact your hearing care professional.
élan tube:
The tubing should be changed as required. Consult
your hearing care professional for advice on how often
you should change the tubing.
For further supplies of tubing or if the custom ear-tip
no longer fits your ear, contact your hearing care professional.
33
Placing the new/clean ear-tip on the élan ear-set
On page 57 you can see how to trim the anchor.
Hold the custom ear-tip between two fingers, with the extraction cord downwards. Hold
the tubing with the other hand
as illustrated. Gently press the
tubing into place in the custom
ear-tip.
Use your fingernail to press the
tubing in as far as it will go so
that it is securely fastened.
Click the ear-set onto the top of
the hearing aid as illustrated.
34
CUSTOM EARMOLDS
The custom earmold is used with a RITE earwire or a
classic tube, depending on the hearing aid model. In a
RITE solution, the receiver or loudspeaker of the hearing aid is placed at the end of the earwire, inside the
earmold. The classic tube is attached to an earhook on
the hearing aid, while the receiver is located inside the
hearing aid housing. Under “Overview and Check Boxes”, you can see which solution has been chosen for
you.
1. Classic tube
2. Earhook
1. Custom receiver hard earmold
2. Earwire
2
2
1
1
Classic
mold
Custom receiver
hard earmold
35
Left/right identification
The custom receiver hard earmold has
”Widex” printed on it. Red print indicates that the earmold is for the right
ear, and blue print indicates that it is for
the left ear.
36
Positioning the hearing aid and earmold
Insert the classic mold in
the ear canal while holding
the lower part of the tubing.
If you have a custom receiver hard earmold, hold the
earmold with your thumb
and forefinger and slowly guide it into your ear canal
until you feel resistance. Let go of the earmold and use
the tip of your forefinger to gently push it into your ear
until it rests comfortably in your ear canal.
To help position the earmold properly you could pull
the outer ear backwards and upwards with the opposite hand.
Place the hearing aid behind the ear, so that the tubing/earwire rests comfortably on the ear, close to your
head.
37
Removing the hearing aid and earmold
Remove the hearing aid from its position behind the ear.
Carefully pull the classic earmold
out of the ear canal, while holding
the lower part of the tubing.
If you have a custom receiver hard
earmold, hold it with your thumb
and forefinger and pull gently.
WARNING
Do not pull the earwire to remove the custom receiver hard earmold, as this can damage the receiver.
If it is difficult, you can try to move the earmold carefully from side to side. It may also help to pull the outer
ear backwards and upwards with the opposite hand.
38
Cleaning
Cleaning accessories*.
1. Soft cloth
2. Brush
3. Wax removing tool
3
1
2
Contact your hearing care professional if you need additional supplies of cleaning accessories.
* Selection depends on ear-set type
39
The ear-set
Make sure that your ear-set is always clean and free of
earwax and moisture.
WARNING
Never use alcohol or other cleaning solutions to clean the earset as this can discolour it.
The custom hard earmold in which the receiver is placed must
never come into contact with water, as this can damage the receiver.
Classic earmold:
Disconnect the earmold from
the tubing.
Clean the vent with the wax removing tool.
Clean the sound bore with the
wax removing tool.
40
At least once a week disconnect the
earmold from the tubing and rinse
the earmold thoroughly in lukewarm
water. Allow it to dry overnight.
If there is still moisture in the
earmold, use a blower or similar
to blow it dry before attaching
the earmold to the tubing.
Custom receiver hard earmold
Clean your earmold with the soft
cloth after use to keep it dry and
clean of earwax or dirt.
41
The sound outlet
It is important that the sound outlet is not blocked by
earwax. If it is blocked, change the wax guard (see
page 45). Do not attempt to clean the wax guard.
The vent
If your earmold is provided with an exterior vent, use
the brush to clean it.
WARNING
The earmold in which the receiver is placed must never come
into contact with water, as it can damage the receiver.
The earwire
Clean the earwire with the cloth after use.
WARNING
Never use water or cleaning solutions to clean the earwire, as it
can damage it
CAUTION
Never attempt to disconnect the earwire from the custom earmold as this can break the connection between the earwire and
the earmold.
42
Changing the ear-set parts
Classic earmold
If your ear-set tubing becomes slack, stiff, yellow or
cracked, replace the tubing.
For further supplies of tubing or if the earmold no longer fits your ear, contact your hearing care professional.
Custom hard earmold
Changing an earwire requires special tools and experience. We recommend that you consult your hearing
care professional when the earwire needs replacement.
WARNING
Do not attempt to change the earwire yourself as this can
break the connection to the receiver or the hearing aid.
If the custom hard earmold no longer fits your ear, contact your hearing care professional.
43
THE WAX GUARD
A wax guard is used with RIC and RITE solutions, in
which the receiver sits in the ear-tip/earmold.
The wax guard helps to protect the hearing aid against
earwax. Always use NanoCare wax guards with your
hearing aid if you have a RIC solution, and CeruSTOP
XL wax guards if you have a RITE solution, otherwise
the warranty for your hearing aid will be void.
The illustration shows a NanoCare wax guard. The wax
guard system consists of the following parts:
1. Holder
2. Removal hook
3. Wax guard
1
3
2
CAUTION
The wax guard is disposable and for one-time use only. Do not
attempt to clean or reuse a wax guard. This could damage your
hearing aid and/or cause the wax guard to become dislodged in
your ear.
44
Changing the wax guard
Custom receiver ear-tips/earmolds
CAUTION
Do NOT remove the ear-tip/earmold from the earwire.
Instant receiver ear-tips
Remove the ear-tip from the earwire.
NOTE
With some instant ear-tip types, the wax guard can also be
changed without first removing the ear-tip from the earwire. If
in doubt, consult your hearing care professional.
45
Procedure:
1. Insert the removal hook into the used wax guard
placed in the sound outlet.
2. Pull the wax guard straight out.
Custom receiver ear-tips/earmolds
1
2
Instant receiver ear-tips
1
2
Now turn the holder around so that
the used wax guard is away from the
receiver and the new one is in position to be inserted.
46
3. Insert the holder into the opening of the sound
outlet and gently press the wax guard onto the
receiver.
4. Pull the holder straight out. The new wax guard
will automatically detach from the holder. Press
the receiver/ear-tip gently against a flat surface to
ensure that the wax guard remains in place.
Custom receiver ear-tips/earmolds
3.
4.
Instant receiver ear-tips
3.
4.
47
Discard the holder with the used
wax guard.
The frequency with which the wax guard should be
changed varies from one individual to another.
If you have any questions regarding your wax guard,
please contact your hearing care professional.
WARNING
If the wax guard fits loosely, discard it and insert another. If the
wax guard becomes dislodged while the ear-tip is placed in the
ear canal, please contact your physician. Do not try to remove
the wax guard from your ear canal yourself.
48
THE ANCHOR
Loose anchor
CAUTION
We do not recommend wearing the hearing aid without the anchor with the open ear-tip or the tulip ear-tip solution. If the
hearing aid is not secured by the anchor, it may fall off your ear
and be lost. With the flex ear-tip, the anchor should only be
used if this is necessary to further secure the ear-set/hearing
aid. The anchor is not used with the double ear-tip or custom
ear-tips.
The anchor is supplied separately
from the rest of the ear-set and can
be used in different ways. Firstly, we
show how the anchor can be used
without prior trimming:
49
The illustrations show a hearing aid
with an an instant open receiver eartip but the same procedure is used
with a tulip ear-tip and a flex ear-tip.
Pull the pointed end of the anchor
through the upper hole on the receiver located at the end of the earwire.
The angled grip should be pointing
towards the hearing aid.
Continue pulling until the anchor is stopped by the grip
at the end.
Your ear-set is now ready for use and is
positioned so that it rests comfortably in
your ear.
50
The anchor can also be trimmed to fit your ear:
Pull the pointed end of the anchor
through the upper hole on the receiver located at the end of the earwire.
The angled grip should be pointing
towards the hearing aid.
Continue pulling until the anchor is
stopped by the grip at the end. Now
turn the ear-set around.
Then guide the pointed end of the anchor through the lower hole to form a
loop.
When the loop is the correct size, cut
any excess off, leaving only the loop.
The anchor loop has the correct size when it supports
the position of the ear-tip in the ear canal, and the earset sits securely in and on the ear.
51
Take great care to cut off all the excess so that the end of the anchor
loop is flush with the small hole and
there are no sharp edges. Use the
tip of your finger to check for sharp
edges. If part of the anchor sticks out
through the hole, creating an uneven surface, this may
cause irritation of the ear.
52
THE ANCHOR
Integrated anchor
Instant ear-tips
The anchor is not used for an instant double ear-tip
solution and should be completely cut off.
For the open ear-tip and tulip ear-tip solution, the anchor can be used without prior trimming.
If trimmed, it should form an appropriately sized loop
to ensure the comfortable retention of the ear-tip in the
ear canal. There are several ways of doing this:
The illustrations show a hearing aid with an instant
open ear-tip, but the same procedure is used with a
tulip ear-tip.
53
Example 1
Pull the tip of the anchor through the small hole on the
side of the tubing.
When the loop is the correct size,
cut off any excess with scissors or
similar.
54
Example 2
Loop the anchor in the direction indicated by the dotted line and arrows.
Guide the tip of the anchor through
the small hole on the side of the
tubing as illustrated to form a heartshaped loop.
When the loop is the correct size,
turn the ear-set around and cut off
any excess with scissors or similar.
55
General information:
Make sure that the end of the anchor loop is flush with
the small hole and there are no sharp edges. Use the tip
of your finger to check for sharp edges.
If part of the anchor sticks out
through the hole, creating an uneven surface, this may cause irritation of the ear.
56
Custom ear-tips
With the custom ear-set solution only 2 mm of the anchor is used.
Trim the anchor so there is approximately 2 mm left. It is important
to leave the 2 mm intact as it helps
keep the custom ear-tip correctly
positioned.
The tubing should look like this when
you have trimmed the anchor.
57
TROUBLESHOOTING
Ear-tips and earmolds with an earwire
The following pages contain some advice on what to
do if your hearing aid malfunctions or fails to perform
satisfactorily. If the problems persist, contact your
hearing care professional. The advice relates only to
the ear-set. Please also see the user instructions for
your hearing aid.
The hearing aid is completely silent
The wax guard is blocked
Change the wax guard
The earwire is broken
Contact your hearing care professional
The hearing aid volume is not powerful enough
The wax guard is blocked
Change the wax guard
The hearing aid whistles continuously
The earwire is yellow or stiff
Contact your hearing care professional
The ear-tip/earmold is not correctly placed in your
ear canal
Take the ear-tip/earmold out and reinsert it. If the
problem persists, contact your hearing care
professional
58
The ear-tip/earmold fit is too loose
Contact your hearing care professional
The receiver is not adequately secured in the
ear-tip
Instant ear-tip: Replace the ear-tip. If the problem
persists, contact your hearing care professional
Custom ear-tip: Contact your hearing care
professional
If the earmold is uncomfortable to wear
Your outer ear or ear canal is sore
It is important that first-time users only wear the
hearing aid for short periods of time at the
beginning. The skin in the ear canal is very thin and
may swell a bit because of the pressure from the
hearing aid. Take 2-3 weeks to gradually get used
to the hearing aid. If the soreness continues,
contact your hearing care professional.
59
TROUBLESHOOTING
Ear-tips and earmolds with a tube
The following pages contain some advice on what to
do if your hearing aid malfunctions or fails to perform
satisfactorily. If the problems persist, contact your
hearing care professional. The advice relates only to
the ear-set. Please also see the user instructions for
your hearing aid.
The hearing aid is completely silent or its volume is
not powerful enough
The sound outlet is blocked
Earmold: Clean the blocked sound bore
Instant ear-tip: Clean or replace the ear-tip
Custom ear-tip: Clean the ear-tip
The hearing aid whistles continuously
The tubing is yellow, stiff or broken
Replace the tubing
The ear-tip/earmold is not correctly placed in your
ear canal
Take the ear-tip/earmold out and reinsert it. If the
problem persists, contact your hearing care
professional
The ear-tip/earmold fit is too loose
Contact your hearing care professional
60
Earmold: The tubing often comes off the earmold
or hearing aid hook
Replace the tubing
Earmold: The hook is cracked
Contact your hearing care professional
61
MAINTENANCE
The hearing aid is a valuable object and should be
treated with care. Here are some things you can do to
prolong the life of your hearing aid:
CAUTION
• Turn off your hearing aid when it is not in use. Remove the
battery if the hearing aid will not be used for several days.
• When the hearing aid is not in use, keep it in its case in a cool,
dry location out of reach of children and pets.
• Do not expose the hearing aid to extreme temperatures or
high humidity. Make sure to dry the hearing aid thoroughly
after heavy perspiration such as that which may occur during
intense physical activity, e.g. playing sports.
• Avoid dropping your hearing aid – perform cleaning and battery changes while holding the hearing aid above a soft surface.
• Do not wear your hearing aid while in the shower or swimming, or when using a hair dryer, perfume, hair and body
sprays or gels such as suntanning lotions or creams.
• In environments with high humidity, a drying kit may be used
daily to reduce the amount of moisture inside the hearing aid.
See the instructions enclosed with the drying kit .
62
Hearing aids, accessories and batteries should not be disposed of with normal
household waste. Please consult your national Widex distributor for advice on how
to dispose of these items.
63
Manufacturer
CIB200/0411
¡9 514 0176 041l¤ ¡#01v¤
Printed by HTO / 2011-04
9 514 0176 041 #01