1
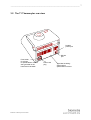
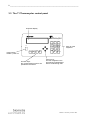
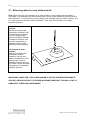
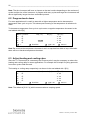
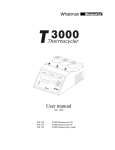
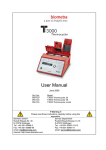
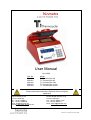
User Manual June 2009 Ord. No. 050-900 050-901 050-902 050-903 050-904 Model T1 Thermocycler 48 T1 Thermocycler 96 T1 Thermocycler 384 T1 Thermocycler in situ T1 Thermocycler combi !! Warning !! Please read these instructions carefully before using this apparatus! Biometra GmbH Rudolf-Wissell-Str. 30 D-37079 Göttingen Tel.: +49 551-50686-0 Fax: +49 551-50686-66 email: [email protected] Internet: http://www.biometra.com Service Department Rudolf-Wissell-Strasse 14-16 D-37079 Göttingen Tel.: +49 551-50881-10/12 Fax: +49 551-50881-11 email: [email protected] Manual T1 Thermocycler June 2009 2 __________________________________________________________________________ 1 Introduction ...........................................................................................................................4 2 Before you start.....................................................................................................................5 2.1 3 Safety precautions.........................................................................................................5 First steps with the T1 Thermocyler ......................................................................................6 3.1 3.2 3.3 3.4 3.5 3.6 3.7 4 The T1 Thermocyler front View .....................................................................................6 The T1 Thermocyler rear view ......................................................................................7 The T1 Thermocycler control panel...............................................................................8 Initial self test.................................................................................................................9 The T1 Thermocycler display ........................................................................................9 Handling of the adjustable heated Lid ...........................................................................9 Releasing wheel in case of blocked lid........................................................................10 Creating a Program.............................................................................................................11 4.1 4.2 4.3 4.4 4.5 4.6 4.7 4.8 4.9 4.10 5 Select a directory.........................................................................................................11 Select a program store ................................................................................................11 Enter name for subdirectory ........................................................................................12 Enter a program name ................................................................................................12 Enter the lid temperature.............................................................................................13 Select / deselect pre-heating of the lid ........................................................................14 Enter temperature and time settings ...........................................................................14 Set cycle number.........................................................................................................15 Cool below ambient temperature ................................................................................16 Save program..............................................................................................................16 View/edit program data .......................................................................................................17 5.1 5.2 5.3 6 Delete / insert program steps ......................................................................................17 Copy program..............................................................................................................18 Delete program............................................................................................................19 Further programming options..............................................................................................21 6.1 6.2 6.3 7 Program time increments ............................................................................................21 Program touch down ...................................................................................................22 Adjust heating and cooling rates .................................................................................22 Run Program.......................................................................................................................23 7.1 7.2 7.3 7.4 8 Select and start program .............................................................................................23 Display during operation..............................................................................................24 View remaining run time..............................................................................................25 Pause / stop program ..................................................................................................25 Special functions .................................................................................................................27 8.1 8.2 8.3 8.4 9 10 Print protocols .............................................................................................................27 Switch beep on/off.......................................................................................................27 Select language...........................................................................................................28 RS232 Control.............................................................................................................28 Maintenance........................................................................................................................29 Exchange of modules......................................................................................................29 Manual T1 Thermocycler June 2009 ____________________________________________________________________________ 3 11 11.1 11.2 11.3 11.4 12 12.1 12.2 Trouble shooting............................................................................................................. 30 Slow heating and cooling............................................................................................ 30 Restart due to unrecognized power failure ................................................................. 30 Adaptation of protocols from other cyclers ................................................................. 30 Recommendations for the use of 384 well Thermocyclers ......................................... 30 Appendix......................................................................................................................... 31 Technical specifications T1 Thermocycler 96............................................................. 31 Ordering information ................................................................................................... 31 13 Instructions for return shipment ...................................................................................... 32 14 Warranty ......................................................................................................................... 33 15 Equipment Decontamination Certificate ......................................................................... 34 16 EU - Konformitätserklärung / EU - Declaration of Conformity ........................................ 35 17 Subject Index.................................................................................................................. 36 Manual T1 Thermocycler June 2009 ____________________________________________________________________________ 4 1 Introduction The T1 Thermocycler was designed to meet the highest standard of a today molecular biology laboratory. The instrument combines the very successful Biometra silver block concept with an advanced block architecture. The result is a Thermocycler that provides extremely high temperature ramping rates and an unrivalled temperature uniformity. High ramping rates ensure specific reation and the perfect temperature uniformity guarantees identical conditions in any position of the block. The T1 Thermocyler is available with different modules that support a broad range of tubes, strips and microplates. There is also an in situ-modul for up to 4 microscopic slides. The T1 Thermocyler is adjusted to match the BIOMETRA TGradient cycling characteristics. Thus protocols, that have been optimized with a TGradient, can be operated without the need for modifications. This makes the T1 the perfect instrument to increase sample throughput togehter with an existing Tgradient. Manual T1 Thermocycler June 2009 ____________________________________________________________________________ 5 2 Before you start 2.1 Safety precautions Please read this manual carefully before starting operation of the T1 Thermocycler. • General safety precautions for laboratory work must be observed when working with the T1 thermocycler. • Be aware that samples are reaching high temperatures. Do not touch or open hot tubes or microplates, because hot liquid may quickly spill out. • Do not heat samples without having the lid locked securely. • Before opening of the lid, release lid pressure (see section 3.6) • Do not place fingers between lid and housing when opening or closing the lid. • Do not touch the heated lid. • When only few samples are put in the block place additional tubes in the four corner positions. This is to evenly distribute the lid pressure and prevents single tubes from excessive pressure. Use of few tubes may result in damage of the tubes by excessive pressure. • Use only suited plastic ware in the T1 thermocycler. Tubes and plates must show good fit when placed in the thermoblock. Only use tubes that are suited for high temperatures (tight lids). • The T1 Thermocyler contains no user serviceable parts. Do not open the housing instrument. Service and repair may only be carried out by the Biometra Service department or otherwise qualified technical personal. • Do not use the instrument when damages of the housing, block, cable or other parts are visible. • The T1 Thermocycler must not be used with explosive, flammable or volatile liquids. • Appropriate safety regulations must be observed when working with infectious or pathogenic material. The thermoblock and the heated lid will reach high temperatures during operation. Both thermoblock and heated lid can burn you. Rapid heating of the thermoblock can cause liquids to boil explosively. Always wear safety goggles during operation. Close the lid before starting a program. It is not necessary to apply oil into the opening of the block in order to improve the heat transfer between the block and the sample tubes. If you still decide to use oil, do not use silicon oil. Mineral oil may be used. Manual T1 Thermocycler June 2009 6 __________________________________________________________________________ 3 First steps with the T1 Thermocyler 3.1 The T1 Thermocyler front View Knob for release of the lid Wheel for the height adjustement of the heated lid. Keypad Graphical display Power switch Manual T1 Thermocycler June 2009 ____________________________________________________________________________ 7 3.2 The T1 Thermocyler rear view Parallel printer port RS-232 port Fuse holder for 2 fuses, for specifications of fuses see type label on the instrument´s backside Manual T1 Thermocycler June 2009 Power cord plug Type label including: serial number specifications of fuses 8 __________________________________________________________________________ 3.3 The T1 Thermocycler control panel Graphical display Power Power switch: backlit = power on A B C D Function keys: the corresponding functions are specified in the screen. 7 8 9 4 5 6 1 2 3 . 0 - Easy to clean keyboard Cursor keys: For free navigation in the programming spreadsheet. Use to scroll through lists. Manual T1 Thermocycler June 2009 ____________________________________________________________________________ 9 3.4 Initial self test After switching on the T1 Thermocyler the serial number of the instrument and the software version is displayed. T1 Thermocycler Serial No 1234567 Vers. 5.01t1 The T1 Thermocyler checks the programs in all directories (so called RAM check). 3.5 The T1 Thermocycler display The T1 Thermocyler display provides information about the instrument and about the status of the active program. prog step temp[°C] time lid A ? 25.2°C 25.4°C B start/stop C programs D + The individual function of the special keys A , B , C and D are specified in the display and depend on the context. 3.6 Handling of the adjustable heated Lid To achieve optimum pressure on the tubes the T1 Thermocyler is equipped with an height adjustable heated lid (smart lid technology). Close the lid: After the samples have been placed in the block close the lid. Turn the wheel clockwise until you hear a clicking noise. In this mode, the pressure will not increase further, even when you keep on turning the wheel. Note: The pressure of the lid has been optimize for a fully loaded block. If only very few tubes are loaded to the block you should place dummy tubes in the four corner positions to avoid damage of tubes by excessive pressure. Open the heated lid: First: Release pressure by turning the wheel counter clockwise. As soon as there is no more resistance the pressure has been released. Then: now you can open the lid with the knob. Important: The lid must not be opened under pressure because this leads to damage of the locking mechanism. Manual T1 Thermocycler June 2009 10 _________________________________________________________________________ 3.7 Releasing wheel in case of blocked lid Note: When the lid is in the extreme up or down position, it may happen that the wheel is uncoupled. In this situation the clutch mechanism is active in both directions (clicking noise in either direction). To unlock wheel, press metal pin with a ballpen and turn wheel carefully. This pin overcomes the automatic clutch mechanism. Thus, care must be taken not to apply excessive pressure. Lid arrested in upper position: carefully turn wheel with pressed pin clockwise, until you feel normal resistance (no more clicking noise, clutch is released). Release pin and turn lid down, until the clutch mechanism is activated (clicking noise, optimum pressure applied). Lid arrested in down position: carefully turn wheel with pressed pin counter clockwise, until you feel normal resistance (no more clicking noise, clutch is released). Release pin and turn wheel counter clockwise until pressure is completely released. Open lid. IMPORTANT: WHEN THE CLUTCH MECHANISM IS ACTIVE (OPTIMUM PRESSURE IS APPLIED), NEVER USE PIN TO FURTHER INCREASE PRESSURE. THIS WILL LEAD TO DAMAGE OF TUBES AND INSTRUMENT! Manual T1 Thermocycler June 2009 ___________________________________________________________________________ 11 4 Creating a Program 4.1 Select a directory In the T1 Thermocyler programs can be stored both in the main directory and in individual subdirectories. For easy identification of the selected storage place, the subdirectories can be named (see section 4.3). Start with the main screen. Prog step temp[°C] time lid A ? 25.2°C 25.4°C B start/stop C programs D + Press [C programs] to enter the edit mode. ⏐-3. ⏐-4. Main direct.--- ⏐-5. ⏐-6. ⏐-7. A ? B subdirect.: subdirect.: Subdirect.: subdirect.: subdirect.: C quit D enter You are now in the main directory. The structure of the subdirectories is displayed. 4.2 Select a program store Programs can be stored in the main directory or in subdirectories. To create a program in the main directory press [D enter]. To access a subdirectory move right with the cursor key Ö and select a subdirectory with the cursor keys ×Ø. The selected directory will be highlighted. ⏐-3. ⏐-4. Main direct.--- ⏐-5. ⏐-6. ⏐-7. A ? Manual T1 Thermocycler June 2009 B subdirect.: subdirect.: Subdirect.: subdirect.: subdirect.: C quit D enter 12 _________________________________________________________________________ 4.3 Enter name for subdirectory The process for naming a subdirectory and a program is the same. For information about naming programs see section 4.4. Press [D enter] to enter the highlighted subdirectory directory: program no. edit A list 5 Name: B C quit D enter Press [A list] to view a list of all existing files and empty memory in this directory. Note: If neither program name nor the word “empty” is displayed, this place may be occupied by a program without name. For the programming of new protocols choose an empty memory. Existing programs that are not needed any more can be deleted to provide new memory. 0 1 2 3 4 A empty empty empty empty empty list B forward C quit D enter Scroll through the list with cursor keys ×Ø and confirm memory with [D enter]. 4.4 Enter a program name Each program is specified by a program number and a subdirectory number. To make retrieval of a program easier, you can enter a name for each program existing of letters, numbers and symbols. Directory: program no. A ABC 3 0 Name: B files ∧ ABCDEFGHIJKLMNOPQRST UVWXYZ-()#°C/,〈〉&+.%! C name OK D enter To enter a name for your program press [A ABC]. Manual T1 Thermocycler June 2009 ___________________________________________________________________________ 13 Directory: program no. A name 3 0 B blank Name: ∧ ABCDEFGHIJKLMNOPQRST UVWXYZ-()#°C/,〈〉&+.%! C quit D enter Choose a letter from the alphabet with cursor keys ÕÖ×Ø Confirm each letter with [D enter]. Directory: program no. A name 3 0 B blank Name: T ∧ ABCDEFGHIJKLMNOPQRST UVWXYZ-()#°C/,〈〉&+.%! C name OK D enter The selected letter will appear in the display and the cursor will move one step to the right. Select the next letter and confirm with [D enter]. Note: What to do, if a wrong letter has been accepted? To alter the position of the cursor within the name press [A name]. Now you can move the cursor with cursor keys ÕÖ through the name. This is helpful if you have confirmed an wrong letter or if you want to change the name of an existing program. Once the name is complete, confirm name with [C name OK]. Directory: program no. lid temp: edit A ? 3 0 °C B files Name: TEST 1 preheating: on C pgm OK D enter 4.5 Enter the lid temperature Note: Thanks to a new lid design, significantly lower lid temperatures than in the past can be used for thermocycling. The lower lid temperature leads to a higher temperature uniformity within the lid and thus to a more even temperature distribution in the tubes. For instruments featuring the new lid design, a maximum temperature of 99.0°C should be used. Manual T1 Thermocycler June 2009 14 _________________________________________________________________________ Directory: 3 program no. 0 lid temp: 99 °C edit A ? Name: TEST 1 preheating: on B files C pgm OK D enter 4.6 Select / deselect pre-heating of the lid You can choose whether the lid is pre-heated before the program starts. This is to avoid evaporation during the initial heating phase. Note: During the preheating of the lid, the block is held constant at 25°C. Directory: 3 program no. 0 lid temp: 99 °C edit A on/off Name: TEST 1 preheating: on B files C pgm OK D enter Note: The default setting, which is recommended for most applications, is preheating: on. After all pre-settings have been made, press [D enter] to open the programming spreadsheet. 4.7 Enter temperature and time settings The programming spreadsheet: Temp[°C] 1 2: 3: 4: A ? time Å opt Æ # B insert/delete C pgm OK D enter Note: In this spreadsheet you can enter all parameters for your cycling protocol. Furthermore, you can set special parameters like touch down, ramping rates or time increments. For further details on these special parameters, see section 6. Note: You can navigate in the spreadsheet without limitations with the four cursor keys ÕÖ×Ø. Note: Each setting is confirmed with [D enter]. The cursor moves automatically to the next field. Alternatively, you can confirm a value by moving forward with the cursor keys. Note: At any time you can call up the help function with [A ?] Note: In an existing protocol hole program steps can be deleted and inserted. For further information on deleting and inserting program steps see section 5.1. Manual T1 Thermocycler June 2009 ___________________________________________________________________________ 15 Now enter temperature for the first step in the protocol: Temp[°C] time Å # 1 65,0 2: 3: 4: A ? B insert/delete opt Æ C pgm OK D enter Confirm temperature with [D enter] or just move on with the cursor key. If you move to the next row, the setting will be stored in the temporary memory. Temp[°C] 1 65.0 2: 3: 4: A ? time Å opt Æ # B insert/delete C pgm OK D enter Enter a time for step one. Note: There is a convention on how time settings are entered in all BIOMETRA cyclers: hours z minutes z seconds If you enter a number without “dot” this value will be interpreted as seconds (“300” => 5 minutes). To program minutes enter a “z” after the number of minutes. To enter hours enter z z after the number. You can also enter any combination of hours, minutes and seconds. Example: for 1 hour, 30 minutes, 20 seconds enter 1z 30 z 20. The time values will be displayed in the following format: 0h 00 m 00s Accept time setting with [D enter] or move to the next field with cursor key. 4.8 Set cycle number Note: In general, loops are defined by selecting the target for the back loop and the number of backloops. Temp[°C] 1: 65.0 2: 65.0 3: 80.0 4: 35.0 A ? time Å # 0h 5m 0s 0h 0m30s 0h 0m30s 0h 0m30s 2 B insert/delete opt Æ C pgm OK D enter In the column labeled with Å you can select the target step for a backloop. Manual T1 Thermocycler June 2009 16 _________________________________________________________________________ Temp[°C] 1: 65.0 2: 65.0 3: 80.0 4: 35.0 A ? time Å # 0h 5m 0s 0h 0m30s 0h 0m30s 0h 0m30s 2 29 B insert/delete C pgm OK opt Æ D enter Enter the number of backloops. Note: total cycler number = (n backloops) + 1, e.g. enter 29 for a total number of 30 cycles. 4.9 Cool below ambient temperature Temp[°C] 2: 65.0 3: 80.0 4: 35.0 5: 4.0 A ? time Å # 0h 0m30s 0h 0m30s 0h 0m30s 2 29 pause B insert/delete C pgm OK opt Æ D enter To hold the temperature for an indefinite time enter “0”. After pressing [D enter] “pause” is displayed. Note: The minimum temperature you can set is –3°C. 4.10 Save program Save program with [C pgm OK]. The program data are stored in the permanent memory. Directory: 3 program no. 0 number of steps: 5 runtime: 1h10m23s edit A B Name: C TEST 1 D The runtime is calculated and displayed. Note: To view the current remaining runtime at any time of the run press [A info] in the main menu. Manual T1 Thermocycler June 2009 ___________________________________________________________________________ 17 5 View/edit program data You can check any existing program by scrolling through the editing mode with cursor keys ÕÖ×Ø. Select the desired program as described in section 4.2. Note: During operation of the cycler the active program can be viewed but not modified. If you want to change settings of the active program for further experiments you have to save a copy of this program to another memory. For further information about copying programs see section 5.2. 5.1 Delete / insert program steps The programming spreadsheet: Temp[°C] time Å # 2: 65.0 0h 0m30s 3: 80.0 0h 0m30s 4: 35.0 0h 0m30s 2 29 5: A ? B insert/delete opt Æ C pgm OK D enter To delete or insert a program step press [B insert/delete] insert / 2: 65.0 3: 80.0 4: 35.0 5: A ? delete step: 0h 0m30s 0h 0m30s 0h 0m30s 2 29 B delete input C quit D enter Enter the number of the step that you want to insert / delete. Note: Additional steps will be inserted before the selected step number. The following steps will be shifted by one position. insert / 2: 65.0 3: 80.0 4: 35.0 5: A ? delete step: 0h 0m30s 0h 0m30s 0h 0m30s 2 3 29 B delete input C quit D enter Note: If you have entered a wrong number, the field can be cleared with [B delete input]. Confirm the step number with [D enter]. Manual T1 Thermocycler June 2009 18 _________________________________________________________________________ insert / delete step: 2: 65.0 0h 0m30s 3: 80.0 0h 0m30s 4: 35.0 0h 0m30s 2 5: A insert B delete 3 29 C quit D enter Press [A insert] to insert one step at the selected position. Note: Additional steps will be inserted before the selected step. The following steps will be shifted by one position. Press [B delete] to delete the selected step. Note: By deleting a step the following steps will be shifted by one position. Note: The insertion and deletion of steps may have an influence on existing cycles. Be sure that all settings are updated to maintain a correct cycle. 5.2 Copy program Select the program you want to copy as described in section 4.1 and 4.2 Directory: program no. lid temp: A ? 3 0 99°C Name: TEST 1 preheating: on B files C pgm OK D enter Press [B files]. Directory: program no. lid temp: edit A copy 3 0 °C Name: TEST 1 preheating: on B delete pgm C quit D enter To copy this program to another memory press [A copy] ⏐-3. ⏐-4. Main direct.--- ⏐-5. ⏐-6. ⏐-7. copy to: A ? B subdirect.: subdirect.: Subdirect.: subdirect.: subdirect.: C quit D enter Select the desired subdirectory with the cursor keys Ö× Ø. The selected subdirectory will highlight. Manual T1 Thermocycler June 2009 ___________________________________________________________________________ 19 ⏐-3. ⏐-4. Main direct.--- ⏐-5. ⏐-6. ⏐-7. copy to: A ? B subdirect.: subdirect.: Subdirect.: subdirect.: subdirect.: C quit D enter Confirm your selection with [D enter]. copy from directory 3 program 0 to directory 6 program A list B C quit D enter Choose an empty memory from the list with [A list]. copy from directory 3 program 0 to directory 6 program 6 enter = OK target program contains A list B 0 steps C quit D enter Note: Before you confirm with [D enter] the target memory is checked. If there is no program in the target, memory the message “ target program contains 0 steps” is displayed. If the memory already contains a program the number of steps is displayed. Note: If you copy a program to a memory that already contains a program, the former program will be deleted! Save a copy of the program in the new directory with [D enter]. 5.3 Delete program Select program as described in section 4.1 and 4.2 Directory: program no. lid temp: edit A copy 3 0 °C B delete pgm To delete this program press [B delete pgm]. Manual T1 Thermocycler June 2009 Name: TEST 1 preheating: on C quit D enter 20 _________________________________________________________________________ Directory: program no. lid temp: 3 0 °C Name: TEST 1 preheating: on delete program 0? A copy B delete pgm enter = yes C quit D enter Confirm your selection with [D enter]. Note: Once you have deleted a program it cannot be restored! Manual T1 Thermocycler June 2009 ___________________________________________________________________________ 21 6 Further programming options Temp[°C] 1: 65.0 2: 65.0 3: 80.0 4: 35.0 A ? time Å 0h 5m 0s 0h 0m30s 0h 0m30s 0h 0m30s 2 B header opt Æ # C pgm OK D enter Note: To program special parameters you can scroll the display to the right. Move the cursor to the right side of the display that is labeled with opt Æ. The following screen will appear: Main funct. dT[°C] 1: Å 2: Å 3: Å 4: Å A ? B header dt[s] C pgm OK Ê[°/s] 5.00 5.00 5.00 5.00 D enter Note: To get back to the screen with the basic parameters move the cursor to the left side of the display labeled with “Main funct.” Alternatively you can move the cursor to the extreme right. Temp[°C] 1: 65.0 2: 65.0 3: 80.0 4: 35.0 A ? time Å 0h 5m 0s 0h 0m30s 0h 0m30s 0h 0m30s 2 B header opt Æ # + C pgm OK D enter Note: In the main screen you will find an information that a special parameter has been modified. This is indicated by a + in the row labeled with opt Æ. 6.1 Program time increments To compensate for loss in enzyme activity each step within a loop can be extended from cycle to cycle. Enter the desired time increment [seconds] in the row labeled with dt[s]. This value will be added to the time value from cycle to cycle. Main funct. dT[°C] 2: Å 3: Å 4: Å 5: Å A ? B header Manual T1 Thermocycler June 2009 dt[s] 10 C pgm OK Ê[°/s] 5.00 5.00 5.00 5.00 D enter 22 _________________________________________________________________________ Note: The time increment will have an impact on the total runtime depending on the numbers of cycles and the size of the increment. A program with many cycles and large time increments will take a significantly longer time than a standard protocol. 6.2 Program touch down For some applications it is useful to start with a higher temperature and to decrease the temperature from cycle to cycle. This subsequent lowering of the temperature is called touch down. To decrease a temperature from cycle to cycle enter a negative temperature increment in the row labeled with dT[s]. Main funct. dT[°C] 2: Å 3: Å 4: Å -0.20 5: Å A ? B header dt[s] C pgm OK Ê[°/s] 5.00 5.00 5.00 5.00 D enter Note: Be sure that the temperature decrease is set in a step that lies within a loop. Otherwise there will be no iterative temperature decrease. 6.3 Adjust heating and cooling rates Since the T1 Thermocyler is a extremely fast Thermocycler it may be necessary to reduce the heating and cooling ramp for some applications. For example this is helpful if cycling protocols from other cyclers shall be used. The heating or cooling ramp respectively can be set in the row labeled with Ê[°/s]. Main funct. dT[°C] 2: Å 3: Å 4: Å 5: Å A ? B header dt[s] C pgm OK Ê[°/s] 5.00 5.00 5.00 5.00 D enter Note: The default is [5.00 °/s], which means maximum ramping speed. Manual T1 Thermocycler June 2009 ___________________________________________________________________________ 23 7 Run Program 7.1 Select and start program Main display: Prog step temp[°C] time lid A ? 25.2°C 25.4°C B start/stop C programs D + To select a program press [B start/stop] ⏐-3. ⏐-4. Main direct.--- ⏐-5. ⏐-6. ⏐-7. start A ? B subdirect.: subdirect.: Subdirect.: subdirect.: subdirect.: C quit D enter Choose directory with cursor keys Ö × Ø or enter main directory with [D enter] Note: The path for the program that was modified most recently is automatically pre-selected ⏐-3. ⏐-4. Main direct.--- ⏐-5. ⏐-6. ⏐-7. A ? B subdirect.: subdirect.: Subdirect.: subdirect.: subdirect.: C quit D enter Enter subdirectory with [D enter] Directory: 5 program no. Edit A list B Name: C quit D enter Enter the number of the program you want to start. Alternatively, [press A] list to select a program from the list of all programs in this subdirectory. Scroll through the list with cursor keys × Ø. Manual T1 Thermocycler June 2009 24 _________________________________________________________________________ 0 1 2 3 4 A test 1 empty empty empty empty list B forward C quit D enter Confirm highlighted program with [D enter]. The number and name of both subdirectory and the selected program will be displayed. Directory: program no. 3 0 Name: TEST 1 preheating lid on signal on C quit D start start block A list B To start the program press [D start]. 7.2 Display during operation During preheating of the lid the following screen is displayed: Prog Step temp[°C] time lid A info 0 TEST 1 1 25.0°C preheating B start/stop dir 3 Æ 65.0 C programs D + Note: In the default setting (preheating on) the block is held constantly at 25°C. The program starts as soon as the lid has reached the set temperature. During the preheating phase the display of the lid temperature alternates between the current lid temperature and “preheating”. Prog Step temp[°C] time lid A info 0 TEST 1 1 25.0°C dir 3 Æ 65.0 preheating B start/stop C programs D + As soon as the block has reached the programmed hold temperature, the timer starts to count down. Manual T1 Thermocycler June 2009 ___________________________________________________________________________ 25 Prog Step temp[°C] time lid A info 0 TEST 1 1 65.0°C 0h 2m15s 98.9°C B start/stop dir 3 cycle 1 of 30 Æ 65.0 Æ0h 5m 0s C programs D + The elapsed time versus programmed hold time is displayed 7.3 View remaining run time Display during operation: Prog Step temp[°C] time lid A info 0 TEST 1 dir 3 1 cycle 1 of 30 80.0 Æ 80.0 0h 0m23s Æ0h 5m 0s 98.9°C B start/stop C programs D + Press [A info] to call up the current remaining time calculation. Additional information about active pgm Status: Step 2 Cycle 3 of 30 Remaining time: 2h 57m Stop or pause: key B in main menu A B C quit D The current remaining run time id displayed in line 4. 7.4 Pause / stop program Main display during operation: Prog Step temp[°C] time lid A info 0 TEST 1 1 35.0°C 0h 0m18s 98.8°C B start/stop dir 3 cycle 8 of 30 Æ 35.0 Æ0h 0m30s C programs D + To pause or stop the active program press [B start/stop] Stop/pause directory: program no: A ? Manual T1 Thermocycler June 2009 3 0 test 1 B pause C quit D stop 26 _________________________________________________________________________ Select [B pause] [D stop] [C quit ] to pause program to stop program to return to the program display When you select [B pause], the following screen is displayed: Prog Step temp[°C] time lid A info 0 TEST 1 1 35.0°C 98.8°C B start/stop dir 3 cycle 8 of 30 Æ 35.0 pause C programs D + The program pauses in the current state. The word pause is displayed and alternates with the elapsed time. You can proceed with the program with [B start/stop]. Manual T1 Thermocycler June 2009 ___________________________________________________________________________ 27 8 Special functions Main screen Prog step temp[°C] time lid A ? 25.2°C 25.4°C B start/stop C programs D + To change special features of the T1 Thermocyler press [D +]. 1 print 2 signal 3 language 4 standard mode 5 test mode A back B forward C quit D enter Scroll though the list with the cursor keys × Ø. Enter desired function with [D enter] 8.1 Print protocols 1 2 3 4 graphic protocol* graphic protocols* print program print all programs A B C quit D enter Scroll through the list with the cursor keys × Ø. Confirm the highlighted function with [D enter]. 8.2 Switch beep on/off There is an option for an audible signal whenever a program enters a pause and when the program is finished. If this option is active, the beep can be switched off by pressing any key of the keyboard. with signal A yes no B C quit D enter In this window you can select whether there is a signal or whether there is not. Using the cursor keys you can toggle between signal yes/no. Confirm your selection with [D enter]. Manual T1 Thermocycler June 2009 28 _________________________________________________________________________ 8.3 Select language The display of the T1 Thermocyler can be switched from English to German. Select language with cursor keys Ø ×. As you toggle between the two settings the language will change. language A German English B C quit D enter To confirm your selection press [D enter] 8.4 RS232 Control The T1 Thermocylcer can be programmed and controlled by a Personal Computer. The Tcontrol iT software is available with the order number 050-820. To acivate remote control, the T1 Thermocylcer has to be set to RS232 control mode. For detailled information on controlling T1 Thermocylcer with PC please refer to the Tcontrol iT manual. Manual T1 Thermocycler June 2009 ___________________________________________________________________________ 29 9 Maintenance The T1 Thermocyler was built to operate for a long time without the need for periodical maintenance. The housing may be cleaned from time to time with a smooth cotton cloth. Do not use strong detergents or organic solvents for cleaning. 10 Exchange of modules For exchange of modules you need two hexagonal keys (number 3 and number 5). These keys are included in the shipment of the module. Remove module       Remove power plug Place instrument upside down on a soft surface Remove the 2 screws that close the shutter (hexagonal key number 3) Remove the 4 screws that hold the block (hexagonal key number 4) unplug connectors from the block (control and power supply) remove module Install module Follow description in reversed order. Manual T1 Thermocycler June 2009 30 _________________________________________________________________________ 11 Trouble shooting 11.1 Slow heating and cooling The T1 Thermocyler is equipped with a strong ventilator for the cooling of the heat sink. The inlet of this fan is located at the bottom side of the instrument. Be sure that the inlet is not clogged by dust or other material (e.g. a sheet of paper placed under the cycler can be attached to the inlet as the fan is in operation). Dirt can be removed easily from the inlet with a conventional vacuum cleaner. 11.2 Restart due to unrecognized power failure High voltage fluctuation can lead to an automatic restart of the Thermocycler. In this case the cycler restarts at the step where there power failure has occurred. To avoid voltage fluctuation, do not connect the cycler to a socket shared by a strong power consumer like a refrigerator or a centrifuge. 11.3 Adaptation of protocols from other cyclers Since the T1 Thermocyler is an extremely fast Thermocycler it may be necessary to reduce the heating and cooling ramps to run protocols from other cyclers. For the setting of the heating and cooling ramps see section 6.3. Alternatively, the time settings may be extended. Note: Protocolls that have been optimized with a TGradient Thermocycler can be run without changes. 11.4 Recommendations for the use of 384 well Thermocyclers a) Use the recommended 384 well plates and sealing materials To prevent sample evaporation by insufficient sealing please use 384 well plates and sealings tested and recommended by Biometra. A list of plates and sealing is available at www.biometra.com -> thermocyclers -> plasticware b) Reduce the temperature of the heated lid Due to the fact that the heated lid is very close to the reaction volume with a 384 well plate compared to 0.2 ml vessels the lid temperature can have a significant impact on the effective incubation temperature. For reaction volumes less than 10 µl the lid temperature is recommended to be set at 95 °C. When using a reaction volume of 10 µl or more, set lid temperature at 85 °C. Even at these lowered lid temperatures possible condensation will not occur as problem due to a mixture of physical factors like dew point, salt concentration, temperature difference, air pressure within the tube and reaction volume. It is strongly recommend to reduce the lid temperature according to the reaction volume. Otherwise, at conventional lid temperature settings, sample volumes or amplification yields might be reduced. Manual T1 Thermocycler June 2009 ___________________________________________________________________________ 31 12 Appendix 12.1 Technical specifications T1 Thermocycler 96 Thermal range Temperature accuracy Thermal homogeneity Maximum heating speed Max. cooling speed Sample capacity Heated lid Line Voltage Frequency Power consumption Fuses Display Ports -3°C – 100°C + 0.1°C + 0.3°C within 15 sec. 4°C/sec. 3°C/sec. 96 x 0.2ml tubes, 96 well microplates, strips High Precision Smart Lid for optimum lid pressure and excellent temperature uniformity Lid temperature range 30.0 – 99.0°C 115 Volt or 230 Volt 50-60 Hz 310 watts maximum see label on the back of the instrument LCD graphical display, back-lit serial: RS232 (bi-directional data transfer) parallel: Centronics (printer) Port for in tube-sensor memory Total capacity: 1500 steps in 10 directories with maximum 100 programs each Dimensions (WxDxH) Weight Storage conditions Operating conditions 25 x 34 x 16,5 cm 8,8 kg 5°C – 35°C 10 – 90% humidity 12.2 Ordering information T1 Thermocyler T1 Thermocyler 48 for 48 x 0.5ml tubes T1 Thermocyler 96 for 96 x 0.2ml tubes, strips or 96 well microplates T1 Thermocyler 384 for 384 well microplates T1 Thermocyler in situ for 4 microscopic slides T1 Thermocyler Modules T1 Thermocyler 48 Module for 48 x 0.5ml tubes T1 Thermocyler 96 Module for 96 x 0.2ml tubes, strips or 96 well microplates T1 Thermocyler in situ Module for 4 microscopic slides Order-No. 050-800 050-801 050-802 050-803 050-810 050-811 050-813 For information about tubes, strips, microplates and other consumables please contact BIOMETRA or your local BIOMETRA distributor. Manual T1 Thermocycler June 2009 32 _________________________________________________________________________ 13 Instructions for return shipment In case of faults occurring with our T1 Thermocyler please proceed as follows: • Return only defective devices. For technical problems which are not definitively recognizable as device faults please contact the Technical Service Department at Biometra (Tel.: +49/551/5068640, Fax: ++49/551/5068666, e-mail: [email protected]). • Important: Cleanse all parts of the instrument of biologically dangerous, chemical or radioactive contaminants. If an instrument is contaminated, Biometra will be forced to refuse to accept the device. The sender of the repair order will be held liable for possible losses resulting from insufficient decontamination of the device. • Please prepare written confirmation that the device is free from biologically dangerous and radioactive contaminants. The declaration of decontamination (see 15) has to be attached to the outside of the packaging. • Use the original packing material. If not available, please use a comparable robust box. Be sure that the instrument fits tightly into the box. When packaging, protect the device in a way to avoid scratches. • Label the outside of the box with “CAUTION! SENSITIVE ELECTRONIC INSTRUMENT!” • Please enclose a note which contains the following: a) Sender’s name and address, b) Name of a contact person for further inquiries with telephone number, c) Description of the fault, which also reveals during which procedures the fault occurred, if possible Manual T1 Thermocycler June 2009 ___________________________________________________________________________ 33 14 Warranty This Biometra instrument has been carefully build, inspected and quality controlled before dispatch. Hereby Biometra warrants that this instrument conforms to the specifications given in this manual. This warranty covers defects in materials or workmanship as described under the following conditions: This warranty is valid for 24 month from date of shipment to the customer from Biometra or an authorized distributor. This warranty will not be extended to a third party without a written agreement of Biometra. This warranty covers only the instrument and all original accessories delivered with the instrument. This warranty is valid only if the instrument is operated as described in the manual. Biometra will repair or replace each part which is returned and found to be defective. This warranty does not apply to wear from normal use, failure to follow operating instructions, negligence or to parts altered or abused. Manual T1 Thermocycler June 2009 34 _________________________________________________________________________ 15 Equipment Decontamination Certificate To enable us to comply with German law (i.e. §28 StrlSchV, §17 GefStoffV and §19 ChemG) and to avoid exposure to hazardous materials during handling or repair, will you please complete this form, prior to the equipment leaving your laboratory COMPANY / INSTITUTE ____________________________________________________________ ADDRESS ____________________________________________________________ TEL NO _____________________ FAX NO _____________________ E-MAIL _____________________ ______________________________ EQUIPMENT If on loan / evaluation Model Serial No __________ __________ __________ __________ __________ __________ __________ __________ Start Date: ________ Finish Date ________ Hazardous materials used with this equipment _________________________________________________________________________________ _________________________________________________________________________________ _________________________________________________________________________________ Has the equipment been cleaned and decontaminated? YES / NO (delete) Method of cleaning / Decontamination _________________________________________________________________________________ _________________________________________________________________________________ _________________________________________________________________________________ NAME ________________________________ POSITION __________________________ (HEAD OF DIV./ DEP./ INSTITUTE / COMPANY) SIGNED ______________________________ DATE ______________________________ PLEASE RETURN THIS FORM TO BIOMETRA GmbH OR YOUR LOCAL BIOMETRA DISTRIBUTOR TOGETHER WITH THE EQUIPMENT. PLEASE ATTACH THIS CERTIFICATE OUTSIDE THE PACKAGING. INSTRUMENTS WITHOUT THIS CERTIFICATE ATTACHED WILL BE RETURNED TO SENDER. Manual T1 Thermocycler June 2009 ___________________________________________________________________________ 35 16 EU - Konformitätserklärung / EU - Declaration of Conformity Göttingen, den 20. 08. 2004 im Sinne der EG-Richtlinie über elektrische Betriebsmittel zur Verwendung innerhalb bestimmter Spannungsgrenzen 73/23/EWG following the EC directive about electrical equipment for use within certain limits of voltage 73/23/EEC und / and im Sinne der EG-Richtlinie für die elektromagnetische Verträglichkeit 89/336/EWG. following the EC directive about the electromagnetic compatibility 89/336/EEC .. Hiermit erklären wir, daß folgende Thermocycler und Thermocycler Module: Herewith we declare that the following thermocyclers and thermocycler moduls: Typen: types: T1 Thermocycler 48, T1 Thermocycler 96, T1 Thermocycler Kombi, T1 Thermocycler 384, T1 Thermocycler in situ, T1 plus Thermocycler 48, T1 plus Thermocycler 96, T1 plus Thermocycler Kombi, T1 plus Thermocycler 384, T1 plus Thermocycler in situ, T1 Modul 48, T1 Modul 96, T1 Modul Kombi, T1 Modul 384, T1 Modul in situ T1 Thermocycler 48, T1 Thermocycler 96, T1 Thermocycler Combi, T1 Thermocycler 384, T1 Thermocycler in situ, T1 plus Thermocycler 48, T1 plus Thermocycler 96, T1 plus Thermocycler Combi, T1 plus Thermocycler 384, T1 plus Thermocycler in situ, T1 module 48, T1 module 96, T1 module combi, T1 module 384, T1 module in situ Best.-Nr. / Order No.: 050-900, 050-901, 050-902, 050-903, 050-904, 050-910, 050-911, 050-912, 050-913, 050-914, 050-920, 050-921, 050-922, 050-923, 050-924 den grundlegenden Anforderungen der corresponds to the basic requirements of EG-Niederspannungsrichtlinie 73/23/EWG und der EC low voltage directive 73/23/EEC and the EG-Richtlinie über die elektromagnetische Verträglichkeit 89/336/EWG entsprechen. EC directive about the electromagnetic compatibility 89/336/EEC . Folgende harmonisierte Normen wurden angewandt: The following harmonized standards have been used: Dr. Jürgen Otte Quality Manager Manual T1 Thermocycler June 2009 EN 55022:1998 + A1:2000 + A2:2003 EN 61000-3-3:1965 + A1:2001 EN 61010-2-010: 1994 + A1: 1996 Formular 006, Ver. 03 EN 55011:1998 + A1:1999 + A2:2000 EN 61000-3-2:2000 EN 61000-6-1:2001 EN 61010-1: 2001 36 _________________________________________________________________________ 17 Subject Index Beep......................................................... 27 Declaration of Conformity ........................ 35 Decontamination ...................................... 34 Heated Lid.......................................... 10, 14 Heating and cooling rates ........................ 22 Language ................................................. 28 Module Exchange ............................................. 29 Program Copy..................................................... 18 Create .................................................. 11 Delete................................................... 19 Increment ............................................. 21 Insert / Delete step ............................... 17 Loop......................................................15 Name ....................................................12 Pause....................................................25 Save......................................................16 Startt .....................................................23 Stop ......................................................25 Protocol Print ......................................................27 Remaining run time...................................25 Safety precautions ......................................5 Self test.......................................................9 Technical specifications............................31 Trouble shooting .......................................30 Warranty ...................................................33 Manual T1 Thermocycler June 2009