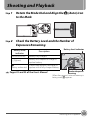
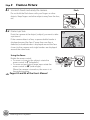
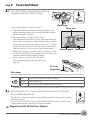
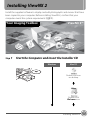
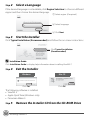
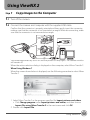
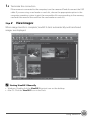
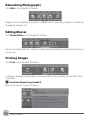
1
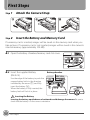
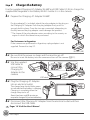
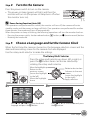
Quick Start Guide
Take the Camera out of the Box
3
First Steps
4
Shooting and Playback
9
Installing ViewNX 2
13
Using ViewNX 2
15
En
Thank you for purchasing a Nikon COOLPIX S8100 digital camera.
This guide introduces the procedures necessary in using this camera for the first
time.
For more detailed information, please refer to the supplied User’s Manual.
Technical support information is available online at the following sites:
• For users in the USA: http://www.nikonusa.com/
• For users in Europe and Africa: http://www.europe-nikon.com/support/
• For users in Asia, Oceania, and the Middle East: http://www.nikon-asia.com/
An Important Notice about Accessories
Nikon COOLPIX digital camera is designed to the highest standards and
includes complex electronic circuitry. Only Nikon accessories, such as battery
chargers, batteries, Charging AC Adapter and AC adapters are certified by
Nikon specifically for your Nikon COOLPIX camera and are engineered and
tested to operate within the requirements of the electronic circuitry of our
cameras.
2
Take the Camera out of the Box
Remove the camera and accessories from the box and confirm that you have all the
items listed below.
COOLPIX S8100
Digital Camera
Camera Strap
USB Cable UC-E6
Audio Video Cable
EG-CP16
Rechargeable Li-ion Charging AC Adapter
Battery EN-EL12
EH-68P/EH-68P (AR)*
(with terminal cover)
ViewNX 2 installer CD
• Quick Start Guide (this guide)
• User’s Manual
• Warranty
* Plug adapter supplied only in countries or regions where required and its shape
varies with country or region of purchase. The shape of the Charging AC Adapter
EH-68P (AR) supplied in Argentina differs from that supplied in other countries (A6).
NOTE: A Secure Digital (SD) memory card, hereafter referred to as a “memory card”, is not
provided. Refer to page 184 in the User’s Manual for a list of approved SD memory cards.
Parts of the Camera
1
2
3
4
14
5
6
7
13
8
12
1
2
3
4
5
6
7
Power switch/power-on lamp
Mode dial
Zoom control
Shutter-release button
Charge lamp/flash lamp
b (movie-record) button
c (playback) button
8
9
10
11
12
13
14
9
10
11
Rotary multi selector
k (apply selection) button
l (delete) button
d button
Battery-chamber/memory card slot cover
Monitor
Flash
A: This icon indicates that more information is available elsewhere in this guide.
Take the Camera out of the Box
3
First Steps
Step 1
Attach the Camera Strap
Step 2
Insert the Battery and Memory Card
If a memory card is inserted, images will be saved on the memory card when you
take pictures. If a memory card is not inserted, images will be saved in the camera’s
internal memory (approximately 102 MB).
2.1
Open the battery-chamber/memory card slot cover.
2.2
Insert the supplied battery
(EN-EL12).
Battery chamber
Use the edge of the battery to push the
orange battery latch in the direction
indicated by the arrow (1) and fully
insert the battery (2).
When the battery is fully inserted, the
battery latch will lock it in place.
Inserting the Battery
Inserting the battery upside down or backwards could damage the camera. Be sure to
check that the battery is in the correct orientation.
4
First Steps
2.3
Insert the memory card.
Memory card slot
Slide the memory card in until it clicks into
place.
Inserting Memory Cards
Inserting the memory card upside down or
backwards could damage the camera or
the memory card.
Be sure to check that the memory card is in
the correct orientation.
2.4
Close the battery-chamber/memory card slot cover.
Removing the Battery and Memory Card
Turn the camera off and be sure that the power-on lamp and the monitor have turned off
before opening the battery-chamber/memory card slot cover.
The battery or memory card may be hot immediately after using the camera.
Observe caution when removing the battery or memory card.
Removing the Battery
To eject the battery, open the battery-chamber/ memory card
slot cover and slide the orange battery latch in the direction
indicated by the arrow (1), then remove the battery while being
careful not to remove the battery at an angle (2).
Removing the Memory Card
Press the card in (1) to partially eject the card, then remove the
card by hand while being careful not to remove the card at an
angle (2).
Pages 12, 13, 20, and 21 of the User’s Manual
First Steps
5
Step 3
Charge the Battery
Use the supplied Charging AC Adapter EH-68P and USB Cable UC-E6 to charge the
supplied Rechargeable Li-ion Battery EN-EL12 while it is in the camera.
3.1
Prepare the Charging AC Adapter EH-68P.
If a plug adapter* is included, attach the plug adapter to the plug on
the Charging AC Adapter. Push the plug adapter firmly until it is
securely held in place. Once the two are connected, attempting to
forcibly remove the plug adapter could damage the product.
* The shape of the plug adapter varies according to the country or
region in which the camera was purchased.
For Customers in Argentina
If the camera was purchased in Argentina, a plug adapter is not
supplied. Proceed to step 3.2.
EH-68P (AR)
3.2
Be sure that the power-on lamp and the monitor are off.
Be sure to insert the battery into the camera and turn off the camera (A12).
3.3
Use the supplied
USB cable to
connect the
Charging AC
Adapter to the
camera.
USB cable
3.4
Plug the Charging AC Adapter
into an electrical outlet.
The charge lamp slowly blinks green
to indicate that the battery is charging.
Charging is complete when the
charge lamp turns off.
About three hours and 50 minutes are
required to charge a fully exhausted battery.
3.5
Disconnect the Charging AC Adapter from the electrical outlet and then
disconnect the USB cable.
Pages 14-16 of the User’s Manual
6
First Steps
Step 4
Turn On the Camera
Press the power switch to turn on the camera.
• The power-on lamp (green) will light, and then the
monitor will turn on (the power-on lamp turns off when
the monitor turns on).
C Power Saving Function (Auto Off)
If no operations are performed for a while, the monitor will turn off, the camera will enter
standby mode, and the power-on lamp will blink. If no operations are performed for another
three minutes, the camera will turn off automatically.
When the power-on lamp is blinking, the following operations will turn the monitor back on.
- Pressing the power switch, shutter-release button, c button, or b (movie-record) button
- Rotating the mode dial
Step 5
Choose a Language and Set the Camera Clock
When the first time the camera is turned on, the language-selection screen and the
date and time setting screen for the camera clock are displayed.
Use the rotary multi selector to make the settings.
The Rotary Multi Selector
Press the rotary multi selector up, down, left, or right, or
press the k button. Items can also be selected by
rotating the rotary multi selector.
Move the highlight up
Return to the
previous screen
(move the highlight
to the left)
Move the highlight
down
5.1
5.2
Rotate to select an item
Advance to the next
screen
(move the highlight
to the right)
Apply selection
Date
Set time and date?
Yes
No
Cancel
Press H, I, J, or K to choose the desired
language and press the k button.
Press H or I to choose Yes and press
the k button.
First Steps
7
5.3
London
Casablanca
Back
Press J or K to choose your home
time zone and press the k button.
5.4
Daylight Saving Time
If daylight saving time is in effect, press H
to enable the daylight saving time function.
• When the daylight saving time
function is enabled, W is displayed at
the top of the monitor.
• Press I to disable the daylight saving
time function.
5.5
Date
Date
D
M
Y
D
M
Y
01
01
2010
15
11
2010
00
00
15
10
Edit
Edit the date and time.
• Choose an item: Press K or J
(changes between D, M, Y, hour,
minute, DMY (the order in which the
day, month, and year are displayed)).
• Edit the highlighted item: Press H or
I.
Edit
Finally, choose DMY (the order in which
the day, month, and year are displayed)
and press the k button.
• The clock starts. The lens extends
and the screen used for taking
pictures is displayed.
C Imprinting the Date on Images While Taking Pictures
After setting the date and time, enable date imprint from the Date imprint option in the z
(setup) menu.
Display the z (setup) menu using the following procedure and change the settings.
Press the d button ➝ press the rotary multi selector J ➝ press H or I to select the z
(setup) tab and press the k button ➝ press H or I to select an item and press the k
button.
Pages 158 and 165 of the User’s Manual
C Changing the Current Date, Time, or Language
Just as described under “Imprinting the Date on Images While Taking Pictures” above, display
the z (setup) menu and set Language or Date.
• To set the time zone or daylight saving time settings, select Time zone from the Date
option.
Pages 160 and 173 of the User’s Manual
The next step explains basic shooting operations using A (auto) mode.
8
First Steps
Shooting and Playback
Step 1
Rotate the Mode Dial and Align the A (Auto) Icon
to the Mark
Auto mode
Step 2
Check the Battery Level and the Number of
Exposures Remaining
Battery level
indicator
Battery level indicator
Description
(NO INDICATOR)
Battery fully charged.
B (glows)
Battery low. Prepare to charge or
replace battery.
N
Cannot take pictures. Recharge or
Battery exhausted. replace with a fully charged battery.
Pages 22 and 23 of the User’s Manual
35
Number of exposures
remaining
When the camera’s internal memory is
being used, C appears.
Shooting and Playback
9
Step 3
3.1
Frame a Picture
Use both hands and ready the camera.
Flash
Do not hold the flash down with your fingers or other
objects. Keep fingers and other objects away from the lens,
etc.
3.2
Frame a picture.
Point the camera at the object (subject) you want to take
a picture of.
If the camera detects a face, a square double border is
displayed around the face. If more than one face is
detected, a double border is displayed around the face
closest to the camera, and single borders are displayed
around the other faces.
Using the Zoom
Rotate the zoom control.
• To zoom in closer to the subject: rotate the
zoom control to g (telephoto).
• To zoom out and view a larger area: rotate the
zoom control to f (wide-angle).
When the camera is turned on, the zoom is at
the widest position.
Pages 24 and 25 of the User’s Manual
10
Shooting and Playback
35
Step 4
4.1
Focus and Shoot
Press the shutter-release button halfway,
stopping when you feel resistance.
If the camera detects a face in step 3:
• The camera focuses on the area indicated by the
yellow double border (focus area), and the double
border changes to green.
If the camera does not detect any faces:
• The camera has nine focus areas, and automatically
selects the focus areas containing the subject closest
to the camera. When the subject is in focus, g (focus
areas) glow green to indicate the areas of the frame
that the camera is focusing on (up to nine areas).
• When the camera is unable to focus, the focus area
will blink red. Modify the composition and press the
shutter-release button halfway again.
• If the subject is dimly lit, the AF-assist
illuminator may light and the flash may
pop up.
Flash lamp
Focus area
1/250
Shutter speed
F 3.5
Aperture
AF-assist
illuminator
Flash lamp
The flash lamp indicates flash status when the shutter-release button is pressed halfway.
On
Flash will fire when picture is taken.
Blinks
Flash charging.*
Off
Flash will not fire when picture is taken.
* If the battery is low, the monitor display will turn off, and remain off, until the flash is fully charged.
4.2
Smoothly press the shutter-release button the rest of the way
down to take the picture.
The shutter is released and the image will be saved to the memory card or
internal memory.
Do not use force when pressing the shutter-release button, as this may
cause camera shake, resulting in blurred images.
Pages 26 and 27 of the User’s Manual
Shooting and Playback
11
Step 5
Playback Images
Press the c (playback) button. The camera enters
playback mode.
• The last image captured is displayed in fullframe playback mode.
• Press the k button to display the shooting
information screen. Press the k button again to
return to full-frame playback.
• To display previous or next images, rotate the
rotary multi selector or press H, J, I, or K.
• To return to shooting mode, press the c
button again or press the shutter-release button
or b (movie-record) button.
b (movie-record) button
15/11/2010 15:30
0004.JPG
4/
4
Display previous images
Display next images
Deleting Unwanted Images
To delete the image currently displayed in the monitor,
press the l (delete) button.
When the deletion screen is displayed, press the rotary
multi selector H or I to select Current image and press
the k button.
When the confirmation dialog is displayed, press H or I
to choose Yes and press the k button to delete the
image that is displayed.
• After pressing the l button, press H or I to choose
Erase selected images and choose multiple images to
be deleted. Choose All images to delete all images.
• Deleted images cannot be restored. To cancel it,
choose No in the confirmation dialog and press the k button.
15/11/2010 15:30
0004.JPG
Pages 28 and 29 of the User’s Manual
Step 6
Turn Off the Camera
Press the power switch to turn the
camera off.
• If the flash is raised, lower the
flash by gently pushing it down,
being careful not to pinch
fingers or other objects.
12
Shooting and Playback
4/
4
Delete
Current image
Erase selected images
All images
Installing ViewNX 2
Install the supplied software to display and edit photographs and movies that have
been copied to your computer. Before installing ViewNX 2, confirm that your
computer meets the system requirements (A19).
Your Imaging Toolbox
Step 1
ViewNX 2™
Start the Computer and Insert the Installer CD
Windows
Mac OS
Double-click icon
on desktop
Double-click
Welcome icon
Installing ViewNX 2
13
Step 2
Select a Language
If the desired language is not available, click Region Selection to choose a different
region and then choose the desired language.
1 Select region (if required)
2 Select language
3 Click Next
Step 3
Start the Installer
Click Typical Installation (Recommended) and follow the on-screen instructions.
Click Typical Installation
(Recommended)
C Installation Guide
Click Installation Guide to display help information about installing ViewNX 2.
Step 4
Exit the Installer
Windows
Mac OS
Click Yes.
Click OK.
The following software is installed:
• ViewNX 2
• Apple QuickTime (Windows only)
• Panorama Maker 5
Step 5
14
Remove the Installer CD from the CD-ROM Drive
Installing ViewNX 2
Using ViewNX 2
Step 1
Copy Images to the Computer
1.1
Turn off the camera.
1.2
Connect the camera and computer with the supplied USB cable.
Confirm that the connector is properly oriented and then gently insert the connector,
making sure that the connector is not inserted at an angle. When disconnecting, make
sure that the connector is not removed at an angle.
The camera automatically turns on and the power-on lamp lights. The camera monitor
will remain off.
When the action selection dialog is displayed on the computer, select Nikon Transfer 2.
When Using Windows 7
When the screen shown below is displayed, use the following procedure to select Nikon
Transfer 2.
1 Select Nikon Transfer 2 as the program specified for Import pictures and videos.
• Click Change program under Import pictures and videos, and then choose
Import File using Nikon Transfer 2 in the next screen and click OK.
2 Double-click Import File.
Using ViewNX 2
15
B Starting Nikon Transfer 2
If there are a large number of images on the memory card, it may take some time for Nikon
Transfer 2 to start.
B Powering the Camera During Image Transfer
• When connecting the camera to a computer to transfer images, use a fully charged battery
to prevent the camera from turning off unexpectedly.
• When the camera is connected to a computer via the supplied USB cable with Auto
(default setting) selected for the Charge by computer option in the setup menu, the
battery inserted into the camera is automatically charged. The charge lamp blinks slowly
while the battery is charging.
Pages 150 and 174 of the User’s Manual
C
Transferring Images Using a Commercially-available Card Reader or a
Computer’s Card Slot
The following methods can also be used to transfer images saved on a memory card to a
computer.
• Insert the memory card directly into the computer’s card slot.
• Connect a commercially-available card reader to the computer, and then insert the
memory card.
1.3
Confirm that the correct source is selected.
Confirm that the camera or removable disk appears as a device button in the “Source”
panel of the Nikon Transfer 2 “Options” area.
Device button
1.4
Click Start Transfer.
At default settings, all the images on the memory card will be copied to the computer.
Click Start Transfer
16
Using ViewNX 2
1.5
Terminate the connection.
If the camera is connected to the computer, turn the camera off and disconnect the USB
cable. If you are using a card reader or card slot, choose the appropriate option in the
computer operating system to eject the removable disk corresponding to the memory
card and then remove the card from the card reader or card slot.
Step 2
View Images
When image transfer is complete, ViewNX 2 starts automatically and transferred
images are displayed.
C Starting ViewNX 2 Manually
• Windows: Double-click the ViewNX 2 shortcut icon on the desktop.
• Mac OS: Click the ViewNX 2 icon in the Dock.
Using ViewNX 2
17
Retouching Photographs
Click Edit in the ViewNX 2 toolbar.
Images can be edited by using tone compensation, adjusting sharpness, trimming
(cropping) images, etc.
Editing Movies
Click Movie Editor in the ViewNX 2 toolbar.
Movies recorded with this camera can be edited by deleting unwanted sections of
movies, etc.
Printing Images
Click Print in the ViewNX 2 toolbar.
A dialog is displayed and images can be printed using a printer connected to the
computer.
C For Details About Using ViewNX 2
Refer to the ViewNX 2 help information.
18
Using ViewNX 2
C
System Requirements
Windows
CPU
OS
RAM
Hard-disk
space
Monitor
Mac OS
• Photographs/JPEG movies:
• Photographs/JPEG movies:
PowerPC G4 (1 GHz or better), G5,
Intel Celeron/Pentium 4, or Intel
Intel Core series, or Xeon series
Core series,1.6 GHz or better
• H.264 movies:
• H.264 movies:
- Playback: PowerPC G5 Dual or
- Playback: 3.0 GHz or better
Core Duo, 2 GHz or better
Pentium D
- Editing: 2.6 GHz or better Core 2
- Editing: 2.6 GHz or better Core 2
Duo
Duo
Pre-installed versions of Windows 7
Home Basic/Home Premium/
Professional/Enterprise/Ultimate,
Windows Vista Home Basic/Home
Premium/Business/Enterprise/
Mac OS X version 10.4.11, 10.5.8, or
Ultimate (Service Pack 2), or Windows
10.6.4
XP Home Edition/Professional
(Service Pack 3)
All installed programs run as 32-bit
applications in 64-bit editions of
Windows 7 and Windows Vista.
• Windows 7/Windows Vista: 1 GB
or more (1.5 GB or more
recommended)
• Windows XP: 512 MB or more
(1 GB or more recommended)
512 MB or more (1 GB or more
recommended)
A minimum of 500 MB available on the startup disk (1 GB or more
recommended)
Resolution: 1024 × 768 pixels (XGA)
or more
Colors: 24-bit color (True Color) or
more
Resolution: 1024 × 768 pixels (XGA)
or more
Colors: Millions or more
Using ViewNX 2
19
Other Features of the COOLPIX S8100
Shooting mode
Rotate the mode dial to select various shooting modes.
In x scene auto selector, y, j night landscape, e night portrait, or R
backlighting, camera settings are automatically optimized for the selected scene.
In s subject tracking mode, the focus area will automatically move to track the subject.
In C continuous shooting mode, images can be captured continuously at high speeds.
Page 42 of the User’s Manual
Movie recording
Movies can be recorded in high definition. Movies can be recorded in slow motion or in
fast motion.
Page 129 of the User’s Manual
h Favorite pictures, F Auto sort, C List by date mode
After shooting, images added to the album can be played back. Images can be found by
the category into which they were automatically sorted or by selecting the shooting date.
Pages 92, 100, and 104 of the User’s Manual
PictBridge
Print images directly from the camera with connection to a PictBridge-compatible printer.
Page 151 of the User’s Manual
Printed in Hong Kong
CT0I01(11)
6MM86911-01