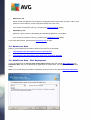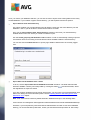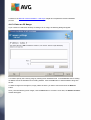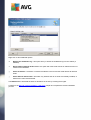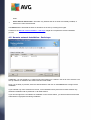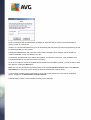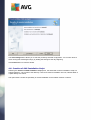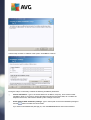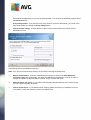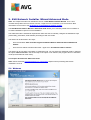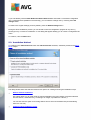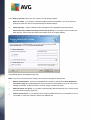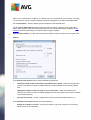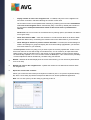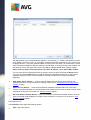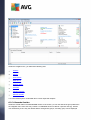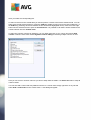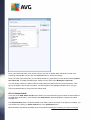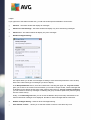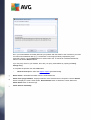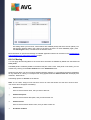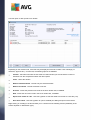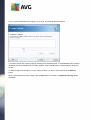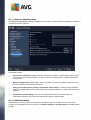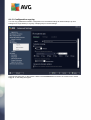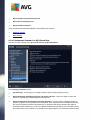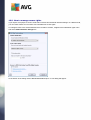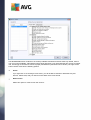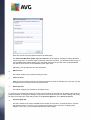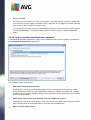
1
AVG AntiVirus Business Edition 2013
User Manual
Document revision 2013.06 (12/13/2012)
C opyright AVG Technologies C Z, s.r.o. All rights reserved.
All other trademarks are the property of their respective owners.
This product uses RSA Data Security, Inc. MD5 Message-Digest Algorithm, C opyright (C ) 1991-2, RSA Data
Security, Inc. C reated 1991.
This product uses code from C -SaC zech library, C opyright (c) 1996-2001 Jaromir Dolecek
<[email protected]>
This product uses compression library zlib, C opyright (c) 1995-2002 Jean-loup Gailly and Mark Adler.
A V G A ntiV irus Bus ines s E dition 2 0 1 3 © 2 0 1 2 C opyright A V G T ec hnologies C Z, s .r.o. A ll rights res erved.
1
Contents
........................................................................................................................ 5
1. Introduction
..........................................................................................................
5
1.1 AVG AntiVirus
Business Edition 2013 scheme
..........................................................................................................
6
1.2 Key features
and functions
7
1.3 Operating..........................................................................................................
Systems Supported
8
1.4 Minimum ..........................................................................................................
Hardware Requirements
..........................................................................................................
9
1.5 Recommended
Hardware Requirements
9
1.6 Network ..........................................................................................................
Requirements
..........................................................................................................
10
1.7 Migrating
Stations From Previous Version
........................................................................................................................
11
2. AVG
AntiVirus Business Edition 2013 Installation
..........................................................................................................
11
2.1 Components
Overview
..........................................................................................................
12
2.2 Where to
Install and Deploy
..........................................................................................................
13
2.3 Welcome
Dialog
14
2.4 License ..........................................................................................................
Activation
..........................................................................................................
15
2.5 Installation
Type
16
2.6 Custom..........................................................................................................
Options
..........................................................................................................
16
2.7 Installation
Complete
........................................................................................................................
18
3. AVG
Admin Deployment Wizard
.......................................................................................................... 18
3.1 Introduction
..........................................................................................................
19
3.2 Deploying
multiple UpdateProxy roles
.......................................................................................................... 19
3.3 Role Selection
..........................................................................................................
20
3.4 DataCenter
Role
..........................................................................................................
20
3.5 DataCenter
Role - First Deployment
..........................................................................................................
21
3.6 DataCenter
Role - Repeated Deployment
..........................................................................................................
25
3.7 DataCenter
Role - Databases Overview
..........................................................................................................
29
3.8 DataCenter
Role - Data Import
..........................................................................................................
31
3.9 DataCenter
Role - Server Access
..........................................................................................................
32
3.10 UpdateProxy
Role
..........................................................................................................
36
3.11 Configuration
Overview
........................................................................................................................
37
4. AVG
Network Installer Wizard Basic Mode
..........................................................................................................
37
4.1 Recommendations
for Components
.......................................................................................................... 38
4.2 Welcome
..........................................................................................................
39
4.3 Installation
Method
40
4.4 Remote ..........................................................................................................
Network Installation
50
4.5 Remote ..........................................................................................................
network installation - final steps
A V G A ntiV irus Bus ines s E dition 2 0 1 3 © 2 0 1 2 C opyright A V G T ec hnologies C Z, s .r.o. A ll rights res erved.
2
52
4.6 Creation..........................................................................................................
of AVG Installation Script
........................................................................................................................
58
5. AVG
Network Installer Wizard Advanced Mode
.......................................................................................................... 58
5.1 Welcome
..........................................................................................................
59
5.2 Installation
Method
60
5.3 Remote ..........................................................................................................
Network Installation
72
5.4 Remote ..........................................................................................................
network installation - final steps
74
5.5 Creation..........................................................................................................
of AVG Installation Script
........................................................................................................................
82
6. AVG
Admin Console
82
6.1 What is..........................................................................................................
AVG Admin Console
..........................................................................................................
83
6.2 AVG Admin
Console Interface Overview
..........................................................................................................
95
6.3 Synchronization
Process
6.4 Stations.......................................................................................................... 97
.......................................................................................................... 100
6.5 Servers
.......................................................................................................... 109
6.6 Scan results
.......................................................................................................... 112
6.7 Notifications
115
6.8 Graphic..........................................................................................................
Reports
.......................................................................................................... 124
6.9 Licenses
..........................................................................................................
125
6.10 Pending
Requests
..........................................................................................................
126
6.11 Network
Installer
144
7.........................................................................................................................
AVG Admin Server
145
8.........................................................................................................................
AVG Admin Lite
..........................................................................................................
145
8.1 AVG Admin
Deployment Wizard Lite
..........................................................................................................
147
8.2 AVG Network
Installer Wizard Lite
151
9.........................................................................................................................
Configuration
151
9.1 Shared..........................................................................................................
Settings for Stations/Groups
165
9.2 Shared..........................................................................................................
Settings for Application Servers
..........................................................................................................
173
9.3 AVG Admin
Server Settings
..........................................................................................................
180
9.4 Connection
String
.......................................................................................................... 180
9.5 Proxy Server
..........................................................................................................
181
9.6 AVG Admin
Console
..........................................................................................................
190
9.7 Sidebar/Desktop
Gadgets
........................................................................................................................
192
10.
How to...
..........................................................................................................
192
10.1 How to
Connect Stations to AVG Datacenter
A V G A ntiV irus Bus ines s E dition 2 0 1 3 © 2 0 1 2 C opyright A V G T ec hnologies C Z, s .r.o. A ll rights res erved.
3
..........................................................................................................
194
10.2 How to
Migrate Stations from/to Different DataCenter
..........................................................................................................
195
10.3 How to
Synchronize Stations
..........................................................................................................
195
10.4 How to
solve Update related issues
..........................................................................................................
197
10.5 How to
Change User Interface Language
..........................................................................................................
198
10.6 How to
use Microsoft SQL Server database system
..........................................................................................................
199
10.7 How to
Control station users actions
..........................................................................................................
200
10.8 Requests
handling and status messages
..........................................................................................................
201
10.9 How to
manage access rights
204
10.10 How..........................................................................................................
to maintain the DataCenter database
205
10.11 List ..........................................................................................................
of AVG Setup Parameters
........................................................................................................................
210
11.
AVG DataCenter
.......................................................................................................... 210
11.1 Maintenance
..........................................................................................................
210
11.2 Password
protection
..........................................................................................................
211
11.3 Converting
the AVG DataCenter to a Different Database
.......................................................................................................... 211
11.4 Web Interface
........................................................................................................................
212
12.
Updates
..........................................................................................................
212
12.1 General
Information
..........................................................................................................
212
12.2 Update
within the Local Network
........................................................................................................................
214
13.
FAQ and Technical Support
A V G A ntiV irus Bus ines s E dition 2 0 1 3 © 2 0 1 2 C opyright A V G T ec hnologies C Z, s .r.o. A ll rights res erved.
4
1. Introduction
This user manual provides comprehensive documentation for AVG AntiVirus Business Edition
2013.
Important notice:
The document may contain references to other user guides, especially the Internet Security guide.
If you are not familiar with the AVG User Interface and AVG Advanced/Firewall settings we strongly
recommend that you download all relevant guides in advance from the http://www.avg.com/ww-en
website, Support Center/Download/Documentation section.
You can also use context help, which is available through the application, to get the requested
information.
1.1. AVG AntiVirus Business Edition 2013 scheme
Please review the simplified scheme of AVG AntiVirus Business Edition 2013 showing the basic connection
and interaction of remote administration components in the default and most common configuration:
A V G A ntiV irus Bus ines s E dition 2 0 1 3 © 2 0 1 2 C opyright A V G T ec hnologies C Z, s .r.o. A ll rights res erved.
5
1)
AVG DataCenter
consists of a database, and AVG Admin Server. The AVG Admin Server performs the role of a
mediator between the AVG DataCenter and AVG stations. The AVG Admin Console uses the AVG
Admin Server to approach the AVG DataCenter database, and to centrally define settings for stations
and system parameters. AVG stations approach the AVG Admin Server to read the setup parameters
and to save their currently defined setting and scan results into the AVG DataCenter.
AVG Admin Server also works as a local update source. If you deploy the UpdateProxy role to multiple
servers, you can then use them for updating stations and keeping the bandwidth/load in balance.
2)
AVG Admin Console
is a program for administration of AVG stations. It communicates directly with the AVG Admin Server.
3)
Stations
communicate with the AVG Admin Server that accepts the default settings, requests specific settings,
sends the scan results etc.
4)
AVG Technologies Server
provides AVG Admin Server/Servers with update files.
1.2. Key features and functions
AVG AntiVirus Business Edition 2013 offers the following functions:
Remote installation
Using this function you can easily install AVG on all stations in the local network. This remote
installation is secured by the AVG Network Installer Wizard – a program for direct remote installation
and/or creation of an installation script that makes it possible to run the Setup installation program on
all remote network stations.
Centrally controlled updates
All AVG stations in the network can be updated centrally using the AVG Admin Console.
Server roles
AVG AntiVirus Business Edition 2013 can now act in multiple roles, where each role can be deployed
separately (DataCenter role used for remote stations management, UpdateProxy role for managing
updates), which allows the user to divide the load among multiple physical servers.
Secured communication
Network communication between AVG Admin (AVG Admin Server) and stations is completely
encrypted.
A V G A ntiV irus Bus ines s E dition 2 0 1 3 © 2 0 1 2 C opyright A V G T ec hnologies C Z, s .r.o. A ll rights res erved.
6
Full remote administration in the network
The full functionality of the AVG AntiVirus Business Edition 2013 guarantees:
o
Automated remote AVG installation on all network stations thanks to new AVG Network installer
Wizard
o
Continuous overview of all network AVG stations’ current status
o
Central control and administration of AVG stations’ configuration
AVG AntiVirus Business Edition 2013 full functionality is provided by the AVG Admin Console, and
the AVG DataCenter.
If you do not need the full functionality, it is possible to install and deploy only the AVG Admin Lite (for
installation scripts generation and local update source).
In addition to all standard features, AVG AntiVirus Business Edition 2013 may contain the following
components support (configuration available directly from the AVG Admin Console):
o
Anti-Spam protection
o
Anti-Spyware protection
o
Firewall protection
o
Online Shield protection
o
LinkScanner protection
o
Anti-Rootkit protection
Note: Depending on your edition, the support of components may vary!
Backward compatibility including an easy migration from the previous version!
1.3. Operating Systems Supported
AVG AntiVirus Business Edition 2013 is intended to manage/protect stations with the following operating
systems (with the exceptions mentioned below the list):
MS Windows XP Professional SP2
MS Windows XP Home SP2
MS Windows XP Professional x64 SP1
MS Windows Server 2003 SP1
MS Windows Server 2003 x64
MS Windows 2008 Server
A V G A ntiV irus Bus ines s E dition 2 0 1 3 © 2 0 1 2 C opyright A V G T ec hnologies C Z, s .r.o. A ll rights res erved.
7
MS Windows 2008 Server x64
MS Windows Vista, all editions
MS Windows Vista x64, all editions
MS Windows 7, all editions
MS Windows 7 x64, all editions
MS Windows 8, all editions
MS Windows 2012 Server
The AVG Admin console, AVG Admin Server and related components are supported in the following
operating systems:
MS Windows XP Professional SP2
MS Windows XP Home SP2
MS Windows XP Professional x64 SP1
MS Windows Server 2003 SP1
MS Windows Server 2003 x64
MS Windows 2008 Server
MS Windows 2008 Server x64
MS Windows Vista, all editions
MS Windows Vista x64, all editions
MS Windows 7, all editions
MS Windows 7 x64, all editions
MS Windows 8, all editions
MS Windows 2012 Server
1.4. Minimum Hardware Requirements
Minimum hardware requirements for AVG AntiVirus Business Edition 2013 and related components are as
follows:
Intel Pentium CPU 1.5 GHz
750 MB of free hard drive space (plus up to 200 MB for downloaded installation package)
A V G A ntiV irus Bus ines s E dition 2 0 1 3 © 2 0 1 2 C opyright A V G T ec hnologies C Z, s .r.o. A ll rights res erved.
8
512 MB of RAM memory
1.5. Recommended Hardware Requirements
Recommended hardware requirements for AVG AntiVirus Business Edition 2013 are as follows:
Intel Pentium CPU 1.8 GHz
900 MB of free hard drive space (plus up to 200 MB for downloaded installation package)
512 MB of RAM memory
1.6. Network Requirements
In order to successfully install AVG on stations remotely, it is necessary to take some steps in advance.
Note: If you experience any problems with the remote administration/installation/connection even after
reviewing the chapters below, please try to find the proper answer in the FAQ (Frequently Ask ed Questions)
located at http://www.avg.com/ww-en/faq.
1.6.1. Ports to be allowed on stations
For individual stations in your network, that use a personal firewall, you will probably need to allow certain
ports and set specific system features in order to be able to correctly use AVG remote installation.
Depending on the firewall type and settings on each station, some of the requirements listed below may be
already predefined or allowed, or its settings may not be available under the same name and description. We
strongly recommend that all changes should only be done by well experienced users! Always consult the
User manual or Help guide for your firewall before proceeding to change any settings.
Ping (ICMP type 0 - Incoming echo request)
Change this setting only if the AVG Network Installer is not able to detect network station(s), which
you are sure are switched on and fully operational.
In the firewall settings used on the remote station allow the incoming ping requests within the local
network. Often this function can be found under ICMP type 0 or Incoming echo request or similar
description. If set correctly, AVG Network Installer will be able to find the station in the network.
RPC: Remote Procedure Call
To be able to launch the AVG installation on the remote station, you need to allow the following ports in
the firewall on the station – TCP and UDP port 135.
Distributed Component Object Model (DCOM)
For proper functioning of WMI (Windows Management Instrumentation) used by the AVG Network
Installer, you have to open the DCOM port. The DCOM port is TCP 135. To open it, follow these steps:
1.
2.
3.
4.
Click Start, and then click Control Panel.
Double-click Windows Firewall, and then click the Exceptions tab.
Click Add Port.
In the Name box, type DCOM_TCP135, and then type 135 in the Port number box.
A V G A ntiV irus Bus ines s E dition 2 0 1 3 © 2 0 1 2 C opyright A V G T ec hnologies C Z, s .r.o. A ll rights res erved.
9
5. Click TCP, and then click OK.
6. Click OK.
1.6.2. Ports to be Allowed for Remote Administration
Ports that need to be allowed for remote administration are listed below:
Communication on TCP port number 80
For downloading AVG updates from the internet to the AVG Admin Server UpdateProxy, it is
necessary to permit outgoing communication for these components on TCP port 80.
TCP Port 4158
For basic communication between the AVG Admin Server and the AVG stations and the AVG Admin
console, you need to allow TCP port 4158 (predefined by default).
This port can be changed in the AVG Admin Server configuration and in the AVG User Interface on the
station (via upper menu Options/Advanced Settings – Remote Administration).
TCP Port 6051
This port is used for direct messages from AVG Admin Server to the AVG Station.
This port can be changed within the AVG User Interface on the station (via upper menu Options/
Advanced Settings – Remote Administration).
TCP Port 6054
This port is used for direct messages from the AVG Admin Server to the AVG Admin Console. This
port is not configurable. AVG Admin Console tries to open this port automatically for listening, if the
port is not available, it tries to open subsequent ports (6055, 6056, …) until it successfully finds an
available one.
1.7. Migrating Stations From Previous Version
The migration of one AVG DataCenter to another is described in the How to migrate stations from/to
different DataCenter chapter.
A V G A ntiV irus Bus ines s E dition 2 0 1 3 © 2 0 1 2 C opyright A V G T ec hnologies C Z, s .r.o. A ll rights res erved.
10
2. AVG AntiVirus Business Edition 2013 Installation
In order to be able to remotely install AVG on stations, you must first install AVG 2013 Remote
Administration and its components.
The whole process consists basically of two steps:
Components Installation
Deployment process
Note: It is strongly recommended that you go through the following chapters first to get a general overview of
the AVG AntiVirus Business Edition 2013 installation possibilities so that you can set the configuration that
best suits your needs. Especially check the Where to Install and Deploy and Components Overview chapters.
AVG AntiVirus Business Edition 2013 can be launched using the .exe file within the AVG Admin directory
on the installation CD. Also, the latest installation package can always be downloaded from the AVG website
at http://www.avg.com/ww-en/download.
Note: There are two installation pack ages available for your product - for 32bit operating systems (mark ed as
x86) and for 64bit operating systems (mark ed as x64). Be sure to use the correct installation pack age for
your specific operating system.
Before installing AVG Remote Administration visit the AVG website and check for the latest
installation file!
2.1. Components Overview
Below you will find a brief overview of all components.
2.1.1. AVG Admin Server Deployment Wizard
This wizard will help you to deploy AVG AntiVirus Business Edition 2013 onto your server or divide it across
multiple servers.
2.1.2. AVG Network Installer
The AVG Network Installer Wizard helps you to automatically install AVG on remote stations with only a
few clicks.
2.1.3. AVG Admin Console
The AVG Admin Console is a central place for administration of your remote AVG station installations in the
network. It communicates with the AVG Admin server and controls, processes and displays all relevant
events.
2.1.4. AVG Admin Lite
AVG Admin Lite is the name given to a simplified installation of AVG AntiVirus Business Edition 2013,
providing only a local update source and script AVG installations on stations, without the benefits of AVG
DataCenter and AVG Admin Console.
A V G A ntiV irus Bus ines s E dition 2 0 1 3 © 2 0 1 2 C opyright A V G T ec hnologies C Z, s .r.o. A ll rights res erved.
11
2.1.5. AVG Admin Server
The AVG Admin Server stores data in a database (AVG DataCenter) and performs the role of a mediator
between the AVG DataCenter and stations. AVG Admin Server may also work as a local update source.
The AVG DataCenter is a database that contains the entire configuration for AVG stations, including scan
and tasks settings. All stations with AVG installed, as well as the AVG Admin Console program,
communicate with the AVG DataCenter. The communication is possible only if the Remote Administration
component is properly installed on all stations connected to the AVG Admin Server.
AVG DataCenter supports one embedded and several standalone (commercial) SQL database systems. You
will be able to choose specific database system during deployment process (AVG Admin Deployment Wizard
starts after installation).
2.1.6. Server roles
There are two roles that can be deployed after installation on AVG Admin Servers. The selection of roles is a
key part of the deployment process that will take place right after product installation. The roles are as
follows:
DataCenter role
Allows central management of AVG stations configuration via the AVG Admin Console, collects scan
results from AVG stations, shows components states and much more.
UpdateProxy role
Serves as a proxy server for downloading and distributing updates to your stations.
2.2. Where to Install and Deploy
You can install and deploy different components/roles of AVG Remote Administration to different servers/
stations. There is no need to install everything on one machine.
Once you finish product installation, you will proceed to the deployment process that allows you to deploy
different server roles.
For example, the AVG DataCenter role can be deployed to some central server in your network. If your
network or number of stations is large, you can deploy the ProxyServer role to multiple servers across the
network to achieve load balancing and adequate bandwidth usage.
Also, the AVG Admin Console (central application for administration of your stations) can be installed to a
different station and the administrator can manage the stations from any place.
A V G A ntiV irus Bus ines s E dition 2 0 1 3 © 2 0 1 2 C opyright A V G T ec hnologies C Z, s .r.o. A ll rights res erved.
12
2.3. Welcome Dialog
The welcome dialog appears in the language of the operating system to which AVG AntiVirus Business
Edition 2013 is being installed. You can switch to another language by using the roll-down menu.
The second part of the welcome dialog offers the full wording of the AVG AntiVirus Business Edition 2013
license agreement. You can either scroll down to read the text or click the Printable version button to open it
in your internet browser window and optionally have the whole agreement printed.
Once you finish reading, click the Accept button to continue. Otherwise use the Decline button, and the
installation process will be cancelled.
A V G A ntiV irus Bus ines s E dition 2 0 1 3 © 2 0 1 2 C opyright A V G T ec hnologies C Z, s .r.o. A ll rights res erved.
13
2.4. License Activation
In this dialog enter your License number. Click the Next button to continue.
A V G A ntiV irus Bus ines s E dition 2 0 1 3 © 2 0 1 2 C opyright A V G T ec hnologies C Z, s .r.o. A ll rights res erved.
14
2.5. Installation Type
In this dialog select which type of Remote Administration you wish to install. You have the following options:
Express Install
This is the recommended option. It will install the application with standard configuration and
components.
Custom Install
This option allows you to select, which components you wish to install.
Upon clicking this options, a new section of this dialog appears, allowing you to specify the destination
folder where AVG AntiVirus Business Edition 2013 (and its components) will be installed. If you want to
select another directory, specify the directory path or choose a directory from your local disk by
pressing the Browse button.
Lite Install
This choice installs the product with simplified wizards that contain predefined settings for
UpdateProxy role only. The AVG Network Installer Wizard allows only simple script generation. No
console for administration will be installed and no AVG DataCenter will be deployed.
You can find more information about the Lite Installation in the AVG Admin Lite Chapter.
If you want to include an optional gadget to your desktop, check the Installs and displays the AVG 2013
gadget... checkbox (available for Windows Vista and Windows 7 or higher operating systems). More
information about this topic can be found in the Configuration/Sidebar/Desktop Gadgets chapter.
A V G A ntiV irus Bus ines s E dition 2 0 1 3 © 2 0 1 2 C opyright A V G T ec hnologies C Z, s .r.o. A ll rights res erved.
15
2.6. Custom Options
If you chose Custom install in the Installation Type dialog, you will experience the following screen:
Select AVG AntiVirus Business Edition 2013 components that you want to install. By default, all key
components are selected. If you decide on another arrangement, check or uncheck the respective checkbox.
To continue the installation process, press the Next button:
Note: If you want to use Graphic reports, install the component on the computer where you install AVG Admin
Server, and on each computer where you install AVG Admin Console. Graphic reports are generated by the
AVG Admin Server and can be viewed from the AVG Admin Console.
2.7. Installation Complete
The Installation complete dialog appears to confirm that AVG AntiVirus Business Edition 2013 and all its
components were installed successfully.
You can optionally also decide to be part of the Product Improvement Programme. To do so, simply keep the
available checkbox ticked (recommended).
A V G A ntiV irus Bus ines s E dition 2 0 1 3 © 2 0 1 2 C opyright A V G T ec hnologies C Z, s .r.o. A ll rights res erved.
16
Press the Finis h button to finalize the installation.
If the installation went through correctly, one of the following Wizards will launch automatically depending on
your previous choices during the installation process:
AVG Admin Deployment Wizard
This Wizard will start automatically if you chose Quick or Custom installation in the Installation type
dialog.
For more information see the AVG Admin Deployment Wizard chapter.
Note: You must go through this wizard in order to mak e AVG AntiVirus Business Edition 2013 function
properly.
AVG Admin Deployment Wizard Lite
This Wizard will start if you chose Lite Installation in the Installation type dialog. For more information
see the AVG Admin Deployment Wizard Lite chapter.
Note: You must go through this wizard in order to mak e AVG AntiVirus Business Edition 2013 function
properly.
Note: If an error occurred during the installation process, or the installation failed, an error dialog appears. In
that case copy the available information and contact our technical support team. Use the contact page
http://www.avg.com/ww-en/support-existing.
A V G A ntiV irus Bus ines s E dition 2 0 1 3 © 2 0 1 2 C opyright A V G T ec hnologies C Z, s .r.o. A ll rights res erved.
17
3. AVG Admin Deployment Wizard
The AVG Admin Server Deployment Wizard is launched immediately after the installation of AVG
AntiVirus Business Edition 2013. It can also be launched any time later from the Start menu program folder, i.
e. All programs/AVG 2013 Remote Administration/AVG Admin Server Deployment Wizard.
The Wizard guides you through the configuration process for the AVG DataCenter database on a selected
database engine. Using the wizard, you can also configure the AVG Admin Server in order to mirror the AVG
updates in a local network. The wizard leads you through the configuration process in a few steps listed in the
following summary.
Note: Navigation in the wizard is as usual:
The Back button takes you one step back in the wizard.
The Next button takes you one step forward and also performs all actions selected in the current stage.
Use the Help button to open a comprehensive information help related to the current step.
By pressing the Cancel button, you can quit the wizard at any stage, discarding the changes
performed so far.
3.1. Introduction
The first dialog explains the purpose of the Wizard and briefly describes two main options. Click the Next
button to proceed to the next step.
Note: We strongly recommend you complete this wizard in order to mak e the AVG Admin Server run
correctly.
A V G A ntiV irus Bus ines s E dition 2 0 1 3 © 2 0 1 2 C opyright A V G T ec hnologies C Z, s .r.o. A ll rights res erved.
18
3.2. Deploying multiple UpdateProxy roles
Before you deploy AVG AntiVirus Business Edition 2013 roles to your server, you may need to consider the
following:
You can deploy the UpdateProxy role to more than one server and distribute updates from different sources to
avoid your server overloading or having bandwidth issues.
The allocation of servers depends on your network size and your server and network specifications. Generally
speaking, if your network consists of more than 150 stations or your network is divided into multiple segments
in different locations, you should consider deploying multiple UpdateProxy roles to different servers and
spread the load.
To deploy the UpdateProxy role to another server you need to repeat the installation and deployment process
on the other server.
3.3. Role Selection
This screen displays information on the AVG Admin Server current state. When everything is correct, the
respective information is displayed in green text.
If this is not your first run and everything seems to be correct (i.e. up-to-date with no warnings or errors), there
is no need to go through the configuration process again (unless you wish to change something).
If there is a configuration problem, you will be briefly informed about the reasons, and the information will be
highlighted in red color. In such cases you need to go through the whole wizard to correct the problem.
In the Server roles section you must choose which server role(s) you want to run on this server. You need to
select at least one option, but you can also select both. The options are as follows:
A V G A ntiV irus Bus ines s E dition 2 0 1 3 © 2 0 1 2 C opyright A V G T ec hnologies C Z, s .r.o. A ll rights res erved.
19
DataCenter role
Allows central management of AVG stations configuration via the AVG Admin Console, collects scan
results from AVG stations, shows components states and much more.
If you choose to install this role only, proceed to the DataCenter Role chapter.
UpdateProxy role
Serves as a proxy server for downloading and distributing updates to your stations.
If you choose to install this role only, proceed to the UpdateProxy role chapter.
If you select both options, proceed to the DataCenter Role chapter.
3.4. DataCenter Role
Select if you are deploying AVG Admin Server for the first time or repeatedly:
I am deploying the AVG Admin Server for the first time
I am deploying the AVG Admin Serve again over an existing database
3.5. DataCenter Role - First Deployment
If you have selected in the Current state of AVG Admin Server step (see chapter Role Selection) the
DataCenter Role, and you are deploying the application for the first time, you will experience the following
dialog.
Note: If you are deploying the database repeatedly, please proceed to the chapter Repeated deployment.
A V G A ntiV irus Bus ines s E dition 2 0 1 3 © 2 0 1 2 C opyright A V G T ec hnologies C Z, s .r.o. A ll rights res erved.
20
Select the database system corresponding to your needs. These options are available:
Firebird
This solution is appropriate for smaller networks with up to 150 stations. The database is a standard
part of AVG AntiVirus Business Edition 2013 installation.
Additionally, you can choose a specific database character set from the roll down menu corresponding
to your language needs.
Microsoft SQL Server Express
The Microsoft SQL Server Express Edition is a reduced version of the Microsoft SQL Server, it can
serve up to 1000 stations. The product is not a standard part of AVG AntiVirus Business Edition 2013.
Its usage is not limited by any commercial license.
Microsoft SQL Server
The Microsoft SQL Server engine can serve over 1000 stations in large networks. It is not a standard
part of AVG AntiVirus Business Edition 2013 and its usage is bound to the Microsoft SQL Server
license.
Oracle 10g/11g
This database engine can serve over 1000 stations in large networks. It is not a standard part of AVG
AntiVirus Business Edition 2013 and its usage is bound to a commercial license.
MySQL 5
This database engine can serve over 1000 stations in large networks. It is not a standard part of AVG
AntiVirus Business Edition 2013 and a commercial license may be needed for use in a commercial
environment.
If you choose a database type that is different to the one you have been currently using, the Wizard can
import the contents of the previously exported AVG DataCenter into the newly chosen database type.
Continue to the Databases Overview chapter.
3.6. DataCenter Role - Repeated Deployment
During the repeated deployment, there is usually an existing database with stations available, so the Wizard
will offer you to backup its contents first:
Note: The back up is not available if the database is in an error state!
A V G A ntiV irus Bus ines s E dition 2 0 1 3 © 2 0 1 2 C opyright A V G T ec hnologies C Z, s .r.o. A ll rights res erved.
21
To do so, simply check the Perform DataCenter database backup to folder checkbox and fill-in your
desired storage location.
The next dialog will inform you about your DataCenter database status. There exist two possible cases either the DataCenter database will be up-to-date or outdated. In the first case, you will experience these two
options:
Keep existing DataCenter database
This option will leave the database untouched. Select this option, if the database version is up to date
and you need to preserve its contents.
Create new empty DataCenter database
Select this option to create completely new database (the originally stored data will be lost). We
strongly recommend to backup the DataCenter database before proceeding!
On the other hand, if the DataCenter database will be outdated, you will be asked, if you wish to update the
existing one or create a new one:
Update existing DataCenter database
This option will update the database to the current version. Select this option, if you need to preserve
the database contents.
A V G A ntiV irus Bus ines s E dition 2 0 1 3 © 2 0 1 2 C opyright A V G T ec hnologies C Z, s .r.o. A ll rights res erved.
22
In the next step you can optionally check the Username and Password checkboxes and fill-in your preferred
user name and password that will be required each time you launch the AVG Admin Console, AVG Admin
Server Deployment Wizard or process stations update.
Note: If you set an username and password here, you should also manually define the same values on all
existing stations in order to allow them correctly connect to your Datacenter!
Depending on your previous choices, you can continue to one of two dialogs:
A V G A ntiV irus Bus ines s E dition 2 0 1 3 © 2 0 1 2 C opyright A V G T ec hnologies C Z, s .r.o. A ll rights res erved.
23
If you kept the existing database, continue to the UpdateProxy Role chapter.
If you asked to create a new database, you will experience the following dialog:
Select the database system corresponding to your needs. These options are available:
Firebird
This solution is appropriate for smaller networks with up to 150 stations. The database is a
standard part of AVG AntiVirus Business Edition 2013 installation.
Additionally, you can choose a specific database character set from the roll down menu
corresponding to your language needs.
Microsoft SQL Server Express
The Microsoft SQL Server Express Edition is a reduced version of the Microsoft SQL Server, it
can serve up to 1000 stations. The product is not a standard part of AVG AntiVirus Business
Edition 2013. Its usage is not limited by any commercial license.
Microsoft SQL Server
The Microsoft SQL Server engine can serve over 1000 stations in large networks. It is not a
standard part of AVG AntiVirus Business Edition 2013 and its usage is bound to the Microsoft
SQL Server license.
Oracle 10g/11g
This database engine can serve over 1000 stations in large networks. It is not a standard part of
AVG AntiVirus Business Edition 2013 and its usage is bound to a commercial license.
A V G A ntiV irus Bus ines s E dition 2 0 1 3 © 2 0 1 2 C opyright A V G T ec hnologies C Z, s .r.o. A ll rights res erved.
24
MySQL 5
This database engine can serve over 1000 stations in large networks.. It is not a standard part of
AVG AntiVirus Business Edition 2013 and a commercial license may be needed for use in a
commercial environment.
If you choose a database type that is different to the one you have been currently using, the Wizard
can import the contents of the previously exported AVG DataCenter into the newly chosen database
type.
Continue to the DataCenter Role - Databases Overview chapter.
3.7. DataCenter Role - Databases Overview
Below you will find the overview of individual databases supported by AVG AntiVirus Business Edition 2013.
3.7.1. Firebird
If you have selected the Firebird option, there are no further settings needed and you can proceed to the next
step (Data Import).
3.7.2. MS SQL Server Express Edition
If you wish to use Microsoft SQL Server Express for storing Datacenter data, fill in the following information:
Computer name – defines the name of the station, on which SQL Express Edition is installed
Instance name – refers to a particular SQL Express Edition installation, if there is more than one
instance installed on the station.
Administrator’s username – predefined automatically, you do not need to change it
A V G A ntiV irus Bus ines s E dition 2 0 1 3 © 2 0 1 2 C opyright A V G T ec hnologies C Z, s .r.o. A ll rights res erved.
25
Administrator’s password – password for the database administrator
Database name - shows the predefined database name
Username - type in a preferred new login name for the database (to be used for AVG Admin Server
connection)
User password - type in a preferred new password for the database (to be used for AVG Admin Server
connection)
If you are experiencing troubles with Microsoft SQL Server Express connection, you might find a solution in
the How to use Microsoft SQL Server database system chapter.
Continue to the next step - Data Import - by pressing the Next button.
3.7.3. MS SQL Server
Fill in the following information:
Computer name – defines the name of the server, on which the SQL Server is installed.
Instance name – refers to a particular SQL Server installation, if there is more than one instance
installed on the station.
Administrator’s username – database administrator user name - must be filled in.
Administrator’s password – password for the database administrator - must be filled in.
Database name - shows the predefined database name.
Username - type in a preferred new login name for the database (to be used for AVG Admin Server
A V G A ntiV irus Bus ines s E dition 2 0 1 3 © 2 0 1 2 C opyright A V G T ec hnologies C Z, s .r.o. A ll rights res erved.
26
connection).
User password - type in a preferred new password for the database (to be used for AVG Admin Server
connection).
If you are experiencing troubles with Microsoft SQL Server connection, you might find a solution in the How to
use Microsoft SQL Server database system chapter.
Press the Next button and continue to the next step - Data Import.
3.7.4. Oracle
Please note: If your database is running on another computer, you must first install the client part of the
Oracle database on that computer. For installation on Windows Vista we recommend to use client part for
Oracle 11g.
Instant Client for different operating systems: http://www.oracle.com/technetwork /database/features/instantclient/index.html
Fill in the following information:
Computer name – defines the name of the server, on which Oracle 10g is installed. Change the value
only if the installation resides on a remote computer.
Administrator’s username – database administrator user name - must be filled in.
Administrator’s password – password for the database administrator - must be filled in.
Instance name – enter your Oracle instance name.
A V G A ntiV irus Bus ines s E dition 2 0 1 3 © 2 0 1 2 C opyright A V G T ec hnologies C Z, s .r.o. A ll rights res erved.
27
Username - shows the predefined login name for the database (to be used for AVG Admin Server
connection)
User password - type in a preferred new password for the database (to be used for AVG Admin Server
connection)
Press the Next button and continue to the next step - Data Import.
3.7.5. MySQL 5
Fill in the following information:
Computer name – defines the name of the server, on which the MySQL 5 is installed. Change the
value only if the installation resides on a remote computer.
Service name - Default operating system service name for the MySQL engine. We recommend
keeping the original value.
Administrator’s username – database administrator user name - must be filled in.
Administrator’s password – password for the database administrator - must be filled in.
Database name - shows the predefined database name.
Username - type in a preferred new login name for the database (to be used for AVG Admin Server
connection)
User password - type in a preferred new password for the database (to be used for AVG Admin Server
connection)
Please note the following information before proceeding:
A V G A ntiV irus Bus ines s E dition 2 0 1 3 © 2 0 1 2 C opyright A V G T ec hnologies C Z, s .r.o. A ll rights res erved.
28
MySQL Server 5 uses max_allowed_packet variable to set the maximum size of one packet. Its default value
is 1048576 bytes (1 MB) which is too low for AVG Admin Server to work properly in most cases. We strongly
recommend to change this value to at least 10 MB. To do so, follow one of the solutions below:
Set the value for the current run only
This will apply the setting until the restart of the server occurs. Then the default value or value from my.
ini will be used again.
Note: You need to be logged as administrator with MySQL root privileges in order to do that.
Login to your MySQL server and run this command:
set global max_allowed_packet = 10485760
Change Settings in the my.ini file (permanent - recommended)
This will save the settings permanently, but requires restart of the MySQL server.
Open the my.ini file on the MySQL server.
Under the section [mysqld] change max_allowed_pack et to the following value:
max_allowed_packet = 10485760
Restart the mysqld daemon or the MySQL service.
Press the Next button and continue to the next step - Data Import.
3.8. DataCenter Role - Data Import
A V G A ntiV irus Bus ines s E dition 2 0 1 3 © 2 0 1 2 C opyright A V G T ec hnologies C Z, s .r.o. A ll rights res erved.
29
Once you confirm your database selection, you can also choose to import some existing data into the newly
created database. If your network supports Active Directory, you will experience these two options:
Import stations from Active Directory
This option will allow you to automatically import all station names from the Active Directory into the
database. Later on you will be able to choose which stations to install.
First, tick the Import stations from Active Directory checkbox. Then fill in your Active Directory
enabled domain name from which you intend to make the import.
Tick the Create groups by sub-domains in AD checkbox in order to automatically create groups and
sort stations into them according to the sub-domain names available inside the Active Directory.
You can also use the Advanced button to specify login details if different from the currently logged
user:
Import data into the database from a folder
To do so, tick the Import data into the database from folder checkbox. The folder selection field
becomes available. Choose your backup folder by clicking this button
the original files for import are stored.
and find the folder, where
If you are currently upgrading from the former 2012 version, you can import your AVG DataCenter 2012
data in this dialog. For more information please consult Importing Stations and Settings from AVG
DataCenter 2012 chapter.
Note: AVG Admin Server creates by default automatic database backups to the following folder:
C:\Documents and settings\All users\Application Data\AVG2013\Admin Server Data\DatabaseBackup
Therefore, if you have previously used AVG Remote Administration and wish to use former database
backup, you can find the backup files there, unless you switched the backup feature off. The backup
A V G A ntiV irus Bus ines s E dition 2 0 1 3 © 2 0 1 2 C opyright A V G T ec hnologies C Z, s .r.o. A ll rights res erved.
30
files are saved in format avgexport.dce (but can be renamed if you wish so).
Confirm your choice by clicking the Next button.
3.9. DataCenter Role - Server Access
In this step you can optionally check the Username and Password checkboxes and fill-in your preferred user
name and password that will be required each time you launch the AVG Admin Console, AVG Admin Server
Deployment Wizard or process stations update.
Note: If you set an username and password here, you should also manually define the same values on all
existing stations in order to allow them correctly connect to your Datacenter!
A V G A ntiV irus Bus ines s E dition 2 0 1 3 © 2 0 1 2 C opyright A V G T ec hnologies C Z, s .r.o. A ll rights res erved.
31
3.10. UpdateProxy Role
This dialog will appear, if you chose to deploy the UpdateProxy role in the Role Selection dialog.
You must choose a folder, into which the update files will be downloaded and stored. If the folder does not
exist, you will be asked if you want to create it.
Click this
button to select the folder. Once finished, click the Next button to continue.
3.10.1. Update Servers
A V G A ntiV irus Bus ines s E dition 2 0 1 3 © 2 0 1 2 C opyright A V G T ec hnologies C Z, s .r.o. A ll rights res erved.
32
This dialog lets you choose update servers, from which the update files will be downloaded by AVG Admin
Server (for further distribution). If you are unsure about these settings, we recommend keeping the default
configuration. It is quite understandable that stations with AVG 2013 and stations with older AVG 2012 require
different updates from different update servers. Therefore you can choose these servers separately using two
stand-alone tabs.
If you for some reason do not wish to download Anti-Spam updates, uncheck the Allow downloading of
Anti-Spam updates item. This check box indicates, that Anti-Spam updates will be downloaded directly from
the Mailshell servers.
Additional information about the Anti-Spam updates can be found in the Configuration/Shared Settings for
Stations/Groups/Anti-Spam chapter.
If you need to change any of these servers, you have the following options:
Press the Add button to define additional update server:
Enter the complete server address into the URL field including http:// prefix and port number, if other than 80.
The following buttons are also available:
Edit - for changing the address of the selected server.
A V G A ntiV irus Bus ines s E dition 2 0 1 3 © 2 0 1 2 C opyright A V G T ec hnologies C Z, s .r.o. A ll rights res erved.
33
Delete - for deleting the selected server address.
Default - for resetting values of the current dialog to default ones.
The servers are listed by priority. The first one always has the highest priority, i.e. updates are first
downloaded from this server. If you need to change the order, simply use the following buttons to do so:
Move Up - to move a selected server up.
Move Down - to move a selected server down.
Once finished, click the Next button to continue.
In this dialog, you have the option to add the currently deployed AVG Admin Server URL into the list of update
A V G A ntiV irus Bus ines s E dition 2 0 1 3 © 2 0 1 2 C opyright A V G T ec hnologies C Z, s .r.o. A ll rights res erved.
34
servers applicable for station settings. Again, two separate tabs are available - one for stations with AVG 2013
and one for stations with older AVG 2012.
From the drop down menu select one of the following:
Do not write to DC - the currently deployed AVG Admin Server URL will not be written to any of the
DataCenter settings.
Application Servers - the currently deployed AVG Admin Server URL will be saved to the Application
Servers group settings.
Shared Settings - the currently deployed AVG Admin Server URL will be saved into the Shared
Settings for Stations.
New group... - the currently deployed AVG Admin Server URL will be saved to a new group. If you
choose this option, you will need to select a group name and optionally its description too.
New stations - the currently deployed AVG Admin Server URL will be saved to the New stations group
settings.
Note: You can only use one option from the drop down menu. The list of update servers will be updated
according to your choice.
In the list of update servers check which server(s) you would like keeping for the set of settings mentioned
above. Use the same function buttons as in the previous dialog.
Check the Update Anti-Spam via AVG Admin Server item to update Anti-Spam database directly via the
AVG Admin Server.
Note: In order to use this check box, it is necessary to move the AVG Admin Server UpdateProxy to the
first place in the list. To do so, use the Move up button.
Additional information about the Anti-Spam updates can be found in the Configuration/Shared Settings for
Stations/Groups/Anti-Spam chapter.
A V G A ntiV irus Bus ines s E dition 2 0 1 3 © 2 0 1 2 C opyright A V G T ec hnologies C Z, s .r.o. A ll rights res erved.
35
3.11. Configuration Overview
This dialog contains a brief overview of the previously selected settings. You can also tick the Send server
dumps automatically to analysis checkbox in order to send potential AVG Admin Server crash dumps
directly to our technical support for further analysis.
Confirm your choices by pressing the Deploy button. The deployment process will start. It may take some
time, so please be patient.
Once the process is completed, click the Finish button to close the Wizard. The AVG Admin Server will then
be started.
To immediately start installing AVG to remote stations, navigate to the AVG Network Installer Wizard chapter
for more detailed information.
Related topics:
Remote Network Installer available from AVG Admin Console
Standalone AVG Network Installer Wizard Basic Mode
Standalone AVG Network Installer Wizard Advanced Mode (for more experienced users)
Connecting Stations to AVG DataCenter
Migrating stations from/to different AVG DataCenter
Also, you may consider going through the general How to... chapter which describes different tasks related to
the remote administration of AVG.
A V G A ntiV irus Bus ines s E dition 2 0 1 3 © 2 0 1 2 C opyright A V G T ec hnologies C Z, s .r.o. A ll rights res erved.
36
4. AVG Network Installer Wizard Basic Mode
Note: This chapter describes the standalone version of AVG Network Installer Wizard. As it is also
included directly within the AVG Admin Console, it might be more convenient to use it from there. More
information can be found in the AVG Admin Console/Network Installer chapter.
The AVG Network Installer Wizard allows you to remotely install AVG on stations or to create installation
scripts for on-site installation.
The wizard can be launched in two ways:
From the Windows Start menu/All Programs/AVG 2013 Remote Administration/AVG Network
Installer
From the AVG Admin Console environment - upper menu Tools/Install AVG on stations...
The wizard can be run either in the Basic or Advanced mode. You can select the Advanced mode by selecting
the option Advanced mode at the beginning of the wizard. If the option is not selected, the program will run in
the Basic mode (recommended for most users).
This chapter describes the Basic mode, which is intended for users who prefer the easiest method for
configuration and installation. The installation will include AVG information and parameters needed for proper
and comprehensive functionality.
4.1. Recommendations for Components
Before installing AVG on stations, please review the following recommendations regarding individual
components.
Note: The basic mode of the AVG Network Installer Wizard does not allow selection of individual components
for installation. To choose custom components you will need to use Advanced mode of the Wizard. More
information can be found in the AVG Network Installer Wizard Advanced mode chapter
The following AVG components are designed only for use on regular workstations:
AVG Firewall
AVG Online Shield
AVG Personal Email Scanner
The above components were not tested under a server load. If installed on a server operating system (such as
ISA, proxy, email server, terminal server, etc.) the components might cause issues with server
communication. To avoid these issues it is not recommended to install the mentioned components on a
server operating system.
AVG Surf-Shield
This component uses a special driver that may require the computer restart in order to successfully
update itself. Therefore installing it to a server environment is not recommended.
Note: These exceptions do not apply if you only use a computer with some server operating system installed
(e.g. Windows Server 2003 etc.) as a standard work station without server features enabled.
A V G A ntiV irus Bus ines s E dition 2 0 1 3 © 2 0 1 2 C opyright A V G T ec hnologies C Z, s .r.o. A ll rights res erved.
37
4.2. Welcome
If you have already used the AVG Network Installer Wizard before and saved a customized configuration
into a configuration file (available in the final step), you can load the settings now by choosing the Load
settings button.
To revert to the original settings preset by default, press the Default settings button.
During the whole installation process you can decide to save the configuration progress at any time by
pressing F2 key or CTRL+S combination. A new dialog will appear allowing you to choose a configuration file
name.
To continue, click the Next button.
A V G A ntiV irus Bus ines s E dition 2 0 1 3 © 2 0 1 2 C opyright A V G T ec hnologies C Z, s .r.o. A ll rights res erved.
38
4.3. Installation Method
To continue in the Basic Mode leave the option Advanced mode unselected, otherwise proceed to Advanced
Mode chapter.
The dialog window offers the selection between two options for creating and using the installation script:
Remote network installation
This option allows you to install AVG on stations available in the local network (computers selected
from the domain, Active Directory, according to IP ranges, imported from a list etc.).
You can also use this option for removing stations from a former AVG Datacenter (and moving them to
a new one).
Creation of AVG installation script
This option allows you to create an installation script and a batch file for local installation or installation
from a removable media/network folder.
A V G A ntiV irus Bus ines s E dition 2 0 1 3 © 2 0 1 2 C opyright A V G T ec hnologies C Z, s .r.o. A ll rights res erved.
39
4.4. Remote Network Installation
For proper remote installation, the wizard will first check whether AVG is already present on the target station,
then transfer the AVG installation files and process the installation accordingly.
Before you proceed, please review the network requirements and exceptions regarding remote AVG
installation.
You can find more detailed information on the ports settings in the Network Requirements chapter.
A V G A ntiV irus Bus ines s E dition 2 0 1 3 © 2 0 1 2 C opyright A V G T ec hnologies C Z, s .r.o. A ll rights res erved.
40
During this step it is necessary to define the following installation parameters:
License information – type in the license data such as Name, Company, and License number
(mandatory value). If you wish to take the Windows username for the Name field, do not select the
respective check box, and leave the default system settings to be used.
Folder with the AVG installation package - type in the full path to AVG installation package or use
this
button to select the proper folder.
If you have not downloaded the package yet, click the Download button and use the wizard to
download the installation file for you into the selected folder. You can view the download progress above
the Download button.
Proxy settings button - If you need to use a proxy server to connect to the Internet, you can fill in the
proxy server details by clicking the Proxy settings button.
License number change - Use this button to input a new license number to be used for remote
installations of AVG.
A V G A ntiV irus Bus ines s E dition 2 0 1 3 © 2 0 1 2 C opyright A V G T ec hnologies C Z, s .r.o. A ll rights res erved.
41
The following options are available in this step.
Note: If you are unsure about these settings, we recommend k eeping the default ones.
Remote administration - Enter the AVG DataCenter connection string into the AVG DataCenter
connection string field. If applicable, also enter the Username and Password. If you do not want to
manage the stations via the AVG Admin Console, simply uncheck this option.
Add new station into group - If you prefer to automatically add new station(s) into a custom group,
you can choose the group name here.
Custom update server - if you already have an existing update server, that you would like to use for
your stations, check this box and fill in its address now.
A V G A ntiV irus Bus ines s E dition 2 0 1 3 © 2 0 1 2 C opyright A V G T ec hnologies C Z, s .r.o. A ll rights res erved.
42
The wizard needs to scan some stations first to find out their status and then install AVG on them.
In the Network scanning method section choose from the drop down list, your preferred method for
selecting stations. The possible options are as follows:
All stations from the domain - this option will scan all stations available in your local domain.
Note: This option is available only if the current computer is part of a domain.
Enter an IP range - this option will allow you to choose a specific range of IP addresses.
Import stations from file - a new dialog will appear and you will be able to choose a file with a list of
stations to be scanned The source text file should contain one station name or an IP address per line.
Select a single station - this option lets you type in a specific Computer name (DNS name) or IP
address.
Select from Active Directory - allows you to choose specific stations directly from the Active
Directory.
Note: This option is available only if the current computer is part of a domain.
The List of accounts section is meant to facilitate your work and to accelerate installation process. If your
access rights are not sufficient for AVG installation on the remote station, you will be asked to enter a
username that has administrator privileges (a username that is member of an administrator's group). If there is
no common administrator account for all stations (with the same login name and password) you will be asked
separately for every station.
This section allows you to create a list of accounts that will be used during remote installation; this way you
will avoid entering multiple credentials. You can add accounts to the list by clicking the Add button (or delete
A V G A ntiV irus Bus ines s E dition 2 0 1 3 © 2 0 1 2 C opyright A V G T ec hnologies C Z, s .r.o. A ll rights res erved.
43
them using the Remove button). If you wish to keep your list of accounts for further use, check the Save list
of accounts box. However, this is not recommended for safety reasons.
Warning: AVG remote installation can be performed only on stations with the supported operating system
installed. See the full list of supported operating systems in the Operating Systems Supported chapter. Also,
you need to k now a logon username with administrator privileges.
You may also need to review the Network Requirements chapter.
4.4.1. All Stations from the Domain
If you choose to install AVG remotely on all stations from the domain, the following dialog listing all stations
available in the domain will appear:
Right-click to view additional options:
Retrieve the installation log - this option will try to obtain the installation log from the station (if
available).
Export stations without AVG to a file - this option will create a file with list of stations that do not
contain AVG installation.
Select all stations - will select or unselect all stations in the list and the Install button will become
active.
Select stations without AVG - will select only stations that do not have AVG already installed, or
where AVG could not be detected.
The Refresh button will reload the state of all stations in the list by scanning them again.
A V G A ntiV irus Bus ines s E dition 2 0 1 3 © 2 0 1 2 C opyright A V G T ec hnologies C Z, s .r.o. A ll rights res erved.
44
Continue to the Remote network installation - final steps chapter and complete the remote installation
process.
4.4.2. Enter an IP Range
If you choose to install AVG remotely according to an IP range, the following dialog will appear:
You need to specify the scanning range by entering the IP addresses here. In the From field enter a starting
IP address and in the To field enter an ending address. Click the Add button to add the address range into
the list.
To delete a range from the right list, simply select the items you wish to remove and click the Remove
button.
Once you finish selecting the IP ranges, click the Next button to continue. Once done, the Station selection
window will appear:
A V G A ntiV irus Bus ines s E dition 2 0 1 3 © 2 0 1 2 C opyright A V G T ec hnologies C Z, s .r.o. A ll rights res erved.
45
Right-click to view additional options:
Retrieve the installation log - this option will try to obtain the installation log from the station (if
available).
Export stations without AVG to a file - this option will create a file with list of stations that do not
contain AVG installation.
Select all stations - will select or unselect all stations in the list and the Install button will become
active.
Select stations without AVG - will select only stations that do not have AVG already installed, or
where AVG could not be detected.
The Refresh button will reload the state of all stations in the list by scanning them again.
Continue to the Remote network installation - final steps chapter and complete the remote installation
process.
4.4.3. Import Stations from File
Note: This option is usually used when migrating stations to another AVG DataCenter. For more information
on this topic see the Migrate Stations from/to Different DataCenter chapter.
If you choose to install AVG remotely on stations selected from a file, you will see a dialog asking for the file.
Locate the file and confirm your choice. The source file format contains one station name per line in simple
text format.
Once done, the Station selection window will appear:
A V G A ntiV irus Bus ines s E dition 2 0 1 3 © 2 0 1 2 C opyright A V G T ec hnologies C Z, s .r.o. A ll rights res erved.
46
Right-click to view additional options:
Retrieve the installation log - this option will try to obtain the installation log from the station (if
available).
Export stations without AVG to a file - this option will create a file with list of stations that do not
contain AVG installation.
Select all stations - will select or unselect all stations in the list and the Install button will become
active.
Select stations without AVG - will select only stations that do not have AVG already installed, or
where AVG could not be detected.
The Refresh button will reload the state of all stations in the list by scanning them again.
Continue to the Remote network installation - final steps chapter and complete the remote installation
process.
A V G A ntiV irus Bus ines s E dition 2 0 1 3 © 2 0 1 2 C opyright A V G T ec hnologies C Z, s .r.o. A ll rights res erved.
47
4.4.4. Select a Single Station
If you choose to install AVG remotely only on a single station, the following dialog will appear:
Click either the Computer name or IP address field and fill in the proper name or IP address. Confirm your
choice by clicking the OK button. The process of checking the chosen station for an AVG installation will
begin. Once done, the Station selection window will appear:
Right-click to view additional options:
Retrieve the installation log - this option will try to obtain the installation log from the station (if
available).
Export stations without AVG to a file - this option will create a file with list of stations that do not
contain AVG installation.
A V G A ntiV irus Bus ines s E dition 2 0 1 3 © 2 0 1 2 C opyright A V G T ec hnologies C Z, s .r.o. A ll rights res erved.
48
Select all stations - will select or unselect all stations in the list and the Install button will become
active.
Select stations without AVG - will select only stations that do not have AVG already installed, or
where AVG could not be detected.
The Refresh button will reload the state of all stations in the list by scanning them again. The Add one
station will allow you to add another single station.
Continue to the Remote network installation - final steps chapter and complete the remote installation
process.
4.4.5. Select from Active Directory
If your network is domain-based, you can choose to install AVG remotely on stations selected from the Active
Directory. A new dialog will pop up (standard Windows dialog for selecting computers). You can choose
multiple stations (separate the values by a semicolon) either by entering the station names manually or by
using the dialog advanced features for searching.
Once done, the Station selection window will appear:
Right-click to view additional options:
Retrieve the installation log - this option will try to obtain the installation log from the station (if
available).
Export stations without AVG to a file - this option will create a file with list of stations that do not
contain AVG installation.
Select all stations - will select or unselect all stations in the list and the Install button will become
A V G A ntiV irus Bus ines s E dition 2 0 1 3 © 2 0 1 2 C opyright A V G T ec hnologies C Z, s .r.o. A ll rights res erved.
49
active.
Select stations without AVG - will select only stations that do not have AVG already installed, or
where AVG could not be detected.
The Refresh button will reload the state of all stations in the list by scanning them again.
Continue to the Remote network installation - final steps chapter and complete the remote installation
process.
4.5. Remote network installation - final steps
Additionally, you may display a so called 'tool tip' when pointing to a station in the list for a few seconds. The
tool tip contains an overview of the station state and other details.
Once you are ready to proceed, select the desired stations and click on the Install button to begin remote
installation.
If you selected only some stations from the list, AVG installation will be performed on these stations only.
Otherwise installation will be performed on all listed stations.
If your access rights are not sufficient for installation on the remote station, you will be asked for the domain
administrator’s login/password during installation.
A V G A ntiV irus Bus ines s E dition 2 0 1 3 © 2 0 1 2 C opyright A V G T ec hnologies C Z, s .r.o. A ll rights res erved.
50
Enter an username with the administrator privileges (an username that is member of the administrator's
group). Confirm by clicking OK.
If there is no common administrator account for all stations (with the same login name and password) you will
be asked separately for every station.
Pressing the Cancel button will cause the current station installation to be skipped, and the wizard will
continue installation on the next station in the list.
AVG will then be transferred to the station and installed. You will see on each line, if the installation was
successful (however it may take some time to process).
Once all your stations receive the installation files and finish the installation process, you will be able to leave
this dialog by clicking the Next button.
Note: You can later review recently installed stations from the AVG Admin Console either in the Stations/
New stations or in the group chosen during the Remote administration settings dialog.
To list recently installed stations that remain in an incorrect state (because of some remote installation
failure), navigate to the Stations/Non-compliant stations.
The final dialog contains a short overview of activity on the station(s).
A V G A ntiV irus Bus ines s E dition 2 0 1 3 © 2 0 1 2 C opyright A V G T ec hnologies C Z, s .r.o. A ll rights res erved.
51
The Save settings button allows you to save the previously selected configuration. You can then reuse it
when running this wizard again simply by loading the settings at the very beginning.
Click Finish button to close the wizard.
4.6. Creation of AVG Installation Script
Selecting the Creation of AVG installation script option, the wizard will create an installation script in a
selected directory. The content of the directory can then be used for installation from CD, network folder or
copied directly to a station.
This option does not offer the possibility of remote installation to the network stations or servers.
A V G A ntiV irus Bus ines s E dition 2 0 1 3 © 2 0 1 2 C opyright A V G T ec hnologies C Z, s .r.o. A ll rights res erved.
52
The first step contains an overview of this option. Click Next to continue.
During this step it is necessary to define the following installation parameters:
License information – type in the license data such as Name, Company, and License number
(mandatory value). If you wish to use the Windows username for the Name field, do not select the
respective check box, and leave the default system settings to be used.
Folder with the AVG installation package - type in the full path to the AVG installation package or
use this
button to select the correct folder.
If you have not downloaded the package yet, click the Download button and use the wizard to
A V G A ntiV irus Bus ines s E dition 2 0 1 3 © 2 0 1 2 C opyright A V G T ec hnologies C Z, s .r.o. A ll rights res erved.
53
download the installation file for you into the selected folder. You can view the download progress above
the Download button.
Proxy settings button - If you need to use a proxy server to connect to the Internet, you can fill in the
proxy server details by clicking the Proxy settings button.
License number change - Use this button to input a new license number to be used for remote
installations of AVG.
The following options are available in this step.
Note: If you are unsure about these settings, we recommend k eeping the default ones.
Remote administration - Enter the AVG DataCenter connection string to the AVG DataCenter
connection string field. If applicable, also enter the Username and Password. If you do not want to
manage the stations via the AVG Admin Console, simply uncheck this option.
Add new station into group - If you prefer to automatically add new station(s) into a custom group,
you can choose the group name here.
Custom update server - if you already have an existing update server that you would like to use for
your stations, check this checkbox and fill in its address now.
A V G A ntiV irus Bus ines s E dition 2 0 1 3 © 2 0 1 2 C opyright A V G T ec hnologies C Z, s .r.o. A ll rights res erved.
54
In this step you may specify names of the installation script files, their storage and other options.
In the File names definition define these options:
Name of the file to launch installation - type in a custom name for the file, that will be used for
launching the installation. The file extension must be *.bat.
Name of the script file with parameters - type in a custom name for the script parameters file. The file
extension must be *.ini.
In the Setup files location define these options:
Select folder where the installation script file will be stored - Tick this checkbox and choose a
custom directory for storing the installation script.
Create a subfolder for AVG 2013 installation files - Tick this checkbox if you prefer AVG setup files
to be stored in a subfolder.
Create the AUTORUN.INF file - If you plan to put your script on a CD/DVD or USB Flash disk from
which you would like to start the AVG installation automatically once inserted, tick this checkbox and
the AUTORUN.INF file will be created.
Enable relative paths - We recommend keeping this option checked. Relative path means, that it is
relative to the current source directory (e.g. if your source disk drive and path is c:\avginstallation and
you uncheck this option, the output script will then look for the installation files in the exactly same
path, which will be most likely different on the target station, where you will execute it and therefore
script would not work.)
A V G A ntiV irus Bus ines s E dition 2 0 1 3 © 2 0 1 2 C opyright A V G T ec hnologies C Z, s .r.o. A ll rights res erved.
55
This step contains a preview of both setup and configuration files. The first tab contains information about the
setup file and the second contains information about the presets.
If you have not done so already, fill in the output path in the Select folder where the script will be stored
section.
Click the Create script button to compile and save the installation script to the selected location.
The Save settings button allows you to save the previously selected configuration. You can reuse it when
running this wizard again simply by loading the settings at the very beginning.
Click the Finish button to close the wizard.
A V G A ntiV irus Bus ines s E dition 2 0 1 3 © 2 0 1 2 C opyright A V G T ec hnologies C Z, s .r.o. A ll rights res erved.
56
There are several options for how to use the produced script file. Here are the two most common examples:
To use the script saved to a folder:
1.
Copy the whole contents of the previously chosen folder to your station.
Note: If you used a network folder for storing the script, you can navigate to that folder directly over the
network .
2.
On the station navigate to this folder and run the AvgSetup.bat file.
3.
The command line window will appear and the installation will begin.
4.
Once the installation is completed, the window will close automatically.
You can also put the script on a removable device, such as an external hard drive, USB flash disk etc.
To use the script from a removable device:
1.
Insert the removable device to your station.
2.
If the autorun feature is enabled in the station's operating system and you chose to create the "autorun.
inf" file during script preparation, the installation will start automatically.
3.
If not, open the removable device disk letter and run the AvgSetup.bat file manually.
4.
The command line window will appear and the installation will begin.
5.
Once the installation is completed, the window will close automatically.
A V G A ntiV irus Bus ines s E dition 2 0 1 3 © 2 0 1 2 C opyright A V G T ec hnologies C Z, s .r.o. A ll rights res erved.
57
5. AVG Network Installer Wizard Advanced Mode
Note: This chapter describes the standalone version of AVG Network Installer Wizard. As it is also
included directly within the AVG Admin Console, it might be more convenient to use it from there. More
information can be found in the AVG Admin Console/Network Installer chapter.
The AVG Network Installer Wizard in Advanced mode allows you to remotely install AVG on stations or
to create installation scripts for on-site installation.
The Advanced mode is intended for experienced users who want to manually configure the installation script
(functionality, parameters, AVG behavior) according to their own needs.
The wizard can be launched in two ways:
From the Windows Start menu/All Programs/AVG 2013 Remote Administration/AVG Network
Installer
From the AVG Admin Console environment - upper menu Tools/Install AVG on stations...
The wizard can be run either in the Basic or Advanced mode. You can select the Advanced mode by selecting
the option Advanced mode in the second step. If the option is not selected, the program will run in the Basic
mode (recommended for most users).
This chapter describes the Advanced mode.
Note: Please review the Recommendations for Components chapter before proceeding with remote
installations of AVG.
5.1. Welcome
A V G A ntiV irus Bus ines s E dition 2 0 1 3 © 2 0 1 2 C opyright A V G T ec hnologies C Z, s .r.o. A ll rights res erved.
58
If you have already used the AVG Network Installer Wizard before and saved a customized configuration
into a configuration file (available in the final step), you can load the settings now by choosing the Load
settings button.
To revert to the original settings preset by default, press the Default settings button.
During the whole installation process you can decide to save the configuration progress at any time by
pressing F2 key or CTRL+S combination. A new dialog will appear allowing you to choose a configuration file
name.
To continue, click the Next button.
5.2. Installation Method
To continue in the Advanced mode check the Advanced mode checkbox, otherwise proceed to the Basic
Mode chapter.
The dialog window offers the selection between two options for creating and using the installation script:
Remote network installation
This option allows you to install AVG on stations available in the local network (computers selected
from the domain, Active Directory, according to IP ranges, imported from a list etc.).
You can also use this option for removing stations from a former AVG Datacenter (and transferring
them to a new one).
Creation of AVG installation script
A V G A ntiV irus Bus ines s E dition 2 0 1 3 © 2 0 1 2 C opyright A V G T ec hnologies C Z, s .r.o. A ll rights res erved.
59
This option allows you to create an installation script and a batch file for local installation or installation
from a removable media/network folder.
5.3. Remote Network Installation
For correct remote installation, the wizard will first check if AVG is present on the target station, then transfer
the AVG installation files and process the installation accordingly.
Before you proceed, please review the network requirements and exceptions regarding remote AVG
installation.
You can find more detailed information on the port settings in the Network Requirements chapter.
A V G A ntiV irus Bus ines s E dition 2 0 1 3 © 2 0 1 2 C opyright A V G T ec hnologies C Z, s .r.o. A ll rights res erved.
60
During this step it is necessary to define the following installation parameters:
License information – type in the license data such as Name, Company, and License number
(mandatory value). If you wish to use the Windows username for the Name field, do not select the
respective check box, and leave the default system settings to be used.
Folder with the AVG installation package - type in the full path to the AVG installation package or
use this
button to select the proper folder.
If you have not downloaded the package yet, click the Download button and use the wizard to
download the installation file for you into the selected folder. You can view the download progress above
the Download button.
Proxy settings button - If you need to use a proxy server to connect to the Internet, you can fill in the
proxy server details by clicking the Proxy settings button.
License number change - Use this button to input a new license number to be used for remote
installations of AVG.
A V G A ntiV irus Bus ines s E dition 2 0 1 3 © 2 0 1 2 C opyright A V G T ec hnologies C Z, s .r.o. A ll rights res erved.
61
In this step, you can choose if you wish to install AVG with default settings or select custom components.
Install AVG with default settings - Choose this option if you prefer the default components to be
installed.
Select installation components - Select this option to view a tree structure offering a list of AVG
components that can be either installed or uninstalled. From the list of components select:
o
Components that should be installed, and mark them like this
o
Components that should be uninstalled or not installed, and mark them like this
o
The default settings will be used for components that you leave blank ( ).
Remote AVG uninstallation - allows AVG removal.
A V G A ntiV irus Bus ines s E dition 2 0 1 3 © 2 0 1 2 C opyright A V G T ec hnologies C Z, s .r.o. A ll rights res erved.
62
In the Setup parameters section you can choose from the following options:
Enable Windows Firewall after installation - in case you are not going to install AVG Firewall
component, you can choose to enable Windows Firewall as soon as the installation is completed.
Quit setup if AVG 2013 is already installed - the remote administration will not proceed if AVG 2013
is already present on the target station.
Kill all running applications that prevent installation - the remote installation will force closure of
any application that could interfere with the installation process. Usually this could be a running email
client or an Internet browser.
Reboot the computer after finishing AVG 2013 setup if needed - in certain cases (Firewall
component installation for example) a computer restart may be required to complete the installation
process.
Display a notification message regarding scheduled system restart on the remote computer - if
the previous checkbox is checked, you can also define a delay before the restart will take place. The
default value is ten minutes.
Select type of installation progress visibility - from the drop down menu select one of the following:
o
hidden installation - no information will be displayed to the currently logged user during the
setup process.
o
show installation progress only - the installation will not require any user attention, but the
progress will be fully visible on the station.
o
show installation wizard - the installation will be visible on the station and the currently logged
user will need to manually confirm all steps.
A V G A ntiV irus Bus ines s E dition 2 0 1 3 © 2 0 1 2 C opyright A V G T ec hnologies C Z, s .r.o. A ll rights res erved.
63
In the Setup properties section you can choose from the following options:
Where to install - if you prefer a customized target location for installation, you can choose it by
entering the path here. We recommend keeping the default settings.
Setup language - choose a default custom language for AVG installation and user interface.
Select folder where AVG 2013 setup LOG file will be stored - if you prefer a custom location for
setup log files, select it here (the folder must already exist on the target station).
The following options are available in this step.
Note: If you are unsure about these settings, we recommend k eeping the default ones.
Remote administration - Enter the AVG DataCenter connection string into the AVG DataCenter
connection string field. If applicable also enter the Username and Password. If you do not want to
manage the stations via the AVG Admin Console, simply uncheck this option.
Add new station into group - If you prefer to automatically add new station(s) into a custom group,
you can choose the group name here.
Custom update server - if you already have an existing update server that you would like to use for
your stations, check this checkbox and fill in its address now.
A V G A ntiV irus Bus ines s E dition 2 0 1 3 © 2 0 1 2 C opyright A V G T ec hnologies C Z, s .r.o. A ll rights res erved.
64
The wizard needs to scan some stations first to find out their status and then install AVG on them.
In the Network scanning method section choose from the drop down list, which method for selecting
stations you prefer. The possible options are as follows:
All stations from the domain - this option will scan all stations available in your local domain.
Note: This option is available only if the current computer is part of a domain.
Enter an IP range - this option will allow you to choose a specific range of IP addresses.
Import stations from file - a new dialog will appear and you will be able to choose a file with a list of
stations to be scanned. The source text file should contain one station name or an IP address per line.
Select a single station - this option lets you type in a specific Computer name (DNS name) or IP
address.
Select from Active Directory - allows you to choose specific stations directly from the Active
Directory.
Note: This option is available only if the current computer is part of a domain.
The List of accounts section is meant to facilitate your work and to accelerate installation process. If your
access rights are not sufficient for AVG installation on the remote station, you will be asked to enter a
username that has administrator privileges (a username that is member of an administrator's group). If there is
no common administrator account for all stations (with the same login name and password) you will be asked
separately for every station.
This section allows you to create a list of accounts that will be used during remote installation; this way you
will avoid entering multiple credentials. You can add accounts to the list by clicking the Add button (or delete
A V G A ntiV irus Bus ines s E dition 2 0 1 3 © 2 0 1 2 C opyright A V G T ec hnologies C Z, s .r.o. A ll rights res erved.
65
them using the Remove button). If you wish to keep your list of accounts for further use, check the Save list
of accounts box. However, this is not recommended for safety reasons.
Check AVG version from AVG DataCenter - check this option if you want the wizard to try obtaining
information about AVG version on each station from the AVG DataCenter (if available). Fill into the
Maximum time since the last station was contacted field a value (in hours) that will indicate the
maximum time since the last contact with such station.
Warning: AVG remote installation can be performed only on stations with the supported operating system
installed. See the full list of supported operating systems in the Operating Systems Supported chapter. Also,
you need to k now a logon username with administrator privileges.
You may also need to review the Network Requirements chapter.
5.3.1. All Stations from the Domain
If you choose to install AVG remotely on all stations from the domain, the following dialog listing all stations
available in the domain will appear:
Right-click to view additional options:
Retrieve the installation log - this option will try to obtain the installation log from the station (if
available).
Export stations without AVG to a file - this option will create a file with list of stations that do not
contain AVG installation.
Select all stations - will select or unselect all stations in the list and the Install button will become
active.
A V G A ntiV irus Bus ines s E dition 2 0 1 3 © 2 0 1 2 C opyright A V G T ec hnologies C Z, s .r.o. A ll rights res erved.
66
Select stations without AVG - will select only stations that do not have AVG already installed, or
where AVG could not be detected.
The Refresh button will reload the state of all stations in the list by scanning them again.
Continue to the Remote network installation - final steps chapter and complete the remote installation
process.
5.3.2. Enter an IP Range
If you choose to install AVG remotely according to an IP range, the following dialog will appear:
You need to specify the scanning range by entering the IP addresses here. In the From field enter a starting
IP address and in the To field an ending address. Click the Add button to add the address into the list.
To delete a range from the right list, simply select the items you wish to remove and click the Remove
button.
Once you have finished selecting the IP ranges, click the Next button to continue. Once done, the Station
selection window will appear:
A V G A ntiV irus Bus ines s E dition 2 0 1 3 © 2 0 1 2 C opyright A V G T ec hnologies C Z, s .r.o. A ll rights res erved.
67
Right-click to view additional options:
Retrieve the installation log - this option will try to obtain the installation log from the station (if
available).
Export stations without AVG to a file - this option will create a file with list of stations that do not
contain AVG installation.
Select all stations - will select or unselect all stations in the list and the Install button will become
active.
Select stations without AVG - will select only stations that do not have AVG already installed, or
where AVG could not be detected.
The Refresh button will reload the state of all stations in the list by scanning them again.
Continue to the Remote network installation - final steps chapter and complete the remote installation
process.
5.3.3. Import Stations from File
Note: This option is usually used when migrating stations to another AVG DataCenter. For more information
on this topic see the Migrate Stations from/to Different DataCenter chapter.
If you choose to install AVG remotely on stations selected from a file, you will experience a dialog asking for
the file. Locate the file and confirm your choice. The source file format contains one station name per line in
simple text format.
Once done, the Station selection window will appear:
A V G A ntiV irus Bus ines s E dition 2 0 1 3 © 2 0 1 2 C opyright A V G T ec hnologies C Z, s .r.o. A ll rights res erved.
68
Right-click to view additional options:
Retrieve the installation log - this option will try to obtain the installation log from the station (if
available).
Export stations without AVG to a file - this option will create a file with list of stations that do not
contain AVG installation.
Select all stations - will select or unselect all stations in the list and the Install button will become
active.
Select stations without AVG - will select only stations that do not have AVG already installed, or
where AVG could not be detected.
The Refresh button will reload the state of all stations in the list by scanning them again.
Continue to the Remote network installation - final steps chapter and complete the remote installation
process.
A V G A ntiV irus Bus ines s E dition 2 0 1 3 © 2 0 1 2 C opyright A V G T ec hnologies C Z, s .r.o. A ll rights res erved.
69
5.3.4. Select a Single Station
If you choose to install AVG remotely only on a single station, the following dialog will appear:
Click either the Computer name or IP address field and fill in the proper name or IP address. Confirm your
choice by clicking the OK button. The process of checking the chosen station for an AVG installation will
begin. Once done, the Station selection window will appear:
Right-click to view additional options:
Retrieve the installation log - this option will try to obtain the installation log from the station (if
available).
Export stations without AVG to a file - this option will create a file with list of stations that do not
contain AVG installation.
A V G A ntiV irus Bus ines s E dition 2 0 1 3 © 2 0 1 2 C opyright A V G T ec hnologies C Z, s .r.o. A ll rights res erved.
70
Select all stations - will select or unselect all stations in the list and the Install button will become
active.
Select stations without AVG - will select only stations that do not have AVG already installed, or
where AVG could not be detected.
The Refresh button will reload the state of all stations in the list by scanning them again. The Add one
station button will allow you to add another single station.
Continue to the Remote network installation - final steps chapter and complete the remote installation
process.
5.3.5. Select from Active Directory
If your network is domain-based, you can choose to install AVG remotely on stations selected from the Active
Directory. A new dialog will pop up (standard Windows dialog for selecting computers). You can choose
multiple stations (separate the values by a semicolon) either by entering the station names manually or by
using the dialog advanced features for searching.
Once done, the Station selection window will appear:
Right-click to view additional options:
Retrieve the installation log - this option will try to obtain the installation log from the station (if
available).
Export stations without AVG to a file - this option will create a file with list of stations that do not
contain AVG installation.
Select all stations - will select or unselect all stations in the list and the Install button will become
A V G A ntiV irus Bus ines s E dition 2 0 1 3 © 2 0 1 2 C opyright A V G T ec hnologies C Z, s .r.o. A ll rights res erved.
71
active.
Select stations without AVG - will select only stations that do not have AVG already installed, or
where AVG could not be detected.
The Refresh button will reload the state of all stations in the list by scanning them again.
Continue to the Remote network installation - final steps chapter and complete the remote installation
process.
5.4. Remote network installation - final steps
Additionally, you may display a so called tool tip when pointing to a station in the list for a few seconds. The
tool tip contains an overview of the station state and other details.
Once you are ready to proceed, select the desired stations and click on the Install button to begin remote
installation.
If you select only some stations from the list, AVG installation will be performed on these stations only.
Otherwise installation will be performed on all listed stations.
If your access rights are not sufficient for AVG installation on the remote station, you will be asked for the
domain administrator’s login/password during installation.
A V G A ntiV irus Bus ines s E dition 2 0 1 3 © 2 0 1 2 C opyright A V G T ec hnologies C Z, s .r.o. A ll rights res erved.
72
Enter a username that has administrator privileges (a username that is member of the administrator's group).
Confirm by clicking OK.
If there is no common administrator account for all stations (with the same login name and password) you will
be asked separately for every station.
Pressing the Cancel button will cause the current station installation to be skipped, and the wizard will
continue installation on the next station in the list.
AVG should be then transferred to the station and installed. You will see on each line, if the installation was
successful (however it may take some time to process).
Once all your stations receive the installation files and finish the installation process, you will be able to leave
this dialog by clicking the Next button.
Note: You can later review recently installed stations from the AVG Admin Console either in the Stations/
New stations or in the group chosen during the Remote administration settings dialog.
To list recently installed stations that remain in an incorrect state (because of some remote installation
failure), navigate to the Stations/Non-compliant stations.
The final dialog contains a short overview of activity on the station(s).
A V G A ntiV irus Bus ines s E dition 2 0 1 3 © 2 0 1 2 C opyright A V G T ec hnologies C Z, s .r.o. A ll rights res erved.
73
The Save settings button allows you to save the previously selected configuration. You can reuse it when
running this wizard again simply by loading the settings at the very beginning.
Click Finish button to close the wizard.
5.5. Creation of AVG Installation Script
Selecting the Creation of AVG installation script option, the wizard will create an installation script in the
selected directory. The contents of the directory can then be used for installation from CD, network folder or
copied directly to a station.
This option does not offer the possibility of remote installation to the network stations or servers.
A V G A ntiV irus Bus ines s E dition 2 0 1 3 © 2 0 1 2 C opyright A V G T ec hnologies C Z, s .r.o. A ll rights res erved.
74
The first step contains an overview of this option. Click Next to continue.
During this step it is necessary to define the following installation parameters:
License information – type in the license data such as Name, Company, and License number
(mandatory value). If you wish to use the Windows username for the Name field, do not select the
respective check box, and leave the default system settings to be used.
A V G A ntiV irus Bus ines s E dition 2 0 1 3 © 2 0 1 2 C opyright A V G T ec hnologies C Z, s .r.o. A ll rights res erved.
75
Folder with the AVG installation package - type in the full path to the AVG installation package or
use this
button to select the proper folder.
If you have not downloaded the package yet, click the Download button and use the wizard to
download the installation file for you into the selected folder. You can observe the download progress
above the Download button.
Proxy settings button - If you need to use a proxy server to connect to the Internet, you can fill in the
proxy server details by clicking the Proxy settings button.
License number change - Use this button to input a new license number to be used for remote
installations of AVG.
In this step, you can choose if you wish to install AVG with default settings or select custom components.
Install AVG with default settings - Choose this option if you prefer the default components to be
installed.
Select installation components - Select this option to view a tree structure offering a list of AVG
components that can be either installed or uninstalled. From the list of components select:
o
Components that should be installed, and mark them like this
o
Components that should be uninstalled or not installed, and mark them like this
o
The default settings will be used for components that you leave blank ( ).
Remote AVG uninstallation - allows AVG removal.
A V G A ntiV irus Bus ines s E dition 2 0 1 3 © 2 0 1 2 C opyright A V G T ec hnologies C Z, s .r.o. A ll rights res erved.
76
In the Setup parameters section you can choose from the following options:
Enable Windows Firewall after installation - in case you are not going to install AVG Firewall
component, you can choose to enable Windows Firewall as soon as the installation is completed.
Quit setup if AVG 2013 is already installed - the remote administration will not proceed if AVG 2013
is already present on the target station.
Kill all running applications that prevent installation - the remote installation will force closure of
any application that could interfere with the installation process. Usually this could be a running email
client or an Internet browser.
Reboot the computer after finishing AVG 2013 setup if needed - in certain cases (Firewall
component installation for example) a computer restart may be required to complete the installation
process.
Display a notification message regarding scheduled system restart on the remote computer - if
the previous checkbox is checked, you can also define a delay before the restart will take place. The
default value is ten minutes.
Select type of installation progress visibility - from the drop down menu select one of the
following:
o
hidden installation - no information will be displayed to the currently logged user during the
setup process.
o
show installation progress only - the installation will not require any user attention, but the
progress will be fully visible on the station.
o
show installation wizard - the installation will be visible on the station and the currently logged
A V G A ntiV irus Bus ines s E dition 2 0 1 3 © 2 0 1 2 C opyright A V G T ec hnologies C Z, s .r.o. A ll rights res erved.
77
user will need to manually confirm all steps.
In the Setup properties section you can choose from the following options:
Where to install - if you prefer a customized target location for installation, you can choose it by
entering the path here. We recommend keeping the default settings.
Setup language - choose a default custom language for AVG installation and user interface.
Select folder where AVG 2013 setup LOG file will be stored - if you prefer a custom location for
setup log files, select it here (the folder must already exist on the target station).
The following options are available in this step.
Note: If you are unsure about these settings, we recommend k eeping the default ones.
Remote administration - Enter the AVG DataCenter connection string into the AVG DataCenter
connection string field. If applicable, also enter the Username and Password. If you do not want to
manage the stations via the AVG Admin Console, simply uncheck this option.
Add new station into group - If you prefer to automatically add new station(s) into a custom group,
you can choose the group name here.
Custom update server - if you already have an existing update server, that you would like to use for
your stations, check this checkbox and fill in its address now.
A V G A ntiV irus Bus ines s E dition 2 0 1 3 © 2 0 1 2 C opyright A V G T ec hnologies C Z, s .r.o. A ll rights res erved.
78
In this step you may specify names of the installation script files, their storage and other options.
In the File names definition define these options:
Name of the file to launch installation - type in a custom name for the file, that will be used for
launching the installation. The file extension must be .bat.
Name of the script file with parameters - type in a custom name for the script parameters file. The file
extension must be .ini.
In the Setup files location define these options:
Select folder where the installation script file will be stored - Tick this checkbox and choose a
custom directory for storing installation script.
Create a subfolder for AVG 2013 installation files - Tick this checkbox if you prefer AVG setup files
to be copied to and stored in a subfolder.
Create the AUTORUN.INF file - If you plan to put your script on a CD/DVD or USB Flash disk from
which you would like to start the AVG installation automatically once inserted, tick this checkbox and
the AUTORUN.INF file will be created.
Enable relative paths - We recommend keeping this option checked. Relative path means, that it is
relative to the current source directory (e.g. your source disk drive and path is c:\avginstallation and you
uncheck this option, the output script will then look for the installation files in exactly the same path,
which will be most likely different on the target station, where you will execute it and the script would
not work.)
A V G A ntiV irus Bus ines s E dition 2 0 1 3 © 2 0 1 2 C opyright A V G T ec hnologies C Z, s .r.o. A ll rights res erved.
79
This step contains a preview of both setup and configuration files. The first tab contains information about the
setup file and the second contains the presets.
If you have not done so already, fill in the output path in the Select folder where the script will be stored
section.
Click the Create script button to compile and save the installation script to the selected place.
A V G A ntiV irus Bus ines s E dition 2 0 1 3 © 2 0 1 2 C opyright A V G T ec hnologies C Z, s .r.o. A ll rights res erved.
80
The Save settings button allows you to save the previously selected configuration. You can use it when
running this wizard again simply by loading the settings in the very beginning.
Click the Finish button to close the wizard.
There are several options for how to use the produced script file. Here are the two most common examples:
To use the script saved to a folder:
1.
Copy the whole content of the previously chosen folder to your station.
Note: If you used a network folder for storing the script, you can navigate to that folder directly over the
network .
2.
On the station navigate to this folder and run the AvgSetup.bat file.
3.
The command line window will appear and the installation will begin.
4.
Once the installation is completed, the window will close automatically.
You can also put the script on a removable device, such as an external hard drive, USB flash disk etc.
To use the script from a removable device:
1.
Insert the removable device to your station.
2.
If the autorun feature is enabled in the station's operating system and you chose to create the autorun.
inf file during script preparation, the installation will start automatically.
3.
If not, open the removable device disk letter and run the AvgSetup.bat file manually.
4.
The command line window will appear and the installation will begin.
5.
Once the installation is completed, the window will close automatically.
A V G A ntiV irus Bus ines s E dition 2 0 1 3 © 2 0 1 2 C opyright A V G T ec hnologies C Z, s .r.o. A ll rights res erved.
81
6. AVG Admin Console
6.1. What is AVG Admin Console
AVG Admin Console is an interface for administrating stations remotely. It helps the network administrator
to maintain the AVG Stations' configuration, status, and to remotely call various operations on AVG stations.
From this console, you can for example:
Monitor AVG component states on stations
Define AVG station settings
Review scan results and control virus infections
Remotely launch scans or updates on AVG stations
Distribute update files within the local network
Access Virus Vault on AVG stations
View Firewall log files
Install AVG Stations remotely
You have several options how to launch the AVG Admin Console:
navigate to the Windows start menu and select Start/All Programs/AVG 2013 Remote
Administration/AVG Admin Console
select AVG Admin Console from your Windows desktop,
or go to your Program files folder (usually c:\Program Files), select folder AVG\AVG2013
Admin\Console\ and double click AvgAdminConsole.exe.
During startup, the AVG Admin Console automatically tries to connect to the last used AVG DataCenter. If
the connection fails, or if you are launching AVG Admin Console for the first time, a dialog window will
appear and you will be asked to specify the communication string for the AVG DataCenter connection. The
communication string uses the same form as the AVG station’s communication string – for details refer to
chapter Configuration/Connection string.
Typically, if AVG Admin Console is installed on the same computer as the DataCenter, it is possible to use
the following communication string: localhost:4158.
A V G A ntiV irus Bus ines s E dition 2 0 1 3 © 2 0 1 2 C opyright A V G T ec hnologies C Z, s .r.o. A ll rights res erved.
82
The general communication string structure is http://server_address:port, where:
server_address is the name/address of a server where the AVG Admin Server runs
port is the AVG Admin Server port number. The default port value is 4158. If the AVG Admin Server
uses this default number, it is not necessary to include the number into the communication string.
If the DataCenter is password protected, you must fill-in the Login name and Password into the appropriate
fields. Without correct password and/or login name, you will not be able to start the AVG Admin Console.
6.2. AVG Admin Console Interface Overview
A V G A ntiV irus Bus ines s E dition 2 0 1 3 © 2 0 1 2 C opyright A V G T ec hnologies C Z, s .r.o. A ll rights res erved.
83
The AVG Admin Console interface is completely customizable allowing users to move or enable/disable
individual panels according to their needs. Within the default view, four from overall five panels are visible (with
the only exception being the Filter panel), in addition to a navigation toolbar and upper menu.
6.2.1. Upper Main Menu
The upper menu contains the following menu items:
DataCenter menu
The DataCenter menu offers the following options:
Connect to AVG DataCenter...
Allows user to select a different DataCenter.
AVG DataCenter settings...
The Station identification section contains a drop down menu, where you can select how you wish to
display stations within the current view section.
The Scan results options section lets you to choose which scan results you prefer to store and
according to which severity. Check the including rootkits checkbox in order to include also storing of
scan results with rootkits.
Keep scan results for maximum period of - simply enter number of days you wish keeping the scan
results received from stations. The default value is 30 days.
A V G A ntiV irus Bus ines s E dition 2 0 1 3 © 2 0 1 2 C opyright A V G T ec hnologies C Z, s .r.o. A ll rights res erved.
84
In the next section choose, how you wish to secure your AVG DataCenter access:
Free access - default settings, that will allow anyone to access the AVG DataCenter (no password is
needed).
Simple password protection - will open a new dialog, where you can choose a custom password (the
same password must be entered into both fields for verification). The password will then be required
during every connection to the AVG DataCenter.
Full access control - please see the How to manage access rights chapter for more information.
Database export... - This dialog allows you to create a backup file (i.e. export the DataCenter contents
to a file) and save it to a local folder on a computer, from which the AVG Admin Console is running.
Exit - Quits AVG Admin Console.
View menu
The View menu offers the following options:
Panels
Here you can show or hide individual main interface panels (Toolbar, Navigation tree etc.) simply by
checking or unchecking them.
To restore the original position of all panels, use the Default position of panels item. The panels will
be restored after you restart the application.
Non-compliance conditions...
A V G A ntiV irus Bus ines s E dition 2 0 1 3 © 2 0 1 2 C opyright A V G T ec hnologies C Z, s .r.o. A ll rights res erved.
85
Here you can choose which conditions on a station are to be considered as non-compliant. According
to your selection, the non-compliant stations will then be highlighted in red within all available views.
Use the Exceptions... button to define groups excluded from the selected rules.
Use the Use for Admin Server button to apply the non-compliance conditions to the AVG Admin
Server, which means, that these conditions will be used in the AVG Admin Report (available via web
interface) and when generating non-compliant stations graphic reports).
Default column setting - use this option to revert the interface column settings into the original state.
Options
In the General view options section choose the viewing preferences:
o
Periodical refresh of the current view in predefined time interval - check the checkbox and
choose a time value in minutes to enable automatic periodical refresh of the currently opened
view.
o
Highlight last station contact in green if it is not older than - check the checkbox and
choose a time value in minutes to enable highlighting of the Last contact cell to see if the station
communicates properly.
o
Font size for the view - choose a required font size for the views (the default value is 11).
In the Advanced view options section choose the following:
o
Display all columns in one tab - check this checkbox to group all columns into one tab (for
easier access to all information).
A V G A ntiV irus Bus ines s E dition 2 0 1 3 © 2 0 1 2 C opyright A V G T ec hnologies C Z, s .r.o. A ll rights res erved.
86
o
Display number of rows in the navigation tree - if enabled, every item in the navigation tree
will contain a number in brackets reflecting the number of rows used.
The numbers of rows can be updated either manually by selecting the menu item View/Refresh
row count in the navigation tree or automatically every 5 minutes by default (this interval can
be changed via View/Options/Periodical refresh of the current view in predefined time
interval).
Please note: The count of rows can be affected also by filtering options (if available and defined
for the given view)!
o
Show time values in GMT - check the checkbox to convert all time values in all views to GMT
(Greenwich Mean Time). Unchecking the checkbox returns the values back to your local time.
o
Show settings for stations of previous version AVG 2012 - if checked, the shared settings for
stations and settings for groups will display also AVG 2012 settings (applicable if you still have
AVG 2012 stations in your network).
The Print options section may help you if you wish to print the currently opened view. It often occurs
that some columns are not wide enough to hold all the text, so it is necessary to adjust their width
before printing. Use the roll-down menu in this section to choose whether you want columns width to
be automatically adjusted or not. You can also choose the Ask option - this means that the possibility
of column adjustment will be reminded to you before every print session.
Refresh - refreshes all records displayed in the current view section (you can use F5 keyboard button
to do so as well).
Refresh row count in the navigation tree - updates the number of rows reflected in brackets within
the navigation tree.
Export the current view contents...
Allows you to save the current view (for example list of stations) into a .csv (comma separated values)
file, which can be easily imported for example into MS Excel or similar spreadsheet application.
Note: You can also quick ly call this dialog by pressing CTRL+S.
A V G A ntiV irus Bus ines s E dition 2 0 1 3 © 2 0 1 2 C opyright A V G T ec hnologies C Z, s .r.o. A ll rights res erved.
87
Use Select all button to mark all column names or select the requested ones manually. If you have
selected only certain rows before entering this dialog and wish to export only those, you should check
the Export only selected rows checkbox.
To change location of the output file or its name, use the
as dialog.
button, which triggers a standard Save
Confirm your choices by pressing OK button.
Print... - opens the standard windows print dialog allowing you to print the currently opened view.
Find station - Use this function to quickly search for a station name (you can use also keyboard
shortcut simply by holding down the CTRL and F keys at the same time to open this dialog). Then type
in the station name or part of its name.
Find next station - Use this to jump to the next search result (or use F3 keyboard button).
Tools menu
The Tools menu offers the following options:
Shared settings for stations... - opens a dialog for editing the shared configuration for stations (For
detailed information on stations shared settings please refer to chapter Configuration/Shared Settings
for Stations).
Shared Firewall settings for stations... - opens a dialog for editing the shared configuration for Firewall
.
Shared settings for application servers... - opens a dialog for editing the shared configuration for
stations with an application server installed (For detailed information on these shared settings please
refer to chapter Configuration/Shared Settings for Application Servers).
Database maintenance... - displays a dialog where you can select scripts for maintaining the
DataCenter database. See How to maintain the DataCenter database chapter for more information.
Show duplicate stations...
A V G A ntiV irus Bus ines s E dition 2 0 1 3 © 2 0 1 2 C opyright A V G T ec hnologies C Z, s .r.o. A ll rights res erved.
88
This dialog allows you to identify duplicate stations in your network (i. e. stations with identical names).
Such duplicity can easily occur e.g. during MAC address identification (notebooks in your network may
be displayed twice – once when network adapter is used for their connection, once when WiFi is used).
There are several methods for duplicate stations to be identified. To change currently used method, use
the roll-down menu in the upper right corner of this dialog. Available identification methods are by
station name, by station name and domain, by station IP address, and by station MAC address.
You can easily remove a duplicate station by selecting it from the list and clicking the Delete button.
You can also click the Export button to save the whole list of duplicate stations into a .csv (comma
separated values) file, which can be imported for example into MS Excel or similar spreadsheet
application.
AVG Admin Server settings... - opens a dialog for editing the AVG Admin Server settings (For
detailed information on AVG Admin Server settings please refer to Configuration/AVG Admin Server
Settings chapter)
Install AVG on stations... - starts the AVG Network installation integrated within the AVG Admin
Console. The wizard will guide you through adding AVG stations that you want to install remotely. More
information on this topic can be found in Network Installer chapter)
Run AVG Network Installer Wizard - starts the standalone AVG Network Installer Wizard, which will
guide you through AVG installation on stations. More information on this topic can be found in AVG
Network Installer chapter)
Information menu
The Information menu offers the following options:
Help - opens the help file.
A V G A ntiV irus Bus ines s E dition 2 0 1 3 © 2 0 1 2 C opyright A V G T ec hnologies C Z, s .r.o. A ll rights res erved.
89
What is new... - displays step-by-step summary of important news in the AVG Admin application.
Check for updates... - AVG Admin Console automatically, during startup, checks if a newer version
of AVG Admin Console is available. But you can also open this dialog and immediately see if a new
version is available.
You can also use the link in the dialog to directly download the latest installation package.
To disable the startup checking feature, uncheck the Check for updates during startup checkbox.
Download latest documentation - opens your default Internet browser with the AVG website
documentation download page.
Download AVG Rescue CD - opens your default Internet browser with the AVG website Rescue CD
download page. In order to download the product, you will need to insert your license number for AVG
Rescue CD.
Product Improvement Program - Click to enable or disable your paticipation in AVG Product
Improvement Programme, that helps us to secure your computers and network even better by regularly
analyzing your current needs according to your application usage.
About AVG Admin Console... - displays the copyright information, and the application/database
version number.
6.2.2. Navigation Tree
The Navigation Tree contains all groups arranged in a hierarchical manner. A group is a data structure
review, e.g. a list of stations with their configuration, or scan results table, etc. The group content itself
displays in the Current view, in the central table.
A V G A ntiV irus Bus ines s E dition 2 0 1 3 © 2 0 1 2 C opyright A V G T ec hnologies C Z, s .r.o. A ll rights res erved.
90
Within the navigation tree, you will find the following sets:
Stations
Servers
Scan results
Notifications
Graphic reports
Licenses
Pending requests
Network Installer
You can find descriptions of individual items in their respective chapters.
6.2.3. Records Section
Within the central table in the Current view section of the screen you can view data of the group selected in
the navigation tree. Some sets may contain a considerable amount of data for a specific view (e.g. station/
user information); that is why the relevant data is arranged into groups, and every group can be displayed
A V G A ntiV irus Bus ines s E dition 2 0 1 3 © 2 0 1 2 C opyright A V G T ec hnologies C Z, s .r.o. A ll rights res erved.
91
when you select the corresponding tab.
To select a record from the central table you need to perform a mouse click over the desired record. You can
select more records at the same time: press the CTRL key (adding a new record to the current selection), or
the SHIFT key (selecting all records between the first and the last highlighted record). Click the mouse right
button over the selected record to open the Context menu. It is possible to call various actions related to the
current selection from the Context menu.
To select only specific columns for displaying, you can either right-click on any column and choose Hide
column or from the same menu select Organize columns hiding for selecting multiple columns at once:
Here you can check or uncheck columns you wish to keep visible or hidden. Use Select all button to keep all
columns visible.
You can also add a custom tab with preferred columns to a chosen view. Simply right-click on any tab and
select Add a custom tab from the context menu. A new dialog will appear:
A V G A ntiV irus Bus ines s E dition 2 0 1 3 © 2 0 1 2 C opyright A V G T ec hnologies C Z, s .r.o. A ll rights res erved.
92
Fill-in your custom tab name, then choose columns you wish to display within the tab and confirm your
choice by pressing OK. You can also use Select all button to choose all columns.
Once you create your custom tab, you can easily remove it by right-clicking on any tab and selecting Delete
the custom tab. To modify the existing tab, choose from the same menu Modify the custom tab.
You can quickly search for a station name by holding down the CTRL and F keys at the same time. Then
type in the station name or part of its name. You will experience the highlighted results just as you type.
Use F3 keyboard button to jump to the next search result.
6.2.4. Status Panel
In this part of the AVG Admin Console main window you can find various system notices and information on
the application functionality, communication with AVG stations, detected problems, positive scan results
warnings, etc.
The Status Window panel is located by default in the bottom part of the screen. If the panel is not visible, you
can activate it by clicking on Status window item in the View/Panels menu.
More information how status messages work can be found in the Requests handling and status messages
A V G A ntiV irus Bus ines s E dition 2 0 1 3 © 2 0 1 2 C opyright A V G T ec hnologies C Z, s .r.o. A ll rights res erved.
93
chapter.
If you right-click to the Status window area, you will have several options available to choose from:
Show all - The status window will display all messages.
Show errors and warnings - The status window will display only error and warning messages.
Show errors - The status window will display only error messages.
Enable messages filtering...
This option allows you to filter out messages according to more extensive parameters. From the drop
down menu select what type of messages you wish to display.
In the Recipient/Sender section, there two checkboxes. Checking the upper one, only from sender,
gives you access to the context menu that allows you to select a unique sender, whose messages will
be displayed in the Status window panel. After checking the lower one, only for recipient containing,
you can choose to show only messages considering one group of stations (select this particular group
from the context menu).
Finally, in the Receiving time area you can check the From or To (or even both) checkboxes to set
the time interval for messages to be displayed. No older or newer messages will be shown then.
Disable messages filtering - switches off the messages filtering.
Save window content... - allows you to save the window content to a text file at any time.
A V G A ntiV irus Bus ines s E dition 2 0 1 3 © 2 0 1 2 C opyright A V G T ec hnologies C Z, s .r.o. A ll rights res erved.
94
6.2.5. Filter Panel
The Filter panel contains a list of filtering options available for the current view. The list will become active only
if there are any filters available for the selected view.
Description of individual filters can be found in the tree items' respective chapters:
Stations
Servers (Application servers)
Scan results
Graphic reports
Pending requests
The Filter panel is hidden by default, but can be easily activated by clicking on the Filter window item in the
View/Panels menu. Afterwards it is located in the bottom left part of the screen.
6.3. Synchronization Process
Stations managed by AVG Remote Administration periodically perform synchronization with the AVG
DataCenter. The process includes synchronization of:
Station settings
Scan results
Station components states
You may also need to review the Network Requirements chapter for more information on connection
requirements needed for successful synchronization.
6.3.1. Station Settings Synchronization
During the synchronization of station settings:
mandatory settings are transferred from the DataCenter to the station,
non-mandatory settings are transferred from the Station to the DataCenter.
The synchronization is performed periodically. By default, the settings synchronization process is done every
A V G A ntiV irus Bus ines s E dition 2 0 1 3 © 2 0 1 2 C opyright A V G T ec hnologies C Z, s .r.o. A ll rights res erved.
95
60 minutes. To alter the synchronization period for all stations, follow these steps:
1.
In the AVG Admin Console select Tools from the upper main menu and choose the Shared settings
for stations item.
2.
Select the Remote Administration node.
3.
From the Synchronize configuration every drop down menu choose the required value. Close the
dialog by clicking the OK button.
4.
Wait until all stations get synchronized.
Alternatively, you can force immediate synchronization of all stations: In the navigation tree, right-click on the
Stations node and select Synchronize settings from the context menu.
Note: To change the setting only for stations in a group, simply repeat the process from step two after you
right click on Stations/YourGroupName and select Shared Settings for group from the context menu.
Additionally, the synchronization happens:
every time the station powers on/goes online, its settings are synchronized at latest within the period,
when the station connects to the AVG DataCenter the first time, its settings are synchronized
immediately,
when settings of a station or several stations are changed and confirmed from the AVG Admin Console.
It is also possible to request immediate settings synchronization from the AVG Admin Console. Simply
right-click on a station's node in the navigation tree or on a particular station in a stations view and select
Synchronize settings from the context menu.
6.3.2. Scan Results Synchronization
This synchronization process sends data from the station to the AVG DataCenter. It takes place:
every time the station powers on/goes online (at the latest within 20 minutes),
immediately after scan completion or after an infection is detected by the Resident Shield,
immediately or latest within 20 minutes when there is a scan result modification done by a user on the
station in the AVG User Interface (healing, moving to vault etc.).
It is also possible to request immediate scan results synchronization from the AVG Admin Console. Simply
right-click on a station's node in the navigation tree or on a particular station in a stations view and select
Tasks related to Scan/Ask for scan results from the context menu.
6.3.3. Station Components States Synchronization
This synchronization process sends data from the station to the AVG DataCenter. It takes place:
every time the station powers on/goes online (immediately),
every time a component state is changed (within 5 minutes).
A V G A ntiV irus Bus ines s E dition 2 0 1 3 © 2 0 1 2 C opyright A V G T ec hnologies C Z, s .r.o. A ll rights res erved.
96
It is also possible to request immediate synchronization from the AVG Admin Console. Simply choose a
station's node in the navigation tree, in a stations view right-click and from the context menu select Station
settings/Refresh components state from the context menu.
6.4. Stations
The Stations item allows you to view complex information about all stations currently managed by the AVG
DataCenter. The record of a station is created once the station first logs in to the AVG DataCenter.
You are allowed (using the context menu over the table of groups of stations displayed in the view section) to
create groups of stations, and to assign a single station into specific groups.
By default, the stations are divided into these groups:
Non-Compliant stations - contains stations that are in an non-standard state (i.e. don't comply to
predefined conditions)
Stations with AVG Firewall - contains a list of stations that have the Firewall component installed.
New Stations - contains only stations that have not been assigned to any administrator defined group
yet.
More detailed information on each group can be found in the following chapters.
In the current view section you can then find information related to specific stations. Using the tabs, the
information is divided into several categories:
Stations tab
Contains general information about each station (name, domain, group, last contact, etc).
Details tab
Displays additional information regarding the stations including IP address, MAC address, operating
system, restart request etc.
Versions tab
Displays information about versions of AVG, virus base, anti-spyware base or anti-spam base on each
station.
Component states tab
Contains an overview of component states on each station.
More information on other options and settings can be found in the Configuration/AVG Admin Console
chapter.
A V G A ntiV irus Bus ines s E dition 2 0 1 3 © 2 0 1 2 C opyright A V G T ec hnologies C Z, s .r.o. A ll rights res erved.
97
6.4.1. Non-Compliant Stations
The Non-compliance conditions dialog can be accessed from the application's upper menu by selecting the
Non-compliance conditions... item in the View menu.
In this dialog, you can specify which conditions a station must fulfill in order to be considered as noncompliant.
The conditions are as follows:
The AVG version is outdated - a station will be considered as non-compliant if the AVG version on
the station is not up to date.
The scanning engine version is outdated - a station will be considered as non-compliant if its
scanning engine version is outdated.
The virus database release date is older than - if used, stations with the virus database older than the
entered interval will be highlighted.
No communication with station for a period longer than - a station will be considered as noncompliant if there was no communication with the station for a period longer than a specific amount of
days or hours (insert plain digital value for hours and a digital value with d for days - i.e. 7d for seven
days).
High severity infections unremoved - if checked, stations with unremoved high severity infections will
be highlighted.
Medium severity infections unremoved - if checked, stations with unremoved medium severity
infections will be highlighted.
A V G A ntiV irus Bus ines s E dition 2 0 1 3 © 2 0 1 2 C opyright A V G T ec hnologies C Z, s .r.o. A ll rights res erved.
98
Rootkits unremoved - if checked, stations with unremoved rootkits will be highlighted.
Inaccurate component state: Firewall - check this to highlight the stations with Firewall component in
an inaccurate state.
Inaccurate component state: License - check this to highlight the stations with License component in
an inaccurate state.
Inaccurate component state: Computer - check this to highlight the stations with Computer
component in an inaccurate state.
No scan on the station for a period longer than - check this to highlight stations that did not perform
the whole computer scan or a scheduled scan for a long time. Can be specified in either hours or days.
License of the station will expire in - check this to highlight stations that have expired license or their
license will expire shortly. You can specify this time in hours (e.g. 7) or in days (e.g. 15d).
The following buttons are available:
Exceptions... - allows you to define groups excluded from the selected rules.
Use for Admin Server - applies the non-compliance conditions to the AVG Admin Server (to be used
in the AVG Admin Report and when generating non-compliant stations graphic reports).
Confirm your choice by clicking the OK button or close it by pressing Cancel.
6.4.2. Stations with AVG Firewall
The Stations with AVG Firewall group contains a list of all network stations with firewall enabled.
Double click your mouse or press the Enter key to open the Firewall configuration Dialog. Only certain
settings are allowed to change because of safety precautions.
6.4.3. New Stations
Contains only stations that have not been assigned to any user-predefined group yet.
6.4.4. Filtering
You can apply various listing filters to the current view. The filters are available by default from the bottom left
Filter panel.
The Filter panel is located by default in the bottom left part of the screen. If the panel is not visible, you can
activate it by clicking on the Filter window item in the View/Panels menu.
Within the text filters you can use simple wildcard asterisk character (*). The wildcard character substitutes
for any character or a string. For example Stat* string applied within the Station name filter will display also
Station01, Station02 etc.
The filtering options for Stations are as follows:
A V G A ntiV irus Bus ines s E dition 2 0 1 3 © 2 0 1 2 C opyright A V G T ec hnologies C Z, s .r.o. A ll rights res erved.
99
Note: To use a filter, simply tick the check box next to its name and double click the line to insert a value.
The results will be displayed immediately.
Station name
Insert a custom station name, that you want to filter out.
Station description
Insert a custom station description, that you want to filter out.
Station domain
Insert a custom station domain name, that you want to filter out.
IP address of station
Insert a custom station IP address, that you want to filter out.
Station operating system
Insert a custom operating system name or its part, that you want to filter out. For example to display
only all stations with Windows XP installed, input the following string:
*XP*
Infected stations
Check this in order to filter out only infected stations.
Stations are not connected after the remote installation
Check this to show only stations that failed to connect after the remote installation.
Restart is needed
Check this to show only stations that require restart.
To disable a filter, simply uncheck the checkbox next to its name or right-click in the filters window and from
the context menu select Switch off all filters.
Note: All filters are case insensitive!
6.5. Servers
The Servers item contains an overview of all deployed servers and stations with an AVG application server
component installed.
A V G A ntiV irus Bus ines s E dition 2 0 1 3 © 2 0 1 2 C opyright A V G T ec hnologies C Z, s .r.o. A ll rights res erved.
100
6.5.1. AVG Admin servers
This item displays a list of AVG Admin servers installed. Double clicking on any server will open a
configuration dialog for the given server and allow you to change configuration of the server.
More information on other options and settings can be found in the Configuration/AVG Admin Server Settings
chapter.
6.5.2. Application Servers
This item displays a list of stations with an AVG application server installed.
In the current view section you can then find information related to specific stations. Using the tabs, the
information is divided into several categories:
Servers tab
Contains general information about each station (name, domain, group, last contact etc).
Details tab
Displays additional information regarding the stations including IP address, MAC address, operating
system, restart request etc.
Versions tab
Displays information about versions of AVG, virus base and anti-spyware base on each station.
Component states tab
Contains an overview of component states on each station.
More information on other general options and settings can be found in the Configuration/AVG Admin
Console chapter.
If you right-click on the Application Servers item in the left tree, you can choose from the following options to
be applied on application servers:
Shared settings for application servers... - will open shared advanced settings dialog for application
servers.
Access control for application servers...
If you are using the Full access control feature (DataCenter upper main menu of the AVG Admin
Console, DataCenter settings menu item) and have at least one user account created, you can use
this feature to set access rights to the selected group of stations (application servers in this case).
Double-click on one of the account names to trigger a roll-down menu (or right-click on it to trigger the
context menu with same contents). From there, you can choose the permission type:
o
Full access - the chosen user account will have the full access to the group.
o
Read only - the chosen user account will be only able to view the group.
A V G A ntiV irus Bus ines s E dition 2 0 1 3 © 2 0 1 2 C opyright A V G T ec hnologies C Z, s .r.o. A ll rights res erved.
101
o
No access - the chosen user account will have no access to the group at all.
Synchronize settings - will ask all stations in the group for immediate synchronization of settings.
Ask to perform program update - will ask all stations in the group to start the program update
process.
Ask to perform virus database update - will ask all stations in the group to start the virus database
update process.
Ask to rollback last antivirus database update - will ask all stations in the group to use previous virus
database version and disregard the last one.
Delete temporary update files - sends request to all stations to remove temporary update files.
Ask for scan results - will ask all stations in the group for scan results.
If you right click on a station in the Application Servers view, you can choose from the following options:
Station overview - will launch a station overview dialog that contains well arranged detailed information
related to such station. The dialog offer the following working buttons:
Settings - opens station settings.
Firewall Settings - displays Firewall settings of the currents station. Available only if there is the
Firewall component installed.
Export - allows you to export the information into a .csv file.
Close - closes the dialog.
Station settings:
o
Settings - opens station settings.
o
Firewall settings - displays Firewall settings of the currents station. Available only if there is the
Firewall component installed.
o
Synchronize settings - will ask for immediate synchronization of stations' settings with the AVG
DataCenter.
o
Refresh components state - will refresh the state of all components.
o
Copy settings to... - triggers a new dialog:
A V G A ntiV irus Bus ines s E dition 2 0 1 3 © 2 0 1 2 C opyright A V G T ec hnologies C Z, s .r.o. A ll rights res erved.
102
Use this dialog to copy application server settings between groups, stations and/or application servers.
You can select objects you want to copy the configuration to by choosing a group from the roll down
menu, and/or selecting separate group or station by checking the checkbox near its name. When
you're done, click OK button to confirm your choice.
o
Import settings... - allows you to load settings from the configuration file of your choice and
apply them to a selected application server. This file (in .pck format) may or may not include
Firewall settings (depending on the station or a group of station previously used for its creation).
For more info on creation of configuration files, see the description of Export settings... item
below.
o
Export settings... - allows you to save settings (including Firewall settings, if Firewall is present
on at least one of the stations) for the selected application server to a single configuration file (in
.pck format). You will be asked to specify where you wish this file to be stored. Settings from
the configuration file can be applied to any station, application server or a group of stations (via
above-mentioned Import settings... item).
o
Station description
Simply enter brief description of the selected station into this dialog's text box and press OK.
A V G A ntiV irus Bus ines s E dition 2 0 1 3 © 2 0 1 2 C opyright A V G T ec hnologies C Z, s .r.o. A ll rights res erved.
103
o
Ask station for its description - will ask the selected station for its description. If available, the
description will be displayed in the Description column.
o
Station shutdown or restart
This dialog lets you shutdown or restart the selected station. Choose the action from the first roll-down
menu, then the delay from the second one.
Tasks related to Scan:
o
Ask for scan results - will ask the selected station for scan results.
o
Show the infected scan results - will show only test results with infections of the selected
station.
o
Show Virus vault - will show the Virus vault content of the selected station.
Use the Refresh button to obtain the most current Virus Vault findings. To work with individual threats,
use one of the following buttons:
Restore - select a threat or threats you wish to restore on the station and click this button.
Delete - use this button to delete the selected threat(s).
A V G A ntiV irus Bus ines s E dition 2 0 1 3 © 2 0 1 2 C opyright A V G T ec hnologies C Z, s .r.o. A ll rights res erved.
104
o
Manage scans - in order to view and manage scans using this function, the station in question
must be running and connected to the Datacenter. You have the following control options:
Refresh - obtains the most recent information about scans from the station.
Start - starts the selected scans on the remote station.
Resume - resumes the selected scans on the remote station.
Pause - pauses the selected scans on the remote station.
Stop - stops the selected scans on the remote station.
To close the window, use the Close button.
o
Launch scan on the selected stations
A new dialog will appear. Choose from the roll-down menu, whether you want to Scan whole computer,
launch a Scheduled scan, or Anti-Rootkit scan. then press OK to send your request to the selected
station.
Tasks related to Update:
o
Ask to perform program update - will ask the selected station to start the program update
process.
A V G A ntiV irus Bus ines s E dition 2 0 1 3 © 2 0 1 2 C opyright A V G T ec hnologies C Z, s .r.o. A ll rights res erved.
105
o
Ask to perform virus database update - will ask the selected station to start the virus database
update process.
o
Ask to rollback last antivirus database update - will ask the selected station to use previous
virus database version and disregard the last one.
o
Delete temporary update files - sends request to selected station(s) to remove temporary
update files.
Station statistics:
o
Show Firewall log - will show the Firewall communication log from the selected station.
o
Show events of the selected station - will show events related to the chosen station.
o
Show Event history log - will show Event history log of the chosen station.
o
Gather diagnostic data - asks the selected station for diagnostic data which you can either
send directly to the AVG Technical support or save locally for further processing:
Click the Next button to start downloading the diagnostic data. It may take a while to download all the
necessary data, so please be patient. Once finished, you will experience the following dialog:
Use Save button to store the data on your hard drive for later use (i.e. sending by email). Click Send
for sending the contents directly:
A V G A ntiV irus Bus ines s E dition 2 0 1 3 © 2 0 1 2 C opyright A V G T ec hnologies C Z, s .r.o. A ll rights res erved.
106
Fill in your email address and briefly describe your problem with the station to the next field. If you need
to enclose some additional files (e.g. a screenshot or some logs previously requested by AVG
Technical support), use the Attach button to choose them now. To remove an unwanted attachment,
select it and use the Remove button.
If you use proxy server in your network, fill in also your proxy server details by opening the Proxy
settings dialog.
To complete the process click the Send button.
o
Generate new report - starts the Graphic reports generation dialog.
Delete station - will delete the station from the AVG DataCenter.
Show server plugin statistics - displays statistics of the selected server component. Use the Reload
button to display the most current results, Reset statistics button to delete the current values and
Show details button to view the logs.
Check stations availability
A V G A ntiV irus Bus ines s E dition 2 0 1 3 © 2 0 1 2 C opyright A V G T ec hnologies C Z, s .r.o. A ll rights res erved.
107
This dialog allows you to find out, which stations are available (online) and which are not (offline). You
will see each station's state in the column to the right of its name. To check availability again, press
the Check again button, or double-click the station's name.
More information on options and settings of individual application servers can be found in the Configuration/
Shared Settings for Application Servers chapter.
6.5.3. Filtering
You can apply various listing filters to the current view. The filters are available by default from the bottom left
Filter panel.
The Filter panel is located by default in the bottom left part of the screen. If the panel is not visible, you can
activate it by clicking on the Filter window item in the View/Panels menu.
Within the text filters you can use simple wildcard asterisk character (*). The wildcard character substitutes
for any character or a string. For example Stat* string applied within the Station name filter will display also
Station01, Station02 etc.
The filtering options for Servers are as follows:
Note: To use a filter, simply tick the check box next to its name and double click the line to insert a value.
The results will be displayed immediately.
Station name
Insert a custom station name, that you want to filter out.
Station description
Insert a custom station description, that you want to filter out.
Station domain
Insert a custom station domain name, that you want to filter out.
IP address of station
A V G A ntiV irus Bus ines s E dition 2 0 1 3 © 2 0 1 2 C opyright A V G T ec hnologies C Z, s .r.o. A ll rights res erved.
108
Insert a custom station IP address, that you want to filter out.
Station operating system
Insert a custom operating system name or its part, that you want to filter out. For example to display
only all stations with Windows Server 2003 installed, input the following string:
*Server 2003*
Infected stations
Check this in order to filter out only infected stations.
Stations are not connected after the remote installation
Check this to show only stations that failed to connect after the remote installation.
Restart is needed
Check this to show only stations that require restart.
To disable a filter, simply uncheck the checkbox next to its name or right-click in the filters window and from
the context menu select Switch off all filters.
Note: All filters are case insensitive!
6.6. Scan results
This item offers an overview of all scan results (including results from the Resident shield or Online Shield) on
stations together with detailed information related to specific scans. The scan results are by default regularly
retrieved from the station, but if you require, you can request them manually:
for individual stations - by right-clicking on a station name in the Stations/group view and selecting
the Tasks related to Scan/Ask for scan results item.
for all stations in a group - by right-clicking on the group name and selecting the Ask for scan
results item.
for all stations - by right-clicking on the Stations item in the main tree and choosing the Ask for scan
results item.
The right-click context menu contains the following options:
Delete scan results - will delete the chosen scan results.
Confirm scan results - will mark the selected scan results as confirmed. Confirmation time column will
then contain date and time of the confirmation. Also, you will not find the number of infections from the
accepted scan result within the other reports.
Update scan results - will synchronize all selected scan results again.
Scan Result details
A V G A ntiV irus Bus ines s E dition 2 0 1 3 © 2 0 1 2 C opyright A V G T ec hnologies C Z, s .r.o. A ll rights res erved.
109
Use this option to view specific scan results:
Depending on the viruses found, more tabs may be displayed. Each tab contains a list of findings (i.e.
Infections, Spyware etc.). On each tab, the following options are available:
Confirm - this button will mark the test result as confirmed and you will not find the number of
infections from the accepted test within the other reports.
Close - closes the window.
Remove selected threats - removes only the selected threats.
Remove all threats - removes all threats in the list.
Previous - shows the previous scan result in the Scan results view, if available.
Next - shows the next scan result in the Scan results view, if available.
Export scan results to a file - click this hyperlink to save the listed scan results to a text file (.csv).
Print scan results - click this hyperlink to open a standard print dialog and print out the results.
Right-clicking on a finding in the list will allow you to choose from the following actions (availability of the
actions depends on file/infection type):
A V G A ntiV irus Bus ines s E dition 2 0 1 3 © 2 0 1 2 C opyright A V G T ec hnologies C Z, s .r.o. A ll rights res erved.
110
Heal - will ask the station to try healing the selected finding(s).
Delete - will ask the station to delete the selected finding(s).
Move to Vault - will ask the station to remove the selected finding(s) to the station's Virus Vault.
Add as exception - will ask the station to create an exception for the selected finding(s). AVG will then
ignore the file and will not report it anymore.
If the station is active, the requested operation(s) will be done immediately after the request. If the station is
not currently active (i.e. is not connected to the AVG Datacenter), all pending operations will be processed
next time the station connects.
Once you request an action, then if the AVG station is active, it will try to find the requested test result and
process all selected infections.
One of the action result states, listed below, will be displayed in the State column. The states are as follows:
Infected - the file is infected.
Healed - the file was cleaned.
Moved to Virus Vault - the file was moved to the Virus vault on the station.
Restored - the file was restored from the Virus Vault.
Added to exceptions - the infection was added to the list of exceptions (will no longer be considered
as a threat).
Reboot is required to finish the action - the station needs to be restarted in order to finish the action.
False detection - the file was detected by mistake; it wasn't really infected.
6.6.1. Filtering
You can apply various listing filters to the current view. The filters are available by default from the bottom left
Filter panel.
The Filter panel is located by default in the bottom left part of the screen. If the panel is not visible, you can
activate it by clicking on the Filter window item in the View/Panels menu.
Within the text filters you can use simple wildcard asterisk character (*). The wildcard character substitutes
for any character or a string. For example Stat* string applied within the Station name filter will display also
Station01, Station02 etc.
The filtering options for Scan results are as follows:
Note: To use a filter, simply tick the check box next to its name and double click the line to insert a value.
The results will be displayed immediately.
Station name
Insert a custom station name, that you want to filter out.
A V G A ntiV irus Bus ines s E dition 2 0 1 3 © 2 0 1 2 C opyright A V G T ec hnologies C Z, s .r.o. A ll rights res erved.
111
Station description
Insert a custom station description, that you want to filter out.
Scan name
Insert a custom scan name, that you want to filter out.
User name
Insert a custom username, that you want to filter out.
Severity
Choose a preferred severity level from the drop down menu.
Including rootkits
Choose if scan results with rootkits should be filtered out.
Unconfirmed
This filter will display only unconfirmed scan results.
To disable a filter, simply uncheck the checkbox next to its name or right-click in the filters window and from
the context menu select Switch off all filters.
Note: All filters are case insensitive!
6.7. Notifications
The Notifications item allows you to select from predefined notification actions. These notifications once set
can inform an administrator via email about different events within the AVG Admin Console.
Note: Proper dispatch of email notifications requires correct SMTP server definition on the Configuration /
AVG Admin Server Settings / E-Mail tab.
To activate a notification you need to right click on its line and from the context menu select Active.
Double-clicking a line (i.e. specific notification) will open Notification settings dialog, that allows further
customization (see the chapters below).
A V G A ntiV irus Bus ines s E dition 2 0 1 3 © 2 0 1 2 C opyright A V G T ec hnologies C Z, s .r.o. A ll rights res erved.
112
6.7.1. Condition Tab
On this tab you can customize under which conditions the notification should be sent.
Check the Send a notification message when the condition is fulfilled checkbox to receive an email once
the above mentioned parameters or the condition generally is met.
You can also select a period in which the condition should be checked.
Check the Group multiple findings into a single message checkbox, if you want to customize number of
event occurrences that must occur before the notification message will be sent.
Certain notifications have also some Condition parameters available, which can be changed by doubleclicking the appropriate line and inserting the requested value.
A V G A ntiV irus Bus ines s E dition 2 0 1 3 © 2 0 1 2 C opyright A V G T ec hnologies C Z, s .r.o. A ll rights res erved.
113
6.7.2. Message Tab
On this tab you can customize the notification message itself.
If the AVG Admin Server is not configured properly for sending email messages, you should correct the
settings by clicking the AVG Admin Server settings button. More information can be found in the
Configuration/AVG Admin Server settings/Email tab chapter.
The available fields are as follows:
To - insert a message recipient address (in the form "[email protected]").
Subject
Notification header
Notification body
Notification footer
Into these fields you can insert either custom text to be displayed within the message, or use a macro to
insert a variable. To use a variable (macro), simply click Insert macro button located next to each message
part.
A V G A ntiV irus Bus ines s E dition 2 0 1 3 © 2 0 1 2 C opyright A V G T ec hnologies C Z, s .r.o. A ll rights res erved.
114
The variable will be converted to a real value once the message is sent from the AVG DataCenter. The
possible variables (macros) are as follows:
%AVG_StationName% - name of the station.
%AVG_StationDomain% - The domain name in which the station exists (if applicable).
%AVG_GroupName% - the group name, in which the station is located.
%AVG_IPAddress% - the station IP address.
%AVG_MacAddress% - the MAC address of the station.
%AVG_LastCall% - last time the station contacted the AVG DataCenter.
%AVG_WinVersion% - the version of MS Windows.
%AVG_AvgVersion% - the AVG version on the station.
%Antivirus_Version% - the version of the antivirus database.
%Antivirus_ReleaseDate% - the release date of the antivirus database.
%AVG_StationDesc% - the description of the station.
6.8. Graphic Reports
Note: As Graphic reports are generated by the AVG Admin Server, report generation will only work if
installed on a computer where AVG Admin Server is also installed.
The Graphic reports allow users to quickly and easily generate well arranged reports. Reports may show
various summaries and statistics. Graphical reports are accessible from the main AVG Admin Console
navigation tree.
The reports are always generated in the language that has been chosen during installation of the AVG Admin
Server.
You can generate reports in one of two ways:
By navigating to Graphic reports/Report schedules and choosing to define a new report schedule.
A V G A ntiV irus Bus ines s E dition 2 0 1 3 © 2 0 1 2 C opyright A V G T ec hnologies C Z, s .r.o. A ll rights res erved.
115
By selecting station(s) or server(s) directly and from the right-click context menu choosing Generate
new report item. The same applies to groups.
In both cases the Report schedule definition wizard will be launched and you will be able to choose
properties of your report. More information can be found in the Report Schedules chapter below.
Note: Generated reports are physically saved to a temporary location on your hard drive, under the AVG2013
data folder (e.g. C:\Documents and Settings\All Users\Application data\avg2013\Admin Server Data\Reports).
Each generated report will consume some hard drive capacity (from 0,1 to 0,5 MB approximately, but can be
even more, if you have lots of stations). Therefore if you suffer from insufficient disk space, we recommend
creating only a reasonable amount of reports or deleting the old ones accordingly.
During Export/Import (available through DataCenter/Database Export) of the AVG Admin Console data, only
Report schedules and generated reports will be processed. Report templates will not be exported or imported.
Once you import your former exported data, Graphic reports will not be available until you restart the AVG
Admin Server!
6.8.1. Report Templates
There are some predefined templates that can be quickly used for report generation. Some templates allow
you to set additional parameters for more precise reports.
To create a report directly from this menu, right-click on the report you want to generate and select the
Generate report from template menu item. If you prefer only to display a preview of the report layout, select
Template preview.
All stations - shows all stations registered in the AVG Admin Console
Available parameters:
-
Minimum count of infected objects - type in the minimum count of infected objects on station.
0 = disable this parameter.
-
IP address starts with - specify the beginning part of the IP address.
-
Type of Chart - choose the requested chart type (default selection is pie chart).
-
Grouped by - the result data will be grouped by the selected column.
Non-compliant stations - shows stations in a non-compliant state according to conditions available
from the View/Non-compliance conditions menu.
Stations by AVG Version - shows all stations sorted by AVG version.
Available parameters:
-
Type of Chart - choose the requested chart type (default selection is pie chart).
Stations not communicating longer than N days
Available parameters:
A V G A ntiV irus Bus ines s E dition 2 0 1 3 © 2 0 1 2 C opyright A V G T ec hnologies C Z, s .r.o. A ll rights res erved.
116
-
Number of days - choose the number of days for which the stations were not communicating.
-
Type of Chart - choose the requested chart type (default selection is pie chart).
-
Grouped by - the result data will be grouped by the selected column.
Most infected stations - shows top infected stations.
Available parameters:
-
Stations count in report - limit the number of stations in the report. 0 = unlimited.
-
Type of Chart - choose the requested chart type (default selection is pie chart).
-
Severity - choose the minimum scan results severity to be included in the report.
-
Including rootkits - choose whether to include rootkits to the report or not.
-
Grouped by - the result data will be grouped by the selected column.
-
Time interval from - specify the beginning of the time interval for selecting data (last day, last
week, last month, last year, unlimited).
-
Time interval to - specify the ending of the time interval for selecting data (last day, last week,
last month, last year, unlimited).
-
Include only threats - choose to include confirmed/unconfirmed or all threats.
Most threats - This report shows the top threats of all stations.
Available parameters:
-
Viruses count in report - limit the number of viruses in the report. 0 = unlimited.
-
Time interval - specify the time interval for selecting data (last day, last week, last month, last
year, unlimited).
-
Type of Chart - choose the requested chart type (default selection is pie chart).
-
Grouped by - the result data will be grouped by the selected column.
-
Severity - choose the minimum scan results severity to be included in the report.
-
Including rootkits - choose whether to include rootkits to the report or not.
Virus scan report - This report shows the status of viruses.
Available parameters:
-
Time interval - specify the time interval for selecting data (last day, last week, last month, last
year, unlimited).
A V G A ntiV irus Bus ines s E dition 2 0 1 3 © 2 0 1 2 C opyright A V G T ec hnologies C Z, s .r.o. A ll rights res erved.
117
-
Severity - choose the minimum scan results severity to be included in the report.
-
Including rootkits - choose whether to include rootkits to the report or not.
Viruses on stations - This report shows the viruses on stations.
Available parameters:
-
Time interval - specify the time interval for selecting data (last day, last week, last month, last
year, unlimited).
-
Severity - choose the minimum scan results severity to be included in the report.
-
Including rootkits - choose whether to include rootkits to the report or not.
-
Grouped by - the result data will be grouped by the selected column.
6.8.2. Report Schedules
In this group, you can create, edit and view graphic report schedules. Actions applicable on individual or
multiple reports are available through the right-click context menu:
Edit - opens an edit dialog for the selected schedule.
Define a new schedule - will start the wizard for creating a new report schedule.
The Report Schedule is active - use this function to activate or disable selected report(s).
Remove - removes selected reports from AVG DataCenter.
By default, there are no schedules available. To prepare a new scheduled report, right-click in the Report
schedules area and select the Define a new schedule item from the menu.
A V G A ntiV irus Bus ines s E dition 2 0 1 3 © 2 0 1 2 C opyright A V G T ec hnologies C Z, s .r.o. A ll rights res erved.
118
o
Note: You can generate reports also from the Stations/Servers/Groups view group simply by selecting a
station or stations and choosing Generate new report from the right-click context menu.
A new dialog will come up:
A V G A ntiV irus Bus ines s E dition 2 0 1 3 © 2 0 1 2 C opyright A V G T ec hnologies C Z, s .r.o. A ll rights res erved.
119
Fill in the Name and Description. Proceed to the next dialog by pressing the Next button.
From the rollover menu select which template you want to use for your report.
On the left choose which groups should be included and on the right choose individual stations for the report.
A V G A ntiV irus Bus ines s E dition 2 0 1 3 © 2 0 1 2 C opyright A V G T ec hnologies C Z, s .r.o. A ll rights res erved.
120
If there are additional parameters available for the selected report, fill in the requested values, or leave the
default values. For more information on templates, see the Report templates section above. Once ready,
press the Next button.
In this dialog choose which columns you wish to include in your report. Click the Select all button to include
all columns or use the Select default button to keep the default one. To change the order of the columns, first
select the desired column you wish to move and choose the appropriate action:
Move to top - moves the selected column to the first place.
Move up - moves the selected column one step up.
A V G A ntiV irus Bus ines s E dition 2 0 1 3 © 2 0 1 2 C opyright A V G T ec hnologies C Z, s .r.o. A ll rights res erved.
121
Move down - moves the selected column one step down.
Move to bottom - moves the selected column to the very end position.
In this dialog, choose whether you want to generate the report only once in the selected time, or to generate
the report periodically:
Generate once at a specific time - choose the exact time and date of generation.
Generate periodically - Choose a Period (daily, weekly, monthly) of generation and First generation
time and date.
Press Next button to proceed to the following part:
A V G A ntiV irus Bus ines s E dition 2 0 1 3 © 2 0 1 2 C opyright A V G T ec hnologies C Z, s .r.o. A ll rights res erved.
122
If you want to send the report or notification by email when it is generated, enable the Send email after
report generation checkbox.
In order to be able to use the email feature, you must first configure the SMTP settings in the AVG Admin
Server (Email tab).
Click on the AVG Admin Server settings to configure the SMTP/Email settings now.
Note: To learn more about configuring the AVG Admin Server settings for sending Email, see the Email tab
topic in the Configuration/AVG Admin Server Settings chapter.
If you have already previously configured the Email tab in the AVG Admin Server configuration, you should see
predefined values already in the correct fields. If not, please check the AVG Admin Server settings or fill in
your custom values.
If you want to receive reports directly as an attachment, enable the Send report as attachment checkbox.
If you do not select to receive the report as an attachment, you will only receive a notification email and will
have to review the report manually within the AVG Admin Console.
Once ready, proceed to the final screen by pressing the Next button.
In the next screen check, if all settings are correct and complete the process by pressing the Finish button.
6.8.3. Generated Reports
This group contains a list of all currently generated reports.
To open a report, right-click on the chosen line and from the context menu select the Show... item.
To delete a report right-click on the chosen line and from the context menu select the Remove item.
A V G A ntiV irus Bus ines s E dition 2 0 1 3 © 2 0 1 2 C opyright A V G T ec hnologies C Z, s .r.o. A ll rights res erved.
123
Once you have opened one of your generated reports, you can then also print it on your printer or save it as a
zip archive containing html files and related pictures.
6.8.4. Filtering
You can apply various listing filters to the Generated reports view. The filters are available by default from the
bottom left Filter panel.
The Filter panel is located by default in the bottom left part of the screen. If the panel is not visible, you can
activate it by clicking on the Filter window item in the View/Panels menu.
Within the text filters you can use simple wildcard asterisk character (*). The wildcard character substitutes
for any character or a string. For example Stat* string applied within the Station name filter will display also
Station01, Station02 etc.
The filtering options for the Generated reports are as follows:
Note: To use a filter, simply tick the check box next to its name and double click the line to insert a value.
The results will be displayed immediately.
Report template
From the roll down menu choose a report template name, that you want to filter out.
Schedule name
Insert a custom report schedule name, that you want to filter out.
Date
Insert a custom date and time value, that you want to filter out.
To disable a filter, simply uncheck the checkbox next to its name or right-click in the filters window and from
the context menu select Switch off all filters.
Note: All filters are case insensitive!
6.9. Licenses
This item offers an overview of all license numbers used. It allows you to easily monitor all existing license
numbers, and add or update license number for individual or multiple stations.
6.9.1. Shared Settings
In the view, you will see the list of all groups (including the custom ones).
You have the following options available from the right-click context menu applicable for each group:
Mandatory - will mark the usage of the given license number as mandatory for the selected group,
which means, that all stations in this group will use it.
Change license number - will open a new dialog allowing you to insert a different license number.
A V G A ntiV irus Bus ines s E dition 2 0 1 3 © 2 0 1 2 C opyright A V G T ec hnologies C Z, s .r.o. A ll rights res erved.
124
Once changed, the license number will apply for all stations in the given group.
Note: The new license number(s) will be deployed to individual stations once the synchronization process
tak es place. More information about the synchronization process can be found in the Synchronization
process chapter.
6.9.2. Stations
In the view, you will see the list of all stations. You have the following options available from the right-click
context menu applicable for each station:
Mandatory - will mark the usage of the given license number as mandatory for the selected station.
Change license number - will open a new dialog allowing you to insert a different license number.
Once changed, the license number will apply for all stations in the given group.
Note: The new license number(s) will be deployed to individual stations once the synchronization process
tak es place. More information about the synchronization process can be found in the Synchronization
process chapter.
6.10. Pending Requests
This item allows you view all currently pending requests sent from the AVG Admin Console. You can also
delete them by right-clicking on them and selecting Delete selected requests from the context menu.
6.10.1. Filtering
You can apply various listing filters to the Pending requests view. The filters are available by default from the
bottom left Filter panel.
The Filter panel is located by default in the bottom left part of the screen. If the panel is not visible, you can
activate it by clicking on the Filter window item in the View/Panels menu.
Within the text filters you can use simple wildcard asterisk character (*). The wildcard character substitutes
for any character or a string. For example Stat* string applied within the Station name filter will display also
Station01, Station02 etc.
The filtering options for the Pending requests are as follows:
Note: To use a filter, simply tick the check box next to its name and double click the line to insert a value.
The results will be displayed immediately.
Request type
Double-click the field to open drop-down menu with list of request types and choose the one you wish
to filter out.
Station name
Double-click the field to insert a custom station name to be filtered out.
Date
A V G A ntiV irus Bus ines s E dition 2 0 1 3 © 2 0 1 2 C opyright A V G T ec hnologies C Z, s .r.o. A ll rights res erved.
125
Insert a custom date and time value, that you want to filter out.
To disable a filter, simply uncheck the checkbox next to its name or right-click in the filters window and from
the context menu select Switch off all filters.
Note: All filters are case insensitive!
6.11. Network Installer
This is the integrated Network installer that allows you to add/remove stations for remote installation and
observe the installation status.
Note: This option serves only for network installation. If you prefer to create an installation script, you need to
use the standalone AVG Network Installer Wizard.
To add a new stations for remote installation, simply right-click on the Network installer node name and from
the context menu select Add new stations. The Network scanning dialog appears. See the Network
scanning chapter for more information.
The other context menu items are as follows:
Show network scan progress
Displays an overview of the network scanning process. Use the Abort button to stop the scanning
process. The Pause button will temporarily stop the process (use Continue button resume the
scanning).
Export all station list... - allows you to export the list of added stations into a .csv file.
Install all stations... - will start installation on all stations in the list.
6.11.1. Network Scanning
Before you begin with adding stations and remote installations, you may want to review the following chapters:
Recommendations for Components
A V G A ntiV irus Bus ines s E dition 2 0 1 3 © 2 0 1 2 C opyright A V G T ec hnologies C Z, s .r.o. A ll rights res erved.
126
Network Requirements
Before you can install a station remotely, you need to add it via an easy to use wizard. To do so, simply rightclick on the Network installer node name and from the context menu select Add new stations. The
Network scanning dialog appears:
In the Network scanning method section choose from the drop down list, your preferred method for
selecting stations. The possible options are as follows:
All stations from the domain - this option will scan all stations available in your local domain.
Enter an IP range - this option will allow you to choose a specific range of IP addresses.
Import stations from file - a new dialog will appear and you will be able to choose a file with a list of
stations to be scanned. The source text file should contain one station name or an IP address per line.
Select a single station - this option lets you type in a specific Computer name (DNS name) or IP
address.
Select from Active Directory - allows you to choose specific stations directly from the Active
Directory.
Note: This option is available only if the current computer is part of a domain.
The List of accounts section is meant to facilitate your work and to accelerate installation process. If your
access rights are not sufficient for AVG installation on the remote station, you will be asked to enter a
username that has administrator privileges (a username that is member of an administrator's group). If there is
no common administrator account for all stations (with the same login name and password) you will be asked
separately for every station.
A V G A ntiV irus Bus ines s E dition 2 0 1 3 © 2 0 1 2 C opyright A V G T ec hnologies C Z, s .r.o. A ll rights res erved.
127
This section allows you to create a list of accounts that will be used during remote installation; this way you
will avoid entering multiple credentials. You can add accounts to the list by clicking the Add button (or delete
them using the Remove button). If you wish to keep your list of accounts for further use, check the Save list
of accounts box. However, this is not recommended for safety reasons.
Once you select all required parameters, proceed by clicking the Next button.
If you choose to add all stations from the domain, the network scanning dialog will appear:
The dialog displays an overview of the network scanning process. You do not have to wait for it to stop
scanning - simply close it by using the Close button and continue working with the Console. To open this
dialog again, simply right-click on the Network installer node name and from the context menu select Show
network scan progress.
The dialog allows you to stop the scanning process by using the Abort button. The Pause button will
temporarily stop the process (use Continue button resume the scanning).
Once you finish adding stations, proceed to the Remote Network Installation chapter for instructions how to
remotely install the required stations.
A V G A ntiV irus Bus ines s E dition 2 0 1 3 © 2 0 1 2 C opyright A V G T ec hnologies C Z, s .r.o. A ll rights res erved.
128
If you choose to add stations according to an IP range, the following dialog will appear:
You need to specify the scanning range by entering the IP addresses here. In the From field enter a starting
IP address and in the To field enter an ending address. Click the Add button to add the address range into
the list.
To delete a range from the right list, simply select the items you wish to remove and click the Remove
button.
Once you finish selecting the IP ranges, click the Next button to continue. The Network scanning window
will appear:
A V G A ntiV irus Bus ines s E dition 2 0 1 3 © 2 0 1 2 C opyright A V G T ec hnologies C Z, s .r.o. A ll rights res erved.
129
The dialog displays an overview of the network scanning process. You do not have to wait for it to stop
scanning - simply close it by using the Close button and continue working with the Console. To open this
dialog again, simply right-click on the Network installer node name and from the context menu select Show
network scan progress.
The dialog allows you to stop the scanning process by using the Abort button. The Pause button will
temporarily stop the process (use Continue button resume the scanning).
Once you finish adding stations, proceed to the Remote Network Installation chapter for instructions how to
remotely install the required stations.
If you choose to add stations selected from a file, you will see a dialog asking for the file. Locate the file and
confirm your choice. The source file format contains one station name per line in simple text format.
Once done, the Network scanning dialog will appear:
A V G A ntiV irus Bus ines s E dition 2 0 1 3 © 2 0 1 2 C opyright A V G T ec hnologies C Z, s .r.o. A ll rights res erved.
130
The dialog displays an overview of the network scanning process. You do not have to wait for it to stop
scanning - simply close it by using the Close button and continue working with the Console. To open this
dialog again, simply right-click on the Network installer node name and from the context menu select Show
network scan progress.
The dialog allows you to stop the scanning process by using the Abort button. The Pause button will
temporarily stop the process (use Continue button resume the scanning).
Once you finish adding stations, proceed to the Remote Network Installation chapter for instructions how to
remotely install the required stations.
If you choose to add only a single station, the following dialog will appear:
Click either the Computer name or IP address field and fill in the proper name or IP address. Confirm your
choice by clicking the OK button. The Network scanning window will open:
A V G A ntiV irus Bus ines s E dition 2 0 1 3 © 2 0 1 2 C opyright A V G T ec hnologies C Z, s .r.o. A ll rights res erved.
131
The dialog displays an overview of the network scanning process. You do not have to wait for it to stop
scanning - simply close it by using the Close button and continue working with the Console. To open this
dialog again, simply right-click on the Network installer node name and from the context menu select Show
network scan progress.
The dialog allows you to stop the scanning process by using the Abort button. The Pause button will
temporarily stop the process (use Continue button resume the scanning).
Once you finish adding stations, proceed to the Remote Network Installation chapter for instructions how to
remotely install the required stations.
If your network is domain-based, you can choose to add stations selected from the Active Directory. A new
dialog will pop up (standard Windows dialog for selecting computers). You can choose multiple stations
(separate the values by a semicolon) either by entering the station names manually or by using the dialog
advanced features for searching.
Once done, the network scanning dialog will appear:
A V G A ntiV irus Bus ines s E dition 2 0 1 3 © 2 0 1 2 C opyright A V G T ec hnologies C Z, s .r.o. A ll rights res erved.
132
The dialog displays an overview of the network scanning process. You do not have to wait for it to stop
scanning - simply close it by using the Close button and continue working with the Console. To open this
dialog again, simply right-click on the Network installer node name and from the context menu select Show
network scan progress.
The dialog allows you to stop the scanning process by using the Abort button. The Pause button will
temporarily stop the process (use Continue button resume the scanning).
Once you finish adding stations, proceed to the Remote Network Installation chapter for instructions how to
remotely install the required stations.
6.11.2. Remote Network Installation
As soon as you add stations for remote installation, the AVG Admin Server starts checking their state - e. g.
you can instantaneously see if the scanned station is online, if there is AVG already installed and its version.
There are several operations available for added stations (available via right-click context menu):
Re- check state of selected stations - checks the station status and AVG version again.
Delete selected stations - removes the selected stations from the list.
Modify list of accounts for remote installation - displays a new dialog:
A V G A ntiV irus Bus ines s E dition 2 0 1 3 © 2 0 1 2 C opyright A V G T ec hnologies C Z, s .r.o. A ll rights res erved.
133
This dialog is meant to facilitate your work and to accelerate installation process. If your access rights
are not sufficient for AVG installation on the remote station, you will be asked to enter a username that
has administrator privileges (a username that is member of an administrator's group). If there is no
common administrator account for all stations (with the same login name and password) you will be
asked separately for every station.
This dialog allows you to modify a list of accounts that will be used during remote installation; this way
you will avoid entering multiple credentials. You can add accounts to the list by clicking the Add button
(or delete them using the Remove button).
Export selected stations list - exports selected stations into a .csv file.
Install selected stations - displays Remote Network Installation dialog which will guide you through
the network installation process itself.
Warning: AVG remote installation can be performed only on stations with the supported operating system
installed. See the full list of supported operating systems in the Operating Systems Supported chapter. Also,
you need to k now a logon username with administrator privileges.
You may also need to review the Network Requirements chapter.
You can choose basic or advanced remote network installation:
Basic remote network installation - recommended for beginners.
Advanced remote network installation - recommended for advanced users.
Before you begin with the installation of the remote stations, you may want to review the following chapters:
Recommendations for Components
Network Requirements
Note: This chapter describes the basic setup of Network Installer available from the AVG Admin Console. If
you prefer to configure more details, proceed to the Advanced Remote Network Installation chapter.
This wizard allows you to remotely install AVG on stations in few easy steps.
A V G A ntiV irus Bus ines s E dition 2 0 1 3 © 2 0 1 2 C opyright A V G T ec hnologies C Z, s .r.o. A ll rights res erved.
134
If you have already used the wizard before and saved a customized configuration into a configuration file
(available in the final step), you can load the settings now by choosing the Load settings button.
To revert to the original settings preset by default, press the Default settings button.
During the whole installation process you can decide to save the configuration progress at any time by
pressing F2 key or CTRL+S combination. A new dialog will appear allowing you to choose a configuration file
name.
If you wish to use default settings for your whole installation, you may always use the Skip button to proceed
to the final installation step (see below for more details).
To continue, click the Next button.
A V G A ntiV irus Bus ines s E dition 2 0 1 3 © 2 0 1 2 C opyright A V G T ec hnologies C Z, s .r.o. A ll rights res erved.
135
For proper remote installation, the wizard will first check whether AVG is already present on the target station,
then transfer the AVG installation files and process the installation accordingly.
Before you proceed, please review the network requirements and exceptions regarding remote AVG
installation.
You can find more detailed information on the ports settings in the Network Requirements chapter.
A V G A ntiV irus Bus ines s E dition 2 0 1 3 © 2 0 1 2 C opyright A V G T ec hnologies C Z, s .r.o. A ll rights res erved.
136
During this step it is necessary to define the following installation parameters:
License information – type in the license data such as Name, Company, and License number
(mandatory value). If you wish to take the Windows username for the Name field, do not select the
respective check box, and leave the default system settings to be used.
Selection of AVG installation package - you can either keep the default settings (and let the Admin
server download the newest package for you) or choose from the roll-down menu a custom path. In
such case specify the full path to AVG installation package or use this
folder.
button to select the proper
Storing of installation packages on the Admin server side - here you can choose if you wish to:
Delete installation pack age after successful installation (from the Admin Server)
Delete installation pack age after a specified number of week s.
The following options are available in this step.
Note: If you are unsure about these settings, we recommend k eeping the default ones.
Remote administration - Enter the AVG DataCenter connection string into the AVG DataCenter
connection string field. If applicable, also enter the Username and Password. If you do not want to
manage the stations via the AVG Admin Console, simply uncheck this option.
Add new station into group - If you prefer to automatically add new station(s) into a custom group,
you can choose the group name here.
Custom update server - if you already have an existing update server, that you would like to use for
your stations, check this box and fill in its address now.
A V G A ntiV irus Bus ines s E dition 2 0 1 3 © 2 0 1 2 C opyright A V G T ec hnologies C Z, s .r.o. A ll rights res erved.
137
Once done, click Finish button to begin remote installation. You will be able to observe the status of the
installation from the Network installer view.
Use Save settings option to save the configuration used.
Note: To list recently installed stations that remain in an incorrect state (because of some remote installation
failure), navigate to the Stations/Non-compliant stations.
Note: This chapter describes the advanced setup of Network Installer available from the AVG Admin
Console. If you prefer to configure less details, proceed to the Basic Remote Network Installation chapter.
This wizard allows you to remotely install AVG on stations in few easy steps.
If you have already used the wizard before and saved a customized configuration into a configuration file
(available in the final step), you can load the settings now by choosing the Load settings button.
To revert to the original settings preset by default, press the Default settings button.
During the whole installation process you can decide to save the configuration progress at any time by
pressing F2 key or CTRL+S combination. A new dialog will appear allowing you to choose a configuration file
name.
If you wish to use default settings for your whole installation, you may always use the Skip button to proceed
to the final installation step (see below for more details).
To continue, click the Next button.
A V G A ntiV irus Bus ines s E dition 2 0 1 3 © 2 0 1 2 C opyright A V G T ec hnologies C Z, s .r.o. A ll rights res erved.
138
For proper remote installation, the wizard will first check whether AVG is already present on the target station,
then transfer the AVG installation files and process the installation accordingly.
Before you proceed, please review the network requirements and exceptions regarding remote AVG
installation.
You can find more detailed information on the ports settings in the Network Requirements chapter.
A V G A ntiV irus Bus ines s E dition 2 0 1 3 © 2 0 1 2 C opyright A V G T ec hnologies C Z, s .r.o. A ll rights res erved.
139
During this step it is necessary to define the following installation parameters:
License information – type in the license data such as Name, Company, and License number
(mandatory value). If you wish to take the Windows username for the Name field, do not select the
respective check box, and leave the default system settings to be used.
Selection of AVG installation package - you can either keep the default settings (and let the Admin
server download the newest package for you) or choose from the roll-down menu a custom path. In
such case specify the full path to AVG installation package or use this
folder.
button to select the proper
Storing of installation packages on the Admin server side - here you can choose if you wish to:
Delete installation pack age after successful installation (from the Admin Server)
Delete installation pack age after a specified number of week s.
In this step, you can choose if you wish to install AVG with default settings or select custom components.
Install AVG with default settings - Choose this option if you prefer the default components to be
installed.
Select installation components - Select this option to view a tree structure offering a list of AVG
components that can be either installed or uninstalled. From the list of components select:
o
Components that should be installed, and mark them like this
o
Components that should be uninstalled or not installed, and mark them like this
o
The default settings will be used for components that you leave blank ( ).
A V G A ntiV irus Bus ines s E dition 2 0 1 3 © 2 0 1 2 C opyright A V G T ec hnologies C Z, s .r.o. A ll rights res erved.
140
Remote AVG uninstallation - allows AVG removal.
In the Setup parameters section you can choose from the following options:
Enable Windows Firewall after installation - in case you are not going to install AVG Firewall
component, you can choose to enable Windows Firewall as soon as the installation is completed.
Quit setup if AVG 2013 is already installed - the remote administration will not proceed if AVG 2013
is already present on the target station.
Kill all running applications that prevent installation - the remote installation will force closure of
any application that could interfere with the installation process. Usually this could be a running email
client or an Internet browser.
Reboot the computer after finishing AVG 2013 setup if needed - in certain cases (Firewall
component installation for example) a computer restart may be required to complete the installation
process.
Display a notification message regarding scheduled system restart on the remote computer - If
the previous checkbox is checked, you can also define a delay before the restart will take place. The
default value is ten minutes.
Select type of installation progress visibility - from the drop down menu select one of the following:
o
hidden installation - no information will be displayed to the currently logged user during the
setup process.
o
show installation progress only - the installation will not require any user attention, but the
progress will be fully visible on the station.
A V G A ntiV irus Bus ines s E dition 2 0 1 3 © 2 0 1 2 C opyright A V G T ec hnologies C Z, s .r.o. A ll rights res erved.
141
o
show installation wizard - the installation will be visible on the station and the currently logged
user will need to manually confirm all steps.
In the Setup properties section you can choose from the following options:
Where to install - if you prefer a customized target location for installation, you can choose it by
entering the path here. We recommend keeping the default settings.
Setup language - choose a default custom language for AVG installation and user interface.
Select folder where AVG 2013 setup LOG file will be stored - if you prefer a custom location for
setup log files, select it here (the folder must already exist on the target station).
In this final step, there are the following options available:
Note: If you are unsure about these settings, we recommend k eeping the default ones.
Remote administration - Enter the AVG DataCenter connection string into the AVG DataCenter
connection string field. If applicable, also enter the Username and Password. If you do not want to
manage the stations via the AVG Admin Console, simply uncheck this option.
Add new station into group - If you prefer to automatically add new station(s) into a custom group,
you can choose the group name here.
Custom update server - if you already have an existing update server, that you would like to use for
your stations, check this box and fill in its address now.
Once done, click Finish button to begin remote installation. You will be able to observe the status of the
installation from the Network installer view.
A V G A ntiV irus Bus ines s E dition 2 0 1 3 © 2 0 1 2 C opyright A V G T ec hnologies C Z, s .r.o. A ll rights res erved.
142
Use Save settings option to save the configuration used.
Note: To list recently installed stations that remain in an incorrect state (because of some remote installation
failure), navigate to the Stations/Non-compliant stations.
A V G A ntiV irus Bus ines s E dition 2 0 1 3 © 2 0 1 2 C opyright A V G T ec hnologies C Z, s .r.o. A ll rights res erved.
143
7. AVG Admin Server
AVG Admin Server is used to secure communication between the AVG stations and the AVG DataCenter
on the server. Through the AVG Admin Server the AVG stations connect to the AVG DataCenter using the
TCP protocol (or the HTTP protocol, to be exact) that is a part of each Windows operating system installation.
Therefore, the AVG stations do not need any other third party component to be able to connect to the remote
administration system.
The AVG Admin Server can serve as a proxy server for downloading and distributing updates to your
stations within the local network (by deploying the UpdateProxy role).
It basically works as a simple web server offering the update files to AVG stations. The update files are
downloaded from the AVG central update servers just once, which significantly decreases the internet
connection link load, especially in larger networks.
The AVG Admin Server is started automatically after deployment. If not, you can start it manually from the
Windows start menu All programs/AVG 2013 Remote Administration by selecting AVG Admin Server
Monitor, button Start server.
More information about the configuration of AVG Admin Server is available in the Configuration/AVG Admin
Server Settings chapter.
A V G A ntiV irus Bus ines s E dition 2 0 1 3 © 2 0 1 2 C opyright A V G T ec hnologies C Z, s .r.o. A ll rights res erved.
144
8. AVG Admin Lite
AVG Admin Lite is a simplified version of AVG Remote Installation. It contains only the AVG Admin Server
Deployment Wizard Lite and the AVG Network Installer Wizard Lite. No management console is available
(such as AVG Admin Console), or any advanced options.
AVG Admin Server Deployment Wizard Lite - only allows deployment of the UpdateProxy role.
AVG Network Installer Wizard Lite - only allows AVG Installation Script creation.
In order to install and use only the AVG Admin Lite features, you must have chosen the Lite Installation
option during the AVG AntiVirus Business Edition 2013 installation process (For more information see
chapter Installation type).
8.1. AVG Admin Deployment Wizard Lite
The first dialog explains the purpose of the Wizard. Click the Next button to proceed to the next step.
Note: You need to complete this wizard in order to proceed with remote network installation.
A V G A ntiV irus Bus ines s E dition 2 0 1 3 © 2 0 1 2 C opyright A V G T ec hnologies C Z, s .r.o. A ll rights res erved.
145
8.1.1. Configuration Overview
This section contains an overview of the configuration, that is going to be deployed on your server. Basically
only the UpdateProxy role will be deployed to your server. The UpdateProxy role serves as a proxy server for
downloading and distributing updates to your stations.
The wizard will also create the update folder on the C: drive (by default) or drive that is indicated in your
overview.
You can also tick the Send server dumps automatically to analysis checkbox in order to send potential
AVG Admin Server crash dumps directly to our technical support for further analysis.
A V G A ntiV irus Bus ines s E dition 2 0 1 3 © 2 0 1 2 C opyright A V G T ec hnologies C Z, s .r.o. A ll rights res erved.
146
8.1.2. Completion
If everything went smoothly, you will see a dialog similar to the one above. Click Finish to close the Wizard
and continue to the AVG Network Installer Wizard Lite.
8.2. AVG Network Installer Wizard Lite
A V G A ntiV irus Bus ines s E dition 2 0 1 3 © 2 0 1 2 C opyright A V G T ec hnologies C Z, s .r.o. A ll rights res erved.
147
The AVG Network Installer Wizard Lite will quickly guide you through the AVG script creation process. The
script can then be used to install AVG on your stations.
8.2.1. Installation Settings
Fill in the requested values. License number is a mandatory field that must be filled in. Alternatively you may
check the Name and/or Company checkboxes and fill in the appropriate values.
Use the License number change button to input a new license number for AVG installations.
A V G A ntiV irus Bus ines s E dition 2 0 1 3 © 2 0 1 2 C opyright A V G T ec hnologies C Z, s .r.o. A ll rights res erved.
148
8.2.2. Creation of AVG Installation Script
In this dialog you need to choose, where the installation script will be saved. If the location does not contain
the latest AVG installation package, the wizard will try to download the file from the Internet once you click
the Next button. In such a case please make sure your Internet connection is available.
You can choose one of the following:
Portable data storage medium (USB drive)
If you have not done so already, insert a removable USB device (Flash drive, portable hard drive etc.)
and hit the Refresh button to see the device in the drop down list. Make sure the drive is not writeprotected.
Folder
Selecting this option will let you choose a folder, where the script will be stored. If you choose a
network folder, make sure it has correct write-access rights.
A V G A ntiV irus Bus ines s E dition 2 0 1 3 © 2 0 1 2 C opyright A V G T ec hnologies C Z, s .r.o. A ll rights res erved.
149
8.2.3. Completion
If the script creation proceeded successfully, you will see a dialog similar to this one. Click the Finish button
to close the wizard.
To use the script saved to a folder:
1.
Copy the whole contents of the previously chosen folder to your station.
Note: If you used a network folder for storing the script, you can navigate to that folder directly over the
network .
2.
On the station navigate to this folder and run the AvgSetup.bat file.
3.
The command line window will appear and the installation will begin.
4.
Once the installation is completed, the window will close automatically.
To use the script from a removable device:
1.
Insert the removable device to your station.
2.
If the autorun feature is enabled in the station's operating system, the installation will start
automatically.
3.
If not, open the removable device disk letter and run the AvgSetup.bat file manually.
4.
The command line window will appear and the installation will begin.
5.
Once the installation is completed, the window will close automatically.
A V G A ntiV irus Bus ines s E dition 2 0 1 3 © 2 0 1 2 C opyright A V G T ec hnologies C Z, s .r.o. A ll rights res erved.
150
9. Configuration
This chapter contains a description of configuration options for different parts of AVG AntiVirus Business
Edition 2013.
9.1. Shared Settings for Stations/Groups
This dialog allows you to define shared settings for stations. The options are exactly the same as on the
station with few exceptions described in the chapters below. If you require more detailed information on other
items configuration, we recommend you to consult the AVG Internet Security User Guide available to
download from http://www.avg.com/ww-en or the context help available via the nice question mark button.
Note: You can use Default button to restore the original settings of the current dialog.
9.1.1. General control and priority levels
All setting values applicable for stations or groups can be defined as a mandatory value or as an optional value
(default setting). A value can be changed from mandatory to optional from its context menu (right mouse
button).
The individual levels of priorities are set as follows (sorted from the highest to lowest priority):
Shared settings for stations
A V G A ntiV irus Bus ines s E dition 2 0 1 3 © 2 0 1 2 C opyright A V G T ec hnologies C Z, s .r.o. A ll rights res erved.
151
Shared settings defined as mandatory in the Shared settings for stations (available through upper top
menu Tools) always have higher priority than the others. Which means, that items set as mandatory in
the mentioned settings list cannot be changed at any lower levels.
Shared settings in group
Shared settings defined as mandatory in the station groups (item Shared settings in group available
from the specific group workspace via right-clicking the context menu in the Stations branch) have
higher priority, than the particular station settings, but lower than the Shared settings for stations.
Individual station settings
Particular settings for stations are considered to have the lowest priority, which means, that all items
set as mandatory in higher levels mentioned above cannot be changed there.
Individual settings for stations can be accessed by right-clicking a station and selecting Station
settings -> Settings.
By default, mandatory items are displayed as bold and can be easily changed by right-clicking on the certain
item's lock icon and choosing from the context menu Mandatory item value.
The context menu contains also the following options:
All mandatory - sets mandatory flag to all items in the current dialog.
All monitored - resets the mandatory flag for all items in the current dialog.
By marking an item as mandatory, the user on the local station will not be able to customize such setting.
The individual levels are distinguished by icons next to each item. Generally, an item set as mandatory is
marked by the black "locked" lock icon. The icon with red lock means, that the setting is already set as
mandatory in Shared settings for stations (highest level) and the icon with blue lock indicates, that the setting
is marked as mandatory in Shared settings in group.
Note: The lock icons are not available on the stations.
A V G A ntiV irus Bus ines s E dition 2 0 1 3 © 2 0 1 2 C opyright A V G T ec hnologies C Z, s .r.o. A ll rights res erved.
152
9.1.2. Remote Administration
The Remote Administration settings available from AVG Admin Console contain some additional settings (in
comparison to station settings).
The settings include:
Synchronize configuration every - choose the automatic interval for synchronization (station will try
to synchronize every selected period - i.e. will try to find out if anything new is available and transfer
changes only).
Retrieve messages from server every - choose how often you wish the requests invoked from AVG
Admin Console to be retrieved from the server.
Delay of processing specific pending requests after station startup - choose how long should the
AVG Admin Server wait before it starts processing the pending requests for a station that just became
available.
Synchronize Firewall settings - If you do not require Firewall settings synchronization, we
recommend to switch it off to reduce the data flow and ease the network traffic.
9.1.3. Allowed Actions
Allowed actions are items, that can be enabled or disabled for usage on a station from the AVG Admin
Console. The configuration can be set either in the Shared Settings for groups/stations or individual station
settings.
A V G A ntiV irus Bus ines s E dition 2 0 1 3 © 2 0 1 2 C opyright A V G T ec hnologies C Z, s .r.o. A ll rights res erved.
153
The feature is accessible from the Remote Administration item in the main tree as Allowed actions.
By unchecking the following checkbox(es), you can forbid use of the feature for user on the station.
Change of the license number - if unchecked, it will disallow users on the station to change the
license number.
Advanced settings dialog access - if unchecked, it will disallow users on the station to open and edit
advanced settings.
Virus vault access - if unchecked, it will disallow users on the station to access the virus vault.
Restoring items from the virus vault - if unchecked, it will disallow users on the station to restore
files from the virus vault.
Deleting items from the virus vault - if unchecked, it will disallow users on the station to delete files
from the virus vault.
Send bug report - if unchecked, it will disallow users on the station to send a bug report.
Creating new exceptions - if unchecked, it will disallow users on the station to create a new
exception.
AVG user interface access - if unchecked, it will disallow users on the station to access AVG user
A V G A ntiV irus Bus ines s E dition 2 0 1 3 © 2 0 1 2 C opyright A V G T ec hnologies C Z, s .r.o. A ll rights res erved.
154
interface.
Launching an instant update - if unchecked, it will disallow users on the station to launch an instant
updating process.
Temporarily disable AVG protection - if unchecked, it will disallow users on the station to
temporarily disable AVG protection.
Clear event history - if unchecked, it will disallow users on the station to clear event history.
Terminate AVG Tray - if unchecked, it will disallow users to terminate AVG tray icon on their station
(s).
If you want to enable users to use unallowed actions after entering password, click on the Activate password
for access to unallowed actions ... and in the new dialog fill in a new password (twice for verification).
The password will be required every time the user tries to access the disallowed action.
Similarly you can enable the user on a station to change mandatory settings. To do so, check the Activate
password for modification of mandatory settings ... checkbox and fill in a new password (twice for
verification). This will allow the user to temporarily change the settings for the currently opened dialog in
Advanced settings on the station by using the Temporarily disable mandatory mode button that appears
only if this feature is active.
Note: The password must not be blank . Also, after synchronization, the settings possibly changed by the
user on the station will receive their values back .
Note: The changes will tak e effect once the stations get synchronized. For more information about the
synchronization process visit the Synchronization process chapter.
A V G A ntiV irus Bus ines s E dition 2 0 1 3 © 2 0 1 2 C opyright A V G T ec hnologies C Z, s .r.o. A ll rights res erved.
155
9.1.4. License
The License settings are available only from AVG Admin Console.
You can set the following options:
Owner name - enter a required name of the owner.
Company - enter a required company name.
License number - enter a required license number.
In the Expiration message section you can choose if expiration dialog should be displayed in case the
license has expired:
Show expiration dialog - select one of the options. If you wish to use a custom message to display,
use the last option and fill in the Custom message field accordingly.
A V G A ntiV irus Bus ines s E dition 2 0 1 3 © 2 0 1 2 C opyright A V G T ec hnologies C Z, s .r.o. A ll rights res erved.
156
9.1.5. Configuration copying
You can copy predefined Schedules configuration from the Shared settings for stations/Groups (or from
settings for a single station) to a group, multiple groups or shared settings.
In the left tree right-click on the chosen subitem under Schedules item and from the context menu choose
Copy to. A new dialog will appear:
A V G A ntiV irus Bus ines s E dition 2 0 1 3 © 2 0 1 2 C opyright A V G T ec hnologies C Z, s .r.o. A ll rights res erved.
157
From the drop-down menu select where do you wish the configuration to be copied. You can choose Shared
settings in Groups, Stations, Shared settings for application servers or Application servers.
If you select Stations option, the from group drop-down menu will become available, where you can choose
a group, from which the stations will be listed. Then select individual stations into which you wish to copy the
configuration.
A V G A ntiV irus Bus ines s E dition 2 0 1 3 © 2 0 1 2 C opyright A V G T ec hnologies C Z, s .r.o. A ll rights res erved.
158
9.1.6. Scheduled Scans
During a new scheduled scan definition, you can use either a predefined option to Scan whole computer, or
choose to Scan specific files or folders.
The second option allows you to select custom sections that you wish to scan:
Local hard drives: <Loc>
All local (fixed) drives will be scanned.
My Documents folder: <Doc>
The following location will be scanned:
C:\Documents and Settings\<current user>
Where current user represents a user logged during the scanning process.
Shared Documents: <DocAll>
The following location will be scanned:
C:\Documents and Settings\All Users
Program Files: <Prg>
A V G A ntiV irus Bus ines s E dition 2 0 1 3 © 2 0 1 2 C opyright A V G T ec hnologies C Z, s .r.o. A ll rights res erved.
159
The program files (e.g. C:\Program Files\) location will be scanned.
Windows folder: <WinDir>
The Windows folder (e.g. C:\Windows) will be scanned.
System folder: <SysDir>
The Windows system folder (e.g. c:\Windows\System32) will be scanned.
System drive: <SysDrv>
The system drive (e.g. C:\) will be scanned.
Temporary Files folder: <Temp>
The following location will be scanned:
C:\Documents and Settings\<user>\Local Settings\Temp
Where <user> represents an user profile name.
Temporary Internet Files: <Web>
The MS Internet Explorer cache directory will be scanned:
C:\Documents and Settings\<user>\Local Settings\Temporary Internet Files
Where <user> represents an user profile name.
Warning: Since all scheduled scans run under SYSTEM user account, it is currently not possible to scan
some locations properly (namely <Web>, <Temp> or <Doc>) due to Windows security policy.
9.1.7. Moving values to groups/servers
If you need to apply certain configuration only to a limited number of station groups and you do not want or
cannot set it within the Shared settings for stations (which would apply the configuration to all other inherited
groups), you can use the following option instead.
Open the Shared settings for stations and choose a configuration dialog with the value(s) you wish to move:
A V G A ntiV irus Bus ines s E dition 2 0 1 3 © 2 0 1 2 C opyright A V G T ec hnologies C Z, s .r.o. A ll rights res erved.
160
In order to move a predefined value to all other group settings, right-click on the chosen checkbox and from
the context menu select Move value to groups. You should see a changed lock icon next to the chosen
configuration item:
To transfer the chosen setting to other group settings click OK or Apply button.
Please note: If you change the value of the setting or amend its status before you click OK or Apply button,
the changes will be lost and the configuration will not be copied.
Analogically you can process the Shared settings for application servers and move selected configuration
to all servers. The context menu item is named Move value to servers.
There is also possibility to move the value from a group settings to the Shared settings for stations:
A V G A ntiV irus Bus ines s E dition 2 0 1 3 © 2 0 1 2 C opyright A V G T ec hnologies C Z, s .r.o. A ll rights res erved.
161
In order to move a configuration from a group to the Shared settings for stations, you can right-click on the
chosen checkbox and from the context menu select Move value to Shared settings. You should see a
changed lock icon next to the chosen configuration item:
By clicking OK or Apply button, the value will be moved to the Shared settings for stations and set as
mandatory. In any other group it will be set as monitored. This can be used to easily remove the mandatory
flag from all the groups at once.
You can similarly process the individual server settings within the application servers and move the selected
configuration to the Shared settings for application servers. The context menu item is named Move value
to the Shared settings.
9.1.8. Anti-Spam
If you deploy UpdateProxy role (during the AVG Admin Server Deployment Wizard), you can choose to
download Anti-Spam updates directly from Mailshell servers and then use AVG Admin server to distribute
them among your stations.
The downloading of Anti-Spam updates can be switched off/on from the AVG Admin Server settings dialog,
UpdateProxy tab.
The Anti-Spam updates can be also changed manually from the Shared settings. To do so, navigate to the
AVG Admin Console, upper menu Tools/Shared settings for stations item. Then select Anti-Spam/Expert
Settings/Internet connection.
In the Proxy server dialog insert your AVG Admin Server address including port number (default value is
A V G A ntiV irus Bus ines s E dition 2 0 1 3 © 2 0 1 2 C opyright A V G T ec hnologies C Z, s .r.o. A ll rights res erved.
162
4158).
If your AVG Admin Server uses username and password, open also the Proxy authentication dialog and
input the correct username and password.
A V G A ntiV irus Bus ines s E dition 2 0 1 3 © 2 0 1 2 C opyright A V G T ec hnologies C Z, s .r.o. A ll rights res erved.
163
Note: You can analogically update these settings manually for Shared settings for group or for individual
stations as well if needed.
A V G A ntiV irus Bus ines s E dition 2 0 1 3 © 2 0 1 2 C opyright A V G T ec hnologies C Z, s .r.o. A ll rights res erved.
164
9.2. Shared Settings for Application Servers
This dialog allows you to define shared settings for application servers. Most of the options are exactly the
same as on the station with few exceptions described in the chapters below. If you require more detailed
information on configuration of other items, we recommend you to consult the AVG Email Server Edition User
Guide available to download from http://www.avg.com/ww-en or the context help available via the nice question
mark button.
Note: You can use Default button to restore the original settings of the current dialog.
9.2.1. Overview
Basic overview of the individual server components:
Anti-Spam Server for MS Exchange
Checks all incoming email messages and marks unwanted emails as SPAM. It uses several analyzing
methods to process each email message, offering maximum possible protection against unwanted
email messages.
Email Scanner for MS Exchange (routing Transport Agent)
Checks all incoming, outgoing and internal email messages going through the MS Exchange HUB role.
A V G A ntiV irus Bus ines s E dition 2 0 1 3 © 2 0 1 2 C opyright A V G T ec hnologies C Z, s .r.o. A ll rights res erved.
165
Available for MS Exchange 2007/2010 and can be installed for HUB role only.
Email Scanner for MS Exchange (SMTP Transport Agent)
Checks all email messages coming through the MS Exchange SMTP interface.
Available for MS Exchange 2007/2010 only and can be installed for both EDGE and HUB roles.
Email Scanner for MS Exchange (VSAPI)
Checks all email messages stored in user mailboxes. If any viruses are detected, they are moved to
the Virus Vault, or completely removed.
Document Scanner for MS SharePoint
Scans documents during download to/from the Sharepoint server. If any viruses are detected, they are
moved to the Virus Vault, or completely removed.
9.2.2. Anti-Spam Server for MS Exchange
Options available for Anti-Spam Server for MS Exchange are exactly the same as on the station (although
the predefined default settings are different). Should you require more information about individual options,
please consult the AVG Internet Security or E-Mail Server User Guide available to download from http://www.
avg.com/ww-en or the context help.
9.2.3. E-mail Scanner for MS Exchange (routing TA)
This item contains settings of the Email Scanner for MS Exchange (routing transport agent).
A V G A ntiV irus Bus ines s E dition 2 0 1 3 © 2 0 1 2 C opyright A V G T ec hnologies C Z, s .r.o. A ll rights res erved.
166
The Basic Settings section contains the following options:
Enable component - uncheck to disable the whole component.
Language - select preferred component language.
Certify messages - check this if you wish to add a certification note to all scanned messages. You can
customize the message in the next field.
The Scanning properties section:
Use Heuristics - check this box to enable heuristic analysis method during scanning.
Report Potentially Unwanted Programs and Spyware threats - check this option to report the
presence of potentially unwanted programs and spyware.
Report enhanced set of Potentially Unwanted Programs - check to detect extended package of
spyware: programs that are perfectly ok and harmless when acquired from the manufacturer directly,
but can be misused for malicious purposes later, or programs that always harmless but might be
unwanted (various toolbars etc.). This is an additional measure that increases your computer security
and comfort even more, however it can possibly block legal programs, and is therefore switched off by
default. Note: This detection feature is additional to the previous option, so if you want protection from
the basic types of spyware, always keep the previous box checked.
Scan inside archives - check this option to let the scanner look also inside archived files (zip, rar,
etc.)
The Email attachments reporting section allows you to choose which items should be reported during
scanning. If checked, each email with such an item will contain [INFORMATION] tag in the message subject.
This is the default configuration which can be easily amended in the Detection actions section, part
Information (see below).
The following options are available:
Report password protected archives
Report password protected documents
Report files containing macro
Report hidden extensions
There are also these sub-items available in the following tree structure:
Detection actions
Mail filtering
9.2.4. E-mail Scanner for MS Exchange (SMTP TA)
The configuration for the Email Scanner for MS Exchange (SMTP Transport Agent) is exactly the same as
in the case of routing transport agent. For more information please see the Email Scanner for MS Exchange
(routing TA) chapter above.
A V G A ntiV irus Bus ines s E dition 2 0 1 3 © 2 0 1 2 C opyright A V G T ec hnologies C Z, s .r.o. A ll rights res erved.
167
There are also these sub-items available in the following tree structure:
Detection actions
Mail filtering
9.2.5. E-mail Scanner for MS Exchange (VSAPI)
This item contains settings of the Email Scanner for MS Exchange (VSAPI).
The Basic Settings section contains the following options:
Enable component - uncheck to disable the whole component.
Language - select preferred component language.
The Scan settings section:
Background Scan – you can enable or disable the background scanning process here. Background
scanning is one of the features of the VSAPI 2.0/2.5 application interface. It provides threaded scanning
of the Exchange Messaging Databases. Whenever an item that has not been scanned with the latest
AVG virus base update is encountered in the users’ mailbox folders, it is submitted to AVG for
Exchange Server to be scanned. Scanning and searching for the not examined objects runs in parallel.
A specific low priority thread is used for each database, which guarantees other tasks (e.g. email
messages storage in the Microsoft Exchange database) are always carried out preferentially.
Proactive Scan (incoming messages)
A V G A ntiV irus Bus ines s E dition 2 0 1 3 © 2 0 1 2 C opyright A V G T ec hnologies C Z, s .r.o. A ll rights res erved.
168
You can enable or disable the proactive scanning function of VSAPI 2.0/2.5 here. This scanning occurs
when an item is delivered to a folder, but a request has not been made by a client.
As soon as messages are submitted to the Exchange store, they enter the global scanning queue as
low priority (maximum of 30 items). They are scanned on the first in, first out (FIFO) basis. If an item is
accessed while still in the queue, it is changed to high priority.
Note: Overflow messages will continue to the store unscanned.
Note: Even if you disable both Background Scan and Proactive Scan options, the on access scanner will
be still active when an user will try to download a message with the MS Outlook client.
Scan RTF - you can specify here, whether the RTF file type should be scanned or not.
Number of Scanning Threads - the scanning process is threaded by default to increase the overall
scanning performance by a certain level of parallelism. You can change the threads count here.
The default number of threads is computed as 2 times the ‘number_of_processors’ + 1.
The minimum number of threads is computed as ('number of processors'+1) divided by 2.
The maximum number of threads is computed as 'Number of Processors' multiplied by 5 + 1.
If the value is set to lower than the minimum value or to greater than the maximum value, the default
value is used.
Scan Timeout - the maximum continuous interval (in seconds) for one thread to access the message
that is being scanned (the default value is 180 seconds).
The Scanning properties section:
Use Heuristics - check this box to enable heuristic analysis method during scanning.
Report Potentially Unwanted Programs and Spyware threats - check this option to report the
presence of potentially unwanted programs and spyware.
Report enhanced set of Potentially Unwanted Programs - check to detect extended package of
spyware: programs that are perfectly ok and harmless when acquired from the manufacturer directly,
but can be misused for malicious purposes later, or programs that always harmless but might be
unwanted (various toolbars etc.). This is an additional measure that increases your computer security
and comfort even more, however it can possibly block legal programs, and is therefore switched off by
default. Note: This detection feature is additional to the previous option, so if you want protection from
the basic types of spyware, always keep the previous box checked.
Scan inside archives - check this option to let the scanner look also inside archived files (zip, rar,
etc.)
The Email attachments reporting section allows you to choose which items should be reported during
scanning. The default configuration can be easily amended in the Detection actions section, part
Information (see below).
The following options are available:
Report password protected archives
A V G A ntiV irus Bus ines s E dition 2 0 1 3 © 2 0 1 2 C opyright A V G T ec hnologies C Z, s .r.o. A ll rights res erved.
169
Report password protected documents
Report files containing macro
Report hidden extensions
There are also these sub-items available in the following tree structure:
Detection actions
Mail filtering
9.2.6. Document Scanner for MS SharePoint
This item contains settings of the Document Scanner for MS SharePoint.
The Scanning properties section:
Use Heuristics - check this box to enable heuristic analysis method during scanning.
Report Potentially Unwanted Programs and Spyware threats - check this option to report the
presence of potentially unwanted programs and spyware.
Report enhanced set of Potentially Unwanted Programs - check to detect extended package of
spyware: programs that are perfectly ok and harmless when acquired from the manufacturer directly,
but can be misused for malicious purposes later, or programs that always harmless but might be
unwanted (various toolbars etc.). This is an additional measure that increases your computer security
and comfort even more, however it can possibly block legal programs, and is therefore switched off by
A V G A ntiV irus Bus ines s E dition 2 0 1 3 © 2 0 1 2 C opyright A V G T ec hnologies C Z, s .r.o. A ll rights res erved.
170
default. Note: This detection feature is additional to the previous option, so if you want protection from
the basic types of spyware, always keep the previous box checked.
Scan inside archives - check this option to let the scanner look also inside archived files (zip, rar,
etc.)
The Reporting section allows you to choose which items should be reported during scanning. The reports
have Information severity. The default action can be easily amended in the Detection actions section, part
Information (see below).
The following options are available:
Report password protected archives
Report password protected documents
Report files containing macro
Report hidden extensions
There is also the following sub-item available in the tree structure:
Detection actions
9.2.7. Detection Actions
In the Detection actions sub-item you can choose automatic actions that should take place during the
scanning process.
A V G A ntiV irus Bus ines s E dition 2 0 1 3 © 2 0 1 2 C opyright A V G T ec hnologies C Z, s .r.o. A ll rights res erved.
171
The actions are available for the following items:
High severity detections - dangerous items, that should be removed.
Medium severity detections - items, that can be dangerous, but you can determine if to remove them
or keep them.
Information severity detections - items solely informative.
Use the roll-down menu to choose an action for each item:
None - no action will be taken.
Move to Vault - the given threat will be moved to Virus Vault.
Remove - the given threat will be removed.
To select a custom subject text for messages that contain the given item/threat, check the Mark subject
with... box and fill-in a preferred value.
Note: The last mentioned feature is not available for Email Scanner for MS Exchange VSAPI and Document
Scanner for MS Sharepoint settings.
9.2.8. Mail Filtering
In the Mail Filtering sub-item you can choose which attachments should be automatically removed, if any.
The following options are available:
A V G A ntiV irus Bus ines s E dition 2 0 1 3 © 2 0 1 2 C opyright A V G T ec hnologies C Z, s .r.o. A ll rights res erved.
172
Remove attachments - check this box to enable the feature.
Remove all executable files - removes all executables.
Remove all documents - removes all document files.
Remove files with these comma separated extensions - fill the box with file extensions you wish to
automatically remove. Separate the extensions with comma.
Move filtered attachments into virus vault - check if you don't want the filtered attachments to be
removed completely. With this box checked, all attachments chosen in this dialog will be automatically
moved into the Virus Vault quarantine environment. It is a safe place to store potentially malicious files
- such files can be viewed and examined without posing any threat.
9.3. AVG Admin Server Settings
The AVG Admin Server Monitor is a part of the AVG Admin Server installation. The AVG Admin Server
Monitor displays an icon on the system tray, and the icon’s color indicates the AVG Admin Server status.
Double click on the icon to open the AVG Admin Server Monitor dialog with basic information on the server
activities.
If there is no icon available, you can start the AVG Admin Server Monitor from the Windows start menu All
programs/AVG Remote Administration by selecting AVG Admin Server Monitor.
The AVG Admin Server Monitor dialog contains the following control buttons:
Stop server – allows you to stop the AVG Admin Server.
Pause server – allows you to pause the AVG Admin Server, and continue its running.
Restart server – allows you to restart the AVG Admin Server.
Server settings – allows you to set up the AVG Admin Server configuration.
A V G A ntiV irus Bus ines s E dition 2 0 1 3 © 2 0 1 2 C opyright A V G T ec hnologies C Z, s .r.o. A ll rights res erved.
173
If you prefer not to automatically launch the AVG Admin Server Monitor at Windows system startup, you
can uncheck the checkbox Run AVG Admin Server Monitor at startup (not recommended).
9.3.1. General tab
This tab offers the following options:
License section
Click the Change button to insert a new license number and/or your personal/company details.
This license number must correspond to the network license, i.e. the remote administration support
must be active.
Connection section
Here you can change the port number and local address.
o
Port - the default port value is 4158. You can reset the default value any time by pressing the
Set default port button.
o
Local address - specify the local address for incoming connections. The default value is empty,
meaning any local address. If the specified name resolves to more than one address, then the
first available one is used (the server tries all of them).
A V G A ntiV irus Bus ines s E dition 2 0 1 3 © 2 0 1 2 C opyright A V G T ec hnologies C Z, s .r.o. A ll rights res erved.
174
o
Use IPv4/IPv6 - specify which version of the internet protocol you prefer to use during connection
(the default setting is to prefer IPv4 over IPv6).
Server access section
In this section you should fill in a chosen username and password for access to the AVG DataCenter.
The values are optional, but we recommend setting them up to increase security.
Note: This username and password apply for connecting stations to the AVG DataCenter. In other
words, these values must be correctly filled when connecting stations to the AVG DataCenter (either
via the AVG Network Installer Wizard or manually).
Miscellaneous section
Tick the Send server dumps automatically to analysis checkbox in order to send potential AVG
Admin Server crash dumps directly to our technical support for further analysis.
9.3.2. DataCenter tab
This tab offers the following options:
Database system settings section contains database options. To change the database system, choose a
different one from the drop down list.
A V G A ntiV irus Bus ines s E dition 2 0 1 3 © 2 0 1 2 C opyright A V G T ec hnologies C Z, s .r.o. A ll rights res erved.
175
Firebird
This database engine is appropriate for smaller networks with up to 150 stations. The database is a
standard part of AVG AntiVirus Business Edition 2013 installation.
To change location of the database file, you can change the path in the Database file field.
MS SQL Server Express
A reduced version of the Microsoft SQL Server, it can serve up to 1000 stations. The product is not a
standard part of AVG AntiVirus Business Edition 2013. Its usage is not limited by any commercial
license.
To change the database name insert a custom value into the Database name field.
MS SQL Server
This engine can serve over 1000 stations in large networks. It is not a standard part of AVG AntiVirus
Business Edition 2013 and its usage is bound to the Microsoft SQL Server license.
To change the database name insert a custom value into the Database name field.
Oracle
This engine can serve over 1000 stations in large networks. It is not a standard part of AVG AntiVirus
Business Edition 2013 and its usage is bound to a commercial license.
MySQL
This engine can serve over 1000 stations in large networks. It is not a standard part of AVG AntiVirus
Business Edition 2013 and a commercial license may be needed for use in a commercial environment.
The Database access section allows you to change the following parameters (not available for all database
engines):
Username - a database username chosen for the database creation during the AVG Admin
Deployment Wizard.
Password - a database password chosen for the database creation during the AVG Admin Deployment
Wizard.
Computer name - type in the computer name with the database.
Instance – refers to a particular SQL Server/Oracle installation, if there is more than one instance
installed on the station.
The DataCenter settings section contains the following option:
Perform regular database backups - if checked, the AVG Admin Server will automatically create the
database backup. You can choose when to do the backups and how often.
The backup files are stored in the following location:
A V G A ntiV irus Bus ines s E dition 2 0 1 3 © 2 0 1 2 C opyright A V G T ec hnologies C Z, s .r.o. A ll rights res erved.
176
C:\Documents and settings\All users\Application Data\AVG2013\Admin Server Data\DatabaseBackup
The folders are named in the format YEAR-MM-DD TIME for easier differentiation.
9.3.3. UpdateProxy tab
This tab offers the following options:
Update files folder - fill in a complete pathname (e.g. c:\AVGUpdate) to the directory, where the
downloaded update files will be stored.
Download source section (with two separate tabs for stations with AVG 2013 and older AVG 2012)
Contains list of available update servers sorted according to priority. The server on the top will be used
first. Possible options are as follows:
Add - will open a dialog for adding a new update server.
Edit - will allow you to edit the selected entry.
Delete - will delete the selected entry.
Default - will restore the original update server settings.
A V G A ntiV irus Bus ines s E dition 2 0 1 3 © 2 0 1 2 C opyright A V G T ec hnologies C Z, s .r.o. A ll rights res erved.
177
Move up - allows you to increase the priority of a server.
Move down - allows you to decrease the priority of server.
You can also check or uncheck certain entries. The AVG Admin Server will consider only checked
entries.
Download Anti-Spam updates - If you do not wish to download Anti-Spam updates, uncheck this
option.
Note: Anti-Spam updates are downloaded directly from the Mailshell servers.
Additional information about the Anti-Spam updates can be found in the Configuration/Shared
Settings for Stations/Groups/Anti-Spam chapter.
Internet connection
If you require a proxy server in your network, you can fill in the details here. Check the Use proxy
server checkbox and enter your proxy server Address and Port number.
If the server requires login for successful connection, check the Authentication checkbox and fill in the
username and password.
A V G A ntiV irus Bus ines s E dition 2 0 1 3 © 2 0 1 2 C opyright A V G T ec hnologies C Z, s .r.o. A ll rights res erved.
178
9.3.4. E-mail tab
This tab offers the following options:
To be able to send Graphic reports by email or receive notifications, you need to configure this tab first.
Note: The crucial fields to be filled are located in the Server for sending emails (SMTP) section (see
below). You will be allowed to select other fields (To/Subject/Body) also during the Report Schedule Definition
Wizard, but all values you will enter here will be considered as default.
The Message header section contains these fields:
To - specify one or more email addresses that the report(s) will be sent to. Separate individual items by
a comma. This field can also be filled during Report Schedule definition.
Copy - An optional value. Specify one or more email addresses that the report(s) will be sent to.
Separate individual items by a comma.
Blind copy - An optional value. Specify one or more email addresses that the report(s) will be sent to
as a blind copy (no other recipients will see these addresses). Separate individual items by a comma.
From - An optional value. Specify the sender's email address and/or sender's name and email address
in angle brackets <[email protected]>
Reply to - An optional value. Specify a reply email address.
A V G A ntiV irus Bus ines s E dition 2 0 1 3 © 2 0 1 2 C opyright A V G T ec hnologies C Z, s .r.o. A ll rights res erved.
179
Subject - enter some text to recognize the reports.
The Server for sending emails (SMTP) section contains these customizable fields:
SMTP server - insert your SMTP server address (can be an IP address or a domain name).
SMTP port - specify the SMTP server port number. Default value is 25.
If your SMTP server requires authentication for sending emails, enter the login details below:
SMTP Login - specify username.
SMTP Password - specify password.
To verify the email properties you can optionally use the Send test email button to send a test message to
the predefined email recipient(s) via the entered SMTP server.
Confirm all changes of the server configuration by the OK button. However, the changes are applied after the
server launches again with the new configuration. If the AVG Admin Server is running, a dialog will prompt
you to restart the server (note that the server will be inaccessible for some time during the restart).
9.4. Connection String
Stations are connected to the AVG DataCenter via a so called connection string. This string consists of
your AVG Admin Server address and a port number. For example:
localhost:4158
To connect a station to the AVG DataCenter (and manage it via the AVG Admin Console), the Remote
Administration component has to be installed on your station(s). During installation of this component, you
will be asked for the connection string to the AVG DataCenter. Once the station is connected to the AVG
DataCenter, you will be able to manage the station from the AVG Admin Console. The connection string can
be changed later on in the AVG User Interface (menu Tools/Advanced Settings) on the station.
To connect to an AVG DataCenter from the AVG Admin Console, follow these steps:
1.
In the AVG Admin Console click on the upper menu DataCenter and select the Connect to AVG
DataCenter item.
2.
Enter a new server address and port number, alternatively also a username and password, if required.
3.
Confirm your choice by clicking the OK button.
9.5. Proxy Server
This chapter describes internet proxy server related issues.
Generally, the proxy server term refers to a server, typically on a private network that allows access to
external network resources.
Within the AVG AntiVirus Business Edition 2013, you have basically two options for proxy server usage:
A V G A ntiV irus Bus ines s E dition 2 0 1 3 © 2 0 1 2 C opyright A V G T ec hnologies C Z, s .r.o. A ll rights res erved.
180
1.
Use your own proxy server to connect to the AVG update servers. In this case, you need to define the
proxy server settings for all your stations. To do so, follow these steps:
In the AVG Admin Console select the Shared settings for stations item from the upper menu
Tools.
Navigate to Update and select the Proxy item.
In the right part of the dialog select Use proxy and define Manual or Auto configuration,
depending on your network settings.
Click OK to confirm the changes.
Wait until all stations have been synchronized. (Default synchronization period is 60 minutes.)
Alternatively, you can force immediate synchronization of all stations: Right-click on the Stations node and
from the context menu select Synchronize settings.
2.
Deploy the UpdateProxy role of the AVG Admin Server to work as a mediator (i.e. a proxy server)
between the official AVG update servers and your stations. It downloads all necessary update files
requested by AVG stations connected to your DataCenter. By using this, you will preserve bandwidth.
You can also optionally deploy more than one UpdateProxy server and split the load among two or
more servers (depending on your network size).
To deploy the UpdateProxy role to your AVG Admin Server, simply select from the Windows Start
menu/All programs/AVG 2013 Remote Administration/AVG Admin Server Deployment Wizard
item and in the second step of the wizard tick the checkbox UpdateProxy role and complete the rest
of the steps.
Additionally, if you need to set your internet proxy server to allow the AVG Admin Server to download update
files from AVG update servers, follow these steps:
Open AVG Admin Server settings from the Tools menu in the AVG Admin Console.
Navigate to the UpdateProxy tab and in the Internet Connection section check the Use proxy server
option. Fill in your proxy server details and press OK to confirm your choice.
9.6. AVG Admin Console
9.6.1. Context Menu
If you right-click on the Stations item in the left tree a new context menu will appear with the following
options:
New group - allows you to create a new group (more information on groups can be found in the Station
groups chapter).
Synchronize settings - will ask for immediate synchronization of settings with stations.
Ask to perform program update - will ask all stations to start the program update process.
A V G A ntiV irus Bus ines s E dition 2 0 1 3 © 2 0 1 2 C opyright A V G T ec hnologies C Z, s .r.o. A ll rights res erved.
181
Ask to perform virus database update - will ask all stations to start the virus database update
process.
Ask to rollback last antivirus database update - will ask all stations to use the previous virus
database version and disregard the last one.
Delete temporary update files - sends request to all stations to remove temporary update files.
Ask for scan results - will ask all stations for scan results.
Generate new report - starts the Graphic reports generation dialog.
If you right-click on the New Stations item in the left tree or any existing group a new context menu will
appear with the following options:
New group - allows you to create a new group (more information on groups can be found in the Station
groups chapter).
Edit group - allows you to change the group name and description (does not apply for the New
stations group).
Delete group - allows you to delete the selected group (does not apply for the New stations group).
Access control for group
If you are using the Full access control feature (DataCenter upper main menu of the AVG Admin
Console, DataCenter settings menu item) and have at least one user account created, you can use
this feature to set access rights to the selected group of stations.
Double-click on one of accounts' names to trigger a roll-down menu (or right-click on it to trigger the
context menu with same contents). From there, you can choose the permission type:
o
Full access - the chosen user account will have the full access to the group.
o
Read only - the chosen user account will be only able to view the group.
o
No access - the chosen user account will have no access to the group at all.
Group setting
o
Shared settings for group - opens shared settings for group.
o
Shared firewall settings for group - opens shared Firewall settings for group.
o
Synchronize settings - will ask for immediate synchronization of settings with stations.
o
Copy settings to... - triggers a new dialog:
A V G A ntiV irus Bus ines s E dition 2 0 1 3 © 2 0 1 2 C opyright A V G T ec hnologies C Z, s .r.o. A ll rights res erved.
182
Use this dialog to copy group settings between groups, stations and/or application servers. You can
select objects you want to copy the configuration to by choosing a group from the roll down menu, and/
or selecting separate group or station by checking the checkbox near its name. When you're done,
click OK button to confirm your choice.
o
Import settings... - allows you to load settings from the configuration file of your choice and
apply them to a selected group of stations. This file (in .pck format) may or may not include
Firewall settings (depending on the station or a group of station previously used for its creation).
For more info on creation of configuration files, see the description of Export settings... item
below.
o
Export settings... - allows you to save settings (including Firewall settings, if Firewall is present
on at least one of the stations) for the selected group of stations to a single configuration file (in .
pck format). You will be asked to specify where you wish this file to be stored. Settings from the
configuration file can be applied to any station or a group of stations (via above-mentioned Import
settings... item).
Tasks related to Update
o
Ask to perform program update - will ask all stations to start the program update process.
o
Ask to perform virus database update - will ask all stations to start the virus database update
process.
o
Ask to rollback last antivirus database update - will ask the selected station to use previous
virus database version and disregard the last one.
o
Delete temporary update files - sends request to all new stations to remove temporary update
files.
Ask for scan results - will ask all stations for scan results.
Generate new report - starts the Graphic reports generation dialog.
A V G A ntiV irus Bus ines s E dition 2 0 1 3 © 2 0 1 2 C opyright A V G T ec hnologies C Z, s .r.o. A ll rights res erved.
183
Other right-click context menu controls are available when used in the current view section (right-clicking on a
station):
Station overview - will launch a station overview dialog that contains well arranged detailed information
related to such station. The dialog offer the following working buttons:
Settings - opens station settings.
Firewall Settings - displays Firewall settings of the currents station. Available only if there is the
Firewall component installed.
Export - allows you to export the information into a .csv file.
Close - closes the dialog.
Station settings:
o
Settings - opens station settings.
o
Firewall settings - displays Firewall settings of the currents station. Available only if there is the
Firewall component installed.
o
Synchronize settings - will ask for immediate synchronization of stations' settings with the AVG
DataCenter.
o
Refresh components state - will refresh the state of all components.
o
Copy settings to... - triggers a new dialog:
Use this dialog to copy application server settings between groups, stations and/or application servers.
You can select objects you want to copy the configuration to by choosing a group from the roll down
menu, and/or selecting separate group or station by checking the checkbox near its name. When
you're done, click OK button to confirm your choice.
A V G A ntiV irus Bus ines s E dition 2 0 1 3 © 2 0 1 2 C opyright A V G T ec hnologies C Z, s .r.o. A ll rights res erved.
184
o
Import settings... - allows you to load settings from the configuration file of your choice and
apply them to a selected application server. This file (in .pck format) may or may not include
Firewall settings (depending on the station or a group of station previously used for its creation).
For more info on creation of configuration files, see the description of Export settings... item
below.
o
Export settings... - allows you to save settings (including Firewall settings, if Firewall is present
on at least one of the stations) for the selected application server to a single configuration file (in
.pck format). You will be asked to specify where you wish this file to be stored. Settings from
the configuration file can be applied to any station, application server or a group of stations (via
above-mentioned Import settings... item).
o
Station description
Simply enter brief description of the selected station into this dialog's text box and press OK.
o
Ask station for its description - will ask the selected station for its description. If available, the
description will be displayed in the Description column.
o
Station shutdown or restart
This dialog lets you shutdown or restart the selected station. Choose the action from the first roll-down
menu, then the delay from the second one.
Tasks related to Scan:
o
Ask for scan results - will ask the selected station for scan results.
o
Show the infected scan results - will show only test results with infections of the selected
A V G A ntiV irus Bus ines s E dition 2 0 1 3 © 2 0 1 2 C opyright A V G T ec hnologies C Z, s .r.o. A ll rights res erved.
185
station.
o
Show Virus vault - will show the Virus vault content of the selected station.
Use the Refresh button to obtain the most current Virus Vault findings. To work with individual threats,
use one of the following buttons:
Restore - select a threat or threats you wish to restore on the station and click this button.
Delete - use this button to delete the selected threat(s).
o
Manage scans - in order to view and manage scans using this function, the station in question
must be running and connected to the Datacenter. You have the following control options:
Refresh - obtains the most recent information about scans from the station.
A V G A ntiV irus Bus ines s E dition 2 0 1 3 © 2 0 1 2 C opyright A V G T ec hnologies C Z, s .r.o. A ll rights res erved.
186
Start - starts the selected scans on the remote station.
Resume - resumes the selected scans on the remote station.
Pause - pauses the selected scans on the remote station.
Stop - stops the selected scans on the remote station.
To close the window, use the Close button.
o
Launch scan on the selected stations
A new dialog will appear. Choose from the roll-down menu, whether you want to Scan whole computer,
launch a Scheduled scan, or Anti-Rootkit scan. then press OK to send your request to the selected
station.
Tasks related to Update:
o
Ask to perform program update - will ask the selected station to start the program update
process.
o
Ask to perform virus database update - will ask the selected station to start the virus database
update process.
o
Ask to rollback last antivirus database update - will ask the selected station to use previous
virus database version and disregard the last one.
o
Delete temporary update files - sends request to selected station(s) to remove temporary
update files.
Station statistics:
o
Show Firewall log - will show the Firewall communication log from the selected station.
o
Show events of the selected station - will show events related to the chosen station.
o
Show Event history log - will show Event history log of the chosen station.
o
Show Email Scanner and Anti-Spam components statistics - opens statistics for Email
Scanner and Anti-Spam components.
o
Gather diagnostic data - asks the selected station for diagnostic data which you can either
send directly to the AVG Technical support or save locally for further processing:
A V G A ntiV irus Bus ines s E dition 2 0 1 3 © 2 0 1 2 C opyright A V G T ec hnologies C Z, s .r.o. A ll rights res erved.
187
Click the Next button to start downloading the diagnostic data. It may take a while to download all the
necessary data, so please be patient. Once finished, you will experience the following dialog:
Use Save button to store the data on your hard drive for later use (i.e. sending by email). Click Send for
sending the contents directly:
A V G A ntiV irus Bus ines s E dition 2 0 1 3 © 2 0 1 2 C opyright A V G T ec hnologies C Z, s .r.o. A ll rights res erved.
188
Fill in your email address and briefly describe your problem with the station to the next field. If you need
to enclose some additional files (e.g. a screenshot or some logs previously requested by AVG
Technical support), use the Attach button to choose them now. To remove an unwanted attachment,
select it and use the Remove button.
If you use proxy server in your network, fill in also your proxy server details by opening the Proxy
settings dialog.
To complete the process click the Send button.
o
Generate new report - starts the Graphic reports generation dialog.
Add to group - will add the selected station to a group.
Remove from group - will remove the selected station from an user-created group.
Delete station - will delete the station from the AVG DataCenter.
Check stations availability
This dialog allows you to find out, which stations are available (online) and which are not (offline). You
will see each station's state in the column to the right of its name. To check availability again, press
the Check again button, or double-click the station's name.
9.6.2. Station Groups
The administrator can define station groups as the need arises. All objects included in the group then take the
configuration set up for this group.
This way the administrator can define the group configuration, and change the configuration previously set for
a specific station by simply assigning the station into a group. Station assignments into groups make
administration much easier, and should be used if the number of stations exceeds the number of records for
one screen (i.e. approximately 20-25 objects).
The procedure of creation and administration of station groups is the same in both cases. The following text
describes the respective procedure for stations:
A V G A ntiV irus Bus ines s E dition 2 0 1 3 © 2 0 1 2 C opyright A V G T ec hnologies C Z, s .r.o. A ll rights res erved.
189
Create a new group
To create a new group, follow these steps:
o
In the navigation tree right-click on the Stations group.
o
From the context menu select the New group item, and specify its name
o
Press the Enter button to confirm the creation of the group
Immediately after creating the group, a new shared settings object is created in the AVG DataCenter
that can be further edited. All members of the new group then automatically share this object’s
configuration.
Delete a Group
The Delete group procedure is analogical to the group creating:
o
Click the right mouse button over the name of the group that you want to delete
o
From the newly-opened context menu select the Delete group item
Using the same context menu you can also rename groups (through the Edit group item).
Moving stations between groups
You can quickly move one or multiple stations between individual groups. To do so, select one or more
stations, click left mouse button and while holding it, drag the cursor to the target group and release to
complete.
Stations can be assigned into a station group also using the context menu Add to group item. You
can highlight and assign more stations at once.
The New stations group is a specific system group that cannot be deleted. Stations newly connected to the
AVG DataCenter are automatically assigned to this group, unless you choose to assign them to a different
group during remote installation. All stations are visible in the top Stations group.
9.7. Sidebar/Desktop Gadgets
You can optionally choose to include a sidebar/desktop gadget with information related to AVG Remote
Administration.
Note: The Windows Desk top Gadgets (also called Windows Sidebar in Windows Vista) are available for
Windows Vista and Windows 7 operating systems and basically it displays a sidebar anchored to the side of
the desk top. These gadgets can perform various task s, such as displaying a statistical information, showing
login screens etc.
In order to include the Windows sidebar/desktop gadget for AVG Remote Administration in your Windows,
you need to have it installed first - i.e. to check the checkbox (default option) in the setup dialog (see
Installation Type chapter for more information).
To enable it, simply navigate to the Gadgets section of your Windows (usually right-click on the desktop and
A V G A ntiV irus Bus ines s E dition 2 0 1 3 © 2 0 1 2 C opyright A V G T ec hnologies C Z, s .r.o. A ll rights res erved.
190
from the context menu select Gadgets item). From the screen select AVG Remote Administration gadget
(AVG logo) and drag it to your desktop where convenient.
A floating window similar to this one should appear on your desktop:
Clicking the Non-Compliant stations link will open a browser window with the list of stations in that state.
Clicking the Options icon ( ) opens a login screen for AVG DataCenter:
Use the form to quickly connect to a different DataCenter and display adequate results within the gadget.
A V G A ntiV irus Bus ines s E dition 2 0 1 3 © 2 0 1 2 C opyright A V G T ec hnologies C Z, s .r.o. A ll rights res erved.
191
10. How to...
This chapter describes how to do selected tasks in AVG AntiVirus Business Edition 2013. Currently covered
topics:
How to connect stations to AVG DataCenter
How to migrate stations from/to different Datacenter
How to synchronize stations
How to solve update related issues
How to change user interface language
How to use Microsoft SQL Server database system
How to Control station users actions
Requests handling and status messages
How to manage access rights
How to maintain the DataCenter database
List of AVG Setup Parameters
Note: If you experience any problems with the remote administration/installation/connection even after
reviewing the chapters below, please try to find the correct answer in the FAQ (Frequently Ask ed Questions)
located at ht t p://w w w .a v g.c om /w w -e n.
10.1. How to Connect Stations to AVG Datacenter
You have basically two options for connecting stations to your AVG DataCenter:
AVG Network Installer Wizard
Manual connection
10.1.1. Connecting Stations Manually
Directly, you can install AVG manually on every single station/server in the network, and then connect them
(manually) to the AVG AntiVirus Business Edition 2013. This option can be used for all Windows platforms.
To be able to successfully manage your AVG stations remotely, you must include the Remote
Administration component during the AVG installation process. Once this component is correctly installed,
you must manually specify the correct AVG DataCenter Connection String.
For more information about the Connection String see chapter Connection String.
For a detailed description of AVG installation please refer to the AVG 2013 Internet Security (or your
appropriate edition) User Manual; available for download in the downloads section of AVG website (http://
A V G A ntiV irus Bus ines s E dition 2 0 1 3 © 2 0 1 2 C opyright A V G T ec hnologies C Z, s .r.o. A ll rights res erved.
192
www.avg.com/ww-en).
Note: You can also insert the AVG DataCenter connection string directly during AVG installation on the
station.
To insert the string on the station, open the AVG User Interface and navigate to the Advanced settings (via
upper menu Options/Advanced Settings). Select Remote Administration group.
In the right part of the dialog fill in the following entries:
Server - enter your AVG DataCenter server name or IP address.
Port - enter your AVG DataCenter server port (default is 4158).
If your AVG DataCenter requires username and password for connection, also fill in these details:
Login name - enter username.
Password - enter password.
We recommend keeping Port for incoming messages with the default value.
Enter all required information and then use the Test connection button to verify the connection. If it fails,
consult the Network requirements chapter for a possible solution.
A V G A ntiV irus Bus ines s E dition 2 0 1 3 © 2 0 1 2 C opyright A V G T ec hnologies C Z, s .r.o. A ll rights res erved.
193
10.2. How to Migrate Stations from/to Different DataCenter
This chapter describes migration of stations from a different AVG DataCenter. The following two topics are
covered:
Importing Stations and Settings from AVG DataCenter 2012
Migrating Stations to another AVG DataCenter
10.2.1. Importing Stations and Settings from AVG DataCenter 2012
Although the new version of AVG AntiVirus Business Edition 2013 is backward compatible with the previous
version, you can also import AVG DataCenter 2012 stations via the AVG Admin Deployment Wizard during
creation of a new database.
Importing procedure:
1.
Prepare an export of your AVG DataCenter 2012.
To do so, open AVG Admin Console 2012 and from the menu DataCenter select Database Export.
Choose a desired folder and press OK.
Note: The target folder should be empty, since multiple files will be exported.
2.
Open the AVG Admin Deployment Wizard 2013. Choose to create a new empty DataCenter
Database and during the Data import step, select the folder into which you exported your former 2012
data.
3.
Finish the deployment process as usual.
10.2.2. Migrating Stations to another AVG DataCenter
In order to move your stations to a different AVG Datacenter you need to firstly deploy the AVG Admin
Server to a different computer (if you have not done so already).
Once you have your new AVG Datacenter ready, you need to provide a new connection string for all stations
you wish to connect to it.
To reflect the new settings of your stations, follow these steps:
1.
In the AVG Admin Console select Tools from the upper main menu and choose the Shared settings
for stations item.
2.
Select the Remote Administration.
3.
Fill in the new server address and port number. Close the dialog by clicking the OK button.
4.
Wait until all stations get synchronized. (Default synchronization period is 60 minutes.)
Alternatively, you can force immediate synchronization of all stations: In the navigation tree right-click on the
Stations node and select Synchronize settings from the context menu.
A V G A ntiV irus Bus ines s E dition 2 0 1 3 © 2 0 1 2 C opyright A V G T ec hnologies C Z, s .r.o. A ll rights res erved.
194
To verify successful migration of the stations, connect to your new AVG DataCenter:
1.
In the AVG Admin Console click on the upper menu DataCenter and select the Connect To AVG
DataCenter item.
2.
Enter the new server address and port number, alternatively also a username and password, if required.
3.
Confirm your choice by clicking the OK button.
You can also export the whole existing content of your AVG DataCenter and then import it to the newly
created one. To do so, follow these steps:
1.
To export the existing AVG DataCenter content navigate to the DataCenter/Database export upper
menu item.
2.
You will be asked to choose a destination folder. Once you confirm your choice, the export will begin.
3.
To import the data back to a new AVG DataCenter, start AVG Admin Server Deployment Wizard on
the server, where you wish to import the data back. Go through the wizard and in the Database update/
creation step select Create new empty DataCenter database.
4.
Continue to the Data import step, check the Import data into the database from folder checkbox and
fill-in the path to the recently exported/saved backup folder.
5.
Confirm your choice and finish the wizard. Upon its completion, the original data will be available in the
new AVG DataCenter.
10.3. How to Synchronize Stations
The synchronization process is described in the AVG Admin Console/Synchronization process chapter.
10.4. How to solve Update related issues
If your stations are not up-to-date, you may need to verify, that they are correctly connected to your
DataCenter and if updates can be triggered remotely. We recommend following these steps:
First try to update the stations manually to see, if the stations are responding correctly. To do so, in the AVG
Admin Console right-click on the Stations node or a particular station in stations view and from the context
menu select Tasks related to Update/Ask to perform virus database update item. Watch the status
window in the AVG Admin Console and check for error messages.
To be completely sure, that the update was successful, synchronize the settings (right-click on the Stations
node or a particular station in a stations view and from the context menu select Station settings/Refresh
component states) and then open the Versions tab in the stations view. Here you can see, if all databases
have been updated.
If the update went correctly, but after some time the stations become out-of-date again, check the following
settings:
1.
From the upper menu Tools select the Shared settings for stations item.
2.
Navigate to the Schedules and select Virus database update schedule.
A V G A ntiV irus Bus ines s E dition 2 0 1 3 © 2 0 1 2 C opyright A V G T ec hnologies C Z, s .r.o. A ll rights res erved.
195
3.
In the right part of the dialog verify, that the Enable this task checkbox is ticked and also, that the
schedule is predefined the way you require it. Click OK to close the dialog and confirm the changes.
Note: You should repeat this action also for Program update schedule.
4.
Right-click on the Stations node or a particular station in a stations view and from the context menu
select Station (group) settings/Synchronize settings.
If you received an error during the previous steps, or your stations still show non-compliant conditions as far
as the updates are concerned, try to continue with these steps:
1.
From the upper menu Tools select the Shared settings for stations item.
2.
Navigate to the Update and select URL.
3.
In the right part of the dialog verify, that the correct update addresses are entered. I.e. if you’re using
the UpdateProxy role of the AVG Admin Server, your AVG Admin Server address should be visible.
Otherwise, you should see the default AVG update servers (see below).
4.
Correct the addresses, if needed, and click OK to confirm the changes.
5.
Wait until all stations get synchronized. (Default synchronization period is 60 minutes.)
Alternatively, you can force immediate synchronization of all stations: Right-click on the Stations node and
from the context menu select Synchronize settings.
If you are not getting updates to your AVG Admin Server UpdateProxy at all and your Internet connection is
working correctly, try to check the AVG Admin Server status page first. To do so open your AVG Admin
Server IP address or domain name with the correct port number (default is 4158) in your web browser. For
example:
http://localhost:4158/
In the UpdateProxy server role section you will find the UpdateProxy status as well as download/upload
statistics.
If this seems to be incorrect or you still think that there is an error, try to deploy the UpdateProxy role of the
AVG Admin Server again. To do so, run the AVG Admin Server Deployment Wizard again - follow the steps
described in the AVG Admin Deployment Wizard chapter.
In the Configuration of update servers step, check that the update server is set correctly. Default update
servers are as follows:
Primary update server address:
http://update.avg.com/softw/13/update - for stations with AVG 2013
http://update.avg.com/softw/12/update - for stations with older AVG 2012
Backup update server address:
http://backup.avg.cz/softw/13/update - for stations with AVG 2013
A V G A ntiV irus Bus ines s E dition 2 0 1 3 © 2 0 1 2 C opyright A V G T ec hnologies C Z, s .r.o. A ll rights res erved.
196
http://backup.avg.cz/softw/12/update - for stations with older AVG 2012
Finish the Wizard by confirming all steps.
10.5. How to Change User Interface Language
During installation of AVG you have the option to choose the user interface language you prefer. If, for some
reason you need to use the application also in a different language, you can change it by following this
procedure:
When starting AVG components, it is possible to use this command line parameter to change the language of
the user interface:
Parameter
Meaning
/LNG=xxxx
If the required language version is available, it will be used. Otherwise the
application will choose the language according to the operating system
language.
The possible values are:
CZ - Czech user interface
US - English user interface
GE - German user interface
FR - French user interface
PB - Brazilian Portuguese user interface
IT - Italian user interface
ES - Spanish user interface
PL - Polish user interface
JP - Japanese user interface
KO - Korean user interface
PT - Portuguese user interface
RU - Russian user interface
TR - Turkish user interface
ZT - Traditional Chinese user interface
A V G A ntiV irus Bus ines s E dition 2 0 1 3 © 2 0 1 2 C opyright A V G T ec hnologies C Z, s .r.o. A ll rights res erved.
197
ZH - Simplified Chinese user interface
Example usage:
From the Windows Start menu choose Run and enter your requested component with path and appropriate
parameter. For example:
Note: We assume that you have installed AVG to the following destination:
C:\Program Files\AVG\AVG2013 Admin\
If not, change the paths below accordingly.
To start AVG Admin Console in German language:
"C:\Program Files\AVG\AVG2013 Admin\Console\AVGAdminConsole.exe" /lng=ge
To start AVG Network Installation Wizard in German language:
"C:\Program Files\AVG\AVG2013 Admin\Console\AVGNetworkInstaller.exe" /lng=ge
To start AVG Admin Deployment Wizard in German language:
"C:\Program Files\AVG\AVG2013 Admin\Server\AVGAdminServerWizard.exe" /lng=ge
To start AVG Admin Server Monitor in German language:
"C:\Program Files\AVG\AVG2013 Admin\Server\AVGAdminServerMonitor.exe" /lng=ge
10.6. How to use Microsoft SQL Server database system
If you wish to use Microsoft SQL Server (or Microsoft SQL Server Express) for storing DataCenter data, you
have to install it first it is not a part of AVG AntiVirus Business Edition 2013 installation and it is therefore
impossible to generate any of its parameters using the AVG Admin Deployment Wizard.
When installing SQL Server, it is vital to remember that AVG 2013 Remote Administration requires
administrator privileges to access Microsoft SQL database. Therefore, in the Database Engine
Configuration step of SQL Server installation it is necessary to choose Mixed authentication mode (NOT
preselected Windows authentication mode) and to specify the password for the SQL Server system
administrator account (or accounts).
A V G A ntiV irus Bus ines s E dition 2 0 1 3 © 2 0 1 2 C opyright A V G T ec hnologies C Z, s .r.o. A ll rights res erved.
198
This password has to be entered into the Administrator’s password field of the Microsoft SQL Server
Credentials dialog.
10.7. How to Control station users actions
This chapter shortly describes examples how an administrator can remotely control actions of AVG users on
stations.
By default, all actions within AVG user interface are allowed to be changed/interrupted by user on the local
station.
There are three main ways how to manage users' access:
Allowed actions
It is possible to disallow access to different actions on a local station by managing allowed actions - for
more information see chapter Configuration/Shared Settings for Stations/Groups/Allowed Actions.
Mandatory settings
The mandatory/monitored settings can be used for disabling/enabling various actions within the station
settings. By marking an item as mandatory, the user on the local station will not be able to customize
it.
For more information see chapter Configuration/Shared Settings for Stations/Groups/General
control and priority levels.
Scheduled scan cancellation
A V G A ntiV irus Bus ines s E dition 2 0 1 3 © 2 0 1 2 C opyright A V G T ec hnologies C Z, s .r.o. A ll rights res erved.
199
You can decide, whether you want to allow the local user to stop a running scheduled scan or not. This
can be done via Shared settings for stations/groups or in the individual station settings. To do so,
navigate to Schedules/Scheduled scan item and in the right part of the dialog tick the User can stop a
running task checkbox.
10.8. Requests handling and status messages
This chapter describes requests, their handling and processing within AVG DataCenter.
Requests sent to a single station
If a request is invoked from AVG Admin Console (e.g. request for settings synchronization, update
performing, etc.) a message appears in the Status Window and at the same time, the request is stored
within the AVG DataCenter.
Then the station is notified about the request and if it is online, it will start processing it immediately.
Information about the result is delivered back to the AVG DataCenter and instantly displayed in the
Status window. Error messages appear in red color.
In special cases two situations may happen:
The station is online but for some reason cannot accept the request (e.g. notification port is not
working correctly for some reason), the server will try to periodically delivery the request (default
interval is five minutes).
Note: This interval can be changed in Shared settings for stations/groups, Remote
Administration item, advanced settings section, Retrieve messages from server every drop
down menu.
The station is offline and will receive the request immediately after it gets online.
In case of special request that requires more time, the status window will display a message saying,
that the station has started processing the request and as soon as it finishes also the result.
Requests sent to groups/all stations
Some requests can be sent to a group or all stations (by right-clicking on a group name or on stations
item and choosing and action from the context menu).
Such request is stored in the AVG DataCenter and then distributed by AVG Admin Server to individual
stations of the chosen group. Also the result is later displayed individually for each station.
Duplicated requests
If a same request is sent multiple times to a station, it is not stored in AVG DataCenter and the station
will only process the first one.
This applies also to offline stations. In other words there is no need to send more than one request,
since the duplicated requests are disregarded.
Requests expiration
Requests, which are not processed in 30 days are deleted from the AVG DataCenter.
A V G A ntiV irus Bus ines s E dition 2 0 1 3 © 2 0 1 2 C opyright A V G T ec hnologies C Z, s .r.o. A ll rights res erved.
200
10.9. How to manage access rights
If you require more people to access AVG Admin Console and administer stations/settings on a different level,
you can create various user accounts with miscellaneous access rights.
To manage access to the AVG DataCenter via AVG Admin Console, navigate to the DataCenter upper menu
and select AVG DataCenter settings item.
At the bottom of the dialog choose Full access control option. A new dialog will appear:
A V G A ntiV irus Bus ines s E dition 2 0 1 3 © 2 0 1 2 C opyright A V G T ec hnologies C Z, s .r.o. A ll rights res erved.
201
The Account list section contains list of currently available usernames and their states. By default, there is
only one account available - administrator with a blank password. If you intend keeping this account for further
use, we strongly recommend to choose a proper password first (see below how to do this). The right-mouse
button context menu has the following options:
Active
If you right-click on an existing account name, you will be able to activate or deactivate it by this
function. Please note, that you need to have at least one account active!
New Account
Select this option to create a new user account:
A V G A ntiV irus Bus ines s E dition 2 0 1 3 © 2 0 1 2 C opyright A V G T ec hnologies C Z, s .r.o. A ll rights res erved.
202
Enter the account name and password (twice for verification).
The Associated Windows system login for SSO field can be used for entering an existing Windows
system login name. If you then logon to Windows under this username, you will also be able to login to
the AVG DataCenter without entering any password. Note, that the account name or password does
not have to be the same, as the Windows system login name.
Optionally, you can add some account description.
Edit Account
This option will allow you to edit an existing account.
Clone Account
Right-click on an existing account and choose this option to clone its settings into a new one. You will
be required to enter new account name, password etc.
Delete Account
This option will allow you to delete an existing account.
To each account corresponds number of account rights and group access options. By default, all actions are
preset as allowed. To change the settings, simply click on the account name you wish to change and modify
the items in the right part of the dialog, either on the Account rights tab, or the Group access tab.
Account rights tab
This tab contains list of actions available for the chosen account name. To forbid an action, uncheck
the checkbox next to its name. If you uncheck the checkbox next to the name of category (like
Stations, Scans etc.), you will forbid all actions from this category.
A V G A ntiV irus Bus ines s E dition 2 0 1 3 © 2 0 1 2 C opyright A V G T ec hnologies C Z, s .r.o. A ll rights res erved.
203
Group access tab
The Group access tab allows you to set access rights to user defined groups of stations. Double-click
on one of these groups to trigger a drop down menu (or right-click on it to trigger the context menu with
same contents). Now choose the permission type.
You can give the user of the account the Full access to the group, allow him/her just to view the group
by selecting Read only, or completely forbid him/her to access the group by choosing No access
option.
10.10. How to maintain the DataCenter database
AVG DataCenter database maintenance is easy due to predefined scripts, that can be easily accessed from
the Tools/Database Maintenance upper menu.
The predefined scripts are as follows:
Unify stations with equal identification
Choosing this script will remove duplicated stations from the AVG DataCenter according to chosen
station identification method (e.g. if the identification method is IP address, all stations with the same
IP address will be removed). Individual settings of removed stations will be deleted and only the newest
stations will be preserved.
Delete objects whose owner is not available in the AVG DataCenter anymore
Choosing this script will remove all settings, tests, rules and the scheduled tasks belonging to stations
that no longer exist in the AVG DataCenter anymore from the AVG DataCenter.
Remove unused update servers
A V G A ntiV irus Bus ines s E dition 2 0 1 3 © 2 0 1 2 C opyright A V G T ec hnologies C Z, s .r.o. A ll rights res erved.
204
Choosing this script removes all update servers that have not communicated for more than 7 days from
the AVG DataCenter.
Remove old Alert Manager events from the AVG DataCenter
Choosing this script removes all Alert Manager events older than 7 days from the AVG DataCenter.
Check the scripts you are willing to apply and click Run scripts button to use them. Please note, that the
database maintenance process may take a while.
You can also use the Load custom script button to choose a custom SQL Script file manually. This option is
recommended only to advanced users.
10.11. List of AVG Setup Parameters
The following tables contain list of AVG setup parameters that can be used by advanced users to customize
the AVG installation (i.e. by editing the produced installation scripts or by creating new ones). Most of these
parameters are used by AVG Network Installer automatically to install AVG in silent mode with desired
components, settings, etc.
Syntax:
Setup /Parameter_Name=<parameter value>
or
Setup /Parameter_Name
Usage examples:
setup.exe /UILevel=silent
avg_ipw_x86_all_2013_1109a3125.exe /SelectedLanguage=1033
You can also create (amend) mfaconf.txt file with a list of parameters and values of your wish:
AppMode=Setup
UILevel=silent
SelectedLanguage=1033
Note: MFA abbreviation stands for MSI Front-end application, provides GUI for MSI installation and
supervises it. It accepts parameters mentioned below, either on command line or in MFA configuration file (if
not stated otherwise).
There are several types of parameters, the individual usage is marked in brackets with either one of these
options:
Boolean - requires a numerical value limited to 0 or 1 (true/false). Example: /InstallToolbar=1 will install
the feature.
Integer - requires a numerical value. Example: /Maintenance=2
A V G A ntiV irus Bus ines s E dition 2 0 1 3 © 2 0 1 2 C opyright A V G T ec hnologies C Z, s .r.o. A ll rights res erved.
205
String - requires a string value, either specified in the Allowed values or described within the
Description.
Example: /TemporaryPath="C:\Temporary Folder\MFATemp"
No value - some parameters can be used without any specific value. Example: /EnableWinFW
Parameter Name
Description
TemporaryPath=<string>
Specifies the full path to the installation
temporary folder.
LoggerPath=<string>
Specifies the full path to the installation
log folder.
UILevel=<string>
Defines which level of user interface
should be displayed.
Allowed values
Minimal - displays only progress.
Silent - no dialog will be visible.
Normal - regular dialogs.
ConfigFilePath=<string>
Defines a full path to an alternative MFA config file (usable only from the
command line).
InstallFeatures=<string>
List of features to be installed.
RemoveFeatures=<string> List of features to be uninstalled or not
installed.
List of feature IDs separated by comma
or semicolon. The possible IDs can be
found in the table below.
List of feature IDs separated by pipe (|),
comma or semicolon. The IDs can be
found in the table below.
RestartDelay=<integer>
Delay before the computer restart is
Value (time) in seconds.
processed. A system dialog with
countdown is displayed before the restart
occurs (even if silent UILevel is used).
AppMode=<string>
Defines functionality that should be
performed.
SETUP - Launches application setup.
UPDATE - Launches application
update.
TargetInstallationPath=<stri Defines the installation path. Default value is C:\Program Files\AVG\AVG2013
ng>
LicenseKey=<string>
Defines a license key used for installation.
InstallToolbar=<boolean>
Defines if the toolbar will be installed or
not.
1 - will be installed
0 - will not be installed
A V G A ntiV irus Bus ines s E dition 2 0 1 3 © 2 0 1 2 C opyright A V G T ec hnologies C Z, s .r.o. A ll rights res erved.
206
ChangeBrowserSearchProvi Defines if the default search engine
der=<boolean>
provider should be changed. (Only valid
with parameter InstallToolbar=1)
1 - provider will be changed
0 - provider will not be changed
SelectedLanguage=<intege A numerical value of the language used for installation (IDs are listed in the table
r>
at the end of this chapter).
InstallSidebar=<boolean>
Defines if the sidebar gadget should be
installed or not.
1 - will be installed
0 - will not be installed
ParticipateProductImprove Defines if the station will participate in the 1 - participate
ment=<boolean>
Product improvement programme.
0 - do not participate
DataCenterSpec=<string> Defines the datacenter connection string. myserver:4158
EnableWinFW
Switches on the Windows Firewall. If AVG Firewall is installed, this parameter
will be ignored.
DisableWinFW
Switch off the Windows Firewall.
DontRestart
No restart will be allowed after installation or uninstallation.
Maintenance=<integer>
Launches setup in one of the supported 0 - starts Add/Remove feature mode
maintenance modes: Uninstall, Add/
Remove features or Reinstall/Repair.
1 - starts Repair mode
2 - starts Uninstall mode
DisableScan
Disables all default scan plans after installation.
KillProcessesIfNeeded
Kills processes that prevents installation.
Below is the list of available feature (component) values for InstallFeatures and RemoveFeatures parameters.
Note: Whether a feature can be really installed or not depends mostly on its presence in the installation
pack age, also on a license number and in some cases (plug-ins) on other software that must be present on
the target PC.
Feature name
Feature description
fea_FW
AVG Firewall
fea_OnlnSc
AVG Online Shield
LinkScnFea
AVG LinkScanner
fea_SrchSrf__Surf
AVG Surf-Shield
A V G A ntiV irus Bus ines s E dition 2 0 1 3 © 2 0 1 2 C opyright A V G T ec hnologies C Z, s .r.o. A ll rights res erved.
207
fea_AntiRk
AVG Anti-rootkit
fea_SysTool
AVG System tools
fea_Client
AVG Remote Administration library
LanguagesFea
All languages (or languages allowed for the product)
EmailPluginsFea
AVG email plug-ins
fea_Emails__Bat
AVG Email plug-in for TheBat!
fea_Emails__Outlook
AVG Email plug-in for Microsoft Outlook
fea_Emails__Thunder
AVG Email plug-in for Mozilla Thunderbird
fea_Emails__EMC
AVG Email scanner
fea_AntiSpm
AVG Anti-spam
fea_Office
Plug-in for MS Office 2000 - 2007
fea_SrvAddI__ExAS
AVG Anti-spam for MS Exchange Server
fea_SrvAddI__ExSmtp
Email scanner for MS Exchange Server (SMTP TA)
fea_SrvAddI__ExRte
Email scanner for MS Exchange Server (Routing TA)
fea_SrvAddI__ExVS
Email scanner for MS Exchange Server (VSAPI)
fea_SrvAddI__Shrp
File scanner for MS Sharepoint Server
Below is the list of language codes for the SelectedLanguage parameter.
1029
Czech
1036
French
1031
German
1038
Hungarian
1040
Italian
A V G A ntiV irus Bus ines s E dition 2 0 1 3 © 2 0 1 2 C opyright A V G T ec hnologies C Z, s .r.o. A ll rights res erved.
208
1041
Japanese
1043
Dutch
1046
Brazilian Portuguese
2070
Portuguese (Portugal)
1045
Polish
2074
Serbian
1051
Slovak
1034
Spanish
1030
Danish
1033
English (US)
1049
Russian
1042
Korean
1057
Bahasa (Indonesian)
16393
English (Indian)
1086
Malay
1055
Turkish
3076
Chinese (Simplified)
2052
Chinese (Traditional)
A V G A ntiV irus Bus ines s E dition 2 0 1 3 © 2 0 1 2 C opyright A V G T ec hnologies C Z, s .r.o. A ll rights res erved.
209
11. AVG DataCenter
The AVG DataCenter consists of a database, and AVG Admin Server. The AVG Admin Server performs
the role of a mediator between the AVG DataCenter and AVG stations. The AVG Admin Console uses the
AVG Admin Server to approach the AVG DataCenter database, and to centrally define settings for stations
and system parameters. AVG stations approach the AVG Admin Server to read the setup parameters; and to
save their currently defined setting and scan results into the AVG DataCenter.
The communication with stations is possible only if the Remote Administration component is properly
installed on all stations, and connected to the AVG DataCenter.
The AVG DataCenter contains an implemented SQL database, or it can be attached to a separate database
server running either on the same or another computer within the local network.
Attention: Particular database engines can serve only a limited number of connected computers. More
information on this topic can be found in the DataCenter role chapter.
11.1. Maintenance
After a considerable period of AVG AntiVirus Business Edition 2013 use (i.e. AVG Admin Console use),
some inconsistencies or duplication in the AVG DataCenter may appear. Such a situation puts increasing
demands on the network load, and the maintenance options are aggravated. For easy AVG DataCenter
maintenance we have prepared several scripts that will help you perform the frequently required maintenance
operations. During maintenance (when a script is active) the AVG DataCenter is locked, and users cannot
access it.
The maintenance scripts are available from the AVG Admin Console, menu Tools/Database Maintenance.
11.2. Password protection
You can password protect access to the AVG Datacenter database and to the AVG Admin Server.
Access to the AVG DataCenter database
The username and password for the database access is mandatory and it can be changed within the
AVG Admin Server Settings, DataCenter tab, Database Access section.
Note: The login details for the internal Firebird database are predefined and cannot be changed.
Access to the AVG Admin Server
Optionally you can also set username and password to access AVG Admin Server. To do so navigate
to the AVG Admin Server Settings, General tab, Server Access section.
This username and password apply for connecting stations to the AVG DataCenter. These values must
be correctly filled when connecting stations to the AVG DataCenter (either via the AVG Network
Installer Wizard or manually).
If you require more people to access AVG Admin Console and administer stations/settings on a different level,
you can also create various user accounts with miscellaneous access rights.
To manage access to the AVG DataCenter via AVG Admin Console, navigate to the DataCenter upper menu
A V G A ntiV irus Bus ines s E dition 2 0 1 3 © 2 0 1 2 C opyright A V G T ec hnologies C Z, s .r.o. A ll rights res erved.
210
and select AVG DataCenter settings item. More information on this topic is available in the How to.../How to
manage access rights chapter.
11.3. Converting the AVG DataCenter to a Different Database
The AVG Admin Server Deployment Wizard is able to automatically convert any existing AVG DataCenter to
a different database format.
It is also possible to convert the AVG DataCenter from one AVG DataCenter to another using the Export/
Import functions. From within the AVG Admin Console it is possible to export the AVG DataCenter to a
portable text format (menu DataCenter/Database Export) and import the data during the AVG Admin
Deployment Wizard.
More information about the wizard can be found in the AVG Admin Deployment Wizard chapter.
11.4. Web Interface
The AVG Admin Server offers a web interface with overview of its status, roles details and other information.
You can access the status pages by entering the connection string into your favorite internet browser:
http://localhost:4158/
Where localhost represents your AVG Admin server address and 4158 is a default port number.
Except basic information, DataCenter and UpdateProxy roles overview, there are the following buttons
available:
List of all stations - lists all stations currently held in DataCenter.
List of non-compliant stations - lists all stations that are currently in an error state.
List of served stations - this option will be available only if there is UpdateProxy role installed. Use this
button to list stations that are receiving updates from this server.
A V G A ntiV irus Bus ines s E dition 2 0 1 3 © 2 0 1 2 C opyright A V G T ec hnologies C Z, s .r.o. A ll rights res erved.
211
12. Updates
12.1. General Information
AVG offers two update levels to select from:
Definitions update contains changes necessary for reliable antivirus, anti-spam and anti-malware
protection. Typically, it does not include any changes to the code and updates only the definition
database. This update should be applied as soon as it is available.
Program update contains various program changes, fixes and improvements.
When scheduling an update, it is possible to select which priority level should be downloaded and applied.
You can distinguish between two types of update:
On demand update is an immediate AVG update that can be performed any time the need arises.
Scheduled update - within AVG it is also possible to pre-set an update plan. The planned update is
then performed periodically according to the setup configuration. Whenever new update files are present
on the specified location, they are downloaded either directly from the Internet, or from the network
directory. When no newer updates are available, nothing happens.
Note: If a time coincidence of a scheduled program update and scheduled scan occurs, the update process
is of higher priority and the scan will get interrupted.
12.2. Update within the Local Network
AVG stations can perform an update directly from the AVG Technologies web servers. Also, it is possible to
download the update file onto a LAN server, and configure the AVG stations for local update.
For smaller networks (20-25 stations typically) it is recommended to update directly from the internet. AVG
update files are designed so that always the smallest available required files are downloaded.
If the network consists of more than 50 stations, it is better to maintain mirroring of all the available update
files within the local network. All the update files (that could be used for all the previous AVG versions update)
must be downloaded this way to allow AVG stations to use the current file to perform the program/virus
database update.
Generally, there are two options of update files local mirroring. The recommended option is using the
UpdateProxy role, that can be deployed also on multiple servers. See the Deploying multiple UpdateProxy
roles chapter for more information.
By using this, the AVG Admin Server is able to automatically download all necessary update files. AVG
stations then search for the update files on the computer with the AVG Admin Server running. This option is
considered the preferred way of update file distribution within the local network.
However, it is possible to use any other web server for this kind of update. The server only has to share one
isolated folder accessible by AVG stations. When you are using Microsoft Information Server, for example,
the root of all the accessible folders is usually C:\InetPub\wwwroot. Supposing C:\InetPub\wwwroot\avgupdate
A V G A ntiV irus Bus ines s E dition 2 0 1 3 © 2 0 1 2 C opyright A V G T ec hnologies C Z, s .r.o. A ll rights res erved.
212
folder, which is accessible by web interface, is present on the web server called localweb. Web (HTTP) clients
can access documents and files in this directory by the URL http://localweb/avgupdate. Following these
steps, AVG stations will use the same URL http://localweb/avgupdate for updates.
Update files for distribution can be downloaded from the http://www.avg.com/ww-en website, section Support
Center/Downloads.
A V G A ntiV irus Bus ines s E dition 2 0 1 3 © 2 0 1 2 C opyright A V G T ec hnologies C Z, s .r.o. A ll rights res erved.
213
13. FAQ and Technical Support
Should you have any problems with your AVG AntiVirus Business Edition 2013, either business or technical,
please refer to the FAQ section of the AVG website at http://www.avg.com/ww-en/faq.
If you do not succeed in finding help this way, contact the technical support department by email. Please use
the contact form accessible from the system menu via Help / Support by email in the AVG application.
If you have gone through this documentation and you are still not sure about what level or type of AVG
AntiVirus Business Edition 2013 functions are best for you, we recommend that you consult the AVG
Technologies technical support department: http://www.avg.com/ww-en/support-existing.
To help us find the best solution for AVG implementation on your network, please prepare the following
information:
the size of your network (the file server type, number of network stations)
operating systems on the stations in the network
average HW parameters of the station (or rather the minimum parameters)
LAN or WAN, and the connection quality for WAN
your demands for AVG AntiVirus Business Edition 2013 (administrator’s requirements, and
administration extent)
A V G A ntiV irus Bus ines s E dition 2 0 1 3 © 2 0 1 2 C opyright A V G T ec hnologies C Z, s .r.o. A ll rights res erved.
214