1
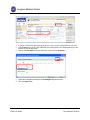
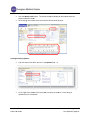
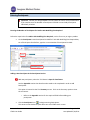
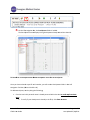
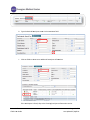
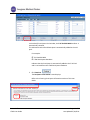
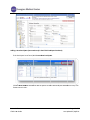
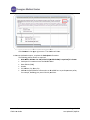
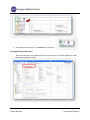
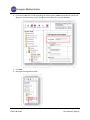
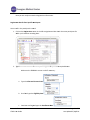
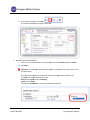
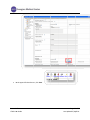
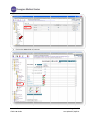
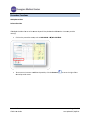
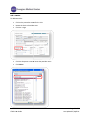
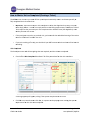
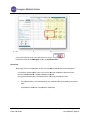
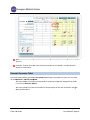
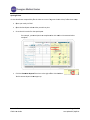
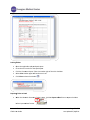
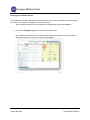
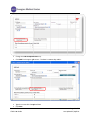
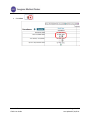
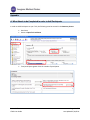
CTMS User Manual For Clinical Trial Research Management Coordinators and Trial Staff Research IT Last Updated 3/10/11 Table of Contents LOGGING IN 3 SCREEN ORIENTATION 3 LOCATING AND OPENING A STUDY IN CTMS 4 ENTERING PARTICIPANTS 10 ADDING A VISIT 23 PROCEDURE FUNCTIONS 25 HOW TO MARK A VISIT AS COMPLETED (CREATING A TICKET) 31 RESEARCH ENCOUNTER TICKET 35 APPENDIX 41 A. WHAT NEEDS TO BE COMPLETED IN ORDER TO ADD PARTICIPANTS 41 B. CONTRACTS/AGREEMENTS STATUSES 42 C. CTMS TRIAL STATUSES 45 Research IT CTMS User Guide Page 2 of 46 Last Updated 3/10/2011 Important addresses a and d phone numbers: In nfoEd System m URL: M MCIT Self-Serv vice URL: O OCT (Office off Clinical Trials) http://infoed.med..nyu.edu http://nyumc.net/n nyu/mcit 212.263.4210 Loggingg In InfoEd can n be reached only via the NYU Langonee Medical Cen nter network.. That means you need to be on‐site, or have VPN access to reach the NYU neetwork remotely. Tiip: Access MCIT Self‐Serviice via the link above to su ubmit a requeest for an Info oEd Remote Access Quick R Reference. Th he guide desccribes how to o set up off‐caampus access through O OnSiteHealth. InfoEd Pro oduction Th he InfoEd serrver’s addresss is: http://inffoed.med.nyu u.edu To o log in, enter your Kerberros ID and yo our InfoEd passsword. Screen Orientatio on CTMS screen will look like below. Note e: Your left Naavigation Too ol Bar Immediattely after loggging in, your C options w will vary based d on what mo odules to whicch you have aaccess. Immediate ely after Loggging In, you will click on Myy Clinical Trials. Research IT CTMS Useer Guide Page 3 of 46 Last Updated 3/10//2011 Locatingg and Ope ening a Stu udy in CTM MS Click on th he Search For screen. There aree several optio ons for finding a study in C CTMS. This seection describ bes all of the searching opttions that are aavailable to yo ou. nd most direcct way is to enter the Reseearch Number for the stud dy in the “Triaal The first an Number” ffield. The second way is to seearch by PI. way is to searrch by PI and Sponsor. The third w Locating SStudy by Triaal Number Type the R Research Num mber into the Trial Number field. Click Open n/Locate. Note: Wildcard Seaarches. You sshould use an n asterisk (*) tto denote a w wildcard at the oking for all sttudies that sttart with the ttrial end off your search.. For instancee, if you’re loo numbe er “07‐1” you u would type “07‐ 1*” in th he search valu ue field. The resultss appear belo ow the main ssearch area. Research IT CTMS Useer Guide Page 4 of 46 Last Updated 3/10//2011 Trial Iccons. The ico ons to the righ ht of the trial number are tthe Trial Icon ns. Depen nding on yourr level of acceess, some of them may be grayed out in ndicating thatt the functio on is not available to you. Specifically, the delete traash icon is no ormally not availab ble to non‐mo odule administrators. If you do not e enter the exacct Trial Numb ber, you will gget a results list of every sttudy whose TTrial Number is a paartial match tto what you eentered. Locating aa Study by PI Name Tyype the last n name of the P PI into the PI ffield, such as “delucchi” Press the Open n/Locate button. Research IT CTMS Useer Guide Page 5 of 46 Last Updated 3/10//2011 If you do not know the exact spelling of the PI’s name, you can instead look the name up. Click the Set button to the right of PI field. This will pop open a new window where you can find the PI by their last name. Click on the first letter of the PI’s last name, such as “D” for “Delucchi.” Select the investigator name from the Investigator drop-down menu. Click the Save button. Research IT CTMS User Guide Page 6 of 46 Last Updated 3/10/2011 O button. The search resultts will display all the studie es where the Click the Open/Locate person selected is the PI. P Scroll through the searcch results to llocate the desired study to o open. Locating aa Study by Sp ponsor Type the e exact name off the sponsorr in the Sponssor field… or To the righ ht of the Spon nsor field, preess Set to look up the spon nsor’s name u using an alphabeticcal pick‐list wiindow. Research IT CTMS Useer Guide Page 7 of 46 Last Updated 3/10//2011 Once you’vve found the sponsor, press the Save b button (closing the sponsor pick‐list win ndow) and then p press the Ope en/Locate buttton to displaay a list of all studies with tthat sponsor.. Research IT CTMS Useer Guide Page 8 of 46 Last Updated 3/10//2011 Opening aa Study to Fin nd the Particiipants Section For this m manual, we wiill work with sstudy 90‐9090. When you u hover over the toolbar, sscreen tips will list the icon function. Participants iccon to begin eentering Participants. Thiss causes a new w window to open Click the P above our main CTMS ssearch screen n. (2) Research IT CTMS Useer Guide Page 9 of 46 Last Updated 3/10//2011 Entering Participants Important: Contact your Assigned RMC from OCT (Office of Clinical Trials) to determine if you need to enter the Number of Participants Enrolled or enter Study Participants individually as below. Entering the Number of Participants for Studies with No Billing Plan Required Follow the steps below for studies with No Billing Plan Required, such as for survey or registry studies. On the Participants screen Participants Enrolled for Trials With No Billing Plan Required box, No. of Participants Enrolled box, type the correct Number of Participants Enrolled. (2) Adding a New Participant in the Participants Section Add new participants, when the Trial Status is Open for Enrollment. See the Appendix section that describes what needs to be completed in order to add Participants. This option is located via the Trial Summary screen. Click on the Summary option to view the trial status. o Refer to the Appendix section for the required fields before adding your participants. Click the Participants icon to begin entering Participants. This causes a new window to open above our main CTMS search screen. Research IT CTMS User Guide Page 10 of 46 Last Updated 3/10/2011 On the leftt navigation b bar, the Particcipants folder is bolded. The Particiipants Screen n displays listiing Participan nts already en ntered into th he trial. To Search h for a Participant Name w within the Spe ecific Trial’s LList of Participants Once you have selecte ed a specific TTrial number, you will see tthe Participan nts Folder in tthe Left Navigation Tool bar (ab bove circled iin red). To add a P Participant, sttart by doing the followingg: 1. Check to see iff this person’ss name is alreeady entered within the trrial to avoid d duplicate dataa en ntry. ow Browses a. To verrify if your Parrticipant is alrready in the TTrial, click Sho Research IT CTMS Useer Guide Page 11 of 46 Last Updated 3/10//2011 b. Type the desired Paarticipant nam me in the Lastt Name field. c. Click the folder to vview enter ad dditional Partiicipant inform mation. If the P Participant is found, skip to the Enterin ng Participant Information section. Research IT CTMS Useer Guide Page 12 of 46 Last Updated 3/10//2011 If the name I is not in thee Trial, pleasee check to see if the perso on is associateed with another w Trial and hass his/her nam me already listted within thee listing of all Participants in the CTMS P Participants D Directory in th he Infoed Systtem by clickin ng on the Plus Icon t . 1. Now enter the p person’s Last Name and Fiirst Name into the corrresponding ffields: will be listed u under the Seaarch For section in If yyou find any results, they w thee Results Subssection and yyou can view tthe result by clicking on th he Sellect hyperlinkk. Research IT CTMS Useer Guide Page 13 of 46 Last Updated 3/10//2011 In the Identify Participants Pool window, the Trial Pool 90‐9090 checkbox is automatically selected. This indicates that the found Participant is automatically added to the trial pool. For example: Trial Pool 90‐9090 CTMS Participants Database Indicates that the Participant is automatically added to the Trial Pool and is retrieved from the CTMS Participants Database. 2. Click Continue. The Partipant’s Information screen displays. Refer to the Entering Participants information section of this User Guide. Research IT CTMS User Guide Page 14 of 46 Last Updated 3/10/2011 Adding a New Particip pant (one nott already in th he CTMS Partticipant Database) If the Participant iss not found, cclick Create N New Participaant. Click tthe NYU Patie ents checkbo ox to add the patient to thee CTMS Particcipant Databaase for entry into futuree research trials. Research IT CTMS Useer Guide Page 15 of 46 Last Updated 3/10//2011 Check off tthe box to Incclude CTMS P Participants P Pool. Click Contiinue in the up pper right corrner. The win ndow will closse. In thee new window w that opens, complete the Participantt information.. The follow wing patient details are req quired. NYU M MR# or Bellevvue # or VA# ((circled in ligh ht blue below w) is required d if it is known n. Participant First and d Last Name and Middle in nitial. of Birth (DOB)) Date o Gende er Full Ad ddress, City, SState, Zip Additio onal optionall Patient Inforrmation can b be added here as per depaartment policcy. For example, Radio ology may entter Ethnicity aand Race. Research IT CTMS Useer Guide Page 16 of 46 Last Updated 3/10//2011 1. In n the upper right corner, click Save. Notice the chaanges in the LLeft Navigation Tool Bar area: Before e entering thee information n about the Paarticipant, theere is no nam me in this field d. After cclicking on thee SAVE butto on, the name of the Participant appearss here. An EM MR (Electronicc Medical Reccord) is createed. Research IT CTMS Useer Guide Page 17 of 46 Last Updated 3/10//2011 2. In n the upper le eft‐hand corner, click Done e to exit this sscreen. Entering P Participant In nformation Th he new Particcipant is now added and you are return ned to the Trial Folder view w and the new w Paarticipant Information screeen. Research IT CTMS Useer Guide Page 18 of 46 Last Updated 3/10//2011 1. If you wish to e edit the Trial ID assigned b by the Infoed system, deleete the PAT # that is there and asssign the Trial ID relevant to your Trial ffor that Participant; it is a unique identtifier. 2. Click Save 3. Next open the Registration folder Research IT CTMS Useer Guide Page 19 of 46 Last Updated 3/10//2011 Now you are ready to enterr the Registraation information. or a Specific P Participant Registratiion Details fo ord. You are sttill in the partticipant’s reco 1. Click on the Re egistration sccreen in the leeft navigation n tool bar with hin the same participant for w which you hav ve been enterring data : 2. Tyype the recorrd details of the Participan nt’s registratio on process ass required bellow: Make sure the Trial ID is correctt or edit if neccessary. a. Type the Informed Consent Datte b. Scroll aand type the Eligibility Daate c. Contin nue scrolling aand type the Enrollment D Date. Research IT CTMS Useer Guide Page 20 of 46 Last Updated 3/10//2011 d. In the upper left co orner, click Save. d. The Status automattically changees to Enrolled 3. Th he arm must be identified also. a. Click the Trial Arm d drop‐down arrow and seleect the correcct Trial Arm, ssuch as Arm 1 1. b. Click SSave. Important: The OC CT RMC must be contacted d for any chan nges to the arrms, cycles, visits, and prrocedures. The Fin nancials>Proccedure matrixx has all of th he visits and p procedures fo or the trial. Trial A Arms are treattment groupss in a trial. Arms ccontain Cycle es, such as Scrreening. Cycless contain Visitts. Visits ccontain Proce edures or services perform med on each vvisit. Research IT CTMS Useer Guide Page 21 of 46 Last Updated 3/10//2011 In n the upper le eft‐hand corner, click Save e. Research IT CTMS Useer Guide Page 22 of 46 Last Updated 3/10//2011 Adding a Visit Schedule Set The Sched dule Set scre een is where yyou assign vissits to a particcipant by seleecting one or more cycles ffrom the pull‐d down menu an nd then presssing the add ((+) icon. In the left‐hand navvigation menu, find and click Schedule – Set. he desired cyccle, such as Sccreening. Click the drop‐‐down arrow and select th to aadd the cyclee. Click his will add all of the visitss that have beeen assigned to that cycle.. Th Only add cycles as tthe participan nt goes throu ugh them. Research IT CTMS Useer Guide Page 23 of 46 Last Updated 3/10//2011 Click on the Visits folder to continue. Research IT CTMS Useer Guide Page 24 of 46 Last Updated 3/10//2011 Procedu ure Functio ons Providers Multiple P Delete a P Provider If Multiplee Providers lisst on an Enco ounter Reportt Ticket, delette the additio onal or incorreect provider name(s). Click on the prrocedure nam me, such as MRI BRAIN – W W/WO CONTR RAS. To o remove an incorrect or aadditional pro ovider, click the Remove deesired provider name. Research IT CTMS Useer Guide arrow to the right of tthe Page 25 of 46 Last Updated 3/10//2011 O Only one prov ider displays. Click Apply to All Visits Click Close. XX Research IT CTMS Useer Guide Page 26 of 46 Last Updated 3/10//2011 Add a Pro ovider To add a P Provider: Click on the prrocedure nam me for the visit. Lo ocate the Serrvice Providerrs area Click the + sign n. Click the drop‐‐own arrow to o locate the p provider name Click Select. Research IT CTMS Useer Guide Page 27 of 46 Last Updated 3/10//2011 Click Apply to All Visits. Click X to close e. Billable The Billab ble To field indicates who tthe charge sh hould be billed to for a speecific visit pro ocedure. o field are: Options available for the Billable To Sttudy Accountt/Sponsor/Grrant 3rrd Party Paye er/Subject N Non‐Billable Research IT CTMS Useer Guide Page 28 of 46 Last Updated 3/10//2011 To add orr change the B Billable To fieeld: Click on the sp pecific proced dure for the viisit, such as M MRI BRAIN – W W/WO CONTTRAS. Click the Billab ble To drop do own arrow an nd select the correct Billab ble to option,, such as r rd 3 Party Payerr/Subject. Research IT CTMS Useer Guide Page 29 of 46 Last Updated 3/10//2011 Click Apply to All Visits then click X to close. Eliminatin ng or Adding a Procedure from a Visit Im mportant: At the Visits scrreen, eliminatte procedures first as appllicable. O Once a ticket i s completed, procedures ccan no longerr be added to o the visit. In the Pro ocedure scree en: 1. Uncheck the visit to which tthe procedurre no longer aapplies or check the V Visit to which tthe procedurre applies. 2. Click Apply to all visits, then Close. Research IT CTMS Useer Guide Page 30 of 46 Last Updated 3/10//2011 How to Mark a Viisit as Com mpleted (Crreating a TTicket) here you markk off that a paarticipant hass actually com me in and eith her partially o or The Visitss screen is wh fully comp pleted their sscheduled visiit. o Im mportant: Yo ou must markk your visits co omplete on eeither the dayy when they o occur or one o or m more day(s) be efore. In ordeer to comply with the trialls billing requirements, thee Office of Clinical Trrials requires that you marrk your visits complete either ahead of time (the dayy before) or o on th he day that th he visit occurss. o If the participaant cancels a pre‐marked vvisit, you havee until that sccheduled evening of the viisit to reeturn to CTMS and “uncheeck” the visit. o If you miss marking off a vissit, you should call your OC CT contact to o let them kno ow of the latee visit reecording. Visit Com mpleted The Particcipant came aand did everyything that waas required, aand the visit w was completeed. Visit Completted checkboxx if all of the p procedures fo or the visit weere done. Check off the V A message pop p‐up will appeear, asking if the sponsor rrequirementss were met. Click OK or on some browseers click Yes, in response tto the pop‐up p screen statin ng the sponso or reequirement fo or this visit w were completeed. Research IT CTMS Useer Guide Page 31 of 46 Last Updated 3/10//2011 Th he date comp pleted will bee automaticallly generated using today’ss date. O Open the Rese earch Encounter Ticket and d confirm thee information as correct. he ticket is given to the Paatient and em mailed/faxed/o or printed to the service p provider. Th Visit Partiial Date of Se ervice ows you to co omplete 2 tickkets for a visitt. CTMS allo If all of th he procedures for a visit arre completed d in 2 days, then you will neeed to do thee following: First Day 1. Fo or the first daay, uncheck th he proceduree(s) services that were not completed u using the ch heckboxes in the visit colu umn. Research IT CTMS Useer Guide Page 32 of 46 Last Updated 3/10//2011 2. Click the Visit Partially Com mpleted? Checkbox provided. mation as correct. Click on the ticcket to confirm the Inform d to the Servicce Provider. Provide the ticcket to the Paarticipant and Second Day Th hese steps arre for the seco ond day of the visit when aall procedurees have been completed. For example, the particip pant came in for the first d day with proccedures Adverse Events, toxicities an nd MRI BRAIN N – W/WO CO ONTRAS comp pleted. During the second day, tthe participan nt had the rem maining procedure(s) done: For the e second day, click checkb boxes for the remainder off the procedu ure(s) to indicate done. All pro ocedures shou uld be compleeted the seco ond day. Research IT CTMS Useer Guide Page 33 of 46 Last Updated 3/10//2011 Check off the Visit C Completed checkbox. A message pop‐up will appear, aasking if the ssponsor requiirements werre met. Click Y Yes. The daate completed d will be auto omatically gen nerated usingg today’s datee. Research IT CTMS Useer Guide Page 34 of 46 Last Updated 3/10//2011 Im mportant: Click the Encounter Report TTicket icon an nd confirm the ticket for co ompleteness and acccuracy. Reminder: Pre esent the tickket to the Partticipant and tthe Service Prrovider. See tthe Research En ncounter Tickket below. Researcch Encountter Ticket The InfoEd CTMS module generatess an Encounte er Ticket for yyour participaants for each visit you cheeck off as Com mpleted or Paartially Comp pleted. Th his ticket detaails the locatiion(s) and pro ocedures thatt a participan nt will undergo during a vissit. It is called an EEncounter Re eport. Th his ticket should be printed and provided to the parrticipant to take with them m when they gget th he procedures done. Research IT CTMS Useer Guide Page 35 of 46 Last Updated 3/10//2011 Opening TTickets oordinator re esponsibility ffor the ticket as correct. To o get to the vvisit ticket, folllow these steeps: It is the Co O dy in CTMS Open your stu O icipant whosee ticket you w wish to print. Open the Parti nt. Go to the Visitt section for that participan For example, your P Participant haas completed d the visit and d the visit wass marked as complete. unter Reportt Ticket icon to the right off the Visit cheeckbox. Click the Encou he Encounterr Report wind dow pops up. Th Research IT CTMS Useer Guide Page 36 of 46 Last Updated 3/10//2011 Printing TTickets Open the applicable study aand participant. O Go to the Visitt section for that participan nt. Click the Encou unter Report Ticket icon to o the right of the Visit checkbox. Seelect Print viaa the upper leeft‐hand corn ner icon. Click Close to cclose the window . Exportingg Ticket to Exccel W When the Rese earch Encoun nter Ticket is o open, click th he Export to EExcel icon to eexport the ticcket in n Excel spread dsheet format. Research IT CTMS Useer Guide Page 37 of 46 Last Updated 3/10//2011 Changing the Visit Datte of Service If the Visitt date is any o other day oth her than the ccurrent day su uch as when procedures aare completed d in two datess, it is necessaary to changee the Visit Datte of Service. Yo ou are able to o change the Visit Completed Date and d the Sponsor Req Satisfied d Date. Click on the Visit Name hyp perlink at the top of the vissit column. Fo or example, iff the Participant came thee day before tthe date entered in the Vissit, change the daate by clicking on the visit name at the top of the co olumn: Research IT CTMS Useer Guide Page 38 of 46 Last Updated 3/10//2011 Change the Vissit Completed d Date only. Click SAVE in the upper righ ht corner. The date is now w one day earrlier. Tyype the corre ect Visit Comp pleted Date. Click Save. Research IT CTMS Useer Guide Page 39 of 46 Last Updated 3/10//2011 Click Close. Research IT CTMS User Guide Page 40 of 46 Last Updated 3/10/2011 Appendix A. What Needs to be Completed in order to Add Participants In order to Add Participants to your Trial, the following must be entered in the Summary Screen. Start Date Status as Open for Enrollment Total participants greater than the number of participants Research IT CTMS User Guide Page 41 of 46 Last Updated 3/10/2011 In the Personnel screen, the Trial Coordinator Contact must be entered. B. Contracts/Agreements Statuses Status Definition Used by ICF = CTA ‐ CRMC ICF = CTA ‐ used when ICF/CTA match and when requested modifications to ICF based on CTA are submitted to IRB for approval CRMC ICF Needs Reconciliation with CTA ‐ CRMC ICF‐CTA language mismatch ‐ RMC requests SC make necessary amendments CRMC Budget ‐ Finalized Pending Contract When budget and payment terms are finalized, but contract language is still being negotiated CRMC Budget ‐ Initial NYU Review 1st review/mark up by NYU taking place CRMC Budget ‐ Negotiation at OCT Budget is at a middle negotiation and is currently with NYU CRMC Budget ‐ Negotiation at PI/Study Team Budget is at a middle negotiation and is currently with PI/Study team CRMC Budget ‐ Negotiation at Sponsor Budget is currently with the sponsor, any point after the initial mark up has been done by NYU and prior to finalization CRMC Budget ‐ Waiver of Usual or Standard Fees When any fee or usual budgetary item is waived. Comments should note what has been waived and by whom Budget ‐ Waiver Requested When a fees waiver is requested. Comments should note what is being requested and who is reviewing the request CRMC CTA ‐ BRANY CTA and Partially Executed Study Memo received by NYU When OCT receives fully executed CTA and Partially Executed Study Memo from BRANY ‐ NYU signatures on Study Memo needed Research IT CTMS User Guide CRMC CS Page 42 of 46 Last Updated 3/10/2011 CTA ‐ BRANY CTA with NYU for approval When NYU receives near‐final CTA and/or Study Memo from BRANY for approval prior to execution. CS CTA ‐ BRANY negotiating CTA is in negotiation by BRANY. CS CTA ‐ Final CRMC Review CTA (language/budget/payment terms) has been finalized and executable copies are being reviewed by CRMC prior to Directors signature CRMC CTA ‐ Final CS Notes and Exceptions For CS to document final notes and exceptions ‐ including any waivers related to contract language CTA ‐ Final CS Review CTA (language/budget/payment terms) has been finalized and hard copies are being reviewed by CS prior to Directors signature CS CTA ‐ Finalized Pending Budget When contact language finalized, but budget is still being negotiated CS CTA ‐ Fully Executed Agreement When OCT receives fully executed (signed by all parties) CTA CS CTA ‐ Initial Review Initial contract language mark up by NYU taking place CS CTA ‐ Language and Budget Finalized ‐ Awaiting Executable Copies Awaiting for executable copies of final CTA from sponsor CS CTA ‐ Negotiation at NYU CTA is at a middle negotiation and is currently with NYU CS CTA ‐ Negotiation at Sponsor CTA is currently with the sponsor, any point after the initial mark up has been done by NYU and prior to finalization CS CTA ‐ Partially Executed CTA received by NYU Hard copies of finalized CTA signed by sponsor ‐ NYU signatures needed CS CTA ‐ Signed by Director Director chooses this when they sign the CTA = OCTs contracting end date OCT Dir CTA ‐ Waiver of Liability/Other terms When a waiver of indemnification or standard subject injury language is granted. Comments should note what was approved and by whom CS CTA ‐ Waiver Requested Research IT CTMS User Guide When a waiver of indemnification, standard subject injury language, or other term is requested. Comments should note CS CS Page 43 of 46 Last Updated 3/10/2011 what is being requested and who is reviewing the request CTA ‐ With OCT Director for Signature When the CTA is sent to the OCT Director for signature CS/CRMC CTA ‐ With PI for Signature When the CTA is sent to the PI for signature CS CTA ‐ With Sponsor for Signature When the CTA is sent to the sponsor for signature CS In Initial Review by NYU Have received all items needed for initial review ‐ contract template, Budget template, R#, protocol, sponsor contact information, dept "GO". This will generally be the 1st status seen in the contracts folder CRMC Pending Initial Review Have not received all items needed for initial review ‐ should list what is missing CRMC Transferred to Another Contracting Office When negotiation transferred after Day 0 documented CS/CRMC Withdrawn/Never Finalized CTA (language and/or budget) never finalized or withdrawn (closed before site initiation) CS/CRMC Research IT CTMS User Guide Page 44 of 46 Last Updated 3/10/2011 C. CTMS Trial Statuses These are various statuses available in CTMS, and what they mean. They are presented in approximately the order of a study’s approval process/lifecycle. Pending Pre‐PRMC approval ‐ No regulatory or contractual work has begun yet. Under Review PRMC approved ‐ initial work has begun from a regulatory, financial, and/or contractual perspective. Multiple approval groups need to review and give their approval to the study before it can be opened to enrollment. Open to Enrollment All required approvals have been received and documented. This includes all institutional and group approvals, the grant or contract has been executed, the study visits have been built and CTMS is ready to receive enrollment data. Disapproved Something or some group has not OK’d the project and no further reconciliation is being attempted to open this study at this time. Suspended A research study is stopped or suspended by the IRB for regulatory, human subject, or other concerns. Enrollment on Hold Any reason a trial is put on hold other than IRB specific. Specifically, it would be because of PI or sponsor issues that would stop enrollment however it would not imply an IRB‐imposed suspension. Terminated This project enrolling was terminated by PI or Sponsor prior to completing its required enrollment criteria. Closed This study completed its contracted enrollment, all follow ups are completed, all data queries are solved, all financials have been accounted for, and the study is closed out in the IRB. Closed ‐ In Long Term Follow‐up Research IT CTMS User Guide Page 45 of 46 Last Updated 3/10/2011 This study is closed to enrollment and has a potentially infinite long term follow up phase with no end. Patients are followed at some specified time increment for mortality until end of life. Closed to Enrollment This study is closed to new enrollment but ongoing enrolled subjects still have visits to complete or data analysis is ongoing. Study is still “opened” in the IRB and continuations need to be completed yearly. Withdrawn Withdrawn is used when a Principal Investigator decides he/she no longer wishes to submit a research study for review but withdraws it from submission. The decision has been made not to pursue opening a project PRIOR to it being open for enrollment. The review decision would show Withdrawn. Exempt IRB Approved Projects accepted as Exempt in the IRB and do not have any billing requirements that would necessitate a billing plan submission to the OCT. Research IT CTMS User Guide Page 46 of 46 Last Updated 3/10/2011