1
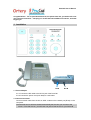
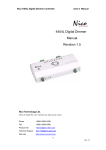
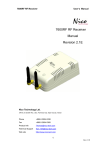
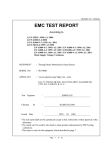
Ortery PeerCall 100 User’s Manual
Experience the relax talking mood with broadband advantage
Connect to people as long as you like anytime, anywhere in the world
PeerCall User’s Manual
Ortery PeerCall User’s Manual (For 18-Key Model)
01/01/2004 V0.20
Table of Contents
1. Installation ......................................................................................................................... 1
1.1 Power Adaptor ............................................................................................................ 1
1.2 Internet Connector ..................................................................................................... 1
2. Make a Call......................................................................................................................... 2
2.1 Standby........................................................................................................................ 2
2.2 Dial a Number.............................................................................................................. 2
2.3 Access a Previous Number from Call list ................................................................ 3
2.4 Access the Phone Book............................................................................................. 3
2.4.1 Save a phone number to the Phone Book ..................................................... 3
2.4.2 Retrieve a phone number from the Phone book ........................................... 4
3. Answer a Call..................................................................................................................... 4
4. Voice Message .................................................................................................................. 4
4.1 Record a Voice Message ........................................................................................... 4
4.2 Retrieve a Voice Message.......................................................................................... 5
5. Phone Set-Up..................................................................................................................... 5
5.1 Change Network Modes............................................................................................. 5
5.1.1 Set PPPoE Parameters..................................................................................... 6
5.1.2 Set Fixed IP Parameters................................................................................... 7
5.1.3 Set Network Connection Mode........................................................................ 8
5.2 Set Time Zone ............................................................................................................. 8
5.3 Record Greeting Message ......................................................................................... 8
5.4 Set Server IP................................................................................................................ 8
5.5 Show PeerCall System Information.......................................................................... 9
Appendixes ............................................................................................................................ 10
A. Power-on Messages ................................................................................................. 10
B. Contact Information ................................................................................................. 10
PeerCall User’s Manual
Congratulations! You’ve purchased PeerCall, the phone that lets you make calls over
your internet connection. Just plug it in to the Internet broadband connector, and start
enjoying it!
1. Installation
RJ45
DC IN
1.1 Power Adaptor
1.1.1 Connect the DC cable to the DC IN jack of the PeerCall.
1.1.2 Connect the power cord (main lead) to a wall outlet.
1.2 Internet Connector
Connect network cable from the hub or ADSL modem to the network port (RJ45) on the
rear panel.
The PeerCall service will be activated automatically the first time you connect to the
server. From that time on, you will have one year of free service for your PeerCall.
1
PeerCall User’s Manual
You can apply to extend the service before the expiration date.
2. Make a Call
2.1 Standby
PeerCall will display Starting... during the power-on process. There will be a sound
of Chime once the PeerCall is on and connected successfully. It will then show the phone
number for two seconds before entering Standby mode if it is ready for Dialup. The
message PeerCall 100 and the current time will be displayed. The number, i.e. 100, is
the model number of the product. One of the TheDHCP, PPPoE, or FxIP will be on to
indicate the current network connection mode, if it indicate DHCP Failed, it means your
connection may be PPPoE or FxIP type, please check with your MIS manager or ISP to
confirm your connection type, and refer to 5. Phone Set-Up to change network mode.
When user is using the PeerCall, pressing <Exit> button or hanging up the Handset will
put the phone back in Standby mode. The PeerCall will be put back to Standby mode
also if user didn’t press any key for more than 30 seconds, except during talking,
recording a greeting, or recording voice messages.
Please note, the first time the user plugs in the PeerCall, the server will assign a phone
number for it. The User can always display the current PeerCall phone number by
using Show System Information function.
The PeerCall would not be able to function properly if it could not connect to a server.
The message Not Ready... will be displayed. PeerCall will automatically try to
reconnect to the server until a connection is established. If the service subscription
has expired, the message Service End will show on the screen. For a complete list
of Power-on Messages, please refer to Appendix A. The PeerCall is able to receive
text messages from the server in Standby mode.
2.2 Dial a Number
2.2.1 The user can either pick up the Handset or press any digit to go to Dialup mode
(section 2.2.2). For the PeerCall model with a hook, the display will be replaced by
Please Dial with the dial tone.
2.2.2 Dial the ten digit PeerCall number. There is a tone for each key when pressed. To
erase the last digit, press <Clear>. Press <Exit> or hang up the Handset to put
PeerCall back to Standby mode.
Please note, the user can switch to Access a Previous Number mode by pressing
<Previous> or <Next> button ONLY when all digits are erased. The user can
switch to Save Phone Book mode by pressing <Function> button.
2.2.3 Press <OK> to start calling.
2.2.4 You will see a Calling... message (and hear Ring Echo Tone) before the
receiver picks up the phone (please also refer to Answer a Call).
If the receiver picks up the phone, you can start talking. The display will show
Talking..., the outgoing ( ) icons will be on, the current time, hh:mm mo/dy
and the elapsed time ee (in minutes) will be displayed.
2
PeerCall User’s Manual
During the conversation, if the receiver hangs up the phone or press <Exit>, the
message End of Talk will be displayed for two seconds, then the PeerCall will
be put back to Standby mode. But if the link was disconnected due to transmission
difficulties (for more than eight seconds), the display will show Disconnected.
At the end of the conversation, just hang up the Handset or press <Exit>.
If receiver didn’t pick up the phone after 30 seconds, it will go to Record a Voice
Message mode.
2.2.5 You will hear the Busy Tone if the receiver is Busy or Off-Line. In five seconds,
PeerCall will go to Record a Voice Message mode. The display will show either
Busy... or Off-line....
2.2.6 You will hear the Busy Tone for dialing a non-existing (or an un-subscribed) number,
the message Invalid # will be displayed with a warning (buzzer) sound. You
should check the number you have dialed before trying to dial again later.
Want to make a quick test? Just dial 222-222-2222. You should hear the voice:
Thank you for using PeerCall. If you hear this message, your PeerCall is
working properly. Enjoy using it!
2.3 Access a Previous Number from Call list
2.3.1 From Standby or Dial up mode, press <Previous> or <Next> button directly to
browse the Call List.
2.3.2 If the Call List is empty, the message No Call List will be displayed with a
warning (buzzer) sound. The user can hang up or press <Exit> button to put the
PeerCall back to Standby mode.
2.3.3 Up to 20 most recent outgoing ( ) and incoming ( ) calls will be recorded in the
Call List. When CALL RECORD is on, Call ID numbers, sequence number and the
time of call will be displayed. For calls that were not connected (such as line busy,
off-line etc.), the failed (
) icon will be on.
2.3.4 Press <OK> to start the calling. Go to 2.2.4 for the rest of the calling procedure.
2.4 Access the Phone Book
2.4.1 Save a phone number to the Phone Book
At Dial up mode, dial the ten-digit PeerCall number, then press <Function>. The
3
PeerCall User’s Manual
message Enter ID 0-9 will be displayed. User can then enter the one digit
memory ID (0-9); the ten-digit phone number will be stored to the Phone Book and
displayed on the screen.
Press <OK> to start calling. Press <Exit> or hang up the hook put the PeerCall
back to Standby mode.
Please note, the number will be stored to the server immediately once entered
completely. In case the link was disconnected, this number will be dropped.
The message Not Ready... indicates the PeerCall is off-line (please refer to
section 2.1). In that case, please follow instructions above and try again.
2.4.2 Retrieve a phone number from the Phone book
In Standby mode, the user is able to select a phone number from the Phone book
by holding down the memory ID (0-9, a digit number) for more than two seconds.
The phone number for the selected memory ID will be displayed.
Press <OK> to start calling. Pressing <Exit> or hanging up the Handset will put the
PeerCall back to Standby mode.
3. Answer a Call
When someone is calling, the buzzer will ring and the display will show the Caller’s ID
number, e.g. 111-666-8888. Just pick up the Handset or press <OK> to answer the call.
The display will show Talking..., the incoming ( ) icons will be on, the current time,
hh:mm mo/dy and the elapsed time ee (in minutes) will be displayed.
During the conversation, if the caller hangs up the Handset or presses <Exit>, the
message End of Talk will be displayed for two seconds, the PeerCall will then be put
back in Standby mode. If the link was disconnected due to transmission difficulties (for
more than eight seconds), the message Disconnected will be displayed.
4. Voice Message
4.1 Record a Voice Message
4.1.1 If the Voice Message box is full, you will hear the Busy Tone and the display will
show Msg Box Full with a warning (Buzzer) sound.
The user can hang up the Handset or press <Exit> button to put PeerCall back to
Standby mode.
4.1.2 If the Voice Message box is available, the user will hear a Greeting Message prerecorded by the receiver. The display will show Greeting... in the meantime. In
case the receiver has not pre-recorded a Greeting Message, the user will hear the
default Greeting Message instead:
Hi, I’m not available at this moment. Please leave your message after the beep.
4.1.3 The caller can leave a message after hearing a beep.
There is a 30 second timer counting down while the text displays Recording...
4.1.4 The recording will end either when the caller hangs up the phone, presses the
<Exit> button, or the 30 second timer is up with a warning (buzzer) sound. The
PeerCall will then go back to Standby mode.
4
PeerCall User’s Manual
4.1.5 A message which lasts less than two seconds will be ignored by the PeerCall.
4.2 Retrieve a Voice Message
4.2.1 Press the <Function> button to allow user to retrieve Voice Messages.
4.2.2 If there are no Voice Messages, the message No Message will be displayed with a
warning (buzzer) sound.
Pressing the <OK> or <Exit> button will put the PeerCall back to Standby mode.
4.2.3 If there are Voice Messages, the PeerCall will display the following Voice Message
information.
The box VOICE MESSAGE will be on, the Sequence Number, Caller ID Number,
the incoming ( ) icon if the message is new (unread) and the Record Time of the
message (hh:mm mo/dy) will be displayed.
4.2.4 Press <OK> to play the Voice Message.
4.2.5 Press <Previous> or <Next> to stop playing the current message, and to display
the previous or next Voice Message information.
4.2.6 Press <Clear> to erase the current Voice Message.
The user can have up to 10 messages kept at the voice message server. It is the
user’s responsibility to clear the voice message box. The server won’t be able
to record any additional new messages if the voice message box is full. Please
refer to section 4.1.1
4.2.7 Hanging up the Handset or pressing <Exit> button will put the PeerCall back to
Standby mode.
5. Phone Set-Up
You can enter Set-Up Mode by holding the <Function> key for two seconds until SETUP
is on, and Set Network shows up on the screen. The user can use <Previous> and
<Next> keys to scroll and select the desired option.
Set Network
Set TimeZone
Set Greeting
Set ServerIP
Show System
Change Network Modes
Set Time Zone
Record Greeting Message
Set Server IP
Show PeerCall System Information
Press <OK> for the Settings you selected, or <Exit> to return to Standby mode.
5.1 Change Network Modes
The PeerCall supports three types of Network connections: DHCP (Dynamic Host
Configuration Protocol), PPPoE (Point-to-Point Protocol over Ethernet) and Fixed IP
(Fixed Internet Protocol). The factory default setting is DHCP. If you cannot make the
PeerCall work in a new environment, use this option to set up or display the current
5
PeerCall User’s Manual
setting.
If you connect PeerCall at the LAN socket in the office, or connect to an IP Sharing
Router at home, there’s a very good chance you are connecting with DHCP mode
through an NAT server. If you connect to the ISP site through an ADSL or Cable
Modem directly, or use only routers without an NAT server, you are very likely using
PPPoE mode for connection.
Press <Previous> and <Next> to go through the different options.
Set PPPoE Parameters
Set Fixed IP Parameters
Set Network Connection Mode
Set PPPoE
Set Fixed IP
Set Mode
Press <Exit> to return to Standby mode, or <OK> to start the corresponding sub-menu
5.1.1 Set PPPoE Parameters
For PPPoE, your network connection
configuration is similar to the diagram on the
right.
You would be requested by PeerCall to enter
the Account Name and the Password. Your
MIS Manager or ISP should be able to
provide you these two parameters.
5.1.1.1 When asked to enter the account name (display will show Account Name
for two seconds), press the numerical keypads to make up to 29 alphanumeric characters while SETUP and NAME are on. Press <Clear> to erase
the last entry, <Exit> to ignore entries and return to Standby mode, or <OK>
to store the account name to the system table.
Repeatedly pressing the same numerical key quickly will show the
alphabetical characters. The alphabet is in lower case. If you need to
change to the upper case, press <*> (Caps Lock) key. The alphabet is
assigned with the following numerical keys:
1
2
3
4
5
6
7
8
9
@
a
d
g
j
m
p
t
w
_
b
e
h
k
n
q
u
x
.
c
f
i
l
o
r s
v
y z
6
PeerCall User’s Manual
0
* ⇧ (Caps Lock)
#
After user enters or erases an entry, the last character will always be shown
on the display. For an entry which is longer than 12 characters, PeerCall will
display the entered account name by segment, i.e. character 1st to 12th, or
12th to 23rd, or 23rd to 29th of the account name. Pressing <Previous> or
<Next> button will shift the display to the left or right by a single character.
5.1.1.2 When asked to enter the password (display will show Password for two
seconds), press the numerical keypads to make the right entries while
SETUP and PASSWORD are on. Follow the same procedure as described
in the previous section. Press <Exit> to return to Standby mode, or <OK> to
save the password to the system table.
5.1.1.3 PeerCall will then auto restart for the new setting to take effect. After save
the password to the system, if there is problem to take effect, please power
off and then power on the phone again to restart the new setting to take
effect.
5.1.2 Set Fixed IP Parameters
For Fixed IP, the network connection configuration is similar to the diagram on the
right.
PeerCall will request that you enter three sets of Fixed IP parameters: The PeerCall
IP, Network Mask and Gateway IP. Your MIS Manager or ISP should be able to
provide you these parameters.
5.1.2.1 When asked to enter the PeerCall IP address (display will show PeerCall
IP for two seconds), press the numerical keypads to make the right entries
while SETUP and IP are on. Press <Clear> to erase the last entry, <Exit> to
ignore entries and return to Standby mode, or <OK> to save the entry.
Please note, the IP address consists of four segments with 3 digits (000 to
255) each. Any segment which is smaller than 100 should be entered with
leading zeros, e.g., 25 should be entered as 025. PeerCall will validate
the number each time the user is done with the entry of a segment. If the
number entered was greater than 255, Input Error! will be displayed
for two seconds, then the segment will be cleared for user to re-enter
again.
5.1.2.2 You will then be asked to enter network mask (display will show
Network Mask for two seconds) while SETUP and MASK are on. Follow
the same procedure as described in the previous section.
5.1.2.3 You will be asked next to enter the gateway IP address (display will show
Gateway IP for two seconds) while SETUP and GATEWAY are on. Follow
the same procedure as described in the section 5.1.2.1.
7
PeerCall User’s Manual
5.1.2.4 PeerCall will then auto restart for the new setting to take effect. After save the IP,
Network Mak, and Gateway IP to the system, if there is problem to take effect, please
power off and then power on the phone again to restart the new setting to take effect.
5.1.3 Set Network Connection Mode
The connection mode which was selected for the power-on will be displayed first.
Press <Previous> and <Next> to go through the different network connection mode,
DHCP
PPPoE
Fixed IP
Select DHCP
Select PPPoE
Select Fixed IP
DHCP, PPPoE, or FxIP will be on correspondingly. Press <Exit> to ignore the
setting and return to Standby mode, or <OK> to select the new mode. The
PeerCall will then auto restart for the new settings to take effect.
For selecting PPPoE or Fixed IP modes, please refer to section 5.1.1 or 5.1.2 for
providing more parameters.
5.2 Set Time Zone
Press <Previous> and <Next> to go through the right time zone. The display will show
GMT+hh:00 (i.e. GMT-12:00, … GMT-01:00, GMT, GMT+01:00, … GMT+13:00).
Press <Exit> to ignore the setting and return to Standby mode, or <OK> to confirm the
selection. The clock will then be refreshed by the server.
5.3 Record Greeting Message
5.3.1 The message OK to Start is displayed. Whenever the user is ready to record,
press the <OK> key. The display will change to Recording... and the timer will
start to count down for 15 seconds. You can now record your greeting message.
5.3.2 At the end of the 15 seconds, or when the user presses <OK>, PeerCall will stop
the recording.
5.3.3 The display will then show Replay... and the recorded message will be played.
At the end, the message OK or Clear will be displayed.
5.3.4 The user can press <OK> to accept the Greeting Message and then go back to
Standby mode.
Please note, the user can dial the current PeerCall phone number to replay the
greeting.
5.3.5 The user can also press <Clear> to re-do the recording as described at the section
5.3.1.
5.3.6 Whenever the user hangs up the Handset or presses <Exit> during the recording
process, it will put the PeerCall back to Standby mode.
5.4 Set Server IP
Your PeerCall comes with a default Server IP Address. In case you intend to connect to
a different server offered by some other PeerCall service providers, you may change it
based on the parameters that those service providers give to you.
When asked to enter the server IP address (display will show Server IP for two
seconds), press the numerical keypads to make the right entries, i.e. four segments with 3
digits each (please refer to the note described in the section 5.1.2.1), while SETUP and
SERVER IP are on. At the end, press <Exit> to ignore entries and return to Standby
mode, or <OK> to submit it. The PeerCall will then auto restart for the new settings to
8
PeerCall User’s Manual
take effect.
5.5 Show PeerCall System Information
Press <Previous> and <Next> to display various PeerCall system information. They are,
5.5.1 The 10 digits phone number
(e.g. 123-456-7890).
5.5.2 The firmware version number (e.g. F/W V1.10).
Press <OK> to put the PeerCall back to Standby mode.
9
PeerCall User’s Manual
Appendixes
A. Power-on Messages
Message
Description
DHCP Failed
No IP was Assigned by the DHCP Server
Not Ready
Cannot Connect to a Server
PeerCall 100
Connected Successfully – go to Standby mode
PPPoE Error!
Recorded PPPoE Account Name or Password is Invalid
PPPoE N/A
Cannot Access the PPPoE Server
PPPoE Reject
Rejected by the PPPoE Server – Unauthorized Access
Service Down
Out of Service – Server is Overloaded
Service End
PeerCall Subscription is Expired
Service N/A
No Service Available from the Server – e.g. PeerCall phone
number is not on the service number list.
Starting...
Power-on Process in Progress
Wrong F/W
Unsupported Firmware Version
Wrong H/W
Unsupported Hardware Type
Wrong Vendor
Unsupported Manufacturer Code
B. Contact Information
www.phonekiller.com
www.ortery.com
Ortery Technologies Inc.
3Fl., No. 46, Han-Sheng W. Rd.
Panchiao, Taiwan
+886-2-2258-2180 (Phone)
+886-2-2258-2381 (Fax)
e-Mail to Sales Division:
[email protected]
e-Mail to Customer Support:
[email protected]
10