1
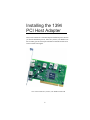
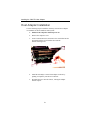
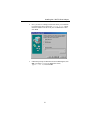
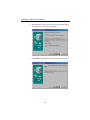
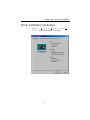
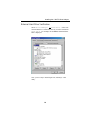
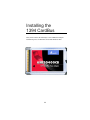
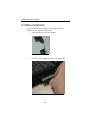
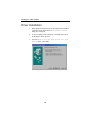
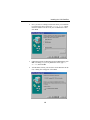
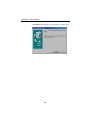
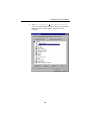
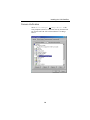
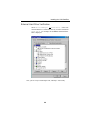
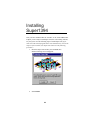
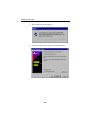
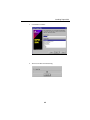
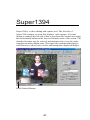
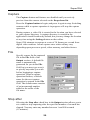
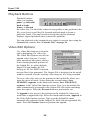
1394 Host Adapter
Installation Guide and
Super1394
User Manual
3307-0045 Release 2.0
Product:
1394 PCI Host Adapter:
ASB30400
1394 CardBus Host Adapter:
ASB30400CB
Copyright
© 2000 Advanced System Products, Inc., 1150 Ringwood Ct.,
San Jose, CA 95131
This manual, as well as the software described in it, is
furnished under license and may only be used or copied in
accordance with the terms of such license. Except as permitted
by such license, no part of this publication may be reproduced,
stored in a retrieval system or transmitted, in any form or by
any means, electronic, mechanical, recording, or otherwise,
without the prior written permission of Advanced System
Products, Inc. The information in this manual is furnished for
informational use only, is subject to change without notice, and
should not be construed as a commitment by Advanced System
Products, Inc. Advanced System Products, Inc., assumes no
responsibility or liability for any errors or inaccuracies that
may appear in this book.
Trademarks
AdvanSys, Super1394 are trademarks of Advanced System
Products, Inc., registered in the U.S., and other countries. All
other trademarks used belong to their respective owners.
ii
Revision Control
Part Number 3307-0045, Release 2.0 , August 2000
How to Reach Us
Advanced System Products, Inc.
1150 Ringwood Court, San Jose, CA 95131 USA
408-383-9400
Tech Support:Phone: (408) 467-2930 Monday –Friday,
8:30AM -5:00PM PST
Fax: 408-383-9612
Email: [email protected]
Or visit our web site at http://www.advansys.com
iii
FCC Part 15 Class B
Registration Warning
This equipment generates and uses radio frequency energy. If
the equipment is not installed and used properly, that is, in
strict accordance with the manufacturer’s instructions, it may
cause interference with radio and television reception. It has
been type-tested and found to comply with the limits for a
Class B computing device in accordance with the specification
in Subpart B of Part 15 of FCC Rules & Regulations, which is
designed to provide reasonable protection against such
interference in a residential installation. If this equipment does
cause interference to radio or television reception, which can
be determined by turning the equipment off and on, the user is
encouraged to try to correct the interference by one or more of
the following measures: (1) Reorient the receiving antenna (2)
Relocate the computer with respect to the receiver (3) Move
the computer away from the receiver (4) Plug the computer
into a different outlet so that the computer and receiver are on
different branch circuits. If necessary, the user should consult
the dealer or an experienced radio/ television professional for
additional suggestions. The Federal Communications
Commission produces a booklet: How to Identify and Resolve
Radio-TV Interference Problems, which the user may find
helpful. This booklet is available from the U.S. Government
printing office, Washington, DC 20402.
Stock No. 004-000-00345-4
Shielded cables and certified Class B peripherals must be used
with this product. Using unshielded cables or uncertified
peripherals may result in this unit being out of compliance with
FCC Rules Part 15.
Changes or modifications not expressly approved by the
manufacturer can void the user’s authority to operate this
equipment.
This device complies with Part 15 of the FCC Rules &
Regulations. Operation is subject to the following two
conditions: (1) this device may not cause harmful
interference; (2) this device accepts any interference received,
including interference that may cause undesired operation.
iv
Table of Contents
Installing the 1394 PCI Host Adapter . . . . . . . . . . . . . . . 1
Host Adapter Installation . . . . . . . . . . . . . . . . . . . . . 2
Driver Installation . . . . . . . . . . . . . . . . . . . . . . . . . . . 4
Driver Installation Verification . . . . . . . . . . . . . . . . . . 7
Camera Verification . . . . . . . . . . . . . . . . . . . . . . 9
External Hard Drive Verification . . . . . . . . . . . . 10
Installing the 1394 CardBus . . . . . . . . . . . . . . . . . . . . . . 11
CardBus Installation . . . . . . . . . . . . . . . . . . . . . . . . . 12
Driver Installation . . . . . . . . . . . . . . . . . . . . . . . . . . . 14
Driver Installation Verification . . . . . . . . . . . . . . . . . . 18
Camera Verification . . . . . . . . . . . . . . . . . . . . . . 20
External Hard Drive Verification . . . . . . . . . . . . 21
Installing Super1394 . . . . . . . . . . . . . . . . . . . . . . . . . . . . 23
Super1394 . . . . . . . . . . . . . . . . . . . . . . . . . . . . . . . . . . . 27
Capture Tab . . . . . . . . . . . . . . . . . . . . . . . . . . . . . . . 28
Preview . . . . . . . . . . . . . . . . . . . . . . . . . . . . . . . 28
Capture . . . . . . . . . . . . . . . . . . . . . . . . . . . . . . . 29
File . . . . . . . . . . . . . . . . . . . . . . . . . . . . . . . . . . . 29
Stop after . . . . . . . . . . . . . . . . . . . . . . . . . . . . . . 29
Resolution & Format . . . . . . . . . . . . . . . . . . . . . 30
v
Edit Tab . . . . . . . . . . . . . . . . . . . . . . . . . . . . . . . . . . 31
Video & Bitmap Files . . . . . . . . . . . . . . . . . . . . . 31
File Manipulation Buttons . . . . . . . . . . . . . . . . . 31
Playback Buttons . . . . . . . . . . . . . . . . . . . . . . . . 32
Video Edit Options . . . . . . . . . . . . . . . . . . . . . . . 32
Cassette Tab . . . . . . . . . . . . . . . . . . . . . . . . . . . . . . 34
Diagnostics Tab . . . . . . . . . . . . . . . . . . . . . . . . . . . . 37
Status Bar, Tool Bar, Caption Bar . . . . . . . . . . . . . . 37
Status Bar . . . . . . . . . . . . . . . . . . . . . . . . . . . . . 37
Tool Bar . . . . . . . . . . . . . . . . . . . . . . . . . . . . . . . 37
Caption Bar . . . . . . . . . . . . . . . . . . . . . . . . . . . . 38
Troubleshooting . . . . . . . . . . . . . . . . . . . . . . . . . . . . . . . 39
At a Glance . . . . . . . . . . . . . . . . . . . . . . . . . . . . . . . 40
vi
Installing the 1394
PCI Host Adapter
This section outlines the 1394 Host Adapter installation process. Before
you start the installation process, make sure you have your Windows 98
SE CD. Many systems will require information included on that CD in
order to install 1394 support.
Note: Please make sure you have your Windows 98 SE CD.
1
Installing the 1394 PCI Host Adapter
Host Adapter Installation
Use the following steps to install the AdvanSys 1394 PCI host adapter
in a Windows 98 SE or Windows 2000 System:
1.
Shutdown the computer and turn power off.
2.
Remove the computer cover.
3.
Locate an unused PCI slot, and remove the metal filler bracket
associated with the slot if installed. Set aside the
bracket retaining screw.
4.
Install the AdvanSys 1394 PCI host adapter in the PC by
pushing it completely into the PCI connector.
5.
Re-install the screw into the chassis, locking the adapter
bracket in place.
2
Installing the 1394 PCI Host Adapter
6.
Complete the installation by connecting the 1394 Hot Plug to
the 1394 PCI host adapter, and your 1394 peripheral device.
7.
Turn on the system.
3
Installing the 1394 PCI Host Adapter
Driver Installation
1.
When Windows 98 SE boots up, the PCI OHCI IEEE 1394 Host
Controller will be detected. The New Hardware Found
dialog box will appear.
2.
A series of dialog boxes will appear. Click Next until you see
the dialog box shown in step 3.
3.
Select the Search for the best driver for your
device option. Click Next.
4
Installing the 1394 PCI Host Adapter
4.
Now, you will see a dialog box that asks where you would like
to search for the drivers. Select the CD-Rom drive option.
Insert the Windows 98 SE CD in your CD-ROM drive. Then
click Next.
5.
If Windows prompts for Windows 98 SE CD-ROM again, click
OK. (Assuming D is your CD_ROM drive letter)
type D:\ win 98, and click OK.
5
Installing the 1394 PCI Host Adapter
6.
After Windows locates your new driver on the Windows 98 SE
CD, a dialog box will appear. Select Next.
7.
Click Finish and restart the system for the driver to take effect.
6
Installing the 1394 PCI Host Adapter
Driver Installation Verification
1.
Select Start
Settings
Control Panel
System. The following dialog box will appear:
7
Installing the 1394 PCI Host Adapter
2.
Select Device Manager
1394 Bus Controller.
If the 1394 PCI host adapter is properly installed, the PCI OHCI
IEEE 1394 Host Controller will be listed under the Bus
Controller.
8
Installing the 1394 PCI Host Adapter
Camera Verification
Select Device Manager
Image device. If the
1394 peripheral (camera) is connected correctly, the Microsoft
DV Camera and VCR will be listed under the 1394 Image
Device.
9
Installing the 1394 PCI Host Adapter
External Hard Drive Verification
Select Device Manager
Disk drive. If the 1394
external hard drive is connected correctly, it will be listed under
Disk drive. For example, the SYMBIOS SYM13FW500Disk is displayed.
Now, you are ready to install Super1394, AdvanSys’ video
utility .
10
Installing the
1394 CardBus
This section outlines the AdvanSys 1394 CardBus host adapter
installation process for Windows 98 SE and Windows 2000.
11
Installing the 1394 CardBus
CardBus Installation
Use the following steps to install the 1394 CardBus adapter in a
Windows 98 SE or Windows 2000 System:
1.
Connect the dongle to the1394 CardBus.
2.
Insert the 1394 CardBus and dongle in the CardBus Slot.
12
Installing the 1394 CardBus
3.
Complete the installation by connecting the 1394 Hot Plug
cable to the CardBus dongle and to your 1394 peripheral device.
13
Installing the 1394 CardBus
Driver Installation
1.
When Windows 98 SE boots up, the PCI OHCI IEEE 1394 Host
Controller will be detected. The New Hardware Found
dialog box will appear.
2.
A series of dialog boxes will appear. Click Next until you see
the dialog box shown in step 3.
3.
Select the Search for the best driver for your
device option. Click Next.
14
Installing the 1394 CardBus
4.
Now, you will see a dialog box that asks where you would like
to search for the drivers. Select the CD-Rom drive option.
Insert the Windows 98 SE CD in your CD-ROM drive. Then
click Next.
5.
If Windows prompts for Windows 98 SE CD-ROM again, click
OK. (Assuming D is your CD_ROM drive letter) type D:\
win 98, and click OK.
6.
After Windows locates your new driver on the Windows 98 SE
CD, A dialog box will appear. Select Next.
15
Installing the 1394 CardBus
7.
Click Finish and restart the system for the driver to take effect.
16
Installing the 1394 CardBus
Driver Installation Verification
1.
Select Start
Settings
Control Panel
System. The following dialog box will appear:
17
Installing the 1394 CardBus
2.
Select Device Manager
1394 Bus Controller.
If the 1394 CardBus adapter is properly installed, the PCI OHCI
IEEE 1394 Host Controller will be listed under the Bus
Controller.
18
Installing the 1394 CardBus
Camera Verification
Select Device Manager
Image device. If the
1394 peripheral (camera) is connected correctly, the Microsoft
DV Camera and VCR will be listed under the 1394 Image
Device.
19
Installing the 1394 CardBus
External Hard Drive Verification
Select Device Manager
Disk drive. If the 1394
external hard drive is connected correctly, it will be listed under
Disk drive. For example, the SYMBIOS SYM13FW500Disk is displayed.
Now, you are ready to install Super1394, AdvanSys’ video utility.
20
Installing
Super1394
Once you have installed either the 1394 PCI or the 1394CardBus Host
Adapter you are ready to install Super1394, the video editing software,
on your system. Use the following steps to install Super1394. (If for
some reason the install program doesn’t start automatically, click on the
setup.exe file located on your Super1394 CD to start the following
procedure.)
1.
Insert the Super1394 CD into your CD ROM drive
and the following screen will appear:
2.
Select Install
23
Installing Super1394
3.
The Setup screen will then appear.
4.
Chose the location to place Super1394, then click Next.
24
Installing Super1394
5.
Click Next to continue.
6.
The files will then start transferring.
25
Installing Super1394
7.
At this point you have the option to restart your computer or
restart it later. Once you have selected an option click Finish.
26
Super1394
Super1394 is a video editing and capture tool. The left side of
Super1394 contains a screen that displays video images. You may
detach or reattach the left side video screen from the control area using
the dock/undock button in the lower left-hand corner of the screen. The
detached window may be resized, and maximized to cover the entire
computer monitor display area. The right side contains tabbed pages
with features to allow you to select and manipulate displayed images.
Dock/Undock Button
27
Super1394
Capture Tab
Capture commands are disabled until at least one attached and active
(turned on) camera is detected.
Preview
Preview displays a live video
image of what the current selected
camera is seeing. It is exactly like
looking through the view finder of
your camera. The Preview feature
does not use up any disk space as
it runs.
Press the Preview button to begin;
press it again to stop. Notice: the Caption bar and the small window next
to the Preview and Capture buttons are updated to display the current
state of the preview operation. See “Caption Bar” on page 38.
Features on this page will be
disabled if the camera is set to
cassette playback mode rather than
live camera mode. If you have more
than one active camera attached to the 1394 card, you may switch
between cameras using the Drop-down list on the toolbar. Also, you
may switch cameras while a preview is in progress.
28
Super1394
Capture
The Capture button and features are disabled until you actively
preview from the camera selected on the Drop-down list.
Press the Capture button to begin; and press it again to stop. Switching
cameras while a capture operation is in progress will stop the capture
operation.
During capture, a video file is created in the location you have selected
as your capture directory. A capture directory is created in the
application’s install location by default, but you may change the location
at any time using the Settings button on the toolbar.
Super1394 attempts to capture at a rate of 30 frames per second from
digital video cameras. Actual capture rates achieved may vary
depending upon processor speed, video memory, and other factors.
File
Specify a name for the captured
file in the File field of the
Output section. A default file
name is automatically
generated for you in the File
field, but you may type over it
to specify any name you wish
before beginning a capture
operation. When a capture
operation finishes, a default
name for the next capture
operation is entered in the File
field. The default name consists
of an incremental number
added to the suffix of the
file name.
Stop after
Selecting the Stop after check box in the Output section allows you to
set a timer to stop capturing after the specified number of seconds has
elapsed. You may enter any number between 1 and 900 seconds
(15 minutes).
29
Super1394
Resolution & Format
The output resolution and format are fixed. Super1394 captures digital
video camera output to Type-1 DV AVI file format. The file edit output
is stored in an .AVI file in uncompressed format. Super1394 does not
support capture to MPEG format, but MPEG files (with .MPG
extensions) from other sources may be played and edited when placed in
the capture files directory.
30
Super1394
Edit Tab
The Edit tab features bitmap and
video clip viewing. Video clips
located in your capture directory
can be displayed. You should be
able to view any file having a
.BMP, .AVI, or .MPG extension,
not just files created with
Super1394. You will need to move
any files from other sources into
the capture directory in order to
view them in Super1394. Playback
and edit features are disabled until
a video clip has been loaded.
Video & Bitmap Files
Select the file type with the
bitmap and video buttons. The window, located under those buttons,
lists the current files in the capture directory.
File Manipulation Buttons
You may use the buttons on the right to Delete, Rename, or
Load the selected file in the Output File window for display.
Once a video file has been loaded, you may use the playback
features to go to any position in the file for viewing or
editing. You can unload a video or bitmap file by pressing the small X
button located beside the Load button. If you start a video operation on
another tab while a file is loaded, Super1394 will automatically unload
the file for you.
Notice that the caption bar is updated to display the name of the
currently loaded file. See “Caption Bar” on page 38.
31
Super1394
Playback Buttons
Playback buttons
allow you to play,
pause, go forward/
back a single
frame, or rewind
the video clip. Use the slider control to zip quickly to any position in the
file, or to slowly scroll the file forward and backward to locate a
particular frame. The small window beside the playback buttons
displays elapsed playback time (current file position).
You can playback video contained on a camera’s cassette tape using the
Cassette tab controls. See “Cassette Tab” on page 34.
Video Edit Options
Use Video Edit Options to trim the
end or beginning of a video clip.
The Video Edit Options are used to
append video clips too. Cut and
paste operations take place relative
to the current playback position of
the loaded file. As with playback,
Super1394 can handle any file
having an .AVI or .MPG extension,
not just files it has generated. The Output File is displayed in the small
window centered over the existing video image as it is being recorded.
To cut a video clip, move to the position in the loaded file where you
want the cut to be made. Select either the second button, Save
LEADING segment, or the third radio button, Save TRAILING
segment, in the Video Edit Options section. Type over the default file
name automatically generated in the Output File field with something
more descriptive. Press the Execute button to perform the cut.
To Append a clip, move to the position in the loaded file where you
would like to append the clip. Select the fourth radio button, Append, in
the Video Edit Options section. Type over the default file name
automatically generated in the Output File field with the appended file
name. Press the Execute button to perform the append.
32
Super1394
Note: the second clip will NOT be inserted (spliced) into the first clip,
but will REPLACE any portion of the first clip past its current playback
position. A true splicing operation, will require one cut and two append
operations -- cut the original clip into two sections, append the clip to
section one. Then append section two to the results of the first append.
You may cancel an ongoing edit operation at any time by deselecting the
Execute button. If you start a video operation on another tab, during an
edit operation, Super1394 will automatically cancel the edit operation.
33
Super1394
Cassette Tab
The Cassette tab shows video clips stored on a attached digital video
camera’s cassette, and downloads any part of those clips to your hard
drive for editing. Cassette commands are disabled until at least one
attached and active (turned on) camera is detected, and that camera is
set to cassette playback -- not live camera mode.
If you have more than one active camera attached to the 1394 card, you
may switch between cameras using the list on the toolbar. Unlike live
camera preview, you may NOT switch cameras during a cassette
operation. When performing cassette operations in Super1394, it is best
to avoid using the camera’s manual controls, and to rely exclusively on
the controls provided by Super1394 to avoid confusion.
Note: Attaching or detaching a device while a preview, capture, or
cassette operation is in progress will cause the process to end.
34
Super1394
Press the View button to
access the cassette
contents. If successful, the
playback buttons will
become active and you may
play the tape at the
following speeds: Slow,
Normal, Fast. The
following controls are also
available: Pause, Move a
Single Frame Forward,
Rewind a Single Frame,
Rewind, Fast Forward. To
stop reading the cassette,
press the View button
again. Super1394 will
automatically stop reading
a cassette if you start a
video operation on another
tab while a cassette
operation is in progress.
Pausing Playback and pressing the Download button stores the cassette
contents to a file on your hard drive as the cassette plays. Pressing
Download again stops the operation. Notice the caption bar and the
small window (next to the load buttons) are updated to display the
current state of the download operation. See “Caption Bar” on page 38.
Switching cameras while a cassette download operation is in progress
stops the operation.
35
Super1394
During Download, a video file will be created in the location you have
selected as your capture directory. A capture directory is created in the
application’s install location by default, but you may change the location
at any time using the Settings button on the toolbar. The downloaded
file will be named according to what you see in the field next to the
Output option. A default file name is automatically generated for you,
but you may type over it to specify any name you wish before beginning
a download operation. When a download operation finishes, the a
number will be added to the current filename to generate a default name
for the next capture operation.
Super1394 can display and download cassette contents stored in either
normal or Long Play (LP) format, but may be unable to download
cassette contents from a camera whose model or manufacturer does not
match the device on which the original recording was made.
During download, disk space on the drive where your capture directory
is located will be consumed at the rate of 3.7 megabytes per second; you
should refer to the status bar to ensure sufficient available space before
you start. Super1394 automatically stops your download operation and
saves your file before you run out of disk space.
36
Super1394
Diagnostics Tab
The Diagnostics tab is hidden by default.
This is done in order to avoid any
confusion concerning how devices are
selected for use with Super1394 video
features. The tab is displayed by checking
the Diagnostics Tab item under the View
menu.
This tab contains a simple tree view of all attached 1394 devices of any
type (not only cameras). Also, this tab contains a Reset button used to
force all attached devices to reidentify themselves to the system.
Information in the tree view is automatically updated as devices are
attached and detached to the 1394 host adapter board.
Status Bar, Tool Bar, Caption Bar
This section discusses the status bar, tool bar, and caption bar. The status
bar is found at the bottom of Super1394. The tool bar and the caption
bar are found at the top of Super1394.
Status Bar
The status bar along the bottom of Super1394 provides you with
continually updated disk space information, while the program is
running. You may change the units used to display available disk space
to whatever you feel is most useful. A shrinking progress bar acts as a
visual aid in tracking disappearing disk space, and overlaid text keeps
you informed of whether available space is OK, LOW, or CRITICAL.
Low is defined as 100MB, and critical as 20MB. The available disk
space shown refers to the drive where the capture files directory is
currently located.
Tool Bar
A tool bar along the top of Super1394
contains the Settings button, which
allows you to define a new location to
store your video files. It also contains a list of supported cameras
37
Super1394
currently turned on and plugged into the 1394 card in your system.
The list of cameras will be updated automatically as devices are
removed or attached to your system.
A button on the far right side of the
toolbar displays an HTML-based user
manual.
Caption Bar
The caption bar in Super1394 provides valuable feedback to help
identify the video image you are currently viewing. Refer to the caption
bar to see the name of the file, or camera, and a description of the
current activity.
38
Troubleshooting
Before you call AdvanSys’ Customer Service, please review these
helpful tips that may help you resolve your problem . Troubleshooting
takes patience, analysis, and record keeping. Remember, we are here to
help. Some things to consider.
Troubleshooting Process
The process consists of these steps:
•
Collect information concerning failure
•
Confirm the problem
•
Isolate the problem
•
Perform the repair
•
Verify the repair
Throughout the troubleshooting process, you should also
•
Keep notes
•
Consult resources
Hotline Number: (408) 467-2930
39
Troubleshooting
At a Glance
The following table addresses some common problems. Make sure that
Microsoft’s Windows SE 1394 Storage Supplement is installed. This
update increases performance. Refer to the AdvanSys web site http:/
/www.advansys.com/products/super1394.htm#patch
for the latest information concerning the patch.
Description of Problem
Solution
Screens drop out or
the audio is not in synch
with the video, and you
have an IDE drive.
• Go to Start
Settings
Control Panel
System. Select
Device Manager tab. Make sure that
View devices by type is selected,
click Disk drives. Listed under
Disk drives, right click Generic
IDE Disk Type46 select
properties. Go to the Settings
tab and make sure that the DMA Option
is selected.
The Drop down list
shows -no camera
found; even though,
my camera is connected
to the system.
• Make sure the camera is on in camera mode.
When using the Cassette
feature, my video file
doesn’t load onto my
hard drive.
• Make sure there is a tape in the camera.
There is distortion across
the Super1394 video
display screen during
Cassette Playback mode.
• Distortion sometimes happen when a film
clip was produced on one type of camera
and played back on another type of camera.
The way to eliminate the lines is to use the
same camera to produce and playback the
clip on the same camera.
• Reconnect the hot plug cable at both ends
and restart your computer.
• Verify that the camera is in “VCR” mode.
40


![Registry Manual []](http://vs1.manualzilla.com/store/data/005750489_1-c8586633e9f35db1a00a4874731a3151-150x150.png)