1
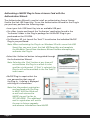
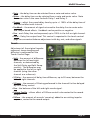
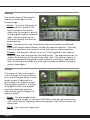
User’s Manual
Flexible Convolution Reverb
McDOWELL SIGNAL PROCESSING, LLC
McDSP Revolver
McDSP Revolver Plug-In Manual
McDSP
McDowell Signal Processing, LLC
1300 Crittenden Lane #401
Mountain View, CA 94043
Support
Email: [email protected]
Technical Support: [email protected]
World Wide Web: www.mcdsp.com
mcdsp.com
Page i
Special Thanks to:
• Bert McIntyre and Fokke van Saane
• Stephen Hart, James Willets, and James Gangwer at Fantasy Studios
from the entire McDSP development team.
Copyright Notice:
Copyright 1998-2008 McDowell Signal Processing, Limited Liability Company
All Rights Reserved. The McDowell Signal Processing, Limited Liability Company’s Revolver Plug-In and
corresponding User’s Manual is copyrighted and all rights are reserved. Information in this document is
subject to change without notice and does not represent a commitment on the part of McDowell Signal
Processing, Limited Liability Company. This document may not, in whole or part, be copied, photocopied,
reproduced, translated, or reduced to any electronic medium or machine-readable form for the purpose of
resale without prior consent, in writing, from McDowell Signal Processing, Limited Liability Company.
Trademarks:
McDowell Signal Processing, Limited Liability Company is a trademark of McDowell Signal Processing,
Limited Liability Company. Other brands and their products are trademarks of their respective holders and
should be noted as such.
Digidesign™ and Pro Tools™ are registered trademarks of Digidesign, Inc.
Page ii
McDSP Revolver
Table of Contents
McDSP Revolver License Agreement
iv
Getting Started with Revolver
vi
System Requirements
Installing the Plug-Ins
Authorizing your McDSP Plug-Ins
Authorizing with iLok.com
Registering your Revolver Plug-In
Using your McDSP Plug-Ins
vi
vii
xi
xv
xviii
xviii
Introducing Revolver
1
The Quick Start Tour
3
Revolver Overview
Controls
Plot Display
The Revolver About Box
General Information
Control Linking
Meters
Automation
Presets: Using the Presets and Making Your Own
A Word on Preset Compatibility
Using the Revolver Plug-In
Why Use Reverb?
What Is Convolution?
Optimizing Revolver Performance
Loading Impulse Responses
Creating New Impulse Responses
Impulse Response Creation Tips and Tricks
Revolver Specifications
mcdsp.com
3
5
9
10
10
10
10
10
11
11
12
12
12
13
14
14
15
16
Page iii
McDSP Revolver License Agreement
The software described in this manual is furnished under a license agreement and may be used only in
accordance with the terms of the agreement.
McDowell Signal Processing, Limited Liability Company License and Warranty:
The software which accompanies this license (the “Software”) is the property of McDowell Signal
Processing, Limited Liability Company or its licensers and is protected by copyright law. While McDowell
Signal Processing, Limited Liability Company continues to own the Software, you will have certain
rights to use the Software after your acceptance of this license. Except as may be modified by a license
addendum which accompanies this license, your rights and obligations with respect to the use of this
Software are as follows:
You May:
• authorize 1 (one) copy of the Software on 1 (one) PACE Anti-Piracy iLok USB Smart Key, for use with
no more than 1 (one) computer at any given time;
• make copies of the Software for archival purposes, or copy the software onto the hard disk of your
computer and retrain the original for archival purposes;
• after written notice to McDowell Signal Processing, Limited Liability Company, transfer the Software
on a permanent basis to another person or entity, provided that you retain no copies of the Software
and the transferee agrees to the terms of this agreement
• use the impulse response included with the Software only with the Software, and for no other
purpose; and
You may not:
• copy, duplicate, or reproduce the documentation which accompanies the Software for the purpose of
resale;
• sublicense, rent or lease any portion of the Software to a third party without expressed written
permission from McDowell Signal Processing, LLC;
• reverse engineer, de-compile, disassemble, modify, translate, make any attempt to discover the source
code of the Software, or create derivative works from the Software;
• reverse engineer, reproduce, duplicate, or re-sample the impulse responses included with the
Software;
• make any attempt to circumvent any copy protection software;
• use a previous version or copy of the Software after you have received a replacement set or an
upgraded version as a replacement of the prior version, unless you donate a previous version of an
upgraded version to a charity of your choice, and such charity agrees in writing that it will be the sole
end user of the product , and that it will abide by the terms of this agreement. Unless you so donate
a previous version of an upgraded version, upon upgrading the Software, all copies of the prior
version must be destroyed.
Page iv
McDSP Revolver
Limited Warranty:
McDowell Signal Processing, Limited Liability Company warrants that the media on which the Software
is distributed will be free from defects. Your sole remedy in the event of a breach of this warranty will
be that McDowell Signal Processing, Limited Liability Company will, at its option, replace any defective
media. McDowell Signal Processing, Limited Liability Company does not warrant that the Software will
meet your requirements or that the operation of the Software will be uninterrupted or that the Software
will be error-free. THE ABOVE WARRANTY IS EXCLUSIVE AND IN LIEU OF ALL OTHER WARRANTIES,
WHETHER EXPRESSED OR IMPLIED, INCLUDING THE IMPLIED WARRANTIES OF MERCHANTABILITY, FITNESS
FOR A PARTICULAR PURPOSE AND NON INFRINGEMENT. THIS WARRANTY GIVES YOU SPECIFIC LEGAL
RIGHTS. YOU MAY HAVE OTHER RIGHTS, WHICH VARY FROM STATE TO STATE.
Disclaimer of Damages:
REGARDLESS OF WHETHER ANY REMEDY SET FORTH HEREIN FAILS OF ITS ESSENTIAL PURPOSE, IN NO
EVENT WILL McDowell Signal Processing, Limited Liability Company BE LIABLE TO YOU FOR ANY SPECIAL,
CONSEQUENTIAL, INDIRECT OR SIMILAR DAMAGES, INCLUDING ANY LOST PROFITS OR LOST DATA ARISING
OUT OF THE USE OR INABILITY TO USE THE SOFTWARE EVEN IF McDowell Signal Processing, Limited Liability
Company HAS BEEN ADVISED OF THE POSSIBILITY OF SUCH DAMAGES. SOME STATES DO NOT ALLOW THE
LIMITATION OR EXCLUSION OF LIABILITY FOR INCIDENTAL OR CONSEQUENTIAL DAMAGES SO THE ABOVE
LIMITATION OR EXCLUSION MAY NOT APPLY TO YOU. IN NO CASE SHALL McDowell Signal Processing,
Limited Liability Company’s LIABILITY EXCEED THE PURCHASE PRICE FOR THE SOFTWARE. The disclaimers
and limitations set forth above will apply regardless of whether you accept the Software.
U.S. Government Restricted Rights:
RESTRICTED RIGHTS LEGEND: Use, duplication, or disclosure by the Government is subject to restrictions as
set forth in subparagraph (c) (1)(ii) of the Rights in Technical Data and Computer Software clause at DFARS
252.227-7013 or subparagraphs (c)(1) and (2) of the Commercial Software Restricted Rights clause at 48 CFR
52.227-19, as applicable, McDowell Signal Processing, Limited Liability Company, Mountain View, CA 94043
([email protected]).
General:
This Agreement will be governed by the laws of the State of California. This Agreement may only be
modified by a license addendum which accompanies this license or by a written document which has
been signed both by you and McDowell Signal Processing, Limited Liability Company. Should you have
any questions concerning this Agreement, or if you desire to contact McDowell Signal Processing, Limited
Liability Company for any reason, please email: [email protected]. By downloading, using, or copying this
Binary Software, Licensee agrees to abide by the intellectual property laws, and all other applicable laws
of the U.S., and the terms of this License. Ownership of the software shall remain solely in McDowell Signal
Processing, Limited Liability Company.
mcdsp.com
Page v
Getting Started with Revolver
Congratulations on purchasing the Revolver Plug-In, the convolution reverb
from McDSP.
System Requirements
Operating System
McDSP Revolver is compatible with both Mac OS X 10.4.x and Windows XP.
Configurations
McDSP Revolver is only available in RTAS and AudioSuite configurations.
Applications
Pro Tools™ 7.x or higher is required for TDM, LE, and M-Powered systems.
Additionally, a Third Party software application that supports the Digidesign
TDM, RTAS, or AudioSuite plug-in Standard may be supported. See http://www.
digidesign.com/developers/plugin_info/ for more information.
McDSP plug-ins are compatible with the entire Pro Tools™ 7 product line.
Hardware
McDSP plug-ins support any Digidesign or approved Third Party hardware
supported in Pro Tools™ 7.x. This includes HD, HD Accel, 002, and Mbox host
based systems. See http://www.digidesign.com/compato/ for more specific
information.
The McDSP Mac versions are compatible with both Intel and PowerPC based
computers. The McDSP XP versions require an Intel Pentium 4 or greater processor.*
* Our XP test machines are chosen to follow the Digidesign recommended systems guide, which currently
is the Dell Precision™ Workstation 670 with 2.79 GHz Xeon processor. All products are guaranteed to
run on that system. Older Intel processors (i.e. Pentium III and predecessors) and AMD processors are not
supported.
Please visit mcdsp.com for the latest information about compatibility.
Digidesign™ and Pro Tools™ are registered trademarks of Digidesign, Inc.
Page vi
McDSP Revolver
Installing the Plug-Ins
Installation on Mac OS X
The Revolver plug-in Package includes this manual, ReadMe and Release
Notes, a folder of presets for the Revolver plug-in, and the Revolver plug-in.
Two copies of the Revolver Licensing Agreement are included - one in this
pdf manual and a second as a separate text file. The Revolver plug-in manual
requires that Adobe Acrobat reader (or similar .pdf reader) is installed.
Both online and boxed version will come with a Revolver installer that will
automatically install the Revolver plug-in and its presets on your system. The
authorization of the Revolver plug-in is still required after running the installer,
and those steps are detailed in the following sections.
Installing the Revolver plug-in and presets with the Installer:
The online version of the package has been prepared for Internet delivery,
and is transmitted as a compressed file in zip format (.zip). In Mac OS X 10.4.x,
simply double click the *.zip file to unpack the installer. The boxed plug-in
package purchased at your local dealer will be on CDROM. As with the online
version, these ‘physical’ versions of the Revolver plug-in package should be
copied into a local folder on your system.
• Insert the McDSP ‘HD Disk,’ ‘Native Disk,’ or ‘LE Disk’ CDROM onto an
available CDROM drive.
• Navigate to the Revolver plug-in folder on the CDROM - the installer
application is contained therein.
• Run the Revolver plug-in Installer application to install (copy) the Revolver
plug-in, presets, and documentation to a local folder on your system. The
plug-in will be placed in the ‘Plug-Ins’ folder, and the presets will be placed
in the ‘Plug-Ins Settings’ folder.
• If a previous version of the Revolver plug-in (or other HD, Native, or LE
version) was already in the plug-ins folder, it will automatically be updated
(or replaced) by the installer.
mcdsp.com
Page vii
Re-installing the Revolver plug-in presets manually:
In you wish to restore the factory default presets, it may be useful to know how
to manually re-install only the presets.
• Go to the ‘Plug-in Settings’ folder:
• Root->Library->Application Support->Digidesign->Plug-in Settings
• If Pro Tools™ has not already done so for you, create a folder called
‘Revolver’.
• Place a copy of the folder from the Revolver plug-in package called ‘Presets’
into the ‘Revolver’ folder. The presets are now viewable (after restarting Pro
Tools™) from the settings popup menu from the Revolver plug-in.
Note: it may be necessary to re-start Pro Tools™ in order for the newly
added ‘Presets’ folder to be viewable from the Settings popup inside
the Plug-In window toolbar.
Page viii
McDSP Revolver
Installing the Revolver plug-in on Windows XP
The Revolver plug-in Package includes this manual, ReadMe and Release Notes,
a folder of presets for the Revolver plug-in, and the Revolver plug-in. Two
copies of the Revolver Licensing Agreement are included - one in this pdf
manual and a second as a separate text file. The Revolver manual requires that
Adobe Acrobat reader (or similar .pdf reader) is installed.
Both online and boxed version will come with a Revolver installer that will
automatically install the Revolver plug-in and its presets on your system. The
authorization of the Revolver plug-in is still required after running the installer,
and those steps are detailed in the following sections.
Installing the Revolver plug-in and presets with the Installer:
The Revolver plug-in package purchased at your local dealer will be on CDROM
and contain a Windows self extracting executable (.exe) similar to the online
Revolver plug-in package prepared for Internet delivery. Both the boxed and
online versions the Revolver plug-in executable file will automatically install
the plug-in and its presets on your system. Double click the file to launch the
installer which will install the Revolver plug-in, presets, and documentation.
At any time after installation, you may access the documentation from the
Windows ‘Start Menu’ under the ‘McDSP’ group.
Authorization of the Revolver plug-in is still required after running the installer,
and those steps are detailed in the following sections. Note that after installing
new versions of the PACE iLok drivers with the Revolver plug-in installer, you
will be prompted by the Revolver plug-in installer to reboot your system. If you
are not prompted by the installer, there is no need to reboot.
• Insert the McDSP ‘HD Disk,’ ‘Native Disk,’ or ‘LE Disk’ CDROM onto an
available CDROM drive.
• Navigate to the Revolver plug-in folder on the CDROM - the installer
application is contained therein.
• Run the Revolver plug-in Installer application to install the Revolver plug-in,
presets, and documentation to a local folder on your system. The plug-in
will be placed in the ‘Plug-Ins’ folder, and the presets will be placed in the
‘Plug-Ins Settings’ folder.
• If a previous version of the Revolver plug-in (or other HD, Native, or LE
version) was already in the plug-ins folder, it will automatically be updated
(or replaced) by the installer.
mcdsp.com
Page ix
Re-installing the Revolver plug-in presets manually:
In you wish to restore the factory default presets, it may be useful to know how
to manually re-install only the presets.
• Go to the Plug-In Settings folder:
• C:\Program Files\Common Files\Digidesign\DAE\Plug-In Settings\
• If Pro Tools™ has not already done so for you, create a folder called
‘Revolver’.
• Place a copy of the folder from the Revolver plug-in package called ‘Presets’
into the ‘Revolver’ folder. The presets are now viewable (after restarting Pro
Tools™) from the settings popup menu from the Revolver plug-in.
Note it may be necessary to re-start Pro Tools™ in order for the newly added
‘Presets’ folder to be viewable from the Settings popup inside the
Revolver plug-in window toolbar.
Page x
McDSP Revolver
Authorizing your McDSP Plug-Ins
Authorizing with a pre-programmed iLok Smart Key
McDSP bundles such as the Classic Pack
come with a pre-programmed iLok Smart
Key. Simply insert the iLok into any
available USB port on your computer. The
iLok’s indicator light will illuminate when
the iLok has a proper connection. The
Plug-Ins included in the bundle require no
further authorization steps. As with any iLok on your system it is recommended
that your iLok be registered and synchronized with iLok.com
Authorizing with an iLok License Card
All McDSP Plug-Ins require that a valid
authorization is present on your iLok
USB Smart Key. McDSP Plug-ins that
are purchased individually provide this
authorization on a plastic License Card
(about the size of a credit card), with a
small punch-out iLok License Chip. After
being separated from the License Card,
this iLok License Chip is to be inserted into the ‘key slot’ of the iLok USB Smart
Key in order to transfer the authorization from the License Card to the iLok USB
Smart Key. Note that each License Card holds ONE Plug-In authorization. The
following instructions detail this process
Important Note: The Authorization Wizard will prompt the user to register
their iLok USB Smart Key at iLok.com. iLok.com is a service offered by PACE
Anti-Piracy, Inc. and this step is recommended but NOT REQUIRED by McDSP to
complete the authorization of the Plug-In. If you choose to register your iLok
USB Smart Key at iLok.com, care must be taken to record your ilok.com account
information (i.e. write down your User ID and Password in a safe place). If your
iLok.com account information is lost, the iLok cannot be registered to another
account and unfortunately there is nothing McDSP can do to help you. See
iLok.com for more details about the benefits of using PACE’s iLok.com service.
Note: Images in this section are for illustration only, the actual product and
screens will be the name of the product you are authorizing.
mcdsp.com
Page xi
Authorizing a McDSP Plug-In from a License Card with the
Authorization Wizard:
The Authorization Wizard is used to install an authorization from a License
Card to the iLok USB Smart Key. To use the Authorization Wizard for the Plug-In
you purchase, perform the following steps:
• Insert your iLok USB Smart Key into an available USB port.
• On a Mac :Locate and launch the ‘Authorizer’ application found in the
‘Authorize’ folder in the Plug-In package for the McDSP Plug-In you
purchased on the CD-ROM.
• On Windows XP, just launch Pro Tools™ to authorize the individual McDSP
Plug-In you purchased.
Note: When authorizing the Plug-In on Windows XP with a new iLok USB
Smart Key, you must insert the iLok USB Smart Key and complete
the Windows ‘Found New Hardware Wizard’ before attempting to
authorize the Plug-In.
• Select the ‘Authorize’ button to be guided through
the Authorization Wizard.
Note: Selecting the ‘Quit’ button at any time will
not authorize the Plug-In or allow it to be
used for a trial period. If ‘Quit’ is selected, the
Plug-In will not be available in the Pro Tools™
insert menu.
• McDSP Plug-Ins require that the
user personalize their copy of
the Plug-In. A dialog is displayed
soliciting this information.
Note that the product registration
card enclosed with the PlugIn MUST ALSO be filled out
as well and returned to
McDSP via mail (or fax to
707-220-0994). This additional
mail-in registration will entitle
the user to future upgrades
and advance information from McDSP.
Page xii
McDSP Revolver
• Once the Plug-In is personalized, click the ‘Next’ button to continue.
• Check the ‘Use License Card’ box and
press the ‘Next’ button (figure 2.3).
Note: Although the Authorization
Wizard may appear to allow
authorization by challenge/
response, that method is
currently NOT SUPPORTED
McDSP Plug-Ins.
• Separate the small punch-out iLok License Chip
(the removable metal and plastic tab) from
the License Card by pushing the cutout up and
out with your thumb. Do not force your finger
downward.
• The iLok License Chip may now be
inserted into the ‘key slot’ of the iLok
USB Smart Key (figure 2.6). If the iLok
USB Smart Key does not appear to
be present on the system, ensure the
iLok USB Smart Key is connected to a
valid USB port and that the green LED is lit inside the iLok USB Smart Key.
To insert the License Chip into the iLok USB Smart Key, orient the iLok USB
Smart Key’s USB end to the left, and the loop end to the upper right. Insert
the metal chip end of the iLok License Chip (the License Chip tab should
have the metal chip side facing up towards you, not down). You should be
able to visually verify that the License Chip makes contact with the iLok USB
Smart Key metal card reader.
• The green LED in the iLok USB Smart Key will light when it is ready to
receive and transmit data.
• Upon inserting the iLok License
Chip, a message will be displayed
indicating the authorization was
installed successfully. Click ‘Ok’ in
the message dialog.
mcdsp.com
Page xiii
• Once the authorization is installed
on the iLok USB Smart Key, a dialog
is displayed prompting the user
to register their iLok USB Smart
Key at the www.ilok.com website.
The iLok.com website was created
to allow users to manage the
software authorizations on their
iLok USB Smart Key. THIS STEP
IS NOT REQUIRED TO COMPLETE
THE AUTHORIZATION OF MCDSP
SOFTWARE. The registration of the iLok USB Smart Key to an iLok.com
account can be bypassed by clearing the checkbox. The user may also
choose to not be asked to register again. While iLok.com is a great resource
for the iLok USB Smart Key, your iLok USB Smart Key may only be linked
to one iLok.com account. That is, an individual iLok USB Smart Key can
only be registered to one account at a time--but a single account can have
multiple iLok USB Smart Keys. If the iLok.com account information is lost,
the iLok USB Smart Key cannot be registered to another account. However,
an iLok USB Smart Key may be transferred between accounts if all the
authorizations have been transferred off the iLok USB Smart Key. Register
the iLok USB Smart Key to an iLok.com account only when you are ready to
retain all the needed iLok.com account information (User ID and Password).
• A ‘Finished’ dialog is displayed showing what authorization method was
used.
• Click ‘Finish’ to exit the Authorization Wizard.
Page xiv
McDSP Revolver
Authorizing with iLok.com
Required for demo, upgrade, and replacement authorizations only
iLok.com can be accessed from any Macintosh or PC with an Internet
connection. You can do this at home, a friend’s, or at the office as long as there
is an internet connection to access iLok.com--note that you don’t have to use
your ProTools system computer! You simply use this computer to connect to
iLok.com and transfer authorizations to your iLok Smart Key. The iLok Smart
Key can then be moved to your ProTools system to complete authorization of
your Plug-In.
You will need:
• A computer with an Internet connection. Either a Macintosh
running OS 9.2 to OS 10.3 or a PC running Windows 98, ME,
2000, or XP
• An iLok USB Smart Key
• A valid iLok.com account. Visit www.iLok.com and set up a
free account, if you have not already done so.
1) Download and install the required client software from iLok.com.
2) Download the desired McDSP Plug-In Installer from:
http://www.mcdsp.com/support/updating.html
3) To receive an upgrade or replacement authorization, send email your iLok.
com account information to: [email protected]
To receive a demo authorization, email your iLok.com account information
to: [email protected]
Insert your iLok Smart Key into an
available USB port and ensure that
the indicator light is lit. Once your
demo, upgrade, or replacement
authorization is available for
transfer, your iLok.com account will
display the notice saying “You have
licenses” on the upper left. Begin by
selecting that link.
mcdsp.com
Page xv
The next page will display
the pending licenses
available for download.
This page will also display
the name of the Plug-In,
its manufacturer, the type
of authorization (demo,
Not For Resale, or License), the date the authorization was deposited, and the
date when the authorization will no longer be available for download from the
server.
Before any transfer of
authorizations can take place, you
must synchonize your iLok Smart
Key with iLok.com. This may take a
moment to process depending on
your internet connection.
Once you have synchronized
your iLok, you can select the
authorization(s) you wish to
transfer to your iLok.
If you have multiple iLoks
connected to your computer, it
is important to select the correct
iLok you wish the authorizations
to be transferred to. Then click
“Download Licenses” to begin
the process. Again, this may take
a moment depending on your
internet connection.
When the transfer finishes you will be
asked to confirm the completition of the
transaction, thereby letting you know that
the transfer was successful.
Page xvi
McDSP Revolver
If you wish to go back into
your account and visually
confirm the transaction
for yourself, select “View
iLoks” Then select the iLok
you had the authorizations
transferred to.
That’s it! Dont forget to
logout and move the iLok
Smart Key to your ProTools
System if you are using
another computer for Internet access. Also, you may need to install a different
version of the Plug-In if you are upgrading or replacing.
Transferring Authorizations with iLok.com
You may freely transfer any authorization within your iLok.com account
between any of your registered iLok Smart Keys. If you wish to transfer an
authorization out of your iLok.com account to a different user, it will require
additional support from PACE Anti-Piracy, Inc and may be subject to a service
fee or limited by manufacturer restrictions. Check the www.ilok.com website
for updates and developments regarding iLok USB Smart Keys and the Pace
Interlok Copy Protection system.
mcdsp.com
Page xvii
Registering your Revolver Plug-In
To register your McDSP Plug-In, fill out and return the product registration
card enclosed with the boxed Plug-In package by mail or fax 707-220-0994.
Registering your product entitles you to future upgrades and advance
information from McDSP. Each individual product must be registered (even if
you have multiple copies), and the product must be registered to an individual,
not an entity. If you represent a company it is your company’s responsibility
to notify McDSP in writing if the individual who registered the Plug-In is no
longer with the company. The Company must also be able to supply matching
registration information to successfully transfer ownership of the Plug-In.
Using your McDSP Plug-Ins
Starting a McDSP Plug-In:
Follow the installation, authorization, and registration instructions above,
Launch Pro Tools™, and the McDSP Plug-In and its presets are ready for use.
Refer to the Digidesign™ Pro Tools™ Reference Guide for details on general
Plug-In operation such as automation.
Exiting a McDSP Plug-In
A McDSP Plug-In is exited by clicking on the desktop or other window in
the DAE application running the Plug-In, closing the Plug-In window, or
de-instantiating the Plug-In. Pro Tools™ sessions will save instantiated PlugIn configurations and their settings. Refer to the Digidesign™ Pro Tools™
Reference Guide for details on general Plug-In operation.
Digidesign ™ and Pro Tools™ are registered trademarks of Digidesign, Inc.
Page xviii
McDSP Revolver
Introducing Revolver
Revolver is the ultimate combination of high end reverb control with the
sound capacity of convolution.
The Revolver plug-in is a highly optimized convolution engine customized
for reverb applications. The plug-in comes with over 300 samples (impulse
responses) including acoustic spaces and out of production equipment. In
addition to the convolution engine, Revolver comes with dedicated and
routable EQ, two stereo delay lines, a reverb decay crossover network, and
specialized stereo imaging control.
The Revolver main controls allow articulation of the sampled impulse
response low and high freq response, the overall attack of the impulse
response, and a generous pre delay that can delay the wet or dry signal by up
to 500 msec.
Attention Revolver LE owners:
This manual contains a description of the full Revolver plug-in.
Revolver LE contains the main control page and impulse library
contained in the full Revolver plug-in. For more information on
Revolver LE, see the printed quick start guide included with the plugin. For information on upgrading to the full version of Revolver, see
www.mcdsp.com
The features listed below are included in Revolver Native.
The Revolver delay lines can be synced to MIDI beat clock for a variety of
tempo-based effects. The reverb can be routed in a number of ways with the
delay lines, and a 3-band EQ can be inserted anywhere in the signal path. The
delay lines are each 3 seconds long.
A tweak page allows adjustment of other acoustic parameters usually only
found on synthetic reverbs. The stereo field can be adjusted (even with mono
impulse responses) by delaying the left and right channel separately. Special
filtering techniques can also be used to modify the stereo image. Diffusion
can also be added to the original impulse response to increase the echo
density of an otherwise sparse sample.
mcdsp.com
Page R1
The X-Over (cross over) page breaks the reverb into three frequency bands, and
then allows the reverb tails of those bands to be decreased or increased as a
percentage of the original reverb length.
The Contour page provides unparalleled control of the shape of the reverb.
In addition to the Attack control mentioned above, the Hold, Contour, and
of course length control can add sublte to dramatic changes to the original
impulse response.
Revolver is a highly optimized convolution engine. Revolver is capable of
getting tremendous amounts of reverb time out of the host processor (for
example, up to 70 seconds in a moderate mix using a dual 1.8 G Hz Mac).
Additionally, all parameter adjustments are heard immediately, and no outputs
are muted during any control updates. The user does not need to wait while
the reverb is ‘re-rendered’.
Feature List:
• Powerful Convolution Engine: Any acoustic space, any outboard gear,
any signal path, can be modeled in a few minutes with Revolver and the
Revolver analysis tools (full version only).
• Flexible routing system rivaling top synthetic reverbs, including insertable
EQ, two programmable delay lines, and other stereo field adjustments.
• Extensive library with 100’s of samples of real spaces and out of production
equipment.
• Revolver is compatible with ProTools and other DAW applications that
support TDM, RTAS, and Audiosuite plug-in formats. McDSP’s Revolver plugin operates on Mac OS X Tiger 10.4 and later versions (Windows XP version
coming in 2008).
• Supports Digidesign’s™ ICON, Command 8, ProControl, and Control | 24, and
Mackie’s™ HUI external control surfaces.
Page R2
McDSP Revolver
The Quick Start Tour
Start Protools™ and Instantiate the Revolver plug-In
• Launch Protools™ and Open a Protools™ Session.
• Verify the Display-> Mix Window Shows->Inserts View option is checked.
• In one of the inserts of a stereo master fader, select the Revolver plug-In.
Note the Revolver plug-in will operate on master or regular audio tracks in
mono or stereo versions.
• If the insert selection does not show the Revolver plug-In, verify that the
Revolver plug-in has been installed correctly.
• For more information on starting Pro Tools™ and working with Plug-Ins, see
Digidesign’s™ Pro Tools™ Reference Guide
Revolver Overview
The Revolver plug-in uses convolution to extract and replicate acoustic spaces
and other equipment exactly. The Revolver plug-in combines this processing
power with the flexibility only found in high end outboard reverbs.
The Revolver Length controls the duration of the impulse response, as a
percentage of the original impulse response length. The RT60 time, the time it
takes for the reveb signal level to fall to roughly - 60 dB, is also displayed. Both
the length percentage and RT60 values are updated when the Length control is
adjusted. Only the length percentage text field is editable.
mcdsp.com
Page R3
In addition to the usual reverb length, wet and dry mix controls, Revolver pages
of controls grouped into functional blocks. While the user can select any one of
these control pages, the reverb length, wet, and dry mix control are displayed
at all times. The Control Page selector is located to the left of the impulse
response display.
Plot Window
Tab Navigation
Basic Controls
Page Controls
On all pages
Selected by menu in upper left
Page R4
McDSP Revolver
Controls
The Main Control Page
The most commonly used controls
are in the Main Control Page.
• Pre Delay – the amount of time
after with the reverb (wet)
signal appears at the output.
Negative Pre Delay values delay
the original (dry) signal instead
of the wet signal.
• Attack – the initial character of
the reverb. Fast attacks (0-10
msec) introduce the reverb
signal into the output as quickly as the original impulse response does.
Slower attacks (up to 500 msec) smooth the onset of reverberation.
• LF Color - the amount of boost or cut (+/- 12 dB) applied to the Low
Frequency (LF) portion of the reverb signal.
• LF Freq – the frequency at which the LF Color boost or cut is applied. Note
the LF Freq control also introduces a low frequency roll off to prevent extreme
low frequency data from imparting a ‘boomy’ sound to the reverb signal.
• HF Color – the amount of boost or cut (+/- 12 dB) applied to the High
Frequency (HF) portion of the reverb signal.
• HF Freq – the frequency at which the HF Color boost or cut is applied.
Levels
The overall mix of each component
of the Revolver reverb is adjusted
on the Levels Control page.
• In – the input signal attenuation.
• Out – the output signal
attenuation.
• Reverb - the output attenuation
for the reverb signal
mcdsp.com
Page R5
• Delay 1 – the output attenuation for Delay 1.
• Delay 2 – the output attenuation for Delay 2.
Revolver LE only comes with the Main and Levels pages of controls. All other
pages listed below are included in the full version of the Revolver plug-In.
Equalizer
Revolver comes with a 3 band
parametric EQ that can be
inserted in one of several
signal path locations. The EQ
parameters are available on this
page. The Q for each band is gain
dependent, getting narrower as
the band gain is increased.
• Freq 1, 2, 3 – the frequency at
which the band boost or cut is
applied.
• Gain 1, 2, 3 – the amount of boost or cut (+/- 12 dB) applied at the band
frequency.
Delay 1, Delay 2
Two separately programmable
delay lines are available in
Revolver.
• Delay – the amount of delay
time, up to 3 seconds. The
Delay 1 and Delay 2 lines may
be inserted in a variety of ways
as determined by the Flow
Page (explained later in this
manual).
• BPM (Beats Per Minute) –
When synced to MIDI playback tempo, the delay control is locked to the
appropriate delay valye. Adjusting the Note, Meter, and Groove controls
will only affect delay times when the delay is synced.
Page R6
McDSP Revolver
• Note – the delay time can be selected from a note and meter value.
• Meter – the delay time can be selected from a note and meter value. Note
the meter value is the same for both Delay 1 and Delay 2.
• Groove – adjust the synced delay time by up to +/- 100% of the delay time of
the next smallest note interval.
• Feedback – the amount of signal returned to the delay line to create echo
and tempo-based effects. Feedback can be positive or negative.
• Pan – each Delay line can be panned, up to 100% in the left or right channel.
• Level – Delay line output level. This control is repeated in the Levels control
page for convenient balance adjustment with dry, wet, and other signals.
Tweak
Adjustment of the original impulse
response’s stereo imaging and
diffusion is performed on the
Tweak Control Page.
• Split – the amount of difference
between the left and right
channels, as determined by
the Split Delay and Split Damp
controls. The difference may
be applied to the left or right
channel (using the other
channel as a reference).
• S-Delay – the amount of delay time difference, up to 50 msec, between the
left and right channels.
• S-Damp – the amount of filtering performed in the channel further delayed
by the S-Delay control.
• Pan – the balance of the left and right reverb signal.
• Diffuse Enable – allows affect of Diffuse control to be routed to the reverb
output.
• Diffuse – the amount of acoustic ‘smearing’ added to an existing impulse
response, routed to the reverb output.
mcdsp.com
Page R7
Contour
The overall shape of the impulse
response is adjusted from the
Contour page.
• Attack – the initial character of
the reverb. Fast attacks (0-10
msec) introduce the reverb
signal into the output as quickly
as the original impulse response
does. Slower attacks (up to
500 msec) smooth the onset of
reverberation.
• Hold – the amount of time the shape of the reverb remains unaffected
before the Length control begins to fade the impulse response. The hold
time also represents the time over which the Contour control operates.
• Contour – the amount of boost or cut (+/- 12 dB) applied to the impulse
response over the time given by the Hold control. The applied boost or cut
reaches its maximum at the end of the Hold time. This control is great to
making compressed and gated reverbs maintain a relatively fixed output
level, or taming the already too loud impulse response before the length
control fade begins.
X Over
The output of the reverb engine
is sent through a three-band cross
over, and the reverb decay of each
band’s output is adjusted as a
percentage of its original length.
The crossover network is a system
of 24 dB/Oct filters that provide
maximum side band rejection
and minimal signal leakage into
adjacent bands.
• Decay – the percentage of the
original reverb length. A setting of 100% does nothing, while values less
than 100% shorten the decay, and values greater than 100% increase the
decay time.
• X1, X2 – the crossover frequencies.
Page R8
McDSP Revolver
Plot Display
Along the top of the impulse response plot is a row of tabs, selecting the
Display Mode. The Display Mode shows the following data:
Impulse – the impulse response data
(mono or stereo) is shown across a
selectable timeline (as per the zoom
controls in the upper right hand corner of
the plot).
Image – an image of the source location or
equipment is shown when available.
Plot – displays the frequency repsonse of
the LF and HF Color EQ, routable 3-band
EQ, and all crossover sections.
Flow – the five routing modes for the
reverb and Delay 1 and 2 signals is shown.
The EQ insert points are displayed along
various points in the signal flow diagrams,
and can be enabled by simply clicking those
insert points. The five modes are listed as
tabs along the bottom of the Flow Display
Mode page.
System – controls uses to optimize the
performance of the Revolver convolution
engine are shown. These controls are:
• Tail Cut – the level (in dB) at which the
reverb tail is truncated.
• Latency Mode – selectable latency
modes. Low latency mode incurs the
highest CPU use, while minimizing
algorithm delay to just 992 samples
(wet and dry signals are delay equally).
The medium latency mode incurs
significantly less CPU use, and has an
algorithm delay of approximately 2000
samples.
mcdsp.com
Page R9
The Revolver About Box
The Revolver About Box contains
information on the Revolver plug-In. The
About Box can be accessed by clicking the
version text in the user interface of any
Revolver configuration.
General Information
To adjust any of the Revolver controls the user can:
• Hold the <Command> key while dragging the slider for fine control, or
• Click on the text box to highlight and edit the numeric value to get precise
control (if a value outside the valid range is input, the control will default to
the nearest allowed value when enter is hit) and hit <Enter>, or
• Click on the text box to highlight the numeric value and then use the arrow
keys to increase or decrease the numeric value, or
• Use the <Option> key to bring all the controls to their default values, or
• Use hardware controller surfaces supported by the Chrome Tone including
the Mackie HUI and Digidesign’s ICON™, ProControl™ and Control 24.
Control Linking
As of release 1.0, Revolver does not offer any control linking capabilities.
Meters
Revolver shows signal clipping using a red LED just to the right of the Length
percent and RT60 text readouts. Click the LED to clear previous clip indications.
Automation
Most Revolver controls are completely automatable. See the Digidesign™ Pro
Tools™ Reference Guide, Automating Plug-Ins section.
Page R10
McDSP Revolver
Presets: Using the Presets and Making Your Own
The Revolver presets are inspired the pursuit of the ultimate reverb library.
Over 300 impulse responses are included with the Revolver Plug-In. More
presets are available in other installers included with the boxed copy of the
Revolver plug-in. The presets can be accessed from the Pro Tools™ “Plug-In
Librarian” and “Plug-In Settings” pop-up menus.
To make and save your own presets, see the “Plug-In Librarian Functions”
section of Digidesign™‘s DigiRack Plug-Ins Guide.
A Word on Preset Compatibility
Presets for the Revolver and Revolver LE plug-Ins are interchangeable from LE
to the full version. Sessions uses Revolver LE will restore correctly in a system
with Revolver installed. Note the extra controls included with Revolver (3 band
EQ, delay lines, tweak page, contour page (except the Attack control), and
X-over page controls)) will not be restored in a system that has only Revolver
LE.
Pro Tools™ is a registered trademark of Digidesign, Inc.
mcdsp.com
Page R11
Using the Revolver Plug-In
The Revolver plug-in uses a highly optimized (and proprietary) convolution
engine to produce the maximum amount of reverb on a host CPU. Additionally,
all parameter changes are heard immediately – no waiting for control updates
to ‘render’ a new reverb. This chapter covers some of the basics of reverb,
convolution, and how the Revolver plug-in combines elements from many
Reverb processing methods to deliver a superior sound and user experience.
Why Use Reverb?
The sounds we hear are comprised of the original source signal, combined
with reflected versions from our acoustic environment. These reflections, or
reverberations, create a sense of space and proximity. Such effects are useful
in creating music productions. The reverb becomes a tool to enhance an
otherwise dull track such a vocal recorded in a acoustically dampened vocal
booth, or create separation by balancing an original direct sound with a
reverberated one. Now the drums sound ‘behind’ the singer, the guitar is ‘over
there’, and the vocal has lots of ‘presence’.
But if reverb is so great, why not record everything in a reverberant chamber
from the start? Even if such acoustic chambers were readily available to every
recording studio, different reverbs are generally applied to different groups
of tracks. The drum sub might get one reverb, the lead vocal another, and still
all the backing vocals something else. In order to effectively create a sense of
space and proximity, different reverbs are used on different sets of tracks.
What Is Convolution?
Convolution is the basic building block of many algorithms. It is the process
of taking a known response and applying it to an input signal. The known
response can be measured before hand, tweaked and adjusted until the user
is satisfied. The advantage to such a process is the ability of the convolution
engine to reproduce the exact response from the sample acoustic space or
equipment. The disadvantage is the processing power needed to carry out such
calculations in realtime has only been available in the last 10 years.
McDSP’s engineering staff has taken the capabilities of convolution to new
heights by providing a multitude of other processing options to further
Page R12
McDSP Revolver
enhance the sound of the reverb itself. Delay lines, insertable EQ, contour
controls, and stereo field adjustments, previously only available on ultra-highend equipment, are now available in a software product.
Optimizing Revolver Performance
The Revolver plug-In’s convolution engine is extremely efficient. This means
many Revolver plug-ins can be used in a single session with the minimum
amount of CPU power. The control updates are also immediate – no muted
outputs or rendering delays are experienced. The user not only has a great
sounding reverb, but a responsive one too.
Even so, there are ways to further improve the performance of the Revolver
plug-In. Using the Display Mode control along the top of the graphs in the
middle to upper right corner of the Revolver user interface, select the System
page. On this page there are three controls – Tail Cut, Latency Mode, and
Stereo Mode.
Tail Cut allows the user to select the level (in dB) at which the remainder of
the reverb is truncated. This is useful in reducing the amount of CPU power
used to calculate the entire reverb output. Most conditions call for a tail cut
somewhere between –100 and –120 dB. At these levels the remaining reverb
tail is inaudible when combined with other elements of a mix. The control can
go as high as –90 dB.
Tail Cut also becomes indispensable when the sampled acoustic space or
equipment has a noise floor that is higher than the 32 bit audio path available
in Revolver. By choosing a Tail Cut that is higher than this noise level, CPU
power is not wasted on calculating, well, noise! Using the Display Mode
control, select the Impulse page, and zoom out to the maximum range (10
seconds). With this scale you will note when the natural decay of the impulse
response levels off and appears to be relatively level. The level at which this
signal occurs is the approximate value that should be used for the Tail Cut
control value.
The Revolver plug-in also has two latency modes – Low Latency and Medium
latency. Both are extremely optimized for native processing. Low Latency
mode incurs more CPU use, with an output delay of 992 samples. Medium
Latency mode incurs less CPU use, with an output delay of roughly 2000
samples. Note when the user adjusts the playback buffer size of their
DAW, Revolver will also check which latency mode has been selected and
automatically chose the best one.
mcdsp.com
Page R13
Loading Impulse Responses
Revolver comes with hundreds impulse responses, as well as presets for a
variety of applications. The presets always contain the original IR data, unless
a new preset is loaded that contains another IR sample. This allows uses to
make many version of the original IR preset, while insuring all needed IR
data is stored with the preset, and/or Pro Tools session. In order to minimze
the amount of hard drive space used by each Revolver preset, the IR data is
compressed before writing to disk.
In order to load in new impulse responses not provided by McDSP, the user
pulls up the IR Reader AudioSuite plug-In. The impulse response is imported
into ProTools, and then placed on a track (mono or stereo versions of the IR
Reader are available). Highlight the audio and press the Analyze buttons in the
ProTools toolbar just beneath the IR Reader user interface. Once the process
in completed, the impulse response will be displayed in the IR Reader impulse
response plot. The IR Reader will automatically locate the best starting point
for the impulse response, as well as identify the noise floor present, and fade
out the calculated impulse response from the noise floor.
Once the new impulse response is calculated, the user can save the impulse
response. Note the IR Reader generates impulse response only presets, so the
saved preset should be placed in the ‘IR Only’ folder of the Revolver settings
files.
Creating New Impulse Responses
Revolver comes with a set of tools for sweeping acoustic spaces or outboard
equipment and turning the processed sweeps into impulse responses for use
with the Revolver plug-in.
For a detailed example of how to capture impulse responses, refer to the
example session and tutorial included in the Impulse Response Library CDROM
included with Revolver.
Load the session entitled ‘Create Impulse Response’ from the Revolver folder
created by the installer. This session will create a mono and stereo send in
which an acoustic environment or outboard device can be connected. Now
perform the following steps:
• Select one of the two sets of 30 second sweeps (mono or stereo). Note the
Sweep Generator plug-in can also re-generate these signals if they are erased
accidentally.
• Connect the outboard equipment into the IO inputs and outputs such that
Page R14
McDSP Revolver
the processed sweep is returned to the session. For acoustic environments,
the output is routed to speakers, and microphones, placed at strategic
locations in the sampled space, are routed back into the session. See the
next section for tips and tricks on recording impulses.
• Record enable the track the processed sweep is routed back to.
• Press play and record the processed sweep.
• Pull up the Sweep Analyzer Audiosuite Plug-In.
• Highlight the original sweep, select the ‘Analyze Sweep’ button, and click
analyze.
• Highlight the processed sweep, select the ‘Analyze Response’ button, and
click analyze. Note this process may take 3 to 5 minutes depending on CPU.
• Save the newly created impulse response into the IR Only folder of the
Revolver settings folder (the preset is an impulse only setting).
• A template session and tutorial on how to capture impulse responses is
included in the Revolver Impulse Response Library CDROM that comes with
the Revolver plug-in.
Impulse Response Creation Tips and Tricks
The tools included in the Revolver plug-in are powerful and allow the creation
of many new types of reverbs and effects. Making these sounds can be time
consuming, but well worth the effort for those who want unique sounds in
their productions. In order to make the best use of your time, McDSP has
included a list of tips and tricks regarding impulse response creation.
• Avoid clipping in any part of the signal path.
• When shooting a space or device multiple times, give it plenty of time to
settle down. If a previous sound is still reverberating when a new sweep is
started, the resulting impulse response will contain the end of the old sweep
and the new sweep.
• When shooting digital reverbs, try to disable all chorusing effects if possible.
mcdsp.com
Page R15
Revolver Specifications
Parameter
Range
Function
Main Page (available in Revolver and Revolver LE)
Input
-144 to +12 dB
Output
-144 to +12 dB
Attenuate input signal level to reverb
Attenuate output signal from reverb
Length
1 to 100 %
Percentage of impulse response used to generate reverb.
The lenght (in time) of the reverb effect.
Wet
-144 to +12 dB
Attenuate reverb output signal level
Dry
-144 to +12 dB
Attenuate original (dry) signal level
Pre-Delay
-500 to +500 msec
Amount of delay applied to reverb (wet) signal or original
(dry) signal
Attack
0 to 500 msec
Rate at which reverb output reaches maximum level.
LF Color
- 12 to + 12 dB
Amount of boost or cut applied to low frequency portion
of reverb output signal
LF Freq
40 to 400 Hz
Frequency at which the LF Color boost or cut is applied
HF Color
- 12 to + 12 dB
Amount of boost or cut applied to low frequency portion
of reverb output signal
HF Freq
1000 to 10000 Hz
Frequency at which the HF Color boost or cut is applied
System Page (available in Revolver and Revolver LE)
Tail Cut
-140 to -90 dB
Level at which reverb tail is truncated to zero
Latency Mode
Low, Medium
Convolution engine modes used to minimize CPU load at
the expense of output signal delay
Stereo Mode
Stereo, Summed
Stereo processing mode
-12 dB to +12 dB
Boost or cut for each EQ band
Freq for THE EQ band
Equalizer Page
Gain 1, 2, 3
Freq 1
40 to 4000 Hz
Freq 2
80 to 8000 Hz
Freq for THE EQ band
Freq 3
160 to 16000 Hz
Freq for THE EQ band
Page R16
McDSP Revolver
Parameter
Range
Function
Delay 1, Delay 2 Pages
Delay
0 to 3.0 seconds
Delay time
BPM
60 to 240 bpm (beats
per minute)
Tempo used to calculate delay times (used with meter and
note control values). Can be entered manually or pulled
from session tempo by enabling clock button next to BPM
readout. Note there is only one BPM control for both
delays.
Groove
-100 to +100 %
Percentage of change in selected delay time, based on
BPM, meter, selected note value
Percentage of signal feed back into the delay input.
Feedback
-100 to +100 %
Pan
-100 to +100 %
Mix of delay output to left and right channels
Level
-144 to +12 dB
Attenuation of delay output signal
-100 to +100 %
The amount of effect the Split Delay and Split Damp
settings have on the left or right channels.
Tweak Page
Split
Split Delay
5 to 50 msec
Delay difference between left and right channels.
Split Damp
2000 to 20000 Hz
Low pass filter cutoff frequency for channel further
delayed by Split Delay control
Split Pan
-100 to +100 %
Panning of reverb signal to left or right channel
Diffuse
0 to 100 %
Amount of additional diffusion added to the reverb
output. Note the Diffuse control must be enabled with
the’On’ button next to the Diffuse control label.
mcdsp.com
Page R17
www.mcdsp.com
Copyright 2008 by McDowell Signal Processing,LLC.
All trademarks are property of their respective owners.
McDSP is a trademark of McDowell Signal Processing,LLC.
Revolver is Copyrighted 1998-2008
by McDowell Signal Processing,LLC.