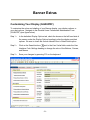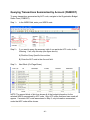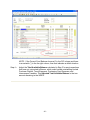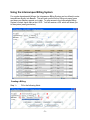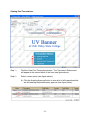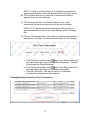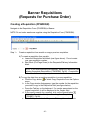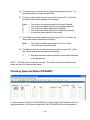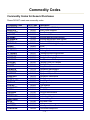
1
FINANCE AND BUSINESS SERVICES
MISSION STATEMENT
Finance and Business Services will safeguard the assets and
resources of the University. We will provide accurate, timely,
and relevant financial data and services to assist the campus
community and other stakeholders in achieving institutional
goals. Our commitment is to provide these services in a
professional, innovative, collaborative, and service-oriented
environment.
2010
FINANCE AND BUSINESS SERVICES
PERSONNEL & CONTACT INFORMATION
Mike Francis, Assistant Vice President of Finance / Controller. . . . . . . . .8818
ACCOUNTANTS
Main Office..................... General Requests .................................................................................. 8294
Jacob Atkin .................... Training, Banner Access, Petty Cash, Journal Entries, Dept
........................................ Billings ................................................................................................... 8576
Ked Black....................... Financial Statements, External Audits, Taxes, Payroll .......................... 8536
Sandy Capell ................. Foundation Accounting .......................................................................... 8293
Bernell Hofheins ........... Bursar – Student Business Services ..................................................... 8292
Wendy Hope .................. Customized Financial Reports, Plant Funds, COA Setup ..................... 8108
Troy James .................... Grants, Contracts ................................................................................... 8958
Mike Jones..................... Treasury Services, Campus ID-Card ..................................................... 8291
Scott Wood .................... Auxiliaries, Accounts Payable, Travel .................................................... 8822
ACCOUNTS PAYABLE
Jeannette Hall................ Payables, Check Requests, Contractual Services ................................ 8963
ACCOUNTS RECEIVABLE
Rozanne Russell ........... Billings, Payment Receipts, Sponsored Students .................................. 8961
COLLECTIONS
Lynn Siemer................... Short-Term Payment Plans, Returned Checks, Perkins Loans, Trust
........................................ Accounts ............................................................................................... 8611
COMPUTER SHOP ..............Computer Upgrades, Repairs ................................................................ 7094
MAIL SERVICES .................USPS, UPS, FedEx, Bulk Mail, Intra Campus Mail ............................... 8181
PAYROLL
Main Office..................... Paychecks, Direct Deposit, Withholdings, Advances ............................ 8841
Gary Griffin .................... Payroll Officer ........................................................................................ 8290
PROCUREMENT SERVICES
Main Office ..................... Requisitions, Purchase Orders, Bids, Sole Source, Limited Purchase
Checks ........................... Checks ................................................................................................... 8301
Ryan Lindstrom ............. Director of Procurement Services .......................................................... 8303
Jeana Miner ................... Assistant Director of Procurement Services .......................................... 8429
P-Card Office ................. P-Card Audits, P-Card Training, Opening/Closing Accounts ................. 7223
STUDENT BUSINESS
SERVICES ......................... Student Services/Billings/Refunds, Departmental Deposits, Tuition
.............................................. Holds ...................................................................................................... 7200
SURPLUS ...........................Surplus, Property Control ...................................................................... 7284
TRAVEL............................. Travel Arrangements, Advances, Reimbursements .............................. 8965
WAREHOUSE ...................Receiving ................................................................................................. 8396
TABLE OF CONTENTS
Finance and Procurement Manual 2010
UVU Finance Policy Summary
Accounts Receivable/Cash Handling Guidelines ....................................... 2
Accounts Receivable Billing Procedures ........................................... 2
Cash Handling................................................................................... 5
Appropriate/Inappropriate Expenditures Summary .................................. 10
Miscellaneous Expenditures ........................................................... 10
Food Expenditures .......................................................................... 11
Procurement Guidelines ........................................................................... 12
Requisitions (Requests for Purchase Order) .................................. 12
Bid Limit .......................................................................................... 12
Sole Source Purchases ................................................................... 13
Receipt and Payment of Materials and Services ............................ 13
Service Purchases .......................................................................... 14
Purchasing Violations ...................................................................... 14
Limited Purchase Checks (LPCs) ................................................... 14
Purchasing Cards (P-Cards) ........................................................... 17
Campus Standards ......................................................................... 21
Travel Guidelines ..................................................................................... 22
Before Travel................................................................................... 22
During the Trip ................................................................................ 23
After Travel...................................................................................... 24
Protected Information ............................................................................... 26
TABLE OF CONTENTS
Continued...
Introduction to Banner Finance
Introduction to Banner ...............................................................................28
Understanding the Chart of Accounts ..............................................28
Understanding INDEX Codes ..........................................................30
Understanding the Organizational Hierarchy ...................................35
Banner Finance Basics ............................................................................ 37
Accessing Banner: Banner-Finance Forms .................................... 37
Logging into Banner ........................................................................ 46
Navigating Banner........................................................................... 48
Changing Your Password (GUAPSWD) ......................................... 51
Creating a Personal Menu (GUAPMNU) ......................................... 52
Extracting Banner Forms to Excel ................................................... 53
Banner Extras........................................................................................... 54
Customizing Your Display (GUAUPRF) .......................................... 54
Using the Calculator (GUACALC) ................................................... 55
Using the Calendar (GUACALN) ..................................................... 55
Banner Budgeting Instructions
Transaction/Budget-Availability Queries................................................... 58
Querying Transactions Summarized by Account (FGIBDST) ......... 60
Querying All Transactions in an Account (FGIBDST/FGITRND) .... 61
Viewing Individual Transaction Detail (FGIBDST/FGITRND) ......... 63
Querying All Encumbrances for an INDEX (FGIBDST/FGIOENC) . 64
Querying Individual Encumbrance Detail
(FGIBDST/FGIOENC/FGIENCD) .................................................... 65
TABLE OF CONTENTS
Continued...
Checking the Available Balance in a Hard-Money or Soft-Budgeted
INDEX (FGIBDST/FGIBSUM)......................................................... 66
Checking the Available Balance in a Soft INDEX (FGITBSR)......... 68
Querying Budget/Transaction Information Using UVLink.......................... 70
Intercampus Transfers ............................................................................. 72
Making Payroll, Budget, and Journal-Voucher Transfers ................ 72
Using the Intercampus Billing System ............................................. 76
Banner Procurement Instructions
Banner Requisitions (Requests for Purchase Order) ............................... 82
Creating a Requisition (FPAREQN) ................................................ 82
Creating a Stores (Warehouse Supplies) Requisition (FSAREQN) 93
Changing a Requisition (FPAREQN) .............................................. 95
Denying a Requisition (FOADOCU) ................................................ 95
Deleting Incomplete Requisitions (FPAREQN) ............................... 96
Canceling a Requisition (FPARDEL) .............................................. 97
Searching for a Requisition (FPIRQST) .......................................... 99
Checking the Status of a Requisition (FOIDOCH) ........................ 100
Checking Approval Status (FOAAINP) .......................................... 102
Requisition Management ........................................................................ 104
Approving/Disapproving Requisitions (FOAUAPP) ....................... 104
Viewing Approval History (FOIAPPH) ........................................... 106
Approving/Disapproving Requisitions Using UVLink ..................... 106
E-mail Notification ......................................................................... 108
TABLE OF CONTENTS
Continued...
Appendix
Glossary ................................................................................................. 110
Forms ..................................................................................................... 114
Budget Transfer Request Form ..................................................... 115
Departmental Deposit Form .......................................................... 116
Journal Voucher Form................................................................... 117
Redistribution Form ....................................................................... 118
Change Fund Reconciliation Form ................................................ 119
Banner Finance Access Form ....................................................... 120
Banner Finance Request for New INDEX Code Form .................. 121
Banner Finance Request for Customized Approval Queue Form . 122
Banner Finance Request for Change of Responsible Party Form 123
Banner Finance Request for Change to INDEX Code Title Form . 124
Commodity Codes .................................................................................. 125
Commodity Codes for General Purchases .................................... 125
Commodity Codes for Warehouse Purchases .............................. 127
Commodity Codes for Capital Purchases ..................................... 128
Account (ACC) Codes ............................................................................ 129
Revenue Account Codes .............................................................. 129
Expense Account Codes ............................................................... 131
UVU Finance Policy Summary
The information contained in this manual is a summary of policy and a helpful guide, not
a direct statement of the University’s policies. For complete information on the
University’s policies, please go to the following URL:
http://www.uvu.edu/policies/officialpolicy/
-1-
Accounts Receivable/Cash Handling
Guidelines
Accounts Receivable Billing Procedures
A receivable results when goods and/or services have been provided but payment has
not yet been received. The function of the Accounts Receivable Department is to
record these transactions and prepare invoices to individuals and businesses that owe
money to the University. In order for a receivable to be recognized and accurately
reported on the University’s financial statements, the receivable must be processed by
the Accounts Receivable Department.
NOTE: Intercampus billings should be processed using a Journal Voucher Form (see
the Intercampus Transfers section, Pg.72) or by using the Banner Billing System.
NOTE: We do not recommend that you have checks sent to your department in
payment of an invoice, but if you do receive the payment in your department, the check
MUST be forwarded to the Accounts Receivable Department to be applied against the
outstanding invoice. DO NOT include the check in your departmental deposit (see the
Cash Handling section, Pg.5).
Billing Requests:
On-line Billing Requests: To submit an on-line billing request to an off-campus
party, complete the following steps as soon as goods are sold or services have
been provided:
Step 1 –
In UVLink under the Employee tab in The Forms Channel, click the
Accounts Receivable Billing Procedures and Forms link. This will
take you to the Accounts Receivable Billing Forms page.
Step 2 –
If you are billing a business, click on the Business Billing Request
Form link. If you are billing an individual, click on the Individual
Billing Request Form link. These links will take you to the
appropriate on-line forms.
Step 3 –
Complete the selected Billing Request Form. All billing requests
must contain the following information (see figure below):
-2-
A) Name of company or person to be billed. Include a name in
the Attn field if the invoice should be directed to a certain
person.
B) Current billing address: include apartment number or suite,
both the street address and a P.O. Box, if available.
C) Phone number (area code needed)
-3-
D) Purchase Order Number. PO numbers are usually required
by larger businesses. Ask the business/Individual you are
billing if one is required and, if so, reference the number
and/or attach an electronic copy of the PO to your billing
request in the Attach File field.
E) Description of services rendered. Be specific. Include all
information that will help explain and clarify the reason for
billing. Itemize amounts and include such information as
dates, quantities, unit prices, etc.
F) Amount
G) INDEX code and Account code (If desired, you may include
your Detail Code in the Description of Services field.)
H) Requestor’s contact information—Include name, department,
extension, and date of request.
NOTE: An electronic copy of any pertinent documentation can be
attached to the on-line Billing Request Form in the Attach File field
before submittal.
Step 4 –
Click the Submit Form button at the bottom of the form to forward
the form to the Accounts Receivable Department.
Hard-Copy Billing Requests: The simplest way to submit a Billing Request
Form is through the on-line method above, but paper copies of the Billing
Request Form will also be accepted through hand delivery to Browning
Administration (BA) -109h, inter-campus mail (in care of Accounts Receivable to
mailstop 109), or by email to [email protected].
Billing Request Processing: Once a Billing Request Form is received by the Accounts
Receivable Department, an official University Invoice will be prepared and sent to the
customer. The INDEX and Account codes listed on the Billing Request Form will be
credited at the time the invoice is sent, and the Accounts Receivable Department will
track the invoice until it is paid in full.
Records and Reporting: Each month the Accounts Receivable Department e-mails an
updated Outstanding Invoice Listing. The purpose of this report is to keep you informed
of the status of your billing requests. Please notify the Accounts Receivable
Department if any changes should be made to the billing information (i.e., address
changes, amount adjustments). In addition, please notify the Accounts Receivable
Department if you are aware of any extenuating circumstances that may impact
collection efforts.
-4-
Collection Procedures: A series of letters and phone calls are consistently made by
Accounts Receivable personnel to facilitate collection of payment. If the Accounts
Receivable Department is unable to collect payment on your invoice within a reasonable
amount of time, the department will send a memo to you asking you to authorize the
forwarding of the invoice to the Collections Office. Please respond quickly if you receive
such a memo; it will assist in the timeliness of the collections.
If the Collections office needs to send an invoice to an outside agency for assistance in
collecting the debt, the revenue that was posted to your Banner INDEX will be reversed.
Invoices that are forwarded to an outside collection agency will have collection costs
associated with them if the agency is successful in collecting the debt. If no signed
contract stating our collection policy is in force, these collection costs will be deducted
from the receivable amount and your department will only realize a portion of the
revenue. You can protect your department from this loss of revenue by having
customers sign a contract for services rendered with a section explaining UVU’s
collection procedures/policies and the charges that will apply if it becomes necessary to
forward an account to an outside agency. Contact the Collections Manager at ext. 8611
for help with the appropriate wording of this contract.
NOTE: If you have further questions regarding billing procedures, please call the
Accounts Receivable Department at ext. 8049 or 8961.
Cash Handling
Change Funds: If change funds are needed for sales, they must be obtained through
Finance and Business Services (contact Jacob Atkin ext.8576). The guidelines below
should be followed when using change funds:
•
•
•
Never mix personal funds with the University’s change funds.
Never use change funds to make purchases of any kind (personal or business)
as this circumvents the University’s procurement policy.
Never cash checks or IOUs from change funds.
Pre-numbered receipts/tickets: Always use Pre-numbered, cash-register/hand-written
receipts or tickets when making sales. Pre-numbered receipts/tickets are only
considered pre-numbered when they are purchased with the numbers printed on them
or when they are created with a point of sale (POS) system (i.e., cash register). Hand
written numbering is not sufficient. The guidelines below should be followed when using
receipts/tickets:
•
Receipts/tickets should be physically controlled by storing them in a secure area
with limited access.
-5-
•
•
Before sales are made, a range of receipt/ticket numbers should be assigned to
responsible parties.
Responsible parties should be held accountable to return all cash and unused
receipts/tickets after sales have been completed.
Cash Receipts: Cash receipts, for the purposes of this section, are any monies
received from departmental sales in the form of cash or check that have not been
deposited with the Cashiers Office. The guidelines below should be followed when
handling cash receipts:
•
•
•
•
Cash should be physically controlled by storing it on campus in a secure area
with limited access (e.g., a locked cash bag).
Checks should be made payable only to Utah Valley University (UVU) and only in
the amount of the purchase.
Checks should be restrictively endorsed with a bank stamp immediately upon
receipt.
Cash receipts must be deposited with the Cashiers Office prior to making any
departmental purchases with the funds.
NOTE: Making purchases directly from cash receipts is a violation of the
University’s procurement policy.
•
•
•
State law requires the University to deposit all cash receipts with its bank within
three working days. To be in compliance, all departments MUST deliver their
daily cash receipts to the Cashiers Office by the following working day.
All deposits should be made at the Cashiers Office, never to an outside bank
account.
Backup documentation for all cash receipts and deposits should be retained for
seven years (i.e., six years plus the current year).
Reconciliation: Once all sales are final, receipts/tickets should be promptly reconciled
to cash receipts (preferably immediately after the sales) by two individuals using the
Change Fund Reconciliation Form available in the Forms section of this manual,
Pg.114. To fill out this form, do the following:
Step 1 –
Total the cash receipts under the Funds on Hand and Total headings (see
figure below).
NOTE: Steps 1-3 are to be completed by two individuals.
A)
Total all bills by denomination on their respective lines under the
Funds on Hand heading.
B)
Enter the sum of all the bill denomination amounts under the Total
heading, on the first line.
-6-
Step 2 –
C)
Total all coins by denomination on their respective lines under the
Funds on Hand heading.
D)
Enter the sum of all the coin denomination amounts under the Total
heading, on the second line down.
E)
Record the date and amount of each check received under the
Funds on Hand heading.
F)
Enter the sum of all the check amounts under the Total heading, on
the third line down.
Complete the Summary and Comments boxes (see figure below).
A)
Enter the sum of the total amounts for bills and coins, calculated in
Step 1-B and D, on the Total Cash line of the Summary box.
B)
Enter the total amount of checks calculated in Step 1-F on the
Checks line.
-7-
C)
Enter the sum of the amounts from the Total Cash and Checks
lines on the Total line.
D)
Enter the total amount of sales for the day (per pre-numbered
receipts/tickets) on the Less Sales line.
E)
Enter the difference of the amounts from the Total and Less Sales
lines on the Balance line.
F)
Enter the residual amount of the change fund on the Should Be
line.
G)
Enter the difference between the Balance and Should Be lines on
the Over/(Short) line.
H)
Complete the Comments box.
Step 3 –
Sign the form and have your co-preparer sign the form.
Step 4 –
After the cash receipts have been deposited, an individual independent
from Steps 1-3 should do the following:
A)
Verify that the correct amount has been posted to Banner.
NOTE: The amount posted to Banner should be equal to the
amount in the Less Sales line.
B)
Sign and date the form in the Reconciliation of Deposit Amount to
Banner Entry box.
-8-
Departmental Deposits: Cash receipts are credited to your Banner INDEX after being
deposited with the Cashiers Office. Deposits can be made in person or placed in the
night depository. The following guidelines should be used when preparing your deposit
for submission to the Cashiers Office:
•
•
•
•
•
All deposits must include a completed copy of the Departmental Deposit Form.
This form is available on the Cashiers Office website and in the Forms Section of
this manual, Pg.114.
All deposits should be contained in sealed envelopes or money bags, dated, and
labeled with your department name and mail code.
Checks included in the deposit must be properly endorsed and accompanied by
an adding machine tape which supports the CHECKS TOTAL on the deposit
form.
Amounts from credit/debit card sales must be accompanied by a settlement
report which supports the CREDIT CARD TOTAL on the deposit form.
All deposits should be checked by two individuals prior to submittal to ensure
accuracy.
NOTE: The night depository is located in the Browning Administration Building
immediately before the first window of the Cashiers Office. A key is needed to open the
depository. To obtain a key, contact the Locksmith at ext. 8019.
-9-
Appropriate/Inappropriate Expenditures
Summary
THIS IS ONLY AN ABBREVIATED REFERENCE. For the full policy, please go to the
following URL: http://www.uvu.edu/policies/officialpolicy/
Miscellaneous Expenditures
Miscellaneous Expenditures Requiring Vice Presidential Approval:
•
•
•
•
•
•
•
•
All expenditures $25,000.00 and above
Departmental uniforms
Clothing/apparel
Gifts, prizes, and awards presented to non-employees (VP or designee)
UVU sponsorship
Flowers for the following:
o Bereavement flowers for death of employee or immediate family member
o Bereavement flowers for death of a student
o Hospitalization of employee
Reasonable holiday decorations
Membership – related to Institutional business
Miscellaneous Inappropriate Expenditures:
•
•
•
•
•
•
•
•
•
•
•
•
Personal expenses of any kind
Charitable donations
Gifts to employees in excess of $50 other than approved recognition programs
Alcoholic beverages
Going-away receptions (reasons other than retirement or leaving the University)
Child care expenses
Gasoline/fuel for private vehicles
Intra-campus holiday cards
Flowers for weddings, baby showers, Secretary’s Day, Valentine’s Day
Loans (internal)
Political contributions
Towing and traffic/parking tickets received in a University vehicle
Special Instructions for Gifts, Prizes, and Awards:
•
Properly approved gifts, prizes, and awards that are taxable for employees must
be reported using a Payroll Action Form (PAF).
- 10 -
•
Any gift, prize, or award to a non-employee greater than or equal to $600.00 per
year requires completion of a W-9 by the recipient.
NOTE: For more detail regarding appropriate expenditures listed and not listed, please
refer to UVU Expenditure Policy: Section 204 Appropriateness of Expenditures.
Food Expenditures
Food Expenditures Requiring Vice Presidential Approval:
•
•
One faculty or staff social per year per organizational unit
Institution-wide employee functions/events (President and/or VP)
Food Expenditure Requiring Second Level Approval: Institutional meeting/event
limited to Institutional employees
Food Expenditures Requiring Associate VP, Dean, or Assistant VP Approval:
•
•
Institution recognition/awards/academic programs
Reasonable food/candy for welcoming/recruiting purposes
Food Expenditures Requiring Responsible Party Approval:
•
•
Light refreshments for staff meetings
Retirement and going-away receptions for employees leaving the University
Inappropriate Food Expenditures:
•
•
•
Refreshments for meetings/receptions or waiting areas without an Institutional
business purpose
Break area food/refreshments
Food/refreshments for baby showers, wedding showers, and birthday parties
NOTE: For more detail regarding appropriate food expenditures listed and not listed,
please refer to UVU Expenditure Policy: Expenditure Policy B-1.4 L
NOTE: If you hold an on-campus event anywhere other than at the McKay Events
Center, food for the event MUST be purchased from UVU Dining Services.
- 11 -
Procurement Guidelines
THIS IS ONLY AN ABBREVIATED REFERENCE. For the full policy, please go to the
following URL: http://www.uvu.edu/policies/officialpolicy/
Requisitions (Requests for Purchase Order)
Requisitions are used to request products and/or services from vendors. A requisition
must be submitted through Banner for all purchases except those being made with a
Limited Purchase Check or a Purchasing Card. In order to comply with Utah State and
UVU policy, the requisition must be approved and the purchase order completed prior to
ordering any materials or services.
It is very important that your requisition include all the information necessary to place
the order. Not doing so could slow down the process considerably. Please be sure to
include all vendor information as well as detailed specifications of the item to be
purchased, including quantity.
WARNING: Do not enter protected information in any field when creating a requisition.
For a list of protected information, refer to the Protected Information section of this
manual, Pg.26.
Bid Limit
If the total purchase, including freight charges, will exceed $2,999, a Request for Bid
must be submitted to multiple vendors for competitive bidding. This policy applies to any
purchase regardless of fund source. It is against Utah State policy to avoid this limit by
submitting more than one requisition.
It is especially important to include all pertinent information on these requisitions.
Specifications should be clear and concise and not vendor specific. Also, if possible,
include the names and contact information of qualified vendors that you would like to be
included in the bidding process. Procurement Services is responsible for submitting,
processing, and awarding bids. If a purchase will exceed $30,000, an invitation to bid
must be advertised in a State-wide periodical. Procurement Services will place the
necessary advertisement and charge the same INDEX code that is on the original
requisition. These bids must be open for two weeks. Please be aware of this timetable.
NOTE: If you use a vendor as a consultant to write up the specifications for your bid,
that vendor cannot be included in the bidding process.
- 12 -
NOTE: If you are using a current State Contract, a bid is not required for the purchase.
A link to the list of current State Contracts can be found on the Procurement Services
website.
Sole Source Purchases
Sole source procurement may be used if a product or service is only available from a
single supplier or for compatibility reasons. A request for sole source procurement must
be submitted in writing. The Sole Source Justification Form can be found on the
Procurement Services website. Procurement Services will search the market in an
attempt to confirm the validity of the sole source request. Procurement Services will
determine whether the materials or services may be purchased using a sole source.
Please be aware that this may delay the purchasing process.
NOTE: Materials or services that can only be obtained from one vendor or manufacturer
may not qualify for a sole source. Materials and services of like specifications, quality,
and value must be considered.
NOTE: All purchases estimated over $30,000 and believed to be a Sole Source must be
posted for two weeks on an online notification system. Please be aware of this
timetable.
Receipt and Payment of Materials and Services
Materials and services must be marked “received” in the Banner system to authorize
payment of the corresponding invoice(s).
Please encourage vendors to deliver all materials to Receiving. This ensures that you
will receive your materials and the vendor will be paid in a timely manner.
When materials and services are received through Receiving, Receiving personnel
enter the receiving information into the Banner system. If you receive materials or
services directly, please contact Receiving and confirm receipt of materials or services.
All invoices should be forwarded to Accounts Payable (MS 109). Please make sure the
purchase order number is listed on the invoice. Failure to forward invoices to Accounts
Payable may result in delay or non-payment to the vendor.
- 13 -
Service Purchases
Any services received from a company must be procured using a requisition. Any
services from an individual must be procured using a Contractual Service Agreement.
These forms should be sent to Finance and Business Services with the appropriate
signatures. If the services received are provided by a current UVU employee, payment
for services rendered must be handled through the Human Resources Department.
NOTE: Contractual Service Agreements should not be used for services that would
normally be provided by a UVU employee. For example, a Contractual Service
Agreement should not be used for a department secretarial position.
Purchasing Violations
All purchases, except those made with a Procurement Card or Limited Purchase Check,
require a purchase order and approval by Procurement Services. Failure to obtain a
purchase order prior to ordering materials or services is a Utah State Law and UVU
purchasing policy violation. In order to pay for unauthorized purchases, a memo stating
the reason for the violation and requesting direct payment of the purchase must be
submitted to Procurement Services. The memo must be signed by the appropriate Vice
President. Please read the policies regarding violations for additional information.
Limited Purchase Checks (LPCs)
Limited Purchase Check Requests:
•
•
•
•
•
Requests must be made with the Limited Purchase Check Request Form.
A maximum of five checks can be requested at one time per INDEX code.
Request must be signed by the responsible party over the INDEX code.
INDEX code must be included (one INDEX code per request).
Checks will be available the following Monday or Thursday, whichever is
soonest.
Check Pickup: The responsible party signs and dates the request and is responsible to
pick up the check(s); however, the responsible party may sign a memo designating
another individual to pick up their checks by doing one of the following:
•
•
Send a memo every time an individual other than the responsible party picks up
checks. The memo needs to include the person’s name who is signing for the
checks, the date they are being picked up, and the INDEX code of the checks.
Send a memo granting permission for an individual to pickup checks for one
fiscal year. The memo needs to include the name of the individual authorized to
- 14 -
pickup checks, the INDEX code, and the fiscal year (i.e., 2006-07). An
Authorization Form can be downloaded from the Procurement Services website.
Check Use:
•
•
•
•
Checks remain the responsibility of the responsible party, regardless of who
spends them.
The user should countersign the check and include his/her driver’s license
number.
A receipt or invoice must be obtained.
A complete description of the items purchased must be included on the check
receipt where indicated.
Restrictions:
•
•
•
•
•
•
•
•
Checks cannot be written out to individuals. This includes UVU employees,
students, and their relatives.
Checks cannot be written for over the authorized maximum amount. Purchasing
many items at the same time with more than one check, even if you have two
invoices or receipts, is not acceptable. This is the same as using two checks for
one purchase. When an invoice or receipt is more than the maximum authorized
amount, the check can only be written for the maximum authorized amount.
Checks can only be used once per day per vendor.
The Limited Purchase Check (LPC) system is designed for small purchases and
any requirements over the maximum authorized amount need to be handled by
the Procurement Services.
Checks are not to be written for cash.
The University is EXEMPT FROM UTAH STATE SALES TAX. Do not allow the
vendor to charge tax. The tax exemption number is printed on the face of the
check underneath the second signature line.
Checks written for food must have proper approvals and documentation.
Under certain circumstances and stipulations, exceptions may be made, in
writing, by Procurement Services.
Check Copy Returns:
•
•
Within thirty days of use, the purchasing copy of the check, along with the
receipt, must be returned to Procurement Services. The department copy is
retained for the department’s records.
If a check is voided for any reason, the entire check (check and all copies) must
be returned to Procurement Services. DO NOT KEEP THE CHECK! DO NOT
DESTROY THE CHECK! Doing so may result in your department being charged
for any stop payment fees.
- 15 -
Failure to Comply with Policy (Violations):
Violations: Violations are defined as follows:
•
•
•
•
•
•
•
Checks written to individuals, UVU employees, students or their relatives
Checks written for cash, or for an amount exceeding purchase
Failure to return Limited Purchase Check documentation
Use of more than one check to pay for an invoice
Checks written for anything on the list below of items you cannot buy
Checks written without approval for anything on the list below of items you
should not buy that are not accompanied by prior approval
Checks written for food without proper approval or documentation
Violation Actions: The following are actions that will be taken if violations occur:
•
•
•
•
1st violation the supervising Vice-President will be notified of the infraction
2nd violation will result in a 3 month probation
3rd violation will result in a 12 month probation
4th violation may result in no further consideration
NOTE: If after 12 months no further violations occur, then the previous violations will be
purged, unless you have had 4 violations and are being given no further consideration.
Restricted Items:
Items You Cannot Buy: Limited Purchase Checks (LPC) CANNOT be used to
purchase items that are not in agreement with the expenditure policy including,
but not limited to, the following items:
•
•
•
•
•
•
•
•
•
•
•
•
•
•
•
•
Alcoholic beverages
Cash advances
Construction or remodeling
Employee benefits: entertainment, tuition, gifts, or flowers
Fabricated equipment
Fines (including parking tickets), late fees, or penalties
Lodging, hotels, motels, or housing (including deposits or holds on such)
Personal purchases
Special services: independent contractors, performers, or speakers
Student events, travel, tuition, scholarships, or stipends
Travel (including airline tickets)
Vehicle rental
Office furniture of any kind
Computers of any kind
Memberships
Food that requires VP approval
- 16 -
Items You Should Not Buy: Limited Purchase Checks (LPC) SHOULD NOT be
used to purchase the following items:
•
•
•
Gifts, gift certificates, or gift cards
Holiday decorations
Clothing (including monogrammed articles)
NOTE: Checks can be used for the items in the “should not” category (in
accordance with University policy) with prior VP approval. Checks without prior
approval will result in a violation.
Purchasing Cards (P-Cards)
When using your Purchasing Card, make sure that you follow all of the proper
guidelines that have been established. The guidelines are in place to keep the
Purchasing Card program running smoothly and to help both the University and its
employees by allowing purchases of items that fall within the guidelines. The guidelines
are as follows:
•
•
•
Follow proper internal procedures specific to your department to obtain
authorization to make a purchase
Determine whether the purchase is restricted on the Purchasing Card
Determine that the price quoted is the best you can obtain
NOTE: Many items have University or state contracts available for superb
savings. You may contact Procurement Services at ext. 8301 for special pricing
contracts available.
•
•
•
•
•
Be certain that the total amount, which includes shipping and handling charges,
will not exceed your per-purchase limit on the card
Do not split a transaction into smaller amounts to avoid dollar limits placed on the
card
Ensure that no sales tax is charged
Do not give your card number to a sales representative to “keep on file” for future
use
Retain itemized receipt for records
The Purchasing Card is an ideal purchasing tool for low dollar purchases, and it is the
intent of the University that the Purchasing Card program be used successfully. The
above guidelines are the means that assure a successful program. Following these
guidelines will not require an extraordinary amount of work and have been established
to ensure that UVU funds are used in an appropriate manner.
- 17 -
Purchasing Card Policies: By accepting a Purchasing Card, you agree to follow the
policies and procedures that have been established by UVU. This section will go over a
few of the policies and procedures including monthly statements, documentation, card
maintenance, and personal credit; for a complete list of all policies and procedures see
the Purchasing Card Policy and Procedures Manual available on the Procurement
Services website.
Monthly Statement: The billing cycle for each card is from the 11th of the month
through the 10th of the next month, if the 10th falls on a weekend or holiday we
will cycle at the end of the next business day. Within 7-10 business days of the
end of the billing cycle you will receive your monthly statement from the bank.
You are then expected to review and reconcile your monthly statements,
including all relevant documentation, after which, you need to sign and date your
monthly statement.
After you have signed and dated your monthly statement, you need to have your
supervisor review the monthly statement and attached documentation to ensure
that all purchases were for legitimate University business. Once your supervisor
reviews the monthly statement, he/she needs to sign and date it, and then return
it to you to keep on file.
Documentation: You will receive a monthly bank statement that details all
purchases made during the billing cycle. In addition to the statements, you are
expected to obtain supporting documentation from the vendor for each purchase
made. A minimum of one form of documentation is necessary for each purchase
made and must include a date, vendor, brief description and purpose, and the
dollar amount. All of the following are acceptable forms of documentation:
•
•
•
•
•
Original itemized receipt
E-mail/internet confirmation page
Fax confirmation page
Telephone order form
Packing list or invoice from shipment
Along with the monthly statement and documentation, it is advised that you use
the Purchasing Card Log of Transactions to help keep track of their records. The
Purchasing Card Log of Transactions becomes an ongoing record of information
about the transactions made on your card. The form is simple and easy to use,
and will require a minimum amount of time to maintain.
Card Maintenance/Security: You are responsible for the security of your card
and the transactions made with the card. The card is issued in your name, and it
will be assumed that any purchases made with the card have been made by you.
The Purchasing Card is UVU’s property and should be secured just as you would
secure your personal credit cards. If your card is lost or stolen, notify the
- 18 -
Purchasing Card Administrator, and contact U.S. Bank Customer Service at 1800-344-5696 immediately! Upon receipt of your call, further use of the card will
be blocked. Prompt action in these circumstances can reduce UVU’s liability for
fraudulent charges.
In addition to your responsibility for the security of your card, you are also
responsible for all purchases made on your card. To avoid purchases that may
be violations and also because some vendors will only accept the card if you are
the one presenting it to them, you should be the only person using your card.
Personal Credit: The Purchasing Card in no way affects your personal credit.
As such, we do not require your Social Security Number to be kept on file. In
place of using Social Security Numbers, UV ID numbers are used for all
Purchasing Card documentation.
Since the bank requires a 9 digit ID number, a zero will be added to the front of your UV
ID when providing your ID to the bank.
Purchasing Card Restrictions: Each card comes with built-in restrictions that include
certain blocked supplier Merchant Category Code’s (MCC) and per purchase/monthly
limits. Additionally, UVU has restricted other purchases due to their business nature.
Your Purchasing Card CANNOT be used to purchase the following items:
•
•
•
•
•
•
•
•
•
•
•
•
•
•
•
•
•
•
•
•
•
Any purchase exceeding $1,000 (including shipping and handling)
Alcoholic beverages
Capital equipment or fabricated equipment
Cash advances
Cell phone bills, accessories, or phones
Clothing (including monogrammed articles)
Computers, laptops, and projectors (must be campus standard)
Construction or remodeling (must be campus standard)
Donations
Employee benefits: entertainment, tuition, gifts, or flowers
Fines (including parking tickets), late fees, or penalties
Food and meals: candy, office meals, office parties, doughnuts, bagels, pizza,
etc.
Furniture and blinds (must be campus standard)
Gas or oil for any vehicles
Gifts, gift certificates, or cards
Holiday decorations
Memberships
Office party items
Personal purchases
Printing (must be campus standard)
Rental or lease of vehicles, facilities, buildings, or equipment
- 19 -
•
•
•
•
Services that would be considered either payroll (salary) or independent
contractor payments (Independent Contractor Form)
Student events, travel, tuition, scholarships, or stipends
Travel-related transportation, lodging, meals, etc.
Unregistered software
NOTE: Contact the Purchasing Card Administrator at ext. 7416 or the Director of
Procurement Services at ext. 8303 for special needs or exceptions.
Purchasing Card Audits: Because of the importance of this program, Procurement
Services has established a separate Purchasing Card Auditing Department. The
purpose of the Purchasing Card Auditors is to ensure that all cardholders are complying
with the established guidelines, policies, and procedures for Purchasing Card use.
The Purchasing Card Auditors will require your records to be available on at least a
yearly basis. The auditor will make arrangements to have all documentation, including
signed monthly statements and receipts, brought to his/her office. This information is
required to be presented to the auditor within the first two weeks of the month of
request. The entire audit is required to be completed by the end of the following month.
Once the auditor has all applicable documentation, an audit of your records will be
conducted by reviewing the documentation and compiling an audit report noting
violations. All violations have been given point values which are shown on the following
table:
Violations
Personal Purchase
Splitting of Transaction
Purchase of Restricted Item
Lack of Signature on Monthly Statement
Receipt/Paperwork Missing (First Violation)
Receipt/Paperwork Missing (Second Violation)
Receipt/Paperwork Missing (All future Violations)
Fabricated Equipment or Furniture Purchase
Taxes Charged on Purchase
Point Value
150
60
40
40
30
40
50
30
10
When the documents have been reviewed, the auditor will make arrangements to return
all documentation to you and will present you with a preliminary audit report. You are
then expected to review the audit report and make corrections.
Once the audit report has been corrected, the auditor will finalize the report, file it in
Procurement Services, and then submit a copy of the report to you and to your
Department Chair/Director.
- 20 -
Upon completion of the audit, new violation points will be added to your profile.
Violation points accumulate from year to year and if they exceed 150 points, then the
card will be revoked.
Campus Standards
Because of warranties, aesthetics, compatibility, service, and other issues, the following
campus standards have been established:
NOTE: This is an abbreviated document. For more information, see the Procurement
Services website.
Item
Standard
Computers
Computers (excluding Macs) must be purchased from the
Computer Shop (ext.7094). To order a desktop PC, fill out a
Computer Order Form located on the Computer Shop website.
Mac desktops can be ordered from the UVU Bookstore with a
requisition.
Laptops
Dell, Epro, Gateway, HP, IBM, Panasonic, Sony, Toshiba, and
Apple are approved laptops. Laptops must include a 3-year
warranty and be installed with Windows XP or Mac OS.
Printers
HP printers are the only approved network printers.
Networking/
Computer Parts
Projectors
Contact IT Help Desk (ext. 8888).
Contact Media Services (ext. 6700).
Furniture may only be purchased with a Purchase Order. This
Furniture/Blinds/
includes, but is not limited to, roll-around file cabinets, book cases,
Clocks/Lamps
clocks, and desktop lamps.
Construction/
Room Changes
Any construction/room changes must be approved by the Space
Committee and be coordinated with the Planning Office. This
includes anything being attached to a wall.
Printing
All printing jobs over $500.00 must be handled through Printing
Services (ext. 8415).
- 21 -
Travel Guidelines
THIS IS ONLY AN ABBREVIATED REFERENCE. For the full policy, please go to the
following URL: http://www.uvu.edu/policies/officialpolicy/
NOTE: Travel forms are not available on-line. Please order these forms from the
warehouse using the Stores Requisition Form (FSAREQN) in Banner (see the
Commodity Codes for Warehouse Purchases section, Pg.127 for travel form commodity
codes). Please include your Banner Finance INDEX code on all travel forms.
NOTE: For questions and concerns, contact the Travel Office at ext. 8965, e-mail
[email protected], or mail stop 109. Please ask questions BEFORE the trip. This will
help you avoid reimbursement problems after travel has been completed.
Before Travel
Travel Authorization: A Travel Authorization Form must be completed and approved
by an appropriate supervisor for all overnight and out-of-state travel. The form
MUST be sent to the Travel Office before any travel arrangements are made or any
reimbursements are given.
Conference Registration: Conference Registration Forms should be completed and
sent to Procurement Services with the Banner requisition number listed on the form.
The Registration Form and check will be mailed by Accounts Payable unless other
arrangements are made. Please allow sufficient processing time to meet deadlines and
"early-bird" discounts. A Purchasing card may be used for conference registration.
Travel Advances: Travel advances are available for up to 75% of the estimated out-ofpocket expenses with a minimum advance of $150. Please check the box on the
Travel Authorization Form to request an advance. Please allow enough time for
processing. All advances are to be picked up in the Finance and Business Services
office (BA109) by the traveler. Only airline tickets and conference registration fees are
pre-paid by the University. All other expenses are to be paid by the traveler and are
reimbursed by the University after travel. Please keep all receipts.
Airline Tickets: Airline tickets can be ordered through the Travel Office. Please give all
pertinent information (i.e., times, dates, and discounts offered by the conference) to the
Travel Office. UVU uses the State Travel Office to obtain state negotiated rates that
can be purchased at any time and fully refundable tickets are available.
Out-of-State Travel via Private Automobile: Out-of-state travel via private automobile
is reimbursed at the appropriate mileage rate multiplied by the miles driven or at the
lowest available airfare which can be obtained through the Travel Office plus airport
- 22 -
transportation and reasonable parking fees, whichever is less. No additional
expenses are reimbursed for travel en route. The University will reimburse only those
expenses incurred had the traveler used a commercial airline. Per diem is based on the
travel days if you had traveled by plane.
Rental Cars: Rental cars, if considered necessary, are to be reserved through the
Travel Office. UVU obtains car rentals through the State Travel Office. Rental cars are
available for both in-state and out-of-state travel. Our State contract includes:
•
•
•
•
•
•
Reasonable rates
Unlimited miles
Liability and collision insurance
A loss-damage waiver
No charge for underage drivers
No charge for an additional driver
Lodging Arrangements: Lodging arrangements are to be made by the traveler. Hotel
deposits will not be paid by the University. Please use a travel advance (as described
above) or a personal credit card to guarantee room reservations. An itemized lodging
receipt is required for reimbursement. Credit card receipts are not considered to be
sufficient documentation.
Travelers staying with friends or relatives will be reimbursed $35 per night. In this
situation, please provide the name, address, and phone number of the person with
whom the traveler stayed.
NOTE: All rates are subject to change.
During the Trip
Mileage: Mileage should be computed from the internet, a mileage chart, or an
odometer reading. If your travel will be to several points within one area, keep track of
the miles driven, and then list them as “area” travel. Mileage is reimbursed at the State
of Utah rates. As of July 1, 2008, the rates are $0.36 per mile when a state car is
available for use but not taken and $0.505 per mile when a state car is not available or
appropriate for use.
- 23 -
Meal Allowances: Meal allowances are given at the State of Utah rates. As of July 1,
2008, they are as follows:
Breakfast
Lunch
Dinner
Total
In-state
$9.00
$11.00
$16.00
$36.00
Out-of-state
$10.00
$14.00
$21.00
$45.00
An overnight stay is required to receive any meal allowance. In order to receive a
full day's allowance, the traveler must leave before 7 a.m. and return after 7 p.m. Meals
included in or provided by conferences will not be reimbursed.
Receipts: In order to receive a reimbursement, receipts for hotel, taxi, limousine, rental
car, registration fee, etc. MUST be turned into the Travel Office. Obtain and keep
receipts from all travel related expenditures. If there is any question whether or not an
expenditure is reimbursable, keep the receipt.
Parking: Parking is available at the airport for $7 per day. For more information, visit
the State Travel Office Web site (http://finance.utah.gov/travel/).
NOTE: All rates are subject to change.
After Travel
The Travel Reimbursement Form: A completed Travel Reimbursement Form should
be sent to Finance and Business Services within 30 days of the traveler’s return. On
the form, list all expenses eligible for reimbursement, attach all Original Itemized
receipts, and subtract out any travel advance received. Both the traveler and the
appropriate supervisor must sign the form. Supervisors should review Travel
Reimbursement Forms before signing.
Expenses Allowed:
•
•
•
•
•
•
•
Airfare (not already paid for by the University)
Mileage for University business used on a personal vehicle OR airfare in lieu of
mileage (whichever is less)
Hotel room charge
Parking
Shuttle
Per diem
Public transportation
- 24 -
•
Rental car
Expenses NOT Allowed:
•
•
•
•
•
•
•
•
Personal expenses
Hotel food charges
Hotel movies
Hotel bar charges
Exercise facilities
Personal travel or mileage
Laundry charges
Telephone charges (except one call home per day)
Reimbursements to the University: Any reimbursements to the University should be
deposited with the Cashiers Office. Deposits should be made to your INDEX code and
account code 750015 for out-of-state travel and account code 750005 for in-state travel.
The deposit receipt should be sent to the Travel Office with the completed travel
reimbursement form and other receipts.
NOTE: Do not send checks to the Travel Office.
- 25 -
Protected Information
THIS IS ONLY AN ABREVIATED REFERENCE For the full policy, please go to the
following URL: http://www.uvu.edu/policies/officialpolicy/
Protected Information, for the purposes of this manual, is any specific information about
an individual or independent entity that is considered private or sensitive which can lead
to adverse consequences if disclosed, such as identity theft, financial loss, or invasion
of privacy. Access to such data is governed by state and federal laws, both in terms of
protection of the data and requirements for disclosing the data to the individual to whom
it pertains. Specifically, protected information includes, but is not limited to, the
following:
•
•
•
•
•
•
•
•
•
•
•
•
•
•
Social security numbers
Credit card information
Birthdays
Student directory information including: name, address, dates of attendance,
phone number, field of study, and degree
Bank account numbers
E-mail and personal documents
Health and medical records
Institutional financial records
Family financial data commonly found in financial aid applications and supporting
documents
Any identifying bio-demographic information
Employee payroll and personnel data
Corporate, foundation, and individual donor data
Computer passwords/PIN authentication
Data concerning any other individual or independent entity flagged for nondisclosure
Employees are personally responsible for the protection of such information. Do not
include protected information when creating requisitions in Banner Finance, when filling
out Check Request Forms, or when making journal entries/FZPLOADS.
- 26 -
Introduction to Banner Finance
- 27 -
Introduction to Banner
Banner is an Oracle TM -based Enterprise Resource Planning System (ERP) which is an
accounting-related database that connects the entire University. Banner is made up of
six modules which store and allow for easy access to the University’s data. The
modules include the following:
•
•
•
•
•
•
Banner General
Banner Finance
Banner Human Resources
Banner Student
Banner Financial Aid
Banner Accounts Receivable
The focus for this manual is the use of the Banner Finance Module (Banner Finance).
Its purposes include entry, storage, and timely reporting of accurate, relevant financial
data. It also provides a controlled purchasing/procurement environment for creating,
approving, and checking the status of requisitions (i.e., requests for purchase orders
(POs)).
Understanding the Chart of Accounts
The Chart of Accounts is a systematic classification of accounts and an essential part of
the Banner Finance accounting system. It defines the accounting distribution used on
all transactions and organizes the data in the way needed to produce financial
statements and reports. The FOAPAL string is an acronym used to identify the different
elements of the Chart of Accounts: FUND, ORGANIZATION, ACCOUNT, PROGRAM,
ACTIVITY, and LOCATION. The FUND, ORGANIZATION, ACCOUNT, and
PROGRAM codes are the primary Chart of Accounts elements used for classification,
budgeting, recording, and/or reporting. The ACTIVITY and LOCATION codes are used
to provide more specific performance-related detail for transactions. An INDEX code is
used to default certain FOAPAL elements, normally the FUND, ORGANIZATION, and
PROGRAM.
FUND:
•
•
•
A FUND code identifies ownership or the funding source.
It is the balance sheet or general ledger which organizes the information
into a self-balancing set of accounts: Assets = Liabilities + Fund Balance
(Equity).
Some specific FUND categories include: State Appropriations, Restricted
Grants, Private Donations, Institutional Interest Income (III), Student Fee
Revenue, Auxiliaries, and Agency Funds.
- 28 -
ORGANIZATION (ORG):
•
•
•
•
•
An ORG code identifies a department or budget unit.
It defines “who” is spending the money.
ORG codes are organized according to a hierarchy patterned after the
University’s organizational chart.
ORG codes are the operating or subsidiary ledger that tracks the detail of
revenue and expenditures (income statement items).
Budgeting is done at the ORG code level.
ACCOUNT (ACC):
•
•
•
•
•
An ACC code classifies or categorizes a transaction.
General Ledger ACC codes are assets, liabilities, and fund balance.
Operating Ledger ACC codes are revenue/income, expenditure and
transfer.
Budgets are also categorized by ACC codes: Salaries, Hourly Wages,
Benefits, Current Expense, Capital Expenditures, and Travel.
Using a Commodity code on a Banner requisition will automatically assign
the proper ACC code.
PROGRAM (PROG):
•
•
•
A PROG code identifies a function.
PROG codes are based on the definitions provided by the National
Association of College and University Business Offices (NACUBO).
PROG code categories are: Instruction, Academic Support, Student
Services, Institutional Support, Operation and Maintenance of Plant,
Student Financial Aid, Auxiliary Enterprises, Research, and Public
Service.
ACTIVITY (ACTV):
•
•
•
•
An ACTV code tracks specific projects within an ORG code.
ACTV codes are optional and are only used in specific situations.
ACTV codes cannot be used to set up separate budgets within the same
ORG code.
An example of using ACTV codes is the Facilities Department having one
ORG code for remodeling, but using ACTV codes to track specific
remodeling projects within that ORG (and INDEX) code.
LOCATION: LOCATION codes can be used with the fixed assets system to
identify where assets are physically located. However, UVU is not currently
using these codes.
- 29 -
INDEX Codes:
•
•
•
•
•
An INDEX code is used to default and group together certain FOAPAL
elements.
INDEX codes should be used on all transactions.
Most commonly, FUND, ORG, and PROG will be defaulted.
If an ACTV code is being used, that will also be defaulted and the INDEX
code name will be the same as the ACTV code name.
The FOAPAL elements that are defaulted from an INDEX code should
never be changed.
A FOAPAL string is a complex concept to grasp. Here is a simple way to think of how a
transaction is organized by a FOAPAL:
“I made a purchase with this money (FUND) for my department (ORG). I purchased this
type of product or service (ACC). This purchase will help the University fulfill this
function (PROG) by helping complete this project (ACTV).“
Although the above example does not represent a 100% accurate usage of a FOAPAL
string, it gives you a general idea of how each element is used.
Understanding INDEX Codes
To save time and to ensure data is accurately entered into Banner Finance, INDEX
codes were developed. An INDEX code normally defaults a unique combination of
FUND, ORG, and PROG codes for each transaction.
An INDEX code can be compared to a personal bank account number. When you
provide a bank with your account number, the bank knows who you are and to which
bank account your money is to be deposited or withdrawn based on that number. In the
same way, when you provide Banner with an INDEX code, Banner knows your ORG
and to which FUND and PROG your ORG’s money is to be deposited or withdrawn.
Each college, school, department, club, etc. can request as many INDEX codes as are
necessary to “bank” with Banner and properly account for the transactions they are
incurring.
There are three different types of INDEX codes: Hard, Soft, and Soft Budgeted. The
INDEX code type is displayed on the weekly e-mailed Manager’s Summary report with
the following key: H = Hard, S = Soft, SB = Soft Budgeted. It is important to know the
type of INDEX codes you are working with because they are accounted for differently
and the Available Balance is calculated differently for each one. These INDEX code
types are described below.
- 30 -
Hard Money INDEX Codes:
•
•
•
•
•
•
Each fiscal year, funds from the Utah State Legislature are appropriated to the
University. INDEX codes budgeted from these State appropriated funds are
known as Hard Money INDEX codes. Hard Money INDEX codes operate with
budgets.
The Budget Office controls the budgets and makes all budget adjustments and
budget transfers.
Hard Money INDEX codes have a unique ORG code that is used for that INDEX
code and any related INDEX codes using a different PROG or ACTV code.
Hard Money INDEX codes all share the same FUND code.
Revenue CANNOT be posted to a Hard Money INDEX Code. Annually, under
the direction of the President, the Budget Office will publish guidelines for
processing of year-end appropriated INDEX code balances.
To determine the amount available to spend, use the Hard Money Summary or
the Manager’s Summary weekly reports e-mailed to the responsible party. You
can also look at FGIBAVL or FGIBSUM in Banner (see Pg.66).
Soft Money INDEX Codes:
•
•
•
•
•
INDEX codes with sources of funding other than State appropriations are called
Soft Money INDEX Codes.
For most Soft Money INDEX Codes, the balance will roll from one fiscal year to
the next, i.e. you will not lose the funds if they are not spent by the end of the
fiscal year.
To determine the amount available to spend, use the Soft Money Summary or
the Manager’s Summary weekly reports e-mailed to the responsible party. You
can also look at FGITBSR in Banner (see Pg.68).
Budgets are entered on regular Soft Money INDEX codes to be used by the
requisition system in Banner. The budget entered may be based on the actual
Fund Balance or may be estimated. The budget should not be viewed as an
accurate indicator of funds available; it is only used for NSF (Non-Sufficient
Funds) checking when processing a requisition. See the Soft-Budgeted INDEX
Codes section below for different information about those budgets.
Soft Money INDEX codes have a unique FUND that is used only for that INDEX
code and any related INDEX codes using a different ACTV code.
Soft Budgeted INDEX Codes:
•
•
Soft Money INDEX codes that do use budgets to determine the available balance
are called Soft Budgeted INDEX codes.
One group of Soft Budgeted INDEX codes use a common FUND and several
ORG codes (similar to Hard Money). This group includes Institutional Interest
Income (III), Student Fee Revenue, Athletic Fee Revenue, and some grants.
- 31 -
•
•
Another group of Soft Budgeted INDEX codes represent Federal and State
Grants. Because many of these grants operate on a reimbursement basis, a
budget is used to indicate the total funds that are available to receive
reimbursement, or that have been awarded.
To determine the amount available to spend, use the III, Student Fee, Athletic
Fee, or Federal & State Grants Summary; or the Manager’s Summary weekly
reports e-mailed to the responsible party. You can also look at FGIBAVL or
FGIBSUM in Banner (see Pg.66)
- 32 -
Summary of INDEX Code Types:
Hard
Funding
Source
• State
Appropriations
Soft
• Non-State
Appropriated
Revenue
Soft Budgeted
• Institutional Interest
Income (III), Student Fee
Revenue, Athletic Fee
Revenue
• Federal & State Grants
and Contracts
Budgeting
Method
• Budget allocated
by the Budget
Office
• Budget
– Expenditures
– Encumbrances
= Amount
Available to Spend
How to
Determine
Amount
Available to
Spend
• Weekly e-mail
Hard Money
Summary or
Manager’s
Summary Reports
• FGIBAVL or
FGIBSUM in
Banner
Carry Over
to Next
Fiscal Year
• Determined
annually by
President
• Budget used for
NSF checking only
• Beginning Fund
Balance
+ Revenue
– Expenditures
+/- Transfers
– Encumbrances
= Amount Available
to Spend
• Weekly e-mail
Soft Money
Summary or
Manager’s
Summary Reports
• Budget allocated based
on actual or estimated
revenue streams
• Budget
– Expenditures
– Encumbrances
= Amount Available to
Spend
• Weekly e-mail III,
Student Fee, Athletic Fee,
or Federal and State
Grants Summary or
Manager’s Summary
Reports
• FGIBAVL or FGIBSUM
in Banner
• FGITBSR in
Banner
• III, Student Fee and
Athletic Fee with
permission only
• Yes, in most cases
- 33 -
• Federal & State Grants
and Contracts will carry
forward any amounts
remaining on the grant
INDEX Code Naming Conventions:
Hard
Soft
• First digit of FUND is
dropped and replaced
• All numeric will
with letter:
match the ORG code
C – Clubs
(only Hard has all
E – Service Enterprise
numeric)
F – Lab & Course Fees
G – Grants & Contracts
• Ending in U, L, V are
J – Academic Service
the Upper, Lower, Voc
N – Loan Funds
codes used for
P – Plant Funds
salaries
R – Scholarship
S – Other Soft Money
• Starting with CEL
W – Conf & Workshops
are CEL grants
X – Auxiliaries
Y – Agency Funds
• If using an ACTV
code, the INDEX code
• If using an ACTV code,
will be the same as
the INDEX code will be
the ACTV code
the same as the ACTV
code
- 34 -
Soft Budgeted
• For INDEX codes using pooled
budgets, the first digit of ORG is
dropped and replaced with a letter
at the end of the INDEX code:
I – III/Institutional Interest Income
T – Student Fee Revenue
A – Athletic Fee Revenue
G - Grants
• For Federal & State Grants, the
first digit of FUND is dropped and
replaced with G
• If using an ACTV code, the
INDEX code will be the same as
the ACTV code
Understanding the Organizational Hierarchy
ORG codes are arranged in a hierarchical order patterned after the organizational chart
of the University. Data entry level ORG codes are used in INDEX codes. ORG codes
that are predecessors to the data entry level ORG codes are called roll up ORG codes.
The number of digits in the roll up ORG code indicates how many levels away from
reporting to the President that ORG code is. The following figure illustrates the
hierarchy levels:
- 35 -
In order to keep the levels consistent with the number of digits used in each level, some
areas will have the same ORG code description repeated in order to form the
hierarchical chain to the data entry level. For example:
ORG Code
1
20
200
2000
20000
200002
Description
Office of the President
VP Academic Affairs
VP Academic Affairs
VP Academic Affairs
VP Academic Affairs
VP Academic Affairs Example (Data Entry Level)
- 36 -
Banner Finance Basics
Accessing Banner: Banner-Finance Forms
In order to gain access to Banner Finance and to make certain executive changes, you
will need to fill out the proper forms and obtain proper authorization. Banner Finance
Forms are available on the Finance and Business Services website under the Banner
Finance Forms & Information link and in the Forms section of this manual, Pg.114.
Instructions for each Banner Finance Form are presented below.
Form
Banner Finance Access Form
Banner Finance Request for New Banner
INDEX Code Form
Banner Finance Request for Customized
Approval Queue Form
Banner Finance Request for Change of
Responsible Party
Banner Finance Request for Change to INDEX
Code Title Form
Purpose
Gaining access to Banner Finance
Requesting new INDEX codes
Adding approvers to an approval
queue
Changing an INDEX code’s
responsible party
Changing the title of an INDEX code
Banner Finance Access Form: The Banner Finance Access Form is used for gaining
access to Banner Finance. To fill out this form, do the following:
Step 1 –
In the top section, enter your personal information (see figure below)
A) On the Name line, enter your name as you would like it to appear on
requisitions as the requestor.
B) On the UV ID line, enter your UV ID.
C) Complete the remaining fields of the top section.
- 37 -
Step 2 –
If special access is needed, such as query budgets only, please describe
the needed access in the second section (see figure below).
NOTE: Default access will allow a user to submit requisitions, view
approval process forms showing where a requisition is in the approval
process, and query budget information.
Step 3 –
If you desire Banner to default to a certain INDEX code when you create
requisitions, list the INDEX code next to the INDEX Code to default for
requisitions heading (see figure below).
NOTE: The ORG code associated with this INDEX code will be entered as
a default on the Banner Requisition Form (FPAREQN).
NOTE: If you leave this area blank, you will have to enter an ORG code
every time you submit a requisition. The INDEX code to use for the
requisition can always be changed, even if a default is set.
Step 4 –
If you need access to all current and future INDEX codes in a department
or area (roll up ORG access), in the fourth section, enter your ORG code
and your department’s name in the Roll up ORG Code and
ORG/Department Title columns (see figure below). If you only need
access to (a) specific INDEX Code(s), skip this step and go to Step 5 (see
figure below).
NOTE: If you do not know what the roll up ORG code is for your
department, contact Jacob Atkin, [email protected], ext. 8576.
Step 5 –
If you only need access to some of your ORG’s INDEX Codes, or you
need access to INDEX Codes in addition to those attached to the roll up
ORG code you specified in Step 4 then, in the fifth section, enter the
- 38 -
specific INDEX code(s) and their accompanying INDEX title(s) under the
INDEX Code and INDEX Title headings (see figure below).
NOTE: Most users will not need to complete this section. The following
are examples of situations when you would need this access:
Step 6 –
•
You work with another department that wants to share access to a
specific INDEX Code with you.
•
The department supervisor does not want you to have access to all
budgets for that department, but just specific ones.
In the Approval section of the form, have the responsible party over all the
ORG/INDEX codes listed on the form, or someone higher in the
organizational structure, sign and date the form (see figure below).
NOTE: The Approval section must be signed by the responsible parties of
all ORGS/INDEX Codes listed on the form. If this form is e-mailed from
the person authorized to sign, that acts as an electronic signature.
Step 7 –
Submit the form to Jacob Atkin, BA-109, [email protected], ext. 8576.
Step 8 –
Contact Jacob Atkin for Banner training.
- 39 -
Banner Finance Request for New INDEX Code Form: The Banner Finance Request
for New INDEX Code Form should be used to request new INDEX codes. To complete
this form, do the following:
Step 1 –
In the top section, enter your personal information (see figure below).
Step 2 –
In the middle of this form, complete the following (see figure below):
A) Under the Type of INDEX Code Requested heading, select the INDEX
type you wish to request.
NOTE: Next to each INDEX Code type, special instructions for filling
out the form are included. Be sure to follow any special approval,
setup, or submittal instructions included here.
B) Under the Requested INDEX Code Title heading, write the desired
name for the new INDEX Code.
NOTE: INDEX Code titles are limited to 35 characters.
C) Under the How will the requested INDEX Code receive funding and / or
revenues heading, give a description of the type of funding/revenues
the INDEX Code will receive (e.g., donations, grants, sales).
- 40 -
D) Under the Please give a brief explanation of why you need this INDEX
Code and how it will be used heading, explain the activities or
programs that will produce the funding/revenue.
Step 3 –
In the Approval section of the form, have the responsible party over the
INDEX code requested, or someone higher in the organizational structure,
sign and date the form (see figure below).
NOTE: If this form is e-mailed from the person authorized to sign, that acts
as an electronic signature.
Step 4 –
Follow any special instructions given next to the INDEX code type
selected in Step 2-A.
Step 5 –
Submit the form to Wendy Hope, MS 109, [email protected], ext. 8108 or
for a grant INDEX Code, submit the form to Nancy Bartlett, MS 272,
[email protected], ext. 8156.
Banner Finance Request for Customized Approval Queue Form: The Banner
Finance Request for Customized Approval Queue Form is used for adding approvers to
requisition approval queues. To fill out this form, do the following:
Step 1 –
In the top section, enter your personal information (see figure below).
Step 2 –
Under the REQUEST FOR ADDITIONAL USERS TO BE ADDED AS
APPROVERS heading, enter the following information (see figure below):
- 41 -
A) In the Banner Username column, enter the additional approvers’
Banner usernames.
B) In the Approval Queue ID column enter the approval queue ID(s) for
the appropriate approval queue(s).
NOTE: If you do not know what your approval queue ID is, contact
Wendy Hope, [email protected], ext. 8108 or Jacob Atkin, ext. 8576.
C) In the Maximum Dollar Limit column, enter the maximum dollar amount
under which each approver will be allowed to approve requisitions.
NOTE: If an approver approves any requisition in excess of his/her
maximum dollar limit, the document will have to be approved by
another individual with a higher maximum dollar limit.
D) In the Co-Approver or Backup? heading, select Co or Back for each
approver.
NOTE: Co-approvers receive e-mail notifications when they need to
approve requisitions, just as the responsible party does. Backup
approvers do not receive notifications, but they do have access to
approve documents for which they are authorized as a backup
approver. Viewing requisitions for which you are authorized as a
backup approver is explained in the Approving/Disapproving
Requisitions (FOAUAPP) section, Pg.104.
E) If the requested approval access will only be for a certain time period,
enter the start and end dates in the Start Date and End Date columns,
otherwise leave these columns blank.
Step 3 –
In the Approval section of the form, have the responsible party over the
listed approval queues’ respective INDEX codes, or someone higher in the
organizational structure, sign and date the form (see figure below).
- 42 -
Step 4 –
Submit the form to Wendy Hope, MS 109, [email protected], ext. 8108.
NOTE: If this form is e-mailed from the person authorized to sign, that acts
as an electronic signature.
Banner Finance Request for Change of Responsible Party Form: The Banner
Finance Request for Change of Responsible Party Form is used for changing an INDEX
Code’s responsible party. To fill out this form, do the following.
Step 1 –
In the top section, enter your personal information (see figure below).
Step 2 –
In the middle section of this form, do the following (see figure below):
A) In the Banner INDEX Number field, enter the INDEX Code for which
the responsible party is to be changed. If all of the INDEX Codes for
which an individual is responsible are to be reassigned to a new
responsible party, then, in place of an INDEX code, enter “ALL” in the
field.
- 43 -
NOTE: Changing the responsible party on an INDEX code will also
change the user in the approval queue.
B) In the Banner INDEX Title field, enter the name of the Banner INDEX
code listed in the Banner INDEX Number field.
C) In the Current Responsible Party Name field, enter the name of the
individual currently responsible for the INDEX code listed in the Banner
INDEX Number field.
D) Next to the NEW Resp Party (Change to) heading, in the Name of
Responsible Party field, enter the name of the new responsible party.
E) In the Banner Username field, enter the new responsible party’s
Banner user name.
NOTE: Banner user names are the same as Novell user names.
F) In the UV ID field, enter the UV ID of the new responsible party.
G) Under the Reason for Change heading, write a brief description of why
the responsible party is being changed.
Step 3 –
Under the Effective date of changes requested heading, enter the date for
the responsible party to be changed (see figure below).
Step 4 –
In the Approval section of the form, have the responsible party over the
INDEX codes listed on the form, or someone higher in the organizational
structure, sign and date the form (see figure below).
Step 5 –
Submit the form to Wendy Hope, MS 109, [email protected], ext. 8108.
NOTE: If this form is e-mailed from the person authorized to sign, that acts
as an electronic signature.
- 44 -
Banner Finance Request for Change to INDEX Code Title Form: The Banner
Finance Request for Change to INDEX Code Title Form is used for changing the title of
an INDEX Code. To fill out this form, do the following:
Step 1 –
In the top section, enter your personal information (see figure below).
Step 2 –
In the middle section of this form, do the following (see figure below):
A) In the INDEX Code column, enter the INDEX Code(s) for which you
wish to change the title(s).
B) In the Current Title column, enter the current title(s) of the INDEX
Code(s).
C) In the New Title Requested column, enter the new title(s).
NOTE: INDEX Code titles are limited to 35 characters.
- 45 -
D) On the line next to the Effective date of changes requested heading,
enter the date you wish the title(s) to be changed.
Step 3 –
In the Approval section of the form, have the form signed and dated by the
responsible party over the INDEX Codes listed on the form and over the
ORG/FUNDs associated with those INDEX Codes, or have someone
higher in the organizational structure sign and date the form (see figure
below).
Step 4 –
Submit the form to Wendy Hope, MS 109, [email protected], ext. 8108.
NOTE: If this form is e-mailed from the person authorized to sign, that acts
as an electronic signature.
Logging into Banner
There are two ways to access Banner information, UV Internet Native Banner (UV
Banner (INB)) and UVU Banner Online Services.
UV Banner (INB): UV Banner (INB) is the most common way to access Banner. This is
where most of your work with Banner Finance will be performed.
There are several instances (copies) of Banner, each with a different purpose and login
procedure. Definitions and login procedures for the Production and Test instances are
described below.
Production: The Production instance (PROD) updates live data. This instance
is where you will perform your work. To access PROD do the following:
Step 1 – Go to the following URL:
http://uvaps.uvu.edu:7770/forms/frmservlet?config=prod
Step 2 – On the Logon window that appears (see figure below) in the Username
field, enter your user name. Your Banner user name is the same as
your Novell username (i.e. SMITHJO for John Smith).
- 46 -
Step 3 – In the Password field, enter your password. If you are a new user and
this is your first time logging in, your password will be your first name
(i.e. john for John Smith)
Step 4 – Click Connect.
NOTE: Leave the Database field blank when you login. It will default to PROD. If
for some reason you are unsuccessful in logging in, try typing PROD in the
Database field.
NOTE: The first time you run Banner from your own computer, it will ask you if
you want to install an Oracle Initiator program. Answer YES, and proceed
through the installation of this program. This is a one-time installation. If you have
a problem loading the Oracle Program, and you are using the Netscape browser,
try using Internet Explorer.
Test: Please use the Test instance (FASTTEST) for exploration, practice, and to
test functions in Banner as it does not update live information in PROD. To
access this instance do the following:
Step 1 – Go to the following URL:
http://bannertst.uvu.edu:7770/forms/frmservlet?config=fasttest
Step 2 – Complete Steps 2-4 for Logging into PROD shown above.
NOTE: Leave the Database field blank when you login. It will default to
FASTTEST.
UVU Banner Online Services: UVU Banner Online Services can be accessed through
UVLink. It has a different format and different functionality than UV Banner (INB). Use
this system if you need to access Banner information from off campus. Approving
requisitions is also done easily with UVU Banner Online Services. To access UVU
Banner Online Services, in UVLink, under the Home tab, click the Financial Information
Menu link under the Online Services Menus channel. The figure below will appear.
- 47 -
Navigating Banner
General Menu: After logging into UV Banner (INB), the first thing you will see is the
General Menu (see figure below). The General Menu links to every available Banner
screen (form). Some useful parts of the General Menu include the following (see figure
below):
- 48 -
Title Bar: Shows the descriptive form name, seven-letter form acronym, Banner
release number, database name, and today’s date.
Toolbar: The Toolbar is a panel of useful onscreen buttons. These buttons can
be used in place of key-strokes. Many useful functions of the Toolbar are
described on the Banner Navigation Quick Keys Chart at the end of this section,
Pg.51.
Menu Bar: The menu bar houses drop-down menus which interact with Banner.
The Help Menu is located on this bar. Many useful functions of the Menu Bar are
described on the Banner Navigation Quick Keys Chart at the end of this section,
Pg.51.
Status Bar: This bar displays error messages and instructions.
Forms: The different screens in Banner are called “forms.” Each form allows the user
to view specific information and perform specific tasks. You can query, enter, change,
or view information in different fields within each form. Banner forms have been
assigned descriptive form names and seven-letter acronyms (e.g. FGIBDST). The
acronyms are used in Banner as addresses for direct access to different forms. The
first letter in the acronym stands for the form’s Banner Module (e.g. “F” is for Banner
Finance). The second letter is the Module section (these sections will not be
discussed). The third letter is the type of form. Most of the forms you will use have an
A or an I in this position. “A” is for an application form used to enter and update
information in the database. “I” is for an inquiry form used to look up existing
information in the database. The remaining four letters are an abbreviation of the form’s
descriptive form name. Forms can be accessed in the following ways (see figure
below):
Direct Access: Entering a form acronym in the Direct Access field takes you
directly to the form.
Menu Access: Menu Access allows you to search through an organized list of
forms.
- 49 -
Options Menu: Once you have accessed a form, clicking a link in the Options
Menu will take you to a related form. This menu can also take you to other
windows, or blocks within a form. Blocks are separate sections of information
within a form, usually separated with headings. Windows are pop-up screens.
Next Block: You will normally access blocks within forms by clicking the Next
Block button
on the Toolbar or pressing Ctrl-Page Down on the keyboard.
Querying: To perform a query in Banner, enter query mode by clicking the Enter Query
button
or F7 on the keyboard. Type the exact text for which you are searching into
the appropriate field, and then click the Execute Query button
on the Toolbar or F8
on the keyboard. Searches are case sensitive. Most words start with a capital letter
and end with lowercase letters. Acronyms and some abbreviations could be in all caps.
If the exact text is not known, a wild-card query can be used. Either type the beginning
of a value or word, and then type “%” to search for any entry starting with that value or
word; type a “%” on both sides of a value or word to search for any entry containing that
value or word anywhere within the entry; or type “%”, and then type a value or word to
search for entries ending with that value or word. For example, type “7%” to search for
all entries beginning with 7; type “%7%” to search for all entries containing the number
7; or type “%7” to search for entries ending with the number 7.
For Date and Number fields, querying by range is also possible; simply type “<” or “>”
before a number or date to pull up all numbers or dates below or above that number or
date. Dates are entered in the DD-MMM-YYYY format, e.g. 30-JUN-2009.
- 50 -
Banner Navigation Quick Keys:
Function
Menu Option
Keystroke Option
Next Record
Record/Next
Down Arrow
Previous Record
Record/Previous
Up Arrow
Clear or Delete Record
Record/Clear or
Record/Remove
Shift + F6
Insert Record
Record/Insert
F6
Duplicate Record
Record/Duplicate
F4
Next Block
Block/Next
Ctrl + Page Down
Previous Block
Block/Previous
Ctrl + Page Up
Enter Query
Query/Enter
F7
Execute Query
Query/Execute
F8
Cancel Query
Query/Cancel
Ctrl + q
Rollback
File/Rollback
Shift + F7
Save or Commit
File/Save
F10
Exit
File/Exit
Ctrl + q
Select
File/Select
Shift + F3
Toolbar Button
None
Changing Your Password (GUAPSWD)
As a new user, you should change the password you were initially given. If you were
not prompted to do this on first login, navigate to the Oracle Password Change Form
(GUAPSWD) (see figure below).
NOTE: You can navigate to this form by clicking the Change Banner Password link on
the right side of the General Menu under My Links.
- 51 -
Step 1 –
In the Oracle Password field, type your old password.
Step 2 –
In the New Oracle Password field, type a new password. Reenter the
password in the Verify Password field.
Step 3 –
Click on the Save button
.
NOTE: Leave the Database field blank.
Creating a Personal Menu (GUAPMNU)
To personalize the Menu Access folders on the General Menu, navigate to the My
Banner Maintenance Form (GUAPMNU) (see figure below).
Step 1 –
With your cursor in the Object field, type in the Banner acronym of the first
form that you want to add to your personal menu.
Step 2 –
Click the Down Arrow Key to move down to the next line. Add additional
forms by repeating Step 1.
Step 3 –
When you have added all of the forms you want, save the changes that you
have made by clicking the Save button
F10 on the keyboard.
- 52 -
on the Toolbar or by pressing
Step 4 –
Exit by clicking the Exit button X on the Toolbar.
NOTE: You can modify the descriptive form names for each form if you prefer a different
description.
Extracting Banner Forms to Excel
Most Banner forms can be extracted to Microsoft Excel. This allows you to modify the
data to fit the format of your choice.
Step 1 –
Select Help on the Menu bar.
Step 2 –
While holding the Ctrl key (to disable any pop-up blockers), select Extract
Data No Key from the Help drop-down menu.
Step 3 –
Hold the Ctrl Key until a Windows dialog box appears
Step 4 –
Click Open on the Windows dialog box. This will open Microsoft Excel and
export all of the data from the Banner form to an Excel spreadsheet.
- 53 -
Banner Extras
Customizing Your Display (GUAUPRF)
To customize the colors and shading of your Banner display, your display options, or
your alert options. Navigate to the General Users Preferences Maintenance Form
(GUAUPRF) (see figure below).
Step 1 –
In the defaulted Display Options tab, check the boxes on the left hand side of
the screen under the Display Options heading to alter the display and alert
options. Be sure to check the Include Header Row in Data Extract option.
Step 2 –
next to the User Value fields under the User
Click on the Search buttons
Interface Color Settings heading to change the color of the Buttons, Canvas,
and Menus.
Step 3 –
Save your changes by pressing F10 on the keyboard.
- 54 -
Using the Calculator (GUACALC)
The calculator Form (GUACALC) can be used to calculate figures for some amount
fields.
Step 1 – Double-click an amount field in a form.
Step 2 – Calculate a figure.
Step 3 – When you are finished calculating, click the OK button. Your calculated figure
will populate the form field you are working on.
Using the Calendar (GUACALN)
The Calendar Form (GUACALN) can be used to populate date fields.
Step 1 – Double-click a date field in a form.
Step 2 – Select the appropriate date.
- 55 -
Step 3 –
Click the OK button. The date will populate the form field you are working
on.
NOTE: In a date field, you can also type any letter followed by the Tab or Enter Key to
insert today’s date. (If you have typed something else in the field, this will not work.)
Dates must be entered in the following format: DD-MMM-YYYY (month is a 3 digit
alphabetical abbreviation, JAN, FEB, etc.).
- 56 -
Banner Budgeting Instructions
- 57 -
Transaction/Budget-Availability Queries
The Organization Budget Status Form (FGIBDST) can be used as a home base when
making transaction and budget-availability queries. The following section will start from
and return to the Organization Budget Status Form (FGIBDST) for each of the query
examples discussed, except for the last one regarding the Available Balance for a Soft
INDEX. The following figure shows the Banner forms you can access through the
Organization Budget Status Form (FGIBDST) and summarizes what can be
accomplished with each form:
Hard Summary / Soft YTD
Start Here
(Navigate directly to this Banner form via the GO TO… field on the General
Menu. Navigate to subsequent Banner forms via the Options Menu.)
Organization
Budget Status
(FGIBDST)
● Querying Transactions
Summarized by Account
Pg. 60
Detail Transaction
Activity
(FGITRND)
Organization
Budget Summary
(FGIBSUM)
● Querying all Transactions
in an Account Pg. 61
● Querying Individual
Transaction Detail Pg. 63
● Checking the Available
Budget Balance for Hard
and Soft Budgeted Indexes
Pg. 66
Organizational
Encumbrance List
(FGIOENC)
Detail
Encumbrance
Activity
(FGIENCD)
● Querying all open
Encumbrances for an Index
Pg. 64
● Querying Individual
Encumbrance Detail Pg. 65
Soft Money
(Navigate directly to this Banner form via the GO TO… field on the General Menu.)
Trial Balance
Summary
(FGITBSR)
- 58 -
● Checking the Available
Fund Balance in a Soft
Index Pg. 68
NOTE: All of the forms discussed in this section can also be accessed directly from the
General menu.
In The Organization Budget Status Form (FGIBDST), the Adjusted Budget column
shows the balance for each budget. The YTD Activity column shows year-to-date
expenditures from each budget summarized by ACC code. The Commitments column
shows amounts of encumbrances (earmarked funds for pending requisitions/open POs)
summarized by ACC code. The Available Balance column shows the Adjusted Budgets
less Year-To-Date (YTD) Activity and Commitments (see figure below). For Hard
Money and Soft Budgeted INDEX Codes, this form will show the correct Available
Balance (Adjusted Budget – YTD Activity – Commitments = Available Balance).
For Soft Money INDEX Codes, the YTD Activity column is useful as it includes the total
YTD revenue earned, along with the YTD expenses incurred; however, the budget is
only used for NSF checking and may not be an accurate indicator of the Available
Balance. At the very bottom of this column, in the Net Total row, the net income or loss
for the current fiscal year is shown exclusive of amounts carried over from past fiscal
years (see figure above).
- 59 -
Querying Transactions Summarized by Account (FGIBDST)
To query transactions summarized by ACC code, navigate to the Organization Budget
Status Form (FGIBDST).
Step 1 –
In the INDEX field, enter your INDEX code.
Step 2 –
If you want to query the summary total of one particular ACC code, do the
following. If not, skip this step (see figure above):
A) Click the Query Specific Account box.
B) Enter the ACC code in the Account field.
Step 3 –
Next Block (Ctrl Page-Down).
NOTE: The second block of this form shows all of the budget information for the
selected INDEX summarized by ACC code. Only ACC codes that have been used will
appear. If a certain ACC code was entered in Step 2, only information summarized
under that ACC code will be shown.
- 60 -
Querying All Transactions in an Account
(FGIBDST/FGITRND)
This query uses the Detail Transaction Activity Form (FGITRND). This form gives a
history of every YTD, Budget, and Encumbrance transaction incurred for a given INDEX
Code. Each transaction’s activity date, accounting information, and document number
is given along with a short description.
To query all transactions in a particular ACCOUNT, navigate to the Organization Budget
Status Form (FGIBDST).
Step 1 –
Complete Steps 1-3 of the Querying Transactions Summarized by Account
(FGIBDST) section, Pg.59.
Step 2 –
In the second block of the Organization Budget Status Form (FGIBDST),
select the appropriate ACC code from the Account column. Make sure the
cursor stays in the Account column (see figure below).
Step 3 –
Select Transaction Detail Information in the Options menu (see figure
above). This will take you to the Detail Transaction Activity Form
(FGITRND). This form will show all of the transactions behind the summary
total for the selected ACC code (see figure below).
- 61 -
NOTE: In the Detail Transaction Activity Form (FGITRND), some
transactions will appear to be duplicates. However, they most likely
represent different stages of one transaction. Look in the Field column to
differentiate the amounts. The following is a list of the most common field
codes and their meaning:
Field
Code
Name
YTD
Year to Date
RSV
Reserve
ENC
OBD
ABD
Encumbrance
Original Budget
Adjusted Budget
Step 4 –
Description
Actual increase or decrease to fund
balance from an invoice or journal entry.
Increase or decrease to requisition
encumbrances.
Increase or decrease to PO encumbrances.
Increase or decrease to budget.
Increase or decrease to budget.
Click the Exit button X on the Toolbar to return to the Organization Budget
Status Form (FGIBDST).
- 62 -
Viewing Individual Transaction Detail (FGIBDST/FGITRND)
To query individual transaction detail, navigate to the Organization Budget Status Form
(FGIBDST).
Step 1 –
Complete Steps 1-3 of the Querying All Transactions in an Account
(FGIBDST/FGITRND) section, Pg.61.
Step 2 –
On the Detail Transaction Activity Form (FGITRND), highlight a transaction.
Make sure the cursor stays in the Account field.
Step 3 –
In the Options menu, select Query Document. This will bring up the Inquiry
version of the Banner form that was used to create the transaction.
NOTE: This process will not work for transactions created by journal entries
or feed documents. The process will, however, work for transactions created
by requisitions, purchase orders, receiving documents, and invoices. For a
transaction created by a completed requisition, all of the requisition
information will be available in the same format as on the Requisition Form
(FPAREQN) discussed in the Banner Requisitions (Requests for Purchase
Order) section, Pg.82.
Step 4 –
Next Block (Ctrl Page-Down) to view the different blocks of the transaction’s
inquiry form.
Step 5 –
Click the Exit button X on the Toolbar to return to the Detail Transaction
Activity Form (FGITRND).
Step 6 –
Click the Exit button X on the Toolbar again to return to the Organization
Budget Status Form (FGIBDST).
- 63 -
Querying All Encumbrances for an INDEX
(FGIBDST/FGIOENC)
This query uses the Organizational Encumbrance List Form (FGIOENC). This form
shows a list of all current encumbrances for a given INDEX Code including: vendor
names, document numbers, and encumbered amounts.
To see all current encumbrances for a given INDEX Code, navigate to the Organization
Budget Status Form (FGIBDST).
Step 1 –
Complete Steps 1-3 of the Querying Transactions Summarized by Account
(FGIBDST) section, Pg.59.
Step 2 –
On the Organization Budget Status Form (FGIBDST), in the Options menu,
select Organization Encumbrances. All outstanding encumbrances for the
indicated INDEX will be listed (see figure below).
Step 3 –
Click the Exit button X on the Toolbar to return to the Organization Budget
Status Form (FGIBDST).
- 64 -
Querying Individual Encumbrance Detail
(FGIBDST/FGIOENC/FGIENCD)
For more detailed information on a specific encumbrance, the Detail Encumbrance
Activity Form (FGIENCD) should be used. This form shows the original amount of the
encumbrance, the summarized amount spent from the encumbrance (the Liquidation
Amount), and the remaining balance of the encumbrance. Additionally, the last block of
this form shows the detail behind the summarized amounts including the date of each
transaction, the amount of each increase and decrease to the encumbrance, each
transaction’s document code, and the remaining balance of the encumbrance.
Step 1 –
Complete Steps 1 and 2 of the Querying All Encumbrances for an INDEX
(FGIBDST/FGIOENC) section, Pg.64.
Step 2 –
From the Organization Encumbrance List Form (FGIOENC), select the
appropriate encumbrance. Make sure your cursor stays in the Encumbrance
field.
Step 3 –
Select Query Detail Encumbrance Info from the Options menu. This will take
you to the Detail Encumbrance Activity Form (FGIENCD) (see figure below).
This form shows the following:
A)
The Encumbrance field shows the original amount of the
encumbrance
B)
The Liquidation field shows the amount spent
C)
The Balance field shows the remaining funds
- 65 -
Step 4 –
Click the Exit button X on the Toolbar to return to the Organization
Encumbrance List Form (FGIOENC).
Step 5 –
Click the Exit button X on the Toolbar again to return to the Organization
Budget Status Form (FGIBDST).
Checking the Available Balance in a Hard-Money or SoftBudgeted INDEX (FGIBDST/FGIBSUM)
This query uses the Organization Budget Summary Form (FGIBSUM). This form has
the same columns as the Organization Budget Status Form (FGIBDST). The difference
is that the transactions are summarized by budget not by ACC code.
NOTE: The Available Balance calculated below does not take into account outstanding
Limited Purchase Checks, Travel Expenses, Purchasing Card Expenses, and
Intercampus Transfers.
- 66 -
To check the Available Balance in a Hard Money or Soft Budgeted INDEX Code,
navigate to the Organization Budget Status Form (FGIBDST).
If more funds are encumbered by a requisition than are available to spend (per the
budget showing on FGIBAVL), then your requisition will go into an NSF approval queue
after going through the regular approval queues which will increase the processing time
by a few days.
Step 1 –
Complete Steps 1-3 of the Querying Transactions Summarized by Account
(FGIBDST) section, Pg.59.
Step 2 –
On the Organization Budget Status Form (FGIBDST), in the Options menu,
select Budget Summary Information (see figure below). This will take you to
the Organization Budget Summary Form (FGIBSUM).
Step 3 –
In the Available Balance column, on the far right of the form, each budget’s
Available Balance will be shown (see figure below). Simply add the amounts
in this column to arrive at the Total Available Balance for the INDEX.
Step 4 –
Adjust the Total Available Balance calculated in Step 3 for any transactions
not yet posted to Banner, which could include outstanding Limited Purchase
Checks, Travel Expenses, Purchasing Card Expenses, and Intercampus
Transfers. This Adjusted Total Available Balance is the true amount
remaining in the INDEX.
- 67 -
Step 5 –
To return to the Organization Budget Status Form (FGIBDST), press the Exit
button X on the Toolbar (see figure above).
NOTE: When a requisition is completed past a certain point, Banner will encumber the
amount as if the requisition had been completed. The Organization Budget Status Form
(FGIBDST) and the Organization Budget Summary Form (FGIBSUM) do not take into
account funds encumbered by incomplete requisitions or requisitions waiting to be
approved. Therefore, when Banner checks for non-sufficient funds (NSF) the Total
Available Balance may be lower than what is calculated using the method above.
Make sure all incomplete requisitions have been completed or removed when making
spending decisions. If an incomplete requisition was created by mistake, delete it (see
Deleting Incomplete Requisitions (FPAREQN), Pg.96).
Checking the Available Balance in a Soft INDEX (FGITBSR)
The Trial Balance Summary Form (FGITBSR) allows you to view general ledger
information which includes beginning balances or funds carried over from prior fiscal
years. This makes it appropriate for calculating the Available Balance in Soft Money
INDEX Codes.
To check the Available Balance in a Soft Money INDEX Code (FUND), navigate to the
Trial Balance Summary Form (FGITBSR) (see figure below).
Step 1 –
In the Fund field, enter your Soft Money INDEX Code’s corresponding FUND
code.
NOTE: This field will not accept INDEX Codes.
Step 2 –
Next Block (Ctrl Page-Down).
Step 3 –
Subtract the amounts in the Current Balance column that correspond to the
Encumbrance Control and Reservation Control descriptions from the Current
Fund Balance amount shown at the very bottom of the form (see figure
below). This is the Total Available Balance. The following example
illustrates this step (amounts from figure below):
Current Fund Balance
Less: Encumbrance Control
Less: Reservation Control
= Total Available Balance
569,736.69
(60,435.02)
(470.00)
508,831.67
NOTE: Reservation Control and Encumbrance Control are summary
amounts of funds encumbered by requisitions and POs.
- 68 -
NOTE: If the Current Fund Balance shows a D in the D/C column and there
is an asterisk (*) in the far right column, then that indicates a deficit situation.
Step 4 –
Adjust the Total Available Balance calculated in Step 3 for any transactions
that have not yet posted to Banner, which could include outstanding Limited
Purchase Checks, Travel Expenses, Purchasing Card Expenses, and
Intercampus Transfers. This Adjusted Total Available Balance is the true
amount remaining in the INDEX.
- 69 -
Querying Budget/Transaction
Information Using UVLink
UVLink interfaces with Banner Finance to provide another way to access Banner
Finance information.
Step 1 –
In UVLink, under the Home tab, click the Financial Information Menu link on
the Online Services Menus channel.
Step 2 –
Select Budget Queries from the menu that appears (see figure below).
Step 3 –
On the next screen that appears, on the drop-down menu next to the Create
a New Query Type heading, select Budget Quick Query (see figure below).
Step 4 –
Click Create Query.
Step 5 –
On the next screen, enter your INDEX Code in the INDEX field (see figure
below).
- 70 -
Step 6 –
Click Submit Query. This will populate the Fund and Organization fields.
Step 7 –
Click Submit Query again. This will bring the Query onto the screen where it
can be viewed or printed (see figure below).
NOTE: The data in the report that appears is set up in a similar fashion to data
presented on the Organization Budget Summary Form (FGIBDST) described in Step 4
of the Checking the Available Balance in a Hard Money or Soft Budgeted INDEX
(FGIBDST/FGIBSUM) section, Pg.66.
- 71 -
Intercampus Transfers
Making Payroll, Budget, and Journal-Voucher Transfers
Situations arise where Expenses, Revenues, Budgets, or Payroll need to be transferred
from one INDEX Code to another. There are specific, departmental forms that are used
to process requests of this nature.
Step 1 –
Ask yourself the questions in the following chart to determine which form
you must use:
NOTE: If you need to make a long list of Journal-Voucher related transfers on a regular
basis, contact Jacob Atkin, ext. 8576 for a FZPLOAD Template which is a spreadsheet
used to enter journal entries into Banner. If your department regularly provides goods
or services to other departments on campus, contact Jacob Atkin, ext. 8576 about using
the Intercampus Billing System.
NOTE: For transfers that do not fall into the situations discussed above, contact Jacob
Atkin, ext. 8567 or another accountant in Finance and Business Services.
Step 2 –
Go to the appropriate form and situation section below and continue from
there.
- 72 -
Payroll Redistribution Form (Situation 1): The Payroll Redistribution Form is
available on the Payroll Office’s website and in the Forms section of this manual,
Pg.114. Do the following:
Step 3 –
If you are moving an employee’s entire Payroll Expense for a pay period,
leave the area under the $ AMT heading blank and the entire amount will
be transferred. Otherwise, enter the exact dollar amount.
Step 4 –
If you are permanently transferring a current employee’s Payroll Expense
to another INDEX, submit a completed Electronic Personnel Action Form
(EPAF) with the Payroll Redistribution Form. The EPAF is available on
Human Resources’ website.
Step 5 –
If you want Payroll Expense to be transferred to only one other INDEX for
multiple pay periods, there is no need to use more than one box, just
include the entire range of dates on the From/To Pay Period Date lines
above the first box.
Step 6 –
If you are moving Payroll Expenses between more than two INDEXes, use
the other two available boxes. This will show the appropriate INDEX to
charge for each time period.
Step 7 –
Complete the form. Remember to include your extension number.
Budget Transfer Request Form (Situation 3): This form is available on the Budget
Office’s website and in the Forms section of this manual Pg.114. When filling out a
Budget Transfer Request Form, think in terms of Cash. Source is the source of the
Cash and To is where you are sending the Cash. Complete the form and send it to the
Budget Office.
Journal Voucher Form (Situations 2, 3, and 4): The Journal Voucher Form is
available on Finance and Business Services’ website and in the Forms section of this
manual Pg.114. When filling out this form, you need to think in terms of Expenses and
Revenues, not Cash. Instructions for the applicable situations from the chart above are
described below:
Situation 2–Transfer of Past Expenses: For this situation, think in terms of
Expense. Do the following:
Step 3 –
Put the INDEX that incurred the Expense on the left under the
Increase Fund Balance heading.
Step 4 –
Put the INDEX that will receive the Expense on the right under the
Decrease Fund Balance heading.
- 73 -
Step 5 –
Put the same Expense ACC code that was charged in Banner
under both of the Banner Exp/Rev Account headings.
Step 6 –
In the Reason box, state that you are moving an Expense and write
the description of that Expense.
Step 7 –
Complete the rest of the form and send it to Finance and Business
Services.
Situation 3–Transfer to Cover Future Expenses: For this situation, think in
terms of Revenue. Revenue moves in the same direction as Cash. Do the
following:
Step 3 –
Put the INDEX providing the funds on the right side of the form
under the Decrease Fund Balance heading.
Step 4 –
Next to that INDEX, under the Banner Exp/Rev Account heading,
put the Expense ACC code 720070.
Step 5 –
Put the INDEX receiving funds on the left side of the form under the
Increase Fund Balance heading.
Step 6 –
If you are moving funds into a Soft INDEX, put the Revenue ACC
code 582070 next to the INDEX receiving the funds under the
Banner Rev/Exp Account heading. If you are moving funds into a
Hard INDEX, use the Expense ACC code 720070 instead of
582070.
Step 7 –
In the Reason box, state that you need to cover future Expenses.
Step 8 –
Complete the form and send it to Finance and Business Services.
Situation 4–Intercampus Billing: For this situation, think in terms of Revenue.
Revenue moves in the same direction as Cash. Do the following:
Step 3 –
Put the INDEX being charged on the right side of the form under
the Decrease Fund Balance heading.
Step 4 –
Next to that INDEX, under the Banner Exp/Rev Account heading,
put the appropriate Intercampus Expense ACC code.
NOTE: A list of all Intercampus Revenue and Expense ACC codes
that can be used with this form is available on Finance and
Business Services’ website. Please do not use ACC codes that are
not on this list.
- 74 -
Step 5 –
Put the INDEX that is making the charge on the left side of the form
under the Increase Fund Balance heading.
Step 6 –
Put the appropriate Intercampus Revenue ACC code from the
Account Codes list next to that INDEX under the Banner Exp/Rev
Account heading.
NOTE: Revenue ACC codes cannot be used with Hard INDEXes.
For Hard INDEXes, use the same Intercampus Expense ACC code
on both sides of the form under the Banner Exp/Rev Account
heading.
Step 7 –
In the Reason box, state that you are charging another INDEX and
what the charge is for.
Step 8 –
Complete the form and send it to Finance and Business Services.
- 75 -
Using the Intercampus Billing System
For regular departmental billings, the Intercampus Billing System can be utilized to enter
transactions directly into Banner. This will save you the time of filling out paper forms
and keep your Banner records up to date. To gain access to the Intercampus Billing
System, contact Jacob Atkin at ext. 8576. You will receive a URL which will direct you
to the system (see figure below).
Creating a Billing:
Step 1 –
Fill in the following fields:
- 76 -
A) Enter the description of the charge in the Description field. This is the
description that will show up in Banner. It is limited to 35 characters.
B) Enter the amount of the charge in the Amount field.
C) To the right of the Transaction Process heading, select Approval to ask
for the approval of the responsible party for the INDEX being charged
before completing the transaction, or select Notification to notify the
responsible party of the billing without asking for approval.
NOTE: These messages are sent via e-mail.
D) In the Debit INDEX field, enter the INDEX code to be billed.
E) To select the INDEX code to receive the funds, click the Drop-Down
Menu button
next to the Credit INDEX field and select the
appropriate INDEX code.
F) To select the ACC code to be charged, click the Drop-Down Menu
button
code.
Step 2 –
next to the Account field and select the appropriate ACC
If needed, you can add transactions to the invoice:
A) Click the Add to Invoice button.
B) Repeat Step 1 for each transaction
Step 3 –
Submit the billing by clicking the Submit to Banner button or click the Save
and Exit button to save the invoice for later updating and submission.
NOTE: The Intercampus Billing System can be customized to meet your department’s
needs. For example, some departments have a Control Number field for invoice
numbers and some have an Email Description field to explain charges to internal
customers in more detail.
Viewing Current Transactions: Current transactions are unfinished transactions that
have been saved but not submitted. To view current transactions, click the View
Current Transactions button. The transactions will be shown in the second block of the
form.
- 77 -
Viewing Past Transactions:
Step 1 –
Click the View Past Transactions button. The Transaction Status menu
will appear in the second block of the form (see figure above).
Step 2 –
Select a menu option (see figure above):
A) Click the Awaiting Approval button to view a list of all transactions that
are still awaiting responsible party approval (see figure below).
- 78 -
NOTE: To send an e-mail reminder to an individual responsible for
approving a transaction, press the Resend button (see figure above).
B) Click the Declined button to view a list of transactions requiring
approval that have been declined.
C) Click the Approved (Not Transferred) button to view a list of
transactions that have been approved but are still processing.
NOTE: The IT Department posts transactions to Banner daily so
approved transactions will not show up in Banner until the following
day.
D) Click the Transferred button to view a list of completed transactions in
between any two dates. To enter the desired dates, do the following:
a. Click the Show Calendar button
next to the Starting Date field
and select the proper date in the calendar that appears. The date
will populate the Starting Date field.
b. Click the Show Calendar button
next to the Ending Date field
and select the proper date in the calendar that appears.
c. Click the Find button. This will pull up a list of completed
transactions in between the dates entered.
Printing/Extracting Current and Past Transactions:
- 79 -
Step 1 –
Pull up any list of transactions using a method described above in the
Viewing Current Transactions or Viewing Past Transactions sections.
Step 2 –
Scroll down to the bottom of the list.
Step 3 –
Click the Print Invoice button to print the list or click the Extract Invoice
button to extract the list into Microsoft Excel.
- 80 -
Banner Procurement Instructions
- 81 -
Banner Requisitions
(Requests for Purchase Order)
Creating a Requisition (FPAREQN)
Navigate to the Requisition Form (FPAREQN) in Banner.
NOTE: Do not order warehouse supplies using the Requisition Form (FPAREQN).
Step 1 –
Create a requisition from scratch or copy a previous requisition.
A) To create a requisition from scratch:
a. Leave the Requisition field blank (see figure above). Do not create
your own requisition number.
b. Next Block (Ctrl-Page Down) to the Requestor/Delivery Information
block.
NOTE: If you enter something accidentally, delete the requisition (see
Deleting Incomplete Requisitions (FPAREQN), Pg.96). A requisition
with an invalid number may not process.
B) To copy the data from an existing requisition to a new requisition:
or select Copy Requisition from the Options
a. Click the Copy button
menu.
b. In the Copy window that appears, type the number for the requisition
you wish to copy in the Requisition field (see figure below).
c. Press the Tab key on the keyboard. If a vendor was entered on the
original requisition, it will be displayed in the Vendor field.
d. If you need to search for a number, click on the Search button
next to the Requisition field (see Searching for a Requisition
(FPIRQST), Pg.99).
e. Click OK to proceed to the Requestor/Delivery Information block.
- 82 -
Step 2 –
Complete the following fields in the Requestor/Delivery Information block
(see figure below):
A
B
C
D
E
A) To enter the Delivery Date, press any letter on the keyboard followed by
the Tab or Enter key. This will enter today’s date. If you would like the
items delivered as soon as possible, please use today’s date; otherwise
enter a future delivery date. You can also use the calendar to select a
date by pressing the Calendar button
next to the Delivery Date field
(see Using the Calendar (GUACALN), Pg.55).
- 83 -
B) The Comments field does not print on the PO. This field is for
information you want to provide to Procurement Services. Use this field
to indicate requests, such as: Standing/Open PO or rush order. Do
not include information that needs to be provided to the vendor.
WARNING: Do not enter protected information in any field when creating
a requisition. For a list of protected information, refer to the Protected
Information section of this manual, Pg.26.
C) The Requestor field should populate with your information, based on
your user name. If you wish to change it, you may. Remember, when
searching for requisitions, Banner uses the name in this field.
D) The Ship To field should always be ‘UVU’. This gives the vendor the
correct address for which to ship the items. We want all items to be
delivered to Receiving.
NOTE: If you are on another campus or need something large installed,
Procurement Services will change the address on the PO.
E) The Attention To field defaults with ‘Warehouse Staff’. Replace this with
the name of the department contact and the mail stop code where the
PO should be sent. Do not use more than 30 characters when entering
this information.
NOTE: The COA, Organization, Email, Phone, and Fax fields should
populate based on your user name. You may change anything but the COA
field by manually entering the information or by contacting Procurement
Services to have the auto-populating information changed. Changing the
COA field will cause your requisition to go into suspense and it will not
process correctly.
Step 3 –
If needed, add Document Text. Document Text can be used to enter
prospective vendors for a bid, addresses that are too long for the Vendor
field, or vendor needed information regarding the order. Document Text can
be entered at anytime during the creation of a requisition.
NOTE: Do not use Document Text for information that is specific to a certain
item being ordered. That information should be entered in Item Text, found
in the Options menu. Item Text works just like Document Text, except that it
ties the text directly to a specific item.
WARNING: Do not enter protected information in any field when creating a
requisition. For a list of protected information, refer to the Protected
Information section of this manual, Pg.26.
- 84 -
A) To enter Document Text, select Document Text from the Options menu
(see figure below). This will take you to the Procurement Text Entry Form
(FOAPOXT). Ignore all of the information in the first block.
B) Next Block (Ctrl-Page Down) to the Text fields (see figure below) or select
the first Text field with your mouse.
E
C
Enter Text Here
C) Type as many as 1000 lines. Unfortunately, there isn’t a wrap feature. At
the end of each line, manually move to the next field by pressing the Down
Arrow key on the keyboard.
D) Save your work by pressing the F10 key.
E) When you are finished entering Document Text, press the Exit button X to
exit the form. This will return you to the Requisition Form (FPAREQN).
NOTE: The Accounts Payable Office (A/P) does not see the online
requisition. Please do not put requests for A/P in Item or Document Text
(i.e., check holding). If you need a check held, please contact A/P directly or
attach a note to your invoice when you send the document to A/P for
payment.
- 85 -
Step 4 –
Next Block (Ctrl-Page Down) to the Vendor Information block.
Step 5 –
Enter the vendor information (see figure below).
A) To search for the vendor ID:
next to the Vendor field.
a. Click on the Search button
b. Choose Entity Name/ID Search (FTIIDEN) from the Option list window
that appears (see figure above).
c. In the Last Name field of the Vendor Name/ID Search Form (FTIIDEN),
enter a portion of the vendor name surrounded by “%” signs (i.e.,
%Company%) (figure not shown).
NOTE: This search is case sensitive and must match exactly. The first
letter of each word is capitalized while the rest are not.
d. Click Execute Query
on the Toolbar or press F8 on the keyboard.
e. Double click the appropriate Vendor ID number, and the vendor
information will auto populate the Vendor field.
f. Many vendors have more than one address. To access other
addresses, click the search button by the Sequence field after the
Vendor ID has been entered (see figure below).
B) Enter a Vendor ID in the left Vendor field.
- 86 -
C) If the vendor you want is not listed in the Vendor Name/ID Search Form
(FTIIDEN):
a. Leave the left Vendor field on the Vendor Information block blank.
b. In the right Vendor field, enter the vendor name and address (see
figure below).
c. If the information is too large for that area, enter it in the Email field or
Document Text (see Step 3).
D) If you are entering a bid:
a. Leave the left Vendor field blank.
b. In the right Vendor field, enter “Bid” and what the bid is for (i.e., Bid for
Speaker Equipment).
c. Enter all of your vendors’ information in Document text.
NOTE: If the address information in Banner is incorrect, please note the
changes in Document Text.
Step 6 –
Next Block (Ctrl-Page Down) to the Commodity/Accounting block.
- 87 -
Step 7 –
At this point, a requisition number is assigned. Your requisition number is
visible in the Requisition field (see figure above). Write this number down in
case you need to refer to it in the future.
Step 8 –
Choose a cost allocation method (Document or Commodity Level
Accounting).
A) To allocate the total dollar amount of your requisition to one INDEX (see
example below), choose Document Accounting by leaving the Document
Level Accounting box checked (see figure above).
B) To allocate the total dollar amount to multiple INDEXes based on percent
or arbitrary dollar amounts (see example below), choose Document
Accounting by leaving the Document Level Accounting box checked (see
figure above).
NOTE: You must have permission/access to enter information for each
INDEX on a requisition in Banner.
- 88 -
C) To allocate each item’s cost to specific INDEXes (see example below),
choose Commodity Accounting by un-checking the Document Level
Accounting box (see figure above):
D) To allocate each item’s cost to multiple ACC codes under one INDEX (see
example below), choose Commodity Accounting by un-checking the
Document Level Accounting box (see figure above).
NOTE: You must decide between Document Accounting and Commodity
Accounting prior to entering any accounting information in Step 9.
Procurement Services cannot change this later. Also, in Commodity
Accounting, item cost can also be allocated to multiple INDEXes. Contact
Procurement Services for further explanation.
Step 9 –
Describe what you are ordering. Enter the following fields (see figure below):
A) In the Commodity field, enter the commodity code of the item you are
requesting. Commodity codes default the appropriate Expense ACC
codes to assign to each purchase. Entering commodity codes will also
- 89 -
ensure that your requisition is forwarded to the appropriate purchasing
agent, saving time. (To look up commodity codes, go to the Commodity
Codes for General Purchases’ section in the Appendix, Pg.125 or go to
Procurement Services’ website.)
NOTE: Never use a stock (Warehouse) commodity code on a requisition
to an outside vendor. Doing so will increase the warehouse inventory.
B) After you enter a commodity code, the Description field will populate with
a default description. Replace the default description with a description
of the item you wish to purchase. Failure to include sufficient information
will cause the requisition to be delayed. This field is limited to 50
characters. For a longer description use Item Text, found in the Options
menu. Please include as much information regarding the item as
possible.
WARNING: Do not enter protected information in any field when creating
a requisition. For a list of protected information, refer to the Protected
Information section of this manual, Pg.26.
C) In the U/M field, enter the Unit of Measure. The most common is each
(EA). Click the Search button next to the U/M field for a list of more
choices.
D) In the Quantity field, enter the quantity of the item you want based on the
Unit of Measure selected.
E) In the Unit Price field, enter the dollar amount of the item requested. If
you are unsure of the exact price, enter your best approximation—
please indicate that this is an approximate price in the Item Text.
Requisitions encumber funds in Banner. Requisitions with zero line
amounts will post but they will not process into POs. These
requisitions will need to be cancelled and recreated. If your order
includes free items, list them in Document Text (see step 3).
F) In the Discount field, enter any special discount. Do not enter vendor
terms here (i.e. 2% net 10), Accounts Payable will receive that
information on the invoice.
G) If you are using Document Accounting, to enter another item, select Next
Record (Down Arrow) and repeat Step 9. If you are using Commodity
Accounting, repeat Steps 9-11 for each item.
Step 10 – Next Block (Ctrl-Page Down) to the Accounting block.
Step 11 – Allocate the cost of the requisition in the Accounting block (see figure below).
- 90 -
B
A
A) Your accounting information will default from the ORG code entered in
the Organization field in Step 2-C, Pg.84. If you wish to change the
accounting information, enter the appropriate INDEX code in the INDEX
field. Do not make changes in the COA field or the Acct field, or your
requisition may not process.
B) If you are using only one INDEX code, the Extended field will
automatically populate. Simply proceed to the Next Block.
C) If you are using multiple INDEXes or ACC codes (see figure below):
a. Enter the first INDEX code in the INDEX field (see figure above).
b. To enter an exact amount to be allocated to the INDEX, simply enter
the amount in the Extended field.
c. To enter a percentage amount to be allocated to the INDEX, click the
% box next to the Extended field, enter the percentage in the
Extended field and press Enter on the keyboard.
d. Press the down arrow to get to the next record.
e. Repeat steps a and (b or c) for each INDEX. (For the last INDEX
entered, the remaining balance will automatically populate the
Extended field.)
NOTE: Never leave a zero dollar amount line on an INDEX or you will
have to recreate the requisition. If you need to delete a line of
accounting information (FOAPAL string), highlight the INDEX and click
Remove in the Record menu (see figure below).
- 91 -
Step 12 – Next Block to the Balancing/Completion block.
NOTE: Once you get to this tab, the requisition will automatically encumber
funds, whether you complete it or not. If you decide not to process the
requisition, you will need to delete it in order to release the encumbrance of
funds (see Deleting Incomplete Requisitions (FPAREQN), Pg.96).
Step 13 – Complete the Requisition (see figure above).
A) Ensure that the amounts under the Input, Commodity, and Accounting
headings match and are balanced.
B) If you wish to hold the requisition, click the In Process button
. This
allows you to come back at any time and modify or complete the
requisition.
- 92 -
C) If everything balances, and you are ready to submit the requisition, click
the Complete button
. This completes the requisition and submits it
for approval.
Creating a Stores (Warehouse Supplies) Requisition
(FSAREQN)
To order supplies from the warehouse, navigate to the Banner Stores Requisition Form
(FSAREQN).
NOTE: Do not order warehouse supplies using the Requisition Form (FPAREQN).
Step 1 –
In the Request field, type NEXT.
Step 2 –
Next Block (Ctrl-Page Down) to the Requestor block.
B
D
Step 3 –
A
C
Complete the following fields in the Requestor block (see figure above):
A) In the Delivery Date field, type any letter, and then press Tab. This will
fill in today’s date. The warehouse will try for next business day delivery,
if possible.
B) In the Requestor field, type your full name.
C) Put your telephone number in either the Phone field or the Extension
field.
- 93 -
D) In the Ship To field, type your mail code. If this pulls up the wrong
information, please send an e-mail to [email protected] with the correct
information.
Step 4 –
Next Block (Ctrl-Page Down) to the Commodity Data block.
Step 5 –
Complete the following fields in the Commodity Data Block (see figure
below):
A
B
A) In the Commodity field, type the commodity code. You can look up the
appropriate commodity code on the Commodity Codes for Warehouse
Purchases section in the Appendix, Pg.127 or on the Procurement
Services’ website. Stores/warehouse commodity codes are always a
four-digit number.
B) In the Quantity field, type the desired number of items.
C) For multiple item orders, choose Next Record or press the down arrow
on the keyboard to advance to the next line.
Step 6 –
Next Block (Ctrl-Page Down) to the Accounting Data block (see figure
below).
A
Step 7 –
B
Complete the following fields in the Accounting Data Block:
A) In the INDEX field, type your INDEX code.
B) In the Account field, type 720076. This will always be the ACC code for
stores purchases.
- 94 -
Step 8 –
Next Block (Ctrl-Page Down) to the Completion block.
Step 9 –
Make sure everything balances and click the Complete button
.
NOTE: If you have received or ordered the wrong item, please call the warehouse at
8396 to make arrangements for the item to be picked up and the correct item to be
delivered.
Changing a Requisition (FPAREQN)
A requisition can be changed prior to being approved by the final approver. If the
requisition has been completed, the document must first be denied (see Denying a
Requisition (FOADOCU) below). Once the requisition is in an incomplete state,
changes can be made to the requisition using the Requisition Form (FPAREQN). Once
. The
you have made all of the necessary changes, click the Complete button
requisition will be forwarded to the approval queues. Keep in mind that the requisition
will need to pass through all approval queues required for the purchase, even if it
previously was approved in one or more of those queues.
Denying a Requisition (FOADOCU)
Once you complete a requisition, you can no longer make changes to it without denying
the document and setting it back to incomplete. This can be done anytime before the
final approval. To do this, you will need to have the next approver deny the requisition,
or navigate to the Document by User Form (FOADOCU) to deny it.
NOTE: Procurement Services cannot change requisitions, nor can they deny them.
- 95 -
Step 1 –
Ensure that your user ID defaults in the Original User ID field.
Step 2 –
Enter ‘REQ’ in the Document Type field.
Step 3 –
Change the Status field to ‘Completed’.
Step 4 –
Next Block (CTRL-Page Down).
Step 5 –
A list of documents meeting the specified criteria will be listed. Locate the
document you wish to deny and click the Deny Document button .
Deleting Incomplete Requisitions (FPAREQN)
To delete a requisition that is still “in process,” navigate to the Requisition Form
(FPAREQN).
NOTE: If the requisition has been completed, but not approved, first set the requisition
to incomplete status (see Denying a Requisition (FOADOCU), Pg.95).
Step 1 –
In the Requisition field, enter the requisition number you wish to delete. This
number should be an R, 0 (zero), 0 (zero), and the five digit number (i.e.,
R0027722).
Step 2 –
Next Block (CTRL-Page Down).
Step 3 –
Go to the Record menu and select Remove, click the Record Remove button
on the Toolbar, or press CTRL-F6 on the keyboard.
- 96 -
Step 4 –
Repeat Step 3. You must select Remove twice in a row to delete a
requisition.
Step 5 –
A box stating “All Commodity and Accounting Records will be deleted” will
pop up.
Step 6 –
Click OK. The requisition will be deleted and no record will exist in Banner.
NOTE: Remember that Banner encumbers the amount listed on requisitions. So, if you
do not cancel unneeded or incorrect requisitions, they will still show up as
encumbrances and reduce the Available Balance in your INDEX.
Canceling a Requisition (FPARDEL)
To cancel a requisition that has been completed and approved, navigate to the
Requisition Cancel Form (FPARDEL). If your requisition has not been approved, you
will need to delete the requisition (see Deleting Incomplete Requisitions (FPAREQN),
Pg.96).
- 97 -
Step 1 –
In the Request Code field, enter the requisition number of the requisition you
want to cancel (see figure above). You can also search for the requisition by
clicking the down arrow (see Searching for a Requisition (FPIRQST), Pg.99).
Step 2 –
Next Block (CTRL-Page Down) and the remainder of the form will fill in
automatically. Verify that the requisition is the one you want to cancel.
Step 3 –
Next Block (CTRL-Page Down) to the Cancel Date tab (see figure above).
Step 4 –
In the Reason Code field, enter the appropriate reason for canceling the
requisition. (You can view a list of codes by clicking the Search button
next to the Reason Code field.)
- 98 -
Step 5 –
Click on the Make Cancellation Permanent button . This will cancel the
requisition and send it to the posting process. Within several minutes, the
encumbrance on your budget will be removed. Once canceled, a requisition
cannot be reopened.
NOTE: Remember that Banner encumbers the amount listed on requisitions. So, if you
do not cancel unneeded or incorrect requisitions, they will still show up as
encumbrances and reduce the Available Balance in your INDEX.
Searching for a Requisition (FPIRQST)
To search for a requisition, navigate to the Requestor Validation Form (FPIRQST).
NOTE: You can navigate to this form by clicking the Search button
Requisition Number or Document Code field.
Step 1 –
The form will load populated with all of the requisitions ever entered into
Banner. To begin a query, select Enter from the Query menu, click the Enter
Query button on the Toolbar, or press F7 on the keyboard.
A
B
D
Step 2 –
next to any
C
E
F
Choose a field from which to query. You can query on one or more of the
following fields (see figure above):
A) Requestor Name– The name must be entered exactly as it was entered
during the creation of the requisition. You can also search using part of a
name by using % signs (i.e. %Miner% will search for all names with
‘Miner’ in them). This search is case sensitive.
- 99 -
B) Request Date – You can search for specific date, or you can narrow your
search by a date range. For example, to search for all requisitions
created after October 1, 2008 enter the following: ‘>01-OCT-2008’.
C) Request Type– There are two request types: enter P for a general
requisition and S for a stores requisition.
D) Organization– Enter an ORG code.
E) Completed – Enter ‘Y’ or ‘N’
F) Approved – Enter ‘Y’ or ‘N’
NOTE: For more query options, see the Navigating Banner section, Pg.48.
Step 3 –
When you have entered all of your desired search criteria, execute the query
by selecting Execute from the Query menu, clicking the Execute Query
button
Step 4 –
on the Toolbar, or by pressing F8 on the keyboard.
When you have located your desired requisition, you can double click it to
copy the requisition number to the previous form (i.e., FPAREQN or
FOIDOCH).
Checking the Status of a Requisition (FOIDOCH)
To check the status of a requisition or PO, navigate to the Document History Form
(FOIDOCH) (see figure below).
Step 1 –
In the Document Type field, enter either ‘REQ’ for requisition or ‘PO’ for
purchase order.
Step 2 –
Enter the appropriate document number in the Document Code field.
NOTE: You can search for either the document type or the document code
.
by clicking the appropriate Search button
Step 3 –
Next Block (CTRL-Page Down):
A) The Requisition box contains Requisition and Status fields (see figure
below). The Status field entries in this box represent the following:
Blank = The requisition has either not been completed or has been
denied.
- 100 -
C
A
X
= The requisition has been completed, but not approved (see
Checking Approval Status (FOAAINP), Pg.102).
= The requisition has been approved and forwarded to
Purchasing.
= The requisition has been canceled.
B) The Bid box will only contain a bid number if a Request for Bid was sent
out by Procurement Services. If there is a number in the Request field,
and the Purchase Order field is blank, then Procurement Services is
processing the bid.
A
B
E
F
C
D
G
C) The Purchase Order box contains Purchase Order and Status fields.
The Status field entries in this box represent the following:
Blank = The PO is being processed by Purchasing.
A
= The PO has been completed, approved, and forwarded to the
Vendor.
X
= The PO has been canceled.
- 101 -
D) The Issues box is used for stores (warehouse) requisitions only. It is
populated when the order has been filled.
E) The Invoice box lists all invoices received for a given PO. In this box,
the Status field entries represent the following:
Blank
C
A
R
P
=
=
=
=
=
The invoice is being processed by Accounts Payable.
The invoice has been entered, but is pending approval.
The invoice has been approved for payment.
The invoice has been entered, but is awaiting receiving.
A check has been issued for the invoice.
F) The Check box lists all checks issued for a given PO. In this box, the
Status field entries represent the following:
Blank = The check has been issued and sent to the Vendor.
F
= The check has cleared the bank.
G) The Receiver box lists all shipments received from a given PO. In this
box, Status field entries represent the following:
C
= Shipment has been received and the commodities delivered
to the department.
NOTE: The Return box is currently not used. The Asset Tag and Asset Adjustment
boxes are used for tracking fixed assets.
Checking Approval Status (FOAAINP)
If in the Document History Form (FOIDOCH), the Status field in the Requisition box is C
(see figure above), the Document Approval Form (FOAAINP) will show the queues in
- 102 -
which the requisition is awaiting approval. Navigate to the Document Approval Form
(FOAAINP).
Step 1 –
In the Document field, enter the requisition number.
Step 2 –
Next Block (CTRL-Page Down). The approval queues through which a
requisition must pass are listed on the left-hand side of the form (see figure
below). The individuals authorized to approve requisitions within each queue
are listed on the right-hand side and may be listed on several different levels.
One person in each queue must approve the requisition before it is
forwarded to Procurement Services.
NOTE: If the queue is set up with different dollar levels, it may require more than one
person per queue to approve the document.
- 103 -
Requisition Management
Approving/Disapproving Requisitions (FOAUAPP)
To approve or disapprove/deny a requisition, navigate to the User Approval Form
(FOAUAPP).
Step 1 –
Your user name will default. Next Block (Ctrl-Page Down).
NOTE: This screen will only show you requisitions for which you are the next
approver. To see requisitions for which you are not the next approver, or for
which you are a back up approver, uncheck the Next Approver box (see
figure below).
Step 2 –
To view a requisition’s accounting breakdown and other detail:
A) Click the Detail button under the appropriate requisition. This will take
you to the Requisition Approval Form (FOQRACT) which contains the
accounting information for the selected requisition (form not shown).
B) To view more detail regarding the requisition, in the Requisition Approval
Form (FOQRACT), at the top of the screen, click the Options menu.
This will provide you with a menu of two choices, Document Query and
View Commodities.
C) Click Document Query to navigate to the Requisition Query Form
(FPIREQN) which displays the entire requisition (form not shown).
a. Next Block (Ctrl-Page Down) to cycle through the different blocks of
the requisition.
b. Exit this form X to return to the Requisition Approval Form
(FOQRACT).
- 104 -
D) Click View Commodities to navigate to the Commodities for Review
Query Form (FOICOMM) which display a list of the items entered on the
requisition (form not shown). Exit this form X to return to the Requisition
Approval Form (FOQRACT).
E) When you are finished reviewing the details, Exit X the Requisition
Approval Form (FOQRACT) to return to the User Approval Form
(FOAUAPP).
Step 3 –
To view a requisition’s approval history:
A) Click the Queue button under the appropriate requisition. This will
take you to the Document Approval Form (FOAAINP) which shows the
current approval queue with all of the individuals in the queue that have
access to approve the selected requisition (form not shown).
B) To view the approval history, select Approval History in the Options
menu. This will take you to the Document Approval History Form
(FOIAPPH).
C) When you are finished, Exit X both the Document Approval and
Approval History Forms to return to the User Approval Form
(FOAUAPP).
. To disapprove/deny
Step 4 –
To approve a document, click on the Approve button
a document, click the Disapprove button .
Step 5 –
A Document Approval message window with the default message
‘DOCUMENT IS APPROVED’ or ‘DOCUMENT IS DISAPPROVED’ will be
displayed. This message will be forwarded through Banner to the individual
who submitted the requisition. You can edit it if you would like to. Click on
OK to finalize the approval.
- 105 -
NOTE: If you complete and approve a NSF (non-sufficient funds) document, it will not
go to Procurement Services after it is approved. Requisitions that are NSF go into a
NSF approval queue. Finance and Business Services personnel review these
documents prior to processing the purchase order.
Viewing Approval History (FOIAPPH)
To view approval history, navigate to the Document Approval History Form (FOIAPPH).
Step 1 –
Enter the requisition number in the first Document Code field.
Step 2 –
Click Execute Query
or F8 on the keyboard. This will display a list of
individuals that have reviewed and approved the requisition.
Approving/Disapproving Requisitions Using UVLink
Step 1 –
On UVLink, under the Home tab, click the Financial Information Menu link in
the Online Services Menus channel.
Step 2 –
Click Approve Documents from the Menu that appears (see figure below).
- 106 -
Step 3 –
Your User ID should default. Choose to view just one requisition by entering
its requisition number in the Document Number field, select Documents for
which you are the next approver to see all of the requisitions for which you
are the next approver, or select All documents you may approve to view all
of the requisitions you will need to approve (see figure below).
Step 4 –
Click the Submit Query button.
Step 5 –
Click the requisition number in the Document column to view detail (see
figure below).
Step 6 –
Click the History link to view approval history.
Step 7 –
Click on the Approve link to approve the document or the Disapprove link to
disapprove/deny it.
Step 8 –
A page will be displayed with the default message ‘This document has been
approved’ or ‘Approval has been denied.’ This message will be forwarded to
the individual who submitted the requisition. You can edit it if you would like
to. Click on Approve Document or Disapprove Document to finalize the
approval (see figure below).
- 107 -
E-mail Notification
If you are the next approver for a requisition, you will receive an e-mail reminder that the
requisition is waiting to be approved. These e-mails are automatically sent at 10:00
a.m. and 3:00 p.m. each weekday.
If you are a back-up approver, you will not receive e-mail notifications, but you can view
documents for which you are the back-up approver. For instructions on how to view this
information see the Approving/Disapproving Requisitions (FOAUAPP) section, Pg.104
or the Approving/Disapproving Requisitions using UVLink section, Pg.106 of this
manual.
An approval queue may have multiple approvers. If you receive an e-mail that a
requisition is awaiting approval, but when you login, the requisition is not in your listing,
then someone else authorized to approve that requisition approved it after the e-mail
was sent.
- 108 -
Appendix
- 109 -
Glossary
Account Receivable – A claim against a debtor, carried on open account, usually
limited to debts due from the sale of goods and services.
Account Payable – A liability to a creditor carried on open account, usually for
purchases of goods and services.
Alert Box – A type of dialog box to notify you of a condition that may affect how you can
enter information or the kind of information you can enter.
Allocation – Transfers between specified account categories (i.e. salaries and
equipment) or moving resources (i.e. salaried positions) from one INDEX to another.
Application Form – A type of Banner form used to enter, update, or query information.
An application form will have the letter “A” in the third position of the form name.
Appropriated (Hard) Funds – The general-operating budget for the institution
appropriated by the Legislature, includes salaries, benefits, operating expenses, fuel,
and power. The sources of appropriated funds include state taxes, tuition, and may
also include one-time/supplemental funds from legislature.
Approval Queue – The levels of approval through which a requisition must pass before
being processed into a purchase order.
Available Balance – For Hard INDEXes, Available Balance is the Beginning Budget
Balance less Expenditures. For Soft INDEXes, Available Balance is Beginning Balance
plus Revenues less Expenditures.
Balance Sheet– A record of the financial situation of an institution on a particular date
by listing its assets and the claims against those assets.
Banner Finance – The finance module of the Banner database.
Block – An area of information on a Banner form usually separated by tabs or a solid
line.
Budget – An authorized amount of expenditure allowed for an individual INDEX.
Budget Transfer – Transaction that reduces the budget in one INDEX and increases
the budget in another INDEX by an equal amount.
Budget Unit – A unit of budgetary responsibility or departments within an institution
(such as the President’s Office).
- 110 -
Calling Form – The original form from which a button was clicked to access another
form.
Cancel Query – A Toolbar button which exits you from an Option List or List of Values.
Capital Appropriations – Funds provided for a specific physical plant-related project.
Capital appropriations must be used for the specific purpose for which the funds were
provided.
Capital Expenditures – Expenditures which result in the acquisition of or addition to
fixed assets; tangible items with an individual item cost of $5,000 or more.
Carryover/Carry Forward – A portion or total of the unexpended balance of an INDEX
code budget or fund balance, which is made available for expenditure in the succeeding
year.
Cash Receipts – Any monies received from departmental sales in the form of cash or
check that have not been deposited with the Cashiers Office.
Change Fund – A set amount of money used by a department to make change for
customers who are purchasing goods or services.
Clear – A Block, Item, or Record option on the Menu Bar which clears block, item, or
record fields and returns the curser to the first entry field in the block, or record cleared.
Deficit – The excess of liabilities and reserves of a fund over its assets, or excess of
expenses over revenues/budget.
Dialog Box – A window which requires you to respond to information before allowing
you to continue.
Encumbrances – An amount of the Available Balance in an INDEX earmarked for
paying anticipated or known obligations.
Enter Query – Puts the form into query mode and lets you enter search criteria to see
what information is already in the database. ENTER QUERY appears in the Status Bar.
Enterprise Resource Planning System (ERP) – An institution-wide computer software
system used to manage and coordinate the institution’s resources, information, and
functions.
Execute Query – In query mode, searches the database and displays any records that
match the search criteria.
- 111 -
Exit – From forms and windows, exits you out of the form or window. From the General
menu, exits you out of the Banner system. From query mode, cancels the query and
takes the form out of query mode.
Field – Box in a form where you can enter, query, change information, or existing
information is displayed. Banner describes fields as either enabled, disabled, entry or
display only.
Fiscal Year (FY) – Any yearly accounting period. The State’s and University’s fiscal
year begins on July 1 and ends on the following June 30. Summer semester is the
beginning academic term in a fiscal year.
Form – Window - or series of windows - containing entry fields for a process.
Fund Balance – Also known as Net Worth, Retained Earnings or Net Assets, is the
difference between what you own (Assets) and what you owe (Liabilities).
Hard Money INDEX – An all numerical INDEX code representing appropriated funds
(budgets).
Income Statement – An accounting of income and expenses that indicates a firm's net
profit or loss over a certain period of time, usually one year.
Inquiry Form – Form used to look up existing information on the database. This allows
you to view but not update information. (Any inquiry form will have the letter “I” in the
third position of the form name.)
Limited Purchase Check (LPC) – A purchasing option for low dollar purchases.
Next Block – Moves the cursor to the next information area (block) that has at least one
entry field.
Next Field – The next entry field in the current block.
Next Record – Moves the cursor to the first entry field in the next record of the current
block. If the cursor is in the last record, a new record is created.
Non-Sufficient Funds (NSF) – When documents (requisitions) are created which are in
excess of your budget.
Non-Appropriated (Soft) Funds – Funds which are not appropriated by the
Legislature. Sources include Revenue from student fees, sales and rentals, grants,
course fees, non-credit instruction, workshops, etc.
- 112 -
Operating Expenses – Non-compensation expenses (i.e. supplies and equipment).
Organizational Hierarchy –The structure of the organizational units in a firm for the
purposes of internal controls.
Over Expenditure – When actual expenditures and encumbrances exceed the budget
of an INDEX.
Purchase Order (PO) – A commercial document used to request someone to supply
something in return for payment and providing specifications and quantities.
Purchasing Card (P-Card) – A purchasing option for low dollar purchases.
Personnel Action Form (PAF) – A Human Resource related form stating how and
what an employee will be paid.
Post – Requisitions that are completed go to the Banner “posting” process. This is
when Banner adjusts the budget. Posting is done every few minutes automatically.
Previous Block – The previous information area that has at least on entry field. If the
previous area is another window, then that window is opened.
Previous Field – Moves the cursor to the previous entry field in the current block.
Previous Record – Moves the cursor to the first entry field in the previous record.
Record – All information displayed in the window for an item.
Rollback – A Toolbar button which clears all information and returns you to the first
entry field.
Requisition – An authoritative or formal request for something to be done, given,
supplied, etc.
Show Keys – A Help option on the Menu Bar which displays a list of keystroke options
for any open form.
Soft-Budgeted INDEX – An INDEX code category which represents non-appropriated
funds (revenues) which have been distributed to multiple budget units in the form of
budgets. These codes usually start with five numeric characters and end with an alpha
character.
Soft Money INDEX – An INDEX code category which represents non-appropriated
funds (revenues) and that begins with an alpha character and ends with five numeric
characters.
- 113 -
Forms
- 114 -
Date Prepared_____________________________
DEPARTMENTAL DEPOSIT FORM
DEPARTMENT:
BUS. SERVICES VALIDATION
Mail Stop:
Date Received:
Extension:
Date Entered:
Email:
Amount:
Prepared By:
Initials:
Approved By:
Receipt Number:
DETC
DESCRIPTION
INDEX
ACCT
AMOUNT
RECAP OF DEPOSIT
CURRENCY
100's
50'S
20'S
10'S
5'S
2'S
1'S
TOTAL:
COIN
Dollars
Half Dollars
Quarters
Dimes
Nickels
Pennies
TOTAL:
CREDIT CARD TOTAL:
CHECKS TOTAL:
GRAND TOTAL:
GRAND TOTAL:
GUIDELINES FOR PREPARATION:
¾ Deposits should be submitted daily and contained in sealed envelopes or money bags.
¾ Checks included in the deposit must be properly endorsed. (Include department name and Index with endorsement.)
¾ Checks included in the deposit must be accompanied by an adding machine tape which supports the CHECKS TOTAL in the RECAP OF DEPOSIT.
¾ The bankcard amount must be accompanied by a settlement report which supports the CREDIT CARD TOTAL in the RECAP OF DEPOSIT. ¾ All deposits must include a completed copy of this form. STATE LAW REQUIRES THE UNIVERSITY TO DEPOSIT ALL CASH RECEIPTS WITH ITS BANK WITHIN THREE WORKING DAYS. TO BE IN COMPLIANCE, ALL DEPARTMENTS MUST DELIVER THEIR DAILY RECEIPTS TO THE UVU CASHIER BY THE FOLLOWING WORKING DAY.
Redistribution Form
Name ___________________________________ BANNER ID __________________
Department _______________________________ Extension ____________________
Employee Position # and Suffix __________________
From Pay Period Date ________________
%
or
$ AMT
INDEX
To Pay Period Date _________________
FUND
ORG
ACCT
PROG
INCORRECT
CORRECT
From Pay Period Date ________________
%
or
$ AMT
INDEX
To Pay Period Date _________________
FUND
ORG
ACCT
PROG
INCORRECT
CORRECT
From Pay Period Date ________________
%
or
$ AMT
INDEX
To Pay Period Date _________________
FUND
ORG
ACCT
PROG
INCORRECT
CORRECT
Budget Approval ___________________________________ Date _______________
Department Approval _______________________________ Date _______________
Notes:
FOR OFFICE USE ONLY
RECEIVED ___________ PROCESSED BY _____________ DOC #_______
UTAH VALLEY UNIVERSITY
CHANGE FUND RECONCILIATION
Date:
FUNDS ON HAND
Currency:
$100 Bills
50 Bills
20 Bills
10 Bills
5 Bills
1 Bills
TOTAL
Amount
$
$
$1.00 Coins
.50 Coins
.25 Coins
.10 Coins
.05 Coins
.01 Coins
$
$
Checks by Date
Amount
$
$
COMMENTS
SUMMARY
Location of Cash:
Total Cash
$
Purpose of Fund:
Checks
Total
Additional Comments:
Less Sales
Balance
Should Be
Over/(Short)
Signature:
Co-Signature:
$
Reconciliation of Deposit Amount to Banner Entry
Signature:
Date:
Banner Finance Access Form
This is an electronic form. Complete it by typing in the gray sections. Use the tab key to move
from field to field. Print to sign and submit. It may also be printed and used as a blank form.
If this form is e-mailed from the person authorized to sign, that can be used as an electronic signature.
Name
UV ID
Department
Novell Username
(This will also be your Banner username)
Date
Mailstop
Extension
Please read the instructions provided at the end of the form for help in completing this form.
Access will be granted to submit requisitions and query budgets. If you need a different type of
access, please explain:
INDEX Code to default for requisitions:
(Optional – INDEX that you
would use most often)
If you need access to all current and future INDEX codes for a department or area, complete this
section. Contact Jacob Atkin, x8576, [email protected] if you don’t know your roll up ORG code.
Roll up ORG Code
STOP!
PLEASE READ
INSTRUCTIONS
CAREFULLY
BEFORE
COMPLETING
THIS SECTION
ORG/Department Title
In addition to, or instead of a roll up ORG, list specific INDEX Codes to grant
access to. Use this section to grant access to an INDEX Code that is not
included in the roll up ORG code listed above, or if no roll up access is
desired. Most users will not need to complete this section.
INDEX
Code
INDEX Title
INDEX
Code
INDEX Title
Approval
(must be signed by the responsible party of all ORG/INDEX Codes listed or by someone higher in the organizational structure)
Printed Name of Responsible Party
Signature of Responsible Party
Date Signed
If this form is e-mailed from the person authorized to sign, that can be used as an electronic signature.
Submit form to Jacob Atkin, MS 109k, or [email protected]
FOR OFFICE USE ONLY
BANSECR
All
Req
Bud
FOMPROF
COA=U
Master FUND
Web ID
ORG Default
Ext & E-mail
UVU Ship To
ORG Sec
FUND Sec
REVISED 6/30/08
GOATPAD
GOATPAC
Banner Finance
Request for New Banner INDEX Code
This is an electronic form. Complete it by typing in the gray sections. Use the tab key to move
from field to field. Print to sign and submit. It may also be printed and used as a blank form.
If this form is e-mailed from the person authorized to sign, that can be used as an electronic signature.
Responsible Party
UV ID
Department
Supervisor
Banner Username
Date
(This is the same as your Novell username)
Mailstop
Extension
Type of INDEX Code Requested:
State Appropriated / Hard Money (must have Linda Makin’s approval)
Institutional Interest Income (must have Linda Makin’s approval)
Reimbursed Overhead (must have Linda Makin’s approval)
Course / Lab Access Fee (must also contact Bernell Hofheins and Lilas Park for fee setup)
Grant – Federal, State or Private (submit form to Nancy Bartlett along with copies of contracts or any
other related documentation)
Agency Fund (INDEX Codes where the funds do not belong to UVU, but UVU is acting as the fiscal
agent, e.g. clubs, national conference hosting, sports camps.)
Miscellaneous Soft Money (for anything not listed above)
Requested INDEX Code Title (max 35 char):
How will the requested INDEX Code receive funding and / or revenues?
Please give a brief explanation of why you need this INDEX Code and how it will be used.
Office Use Only
FTMFMGR
FTMORGN
DEF
Approval Queue
R
V
FTMFUND
DEF
FTMAPPQ
Uncheck override
FTMACCI
FOMAQRC
FTMACTV
FOMPROF
PROG CODE 100 I
110 IV
130 IL
150 IU
200 RES
300 PS
400 AS
410 ASL
500 SS
510 SSA
600 IS
700 OP
800 SFA
900 AUX
970 SERV
990 GENREV
Approval
(must be signed by the responsible party of INDEX Code requested or by someone higher in the organizational structure)
Linda Makin (If Required)
Printed Name of Responsible Party
Signature of Responsible Party
Date
If this form is e-mailed from the person authorized to sign, that can be used as an electronic signature.
If you need Linda Makin’s authorization, send to [email protected] and she will forward to Wendy
Hope.
Submit form to Wendy Hope or [email protected] – MS 109 or Nancy Bartlett for Grants [email protected] –
MS 272. For questions, send e-mail or call Wendy 863-8108 or Nancy 863-8156 for Grants.
Banner Finance
Request for Customized Approval Queue
This is an electronic form. Complete it by typing in the gray sections. Use the tab key to move
from field to field. Print to sign and submit. It may also be printed and used as a blank form.
If this form is e-mailed from the person authorized to sign, that can be used as an electronic signature.
Name
Department
Banner Username
Date
(This is the same as your Novell username)
Mailstop
Extension
Standard approval queues will route requisitions to be approved by the responsible party. If it is a
request requiring VP approval, they will route to the VP after the department approval. Contact
Wendy Hope, [email protected], 863-8108 to find out your approval queue ID.
REQUEST FOR ADDITIONAL USERS TO BE ADDED AS APPROVERS
Banner
Username
Approval
Queue ID
Maximum
Dollar Limit
Co-Approver or
Backup?
Co
Back
Co
Back
Co
Back
Co
Back
Start Date
End Date
Maximum dollar amount limits the amount for which a user can approve documents. For example, if the
limit was $500, any document the user approved over their dollar limit would have to also be approved by
someone with a limit higher than the requisition amount.
A Co-Approver will receive notifications that a requisition needs to be approved, just as the responsible
party will. A Backup approver will not receive notifications, but will have access to approve documents if
they look at documents for which they are not the next approver.
If the access is for a certain time period only, enter start and end dates.
If you have a need for customizing the routing of approval queues (such as having a department
secretary review and approve all requisitions before the department head approves them) please contact
Wendy Hope, [email protected] or 863-8108.
Approval
(must be signed by the responsible party of all INDEX Codes or by someone higher in the organizational structure)
I understand that by adding users to an approval queue, I am giving them signature authority to approve
requisitions. I understand that I remain fully responsible for all transactions posted to the Banner
INDEX code for which I have responsibility.
Printed Name of Responsible Party
Signature of Responsible Party
Date
If this form is e-mailed from the person authorized to sign, that can be used as an electronic signature.
Submit form to Wendy Hope, MS 109 or [email protected].
Banner Finance
Request for Change of Responsible Party
This is an electronic form. Complete it by typing in the gray sections. Use the tab key to move
from field to field. Print to sign and submit. It may also be printed and used as a blank form.
If this form is e-mailed from the person authorized to sign, that can be used as an electronic signature.
Name
Department
Banner Username
Date
(This is the same as your Novell username)
Mailstop
Extension
Changing the responsible party on an INDEX Code will also change the user in the approval queue.
To change ALL INDEX Codes assigned to a responsible party,
write ALL in the INDEX Number field.
Banner INDEX Number
Banner INDEX Title
Current Responsible Party Name
NEW
Resp Party
(Change to)
Name of Responsible Party
Banner Username
UV ID
Reason for change:
Office Use Only
ORG
DEF
FUND
DEF
Approval Queue
Transactions?
Detail Code?
FOMPROF
R
V
Old
New
Effective date of changes requested:
Approval
(must be signed by the responsible party of the INDEX code(s) listed or by someone higher in the organizational structure)
Printed Name of Responsible Party
Signature of Responsible Party
Date
If this form is e-mailed from the person authorized to sign, that can be used as an electronic signature.
Submit form to Wendy Hope, MS 109 or [email protected].
For questions, send e-mail or call 863-8108.
Banner Finance
Request for Change to INDEX Code Title
This is an electronic form. Complete it by typing in the gray sections. Use the tab key to move
from field to field. Print to sign and submit. It may also be printed and used as a blank form.
If this form is e-mailed from the person authorized to sign, that can be used as an electronic signature.
Name
Department
Banner Username
Date
(This is the same as your Novell username)
Mailstop
Extension
Changing the title of an INDEX will also change the corresponding FUND or ORG title associated with it.
INDEX
Code
Current Title
New Title Requested (35 char max)
Effective date of changes requested:
Approval
(must be signed by responsible parties of all ORGS/FUNDS/INDEXES listed or by someone higher in the organizational structure)
Printed Name of Responsible Party
Signature of Responsible Party
Date
If this form is e-mailed from the person authorized to sign, that can be used as an electronic signature.
Submit form to Wendy Hope, MS 109 or [email protected].
For questions, send e-mail or call 863-8108.
Commodity Codes
Commodity Codes for General Purchases
Please DO NOT create new commodity codes.
Commodity Code
ADVERPUB
AUDIOVIS
AUTOPARTS
AWARDS
BLDGIMP
BLDGMNTN
BOOKS
BOOKSLIB
BUSES
CHEMICAL
CLOTHING
CLTHGINST
COMPHDW
COMPNET
CONFSEM
COPYING
ELECTRIC
ENTFEE
EQPMNTN
EQPMTREP
EQPREPR
EQUIPINST
FLORAL
FOODCLASS
FREIGHT
FUELAV
FURNITURE
GASOIL
GROUNDS
INSOTH
INSTRSUPP
JANITORIAL
KEYS
LAPTOP
LAUNDRY
LUNCHEON
ACC Code
720505
720255
710505
720508
710108
710105
720155
720205
720805
710141
720511
720210
720720
720725
720105
720160
710111
720105
710114
720705
710117
720215
720520
720260
720523
720265
720715
710510
710120
710315
720270
710123
710126
720720
710129
720538
Description
Advertising and Publicity
Audio Visual Supplies
Auto Parts
Awards and Gifts
Building Materials-Improvement
Building Maintenance and Repairs
Books and Publishing -non-Library
Books and Publishing-Library
Buses
Chemicals
Clothing/Uniforms
Clothing/Uniforms-Instructional
Computer Hardware/Parts
Computer Network / Parts
Conf/Seminars-Off Campus
Copying Costs Off Campus
Electrical Supplies
Entry Fees
Equipment-Maintenance
Equipment Repair-Office
Equipment Repair-Maintenance
Equipment-Instructional
Floral Arrangement
Food-Classrooms
Freight-General
Fuel-Aviation
Office Furniture
Gas/Oil/Grease
Grounds Maintenance
Ins-Other
Instructional Supplies
Janitorial Supplies
Keys and Locks
Laptops
Laundry and Linen Services
Luncheons/Receptions
- 125 -
Commodity Code
MEDICAL
MEMBER
MOVING
MUSINST
OFFEQPMT
OFFGEN
OFFSUPP
PAINT
PARKING
PARTSINS
PARTSMNT
PERIODBIN
PHOTOSUP
POSTAGE
PRINTERS
PRINTING
RADIOS
RENTGEN
RENTSPA
SCENERY
SCIENCE
SERVCONS
SERVINST
SERVMNTN
SERVOFFICI
SERVOTH
SERVPROF
SERVSTAFF
SERVTEST
SIGNS
SOFTWARE
SUBSCRIP
TESTING
TESTMNTN
TONER
TOOLS
VEHICLMTN
VEHICLREP
ACC Code
720541
720544
720547
720215
720710
720553
720550
710132
710135
720275
710138
720280
720285
720556
720710
720165
710144
720805
720810
720290
720270
720405
720415
710147
720420
720425
720430
720435
720440
710150
720514
720565
720295
710153
720553
710156
710525
710515
Description
Medical Care and Related Supplies
Memberships
Moving/Relocation
Musical Instruments
Office Equipment
Other Office and General
Office Supplies
Paint
Parking Lot Maintenance
Parts-Instructional
Parts-Maintenance
Periodicals Binding
Photo Supplies/Service
Postage and Handling
Printers
Printing Supplies and Services
Radios / Repair
Rentals-General
Rentals-Space
Scenery and Props
Scientific Supplies
Services-Consulting
Services-Instruction
Services-Maintenance
Services-Officials
Services-Other
Services-Professional
Services-Staffing
Services-Testing
Signs
Computer Software
Subscriptions
Testing Supplies
Testing Services
Toner Cartridges
Tools and Instruments
Vehicle Maintenance
Motor Vehicle Repair
- 126 -
Commodity Codes for Warehouse Purchases
These codes are only to be used on the Stores Requisition Form (FSAREQN).
Commodity Code
0950
1010
2230
2780
2815
2820
2829
2850
2855
2870
2875
3020
3023
3025
3027
3635
4210
4220
4240
5500
5501
5505
5510
5515
5520
5530
5540
5555
5560
5575
6625
6710
7700
7720
8330
8340
8342
8355
Description
Cups Paper 7 Oz
Catalogs
Envelopes Catalog 7.5 X 10.5
Floor Dry Absorbent
Forms Check Request
Forms Contractual Service
Forms Limited Purchase Check
Forms Scantron 882 Green (Abc)
Forms Scantron 2052N Blue (123)
Forms Travel Authorization
Forms Travel Reimbursement
Gloves Derma Thin Large (100)
Gloves Derma Thin Medium (100)
Gloves Derma Thin Ex-Large (100)
Gloves Derma Thin Small (100)
Labels Mailing UVSC
Liners Trash 24 X 24 (Small)
Liners Trash 33 X 40 (Medium)
Liners Trash 43 X 48 (Large)
Paper White 88 Drilled
Paper White 88 Non-Drilled
Paper Copy Blue
Paper Copy Canary
Paper Copy Cherry
Paper Copy Goldenrod
Paper Copy Green
Paper Copy Pink
Paper Copy White Legal 8.5 X 14
Paper Copy White Letter 8.5 X 11
Paper Copy White Ledger 11 X 17
Rags Cotton Wiping 25 Lb.
Clear Poly Bag With Logo
Soap Laundry 5 Gal Bucket
Soap Liquid Hand
Tissue Facial
Tissue Toilet Paper
Toilet Seat Covers
Towels Paper White (6 Case)
- 127 -
U/M
PKG
EA
EA
EA
PKG
PKG
PKG
PKG
PKG
PKG
PKG
BOX
BOX
BOX
BOX
PKG
BOX
BOX
BOX
CTN
CTN
RM
RM
RM
RM
RM
RM
RM
RM
RM
BOX
EA
EA
EA
BOX
CSE
CSE
CSE
Commodity Codes for Capital Purchases
These codes should only be used for the purchase of Capital Assets. A Capital Asset is
equipment or a group of items that works together as a system which costs $5000 or more.
Capital Assets also include buildings, and land improvement/infrastructure projects which cost
$50,000 or more. For more information, please contact Nathan James, extension 7416.
Commodity Code
CAIRCRAFT
CAPART
CAUDIOVIS
CDATAPRO
CINSTEQP
CMISCEQP
CMOTVEH
COFFEQP
CBLDGS
CINFRAS
CLANDIMP
CLANDIMPN
CLANDPUR
CLEASES
ACC Code
770005
770063
770010
770015
770020
770025
770030
770035
770040
770045
770050
770055
770060
770060
Description
Aircraft
Works of Art/Historical Treasures
Audio Visual Equip
Data Process Equip/Computers
Instructional Equip
Misc Equipment
Motor Vehicles
Office Equipment
Buildings/Additions/Major Imp
Infrastructure
Land Improvements-Depreciable
Land Improvements-Non Depreciable
Land Purchases
Leases
These codes are for non-capital leases
LEASEBLD
LEASEEQP
LEASEOTH
720355
720360
720365
Lease Payments-Buildings
Lease Payments-Equipment
Lease Payments-Other
- 128 -
Account (ACC) Codes
Revenue Account Codes
TAXABLE REVENUE
560105 Admit-Athletics Taxable
560110 Admit-Dance Taxable
560115 Admit-Other Taxable
560120 Admit-Theater Taxable
560130 Amusement Taxable
560135 Books-Gen Reading Taxable
560140 Catering Taxable
560155 Clothing Taxable
560160 Computer Supplies Taxable
560165 Computers Taxable
560170 Concessions Taxable
560175 Confection Taxable
560180 Copies Taxable
560190 Food Taxable
560195 Gifts/Jewelry Taxable
560205 Other Taxable
560240 Service Taxable
560245 Software Taxable
560255 Supplies Taxable
560260 Text Books -New Taxable
560265 Tickets Taxable
560270 Text Books -Used Taxable
TUITION
501105 Resident Undergraduate
506105 Nonresident Undergraduate
511105 Resident 10 percent
511305 Senior Citizens
511505 Police/Firefighter Survivor
511605 Wards of the State
511705 Public School Teacher
511805 Employee Tuition Remissions
511905 National Guard Waivers
511955 MATC General Ed
516105 Nonres Merit Res Portion First Year
516205 Nonres Merit Nonres Portion 1st Yr
516305 Nonres Merit Nonres Portion Cont
516705 WICHE/WUE
517005 Certain High School Graduates
FEE REVENUE – SPRING
520505 Activity Fee-Spring
520510 Activity Ctr Fee-Spring
520515 Athletic Fee-Spring
NON-TAXABLE REVENUE
560505 Admit-Athletics Non-Taxable
560510 Admit-Dance Non-Taxable
560515 Admit-Other Non-Taxable
560520 Admit-Theater Non-Taxable
560525 Advertising Non-Taxable
560530 Amusement Non-Taxable
560535 Books-Gen Reading Non-Taxable
560545 Catalog Non-Taxable
560550 Catering Non-Taxable
560555 Clothing Non-Taxable
560560 Computer Supplies Non-Taxable
560565 Computers Non-Taxable
560570 Concessions Non-Taxable
560575 Confection Non-Taxable
560580 Copies Non-Taxable
560585 Decals Non-Taxable
560590 Food Non-Taxable
560595 Gifts/Jewelry Non-Taxable
560600 Meters Non-Taxable
560605 Other Non-Taxable
560610 Parking Non-Taxable
560615 Parking Lot L Non-Taxable
560620 Parking Lot D Non-Taxable
560625 Printing Non-Taxable
560630 Remotes Non-Taxable
560635 Schedules Non-Taxable
560640 Service Non-Taxable
560645 Software Non-Taxable
560650 Stamps Non-Taxable
560655 Supplies Non-Taxable
560660 Text Books -New Non-Taxable
560665 Tickets Non-Taxable
560670 Text Books -Used Non-Taxable
560675 UTA Bus Pass Non-Taxable
560680 Vending Non-Taxable
560685 Shipping and Handling Non-Taxable
560690 Aviation Flight Time Non-Taxable
FEE REVENUE – OTHER
520105 Off Campus Fees
520110 STL Write-Off
520115 Tuition Write-Off
520120 Financial Aid Repay
- 129 -
FEE REVENUE – SPRING CONTINUED
520520 Building Fee-Spring
520525 Computer Fee-Spring
520530 Student Center Fee-Spring
FEE REVENUE – SUMMER TERM
520605 Activity Fee-Summer
520610 Activity Ctr Fee-Summer
520615 Athletic Fee-Summer
520620 Building Fee-Summer
520625 Computer Fee-Summer
520630 Student Center Fee-Summer
FEE REVENUE – FALL TERM
520705 Activity Fee-Fall
520710 Activity Ctr Fee-Fall
520715 Athletic Fee- Fall
520720 Building Fee- Fall
520725 Computer Fee- Fall
520730 Student Center Fee- Fall
INTRACAMPUS REVENUE
NON-CASH TRANSACTIONS ONLY
These codes are to be used for Intra-campus transactions
only! The offsetting entry must be to another UVU
Intra-campus revenue or expense account code ONLY.
The offsetting debit or credit can be the same revenue code
(debit and credit the same account code in different
funds), or the matching Intracampus expense account
code. All Intra-campus revenue codes have a matching
720xxx expense account code.
582001 Allocated Indirect Costs
582004 Computer Hardware-Intra Campus
582007 Computer Network Parts Intra Campus
582010 Computer Software-Intra Campus
582013 Conferences/Training-Intra Campus
582016 Culinary Arts-Intra Campus
582019 Events Center-Intra Campus
582022 Keys and Locks-Intra Campus
582025 Luncheons/Receptions-Intra Campus
582028 Maintenance/Remodeling Intra Campus
582031 Misc-Intra Campus charges
582034 Parking-Intra Campus
582037 Postage and Handling-Intra Campus
582040 Printing-Intra Campus
582043 Publicity/Advertising Intra Camp
582046 Reimbursements-Intra Campus
582049 Rentals-Intra Campus
582052 Services Miscellaneous Intra Campus
582055 Services-Police Intra Campus
582058 Signs-Intra Campus
582061 Telephone-Long Dist Intra campus
582064 Telephone-Fax/Modem Intra campus
- 130 -
FEE REVENUE– OTHER CONTINUED
520125 Admission Fee W/O
520130 Collection of Prev Write-offs
520135 Activity Fees
520140 Admission Fees
520145 Class Change Fee
520150 Graduation Fee
520155 Late Payment Fee
520160 Recording Fee
520165 Special Exam Fee
520170 Testing Fee
520175 Transcript Fee
525005 Lab Access Fee
525010 Lab Fees-Misc
525015 Other Fees
STATE APPROPRIATIONS/
GRANTS, CONTRACTS, & DONATIONS
534005 State Appropriations
534010 State Appropriations-Capital
534015 State Approp-State Trust Funds
540105 Fed Grants and Contracts-Exchange
540110 Fed Grants and Contracts Non-exch
540115 Fed Grants and Contracts-Capital
540505 State Grants and Contracts-Exchange
540510 State Grants and Contracts Non-exch
540515 State Grants and Contracts-Capital
540905 Private Grants and Contracts
540910 Donations
540913 Donations-Capital
540915 Donations-Phonathon
540920 Donations-Presidential
540925 Donations-Golf Tournament
OTHER REVENUE
560805 Fines
560810 Over/Short
560815 Returned Check Charges
560820 Service Charges
560825 Service Reimbursements
560830 Other
560905 Conferences and Workshops
560908 Instructional Supplies
560911 Rental-ATM
560914 Rental-Equipment Non-Tax
560917 Rental-Events Center Non-Tax
560920 Rental-Lease Payments
560923 Rental-Lockers Non-Tax
560926 Rental-Other Non-Tax
560929 Rental-Rooms Non-Tax
560932 Services-Tutoring
560935 Services-LMS
INTRACAMPUS REVENUE CONTINUED
582067 Telephone Services-Intra campus
582070 Transfers-Intra Campus
582073 UVSC Net-Intra Campus
582076 Warehouse-Intra Campus
OTHER REVENUE CONTINUED
560938 Signs
560941 Dues
580005 Interest Income
580010 Gains/Losses
Expense Account Codes
SALARIES, WAGES, & FRINGE BENEFITS
611005 Faculty -Instr Salaries
611010 Faculty -Adm Salaries
613001 Exec/Adm Salaries
615001 Exempt Staff Salaries
615002 Non-exempt Staff Salaries
620000 Wages/Hourly Budget
621001 Hourly Faculty Regular
625001 Hourly Staff Regular
630000 Benefits Budget
630001 Benefits Cost Distribution
630101 Workers Compensation Insurance
630201 Fica Match
630301 Tiaa Match
630401 State Retirement-Contributory
630501 State Ret-Non-Contributory
630701 Life Insurance
630801 LT Disability Insurance
630901 Indemnity Insurance
631001 Health Insurance
631002 UVSC Employee Medical Claims
632001 Dental Insurance
632002 UVSC Employee Dental Claims
633002 Benefit Plans Fees
640001 Taxable Cell Phone Reimbursements
MAINTENANCE, REPAIRS, & UTILITIES
BUILDING MAINTENANCE
710105 Building Maintenance and Repairs
710108 Building Materials-Improvement
710111 Electrical Supplies
710114 Equipment-Maintenance
710117 Equipment Repair-Maintenance
710120 Grounds Maintenance
710123 Janitorial Supplies
710126 Keys and Locks
710129 Laundry and Linen Services
710132 Paint
710135 Parking Lot Maintenance
710138 Parts-Maintenance
INTRACAMPUS CHARGES
These codes are to be used for Intra-campus transactions
only! The offsetting entry must be to another UVU
Intra-campus revenue or expense account code ONLY.
The offsetting debit or credit can be the same expense code
(debit and credit the same account code in different
funds), or the matching Intra-campus revenue account
code. All Intra-campus expense codes have a matching
582xxx revenue account code.
720001
Allocated Indirect Costs
720004
Computer Hardware-Intra Campus
720007
Comp Network Parts-Intra Campus
720010
Computer Software-Intra Campus
720013
Conferences/Training-Intra Campus
720016
Culinary Arts-Intra Campus
720019
Events Ctr Settlements Intra Campus
720022
Keys and Locks-Intra Campus
720025
Luncheons/Receptions-Intra Campus
720028
Maintenance/Remodeling Intra Campus
720031
Misc-Intra Campus charges
720034
Parking Services-Intra Campus
720037
Postage and Handling-Intra Campus
720040
Printing-Intra Campus
720043
Publicity/Advertising Intra Campus
720046
Reimbursements-Intra Campus
720049
Rentals-Intra Campus
720052
Services-Misc-Intra Campus
720055
Services-Police Intra Campus
720058
Signs-Intra Campus
720061
Telephone-Long Dist Intra campus
720064
Telephone-Fax/Modem Intra campus
720067
Telephone Services-Intra campus
720070
Transfers-Intra Campus
720073
UVSC Net-Intra Campus
720076
Warehouse-Intra Campus
GENERAL & ADMINISTRATIVE
CONFERENCES & SEMINARS
720105
Conf/Seminars-Off Campus
720110
Non-UVSC Tuition Reimbursement
- 131 -
BUILDING MAINTENANCE CONTINUED
710141 Chemicals
710144 Radios / Repair
710147 Services-Maintenance
710150 Signs
710153 Testing Services
710156 Tools and Instruments
INSURANCE
710305 Ins-Fire and Boiler
710310 Ins-Liability
710315 Ins-Other
710320 Ins-Vehicle
MOTOR VEHICLE
710505 Auto Parts
710510 Gas/Oil/Grease
710515 Motor Vehicle Repair
710520 Shuttle Bus Expense
710525 Vehicle Maintenance
UTILITIES
710705 Telephone-Cellular
710707 Payroll Reimbursed Cellular Phone
710710 Telephone-Equipment
710715 Telephone-Service Carriers
710720 Telephone-Pagers
710725 Utilities-Waste Removal
710735 Utilities-Sewer
710740 Utilities-Waste
710745 Utilities-Water
710905 Long Term Debt-Interest Expense
710910 Retirement of Debt
710915 Long Term Debt-Interest Expense
710920 Retirement of Debt
741005 Utilities-Gas
742005 Utilities-Electric
744005 Utilities-Fuel
745005 Utilities-Other
RESALE-COST OF GOODS SOLD
These codes are used only by Auxiliaries
730005 Resale-New Text Books
730008 Resale-Bus Passes
730011 Resale-Computers
730014 Resale-Computers/Eel
730017 Resale-Events Center
730020 Resale-Food
730023 Resale-Freight
730026 Resale-Gifts/Cards
730029 Resale-Kitchenware
730032 Resale-Movie Passes
730035 Resale-General Reading
730038 Resale-Soft Goods
GENERAL & ADMINISTRATIVE CONTINUED
ANNUITY EXPENSE
720135
Annuity Expense
COPY & PRINTING
720155
Books and Publishing -non-Library
720160
Copying Costs
720165
Printing Supplies and Services
INSTRUCTIONAL EQUIPMENT
720205
Books and Publishing-Library
720210
Clothing/Uniforms-Instructional
720215
Equipment-Instructional
INSTRUCTIONAL SUPPLIES
720255
Audio Visual Supplies
720260
Food-Classrooms
720265
Fuel-Aviation
720270
Instructional Supplies
720275
Parts-Instructional
720280
Periodicals Binding
720285
Photo Supplies/Service
720290
Scenery and Props
720295
Testing Supplies
OPERATING LEASES
These codes are for non-capital leases
720355
Lease Payments-Buildings
720360
Lease Payments-Equipment
720365
Lease Payments-Other
SERVICES
720405
Services-Consulting
720410
Services-Contract 1099
720415
Services-Instruction
720420
Services-Officials
720425
Services-Other
720430
Services-Professional
720435
Services-Staffing
720440
Services-Testing
720445
Stipends
OFFICE & GENERAL
720505
Advertising and Publicity
720508
Awards and Gifts
720511
Clothing/Uniforms
720514
Computer Software
720517
Deposit Refunds
720520
Floral Arrangement
720523
Freight-General
720526
Indirect Overhead Costs
720529
Interest / Bank Charges
720532
Interest Expense
720535
Limited Purchase Exp
720538
Luncheons/Receptions
- 132 -
RESALE-COST OF GOODS SOLD CONTINUED
730041 Resale-Software
730044 Resale-Stamps
730047 Resale-Supplies
730050 Resale-Used Text Books
CAPITAL EXPENSE
These codes should only be used for items that
are capital assets. Equipment = $5,000 or more per
item or group of items that work together as a
system. Buildings/Infrastructure/Land Improvements
$50,000 or more per project.
Contact Wendy Hope (x8108) with questions.
CAPITAL
770001 Capital Exp-Library Books/Films
770005 Aircraft
770010 Audio Visual Equip
770015 Data Process Equip/Computers
770020 Instructional Equip
770025 Misc Equipment
770030 Motor Vehicles
770035 Office Equipment
770040 Buildings/Additions/Major Imp
770045 Infrastructure
770050 Land Improvements-Depreciable
770055 Land Improvements-Non Depreciable
770060 Land Purchases
770065 Capital Leases-Equipment
779000 Gain/Loss on Disposal of Asset
BUDGET POOL ACCOUNT CODES
For use with Budget Entries only
700000 Current/Capital/Travel Budget
710000 Current Expense Budget
740000 Fuel and Power Budget
750000 Travel Expense Budget
760000 Scholarship Budget
770000 Capital Expenditure Budget
INDIRECT COSTS
790005 Indirect Costs
OFFICE & GENERAL CONTINUED
720541
Medical Care and Related Supplies
720544
Memberships
720547
Moving/Relocation
720550
Office Supplies
720553
Other Office and General
720556
Postage and Handling
720559
Procurement Card
720562
Project Expenses
720565
Subscriptions
720568
Taxes and Assessments
720571
Wolverine Card
OFFICE EQUIP & FURNITURE
720705
Equipment Repair-Office
720710
Office Equipment
720715
Office Furniture
720720
Computer Hardware/Parts
720725
Computer Network / Parts
RENTALS
720805
Rentals-General
720810
Rentals-Space
TRAVEL
750005
In State Travel
750010
In State Travel Motor Pool Charges
750015
Out State Travel
750020
Travel Advance
750025
Recruiting Travel
FINANCIAL AID
These codes are to be used
for transactions related to UVU
students only
760005
Cost of Princ and Int Cancel
760010
Scholarships-Federal
760015
Scholarships-State
760020
Scholarships-Private
760025
Scholarships-Exchange
760030
Scholarships-Food
760035
Scholarships-Housing
760040
Tuition Expense
760045
Tuition Refunds
760050
Tuition Waivers
- 133 -
- 134 -