1
Cobra HD
FPV Camera User Manual
Thanks for choosing Cobra HD truly FPV featured camera.
Please refer to the manual carefully before operations.
Safety Notice
Warning
.&_ Keep the instrument away from rain or moistness, avoiding the danger of fire, electric
shock or damage of the device .
.&_ If data transmission interrupts (fails) due to static or electromagnetism, be sure to
disconnect or restart the application program and reconnect the communication cable
(USB, etc.).
.&_ Do not install or place this instrument in the closed space such as cabinet, closet and
so on in order to avoid fire due to overheat.
.&_
Do not install or place this instrument on the flammable or explosive article to avoid
such risks as fire, explosion and so on due to overheat.
.&_ Do not place this instrument near for example open fire.
Notices for the use of this Instrument:
~ 1. Before use, please try taking a photo or video firstly to make sure this instrument
can work normally.
~ 2. As this instrument is not dustproof or waterproof, be careful when using it.
~ 3. Do not place this instrument in a humid environment. The entry oif moisture into this
instrument may damage it and it may not be repaired in some circumstances.
~ 4 . Do not use this instrument near the place with strong wireless waves or radioactive
rays; otherwise, it cannot be used normally.
~ 5. Do not point the camera of this instrument against sunshine or strong ray, otherwise
failure may be caused.
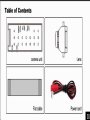
Table of Contents
0
0
0
0
0
0
0
0
0
0
~
0
0
camera unit
II
Lens
II
Flat cable
Power cord
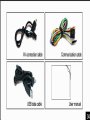
AV connection cable
Communication cable
USB data cable
User manual
CONTENTS
I. Func.tional Illus trations
06
II. FPV Setting
11
Ill. Operation
13
Video Mode
13
Photo taking
15
Date and time s etting
15
IV. Firmware Updating
16
V. Communicating to PC
17
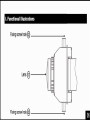
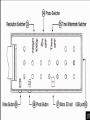
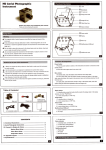
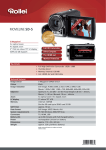
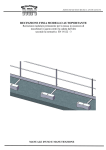
I. Functional Illustrations
Fixing screw hole @
==
Lens@)
"'=
Fixing screw hole @
I
(§ Photo Switcher
1
Resolution Switcher@)!
J
fl
Video Button@J
l
Q
Ii
0
0
0
0
Gl
@o
0
<DB
l'I
~
@Time Watermark Switcher
~ ~~
0
0
0
G
40
@
()
0
L @> Photo Button L @) Micro SD slot
USB port@
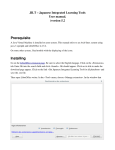
Functions of parts
Video Button
1. Press for 1sec, activating the video shooting.
Photo Button
1.Press for 1sec, activating the photo taking.
Resolution Switcher
1.Up: 720P 60fps
2.Down: 1080P 30fps
Photo Switcher
1. Up: 3sec self timer
2. Down: Normal photo mode
Time Watermark Switcher
1. Up: Time Watermark on
2. Down: Time Watermark off
USB port
1. Multi-functions: USB data transmitting, Video/Audio output and IR data control.
2. 5V DC power input, Automatic startup on power.
Indicating LED
1. Blue: stand by
2. Red quick flashing: record
3. Red slow flashing: photo
5 pin connector
1. DC 12V input
2. AV output
3. IR data in
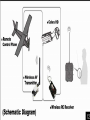
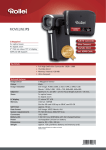
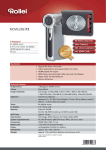
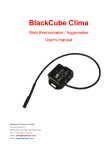
II . FPV setting
1. Connect Lens unit to Cobra HD record unit, mount the Cobra HD and Tx to the plane.
2. Connect Cobra HD and Tx with Spin cable.
(Audio and Video will be sent back via Tx, when Cobra HD work.)
3. Connect the Cobra HD to the Radio receiver with 3pin cable.
(Remote control the Cobra HD to work( start/stop recording or taking pitures)
4. Cobra HD will be automatic startup to stand by mode when connected and
powered.Press Video Button to start recording video;Remote control the Video/Photo
taking from the tuned radio controller, to start or stop video/photo taking.
•Cobra HD
eRemote
Control Plane
•Wireless AV
Transmitter
(Schematic Diagram)
• Wireless RC Receiver
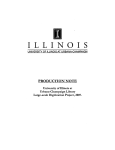
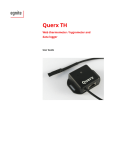
Ill. Operation
Vide o Mode
1. Press the video button, red indicator led on, video under recording.
2. File section is 15mins. New files will be created when there is 15mins; files will be
named in increasing mode.
3. File section is compulsion, and can not be set off.
4.Resolution options: 720P 60fps or 1080P 30fps.
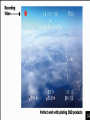
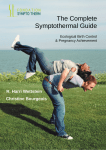
Recording
Video - - - <••
•
Perfect work with piloting OSD products
Photo taking
1. Indicator LED flash when taking a photo.
2. Back to stand by mode when photo taken.
3. Normal mode and 3Sec self timer Mode for options.
4.Resolution options: 720P 60fps or 1080P 30fps.
Date and time setting
1. Connect the Micro SD card to PC, and edict the file:system .txt time file.(file name can
not be changed)
2. Tir'r'le File forrn:
2013-0·1-01 00:00:59
Remark.s: Cobra HD can save the updated date/time for 24hrs each update. You can
tum the Time Water Mark function off, if you don't need it.
IV. Firmware Updating
1. Make the sure of the steady power supply before update.
2. Put the firmware file into the Micro SD card, and don't change the file name, and put
the Micro SD card to the Cobra HD.
3. Start the Cobra HD, update will be automatic startup, Cobra HD will be automatic shut
down when update finish .
4.Update file will be automatic removed when the update finish.
V. Date and time setting
1. Connect Cobra HD and PC with USB cable, start the Cobra HD, and it will be working
in mobile storage mode.
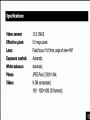
Specifications:
Video sensor:
1/2.5 CMOS
Effective pixel:
5.0 mega pixels
Lens:
Fixed focus, f=3.15mm, angle of view=146°
Exposure control:
Automatic;
White balance:
Automatic;
Photo:
JPEG.Pixel, 2,592x1 ,944;
Video:
H.264 compressed;
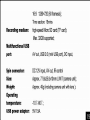
16:9 1920x1080 (30 frames/s);
16 :9 1280x720 {60 frames/s );
Time section: 15mins
Recording medium:
high-speed Micro SD card (TF card);
Max. 32GB supported;
Multifunctional USB
port:
AV out, USB 2.0 {mini USB port), DC input,
Spin connector:
DC 12V input, AV out, IR control
Size:
Approx. 77.8x25.8x10mm uwrr {camera unit);
Weight:
Approx. 409 {including camera unit with lens );
Operating
temperature:
-10'C -60 t .
USB power adapter:
5V/1.5A.
'