1
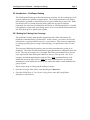
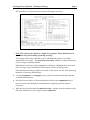
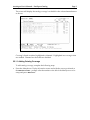
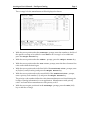
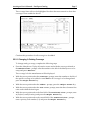
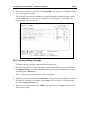
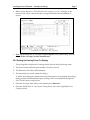
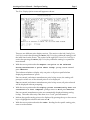
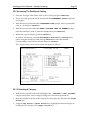
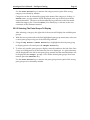
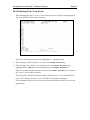
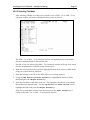
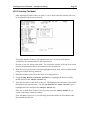
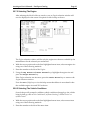
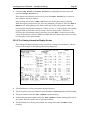
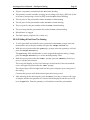
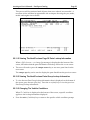
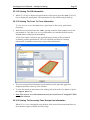
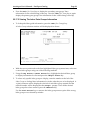
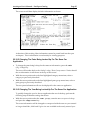
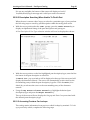
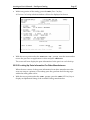
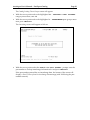
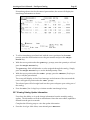
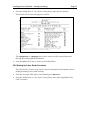
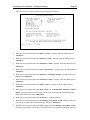
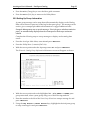
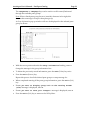
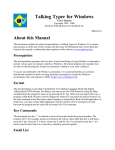
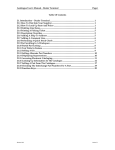
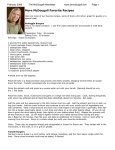
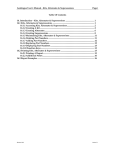
Autologue User’s Manual – PartExpert® Catalog
Page i
Table Of Contents
22. Introduction – PartExpert Catalog .................................................................................. 1
22.1 Setting Up Catalog Line Coverage ............................................................................... 1
22.1.1 Adding Catalog Coverage .................................................................................... 3
22.2.1 Changing A Catalog Coverage ............................................................................ 5
22.3.1 Deleting Catalog Coverage .................................................................................. 6
22.2 Setting Up Catalog Prices To Display ......................................................................... 7
22.3 Allow Cataloging On A Specific Terminal Device ................................................... 10
22.4 Allocating Licenses To Terminals ................................................................................ 10
22.5 Accessing The PartExpert Catalog ................................................................................ 13
22.1.5 Selecting A Category ............................................................................................. 13
22.2.5 Selecting The Parts Groups To Display ............................................................ 14
22.3.5 Selecting The Year ................................................................................................. 15
22.4.5 Selecting A Car, Truck Or Van ............................................................................ 16
22.5.5 Selecting The Make ............................................................................................... 17
22.6.5 Selecting The Model.............................................................................................. 18
22.7.5 Selecting The Engine ............................................................................................. 19
22.8.5 Selecting The Vehicle Conditions ...................................................................... 19
22.9.5 The Catalog Information Display Screen .......................................................... 20
22.10.5 Selling A Part From The Catalog ...................................................................... 21
22.11.5 Viewing The Next/Previous Page Of Parts Lookup Information ............... 22
22.12.5 Viewing The Next/Previous Parts Group Lookup Information.................. 22
22.13.5 Changing The Vehicle Conditions ................................................................... 22
22.14.5 Viewing The VIN Information.......................................................................... 23
22.15.5 Viewing The Cover To Cover Information ..................................................... 23
22.16.5 Viewing The Secondary Parts Groups Line Information ............................ 23
22.17.5 Viewing The Labor Parts Groups Information .............................................. 24
22.18.5 Changing The Parts Being Looked Up For The Same Car
Application ......................................................................................................................... 25
22.19.5 Changing The Year Being Looked Up For The Same Car
Application ......................................................................................................................... 25
22.20.5 Description Searching When Unable To Find A Part ................................... 26
22.21.5 Accessing Previous Car Lookups ...................................................................... 26
22.22.5 Looking Up Parts Information For Other Manufacturers ............................ 27
22.6 Accessing The PartExpert InterChange ....................................................................... 28
22.7 Viewing Catalog Update Information ......................................................................... 30
22.8 Setting Up Labor Guide Constants .............................................................................. 31
22.9 Setting Up Group Information ..................................................................................... 33
22.10 Keyboard Functions ...................................................................................................... 35
22.11 Function Keys ................................................................................................................. 35
Revision 04/07
Linux Version 7.1
Autologue User’s Manual – PartExpert Catalog
Page 1
22. Introduction – PartExpert Catalog
The PartExpert® Catalog provides the functions necessary for all countermen to look
up part numbers for specific car applications. The lookup information will display
part numbers, quantity on hand and prices for parts within the inventory file. Items
can then be sold (or posted) from the catalog back into an open workspace.
Optionally, the user can view Mitchell Labor Guide or VIN information for a specific
car application. Optionally, interchange and cover to cover detailed information can
also be looked up for a specific part number.
22.1 Setting Up Catalog Line Coverage
The PartExpert Catalog data includes application and vehicle information for
hundreds of manufacturers’ product lines. At the counter, you want to be sure the
information is organized the best way for your business. This can be accomplished
by setting up catalog line coverage’s and entering your specific line codes for each
setup.
This consists of defining the primary and secondary manufacturer groups to be
displayed. The order in which manufacturer part information is displayed must also
be set. This step is necessary if, for example, Wix Filter part numbers are to always
come up first and Fram Filter part numbers to always come up next. Also if, for
example, the default manufacturer code for Wix is WIX and manufacturer code
within the inventory file for Wix is WXF, the user would then have to setup the
manufacturer code within the inventory file within this table for each manufacturer
group of parts.
Below are the steps to setting up the catalog coverage:
•
From the Autologue Main Menu, enter 21 and press <Return>.
•
From the Utility Menu 8 – Part Expert Catalog Menu, enter 4 (Display/Update
Manufacturer Information).
Autologue User’s Manual – PartExpert Catalog
Page 2
The Manufacturer Display Information screen will appear as shown:
) Note: The setup for the catalog is a single user program! There should never be
more than one person setting up catalog coverage.
The catalog can be setup with 600 or up to 1000 different primary/secondary
manufacturer coverage’s. The Primary/Secondary Count: prompt displays the
total coverage’s currently enabled.
Manufacturers listed are either highlighted or dimmed. Highlighted are those that
have coverage setup. Dimmed are those that do not have coverage setup.
If the manufacturer being sought is not listed on the screen, use one of the following
methods to locate the manufacturer:
♦ Use the <PageDown> or <PageUp> keys to scroll forward/backward through the
available manufacturers.
♦ Enter the first few letters of the manufacturer and press the <PageDown> key to
have the screen automatically list manufacturers beginning with the entered
characters.
•
With the cursor positioned at the Manufacturer: prompt, enter the number to the
left of the Manufacturer to be setup and press <Return>.
Autologue User’s Manual – PartExpert Catalog
Page 3
The screen will display the catalog coverage’s available for the selected manufacturer
as shown:
Coverage’s listed are either highlighted or dimmed. Highlighted are coverage’s that
are enabled. Dimmed are those that are disabled.
22.1.1 Adding Catalog Coverage
To add catalog coverage, complete the following steps.
•
From the Manufacturer Display Information screen and with the cursor positioned at
the Manufacturer: prompt, enter the number to the left of the Manufacturer to be
setup and press <Return>.
Autologue User’s Manual – PartExpert Catalog
Page 4
The coverage’s for the manufacturer will be displayed as shown:
•
With the cursor positioned at the Coverage: prompt, enter the number to the left of
the specific coverage to be added or enter ALL for all coverage’s to be added and
press the <Right Arrow> key.
•
With the cursor positioned at the Jobber: prompt, press the <Right Arrow> key.
•
With the cursor positioned at the Your Line: prompt, enter the three character line
code used within the Autologue.
•
With the cursor positioned on the first field of the Preferred Line: prompt, enter
Y (Preferred) or N (Secondary) and press the <Right Arrow> key.
•
With the cursor positioned on the second field of the Preferred Line: prompt,
enter a priority code number (1-9) and press the <Right Arrow> key.
The priority code numbers define the order that manufacturers are listed during the
lookup of catalog information for a car application. Manufacturers with priority
code 1 are listed before manufacturers with priority code 2.
•
With the cursor again positioned at the Coverage: prompt, press the <F6> (Add)
key to add the coverage.
Autologue User’s Manual – PartExpert Catalog
Page 5
The coverage lines will now be highlighted for those that were entered to show that
coverage is now enabled as shown:
Continue this procedure for all coverage’s to be added.
22.2.1 Changing A Catalog Coverage
To change catalog coverage, complete the following steps.
•
From the Manufacturer Display Information screen and with the cursor positioned at
the Manufacturer: prompt, enter the number to the left of the Manufacturer to be
setup and press <Return>.
The coverage’s for the manufacturer will be displayed.
•
With the cursor positioned at the Coverage: prompt, enter the number to the left of
the specific coverage to be added or enter ALL for all coverage’s to be changed and
press the <Right Arrow> key.
•
With the cursor positioned at the Jobber: prompt, press the <Right Arrow> key.
•
With the cursor positioned at the Your Line: prompt, enter the three character line
code used within the Autologue.
•
With the cursor positioned on the first field of the Preferred Line: prompt, enter
Y (Preferred) or N (Secondary) and press the <Right Arrow> key.
•
With the cursor positioned on the second field of the Preferred Line: prompt,
enter a priority code number (1-9) and press the <Right Arrow> key.
Autologue User’s Manual – PartExpert Catalog
•
Page 6
With the cursor again positioned at the Coverage: prompt, press the <F7> (Change)
key to change the coverage.
The coverage lines will be automatically updated with the entered changes and the
screen will display an “All coverages changed for this Manufacturer” message at the
bottom of the screen as shown:
22.3.1 Deleting Catalog Coverage
To delete catalog coverage, complete the following steps.
•
From the Manufacturer Display Information screen and with the cursor positioned at
the Manufacturer: prompt, enter the number to the left of the Manufacturer to be
setup and press <Return>.
The coverage’s for the manufacturer will be displayed.
•
With the cursor positioned at the Coverage: prompt, enter the number to the left of
the specific coverage to be added or enter ALL for all coverage’s to be deleted and
press the <Right Arrow> key.
•
With the cursor positioned at the Jobber: prompt, press the <F12> (Delete) key to
delete the coverage.
Autologue User’s Manual – PartExpert Catalog
•
Page 7
When screen displays a “Delete all entries for coverage (Y or N)?” message on the
bottom of the screen, enter Y and the coverage line deleted will be dimmed as
shown:
) Note: By entering ALL as coverage and pressing the <F12> (Delete) key, you can
delete all the coverage’s for this manufacturer!
22.2 Setting Up Catalog Prices To Display
The pricing that is displayed for catalog data is derived in the following order:
1. The prices stored within the part number’s inventory record
2. The Electronic Price Sheet (EPS) database
3. The internal prices stored within the catalog
To define the selling price displayed for the internal prices stored within the catalog
during normal and manufacturer price lookups, this is accomplished through the
Price Display Options setup screen.
•
From the Autologue Main Menu, enter 21 and press <Return>.
•
From the Utility Menu 8 – Part Expert Catalog Menu, enter 5 (Display/Update Price
Display Options).
Autologue User’s Manual – PartExpert Catalog
Page 8
The Price Display Options screen will appear as shown:
There are two different price display sections. The section on the left (Catalog Price
Look Up) is used when pressing the <F10> (Mfr. Prices) key within the catalog for all
the items listed on the screen. The section on the right (Full Screen Price Look Up) is
used when pressing the <F10> (Mfr. Prices) key within the catalog for a particular
item selected.
•
With the cursor positioned at the Request one price to be selected
during manufacturer’s price sheet lookup: prompt, enter Y or N and
press <Return>.
This indicates whether to display only one price or all prices specified when
displaying manufacturers’ prices.
If Y was entered, each time a manufacturers price lookup occurs, the catalog will
prompt for which one of the selected prices is to be displayed.
If N was entered, each time a manufacturers price lookup occurs, all prices selected
will be displayed without prompting.
•
With the cursor positioned at the Display prices automatically when not
connected to a host computer: prompt, enter Y or N and press <Return>.
If Y was entered, manufacturer prices are automatically displayed during catalog
lookup. This takes effect only when there is no “local” price information.
•
Indicate the specific catalog prices to be displayed by pressing the up or down arrow
keys to highlight the selection and enter Y or N.
•
With the cursor positioned under the Order: heading for the specific catalog price,
enter an order number.
Autologue User’s Manual – PartExpert Catalog
Page 9
•
When entering an order number for the Calculated Sell Price: heading, a Sell
Price Calculation pop up window will be displayed as shown:
•
With the cursor positioned at the First Choice: prompt, enter a percentage and
press <Return>.
•
With the cursor positioned after the of prompt, enter the price code to be used when
calculating the sell price and press <Return>.
The first choice means that the catalog will use its calculation when there is a price
within the price code selected.
Shown below are the available price codes:
Price Code
X
J
M
S
W
U
L
O
K
P
Price Description
Stocking Jobber
Jobber Price
Master Installer
Stocking Dealer
Non Stocking Dealer
User Price
List Price
Other Price
SKU Number
Calculated Sell Price
•
With the cursor positioned at the Second Choice: prompt, enter a percentage and
press <Return>.
•
With the cursor positioned after the of prompt, enter the price code to be used when
calculating the sell price and press <Return>.
Autologue User’s Manual – PartExpert Catalog
Page 10
The second choice means that the catalog will use its calculation when there is not a
price stored within the price code selected of the first choice.
•
After setting the price display selections, press the <F7> (Change) key to save the
selections.
•
Press the <F11> (Exit) key to return to the Utility Menu.
22.3 Allow Cataloging On A Specific Terminal Device
Each terminal device that will be accessing the catalog will need to be added into the
device table. Once each terminal has been added, the specific terminals can be
enabled for catalog access.
Complete the following steps to name the specific terminal device.
•
From the Autologue Main Menu, enter 21 and press <Return>.
•
From the Utility Menu 8 – Part Expert Catalog Menu, enter 9 (Allow Cataloging On This
Terminal).
•
The terminal device will be automatically added into the device table and the screen
will return to the Utility Menu.
22.4 Allocating Licenses To Terminals
Once all terminals have been named, management must allocate catalog licenses to
the specific terminals in order for cataloging to be accessible. This step must be
performed within the host location. Complete the following steps to allocate licenses.
•
From the Autologue Main Menu, enter 21 and press <Return>.
•
From the Utility Menu 8 – Part Expert Catalog Menu, enter 8 (Allocate Licenses).
Autologue User’s Manual – PartExpert Catalog
Page 11
The Information Products Device Setup screen will appear as shown:
•
With the cursor positioned at the Type : prompt under the Client section of the
screen, press <Return>.
•
With the cursor positioned at the ID : prompt under the Client section of the screen,
press <Return>.
•
With the cursor positioned at the ID : prompt under the Location section of the
screen, press <Return> if the system is setup for a single store. If setup with a
multi-store, press the <F2> (List) key and highlight the specific store to setup
licensing for and press <Return>.
•
With the cursor positioned at the ID : prompt under the Device section of the
screen, press the <F2> (List) key and highlight the specific terminal device to setup
licensing for and press <Return>.
The <PageDown> or <PageUp> keys can be used to scroll forward/backward
through the list of terminals pop up selection window.
•
With the cursor positioned next to the PartExpert prompt under the Y/N column
heading, enter Y or N to toggle this feature on and off and press <Return>.
•
With the cursor positioned next to the PartExpert-All Lines prompt under the
Y/N column heading, enter Y or N to toggle this feature on and off and press
<Return>.
•
With the cursor positioned next to the Interchange prompt under the Y/N column
heading, enter Y or N to toggle this feature on and off and press <Return>.
Autologue User’s Manual – PartExpert Catalog
Page 12
•
With the cursor positioned next to the Interchange-All Lines prompt under
the Y/N column heading, enter Y or N to toggle this feature on and off and press
<Return>.
•
With the cursor positioned next to the Manuf. Prices prompt under the Y/N
column heading, enter Y or N to toggle this feature on and off and press <Return>.
•
With the cursor positioned next to the LaborExpert prompt under the Y/N column
heading, enter Y or N to toggle this feature on and off and press <Return>.
•
With the cursor positioned next to the Service Intervals prompt under the Y/N
column heading, enter Y or N to toggle this feature on and off and press <Return>.
•
With the cursor positioned next to the Vin prompt under the Y/N column heading,
enter Y or N to toggle this feature on and off and press <Return>.
•
Press the <F7> (Save) key to save the allocation change for the selected terminal
device.
Once completed the Information Products Device Setup screen will appear as shown:
Continue this process for all terminal devices that licenses are to be assigned.
The number of total licenses allowed per store is displayed under the Allowed
column heading. The number of licenses assigned will be displayed under the
Assigned column heading. The number of licenses available per store will be
displayed under the Avail column heading.
•
Press the <F11> (Exit) key to return to the Utility Menu.
Autologue User’s Manual – PartExpert Catalog
Page 13
22.5 Accessing The PartExpert Catalog
•
From the Autologue Main Menu, enter 1 (Point of Sale) and press <Return>.
•
The point of sale program will be loaded and the COUNTERMAN CODE prompt will
now appear.
•
With the cursor positioned at the COUNTERMAN CODE prompt, enter a counterman
code (A - 9) and press <Return>.
•
With the cursor positioned at the ENTER CUSTOMER NAME OR NUMBER prompt,
enter the customer’s name or customer number and press <Return>.
•
Within the open workspace, press the <F16> key.
A window will pop-up, select the PartExpert Electronic Catalog menu
option using the arrow keys and pressing <Return> or enter the number
corresponding to the selection desired and press <Return>.
The Catalog Lookup / Parts Groups screen will appear as follows:
22.1.5 Selecting A Category
•
With the cursor positioned on the highlighted 01. IGNITION & ENG. FILTERS
category menu item, select a category using one of the following methods:
1. Enter the number to the left of the Category to lookup parts for and press the <Right
Arrow> key.
2. Using the <Up Arrow> or <Down Arrow> keys, highlight the desired category to
lookup parts for and press the <Right Arrow> key.
Autologue User’s Manual – PartExpert Catalog
Page 14
Use the <Left Arrow> key to return to the category menu option if the wrong
category was selected by mistake.
Categories can also be selected by typing in the name of the category to lookup. A
Search for: pop up window will be displayed at the top of the screen with the
entered characters. The cursor will automatically be positioned on the first match
within the category list. Press the <F12> (Next Match) key to advance to the next
occurrence of the characters entered.
22.2.5 Selecting The Parts Groups To Display
After selecting a category, the right side of the screen will display the available parts
groups.
•
With the cursor positioned on the first highlighted parts group menu item, select one
or more parts groups using one of the following methods:
1. Using the <Up Arrow> or <Down Arrow> keys, highlight the desired parts group
to display parts for first and press the <Right Arrow> key.
2. To select only specific parts group to display, enter the number to the left of the Parts
Groups to lookup parts for in the order they are to be displayed. A + (plus) character
will be displayed to the left of each parts group entered and the entered number will
be displayed at the Groups: prompt. Once all the desired parts groups have been
entered, press the <Return> key.
Use the <Left Arrow> key to return to the parts groups menu option if the wrong
parts groups were selected by mistake.
Autologue User’s Manual – PartExpert Catalog
Page 15
22.3.5 Selecting The Year
After selecting the parts groups to display, a Year selection window will now be
displayed on the left side of the screen as shown:
•
With the cursor positioned on the first highlighted year menu item, select a year
using one of the following methods:
1. Enter the last 2 digits of the year.
2. Use the <Up Arrow> and <Down Arrow> keys to highlight the desired year and
press the <Right Arrow> key.
If the year selected was incorrect, press the <Left Arrow> key to return to the Year
selection window.
All domestic and import coverage is from 1968 to the present. Volkswagen only
starts in 1962.
Autologue User’s Manual – PartExpert Catalog
Page 16
22.4.5 Selecting A Car, Truck Or Van
After selecting the year, a Truck Or Van selection window will now be displayed in
the lower left side of the screen as shown:
The cursor will be positioned on the highlighted 1. NO menu item.
•
If the lookup is not for a truck or van, press the <Right Arrow> key.
•
If the lookup is for a truck or van, enter 2 or press the <Down Arrow> key to
highlight the 2. YES menu item and then press the <Right Arrow> key.
If the car or truck selection was incorrect, press the <Left Arrow> key to return to
the Truck Or Van selection window.
The Truck/Van selection should be used for all trucks up to 1 ton, mini & full size
vans, APV’s, Blazers, Broncos, 4 x 4’s, El Camino’s, Rancheros and Jeeps.
Press the <F1> (Help) key to view the help screen that defines truck/van versus car
applications.
Autologue User’s Manual – PartExpert Catalog
Page 17
22.5.5 Selecting The Make
After selecting whether to lookup cars or trucks/vans, a Make - Car or Make - Truck
selection window will now be displayed on the screen as shown:
The Make - Car or Make - Truck selection window will alphabetically list all makes
that were manufactured for the selected year.
If truck or van was selected, the Make - Truck selection window will only show truck
and van manufacturers available for the selected year.
•
With the cursor positioned on the first highlighted menu item, select a vehicle make
using one of the following methods:
1. Enter the number to the left of the Make of the car to lookup parts for.
2. Using the <Up Arrow> and <Down Arrow> keys, highlight the desired vehicle
make and press the <Right Arrow> key.
3. Enter the first letter of the Make of the car. The highlight will advance to first make
that matches the entered letter. Use the <Up Arrow> and <Down Arrow> keys to
highlight the Make and press the <Right Arrow> key.
If the car or truck Make selection was incorrect, press the <Left Arrow> key to
return to the Make - Car or Make - Truck selection window.
Autologue User’s Manual – PartExpert Catalog
Page 18
22.6.5 Selecting The Model
After selecting the Make of the car, truck or van, a Model selection window will now
be displayed on the screen as shown:
The Model selection window will alphabetically list only the models that are
available by the manufacturer for the selected year.
If truck or van was selected, the Make - Truck selection window will only show truck
and van manufacturers that was available for the selected year.
•
With the cursor positioned on the first highlighted menu item, select a vehicle model
using one of the following methods:
1. Enter the number to the left of the Model to lookup parts for.
2. Using the <Up Arrow> and <Down Arrow> keys, highlight the desired vehicle
model and press the <Right Arrow> key.
3. Enter the first letter of the Model of the car. The highlight will advance to first model
that matches the entered letter. Use the <Up Arrow> and <Down Arrow> keys to
highlight the Model and press the <Right Arrow> key.
If the car or truck Model selection was incorrect, press the <Left Arrow> key to
return to the Model selection window.
Press the <F1> (Help) key to view the help screen that defines in more detail what
the available models are.
Autologue User’s Manual – PartExpert Catalog
Page 19
22.7.5 Selecting The Engine
After selecting the Model of the car, truck or van, an Engine selection window will
now be displayed on the screen if required for this lookup as shown:
The Engine selection window will list only the engine sizes that are available by the
manufacturer for the selected year and model.
•
With the cursor positioned on the first highlighted menu item, select an engine size
using one of the following methods:
1. Enter the number to the left of the Engine.
2. Using the <Up Arrow> and <Down Arrow> keys, highlight the engine size and
press the <Right Arrow> key.
If the Engine selection was incorrect, press the <Left Arrow> key to return to the
Engine selection window.
Press the <F1> (Help) key to view the help screen that defines in more detail what
the available engine sizes and VIN codes are.
22.8.5 Selecting The Vehicle Conditions
Some lookups will prompt for addition vehicle conditions that apply to the vehicle
being looked up, such as Air Conditioned?, w/Power Steering?, 4 Wheel Drive? or
w/Auto Trans?
•
With the cursor positioned on the first highlighted menu item, select a menu item
using one of the following methods:
1. Enter the number to the left of the menu item.
Autologue User’s Manual – PartExpert Catalog
Page 20
2. Using the <Up Arrow> and <Down Arrow> keys, highlight the menu item and
press the <Right Arrow> key.
If the menu item selected was incorrect, press the <Left Arrow> key to return to
the condition selection window.
Most lookups will require a YES or NO answer for all the parts being looked up.
With the engine code question, the user may find that it is better to select the DON’T
KNOW answer when getting to the final screen and look for the question mark (?)
following the part number displayed. If there is not a “?” following the part number
being looked up, then there was no need to answer the question. If there is a “?”
following the part number being looked up, press the <F5> (Conditions) key and to
return to the specific vehicle condition prompt and select the proper answer in order
to lookup the correct part number.
22.9.5 The Catalog Information Display Screen
The catalog information display screen consists of a variety of information. Shown
below is an example of the catalog information displayed:
♦ The manufacturer of the part number being displayed
♦ The description of the part number under the Part Description column heading
♦ The part number under the Part Number column heading
♦ Linked alternate part number under the Part Number column heading (denoted by
the greater than (>) symbol next to the item number)
♦ The manufacturer code the part number was setup with under the MFR column
heading
Autologue User’s Manual – PartExpert Catalog
Page 21
♦ The per car quantity needed under the PC column heading
♦ The quantity on hand available, stocking/non-stocking code (if qty), EPS code (if not
in inventory and pricing is found in EPS) under the Avl column heading
♦ The list price for the part number under the List column heading
♦ The sell price for the part number under the Sell column heading
♦ The core price for the part number under the Core column heading
♦ The year range that the part number fits under the Yrs column heading
♦ Related items to suggest
♦ The fluid capacity required (oil, coolant, etc.)
22.10.5 Selling A Part From The Catalog
•
To sell a part listed and with the cursor positioned at the Item: prompt, enter the
item number next to the part number and press the <Right Arrow> key.
•
With the cursor positioned at the Quantity: prompt, enter the quantity to sell and
press the <Right Arrow> key.
The Quantity: field will default to a value assigned through the catalog. Simply
press the <Right Arrow> key to use the default quantity value.
•
With the cursor positioned at the Codes: prompt, press the <Enter> (Post) key to
post (or sell) the part selected.
The screen will display an Item Posted message on the bottom of the screen and the
cursor will again be positioned at the Item: prompt.
The selected part will be brought back into the open workspace upon exiting out of
the catalog.
Continue this process until all the desired parts have been posted.
•
After selecting all the desired parts, press the <F11> (Exit) key to return to the open
workspace and the first part that was selected will be displayed and the cursor will
be in the QTY field. Enter the quantity to sell and then extend the part number.
Autologue User’s Manual – PartExpert Catalog
Page 22
This process will be continued until all parts, that were selected, are extended. A
text write in line will then be appended to the workspace showing the year, make,
model, and engine size as shown:
22.11.5 Viewing The Next/Previous Page Of Parts Lookup Information
When a PgDn for more, -> to change Qty message is displayed at the bottom of the
screen, this means that the parts information looked up will not fit on one screen.
•
The user will need to press the <Page Down> key to see more parts listed on the
next screen.
The <Page Up> key can be used to display the parts listed from the previous screen.
22.12.5 Viewing The Next/Previous Parts Group Lookup Information
•
To view the next Part Group lookup information that is displayed on the bottom of
the screen, press the <+> (plus) key. Press the <-> (dash) key to view the previous
Part Group lookup information.
22.13.5 Changing The Vehicle Conditions
When F5 Conditions is displayed at the bottom of the screen, a specific condition
applies to the lookup information displayed.
•
Press the <F5> (Conditions) key to return to the specific vehicle condition prompt.
Autologue User’s Manual – PartExpert Catalog
Page 23
22.14.5 Viewing The VIN Information
•
When F5 VIN info is displayed at the bottom of the screen, press the <F5> (VIN info)
key to display the appropriate VIN information for the vehicle being looked up.
22.15.5 Viewing The Cover To Cover Information
To view cover to cover information for a part listed on the screen, perform the
following:
•
With the cursor positioned at the Item: prompt, enter the item number next to the
part number to view the cover to cover information for and then hold down the
<Ctrl> button and press the letter E key.
A Web View window will now pop up displaying a picture of the product (if
available), product specifications, OE cross reference and links to warranty
information, installation instructions and product information:
•
The user can print this information by left clicking on the print this page link
displayed just below the top of the window.
•
To close this window and return to the catalog, left click on the Close button or press
the <Space Bar> key.
) Note: The cover to cover information can only be viewed on a PC using the TTWin
emulation software.
22.16.5 Viewing The Secondary Parts Groups Line Information
When F6 Sec. Lines is displayed at the bottom of the screen, this means that there are
more brands of parts available for this lookup.
Autologue User’s Manual – PartExpert Catalog
•
Page 24
Press the <F6> (Sec. Lines) key to display the secondary part groups’ lines
information for the vehicle being looked up. Press the <F6> (Pri. Lines) key to again
display the primary part groups’ line information for the vehicle being looked up.
22.17.5 Viewing The Labor Parts Groups Information
•
To lookup the labor guide information, press the <F4> (Sec. Groups) key.
A Labor Groups selection window will be displayed as shown:
•
With the cursor positioned on the first highlighted labor group menu item, select one
or more labor groups using one of the following methods:
1. Using the <Up Arrow> or <Down Arrow> keys, highlight the desired labor group
to display information for first and press the <Right Arrow> key.
2. To select only specific labor groups to display, enter the number to the left of the
Labor Groups to lookup labor information for in the order they are to be displayed. A
+ (plus) character will be displayed to the left of each labor group entered and the
entered number will be displayed at the Groups: prompt. Once all the desired
labor groups have been entered, press the <Return> key.
Use the <Left Arrow> key to return to the labor groups menu option if the wrong
labor groups were selected by mistake.
Autologue User’s Manual – PartExpert Catalog
Page 25
The screen would then display the labor information as shown:
At the time of this writing, labor information cannot be posted back into the open
workspace. This is information is used strictly for viewing purposes.
22.18.5 Changing The Parts Being Looked Up For The Same Car
Application
•
To change the parts being lookup for the same car information, press the <F3>
(Chg. Lookup) key.
The user will be taken back to the Catalog Lookup / Parts Groups screen. Notice that all
the car information is still shown at the top of the screen!
•
With the cursor positioned on the first highlighted category menu item, select a
category as previously described.
•
With the cursor positioned on the first highlighted parts group menu item, select a
parts group as previously described.
The new parts information will now be displayed for the same car application.
22.19.5 Changing The Year Being Looked Up For The Same Car Application
To quickly change the year for the car application that was looked up, perform the
following steps within the catalog data screen.
•
With the cursor positioned at the Item: prompt, enter the new car year to lookup
and press the <Page Down> key.
The screen information will be changed to correspond with the new car year entered
as long as that Make, Model and Engine size was available in the newly entered year.
Autologue User’s Manual – PartExpert Catalog
Page 26
If it was not available, the bottom of the screen will display an Invalid
Year/Make/Model/Engine message and a valid year need to be entered.
22.20.5 Description Searching When Unable To Find A Part
When the user is unsure what Category to select for a particular type of part, perform
the following steps to search by part description within the catalog data screen.
•
With the cursor positioned at the Item: prompt, press the <Left Arrow> key to
display an alphabetical listing of the part descriptions and part types.
A Part Description & Part Types selection window will now be displayed as shown:
•
With the cursor position on the first highlighted part description/type, enter the first
few letters of the part description to search for.
A Search for: pop up window will be displayed at the top of the screen and will
display the characters entered. The cursor will automatically position itself on the
first matching entry within the part description/type list. Press the <F12> (Next
Match) key to advance the cursor to the next matching entry of the characters
entered.
•
Using the <Up Arrow> and <Down Arrow> keys, highlight the desired part
description/type and press the <Right Arrow> key.
The top of the screen will now display the Category and Parts Group associated with
the selected parts description/type.
22.21.5 Accessing Previous Car Lookups
The catalog retains information from previous vehicle lookups by terminal. To look
up a previously vehicle, complete the following steps.
Autologue User’s Manual – PartExpert Catalog
•
Page 27
Within any portion of the catalog, press the <F9> (Prev. Car) key.
A Previous Car Lookup selection window will now be displayed as shown:
•
With the cursor positioned at the Previous car: prompt, enter the item number
next to the previous car application to select and press <Return>.
The screen will now display the parts information for the previous car looked up.
22.22.5 Looking Up Parts Information For Other Manufacturers
When the user wants to lookup parts information from other manufacturers that
were not setup as a primary or secondary parts line, perform the following steps
within the catalog data screen.
•
With the cursor positioned at the Item: prompt, press the <F8> (All Lines) key to
display an alphabetical listing of the available catalog manufacturers.
Autologue User’s Manual – PartExpert Catalog
Page 28
An All Lines Catalog Manufacturers selection window will now be displayed as
shown:
•
With the first menu item highlighted, enter in the numbers of up to five different
manufacturers to be looked up.
A + (plus) character will be displayed to the left of each manufacturer entered and
the entered number will be displayed at the Manufacturers: prompt.
•
Once all the desired manufacturers have been entered, press the <Right Arrow>
key and the part numbers for the selected manufacturers will now be displayed on
the screen.
22.6 Accessing The PartExpert InterChange
•
Within the open workspace, press the <F16> key.
A window will pop-up, select the PartExpert Electronic Catalog menu
option using the arrow keys and pressing <Return> or enter the number
corresponding to the selection desired and press <Return>.
Autologue User’s Manual – PartExpert Catalog
Page 29
The Catalog Lookup / Parts Groups screen will appear.
•
With the cursor positioned on the highlighted 01. IGNITION & ENG. FILTERS
category menu item, enter 13.
•
With the cursor positioned on the highlighted 1. INTERCHANGE parts groups menu
item, press <Return>.
The Interchange screen will appear as follows:
•
With the cursor positioned at the Search for Part Number: prompt, enter the
part number to lookup interchange information for and press <Return>.
If the part number entered has no interchange data, the bottom of the screen will
display a Part: XXX not found in interchange data message (with XXX being the part
number entered).
Autologue User’s Manual – PartExpert Catalog
Page 30
If interchange data exists for the entered part number, the screen will display the
interchange information as shown:
•
To sell an interchange part listed and with the cursor positioned at the Item:
prompt, enter the item number next to the part number and press the <Right
Arrow> key.
•
With the cursor positioned at the Quantity: prompt, enter the quantity to sell and
press the <Right Arrow> key.
The Quantity: field will default to a value assigned through the catalog. Simply
press the <Right Arrow> key to use the default quantity value.
•
With the cursor positioned at the Codes: prompt, press the <Enter> (Post) key to
post (or sell) the part selected.
The screen will display an Item Posted message on the bottom of the screen and the
cursor will again be positioned at the Item: prompt.
The selected part will be brought back into the open workspace upon exiting out of
the catalog.
•
Press the <F2> (New Lookup) key to initiate another interchange lookup.
22.7 Viewing Catalog Update Information
Users have the ability to view the change information from the monthly catalog
update. The information will show manufacturer lines that were added, updated or
deleted from the previous month.
Complete the following steps to view the update information.
•
From the Autologue Main Menu, enter 21 and press <Return>.
Autologue User’s Manual – PartExpert Catalog
•
Page 31
From the Utility Menu 8 – Part Expert Catalog Menu, enter 3 (View Updates).
The Bulletin Board screen will appear as shown:
The <PageDown> or <PageUp> keys can be used to scroll forward/backward
through the catalog update information.
•
Press the <F11> (Exit) key to return to the Utility Menu.
22.8 Setting Up Labor Guide Constants
The Labor Guide Constants Setup screen is used to determine the information that is
displayed during Labor Guide lookups.
•
From the Autologue Main Menu, enter 21 and press <Return>.
•
From the Utility Menu 8 – Part Expert Catalog Menu, enter 6 (Display/Update Labor
Guide Constants).
Autologue User’s Manual – PartExpert Catalog
Page 32
The Labor Guide Constants Setup screen will appear as shown:
•
With the cursor positioned at the Skill Level: prompt, enter Y or N and press
<Return>.
•
With the cursor positioned at the Factory Time: prompt, enter Y or N and press
<Return>.
•
With the cursor positioned at the Estimate Time: prompt, enter Y or N and press
<Return>.
•
With the cursor positioned at the Sell Extension: prompt, enter Y or N and press
<Return>.
•
With the cursor positioned at the Vehicle Coverage Years: prompt, enter Y or
N and press <Return>.
•
With the cursor positioned at the Estimate Time: prompt, enter Y or N and press
<Return>.
•
With the cursor positioned at the Labor Rate: prompt, enter Y or N and press
<Return>.
•
With the cursor positioned at the Host Down or Standalone Default Labor
Rate: prompt, enter an hourly labor rate to use for calculations when displaying
labor information and press <Return>.
•
With the cursor positioned at the Mitchell: prompt, enter Y.
•
With the cursor positioned under the Modify Estimate Time heading, enter the
percentage to adjust the estimate time by and press <Return>.
•
With the cursor positioned on the Up prompt under the Modify Estimate Time
heading, enter U (Up) or D (Down) to set the direction to adjust the estimate times by.
Autologue User’s Manual – PartExpert Catalog
•
Press the <F7> (Change) key to save the labor guide constants.
•
Press the <F11> (Exit) key to return to the Utility Menu.
Page 33
22.9 Setting Up Group Information
A parts group message can be setup that will automatically display on the Catalog
Data screen whenever parts are looked up for that parts group. The message can be
used to give counterpeople additional information or suggest additional sales.
Example: Management can set up the message: “Don’t forget to ask about emission
parts” to automatically display when the counterperson looks up a carburetor
rebuild.
Complete the following steps to set up messages to display on the catalog data
screen.
•
From the Autologue Main Menu, enter 21 and press <Return>.
•
From the Utility Menu 1, enter 8 (Shell Out).
•
With the cursor positioned at the # prompt, enter uri and press <Return>.
The Electronic Catalog Group Information Maintenance screen will appear as shown:
•
With the cursor positioned on the highlighted 01. A/T,FLTRS & PARTS parts
group menu item, select a parts group using one of the following methods:
1. Enter the number to the left of the Parts Group Selection to setup a message for and
press <Return>.
2. Using the <Up Arrow> or <Down Arrow> keys, highlight the desired parts group
to setup a message for and press <Return>.
Autologue User’s Manual – PartExpert Catalog
Page 34
The <PageDown> or <PageUp> keys can be used to scroll forward/backward
through the available parts groups.
Note: When a listed parts group has an * (asterisk) character its far right, this
denotes that a message is setup for that parts group.
A Group Information pop up window will now be displayed for the selected parts
group as shown:
•
With the cursor positioned under the Group Information heading, enter or
change the message in the group information line.
•
To delete the previously stored information, press the <F8> (Delete) key twice.
•
Press the <F11> (Return) key.
Repeat this process for all the desired parts groups to setup message for.
•
When completed entering all the parts group information, press the <F11> (Exit)
key.
•
If a Do you want to display group info on the Catalog Screen
(Y/N)? message is displayed, enter Y.
•
If a Do you want to save your changes?: message is displayed, enter Y.
•
Press the <F11> (Exit) key to return to the Utility Menu.
Autologue User’s Manual – PartExpert Catalog
Page 35
22.10 Keyboard Functions
Key
<Left Arrow>
<Right Arrow>
<Up Arrow>
<Down Arrow>
<Return>
<Page Up>
<Page Down>
<+>
<->
Function
Previous Menu
Select Menu
Move highlight up
Move highlight down
Accept current selection
Scrolls information up the screen or to the previous Group
Scrolls information down the screen or to the next Group
Skips to the Next Group
Skips to the Previous Group
22.11 Function Keys
The available function keys are displayed at the bottom of each screen. These will
change depending on the screen being displayed. In the lookup screen, the
following keys could be displayed:
<Enter>
<F1>
<F2>
<F3>
<Left Arrow>
<F4>
<F5>
<F5>
<F6>
<F7>
<F8>
<F9>
<F10>
<F11>
<F12>
POST
Posts or import the selected item number’s part number into the workspace.
HELP
This displays help associated with the screen currently being viewed.
NEW LOOKUP
This starts a completely new lookup.
CHANGE LOOKUP
Allows the user to change the Category being looked up for the same vehicle.
PART DESCRIPTIONS/TYPES (first screen only)
Displays a list of all parts description/types in the catalog for lookup.
LABOR/PRIMARY GROUPS
Displays the Labor Groups selected and then returns to the Parts Group selection.
VIN INFORMATION
Displays the appropriate VIN information for the vehicle looked up. Will also prompt for
the VIN number.
CONDITIONS (when applicable)
Displays the Condition prompts again to allow modification of answers.
SECONDARY LINES / PRIMARY LINES
Displays the secondary manufacturer lines selected and then returns to the primary lines.
CHANGE CAR
Allows the user to change the car application for the selected parts group.
ALL LINES
Displays an All Lines window that is available for a specific manufacturer lookup.
PREVIOUS CAR
Displays the previous car applications looked up from the specific terminal the user is
connected to.
MANUFACTURERS PRICES
Displays manufacturers prices for parts selected or listed on the screen as determined in
the Price Display Options setup.
EXIT
Exits out of the catalog and return the user back into the workspace. It will also exit out of
pop up help screen windows.
Advances the cursor or highlighted menu item to the next matching occurrence for the
letters entered.
Autologue User’s Manual – PartExpert Catalog
<Ctrl> E
COVER TO COVER INFORMATION
Will pop up a window displaying a picture of the product (if available), product
specifications, OE cross reference and links to warranty information, installation
instructions and product information for the selected part.
Page 36