1
DENODO ITPILOT 4.0 USER MANUAL
NOTE
This document is confidential and is the property of denodo technologies
(hereinafter denodo).
No part of the document may be copied, photographed, transmitted
electronically, stored in a document management system or reproduced by
any other means without prior written permission from denodo.
copyright © 2007
This document may not be reproduced in total or in part without written permission from denodo technologies.
ITPilot 4.0
User Manual
INDEX
SCOPE ..........................................................................................................................................................................I
WHO SHOULD USE THIS DOCUMENT ...................................................................................................................I
SUMMARY OF CONTENTS .......................................................................................................................................I
1.1
DENODO ITPILOT ENVIRONMENTS ................................................................................................... 2
1.1.1 Administration Tool................................................................................................................................... 3
1.1.2 Generation Environment ........................................................................................................................... 3
1.1.3 Execution Environment.............................................................................................................................. 4
1.1.4 Maintenance Environment........................................................................................................................ 4
2.1
DISTRIBUTION OF THE GENERATION ENVIRONMENT .................................................................. 5
2.2
DISTRIBUTION OF THE EXECUTION ENVIRONMENT ..................................................................... 5
2.3
DISTRIBUTION OF THE MAINTENANCE ENVIRONMENT .............................................................. 6
3.1
PREINSTALLATION OF THE ITPILOT COMPONENTS ...................................................................... 8
3.1.1 Preinstallation of the Administration Server ............................................................................................ 8
3.1.2 Preinstallation of the Browser Pool .......................................................................................................... 8
3.1.3 Preinstallation of Wrapper Server ............................................................................................................ 9
3.1.4 Preinstallation of the Maintenance Server............................................................................................... 9
3.2
USING THE INSTALLATION TOOL..................................................................................................... 10
3.2.1 Configuring the Generator Tools in Installation Phase........................................................................... 10
3.2.2 Configuring Browser Pool in Installation Phase ..................................................................................... 10
3.2.3 Configuring Wrapper Server in Installation Phase ................................................................................. 11
3.2.4 Configuring the Maintenance Server in Installation Phase.................................................................... 11
3.2.5 Configuring the Administration Server in Installation Phase ................................................................. 12
3.2.6 DIRECTORY STRUCTURE OF THE DISTRIBUTION................................................................................... 12
3.3
STARTING UP THE COMPONENTS................................................................................................... 14
3.3.1 Installing the Denodo ITPilot License ..................................................................................................... 14
3.3.2 Starting up the Administration Server.................................................................................................... 14
3.3.3 Starting up the Browser Pool.................................................................................................................. 14
3.3.4 Starting up the Wrapper Server.............................................................................................................. 14
3.3.5 Startup of the Maintenance Server ........................................................................................................ 15
5.1
INTRODUCTION.................................................................................................................................... 17
5.2
STARTING UP THE SERVERS............................................................................................................. 17
5.3
CONFIGURING THE BROWSER POOL............................................................................................... 17
5.3.1 Identification of pool and assignment of ports....................................................................................... 18
5.3.2 Behavior of the pool browsers................................................................................................................ 19
5.3.3 Proxy with authentication ....................................................................................................................... 20
5.3.4 HTML conversion configuration.............................................................................................................. 21
5.3.5 Firefox Browser Configuration ................................................................................................................ 21
5.3.6 Pool size and policy for reusing browsers .............................................................................................. 21
5.3.7 Initializing the pool.................................................................................................................................. 23
5.3.8 Executing and stopping the Browser Pool .............................................................................................. 24
5.4
CONFIGURATION OF THE WRAPPER SERVER................................................................................ 24
5.4.1 Access to Wrapper Server ...................................................................................................................... 25
5.4.2 List of Wrappers...................................................................................................................................... 26
5.4.3 Selecting location of the associated browser pool ................................................................................ 27
5.4.4 Port Assignment...................................................................................................................................... 27
5.4.5 Loading new wrappers from VQL files.................................................................................................... 28
5.4.6 Creating a Web Service .......................................................................................................................... 28
5.5
CONFIGURING THE MAINTENANCE SERVER................................................................................. 30
5.5.1 Access to the Maintenance Server......................................................................................................... 30
5.5.2 Server Configuration Data ...................................................................................................................... 31
5.5.3 Selecting location for the associated browser pool............................................................................... 34
5.5.4 Selecting location of wrapper server...................................................................................................... 34
ITPilot 4.0
User Manual
ITPilot 4.0
User Manual
FIGURES
Figure 1
Figure 2
Figure 3
Figure 4
Figure 5
Figure 6
Figure 7
Figure 8
Figure 9
Figure 10
Figure 11
Figure 12
Figure 13
Figure 14
Figure 15
Figure 16
Figure 17
Figure 18
Figure 19
Figure 20
Figure 21
Figure 22
Figure 23
Figure 24
Figure 25
Figure 26
Figure 27
Bookshop form .......................................................................................................................................... 2
ITPilot Environments and Components ..................................................................................................... 3
Distribution of the Generation Environment............................................................................................. 5
Distribution of the Execution Environment ............................................................................................... 6
Relationship Between Execution and Maintenance Environments.......................................................... 7
Login page of the Administration tool .................................................................................................... 16
Browser pool Tab .................................................................................................................................... 17
Server Addition Page .............................................................................................................................. 18
Identification and Assignment................................................................................................................ 19
Browser behaviour .................................................................................................................................. 20
Proxy with Authentication....................................................................................................................... 20
Size and Reuse Policy ............................................................................................................................. 22
Pool Initialization..................................................................................................................................... 24
Wrapper Server Configuration Window ................................................................................................. 25
Wrapper Connection ............................................................................................................................... 26
Wrapper Execution Page......................................................................................................................... 27
Pool Browser Localization....................................................................................................................... 27
Loading Wrappers Using VQL Files......................................................................................................... 28
List of Wrappers with Loaded “Webmail” ............................................................................................. 28
Web Service Export Page........................................................................................................................ 29
Maintenance Administration Main Page................................................................................................ 30
Maintenance database Parameters........................................................................................................ 31
Wrapper Change Notification Parameters ............................................................................................. 32
Port Assignment Parameters .................................................................................................................. 32
Edition of Verification Rules ................................................................................................................... 34
Locating the browser pool ...................................................................................................................... 34
Locating the Wrapper Server.................................................................................................................. 34
ITPilot 4.0
User Manual
PREFACE
SCOPE
This document serves as introduction, administration and utilization guide of Denodo ITPilot.
WHO SHOULD USE THIS DOCUMENT
This document is aimed at administrators that want to install the software, and to use the Denodo ITPilot
administration tool.
SUMMARY OF CONTENTS
More specifically, this document describes:
•
An introduction to ITPilot
•
The different functioning environments of ITPilot
•
The configuration of each of the Denodo ITPilot components in the execution and maintenance
environments
Preface
i
ITPilot 4.0
1
User Manual
INTRODUCTION
Most data available on the World Wide Web (hereinafter Web) can be obtained only by means that are friendly for
Web users, but not useful for automatic and mechanical processing by software applications. Nowadays, many Web
sites offer ad hoc query interfaces with forms that return the data required in lists comprising semi-structured
responses encoded in HTML documents. This part of the Web – accessed through different types of forms and/or
interfaces that return data automatically obtained from internal databases – is normally called “Hidden Web”).
This “Hidden Web” is by no means a small part of the whole WWW and contains a huge amount of data which, in
many cases, are of great quality and interest to users. Web sites like e-shops (that provide their catalogs in this way)
and search engines for data of a scientific, health, patenting or financial nature are good examples of this. It is also
often the case that these Web sites are private access (i.e. a user/password is required to access them), have an
advanced query interface (allowing data searches in respect of different subject matters) and/or return results in the
form of lists of items encoded in HTML with links to related pages that contain more data on each item (e.g.
generally e-shops return a list of results, but with the option for the user to “click” on the title to access another page
with commentaries on the product, photos, related products, etc.).
Other common complications arise from the use of technologies such as JavaScript, dynamic HTML or session
maintenance systems that further complicate automated access to data contained in these Web sites.
In addition to the problem of accessing these sources with “hidden” data, applications that want to use these data
are also frequently faced with the problem of results being returned in HTML, which is a tag language defined for
visual display by users that never publishes metadata of any type on the structure and/or semantics of the results
generated. Neither does it structurally differentiate navigation elements (menus), graphic panels and data useful to
the user. The problem of extracting the relevant data contained in HTML pages thus also arises.
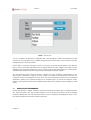
Example: Look at this example of an Internet bookshop with a search form as shown in Figure 1. The form obliges
users to specify a value for the attribute ‘TITLE’ and gives them the option of entering a value for the attribute
‘AUTHOR’ and for the attribute ‘FORMAT’ (restricting a group of values).
The bookshop returns a result list with data on TITLE, AUTHOR, FORMAT, PUBLISHER and PRICE.
Introduction
1
ITPilot 4.0
User Manual
Figure 1 Bookshop form
This case summarizes the difficulties an application faces when attempting to extract structured data from Web
environments: accessing Web sources, navigating through transactional environments, option selecting and, finally,
extracting data from semi-structured data.
Denodo ITPilot is the Denodo Technologies solution for easy access to and structuring of datasets on the Web; this
process involves constructing an abstraction from the specific Web source called “wrapper” that isolates the client
applications from the intrinsic characteristics of this site (access protocol, native data structure, etc.). ITPilot provides
a distributed and scaleable environment for generating, executing and maintaining “wrappers”.
This manual presents Denodo ITPilot and provides instructions for correct installation, recommendations on the
different types of architecture it supports, as well as a guide to the execution and maintenance environment. The
components of ITPilot are introduced in this same section; next section will provide an overview of the recommended
architectures. Chapter 3 gives a detailed description of the installation process for each of the components. Finally,
chapters 4 and 5 explain the ITPilot Execution and Maintenance Environments and how to export a wrapper as a Web
Service.
1.1
DENODO ITPILOT ENVIRONMENTS
Denodo ITPilot facilitates “wrapper” generation, execution and maintenance in Web sources in a simple and dynamic
way. Three Environments exist, each of which facilitates one of the aforementioned actions and all are managed
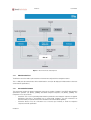
through the Administration Tool. Each environment contains a series of Components described below. Figure 2 shows
the relationships between Environments and their Components.
Introduction
2
ITPilot 4.0
User Manual
Figure 2 ITPilot Environments and Components
1.1.1
Administration Tool
The different servers that make up the execution environment are configured in the management center.
This is a Web tool that communicates with an administration server (can be deployed in Web containers that meet
servlet and JSP specifications).
1.1.2
Generation Environment
This environment includes the group of components necessary for creating “wrappers” from DEXTL data extraction
specifications generator (see [DEXTL], [GENER]) and NSEQL navigation sequences (see [NSEQL], [GENER]). The
components it uses are as follows:
- Generation Tools: tools for generating data extraction specifications and navigation sequences are graphic
applications that allow a non-technical user to create Web “wrappers”. For more information we
recommend that you read the Denodo ITPilot Generation Environment Manual [GENER].
- Generation Browser Pool: this environment uses a browser pool internally to check the navigation
sequences and final specification.
Introduction
3
ITPilot 4.0
User Manual
In addition and although it does not belong to this environment per se, generator tools may need to store the
“wrapper” created. The Wrapper Server in the Execution Environment is used to do this (see next section 1.1.3).
1.1.3
Execution Environment
This is the continued operation environment, in which the user can use previously created “wrappers” to launch
queries on isolated sources. This use may be direct (through an API or publishing the wrapper as a Web Service) or
through other products such as Denodo Virtual DataPort, with which ITPilot is fully integrated. The components that
make up this environment are as follows:
- Wrapper Server: this is the component responsible for storing “wrappers” for accessing. These include a
remote interface for statement execution.
- Browser Pool: when a “wrapper” is executed, a browser type can be selected: IEBrowser (automatic
navigation module based on Microsoft Internet Explorer [IE]), Firefox [FRFOX] or an HTTP client as an access
method. In this case, the wrapper server uses the browser pool to minimize the time required to create
browser instances. This pool can be configured from the administration tool.
1.1.4
Maintenance Environment
The most complete environment is that of Execution and Maintenance. As Web sources are autonomous and
independent of the “wrappers”, they can be modified and edited, and these modifications and edits can invalidate
the current access mode, whereby the “wrappers” no longer extract the data properly. Denodo ITPilot offers an
automated maintenance tool that allows “wrappers” to be repaired automatically by automatically detecting the
changes referred to above. Although this will be dealt with in more depth in section 5, its basic functioning is as
follows:
- The wrapper server stores all the wrappers in each of the Web sources; they are stored in XML, whereby
no database is required.
- The system uses the check frequency configuration to check each wrapper for changes.
- When a change is detected in a source, the actions to be taken can be configured.
- One possible action is to send an e-mail informing of the change.
- The other option is to regenerate and edit the wrapper. Actions can be strung together and can be
implemented by users.
The components of this environment, apart from those already mentioned in the execution environment, are as
follows:
- Maintenance Server: component responsible for dectecting automatically any change happened in the
sources and for regenerating the wrappers. It communicates with the wrapper server to request all the
“wrappers” to maintain, and to obtain the query execution results over them (which will be used to check
possible changes, and during the regeneration process).
- Browser Pool of the Maintenance Server: browser pool used in the regeneration phase.
As mentioned earlier, a detailed explanation of this environment is provided in section 2.3 of this same manual.
The next section recommends different distribution architectures for these components. Chapter 3 gives details of the
installation and configuration processes for each of the ITPilot environments.
Introduction
4
ITPilot 4.0
2
2.1
User Manual
DISTRIBUTION OF ENVIRONMENTS
DISTRIBUTION OF THE GENERATION ENVIRONMENT
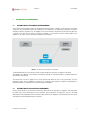
As mentioned in the preceding section, the Generation Environment allows “wrappers” to be created in a visual and
simple way. This environment requires the installation of two components: the specifications generator tool and the
navigation sequences generator tool. The wrapper server of the execution environment may also be accessible (this
is optional: users also have the option of storing the “wrapper” in a local file that can be manually added to the
wrapper server). Figure 3 shows the relationship between the elements.
Figure 3 Distribution of the Generation Environment
The Web administration tool can also be used to configure the browser pool (does not appear in the figure).
The wrapper server belongs to the execution environment, whereby it is normally installed in a separate machine in
the production environment.
This manual does not aim to explain how to install, operate and handle the tools in this environment. For more
information please refer to [GENER] for instructions on installation and operation and [DEXTL] and [NSEQL] for
detailed information on specification and sequence definition languages.
2.2
DISTRIBUTION OF THE EXECUTION ENVIRONMENT
Denodo ITPilot operates in the execution environment, where actions are executed on “wrappers” that encapsulate
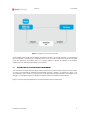
the Web sources from which data are to be extracted. Three components are required in this case: the Web
administration tool (independent of the environment, but used here), the wrapper server and the browser pool. Figure
4 describes the relationship between these elements.
Distribution of Environments
5
ITPilot 4.0
User Manual
Figure 4 Distribution of the Execution Environment
As the wrapper server can be used in different environments and due to its possible workload, it is recommended
that it be installed in a machine that is independent of the rest of the system. The browser pool can be found either
in the same machine as the wrapper server or in a separate machine; in general, this depends on the maximum
number of browsers that can be open during system execution.
2.3
DISTRIBUTION OF THE MAINTENANCE ENVIRONMENT
This environment should be executed together with the execution environment and allows ITPilot to monitor changes
in sources from which data are extracted and automatically regenerate “wrappers” as required (see section 1.1.4).
The maintenance server, which uses a browser pool, can be executed in the same machine as the wrapper server,
although it is a distributed component, whereby we recommend that it be installed in another machine.
Figure 5 shows the relationship between this environment and the execution environment.
Distribution of Environments
6
ITPilot 4.0
User Manual
Figure 5 Relationship Between Execution and Maintenance Environments
The basic process of the maintenance server is the following: when executing a query against a wrapper, it is sent
along with the produced results to the maintenance module. When this module receives the query and associated
results, they will be stored in a relational database and, at the same time, the necessary tests will be obtained in
order to determine whether that wrapper has changed or not.
Each test (configurable by the user, see section 5.5) is executed by handing it that query plus its results as
parameters. Each test returns a result between 0 and 100 (where 0 means that the condition is not accomplished at
all, and 100 that is absolutely successful) which is stored in a result manager.
Next, an evaluating process is launched which determines if the wrapper has changed in terms of the results of the
tests. This evaluator needs both the results from the last tests, and the evaluation rules.
If the wrapper changes, the maintenance system selects the subset of all these stored queries which will be used by
regenerating the wrapper.
When the query results are saved in the database, an expiry time is assigned to each of them. The expired results are
deleted on a period basis.
The next section describes the installation steps for each of the components.
Distribution of Environments
7
ITPilot 4.0
3
User Manual
INSTALLATION
This section centers on installation and configuration of the different components of Denodo ITPilot.
3.1
3.1.1
PREINSTALLATION OF THE ITPILOT COMPONENTS
Preinstallation of the Administration Server
The management nucleus of Denodo ITPilot is the Web administration tool. Installation of its server is the first step
for configuring the rest of the system.
3.1.1.1
Hardware Requirements
The system has been satisfactorily tested on a PC Pentium IV 2.4 GHz 1 GB with Internet access. Initial installation
requires approximately 5 MB of disk space.
3.1.1.2
3.1.2
Software Requirements
-
This component can be executed in any environment compatible with Java Virtual Machine [J2SE].
-
It has been satisfactorily tested on Linux Fedora Core 3 [LIN] distribution and installed in Windows
[WIND] (2000 Server, 2000 Advanced Server, 2003, XP, Vista).
-
Java 2 SDK Standard Edition (J2SE) 1.4.2_09 or higher must also be available (tested successfully
with J2SE 1.5.0_05 and J2SE1.6.0 also) [J2SE].
-
Application Server: to date, Denodo ITPilot has been tested with Jakarta Tomcat 5.0.28, 5.5.9, and
6.0.10 [TOM], and BEA WebLogic Server 9.0 [BEA], although as the Administration server complies
with Servlet specification 2.3 and JSP specification 1.2, it can be displayed in any servlet container
that fulfills these specifications. Besides, the server can be installed in any J2EE-compliant application
server by using the .ear file available in the distribution.
Preinstallation of the Browser Pool
Both the generator environment and the wrapper and maintenance servers in the execution and maintenance
environments require access to browsers that access the Web sources automatically. This access is not direct but
through browser “pools”, servers that are responsible for optimizing access to browsers, thus improving response
times.
3.1.2.1
Hardware Requirements
The system has been satisfactorily tested on a PC Pentium IV 2.4 GHz 1 GB with Internet access. Initial installation
requires approximately 15 MB of disk space.
3.1.2.2
Software Requirements
The wrapper server requires preinstallation of the following Software (the rest is included with the distribution):
-
Pool Browsers can be built by using Microsoft Internet Explorer 6.x, 7.x [IE] or Mozilla Firefox 1.5.x,
2.0.x [FRFOX]. There is a third option which implies the use of an HTTP Client, included in ITPilot, not
requiring any pre-installed browser; nevertheless, this option might not be adequate if web sources
include JavaScript or other browsing complexities.
Installation
8
ITPilot 4.0
3.1.3
User Manual
-
In case of using Microsoft Internet Explorer as browser pools, this component must be installed in the
Windows [WIND] operating system (2000 Server, 2000 Advanced Server, 2003, XP, Vista).
-
In case of using Mozilla Firefox as pool browsers, this system has been satisfactorily tested on Linux
Fedora Core 3 [LIN] distribution and installed in Windows [WIND] (NT Server, NT Workstation, 2000
Professional, 2000 Server, 2000 Advanced Server, 2003, XP).
-
Java 2 SDK Standard Edition (J2SE) 1.4.2_09 or higher must also be available (tested successfully
with J2SE 1.5.0_05 and J2SE1.6.0 also) [J2SE].
Preinstallation of Wrapper Server
3.1.3.1
Hardware Requirements
The system has been satisfactorily tested on a PC Pentium IV 2.4 GHz 1 GB with Internet access. Initial installation
requires approximately 15 MB of disk space.
3.1.3.2
Software Requirements
The wrapper server requires preinstallation of the following software (the rest is included with the distribution):
3.1.4
-
This component can be executed in any environment compatible with Java Virtual Machine [J2SE].
-
It has been satisfactorily tested on the Linux Fedora Core 3 [LIN] distribution and installed in
Windows [WIND] (2000 Server, 2000 Advanced Server, 2003, XP, Vista).
-
Java 2 SDK Standard Edition (J2SE) 1.4.2_09 or higher must also be available (tested successfully
with J2SE 1.5.0_05 and J2SE1.6.0 also) [J2SE].
-
If required to extract information from Adobe PDF resources, the system must be executed on a
Windows machine, and Adobe Acrobat Professional 7 must be previously installed.
-
If required to extract information from Microsoft Word resources, the system requires the previous
installation of OpenOffice 2.0.x.
Preinstallation of the Maintenance Server
3.1.4.1
Hardware Requirements
The system has been satisfactorily tested on a PC Pentium IV 2.4 GHz 1 GB with Internet access. Initial installation
requires approximately 25 MB of disk space.
3.1.4.2
Software Requirements
The maintenance server requires preinstallation of the following software (the rest is included with the distribution):
-
This component can be executed in any environment compatible with Java Virtual Machine [J2SE].
-
It has been satisfactorily tested on the Linux Fedora Core 3 [LIN] distribution and installed in
Windows [WIND] (2000 Server, 2000 Advanced Server, 2003, XP).
-
Java 2 SDK Standard Edition (J2SE) 1.4.2_09 or higher must also be available (tested successfully
with J2SE 1.5.0_05 and J2SE1.6.0 also) [J2SE].
-
Relational Databases: the maintenance server makes use of a relational database with information
about the wrappers so that they can be regenerated later if required. The system has been
Installation
9
ITPilot 4.0
User Manual
successfully tested with MySQL5.0 [MYSQL], Oracle 9 [ORA] and Postgres 7.4 [POST]. Denodo ITPilot
provides a table creation script for these DB management systems.
3.2
USING THE INSTALLATION TOOL
The Denodo Platform modules are installed through a graphic tool.
The installation “wizard” guides you through each of the necessary configuration steps. This section describes the
steps to be followed to install each of the components of the Denodo ITPilot module.
After the introduction screen, the installation process will display the product licensing conditions, which you should
read carefully. If you accept the conditions, the next screen will allow the configuration of the platform’s default
locale version. This option will also allow configuring the wrappers’ localization information. The information from
different countries or geographic areas can thus be integrated, and the output data can be expressed in the formats
expected for every specific country. There is an internationalization configuration for each of the countries/locations.
Some examples of configurable parameters are: currency, symbols used as separators into decimal numbers and into
thousands for currency, date format, etc. ITPilot includes internationalization configurations already created for the
most common situations. The names of the zones correspond to the codes defined by the ISO-639 standard [ISO639].
Some examples are: ES_EURO (Spain), GB (Great Britain), US_PST (US, PST timezone)… You can always modify
this configuration later on. For more information, please read [GENER].
The next screen presents you with the different components that can be installed:
- Navigation Sequence Generator. See section 1.1.2.
- ActiveX Control for Sequence Execution (“Sequence Executor ActiveX Control”). See section 6.
- Wrapper Specification Generator. See section 1.1.2.
- Browser pools (“Browser Pool”). See sections 1.1.3 and 1.1.4.
- Execution server (“Wrapper Server”). See section 1.1.3.
- Maintenance server. See section 1.1.4.
- Web administration tool (“Administration Console”). See section 1.1.1 for more information.
- Wrapper Client Environment. See [DESAR].
Once the components and the installation path (DENODO_HOME from now on) have been selected, the system starts
the file copy process.
To conclude the installation process each of the components must be configured. These components can always be
configured again at a later stage from the ITPilot Web administration tool.
In order for the configuration process to be successful, it is required to define the following environment variable:
•
JAVA_HOME:_ installation directory of the Java Virtual Machine. It is mandatory that this variable be
defined.
The next sections describe this phase for each component.
3.2.1
Configuring the Generator Tools in Installation Phase
No further configuration is required for this environment during the installation process.
Installation and configuration of generator tools is not dealt with in this document. For more information on this
process we highly recommend that you read the Denodo ITPilot Generation Environment Manual [GENER].
3.2.2
Configuring Browser Pool in Installation Phase
The configuration data required in this installation phase for each browser pool is as follows:
Installation
10
ITPilot 4.0
-
User Manual
Pool listening port.
Browser halt port
Auxiliary port. The auxiliary port is used by the pool for communications with its clients.
Initial browser launch port.
NOTE: Where communications between clients and the server are to pass through firewall software, this must be
configured to allow for access to the listen, stop and auxiliary ports.
It is possible to specify that the browser pool be installed as a service in Windows operating systems.
It is also necessary to point out the path where required external applications are installed:
- Path where Mozilla Firefox is installed. Firefox is necessary if the browser pool is required to use this
browser type.
- Path where Adobe Acrobat Professional is installed. Required if its PDF document conversion tools are to
be used.
- Path where OpenOffice is installed. Required to manage Word documents.
The rest of the configuration data can be updated from the ITPilot administration tool (see section 5.3).
3.2.3
Configuring Wrapper Server in Installation Phase
The configuration information required in this installation phase for a wrapper server is the following:
-
Server listening port.
Server halt port
Auxiliary port. The auxiliary port is used by the server for communications with its clients.
It is possible to specify that the wrapper server be installed as a service in Windows operating systems.
NOTE: Where communications between clients and the server are to pass through firewall software, this must be
configured to allow for access to the listen, stop and auxiliary ports.
In case ITPilot is being installed in the same path in which DataPort was previously installed, the values configured
for these ports in the VDP Execution Server will be overwritten by these new values.
Besides, if in this same installation process no browser pool is being installed, the following pool access data, which
will be used by the wrapper server, must be configured:
-
Browser Pool IP Address
-
Browser Pool Listening Port
If a browser pool is also being installed, the installer will take as values for the previously defined parameters the
ones indicated for the pool during the installation. Later on, these values might be modified by using the
administration tool.
3.2.4
Configuring the Maintenance Server in Installation Phase
The maintenance server also uses a browser pool, whereby information is required on the access data in addition to
domain and listening port configuration. The access data for the wrapper server with which it communicates must
also be configured.
-
Server listening port.
Installation
11
ITPilot 4.0
-
User Manual
Server halt port
Auxiliary port. The auxiliary port is used by the server for communications with its clients.
Pool IP Address
Pool listening port.
NOTE: Where communications between clients and the server are to pass through firewall software, this must be
configured to allow for access to the listen, stop and auxiliary ports.
It is possible to specify that the wrapper server be installed as a service in Windows operating systems.
Besides, if in this same installation process no wrapper server is being installed, the following wrapper server access
data, which will be used by the maintenance server, must be configured:
-
Wrapper Server IP Address
-
Wrapper Server Listening Port
If a wrapper server is also being installed, the installer will take as values for the previously defined parameters the
ones indicated for the server during the installation. Later on, these values might be modified by using the
administration tool.
3.2.5
Configuring the Administration Server in Installation Phase
No configuration data is required from this server. In this screen indicators as to its display in a Web container or
applications server appear.
The administration server is provided either as a .war file (Web Archive) and as a .ear file (Enterprise Archive) to be
used in Application Servers. A WAR is a specification developed by Sun Microsystems [SUN] which allows a group of
classes and documents that form a Web application in Java to be grouped. Generally these WARs are used by the
various “Servlet Engines” (Web containers) on the market. The Denodo ITPilot administration server has been tested
with Jakarta Tomcat 4.1.31, 5.0.28 and 5.5.x [TOM] (see section 3).
The installer stores the .war and .ear files in the webapps/itpilot directory of the installation route. If it is Tomcat, it
should normally be copied in the %TOMCAT_HOME%/webapps directory (other installation modes are possible in
Tomcat and in other Web containers). Other Tomcat installation options exist, which is why we recommend that you
read the documentation.
Regarding the .ear file, the usual procedure is to copy the file into the J2EE-compliant application server (tested
successfully with BEA WebLogic Server 9.0 [BEA]) and deploy the application (the specific process depends on the
application server chosen).
3.2.6
DIRECTORY STRUCTURE OF THE DISTRIBUTION
The directory structure of the Server distribution is specified as follows:
Starting by the root directory previously selected in the installation process (DENODO_HOME), the directory structure
described next is created.
•
activex/itpilot. This directory stores the automatic browsing sequence execution ActiveX control,
which is explained in section 6.
•
bin. Directory which incluyes the system execution scripts for bash (linux – unix systems) and their equivalent
batch processing files for Windows. The first ones have “.sh” extensions, and the last ones, “.bat”:
Installation
12
ITPilot 4.0
•
User Manual
Wrapper Server:
o
vqlserver.sh/.bat.
1. vqlserver startup: launches the wrapper server.
2. vqlserver shutdown: stops the wrapper server.
o
•
•
•
•
vdpservice.bat: in Windows systems, it launches the Wrapper Server as a
service.
Maintenance Server:
o
startVerificationEngine.sh/.bat: launches the maintenance server.
o
shutdownVerificationEngine.sh/.bat: stops the maintenance server.
o
VerificationService.bat: in Windows systems, it launches the Maintenance
Service as a service.
Browser Pool:
o
start_Pool.bat: launches the browser pool.
o
stop_Pool.bat: stops the browser pool.
o
PoolService.bat: in Windows systems, it launches the Browser Pool as a service.
Generation Environment:
o
start_GenITP.bat: starts the specification generation tool.
o
gen_scanner.bat/sh: allows the generating and compiling scanners.
conf. This directory stores all system configuration files:
•
iebrowser: configuration directory for the browser pool.
−
•
itpilot-client: configuration directory for the ITPilot client.
−
•
log4j.xml. Log4J [LOG4J] configuration file.
specGenerator: configuration directory for specification generator.
−
•
log4j.xml. Log4J [LOG4J] configuration file.
maintenance: configuration directory for the maintenance server
−
•
log4j.xml. Log4J [LOG4J] configuration file.
log4j.xml. Log4J [LOG4J] configuration file.
vdp: configuration directory for wrapper server:
−
log4j.xml. Log4J [LOG4J] configuration file.
•
docs. Directory in whichi the application documentation and javadoc can be found, plus a text file,
README_ITPilotClient, with information about how to create client applications.
•
lib. Directory in which the libraries used by the system are stored.
•
logs: Directory which stores various application log files.
•
/itpilot. Directory which stores various log files from the wrapper and maintenance servers:
•
maintenance.log: maintenance server log file
•
iebrowser.log: browser pool log file.
•
itpilotadmintool.log: ITPilot administration tool log file.
Installation
13
ITPilot 4.0
•
•
•
seqgenerator.log: sequence generation tool log file.
•
specgenerator.log: specification generation tool log file.
User Manual
/vdp. Directory which stores the wrapper server log file.
metadata: metadata directory.
•
/parser: tag sets and scanners.
•
/db: wrapper server metadata
•
/seqgenerator: sequence generation tool domains.
•
patches/itpilot: initially empty, it is the storage path of the ITPilot’s current version patches.
•
scripts/itpilot/sql: maintenance database table creation scripts.
•
webapps/itpilot. Contains all elements required for the distribution of the administration tool: Java
classes, libraries, JSP and HTML pages, configuration files, and so on, packaged in a “.war” file, which is
directly deplorable in a JSP/HTML page server.
3.3
STARTING UP THE COMPONENTS
Once the installation process has terminated, the servers are ready to run. Each server found on the same machine as
the administration server can be started up directly from the Web tool itself, as dealt with in section 5.2. If this is not
the case, they have to be started up in the machines in which they reside.
3.3.1
Installing the Denodo ITPilot License
Place the Denodo Platform license file which you will have been handled (denodo.lic) into the “conf” directory of the
tool distribution. Without this file, ITPilot components will not start up.
3.3.2
Starting up the Administration Server
This startup is dependent on the Web container or applications server selected. In principle, once the application has
been properly displayed, the administration server will be available in http://domain:port/itpilot-admin-1.3.5/
3.3.3
Starting up the Browser Pool
The following scripts are available in the path DENODO_HOME/bin:
3.3.4
•
start_pool: Starts up the browser pool.
•
stop_pool. Stops the remote pool and all the browsers contained in it.
Starting up the Wrapper Server
The scripts vqlserver with the options startup and shutdown of the directory DENODO_HOME/bin or the
scripts vqlserver_startup and vqlserver_shutdown, respectively, allow the server to be started up
and stopped.
Installation
14
ITPilot 4.0
3.3.5
User Manual
Startup of the Maintenance Server
The scripts StartVerificationEngine and ShutdownVerificationEngine of the directory
DENODO_HOME/bin allow the server to be started up and stopped.
Installation
15
ITPilot 4.0
4
User Manual
WEB ADMINISTRATION TOOL
The ITPilot administration tool allows the execution and maintenance environments to be managed in a simple and
uniform way. This is a Web application that controls both the wrapper server and the browser pool as well as the
maintenance server – of course, if the latter is necessary. Figure 6 displays the aspect of the tool after startup and
access (through the URL domain:port/itpilot-admin-1.3.5 and with user admin and empty password as initial access).
The tool is visually composed of the elements described in the preceding figure.
• Server Selection Area: it is here that the user can select which server is to be configured: wrapper server,
browser pool or maintenance server, where it is used for administration of the execution environment.
• Work Area: this area displays the configuration data relevant for each server.
The following section describes the series of steps to be taken to configure and administer the execution and
maintenance environments.
Figure 6 Login page of the Administration tool
Web Administration Tool
16
ITPilot 4.0
5
5.1
User Manual
ADMINISTRATION OF THE EXECUTION AND MAINTENANCE ENVIRONMENTS
INTRODUCTION
The Web administration tool can be used to configure and, in specific cases, start up and stop the different servers
that make up the execution and maintenance environments.
5.2
STARTING UP THE SERVERS
The administration tool can be used to manage the configuration of each of the servers. Of course, the servers must
be started up first. If they are in the same machine as the administration tool, they may be started up from it directly
by using the button Start/Stop
. If the servers are found distributed across machines other than where the
administration tool resides, these must be started up beforehand.
5.3
CONFIGURING THE BROWSER POOL
The wrappers that implement the navigation sequences through NSEQL programs require that the ITPilot execution
environment has access to a browser pool. Section 3.2.2 described the installation process for this component. The
configuration options for same are described in this section.
A first aspect to bear in mind is that the browsers in the pool will use the configuration established for Microsoft
Internet Explorer and/or Firefox in the system in which the pool is executed.
• It is recommended that the home page be a blank page (“about:blank”) to avoid each new browser started
up by the pool connecting to the home page before executing an application request, which would cause an
unnecessary delay.
• It is also necessary to consider the security options and cookies, as the pool browsers will act according to
said configuration.
The browser pool is configured in the “Browser Pool” panel of the administration tool in the ITPilot execution
environment. Figure 7 shows this window.
Figure 7 Browser pool Tab
Administration of the Execution and Maintenance Environments
17
ITPilot 4.0
User Manual
In the first place, the access data of each browser pool to be used must be indicated. The “AddServer”
button is used for this, which displays a window like that shown in Figure 8. The fields to be
completed are as follows:
- Name: server identifier name.
- Host: address where it is found.
- Port: server listening port.
- Local path: optional, to indicate that the server is local; by adding the local path, where the application is,
the user will be able to start up and stop the maintenance server from the graphic administration tool.
Figure 8 Server Addition Page
The pool data added can be edited by pressing the “Edit” button that leads to the same configuration window
mentioned earlier. The “Start/Stop” button will be visible, if - and only if - the “Local Path” field has been properly
completed when configuring the pool.
Of course, any number of pools can be added as needed, although the architecture considerations in section 2 of this
document should be taken into account.
Once the pool has been configured, connect it by clicking on the “Connect” button. If the connection is successful, the
parameter set that can be configured by the user appears in the window.
The existing configuration parameters can be divided into several groups, each of which can be accessed in the
administration tool panel: identification of the pool and system port assignment, behavior of the pool browsers,
support for proxies with authentication, pool size and browser assignment policies and, finally, initialization
parameters. The following subsections deal with each of these parameter groups respectively.
5.3.1
Identification of pool and assignment of ports
The parameters of this group are:
•
TYPE OF BROWSER: browser type to be used in the pool
o
IEBrowser: Internet Explorer browser.
Administration of the Execution and Maintenance Environments
18
ITPilot 4.0
o
Firefox: Firefox browser.
o
HttpClient: HTTP Client with session maintenance capabilities.
User Manual
•
PORT. Port in which the browser pool listens to requests.
•
INITIAL_PORT. Each browser of the pool listens to requests in a port. The value of this parameter
determines the port number to be used as the first one to assign port numbers to the browsers. From this
number consecutive port numbers will be used in an ascending order. (Note: the name of this parameter in
the configuration file is currently in Spanish: PUERTO_INICIAL).
•
SHUTDOWN_PORT: port in which the server listens the Shutdown signal in order to be stopped.
•
AUXILIARY_PORT: The auxiliary port is used by the pool for communications with its clients.
Figure 9 shows the administration tool page where to configure those parameters.
Figure 9 Identification and Assignment
5.3.2
Behavior of the pool browsers
The parameters of this group are:
•
MAX_DOWNLOAD_TIME. Indicates the maximum time a browser will wait to download a page (in
milliseconds).
•
OBJECT_TIMEOUT: Maximum time (in milliseconds) that a browser can be used outside the pool to deal
with a wrapper request. When this time lapses, the browser is destroyed. If the value of this parameter is
less than 0, the browser can remain outside the pool indefinitely.
•
DOWNLOAD_CONTROLS. This group of parameters allows the type of contents that should be downloaded
by the pool browsers to be specified. The content types whose download can be configured are: images,
videos, background sounds, script programs, Java applets and ActiveX components.
•
CACHE_CONTROLS. This group of parameters is for specifying, whether or not the pool browsers should
use the local cache and/or the proxy cache.
Administration of the Execution and Maintenance Environments
19
ITPilot 4.0
•
User Manual
GRAPHICAL_INTERFACE. Indicates whether or not the pool browsers will display a graphic interface. To
optimize system efficiency applications in production do not normally display browser graphic interfaces.
However, it may be useful to edit the value of this option for debugging purposes.
Figure 10 shows the administration tool page where to configure these parameters.
Figure 10 Browser behaviour
5.3.3
Proxy with authentication
If the Internet is accessed through a proxy with authentication, the following parameters must be given a value:
•
PROXY_LOGIN: user login in the proxy.
•
PROXY_PASSWORD: user password in the proxy.
•
PROXY_DOMAIN: (Windows 2000): Windows domain.
Figure 11 shows the administration tool page where to configure these parameters.
Figure 11 Proxy with Authentication
Administration of the Execution and Maintenance Environments
20
ITPilot 4.0
5.3.4
User Manual
HTML conversion configuration
This section shows how to configure the conversion tools from Microsoft Word and PDF to HTML so that the content
of tose resources can be extracted by ITPilot:
•
PDF To HTML converter: conversion tool type used to transform the PDF resource into HTML
o
Acrobat HTML: uses the HTML conversion tool from the Adobe Acrobat Professional software (it
is required that this product be installed).
o
Acrobat Text: uses the plain text conversion tool from the Adobe Acrobat Professional software,
from which ITPilot generates an HTML file (it is required that this product is installed).
o
PDF Box: uses the PDFBox library [PDFBOX] to generate the HTML page.
•
Conversion Server port: port where the conversion Server will be listening from.
•
Open Office Lib Directory: path where the OpenOffice class library resides.
•
Acrobat Prof. Plugins Directory: path where the Acrobat Professional plugins reside.
o
5.3.5
In this case, besides updating the directory in the administration tool, the plugin
DDEPdfToHtml.api, which resides in the <DENODO_HOME>/dll/itpilot
directory, must be copied to the Acrobat/plug_ins directory, wherever Adobe Acrobat is
installed.
Firefox Browser Configuration
This section shows how to configure Firefox to be used in the ITPilot execution environment.
•
5.3.6
Firefox Home directory: Firefox installation base path.
o
In this case, besides updating the directory in the administration tool, the plugin
<DENODO_HOME>/setup/itpilot/dll/iebrowser/denodoruntime.xpi must be installed by executing the firefox -install-globalextension denodo-runtime.xpi command from that same directory.
o
Firefox does not provide a plugin uninstaller, therefore if required, it will have to be deleted
manually as a directory in the firefox installation (usually, \extensions\{800f0371e961-44b9-97a6-2d9d8b7147b8}).
Pool size and policy for reusing browsers
The parameters of this group are:
•
MAX_POOLSIZE: Maximum number of browsers in the pool.
Administration of the Execution and Maintenance Environments
21
ITPilot 4.0
User Manual
•
MIN_POOLSIZE: Minimum number of browsers. The system will not reuse browsers already existing in the
pool unless the current number is equal to or greater than the value of this parameter.
•
REUSABLE_BROWSERS. Indicates if the pool browsers can be reused to deal with more than one request.
Enabling browser reusability increases the efficiency of most applications; however, it may not be suitable
in some cases, where dealing with a previous request changes the browser response to subsequent
requests (for example, through the use of cookies).
•
ASSIGNMENT_STRATEGY: Allows the assignment strategy to be used by the browser pool to be specified.
The STATE strategy attempts to assign a browser to each request the status of which allows the number of
navigation steps required to deal with a request to be minimized. Otherwise, the SIMPLE strategy assigns
any free browser to each request. If reuse is deactivated (REUSABLE_BROWSERS=false), then the
ASSIGNMENT_STRATEGY value is ignored. The next section (5.3.6.1) explains the implications of this
parameter in more detail.
Figure 12 shows the administration tool page where to configure these parameters.
Figure 12 Size and Reuse Policy
5.3.6.1
Browser Reuse Policies
It often occurs that navigation sequences executed by a specific “wrapper” share a series of initial common steps; for
example, imagine that a wrapper has been created to automate the search process in a specific Web source. The
source requires an authentication process that involves the introduction of a user name and a password. In our
example, let us imagine that the wrapper uses the same login/password pair for all source accesses.
Using Denodo ITPilot to create this “wrapper” (for more information see [GENER]) an initial navigation sequence
would be created that would execute the following steps:
1.
2.
3.
4.
5.
Connect to the source home page.
Complete the authentication form with the login/password and press the “Submit” or “Enter” button to
authenticate.
Once authenticated, click on the link that accesses the search page.
Complete the search form with the required query.
The server returns a page with the query results.
The first three steps are common to all queries made to the wrapper. The difference between one query and the next
only arises in step four, when the search form is completed according to the specific query to be made at each
moment in time.
It would be nice to save time on these first three steps in each query: ideally, when a new query is received, one
browser is already authenticated and situated in the search page of the source to which the new request could be
assigned. The browser searches immediately (step 4) and returns the results (step 5), thus avoiding time loss in steps
1-3.
Administration of the Execution and Maintenance Environments
22
ITPilot 4.0
User Manual
Denodo ITPilot supports this “intelligent” reuse of browsers through the combined use of the following mechanisms:
•
“Back” navigation sequences. A back navigation sequence is responsible for returning a browser to a state
in which it can be reused in future requests to the same wrapper. When the wrapper in our example has
made a query to the source, the browser used to execute the navigation sequence stays in the query results
page (step 5). For the browser to be used for a new wrapper query it must return to the search page (step
4). The sequence responsible for achieving this is the aforementioned back sequence. A wrapper can obtain
a back sequence in two ways:
o
o
•
Explicitly: the wrapper creator can specify a back navigation sequence for a wrapper in the
Search tab in the “Back Sequence” option in the sequence loading area of the specifications
generator (see [GENER]).
Implicitly: if the STATE assignment strategy has been activated in the browser pool
(ASSIGNMENT_STRATEGY= PoolAssigmentStrategy, see next point) and a wrapper does not
have an explicitly defined back sequence, then Denodo ITPilot will attempt to obtain a suitable
back sequence for the wrapper depending on its previous executions. Normally Denodo ITPilot
requires at least two wrapper executions before being able to determine, whether a back
sequence that is appropriate to the wrapper exists.
Browser pool assignment strategy PoolAssigmentStrategy. If this browser assignment strategy is activated,
then, when the pool receives a request to execute a specific navigation sequence, it then searches
amongst the active browsers to see, if any is free that is already in one of the intermediate pages of the
sequence, thus avoiding having to repeat it in its entirety. Continuing with our example, if the pool receives
a request to execute a navigation sequence to search our source and a browser is already situated in the
source search page (probably due to the fact that this browser was used for a previous request with the
same wrapper and, subsequently, the wrapper back sequence was executed on it), then execution of the
new sequence to said browser is assigned, which will then only follow steps 4 and 5 of same, thus
avoiding the cost of steps 1-3.
As mentioned in the preceding section (5.3.4), it is not always advisable to reuse browsers (REUSABLE_BROWSERS
marked). It can occur that dealing with a previous request changes the browser response to subsequent requests (for
example, through the use of cookies), which makes its reuse inadvisable. The typical case is when an attempt is
made to access a source in which another browser is authenticated; often, when navigating to the home page the
entry form is not requested again (login/password), whereby the sequence will fail, as it cannot find it.
However, using the STATE strategy sometimes it is possible to reuse browsers in this scenario, if all accesses to the
source share the same login/password pair, as this strategy prevents the browser from trying to execute the
authentication steps again, as it considers them part of the initial common steps.
If there are cookie sessions in the source and a different login/password pair is used for each access, then
REUSABLE_BROWSERS must be unmarked.
When it is possible to reuse a browser from a previous query, it is good to do so, even if the sequence executes from
the beginning, because you save having to create a new browser for each query (if the pool load is high, this is very
noticeable).
5.3.7
Initializing the pool
The browser pool can be configured to automatically initialize a certain number of browsers with a specific
navigation sequence. This functionality is useful, when the navigation sequences to be executed by application share
a series of initial steps (e.g. establishing a session through an authentication process) with which we want to save
time when executing requests. Using this functionality and the IEBrowserStatePoolAsignationStrategy assignment
Administration of the Execution and Maintenance Environments
23
ITPilot 4.0
User Manual
policy it is possible to improve the response times of the system in these cases.
For each required navigation sequence two parameters must be specified:
•
•
POSITION.
NSEQL
program
that
implements
the
navigation
sequence
(e.g.
“navigate,http://www.denodo.com,1;”)
INITIAL_BROWSERS. Number of browsers we want the pool to initialize with this navigation sequence.
If no navigation sequence is specified in this section, the pool will not automatically start up any browser, when it
initializes; instead it does so as requests are received.
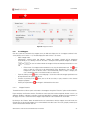
Figure 13 shows the administration tool page where to configure these parameters.
Figure 13 Pool Initialization
5.3.8
Executing and stopping the Browser Pool
The “Start/Stop”
button in the browser pool configuration window in the administration tool allows the browser
pool to be started up or stopped, whenever it is located in the same machine in which said tool is executed.
It is also possible to start up or stop the pool using command line. The following scripts are available for this in the
path DENODO_HOME/bin:
•
start_pool. Starts the browser pool.
•
stop_pool. Stops the remote pool and all the browsers contained in it.
It is important to remember that in order for changes to the pool configuration to take effect the pool has to be
stopped and restarted.
5.4
CONFIGURATION OF THE WRAPPER SERVER
The wrapper server configuration window (see Figure 14) allows the administrator to control all the configuration
parameters of the stated server, as well as monitor and execute different wrappers that are stored. The configurable
elements of this window are detailed below.
Administration of the Execution and Maintenance Environments
24
ITPilot 4.0
User Manual
Figure 14 Wrapper Server Configuration Window
5.4.1
Access to Wrapper Server
As can be seen in Figure 14, this area shows the group of wrapper servers available at this moment in time, as well
as the possibility of adding new ones. When a new server is added and as configurable data of each one of the listed
servers, the domain and the port where it is listening can be selected (remember that if this resides in the same
machine as the administration server, the Web tool allows it to start up, if it is not raised; otherwise, it should be
started manually following the instructions in section 5.2).
After the edition of the wrapper server, it is necessary to connect to it in order to perform the rest of the actions, by
button of the desired wrapper server. A window is shown where the user must insert its login and
pressing the
password to connect the wrapper server (“admin/admin” in case ITPilot is the only Denodo product installed). It is
possible for the system to remember these data during the session by pressing the “Remember in this session”
checkbox.
A new page will be shown like the one in Figure 15. In section
one must choose which
database the wrapper server must use. In case of having installed only ITPilot, the database does not have to be
selected, and the wrapper list will be directly shown. By default, a list is shown with those wrappers stored in the
“ITPilot” database.
Administration of the Execution and Maintenance Environments
25
ITPilot 4.0
User Manual
Figure 15 Wrapper Connection
5.4.2
List of Wrappers
Once the system has connected to the wrapper server, the Web tool displays the list of wrappers contained in this
server (already seen in section 1.1.1). The data displayed for each of these is as follows:
- Name: wrapper name.
- Maintenance: selection option that indicates, whether the wrapper selected will be maintained
automatically or not. Clicking on the link the value is changed for that particular wrapper. The buttons
and
are used to indicate whether all wrappers will be automatically maintained or no one
will.
o
-
5.4.2.1
ITPilot informs if a wrapper can be maintained or not, from the administration tool. The
icon
points out that the source can not be maintained by ITPilot. Nevertheless, the user can still
configure the system so that the source is still monitorized by ITPilot so that, if it changes, the
user is informed by means of an electronic mail (see section 5.5).
Export: by clicking on the
button, a new web page is shown from where the wrapper specification can
be exported to the file specified by the user.
Execution: by clicking on the
button, and as will be seen later, a query execution on the selected
wrapper is prepared.
Delete: pressing the button , the wrapper is eliminated from the server.
Wrapper Execution
The administration tool allows queries to be made to the wrappers through the “Execution” option mentioned earlier.
Figure 16 displays the Execution window. The different source query fields can be completed; whether or not it is an
obligatory attribute is indicated in each (the search fields belonging to mandatory attributes must be completed). In
this page, one can also select which of the wrapper output fields are to be visualized in the result table.
By clicking on the “Execute” button the administration tool communicates with the wrapper server and invokes the
required query for the specific wrapper; this is communicated to the data source. The results, properly structured, are
shown in the execution window result list.
Administration of the Execution and Maintenance Environments
26
ITPilot 4.0
User Manual
Figure 16 Wrapper Execution Page
5.4.2.2
Exporting results as a CSV-formatted file
Before pressing the Execute button, the output format of the results can be configured so that they are returned as a
CSV (Comma-Separated Value)-type file (where ITPilot allows the definition of the separation character). After
execution, the user will have the choice to save the generated file whenever it is desired.
The selection field “Include Headers” allows to point out whethere the CSV file will treat the names of the fields
obtained by ITPilot as headers or not.
5.4.3
Selecting location of the associated browser pool
When a wrapper is executed, if this uses the component “iebrowser” as an access method, it may request an
instance from the pool. In the administration tool window its location can be indicated by using the name used in the
“Browser Pools” tab to identify each one of the pools created (see Figure 17).
Figure 17 Pool Browser Localization
5.4.4
Port Assignment
In this section the following parameters can be configured:
Administration of the Execution and Maintenance Environments
27
ITPilot 4.0
-
5.4.5
User Manual
Application Port: port through which the wrapper server listens and waits for requests.
Shutdown Port: port through which the server listens and waits for the Shutdown signal.
Auxiliary Port: used for communications between the browser pool and the wrapper server.
Loading new wrappers from VQL files
Although wrappers are normally exported from the specifications generation tool to the wrapper server, VQL files
containing the definition of a wrapper can also be loaded. This is useful when the specification has been produced
entirely manually. To do so, click on the “Load VQL File” button once the full path accessing the VQL file has been
loaded, before clicking on the “Browse…” button and then selecting the required VQL file. The wrapper will appear
in the list of database wrappers from which it has been loaded.
5.4.6
Creating a Web Service
The wrappers saved in the execution server can be invoked in two different ways. Firstly, the native ITPilot Java API
can be used to access the wrappers, obtain their data structure and run queries on them from a Java application.
Another option is to show these wrappers through Web Services. A description of the use of both options can be
found in the ITPilot Developer’s Guide [DESAR]. In the case of Web Services, they are created from the Web
administration tool.
This section describes the Web Service to be generated based on an example included in the ITPilot distribution.
Therefore, the wrapper on which the Web service is to be generated must be loaded. To do so, select the
“webmail.vql” file in the ITPilot installation path in “samples/itpilot/itp-clients/scripts/”, click on “Browse...” and
then on “Load VQL” (see Figure 18). The wrapper will appear in the list of wrappers, as shown in Figure 19.
Figure 18 Loading Wrappers Using VQL Files
Figure 19 List of Wrappers with Loaded “Webmail”
You can then generate the Web service by clicking on the “Create Web Service” button on the execution server tab,
Administration of the Execution and Maintenance Environments
28
ITPilot 4.0
User Manual
after which a page will appear as shown in Figure 20 from where the Web Service to be generated is described:
-
-
Web Service Name: name to be given to this service. For example, “webmailws”.
Web Service URL: this is the execution server URL saving the wrapper to be accessed through the Web
Service: “//localhost:9999/itpilot”, where “localhost:9999” is the domain and port where the run server
resides and “itpilot” is the database where the wrapper is loaded.
Login/Password: login and password to access ITPilot. In this case and by default, “admin/admin”.
Query Timeout: maximum waiting time for a query result (left blank to take the default value).
ChunkTimeout: maximum waiting time between two consecutive results (also left blank).
ChunkSize: chunk size for each operation (also left blank).
Web Service Style: Web Service style to generate (RPC or DOCUMENT). Some Web Service consuming
applications may require one specific style.
Figure 20 Web Service Export Page
Once the data describing access to the server have been configured, the next step involves defining the Web service
operations. ITPilot allows two operations to be generated per wrapper. One contains all the compulsory parameters
(those marked as searchable and compulsory attributes in the specification, see [GENER]. Where there are no
compulsory parameters, the query would be run without parameters) and the other contains any searchable and
optional attributes selected in the “OPT FIELDS” column. In this example, there are no optional parameters and,
therefore, only one operation will be created, known as “getMails”, by writing this name in the text field of the “OBL
Operation Name” column corresponding to the “webmail” wrapper. Mark the “Add Operation” option to inform the
administration server.
Lastly, ITPilot allows to generate the Web Service as a .war file, plus the WSDL file. Pressing the “Create Web
Service” and “Create WSDL” buttons, the user will be able to locally store those files.
Administration of the Execution and Maintenance Environments
29
ITPilot 4.0
User Manual
Where required, this action can also be tested using the sample programs to be found in the ITPilot installation path
in the directory samples/itpilot/itpilot-clients. The samples/itpilot/itpilot-clients/README file should be read.
Clicking on the “Save Changes” button allows the system to store all the changes. In each tab there is a “Save
Changes” button. For the new configuration to work out, the server must be relaunched.
5.5
CONFIGURING THE MAINTENANCE SERVER
Denodo ITPilot offers a component for automatic maintenance of wrappers. The main idea on which this component
is based is the collection of results of valid queries to a specific wrapper, whereby when a change is detected in the
source, these examples, properly tagged, are used to generate new examples that automatically start a wrapper
regeneration process.
This component is deployed in a maintenance server, whose configuration process through the Web administration
tool is detailed in this section.
5.5.1
Access to the Maintenance Server
As can be seen in Figure 21, this area displays the group of maintenance servers that are available at the moment,
together with the possibility of adding new ones. Normally only one would be started, but if the size or quantity of
sources so requires, this option is always available. When a new server is added and as configurable data of each of
the listed servers, the domain and the port, where it is listening, can be selected (remember that if this resides in the
same machine as the administration server, the Web tool allows this to start if it is not raised; otherwise, it should
be started manually following the instructions in section 5.2).
Figure 21 Maintenance Administration Main Page
The fields to be completed are as follows:
- Name: server identifier name.
- Host: address where it is found.
- Port: server listening port.
- Local path: optional, to indicate that the server is local; by adding the local path, where the application is,
the user will be able to start up and stop the maintenance server from the graphic administration tool.
Administration of the Execution and Maintenance Environments
30
ITPilot 4.0
5.5.2
User Manual
Server Configuration Data
Once the system has connected to the maintenance server (either by clicking the tab or editing the access data, as in
the previous section), the Web tool displays the server configuration data. The data displayed in each of these is as
follows:
5.5.2.1
-
Database parameters
Provider: database provider (e.g. mysql, oracle)
JDBC URL: URL access to the Database for the JDBC driver
User/Password: user and access password
JDBC driver: JDBC driver to be used
Pool size: maximum number of connections the pool will allow
Test query: test query executed on the DBMS. The connection pool, before assigning any of the free
connections in the queue, will check to verify if the connection is valid or not.
Figure 22 shows these confnigurable parameters in the maintenance server tab:
Figure 22 Maintenance database Parameters
5.5.2.2
E-mail notification parameters
These parameters will be used to notify via e-mail those changes detected in the sources:
-
SMTP Server: name of the mail server
From: e-mail address from which the notification is emitted.
To: e-mail address to which the notification is sent.
Subject: e-mail subject.
Figure 23 shows these configurable parameters in the maintenance server tab:
Administration of the Execution and Maintenance Environments
31
ITPilot 4.0
User Manual
Figure 23 Wrapper Change Notification Parameters
5.5.2.3
-
Port Assignment Parameters
Application Port: port used by the maintenance server to communicate with the wrapper server.
Shutdown Port: port used by the server to wait for the Shutdown signal in order to finish its execution if
received.
Auxiliary Port: communication port between the maintenance server and its clients.
Figure 24 shows these configurable parameters.
Figure 24 Port Assignment Parameters
5.5.2.4
Edition of Verification Rules
The ITPilot automatic maintenance system requires the generation of a set of rules to check which wrappers have
changed. The administrator can create as many rules as desired, and they can affect a single wrapper or the whole
set.
Rules are composed by entries, each of which is a check of the wrapper or wrappers. When all of the entries are
successfully checked, that rule is activated.
The activation of any of the rules of a wrapper is enough to consider that the wrapper has changed.
Figure 25 shows an example in which a couple of rules have been defined; the first one is composed by a set of three
entries, and the second rule by a single one. Remember that every entry must be verified for the rule to be considered
valid, therefore validating the rule and proceeding to start the automatic maintenance.
Rules may contain the tests that are specified in the following paragraphs. Each test will return a percentage value
(where 100% means the total accomplishment of the checking performed in that test):
-
ZeroResults: checks whether the source returns any result or not. The intuition behind this test is that if a
-
significant number of queries do not return any results, a possible reason is a malfunctioning of the current
wrapper. This test will return “0” if there are no results, and, on the contrary, “100”.
Compatibility: checks the compatibility between the results and the query. E.g. if “title=java” is searched,
Administration of the Execution and Maintenance Environments
32
ITPilot 4.0
-
-
-
-
User Manual
then the returned results should contain the word “java” in the “title” field of the extracted tuples. The
opposite would mean that the current wrapper might not be correctly extracting the data from that field,
and thus it might be necessary to regenerate it. The percentage value is calculated proportionally to the
number of tuples which verify the compatibility test with regard to the total ones.
Consistency: checks whether the results match the regular expressions defined in the wrapper metadata
(see [GENER]). The intuition behind this test is similar to the previous test: if the results do not verify the
pointed out regular expressions, it is probable that the current wrapper is not correctly performing the
extraction process, and thus, it must be regenerated. The percentage value is calculated proportionally to
the number of tuples which verify the regular expressions with regard to the total ones.
Invariability: checks that a certain result percentage of the results of some query is maintained when that
same query is executed some time later. The intuition behind this test is that, in some sources, very abrupt
changes in the extracted results for a same query alongside time, might indicate a malfunctioning of the
current wrapper. The percentage value is calculated proportionally to the number of tuples which are kept
since last query executions with regard to the total ones.
Pagination: checks that in every intermediate result page returned by the wrapper (all but the last one), the
number of returned tuples is the same. If any intermediate page does have fewer results than others, this
could mean that the wrapper is omitting some relevant results (take into account that web sources usually
paginate their results in intervals with a fixed number of results for each one). The returned percentage
value is calculated as a function of the deviation of the obtained number of tuples with regard to the
expected number of tuples. This expected number of tuples is calculated by supposing that each
intermediate page returns the maximum number of results obtained for some of the pages.
ResultsNumber: checks that the number of tuples obtained in successive executions of a same query
alongside time is similar. The intuition behind this test is that, in some sources, very abrupt changes in the
number of extracted results for a same query could indicate a malfunctioning of the current wrapper. The
percentage value is calculated proportionally to the deviation of the number of tuples returned by the query
with regard to the average of the last executions of that query.
The verification rule editor allows the configuration of each entry in the following manner:
- Test: test to perform (Invariability, Pagination, etc.)
- Amount: number of executions of the wrapper that this test must carry out for this entry to be activated.
This quantity must be taken contextually to the execution interval which will be taken into account, as
configured in “Interval”.
- Interval: wrapper executions which are taken into account in this test. The value “0” indicates the last
execution performed, “1” is the one before the last, and so on.
- Values: each test execution returns an integer value between “0” and “100”, closer to “0” when the
results are worse with regard to the performed test. This parameter determines the range of values which
would activate the test.
Let us now consider the example of Figure 25. In the first rule, their entries mean the following:
- First entry: it uses the test “ResultsNumber”. It will get activated when the returned percentage value by
any query is below 50% in at least one (amount=1) of the last ten executions, except for the last one
(interval= 1-10).
- Second entry: it will be activated when the result for the ResultsNumber test is 0 in the last execution of
any query.
- Third entry: it will get activated when the result for the Pagination test is 0 in the last execution of any
query.
Administration of the Execution and Maintenance Environments
33
ITPilot 4.0
User Manual
Figure 25 Edition of Verification Rules
5.5.3
Selecting location for the associated browser pool
During wrapper maintenance the server requires that the “iebrowser” component be used as an access method,
whereby a browser pool should be used. Its location can be indicated in the administration tool window using the
name used in the “Browser Pools” tab to identify each of the pools created (see Figure 26).
Figure 26 Locating the browser pool
5.5.4
Selecting location of wrapper server
Likewise, the maintenance server needs to access the wrapper server, where the wrappers in execution are stored,
so that it can detect changes and regenerate them automatically. In the list “Wrapper Server Name” you can select
the required wrapper server from all those that have been created in the “Wrapper Server” tab (see Figure 27).
Figure 27 Locating the Wrapper Server
Clicking on the "Save Changes" button allows you to store all the changes made. In each tab there is a "Save
Changes" button, which saves the configuration, i.e. it sends the new configuration to the corresponding server for it
to be stored on disk. For the new configuration to take effect the corresponding server must be relaunched.
Administration of the Execution and Maintenance Environments
34
ITPilot 4.0
6
User Manual
ACTIVEX CONTROL FOR AUTOMATIC BROWSING SEQUENCE RUNNING IN CLIENT BROWSERS
ITPilot includes an ActiveX control that enables a Web server to provoke the automatic running of any browsing
sequences in a client browser, provided that this browser has been configured to permit this type of action. An
example of using this function is a Web automation process such as automatic authentication in a Web application
(“autologin”). This is carried out using an ActiveX control installed in the local machine from where a specific
browsing action is to be run. This function is extremely useful when some type of Web automation involving
automatic browsing is required.
The operation is as follows: the SeqExeAX.cab control is found in the activex/itpilot/ path in the ITPilot distribution
installation directory. This control can either be saved in a Web server to be accessed via http or, if the control is
already recorded in the local system, it can be accessed through the Windows register via its CLSID. Once this action
is complete, Web sites can be created that enable automatic browsing through the addition of the following
elements to the HTML code:
<object
CLASSID="CLSID:<CLSID of component SeqExeAX
CODEBASE="http://<access
path
to
>/SeqExeAX.cab#version=<SeqExeAX component version">
<param
name="Sequence"
value="NSEQL browse sequence">
control
The CLSID and SeqExeAX component version can be found in the SeqExeAX.inf file in the SeqExeAX.cab component
(this can be opened from any unzip tool on the market as if it were a zipped file). The browse sequence is specified in
NSEQL language, explained in detail in [NSEQL].
A Microsoft Internet Explorer browser can be launched with the Web server that contains the .cab control running,
and the site containing the aforementioned elements can be loaded.
NOTE: It is important to note that the browser must be configured to enable the running of ActiveX controls, which is
often done by customizing the security tab in Tools->Internet Options or by selecting the “Low Level” security option
in the required Web content area (e.g. “Local Intranet” if it is a local site or “Internet” if the site being run in the
sequence is accessible over the Internet).
If the browser is opened with the aforementioned site, it can be seen how the browser automatically runs the browse
sequence described in the “value” attribute of the “param” element.
ActiveX Control for Automatic BrowsING Sequence Running in Client Browsers
35
ITPilot 4.0
User Manual
REFERENCES
[BEA] BEA Systems Application Server. http://www.bea.com
[DESAR] Denodo ITPilot Developer Guide. Denodo Technologies, 2007.
[DEXTL] DEXTL Manual. Denodo Technologies, 2007.
[GENER] ITPilot Generator Environment Guide. Denodo Technologies, 2007.
[FRFOX] Mozilla Firefox Browser. http://www.firefox.com
[IE] Microsoft Internet Explorer. http://www.microsoft.com/windows/ie/
[ISO639] Código de lenguaje ISO-639 (http://www.ics.uci.edu/pub/ietf/http/related/iso639.txt)
[J2SE] Java 2 Standard Edition. http://java.sun.com/j2se/
[LIN] Linux Fedora Core 3 Distribution, http://www.fedora.org
[LOG4J] The Log4j Project. Apache Software Foundation. http://logging.apache.org/log4j/docs/
[MYSQL] MySQL Open Source Database. http://www.mysql.com
[NSEQL] NSEQL Manual. Denodo Technologies, 2007.
[ORA] Oracle 9. http://www.oracle.com
[PDFBOX] PDF document management Java Library, PDFBox. http://www.pdfbox.org/
[POST] PostgreSQL Open Source Database. http://postgresql.org
[SUN] Sun Microsystems. http://java.sun.com
[TOM] Jakarta Tomcat 4.x.x servlet and JSP container, http://jakarta.apache.org/tomcat
[WIND] Microsoft Windows Operating Systems, http://www.microsoft.com
References
36