1
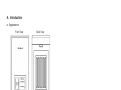
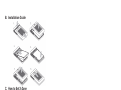
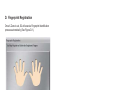
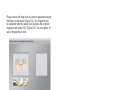
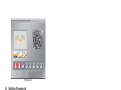
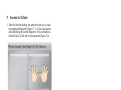
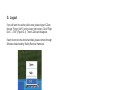
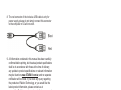
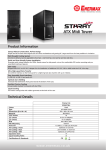
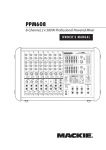
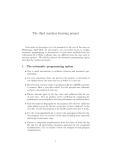
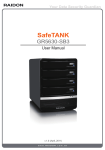
S225-1S-B2
User Manual
Version : 1.1 (March, 2008)
A. Introduction
a. Appearance
Front View
Back View
Upper View
DC in
USB port
b. LED Indicator Function:
S2 Status
Access
Power on
Light Blue
─
Read/Write
Light Blue
Red Light Twinkling
c. Accessories:
•
•
•
•
LED Indicators
Power
User Manual
USB Cable
Collection Box
CD
B. Installation Guide
C. How to Set X-Zone
Please be sure there is no important information in your hard
disk drive before installing hard disk drive in S2 because all
information will be clear when you reset the invisible and
visible zone.
After installing the hard disk drive and connecting to computer
with USB cable, Windows operating system will detect the hard
disk automatically. After the system detects S2, please execute
“Initial.exe” (You can find it in the CD ROM) and you will see
Figure C-1.
Figure C-1
You can decide the capacity of invisible X-Zone and for public
by yourself. Moving the small ball on the scrolling bar, clicking”
START” and the system will reset your hard disk automatically.
Then you can check APdisk (X-Zone) and Public Zone through
“My Computer” (Figure C-2). At this moment, the public zone is
ready for information access.
Figure C-2
D. Fingerprint Registration
Once X-Zone is set, S2 will execute Fingerprint Identification
process automatically (See Figure D-1).
Figure D-1
Note : If you do not see Figure D-1, please double click
”APdisk” in the “My Computer” to execute it.
(Figure C-2)
Please choose the finger that you want to register and sweep
that finger on the sensor (Figure D-2). You fi ngerprint will
be registered when the sensor can recognize the complete
fingerprint and shows “OK” (Figure D-3). You can register 10
sets of fingerprints at most.
Figure D-2
Note : You can register 10 sets of fingerprints (whatever use
different fingerprints or the same one) to enhance the
identification rate.
Figure D-3
E. Setting Password
The fingerprint is the maim key to access X-Zone. In case of
any accident, S2 also provides password as the access pass.
The following process will help you set the password (See
Figure E-1)
Figure E-1
F. Access to X-Zone
1. After the first time setting, the system will ask you to input
the registered fingerprint (Figure F -1). X-Zone will appear
after identifying the correct fingerprint. If the verification is
failed 6 times, S2 will ask for the password (Figure F-2).
Figure F-1
Figure F-2
2. If you would like to access to X-Zone by entering password,
please click “Password”. If you are not willing to access
X-Zone, click “Cancel” and exit.
3. After registering the fingerprint, you can click “APdisk” to
input your fingerprint to access to X-Zone no matter what
operation system it is.
4. Once the fingerprint is verified, S2 will reset automatically
and X-Zone will be showed through “My Computer” (See
Figure F-3). You will see “Finger Verify” on the lower right
side corner (See Figure F-4).
Figure F-3
Figure F-4
G. Logout
If you still want to use the public zone, please logout X-Zone
through “Finger Verify” (on the lower right corner). Click “Right
Click” →”Exit” (Figure G-1). Then X-Zone will disappear.
If want to remove the whole hard disk, please remove through
Windows default setting “Safely Remove Hardware”.
Figure G-1
Note : S2 will reset the whole hard disk after clicking “Exit”.
Thus, please be sure that no file is transferring in public
zone before clicking “Exit”. Otherwise the transferring
file may be failed.
H. Others
a. Reset the capacity of X-Zone:
Please execute “Initial.exe” to reset.
b. Register other fingerprints / Delete the fingerprints / reset
password:
Access X-Zone and use “Finger Verify” to do the new
setting.
c. Encrypt other file which is not saved in S2:
You can encrypt the file which is saved in the computer
through S2. Please execute fingerprint identification process
first, and click the file and right click “Encrypting”. On the
contrary, if you want to decrypt the file, right click “Decrypting”
d. For more details, please find the Instruction in “Finger
Verify”.
I. Attention:
1. The efficiency of performing “Initial” and “Finger Verify”
depends on the hardware which the computer is equipped.
2. Some antivirus software may think “Initial” or “Finger Verify”
as virus and slow down the working efficiency.
3. We strongly suggest you to remember your password
carefully; in case that the fingerprint sensor is out of order
which means you can not access any information in X-Zone
anymore. But if you really forget the password, there are
two ways to help you access to X-Zone with the fingerprint
again. One is to find another S2 enclosure; the other one is
to send your S2 back for repair.
4. Please note that S2 will reset HDD while login, logout
X-Zone or adjust X-Zone capacity. Therefore, make sure
that no information is transferring on public HDD before
doing any work on X-Zone.
5. Once the HDD has been set in S2, all the information will
only be read/ write through S2.
If this same HDD is connected to computers with other
enclosure, it will be considered as an unformat HDD and all
information on it will not be read or write.
6. Before connecting the HDD to other device without S2,
please format the HDD to prevent personal confidential
data from stealing.
7. S2 uses the standard USB Bus Power (5V/500mA), and is
able to connect to AC Adapter (5V/2A) which is not
inclusive. If you use the large capacity HDD or your
computer/laptop limits output electric power of the USB
port, you may need extra AC Adapter to get your computer/
laptop work smoothly. You need to pay the extra money for
it.
8. The red connector of the inclusive USB cable is only for
power supply, please do not simply connect this connecter
to the computer or S2 will not work.
9. All information contained in this manual has been carefully
confirmed before printing, but the actual product specifications
shall be in accordance with those at the time of delivery;
any update to product specifications or relevant information
may be found on www.STARAY.com.tw, and no separate
notification will be made. If you have any query regarding
the products of Raidon Technology, or you would like the
latest product information, please contact us at
[email protected], and we shall give you a reply
as soon as possible.
Note : Raidon Technology will only provide technical
support and services on products purchased
directly from the company. General consumers and
third-party buyers who did not purchase from the
company should contact their distributor or supplier
directly to receive faster support and response.
If you did not purchase products directly from
our company, please avoid contacting our company
directly because your support and response may
be delayed to your satisfaction.
Copyright RAIDON TECHNOLOGY, INC. All rights reserved.