1
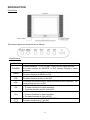
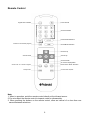
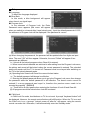
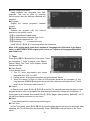
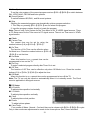
20"/ 51cm LCD ED Television FLA-2007B 20060508 CONTENTS INSTRUCTION MANUAL.................................................................................................. 2 PACKING LIST.................................................................................................................. 4 GENERAL INTRODUCTION............................................................................................. 4 REMOTE CONTROL......................................................................................................... 8 INSTALLATION ............................................................................................................... . .9 GENERAL OPERATION ...................................................................................................9 FUNCTION INTRODUCTION..........................................................................................10 MENU OPERATION........................................................................................................ 10 PICTURE ..................................................................................................................... 10 SOUND ........................................................................................................................ 10 SETUP ......................................................................................................................... 11 TUNE ........................................................................................................................... 12 CLOCK......................................................................................................................... 13 PC SETUP ................................................................................................................... 13 OTHER FUNCTIONS ...................................................................................................... 14 VOLUME CONTROL ................................................................................................... 14 SOUND MODE SELECTION .................................................................................... 14 PICTURE MODE SELECTION ....................................................................................14 RECALL ....................................................................................................................... 14 SIGNAL SWITCH ........................................................................................................ 14 CHANNEL CHANGING................................................................................................ 15 SLEEP FUNCTION ...................................................................................................... 15 INDICATOR LIGHTS................................................................................................. . . 15 TROUBLESHOOTING .................................................................................................... 16 SPECIFICATIONS ......................................................................................................... 17 Note: The OSD and illustration in this manual may be somewhat different from the actual situation. Please take the LCD TV for standard. 1 Polaroid. Add a little color to your life. Since 1937, people have turned to Polaroid for their photography needs. Today, families look to Polaroid for consumer electronics that define the digital age: plasma and LCD TVs, portable and standard DVD players, digital cameras. And while our selection has changed, you’ll still receive the same friendly, helpful service. Congratulations on your new Polaroid LCD TV purchase. To ensure your new LCD TV provides you with years of enjoyment, please read this guide carefully. Instruction Manual WARNING WARNING reduce the the risk riskofoffire fireor TTo o reduce or electric shock, electric shock, do do expose not this expose thisto not product to rain or rproduct ain or moisture. moisture. Apparatus shall not be exposed to dripping or splashing and no objects filled with liquids, such as vases, shall be placed on the apparatus. Apparatus shall be connected to a MAINS socket outlet with a protective earthing connection. CAUTION RISK OF ELECTRIC SHOCK. DONOT OPEN This symbol indicates “dangerous voltage” inside the product that presents a risk of electric shock or personal injury. Caution: To reduce the risk of electric shock, do not remove cover (or back). No user serviceable parts inside. Refer servicing to qualified service personnel. This symbol indicates important instructions accompanying the product. Caution: To prevent electric the 3-pronged plug into a grounded outlet. shock, plug Refer to the identification/rating label located on the back panel of your product for its proper operating voltage. Caution: Using video games or any external accessory with fixed images for extended periods of time can cause them to be permanently imprinted on the LCD panel (or projection TV picture tubes). ALSO, some network/program logos, phone numbers, etc. may cause similar damage. This damage is not covered by your warranty. 2 Product Information Keep your sales receipt to obtain warranty parts and service and for proof of purchase. Attach it here and record the serial and model numbers in case you need them. These numbers are located on the back of your LCD color television. Model No. Serial No. Purchase Date: Dealer/Address/Phone: Instruction Manual IMPORTANT SAFETY INSTRUCTIONS 1. 2. 3. 4. 5. 6. 7. Read these instructions. Keep these instructions. Heed all warnings. Follow all instructions. Do not use this apparatus near water. Clean only with dry cloth. Do not block any ventilation openings. Install in accordance with the manufacturer’s instructions. 8. Do not install near any heat sources such as radiators, heat registers, stoves, or other apparatus (including amplifiers) that produce heat. 9. Do not defeat the safety purpose of the polarized or grounding-type plug. A polarized plug has two blades with one wider than the other. A grounding type plug has two blades and a third grounding prong. The wide blade or third prong is provided for your safety. If the provided plug does not fit into your outlet, consult an electrician for replacement of the obsolete outlet. 10. Protect the power cord from being walked on or pinched particularly at plugs, convenience receptacles, and the point where they exit from the apparatus. 11. Only use attachments/accessories specified by the manufacturer. 12. Use only the cart, stand, tripod, bracket, or table specified by the manufacturer, or sold with the apparatus. When a cart is used, use caution when moving the cart/apparatus combination to avoid injury from tip-over. 13. Unplug this apparatus during lightning storms or when unused for long periods of time. 14. Refer all servicing to qualified service personnel. Servicing is required when the apparatus has been damaged in any way, such as power-supply cord or plug is damaged, liquid has been spilled or objects have fallen into the apparatus, the apparatus has been exposed to rain or moisture, does not operate normally, or has been dropped. 15. Warning: This unit should only be serviced by an authorized and properly trained technician. Opening the cover or other attempts by the user to service this unit may result in serious injury or death from electrical shock, and may increase the risk of fire. The MAINS plug or an appliance coupler of the apparatus is used as the disconnect device, the disconnect device 16. The MAINS plug or an appliance coupler of the apparatus is used as the disconnect device, the disconnect device shall remain readily operable. 17. No naked flame source, such as lighted candles, should be placed on the apparatus. 3 PACKING LIST LCD TV Operation Manual AC Power Cable Infrared Remote Control Remote Control Battery Warranty Card Quick Start Guide AV Cable 1 1 1 1 2 1 1 1 Note: Please keep the original box and packaging for transporting the set in the future. GENERAL INFORMATION Radio Frequency input; supports CATV Capable of receiving cable programs in 470MHz, it can store 236 TV channels AV input Convenient for watching a DVD player, VCR, video camera or other playback devices. S-Video input Convenient of receiving a high quality component signal from a DVD player HDTV input Capable of receiving the high definition YPbPr signal in 480i, 480P, 576i, 576P, 720P, 1080i , and 1080P formats D-sub input a. Convenient to connect with a host computer b. Use as a data display terminal c. Connect the 3.5mm (diameter) audio jack to your computer’s soundcard to listen to stereo sound transmitted from your home computer Program & Child Lock Capable of blocking inappropriate programs and the function button on the front panel. Timer function 4 Blue background with noise reduction In AV S-VIDEO and YPbPr modes, screen displays soft blue background if there is no signal input Multi Language On-Screen Display menu Text and graphical user interface makes the menu operation user-friendly Power Energy Saving Mode (Power management mode) When used as PC display terminal without PC signal output, the LCD TV will automatically power off within 30 seconds and enter Power Energy Saving Mode. It will automatically start up again when it receives a signal from the PC. To start the TV manually with no signal press the number buttons or /CH+/CH- on the remote control Plug and Play No additional software is needed when the product is used as computer terminal display Automatic picture quality adjustment Power management mode Auto on timer Zoom mode Full-screen, 16:9, cinema, subtitle Low power consumption Picture enhancement function High definition display panel Dynamic comb filter Headphone output 5 INTRODUCTION Front Panel Power On/Off The button names and functions are as follows: Panel buttons Button SOURCE MENU VOLVOL+ CH- CH+ Description To switch between TV, AV, S-Video, YPbPr and PC signal sources. The same function as SOURCE on R/C (remote control) in menu operation. To enter or quit from the OSD (On-Screen Display) menu. The same function as MENU on R/C To decrease the sound volume. Adjust functions in menu operation. The same function as Vol- on the R/C To increase the sound volume. Adjust functions in menu operation. The same function as Vol+ on R/C 1. In TV mode, decrease the channel number 2. To select functions in menu operation. 3. The same function as CH- on the R/C 1. In TV mode, increase the channel number 2. To select functions in menu operation. 3. The same function as CH+ on R/C To power on or put the LCD TV to STANDBY The same function as on R/C 6 Rear Panel Headphone Output AC Input Detail Illustration of Signal Input Ports RF 7 Remote Control Power On/Off Signal Source Switch Channel Number Picture Mode Selection Return to last viewed program Sound Mode Selection Channel Up Volume Up Volume Down Channel Down On-screen Display Menu Screen Size Mode Selection Show Info of Current Program Sleep Timer Sound Mute On/Off Note: 1. When in operation, point the remote control directly at the infrared sensor. 2. Do not subject the remote control to impacts, water or disassembly. 3. When pressing the buttons on the remote control, allow an interval of no less than one second between selections. 8 INSTALLATION 1. Remove the LCD TV from the box and place it on a flat surface in a well-ventilated location. 2. Connect the output terminal of RF cable to the corresponding TV RF signal input terminal. The LCD TV is a high technology digital product, use quality RF cables to obtain optimal results. 3. Connect the output terminal of the AV devices such as DVD player, VCR, etc. to the corresponding terminal of your LCD TV. 4. Connect one end of the D-sub terminal to the corresponding terminal of the host computer, and connect the other end to the corresponding LCD TV terminal. Screw down the screws on both sides to secure it. Caution: When connecting, plug directly and lightly to the interface, otherwise you may damage the pins in the connector. 5. Ensure that every AV signal cord is correctly connected to the corresponding jack. 6. Put the DC power plug in the DC input outlet of the TV, then plug the AC power plug of the power adapter in the AC power outlet. GENERAL OPERATION To Turn the TV On After the power cord is plugged into the power socket, the TV will enter Standby mode. Press on the remote control or the front panel to turn the TV on To Turn the TV Off 1. Press on the remote control or the front panel to turn the TV off. 2. Unplug the DC power adapter from the AC wall outlet and then unplug the power adapter from the TV to turn the set off completely. Caution: The TV will be shut off automatically when AC power is interrupted. Unplug the power adapter from the AC outlet if this happens. The last used TV mode will appear when power resumes. Do not turn the TV on/off too often. Unplug the power adapter from the AC outlet if power is suddenly interrupted. 9 Menu Operation 1. Use the On Screen Display menu to set and adjust functions 2. Use 【CH+】/【CH-】 to select the desired menu after pressing【MENU】, then press【VOL+】 【OK】 / to enter the corresponding menu and use 【CH+】 【CH-】 / to choose from the menu option; Use 【VOL+】/【VOL-】to adjust the options value and return to the previous menu by pressing 【MENU】again. The menu will disappear without any operation within 10 seconds. Function Introduction In TV, AV, S-VIDEO, YPbPr and PC modes Ⅰ Picture ● Brightness To adjust the picture’s brightness ● Contrast To adjust the picture’s contrast. ● Sharpness To adjust the picture’s definition. ● Colour To adjust the picture’s color. ● Tint To adjust the picture’s tint. (For NTSC signal only) Note: Picture menu options in other signal sources. AV/S-VIDEO: the same as in TV mode YPbPr/PC: only two options of Brightness and Contrast ⅡSound ● Volume To increase or decrease the volume. ● Balance To balance the volume between the left and right speakers. ● Woofer To turn on/off the woofer. ● Spatial To turn on/off the surround. ● Equalizer (submenu) Use 【 VOL+ 】/ 【OK 】to enter the Equalizer (submenu), you can increase or decrease the value of the sound output in every frequency band preferred Note: The Audio menu options are the same in TV signal as well as in other signal sources 10 Ⅲ Setup ● Language To select the language displayed. ● Blue Back In this mode, a blue background will appear when there is no signal input. ● Program Lock In the submenu of Program Lock, the Enter Password menu appears (this menu will appear when you switch to a channel after it was locked once);. Input the default password of 1235, the submenu of Program Lock will be displayed if the password is correct. (a) When changing the password, the password will be updated after four digits are input twice. The word ”OK” will then appear. Otherwise, the word “Failed” will appear if two passwords are different. (b)Unlock all the locked programs when Clear All is entered. (c)When some locked channels are switched to after exiting from the Program Lock menu, the picture and sound will be locked unless the correct password is entered. The unlocked status will remain until the TV is turned off. Password must be re-keyed after switching on the TV to the locked channels again. (d) Operating Auto Search will cancel the current locked status. (e)The default password will always be effective. (f)Entering the default password allows you to go to the Program Lock menu, then change the password while the default password is still effective. The branch menu cannot be entered if a wrong password was keyed in, therefore the previous menu needs to be reverted by pressing 【MENU】 (g)There will be a short pause when entering the functions of Lock All and Clear All. (h) All programs would be locked when Lock All is entered. ● Child Lock In Child Lock On mode, local buttons on TV do not work. A prompt ”keyboard locked” will be displayed. However, the remote control buttons will still function. When the TV is on and the Child Lock is on, a prompt ”Locked, power off after 6s” will appear, using the remote control can solve this. Otherwise, It will automatically enter into Standby mode. 11 ● Prog. Swap (submenu) Swap between two programs and their channels. This can be done by pressing Switch button after two different channels are selected. ● Program Display the current program’s channel number ● Name Rename the program with four colored buttons on the remote control 【1】for Capitalized English letters 【2】for Alphanumeric numbers from 0 to 9 【3】 for special characters as “#” 【4】Resuming “*” in unnamed mode Use【VOL+】/【VOL-】 to input and select the characters Note: In PC signal mode, there are 2 options of Language and Child Lock in the Setup menu. In AV/S-VIDEO/YPbPr signal mode, there are 3 options of Language,Blue Back and Child Lock. Ⅳ Tune Press【CH+】 【CH-】 / to select the Tune menu. There are altogether 7 items to adjust: Auto Search, Search, Band, Fine Tune, Color System, Sound System and Skip. ● Auto Search In Auto Search mode 1. The TV does auto-search and stores programs from VHF-L to UHF. 2. During search, all programs searched are automatically stored. 3. When the search is done or when all 236-program positions are occupied, or you have pressed 【MENU】during the search process, the search will halt and the TV will return to the Tune menu with channel 1. ● Search In Search mode, press【VOL+】/【VOL-】so that the TV manually searches the upper or lower program position until one program was searched and automatic storage will commence. If the program is not needed, then press【VOL+】/【VOL-】again. After pressing 【MENU】, the TV will exit from Search and return to the menu. ● Band To set which band the current program belongs to. ● Fine Tune In Fine Tune mode, press【VOL+】 【VOL/ 】to until the best picture and sound is achieved. After adjusting, the TV will auto-store the channels. Press 【MENU】to exit and return to the Tune menu. 12 ● Color System To set the color system of the current program and use【VOL+】/【VOL-】to switch between PAL, NTSC,N4.43, SECAM and Auto systems. ● Sound System To switch between B/G,D/K,I, and M sound systems. ● Skip Skipping the unwanted program can dramatically quicken program selection. 1. Turn Skip on, pressing【CH+】/【CH-】can not select this program. 2. Input the program number directly to locate the program. Note: There is only Color System for the Tune Menu in AV, S-VIDEO signal sources. There is PC Setup menu for the Tune menu in PC signal source. There is no Tune menu in YPbPr signal source. Ⅴ Clock ● Current Time The current time can be set by using the number buttons (0-9) or【VOL+】/【 VOL-】. ● On Time The function of On Time can be effective when On Mode is on. Press the number buttons or【VOL+】 /【VOL-】to set the time. ● On Mode When this function is on, a preset time can be programmed to turn on the TV. ● On Prog To enter a selected program directly after Timer On is set. ● Off Time The function of Off Time can be effective only when Off Mode is on. Press the number buttons (0-9) or【VOL+】/【VOL-】to adjust the time. ● Off Mode When this function is on, a preset time can be programmed to turn off the TV. Note: The TV can only be turned on automatically when it is in standby mode. The Clock menu is applicable in all signal sources. Ⅵ PC Setup ● H Position To adjust picture position horizontally. ● V Position To adjust picture position vertically. ● Clock To adjust picture clock position. ● Phase To adjust picture phase. ● Color Temp Four modes of Warm、Normal、Cool and User can be chosen with【VOL+】/【VOL-】in cycle. Only in User mode can adjustments be made to the three options: Red, Green and Blue. 13 ● Auto Adjust To automatically adjust the picture position, clock, phase and color temperature to a preset optimum value. This mode is invalid in DOS mode. Note: The PC Setup menu is only available in the PC signal source. Other Functions ● Volume Control 1. Press【VOL+】 to increase or【VOL - 】to decrease the volume when there is no menu on the screen. The Volume bar will disappear if there left idle for more than 6 seconds. 2. Press the【MUTE】button on the remote control to turn On/Off the MUTE mode. In Mute mode, a sign of“Mute” in red will appear on the upper-right corner of the screen. This symbol is hidden when the menu operation is entered, but the feature is still valid. It appears again when the menu operation is exited. When there is no valid signal input, the TV will be mute (but no mute symbol) with a blue background. ● Sound Mode Selection Press 【SOUND】 to select between Personal, News, Theater and Music modes and activate the Picture Mode. The latter three modes are default setting that cannot be adjusted. Entering the Personal mode allows setting to the preferred mix. Sound Mode Personal News Theater Music Sound Quality For the user’s preference For general programs of conversations and news report For better audience effect as soft, magnificent and vivid For general music programs Note: The operation and setting of the Volume Control are applicable to all the signal sources. ● Picture Mode Selection Press【PICTURE】to Switch among Personal, Soft, Normal and Rich modes. Picture Mode Personal Soft Picture Quality For the user’s preference For more mellow pictures Normal For general programs Rich For better visual effect such as magnificent and vivid Note: The setting of this selection is in the same state are applicable to all the signal sources. ● Recall In TV mode, press【LAST】on the remote control to return to the previous channel or signal source. ● Signal Switch Press【SOURCE】on the remote control to select between the signal sources: TV AV, S-VIDEO, , YPbPr and PC. The order is as below: TV AV S-VIDEO V 【 L O 14 YPbPr PC ● Channel Switch Use the number buttons to choose the desired channel directly or press【CH+】/【CH-】 on the panel or 【CH+】/【CH-】 on the remote control to select the channel number. If a channel number is in SKIP ON mode, the next channel will be displayed. A maximum of 3 digits can be keyed in at one time with the number button on the remote control. The symbol of “ - - ” on the upper-right corner represents tens and one respectively.. ,two digits are only admitted if a number input is beyond the range and the number for hundred digit is bigger than “2”.The first input number is for hundreds, if it is “1”,“1- -”appears on. The TV will switch to channel 1 if no number is input in 3 seconds. The second is for tens if it is “2”,“12 -”appears on. The TV will switch to channel 12 if no number is input in 3 seconds and the third is for ones., Press 【OK】to turn to the desired channel quickly after the corresponding number is input. Note: This function is only available in TV mode ● Sleep Function Press【SLEEP】on the remote control once to Sleep 30 activate the function and subsequent keying in to select the sleep time of 0, 15, 30, 45, 60,90, 120, 150,180, 240 and 0 minutes. This is will be reflected in the top right hand corner of the screen. After this step is done, press 【SLEEP】to view the set sleep. See the illustration in the right. ● Indicator Light Status On/Off Standby Timer On/Off Or Sleep Sleep (PC) Receives signal from the remote control Light Colour Off Red Green Yellow Flickering Description The TV works normally/is power off In Standby Mode Timer On/Off is valid or Sleep is on Sleep for power-saving; The indicator will flicker when the TV receives signal from the remote control 15 TROUBLESHOOTING Before calling a technician, please check the following table to see if the below mentioned symptoms can be diagnosed and fixed. Symptoms Possible Reasons No picture, no sound, and no indicator light on No picture, no sound, but the green light indicator No picture, no sound, but the yellow light indicator 1. The power cord is not plugged in 2. The power is off 1. Plug the power cord in 2. Turn on the power Functions of ON/OFF TIME and SLEEP have been set Press【 1.PC is in VGA Mode without any PC signal input 2.The signal cord is not connected correctly 1.Press 【 signal 2.Connect properly Picture and sound with abnormality 1.Contrast, sharpness, and colour are set improperly 2.Colour system is set improperly 3.Sound system is set improperly 1.Adjust the value of Contrast, sharpness, and colour 2.Set the Colour System to the country broadcasting standard 3.Set the Sound System to the country broadcasting standard Signal source is low-grade or the signal is in a lower quality Use the qualified signal cord No Video signal or the signal cord is improperly/not connected Connect the signal cord properly Picture is not well adjusted Adjust automatically by selecting Auto Adjust or adjust Clock 、 Phase、H Position and V Position manually after enter into the PC Setup menu to solve this problem Picture is not well adjusted Adjust pictures automatically by resetting H Position、V Position、 Phase and Clock Picture is spotted or with snow Blue background Picture is unclear, or moves or have black stripes on horizontal position in PC mode PC Picture is not in the middle of the screen No sound No Audio signal or the signal cord is improperly/not connected The remote control does not work Batteries are improperly installed or exhausted 16 Correction 】to turn on the TV 】or input the PC the signal cord 1.Connect the audio signal cord properly 2.Set the sound system properly 1.Make sure the positive and the negative polarities are correct. 2.Check if there is loose contact between the springs and the batteries. 3.Replace the batteries SPECIFICATIONS FLA-2007B Items Size (diagonal) Brightness Contrast Angle of View Speed Response Lamp Life Recommended Pixel Pitch Number of Dots Viewable Area Color Display Specifications Color System Sound System PC Qualified Input Format 51cm/20.1 inch 450 cd/m2 400:1 1760(H)/1760(V) 25 ms 50,000 Hours 640 X480 0.2125mm(H) X0.6375mm (V) 640XRGBX480 408mm(H) x306mm (V) 16.7million PAL/SECAM D/K,B/G,I,M VGA/SVGA YPbPr Input Format 480i, 480p, 576i, 576p, 720p, 1080i,1080p Audio Output Consumption AV-Audio Input AV-Video Input Headphone Output Comb Filter S-Video Input YPbPr Input D-sub Video Input D-sub Audio Input DC Voltage Input Power Adaptor Voltage Input Rated Power Consumption Standby Power Consumption Unit Dimension Net Weight 2x2.0 W One way (S-Video is parallel) One way One way YES One way One way (with audio input) One way One way DC 12V LCD panel items Please refer to the power adapter. ≤1.5W(with power adapter) 590mm(W)×435mm(H)×230mm(D) 10kg (approximate) Note: The LCD panel is a high technology product that reproduces finely detailed pictures. Occasionally, a few non-active pixels may appear on the screen as a fixed point of blue, green, red, black or white. Please note that this does not affect the performance of your LCD TV. For service, support, and queries, call 1300 366 144. 17