1
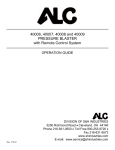
INSTALLATION, OPERATING AND MAINTENANCE DIRECTIONS FOR
DUSTLESS BLASTING MODELS
DB500 & DB800
(The following information is given with your best interest in mind. Do not jeopardize the
machine operation and result by lack of attention to these directions.)
1
15
3
7
16
11
4
6
10
8
14
18
4
17
2
5
9
12
DUSTLESS BLASTING MODELS
DB500 & DB800
13
1.
2.
3.
4.
5.
Pinch Hose
Control Box Input Couplings
Fill Cap
Blowdown Valve
Air Inlet Valve
6. Compressed Air Inlet
7. Compressed Air Pressure Gage
8. Pressure Regulator
9. Control Box
10. Blast Pressure Gage
11.
12.
13.
14.
15.
Abrasive Control Lever
Vibrator
Bottom Flange
Overflow Valve
Pinch Valve
16. Abrasive Control Knob
17. Vibrator Valve
18. Moisture Trap
STEP 1. Compressed air supply hose size and lengths from air compressor to
Dustless Blasting machine.
50’ or shorter length - use at least 1” ID hose.***
75’ to 100’ lengths - use at least 1 1/4” ID hose.
125’ and longer lengths - use at least 1 1/2” ID hose.
***If available hose is used and is smaller than sizes specified (against recommendation) use (2) two hoses - example,
(2) two 3/4” ID instead of (1) one 1” ID. Connect hoses to machine and air compressor with “Y” pipe fittings - do not use
any fittings smaller than 1 1/4” pipe size. Connect fittings to machine with 1 1/4” pipe nipple and bushing fittings to receive
hose couplings. Connect air line to 1 1/2” or 2” air compressor receiver openings - not 3/4” opening.
Avoid restrictions in air supply line, because it is important that proper volume and pressure of compressed air
occur for maximum machine production.
PAGE 1
STEP 2. Connection of air supply hose to machine
“Blow-Out” air supply hose prior to coupling with machine in order to remove all moisture, oils and dirt. Connect hose to feature
6, compressed air inlet.
STEP 3. Connect coupled blast hose to pinch hose, feature 1.
STEP 4. Connect remote control air supply hose to control box.
Connect the color coded twin line to the corresponding male connectors on the bottom of the control box, feature 2. Connect
the opposite end of the dual line hose to the male connection of the dual line activator valve. Activator valve should be
conveniently positioned near end of blast hose and held in place by coupling band. All connections must be absolutely tight
because any compressed air leakage will impair machine’s operation.
STEP 5. To fill the machine with abrasive.
Machine will use any type of abrasive or cleaning medium which sinks in water and is not water soluble. You must ADD
WATER BEFORE ABRASIVE. Open the overflow valve, feature 14, and fill the machine with water until valve overflows,
then close valve and add media. Media capacities:
Dustless Blaster Capacity Chart (Based on media weighing 72 lbs/ft3)
Model
Water (gallons)
Abrasive (lbs)
Rust Inhibitor
DB150
5
50
7 oz
DB225
10
100
14 oz
DB500
20
200
28 oz
DB800
30
300
42 oz
DB1500
75
750
100 oz
DB3000
150
1500
1.5 Gallons
Abrasive or cleaning medium should be no longer than one-third the diameter of the blast nozzle used - to avoid nozzle
plugging. Pour screened, dry abrasive into top of machine (abrasive screen inside funnel is designed to keep foreign matter
from entering machine).
STEP 6. To adjust abrasive supply.
Loosen abrasive adjustment screw, feature 16.
Pull abrasive control lever, feature 11, upward which will raise outlet pipe. Raise pipe until approximately 1/2” of unpainted pipe
is visible. Said distance will actually very depending on size of blast nozzle used, size and type of abrasive used.
While the outlet pipe is in the adjusted, raised position, tighten abrasive adjustment screw and set lock nut thereon, which will
lock the abrasive control lever setting.
STEP 7. To adjust blast pressure.
Tighten or loosen knob on the pressure regulator, feature 8. Use the chart below to get an idea of what pressure to use. The
chart below contains approximate guidelines, experiment until you find the right blast distance and pressure. The closer the
nozzle is to the blast surface, the smaller the blast pattern, the harsher the effect, and the faster a coating will be removed.
Start far away and come in slowly to insure you don’t cause damage to the substrate.
Material
Blast Pressure
Blast Distance
Blast Pattern
Fiberglass Boats
70 PSI
18-24 In.
Large
Brick Walls
100 PSI
18-24 In.
Large
Metal Auto Bodies
100-120 PSI
12-14 In.
Medium
Thick Aluminum
120-150 PSI
12-20 In.
Medium-Large
Thick Steel
150 PSI
10-14 In.
Medium
STEP 8. To begin the blast cleaning operation.
Insure that fill cap is on and locked down. Make sure the blowdown valve, feature 4, is closed. Open compressed air intake
valve, feature 5, fully.
Push in safety button and depress remote control activator valve lever, continuously. A second or two will pass before blasting
begins.
STEP 9. To stop the blast cleaning operation.
Close compressed air inlet valve, feature 5, and open air pressure release (blow-off) valve, feature 4. Said actions will shut-off
compressed air to the machine, and release the air pressure from the machine.
STEP 10. Blowing Out Blast Hose.
Push abrasive shut-off lever, feature 11, towards machine, which lowers outlet pipe to a seated position and permits only
compressed air to be discharged from the blast nozzle. If excessive abrasive has crowded around the outlet pipe it may be
hard to lock the abrasive lever. A twisting of the pipe, by means of moving the outlet elbow, will permit the pipe to be lowered.
PAGE 2
MAINTENANCE
MOISTURE TRAP ATTENTION
Keep the black screw on the Moisture Trap, feature 18, slightly open to drain the liquid from the trap area. Only open it slightly,
allowing some air to be released.
CONTROL BOX ATTENTION
The control box has its own pressure regulator. This is already set properly from the factory, and should not be tampered with
under normal circumstances. However, if it gets changed accidentally, make sure you readjust it to 90 PSI.
VIBRATOR ATTENTION
During blasting, the vibrator valve, feature 17, must be open. Adjust it so that you feel maximum vibration at the head of the
machine. This will insure that all media gets “shaken” to the bottom of the tank. You should only need to adjust it once and
then you can leave it alone, there is no need to close it.
PROTECTION FOR INSIDE THE MACHINE
No damage to the machine will occur by leaving water and media inside of it. However, if water is left in the machine longer
than 24 hours it will begin to smell foul. For this reason, when the machine will not be in use for a long time, it is recommended
that you remove water and sand from machine either by blasting it out or by removing the bottom flange, feature 13 and
allowing it to drain. Refer to the user’s manual for instructions on how to do this.
CHANGE OR STOPPAGE OF ABRASIVE FLOW - assuming proper installation, air pressure and
abrasive.
Check media quality. Your machine is designed to run with clean, high quality abrasive. Dirt will turn into mud, clay will harden,
etc.
Check blast nozzle - if foreign matter should accidentally enter the machine, a stoppage can occur. FULLY DEPRESSURIZE
MACHINE FIRST!
The air pressure gauge on machine is important and should be replaced when broken or inoperative, in order to sustain
productive and profitable results.
- WARNING OSHA regulations require remote controls (point of operations controls) on all blast machines. Basic manual
control machines shown in this manual are for the convenience of customers having existing remote control
systems and for selecting various remote control systems offered.
DUSTLESS BLASTING is an MMLJ, Inc. Company, the original manufacturer of blast equipment,
and still the only to offer a lifetime warranty on tank assemblies. Built in America with quality. Patent since 1941.
5711 Schurmier Road, Houston TX 77048
(800) 727-5707 Toll Free
(713) 869-2227 Int’l
www.DustlessBlasting.com
BULLETIN DO-OTMR
Reproduction of data contained herein expressly forbidden without written permission
MADE IN USA
PAGE 3
IMPORTANT
(Pertinent to all abrasive blast cleaning machines.)
WARNING
Before operating any abrasive blast cleaning equipment , READ ALL operating and
maintenance instructions. Personal protective equipment is REQUIRED when using this type of
equipment. Operator MUST be equipped with heavy canvas or leather gloves, apron, and arm
protectors. Safety shoes and hearing protection MUST be work when required. NIOSH
approved air fed respirators (helmets) furnished with at least Grade D breathing air MUST be
used for protection against dust inhalation. Air MUST be filtered and monitored for Carbon
Monoxide.
DANGER
Use of abrasive cleaning equipment with silica sands may produce a heavy concentration of
silica dust. Breathing this dust can produce “Silicosis”, a permanent lung disease. Depending
upon the object to be cleaned, blasting, even with non-silica abrasives may release hazardous
dust particles into the air that can cause permanent lung damage. Failure to use NIOSH
approved air fed respirator (helmet) may cause SERIOUS lung DAMAGE. This warning, as to
the proper use of an approved respirator (helmet) applies not only to the operator, but extends
to all those working in or around the blasting area. such as pot tenders, painters, supervisors,
etc.
CAUTION
Blast cleaning equipment and components are subjected to wear and deterioration.
Keep your equipment in good operable condition.
MAINTAIN nozzle controlat all times during operation.
INSPECT machine nozzles, hoses, and couplings.
WIRE all kwik-fit hose couplings together.
Inspect, clean, or replace helmet lens and filters frequently.
Ground equipment to AVOID electrical schock.
DO NOT operate any machine without thorough knowledge of machine operation.
Carefully READ the INSTALLATION, OPERATING, and MAINTENANCE directions supplied
with the machine from the factory. If you do not have a copy, please contact your employer
(supervisor) or MMLJ Inc. Company, 5711 Schurmier Road Houston TX 77048
Toll free (800) 727-5707 International (713) 869-2227
www.DustlessBlasting.com
PAGE 4