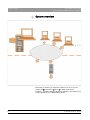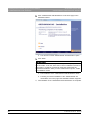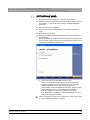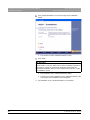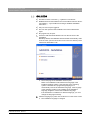
1
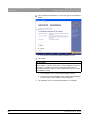
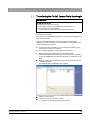
kÉï=~ë=çÑW==
MVKOMNQ
loqelmelp=udP=L=loqelmelp=udR=L==
loqelmelp=udPaêÉ~Çó=L=loqelmelp=udPa=L==
d^ifiblp===`çãÑçêí=L=d^ifiblp===`çãÑçêímäìë
pçÑíï~êÉ=áåëí~ää~íáçå
båÖäáëÜ
Software installation for 2D / 3D X-ray systems
=
Sirona Dental Systems GmbH
Contents
Software installation ORTHOPHOS XG / GALILEOS
1
Structure of the document .......................................................................................
4
1.1
Identification of danger levels.......................................................................
4
1.2
Formats and symbols used ..........................................................................
4
2
Scope of supply .......................................................................................................
5
3
System overview .....................................................................................................
6
4
Establishing the network connection .......................................................................
7
5
Installing the RCU (only for ORTHOPHOS XG3D or GALILEOS) ..........................
8
5.1
Setting the time zone and time.....................................................................
8
5.2
Installing the SIDEXIS Client........................................................................
8
5.3
Installing the "Sirona reconstruction server" software ..................................
9
Installing the device software (plug-in) on the workstations ....................................
14
6.1
ORTHOPHOS XG3 / XG5 / XG3Dready ......................................................
15
6.2
ORTHOPHOS XG3D ...................................................................................
17
6.3
GALILEOS....................................................................................................
19
7
Setting up the X-ray component ..............................................................................
21
8
Activating licenses ...................................................................................................
22
8.1
"Floating" licenses upon delivery of the X-ray system..................................
22
8.2
Transferring the "initial" license file to the dongle.........................................
23
Upgrading software licenses ...................................................................................
25
6
9
61 42 389 D 3437
D 3437.031.02.10.02
09.2014
3
båÖäáëÜ
Contents
1 Structure of the document
Sirona Dental Systems GmbH
1.1 Identification of danger levels
Software installation ORTHOPHOS XG / GALILEOS
1
Structure of the document
1.1 Identification of danger levels
To prevent personal injury and material damage, please observe the
warning and safety information provided in this document. Such
information is highlighted as follows:
DANGER
An imminent danger that could result in serious bodily injury or death.
WARNING
A possibly dangerous situation that could result in serious bodily injury
or death.
CAUTION
A possibly dangerous situation that could result in slight bodily injury.
NOTICE
A possibly harmful situation which could lead to damage of the product
or an object in its environment.
IMPORTANT
Application instructions and other important information.
Tip: Information on making work easier.
1.2 Formats and symbols used
The formats and symbols used in this document have the following
meaning:
Prerequisite
Prompts you to do something.
1. First action step
2. Second action step
or
➢
Alternative action
Result
➢ Individual action step
4
see "Formats and symbols
used [ → 4]“
Identifies a reference to another
text passage and specifies its page
number.
● List
Designates a list.
"Command/menu item"
Identifies commands, menu items
or quotations.
61 42 389 D 3437
D 3437.031.02.10.02 09.2014
Sirona Dental Systems GmbH
2 Scope of supply
Software installation ORTHOPHOS XG / GALILEOS
2
ORTHOPHOS XG 3 / 5 / XG3Dready
Scope of supply
● ORTHOPHOS XG Workstation CD
The installer for the ORTHOPHOS XG 3 / 5 / XG3Dready (plug-in)
software is located on the ORTHOPHOS XG Workstation CD.
Besides the complete ORTHOPHOS XG (plug-in) installation, this
CD also contains other tools that can also be installed by the
selection software on the CD.
GALILEOS
● GALILEOS Workstation CD
The installer for the GALILEOS (plug-in) software is on the
GALILEOS Workstation CD. Besides the complete GALILEOS XG
(plug-in) installation, this CD also contains other tools that can also
be installed by the selection software on the CD.
båÖäáëÜ
● Dongle with the following Licenses [ → 22]:
– 1x "Sirona reconstruction server" software
– 2x "GALAXY" full version (3D visualization)
– 1x "GALILEOS Implant" (3D implant planning)
● Sirona reconstruction server CD
The installer for the "Sirona reconstruction server" software is located
on the Sirona reconstruction server CD.
ORTHOPHOS XG3D
● ORTHOPHOS XG3D Workstation CD
The installer for the ORTHOPHOS XG3D (plug-in) software is located
on the ORTHOPHOS XG3D Workstation CD. Besides the complete
ORTHOPHOS XG3D (plug-in) installation, this CD also contains
other tools that can also be installed by the selection software on the
CD.
● Dongle with the following Licenses [ → 22]:
– 1x "Sirona reconstruction server" software
– 2x "GALAXY" full version (3D visualization)
– 1x "GALILEOS Implant" (3D implant planning)
● Sirona reconstruction server CD
The installer for the "Sirona reconstruction server" software is located
on the Sirona reconstruction server CD.
61 42 389 D 3437
D 3437.031.02.10.02
09.2014
5
3 System overview
Sirona Dental Systems GmbH
Software installation ORTHOPHOS XG / GALILEOS
3
System overview
Depending on whether you install the software for a 2D or 3D X-ray
system, the Reconstruction Control Unit (RCU) must also be
installed [ → 8] besides installing the device software in 3D-capable X-ray
systems (GALILEOS or ORTHOPHOS XG3D).
6
61 42 389 D 3437
D 3437.031.02.10.02 09.2014
Sirona Dental Systems GmbH
4 Establishing the network connection
Software installation ORTHOPHOS XG / GALILEOS
4
Establishing the network connection
Once the X-ray unit was set up according to the installation instructions,
the X-ray unit, and in the case of 3D X-ray systems, the associated Sirona
Reconstruction Control Unit (RCU) must be connected to the local
network.
✔ The conditions described in the "Installation requirements" document
are met.
✔ The X-ray unit has been installed according to the installation
instructions.
✔ The unit installer has administrator rights.
1. Connect the X-ray unit to the local network using the media converter.
3. Assign the necessary user rights for the future users of the system in
the network.
61 42 389 D 3437
D 3437.031.02.10.02
09.2014
7
båÖäáëÜ
2. Only for ORTHOPHOS XG3D or GALILEOS:
Connect the RCU with the local network.
5 Installing the RCU (only for ORTHOPHOS XG3D or GALILEOS)
5.1 Setting the time zone and time
Sirona Dental Systems GmbH
Software installation ORTHOPHOS XG / GALILEOS
5
Installing the RCU (only for ORTHOPHOS
XG3D or GALILEOS)
5.1 Setting the time zone and time
✔ The Sirona Reconstruction Control Unit (RCU) is connected and put
into operation. All connections (keyboard, mouse, monitor, network)
are established.
✔ The dongle included in the delivery is plugged to a USB port on the
RCU.
1. Switch the RCU on.
2. Set the correct time zone and time on the RCU.
5.2 Installing the SIDEXIS Client
Before installing the "Sirona Reconstruction Server "software, SIDEXIS
Client must be installed on the RCU.
✔ Sidexis has already been installed on the SIDEXIS server and
optionally on the workstations (Clients) in accordance with the
SIDEXIS installation instructions.
IMPORTANT
Possible drop in performance
It is generally possible to perform SIDEXIS standalone installation (with
SIDEXIS server and SQL database) on the RCU.
However, Sirona advises strongly against it, as it may lead to significant
drop in performance in this case.
➢ Install the SIDEXIS Client on the RCU according to SIDEXIS
installation instructions.
8
61 42 389 D 3437
D 3437.031.02.10.02 09.2014
Sirona Dental Systems GmbH
5 Installing the RCU (only for ORTHOPHOS XG3D or GALILEOS)
Software installation ORTHOPHOS XG / GALILEOS
5.3 Installing the "Sirona reconstruction server" software
5.3 Installing the "Sirona reconstruction server"
software
✔ The RCU must be connected [ → 7] with the local network.
✔ Prior to installation of the "Sirona Reconstruction Server ", SIDEXIS
Client must be installed on the RCU according to SIDEXIS installation
instructions.
✔ Only one user may be logged in.
✔ The user who performs the installation must have administrator
rights.
ª The home page of the installation wizard opens.
NOTE: The installation wizard detects the language of the
installed operating system. If the language of the operating
system is available as a programming language, it is
automatically used as the installation language. If the language
of the operating system is not available as the installation
language, English is used as the installation language.
If the RCU is installed in a different language, you must change
the language manually.
Note: The RCU comes with an operating system in English.
61 42 389 D 3437
D 3437.031.02.10.02
09.2014
9
båÖäáëÜ
✔ No program may be open.
1. Insert the "Sirona reconstruction server CD" into the CD drive of an
RCU.
NOTE: By default, the RCU installation wizard will start automatically.
If this is not the case, open the file "autorun.exe" in the root directory
of the "Sirona reconstruction server CD."
5 Installing the RCU (only for ORTHOPHOS XG3D or GALILEOS)
5.3 Installing the "Sirona reconstruction server" software
Sirona Dental Systems GmbH
Software installation ORTHOPHOS XG / GALILEOS
2. Click the language you prefer in the bottom bar on the home screen.
ª The installation language is changed.
3. Click "Sirona Reconstruction Server " on the home page of the
installation wizard.
ª The window to install the "Sirona Reconstruction Server "
program opens.
4. Click "Next".
IMPORTANT
If the .Net Framework 3.5 is not yet installed, you will be prompted at this
time to install it. To do this, follow the on-screen installation instructions.
If necessary, you will be prompted to restart the system after the
Framework installation. After you have restarted the computer, restart
the installation routine.
10
61 42 389 D 3437
D 3437.031.02.10.02 09.2014
5 Installing the RCU (only for ORTHOPHOS XG3D or GALILEOS)
Software installation ORTHOPHOS XG / GALILEOS
5.3 Installing the "Sirona reconstruction server" software
båÖäáëÜ
Sirona Dental Systems GmbH
ª The installation wizard for the "Sirona Control Server" opens.
5. Click "Next".
IMPORTANT
Sirona recommends that you do not change the password.
ª The window for changing the password opens.
6. Click "Next".
ª The window for specifying the installation directory opens.
61 42 389 D 3437
D 3437.031.02.10.02
09.2014
11
5 Installing the RCU (only for ORTHOPHOS XG3D or GALILEOS)
5.3 Installing the "Sirona reconstruction server" software
Sirona Dental Systems GmbH
Software installation ORTHOPHOS XG / GALILEOS
IMPORTANT
Insufficient hard disk space
Do not install the temporary directory on the C drive.
Sirona supplies the RCU with a sufficiently large D drive. Select this
drive as the temporary directory.
7. Select the target directory for the temporary data.
NOTE: The target directories for the "Sirona Reconstruction Server "
program are specified by the system.
8. Click "Next".
ª The window to configure "Sirona Control Server" opens.
9. Select the RCU as the installation computer in the list box "Host".
10. NOTE: In most cases, the default port number can be retained.
Enter a port number in the text box "Port".
11. Check the destination directory for the SQL Server and the image
storage.
12. Click "Next".
12
61 42 389 D 3437
D 3437.031.02.10.02 09.2014
5 Installing the RCU (only for ORTHOPHOS XG3D or GALILEOS)
Software installation ORTHOPHOS XG / GALILEOS
5.3 Installing the "Sirona reconstruction server" software
båÖäáëÜ
Sirona Dental Systems GmbH
ª The window to start the installation opens.
13. Click "Next".
ª The installation of the "Sirona Control Server" starts.
ª The window to complete the installation opens.
14. Click "Finish".
ª Following successful installation of the "Sirona Control Server",
the "Sirona Reconstruction Server" program is now installed
automatically.
ª The home page of the installation wizard is displayed again.
ª Installation of the "Sirona Reconstruction Server " program, and
therefore, installation of the RCU is completed.
61 42 389 D 3437
D 3437.031.02.10.02
09.2014
13
6 Installing the device software (plug-in) on the workstations
Sirona Dental Systems GmbH
Software installation ORTHOPHOS XG / GALILEOS
6
Installing the device software (plug-in) on
the workstations
In order to operate an X-ray unit at a workstation using SIDEXIS, the
corresponding device plug-in has to be installed on the workstation.
IMPORTANT
Device plug-in XG with SIDEXIS XG
ORTHOPHOS XG3 / XG5 or XG3Dready with SIDEXIS XG
This device plug-in for X-ray units of the type ORTHOPHOS XG3 / XG5
or XG3Dready already exists in the SIDEXIS XG software. If a unit of this
type is operated at a workstation using SIDEXIS XG, the device plug-in
need not be installed.
If an X-ray unit of the type ORTHOPHOS XG3 / XG5 or XG3Dready is
operated with SIDEXIS 4, the corresponding device plug-in must be
installed [ → 15].
14
61 42 389 D 3437
D 3437.031.02.10.02 09.2014
Sirona Dental Systems GmbH
6 Installing the device software (plug-in) on the workstations
Software installation ORTHOPHOS XG / GALILEOS
6.1 ORTHOPHOS XG3 / XG5 / XG3Dready
6.1 ORTHOPHOS XG3 / XG5 / XG3Dready
✔ Only one user may be logged in.
✔ The user who performs the installation must have administrator
rights.
✔ No program may be open.
båÖäáëÜ
1. Insert the "ORTHOPHOS XG Workstation CD" into the CD drive of
the workstation.
NOTE: By default, the installation wizard will start automatically. If this
is not the case, open the file "autorun.exe" in the root directory of the
"ORTHOPHOS XG Workstation CD."
ª The home page of the installation wizard opens.
NOTE: The installation wizard detects the language of the
installed operating system. If the language of the operating
system is available as a programming language, it is
automatically used as the installation language. If the language
of the operating system is not available as the installation
language, English is used as the installation language.
If the workstation is installed in a different language, you must
change the language manually.
2. Click the language you prefer in the bottom bar on the home screen.
ª The installation language is changed.
61 42 389 D 3437
D 3437.031.02.10.02
09.2014
15
6 Installing the device software (plug-in) on the workstations
6.1 ORTHOPHOS XG3 / XG5 / XG3Dready
Sirona Dental Systems GmbH
Software installation ORTHOPHOS XG / GALILEOS
3. Click "ORTHOPHOS XG Workstation" on the home page of the
installation wizard.
ª The window to install "ORTHOPHOS XG Workstation" opens.
4. Click "Next".
IMPORTANT
If the .Net Framework 4 is not yet installed, you will be prompted at this
time to install it. To do this, follow the on-screen installation instructions.
If necessary, you will be prompted to restart the system after the
Framework installation. After you have restarted the computer, restart
the installation routine.
ª The installation of the "ORTHOPHOS XG Workstation" starts.
ª Following successful installation of the "ORTHOPHOS XG
Workstation", the home page of the installation wizard reappears.
ª The installation of the "ORTHOPHOS XG Workstation" is completed.
16
61 42 389 D 3437
D 3437.031.02.10.02 09.2014
Sirona Dental Systems GmbH
6 Installing the device software (plug-in) on the workstations
Software installation ORTHOPHOS XG / GALILEOS
6.2 ORTHOPHOS XG3D
6.2 ORTHOPHOS XG3D
✔ The RCU must be connected [ → 7]with the local network.
✔ SIDEXIS Client and the software must "Sirona Reconstruction Server
"be installed [ → 8]on the RCU according to SIDEXIS installation
instructions.
✔ Only one user may be logged in.
✔ The user who performs the installation must have administrator
rights.
✔ No program may be open.
båÖäáëÜ
1. Insert the "ORTHOPHOS XG3D Workstation CD" into the CD drive of
the workstation.
NOTE: By default, the installation wizard will start automatically. If this
is not the case, open the file "autorun.exe" in the root directory of the
"ORTHOPHOS XG3D Workstation CD."
ª The home page of the installation wizard opens.
NOTE: The installation wizard detects the language of the
installed operating system. If the language of the operating
system is available as a programming language, it is
automatically used as the installation language. If the language
of the operating system is not available as the installation
language, English is used as the installation language.
If the workstation is installed in a different language, you must
change the language manually.
2. Click the language you prefer in the bottom bar on the home screen.
ª The installation language is changed.
61 42 389 D 3437
D 3437.031.02.10.02
09.2014
17
6 Installing the device software (plug-in) on the workstations
6.2 ORTHOPHOS XG3D
Sirona Dental Systems GmbH
Software installation ORTHOPHOS XG / GALILEOS
3. Click "XG3D Workstation" on the home page of the installation
wizard.
ª The window to install "XG3D Workstation" opens.
4. Click "Next".
IMPORTANT
If the .Net Framework 4 is not yet installed, you will be prompted at this
time to install it. To do this, follow the on-screen installation instructions.
If necessary, you will be prompted to restart the system after the
Framework installation. After you have restarted the computer, restart
the installation routine.
ª The installation of the "XG3D Workstation" starts.
ª Following successful installation of the "XG3D Workstation", the
home page of the installation wizard reappears.
ª The installation of the "XG3D Workstation" is completed.
18
61 42 389 D 3437
D 3437.031.02.10.02 09.2014
Sirona Dental Systems GmbH
6 Installing the device software (plug-in) on the workstations
Software installation ORTHOPHOS XG / GALILEOS
6.3 GALILEOS
6.3 GALILEOS
✔ The RCU must be connected [ → 7]with the local network.
✔ SIDEXIS Client and the software must "Sirona Reconstruction Server
"be installed [ → 8]on the RCU according to SIDEXIS installation
instructions.
✔ Only one user may be logged in.
✔ The user who performs the installation must have administrator
rights.
✔ No program may be open.
båÖäáëÜ
1. Insert the "GALILEOS Workstation CD" into the CD drive of the
workstation.
NOTE: By default, the installation wizard will start automatically. If this
is not the case, open the file "autorun.exe" in the root directory of the
"GALILEOS Workstation CD."
ª The home page of the installation wizard opens.
NOTE: The installation wizard detects the language of the
installed operating system. If the language of the operating
system is available as a programming language, it is
automatically used as the installation language. If the language
of the operating system is not available as the installation
language, English is used as the installation language.
If the workstation is installed in a different language, you must
change the language manually.
2. Click the language you prefer in the bottom bar on the home screen.
ª The installation language is changed.
61 42 389 D 3437
D 3437.031.02.10.02
09.2014
19
6 Installing the device software (plug-in) on the workstations
6.3 GALILEOS
Sirona Dental Systems GmbH
Software installation ORTHOPHOS XG / GALILEOS
3. Click "GALILEOS Workstation" on the home page of the installation
wizard.
ª The window to install "GALILEOS Workstation" opens.
4. Click "Next".
IMPORTANT
If the .Net Framework 4 is not yet installed, you will be prompted at this
time to install it. To do this, follow the on-screen installation instructions.
If necessary, you will be prompted to restart the system after the
Framework installation. After you have restarted the computer, restart
the installation routine.
ª The installation of the "GALILEOS Workstation" starts.
ª Following successful installation of the "GALILEOS Workstation",
the home page of the installation wizard reappears.
ª The installation of the "GALILEOS Workstation" is completed.
20
61 42 389 D 3437
D 3437.031.02.10.02 09.2014
Sirona Dental Systems GmbH
7 Setting up the X-ray component
Software installation ORTHOPHOS XG / GALILEOS
7
Setting up the X-ray component
Once the necessary software components were installed on the RCU and
the workstations, the appropriate X-ray component must be set up on the
workstations using the "Configuration of the X-ray components" software.
✔ The workstations and the X-ray unit are ready for operation.
✔ In ORTHOPHOS XG3D or GALILEOS:
The RCU is ready for operation.
båÖäáëÜ
➢ Set up the X-ray component.
The setting up of the X-ray component is described in the installation
instructions for the X-ray unit in the "Setting up the commissioning/Xray component via the SIXABCon program" section.
Tip: Sirona recommends setting up the X-ray component using the
"Boot service".
61 42 389 D 3437
D 3437.031.02.10.02
09.2014
21
8 Activating licenses
Sirona Dental Systems GmbH
8.1 "Floating" licenses upon delivery of the X-ray system
8
Software installation ORTHOPHOS XG / GALILEOS
Activating licenses
8.1 "Floating" licenses upon delivery of the X-ray
system
A 3D X-ray system, such as GALILEOS or ORTHOPHOS XG3D comes
with the following "floating licenses" on the dongle, i.e. licenses limited to
a certain number of times the software can be accessed:
● 1x "Sirona reconstruction server" software
● 2x "GALAXY" full version (3D visualization)
● 1x "GALILEOS Implant" (3D implant planning)
IMPORTANT
No license without dongle
The dongle must be inserted into a USB port on the RCU after the unit
is put into operation for the first time.
License limitation
The "GALAXY" full version, "GALILEOS Implant" and the use of the
"Sirona reconstruction server" software are limited to 200 times access.
The sectional magnification may be used 20 times.
Removing the license limitation
Once the unit is calibrated and set up, the technician will fill out a takeover
record and send the same together with the data of end customers to the
Customer Service Center (CSC) at Sirona.
The Customer Service Center will create an individual license. This is
available only as a file and is referred to as the "initial" license file.
The "initial" license file is sent to the end customers either as an email
attachment or burnt on CD.
Following the transfer of the "initial" license file to the dongle, the license
limitations for the software are removed [ → 23].
22
61 42 389 D 3437
D 3437.031.02.10.02 09.2014
Sirona Dental Systems GmbH
8 Activating licenses
Software installation ORTHOPHOS XG / GALILEOS
8.2 Transferring the "initial" license file to the dongle
8.2 Transferring the "initial" license file to the dongle
IMPORTANT
Saving the license file
The license file needs to be saved...
– on removable media (e.g. CD-ROM or USB flash drive, or
– on the desktop of the workstation
..., so as to enable transfer of the license file to the dongle.
The "initial" license file contains license information that must be
transferred to the dongle.
Using the "SIDEXIS Manager" and the "SIRONA Control Admin"
software, the "initial" license file is transferred from a workstation of the
practice network to the dongle.
✔ The RCU and the workstation, from which the license file is to be
transferred, are ready for operation.
✔ The dongle is plugged into the USB port on the RCU.
1. When installing the license file from removable media:
Insert the CD with the license file into the CD drive of the workstation,
or plug the USB flash drive with the license file to a USB slot on the
RCU.
2. Start the "Sirona Control Admin" program at the workstation via the
"SIDEXIS Manager"
(see SIDEXIS XG or SIDEXIS 4 user manual).
3. Click the "Licenses" tab.
4. Click on the "Load license file..." button.
ª A window for selecting the license file opens.
61 42 389 D 3437
D 3437.031.02.10.02
09.2014
23
båÖäáëÜ
The licenses are managed via the RCU, i.e. the dongle is plugged into a
USB slot on the RCU.
8 Activating licenses
Sirona Dental Systems GmbH
8.2 Transferring the "initial" license file to the dongle
Software installation ORTHOPHOS XG / GALILEOS
IMPORTANT
Name of the license file
The license file can be identified by the name
"Activation codes-Serial number.xml ".
Serial number = Sirona-specific code.
5. Select the license file and click "Open".
ª The license file is transferred to the dongle.
6. Following successful transfer of the license file to the dongle, click
Exit.
ª The "Sirona Control Admin" program is terminated and the
window closed.
7. When installing the license file from removable media:
Remove the CD from the CD drive or remove the USB flash drive
"safely" from the USB port on the workstation.
24
61 42 389 D 3437
D 3437.031.02.10.02 09.2014
Sirona Dental Systems GmbH
9 Upgrading software licenses
Software installation ORTHOPHOS XG / GALILEOS
9
Upgrading software licenses
Once the order for a license upgrade has been received at the Sirona
Customer Service Center (CSC), the customer profile is retrieved using
the current licenses. The newly acquired licenses are supplemented in
the customer profile and a new "initial" license file is generated.
This new "initial" license file is sent to the customer on CD-ROM by mail.
At the customer's request, this license file can also be sent as an e-mail
attachment in advance.
båÖäáëÜ
The new license file needs to be newly installed [ → 23]at the customer.
61 42 389 D 3437
D 3437.031.02.10.02
09.2014
25
tÉ=êÉëÉêîÉ=íÜÉ=êáÖÜí=íç=ã~âÉ=~åó=~äíÉê~íáçåë=ïÜáÅÜ=ã~ó=ÄÉ=êÉèìáêÉÇ=ÇìÉ=íç=íÉÅÜåáÅ~ä=áãéêçîÉãÉåíëK
«=páêçå~=aÉåí~ä=póëíÉãë=dãÄe=OMNQ
a=PQPTKMPNKMOKNMKMO MVKOMNQ
péê~ÅÜÉW ÉåÖäáëÅÜ
ûKJkêKW= NNV=QOS
mêáåíÉÇ=áå=dÉêã~åó
páêçå~=aÉåí~ä=póëíÉãë=dãÄe
áå=íÜÉ=rp^W
c~Äêáâëíê~≈É=PN
aJSQSOR=_ÉåëÜÉáã
dÉêã~åó
ïïïKëáêçå~KÅçã
páêçå~=aÉåí~ä=póëíÉãë=ii`
QUPR=páêçå~=aêáîÉI=pìáíÉ=NMM
`Ü~êäçííÉI=k`=OUOTP
rp^
lêÇÉê=kç
SN=QO=PUV=a=PQPT