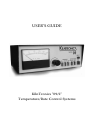
1
USER'S GUIDE
KilnTronics "09/2"
Temperature/Rate Control Systems
Third Edition
September 22, 1994
This document was prepared by Warner Instruments, for the
specific purpose of instructing it's customers in the use of it's
product. All rights, domestic and international, are reserved by
Warner Instruments. Requests for permission to reproduce or
distribute this document should be addressed to:
Warner Instruments
1320 Fulton Street PO Box 604
Grand Haven, Michigan 49417-0604
©1982 -1994 by Warner Instruments Grand Haven, Michigan
49417 USA ... All rights reserved. No part of this publication may be
reproduced, stored in a retrieval system, or transmitted, in any form
or by any means, electronic, mechanical, photocopying, recording
or otherwise, without the prior written permission of the publisher.
No patent liability is assumed with respect to the use of the
information contained herein. While every precaution has been
taken in the preparation of this document, the publisher assumes
no responsibility for errors or omissions. Neither is any liability
assumed for damages resulting from the use of the information
contained herein.
®KilnTronics is a registered trademark of the American Art Clay Company
™FireRight is a tradename of Warner Instruments.
This document formerly provided as Handbook Number 451004
PERSONAL NOTE FROM THE WRITERS
The KilnTronics Model 09/2 was produced during late 1970's and
early 1980's. The controller was very well received, since it was the
first practical kiln temperature controller to offer automatic
regulation of the heat-up rate. Many, if not most, of these units are
probably still in use today.
The Model 09/2 controller was eventually replaced by the Model
09VR, which offered advanced features suggested by 09/2 users.
Nevertheless, in its day, the Model 09/2 was the most popular
electronic kiln temperature controller on the market, and it remains
a very useful tool for those who still own one.
"WHO NEEDS A LEARNER'S MANUAL FOR KILN
CONTROLS?"
The answer ... almost everyone except an electronic process control
specialist. Today's controls are very sophisticated compared to
those of just a few years ago. Some of the controller's functions and
features are not obvious, and a little reading will guarantee that you
get the most out of your kiln and its control system.
We encourage you to learn ALL about your remarkable 09/2
control system.
Warner Instruments
TABLE OF CONTENTS
Introduction
Limited Warranty
Cautions and Warnings
Features Involving Safety
Cone Charts
Installation & Hook-Up
Mounting the Power Controller
Mounting the Temperature Sensor
Choosing a Location for the Temperature/Rate Controller
Hooking things Up
Explanation of Controls
On/Off Switch
The Temperature Indicator and it's Two Control Switches
The Limit Controls
The Set Point Ramp Generator and It's Controls
Prefiring check-out
Troubleshooting
Technical Assistance - Factory Service
Firing Instructions:
General Information
Pyrometric Cones
Overtime - Over-temperature
Basic (Biscuit) Firings - Step by Step
Glaze Firings
Crystalline Glaze
Appendix:
Cone Charts
Wiring Diagrams
INTRODUCTION
But do I REALLY have to take a course on 'How to Operate an
Electronic Kiln Control System' to use this one?" No - not if you (1)
like to experiment, (2) have a lot of time, and (3) really enjoy
surprises.
If you want to learn to use all the functions and features which this
control systems offers, approach it the same way you would any
new toy ... with a healthy curiosity and an open mind. It probably
far exceeds what you've become used to over the years. And it's
probably a lot more advanced you'd expect from a control system
inexpensive enough to call your own.
The 09/2 control system, will work with virtually any kiln. It's
popularity is almost universal. Hobbyists enjoy being relieved from
many of the doubts and uncertainties often connected with firing
kilns. Schools, ceramic shops and teaching studios like the load-toload repeatability that results from firing according to a closely
controlled schedule, time after time. Professional artists and
production potters go for the expanded firing capabilities possible
with this advanced control system. Industrial users like the
comparative simplicity and low pricing of the system.
And everybody likes the CONVENIENCE of not having to baby-sit
the kiln for hours on end!
If you're on the industrial end of the user spectrum, you're certainly
not going to be intimidated by this little "toy", since you probably
seen systems much more complex and expensive. You, and the
other more impatient readers, might as well head for the
INSTALLATION section and have at it. The rest of us will take the
time to learn to use it right - the first time.
And before we start - an important note ...
The firing instructions given in this booklet are representative only.
Their purpose is to illustrate what the control system can do, and
how you make it do what you want the kiln to do. If you usually do
your firing differently ... great! Learn how to make the control
system fire your kiln your way.
For those who feel their firing knowledge and skill is a bit rusty,
there are several excellent books available. If you have a modemequipped computer, log on to the "Book Stacks Unlimited BBS" at
(216) 694-5732 and do a search on the key-words "ceramics" and
"kilns". Otherwise, your local bookstore will be happy to search its
data base of books in print for relevant titles.
LIMITED WARRANTY
Our products are guaranteed to be free of defects in materials and
workmanship for a period of one (1) year from the date of
purchase.
Please return your WARRANTY REGISTRATION CARD
immediately upon receiving your control system. We must
otherwise use our factory shipping date as the effective date of
purchase, unless you are able to provide some other proof of
purchase upon application for warranty service.
Your rights under this warranty consist solely of requiring us to
repair or, in our sole discretion, to replace, free of charge, F.O.B.
our factory, any defective product received in good condition at
the factory within one (1) year from the date of purchase, and
determined by us to be defective as claimed. Any defect appearing
more than one (1) year from the date of purchase will be deemed
to be due to ordinary wear and tear. Our products are identified
by serial numbers, and cannot qualify for warranty service if their
serial number has been altered or obliterated, or is missing
entirely.
The foregoing constitutes the sole and exclusive remedy of the
purchaser, and the exclusive liability of Warner Instruments,
AND IS IN LIEU OF ANY AND ALL OTHER WARRANTIES;
EXPRESS, IMPLIED OR STATUTORY AS TO
MERCHANTABILITY, FITNESS FOR PURPOSE SOLD,
DESCRIPTION, QUALITY, PRODUCTIVENESS, OR ANY
OTHER MATTER.
Warner Instruments assumes no risk or liability for results of the
use of its products. The giving of, or failure to give, any advice or
recommendations, shall not constitute any warranty by, or
impose any liability upon Warner Instruments. IN NO EVENT
SHALL WARNER INSTRUMENTS BE LIABLE FOR SPECIAL
OR CONSEQUENTIAL DAMAGES, OR FOR DELAY IN
PERFORMANCE OF THIS WARRANTY.
CAUTIONS - WARNINGS
NEVER LEAVE YOUR KILN UNATTENDED BEYOND
THE SCHEDULED FIRING TIME. Never place the
controller on top of your kiln. NEVER CONNECT THE
TEMPERATURE SENSOR TO THE CONTROLLER
WITHOUT ASSURING THAT THE THERMOCOUPLE
ELEMENT HAS BEEN PROPERLY INSTALLED AND
SECURELY FASTENED TO YOUR KILN. No man-made
product can be made fully failsafe. Automatic controls
should be monitored or equipped with back-up safety
devices to an extent which the user deems appropriate after
carefully considering the possibility of failure, and the
probable consequences thereof. The safety of your kiln is
YOUR RESPONSIBILITY
FEATURES INVOLVING SAFETY
In the event of a sensor failure (eventual burn-out, or open
sensor circuit), the controller will automatically provide a
temperature indication exceeding 2500°F, which will cause
the kiln to remain OFF.
Momentary power failures (due to lightening strikes, etc ...)
will cause the controller to latch OFF, so as to prevent
random start-ups, or re-firing previously shut-off loads,
when the power is restored.
The control system is OFF only when manually turned off.
Turn the controller off when not actually in use. To assure
safety, turn the controller off when loading or unloading
your kiln.
INSTALLATION & HOOK-UP
Installation is easy. In most cases, everything is fully assembled and
ready to use. The power line cable and kiln's power cable will have
to be hard-wired to the power contactor inside of your new power
controller. Otherwise, everything is pre-wired, so you can't go
wrong.
In the beginning, 09 control systems were shipped either with a
"field kit" box mounted on the side of the kiln, which contained a
power contactor and fuse ... or with the contactor built right in as
an integral part of the kiln's switch box.
Due to the limited space inside the switch box on most kilns, and
the possibility of rather high ambient temperatures, the "integral"
set up is no longer recommended. Field kit boxes (called "power
controllers" herein) may still be mounted on the outside jacket of
the kiln, near its bottom, if desired ... but a better way is now
recommended. We're now suggesting the power controller be
mounted on the wall, just above the 50-amp electrical receptacle
which you've provided for the kiln (or just below its breaker box, if
your kiln draws more than 50-amps or must otherwise be directwired).
This set up assures that the components of the control system will
not be subjected to temperatures higher than room temperature,
and also permits you to use the control system with any standard
kiln (no modification or alteration of the kiln is required).
The following instructions apply to these "factory pre-wired"
systems. If you have purchased a controller only and intend to
connect it to your own power controls, refer to the wiring diagrams
in the appendix for further hook-up details.
MOUNTING THE POWER CONTROLLER
The power controller is the heavy black box.
NOTE - For 50-amp systems, the power connector on your
kiln's cord and your wall receptacle must match. Standard
replacement cords and wall receptacles are normally
available from your local kiln dealer, if required.
Choose a location on the wall for your 50-amp, 250-volt groundingtype service receptacle (typically NEMA Type 6-50R) ... or near
your kiln's electrical service if mounting a 63-amp (or larger) power
controller. Make sure that the kiln's power cord will be able to
reach the power controller's receptacle.
If you have to mount the power controller on a concrete or cement
block wall, fasten a piece of 3/4" plywood, about 8"x 12" to the wall
using masonry nails or sheet metal screws with plastic anchors, to
provide a mounting surface for the unit.
To accurately locate the pilot holes for the power controller, make a
rubbing of the back of the unit using a piece of paper and a crayon,
transferring the exact hole locations onto the paper.
Tape the paper template to the wall or plywood mounting panel, at
the chosen mounting location. Then start the four #8 x 3/4" pan
head sheet metal screws (provided). Drive these screws straight, and
almost fully into the wall or panel, then remove them and discard
the template.
Remove the cover from the power controller and mount it at this
location.
MOUNTING THE TEMPERATURE SENSOR
Most kilns have a sensor port opposite their peepholes. Use it, if
you can. If you must use one of the peepholes, you will have to be
careful about using the other peepholes for venting purposes, since
the resulting drafts inside the kiln may affect the temperature
measurement.
Push the thermocouple element all the way through the mounting
hole. Its tip should protrude at least 2" into the firing chamber.
Mark the locations of its two screw slots on the jacket of your kiln.
Carefully drill a 7/64" hole through the jacket of your kiln at these
locations.
Push the sensor back into the hole and fasten it in place using the
two #6 x 3/8" slotted hex head sheet metal screws (provided).
CHOOSING A LOCATION FOR THE
TEMPERATURE/RATE CONTROLLER
Most systems are provided with a "free-standing" type
Temperature/Rate Controller ... meaning that you can place it at
any convenient location; on a nearby shelf, table or workbench BUT
NOT ON TOP OF THE KILN!
The control cable and thermocouple extension wires are only seven
feet long, so don't plan on having the controller in the kitchen if
your kiln's in the garage.
It's always a good idea to protect electronic things from extremes of
temperature, since expansion and contraction can lead to early
failures. And, needless to say, you'll want to make sure that the
controller isn't going to wind up in a "busy" location where it'll
accidentally be pushed off the back of a crowded workbench.
HOOKING THINGS UP
Call up your electrician and have him connect the power line and
kiln cables to the contactor terminals inside of the power controller,
and to your 50-amp receptacle (if used). If you choose to make
these connections yourself, PROCEED NO FURTHER UNTIL
YOU HAVE ASSURED YOURSELF THAT ALL POWER HAS
BEEN REMOVED FROM THE SERVICE CABLE WHICH WILL
DELIVER POWER TO THE POWER CONTROLLER.
The power controller requires a source of 208/240vac power. Long
runs of undersized wire will not only present a FIRE AND SAFETY
HAZARD, but will also result in a voltage drop which will limit the
kiln's heating capacity, and may cause the fuses in the power
controller to blow every now and then for no apparent reason (a
real nuisance!). Refer to your kiln's instruction book or the table
provided in the Appendix of this manual and use the wire size
recommended for your kiln, based on its current requirements and
distance from the electrical service.
Observe that one side of the contactor inside the power controller
is equipped with male type "quick connect" terminals, and that we
have already made some connections at these terminals. Bring the
service cable into the power controller, and connect it to this side of
the contactor.
Single Phase Power:
Use the left and right contactor terminals, making no
connection to its center terminal. Connect the ground wire
from the cable to the power controller's chassis.
Three Phase Power:
Use all three contactor terminals, and connect the ground wire
from service cable to the power controller's chassis.
In making these connections, be very careful about your
workmanship. Strip the insulation from the wires very carefully to
avoid cut or broken strands of wire, and make sure that every
strand of each wire is properly inserted and secured inside of the
compression terminals on the contactor. Loose strands of wire, or
loose connections, can cause "hot spots" during operation of the
system. Expansion and contraction then loosens the connection still
more, and it gets still hotter ... and this process eventually burns up
the contactor.
Connect the cable from the 50-amp receptacle (or from the kiln) to
the opposite side of the contactor, in the same manner, so that
when the contactor operates, it will connect the service cable to the
kiln's cable, to provide heater current for the kiln. The ground wire
from the kiln (usually GREEN) must be connected to the power
controller's chassis.
WARNING
Never connect the sensor cable to the controller if the
thermocouple element is not securely fastened to the kiln. If
the sensor should happen to fall out of the kiln, an overfiring could easily result!
DANGER - HIGH VOLTAGE
POWER CONTROLLERS AND KILN SWITCH BOXES
CONTAIN VOLTAGES WHICH ARE HIGH ENOUGH
TO PRODUCE LETHAL ELECTRICAL SHOCKS.
NEVER OPERATE THIS EQUIPMENT WITH THE
COVERS REMOVED. REFER SERVICING TO
QUALIFIED PERSONNEL.
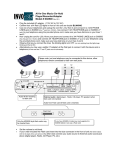
EXPLANATION OF THE CONTROLS
Refer to the front panel of your Temperature/Rate Controller as
you read through the following explanation of what each front
panel feature is and does. Don't be afraid to push the buttons and
turn the knob. You won't break anything.
ON/OFF SWITCH
This switch turns the controller on and off, and thereby serves as an
on/off switch for the kiln. Push this switch in to turn the control
system on; push it again to release it, turning the system off.
Important Point No 1:
It's important for you to know that the controller has a built-in
safety feature which assures that it will always start up in the
"latched off" condition. This feature is activated whenever
power is first applied to the controller ... which may be when
you turn it on, or when power is restored following momentary
power failures (caused by lightening strikes, or backing into the
power pole at the end of the driveway). It assures an orderly,
operator-directed start-up. It also assures that the equipment
will not automatically restart itself, re-firing a previously
completed, or partially fired, load.
Push the POWER ON switch in now. Note that the
temperature indicator rises from 0°F to about 75°F, or whatever
the actual kiln temperature is at the moment. Now push this
button a second time ... it returns to its 'out' position, and the
temperature indication now falls to zero.
Important Point No 2:
It's also important for you to know that the controller never
shuts itself off; it latches its output off, but otherwise remains
fully operational. There will be more on this below, but for now
just remember that the control system is really turned off only
when you physically turn it off with this switch.
THE TEMPERATURE INDICATOR AND IT'S TWO
CONTROL SWITCHES
Now please turn the controller on again, then put your hands in
your pockets. The temperature indicating meter is now displaying
the actual temperature in the kiln.
Have you noticed that, unlike your simple little pyrometer, this
meter works only when you turn the power on?
If you had, good for you! If you hadn't noticed, notice it now. This
isn't just a glorified pyrometer ... nothing of the kind. Your new
controller provides you with a precision, fully compensated
electronic potentiometric temperature measuring system ... (wow!).
Thermocouple type temperature sensors produce a very small
voltage which is roughly proportional to temperature. Your little
pyrometer uses this weak "temperature signal" as its source of
power. This is a neat trick, but unless carefully handled the socalled "limits of uncertainty" become rather broad. If you paid less
than $100 for your pyrometer, its real uncertainties are about
"11.1% of Span", so at cone 10, which should be 2381°F, it may read
anything from 2117°F to 2643°F! Not too good, huh? Your new
controller, on the other hand, is guaranteed to be within 1%, and is
typically calibrated to within 1/4% of Span ... plus or minus only
6.25°F at cone 10 ... about the width of its pointer.
Important Point No 3:
Don't check the controller for accuracy by comparisons with
inexpensive pyrometers. They're in a class by themselves, and
its not fair to them.
Important Point No 4:
With the power turned off, the indicator's pointer should
always rest exactly at the 0°F end-scale mark on the meter.
Although age and vibration may cause this adjustment to shift,
you can always restore it using a small screwdriver at the
"mechanical zero adjustment" on the face of the meter. Never
set it for room temperature, as you would your pyrometer, and
never use it to compensate for suspected calibration errors.
The temperature indicator is also used to display two other values:
the LIMIT temperature setting and the Set Point, or AUTO
temperature setting. But we've learned enough under this heading,
so for now let's just find these switches, and we'll learn more about
them below.
First, push the LIMIT button. The indicator pointer will swing to
some new value between 0°F and 2550°F. (O.K. ... if you just CAN'T
wait, go ahead and turn the LIMIT ADJUST knob and watch the
pointer swing back and forth!)
Next, push the AUTO button. The pointer falls to 0°F, right? (No ...
don't touch it!)
THE LIMIT CONTROLS
In a normal ho-hum type firing, you might increase the kiln's
temperature to some maximum value, then the kiln is shut off and
allowed to cool at its own rate. The "maximum value" shall
hereinafter be referred to as the LIMIT when using this controller.
To set the limit temperature, push the LIMIT button and turn the
LIMIT ADJUST knob until the temperature indicator's pointer
rests exactly at the desired temperature setting. That wasn't
difficult, was it? That's all there is to that. Whenever you want to
check the limit setting, push the LIMIT button. You may do this
even when the kiln is firing: its only effect is to switch the indicator
to the limit signal, so you can do this without upsetting the firing.
Important Point No 5:
The LIMIT ADJUST knob is always enabled, so once you set it,
be careful not to accidentally bump it, thereby inadvertently
changing its setting. Make it a practice to verify the limit setting
as a last step, whenever you do anything else at the control
panel.
So now, what happens at the limit setting?
When you fire your kiln, the controller will automatically regulate
the rate of temperature increase, so that it heats up at a rate of
270°F/Hour (150°C/Hour). When the kiln temperature finally
reaches the LIMIT setting, the controller will shut it off, and latch it
off ... permitting it to cool back down to room temperature at its
own rate.
THE SET POINT RAMP GENERATOR AND IT'S
CONTROLS
The best is yet to come ... and this is it. Here's what sets your
control system apart from any other temperature controller or
shut-off. Here's how it'll pay for itself over and over in the years to
come. Your new controller can control the temperature rate-ofchange between the starting point and the limit setting. This means
convenience! Turn all your kiln's switches on 'High' and let the
controller handle the firing. No need to remember to come back,
time after time, to turn up the switches. Crystalline glaze? ... the
controller's not fully automatic, so you'll need to intervene now and
then, but its a lot more accurate and easier to work with.
You're probably wondering how the controller does it. Briefly, it
uses the power line frequency of 60 cycles per second (50 cycles, in
Europe and certain other locations) as its timing reference. This
'frequency' is divided several times by a 12-stage binary counter, to
provide an accurate, very low frequency time base. This much
slower series of pulses is then counted (accumulated) by an 8-stage
binary up/down counter, and this count is then converted to the
analog voltage which you measure when you push the AUTO
button. ("analog" ... what does that mean ... ? Inside the controller,
all temperature values are represented by voltage levels - i.e., voltage
levels are analogous to temperature levels ... so they're called analog
voltages.) The whole thing works just as if you were standing there
for hours gradually increasing the temperature setting (called the
"Set Point" in polite society).
The power line frequency in most locations is very closely regulated
because of power grid requirements which the power utilities are
forced to comply with. The accuracy of the controller's "ramp
generator" is therefore equal to that of the line frequency ... which is
usually exceptional!
By careful design and calibration, the ramp generator provides a
controlled rate of temperature increase of 270°F per hour
(150°C/Hr). This fixed rate complies with the conventions long
established for pyrometric cones ... and common practice. This is
approximately the rate which you'd achieved if you were to fire your
kiln manually, following its manufacturer's instructions to the letter.
Important Point No 6:
The 'Set Point' value will always be ramped towards the LIMIT
setting, up or down, as required. When it arrives at the limit
value, it will hold at that level, until the kiln temperature
reaches that same value. Then, if the controller is operating in
the shut off mode, the count will be zeroed and latched at zero.
In the HOLD mode, the counters simply remain at a preset
value ...
Say! ... what's these three little buttons next to the LIMIT knob?
The MANUAL - DOWN/HOLD/UP switches allow you to
manually drive the accumulating counters up or down, or to force
them to hold at any desired level. Naturally, you always have to
push the AUTO button in to see what you're doing when you want
to drive the Set Point up or down.
Turn the LIMIT knob all the way up, and reset the controller using
the HOLD button ...
... Huh? "Reset"? ... using the HOLD button?????
Remember we mentioned, above, "Important Point No. 1" ... that
the controller always starts up in its latched-off mode ...? (Tsk, tsk,
tsk!) Press the AUTO button in ... what do you get on the meter?
Right, 0°F! And that's all you'll ever get when the controller is
latched off. To prove it, try holding the AUTO button in while
pressing either the UP or DOWN buttons. Nothing! This zero set
point keeps the kiln off (assuming that the temperature in your part
of the world never drops below 0°F).
To "reset" the latch circuit, press the HOLD button in, then press it
again to release it (Press/Press). Do it now, and see what happens ...
wasn't that exciting? "Click/Click." Now push the AUTO button
again. The meter reads 0°F.
What if you wanted to start firing now? Since the rate is fixed at
270°F/Hour, it would take the set point signal 17-minutes just to get
up to room temperature and turn the kiln on! What a waste of time
... but, not to worry! Simply press the AUTO button in, then the UP
button - is the pointer now moving up-scale? Ahhhh ... that reset
deal really works! ...
What's all this clicking noise? ...
Whenever you drive the Set Point higher than the kiln's actual
temperature, the controller turns the heaters on, and visa versa.
Alternately push the UP and DOWN buttons and watch the red
HEAT ON indicator light.
Oh-oh ... this thing has flipped! We pushed the DOWN button and
the set point flew up to 2500°F, right? Push the UP button in and
hold it in; the needle goes up to 2500°F, then drops back to zero and
starts over. Humm ... let's push the down button and hold it for a
while. Yep; same thing ... in reverse! For the record, this is called
"counter roll-over". In other words, the accumulating counters have
a limited range (2620°F maximum, 0°F minimum). If, when
counting up, they reach their limit, they just stupidly start over
from zero ... but this makes for a nice built in safety feature ...
knowing that they don't have the capability of counting up for ever
and ever in the event that something goes wrong. The "zero rollover" trick also provides a handy way to get to a high Set Point value
in a hurry (good to remember).
Now let's push the HOLD button in and see what that does. Try to
drive the Set Point manually, like we just did above. It's dead, right?
Release the HOLD button, and drive the Set Point to 1500°F. Now
push the HOLD button in again. Did it still disable the ramp
generator? You bet! The HOLD button kills the reference frequency
going to the accumulating counters, so whenever you push it in, the
counters simply stop where they're at and wait. You can use this
button any time you'd like to momentarily stop the progress of a
firing.
For example, you might want to do a little "dry out" at the
beginning of a firing, so you'd set up the whole firing schedule, then
drive the set point up to about 300°F and push the HOLD button in.
After the "smoke out", you'd close the kilns cover and peep holes,
and release the HOLD button - and the firing would then resume
(Boy ... these people think of everything!).
That about does it for the front panel of the controller. As a parting
shot, here's something you must always remember:
WARNING
If, for whatever reason, your kiln is unable to attain
temperatures as high as your limit setting (e.g., low-fire kiln,
low voltage at a the kiln, defective heaters or switches, etc.)
the controller will not be able to shut it off at the limit, and
an over-firing may result.
You should not leave your kiln unattended beyond the
planned firing time. If you plan to do so, you should equip
your control system with either an optional shut-off timer,
or a program time clock, to provide a back-up safety device
which will assure that the kiln is shut off within a
reasonable period of time in the event that something goes
wrong.
PREFIRING CHECK-OUT PROCEDURE
Now let's check out the whole control system, to see if this thing's
really going to work. Incidentally, you'd better get to know this
procedure by heart, since you'll be using it a lot. You'll want to go
through this little routine before every firing, to make sure that
everything is still working right ... and any other time you might
suspect trouble. A 'troubleshooting' section follows. If anything goes
wrong as you go through this simple little check-out ... try it again.
If it's still wrong, check the same item number in the troubleshooting section for some hints as to what might cause problems at
the step where you got hung up.
1. With the controller turned OFF, let's check the mechanical zero
adjustment of the temperature indicator. Line your eyeball up so
that the width of the meter's knife-edge pointer is a small as you
can make it. It should split the 0°F mark on the left end of the
scale. If it's off a little bit, take out your pocket screwdriver and
turn the adjustment of the front of the meter to make it read
right.
2. Now let's hit the POWER ON button to fire this thing up. (Its the
red one.) Checking the meter, it now reads a pleasant 75°F (... or
whatever the kiln temperature actually is). All perfectly correct!
3. Hold the Phone! ... Did we put the sensor in the kiln, or not?
Check it out, will you please. It must be (1) properly secured to
the kiln, with it's tip protruding at least 2" into the firing chamber,
(2) free of any obstructions - nothing shall touch it ... and (3)
there must not be any perceptible movement of the indicator's
pointer when you hold the thermocouple cable firmly near the
sensor and near the controller, and wiggle the cable. Check the
tip for "green rot" too. Eventually it'll eat right through it and then
you can kiss it good-by and toss it into the trash. If it looks like it's
remaining useful life is about and hour and a half, you'd better
plug in a new element before we go any further.
4. Would you now please hold your finger on the LIMIT button,
and we'll check the meter for snags and the LIMIT ADJUST for ...
well, just slowly turn the LIMIT ADJUST knob slowly up and
down and keep your eye on the meter. The pointer should swing
smoothly between about 0°F to just over 2500°F. You're looking
for any sign of "sticktion" or discontinuity (whatever that means
?).
Replacement thermocouple elements are normally available for
immediate shipment - call us at (616) 842-7658.
... if you're done watching the pointer go up/and down, you can
leave it at 500F (but don't let me hurry you. I know it's a lot of
fun.)
5. Now this next item calls for some tricky finger-work on your
part. If you're an accomplished pianist, this will be a breeze ... take
you favorite two fingers (No, no, no ... on the same hand please!).
Place one on the AUTO button and one on the UP button ... very
good. Now, push. Bravo! Bravo! Ooops ... the applause meter
reads zero. Well, you can't please everyone, right? (If the meter
doesn't read zero, you've got a problem - troubleshoot it.)
Push the HOLD button, and push the HOLD button. (That's
right; two times ... Push/Push).
Let's give the applause meter another try. Jab those two fingers
into the AUTO and UP buttons again, but this time do it with
style and finesse. Ayah ... look at that meter climb! Its going to go
right off the end of the scale! (The meter must climb now, and as
it passes the actual temperature in the kiln, the red HEAT ON
light will turn on, and the contactor in the power controller will
also click on). (By the way ... remember what "roll-over" means?)
(See Pg 13)
6. And finally, the finale. While holding the AUTO button in, turn
the LIMIT ADJUST all the way that way (fully counterclockwise). This MUST cause the set point indication to fall to
zero, with the red HEAT ON light and kiln switched off!
That's it ... fun's over!
TROUBLESHOOTING
As mentioned in the previous section, the following items are
numbered to correspond with the steps which make up the
prefiring check-out procedure. Failure of the control system to
perform exactly as that procedure prescribes may indicate a
malfunction. In that case, refer to the trouble-shooting suggestions
which appear in this section, under the same item number.
If a problem does exist, the prefiring check-out procedure will
usually detect it, and the trouble-shooting section will usually
enable you to determine which component of your control system
is at fault. After having established that, refer to the service
information section to find out how to get it fixed.
CAUTION
The power service, the control system's power controller,
and the kiln's switch box all contain electrical potentials
that can readily cause serious injury ... or death. If you are
skilled in electrical work, please work safely.
If you have no electrical skills, please refer service problems
to skilled service personnel.
Meter Problems:
Pointer stuck down-scale: tap the meter front sharply to free
the pointer.
Pointer free, but does not respond to mechanical zero
adjustment: zero adjustment mechanism defective - replace
meter front
Pointer free, but will not zero ... rocking controller from side to
side causes rest position of pointer to change from one
value to another: meter defective - broken taut band replace meter.
Pointer appears to stick or hang-up at one point on the scale:
possible contaminant between meter coil and magnet,
inside meter - hold controller face-up and twist rapidly
back and forth rapidly several times, causing the pointer to
swing wildly back and forth between the limits of the scale
to shake out foreign particles. Pointer may also be fouling
on loose scale plate - remove meter front and readjust scale
plate.
Problems at Turn-On:
HEAT ON light comes on momentarily, but then goes out:
release the HOLD button and try again (this is not
necessarily an abnormal indication)
HEAT ON light comes on as soon as controller is turned on:
thermocouple connections reversed somewhere, else
defective controller - recheck meter reading and if correct,
replace controller. If incorrect, check for reversed sensor
connections. If wired correctly, replace controller.
Controller does not appear to come on at all: recheck power
cord and cable connections.
REMOVE POWER FROM THE SYSTEM, and check the
fuses inside of the power controller. If blown, check for low
power at the power contactor terminals with the kiln full on
(contactor closed manually ... 208vac min - 240vac max).
Inspect the contactor to assure that pole pieces mate
properly when solenoid is energized - clean or replace
solenoid coil, if necessary.
Check the power transformer in controller for overheating
or a "burned" odor - replace if necessary.
Temperature indicator pointer swings immediately up to right
end of scale beyond 2500°F: sensor cable broken or not
properly connected to controller, else sensor burned out, or
controller defective - repair or replace sensor or sensor
cable, if necessary.
If the controller is suspect; disconnect the sensor and short
across the controller's sensor terminals 1 and 2 with a
screwdriver blade - if the indication drops recheck the
sensor circuit - if not, replace the controller.
Temperature indication does not appear to be accurate: inspect
the sensor cable for signs of mechanical damage - replace if
required. Possible indicator problem - tap to assure that
pointer is not sticking, and recheck zero adjustment.
Otherwise controller is defective - replace.
Power control contactor clicks on when controller is turned on,
although HEAT ON light stays off: defective temperature
controller - replace. (Note: the HEAT ON light and the
power contactor may occasionally cycle on and off when
the control system is turned on or off ... this is normal and
inconsequential.)
Sensor Problems:
Indicator pointer jumps when thermocouple cable is wiggled
near controller or sensor: loose connection - check
connections at the sensor, at (or inside of) the temperature
controller.
Sensor not tightly secured to kiln, or does not protrude well
into the firing chamber: THE SENSOR MUST BE
SECURED TO THE KILN - turn the system off, and secure
the sensor now. If the sensor does not protrude at least 2"
into the firing chamber, measuring errors may result.
If the situation seems marginal, pack the sensor port with
ceramic fiber insulation to stop any heat leaks around the
sensor, and proceed.
If accuracy problems arise, or if the sensor is obviously too
short, replace it with a longer type.
LIMIT Problems:
LIMIT reading swings fully up-scale or down-scale, will not
respond to LIMIT ADJUST knob: defective controller replace.
LIMIT reading will not reach 2500°F: possible sticking meter tap face to free pointer. Controller slightly out of
adjustment (useable so long as the desired limit
temperature can be set, but watch limit setting for drift, and
return for service as soon as possible).
LIMIT reading varies erratically as LIMIT ADJUST knob is
moved: loose wiring inside controller or defective
potentiometer - replace controller.
Ramp Problems:
AUTO reading swings fully up-scale, or down-scale to a value
much less than 0°F, while supposedly latched at zero:
controller defective - replace.
AUTO reading higher than 0°F and climbing when AUTO and
UP buttons are pressed: The HOLD button might have
been inadvertently pushed, resetting the shut-off latch prior
to this step - try again the controller is defective and should
be replaced.
Reset Problems:
That's right ... push it two times (Push/Push), leaving it in the
"out" position. If initially left in the "in" position, the HOLD
function will disable the ramp generator with the set point at
0&176;F, and it will appear that the RESET did not take.
More Ramp Problems:
Set point reading will not move off zero when AUTO and UP
buttons are pressed after resetting the shut-off latch: HOLD
button left pushed in, otherwise latch circuit defective replace controller.
AUTO reading moves up, but skips over large segments of the
scale ... or moves up to a point, then falls back and repeats
its travel over the same segment of the scale, never being
able to reach the top: possible indicator sticking (see item
2), else ... counter defect - replace controller.
AUTO reading appears to move up-scale properly, but HEAT
ON light does not come on and the power controller's
contactor does not close as reading passes actual kiln
temperature: recheck indicated kiln temperature; if correct,
output circuit is faulty - repair or replace controller.
AUTO reading appears to move up-scale properly and HEAT
ON light comes on as reading passes actual kiln
temperature, but contactor in power controller does not
close: check control cable for mechanical damage or loose
connection; otherwise ... possible solid state relay failure repair or replace power controller.
... and more Ramp problems ...:
AUTO reading does not fall to zero: shut off latch circuit faulty
- replace controller.
TECHNICAL ASSISTANCE - FACTORY SERVICE
If you think you've got a problem with your control system, refer to
the "Pre-firing Check-Out" section. Then, if necessary, go to the
"Troubleshooting" section of this booklet and attempt a diagnosis.
After you've tried that, if you feel that you need more help, help is
available at ...
FireRight/Warner Instruments
1320 Fulton Street Box 604
Grand Haven, Michigan 49417-0604 usa
Phone: (616) 842-7658
FAX/Data: (616) 842-7658
e-mail: [email protected]
... and we'd welcome an opportunity to help you out!
Control system problems can often be diagnosed over the phone. If
your phone is near enough to your control system to permit you to
discuss the problem and work on the system according to our
instructions during your call, we'll surely find the problem.
Otherwise, "telephone troubleshooting" is effective only about 50%
of the time.
If you have already determined that a particular component of your
control system is defective, phone your dealer, or phone us at the
above number, to determine the warranty status of your unit,
current service rates, and the correct shipping address. Our factory
repair service is highly efficient and very reasonable ... not what
you're used to at all! Generally, anything you return will be "rebuilt"
by our production people, regardless of the reason returned. We
then inspect it, test it, re-calibrate it and get it on it's way back to
you ... usually within one or two working days.
If it's a warranty situation, all this happens with no charge to you,
except possibly for shipping and insurance. If you're paying, you'll
be billed whatever the standard rate is for each item you've sent to
us for service ... and these rates are fixed "flat rates". We can tell you
in advance exactly what the charges will be, and they'll remain the
same regardless of how much time and material we have to put into
your equipment to make it "like new" again!
There's only one hitch ... "false pulls" (items found to be serviceable
- no defect) don't qualify for warranty service, and therefore
automatically accrue the service charge (because everything we
receive must be re-shipped in good condition, and must therefore
be reconditioned, defective or not ... and because "false pulls"
actually take more time and effort to "prove a negative" than units
with catastrophic failures). So please don't get mad and simply
dump everything in a box and send it back to us ... try to decide
what component of your system is bad, then send only that item. If
you're not able to do that, give us a call, and we'll work something
out.
Your dealer may be able to handle your service transaction for you.
If not, pack your component up carefully and ship it to us via UPS,
if possible. We can have UPS call for the package if UPS counter
service is not conveniently available to you. All shipping costs are
billed when we reship your unit to you. A concise service report is
also provided.
SPECIAL NOTE FOR CANADIAN CUSTOMERS
Canadian customers are cautioned to execute the necessary
Canadian customs forms prior to shipping controls for service. You
should complete forms B13 and E15, which identify the equipment
as your property and certify that the required service is not available
in Canada. Our return shipment to you will otherwise be delayed in
Canadian customs, and you might be reassessed duty on the value
of equipment in question.
FIRING INSTRUCTIONS
GENERAL INFORMATION
Firing practices and techniques vary widely. There are probably as
many different opinions as there are books on this subject ... and as
you read more and more, you will find that conflicting information
is commonplace. But there's a message in that, right? ... firing might
not be so complex or critical as many writers and teachers suggest,
and the limits of error are probably fairly wide. So rejoice; you can
probably master it!
But while we're rejoicing ... let us not loose sight of the fact that
firing is also "an art", and as your experience and skill increase, and
as you attempt to create particular effects or duplicate previous
results, you will become increasingly more concerned with its
subtleties. Eventually, you'll forget about the basics and details, and
set up each firing with no more forethought or difficulty than
normally applied to the humming of a favorite tune. Then, when it
comes to firing, you'll also insist on "the Gospel According to You"
... and why not? ... it works for you!
If you're already an expert, you might read the following just for
entertainment ... to see what we say wrong (and to read some things
that you forgot about a long time ago). If you're not an expert,
welcome to our non-exclusive club. Let's get to it!
The stages in a bisque (or "biscuit") firing are generally summarized
as follows:
Water Smoking
... occurring as the kiln temperature increases from room
temperature to about 300°F (150°C). During this time, any free
moisture in the clay boils away.
Dehydration
... removes most of the chemically bonded moisture (as opposed
to "free moisture") as the temperature climbs through the 300 1100°F (150 - 600°C) range. A large volume of superheated
(invisible) steam is generated during this period, and the vapor
pressure in the kiln should be kept reasonably low by simple
venting measures.
Oxidation
... occurs over the 750 - 1650°F (400 - 900°C) range, burning off
most of the carbonaceous content of the clay. If the carbon is
not completely oxidized, "black core" may form inside the body,
or black spots may appear on its surface. At 1470°F (800°C)
most of the moisture and carbon is gone, leaving the other
constituents intact as a somewhat lighter and very porous piece.
With experience, you may learn how to judge the firing result
with the tip of your tongue ... since the suction of the dry biscuit
will draw your moist tongue to it. If too porous, it has not been
fired hard enough ... if too vitreous, it's been over-fired.
Vitrification
... occurs when the fluxes present in the body soften and react
with the clays, gradually changing it to a glass-like substance by
fusion. If taken well beyond the proper firing temperature, the
fluxes begin to boil, causing blistering and bloating. Vitrification
occurs from about 1650°F (900°C) up to the firing temperature
of the clay.
Points of special interest in the firing process focus around
moisture removal and the processes known as "silica inversions".
The rate of temperature increase through the 0 - 300°F (0 - 150°C)
range must be slow enough to permit steam to escape through the
clay without building up bubbles which will eventually burst and
ruin the piece. At about 440°F (225°C), and through the range 1020
- 1070°F (550 - 575°C), the silica inversions cause a sudden
expansion (if heating) or contraction(if cooling) of the body. If
heated or cooled too rapidly through these inversions, the piece
might be damaged or deformed by stresses which develop if its
temperature is not perfectly uniform throughout its mass ... causing
some areas to suddenly expand or contract before others.
Commercial green-ware and other typically thin pieces will usually
tolerate firing rates up to 270°F (150°C) per hour. Thicker pieces
will obviously require slower firing, as will pieces with thick
sections, such as pots with heavy bases ... perhaps as slow as 100°F
(55°C) per hour.
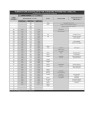
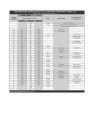
PYROMETRIC CONES
Firing instructions provided with materials, or in texts and
magazine articles, frequently refer to cone numbers rather than
temperatures, because the heat treating process involves both time
and temperature. Pyrometric cones are special formulations which
are designed to mature at different extremes of applied heat, are
therefore useful in gauging the progress of a firing. The 'time vs
temperature' relationship is reflected in the tables furnished in
standard cone charts.
As you can see, a "cone 6" firing can result from a variety of
schedules ...
to 2194°F (1201°C) in 20.5 hours,
to 2232°F (1222°C) in 8.27 hours,
to 2291°F (1255°C) in 4.24 hours,
... etc.
When firing with the controller, you must establish the LIMIT
setting on the basis of the terminal firing rate (i.e., the rate of
temperature change at the end of the firing), using the data
presented in this table as a guide.
Example:
Firing to cone 6, you intend to approach the limit temperature
at a rate of 270°F (150°C) per hour. So you turn to the tables,
find "Cone Number" 6 in the first column, then move your
finger across the page to the "270°F/HR" (or "150°C/HR")
column, to find the suggested LIMIT setting ... which is 2232°F
(or 1222°C).
This matter of rate vs limit setting naturally applies to the final few
hundred degrees of the firing, and you must also consider the
nature of the load ... is the rate slow enough to assure a reasonable
degree of temperature uniformity throughout just prior to shut-off?
On the other hand, if you're firing to a high temperature ... say, over
2100°F ... you might well expect that your kiln will not have enough
heating capacity to keep up with the controller's 270°F/Hr ramp, so
the "final approach" will occur at some slower, kiln dependent, rate.
Experience will help you decide how much to "fudge" on the limit
setting to compensate for this "kiln lag".
OVERTIME OR OVER-TEMPERATURE - OVERFIRED WARE!
This is a simple, but often overlooked point ... its important that
you remember it. You can see from the Cone Charts that firing is a
matter of (1) temperature and (2) time. Too much, or not enough,
of either ... and the results will be poor; perhaps a complete loss.
Keep this in the back of your mind: if you come up with an overfired load, it can just as well be the result of too much time, as too
much temperature.
Suppose that you're firing to a fairly high temperature ... near the
limit of your kiln's capability. Its getting late, and everything's gone
fine up to this point, so you trustingly go to bed thinking that the
kiln will shut off in an hour or so anyway. But then the boys down
at the power plant shut down "Old No 2" for a quick oil change
during the 'off peak' hours (... oops! Your line voltage just dropped
5% ... and so did your kiln's heating capacity).
Finally, the sun comes up, and "Old No 2" and you both come back
on line. After breakfast you go down to unload the kiln ... ouch! Its
still a bit too warm. That's odd, looks like it switched off ok. Humm
... Oh well, let's open it up anyway ...
YECHT! (and a few special cuss words) ... over-fired!
You'll probably never find out why this happened ... and for a long
time your confidence in the control system will be shaken. It
happened, of course, because the volt-loss during the night was just
enough to make your kiln "stall out" just below the LIMIT setting.
So it just sat there and cooked all night long, until the power come
back up; then it finally shut off. Even though the temperature never
got higher than the LIMIT setting, the ware was fired far too long at
that high temperature, and melted down.
There are other ways that this can happen and, as you've probably
guessed, it does happen. This is one of the hazards of modern living!
The main point is this: IF YOU CAN'T BE ON HAND TO ASSURE
THAT THE KILN SHUTS-OFF ON SCHEDULE, ADD A SHUTOFF TIMER OR PROGRAM TIME CLOCK TO YOUR
CONTROL SYSTEM AS A BACK-UP DEVICE
That's the main point. But remember also that if a load has fired
properly according to your schedule, but appears to be a little
overfired, shorten the firing schedule next time. This can be
accomplished simply by reducing the LIMIT setting somewhat. The
reverse would apply to an underfiring, of course, maybe you rushed
it too much.
BASIC (BISCUIT) FIRINGS - Step by Step
1. Perform the prefiring check-out procedure.
2. Push the POWER ON button in.
3. Hold the LIMIT button in, and adjust the LIMIT ADJUST
knob to move the indicator pointer to the desired shut-off
temperature, as determined above (see "Pyrometric Cones)".
4. Set all of your kiln's switches, if used, at "High" (or full-on).
Prop the lid open using an inch-thick piece of firebrick, and
pull the peep hole plugs.
5. Depress and release (push - push) the HOLD button to reset
the shut-off latch. The HOLD button must now be "out".
The firing has now begun ... but from 0°F! In about 17minutes (75°F divided by 270°F/Hour rate) the ramped set
point will reach the kiln's temperature (room-temperature, at
this point). The HEAT ON light will then come on, any you
will hear the contactor in the Power Controller click on. To
eliminate this "dead time", push the AUTO and UP buttons
momentarily to drive the set point rapidly up to the kiln's
temperature.
Allow the controller to "ramp" your kiln up to the shut-off
point at the 270°F/Hr rate. The controller will then latch the
kiln off. Close the cover at about 300°F (150°C) and begin
installing the peep hole plugs.
At 1100°F (600°C) the kiln should be fully closed up.
During the Firing ..
Pushing the LIMIT button during the firing will not upset the
process, and the shut-off setting may be rechecked at will ...
do it; its a good habit to get into. The limit setting may also
be changed during the firing, except that when changed to a
value lower than the kiln's temperature, the shut-off function
will be tripped. To clear that condition, simply set the limit
higher than the kiln's temperature, then press and release
(push - push) the HOLD button. Then, to avoid any loss of
heat, press the AUTO and UP buttons momentarily to drive
the set point back up to the kiln's present temperature, and
pick up the firing where previously disturbed.
The AUTO button may also be used at any time to monitor
the progress of the set point, without disturbing the firing
process.
If you wish to expedite the firing through any zone, you can
manually drive the set point to a somewhat higher lever ...
this forces the kiln to operate at full capacity to catch up, then
it will resume the previously set rate. To do this, push the
AUTO button to display the set point, then push the UP
button to drive the set point to a higher value.
The kiln can be held at any temperature during the firing for
"soak" purposes, simply by pushing the HOLD button in
when the kiln reaches the desired soak temperature. This
stops the automatic ramping of the set point, holding the kiln
at that level until the HOLD button is released. To move
rapidly to any soak temperature, push the AUTO and UP or
DOWN buttons, as required, to drive the set point to the
desired temperature, then press the HOLD button in and
leave it in.
Remember that the limit setting must always be set
somewhat higher than your preset soak temperature, since
the controller will shut down the kiln whenever the
temperature indication goes higher than the limit setting.
To retard the firing process through any zone, use the
opposite procedure to that given in Step 9; push the AUTO
and DOWN buttons to reduce the set point value, forcing the
kiln to turn off and wait for the set point to ramp back up to
its temperature level.
GLAZE FIRINGS
NOTE - Glaze firings may be done using the same methods as
suggested for bisque firings, with the following exceptions ...
Proceed slowly for the first hour or two, to drive away any
surplus moisture retained in the ware as a result of the glaze
application. The operation can then often be expedited, if
desired, up to the firing temperature of the glaze.
If the kiln has fired faster than 270°F (150°C) per hour, it
would probably be a good idea to slow down over the last
hundred degrees to permit time for the glaze to heal over any
craters which might have been formed by escaping gas ... else
soak the kiln at the firing temperature for thirty minutes
prior to shut-off. To use this latter method, you'll have to be
on hand as the kiln approaches the shut-off point. Just prior
to shut-off, push the HOLDbutton in and turn the LIMIT
adjust knob all the way up (clockwise), but remember ... YOU
will have to shut the kiln off after the soak period, since the
controller's shut off function is now disabled!
For good glossy glaze, let the kiln drop slowly for the first
200°F (100°C) after it shuts off. Then speed up the cooling
rate down to 1375°F (750°C) by partially pulling the top peep
hole plugs. At this point, close the kiln up again and permit it
to cool at its own rate down to 300°F (150°C), where you may
slowly begin to open it up to expedite the final cooling
process.
CRYSTALLINE GLAZE
1. As always, start with a prefiring check-out.
2. Push the POWER ON button in.
3. Set the LIMIT ADJUST control all the way up (fully
clockwise).
4. Depress and release (push - push) the HOLD button to reset
the shut-off latch, then press the AUTO and UP buttons in,
and hold them in until the HEAT ON light comes on.
5. Watch the temperature closely as it approaches 2400°F. At
that point, press the HOLD button in and let the kiln soak at
2400°F (1315°C) for about 20-minutes. Then push the HOLD
button again to release it, and using the AUTO and DOWN
buttons, reduce the set point to 2100°F (1150°C).
Crystal growth is a function of soak time at this set point
(2100°F/1150°C). For small crystals soak here for four to five
hours. For larger crystals, soak at this temperature for 8 to 10
hours.
Push the HOLD button to release it, then turn the LIMIT
control all the way down (counter-clockwise). This will trip
the shut-off latch, turning the kiln off.
Allow the kiln to cool according to your customary practice.
Appendix
CONE CHARTS
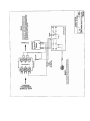
WIRING DIAGRAMS
DN470327: for 110-120vac Systems, original relay output
configuration (28Kb)
DN470328: for 208-240vac Systems, original relay output
configuration (29Kb)
DN470326: for 110-120vac Systems, dc pulse output (modified
controls) (30Kb)
DN470325: for 208-240vac Systems, dc pulse output (modified
controls) (31Kb)
Notes:
FireRight Controls/Warner Instruments
1320 Fulton Street Box 604
Grand Haven, Michigan 49417-0604 usa
Phone:(616) 842-7658
FAX:(616) 482-1471
e-mail: [email protected]