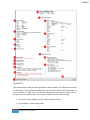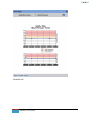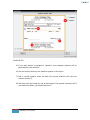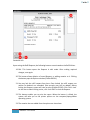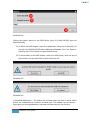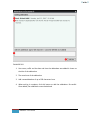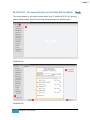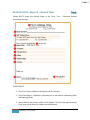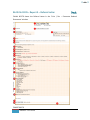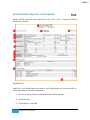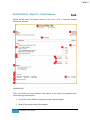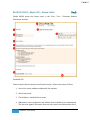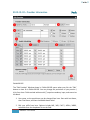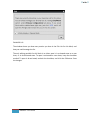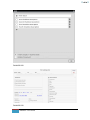
1
User Manual
Version 1.0
6/20/2013
Every effort has been made to make the
manual as complete and accurate as
possible, but no warranty of any kind
whatsoever is implied.
Table of Contents
01 – What does this EMR system do for you
008
02 - Definitions & terminologies used in the manual
009
03 – You Should Know
011
04 – Getting Started
013
05 – The Home Page
018
06 – Patient Charts & Encounter Forms
024
06.01 – General Information Form
030
06.01.01 – The Utility Block
033
06.01.02 – Personal Information & Patient Pharmacy Block
045
06.01.03 – Contact Information Block
048
06.01.04 – Work Information Block
050
06.01.05 – Directives Block
051
06.01.06 – General Information Block
053
06.01.07 – Insurance Block
054
06.01.08 – Secondary Insurance Block
058
06.01.09 – Guarantor’s Block
062
06.01.10 – The Print Functionality
064
06.02 – History Form
2
069
06.02.01 – Past Medical History (PMH) Block
071
06.02.02 – Past Surgical History (PSH) Block
072
06.02.03 – Known Allergies (ALG) Block
073
06.02.04 – Health Maintenance Block
076
06.02.05 – Family History Block
079
06.02.06 – Social History Block
081
06.02.07 – Master Problem List Block
083
EMR NEXT – User Manual
06.02.08 – Master Medication List Block
087
06.02.09 – The Print Functionality
092
06.02.09.01 – History Note
094
06.02.09.02 – Problem List
096
06.02.09.03 – Medication List
097
06.02.09.04 – Allergy List
098
06.02.09.05 – Health Maintenance Report
099
06.03 – Encounter Form
3
100
06.03.01 – Encounter Statistics
105
06.03.02 – Fee Recovery Block
107
06.03.03 – Chief Complain / Encounter Reason Block
108
06.03.04 – History of Present Illness (HPI) Block
109
06.03.05 – Review of Systems (ROS) Block
115
06.03.06 – Vital Signs Block
123
06.03.07 – Physical Examination Block
135
06.03.08 – Procedures / Services Block
142
06.03.09 – Assessment / Diagnosis Block
144
06.03.10 – Orders / Requisitions Block
147
06.03.11 – Medications Block
150
06.03.12 – Plan Notes Block
154
06.03.13 – Encounter Checklist Block
156
06.03.14 – Evaluation & Management (E/M) Code Block
159
06.03.15 – Referral Block
164
06.03.16 – Utility Buttons Block
166
06.03.16.01 – The first button on the Utility Buttons Block
167
06.03.16.01.01 – Deleting Encounter Forms
168
EMR NEXT – User Manual
06.03.16.01.02 – Refilling Medications
06.03.16.02 – The second button on the Utility Buttons Block
169
176
06.03.16.02.01 – Report 1 – Prescription
179
06.03.16.02.02 – Report 2 – Laboratory Order
182
06.03.16.02.03 – Report 3 – Radiology Order
184
06.03.16.02.04 – Report 4 – General Order
186
06.03.16.02.05 – Report 5 – Referral Letter
188
06.03.16.02.06 – Report 6 – Consultation Note
191
06.03.16.02.07 – Report 7 – Encounter Note
194
06.03.16.02.08 – Report 8 – Visit Super Bill
196
06.03.16.02.09 – Report 9 – Patient Invoice
198
06.03.16.02.10 – Report 10 – Excuse Letter
201
06.03.16.02.11 – Report 11 – Face Sheet
203
06.03.16.02.12 – Report 12 – Face Label
206
06.03.16.02.13 – Reports 13 to 20 – Custom Reports
207
06.03.16.03 – The third button on the Utility Buttons Block
208
07 – The Dashboard
209
08 – The Scheduler
229
09 – Customization
245
09.01 – Primary Configuration
4
247
09.01.01.01 – Clinic Information
251
09.01.01.02 – Provider Information
254
09.01.02.01 – Pointer Targets & Buttons
257
09.01.02.02 – Prescriptions & Orders
259
09.01.02.03 – Default Notes & Letters
262
09.01.02.04 – Custom Letters and Handouts
267
EMR NEXT – User Manual
09.01.02.05 – Document Folders
270
09.01.02.06 – Form Validation and other Rules
272
09.01.02.07 – Clinical Decision Support Rules
275
09.01.03.01 – Insurance Companies
281
09.01.03.02 – Pharmacies
284
09.01.03.03 – Physicians
287
09.01.03.04 – Laboratories
290
09.01.03.05 – Radiology Clinics
293
09.01.03.06 – Hospitals
296
09.01.04.01 – Diagnosis (Dx) Codes
299
09.01.04.02 – Procedure (Px) Codes
303
09.01.04.03 – Evaluation & Management (EM) Codes
307
09.01.04.04 – Medications
311
09.01.04.05 – Laboratory Orders
314
09.01.04.06 – Radiology Orders
316
09.01.04.07 – General Orders
318
09.01.04.08 – Visit Types
320
09.01.04.09 – Chief Complaint (CC) Phrases
323
09.01.04.10 – History of Present Illness (HPI) Phrases
325
09.01.04.11 – Reasons For Referral (RFR) Phrases
327
09.01.04.12 – Plan Notes Phrases
329
09.01.04.13 – Past Medical History (PMH) Phrases
331
09.01.04.14 – Past Social History (PSH) Phrases
333
09.01.04.15 – Allergies Phrases
335
09.02 – General Form Template
338
09.03 – History Form Template
344
5
EMR NEXT – User Manual
09.03.01 – Adding New Blocks to the History Form Template
346
09.03.01.01 – Block with Single Free Text Field
349
09.03.01.02 – Block with Multiple Free Text Fields
351
09.03.01.03 – Block with Multiple Free Text Fields
355
(extensible rows)
09.03.01.04 – Block with Single Dropdown
358
09.03.01.05 – Block with Multiple Dropdowns
361
09.03.01.06 – Block with Multiple Pick-lists
365
09.03.01.07 – Block with Large Free Text Area
369
09.03.01.08 – Block with Multiple +/- Buttons
371
09.03.01.09 – Block with Multiple Checkboxes
374
09.03.02 – Editing the Past Medical History Block
377
09.03.03 – Editing the Past Surgical History Block
379
09.03.04 – Editing the Known Allergies Block
381
09.03.05 – Editing the Health Maintenance Block
383
09.03.06 – Editing the Family History Block
386
09.03.07 – Editing the Social History Block
391
09.03.08 – Editing the Master Problem List Block
396
09.03.09 – Editing the Master Medication List Block
398
09.04 – Encounter Form Template
09.04.01 – Adding New Blocks to the Encounter Form Template
400
403
09.04.01.01 – Block with Single Free Text Field
405
09.04.01.02 – Block with Multiple Free Text Fields
407
09.04.01.03 – Block with Multiple Free Text Fields
410
(Extensible Rows)
09.04.01.04 – Block with Single Dropdown
6
EMR NEXT – User Manual
413
09.04.01.05 – Block with Multiple Dropdowns
416
09.04.01.06 – Block with Multiple Pick-lists
420
09.04.01.07 – Block with Large Free Text Area
424
09.04.01.08 – Block with Multiple +/- Buttons
426
09.04.01.09 – Block with Multiple Checkboxes
429
09.04.02 – Editing the Encounter Statistics Block
432
09.04.03 – Editing the Fee Recovery Block
434
09.04.04 – Editing the Chief Complaint / Encounter Reason Block
435
09.04.05 – Editing the History of Present Illness Block
437
09.04.06 – Editing the Review of Systems Block
440
09.04.07 – Editing the Vital Signs Block
444
09.04.08 – Editing the Physical Examination Block
446
09.04.09 – Editing the Procedures / Services Block
451
09.04.10 – Editing the Assessments / Diagnosis Block
453
09.04.11 – Editing the Orders / Requisitions Block
455
09.04.12 – Editing the Medications Block
457
09.04.13 – Editing the Plan Notes Block
459
09.04.14 – Editing the Encounter Checklist Block
461
09.04.15 – Editing the Evaluation & Management Code Block
462
09.04.16 – Editing the Referral Block
463
10 – Screen Sensitive Help
464
11 – Creating and Restoring Backups
468
12 – Navigation Guide
472
7
EMR NEXT – User Manual
«◄○►»
01 – What does this EMR system do for you?
Back
EMR NEXT™ is a complete electronic medical records system for ambulatory care
physicians and healthcare providers. It is an industry-compliant EMR with a wide range
of features and unparalleled customization capability. Regardless of your specialty or
work setting, you will find EMR NEXT more than sufficient for your clinical
documentation and workflow needs. At the very least:
1. It maintains provider’s appointment schedule.
2. It provides complete patient charting capability.
3. It allows documenting patient visits in universal SOAP format.
4. It provides complete prescription and refills management capability.
5. It generates laboratory, radiology and general orders.
6. It generates encounter notes, referral letters and consultation notes.
7. It prepares visit super bills and patient invoices.
8. It generates excuse letters, patient face sheets and labels.
9. It allows setting up clinical reminders and custom documents.
10. It calculates BMI and supports blood pressure trending.
11. It allows importing and organizing external image files such as scanned insurance
cards, consents and laboratory reports.
12. It provides multiple data input methods, including touch, mouse, keyboard and
stylus.
13. It provides extensive point-and-click lists and drop-down menus to minimize
data entry time and effort.
14. It includes customization wizards to allow customizing chart forms according to
the specific needs of the specialty.
This guide provides step-by-step instructions for working with charts and a host of other
options mentioned above found within the EMR NEXT application.
8
EMR NEXT – User Manual
«◄○►»
02 - Definitions & terminologies used in the manual
Back
Combo box – The input field in which you can either write freely or select from
its dropdown list (Section 3, item 2).
Block Window Icon – The icon which appears on the top right corner of any
block. The icon is a light grey dotted square of this shape: . This icon is specific
to the block in which it appears
Field Window Icon – The icon that appears at the end of any field within a block.
The icon is also a light grey dotted square of this shape: . This icon is specific
to the field at the end of which it appears.
Field check box – The square checkbox that appears at the beginning of any field.
Clicking a blank field check box checks it. Clicking a checked field check box unchecks it. Depending on the nature of the field, checking the field checkbox
expands the field to show detailed elements within.
Block Title icon – this is the icon at the left of the title of the block, in this shape:
. Clicking this bullet de-activates the block. Re-clicking the bullet re-activates
the block, in refreshed state.
Add-item icon – This is a triangular icon
which adds a blank item to the block.
at the bottom of the block, clicking
Delete-item icon – This is a cross shaped icon
field, clicking which will delete the item.
at the end of corresponding
.
Free-type-field – A field in which you are free to type anything you want.
Alert – A precautionary or informative elongated narrow window, the function of
which is to bring attention either to a requirement which is not being met, or
make you aware of consequences of the action being attempted, or simply to
inform you about a situation. If it is an informative alert, it will just have an ‘OK’
button. When you click the button, the alert will get dismissed. If it is a
precautionary alert, it will have two buttons, one to continue with the desired
action, and the other to abort the invoked action. Sometimes, an alert will also
have three buttons, according to the requirement of the situation.
Chart – A set of forms representing a patient in the EMR system. These include
the General Form, the History Form, and the Encounter Forms. There is always a
one copy of General and History forms within a chart whereas the Encounters
can be unlimited.
9
EMR NEXT – User Manual
«◄○►»
Encounter – A meeting with the patient, either within your clinic or elsewhere.
Displaced Appointments – An appointment that was initially booked for one or
more complete timeslots, but later on, due to changing the normal “slot
duration” (from the customization screen), the appointment is not fitting
completely in the available timeslots, due to which the last timeslot is partially
booked. For example, a 40 min appointment booked when the normal slot
duration was 10 min will become stale if the normal slot duration is changed to
15 min, as the third (last) slot will only be partially filled (15+15+10). Displaced
appointments are also called stale appointments.
Stale Appointments – An appointment that was initially booked for one or more
complete timeslots, but later on, due to changing the normal “slot duration”
(from the customization screen), the appointment is not fitting completely in the
available timeslots, due to which the last timeslot is partially booked. For
example, a 40 min appointment booked when the normal slot duration was 10
min will become stale if the normal slot duration is changed to 15 min, as the
third (last) slot will only be partially filled (15+15+10). Stale appointments are
also called displaced appointments.
10
EMR NEXT – User Manual
«◄○►»
03 – You Should Know
Back
1. Many fields have dropdown lists associated with them. If there is a dropdown list
on a field, it will open when you click in the writing space of the field. Free
writing is not allowed in such fields, unless and until they are combo boxes (a
combination of free-type and dropdown list).
2. There are two types of combo boxes. Exhibit 03.001 shows the first type.
Exhibit 03.001
See the ‘Join Work-School:’ field in the exhibit. The field is identified with a downarrow at the end (encircled in red). All fields with this type of down-arrow at the end
are combo boxes. In part 1 of the illustration, free typing has been done in the field.
Then, in part 2, the down arrow was clicked, and the drop-down list appeared for
selection. The cursor has been moved on the value ‘after 2 weeks’. When the
selected value is clicked, the selection overwrites the initial inscription, as can be
seen in part 3 of the illustration.
The other type of combo box is shown in exhibit 03.002.
11
EMR NEXT – User Manual
«◄○►»
Exhibit 03.002
The identification of such fields is that when you take the cursor over the name of
the field, the name gets highlighted in grey. (See the ‘Sig’ field in part 2 of the
exhibit). The field is initially a free-type field, as you can see in part 1 of the exhibit –
there is an inscription saying ‘Presently free type field’. In part 2, the cursor was
brought over the name of the field and clicked. Now the field has converted for
selection, and when you click in the field, the dropdown list appears, as can be seen
in part 3.
3. Only three patient charts can be opened at a time. To open the next one, one of
the previously opened charts will have to be closed.
12
EMR NEXT – User Manual
«◄○►»
04 – Getting Started
Back
When you have downloaded the system from the Microsoft Store, following “EMR
Next” icon would be appearing on your desktop (the EMR Next icon is pointed by the
red arrow):
Exhibit 04.001
Click on the icon. The homepage will open:
13
EMR NEXT – User Manual
«◄○►»
Exhibit 04.002
When you click any option on the home page for the first time, the Initial Configuration
Screen slides in from the right. This is because the system requires some basic
information before it can be used.
Exhibit 04.003
Exhibit 04.003 shows the Initial Configuration Screen. The data on this screen will be
used throughout the system. Some information is mandatory. Mandatory fields are
identified by an asterisk (*) after their prompts.
1. Select the country you practice in, from the dropdown list.
2. Identify whether the next geographical unit is a State, Province, Territory,
County, or Principality, as the case may be. If you operate in US, the unit will
automatically get identified as State.
3. Type the name of the unit. If you are in USA or Canada, the list of states /
provinces will drop down for your selection. For other countries, or for other
units, enter the State / Province manually.
4. Write the name of your practice here.
5. Write the address of your practice here.
14
EMR NEXT – User Manual
«◄○►»
6. Write the City in which your practice is located here.
7. Provide your Zip Code, or postal code, etc. as applicable in your country.
8. Give your main telephone number here. For USA and Canada, this field will be
auto-formatted with hyphens included in the appropriate places. For all other
countries, only numerical values will be accepted.
9. Give your main facsimile number here. For USA and Canada, this field will be
auto-formatted with hyphens included in the appropriate places. For all other
countries, only numerical values will be accepted.
10. Your practice’s official email address.
11. Select your specialization from the dropdown list. If your specialization is not
listed in the dropdown, select ‘other’.
12. Once all information is entered, click ‘Next’ to move on.
13. If any mandatory field is not completed, the system will raise this alert,
identifying the first blank field. Complete the field and press ‘Next’ again. When
all the mandatory fields have been completed, the next screen will open:
Exhibit 04.004
15
EMR NEXT – User Manual
«◄○►»
Exhibit 04.004 shows the second page of the initial configuration screen. Fields included
here are:
14. Enter your last, first and middle name initial here.
15. Enter the suffix you would like to use (such as MD / MD, FACC / APRN / MBBS).
16. Enter your Professional ID here.
17. Identify the type of the Professional ID from the dropdown list.
18. Check the ‘Enable Scheduling’ checkbox to schedule your workday. The table will
enable only after you check the box.
19. These are the radio buttons for defining the time slots for one appointment, and
they become visible after you have checked the box in item 18. 3 options are
available – 5 minutes, 10 minutes and 15 minutes. Don’t worry if your standard
appointment slot (SSD) is of greater time. Define appropriate slot here, and use a
combination in the scheduler (For example, say, your SSD is 30 minutes. You may
either define the SSD as 15 minutes and use two slots per appointment, or you
may define it as 10 minutes and use three slots per appointment. Although the
third option of defining the SSD as 5 minutes and selecting six slots per
appointment is also available, but this will be too cumbersome). Exercise your
judgment while defining the SSD.
20. Check mark the days of the week on which your clinic operates.
21. Define the starting times and closing times for the first session, for each weekday
individually. Time intervals in the dropdown list (item 23) are constructed
according to the SSD defined by you in item 19. Dropdown lists are managed in a
manner that you cannot define the closing time earlier than the starting time. It
is not necessary to define the same starting and closing times for each weekday.
For e.g., Monday may start at 9.00 am, Tuesday at 10.am, and so on.
22. If your clinic runs in two sessions, define the starting times and closing times for
the second session here. Again, the dropdown list is managed in a manner that
the second session cannot start before the close of the first session, and neither
can it close before the start time. If the clinic operates in only one session, leave
this part blank.
23. Time slots in the dropdown list start from 12 am and go up to 12 pm, in intervals
equal to the SSD defined by you in item 19. For e.g., if you had selected the SSD
of 15 minutes, the second slot will start at 12.15 am, the third at 12.30 am, and
so on so forth.
16
EMR NEXT – User Manual
«◄○►»
24. If you want to move back to the earlier screen, press this button.
25. Once you have completed, press this button to save the data. If any mandatory
field is left blank, the system will raise an alert like that in item 13. Once all the
requirements are met, the data will save and the screen will close.
This screen appears on the system only at the time of initial setup. If any data is
required to be changed subsequently, it can be done from the Customization
Area (Section 09.01.01.01 & 09.01.01.02).
17
EMR NEXT – User Manual
«◄○►»
05 – The Home Page
Back
Exhibit 05.001
The Home Page operates from the dark grey tool bar on the top. There are 8 iconic
buttons on the tool bar, each of which has a tool-tip that appears when you take the
mouse over them.
1. Click this button to create a new chart. The following window opens.
Exhibit 05.002
18
EMR NEXT – User Manual
«◄○►»
a. Select the right Radio Button to either create a new chart, or to open an
existing one. The default selection is ‘Open New Chart’.
b. Specify patient’s Last Name, First Name and Middle Name Initial here.
c. If either the first name or Last Name is left Blank, and the ‘Create Chart’
button is pressed (item e), this message will appear.
d. If you are not sure whether or not the patient already exists in your
database, this quick-search is available on the Last Name, where you can
type up to 10 characters, and a dropdown list appears with all patients
with that Last Name (Exhibit 05.003)
e. Click this button to create the chart.
f. Click this button to abort the chart creation action.
Exhibit 05.003
If a chart already exists with exactly the same first and last name, the
system will raise an alert, and will drop down the list of all such charts
19
EMR NEXT – User Manual
«◄○►»
(Exhibit 05.004). If you are sure that this is not the same patient, click
‘yes’ on the alert. Otherwise click ‘no’, and click on the name of the
patient in the dropdown list. To visit the existing chart, press ‘No’ on the
alert window. The alert will close. Now click on the name of the patient in
the dropdown list. The ‘Pull Chart Window’ will open, with the Chart ID
mentioned in the ‘Chart ID’ slot (Exhibit 05.005). Click Pull Chart to call
the Chart.
Exhibit 05.004
Exhibit 05.005
20
EMR NEXT – User Manual
«◄○►»
If you want to open an existing chart from here, select the ‘Open Existing
Chart’ button (item a, Exhibit 05.002). The appearance of the window
slightly changes from that shown in Exhibit 05.002.
Exhibit 05.006
a. The Radio Button has been changed to ‘Open Existing Chart’
b. Chart Id field activates. Insert Chart ID.
c. Click ‘Pull Chart’ to pull the chart.
d. Click ‘Cancel’ to abort chart pulling action.
If you do not remember the Chart ID, use the quick-search on the Last Name:
21
EMR NEXT – User Manual
«◄○►»
Exhibit 05.007
e. Insert up to first ten characters of the patient’s last name in the quick
search.
f. List of all patients with the same last name drops down for selection.
Select the required patient chart and click the ‘Pull Chart’ button to pull
the chart.
2. Click this button to open an existing chart directly from the homepage. The
functionality of this button is exactly the same as that of the first button, with
the exception that the default selection of the Radio Button is on ‘Open Existing
Chart’ instead of ‘Create New Chart’ (exhibit 05.008)
22
EMR NEXT – User Manual
«◄○►»
Exhibit 05.008
3. The ‘Recently Viewed’ Icon shows the 20 most recently viewed charts for quick
access. The bullets of charts opened in your current session appear in dark blue
(see the color of the bullet for Smith, Albert, in comparison with the color of the
bullets for the other three patients in Exhibit 05.009), while those of charts
opened in previous sessions in grey. Click the desired chart to access it.
Exhibit 05.009
4. This icon opens the dashboard. (see Section 07)
5. This icon opens the scheduler (see Section 08)
6. This icon opens the customization screens (see Section 09)
7. This icon opens screen sensitive help (Section 10)
8. This icon is for taking or restoring backups (Section 11)
23
EMR NEXT – User Manual
«◄○►»
06 – Patient Charts & Encounter Forms
Back
How to create or open an existing Patient Chart has been shown in Section 05 (item 1,
Exhibit 05.001). Every patient chart is spread over three tabular pages. The first tab is
the General form on which the patient’s demographic, insurance and other
miscellaneous information is stored. The second tab called History is for documenting
the patient’s medical history, including master problem and medication lists. The third
tab called Encounters is where the specific encounter details are documented. There is
always a one copy of General and History forms within a chart whereas the Encounters
can be unlimited. Each of these three forms is discussed separately further down this
manual. But there is some functionality common to all the three forms that is discussed
below:
A. Each of the three forms is composed of several blocks. There is a small black
square to the left of the name of the block (exhibit 06.001). Clicking this square
will disable the block, and any data written in the block will be deleted. (But the
system will raise an alert before disabling the block (exhibit 06.002). Click ‘Yes’ to
continue disabling; click ‘No’ to abort). Next time the chart is opened again, this
block will appear disabled (exhibit 06.003).To re-enable it, click on the same
square again.
Exhibit 06.001
Exhibit 06.002
24
EMR NEXT – User Manual
«◄○►»
Exhibit 06.003
B. Many fields have a down-arrow icon towards the end (exhibit 06.004). This
means that a dropdown list is available for selecting the data, which opens when
this arrow is clicked (exhibit 06.005). But, you can make manual entries, or
combine the selection with manual additions and deletions also.
Exhibit 06.005
C. Many fields have a square icon towards the end (Exhibit 06.006). When you click
this icon, a separate window with feeding options opens, as can be seen in
Exhibit 06.006 – the blue Chief Complaint/Encounter Reason window opened
when the square icon encircled in red was clicked. Multiple entries may be
selected from such windows, and the selected entries may be edited manually.
25
EMR NEXT – User Manual
«◄○►»
Exhibit 06.006
D. Many fields are preceded by a negative (-) sign enclosed in an oval enclosure like
the two shown in Exhibit 06.007. When you click it, the sign changes to positive
(+), and a square icon appears at the end, to call the popup window with
predefined values, as can be seen in Exhibit 06.008. This toggle feature shows
absence or presence of any factor. When the field is negative (-), the default
inscription for negative findings will appear in the field and editing is not
permitted. When it is clicked to positive (+), the default inscription disappears,
and the field is ready for insertion. You may either write your own finding, or
select pre-defined values from the popup window that will appear at the click of
the square icon at the end of the field. The popup window is shown in Exhibit
06.009, identified by the red arrow.
26
EMR NEXT – User Manual
«◄○►»
Exhibit 06.007
Exhibit 06.008
Exhibit 06.009
27
EMR NEXT – User Manual
«◄○►»
E. There may be down-arrow icons at the bottom of certain blocks like the one
encircled in Exhibit 06.010. When you click these, the full set of fields in the
block is duplicated for additional entries. Any number of sets may be added like
this.
Exhibit 06.010
F. A small cross appearing at the end a field or set of fields, like the one encircled in
Exhibit 06.011 is for deleting the field. You may delete all but the last entry in the
block. The last entry will get cleared on the click, but will not be deleted.
28
EMR NEXT – User Manual
«◄○►»
Exhibit 06.011
Now let us move on to each of the specific forms on the chart.
29
EMR NEXT – User Manual
«◄○►»
06.01 – General Information Form
Back
Exhibit 06.012
If you see too much data requirement on the General Page, don’t be worried. All fields
are optional. You need fill in only that information which you want to. Other fields can
remain blank.
The upper part of the form (containing items 1-6) remains common for all three forms,
and the location remains fixed (i.e., this portion does not scroll up when you scroll the
form).
30
EMR NEXT – User Manual
«◄○►»
1. The Chart ID (chart number) is system generated, and will appear whenever a
new chart is created.
2. Titles available on this system include Mr., Ms. Mrs. & Dr., and are selectable
from a dropdown list on the field.
3. Three separate fields are available for the patient’s Last Name, First Name and
initial of Middle Name. The name populates from the name entered by you while
creating this chart. But, it may be edited here.
4. Suffixes available on the system include Sr., Jr., II, III, & IV, and are selectable
from a dropdown list on the field.
5. Age is selectable from the dropdown list on the field. The list starts from
newborn, and carries on a monthly basis to 23 months, and then from 2 years
onwards to 105 years. However, when you will enter the date of birth down
below (third field, item 8), the age will correct itself according to the date of
birth, if there is a disparity between the two. So it is recommended not to enter
the age here, and let the system populate it when you enter the date of birth.
6. When you click the slot for the picture, the system takes you to the operating
system for selecting the photograph. (The photograph should be available on the
computer’s operating system or on an external drive connected to it). Double
click the photo to bring it on the chart. The photo should not exceed 500KB in
size. To replace or remove photo, click on the saved photo. The system raises an
alert (Exhibit 06.013) asking whether you want to remove or replace the photo.
Click the appropriate button to complete the action, or click ‘cancel’ to abort the
replacement/removal action.
Exhibit 06.013
7. The utility block is discussed in section 06.01.01
8. The personal information and patient pharmacy block is discussed in section
06.01.02
9. The contact information block is discussed in section 06.01.03
31
EMR NEXT – User Manual
«◄○►»
10. The work information block is discussed in section 06.01.04
11. The Directives Block is discussed in section 06.01.05
12. The General Information Block is discussed in section 06.01.06
13. The Principal Insurer’s Block is discussed in section 06.01.07
14. The Secondary Insurer’s Block is discussed in section 06.01.08
15. The Guarantor’s Block is discussed in section 06.01.09
16. The Print Functionality on this page is discussed in section 06.01.10
32
EMR NEXT – User Manual
«◄○►»
06.01.01 – The Utility Block
Back
Placement of the Utility Block on the General Information Form is identified at Item 7 of
Exhibit 06.07.
The Utility Block looks like this:
Exhibit 06.014
It has four utilities: Yellow Sticky Notes, Telephone Notes, General Notes and a
document viewer.
1. Yellow Sticky Note. Click on the icon to open the notepad (Exhibit 06.015). Write
your notes and press “Done” to save it. Close by clicking the X icon on the top
right. The icon turns yellow to indicate that a note exists (Exhibit 06.016). Open
the note again, add to it, delete from it, and press “Done” to save. If you want to
remove everything, press the “clear” button on the bottom left, and click
“Done”.
33
EMR NEXT – User Manual
«◄○►»
Exhibit 06.015
Exhibit 06.016
2. Phone Notes. Click the icon to open the Phone Notes window. At the outset, it
will be blank, like that shown in Exhibit 06.017. To add a note, click the “Add
Note” button at the bottom right on the window. The “Add Phone Note” window
opens, as in Exhibit 06.018. The window shows the name of the patient, and has
two fields. In the first, select the nature of caller from the drop down list (Exhibit
06.019). The options are: Pharmacy, Patient, Spouse, Patient, Guardian, Other.
The second field is for the note itself. When done, click on the “Save” button to
save the note. The note will appear like shown in Exhibit 06.020 in the “Phone
Notes” Window. First is the serial number of the note, then the date, then the
nature of the caller (in this case, the patient himself called), and then the note.
You may add as many notes as you want, which appear in serial order in the
window. To delete any note, click on the “Trash Can” Icon on the right of the
respective note. The system raises an alert to confirm if you want to delete the
note (Exhibit 06.021). Click “Delete Note” to delete, or “Don’t Delete” to abort
deletion action. To print the notes, click the “Print” button at the bottom left of
the window (The button is deactivated if there is no note)
34
EMR NEXT – User Manual
«◄○►»
Exhibit 06.017
Exhibit 06.018
Exhibit 06.019
35
EMR NEXT – User Manual
«◄○►»
Exhibit 06.020
Exhibit 06.021
3. General Notes: Click the icon to open the General Notes window, and view
existing notes. At the outset, it will be blank, as shown in Exhibit 06.022. To add a
note, click the “Add Note” button at the bottom right on the window. The “Add
General Note” window opens, as in Exhibit 06.023. The window shows the name
of the patient, and has two fields. In the first, select the nature of the note from
the drop down list (Exhibit 06.024). The options are: Addendum, Clarification,
Information, Instruction, Other. The second field is for the note itself. When
done, click on the “Save” button to save the note. The note will appear like
shown in Exhibit 06.025 in the “General Notes” Window. First is the serial
number of the note, then the date, then the nature of the note (in this case, it is
an information received), and then the note. You may add as many notes as you
want, which appear in serial order in the window. To delete any note, click on
the “Trash Can” Icon on the right of the respective note. The system raises an
alert to confirm if you want to delete the note (Exhibit 06.026). Click “Delete
Note” to delete, or “Don’t Delete” to abort deletion action. To print the notes,
click the “Print” button at the bottom left of the window (The button is
deactivated if there is no note
36
EMR NEXT – User Manual
«◄○►»
Exhibit 06.022
Exhibit 06.023
Exhibit 06.024
37
EMR NEXT – User Manual
«◄○►»
Exhibit 06.025
Exhibit 06.026
4. Document Viewer: Every chart has a set of folders attached to it. These folders
contain patient documents prepared by the system, and documents imported by
you in the system. There are 11 pre-defined folders in the system. These are:
Medication, Laboratory, Radiology, Consultation, Hospital, Insurance, Billing,
Directives, Handouts, Legacy and Other. You can also create your own folders in
the system. Procedure to create your own folders is discussed in Section
09.01.02.05. But any additional folders created will be available for all charts and
not for selective charts only.
38
EMR NEXT – User Manual
«◄○►»
System generated documents go in following folders:
Name of Document
Folder
Prescriptions
Laboratory Orders
Radiology Orders
General Orders
Referral Letters
Consultation Notes
Encounter Notes
Visit Super Bills
Patient Invoices
Excuse Letters
Medication
Laboratory
Radiology
Other
Consultation
Consultation
Consultation
Billing
Billing
Other
Face Sheets, Face Labels, No Show Letters and Reminder Letters are not saved in
the system.
When you click the scans/documents icon (item 4, Exhibit 06.014), the
Document Viewer opens:
Exhibit 06.027
At the outset, all buttons are de-activated, other than ‘Import Scanned File’
button on the top. The folders are in the left section, and the viewing pane is on
the right. In the Exhibit, the nodes of the Medication, Laboratory, Billing and
39
EMR NEXT – User Manual
«◄○►»
Others folders show that there are documents therein. Expand the node, and
select the required document to view it in the viewing pane (Exhibit 06.028)
Exhibit 06.028
When the document is selected, the buttons at the bottom activate. These
include ‘Delete’, ‘Move’, ‘Flag’ and ‘Print’ buttons, and a Lock Icon for locking
documents. The ‘Import Scanned File’ button was already activated. The
functionality of the five buttons is as follows:
Import Scanned File button - Imported documents can be saved in any folder. All
imported documents must be in images, either in JPG, BMP, PNG or GIF format.
Click on ‘Import Scanned File’ button. The following window opens:
Exhibit 06.029
Now click the ‘Select File’ button. You will be taken to the operating system. Click
on the required file, and the file will be brought on the window, with its image
40
EMR NEXT – User Manual
«◄○►»
displayed in the image slot on the left. The file name will appear as the default
document title. Edit the title if required and select the folder (Exhibit 06.030) to
which the document is to be saved. Click the ‘Upload Now’ button, and the file
will get uploaded.
Exhibit 06.030
Lock Document - You may lock a document to protect it from deletion. To lock
document, click the lock icon on the Document Viewer. System will raise an alert
warning that a locked document cannot be deleted (Exhibit 06.031). Click ‘Lock
Document’ on the alert to lock the document, or ‘Don’t Lock’ to abort the locking
action.
Exhibit 06.031
An unlocked document is identified by the ‘lock icon’ when the document is
opened in the document viewer (Exhibit 06.028), while a locked document is
identified by the ‘Locked’ notation with locking date and time, in the place of the
lock icon (Exhibit 06.032).
41
EMR NEXT – User Manual
«◄○►»
Exhibit 06.032
Move Button - Documents can also be moved from one folder to another. Open
the document in the Document Viewer, and click the “Move” button. A small
window opens, asking for the Chart ID to which you want to move the
document, and the type of folder to which you want to move it (Exhibit 06.033).
Provide the information (choose folder type from dropdown list – Exhibit 06.034)
and click the “move” button on the small window. The move will take place, and
the document viewer will go blank.
.
Exhibit 06.033 – change
Exhibit 06.034 - change
System generated documents cannot be moved to any other chart. They may
only be moved from one folder in the chart to another folder in the same chart.
Similarly, a flagged document also cannot be moved out of the chart, but it may
be moved to any other folder within the chart. A notation comes in red on the
42
EMR NEXT – User Manual
«◄○►»
small window that the document is flagged. If you still want to move a flagged
document to another chart (provided it is not a system generated document),
remove the flagging and then move it.
Delete Button - Any document, whether system generated or imported, can be
deleted by selecting the respective document, and clicking on the “Delete”
button at the bottom left of the Document Viewer. The system will raise an alert
confirming whether the file is to be deleted or not (Exhibit 06.035). Click ‘Yes’ to
delete, and ‘No’ to abort deletion action.
Exhibit 06.035
Exhibit 06.036
But, if the document is locked, it cannot be deleted, and when the ‘Yes’ button is
clicked to delete the document, the red notation of ‘Signed Document’ appears
on the window, as shown in Exhibit 06.036. In this case, click “No” to exit..
Flag Document
If you need to review or work on a document later on, you may as a reminder
flag it. Flagged documents are viewable from the Dashboard (Section 07, Item 5
discusses this aspect in detail). To flag a document, open it in the Document
Viewer, and click the ‘Flag’ Button. Whenever a flagged document is opened, a
red asterisk (*) appears on the ‘Flag’ button (Exhibit 06.037). To remove flagging,
click the ‘Flag’ button again.
43
EMR NEXT – User Manual
«◄○►»
Exhibit 06.037
Flagged Documents cannot be moved to any other patient until the flagging has
been removed. (But, it may be moved to any other folder of the same patient).
Print Button
Documents can be printed from the Document Viewer. Open the document in
the viewer, and click the “Print” button at the bottom left. The system takes you
to the operating system for printer selection and print execution.
44
EMR NEXT – User Manual
«◄○►»
06.01.02 – Personal Information & Patient Pharmacy Block Back
Placement of the Personal Information & Patient Pharmacy Block on the General
Information Form is identified at Item 8 of Exhibit 06.07.
The Personal Information & Patient Pharmacy Block looks like this:
Exhibit 06.038
This block requires following information:
1. If your practice is located in US, Social Security Number (SSN) is required. For
practitioners in Canada, Health Card No. (HCN) appears. For all other countries,
Patient ID is required.
2. Medical Record Number (MRN) is your own series of patient number, if you
maintain one for your clinic.
3. Date of Birth comes by selection in the month, day and year field. The range is
from 1908 to the current year. (Exhibit 06.039)
4. Gender also comes by selection from a dropdown list. Three options available,
Male, Female & Transgender. (Exhibit 06.040)
5. Marital Status is also selected from a dropdown list. Options include: Married,
Divorced, Separated, Widowed, Single, Separated Co-habiting & Others (Exhibit
06.041)
6. Sibling details must be entered manually. No selection available from the system
45
EMR NEXT – User Manual
«◄○►»
7. Race comes by selection from dropdown list. Options include: White, Black,
Hispanic, Asian & Other (Exhibit 06.042)
8. Specify the name of the Patient’s pharmacy here. If you have defined the
pharmacy in your database (Section 09.01.03.02 shows how to), you may select
it from the dropdown list. Otherwise write the name of the pharmacy manually
in the form.
9. This is a 20 character field for any other information you may want to add,
concerning the fields in this block.
Exhibit 06.039
Exhibit 06.040
Exhibit 06.041
Exhibit 06.042
46
EMR NEXT – User Manual
«◄○►»
Exhibit 06.043
47
EMR NEXT – User Manual
«◄○►»
06.01.03 – Contact Information Block
Back
Contact Information Block on the General Information Form is identified at Item 9 of
Exhibit 06.07.
The Contact Information Block looks like this:
Exhibit 06.044
1. Two lines are available for the address.
2. City is to be entered manually. No dropdown available.
3. Zip Code field available if your clinic is US based. Otherwise, the Post Code field is
available.
4. Enter the country manually here. Be careful to avoid spelling mistakes.
5. Enter the State/Province etc. here manually. Again, be careful to avoid spelling
mistakes.
6. This field is restricted for numeric input only. Auto formatting applies according
to US standards if your practice is based in USA.
7. This field is restricted for numeric input only. Auto formatting applies according
to US standards if your practice is based in USA.
48
EMR NEXT – User Manual
«◄○►»
8. Save the patient’s email address here.
9. Free-typing field for saving patient’s emergency contact name & address.
If you click the Block-Title Icon on the block, an alert will be raised saying “Closing this
block would also reset its fields to their default values. Are you sure you want to close
it?” If you click the “No” button on the alert, the action will abort. But if you click the
“Yes” button on the alert, all entries made in this block will clear, and the block will be
de-activated. To reactivate the block, click the Block-Title Icon again.
49
EMR NEXT – User Manual
«◄○►»
06.01.04 – Work Information Block
Back
Work Information Block on the General Information Form is identified at Item 10 of
Exhibit 06.07.
Work Information Block looks like this:
Exhibit 06.045
1. Work Status can either be selected from the dropdown list, or may be inserted
manually. Selectable options include: Employed, Unemployed, Retired, Full-time
student, Part-time student. (Exhibit 06.046)
2. Write the name of the employer in this field. Field accepts up to 40 characters,
so if the name is longer, try to abbreviate / shorten wherever possible.
3. Work Phone: The field is restricted for numeric input only. Auto formatting
applies according to US standards if your practice is based in USA.
If you click the Block-Title Icon on the block, an alert will be raised saying “Closing this
block would also reset its fields to their default values. Are you sure you want to close
it?” If you click the “No” button on the alert, the action will abort. But if you click the
“Yes” button on the alert, all entries made in this block will clear, and the block will be
de-activated. To reactivate the block, click the Block-Title Icon again.
Exhibit 06.046
50
EMR NEXT – User Manual
«◄○►»
06.01.05 – Directives Block
Back
Work Directives Block on the General Information Form is identified at Item 11 of
Exhibit 06.07.
The Directives Block concerns patient’s instructions regarding communication with
family, release of information to family and third party, and advance instructions for
procedures prohibited in case of emergencies
Directives Block looks like this:
Exhibit 06.047
1. The Contact field has a dropdown selection of restrictions with regards to
communicating with the patient at home (Exhibit 06.048). Only one option can
be selected from the dropdown, but if multiple restrictions apply, the remaining
may be added manually. Manual entry is permitted in this field.
2. Advance Directives are prohibitions from the patient’s side in case of
emergencies (Exhibit 06.049). Again, only one option can be selected from the
dropdown, but if multiple prohibitions apply, others may be added manually.
Manual entry is permitted in this field.
3. This field records whether or not information may be divulged to third parties in
case of need. One selection is allowed, other information may be added
manually (Exhibit 06.050). Manual Entry is permitted in this field
If you click the Block-Title Icon on the block, an alert will be raised saying “Closing this
block would also reset its fields to their default values. Are you sure you want to close
it?” If you click the “No” button on the alert, the action will abort. But if you click the
“Yes” button on the alert, all entries made in this block will clear, and the block will be
de-activated. To reactivate the block, click the Block-Title Icon again.
51
EMR NEXT – User Manual
«◄○►»
Exhibit 06.048
Exhibit 06.049
Exhibit 06.050
52
EMR NEXT – User Manual
«◄○►»
06.01.06 – General Information Block
Back
General Information Block on the General Information Form is identified at Item 12 of
Exhibit 06.07.
The General Information Block is a free-entry block for any and as much information you
want to store. There is no space restriction. Lines will add automatically if the text
exceeds the initially available space.
General Information Block looks like this:
Exhibit 06.051
If you click the Block-Title Icon on the block, an alert will be raised saying “Closing this
block would also reset its fields to their default values. Are you sure you want to close
it?” If you click the “No” button on the alert, the action will abort. But if you click the
“Yes” button on the alert, all entries made in this block will clear, and the block will be
de-activated. To reactivate the block, click the Block-Title Icon again.
53
EMR NEXT – User Manual
«◄○►»
06.01.07 – Insurance Block
Back
The Insurance Block on the General Information Form is identified at Item 13 of Exhibit
06.07.
Some practitioners operate a ‘Cash Only’ practice. If yours is such a practice, you will not
need this block, and you may remove it altogether from the form. Section 09.01.02.06
shows how to remove the Insurance Block from the form.
The Insurance Block looks like this:
Exhibit 06.052
1. If you have already defined the patient’s Insurance Company in the database
(Section 09.01.03.01 tells how it is done), you may select the name from the
dropdown list (Exhibit 06.053). Otherwise, write the name manually in the form.
If you have defined all required information of the Insurance Company in the
54
EMR NEXT – User Manual
«◄○►»
database (section 09.01.03.01), the first eight fields of this block will be
automatically populated when you select the Insurance Company.
2. Address of the Insurance Company. This will be populated upon selection of the
insurance company, if all data requirements have been completed while defining
the insurance company in the database. Otherwise, write the address manually.
3. The city the Insurance Company is located in. This will be populated upon
selection of the insurance company, if all data requirements have been
completed while defining the insurance company in the database. Otherwise,
write the name of the city manually.
4. Zip Code or the Postal Code of the Insurance Company (If your clinic is located in
USA, the field seeks Zip Code. For all other countries, the field asks for Postal
Code). This will be populated upon selection of the insurance company, if all data
requirements have been completed while defining the insurance company in the
database. Otherwise, write the Zip Code / Postal Code manually.
5. The country in which the Insurance Company is located. This will be populated
upon selection of the insurance company, if all data requirements have been
completed while defining the insurance company in the database. Otherwise,
write the name of the country manually.
6. The State/Province of the Insurance Company. If your clinic is located in USA, the
field requires the name of the State. For all other countries, name of the
Province is sought. This will be populated upon selection of the insurance
company, if all data requirements have been completed while defining the
insurance company in the database. Otherwise, write the name of the
State/Province manually
7. The Insurance Company’s telephone number. This will be populated upon
selection of the insurance company, if all data requirements have been
completed while defining the insurance company in the database. Otherwise,
write the telephone number manually.
8. The Insurance Company’s fax number. This will be populated upon selection of
the insurance company, if all data requirements have been completed while
defining the insurance company in the database. Otherwise, write the fax
number manually.
9. Refers to the particular Insurance Plan of the Insurance Company. The field is
selectable from the list of plans already fed in by you in the database (Exhibit
06.054), as shown in section 09.01.03.01. Otherwise, type in the plan particulars
manually.
55
EMR NEXT – User Manual
«◄○►»
10. Expiry date of the Patient’s Policy. This is selectable from dropdown list (Exhibit
06.055).
11. Patient’s specific Policy No.
12. Group Number, if any
13. The amount or percentage to be paid by the patient, as specified in the plan
14. Authorization Code, if any sought for the encounter.
15. For any remarks pertaining to insurance plan or insurance company. The field is
restricted to 80 characters
After these fields, there is a sub block, to be filled if the patient does not have
his/her own insurance policy, and is using someone else’s policy, like father’s
mother’s, etc. The sub block has following fields:
16. The relationship of the insured with the patient. The field is selectable from the
dropdown list (Exhibit 06.056)
17. The Principal Insured’s Home Phone. Field is restricted to numerical values only.
If your clinic is located in USA or Canada, the phone number will auto-format
according to US/Canadian specifications.
18. Write the Last Name, First Name and Middle Name Initial of the Principal Insured
here.
19. Date of Birth of the principal insured. DOB is selectable from dropdown list
(Exhibit 06.057).
20. The Principal Insured’s Gender, selectable from dropdown list. Options include
Male, Female, Transgender (Exhibit 06.058).
If you click the Block-Title Icon on the block, an alert will be raised saying “Closing this
block would also reset its fields to their default values. Are you sure you want to close
it?” If you click the “No” button on the alert, the action will abort. But if you click the
“Yes” button on the alert, all entries made in this block will clear, and the block will be
de-activated. To reactivate the block, click the Block-Title Icon again.
56
EMR NEXT – User Manual
«◄○►»
.
Exhibit 06.053
Exhibit 06.054
Exhibit 06.055
Exhibit 06.056
Exhibit 06.057
Exhibit06.058
57
EMR NEXT – User Manual
«◄○►»
06.01.08 – Secondary Insurance Block
Back
The Secondary Insurance Block on the General Information Form is identified at Item 14
of Exhibit 06.07.
Some practitioners operate a ‘Cash Only’ practice. If yours is such a practice, you will not
need this block, and you may remove it altogether from the form. Section 09.01.02.06
shows how to remove the Insurance Blocks from the form.
The Secondary Insurance Block looks like this:
Exhibit 06.059
1. If you have already defined the patient’s Secondary Insurance Company in the
database (Section 09.01.03.01 tells how it is done), you may select the name
from the dropdown list (Exhibit 06.060). Otherwise, write the name manually in
the form. If you have defined all required information of the Insurance Company
58
EMR NEXT – User Manual
«◄○►»
in the database (section 09.01.03.01), the first eight fields of this block will be
automatically populated when you select the Secondary Insurance Company.
2. Address of the Secondary Insurance Company. This will be populated upon
selection of the secondary insurance company, if all data requirements have
been completed while defining the insurance company in the database.
Otherwise, write the address manually.
3. The city the Secondary Insurance Company is located in. This will be populated
upon selection of the insurance company, if all data requirements have been
completed while defining the insurance company in the database. Otherwise,
write the name of the city manually.
4. Zip Code or the Postal Code of the Secondary Insurance Company (If your clinic is
located in USA, the field seeks Zip Code. For all other countries, the field asks for
Postal Code). This will be populated upon selection of the insurance company, if
all data requirements have been completed while defining the insurance
company in the database. Otherwise, write the Zip Code / Postal Code manually.
5. The country in which the Secondary Insurance Company is located. This will be
populated upon selection of the insurance company, if all data requirements
have been completed while defining the insurance company in the database.
Otherwise, write the name of the country manually.
6. The State/Province of the Secondary Insurance Company. If your clinic is located
in USA, the field requires the name of the State. For all other countries, name of
the Province is sought. This will be populated upon selection of the insurance
company, if all data requirements have been completed while defining the
insurance company in the database. Otherwise, write the name of the
State/Province manually
7. The Secondary Insurance Company’s telephone number. This will be populated
upon selection of the insurance company, if all data requirements have been
completed while defining the insurance company in the database. Otherwise,
write the telephone number manually.
8. The Secondary Insurance Company’s fax number. This will be populated upon
selection of the insurance company, if all data requirements have been
completed while defining the insurance company in the database. Otherwise,
write the fax number manually.
9. Refers to the particular Insurance Plan of the Secondary Insurance Company. The
field is selectable from the list of plans already fed in by you in the database
59
EMR NEXT – User Manual
«◄○►»
(Exhibit 06.061), as shown in section 09.01.03.01. Otherwise, type in the plan
particulars manually.
10. Expiry date of the Patient’s Policy with reference to the Secondary Insurance
Company. This is selectable from dropdown list (Exhibit 06.062).
11. Patient’s specific Policy No., with reference to the Secondary Insurance Company
12. Group Number, if any
13. The amount or percentage to be paid by the patient, as specified in the
secondary insurance company’s plan
14. Authorization Code, if any sought for the encounter.
15. For any remarks pertaining to the insurance plan or secondary insurance
company. The field is restricted to 80 characters
After these fields, there is a sub block, to be filled if the patient does not have
his/her own insurance policy, and is using someone else’s policy, like father’s
mother’s, etc. The sub block has following fields:
16. The relationship of the insured with the patient. The field is selectable from the
dropdown list (Exhibit 06.063)
17. The Principal Insured’s Home Phone. Field is restricted to numerical values only.
If your clinic is located in USA or Canada, the phone number will auto-format
according to US/Canadian specifications.
18. Write the Last Name, First Name and Middle Name Initial of the Principal Insured
here.
19. Date of Birth of the principal insured. DOB is selectable from dropdown list
(Exhibit 06.064).
20. The Principal Insured’s Gender, selectable from dropdown list. Options include
Male, Female, Transgender (Exhibit 06.065).
If you click the Block-Title Icon on the block, an alert will be raised saying “Closing this
block would also reset its fields to their default values. Are you sure you want to close
it?” If you click the “No” button on the alert, the action will abort. But if you click the
“Yes” button on the alert, all entries made in this block will clear, and the block will be
de-activated. To reactivate the block, click the Block-Title Icon again.
60
EMR NEXT – User Manual
«◄○►»
.
Exhibit 06.060
Exhibit 06.061
Exhibit 06.062
Exhibit 06.063
Exhibit 06.064
Exhibit 06.065
61
EMR NEXT – User Manual
«◄○►»
06.01.09 – Guarantor’s Block
Back
The Guarantor’s Block on the General Information Form is identified at Item 15 of
Exhibit 06.07.
The block contains information of the patient’s guarantor, if any.
The block looks like this:
Exhibit 06.066
1. Select the relationship of the guarantor with the patient from the dropdown list
(Exhibit 06.067). Options include: Self, Spouse, Parent, Child, Other, Institution.
2. Guarantor’s Home Phone Number. Field is restricted to numerical values only. If
your clinic is located in USA or Canada, the phone number auto-formats to
country standards.
3. Specify Guarantor’s Last Name, First Name and Middle Name Initial.
4. Guarantor’s Date of Birth is selectable from dropdown list (Exhibit 06.068).
5. Select Guarantor’s Gender from dropdown list (Exhibit 06.069). Options include
Male, Female, Transgender
6. You may write any remarks here pertaining to the guarantor here. The field is
restricted to 80 characters
If you click the Block-Title Icon on the block, an alert will be raised saying “Closing this
block would also reset its fields to their default values. Are you sure you want to close
it?” If you click the “No” button on the alert, the action will abort. But if you click the
62
EMR NEXT – User Manual
«◄○►»
“Yes” button on the alert, all entries made in this block will clear, and the block will be
de-activated. To reactivate the block, click the Block-Title Icon again.
Exhibit 06.067
Exhibit 06.068
Exhibit 06.069
63
EMR NEXT – User Manual
«◄○►»
06.01.10 – The Print Functionality
Back
The Print Functionality on the General Information Form is identified at Item 16 of
Exhibit 06.012.
Only Patient Face Sheets and Face Labels can be printed from this form.
When you click the printer icon, the “Print/Fax Demographics and Insurance” Window
opens
Exhibit 06.070
Two Radio Buttons are available in the left column, under the patient’s name. Select the
required radio button to call the report on the viewing pane (Exhibit 06.071 & Exhibit
06.073). The ‘Print’ button is presently de-activated. When a report is called in the pane,
it will activate. Clicking this button will take the user to the computer operating system
for printer selection, or for sending fax.
64
EMR NEXT – User Manual
«◄○►»
The Face Sheet
Face Sheets are covering sheets for patient’s physical folder. When the ‘Face Sheet’
Radio Button is clicked, the face sheet appears in the viewing pane like this:
Exhibit 06.071
The full Face Sheet looks like this:
65
EMR NEXT – User Manual
«◄○►»
Exhibit 06.072
Face Sheets may be used as covering sheets for patient folders. Face Sheets do not save
on the system, and may be generated afresh as and when required. All information on
the Face Sheet is called from the General Information Form and the History Form.
History Form is the next section in this manual. Fields in the Face Sheet include:
1. Your clinic’s name, address, phone number and fax number
2. Title of Report – Patient Face Sheet
66
EMR NEXT – User Manual
«◄○►»
3. This section contains the patient’s basic information, which includes Name, Date
of Birth, Social Security Number, Gender, Marital Status, Race, name of patient’s
Pharmacy, and other information (as typed in the general form, items 1, 3, 4, 5,
7, 8 & 9 in Exhibit 06.038).
4. This section contains the patient’s contact information, which includes Address,
Home Phone, Cell Phone, Email and Emergency contact particulars.
5. This section contains patient’s work information, which includes Work Status,
name of Institution, and work phone number.
6. This section contains the emergency contact directives given by the patient, and
contact instructions in case of emergency – whether or not information be
released to third parties.
7. This section contains the general information provided on the patient chart
8. This section contains the Primary Insurance Details, and, if the patient is not the
principal insured, then also particulars of the Principal Insured.
9. This section contains the Secondary Insurance Details, and, if the patient is not
the principal insured, then also particulars of the Principal Insured.
10. This section contains the guarantor’s information, and includes the relationship
of the guarantor with the patient, the guarantor’s name, date of birth, phone
number, and remarks.
11. The Face Sheet will end here, unless this check mark is checked, in which case,
the medical history will also be included in the face sheet.
12. The Medical History section appears when the check mark identified in item 11 is
checked.
13. Known Allergies are listed.
14. Past Medical History is listed.
15. Past Surgical History is listed.
16. Family History of illnesses is listed (items identified appear in red, with a positive
prefix. Other items are in black, with a negative prefix).
67
EMR NEXT – User Manual
«◄○►»
17. Social History of adverse traits is listed (adverse traits appear in red, suffixed
with a positive sign, while unidentified traits appear in blacked, suffixed with a
negative sign).
18. The Master Medication List
19. The Master Problem List
20. Date and time stamp when the face sheet was printed.
Face Labels
Face Labels are sticker-style labels with the patient information. When the ‘Face Label’
Radio Button is selected, the Face Labels call in the viewing pane like this:
Exhibit 06.073
Face Labels include the following information of the patient, in order:
Date on which the label is printed, Patient’s Social Security Number, Name, Gender,
Date of Birth, Phone Number, Address, Guarantor’s Name, Guarantor’s Phone Number,
Insurance Company’s Name, Insurance Policy No. & Group No., 2nd Insurance Company’s
Name, Insurance Policy No. & Group No.
68
EMR NEXT – User Manual
«◄○►»
06.02 – History Form
Back
Exhibit 06.074
The History Form stores Patient’s past and current medical history. When you take in a
new patient, or when you start using this system, you should load patient medical
69
EMR NEXT – User Manual
«◄○►»
history on this form. Thereafter, certain blocks of this form get updated from the
encounter forms automatically.
The top section of the form is the common on all three forms, and has been discussed in
detail as items No. 1 to 6 of Exhibit 06.012. Items in the lower section include:
70
EMR NEXT – User Manual
«◄○►»
06.02.01 – Past Medical History (PMH) Block
Back
Exhibit 06.075
The Past Medical History Block looks like this. Its placement on the History Form is
identified as item 1 on Exhibit 06.074. You can either write the past medical history
manually, or you may select PMH phrases from the list that opens when you click the
square on the right of the block (Exhibit 06.076). You may click as many PMH phrases as
required; they will add in the form one after another upon each click. The system has 56
pre-loaded PMH phrases, but only your favorites appear in the window. You can also
make your own PMH phrases and add them to the favorites (see section 09.01.04.13 for
how to add PMH phrases to the favorites list and how to make your own PMH phrases).
Exhibit 06.076
The PMH Phrase Window has a ‘Clear Field’ button, clicking which will clear all entries
made in the PMH Block so far. The ‘Undo Last’ button will only clear the last insertion in
the block.
Click the square icon before the block title (block icon) to clear and de-activate the
block. Click it again to re-activate it.
Click the block icon twice to refresh the block.
71
EMR NEXT – User Manual
«◄○►»
06.02.02 – Past Surgical History (PSH) Block
Back
Exhibit 06.078
The Past Surgical History Block looks like this. Its placement on the History Form is
identified as item 2 on Exhibit 06.074. You can either write the past surgical history
manually, or you may select PSH phrases from the list that opens when you click the
square on the right of the block (Exhibit 06.079). You may click as many PSH phrases as
required; they will add in the form one after another upon each click. The system has 24
pre-loaded PSH phrases, but only your favorites appear in the window. You can also
make your own PSH phrases and add them to the favorites (see section 09.01.04.14 for
how to add PSH phrases to the favorites list and how to make your own PSH phrases).
Exhibit 06.079
The PSH Phrase Window has a ‘Clear Field’ button, clicking which will clear all entries
made in the PMS Block so far. The ‘Undo Last’ button will only clear the last insertion in
the block.
Click the square icon before the block title (block icon) to clear and de-activate the
block. Click it again to re-activate it.
Click the block icon twice to refresh the block.
72
EMR NEXT – User Manual
«◄○►»
06.02.03 – Known Allergies (ALG) Block
Back
Exhibit 06.080
The Known Allergies (ALG) Block looks like this. Its placement on the History Form is
identified as item 3 on Exhibit 06.074. Exhibit 06.080 shows one set of entries, but by
clicking the down arrow at the bottom left of the set, any number of sets can be added.
The cross icon on the right deletes the set.
Each set consists of the name of the Allergen, the Reaction that it causes, and the status
of the allergy. The names of the Allergen may either be written manually, or may be
selected from your list of favorite allergen from the database (see section 09.01.04.15
for how to create your list of favorite allergen). Reaction has to be recorded manually.
Status can either be ‘Active’ or ‘Inactive’, by selection (Exhibit 06.081). The default
status is ‘Active’. To select from your favorite Allergen, click the square icon at the right
top of the block. The ‘Known Allergies’ Window opens up for selection Exhibit 06.082).
Only one allergen may be selected in one set of entries (although, manually you may
record more than one allergen in one block, but this is not recommended).
Exhibit 06.081
If there are no known allergies, the status of the block must be changed to ‘No Known
Allergies’. To do so, open the ‘Known Allergies’ Window. There is a ‘No known Allergies’
button at the bottom of the window (Exhibit 06.083). Click it to change the status. If any
allergies have been selected in the block, the status will not change. An alert will rise
asking for the selected allergies to be deleted for changing the status to ‘No Known
Allergies’ (Exhibit 06.084). Delete the allergies and then click the button in the window
73
EMR NEXT – User Manual
«◄○►»
again. Another alert will rise confirming that the status is being changed (Exhibit
06.085). If you click ‘Yes’ on the alert, the status will change, and now the block will look
like that in Exhibit 06.086.
Exhibit 06.082
Exhibit 06.083
74
EMR NEXT – User Manual
«◄○►»
Exhibit 06.084
Exhibit 06.085
Exhibit 06.086
If you do not need the Known Allergies block, click the square icon before the block title
(block icon) to clear and de-activate the block. Click it again to re-activate it.
Click the block icon twice to refresh the block.
As already said in the last sentence of the first paragraph of this section, the cross icon
at the right of the set of entries deletes the corresponding set. All but the last sets may
be deleted. The last set will be cleared, but will not delete.
75
EMR NEXT – User Manual
«◄○►»
06.02.04 – Health Maintenance Block
Exhibit 06.087
76
EMR NEXT – User Manual
Back
«◄○►»
The Health Maintenance Block records the procedures performed on the patient. Its
placement on the History Form is identified as item 4 on Exhibit 06.074. The system has
six pre-installed procedures in this block – Influenza Vaccine, Pneumococcal Vaccine,
Colorectal Screening, Prostrate Screening, Screening Mammogram and Screening Pap
Smear. Other procedures and vaccines may be added to the form, or any of these
deleted, suiting your practice. Section 09.03.05 shows how to add or delete procedures
from the Health Maintenance Block.
The exhibit shows one set of entry for each element. You can add as many sets of
entries as required for any element by clicking the down-arrow at the end of the
element. You may delete the added entries by clicking the cross (x) icon at the right of
each set of entry (but, the original set cannot be deleted. It will be cleared).
As you can see in Exhibit 06.087, the data requirement of the first two elements is
different from that of the last four. This is because the first two elements are vaccines,
while the other four are procedures. The system recognizes a vaccine by the CVX code
defined for it (see section 09.03.05 for defining elements and their CVX codes). All
elements without CVX codes are seen as procedures.
Data requirement for vaccines include the following fields: Date, Note (this is a free text
field with a 20 character limit), Next (due date), Dose (ml or mg suffix is selectable –
Exhibit 06.088) Lot Number and Manufacturer.
Data requirement for procedures include the following fields: Date, Note (this is a free
text field with a 20 character limit), Next (due date) and Miscellaneous (this is also a free
text field with a 40 character limit).
Dates in both the data sets are selectable from a dropdown list on the field. (Exhibit
06.089 & 06.090), and the name of the manufacturer is also selectable from dropdown
(Exhibit 06.091).
Exhibit 06.088
77
Exhibit 06.089
EMR NEXT – User Manual
Exhibit 06.090
«◄○►»
Exhibit 06.091
After the Health Maintenance elements, there is a free text area, for any notes relating
to health maintenance. There is no limitation on the size of the note. You may
perpetually add to it or delete from it.
If you do not need the Health Maintenance Block, click the square icon before the block
title (block icon) to clear and de-activate the block. Click it again to re-activate it.
Click the block icon twice to refresh the block.
78
EMR NEXT – User Manual
«◄○►»
06.02.05 – Family History Block
Back
Exhibit 06.092
This is the Family History Block. Its placement on the History Form is identified as item 5
on Exhibit 06.074. Fourteen diseases are pre-defined on the block, but you may add or
delete as many diseases as required, according to the requirements of your practice.
Section 09.03.06 shows how to add or delete diseases from the block.
At the outset, the values are set to negative, indicating absence of family history for this
disease. Click the negative sign to turn it positive (+), as shown in Exhibit 06.093. Now
either enter data manually, or select names of relatives from the given list. Open the list
window by clicking the square button at the end of the field, as shown in Exhibit 06.094.
(The square button will appear only when you click the disease to positive). Select as
79
EMR NEXT – User Manual
«◄○►»
many relations as required by clicking them, and they will add to the field. You can
combine selection with manual inscriptions also. The list window also allows you to clear
the field, or clear the last entry in the field. Respective buttons are available at the top
of the window. The relations in the list in any of the diseases can also be added to or
deleted. Section 09.03.06 shows how to do this. At the end of the Medical History block
is a free text area, where you can write any general notes. There is no restriction on the
size of the note. You can perpetually add to it or delete from it.
Exhibit 06.094
Exhibit 06.095
If you do not need the Family History Block, click the square icon before the block title
(block icon) to clear and de-activate the block. Click it again to re-activate it.
Click the block icon twice to refresh the block.
80
EMR NEXT – User Manual
«◄○►»
06.02.06 – Social History Block
Back
Exhibit 06.096
This is the Social History Block. Its placement on the History Form is identified as item 6
on Exhibit 06.074. There are ten social factors (habits & exposures) listed in the block,
but you may add to or delete any of them, according to the requirements of your
practice. See section 09.03.07 for how to add to or delete social factors from this block.
At the outset, the values are set to negative, indicating absence of habit or exposure.
Click the negative sign to turn it positive (+), as shown in Exhibit 06.097. Now either
enter data manually, or select observations from the given list. Open the list window by
clicking the square button at the end of the field, as shown in Exhibit 06.098. (The
square button will appear only when you click the habit/exposure to positive). Select as
many observations as required by clicking them, and they will add to the field. You can
combine selection with manual inscriptions also. The list window also allows you to clear
the field, or clear the last entry in the field. Respective buttons are available at the top
of the window. Observations for any habit/exposure can also be added to or deleted,
from the customization area (see section 09.03.07). At the end of the Social History
81
EMR NEXT – User Manual
«◄○►»
block is a free text area, where you can write any general notes. There is no restriction
on the size of the note. You can perpetually add to it or delete from it.
Exhibit 06.097
Exhibit 06.098
If you do not need the Social History Block, click the square icon before the block title
(block icon) to clear and de-activate the block. Click it again to re-activate it.
Click the block icon twice to refresh the block.
82
EMR NEXT – User Manual
«◄○►»
06.02.07 – Master Problem List Block
Back
Exhibit 06.099
Master Problem List’s placement on the History Form is identified as item 7 on Exhibit
06.074. It is the history of all problems identified for the patient. Initially, you may
record the problems of a new patient in this block directly, but subsequently, the list will
update automatically from the encounter forms.
Entries may either be made manually, or may be selected from your list of favorite
problems (Exhibit 06.100). Section 09.01.04.01 shows how to make your list of favorites
from the collection of over 1900 preloaded problems in the system.
Exhibit 06.100
If you are adding problems manually, create a fresh set of entries by pressing the downarrow icon under the last set of entries, and fill in the data. For selection from the
database, click the block window icon to call the list of favorites.
Each set of entries in the problem list include the following: 1) DX code of the problem,
2) The onset time, 3) Nature of the problem, 4) Description of the problem, and 5)
Status.
If you select the problem from your list of favorites, the DX code, description of the
problem and the status would be called in from the selection. Only the Onset time and
the Nature of problem have to be specified individually. The Onset field is initially a freetype-field, but if you click on the field name, it converts into a dropdown list for
selection of date (Exhibit 06.101). Nature of problem can be defined only by selection,
from the following selectable values: Minor, Self Limited, Time Limited, Acute, Chronic,
Intermittent, Recurrent, Condition, Symptom, Finding, & Limitation (Exhibit 06.102). The
83
EMR NEXT – User Manual
«◄○►»
default status is set to ‘Active’. Eight other statuses are available for selection as
appropriate: Improving, Stable, Controlled, Worsening, Uncontrolled, Resolved, Ruled
out & Inactive (Exhibit 06.103).
Exhibit 06.101
Exhibit 06.102
Exhibit 06.103
Manually inserted values may be edited, but values populated by selection may not be
edited.
Entries in the Master Problem List may be deleted by pressing the cross (x) at the end of
the list. This option is recommended to be used only if an incorrect entry has been
made. For problems that have resolved, the Status should be changed to “Inactive”, and
not deleted. If a de-activated problem is re-diagnosed in a subsequent encounter, the
status will change to active.
If your list of favorite Problems is very long, and you cannot locate the problem in the
list readily, there is a 3-10 character search available here on the list. Type the key word,
and the system will take you to all entries with the key word (Exhibit 06.104).
For fast location from a long list of problems in the favorites, press the alphabet with
which the problem starts, and the system will take you to the first entry starting with
the alphabet (Exhibit 06.104).
If there are no known problems, the status of the block must be changed to ‘No Known
Problems’. To do so, open the ‘Master Problem List’ Window. There is a ‘No known
Problems’ button at the bottom of the window (Exhibit 06.104). Click it to change the
status. If any problems have been selected in the block, the status will not change. An
alert will rise asking for the selected problems to be deleted for changing the status to
‘No Known Problems’ (Exhibit 06.105). Delete the problems and then click the button in
the window again. Another alert will rise confirming that the status is being changed
(Exhibit 06.106). If you click ‘Yes’ on the alert, the status will change, and now the block
will look like that in Exhibit 06.107.
84
EMR NEXT – User Manual
«◄○►»
Exhibit 06.104
Exhibit 06.105
Exhibit 06.106
85
EMR NEXT – User Manual
«◄○►»
Exhibit 06.107
If you do not need the Master Problem List Block, click the square icon before the block
title (block icon) to clear and de-activate the block. Click it again to re-activate it.
Click the block icon twice to refresh the block.
86
EMR NEXT – User Manual
«◄○►»
06.02.08 – Master Medication List Block
Back
Exhibit 06.108
Master Medication List’s placement on the History Form is identified as item 8 on
Exhibit 06.074. This is the history of all medication prescribed to the patient. For a new
patient, you may fill in the previously prescribed medication in this block manually, but
for all medications prescribed by you in encounters, the list will update automatically
from the respective encounter forms.
For each medicine, the set of entries includes the name of the medicine (Rx),
Dispensation Instructions, Dosage (Sig), and Status.
You may either write each medicine manually, by adding blank sets of entries by clicking
the down-arrow at the bottom of the last set of entries, or you may select the medicines
from your list of favorites, by clicking on the block-window-icon (Exhibit 06.109). Section
09.01.04.04 shows how to make your list of favorite medicines from the over 4500
preloaded medicines in the database, and how to add more medicines to the database.
Exhibit 06.109
When you select the medicine from your favorites, the name and the signature will be
called from the selection (i.e., if a signature phrase has been added to the medicine in
the favorites, as explained in Section 09.01.04.04), while the dispensation instructions
and the status will have to be individually specified. If the signature phrase is not
applicable in any specific instance, it may be edited. Selectable values for dispensation
instructions are GEQ & DAW (Exhibit 06.110), while selectable values for Status include:
Active, Inactive, Completed, Discontinued, Erroneous & Not Covered (Exhibit 06.111)
87
EMR NEXT – User Manual
«◄○►»
Exhibit 06.110
Exhibit 06.111
If you are entering data manually, the signature field is initially a free-type-field. But you
may convert it to a selectable field by clicking at the field title. The selectable field is
broken into four subfields, for Dosage, Route, Frequency and Duration (Exhibits 06.112,
06.113, 06.114 & 06.115). Status can either be Active, Inactive, Completed,
Discontinued, Erroneous, & Not covered (Exhibit 06.111). If a medicine has been
prescribed by error, or entered in the system by error, you may either change the status
to ‘Erroneous’, or you may delete the medicine by clicking the cross(x) icon at the right
of the medicine.
Exhibit 06.112
Exhibit 06.113
Exhibit 06.115
88
EMR NEXT – User Manual
Exhibit 06.114
«◄○►»
Manually inserted entries may be edited, but if the medicine has been selected from the
list favorites, the name is not editable.
Entries in the Master Medication List may be deleted by pressing the cross (x) at the end
of the list. This option is recommended to be used only if an incorrect entry has been
made. For discontinued medicines, the Status should be changed as applicable, rather
than deleting the medicine from the list. If a discontinued medicine is re-introduced in a
subsequent encounter, the status will change appropriately.
If your list of favorite Medicines very long, and you cannot locate the medicine in the list
readily, there is a 3-10 character search available here on the list (Exhibit 06.116). Type
the key word, and the system will take you to all entries with the key word.
For fast location from a long list of favorite medicines, press the alphabet with which the
problem starts, and the system will take you to the first entry starting with the alphabet
(Exhibit 06.116).
If an inactive medicine is prescribed again in a subsequent encounter, the status will
change to active.
If there are no known medications, the status of the block must be changed to ‘No
Known Medications’. To do so, open the ‘Master Medication List’ Window. There is a
‘No known Problems’ button at the bottom of the window (Exhibit 06.116). Click it to
change the status. If any medicines have been selected in the block, the status will not
change. An alert will rise asking for the selected medicines to be deleted for changing
the status to ‘No Known Medications’ (Exhibit 06.117). Delete the medicines and then
click the button in the window again. Another alert will rise confirming that the status is
being changed (Exhibit 06.118). If you click ‘Yes’ on the alert, the status will change, and
now the block will look like that in Exhibit 06.119.
89
EMR NEXT – User Manual
«◄○►»
Exhibit 06.116
Exhibit 06.117
Exhibit 06.118
90
EMR NEXT – User Manual
«◄○►»
Exhibit 06.119
If you do not need the Master Medication List Block, click the square icon before the
block title (block icon) to clear and de-activate the block. Click it again to re-activate it.
Click the block icon twice to refresh the block.
91
EMR NEXT – User Manual
«◄○►»
06.02.09 – The Print Functionality
Back
The Print Functionality on the History Form is identified at Item 9 of Exhibit 06.074.
When the print icon is clicked, the “Print/Fax – Historical Data” Window opens (Exhibit
06.120)
Exhibit 06.120
As can be seen in the left column of the window, five Reports may be printed from this
window. Data for all these reports comes from the History Form. Individual Reports are
discussed section-wise.
Reports are called in the viewing pane by selecting the Radio Buttons. When a report is
called, the print button and the signature stamp activates (Exhibit 06.121)
92
EMR NEXT – User Manual
«◄○►»
Exhibit 06.121
The signature stamp is used for applying your signature on the report. See section
09.01.01.02 for adding your signature stamp to the system. If you do not have a
signature stamp, a notification will pop up (Exhibit 06.122).
Exhibit 06.122
Reports called from this window can only be printed or faxed. They are not stored in the
database.
When the print button is clicked, the system takes you to the operating system for
selection of printer/fax.
93
EMR NEXT – User Manual
«◄○►»
06.02.09.01 – History Note
Back
Exhibit 06.123 shows the complete History Note
Exhibit 06.123
1. Your Clinic’s Name, Address, Phone & Fax Number
2. Title of the Report along with patient name, date of birth, and the date of the
History Note.
3. Past Medical History is called from the History Form
4. Past Surgical History is called from the History Form
5. Known Allergies are called from the History Form
6. Family History is called from the History Form. Positive diseases are identified in
red.
7. Social History is called from the History Form. Positive adverse social traits are
identified in red.
94
EMR NEXT – User Manual
«◄○►»
8. Master Medication list is called from the History Form, and shows the name of
medicine and status.
9. Master Problem List is called from the History Form, and identifies the problem
and its status.
10. Space for your signature
11. Date and Time stamp of when the print was taken.
95
EMR NEXT – User Manual
«◄○►»
06.02.09.02 – Problem List
Back
Exhibit 06.124 shows the Problem List
Exhibit 06.124
1. Your Clinic’s Name, Address, Phone & Fax Number
2. Name of report along with patient’s name and date of birth.
3. List of problems from the Master Problem List, along with the DD codes, the
onset dates, and the status.
4. Space for your signature
5. Date & Time Stamp of when the list was printed.
96
EMR NEXT – User Manual
«◄○►»
06.02.09.03 – Medication List
Exhibit 06.125 shows the Medication List
Exhibit 06.125
1. Your Clinic’s Name, Address, Phone & Fax Number
2. Name of the Report along with patient name and Date of Birth
3. List of medicines from the Master Medication List, along with status
4. Space for your signature
5. Date & Time Stamp of when the list was generated.
97
EMR NEXT – User Manual
Back
«◄○►»
06.02.09.04 – Allergy List
Back
Exhibit 06.126 shows the Allergy List
Exhibit 06.126
1. Your Clinic’s Name, Address, Phone & Fax Number
2. Name of Report along with patient Name and Date of Birth
3. List of Allergies from the History Form, along with reaction, type of the allergy
and the status.
4. Space for your signature
5. Date & Time Stamp of when the report was generated.
98
EMR NEXT – User Manual
«◄○►»
06.02.09.05 – Health Maintenance Report
Back
Exhibit 06.127 shows the Health Maintenance Report
Exhibit 06.127
1. Your Clinic’s Name, Address, Phone & Fax Number
2. Name of the report, along with patient name and Date of Birth
3. List of procedures administered to the patient, along with the date of
administration, and, in case of vaccines, the size of the dose.
4. Space for your signature
5. Date & Time Stamp of when the report was generated.
99
EMR NEXT – User Manual
«◄○►»
06.03 – Encounter Form
Back
Every time a patient visits you, you must record the encounter. The encounter may
either result from a scheduled appointment, or may be created directly on the patient
chart, if the visit is unscheduled.
There is no limit on how many encounters are opened for a patient. Over the years, the
number of encounters for most patients is expected to run in hundreds. For your
convenience, the system will open to the most recent encounter when you open the
chart and click on the encounters tab.
Section 08 (Notes to Item 13) shows how an encounter is opened from a scheduled
appointment on the scheduler. In this section, opening an encounter directly on the
patient chart is explained.
When you create a new chart, only two tabs appear on the left – the General Form and
the History Form, as can be seen in Exhibit 06.128. The space marked as (1) on the
Exhibit is the place where the Encounter tab will appear once an encounter is created.
Exhibit 06.128
Item (2) on Exhibit 06.128 identifies the button which creates encounter forms. When
the button is clicked, the encounter is created. Item (3) on Exhibit 06.129 shows the
encounter tab, which will appear when the first encounter is opened for the patient.
100
EMR NEXT – User Manual
«◄○►»
Item (4) shows the encounter-counter. After the first encounter is opened, it reads “1 of
1” meaning that the first encounter form, of a total of one encounter forms, is open.
Exhibit 06.129
Exhibit 06.130
Exhibit 06.130 shows the state where three encounter forms have been created. Item
(5) shows the counter reading “2 of 3”, meaning that currently, the second encounter
101
EMR NEXT – User Manual
«◄○►»
form, out of a total of 3 encounter forms is open. You may navigate to an earlier
encounter by clicking the left pointing double arrow above the encounter-counter, and
to a more recent encounter by clicking the right pointing double arrow below the
encounter-counter.
The patient chart opens on the General Form. If any encounter exists on the chart, the
encounters tab is visible, but the encounter-counter is not visible (Exhibit 06.131). The
encounter-counter will become visible when the encounter tab is clicked, and the
counter will show the most recent encounter.
Exhibit 06.131
When a new encounter is opened, an alert pops (exhibit 06.132), asking if you want to
open a blank encounter form, or you want to copy the previous encounter form (this
may save you some writing, if there are particulars on the previous encounter form that
you might want to carry on the fresh form also).
Exhibit 06.132
102
EMR NEXT – User Manual
Exhibit 06.133
«◄○►»
If there is any particular encounter form you want to be copied, then you must navigate
to that encounter form, and then create the new encounter. Like, in Exhibit 06.133, the
patient had 12 encounters. But the doctor wanted to copy encounter # 8 on the fresh
encounter form. He/she navigated to encounter # 8, and then clicked the “create-newencounter” button. The popup window now asks if a blank encounter form needs to be
created, or encounter # 8 should be copied, or the last encounter (# 12) should be
copied. A click on the center button created a fresh encounter form (#13), with contents
of encounter # 8 copied thereon.
Deletion of Encounter forms is discussed in section 06.03.16.01.01.
The complete Encounter Form is shown in Exhibit 06.134. The top section is the same as
that discussed in the General Form. Encounter Form specific items are discussed
section-wise.
103
EMR NEXT – User Manual
«◄○►»
Exhibit 06.134
104
EMR NEXT – User Manual
«◄○►»
06.03.01 – Encounter Statistics
Back
Exhibit 06.135 shows the Encounter Statistics Block. The location of the block on the
Encounter Form is identified by item 1 on Exhibit 06.134
Exhibit 06.135
1. This is the encounter number. In this case, it is the seventh encounter of the
patient.
2. Date of encounter, selected from dropdown list (Exhibit 06.136). When creating
an encounter, future dates up to thirty days may be defined (in case you want to
prepare the form ahead of the appointed time). The system will not allow
creation of encounters more than 30 days ahead.
3. Encounter type is selectable from the dropdown list (Exhibit 06.137). Manual
entry is not permitted. 32 options are available in the dropdown. Many have
been picked from the billing regulations; others have been devised from general
experience of the industry. You can manage your list of favorite Service Types in
Section 09.01.04.08.
4. This field is for the Point of Service Code for the encounters. Codes have been
pre-inserted with the encounter types specified in the billing regulations. For
others, field is presently blank. Insert the code if one exists for the encounter
type you select, otherwise leave blank. The Point of Service Codes are also
managed from Section 09.01.04.08
5. If the patient has been referred by any other doctor or any other hospital/clinic,
the name of the doctor or the hospital/clinic. If you have the name of the
doctor/hospital/clinic in your database, then select from dropdown list (Exhibit
06.138), otherwise write manually (Section 09.01.03.03 shows how to add the
names of doctors to the database, and Section 09.01.03.06 shows how to add
name of hospitals/clinics to database).
105
EMR NEXT – User Manual
«◄○►»
6. The referring doctor’s ID. If the ID has been stored along with the name of the
doctor in the database, it will be picked upon selection of doctor in item 5. If the
ID is not in the database, write manually.
7. Your name along with suffix
8. Your ID number.
Exhibit 06.136
Exhibit 06.138
106
EMR NEXT – User Manual
Exhibit 06.137
«◄○►»
Back
06.03.02 – Fee Recovery Block
Exhibit 06.139 shows the Fee Recovery Block. The location of the block on the Encounter
Form is identified by item 2 on Exhibit 06.134. This block is for any fees that you may
receive directly from the patient during encounter. “Cash-Only” practices will always be
using this block.
Exhibit 06.139
1. Write the amount recovered from the patient here.
2. Mode of Payment is selectable from the dropdown list. Options are Cash, Card or
Check (Exhibit 06.140)
3. This is a free-type field, in which you may want to write particulars like card
number, check number, etc. This field accepts up to 30 characters.
4. Payment type is selectable from dropdown list. Options include: Copayment,
Coinsurance, Part Payment, & Full Payment. (Exhibit 06.141).
5. If full amount has been recovered, and further billing is not required, check this
box. The system will mark ‘No Billing Required’ on the Super Bill accordingly.
6. Any note that you might want to write for your biller. The field accepts up to 80
characters.
Exhibit 06.140
107
EMR NEXT – User Manual
Exhibit 06.141
«◄○►»
06.03.03 – Chief Complain / Encounter Reason Block
Back
Exhibit 06.142 shows the Chief Complain / Encounter Reason Block. The location of the
block on the Encounter Form is identified by item 3 on Exhibit 06.134. This block is a
part of the Subjective Section of the encounter, under the Center for Medicare &
Medicaid Guidelines for taking patient history.
Exhibit 06.142
This block records patient’s complaints. You may either record the complaint manually,
or select your favorite complains from the “Chief Complaint / Encounter Reason”
window, that pops when you click the block-window-icon at the top right of the block.
Section 09.01.04.09 shows how to add complaint phrases to the database.
Exhibit 06.143
Exhibit 06.143 shows the open “Chief Complaint / Encounter Reason” window. The
upper section shows the complaints selected in the previous encounter. The lower
section holds favorite phrases, from which you may select as many as required. The
selection may be mixed with manual entry. The “Clear Field” button in the window
clears the field altogether. The “Undo Last” button on the window clears the last of the
multiple selections made from the window.
If you do not need the Chief Complain / Encounter Reason Block, click the square icon
before the block title (block icon) to clear and de-activate the block. Click it again to reactivate it.
Click the block icon twice to refresh the block.
108
EMR NEXT – User Manual
«◄○►»
06.03.04 – History of Present Illness (HPI) Block
Back
Exhibit 06.144 shows the History of Present Illness Block. The location of the block on
the Encounter Form is identified by item 4 on Exhibit 06.134. This block is a part of the
Subjective Section of the encounter, under the Center for Medicare & Medicaid
Guidelines for taking patient history.
Exhibit 06.144
1. Define the present illness either manually, or by selection from the “History of
Present Illness” Window that pops when you click the block-window-icon on the
top right of the block. The upper section of the “HPI” window shows the illnesses
recorded in the previous encounter. The lower section lists you favorite HPI
phrases that you have defined in the database (Section 09.01.04.10 shows how
to define favorite HPI phrases). Multiple entries may be selected. Selections may
be integrated with manual comments.
2. Specify the location of the illness here. Either specify manually, or select from
the “Location Window” which pops when the field-window-icon is clicked.
Exhibit 06.146 shows the “Location Window”. Selection from window may be
mixed with manual noting. In case multiple illnesses are selected in item 1, use
of manual comments to identify the location of specific illnesses is
recommended.
109
EMR NEXT – User Manual
«◄○►»
3. Specify the Quality of the illness here. Either specify manually, or select from the
“Quality Window” which pops when the field-window-icon is clicked. Exhibit
06.147 shows the “Quality Window”. Selection from window may be mixed with
manual noting. In case multiple illnesses are selected in item 1, use of manual
comments to identify the qualities of specific illnesses is recommended.
4. Specify the Severity of the illness here. Either specify manually, or select from
the “Severity Window” which pops when the field-window-icon is clicked. Exhibit
06.148 shows the “Severity Window”. Selection from window may be mixed with
manual noting. In case multiple illnesses are selected in item 1, use of manual
comments to identify the severity of specific illnesses is recommended.
5. Specify the Duration of the illness here. Either specify manually, or select from
the “Duration Window” which pops when the field-window-icon is clicked.
Exhibit 06.149 shows the “Duration Window”. Selection from window may be
mixed with manual noting. In case multiple illnesses are selected in item 1, use
of manual comments to identify the duration of specific illnesses is
recommended
6. Specify the Timing of the illness here. Either specify manually, or select from the
“Timing Window” which pops when the field-window-icon is clicked. Exhibit
06.150 shows the “Timing Window”. Selection from window may be mixed with
manual noting. In case multiple illnesses are selected in item 1, use of manual
comments to identify the timing of specific illnesses is recommended.
7. Specify the Context of the illness here. Either specify manually, or select from the
“Context Window” which pops when the field-window-icon is clicked. Exhibit
06.151 shows the “Context Window”. Selection from window may be mixed with
manual noting. In case multiple illnesses are selected in item 1, use of manual
comments to specify the context of each illness separately is recommended.
8. Specify the Modifying Factors of the illness here. Either specify manually, or
select from the “Modifying Factors Window” which pops when the field-windowicon is clicked. Exhibit 06.152 shows the “Modifying Factors Window”. Selection
from window may be mixed with manual noting. In case multiple illnesses are
selected in item 1, use of manual comments to identify the Modifying Factors of
specific illnesses is recommended.
9. Specify the Signs / Symptoms of the illness here. Either specify manually, or
select from the “Signs-Symptoms Window” which pops when the field-windowicon is clicked. Exhibit 06.153 shows the “Signs-Symptoms Window”. Selection
from window may be mixed with manual noting. In case multiple illnesses are
selected in item 1, use of manual comments to identify the signs / symptoms of
specific illnesses is recommended
110
EMR NEXT – User Manual
«◄○►»
The system has built-in phrases for the illness-qualifiers specified in items no. 2-9
above. You may add to or subtract from the built in phrases. The qualifiers
themselves can also be removed. Section 09.04.05 shows how to do it.
Each of the windows specified in items 2-9 has a “Clear Field” button to clear all
inscriptions/selections in the corresponding field. They also have an “Undo Last”
button to clear the last selection from the window.
If you do not need the History of Present Illness Block, click the square icon before the
block title (block icon) to clear and de-activate the block. Click it again to re-activate it.
Click the block icon twice to refresh the block.
Exhibit 06.145
111
EMR NEXT – User Manual
«◄○►»
Exhibit 06.146
Exhibit 06.147
Exhibit 06.148
112
EMR NEXT – User Manual
«◄○►»
Exhibit 06.149
Exhibit 06.150
113
EMR NEXT – User Manual
«◄○►»
Exhibit 06.151
Exhibit 06.152
Exhibit 06.153
114
EMR NEXT – User Manual
«◄○►»
06.03.05 – Review of Systems (ROS) Block
Back
Exhibit 06.154 shows the Review of Systems Block. The location of the block on the
Encounter Form is identified by item 5 on Exhibit 06.134. This block is a part of the
Subjective Section of the encounter, under the Center for Medicare & Medicaid
Guidelines for taking patient history.
Exhibit 06.154
15 systems are defined in this block, but more systems can be added, or removed,
according to requirement of your practice. (Section 09.04.06 shows how to do so).
115
EMR NEXT – User Manual
«◄○►»
For each system, a suitable set of observations is provided. When the checkbox is
checked, the corresponding system expands to show the available observations. Exhibits
06.155 to 06.169 show the available observations for each system. By default, these
observations are marked as negative. Clicking the negative sign turns them positive, as
shown in Exhibit 06.170. Clicking a positive sign reverts the negative status.
Observations may be added or subtracted from the form, according to the requirement
of the practice. Section 09.04.06 shows how this is done.
A checked checkbox is an indication that the system has been checked. Therefore, if you
examine a system, even if all findings are normal, and none of the observations are
marked positive, the checkbox must remain checked.
Exhibit 06.155
Exhibit 06.156
116
EMR NEXT – User Manual
«◄○►»
Exhibit 06.157
Exhibit 06.158
117
EMR NEXT – User Manual
«◄○►»
Exhibit 06.159
Exhibit 06.160
Exhibit 06.161
Exhibit 06.162
118
EMR NEXT – User Manual
«◄○►»
Exhibit 06.163
Exhibit 06.164
Exhibit 06.165
119
EMR NEXT – User Manual
«◄○►»
Exhibit 06.166
Exhibit 06.167
Exhibit 06.168
Exhibit 06.169
120
EMR NEXT – User Manual
«◄○►»
Exhibit 06.170
The block-icon on the top right of the block pops the “Review of Systems” Window,
which shows the details of the ROS in the previous encounter (Exhibit 06.171). The “Set
All Systems To Normal” button on the window will check the checkbox for all systems,
and leave the findings negative. Care must be exercised to use this function only when
all the systems have been reviewed. To copy the findings of any specific system to the
new encounter form, click the system in the popup window. If the previous findings of
all the systems are to be brought on the new encounter form, click the “Insert All
Previous Items” button at the bottom of the window.
121
EMR NEXT – User Manual
«◄○►»
Exhibit 06.171
At the bottom of the block, free type space is available for remarks. Initially two lines
are available, but lines will add according to the length of the text.
If you do not need the Review of Systems Block, click the square icon before the block
title (block icon) to clear and de-activate the block. Click it again to re-activate it.
Click the block icon twice to refresh the block.
122
EMR NEXT – User Manual
«◄○►»
Back
06.03.06 – Vital Signs Block
Exhibit 06.172 shows the Vital Signs Block. The location of the block on the Encounter
Form is identified by item 6 on Exhibit 06.134. This block is a part of the Objective
Section of the encounter, under the Center for Medicare & Medicaid Guidelines for
taking patient history.
Exhibit 06.172
This block lists the eight commonly observed vital signs – 1) Blood Pressure (BP), 2)
Pulse Rate (PR), 3) Height, 4) Waist (or ‘Head’, if the patient’s age is less than 2 years), 5)
Temperature (Tp) 6) Respiratory Rate (RR), 7) Weight (Wt) and 8) Oxygen Saturation
Rate (SpO2). Permissible values for all vital signs are available in the dropdown lists for
each sign. Manual entry is not permissible. Exhibits 06.173 to 06.181 show the upper
section of the dropdown lists for each sign.
Exhibit 06.173
Exhibit 06.174
Exhibit 06.175
Exhibit 06.176
Exhibit 06.177
Exhibit 06.178
123
EMR NEXT – User Manual
«◄○►»
Exhibit 06.179
Exhibit 06.180
Exhibit 06.181
Vital signs may be recorded according to the British Unit System, or the Metric System.
Select the system suiting your practice from the customization area (section 09.04.07).
Exhibits 06.173 to 06.181 show the values according to metric system.
The block-icon towards the top right of the block opens the “Vital Signs” Window. This
window shows the Body Mass Index (BMI), Blood Pressure Chart and Growth Charts.
The window opens up on the BMI Chart, but there is a set of radio buttons on the top of
the window, to toggle between the BMI Chart and the BP Chart. For Growth Charts, click
the “Show Growth Chart” button at the bottom of the window. The window changes
name to “Growth Charts”. Three Growth Charts are available – BMI for Age, Stature for
Age, and Weight for Age. Click appropriate radio button for the required chart. Exhibit
06.182 and Exhibit 06.183 show sample BMI charts. The structure of the BMI chart for
young patients (2-20years) and older patients (over 20 years) is different, according to
prevailing guidelines. For young patients, 5th percentile, 50th percentile and 95th
percentile values are charted year-wise for boys and girls, and the patient’s readings
appear as a red dot on the chart, for comparison. For older patients, The BMI chart is
divided into four weight classes - underweight, Healthy, Overweight and Obese. The
patient’s weight appears as a dot in its respective class. Appearance and structure of
BMI Chart for patients between 2-20 years is different from that for older patients.
Exhibit 06.184 shows the BMI chart for a patient between 2-20 years. If the patient is
under 2 years, there will be no BMI chart. A message will appear on the chart window,
as shown in Exhibit 06.184.
BMI calculations require weight and height data. If weight or height data is not available
in the chart, a message will appear on the chart, asking for the data to be provided
(Exhibit 06.185).
Exhibit 06.186 shows the Blood Pressure Chart. The BP chart shows the trend of the
systolic and diastolic readings for the past six encounters. Separate charts are shown for
systolic readings and diastolic readings. The readings appear as blue dots on the chart,
connected by a blue line to show the trend. Dates of encounters show on the x axis of
the graph, while readings show on the y axis. If readings have not been taken in any
encounter, dots will not appear for that encounter.
124
EMR NEXT – User Manual
«◄○►»
Exhibits 06.187, 06.188, and 06.189 show the BMI for Age, Stature for Age and Weight
for Age growth charts. On each of the three growth charts, the 5 th, 10th, 25th, 50th, 75th,
(also 85th in BMI only), 90th and 95th percentile values have been charted according to
age. The patient’s readings appear on the chart as a red dot.
For growth chart calculations, the patient must be within 2 – 20 years of age. If the
patient does not fall within this age group, an alert will raise, as shown in exhibit 06.190.
Growth chart calculations also require weight and height. They also require sex
identification. If either of the three is missing, an alert will raise, as shown in exhibit
06.191.
To print the BMI Charts, Blood Pressure Charts, and Growth Charts, click the print icon
on Vital Signs Window or the Growth Chart Window
125
EMR NEXT – User Manual
«◄○►»
Exhibit 06.182
126
EMR NEXT – User Manual
«◄○►»
Exhibit 06.183
127
EMR NEXT – User Manual
«◄○►»
Exhibit 06.184
128
EMR NEXT – User Manual
«◄○►»
Exhibit 06.185
129
EMR NEXT – User Manual
«◄○►»
Exhibit 06.186
130
EMR NEXT – User Manual
«◄○►»
Exhibit 06.187
131
EMR NEXT – User Manual
«◄○►»
Exhibit 06.188
132
EMR NEXT – User Manual
«◄○►»
Exhibit 06.189
Exhibit 06.190
133
EMR NEXT – User Manual
«◄○►»
Exhibit 06.191
134
EMR NEXT – User Manual
«◄○►»
06.03.07 – Physical Examination Block
Back
Exhibit 06.192 shows the Physical Examination Block. The location of the block on the
Encounter Form is identified by item 7 on Exhibit 06.134. This block is a part of the
Objective Section of the encounter, under the Center for Medicare & Medicaid
Guidelines for taking patient history.
Exhibit 06.192
15 systems are defined in this block, but more systems can be added, or removed,
according to requirement of your practice. (Section 09.04.08 shows how to do so).
135
EMR NEXT – User Manual
«◄○►»
For each system, a suitable set of examinations is listed. When the checkbox is checked,
the corresponding system expands to show the listed examinations. Exhibits 06.193 to
06.207 show the list of examinations available for each system.
When you check the checkbox of the exam you perform, it sets the exam result to
negative, and inserts a suitable negative-result phrase in the field. If the findings are
positive, click the negative sign. It will turn positive, the negative-finding phrase will
wipe off, and a field-icon will appear at the end of the field. Now either write the result
manually, or select appropriate phrase from the corresponding “exam result” window
which pops when the field icon is clicked (Exhibit 06.208). Multiple selections are
allowed.
Each “exam result” window has a “Clear Field” button to clear all insertions in the field.
There is also an “Undo Last” button to clear the last selection from the field.
The result phrases in the “exam result” window can be added or removed, or edited
according to the requirement of your practice. Even the negative finding phrase can be
edited. Section 09.04.08 shows how to do it.
The block icon opens “Physical Examination” window, showing the Physical Examination
results of the previous encounter (Exhibit 06.209). It shows the systems checked, the
examinations performed, and the findings. Positive results are shown in red, while
normal findings appear in black. To copy findings of any system from this window to the
current encounter form, click on the system in the window, and the observations will be
copied down on the new encounter, overwriting any freshly written data in the item.
After copying, the data may be edited further. To copy the results of all the systems
checked in the previous encounter to the fresh encounter form, click the ‘Insert All
Previous Items’ button at the bottom of the window. There is also a ‘set all systems to
normal’ button at the top of the window, which marks all systems as checked, and all
examinations therein as performed, with normal findings. This button should be clicked
only if all items are checked, and all exams are performed, with normal findings. If the
button has been clicked by mistake, click the block-title-icon to refresh the block.
There is a free-text space available at the end of the block, for any observations. There is
no space restriction. Lines will add according to the length of the text.
If you do not need the Review of Systems Block, click the square icon before the block
title (block icon) to clear and de-activate the block. Click it again to re-activate it.
Click the block icon twice to refresh the block.
136
EMR NEXT – User Manual
«◄○►»
Exhibit 06.193
Exhibit 06.194
Exhibit 06.195
Exhibit 06.196
137
EMR NEXT – User Manual
«◄○►»
Exhibit 06.197
Exhibit 06.198
Exhibit 06.199
138
EMR NEXT – User Manual
«◄○►»
Exhibit 06.200
Exhibit 06.201
Exhibit 06.202
139
EMR NEXT – User Manual
«◄○►»
Exhibit 06.203
Exhibit 06.204
Exhibits 06.205
Exhibit 06.206
Exhibit 06.207
140
EMR NEXT – User Manual
«◄○►»
Exhibit 06.208
Exhibit 06.209
141
EMR NEXT – User Manual
«◄○►»
06.03.08 – Procedures / Services Block
Back
Exhibit 06.210 shows the Procedures / Services Block. The location of the block on the
Encounter Form is identified by item 8 on Exhibit 06.134. This block is a part of the
Objective Section of the encounter, under the Center for Medicare & Medicaid
Guidelines for taking patient history.
Exhibit 06.210
Procedures / Services Block registers the Procedures Performed by you or Services
offered by you to the patient.
The block initially shows one set of entries. The entry set includes:
1. Code of the Procedure / Service, based on which the biller will make the bill.
2. Modifier to the Procedure / Service Code
3. Description of the Procedure / Service
4. Any remarks you want to incorporate with regards to the service or the
procedure performed.
Entries may either be written manually, or selected from the “Procedures / Services”
Window (Exhibit 06.211) which opens when the block-icon is clicked. The upper section
of this window shows the Procedures/services extended in the previous encounter. If a
procedure / service is being repeated, click on the item in the upper section of the
window to copy it on the fresh encounter form. New procedures / services may be
selected from the lower section of the window, where your favorite procedures/services
are shown. (See Section 09.01.04.02 for how to create your favorites from over 100
procedures/services and their CPT codes already available in the system database). Click
on the item to bring it on the encounter form, along with the code and default note, if
any (default note is also created while selecting favorites in Section 09.01.04.02). If the
default note is not appropriate for this patient, it may be edited on the encounter form.
142
EMR NEXT – User Manual
«◄○►»
If you are not using the block window, and adding the procedures/services offered
manually, first click the down-arrow to add blank sets of entries, and then fill them
appropriately.
Every set of entry has a delete-item icon at the right end. Entries may be deleted by
clicking the delete-item icon for the particular item.
If your list of favorites in the Procedures / Services window is long, you can utilize the
quick search available on the window. Enter a 3-10 character phrase included in the
Procedure / Service, and the system will find all entries with the search phrase. Click the
alphabet with which the description of the Procedure / Service starts, and the cursor will
move to the first entry starting with that alphabet.
Exhibit 06.211
If you do not need the Procedures / Services Block, click the square icon before the
block title (block icon) to clear and de-activate the block. Click it again to re-activate it.
Click the block icon twice to refresh the block
143
EMR NEXT – User Manual
«◄○►»
06.03.09 – Assessment / Diagnosis Block
Back
Exhibit 06.212 shows the Assessment / Diagnosis Block. The location of the block on the
Encounter Form is identified by item 9 on Exhibit 06.134. This block is a part of the
Assessment Section of the encounter, under the Center for Medicare & Medicaid
Guidelines for taking patient history.
Exhibit 06.212
Exhibit 06.212 shows a blank Assessment/Diagnosis block. When entries are inserted in
the block it looks as shown in Exhibit 06.213.
Exhibit 06.213
144
EMR NEXT – User Manual
«◄○►»
The upper section of the block is for Ongoing Problems. Click the Ongoing-Problems
field icon to call the ‘Past Problems’ window (Exhibit 06.214). The upper section of the
window shows the problems dealt with in the previous encounter, while the lower
section shows all other problems diagnosed for the patient earlier (those recorded in
the Master Problem List), along with their status. If the problems are repeating, click on
the problems in the window to bring them on to the current encounter form. All fields
will be carried down from the originating encounter, except the Status field, which must
be re-selected as appropriate from the dropdown list (exhibit 06.216). The ‘Notes’ and
the ‘Onset’ field are editable. The ‘onset’ field is a combo box. Initially it is a free text
field, but if you click on the field name, it becomes a dropdown list for selection of date.
Freshly Assessed Problems are added in the ‘New Assessments’ section. Click the NewAssessments field-icon to call the “New Problems” Window (Exhibit 06.215). The
window lists your favorite problems along with their ICD codes. The system has over
1900 pre-inserted problems with ICD codes, from which you identify your favorites, or
add new problems. Section 09.01.04.01 shows how it is done. After selecting the
problems from the window, fill in the onset, Nature and Notes, if any. The ‘onset’ field is
a combo box. Initially it is set for free-text typing. A click on the field name makes it a
dropdown list for date selection. The ‘Nature’ field is a dropdown list (Exhibit 06.217)
with two sets of options. The first set includes Minor, Self Limited, Time Limited, Acute,
Chronic, Intermittent, & Recurrent. The second set includes Condition, Symptom,
Finding, & Limitation. Only one value can be selected in the field. The Notes Field is free
text, with no limitation. Lines will add as per text requirement.
If you select an ongoing problem from the “New Assessments” Window, it will be added
in the ‘Ongoing Problems’ section, and not in the ‘New Assessments Section’.
If you are not using the “New Problems” Window for selecting the problems, and typing
them manually, first add a blank set of entry by clicking the add-field icon at the bottom
of the New Assessments” section.
For deleting incorrect entries, use the delete-field icon the end of the corresponding set
of entries.
If your list of favorites in the New Problems window is long, you can utilize the quick
search available on the window. Enter a 3-10 character phrase included in the Problem,
and the system will find all entries with the search phrase. Alternatively, click the
alphabet with which the description of the Problem starts, and the cursor will move to
the first entry starting with that alphabet.
All problems added in the New Assessments Section will add up in the Master Problem
List in the History form, along with all particulars. Any subsequent changes made in the
‘Onset’, ‘Status’ and ‘Notes’ field in the original encounter form will be updated in the
145
EMR NEXT – User Manual
«◄○►»
Master Problem List. But any changes made in these fields in the Master Problem List
itself will not be updated in the original encounter form.
If you do not need the Assessment / Diagnosis Block, click the square icon before the
block title (block icon) to clear and de-activate the block. Click it again to re-activate it.
Click the block icon twice to refresh the block
Exhibit 06.214
Exhibit 06.215
Exhibit 06.216
146
EMR NEXT – User Manual
Exhibit 06.217
«◄○►»
06.03.10 – Orders / Requisitions Block
Back
Exhibit 06.218 shows the Orders / Requisitions Block. The location of the block on the
Encounter Form is identified by item 10 on Exhibit 06.134. This block is a part of the Plan
Section of the encounter, under the Center for Medicare & Medicaid Guidelines for
taking patient history.
Exhibit 06.219
Orders / Requisitions Block is for the tests prescribed for the patient. Tests are classified
in three categories in the system – Laboratory Tests, Radiology Tests, and General
Orders. The “Orders / Requisitions” Window is accordingly divided into three sections
(Exhibit 06.221). Click the Block-Window Icon to call the Orders / Requisitions Window
(Exhibit 06.220). The window includes your favorite Orders/Requisitions, which you
have identified from over 250 Laboratory Orders and 200 Radiology Orders available in
the system’s database, or which you have added yourself to the system. Sections
09.01.04.05 (for Lab Orders), 09.01.04.06 (for Radiology Orders) and 09.01.04.07 (for
General Orders) show how to select favorites from the pre-loaded Orders/Requisitions,
and how to add new Orders / Requisitions to the database. For General Orders, there
are just a few pre-loaded items as a sample. You have to develop your own database for
them.
Click the required Orders in the “Orders/Requisitions” Window to bring them on to the
encounter form. They will come along with their category.
If you are not using the “Orders/Requisitions” Window for selecting orders/requisitions,
and are typing them in the block manually, first click the add-field icon at the bottom of
the block to add a new set of entries, and then fill it appropriately. Category is selectable
from the dropdown list on the field. Add suitable description of the item. There is no
space limitation for the description. Lines will add as per text requirement.
Incorrect entries can be deleted by clicking the delete-field icon towards the end of the
field
Each section of the “Orders / Requisitions” Window has quick finder alphabet tabs. If
your list of favorites is long, click the alphabet with which the description of the item
147
EMR NEXT – User Manual
«◄○►»
starts in the respective section and the cursor will move to the first entry starting with
that alphabet.
Exhibit 06.220
Exhibit 06.221
148
EMR NEXT – User Manual
«◄○►»
If you do not need the Orders / Requisitions Block, click the square icon before the block
title (block icon) to clear and de-activate the block. Click it again to re-activate it.
Click the block icon twice to refresh the block
149
EMR NEXT – User Manual
«◄○►»
06.03.11 – Medications Block
Back
Exhibit 06.222 shows the Medications Block. The location of the block on the Encounter
Form is identified by item 11 on Exhibit 06.134. This block is a part of the Plan Section of
the encounter, under the Center for Medicare & Medicaid Guidelines for taking patient
history.
Exhibit 06.222
Medications Section is for the medicines prescribed to the patient in this encounter.
Medications prescribed in an encounter automatically add up in the Master Medication
List in the History Form. (The Master Medication List has an extra field for ‘status’, which
can only be manipulated from the history form).
A set of entries in the block includes the following:
1. Name of the Medicine
2. Dispensation instructions – which can either be “Generic Equivalent” (GEQ) or
“Dispense as Written” (DAW). The field is selectable from the dropdown list on it
(Exhibit 06.224).
3. The Signature field is a combo box. Initially it is set for manual inscription. But, if
the field title is clicked, it breaks into four selectable sections for Dosage, Route,
Frequency and Duration (Exhibits 06.225 to 06.228)
4. Quantity of medicine to be dispensed. Numeric values are available from 1 to
540 in workable lots, and thereafter one month dosage, two months dosage, and
three months dosage quantities are specifiable (Exhibit 06.229).
5. Number of refills authorized. Values are selectable from dropdown list on the
field (Exhibit 06.230)
Medicines may either be written manually in the block, or selected from the
“Medications” Window that pops when you click the block-window-icon. If medicines
are being added manually, add blank sets of entries by clicking the add-field arrow at
the bottom of the block, and then fill them appropriately.
150
EMR NEXT – User Manual
«◄○►»
The “Medications” Window has 4 sections (Exhibit 06.223). The top section lists any
known allergies. The second section lists all medicines included in the Master
Medication List. The third section includes medicines prescribed in the previous
encounter. The fourth section is the list of your favorites. The system has over 4500
medications pre-loaded in the database, and you can either define your favorites from
them, or add new ones to the database. Section 09.01.04.04 shows how it is done.
Click medicines either from the master medication list section, previous encounter
section, or your favorites section to add to the medications in this encounter. If a
medicine is selected from previous encounter, or from master medication section of the
window, all entries will carry to the new form from the most recent encounter, including
the dispensation instructions, signature, quantity and number of refills. But the fields
may be edited.
But if the medicine is freshly selected, then only the dispensation instructions and
signature will carry down. (Signature will carry down only if a signature phrase has been
defined while selecting the medicine in the list of favorites. Otherwise, only
dispensation instructions will carry down) Quantity and number of refills will have to be
specified.
The “Medications” Window has a search utility, in case your list of favorite medicines is
too long. Enter a 3-10 character phrase included in the name of the medicine, and the
system will find all entries with the search phrase. Alternatively, click the alphabet with
which the name of the medicine starts, and the cursor will move to the first entry
starting with that alphabet.
Incorrect entries can be deleted by clicking the delete-field icon towards the end of the
field.
If you do not need the Medications Block, click the square icon before the block title
(block icon) to clear and de-activate the block. Click it again to re-activate it.
Click the block icon twice to refresh the block
151
EMR NEXT – User Manual
«◄○►»
Exhibit 06.223
Exhibit 06.224
152
Exhibit 06.225
EMR NEXT – User Manual
Exhibit 06.226
«◄○►»
Exhibit 06.227
Exhibit 06.229
153
Exhibit 06.228
Exhibit 06.230
EMR NEXT – User Manual
«◄○►»
06.03.12 – Plan Notes Block
Back
Exhibit 06.231 shows the Plan Notes Block. The location of the block on the Encounter
Form is identified by item 12 on Exhibit 06.134. This block is a part of the Plan Section of
the encounter, under the Center for Medicare & Medicaid Guidelines for taking patient
history.
Exhibit 06.231
The Plan Notes Block is for any instructions to the patient with regards to the illness.
Click on the block-icon to call the “Plan Notes” Window (Exhibit 06.232). The upper
section of the window shows the Plan Notes from the previous encounter, if any, and
the lower section shows your favorite phrases with regards to special instructions to the
patients. Section 09.01.04.12 shows how to add Plan Note phrases to database.
Multiple Plan Notes can be selected. Plan Notes can also be added manually. The Plan
notes window has two edit buttons ‘Clear Field’ – for clearing all entries in the Plan Note
block, and ‘Undo Last’ – for deleting the last entry selected from the window.
If you do not need the Plan Notes Block, click the square icon before the block title
(block icon) to clear and de-activate the block. Click it again to re-activate it.
Click the block icon twice to refresh the block
154
EMR NEXT – User Manual
«◄○►»
Exhibit 06.232
155
EMR NEXT – User Manual
«◄○►»
06.03.13 – Encounter Checklist Block
Back
Exhibit 06.233 shows the Encounter Checklist Block. The location of the block on the
Encounter Form is identified by item 13 on Exhibit 06.134.
Exhibit 06.233
This is a confirmatory block to ensure that certain vital elements of the encounter,
which are not a part of the encounter form sequence, have also been covered.
Five elements are included in the block:
1. Reviewed the Past Family and Social (PFS) History. The field-icon opens the “PFS
History - Consolidated View” Window (Exhibit 06.234). The window shows the
Previous Encounter Findings (Vitals, Problems, Orders and Follow-ups), Past
Medical History, Past Surgical History, Family History, Social History, Allergies
and Master Medication List. After reviewing all sections, click on the ‘OK – I have
Reviewed’ button at the bottom of the window, and the item on the encounter
form will be check marked. You may also check mark the item without opening
the view, if you have reviewed all factors from the history form.
2. Obtained old records. Here you certify by check marking the field that you have
obtained the patient’s old records, if any, that are not in your possession.
3. Summarized old records. Here you certify by check marking the field that you
have reviewed the old records and extracted all pertinent information from the
old records for future use.
4. Interpreted test data – here you certify by check marking the field that you have
studied and interpreted all test data for the tests that were ordered for the
patient.
5. Discussed / Reviewed tests – here you certify by check marking the field that you
have discussed and reviewed all tests with the patient. For convenience, the field
icon will open document viewer, in which you can review the three most
recently imported documents into the system for this patient (Exhibit 06.234).
156
EMR NEXT – User Manual
«◄○►»
Select the document in the upper section of the viewer, and click the ‘open’
button to view it.
157
EMR NEXT – User Manual
«◄○►»
Exhibit 06.234
Exhibit 06.235
158
EMR NEXT – User Manual
«◄○►»
06.03.14 – Evaluation & Management (E/M) Code Block
Back
Exhibit 06.236 shows the Evaluation & Management Code Block. The location of the
block on the Encounter Form is identified by item 14 on Exhibit 06.134.
Exhibit 06.236
This block serves three purposes – a) identification of the evaluation & management
code for your service charges for the encounter b) scheduling of next visit, and c)
specifying time by which the patient may join work / school (this is required for Excuse
Note).
1. If you know the Evaluation & Management Code for the encounter, select it from
the dropdown list on this field (Exhibit 06.237). Manual entry is not allowed. If
the E/M Code is not available in the dropdown list, first add it to the database,
and then select it. Section 09.01.04.03 shows how to add E/M codes to the
database.
2. Modifier to the E/M Code
3. E/M charges can either be service based or time based. Select appropriate basis
from the dropdown list (Exhibit 06.238).
4. If E/M charges are time based, specify the time here, in minutes (max. 99
minutes).
5. If you are unsure of the E/M Code for the encounter, the system has an E/M
Code Calculator that will suggest appropriate E/M Code. Click the field-icon to
open the E/M Code Calculator. Since the E/M Code calculator works on the data
entered in the encounter form, if any data is not available, it will show an alert
(Exhibit 06.239), and mark the required field in red (Exhibits 06.240 & 06.241).
Once the required data is provided, the calculator will seek whether the charges
are service based or time based (Exhibits 06.242 & 06.243). For time based
charges, the time must also be selected from the dropdown list (Exhibit 06.244).
Click the “Next” button, and the calculator now suggests suitable E/M Code
(Exhibit 06.245). Click the “Insert” button to insert the code in the field.
159
EMR NEXT – User Manual
«◄○►»
6. Click this button to open the scheduler, for scheduling the patient’s next visit.
Section 08 discusses how the scheduler operates.
7. Also specify by selecting from the dropdown list when the next visit is being
scheduled as shown in Exhibit 06.246 (This will be on an approximate basis here
– the actual appointment, if made will be on the scheduler). Manual comment is
also allowed in this field.
8. If the patient requires a doctor’s certificate for joining school/work, fill in the
time from when he/she may resume in the ‘Join Work-School’ field, or select
appropriate phrase from the dropdown list. When you print the excuse letter
(Section 06.03.16.02.10), the selected or inscribed phrase will appear in the
letter.
Exhibit 06.237
Exhibit 06.238
Exhibit 06.239
160
EMR NEXT – User Manual
«◄○►»
Exhibit 06.240
Exhibit 06.241
Exhibit 06.242
161
EMR NEXT – User Manual
«◄○►»
Exhibit 06.243
Exhibit 06.244
Exhibit 06.245
Exhibit 06.246
162
EMR NEXT – User Manual
«◄○►»
Exhibit 06.247
163
EMR NEXT – User Manual
«◄○►»
06.03.15 – Referral Block
Back
Exhibit 06.248 shows Referral Block. The location of the block on the Encounter Form is
identified by item 15 on Exhibit 06.134.
Exhibit 06.248
Exhibit 06.249
1. If the patient needs to be referred to another doctor, check the checkbox in the
Referral block (Exhibit 06.249)
2. Specify the urgency of the need here, by selecting appropriate phrase from the
drop-down list (Exhibit 06.250).
3. Specify the doctor or the hospital to which the patient is being referred to, by
selection from the dropdown list (Exhibit 06.251). Only two default entries are
available in the dropdown list ‘Any available physician’ or ‘Any Available
hospital’. You must add to the list of doctors and hospitals to the database.
Sections 09.01.03.03 and 09.01.03.06 show how to do this.
4. Specify the reason for the referral either by selecting suitable phrase from the
dropdown list (Exhibit 06.252), or by writing the reason manually in the available
field. Section 09.01.04.11 shows how more referral phrases may be added to the
database. When you print the Referral Letter (Section 06.03.16.02.05), your
selection/comments in this field will be picked in appropriate section of the
letter.
If you uncheck the ‘Refer this patient’ checkbox at the beginning of the block,
further details selected/typed in this block will clear.
164
EMR NEXT – User Manual
«◄○►»
Exhibit 06.250
Exhibit 06.251
Exhibit 06.252
165
EMR NEXT – User Manual
«◄○►»
06.03.16 – Utility Buttons Block
Back
Exhibit 06.253
Exhibit 06.253 shows how the utility buttons block looks on the Encounter Form. Item
16 on Exhibit 06.134 identifies the location of the block in the Encounter Form. The
block has three buttons
166
EMR NEXT – User Manual
«◄○►»
06.03.16.01 – The first button on the Utility Buttons Block
Back
When you click the first button, the following window pops up:
Exhibit 06.254
Exhibit 06.255
The window opens in the Exhibit 06.254 state if the encounter form has not been
locked. The first button is active, and the second and third are de-activated. (see
section 06.03.16.03 for locking.)
The window opens in the Exhibit 06.255 state if the encounter form is locked.
The first button is de-activated, and the second and third are active. (see section
06.03.16.03 for locking.)
167
EMR NEXT – User Manual
«◄○►»
06.03.16.01.01 – Deleting Encounter Forms
Back
When you click the ‘Delete this encounter’ button, the system raises this alert:
EXHIBIT 06.256
Click ‘Don’t Delete’ to abort deletion action; click ‘Yes, Delete Encounter’ to delete the
encounter form.
Only the last encounter form may be deleted. First open the last encounter form, and
then go for deletion. If you have opened any earlier encounter form, you will be unable
to delete the encounter.
Once the last encounter form has been deleted, the second last encounter becomes the
last encounter. Now this encounter can also be deleted. You may keep repeating this
action and delete all the encounters one by one.
168
EMR NEXT – User Manual
«◄○►»
06.03.16.01.02 – Refilling Medications
Back
Clicking the ‘Refill Medications’ button (item 2, Exhibit 06.257) pops the Refills window:
EXHIBIT 06.257
1. Patient’s allergies are shown at the top.
2. This part shows the Master Medication List.
3. This part shows the Medicines prescribed in this encounter
169
EMR NEXT – User Manual
«◄○►»
4. Check the checkboxes of the medicines you want to re-fill.
5. Click the ‘refill selected meds’ button to open the Refill Writer (Exhibit 06.258).
6. This section shows the last five refills of this patient on this encounter form.
7. Press the ‘Open’ button to see the concerned refill report.
The Refill Writer:
Exhibit 06.258
Once the medicines to be refilled are selected, and the ‘Refill Selected Meds’ button
(item 5, Exhibit 06.257) is clicked, the Refill Writer opens, with the selected medicines
showing therein.
1. Your clinic’s name, address, phone number and fax number.
2. Title of the Report – Refill Request
3. Patient’s name, Date of Birth, Sex and Address
170
EMR NEXT – User Manual
«◄○►»
4. Name of the selected medicine, with a free type field under it to write any
remarks.
5. The selection of GEQ (Generic Equivalent) DAW (Dispense as Written) indication.
6. Quantity of medicine. This field is editable, and a dropdown list appears for
selection of quantity, when you click the field.
7. Number of Refills. This field is editable, and a dropdown list appears for selection
of number of refills, when you click the field.
8. The total number of medicines included in this refill is shown.
9. Space for your signature
10. Print Date
11. Checkbox to add your electronic signature. If your electronic signature is not
available a message will appear. (See section 09.01.01.02 for adding electronic
signature on the system).
12. If you press the refresh button, all editing that you have done to the refill
request will undo, and the report will revert to the state when the report was
called in the Refill Writer.
13. Once you are done, save the Refill Request.
14. Refill Request may be printed individually for each medicine, or as a combined
Request for all medicines in one letter. This radio-button gives you the option.
The default value of the radio button is ‘combined’, and a combined report will
print.
171
EMR NEXT – User Manual
«◄○►»
Exhibit 06.259
15. If the radio button is changed to ‘separate’, then separate requests will be
generated for each medicine.
16. You can see here that only one medicine appears in this report.
17. And a counter appears under the date (the second medicine will have the
counter number 2).
18. And here starts the header for the second request. The request continues, and if
you could scroll down, you would have seen it.
172
EMR NEXT – User Manual
«◄○►»
Exhibit 06.260
Upon saving the Refill Request, the following buttons are activated on the Refill Writer.
19. Edit. This button opens the Request in edit mode. After making required
changes, save again.
20. This button allows deletion of saved Request, or adding remarks to it. Clicking
the button pops the Options window (Exhibit 06.261).
21. You may lock the refill request from here. Once locked, the refill request can
neither be deleted nor amended. (But remarks may still be added). Before
locking the Request, system will raise an alert (Exhibit 06.262). Click ‘Don’t Lock’
on the alert to abort locking action; click ‘Lock Refill’ to lock the Request.
22. This button enables you to print the report. When the button is clicked, the
system will take you to the printer options on the computer/laptop/tablet
operating system.
23. The remarks that are added from the options are show here.
173
EMR NEXT – User Manual
«◄○►»
Exhibit 06.261
Clicking the options button on the Refill Writer (item 20, Exhibit 06.260), pops the
Options window.
24. To delete the Refill Request, select this radio button, and press OK (item 26). An
alert will raise (Exhibit 06.263) before deleting the Request. Press ‘Yes, Delete It’
to delete; press ‘Don’t Delete’ to abort deletion action.
25. To add remarks to the Refill Request, select this radio button, write the text of
the remarks in the provided field, and press OK (item 26).
Exhibit 06.262
Exhibit 06.263
3) View/Add Addendums – This button also activates when the form is locked. When
clicked, the ‘Addendums to Encounter’ window pops. The window has two sections –
Upper pane for existing addendums, and lower narrower pane for the new text.
174
EMR NEXT – User Manual
«◄○►»
Exhibit 06.264
1. Your name, suffix and the date and time the addendum was added is shown as
the title of the addendum.
2. The actual text of the addendum
3. Add a new addendum of up to 500 characters here.
4. When writing is complete, click this button to add the addendum. Be careful.
Once added, the addendum cannot be deleted.
175
EMR NEXT – User Manual
«◄○►»
06.03.16.02 – The second button on the Utility Buttons Block
Back
The second button on the utility buttons block (item 2, exhibit 06.253) is for printing
reports. When clicked, ‘Print/Fax Encounter Related Documents’ window opens.
Exhibit 06.265
Exhibit 06.266
176
EMR NEXT – User Manual
«◄○►»
Exhibit 06.267
Exhibit 06.268
1. The left column shows the patient’s name on the top, and 12 printable reports
beneath it. The asterisk (*) after the report name (like that on the first 10 reports
in the exhibit), means that a printable report of this category exists for this
patient on this encounter. The reports or the draft text opens when the radio
button is selected. Under the 12 system generated reports, two Custom Reports
are shown in the exhibit. The system allows you to format up to 8 custom
177
EMR NEXT – User Manual
«◄○►»
reports, as per you practice’s requirement. Section 09.01.02.04 shows how to
format the custom reports.
2. This is the document viewing pane. Documents open in the pane when the
corresponding Radio Button is selected.
3. After opening the report, editing is allowed therein (only in fields which appear
in a darker shade). The refresh button removes all the editing done in the report,
and brings it back to the original shape.
4. If you have a signature stamp in the setup (see Section 09.01.01.02), checking
this button will insert your signature in the document.
5. The first four reports (Prescription, Laboratory Order, Radiology Order, and
General Order) have an option, either to be printed as a combined single report,
or as a separate report for each entry. Click the appropriate radio button to print
either separate reports of a combined report
6. Save the report after generating/editing it.
7. This button allows saved reports to be opened in edit mode. Save them again
after editing.
8. To print or fax the report, click this button.
9. This formatting toolbar is available on Referral Letter, Consultation Note,
Encounter Note, Excuse Letter, and the Custom Reports.
In any report, the editable portions appear in a slightly darker shade, while uneditable portions appear on the background yellow canvas.
Only those reports pertinent to the encounter form from which the ‘Print/Fax
Encounter Related Documents’ window has been opened can be viewed or
printed. To print a report created from some other encounter form, open the
Print/Fax Encounter Related Documents’ window from that encounter form. (But
all documents created from any encounter form may be viewed or printed from
the Document Viewer available on the General Form of the patient chart –
Section 06.01.01, Item 4 on Exhibit 06.014)
178
EMR NEXT – User Manual
«◄○►»
06.03.16.02.01 – Report 1 – Prescription
Back
Exhibit 06.269 shows the Prescription Report in the ‘Print / Fax – Encounter Related
Documents’ window:
EXHIBIT 06.269
1. Your clinic’s name, address and telephone & Fax numbers.
2. Title of the Report – Prescription
3. Patient’s Name
4. Patient’s Date of Birth
5. Patient’s Sex
179
EMR NEXT – User Manual
«◄○►»
6. Patient’s Address
7. The Medication Symbol. If you wish that any particular medicine or medicines do
not appear in the print, click on this symbol, for respective medicine(s). The
item(s) will be highlighted. If you take the print in this state, these items will not
appear in the print. Exhibit 06.270 shows highlighted entries on the report.
8. The name of the medicine
9. Specification whether the medicine may be dispensed as ‘Generic Equivalent’
(GEQ) or as ‘Dispense as Written (DAW).
10. Quantity of medicine(s)
11. Number of Refills
12. Total Number of items in the print.
13. The highlighted medicines (item 7) will not be included in the print.
14. They are even omitted from the medicine count.
All fields in the darker shade are editable. i.e, data called in from the original chart or
encounter form may be edited, added or deleted in these sections of the report.
180
EMR NEXT – User Manual
«◄○►»
EXHIBIT 06.270
181
EMR NEXT – User Manual
«◄○►»
06.03.16.02.02 – Report 2 – Laboratory Order
Back
Exhibit 06.271 shows the Laboratory Order in the ‘Print / Fax – Encounter Related
Documents’ window
EXHIBIT 06.271
1. Your clinic’s name, address and telephone & Fax numbers.
2. Title of the Report – Requisition (the same title is also used for Radiology Order
and General Order
3. Name, address and phone number of the Laboratory that you either typed in the
report manually, or selected from the button.
182
EMR NEXT – User Manual
«◄○►»
4. This is the button on clicking which the window opens with the names of the
Laboratories in your database. Exhibit 06.272 shows how the window with the
names of the laboratories appears on the screen. (See Section 09.01.03.04 for
how to add Laboratories to your database).
5. This part shows the name and date of birth of the patient for whom the
laboratory services have been requested.
6. This part shows the list of the laboratory services ordered. They are picked from
the Orders/Requisitions block of the related encounter form.
7. This section shows the ICDs noted in the concerned encounter form.
8. Space for your signature, followed by your name and ID No.
9. Date of the encounter form.
All fields in the darker shade are editable. i.e, data called in from the original chart or
encounter form may be edited, added or deleted in these sections of the report.
EXHIBIT 06.272
183
EMR NEXT – User Manual
«◄○►»
06.03.16.02.03 – Report 3 – Radiology Order
Back
Exhibit 06.273 shows the Radiology Order in the ‘Print / Fax – Encounter Related
Documents’ window
EXHIBIT 06.273
1. Your clinic’s name, address and telephone & Fax numbers.
2. Title of the Report – Requisition (the same title is also used for Laboratory Order
and General Order
3. Name, address and phone number of the Radiology Clinic that you either typed
in the report manually, or selected from the button.
184
EMR NEXT – User Manual
«◄○►»
4. This is the button on clicking which the window opens with the names of the
Radiology Clinics in your database. Exhibit 06.274 shows how the window with
the names of the laboratories appears on the screen. (See section 09.01.03.05
for how to add Radiology Clinics to the database)
5. This part shows the name and date of birth of the patient for whom the
radiology services have been requested.
6. This part shows the list of the Radiology services ordered. They are picked from
the Orders/Requisitions block of the related encounter form.
7. This section shows the ICDs noted in the concerned encounter form.
8. Space for your signature, followed by your name and ID No.
9. Date of the encounter form.
All fields in the darker shade are editable. i.e, data called in from the original chart or
encounter form may be edited, added or deleted in these sections of the report.
EXHIBIT 06.274
185
EMR NEXT – User Manual
«◄○►»
06.03.16.02.04 – Report 4 – General Order
Back
Exhibit 06.275 shows the General Order in the ‘Print / Fax – Encounter Related
Documents’ window
EXHIBIT 06.275
1. Your clinic’s name, address and telephone & Fax numbers.
2. Title of the Report – Requisition (the same title is also used for Laboratory Order
and Radiology Order
3. Name, address and phone number of the Supplier. This has to be typed manually
in the report, and cannot be called from the database.
186
EMR NEXT – User Manual
«◄○►»
4. This part shows the name and date of birth of the patient for whom the services
have been requested. You have to type the nature of services in the report
manually (like, ‘hardware’ has been typed in this exhibit manually.
5. This part shows the list of the General Services ordered. They are picked from
the Orders/Requisitions block of the related encounter form.
6. Space for your signature, followed by your name and ID No.
7. Date of the encounter form.
All fields in the darker shade are editable. i.e, data called in from the original chart or
encounter form may be edited, added or deleted in these sections of the report.
187
EMR NEXT – User Manual
«◄○►»
06.03.16.02.05 – Report 5 – Referral Letter
Back
Exhibit 06.276 shows the Referral Letter in the ‘Print / Fax – Encounter Related
Documents’ window
EXHIBIT 06.276
188
EMR NEXT – User Manual
«◄○►»
Referral Letter is printed when you are referring a patient to some other doctor. This
letter takes details from the General Form, History Form and the concerned Encounter
Form of the patient chart.
1. Your clinic’s name, address and telephone & Fax numbers.
2. Date of Encounter
3. Title of the Report – Patient Referral Letter
4. Name, address and phone number of the doctor or the hospital to which the
patient is being referred.
5. Patient Name, Address, Date of Birth and Sex
6. Free Type Field for salutations.
7. Introductory remarks
8. Complains for which the patient is being referred.
9. Chief Complaint the patient has
10. Past Medical History
11. Past Surgical History
12. Known Allergies
13. Family History – Positive/identified illness traits appear in red.
14. Social History – Positive/Identified high risk social traits appear in red
15. Procedures & Services prescribed – Only those prescribed in the current
encounter?
16. Physical Examination details
17. Assessments & Diagnosis – Only those established in the current encounter
18. Orders & Requisitions made for the patient– Only those made from the current
encounter
189
EMR NEXT – User Manual
«◄○►»
19. Medications prescribed for the patient– Only those prescribed in the current
encounter
20. Name of the clinic or hospital to which referred (same as that which appears in
item 4)
21. Space for your signature
22. Your name and ID
23. Time stamp of when the referral letter was printed.
All fields in the darker shade are editable. i.e, data called in from the original chart or
encounter form may be edited, added or deleted in these sections of the report.
190
EMR NEXT – User Manual
«◄○►»
06.03.16.02.06 – Report 6 – Consultation Note
Back
Exhibit 06.277 shows the Consultation Note in the ‘Print / Fax – Encounter Related
Documents’ window
EXHIBIT 06.277
191
EMR NEXT – User Manual
«◄○►»
Consultation Note is printed when the patient is referred to you by some other doctor,
and you want to send the findings of your encounter with the patient to the referring
doctor. This letter takes details from the General Form, History Form and the concerned
Encounter Form of the patient chart.
1. Your clinic’s name, address and telephone & Fax numbers.
2. Date of Encounter
3. Title of the Report – Consultation Note
4. Name, address and phone number of the doctor or the hospital which referred
the patient to you.
5. Patient Name, Address, Date of Birth and Sex
6. Free Type Field for salutations.
7. Introductory remarks
8. Free type field to enter final impression or conclusive remarks, if any
9. Chief Complaint the patient has
10. Past Medical History
11. Past Surgical History
12. Known Allergies
13. Family History – Positive/identified illness traits appear in red
14. Social History – Positive/Identified high risk social traits appear in red
15. Procedures & Services prescribed – Only those prescribed in the current
encounter
16. Physical Examination details
17. Assessments & Diagnosis– Only those established in the current encounter
18. Orders & Requisitions made for the patient– Only those made from the current
encounter
192
EMR NEXT – User Manual
«◄○►»
19. Medications prescribed for the patient – Only those prescribed in the current
encounter
20. Name of the clinic or hospital to which patient referred onwards.
21. Space for your signature
22. Your name and ID.
All fields in the darker shade are editable. i.e, data called in from the original chart or
encounter form may be edited, added or deleted in these sections of the report.
193
EMR NEXT – User Manual
«◄○►»
06.03.16.02.07 – Report 7 – Encounter Note
Back
Exhibit 06.278 shows the Consultation Note in the ‘Print / Fax – Encounter Related
Documents’ window
EXHIBIT 06.278
194
EMR NEXT – User Manual
«◄○►»
Encounter Note is a report of the encounter that you might wish to print and place on
the patient’s file. This report takes details from the General Form, History Form and the
concerned Encounter Form of the patient chart.
1. Your clinic’s name, address and telephone & Fax numbers.
2. Title of the Report – Encounter Note, along with the patient’s name, encounter
date, and Date of Birth.
3. Chief Complaint the patient has
4. Past Medical History
5. Past Surgical History
6. Known Allergies
7. Family History – Positive/identified illness traits appear in red
8. Social History – Positive/Identified high risk social traits appear in red
9. Procedures & Services prescribed – Only those prescribed in the current
encounter
10. Physical Examination details
11. Assessments & Diagnosis– Only those established in the current encounter
12. Orders & Requisitions made for the patient– Only those made from the current
encounter
13. Medications prescribed for the patient– Only those prescribed in the current
encounter
14. Name of the clinic or hospital to which patient is referred.
15. Space for your signature
16. Your name and ID.
17. Timestamp of when the Encounter Note was printed.
All fields in the darker shade are editable. i.e, data called in from the original chart or
encounter form may be edited, added or deleted in these sections of the report.
195
EMR NEXT – User Manual
«◄○►»
06.03.16.02.08 – Report 8 – Visit Super Bill
Back
Exhibit 06.270 shows the Visit Super Bill in the ‘Print / Fax – Encounter Related
Documents’ window.
Exhibit 06.279
Super Bill is the billing details you send to your billing agent for raising the bills on
insurance companies, or other third parties.
1. Your clinic’s name, address, telephone number and fax number.
2. Encounter Date
3. Title of Report – Super Bill
196
EMR NEXT – User Manual
«◄○►»
4. Patient Chart ID
5. Encounter Details. Includes: Encounter Type, Encounter Date, Encounter No.
(i.e., this patient’s encounter no. at your clinic) and Super Bill No. (this is a
combination of the Patient Chart ID and the Encounter NO.)
6. Provider Details. Includes your name and ID.
7. Patient Details. Includes: Patient Name, Social Security No., Date of Birth, Sex,
Address, Telephone & Cell Nos., Work Status and Marital Status
8. Primary Insurance. Particulars of the patient’s insurance company. Includes:
Carrier Name, ID (Policy No.), Group No. (of a group plan), Authorization Code,
Carrier’s Address, Plan No. (under which policy has been issued) Expiry of the
policy.
Following particulars are of the principal insured (PI), if the patient is not the PI.
These include: Relationship (of the patient to the PI), Name, Date of Birth,
Telephone No. and Remarks.
9. Secondary Insurance. Particulars of the secondary insurance company. Includes:
Carrier Name, ID (Policy No.), Group No. (of a group plan), Authorization Code,
Carrier’s Address, Plan No. (under which policy has been issued) Expiry of the
policy.
Following particulars are of the principal insured (PI), if the patient is not the PI.
These include: Relationship (of the patient to the PI), Name, Date of Birth,
Telephone No. and Remarks, if any
10. Particulars of the patient’s guarantor. They include: Relationship (of patient with
guarantor), Name, Date of Birth, Telephone No., and Remarks.
11. Name and ID of the doctor/hospital/clinic which referred the patient to you.
12. Shows amount recovered by you directly from the patient, along with the Details
entered by you in the Encounter Form, and the Payment Type selected for the
amount recovered.
13. Instructions for the biller whether or not to raise bill, and Notes for the Biller.
14. The ICD codes and descriptions of diseases identified in this encounter.
15. The CPT codes, description of the procedures applied in the encounter, and their
charges, totaling up to the final amount of the Super Bill.
16. Report Generation Date
197
EMR NEXT – User Manual
«◄○►»
06.03.16.02.09 – Report 9 – Patient Invoice
Back
Exhibit 06.280 shows the Patient Invoice in the ‘Print / Fax – Encounter Related
Documents’ window
Exhibit 06.280
This is the invoice you issue directly to the patient, if you recover any payment from
him/her during the encounter.
1. Your clinic’s name, address, telephone number and fax number.
2. Name of the patient and his/her address.
198
EMR NEXT – User Manual
«◄○►»
3. Encounter Date and Service Type
4. Name of the Report – Invoice
5. The Amount received from the patient during the encounter
6. List of the CPT codes, their description and charges applied in this encounter.
They may not necessarily equal the charges recovered by you. Usually, if the onspot recovery does not cover the full amount, Super Bill is raised for the balance.
7. Total Charges raised, as per the CPTs applied.
8. Any adjustments (concessions) you may make for the patient. Adjustments can
only be made directly in the report, and do not carry forward from the
encounter form. Since this adjustment is incorporated directly in the invoice, it
does not carry through to the Super Bill. You must show this adjustment in the
Note for the biller (item 6 of exhibit 06.139) for the final bill (and the super bill)
to account for the adjustment.
9. The amount recovered from the patient directly during the encounter (item 5).
10. The net balance recoverable. Net result of the total CPT charges, less
adjustments, less this invoice amount.
11. If you do not want to show any billing details to the patient, and show only the
charges recovered from him directly, press this button. The patient will get only
the directly recovered charges amount and the list of services rendered. Exhibit
06.281 shows how the invoice looks like in this mode.
12. If you want to only hide the details of adjustments from the patient, press this
button. The invoice will show up to the total charges for the CPTs applied, but
will not show any adjustments, and how much balance is recoverable through
the biller. Exhibit 06.282 shows how the invoice looks like in this mode.
13. List of diagnoses made in the encounter
14. A free type field for any remarks you may want to add in the invoice. Lines will
add according to text requirement.
15. Payment type, as selected in the encounter form.
16. Mode of payment, as specified in the encounter form, next to the amount
received.
199
EMR NEXT – User Manual
«◄○►»
17. Shows the ‘Details’ mentioned in the encounter form (Item 6 Exhibit 06.139).
18. Net Amount received from the patient
19. Your identification and timestamp on the documents
Exhibit 06.281
Exhibit 06.282
200
EMR NEXT – User Manual
«◄○►»
06.03.16.02.10 – Report 10 – Excuse Letter
Back
Exhibit 06.283 shows the Excuse Letter in the ‘Print / Fax – Encounter Related
Documents’ window
Exhibit 06.283
Patients require Excuse Letters to seek leave from job / school on account of illness.
1. Your clinic’s name, address, telephone & fax numbers
2. Date of encounter
3. Title of Report – Medical Excuse Letter
4. Addressee’s name, designation and address (lines will add as per requirement).
This has to be typed in the report. Does not carry over from the encounter form.
201
EMR NEXT – User Manual
«◄○►»
5. Patient’s name, address, date of birth and sex
6. Salutations – these have to be typed on the letter itself.
7. Recommendation for leave. The sentence has two editable portions – Name of
the patient, and the recommended duration of leave, both of which carry over
from the encounter form (duration of leaves carries from item 8 in exhibit
06.236).
8. Details pertaining to patient’s medical condition and treatment. Includes list of
Procedures / Services applied in the encounter, and Assessments / diagnosis
made.
9. Space for your signature, followed by your name and ID
10. Time stamp of when the Excuse Letter was printed.
202
EMR NEXT – User Manual
«◄○►»
06.03.16.02.11 – Report 11 – Face Sheet
Back
Exhibit 06.284 shows the Face Sheet in the ‘Print / Fax – Encounter Related Documents’
window
Exhibit 06.284
Face Sheets may be required as covering information for patient’s physical file. Face
Sheets do not save on the system, and may be generated afresh as and when required.
1. Your clinic’s name, address, phone number and fax number
203
EMR NEXT – User Manual
«◄○►»
2. Title of Report – Patient Face Sheet
3. This section contains the patient’s basic information, which includes Name, Date
of Birth, Social Security Number, Gender, Marital Status, Race, name of patient’s
Pharmacy, and other information (as typed in the general form, items 3 & 8
Exhibit 06.012).
4. This section contains the patient’s contact information, which includes Address,
Home Phone, Cell Phone, Email and Emergency contact particulars.
5. This section contains patient’s work information, which includes Work Status,
name of Institution, and work phone number.
6. This section contains the emergency contact directives given by the patient, and
contact instructions in case of emergency – whether or not information be
released to third parties.
7. This section contains the general information provided on the patient chart
8. This section contains the Primary Insurance Details, and, if the patient is not the
principal insured, then also particulars of the Principal Insured.
9. This section contains the Secondary Insurance Details, and, if the patient is not
the principal insured, then also particulars of the Principal Insured.
10. This section contains the guarantor’s information, and includes the relationship
of the guarantor with the patient, the guarantor’s name, date of birth, phone
number, and remarks.
11. The Face Sheet will end here, unless this check mark is checked, in which case,
the medical history will also be included in the face sheet.
12. The Medical History section appears when the check mark identified in item 11 is
checked.
13. Known Allergies are listed.
14. Past Medical History is listed.
15. Past Surgical History is listed.
16. Family History of illnesses is listed (items identified appear in red, with a positive
prefix. Other items are in black, with a negative prefix).
204
EMR NEXT – User Manual
«◄○►»
17. Social History of adverse traits is listed (adverse traits appear in red, suffixed
with a positive sign, while unidentified traits appear in blacked, suffixed with a
negative sign).
18. The Master Medication List
19. The Master Problem List
20. Date and time stamp when the face sheet was printed.
205
EMR NEXT – User Manual
«◄○►»
06.03.16.02.12 – Report 12 – Face Label
Back
Exhibit 06.285 shows the Face Label in the ‘Print / Fax – Encounter Related Documents’
window
Exhibit 06.285
Face Labels are small sticker that may be printed for miscellaneous purposes. Face
Labels do not save on the system, and may be generated afresh as and when required.
Face Labels include the following information of the patient, in order:
Date on which the label is printed, Patient’s Social Security Number, Name, Gender,
Date of Birth, Phone Number, Address, Guarantor’s Name, Guarantor’s Phone Number,
Insurance Company’s Name, Insurance Policy No. & Group No., 2nd Insurance Company’s
Name, Insurance Policy No. & Group No.
206
EMR NEXT – User Manual
«◄○►»
06.03.16.02.13 – Reports 13 to 20 – Custom Reports
Back
The system allows you to draft up to eight Custom Reports, suiting the requirements of
your practice.
Section 09.01.02.04 of the Manual shows how to design and name templates for
Custom Reports.
Once designed & named, you may generate these reports from the ‘Print / Fax –
Encounter Related Documents’ window, and edit them as required.
Only one Custom Report of each type can be saved for one encounter on the system.
207
EMR NEXT – User Manual
«◄○►»
06.03.16.03 – The third button on the Utility Buttons Block
Back
The third button on the utility buttons block (item 3, Exhibit 06.253) is for locking the
encounter form. Once an encounter form is locked, it can neither be deleted nor edited.
Open the encounter form that you want to lock, and click on the button. The system
raises the following alert:
Exhibit 06.286
Click ‘Don’t lock’ to abort locking action, or ‘Yes Lock it’ to lock the encounter form.
208
EMR NEXT – User Manual
«◄○►»
07 – The Dashboard
Back
Exhibit 07.001
The fourth icon on the grey toolbar (Item (a) on Exhibit 07.001) on the Home Page is for
the Dashboard. In Exhibit 07.001, the Dashboard has been opened when the icon is
clicked.
The dashboard performs five functions.
1. On the top left corner, it shows the total number of charts in the database.
2. The block marked as item (2) on Exhibit 07.001 is the detailed search
mechanism. There are eight factors on which you can perform the search, which
will be discussed individually. The dropdown list marked (b) on Exhibit 07.001
gives the search options for each factor. Values in this dropdown list change
according to the factors. Enter the search value in the “value-field” identified as
item (c), and press the ‘go’ button. The search values will populate in the
Viewing pane, as can be seen in Exhibit 07.012. Press the “execution button” at
the end of the desired entry (item 1 on Exhibit 07.012), and an options window
will appear with six options. Press the last button “Open Chart” to open the
chart. Other options will be discussed later in this section.
a. Social Security Number – The search options are “Starts with” and
“Equals to” (Exhibit 07.002). If you know the complete SSN, select “Equals
to” and enter the SSN in the value field. Otherwise, enter at least first
209
EMR NEXT – User Manual
«◄○►»
three starting numbers. If less than three characters are entered as
search value, an alert will appear, as shown in Exhibit 07.013, with
appropriate wording.
b. Medical Record Number – This is your clinic’s own serial number, if you
maintain any. Search options are “Starts with” and “Equals to” (Exhibit
07.003). If you know the complete MRN, select “Equals to” and enter the
MRN in the value field. Otherwise, enter at least first three starting
numbers. If less than three characters are entered as search value, an
alert will appear, as shown in Exhibit 07.013, with appropriate wording.
c. Phone – Search options are Home, Cell and Work (Exhibit 07.004). Select
the appropriate option and enter the phone number and click ‘Go’. Full
value is required.
d. Last Name – Search options are “Starts with” and “Equals to” (Exhibit
07.005). If you know the complete Last Name select “Equals to” and
enter the name in the value field. Otherwise, enter at least first three
characters of the Last Name. If less than three characters are entered as
search value, an alert will appear, as shown in Exhibit 07.013.
e. First Name – Search options are “Starts with” and “Equals to” (Exhibit
07.006). If you know the complete First Name select “Equals to” and
enter the name in the value field. Otherwise, enter at least first three
characters of the First Name. If less than three characters are entered as
search value, an alert will appear, as shown in Exhibit 07.013, with
appropriate wording.
f. Birth Date – Date selection is available in Month, Day and Year from
dropdown lists. (Exhibit 07.007).
g. Visit Date – Date selection is available in Month, Day and Year, from
dropdown lists (Exhibit 07.008).
h. Age & Gender – This is a dual factor option. Both, gender and age has to
be specified. Options for gender are Male, Female or Transgender
(Exhibit 07.009) and options for age are “Equals To”, “Greater Than” or
“Less Than” (Exhibit 07.010). Select both, and enter the age value in the
‘value field’.
210
EMR NEXT – User Manual
«◄○►»
Exhibit 07.002
Exhibit 07.003
Exhibit 07.004
Exhibit 07.005
211
EMR NEXT – User Manual
«◄○►»
Exhibit 07.006
Exhibit 07.007
Exhibit 07.008
Exhibit 07.009
212
EMR NEXT – User Manual
«◄○►»
Exhibit 07.010
Exhibit 07.011
213
EMR NEXT – User Manual
«◄○►»
Exhibit 07.012
Exhibit 07.013
3. Scanned Documents / Images can be imported into the system through the
Dashboard. Images imported in the system must be attached to specific charts.
There is a set of folders available for each chart. The images must be stored in
appropriate folder. Folders are discussed in Section 06.01.01, item 4 of the
manual, and are illustrated as Exhibit 06.027.
Item 3 on Exhibit 07.001 is the button for importing files in the system. It opens
the Document Filer (Exhibit 07.014), with the “Select Image” button activated.
When the button is clicked, system takes you to the operating system. Navigate
to the file location and select file. The system supports only ‘JPEG’, BMP, PNG
and GIF images, and only one image can be selected at a time. Upon file
selection, the system brings you back to the Document Filer in the state shown in
Exhibit 07.015, with the selected file viewing on the viewing pane. Select the
Chart to which the document/image is to be saved by using the search
mechanism at item 1 of Exhibit 07.015. The dropdown list that opens when you
use the search mechanism is shown as Exhibit 07.016. The Chart ID and the
Patient Name of the selected patient will populate in items 2 & 3 respectively.
The file name will carry over to item 4, as the name of the file on the system. Edit
file name if required. Select folder to which the image is to be stored from
dropdown field on item 5 (Exhibit 07.017). If you want to insert the timestamp
214
EMR NEXT – User Manual
«◄○►»
on the image, check the “Apply Sign” checkbox identified as item 6 (be careful
while applying sign, as such documents will become a permanent feature of the
chart, and cannot be deleted). If you wish to flag the document, (flagging
discussed at Item 5 below), check the “Also Flag This Document” checkbox
identified at item 7. Now click the “Import Now” button. The document will save
as desired, and the notification shown in Exhibit 07.018 will appear to confirm
the saving.
Exhibit 07.014
Exhibit 07.015
215
EMR NEXT – User Manual
«◄○►»
Exhibit 07.016
Exhibit 07.017
Exhibit 07.018
4. Super Bills are prepared and printed / exported from the dashboard. Super Bills
are your mandate to your billing agent for preparation of final bills for recovery
from Insurance Companies & other parties. The bills are based on charted
encounters (those encounters which have been recorded in patient charts).
From the Dashboard, the whole day’s batch of Super Bills is generated. Individual
216
EMR NEXT – User Manual
«◄○►»
Super Bills cannot be generated from here. (Generating individual Super Bills has
been shown in Section 06.03.16.02.08). When you click the “Export Super Bills”
button on the dashboard, the “Export Super Bills Batch” Window opens (Exhibit
07.019). By default, the radio button is set to print yesterday’s bills. If any other
day’s bills are to be printed, set the radio button to “other date” and select the
date from the dropdown list (Exhibit 07.020). Batches cannot be generated for
multiple days together. One date has to be selected at a time. Normally, such
encounters where CPT codes are not specified, or where “Billing Not Required”
has been checked on the Encounter Form are not included in the Super Bill
Batch. If you desire them to be also included in the batch, check the checkbox
available on the window. Now click the “Generate Batch” button. The batch will
be generated, and the Super Bills will appear in the viewing pane on the window,
stacked one after the other (Exhibit 07.021). Review them if desired, and click
the “Save” Button. The batch will be saved, and the “Export” and “Print” buttons
will activate (Exhibit 07.022). An alert will also be raised as shown in Exhibit
07.023. Every individual Super Bill will be saved in respective Patient’s chart, in
the “Billing” folder. Click the “Export” button to generate an electronic file, or
click “Print” button to take a hard print. Electronic files can be generated either
in HTML format or in CSV (comma separated values) format (CSV files open in
Excel).
Contents of the Super Bills are discussed at length in Section 06.03.16.02.08.
Upon review, if you find any errors in any Super Bill, do not save the batch. Go to
the concerned Encounter Form, and make the necessary corrections, and
generate the batch again.
If a Super Bill Batch has been generated and saved, and another batch is
generated for the day, the earlier Super Bill for the day will be overwritten. The
system retains only one Super Bill for a day. Similarly, if a Super Bill had been
generated for an individual patient earlier on, and thereafter the batch is
generated, the earlier Super Bill will be overwritten, and vice versa.
It is recommended that Super Bills are generated either after the clinic closure
for the day, or on the next working day. The reason is that if there is any new
encounter after the bills have been generated, it might be skipped from billing if
the Super Bill batch is not generated again. Re-generated bills will have a
different time stamp, and if you have already used the earlier Super Bill,
explanations may be warranted. So, to avoid these complications, it is best to
generate the Super Bill batch after you are sure that there will be no further
encounters for the day.
217
EMR NEXT – User Manual
«◄○►»
Exhibit 07.019
Exhibit 07.020
218
EMR NEXT – User Manual
«◄○►»
Exhibit 07.021
Exhibit 07.022
219
EMR NEXT – User Manual
«◄○►»
Exhibit 07.023
5. Flagged charts and documents are retrieved from the dashboard. Frequently,
you will be called away from the chart or the document you are working on. You
would want to complete what you were doing later on. You can flag such charts
or documents. The flagging option is available from three points: For charts there
is a button at the bottom right corner on the chart screen (See the flag button on
the bottom black strip in Exhibit 06.131). For external documents that are being
imported in the system, there is a check box for flagging the document available
on the Document Filer (Item 7, Exhibit 07.015). For documents already saved in
the system folders, the flagging button is available at the bottom of the
document viewer respectively (Exhibit 07.025).
To view flagged documents, open the dashboard, and click the “flagged items”
bar at the bottom of the left column (Item 5, Exhibit 07.001). All flagged items
will appear in the display pane (Exhibit 07.024).
Once you have completed your work on the flagged documents, you can remove
the flagging by clicking on the flagging button. Same button is used for flagging
and de-flagging. An un-flagged document is flagged, and a flagged document is
de-flagged with the click of the same button
220
EMR NEXT – User Manual
«◄○►»
Exhibit 07.024
Exhibit 07.025
6. Item 6 on Exhibit 07.001 is the viewing pane. The pane has a dual functionality. It
is used also for the findings of Search Results, as well as for List of Flagged Items.
221
EMR NEXT – User Manual
«◄○►»
A small yellow margin on the Search Results Bar or the Flagged Items Bar shows
the mode in which the viewing pane is currently. Item (a) on Exhibit 07.026
shows that the viewing pane is currently in the search mode, while Item (b) on
Exhibit 07.027 shows that the viewing pane is currently in the flagged documents
mode.
Exhibit 07.026
Exhibit 07.027
222
EMR NEXT – User Manual
«◄○►»
7. Item 7 on Exhibit 07.001 is the counter for the number of charts found as a
search result. When the pane is in flagging mode, the same counter shows the
number of flagged documents, as in Exhibit 07.027.
Exhibit 07.028
The last button on Exhibit 07.028 was discussed in item 2 of this section, and was shown
as Exhibit 07.012. The remaining five buttons will be discussed here. It is implied, in case
of each button, that you have selected the required chart from the search results and
clicked the Execution-Button listed as item 1 of Exhibit 07.011.
Delete Chart – Click this button if you want to delete the patient’s chart from the
system. Extreme care should be taken, as a chart once deleted cannot be retrieved
(unless a previous backup is installed. See Section 11), and all record of the patient will
be lost. When the button is clicked the system will raise an alert (Exhibit 07.029). Click
“Yes, Delete Chart” to delete, or click “Don’t Delete” to abort deletion action. After
deletion, system will raise an informative alert to show action has been completed
(Exhibit 07.030).
Schedule – This button is clicked if you want to schedule an appointment for the patient.
The scheduler will open, with the patient’s name, chart ID and Phone Number called in
relevant fields of the scheduler (Exhibit 07.031). The scheduler will open on the current
date. Navigate to desired date to make the appointment. (Scheduler is discussed at
length in Section 08).
Phone Notes – If you want a phone note to the patient’s chart, click this button. The
“Phone Notes” Window will open, showing existing notes (Exhibit 07.032). Click the
223
EMR NEXT – User Manual
«◄○►»
“Add Note” button to add the note. Detailed functionality is discussed at Item 2, Section
06.01.01.
Documents – If you want to view patient’s documents, or import a new one, click this
button. The Document Viewer will open, as shown in Exhibit 07.033. View the
documents or import them as the case is. Document import function has been discussed
in detail in Item 4, Section 06.01.01.
Refill Meds – This button enables you to make Medicine Refill Requests. Clicking this
button opens the Refills Window, shown in Exhibit 07.034. Upper section shows
patient’s allergies. Next are all the Medicines in the Master Medication List for the
patient. There is a checkbox against each medicine. Check the checkbox for the
medicines required to be refilled. Now the “Refill Selected Meds” button will activate.
Click the button to open the Refill Writer (Exhibit 07.035). The functionality of the Refill
Writer is discussed in detail in section 06.03.16.01.02. If you are unsure which medicine
requires refilling, a list of the last 5 Refill Requests for the patient appears in the lower
section of the Window. Click “Open” to open the required request.
Exhibit 07.029
Exhibit 07.030
224
EMR NEXT – User Manual
«◄○►»
Exhibit 07.031
Exhibit 07.032
225
EMR NEXT – User Manual
«◄○►»
Exhibit 07.033
226
EMR NEXT – User Manual
«◄○►»
Exhibit 07.034
227
EMR NEXT – User Manual
«◄○►»
Exhibit 07.035
228
EMR NEXT – User Manual
«◄○►»
08 – The Scheduler
Back
You have already defined session times for all seven days of the week on the Provider
Information page of the Initial Configuration Screen when you logged in the system the
first time (Section 04). You also defined the slot durations there (three options were
available – 05 minutes, 10 minutes and 15 minutes). If you want to change any of this
information, it can be done from the customization screens. This will be discussed in
Section 09.
Item 5 on Exhibit 05.001 identifies the icon for the Scheduler on the Home Page. When
the icon is clicked, the scheduler opens for today’s date.
Exhibit 08.001
1. The Scheduler opens on the Day View. The grey bar identified as item (1) is
showing a yellow margin, which indicates that the day view is active.
2. The current date displays here.
3. The first row in this block is for patient name. Start with entering the patient’s
Last Name. There is a search on this field. As soon as you enter the first alphabet
of the last name, a window will open showing all last names starting with the
alphabet (Exhibit 08.002). The window lists the Last Name, First Name, Middle
Name Initial, Date of Birth, Home Phone and Chart ID. As you go on entering
further alphabets, the search will keep narrowing according to the entry. Finally,
229
EMR NEXT – User Manual
«◄○►»
when entry of the last name is complete, the search window will show all
patients with this last name, if any. You may review the list to determine if the
patient already exists in your database. If the patient is included in the list, click
the entry in the list. The Patient Name, Chart ID, and Phone Number will get
copied in respective fields on the Scheduler.
4. Write the reason for the appointment.
5. This is the duration of appointment. By default, the standard duration defined by
you in the Initial Configuration Screen, item 19, Exhibit 04.004 appears here. But
there is a dropdown list on this field, from where you can change the duration of
the appointment (Exhibit 08.003).
6. Click on the icon at the beginning of the viewing pane, for the desired
appointment starting time. For example, in Exhibit 08.004, the appointment is
being sought for 15 minutes, from 9.00 am. Make sure that the slot is available
at the desired time (available slots appear in white. Booked slots appear in blue.
In Exhibit 08.001, all slots are available on that day. (Although it is possible to
book multiple appointments for the same slot. This is discussed in notes to item
6).
7. This is the viewing pane. Once the icon marked at item 6 is clicked, the patient’s
particulars fed in items 3 & 4 will appear here, highlighted in yellow, as shown in
Exhibit 08.004. Also, the “Book Appointment” button below the viewing pane
activates, as shown in item 13 marked on Exhibit 08.004. When this button is
clicked, the appointment books, and the color of the entry turns blue, as shown
in Exhibit 08.005. Four icons now appear at the end of the entry, which will be
discussed in item 13). If the duration of the appointment had been selected as
90 minutes, then a complete group of slots equaling 90 minutes would have
been booked, as can be seen in Exhibit 08.006. There are two bookings of 90
minutes each in Exhibit 08.006.
Just for your information – The viewing pane initially shows the time slots from
the beginning to the end of the session, in slot durations that you have defined
(Section 04). For example, if you had defined the time slots for 10 minutes, and
your session began at 9.00 am and ended at 5.00 pm, the slots available on your
schedule will be 9.00, 9.10, 9.20, 9.30, …, 4.20, 4.30, 4.40, 4.50. If you had
defined two sessions for the day, the time slots between the two sessions would
appear deactivated (please note that there will at least be one slot gap between
the two sessions, as a system requirement. Both sessions cannot adjoin each
other.).
230
EMR NEXT – User Manual
«◄○►»
8. This is the calendar, for browsing on the scheduler. On the top are the Month
and the Year fields, where values are selected from dropdown lists. The day is
selected by clicking the date tab on the month’s calendar. In the Exhibit, 6 th has
been selected. The scheduler will open for the selected date in the viewing pane,
and the date on the viewing pane (item 12) will change to the selected date.
(Please note that the date marked as item 2 will not change. It will continue to
show today’s date).
9. You can also navigate the months from the backward & forward arrows. Click the
back-arrow to go to a previous month, and the forward arrow to go to a future
month.
10. If the scheduler is open on any other day, and you want to come back to today,
the fast way is to click to this button, which will bring you back without having to
go through the hassle of selecting today’s date on the calendar.
11. If you have a busy schedule, and you want to find the next vacant slot of
particular time duration, select the time duration here, and click ‘Go’. The
scheduler will open on the next date on which a slot of this duration is available.
12. This is the date on which the scheduler is open. Available and booked time slots
on the viewing pane pertain to this date.
13. Once an appointment is booked, these four columns will be filled by four icons.
Enlarged view of the icons is shown in Exhibit 08.007. Functionality of these icons
will be discussed in the Notes to item 13.
14. Marked as item 14 is a search for the past and upcoming appointments of the
patient. When the icon is clicked, the search window shown in Exhibit 08.008
opens. The first field has three options in its dropdown list, as shown in Exhibit
08.009. After selecting the search option, select the value on the basis of which
search is to be applied. Options include: Last Name, First Name, Telephone No.
and Chart ID (Exhibit 08.010). Then specify whether your search value will ‘start
with’ or ‘equal to’ the given value (Exhibit 08.011). Thereafter provide the value
in the last field and press the ‘Go’ button. If you had opted for upcoming
appointments, the search results will appear as shown in Exhibit 08.012. If you
had opted for past appointments, search results will appear as in Exhibit 08.013.
There was a third search option, which said ‘Display Appointment History’. If this
option is selected and search is applied (as in Exhibit 08.014), the Appointment
History will display as shown in Exhibit 08.015. There are two blocks in the
history. The first shows Patient’s Name, Chart ID, Telephone No. Total Past
Appointments, Missed Appointments, No. of Upcoming Appointments, and Next
Appointment Date. The second block shows the Patient’s Name, Social Security
Number, Medical Record Number, Date of Birth, Home Phone, Cell Phone, Chart
231
EMR NEXT – User Manual
«◄○►»
Created Date, Total No. of Encounters, and the Last Encounter Date. Important
point to note is that the figure of [Total Past Appointments – Missed
Appointments] should equal the Total Encounters. In this case, total past
appointments are 5, and missed appointments are 1. So the total encounters
should be 4, but instead only 1 is being shown. This shows that the scheduler has
not been managed correctly. There were three more missed appointments,
which were not marked accordingly (marking missed appointments is discussed
in notes to item 13, as No-Show appointments).
15. This icon is for the Scheduler’s Note Pad. Clicking this icon opens the Note Pad
(Exhibit 08.016). The Note Pad is not specific to any chart. Notes may be written
and deleted on an ongoing basis. Notes are saved by clicking the “Save” button
on the right. To clear the entire notepad, press the “clear” button and then the
“save” button. When the notepad is clear, the icon is transparent. When notes
are written, the icon turns yellow.
16. If you want to see the Monthly Planner, click this button. The monthly plan will
open, as in Exhibit 08.017. Booked slots are shown in Blue, as in item (a) on the
Exhibit. Holidays / non-working days are shown in grey, as in item (b) on the
Exhibit. If you want to take a print of the monthly plan, click the print icon
marked as item (c). To go back to the daily schedule, click “Day View”.
Notes to Item 13
The functionality of the four icons on the viewing pane, as mentioned in item 13 and
shown in Exhibit 08.007 is as follows:
The first icon is for canceling the appointment. An alert pops to confirm that you want
to cancel the appointment (Exhibit 08.018). Click “Yes, Delete it”, to cancel the
appointment, and “Don’t Delete” to abort the cancellation action. If the appointment is
being cancelled prior to it’s saving (i.e., the entry is still in yellow color), simply click the
cross(x) at the end of the entry as can be seen in Exhibit 08.004, and it will be deleted
without raising the alert.
The second icon is for rescheduling the appointment. The existing appointment will be
cancelled, but the name of the patient and other particulars in the patient data block
(items 3 & 4 on Exhibit 08.001) will be retained. Book the new appointment and save.
The third icon is to mark the status of the appointment, and to print certain reports.
When the icon is clicked, the window shown in Exhibit 08.019 opens. The first five
buttons on the window mark the status, and have color tags that transfer to the entry.
The statuses are:
232
EMR NEXT – User Manual
«◄○►»
Status
Color Tag
Pending
Confirmed
Arrived
Completed
No-show
White
Yellow
Green
Blue
Brown
Exhibit 08.020 shows how the yellow tag has transferred to the patient’s entry when the
‘Confirmed’ status was marked.
The last three buttons on the window shown in Exhibit 08.019 are for printing Reminder
Cards, Reminder Letters, and No Show Letters. When the buttons are clicked, the card
or letters open in the Print/Fax Window. The formats of the card and letters are shown
in Exhibits 08.021, 08.022 and 08.023. The fields in brown background are editable. Click
the print button on the window to print them. These cards or letters do not save in the
database.
The fourth icon is for opening the patient’s chart.
Notes on Item 6
The system allows certain deviations for booking appointments. It is possible to book
short duration appointments, overlapping appointments, or appointments outside the
normal working hours etc. Such appointments will appear at the bottom of the day’s
schedule after the last normal working slot. For example, see Exhibit 08.024. The normal
working hours of the clinic end at 4 pm. Accordingly, the last normal slot is for 3.45 pm
(the doctor has a 15 minute standard appointment slot). Three appointments are
appearing after the last normal slot. The first is at 9.30 am, second is at 2.15 pm and
third at 5 pm.
The first appointment is a short duration appointment. The appointment is being
booked for 10 minutes, whereas the standard appointment duration is 15 minutes. So
this appointment is appearing after the normal work schedule.
The second appointment is within normal working hours, but this is a duplicate
appointment (i.e., an appointment already exists for the 2.15 slot, as can be seen in the
normal slot for that time. This is the second appointment being booked for the same
time. You can book any number of parallel appointments like this, for the same time.
You may want to do so if 1) you think that some patients will not turn up 2) you think
that the appointments will be brief, and two or more appointments will be covered in
the same time.
233
EMR NEXT – User Manual
«◄○►»
The third appointment is for 5 pm, which is after the normal working hours, and so it is
also being shown below the normal schedule.
You can also book an appointment for an off day. For example, Exhibit 08.025 shows the
schedule for a Sunday, which is off for the clinic. All normal appointment slots are
grayed off. Click the “Add Slot” button towards the bottom. A slot will appear. Define
the appointment start time, which in this case is 11 am, and book the appointment like a
normal appointment.
Such irregular appointments appear as a numeric indication in the month planner. For
example, in Exhibit 08.026, the three irregular appointments booked for 11 th May are
appearing as a numeric value of “3” and the one appointment booked for Sunday, May
12th is appearing as a numeric value of “1” (item d on the Exhibit), indicating the number
of irregular appointments for the respective days.
Sometimes, an appointment booked normally will also become irregular later on. This
can happen in two situations: 1) the time for which the appointment was booked does
not remain a part of the normal working time of the clinic any more, and 2) the standard
appointment slot duration changes after booking the appointment, and the
appointment is no more fitting in the slot of group of slots completely.
The maximum appointment duration on the system is for 90 minutes. If you want to
book an appointment for 120 minutes, you can book two concurrent appointments; say
first one for 90 minutes, and the second one for 30 minutes, or in any other
combination. There are many possibilities to work out your required appointment
duration. For e.g. to book a 35 minute appointment (when the standard slot duration is
15 minutes), you may book a 30 minute appointment and a 5 minute appointment. But
in this case, since the 5 minute appointment is a short duration appointment, it will
show with irregular appointments.
Other places on the system from where the Scheduler can be opened
Scheduler can be opened from two other points in the system. 1 – When you execute a
search on the dashboard, and click the execution button on the search findings, an
action window opens (Exhibit 07.012), the second button on which is to open the
scheduler. 2 – When you check the checkbox for scheduling the next follow up visit on
an encounter form, the scheduler opens.
234
EMR NEXT – User Manual
«◄○►»
Exhibit 08.002
Exhibit 08.003
235
EMR NEXT – User Manual
«◄○►»
Exhibit 08.004
Exhibit 08.005
236
EMR NEXT – User Manual
«◄○►»
Exhibit 08.006
Exhibit 08.007
Exhibit 08.008
Exhibit 08.009
237
EMR NEXT – User Manual
Exhibit 08.010
Exhibit 08.011
«◄○►»
Exhibit 08.012
Exhibit 08.013
Exhibit 08.014
Exhibit 08.015
238
EMR NEXT – User Manual
«◄○►»
Exhibit 08.016
Exhibit 08.017
239
EMR NEXT – User Manual
«◄○►»
Exhibit 08.018
Exhibit 08.019
240
EMR NEXT – User Manual
«◄○►»
Exhibit 08.020
Exhibit 08.021
241
EMR NEXT – User Manual
«◄○►»
Exhibit 08.022
Exhibit 08.023
242
EMR NEXT – User Manual
«◄○►»
Exhibit 08.024
Exhibit 08.025
243
EMR NEXT – User Manual
«◄○►»
Exhibit 08.026
244
EMR NEXT – User Manual
«◄○►»
09 – Customization
Back
EMR Next is a very flexible system. You can re-design the whole forms (there are three
forms – General, History and Encounter) according to your clinic’s / practice’s
requirements. This means, 1) you can change the positioning of the blocks in the forms,
2) you can remove blocks that you do not need permanently from the forms, and you
can add new blocks that you may need, permanently in the form templates.
Within each block, you can add or remove elements and sub-elements (elements within
an element).
Within each element, you can add or delete values permanently, thereby changing the
Lists of Values. These values may either be items, phrases, auxiliary data for the values,
etc.
EMR Next also allows you to make your own Letter / Report Templates for use in a
variety of situations.
All the above functions and changes in the system’s parameters are carried out from the
Customization area.
Location of the Customization Icon on the homepage is identified as item 6 on Exhibit
05.001. When this icon is clicked for the first time during a session, the Customization
Cover Page opens:
Exhibit 09.001
245
EMR NEXT – User Manual
«◄○►»
The four tabs on the Cover Page segregate the customization area in four parts.
1. Primary Configuration – This part covers your clinic’s basic information, general
system-wide settings and the management of lists and menus that are used by
various elements on the chart forms. These will be discussed in Section 09.01 of
the Manual.
2. General Form Template – This part covers the formatting, placement and editing
of the blocks in the General Form Template. These will be discussed in Section
09.02 of the Manual. Changes made in the General Form template will apply only
to the charts created after the change. Previous charts will remain unchanged.
3. History Form Template – This part covers the formatting, placement and editing
of the blocks in the History Form Template. These will be discussed in Section
09.03 of the Manual. Changes made in the History Form template will apply only
to the charts created after the change. Previous charts will remain unchanged.
4. Encounter Form Template – This part covers the formatting, placement and
editing of the blocks in the Encounter Form Template. These will be discussed in
Section 09.04 of the Manual. Changes made in the Encounter Form template will
apply only to the Encounter Forms created after the change. Previous Encounter
Forms will remain unchanged. Thus a patient chart may contain Encounter Forms
of different formats.
246
EMR NEXT – User Manual
«◄○►»
09.01 – Primary Configuration
Back
Exhibit 09.002
The Primary Configuration covers four types of customizations, as marked in Exhibit
09.002.
1. Clinic / Provider Information. This part contains the data that you entered
initially when you set up the system (discussed in Section 04). There are two
screens.
a. Clinic Information – For changing your clinic’s information. When you
click the Edit Button on the field, the “Edit Clinic” Window opens. The
window is discussed in Section 09.01.01.01.
b. Provider Information – For changing your own particulars. When you click
the Edit Button on the field, the Edit Provider Window opens. The
window is discussed in Section 09.01.01.02.
2. Preferences. This part covers seven features, as discussed individually.
a. Pointer Targets & Buttons – Field spacing and shape of toggle buttons can
changed from here. When you click the Edit Button on the field, the “Edit
Pointer Targets & Buttons” Window opens. The window is discussed in
Section 09.01.02.01.
247
EMR NEXT – User Manual
«◄○►»
b. Prescriptions & Orders – Print sizes and settings of Prescriptions and
Orders can be changed from here. When you click the Edit Button on the
field, “Edit Prescriptions/Orders Settings” window opens. This window is
discussed in Section 09.01.02.02.
c. Default Notes & Letters – Certain settings on letters and notes
(Consultation Notes, Encounter Notes, and Referral Letters) can be
changed from here. When you click the Edit Button on the field, the “Edit
Notes/Letters Settings” Window opens. The window is discussed in
section 09.01.02.03.
d. Custom Letters & Handouts – You can design and save up to eight letter
and handout templates from here. When you click the Edit Button on the
field, the “Edit Custom Letters/Handouts Templates” Window opens. The
window is discussed in Section 09.01.02.04.
e. Document Folders – You can create additional folders on EMR Next, and
edit their names from here. When you click the Edit Button on the field,
the “Edit Folders” Window opens. The window is discussed in Section
09.01.02.05.
f. Forms Validation & Other Rules – There are certain Form Validation Rules
which are applied when the Encounter Forms are saved. These rules may
be enforced or waived from here. When you click the Edit Button on the
field, the “Edit Forms Validation & Other Rules” Window opens. The
window is discussed in Section 09.01.02.06.
g. Clinical Decision Support Rules – If certain medicines react with other
medicines, or if certain medicines cause allergies, etc., you may wish to
avoid using such medicines etc. Such rules can be made from here. When
you click the Edit Button on the field, the “Edit Clinical Decision Support
Rules” Window opens. The window is discussed in Section 09.01.02.07.
3. This part maintains lists of institutions and individuals which you will need in
your day to day work on the system. These include:
a. Insurance Companies – Maintenance of list of Insurance Companies is
discussed in detail in Section 09.01.03.01.
b. Pharmacies – Maintenance of list of Pharmacies is discussed in detail in
Section 09.01.03.02.
c. Physicians – Maintenance of list of doctors is discussed in detail in Section
09.01.03.03.
248
EMR NEXT – User Manual
«◄○►»
d. Laboratories – Maintenance of list of Laboratories is discussed in detail in
Section 09.01.03.04.
e. Radiology Clinics – Maintenance of list of Radiology Clinics is discussed in
detail in Section 09.01.03.05.
f. Hospitals – Maintenance of list of Hospitals & Clinics is discussed in detail
in Section 09.01.03.05.
4. This part maintains lists of various other elements that you will need while
maintaining patient charts on EMR Next.
a. Dx Codes – or Diagnosis Codes. Maintenance of list of Dx Codes is
discussed in Section 09.01.04.01
b. Px Codes – or Procedural Codes. Maintenance of list of Procedural Codes
is discussed in Section 09.01.04.02
c. EM Codes – or Evaluation & Management Codes. Maintenance of list of
Evaluation & Management Codes is discussed in Section 09.01.04.03
d. Medications – Maintenance of list of Medications is discussed in Section
09.01.04.04
e. Lab Orders – Maintenance of list of Lab Orders is discussed in Section
09.01.04.05
f. Radiology Orders – Maintenance of list of Radiology Orders is discussed in
Section 09.01.04.06
g. General Orders – Maintenance of list of General Orders is discussed in
Section 09.01.04.07
h. Visit Types – Maintenance of list of Visit Types is discussed in Section
09.01.04.08
249
i.
CC Phrases – or Chief Complaint Phrases. Maintenance of list of Chief
Complaint Phrases is discussed in Section 09.01.04.09
j.
HPI Phrases – or History of Present Illness Phrases. Maintenance of list of
History of Present Illness Phrases is discussed in Section 09.01.04.10
EMR NEXT – User Manual
«◄○►»
k. RFR Phrases – or Reasons for Referral Phrases. Maintenance of list of
Reasons for Referral Phrases is discussed in Section 09.01.04.11
l.
Plan Notes Phrases – Maintenance of list of Plan Notes Phrases is
discussed in Section 09.01.04.12
m. PMH Phrases – or Past Medical History Phrases. Maintenance of Past
Medical History Phrases list is discussed in Section 09.01.04.13
n. PSH Phrases – or Past Surgical History Phrases. Maintenance of Past
Surgical History Phrases list is discussed in Section 09.01.04.14
o. ALG Phrases – or Allergies Phrases. Maintenance of list of Allergies
Phrases is discussed in Section 09.01.04.15
250
EMR NEXT – User Manual
«◄○►»
09.01.01.01 – Clinic Information
Back
Exhibit 09.003
The Edit Clinic Window shown in Exhibit 09.003 opens when you click the “Edit” button
on item 1a in Exhibit 09.002. You may change the particulars of your practice / clinic
from here. Fields marked with asterisk (*) require mandatory input, and cannot be left
blank.
1. Change the country of your practice from the dropdown list available on the
field.
2. Change, by selection from the dropdown list on the field, whether the next
geographical segment is a State, Province, Territory, County, Principality, or
some other division. If your country of practice is USA, only ‘State’ can be
251
EMR NEXT – User Manual
«◄○►»
selected here. If your country of practice is Canada, only Province can be
selected here. For all other countries, selection is unrestricted.
3. Change the name of the segment defined in item 2 above. If your country of
practice is USA, then the State can only be selected from the dropdown list on
this field. If your country of practice is Canada, then the Province can only be
selected from the dropdown list on this field. For all other countries, the name of
the segment has to be entered.
4. Change the name of your practice from here.
5. Add or change the Sub Title of your practice / clinic from here. Subtitle appears
under the practice / clinic name on all documents.
6. Change the address of your practice from here. Two lines are available for the
address.
7. Change the city of your practice from here. Cities have to be entered manually.
No dropdown list is available.
8. Change the Zip Code or Postal Code of your area from here. If your country of
practice is USA, the field is titled Zip Code. For all other countries, it is titled
Postal Code.
9. Change your practice’s phone number from here. If you practice in USA or
Canada, the number will auto-format according to the prevailing standard in USA
or Canada. For all other countries the there is no formatting. The field accepts
only numerical values.
10. Change your practice’s fax number from here. If you practice in USA or Canada,
the number will auto-format according to the prevailing standard in USA or
Canada. For all other countries the there is no formatting. The field accepts only
numerical
11. Change your clinic’s ID number here.
12. Select the type of ID that you have entered in item 11 above. Several options are
included in the dropdown list on the field. If none is applicable, select ‘others’.
13. If your clinic has a second ID, change the second ID here.
14. Select the type of ID that you have entered in item 13 above. Several options are
available in the dropdown list on the field. If none is applicable, select ‘others’.
252
EMR NEXT – User Manual
«◄○►»
15. Change your clinic’s / practice’s email address from here.
16. Change your clinic’s / practice’s specialization from here. Various options are
available in the dropdown list on the field. If none is applicable, select ‘others’.
17. If your clinic / practice has a logo, add or change the logo from here. Click the
‘Select’ button on the right of the field to select the logo. The system will take
you to the operating system. Browse to the location where the logo is available,
and click the file to bring the logo in the field. The size of the logo must be within
36 pixels (in height) and 58 pixels (in width). If the logo size is larger, an alert will
appear. Resize the image and import again. To remove the logo, click on the
“Remove” button on the right of the field.
18. This button will give the inbuilt help suiting this area. Click on the icon will open
online help as shown in Exhibit 09.004.
19. After adding or changing the information / data, click “Save” to save the
changes.
Exhibit 09.004
253
EMR NEXT – User Manual
«◄○►»
09.01.01.02 – Provider Information
Back
Exhibit 09.005
The “Edit Provider” Window shown in Exhibit 09.005 opens when you click the “Edit”
button on item 1b in Exhibit 09.002. You may change the particulars of your practice /
clinic from here. Fields marked with asterisk (*) require mandatory input, and cannot be
left blank.
1. Your name, as the practitioner can be changed from here. Start with Last Name,
then First Name, and then the Middle Name Initial.
2. Edit your suffix from here. Options include MD / MD, FACC / APRN / MBBS,
selectable from the dropdown list on the field.
254
EMR NEXT – User Manual
«◄○►»
3. Edit your Professional ID from here. In the second field, edit the type of ID that it
is. Options are available in the dropdown list on the field. If you wish to
reproduce the ID on reports, check the appropriate checkbox. The first checkbox
is for Prescriptions, second for Laboratory Orders, Radiology Orders and General
Orders, and the third for Notes.
EMR Next has provision to store up to three different IDs. It is possible to use
different IDs on different reports (prescriptions / laboratory orders / radiology
orders / notes), depending on how you check the checkbox.
4. The ‘Enable Scheduling’ checkbox would already be checked while making the
initial configuration (Section 4). Since it is a mandatory field, you can’t uncheck it
(i.e., amendments will not save if the field is unchecked).
5. Change the standard slot duration from here. Slots are available for 5 minutes,
10 minutes and 15 minutes. Once changed, the time slots in the Scheduler will
re-configure according to the new standard. If existing appointments do not fit in
completely in the new schedule, they will convert into irregular appointments
(see Notes to item 6 in Section 08).
6. Change the clinic’s workdays from here. Checkmark days to add them as
workdays, and uncheck them to remove from the workweek. If an existing
workday is made a holiday, the appointments scheduled for that day will convert
into irregular appointments (see Notes to item 6 in Section 08).
7. Define / change work time from here. Dropdown lists on the field give you
selectable options, configured according to the standard time slots defined by
you. The start time for the first session has a 24 hour option. But the end time
can only be after the start time. Different weekdays may start and end at
different times. There is no compulsion to have similar timings throughout the
week.
8. If your clinic / practice runs in two sessions, define / change work time for the
second session from here. Dropdown lists on the field give you selectable
options, configured according to the standard time slots defined by you. The
second session can start only after the first session closes. Likewise, the second
session can end after it has started. It is possible to have only one session on
some weekdays, and two sessions on others. Timings of the second session need
not be consistent throughout the week.
9. Add or change signature stamp on the system from here. Click the ‘Select’
button on the right to select the signature stamp. The system will take you to the
operating system. Browse to the location where the signature stamp is available,
255
EMR NEXT – User Manual
«◄○►»
and click to bring it on the system. The stamp size must be within 36 pixels (in
height) and 168 pixels (in width). If the stamp size is larger, an alert will appear.
Resize the image and import it. To remove the stamp, click on the ‘Remove’
button on the right.
10. This button gives online help suiting this area. Click the icon, and inbuilt help, as
shown in Exhibit 09.004 will appear.
11. After adding or changing the information / data, click ‘Save’ to save the changes.
256
EMR NEXT – User Manual
«◄○►»
09.01.02.01 – Pointer Targets & Buttons
Back
Exhibit 09.006
The “Edit Pointer Targets & Buttons” Window shown in Exhibit 09.006 opens
when you click the “Edit” button on item 2a in Exhibit 09.002. This window
performs two functions:
1. It increases or decreases space between two fields on the form. Since
EMR Next is a touch enabled system, it will sometimes be convenient for
you to increase spacing between two lines to achieve touch accuracy, or
to decrease it to bring visual compactness. While your requirement will
come only in areas where lines are selected by touch, like from dropdown
lists or from field windows from where you select values, the spacing
difference will apply across the forms. But that should not bother you.
The space increase is quite limited, but it improves touch functionality.
Select appropriate radio button to increase or decrease spacing. Please
note that the EMR Next inherently detects whether or not your device is
touch enabled, and for touch enabled devices, it automatically increases
the spacing. But, once you adjust the spacing through this window, the
automated space adjustment feature will lapse, and thereafter, space
adjustment will only be possible from this window.
2. Some blocks in Patient Charts have toggle buttons for positive and
negative findings. By default, these buttons are oval shaped. Positive
findings are encircled in red ovals, while negative findings are encircled in
light grey ovals. If you wish to change the shape of these buttons to
square, like those shown on the right side in Exhibit 09.006, click the
257
EMR NEXT – User Manual
«◄○►»
radio button on the right. To revert to ovals, click the radio button on the
left.
Changes in the settings will become effective only if the “Update” button
on the window is clicked after making the changes.
258
EMR NEXT – User Manual
«◄○►»
09.01.02.02 – Prescriptions & Orders
Back
Exhibit 09.007
Exhibit 09.008
The “Edit Prescriptions/Orders Settings” Window shown in Exhibit 09.007 opens when
you click the “Edit” button on item 2b in Exhibit 09.002. Settings of this window are
limited to Prescriptions, and Laboratory Orders, Radiology Orders and General Orders,
referred simply as Orders in the remaining part of this section. The window performs
following functions:
1. On EMR Next, you may either print each medicine as a separate prescription, or
combine them on one prescription. Likewise, you may either print each item of
an order as a separate order, or combine them on one order. The first section of
this window sets the default mode for combined or separate prints of
prescriptions / orders. Initially, the default is set at “Combined”. Change the
radio buttons for item-wise printing. Setting default still allows you to print
reports in the other mode by selecting the appropriate radio button on the
encounter form (Item 14, Exhibit 06.258 & Item 5, Exhibit 06.266).
259
EMR NEXT – User Manual
«◄○►»
2. Set the print area width from here. Many doctors use a smaller size paper for
printing prescriptions and orders. While paper width may not exactly match the
available settings, select the paper width which most appropriately fits the paper
size you use. Ideally, print area width should be slightly less than the actual
paper width.
3. Set the print area height from here. If you are using continuous roll, then height
is not an issue; you may set any suitable height. But if you are using perforated
rolls or cut paper, then set height in the same manner as the width, keeping the
print area height slightly smaller than the paper size.
4. Set print alignment from here. Two options are available – left aligned and
center aligned.
5. If you wish to print the patient’s Social Security Number or Medical Record
Number on prescriptions and orders, select appropriate radio button. Default is
set not to print SSN or MRN on prescriptions and orders.
6. Total number of medicines in the prescription is shown towards the end on
combined prescriptions. If you do not wish the total number of medicines to be
shown, check this box.
7. There is a micro text line under the signature & ID, the words of which are visible
only on magnification. This text is proof that the document is an original. If the
document is photocopied, the text will be copied as a continuous line, and will
show as a line on magnification, thereby indicating that the document is not an
original. If you wish this tamper resistant text not to be printed on prescriptions
and orders, uncheck the checkbox.
8. If you use pre-printed stationery with your clinic’s name and address printed on
it, you do not need the header, which will only duplicate and overlap the preprinted title. Check the checkbox to remove the header from the print.
9. If you use pre-printed stationery for prescriptions and orders, then you need
EMR Next just to print the name of the medicine or the item on the paper. All
other particulars will be covered in your pre-printed stationery. If this is the case,
check this checkbox. But this setting will work only if you have selected the
‘separate’ printing mode in item 1 above. If you have selected the ‘combined’
printing mode, default setting will apply, even if this checkbox is checked.
10. If you use any e-prescription software / facility, then you may wish to transfer
the prescription thereon expeditiously. If you check this checkbox and provide
the url of the facility in this window, every time you make a prescription and
260
EMR NEXT – User Manual
«◄○►»
press the print button, the webpage of the facility will open, and you will be in a
position to type or copy-paste the medicines from the system to the external
facility.
11. When you check the checkbox for accessing external e-prescription website
(item 10), this field activates for the url of the webpage.
12. Click the “Update” button to save the changes.
On Radio Buttons, system default setting is marked with an asterisk (*).
On checkboxes, system default is unchecked, except on “Enable Tamper Resistance on
Rx” checkbox (item 7), where the system default is checked.
The help icons on the window open inbuilt help on the respective item.
261
EMR NEXT – User Manual
«◄○►»
09.01.02.03 – Default Notes & Letters
Back
Exhibit 09.009
The “Edit Notes / Letters Settings” Window shown in Exhibit 09.009 opens when you
click the “Edit” button on item 2c in Exhibit 09.002. Notes in context of this window
specifically mean “Encounter Notes” (Section 06.03.16.02.07) and “Consultation Notes”
(Section 06.03.16.02.06). Letters includes Referral Letters (Section 06.03.16.02.05) and
all other letters generated by the system.
262
EMR NEXT – User Manual
«◄○►»
1. This setting is applicable only to Referral Letters, Consultation Notes and
Encounter Notes. The difference between verbose content and concise content
is explained with the help of Exhibits 09.010 and 09.011, which are extracts of an
Encounter Note. Compare the Family History and Social History sections of both
the exhibits. In Exhibit 09.010, all the factors included in the family history and
social history appear in the note, with the positive ones marked accordingly and
shown in red, and the negative ones marked accordingly and shown in black.
This is how the notes will appear if you select the “verbose content” radio
button. All factors covered in a checklist, whether negative or positive, are
shown. By contrast, in Exhibit 09.011, where “concise content” has been
selected, only positive factors are shown.
2. If you uncheck this checkbox, patient’s Social Security Number will also appear
on the encounter note, as shown in Exhibit 09.012
3. If you check this checkbox, Master Problem List will be included in the Referral
Letters, Consultation Notes and Encounter Notes. (This setting is not applicable
on other letters)
4. If you check this checkbox, the Master Medication List will be included in the
Referral Letters, Consultation Notes and Encounter Notes. (This setting is not
applicable on other letters).
5. The difference between the two note styles is shown on Exhibits 09.010 and
09.013. In Exhibit 09.010, the first note style has been used. The positive factors
are indicated with a (+) sign, while the negative factors are indicated with a (-)
sign. In Exhibit 09.013, the second note style has been used. The positive factors
are indicated by a ‘Yes’ notation, while the negative factors are indicated by a
‘No’ notation.
6. If this checkbox is unchecked, then the chief complaints will appear in
continuation in the same line. In the default state, where the checkbox is
checked, each complaint takes a new line.
7. If this checkbox is unchecked, then all plan note items will appear in
continuation, one after the other, in the same line. In the default state, where
this checkbox is checked, each plan note item starts with a fresh line.
8. In default state, positive factors or factors of concern are shown in red, as can be
seen in Exhibit 09.010. Allergies and positive factors are appearing in red in the
exhibit. If you wish to remove the distinction, and show all factors in black, check
this checkbox.
263
EMR NEXT – User Manual
«◄○►»
9. In default state, the system starts the patient name with last name, followed by
first name. If you wish to show the first name first, check this checkbox. This
change will apply to all letters and reports, including prescriptions and orders.
But it will not apply to the forms on the screen.
10. On EMR Next, you have option of three fonts – Times, Arial and Courier. The
default is set on Times. To change the font, select appropriate radio button. The
change will apply to all letters and reports, including prescriptions and orders.
But, it will not apply to forms on the screen.
11. EMR Next has an option of three font sizes, set at Smaller, Medium and Larger.
Default is set on Medium. Select appropriate radio button to change font size.
This change will apply only to those reports and letters which are printed on full
size (A4 size) paper. Reports printed on small paper will continue on system
default.
12. If you use pre-printed letterheads, you do not need EMR Next to print the name
& address of the clinic on the letters and reports. Check this checkbox to prevent
printing of header on the letters and reports. This functionality is also included in
the “Edit Prescriptions/Orders Settings” Window – item 8 of Exhibit 09.007, but
there, the feature is for Prescriptions and Orders only. Here it is for all other
letters.
13. If you wish to include any footnote on letters and notes, specify the note here.
14. Press the “Update” button to save the changes.
264
EMR NEXT – User Manual
«◄○►»
Exhibit 09.010
Exhibit 09.011
265
EMR NEXT – User Manual
«◄○►»
Exhibit 09.012
Exhibit 09.013
266
EMR NEXT – User Manual
«◄○►»
09.01.02.04 – Custom Letters and Handouts
Back
Exhibit 09.014
The “Edit Custom Letters / Handouts Templates” Window shown in Exhibit 09.014
opens when you click the “Edit” button on item 2d in Exhibit 09.002.
EMR Next allows you to design up to eight letters or handouts that may be needed in
your practice. Once designed, these templates will be available for all patients.
1. The eight radio-buttons on the top of the window are for each letter/handout
respectively. Blank templates are available for each radio button. Select the
template you want to prepare / edit.
267
EMR NEXT – User Manual
«◄○►»
2. Specify the name of the report as it would appear in the system. This is the name
of the template in the ‘Print/Fax Encounter Related Documents’ Window (Exhibit
06.265), and the file name in the patient folder.
3. Select from the dropdown list the folder in which this letter / handout should
save.
4. The checkbox identified as item 4 on Exhibit 09.014 is to display your clinic’s /
practice’s header on the letter. The header itself on the letter / handout is also
identified as item 4. If you use pre-printed stationery with the clinic’s letterhead
printed on it, check this checkbox off.
5. The checkbox identified as item 5 on Exhibit 09.014 is for the date on the report
/ handout. If this checkbox is checked, the date on which the letter is generated
will appear automatically, in the position identified as item 5.
6. The checkbox identified as item 6 on Exhibit 09.014 is for the patient’s name and
address to appear automatically on the letter / handout. The name and address
will appear in the position also marked as item 6.
7. If the checkbox identified as item 7 is checked, (which by default is checked), the
signature line with your name and ID will also appear automatically at the end of
the letter / handout. The signature block is also identified on the template as
item 7.
8. This is the title of the letter / handout as it would be read from the document.
This may, or may not be the same as the name specified in item 2.
9. This is the space for the opening text of the letter / handout. It may spread over
multiple paragraphs, and may be as long as required.
10. If you want to include any block(s) from the Encounter Form or the History Form
in the letter / handout, this is the place to specify which block(s) to include. The
block(s) included will appear in the template as bullet points. If you at any time
in future wish to delete the selected block from the template, the delete button
is right next to it.
11. Click this button to select the History Form / Encounter Form block to be
included in the letter / handout. The window shown in Exhibit 09.015 will open,
listing all selectable blocks.
12. This is the space for the closing text of the letter / handout. It may also spread
over multiple paragraphs, and may be as long as required.
268
EMR NEXT – User Manual
«◄○►»
13. The system-name and the time stamp of the letter / handout.
14. Once you have drafted the template, click “Save” to save and activate it.
15. Before saving the template, there was an “Inactive” sign here. After saving, it has
converted into “Active”, meaning that the template may now be selected for
printing from the ‘Print/Fax Encounter Related Documents’ Window (Exhibit
06.265).
16. At any time, if you wish to delete the template, click this button. The template
will wash out, and will be available for reuse.
Exhibit 09.015
269
EMR NEXT – User Manual
«◄○►»
09.01.02.05 – Document Folders
Exhibit 09.016
Back
Exhibit 09.017
The “Edit Folders” Window shown in Exhibit 09.016 opens when you click the “Edit”
button on item 2e in Exhibit 09.002.
EMR Next has eleven default folders, as shown in Exhibit 09.016. These folders are
available for all patients. Access to these folders is available from the Utility Block on the
General Form. See Section 06.01.01, Item 4 on Exhibit 06.014. They appear in the
“Document Viewer” as shown in Exhibit 06.027. The documents mapped to these
folders are listed in Section 06.01.01.
The default folders can neither be deleted, nor edited.
However, you may create additional folders, edit their names at will, and delete them if
you do not need them any further.
270
EMR NEXT – User Manual
«◄○►»
To add a folder, click the “Add” button on the Window. A folder will appear in the blank
space, as shown in Exhibit 09.017. Name the folder and click the “Update” button to
save it. Now this folder will be available to all patients. Any number of folders can be
created this way.
To delete the folder click the “Trash Can” icon next to it. If any patient has any
documents in the deleted folders, the documents will move to the default “Others”
folder.
Customer letters / handouts created in Section 09.01.02.04 may be mapped to custom
folders. First create the custom folder, and then select it while specifying the folder type
for the letter (item 3 on Exhibit 09.014).
While naming custom folders, there should be no blank spaces. An alert will appear as
shown in Exhibit 09.018. Folder name cannot be left blank either. An alert will appear as
shown in Exhibit 09.019 if the name is left blank.
Exhibit 09.018
Exhibit 09.019
271
EMR NEXT – User Manual
«◄○►»
09.01.02.06 – Form Validation and other Rules
Back
Exhibit 09.020
The “Edit Forms Validation and Other Rules” Window shown in Exhibit 09.020 opens
when you click the “Edit” button on item 2f in Exhibit 09.002.
The system has certain Form Validation Rules which, if not met, the Encounter Form is
not saved.
1. If the Chief Complaint Block in the Encounter Form is left blank, it does not save.
But, if you wish the system to override the deficiency, check the checkbox. The
system will then allow saving of Encounter Forms without any entry in the Chief
Complaint Block.
2. By default, the system allows you to save Encounter Forms even if the status of
“Ongoing Problems” and the “Nature” of “New Assessments” is not mentioned
in the Assessment / Diagnosis Block of the Encounter Form. For ready reference,
the “Assessment / Diagnosis” Block of the Encounter Form is produced here as
Exhibit 09.021. If you wish the system not to save the Encounter if these two
fields are not completed, uncheck the checkbox.
3. If you are running a ‘Cash Only’ Practice, you will not need the Insurance,
Secondary Insurance and Guarantor Blocks on the General Form. It will be
convenient for you to remove them from the form. Check this checkbox to
remove these blocks from the form. A comparison of how the form looks like
with these blocks in, and with these blocks out is available in Exhibits 09.022 and
09.023. Exhibit 09.22 shows the form without the three blocks, and Exhibit
09.023 shows it with the blocks in.
4. Click the “Update” button to save the changes.
272
EMR NEXT – User Manual
«◄○►»
Exhibit 09.021
Exhibit 09.022
273
EMR NEXT – User Manual
«◄○►»
Exhibit 09.023
274
EMR NEXT – User Manual
«◄○►»
09.01.02.07 – Clinical Decision Support Rules
Back
Exhibit 09.024
Exhibit 09.025
The “Clinical Decision Support Rules” Window shown in Exhibit 09.024 opens when you
click the “Edit” button on item 2g in Exhibit 09.002. For the first time, the window will
be blank as it looks in the Exhibit. When you add the rules, they will display on the
window.
To add a rule, click the “Add Rule” button. The “Add CDS Rule” Window shown in Exhibit
09.025 will open.
1. Four Clinical Decision Support Rules can be implemented on EMR Next, as listed
in the dropdown list on this field (Exhibit 09.026).
a. Care Suggestion
b. Drug-Allergy Interaction
275
EMR NEXT – User Manual
«◄○►»
c. Drug-Drug Interaction
d. Drug Formulary Check
2. If you want to system to prevent the action to be taken in case the conditions of
the rule are met, then select “Blocking” from the dropdown list on this field
(Exhibit 09.027). But if you want just a cautionary alert be raised, without
stopping the action, select “Non-Blocking”.
3. Trigger is the factor that will activate the rule. The four rules covered in this
window require either the ICD name or ICD Code, or the Medicine Name or
Medicine Code to invoke the rule. Thus only these four values are mentioned in
the dropdown list on this field (Exhibit 09.028).
4. Give the value of the triggering factor in this field. For example, if you selected
Medicine Name starting with in the previous field, then specify the name of the
medicine in this field.
5. If the rule activates upon interaction of one factor with another, the second
factor is called the target. It is not necessary that every rule has a target. Where
Rules are activated on the basis of a single factor, the target field should be left
blank. The target field has eight values in the dropdown list, as shown in Exhibit
09.029. In addition to the four values in the trigger field, Allergy Name, Allergy
Code, Manufacturer’s/Laboratory’s Name and Manufacturer’s/Laboratory’s
Code are also included.
6. Give the value of the target factor here. For example, if Allergy Name was
selected in the previous field, specify the name of the Allergy here.
7. If the Rule should apply only on patients of certain age, use the age filter. Specify
by selection from the dropdown list (Exhibit 09.030) whether age should be
equal to, less than or more than a certain value for the rule to activate.
8. Provide the value of the age band here.
9. If the rule should be applied only to patients of a particular sex, use the sex filter.
Select from the dropdown list (Exhibit 09.031) which sex the Rule should apply
to.
10. Write in this field the text or the message that should appear on the Alert, if the
conditions of the Rule are met.
11. After creating the Rule, save it. Saved Rules show in the “Clinical Decision
Support Rules” Window as shown in Exhibit 09.032
276
EMR NEXT – User Manual
«◄○►»
Exhibit 09.033 shows how the alert will raise upon activation of the Rule. First test rule
has been set as a “Drug-Allergy” interaction. Carmol has been specified as the triggering
medicine, and Dust-Mite has been specified as the target Allergy. Blocking mode has
been selected. In the Exhibit, you may see the Allergy “Dust-Mite” appearing in the
Window, and a medicine starting with “Carmol” being selected. The Alert is a blocking
alert with a red stop sign. The precautionary alert has a green stop sign.
Use the “Edit” button corresponding the rule (as shown in Exhibit 09.032) to edit the
rule.
Use the “Delete” button corresponding the rule (as shown in Exhibit 09.032) to delete
the rule.
Exhibit 09.026
Exhibit 09.027
277
EMR NEXT – User Manual
«◄○►»
Exhibit 09.028
Exhibit 09.029
Exhibit 09.030
278
EMR NEXT – User Manual
«◄○►»
Exhibit 09.031
Exhibit 09.032
279
EMR NEXT – User Manual
«◄○►»
Exhibit 09.033
280
EMR NEXT – User Manual
«◄○►»
09.01.03.01 – Insurance Companies
Back
Particulars of the patient’s Insurance Company are required for billing purposes. These
particulars are required in the General Form on the patient chart, in the two Insurance
Company Blocks, discussed in Section 06.01.07 (Exhibit 06.052) and Section 06.01.08
(Exhibit 06.059). You may either feed the particulars manually, for each patient, or you
may enter the particulars of the Insurance Company in the block marked as 3a on
Exhibit 09.002 just once, and whenever a patient with this insurance company pays a
visit, simply select the Insurance Company from the dropdown list on the corresponding
field in the General Form. If all the required particulars are fed here, data in eight fields
on the General Form will be called upon selection of the Insurance Company.
Insurance Companies that have been recorded in the system will show in the Insurance
Block of the “Primary Configuration” tab of the Customization Area like this.
Exhibit 09.034
To edit the particulars, click the first icon corresponding to the name of the Insurance
Company.
To delete the Insurance Company from your list, click the second (trash can) icon
corresponding to the name of the Insurance Company.
To add a new Insurance Company to your list, click the “Add” button on the block. The
“Add Insurance Company” Window will open, as shown in Exhibit 09.035.
281
EMR NEXT – User Manual
«◄○►»
Exhibit 09.035
1. Write the name of the insurance company here.
2. Write the insurance company’s ID number here.
3. Specify the type of ID number, by selection from the dropdown list on the field.
The types available in the dropdown list are illustrated in Exhibit 09.036.
4. Write the name or designation of the contact person at the insurance company
here.
5. This field is for the insurance company’s address.
6. This field is for the insurance company’s city / county, etc.
7. Specify the insurance company’s zip code / postal code here.
8. Specify the insurance company’s country here. Initially, the country in which
your practice is based will come selected. Change if the insurance company’s
country is different from your country.
282
EMR NEXT – User Manual
«◄○►»
9. Specify the insurance company’s State / Province here. Initially, the State /
Province in which your company is based will come selected. Change if the
insurance company’s State / Province is different from yours.
10. Specify the insurance company’s telephone number here.
11. Specify the insurance company’s fax number here.
12. Specify the insurance company’s email address here.
13. This section is for the insurance company’s insurance plans. The company may
have several insurance plans. You can feed as many insurance plans as required.
To delete the plan, click the trash can icon before the plan.
14. Specify the name of the plan here.
15. Specify the amount which is co-payable by the patient under the plan.
16. To add more plans, click the “Add” button.
17. Click the “Save” button to save the insurance company’s particulars.
Exhibit 09.036
283
EMR NEXT – User Manual
«◄○►»
09.01.03.02 – Pharmacies
Back
Particulars of the patient’s Pharmacy are required for issuance of prescriptions. These
particulars are required in the General Form on the patient chart, in the Personal
Information & Patient Pharmacy Block, in the field marked as item 8 on Exhibit 06.038,
in Section 06.01.02 You may either feed the particulars manually, for each patient, or
you may enter the particulars of the Pharmacy in the block marked as 3b on Exhibit
09.002 just once, and whenever a patient with this pharmacy pays a visit, simply select
the pharmacy from the dropdown list on the corresponding field in the General Form.
All the pre-fed particulars of the insurance company will be called wherever required,
on this selection.
Pharmacies that have been recorded in the system will show in the Pharmacies Block of
the “Primary Configuration” tab of the Customization Area like this.
Exhibit 09.037
To edit the particulars, click the first icon corresponding to the name of the Pharmacy.
To delete the Pharmacy from your list, click the second (trash can) icon corresponding to
the name of the Pharmacy.
To add a new Pharmacy to your list, click the “Add” button on the block. The “Add
Pharmacy” Window will open, as shown in Exhibit 09.038.
284
EMR NEXT – User Manual
«◄○►»
Exhibit 09.038
1. Write the name of the pharmacy company here.
2. Write the pharmacy’s ID number here.
3. Specify the type of ID number, by selection from the dropdown list on the field.
The types available in the dropdown list are illustrated in Exhibit 09.039.
4. Write the name or designation of the contact person at the pharmacy here.
5. This field is for the pharmacy’s address.
6. This field is for the pharmacy’s city / county, etc.
7. Specify the pharmacy’s zip code / postal code here.
8. Specify the insurance company’s country here. Initially, the country in which
your practice is based will come selected. Change if the pharmacy’s country is
different from your country (though this is highly unlikely).
9. Specify the pharmacy’s State / Province here. Initially, the State / Province in
which your company is based will come selected. Change if the pharmacy’s State
/ Province is different from yours.
10. Specify the pharmacy’s telephone number here.
11. Specify the pharmacy’s fax number here.
285
EMR NEXT – User Manual
«◄○►»
12. Specify the pharmacy’s email address here.
13. Click the “Save” button to save the insurance company’s particulars.
Exhibit 09.039
286
EMR NEXT – User Manual
«◄○►»
09.01.03.03 – Physicians
Back
Patients will frequently be referred to you by other doctors, and you will also be
referring them to other doctors. The names of the referring doctors, or the doctors to
whom you refer the patients, need to be recorded in Encounter Forms. The names of
referring doctors are recorded in the Encounter Statistics Block discussed in Section
06.03.01, in the field identified as item 5 in Exhibit 06.135. The names of the doctors to
whom you refer the patient are recorded in the Referral Block, discussed in Section
06.03.15, in the field identified as item 3 on Exhibit 06.249.
You may either feed the names and particulars of the doctors in the encounter forms
each time patients are referred to you by them or you refer patients to them, or you
may enter their particulars in the block marked as 3c on Exhibit 09.002 just once, and
whenever this doctor refers a patient to you, or you refer a patient to him/her, simply
select the doctor’s name from the dropdown list on the corresponding fields in either
block in the Encounter Form. All pre-fed particulars of the doctor will be called wherever
needed in the system.
Doctors that have been recorded in the system will show in the Physicians Block of the
“Primary Configuration” tab of the Customization Area like this.
Exhibit 09.040
To edit the particulars, click the first icon corresponding to the name of the doctor.
To delete the doctor from your list, click the second (trash can) icon corresponding to
the name of the doctor.
To add a new doctor to your list, click the “Add” button on the block. The “Add
Physician” Window will open, as shown in Exhibit 09.041.
287
EMR NEXT – User Manual
«◄○►»
Exhibit 09.041
1. Write the name of the doctor here.
2. Write the doctor’s ID number here.
3. Specify the type of ID number, by selection from the dropdown list on the field.
The types available in the dropdown list are illustrated in Exhibit 09.042.
4. Write the doctor’s Salutation (Like MD, MBBS, etc.) here.
5. This field is for the doctor’s address.
6. This field is for the doctor’s city / county, etc.
7. Specify the doctor’s zip code / postal code here.
8. Specify the doctor’s country here. Initially, the country in which your practice is
based will come selected. Change if the doctor’s country is different from your
country.
9. Specify the doctor’s State / Province here. Initially, the State / Province in which
your company is based will come selected. Change if the doctor’s State /
Province is different from yours.
10. Specify the doctor’s telephone number here.
288
EMR NEXT – User Manual
«◄○►»
11. Specify the doctor’s fax number here.
12. Specify the doctor’s email address here.
13. If you want the doctor’s name to be included in the dropdown list only in the
Encounter Statistics Block, as a referring doctor, click the first radio button. If you
want his/her name to be included in the dropdown list only in the Referral Block,
as a doctor to whom you refer the patient, click the second radio block. If you
want the name to be included in both the blocks, click the third radio button.
14. Click the “Save” button to save the doctor’s particulars.
Exhibit 09.042
289
EMR NEXT – User Manual
«◄○►»
09.01.03.04 – Laboratories
Back
You need to specify the name and particulars of the Laboratory on Laboratory Orders.
Laboratory Orders are discussed in Section 06.03.16.02.02. Either you type the name
and particulars of the Laboratory manually for each Laboratory Order you issue, or you
feed the particulars in the block marked as 3d on Exhibit 09.002 just once, and
whenever a Laboratory Order is issued, click the icon marked as item 4 on Exhibit 06.271
to call the list of Laboratories on your database, and select the name & particulars.
Laboratories that have been recorded in the system will show in the Laboratories Block
of the “Primary Configuration” tab of the Customization Area like this.
Exhibit 09.043
To edit the particulars, click the first icon corresponding to the name of the Laboratory.
To delete the Laboratory from your list, click the second (trash can) icon corresponding
to the name of the Laboratory.
To add a new Laboratory to your list, click the “Add” button on the block. The “Add
Laboratory Company” Window will open, as shown in Exhibit 09.044.
290
EMR NEXT – User Manual
«◄○►»
Exhibit 09.044
1. Write the name of the Laboratory here.
2. Write the Laboratory’s ID number here.
3. Specify the type of ID number, by selection from the dropdown list on the field.
The types available in the dropdown list are illustrated in Exhibit 09.045.
4. Write the name or designation of the contact person at the Laboratory here.
5. This field is for the Laboratory’s address.
6. This field is for the Laboratory’s city / county, etc.
7. Specify the Laboratory’s zip code / postal code here.
8. Specify the Laboratory’s country here. Initially, the country in which your
practice is based will come selected. Change if the Laboratory’s country is
different from your country.
9. Specify the Laboratory’s State / Province here. Initially, the State / Province in
which your company is based will come selected. Change if the Laboratory’s
State / Province is different from yours.
10. Specify the Laboratory’s telephone number here.
11. Specify the Laboratory’s fax number here.
291
EMR NEXT – User Manual
«◄○►»
12. Specify the Laboratory’s email address here.
13. Click the “Save” button to save the Laboratory’s particulars.
Exhibit 09.045
292
EMR NEXT – User Manual
«◄○►»
09.01.03.05 – Radiology Clinics
Back
You need to specify the name and particulars of the Radiology Clinic on Radiology
Orders. Radiology Orders are discussed in Section 06.03.16.02.03. You have option to
either type the name and particulars of the Radiology Clinic manually for each Radiology
Order you issue, or to feed the particulars of the Radiology Clinic in the block marked as
3e on Exhibit 09.002 just once, and whenever a Radiology Order is issued, click the icon
marked as item 4 on Exhibit 06.273 to call the list of Radiology Clinics on your database,
and select the name & particulars.
Radiology Clinics that have been recorded in the system will show in the Radiology
Clinics Block of the “Primary Configuration” tab of the Customization Area like this.
Exhibit 09.046
To edit the particulars, click the first icon corresponding to the name of the Radiology
Clinic.
To delete the Radiology Clinic from your list, click the second (trash can) icon
corresponding to the name of the Radiology Clinic.
To add a new Radiology Clinic to your list, click the “Add” button on the block. The “Add
Radiology” Window will open, as shown in Exhibit 09.047.
293
EMR NEXT – User Manual
«◄○►»
Exhibit 09.047
1. Write the name of the Radiology Clinic here.
2. Write the Radiology Clinic’s ID number here.
3. Specify the type of ID number, by selection from the dropdown list on the field.
The types available in the dropdown list are illustrated in Exhibit 09.048.
4. Write the name or designation of the contact person at the Radiology Clinic
here.
5. This field is for the Radiology Clinic’s address.
6. This field is for the Radiology Clinic’s city / county, etc.
7. Specify the Radiology Clinic’s zip code / postal code here.
8. Specify the Radiology Clinic’s country here. Initially, the country in which your
practice is based will come selected. Change if the Radiology Clinic’s country is
different from your country.
9. Specify the Radiology Clinic’s State / Province here. Initially, the State / Province
in which your company is based will come selected. Change if the Radiology
Clinic’s State / Province is different from yours.
10. Specify the Radiology Clinic’s telephone number here.
11. Specify the Radiology Clinic’s fax number here.
294
EMR NEXT – User Manual
«◄○►»
12. Specify the Radiology Clinic’s email address here.
13. Click the “Save” button to save the Radiology Clinic’s particulars.
Exhibit 09.048
295
EMR NEXT – User Manual
«◄○►»
09.01.03.06 – Hospitals
Back
Patients will frequently be referred to you by Hospitals/Clinics, and you will also be
referring them to Hospitals/Clinics. The names of the referring Hospitals/Clinics, or the
Hospitals/Clinics to which you refer the patients, need to be recorded in Encounter
Forms. The names of referring Hospitals/Clinics are recorded in the Encounter Statistics
Block discussed in Section 06.03.01, in the field identified as item 5 in Exhibit 06.135.
The names of the Hospitals/Clinics to whom you refer the patient are recorded in the
Referral Block, discussed in Section 06.03.15, in the field identified as item 3 on Exhibit
06.249.
You may either feed the names and particulars of the Hospitals/Clinics in the encounter
forms each time patients are referred to you by them or you refer patients to them, or
you may enter their particulars in the block marked as 3f on Exhibit 09.002 just once,
and whenever this Hospitals/Clinics refers a patient to you, or you refer a patient to it,
simply select the Hospital’s/Clinic’s name from the dropdown list on the corresponding
fields in either block in the Encounter Form. All pre-fed particulars of the Hospital/Clinic
will be called wherever needed in the system.
Hospitals/Clinics that have been recorded in the system will show in the Hospitals Block
of the “Primary Configuration” tab of the Customization Area like this.
Exhibit 09.049
To edit the particulars, click the first icon corresponding to the name of the
Hospital/Clinic.
To delete the Hospital/Clinic from your list, click the second (trash can) icon
corresponding to the name of the Hospital/Clinic.
To add a new Hospital/Clinic to your list, click the “Add” button on the block. The “Add
Hospital” Window will open, as shown in Exhibit 09.050.
296
EMR NEXT – User Manual
«◄○►»
Exhibit 09.050
1. Write the name of the Hospital/Clinic here.
2. Write the Hospital/Clinic’s ID number here.
3. Specify the type of ID number, by selection from the dropdown list on the field.
The types available in the dropdown list are illustrated in Exhibit 09.051.
4. Write the name or designation of the contact person Hospital/Clinic here.
5. This field is for the Hospital/Clinic’s address.
6. This field is for the Hospital/Clinic’s city / county, etc.
7. Specify the Hospital/Clinic’s zip code / postal code here.
8. Specify the Hospital/Clinic’s country here. Initially, the country in which your
practice is based will come selected. Change if the Hospital/Clinic’s country is
different from your country.
9. Specify the Hospital/Clinic’s State / Province here. Initially, the State / Province in
which your company is based will come selected. Change if the Hospital/Clinic’s
State / Province is different from yours.
10. Specify the Hospital/Clinic’s telephone number here.
297
EMR NEXT – User Manual
«◄○►»
11. Specify the Hospital/Clinic’s fax number here.
12. Specify the Hospital/Clinic’s email address here.
13. If you want the Hospital/Clinic’s name to be included in the dropdown list only in
the Encounter Statistics Block, as a referring Hospital/Clinic, click the first radio
button. If you want its name to be included in the dropdown list only in the
Referral Block, as a Hospital/Clinic to whom you refer the patient, click the
second radio block. If you want the name to be included in both the blocks, click
the third radio button.
14. Click the “Save” button to save the Hospital/Clinic’s particulars.
Exhibit 09.051
298
EMR NEXT – User Manual
«◄○►»
09.01.04.01 – Diagnosis (Dx) Codes
Back
Diagnosis Codes are used in the Assessment & Diagnosis Block on the Encounter Form
(Section 06.03.09), and in the Master Problem List in the History Form (Section
06.02.07). In the Encounter Form, there are two parts of the Assessment & Diagnosis
Block – one for Ongoing Problems, and the other for New Assessments. In the Ongoing
Problems part, Diagnosis Codes identified in previous encounters are shown, and can be
re-selected. In the New Assessments part, new problems are identified. This is where
you need the list of Diagnosis Codes.
Exhibit 06.215 shows the New Problems Window. The Window lists your favorite
Diagnosis Codes and their descriptions. You construct this list of favorites from this
Section – i.e., from the field identified as 4a in Exhibit 09.002. When you click the
“Open” button on the field, the “Add / Delete Diagnosis Codes” Window opens:
Exhibit 09.052
1. The left side of the window is for the Master List of Diagnosis Codes and their
descriptions. The list has more than 1900 entries. The first column shows the
codes, while the second section shows the description. None of these codes will
appear in your list of favorites unless you make them favorite.
299
EMR NEXT – User Manual
«◄○►»
2. This is the 3-10 character quick search for the description you are looking for.
Enter the search value, and enter the right arrow icon next to it. The cursor will
jump to the first entry starting with the search value.
3. Click this arrow to move the Diagnosis Code to your list of favorites.
4. If the Description of the Diagnosis you are looking for is not included in the
master list, you can write it yourself in this field.
5. Write the Diagnosis Code in this field.
6. Press this right-arrow to include it in your list of favorites. The Diagnosis Code
and Description you have added from this field will not be added in the Master
List. They will only be added to your favorites.
7. This is the list of your favorites, that you have prepared either by selection from
the Master List, or by writing the description and codes of the Diagnoses
yourself, or as a combination of both.
8. If you want to add a note to the Diagnosis, Click the corresponding pencil icon.
The window shown in Exhibit 09.053 will open. Write your note and click the ok
button. When the changes are finally saved (by clicking item 10 on Exhibit
09.052), the note will always appear in the field for Notes (Exhibit 06.213) in the
Assessment / Diagnosis Block, when this diagnosis is selected. Where default
notes are added to the diagnosis code, the color of the pencil icon in the window
turns blue, as can be seen in the first entry in Exhibit 09.054.
9. If you want to delete the Diagnosis Code from your list of favorites, click the
corresponding trash can icon. If the code was selected from the Master List, it
will still be available for re-selection there, but if you had yourself defined the
code and description, they will be lost.
10. Save the changes made to the list by clicking the “Save” button. In Exhibit 09.052
the button is in white color, because it is not activated yet. It activates whenever
a change is made in the window. If you try to close the window without saving
the changes, the alert shown in Exhibit 09.055 will raise.
11. The “Reset” button clears all unsaved changes. In Exhibit 09.052 the button is in
white color, because it is not activated yet. It activates whenever a change is
made in the window.
300
EMR NEXT – User Manual
«◄○►»
Exhibit 09.053
Exhibit 09.054
301
EMR NEXT – User Manual
«◄○►»
Exhibit 09.055
302
EMR NEXT – User Manual
«◄○►»
09.01.04.02 – Procedure (Px) Codes
Back
Procedure (Px) Codes are used in the Procedures & Services Block in the Encounter
Form (Section 06.03.08). These are the procedures or services offered by you to your
patients. Exhibit 06.210 shows the Procedures & Services Block on the Encounter Form.
When you click the field icon on the block, the Procedures & Services Window shown in
Exhibit 06.211 opens. The Window lists your favorite Procedure Codes and their
descriptions. You construct this list of favorites from this Section – i.e., from the field
identified as 4b in Exhibit 09.002. When you click the “Open” button on the field, the
“Add / Delete Procedure Codes Window opens:
Exhibit 09.056
1. The left side of the window is for the Master List of Procedure Codes and their
descriptions. The list has more than 100 entries. The first column shows the
codes, while the second section shows the description. None of these codes will
appear in your list of favorites unless you make them favorite.
2. This is the 3-10 character quick search for the description you are looking for.
Enter the search value, and enter the right arrow icon next to it. The cursor will
jump to the first entry starting with the search value.
3. Click this arrow to move the Procedure Code to your list of favorites.
303
EMR NEXT – User Manual
«◄○►»
4. If the Description of the Procedure you are looking for is not included in the
master list, you can write it yourself in this field.
5. Write the Procedure Code in this field.
6. Press this right-arrow to include it in your list of favorites. The Procedure Code
and Description you have added from this field will not be added in the Master
List. They will only be added to your favorites.
7. This is the list of your favorites, that you have prepared either by selection from
the Master List, or by writing the description and codes of the Procedures
yourself, or as a combination of both.
8. If you want to add a note to the Procedure, Click the corresponding pencil icon.
The window shown in Exhibit 09.057 will open. Write your note and click the ok
button. When the changes are finally saved (by clicking item 11 on Exhibit
09.056), the note will always appear in the field for Notes (Item No. 4 in Exhibit
06.210) in the Procedures & Services Block, when this procedure is selected.
Where default notes are added to the diagnosis code, the color of the pencil icon
in the window turns blue, as can be seen in the first entry in Exhibit 09.058.
9. Specify the charges for the Procedures & Services here. Click the Rates icon to
open the window shown in Exhibit 09.058. Specify the charges and click the OK
button. The charges specified here will be picked up in the Patient Invoice and
the Super Bill directly, whenever this Procedure or Service is prescribed.
10. If you want to delete the Procedure Code from your list of favorites, click the
corresponding trash can icon. If the code was selected from the Master List, it
will still be available for re-selection there, but if you had yourself defined the
code and description, they will be lost.
11. Save the changes made to the list by clicking the “Save” button. In Exhibit 09.056
the button is in white color, because it is not activated yet. It activates whenever
a change is made in the window. If you try to close the window without saving
the changes, the alert shown in Exhibit 09.060 will raise.
12. The “Reset” button clears all unsaved changes. In Exhibit 09.056 the button is in
white color, because it is not activated yet. It activates whenever a change is
made in the window.
304
EMR NEXT – User Manual
«◄○►»
Exhibit 09.057
Exhibit 09.058
Exhibit 09.059
305
EMR NEXT – User Manual
«◄○►»
Exhibit 09.060
306
EMR NEXT – User Manual
«◄○►»
09.01.04.03 – Evaluation & Management (EM) Codes
Back
Evaluation & Management (EM) Codes are used in the Evaluation & Management Code
Block in the Encounter Form (Section 06.03.14). Evaluation & Management Codes are
billing codes for patient encounters. These charges are established by American Medical
Association. When you select the Evaluation & Management code in the Block, the
charges are automatically picked by the Patient Invoice and the Super Bill.
The EM codes are selected from the dropdown list on the field identified as item 1 on
Exhibit 06.236. This list shows your favorite Evaluation & Management Codes, that you
construct from here, in the Customization Section. When you click the “Open” button on
the field identified as item 4c on Exhibit 09.002, the “Add / Delete Evaluation &
Management Codes” Window opens:
Exhibit 09.061
1. The left side of the window is for the Master List of Evaluation & Management
Codes and their descriptions. The list has more than 100 entries. The first column
shows the codes, while the second section shows the description. None of these
codes will appear in your list of favorites unless you make them favorite.
307
EMR NEXT – User Manual
«◄○►»
2. Click this right-arrow to move the Evaluation & Management Code to your list of
favorites.
3. If the Description of the Evaluation & Management Code you are looking for is
not included in the Master List, you can write it yourself in this field.
4. Write the Evaluation / Management Code in this field.
5. Press this right-arrow to include it in your list of favorites. The E/M Code and
Description you have added from this field will not be added in the Master List.
They will only be added to your favorites.
6. This is the list of your favorites, that you have prepared either by selection from
the Master List, or by writing the description and E/M codes yourself, or as a
combination of both.
7. Charges for the Evaluation / Management Code are specified from here. Click the
pencil icon to open the window shown in Exhibit 09.062 Specify the charges and
click the OK button. The charges specified here will be picked up in the Patient
Invoice and the Super Bill directly, whenever this E/M Code is selected. Where
rates have been specified for the E/M Code, the pencil icon turns blue, as shown
in the first entry in Exhibit 09.063.
8. If you want to delete the Evaluation / Management Code from your list of
favorites, click the corresponding trash can icon. If the code was selected from
the Master List, it will still be available for re-selection there, but if you had
yourself defined the code, description and rate, they will be lost.
9. Save the changes made to the list by clicking the “Save” button. In Exhibit 09.061
the button is in white color, because it is not activated yet. It activates whenever
a change is made in the window. If you try to close the window without saving
the changes, the alert shown in Exhibit 09.064 will raise.
10. The “Reset” button clears all unsaved changes. In Exhibit 09.061 the button is in
white color, because it is not activated yet. It activates whenever a change is
made in the window.
308
EMR NEXT – User Manual
«◄○►»
Exhibit 09.062
Exhibit 09.063
309
EMR NEXT – User Manual
«◄○►»
Exhibit 09.064
310
EMR NEXT – User Manual
«◄○►»
09.01.04.04 – Medications
Back
Medicines are selected in the Medications Block in the Encounter Form (Section
06.03.11), and in the Master Medication List in the History Form (Section 06.02.08).
These are the medicines that you prescribe to your patient, and are printed in the
Prescriptions (Section 06.03.16.02.01).
When you click the block icon in the Medications Block, the list of medicines shown in
Exhibit 06.223 opens. This list shows your favorite Medicines, that you construct from
here, in the Customization Section. When you click the “Open” button on the field
identified as item 4d on Exhibit 09.002, the “Add / Delete Medications” Window opens
Exhibit 09.065
1. The left side of the window is for the Master List of Medicines. The list has more
than 4500 entries. None of these medicines will appear in your list of favorites
unless you make them favorite.
2. This is the 3-10 character quick search for the description you are looking for.
Enter the search value, and enter the right arrow icon next to it. The cursor will
jump to the first entry starting with the search value
3. Click this right-arrow to move the Medicine to your list of favorites.
311
EMR NEXT – User Manual
«◄○►»
4. If the Medicine you are looking for is not included in the Master List, you can
write it yourself in this field.
5. Write the Code of the medicine in this field.
6. Press this right-arrow to include it in your list of favorites. The name and the
code of the medicine you have added from this field will not be added in the
Master List. They will only be added to your favorites.
7. This is the list of your favorites, that you have prepared either by selection from
the Master List, or by writing the name and code of the medicine yourself, or as
a combination of both.
8. If you want to add a default signature phrase for the medicine, it is done from
here. Click the pencil icon, and the window shown in Exhibit 09.066 will open.
Write the phrase and click the OK button. Now the signature phrase will appear
in the signature field in the medicines block, identified as item 3 on Exhibit
06.222, whenever this medicine is selected. However, the phrase can be edited
on the encounter form, if required. The pencil icon of the medicines on which a
signature phrase has been entered turns blue, as is shown in the first and the
seventh entry on Exhibit 09.067
9. If you want to delete the medicine from your list of favorites, click the
corresponding trash can icon. If the medicine was selected from the Master List,
it will still be available for re-selection there, but if you had yourself written the
name and the code, they will be lost.
10. Save the changes made to the list by clicking the “Save” button. If you try to
close the window without saving the changes, the alert shown in Exhibit 09.068
will raise.
11. The “Reset” button clears all unsaved changes.
Exhibit 09.066
312
EMR NEXT – User Manual
«◄○►»
Exhibit 09.067
Exhibit 09.068
313
EMR NEXT – User Manual
«◄○►»
09.01.04.05 – Laboratory Orders
Back
Laboratory Orders are selected in the Orders/Requisitions Block on the Encounter Form
(Section 06.03.10). These are the laboratory tests you prescribe for your patients. Based
on the Lab Orders, the Lab Order Report shown in Section 06.03.16.02.02 is prepared.
When you click the Block Icon on the Orders/Requisitions Block, the Orders /
Requisitions Window shown in Exhibit 06.221 opens. The first part of this window holds
the list of Laboratory Orders. The list is managed from here in the Customization
Section. When you click the “Open” button on the field identified as item 4e on Exhibit
09.002, the “Add / Delete Lab Orders” Window opens:
Exhibit 09.069
1. The left side of the window is for the Master List of Lab Orders. The list has more
than 250 entries. None of these Lab Orders will appear in your list of favorites
unless you make them favorite.
2. Click this right-arrow to move the Lab Order to your list of favorites.
3. If the Lab Order you are looking for is not included in the Master List, you can
write it yourself in this field.
314
EMR NEXT – User Manual
«◄○►»
4. Press this right-arrow to include it in your list of favorites. The Lab Orders you
have added from this field will not be added in the Master List. They will only be
added to your favorites.
5. This is the list of your favorites, that you have prepared either by selection from
the Master List, or by writing the Lab Orders yourself, or as a combination of
both.
6. If you want to delete a Lab Order from your list of favorites, click the
corresponding trash can icon. If the Lab Order was selected from the Master List,
it will still be available for re-selection there, but if you had yourself written it, it
will be lost.
7. Save the changes made to the list by clicking the “Save” button. In Exhibit 09.069
the button is in white color, because it is not activated yet. It activates whenever
a change is made in the window. If you try to close the window without saving
the changes, the alert shown in Exhibit 09.070 will raise.
8. The “Reset” button clears all unsaved changes. In Exhibit 09.069 the button is in
white color, because it is not activated yet. It activates whenever a change is
made in the window
Exhibit 09.070
315
EMR NEXT – User Manual
«◄○►»
09.01.04.06 – Radiology Orders
Back
Radiology Orders are selected in the Orders/Requisitions Block on the Encounter Form
(Section 06.03.10). These are the Radiology tests you prescribe for your patients. Based
on the Radiology Orders, the Radiology Order Report shown in Section 06.03.16.02.03 is
prepared. When you click the Block Icon on the Orders/Requisitions Block, the Orders /
Requisitions Window shown in Exhibit 06.221 opens. The second part of this window
holds the list of Radiology Orders. The list is managed from here in the Customization
Section. When you click the “Open” button on the field identified as item 4f on Exhibit
09.002, the “Add / Delete Radiology Orders” Window opens:
Exhibit 09.071
1. The left side of the window is for the Master List of Radiology Orders. The list has
more than 200 entries. None of these Radiology Orders will appear in your list of
favorites unless you make them favorite.
2. Click this right-arrow to move the Radiology Order to your list of favorites.
3. If the Radiology Order you are looking for is not included in the Master List, you
can write it yourself in this field.
316
EMR NEXT – User Manual
«◄○►»
4. Press this right-arrow to include it in your list of favorites. The Radiology Orders
you have added from this field will not be added in the Master List. They will only
be added to your favorites.
5. This is the list of your favorites, that you have prepared either by selection from
the Master List, or by writing the Radiology Orders yourself, or as a combination
of both.
6. If you want to delete a Radiology Order from your list of favorites, click the
corresponding trash can icon. If the Radiology Order was selected from the
Master List, it will still be available for re-selection there, but if you had yourself
written it, it will be lost.
7. Save the changes made to the list by clicking the “Save” button. In Exhibit 09.071
the button is in white color, because it is not activated yet. It activates whenever
a change is made in the window. If you try to close the window without saving
the changes, the alert shown in Exhibit 09.072 will raise.
8. The “Reset” button clears all unsaved changes. In Exhibit 09.071 the button is in
white color, because it is not activated yet. It activates whenever a change is
made in the window
Exhibit 09.072
317
EMR NEXT – User Manual
«◄○►»
09.01.04.07 – General Orders
Back
General Orders are selected in the Orders/Requisitions Block on the Encounter Form
(Section 06.03.10). These are the General Items, like slings, gloves, etc. that you
prescribe for your patients. Based on the General Orders, the General Order Report
shown in Section 06.03.16.02.04 is prepared. When you click the Block Icon on the
Orders/Requisitions Block, the Orders / Requisitions Window shown in Exhibit 06.221
opens. The third part of this window holds the list of General Orders. The list is managed
from here in the Customization Section. When you click the “Open” button on the field
identified as item 4g on Exhibit 09.002, the “Add / Delete General Orders” Window
opens:
Exhibit 09.073
1. The left side of the window is for the Master List of General Orders. The list has
twelve entries, only as a sample. None of these General Order items will appear
in your list of favorites unless you make them favorite.
2. Click this right-arrow to move the General Order item to your list of favorites.
3. If the General Order item you are looking for is not included in the Master List
(which will usually be the case, as the master list is just a sample), you can write
it yourself in this field.
318
EMR NEXT – User Manual
«◄○►»
4. Press this right-arrow to include it in your list of favorites. The General Order
items you have added from this field will not be added in the Master List. They
will only be added to your favorites.
5. This is the list of your favorites, that you have prepared either by selection from
the Master List, or by writing the General Order items yourself, or as a
combination of both.
6. If you want to delete a General Order item from your list of favorites, click the
corresponding trash can icon. If the item was selected from the Master List, it
will still be available for re-selection there, but if you had yourself written it, it
will be lost.
7. Save the changes made to the list by clicking the “Save” button. In Exhibit 09.073
the button is in white color, because it is not activated yet. It activates whenever
a change is made in the window. If you try to close the window without saving
the changes, the alert shown in Exhibit 09.074 will raise.
8. The “Reset” button clears all unsaved changes. In Exhibit 09.074 the button is in
white color, because it is not activated yet. It activates whenever a change is
made in the window
Exhibit 09.074
319
EMR NEXT – User Manual
«◄○►»
09.01.04.08 – Visit Types
Back
Visit Types are defined in the Encounter Statistics Block in the Encounter Form, in the
field named “Type” (Section 06.03.01 – Item 3, Exhibit 06.135). When you click the field,
a dropdown list appears with the various Service Types, as shown in Exhibit 06.137. This
list is managed from here, in the Customization Section. When you click the “Open”
button on the field identified as item 4h on Exhibit 09.002, the “Add / Delete Visit
Types” Window opens
Exhibit 09.075
1. The left side of the window is for the Master List of Visit Types. The list has more
than 35 entries. None of these codes will appear in your list of favorites unless
you make them favorite.
320
EMR NEXT – User Manual
«◄○►»
2. Click this right-arrow to move the Visit Type to your list of favorites.
3. This is the list of your favorites, which you have prepared by selection from the
Master List.
4. Specify the Point of Service Code for the Service Type here. Click the pencil icon
to open the window shown in Exhibit 09.076 Specify the code and click the OK
button. The code will be picked up in the Patient Invoice and Super Bill whenever
this Service Type is selected. If the point of service has been defined, the pencil
icon on the List of Favorites will turn blue, as shown in the first entry in Exhibit
09.077
5. If you want to delete the Service Type from your list of favorites, click the
corresponding trash can icon. The Service Type will still be re-selectable from the
Master List.
6. Save the changes made to the list by clicking the “Save” button. If you try to
close the window without saving the changes, the alert shown in Exhibit 09.078
will raise.
7. The “Reset” button clears all unsaved changes.
Exhibit 09.076
321
EMR NEXT – User Manual
«◄○►»
Exhibit 09.077
Exhibit 09.078
322
EMR NEXT – User Manual
«◄○►»
09.01.04.09 – Chief Complaint (CC) Phrases
Back
The Chief Complaints are used in the “Chief Complaints” Block in the Encounter Form
(Section 06.03.03, Exhibit 06.142). When you click the block icon on the block, the “Chief
Complain / Encounter Reason” Window shown in Exhibit 06.143 opens. The complaints
listed in the window are managed from here in the Customization Area. When you click
the “Open” button on the field identified as item 4i in Exhibit 09.002, the “Add / Delete
CC Phrases” Window opens
Exhibit 09.079
1. The left side of the window is for the Master List of Chief Complain Phrases. The
list has more than 70 entries. None of these phrases will appear in your list of
favorites unless you make them favorite.
2. Click this right-arrow to move the Chief Complaint Phrases to your list of
favorites.
3. If the phrase you are looking for is not included in the Master List, you can write
it yourself in this field.
4. Press this right-arrow to include it in your list of favorites. The Chief Complaint
Phrases you have added from this field will not be added in the Master List. They
will only be added to your favorites.
323
EMR NEXT – User Manual
«◄○►»
5. This is the list of your favorites, that you have prepared either by selection from
the Master List, or by writing the phrases yourself, or as a combination of both.
6. If you want to delete the Chief Complaint Phrase from your list of favorites, click
the corresponding trash can icon. If the phrase was selected from the Master
List, it will still be available for re-selection there, but if you had yourself written
it, it will be lost.
7. Save the changes made to the list by clicking the “Save” button. In Exhibit 09.079
the button is in white color, because it is not activated yet. It activates whenever
a change is made in the window. If you try to close the window without saving
the changes, the alert shown in Exhibit 09.080 will raise.
8. The “Reset” button clears all unsaved changes. In Exhibit 09.079 the button is in
white color, because it is not activated yet. It activates whenever a change is
made in the window.
Exhibit 09.080
324
EMR NEXT – User Manual
«◄○►»
09.01.04.10 – History of Present Illness (HPI) Phrases
Back
History of Present Illness Phrases are used in the History of Present Illness Block in the
Encounter Form (Section 06.03.04, item 1 on Exhibit 06.144). When you click the block
icon, the History of Present Illness Window shown in Exhibit 06.145 opens. When you
click the “Open” button on the field identified as item 4j in Exhibit 09.002, the “Add /
Delete HPI Phrases” Window opens
Exhibit 09.081
1. The Master List of History of Present Illness Phrases has no entries. You have to
develop your own list of History of Present Illness Phrases.
2. Specify the HPI Phrase in this field.
3. Press this right-arrow to include it in your list of favorites.
4. This is the list of your favorites.
325
EMR NEXT – User Manual
«◄○►»
5. If you want to delete the History of Present Illness Phrase from your list of
favorites, click the corresponding trash can icon. The phrase will be lost forever,
and you will have to re-write it if you wish to use it again. .
6. Save the changes made to the list by clicking the “Save” button. In Exhibit 09.081
the button is in white color, because it is not activated yet. It activates whenever
a change is made in the window. If you try to close the window without saving
the changes, the alert shown in Exhibit 09.082 will raise.
7. The “Reset” button clears all unsaved changes. In Exhibit 09.081 the button is in
white color, because it is not activated yet. It activates whenever a change is
made in the window.
Exhibit 09.082
326
EMR NEXT – User Manual
«◄○►»
09.01.04.11 – Reasons For Referral (RFR) Phrases
Back
Reasons For Referral Phrases are used in the Referral Block on the Encounter Form
(Section 06.03.15, Item 4 on Exhibit 06.249). When you click on the field, the dropdown
list shown in Exhibit 06.252 opens for selection of reason. The list is managed from here
in the Customization Section. When you click the “Open” button on the field identified
as item 4k in Exhibit 09.002, the “Add / Delete Reasons for Referral Phrases” Window
opens:
Exhibit 09.083
1. The left side of the window is for the Master List of Reasons For Referral Phrases.
The list has more than 30 entries. None of these phrases will appear in your list
of favorites unless you make them favorite.
2. Click this right-arrow to move the Reason For Referral Phrases to your list of
favorites.
3. If the phrase you are looking for is not included in the Master List, you can write
it yourself in this field.
327
EMR NEXT – User Manual
«◄○►»
4. Press this right-arrow to include it in your list of favorites. The Reason For
Referral Phrases you have added from this field will not be added in the Master
List. They will only be added to your favorites.
5. This is the list of your favorites, that you have prepared either by selection from
the Master List, or by writing the phrases yourself, or as a combination of both.
6. If you want to delete the Reason For Referral Phrase from your list of favorites,
click the corresponding trash can icon. If the phrase was selected from the
Master List, it will still be available for re-selection there, but if you had yourself
written it, it will be lost.
7. Save the changes made to the list by clicking the “Save” button. In Exhibit 09.083
the button is in white color, because it is not activated yet. It activates whenever
a change is made in the window. If you try to close the window without saving
the changes, the alert shown in Exhibit 09.084 will raise.
8. The “Reset” button clears all unsaved changes. In Exhibit 09.083 the button is in
white color, because it is not activated yet. It activates whenever a change is
made in the window.
Exhibit 09.084
328
EMR NEXT – User Manual
«◄○►»
09.01.04.12 – Plan Notes Phrases
Back
Plan Notes Phrases are used in the Plan Notes Block in the Encounter Form (Section
06.03.12, Exhibit 06.231). When you click the block icon on the block, the Plan Notes
Window shown in Exhibit 06.232 opens. Entries in this window are managed from here
in the Customization Section. When you click the “Open” button on the field identified
as item 4l in Exhibit 09.002, the “Add / Delete Plan Notes Phrases” Window opens:
Exhibit 09.085
1. The left side of the window is for the Master List of Plan Notes Phrases. The list
has more than 20 entries. None of these phrases will appear in your list of
favorites unless you make them favorite.
2. Click this right-arrow to move the Plan Notes Phrases to your list of favorites.
3. If the phrase you are looking for is not included in the Master List, you can write
it yourself in this field.
329
EMR NEXT – User Manual
«◄○►»
4. Press this right-arrow to include it in your list of favorites. The Plan Notes
Phrases you have added from this field will not be added in the Master List. They
will only be added to your favorites.
5. This is the list of your favorites, that you have prepared either by selection from
the Master List, or by writing the phrases yourself, or as a combination of both.
6. If you want to delete the Plan Notes Phrase from your list of favorites, click the
corresponding trash can icon. If the phrase was selected from the Master List, it
will still be available for re-selection there, but if you had yourself written it, it
will be lost.
7. Save the changes made to the list by clicking the “Save” button. In Exhibit 09.085
the button is in white color, because it is not activated yet. It activates whenever
a change is made in the window. If you try to close the window without saving
the changes, the alert shown in Exhibit 09.086 will raise.
8. The “Reset” button clears all unsaved changes. In Exhibit 09.085 the button is in
white color, because it is not activated yet. It activates whenever a change is
made in the window.
Exhibit 09.086
330
EMR NEXT – User Manual
«◄○►»
09.01.04.13 – Past Medical History (PMH) Phrases
Back
Past Medical History Phrases are used in the Past Medical History Block in the History
Form. When you click the block icon on the block, the Past Medical History Window
shown in Exhibit 06.076 opens. Entries in the Past Medical History Window are managed
from here in the Customization Section. When you click the “Open” button on the field
identified as item 4m in Exhibit 09.002, the “Add / Delete PMH Phrases” Window opens:
Exhibit 09.087
1. The left side of the window is for the Master List of Past Medical History Phrases.
The list has more than 50 entries. None of these phrases will appear in your list
of favorites unless you make them favorite.
2. Click this right-arrow to move the Past Medical History Phrases to your list of
favorites.
3. If the phrase you are looking for is not included in the Master List, you can write
it yourself in this field.
331
EMR NEXT – User Manual
«◄○►»
4. Press this right-arrow to include it in your list of favorites. The Past Medical
History Phrases you have added from this field will not be added in the Master
List. They will only be added to your favorites.
5. This is the list of your favorites, that you have prepared either by selection from
the Master List, or by writing the phrases yourself, or as a combination of both.
6. If you want to delete the Past Medical History Phrase from your list of favorites,
click the corresponding trash can icon. If the phrase was selected from the
Master List, it will still be available for re-selection there, but if you had yourself
written it, it will be lost.
7. Save the changes made to the list by clicking the “Save” button. In Exhibit 09.087
the button is in white color, because it is not activated yet. It activates whenever
a change is made in the window. If you try to close the window without saving
the changes, the alert shown in Exhibit 09.088 will raise.
8. The “Reset” button clears all unsaved changes. In Exhibit 09.087 the button is in
white color, because it is not activated yet. It activates whenever a change is
made in the window.
Exhibit 09.088
332
EMR NEXT – User Manual
«◄○►»
09.01.04.14 – Past Social History (PSH) Phrases
Back
Past Social History Phrases are used in the Past Social History Block in the History Form
(Section 06.02.02, Exhibit 06.078). When you click on the block icon on the block, the
Past Surgical History Window shown in Exhibit 06.079 opens. Entries in the Past Surgical
History Block are managed from here in Customization Section. When you click the
“Open” button on the field identified as item 4n in Exhibit 09.002, the “Add / Delete PSH
Phrases” Window opens
Exhibit 09.089
1. The left side of the window is for the Master List of Past Surgical History Phrases.
The list has more than 20 entries. None of these phrases will appear in your list
of favorites unless you make them favorite.
2. Click this right-arrow to move the Past Surgical History Phrases to your list of
favorites.
3. If the phrase you are looking for is not included in the Master List, you can write
it yourself in this field.
4. Press this right-arrow to include it in your list of favorites. The Past Surgical
History Phrases you have added from this field will not be added in the Master
List. They will only be added to your favorites.
333
EMR NEXT – User Manual
«◄○►»
5. This is the list of your favorites, that you have prepared either by selection from
the Master List, or by writing the phrases yourself, or as a combination of both.
6. If you want to delete the Past Surgical History Phrase from your list of favorites,
click the corresponding trash can icon. If the phrase was selected from the
Master List, it will still be available for re-selection there, but if you had yourself
written it, it will be lost.
7. Save the changes made to the list by clicking the “Save” button. In Exhibit 09.089
the button is in white color, because it is not activated yet. It activates whenever
a change is made in the window. If you try to close the window without saving
the changes, the alert shown in Exhibit 09.090 will raise.
8. The “Reset” button clears all unsaved changes. In Exhibit 09.089 the button is in
white color, because it is not activated yet. It activates whenever a change is
made in the window.
Exhibit 09.090
334
EMR NEXT – User Manual
«◄○►»
09.01.04.15 – Allergies Phrases
Back
Allergy Phrases are used in the Known Allergies Block in the History Form (Section
06.02.03, Exhibit 06.080). When you click the block icon on the block, the Known
Allergies Window shown in Exhibit 06.082 opens. Entries in this window are managed
from here in the Customization Section. When you click the “Open” button on the field
identified as item 4o in Exhibit 09.002, the “Add / Delete Allergies Phrases” Window
opens
Exhibit 09.091
1. The left side of the window is for the Master List of Allergies Phrases. The list has
more than 30 entries. None of these phrases will appear in your list of favorites
unless you make them favorite.
2. Click this right-arrow to move the Allergies Phrases to your list of favorites.
3. If the phrase you are looking for is not included in the Master List, you can write
it yourself in this field.
335
EMR NEXT – User Manual
«◄○►»
4. This field is optional. However, if you specify the code, the next two fields will
become mandatory, and they will have to be specified too. Type the code of the
Allergy here.
5. This field is to be left blank, unless item 4 has been provided. Specify the
classification of the Allergy Code here. Presently, there are two classes of codes
available in the USA – SNOWMED-CT and RxNorm.
6. This field is to be left blank, unless items 4 & 5 have been provided. Specify the
type of Allergen here, by selection from the dropdown list shown in Exhibit
09.092. Available options include drug, food and others.
7. Press this right-arrow to include the Allergy in your list of favorites. The Allergies
you have added from this field will not be added in the Master List. They will only
be added to your favorites.
8. This is the list of your favorites, that you have prepared either by selection from
the Master List, or by writing the Allergies yourself, or as a combination of both.
9. If you want to delete the Allergy Phrase from your list of favorites, click the
corresponding trash can icon. If the phrase was selected from the Master List, it
will still be available for re-selection there, but if you had yourself written it, it
will be lost.
10. Save the changes made to the list by clicking the “Save” button. In Exhibit 09.091
the button is in white color, because it is not activated yet. It activates whenever
a change is made in the window. If you try to close the window without saving
the changes, the alert shown in Exhibit 09.093 will raise.
11. The “Reset” button clears all unsaved changes. In Exhibit 09.091 the button is in
white color, because it is not activated yet. It activates whenever a change is
made in the window.
Exhibit 09.092
336
EMR NEXT – User Manual
«◄○►»
Exhibit 09.093
337
EMR NEXT – User Manual
«◄○►»
09.02 – General Form Template
Back
The tab marked as Item 2 on Exhibit 09.001 opens the General Form Template shown in
Exhibit 09.094.
Exhibit 09.094
The General Form Template shows seven blocks encircled by dotted blue lines. These
encircled blocks are editable blocks on the template. Blue icons, which are attached to
the upper left corners of the blocks, are Edit-Template-Block Icons. The blocks can be
edited by clicking the respective Edit-Template-Block Icon.
338
EMR NEXT – User Manual
«◄○►»
The seven editable blocks include:
1. Contact Information Block
2. Work Information Block
3. Directives Block
4. General Information Block
5. Insurance 1 Block
6. Insurance 2 Block
7. Guarantor Block
There is only one editable feature in these blocks, which is, either to keep them initially
activated when a new chart is created, or to keep them deactivated.
We have already mentioned in Section 06.01, while discussing these respective blocks
that if you click the Block-Title Icon on the block, an alert will be raised saying “Closing
this block would also reset its fields to their default values. Are you sure you want to
close it?” If you click the “No” button on the alert, the action will abort. But if you click
the “Yes” button on the alert, all entries made in this block will clear, and the block will
be de-activated. To reactivate the block, click the Block-Title Icon again.
The activation or deactivation of the block can thus be done from the chart itself. But, if
you do not need the blocks most of the time, then, rather than going through the hassle
of deactivating them every time a new chart is created, you can simply deactivate them
on the template from here, for once and all. Then if you need to activate the blocks on a
case to case basis, you can do it on the chart.
To deactivate a block on the template, click the Edit-Template-Block Icon of the
respective block. The ‘Edit’ window will pop. The edit windows of each of the seven
blocks are shown in Exhibits 09.095 to 09.100 (Exhibit 09.099 is common for Insurance 1
Block and Insurance 2 Block, as the windows are the same).
Uncheck the checkbox on the concerned window, and click the OK button. Then save
the changes made to the template by clicking the Save Changes Button shown in Exhibit
09.101. An alert will appear, as shown in Exhibit 09.102, saying that the changes will
apply only to future charts, and not to previously opened charts.
339
EMR NEXT – User Manual
«◄○►»
As an example, we have deactivated the contact information block in Exhibit 09.103 to
show the appearance of a deactivated block when a fresh chart is created.
Exhibit 09.095
Exhibit 09.096
Exhibit 09.097
340
EMR NEXT – User Manual
«◄○►»
Exhibit 09.098
Exhibit 09.099
Exhibit 09.100
341
EMR NEXT – User Manual
«◄○►»
Exhibit 09.101
Exhibit 09.102
342
EMR NEXT – User Manual
«◄○►»
Exhibit 09.103
There is another kind of editing of the General Information Block also. If you run a Cash
Only Practice, then you can remove the Insurance 1, Insurance 2 and the Guarantor
Blocks from the template altogether. (Please note that all three blocks can be removed
or retained as a set. It is not possible to delete only one or two of these three blocks).
The procedure to do this has been explained in detail in Section 09.01.02.06, and the
appearance of the General Information Form before and after removal of the three
blocks has been shown in Exhibits 09.022 and 09.023.
343
EMR NEXT – User Manual
«◄○►»
09.03 – History Form Template
Back
When you click the third tab on the Customization Home Page (identified as Item 3 on
Exhibit 09.001), the History Form Template opens. The template looks like this:
Exhibit 09.104
344
EMR NEXT – User Manual
«◄○►»
All the eight blocks in the lower portion of the Template are encircled by blue dotted
lines. These lines indicate that the blocks are editable. A blue circular icon is attached to
the upper left corner of each of the encircled blocks. It is the Edit-Template-Block Icon,
on clicking which the Edit Window of the respective block opens. The edit functionality
of each block will be discussed separately.
Before and after each block is a yellow circular icon. This is the Add-New-Block Icon. It
allows you to add a block in the position of the icon. By this mechanism, you can add
blocks virtually anywhere in the template. There is no space limitation, as the template
stretches according to requirement.
Before proceeding further, two important points to be remembered:
1. Changes made to the template must be saved. Unsaved changes will be lost.
Whenever you make a change in the template, a red alert will appear at the top
left corner of the screen, reminding you to save the changes. Save the changes
by clicking the button at the bottom right corner of the screen. Exhibit 09.105
shows both, the alert and the “Save” button.
2. Changes made to the template will be effective only on charts created after the
changes. Previous charts will remain unchanged.
Exhibit 09.105
345
EMR NEXT – User Manual
«◄○►»
09.03.01 – Adding New Blocks to the History Form Template
Back
When you click any of the yellow icons on the History Form Template, the “Add Blocks”
Window shown in Exhibit 09.106 opens.
Exhibit 09.106
The “Add Blocks” Window has two sections. The first one says “Restore Default Blocks”
and the second says “User Definable Blocks”.
Restore Default Blocks
Four of the eight editable blocks shown in Exhibit 09.104 can be deleted from the
template altogether. These are 1) Past Medical History 2) Past Surgical History 3) Family
History, 4) Social History. If any of these blocks is deleted, then the system retains the
346
EMR NEXT – User Manual
«◄○►»
format of the deleted block in this section of the window. If you want to recreate the
deleted block, at its original location or any other new location, open this window from
the yellow icon of the desired location, click the radio button of the block you want to
restore, and press the “Continue” button on the window to proceed. To show you how
the mechanism works, we deleted the ‘Past Medical History’ and ‘Past Surgical History’
Blocks from the template. Now the window looks as shown in Exhibit 09.107:
Exhibit 09.107
Only Default Blocks can be restored in this manner. If user created blocks are deleted,
they cannot be restored.
User Definable Blocks
347
EMR NEXT – User Manual
«◄○►»
In the second part of the window, there are nine radio buttons. These are the nine
formats in which you can create the new block. But, one block can use only one format.
348
EMR NEXT – User Manual
«◄○►»
09.03.01.01 – Block with Single Free Text Field
Back
When you click the first radio button in the “User Definable Blocks” section of the “Add
Blocks” window (Exhibit 09.106), and press the “Continue” Button, the following “Add”
window opens:
Exhibit 09.108
Write the name of the block (or the prompt of the field) in the white space on the
window.
If you want this block to initially appear in opened state on charts, keep the checkbox
checked. If you want it to appear initially as de-activated, uncheck the checkbox.
Click Ok. The “Add” window will close, and the block will be created on the template.
Save the changes.
Now when you open a new chart, the block will appear as this on the Form (for
simplicity and uniformity, we have opened the new block as the first block on the chart.
It is named First Block)
349
EMR NEXT – User Manual
«◄○►»
Exhibit 09.109
350
EMR NEXT – User Manual
«◄○►»
09.03.01.02 – Block with Multiple Free Text Fields
Back
When you click the second radio button in the “User Definable Blocks” section of the
“Add Blocks” window (Exhibit 09.106), and press the “Continue” Button, the following
“Add” window opens:
Exhibit 09.110
Write the name of the block in the white field on the top.
Add as many rows as required by pressing the black down-arrow under the first two
fields. If you have added extra fields, they can be deleted by clicking the trash can icon
at the end of the respective field.
351
EMR NEXT – User Manual
«◄○►»
Now write the names of the fields in the white space at the beginning of each field. For
example, we created five fields, and gave them the names First Field, Second Field, Third
Field, Fourth Field and Fifth Field, as shown in Exhibit 09.111.
If you want this block to initially appear in opened state on charts, keep the checkbox
checked. If you want it to appear initially as de-activated, uncheck the checkbox.
Click Ok. The “Add” window will close, and the block will be created on the template.
Save the changes.
Now when you open a new chart, the block will appear on the Form as shown in Exhibit
09.112 (for simplicity and uniformity, we have opened the new block as the first block
on the chart. It is named Second Block)
Please note that two additional full length fields also appear at the end of the block, for
any free-type notes. The lines will extend according to the length of the text.
352
EMR NEXT – User Manual
«◄○►»
Exhibit 09.111
353
EMR NEXT – User Manual
«◄○►»
Exhibit 09.112
354
EMR NEXT – User Manual
«◄○►»
09.03.01.03 – Block with Multiple Free Text Fields (Extensible
Rows)
When you click the third radio button in the “User Definable Blocks” section of the “Add
Blocks” window (Exhibit 09.106), and press the “Continue” Button, the following “Add”
window opens:
Exhibit 09.113
The difference in this and the previous block is that in this block, on the actual form, if
you want to add multiple lines for any field, they can be added and deleted. In the
previous form, each field had only one line, so limited writing space.
Write the name of the block in the white field on the top.
355
EMR NEXT – User Manual
Back
«◄○►»
Add as many rows as required by pressing the black down-arrow under the first two
fields. If you have added extra fields, they can be deleted by clicking the trash can icon
at the end of the respective field.
Now write the names of the fields in the white space at the beginning of each field. For
example, we created five fields, and gave them the names First Field, Second Field, Third
Field, Fourth Field and Fifth Field, as shown in Exhibit 09.114.
If you want this block to initially appear in opened state on charts, keep the checkbox
checked. If you want it to appear initially as de-activated, uncheck the checkbox.
Click Ok. The “Add” window will close, and the block will be created on the template.
Save the changes.
Now when you open a new chart, the block will appear on the Form as shown in Exhibit
09.115 (for simplicity and uniformity, we have opened the new block as the first block
on the chart. It is named Third Block)
Please note on the form in Exhibit 09.115 that:
Two additional full length fields also appear at the end of the block, for any freetype notes. The lines will extend according to the length of the text.
There is a black down arrow “Add Line” icon below each field to add lines. There
is also a cross shaped “Delete Line” icon at the end of each line, to delete line.
356
EMR NEXT – User Manual
«◄○►»
Exhibit 09.114
Exhibit 09.115
357
EMR NEXT – User Manual
«◄○►»
09.03.01.04 – Block with Single Dropdown
Back
When you click the fourth radio button in the “User Definable Blocks” section of the
“Add Blocks” window (Exhibit 09.106), and press the “Continue” Button, the following
“Add” window opens:
Exhibit 09.116
As the name suggests, this block will have a single field with a dropdown list.
Write the name of the block (which is also the prompt of the field) in the white field on
the left side.
Add as many rows as required for values in the dropdown list by pressing the black
down-arrow under the first two rows. If you have added extra rows, they can be deleted
by clicking the trash can icon at the end of the respective row.
358
EMR NEXT – User Manual
«◄○►»
Now write the values of the dropdown list in the fields. For example, we created five
fields, and gave them the names First Option, Second Option, Third Option, Fourth
Option and Fifth Option, as shown in Exhibit 09.117.
If you want this block to initially appear in opened state on charts, keep the checkbox
checked. If you want it to appear initially as de-activated, uncheck the checkbox.
Click Ok. The “Add” window will close, and the block will be created on the template.
Save the changes.
Now when you open a new chart, the block will appear on the Form as shown in Exhibit
09.118 (for simplicity and uniformity, we have opened the new block as the first block
on the chart. It is named Fourth Block)
Exhibit 09.117
359
EMR NEXT – User Manual
«◄○►»
Exhibit 09.118
360
EMR NEXT – User Manual
«◄○►»
09.03.01.05 – Block with Multiple Dropdowns
Back
When you click the fifth radio button in the “User Definable Blocks” section of the “Add
Blocks” window (Exhibit 09.106), and press the “Continue” Button, the following “Add”
window opens:
Exhibit 09.119
As the name suggests, this block will have a multiple fields with dropdown lists.
Write the name of the block in the top field.
Add as many fields as required by clicking the black down-arrow under the first field (the
black dropdown arrow on the left). If you have added extra fields, delete them by
clicking the trash can icon at the left of the respective field.
361
EMR NEXT – User Manual
«◄○►»
For each field, add as many rows as required for values in the dropdown list of the field
by pressing the black down-arrow under the first two rows of the respective field. If you
have added extra rows, they can be deleted by clicking the trash can icon at the right of
the respective row.
Write the name of each of the field
Write the values of the dropdown lists of each field in the rows you have made available
for each field. For example, we created two fields, and gave them the names First Field
and Second Field, as shown in Exhibit 09.120. For each field we created three row
values. The values for the first field are First Option, Second Option and Third Option.
For the second field, the values are Fourth Option, Fifth Option, and Sixth Option.
If you want this block to initially appear in opened state on charts, keep the checkbox
checked. If you want it to appear initially as de-activated, uncheck the checkbox.
Click Ok. The “Add” window will close, and the block will be created on the template.
Save the changes.
Now when you open a new chart, the block will appear on the Form as shown in Exhibit
09.121 (for simplicity and uniformity, we have opened the new block as the first block
on the chart. It is named Fifth Block). In Exhibit 09.122, the dropdown list on the Second
Field is open. Please note that on the form, the field values will arrange alphabetically.
Please note that two additional full length fields also appear at the end of the block, for
any free-type notes. The lines will extend according to the length of the text.
362
EMR NEXT – User Manual
«◄○►»
Exhibit 09.120
363
EMR NEXT – User Manual
«◄○►»
Exhibit 09.121
Exhibit 09.122
364
EMR NEXT – User Manual
«◄○►»
09.03.01.06 – Block with Multiple Pick-lists
Back
When you click the sixth radio button in the “User Definable Blocks” section of the “Add
Blocks” window (Exhibit 09.106), and press the “Continue” Button, the following “Add”
window opens:
Exhibit 09.123
As the name suggests, this block will have a multiple fields with Pick Lists (Field
Windows). The advantage of this block over the previous block is that in the previous
block, only one value can be selected for each field on the History Form. In this block,
multiple values can be selected for each field.
Write the name of the block in the top field.
365
EMR NEXT – User Manual
«◄○►»
Add as many fields as required by clicking the black down-arrow under the first field (the
black dropdown arrow on the left). If you have added extra fields, delete them by
clicking the trash can icon at the left of the respective field.
For each field, add as many rows as required for values in the pick-list for the field by
pressing the black down-arrow under the first two rows of the respective field. If you
have added extra rows, they can be deleted by clicking the trash can icon at the right of
the respective row.
Write the name of each of the field
Write the values of the pick-lists of each field in the rows you have made available for
each field. For example, we created two fields, and gave them the names First Field and
Second Field, as shown in Exhibit 09.124. For each field we created three row values.
The values for the first field are First Option, Second Option and Third Option. For the
second field, the values are Fourth Option, Fifth Option, and Sixth Option.
If you want this block to initially appear in opened state on charts, keep the checkbox
checked. If you want it to appear initially as de-activated, uncheck the checkbox.
Click Ok. The “Add” window will close, and the block will be created on the template.
Save the changes.
Now when you open a new chart, the block will appear on the Form as shown in Exhibit
09.125 (for simplicity and uniformity, we have opened the new block as the first block
on the chart. It is named Sixth Block). In Exhibit 09.122, the pick-list on the First Field is
open. Please note that on the form, the field values will arrange alphabetically.
Please note that two additional full length fields also appear at the end of the block, for
any free-type notes. The lines will extend according to the length of the text.
366
EMR NEXT – User Manual
«◄○►»
Exhibit 09.124
367
EMR NEXT – User Manual
«◄○►»
Exhibit 09.125
Exhibit 09.126
368
EMR NEXT – User Manual
«◄○►»
09.03.01.07 – Block with Large Free Text Area
Back
When you click the seventh radio button in the “User Definable Blocks” section of the
“Add Blocks” window (Exhibit 09.106), and press the “Continue” Button, the following
“Add” window opens:
Exhibit 09.127
As the name suggests, this block will have a single field with multiple rows.
Write the name of the block in the white field at the top.
If you want this block to initially appear in opened state on charts, keep the checkbox
checked. If you want it to appear initially as de-activated, uncheck the checkbox.
Click Ok. The “Add” window will close, and the block will be created on the template.
Save the changes.
Now when you open a new chart, the block will appear on the Form as shown in Exhibit
09.128 (for simplicity and uniformity, we have opened the new block as the first block
on the chart. It is named Seventh Block).
Please note that on the History Form, the lines in the block will extend according to
requirement.
369
EMR NEXT – User Manual
«◄○►»
Exhibit 09.128
Exhibit 09.129
370
EMR NEXT – User Manual
«◄○►»
09.03.01.08 – Block with Multiple +/- Buttons
Back
When you click the eighth radio button in the “User Definable Blocks” section of the
“Add Blocks” window (Exhibit 09.106), and press the “Continue” Button, the following
“Add” window opens:
Exhibit 09.130
This block will have a single field with multiple factors. The factors can be marked
positive or negative by clicking the appropriate value of the respective + or – button for
the factor, on the History Form.
Write the name of the block in the white field at the top (this will also be the name of
the field).
371
EMR NEXT – User Manual
«◄○►»
Add as many factors as required, by clicking the black down-arrow under the second
row. If you create more rows than required, you can delete them by clicking the trash
can icon at the end of the respective row.
Write the name of the factor in each of the row created.
The default value of the factors shows as negative (-). If you want the default value to
show as positive (+), click the negative sign of the respective factor. It will turn positive.
We added four rows for four factors, naming them First Factor, Second Factor, Third
Factor, and Fourth Factor, and kept the initial values as negative (-), as shown in Exhibit
09.131.
If you want this block to initially appear in opened state on charts, keep the checkbox
checked. If you want it to appear initially as de-activated, uncheck the checkbox.
Click Ok. The “Add” window will close, and the block will be created on the template.
Save the changes.
Now when you open a new chart, the block will appear on the Form as shown in Exhibit
09.132 (for simplicity and uniformity, we have opened the new block as the first block
on the chart. It is named Eighth Block). All the factors are appearing on the form, with
their initial values showing as negative (-).
372
EMR NEXT – User Manual
«◄○►»
Exhibit 09.131
Exhibit 09.132
373
EMR NEXT – User Manual
«◄○►»
09.03.01.09 – Block with Multiple Checkboxes
Back
When you click the ninth radio button in the “User Definable Blocks” section of the “Add
Blocks” window (Exhibit 09.106), and press the “Continue” Button, the following “Add”
window opens:
Exhibit 09.133
This block is quite similar to the previous one, with the exception that instead of +/toggle buttons, the values will be in shape of checkboxes. The block will have a single
field with multiple checkboxes.
Write the name of the block in the white field at the top (this will also be the name of
the field).
374
EMR NEXT – User Manual
«◄○►»
Add as many checkboxes as required, by clicking the black down-arrow under the
second row. If you create more rows than required, you can delete them by clicking the
trash can icon at the end of the respective row.
Write the descriptions of the checkboxes in the respective rows created.
The default value of the checkboxes is unchecked. If you want the default value to
appear as checked, check the checkboxes.
We added four rows for four checkboxes, naming them the First Checkbox Description,
Second Checkbox Description, Third Checkbox Description, and Fourth Checkbox
Description, and kept them initially unchecked, as shown in Exhibit 09.134.
If you want this block to initially appear in opened state on charts, keep the checkbox
checked. If you want it to appear initially as de-activated, uncheck the checkbox.
Click Ok. The “Add” window will close, and the block will be created on the template.
Save the changes.
Now when you open a new chart, the block will appear on the Form as shown in Exhibit
09.135 (for simplicity and uniformity, we have opened the new block as the first block
on the chart. It is named Ninth Block). All the checkboxes are appearing on the form,
with their initial values being Unchecked.
375
EMR NEXT – User Manual
«◄○►»
Exhibit 09.134
Exhibit 09.135
376
EMR NEXT – User Manual
«◄○►»
09.03.02 – Editing the Past Medical History Block
Back
When you click the Edit-Template-Block Icon of the Past Medical History Block, a small
three button window opens, as shown in Exhibit 09.136. The buttons include ‘Cut’, ‘Edit’
and ‘Delete’.
Exhibit 09.136
Cut
If you wish to change the location of this block on the form / template, click the cut
button. The blue boundary around the block will turn red, indicating that block is ready
to be shifted. Now click the yellow Add-New-Block Icon of the location where you want
to relocate the block. A small two button window opens, with the ‘Paste’ and ‘Add’
buttons. Click the ‘Paste’ button. The block will relocate to this position.
Delete
If you wish to delete the block altogether, click the ‘Delete’ button. The block will
remove from the template. Section 09.03.01 shows how to restore the block.
Edit
When you click the ‘Edit’ button, the following ‘Edit’ window opens:
377
EMR NEXT – User Manual
«◄○►»
Exhibit 09.137
The window shows you how many entries you have in the Pick List for this block, and
how you could manage the list.
The only editing possible for this block is to either open it in activated state on a new
chart, or in de-activated state. To open it activated on new charts, keep the checkbox
marked. To open it de-activated, uncheck the checkbox, and click the OK button. Save
the changes.
378
EMR NEXT – User Manual
«◄○►»
09.03.03 – Editing the Past Surgical History Block
Back
When you click the Edit-Template-Block Icon of the Past Surgical History Block, a small
three button window opens, as shown in Exhibit 09.138. The buttons include ‘Cut’, ‘Edit’
and ‘Delete’.
Exhibit 09.138
Cut
If you wish to change the location of this block on the form / template, click the cut
button. The blue boundary around the block will turn red, indicating that block is ready
to be shifted. Now click the yellow Add-New-Block Icon of the location where you want
to relocate the block. A small two button window opens, with the ‘Paste’ and ‘Add’
buttons. Click the ‘Paste’ button.. The block will relocate to this position.
Delete
If you wish to delete the block altogether, click the ‘Delete’ button. The block will
remove from the template. Section 09.03.01 shows how to restore the block.
Edit
When you click the ‘Edit’ button, the following ‘Edit’ window opens:
379
EMR NEXT – User Manual
«◄○►»
Exhibit 09.139
The window shows you how many entries you have in the Pick List for this block, and
how you could manage the list.
The only editing possible for this block is to either open it in activated state on a new
chart, or in de-activated state. To open it activated on new charts, keep the checkbox
marked. To open it de-activated, uncheck the checkbox, and click the OK button. Save
the changes.
380
EMR NEXT – User Manual
«◄○►»
09.03.04 – Editing the Known Allergies Block
Back
When you click the Edit-Template-Block Icon of the Known Allergies Block, a small three
button window opens, as shown in Exhibit 09.140. The buttons include ‘Cut’, ‘Edit’ and
‘Delete’.
Exhibit 09.140
Cut
If you wish to change the location of this block on the form / template, click the cut
button. The blue boundary around the block will turn red, indicating that block is ready
to be shifted. Now click the yellow Add-New-Block Icon of the location where you want
to relocate the block. A small two button window opens, with the ‘Paste’ and ‘Add’
buttons. Click the ‘Paste’ button. The block will relocate to this position.
Delete
The ‘Delete’ button is in white color, indicating that the block cannot be deleted
altogether from the template.
Edit
When you click the ‘Edit’ button, the following ‘Edit’ window opens:
381
EMR NEXT – User Manual
«◄○►»
Exhibit 09.141
The window shows you how many entries you have in the Pick List for this block, and
how you could manage the list.
The only editing possible for this block is to either open it in activated state on a new
chart, or in de-activated state. To open it activated on new charts, keep the checkbox
marked. To open it de-activated, uncheck the checkbox, and click the OK button. Save
the changes.
382
EMR NEXT – User Manual
«◄○►»
09.03.05 – Editing the Health Maintenance Block
Back
When you click the Edit-Template-Block Icon of the Health Maintenance Block, a small
three button window opens, as shown in Exhibit 09.142. The buttons include ‘Cut’, ‘Edit’
and ‘Delete’.
Exhibit 09.142
Cut
If you wish to change the location of this block on the form / template, click the cut
button. The blue boundary around the block will turn red, indicating that block is ready
to be shifted. Now click the yellow Add-New-Block Icon of the location where you want
to relocate the block. A small two button window opens, with the ‘Paste’ and ‘Add’
buttons. Click the ‘Paste’ button. The block will relocate to this position.
Delete
The ‘Delete’ button is in white color, indicating that the block cannot be deleted
altogether from the template.
Edit
When you click the ‘Edit’ button, the following ‘Edit’ window opens:
383
EMR NEXT – User Manual
«◄○►»
Exhibit 09.143
The window shows the six Health Maintenance elements included in the block. If you
want to remove any of these elements from the template, uncheck the corresponding
checkbox. The element will be removed from the block on the template and the form.
If you want to add elements to the list, add a row by clicking the black down-arrow
below the sixth element. A new row will be added, as shown in Exhibit 09.144. Write
the name of the element in the description field. If it is a vaccine, write the CVX code in
the next field. (A system differentiates between a vaccine and a procedure solely on the
basis of the CVX code. If CVX code is given, it is treated as a vaccine. If CVX code is not
given, it is treated as a procedure). The set of fields created for a vaccine are shown in
Exhibit 09.142. The set of fields created for a procedure are shown in Exhibit 09.145.
To remove a user-created row from the block, click the trash can icon of the
corresponding user-created row.
384
EMR NEXT – User Manual
«◄○►»
To open the block in an activated state on a new chart, keep the ‘Initially display in
opened state’ checkbox checked. To open it in de-activated state, uncheck the
checkbox.
Click the OK button. Save the changes.
Exhibit 09.144
Exhibit 09.145
385
EMR NEXT – User Manual
«◄○►»
09.03.06 – Editing the Family History Block
Back
When you click the Edit-Template-Block Icon of the Family History Block, a small three
button window opens, as shown in Exhibit 09.146. The buttons include ‘Cut’, ‘Edit’ and
‘Delete’.
Exhibit 09.146
Cut
If you wish to change the location of this block on the form / template, click the cut
button. The blue boundary around the block will turn red, indicating that block is ready
to be shifted. Now click the yellow Add-New-Block Icon of the location where you want
to relocate the block. A small two button window opens, with the ‘Paste’ and ‘Add’
buttons. Click the ‘Paste’ button. The block will relocate to this position.
Delete
If you wish to delete the block altogether, click the ‘Delete’ button. The block will
remove from the template. Section 09.03.01 shows how to restore the block.
Edit
When you click the ‘Edit’ button, the ‘Edit’ Window shown in Exhibit 09.147 opens,
showing the fourteen default elements. The exhibit is showing the first element, but
there is a scroll-bar on the right, which becomes visible when you take the mouse to it
right inner edge of the window. Scroll down for the remaining thirteen elements.
386
EMR NEXT – User Manual
«◄○►»
Exhibit 09.147
There is two-tiered editing on this window. In the first tier, you can either add or
remove elements from the list. In the second tier, you can add or remove values for any
of the element.
First Tier Editing
To remove any of the fourteen elements in the Family History Block, uncheck the
checkbox to the left of the element. The element will remove, along with its values.
To add new elements in the Family History Block, scroll down to the bottom of the
window, as shown in Exhibit 09.150. Click the black down-arrow icon at the left of the
window to create new fields, as shown in the Exhibit. Write the name of the elements in
the fields. You can create as many elements as required. After creating an element, add
rows for values of the element, by clicking the inner black down-arrow icon of the
respective element. Add as many rows as required, and specify their values. If extra
rows have been created, delete them by clicking the corresponding trash can icon.
387
EMR NEXT – User Manual
«◄○►»
The ‘Phrase for Normal Finding, if any’ field next to the element name is for specifying a
phrase, like for example, ‘No Family History’, which will appear in the form whenever
the findings for this element are normal. To specify the phrase, click the square icon at
the end of the field. The field it will turn blue, as shown in Exhibit 09.148, ready for
inscription.
Second Tier Editing
For each of the fourteen elements, below the Normal Finding Phrase is a list of
Abnormal Findings. These are the relationships in which the disease prevails/prevailed.
If you wish to remove any of these relationships from the list, uncheck the
corresponding checkbox, and the relationship will remove from the list of this element.
If you wish to add more relationships, click the black down-arrow under the last row,
and more rows will be added, as shown in Exhibit 09.149. Now specify the name of the
relationship.
To remove a row created by you, click the corresponding trash can icon.
Please note that changes made to one element are not automatically applicable to all
elements. Values of each element have to be changed individually.
Exhibit 09.148
388
EMR NEXT – User Manual
«◄○►»
Exhibit 09.149
Exhibit 09.150
389
EMR NEXT – User Manual
«◄○►»
To open the block in an activated state on a new chart, keep the ‘Initially display in
opened state’ checkbox checked. To open it in de-activated state, uncheck the
checkbox.
Click the OK button. Save the changes.
390
EMR NEXT – User Manual
«◄○►»
09.03.07 – Editing the Social History Block
Back
When you click the Edit-Template-Block Icon of the Social History Block, a small three
button window opens, as shown in Exhibit 09.151. The buttons include ‘Cut’, ‘Edit’ and
‘Delete’.
Exhibit 09.151
Cut
If you wish to change the location of this block on the form / template, click the cut
button. The blue boundary around the block will turn red, indicating that block is ready
to be shifted. Now click the yellow Add-New-Block Icon of the location where you want
to relocate the block. A small two button window opens, with the ‘Paste’ and ‘Add’
buttons. Click the ‘Paste’ button. The block will relocate to this position.
Delete
If you wish to delete the block altogether, click the ‘Delete’ button. The block will
remove from the template. Section 09.03.01 shows how to restore the block.
Edit
When you click the ‘Edit’ button, the ‘Edit’ Window shown in Exhibit 09.152 opens,
showing the ten default elements. The exhibit is showing the first two elements, but
there is a scroll-bar on the right, which becomes visible when you take the mouse to it
right inner edge of the window. Scroll down for the remaining eight elements.
391
EMR NEXT – User Manual
«◄○►»
Exhibit 09.152
There is two-tiered editing on this window. In the first tier, you can either add or
remove elements from the list. In the second tier, you can add or remove values for any
of the element.
First Tier Editing
To remove any of the ten elements in the Social History Block, uncheck the checkbox to
the left of the element. The element will remove, along with its values.
To add new elements in the Social History Block, scroll down to the bottom of the
window, as shown in Exhibit 09.155. Click the black down-arrow icon at the left of the
window to create new fields, as shown in the Exhibit. Write the name of the elements in
the fields. You can create as many elements as required. After creating an element, add
rows for values of the element, by clicking the inner black down-arrow icon of the
respective element. Add as many rows as required, and specify their values. If extra
rows have been created, delete them by clicking the corresponding trash can icon.
392
EMR NEXT – User Manual
«◄○►»
The ‘Phrase for Normal Finding, if any’ field next to the element name is for specifying a
phrase, like for example, ‘Trait Not Found’, which will appear in the form whenever the
findings for this element are normal. To specify the phrase, click the square icon at the
end of the field. The field it will turn blue, as shown in Exhibit 09.153, ready for
inscription.
Second Tier Editing
For each of the ten elements, below the Normal Finding Phrase is a list of Abnormal
Findings. These are the intensities of misuse of the social element. If you wish to remove
any of these intensities from the list, uncheck the corresponding checkbox, and the
intensity will remove from the list of this element. If you wish to add more intensities (or
any other applicable phrases), click the black down-arrow under the last row, and more
rows will be added, as shown in Exhibit 09.154. Now specify the degree of intensity.
To remove a row created by you, click the corresponding trash can icon.
Please note that changes made to one element are not automatically applicable to all
elements. Values of each element have to be changed individually.
Exhibit 09.153
393
EMR NEXT – User Manual
«◄○►»
Exhibit 09.154
Exhibit 09.155
394
EMR NEXT – User Manual
«◄○►»
To open the block in an activated state on a new chart, keep the ‘Initially display in
opened state’ checkbox checked. To open it in de-activated state, uncheck the
checkbox.
Click the OK button. Save the changes.
395
EMR NEXT – User Manual
«◄○►»
09.03.08 – Editing the Master Problem List Block
Back
When you click the Edit-Template-Block Icon of the Master Problem List Block, a small
three button window opens, as shown in Exhibit 09.156. The buttons include ‘Cut’, ‘Edit’
and ‘Delete’.
Exhibit 09.156
Cut
If you wish to change the location of this block on the form / template, click the cut
button. The blue boundary around the block will turn red, indicating that block is ready
to be shifted. Now click the yellow Add-New-Block Icon of the location where you want
to relocate the block. A small two button window opens, with the ‘Paste’ and ‘Add’
buttons. Click the ‘Paste’ button. The block will relocate to this position.
Delete
The ‘Delete’ button is in white color, indicating that the block cannot be deleted
altogether from the template.
Edit
When you click the ‘Edit’ button, the ‘Edit’ window shown in Exhibit 09.157 opens: Two
editings are possible in this block.
1. The Onset Field in the Master Problem List can initially either appear as a freetext field, or as a date field in which dates are selectable from dropdown lists.
While the character of the field can be changed on specific charts by clicking the
name of the fields, if you wish that the field should initially appear as a free text
field, keep the radio buttons unchanged. If you wish that the field should initially
appear as a date field, change the radio button to the lower value.
396
EMR NEXT – User Manual
«◄○►»
2. To open the block in an activated state on a new chart, keep the ‘Initially display
in opened state’ checkbox checked. To open it in de-activated state, uncheck the
checkbox.
Click the OK button. Save the changes.
Exhibit 09.157
397
EMR NEXT – User Manual
«◄○►»
09.03.09 – Editing the Master Medication List Block
Back
When you click the Edit-Template-Block Icon of the Master Medication List Block, a
small three button window opens, as shown in Exhibit 09.158. The buttons include ‘Cut’,
‘Edit’ and ‘Delete’.
Exhibit 09.158
Cut
If you wish to change the location of this block on the form / template, click the cut
button. The blue boundary around the block will turn red, indicating that block is ready
to be shifted. Now click the yellow Add-New-Block Icon of the location where you want
to relocate the block. A small two button window opens, with the ‘Paste’ and ‘Add’
buttons. Click the ‘Paste’ button. The block will relocate to this position.
Delete
The ‘Delete’ button is in white color, indicating that the block cannot be deleted
altogether from the template.
Edit
When you click the ‘Edit’ button, the ‘Edit’ window shown in Exhibit 09.159 opens: Two
editings are possible in this block.
1. The Signature Field in the Master Medication List can initially either appear as a
free-text field, or as a combination of four dropdown values of Dosage, Route,
Frequency and Duration. While the character of the field can be changed on
specific charts by clicking the name of the field, if you wish that the field should
initially appear as a free text field, keep the radio buttons unchanged. If you wish
that the field should initially appear as a dropdown combination field, change
the radio button to the lower value.
398
EMR NEXT – User Manual
«◄○►»
2. To open the block in an activated state on a new chart, keep the ‘Initially display
in opened state’ checkbox checked. To open it in de-activated state, uncheck the
checkbox.
Click the OK button. Save the changes.
Exhibit 09.159
399
EMR NEXT – User Manual
«◄○►»
09.04 – Encounter Form Template
Back
When you click the fourth tab on the Customization Home Page (identified as Item 4 on
Exhibit 09.001), the History Form Template opens. The template is shown in Exhibit
09.160.
All the fifteen blocks in the lower portion of the Template are encircled by blue dotted
lines. These lines indicate that the blocks are editable. A blue circular icon is attached to
the upper left corner of each of the encircled blocks. It is the Edit-Template-Block Icon,
on clicking which the Edit Window of the respective block opens. The edit functionality
of each block will be discussed separately.
Before and after each block is a yellow circular icon. This is the Add-New-Block Icon. It
allows you to add a block in the position of the icon. By this mechanism, you can add
blocks virtually anywhere in the template. There is no space limitation, as the template
stretches according to requirement.
Before proceeding further, two important points to be remembered:
3. Changes made to the template must be saved. Unsaved changes will be lost.
Whenever you make a change in the template, a red alert will appear at the top
left corner of the screen, reminding you to save the changes. Save the changes
by clicking the button at the bottom right corner of the screen. Exhibit 09.161
shows both, the alert and the “Save” button.
4. Changes made to the template will be effective only on charts created after the
changes. Previous charts will remain unchanged.
400
EMR NEXT – User Manual
«◄○►»
Exhibit 09.160
401
EMR NEXT – User Manual
«◄○►»
Exhibit 09.161
402
EMR NEXT – User Manual
«◄○►»
09.04.01 – Adding New Blocks to the Encounter Form
Template
Back
When you click any of the yellow icons on the History Form Template, the “Add Blocks”
Window shown in Exhibit 09.162 opens.
Exhibit 09.162
The “Add Blocks” Window has two sections. The first one says “Restore Default Blocks”
and the second says “User Definable Blocks”.
Restore Default Blocks
All the fifteen blocks shown in Exhibit 09.160 can be deleted from the template
altogether. When any of these blocks is deleted, then the system retains the format of
403
EMR NEXT – User Manual
«◄○►»
the deleted block in this section of the window. If you want to recreate the deleted
block, at its original location or any other new location, open this window from the
yellow icon of the desired location, click the radio button of the block you want to
restore, and press the “Continue” button on the window to proceed. To show you how
the mechanism works, we deleted the ‘Vital Signs’ and ‘Chief Complaint / Encounter
Reason’ Blocks from the template. Now the window looks as shown in Exhibit 09.163:
Exhibit 09.163
Only Default Blocks can be restored in this manner. If user created blocks are deleted,
they cannot be restored.
User Definable Blocks
In the second part of the window, there are nine radio buttons. These are the nine
formats in which you can create the new block. But, one block can use only one format.
404
EMR NEXT – User Manual
«◄○►»
09.04.01.01 – Block with Single Free Text Field
Back
When you click the first radio button in the “User Definable Blocks” section of the “Add
Blocks” window (Exhibit 09.162), and press the “Continue” Button, the following “Add”
window opens:
Exhibit 09.164
Write the name of the block (or the prompt of the field) in the white space on the
window.
If you want this block to initially appear in opened state on charts, keep the checkbox
checked. If you want it to appear initially as de-activated, uncheck the checkbox.
If this block is billable, i.e., you recover charges for the entry in this block, then check the
‘Billable Procedure?’ checkbox. The next three fields will activate. Enter the billing code,
description and the amount to be filled in these fields.
Click Ok. The “Add” window will close, and the block will be created on the template.
Save the changes.
Now when you open a new chart, the block will appear as this on the Form (for
simplicity and uniformity, we have opened the new block as the first block on the chart.
It is named First Block).
405
EMR NEXT – User Manual
«◄○►»
Exhibit 09.165
Whenever there is an entry in this block, the Patient Invoice (if Patient Invoice is issued)
and the Super Bill will both include the amount. If the amount is to be recovered
through the Super Bill, then amend the amount in the Patient Invoice to ‘Zero’.
406
EMR NEXT – User Manual
«◄○►»
09.04.01.02 – Block with Multiple Free Text Fields
Back
When you click the second radio button in the “User Definable Blocks” section of the
“Add Blocks” window (Exhibit 09.162), and press the “Continue” Button, the following
“Add” window opens:
Exhibit 09.166
Write the name of the block in the white field on the top.
Add as many rows as required by pressing the black down-arrow under the first two
fields. If you have added extra fields, they can be deleted by clicking the trash can icon
at the end of the respective field.
407
EMR NEXT – User Manual
«◄○►»
Now write the names of the fields in the white space at the beginning of each field. For
example, we created five fields, and gave them the names First Field, Second Field, Third
Field, Fourth Field and Fifth Field, as shown in Exhibit 09.167.
If you want this block to initially appear in opened state on charts, keep the checkbox
checked. If you want it to appear initially as de-activated, uncheck the checkbox.
If this block is billable, i.e., you recover charges for the entry in this block, then check the
‘Billable Procedure?’ checkbox. The next three fields will activate. Enter the billing code,
description and the amount to be filled in these fields.
Click Ok. The “Add” window will close, and the block will be created on the template.
Save the changes.
Now when you open a new chart, the block will appear on the Form as shown in Exhibit
09.168 (for simplicity and uniformity, we have opened the new block as the first block
on the chart. It is named Second Block)
Please note that two additional full length fields also appear at the end of the block, for
any free-type notes. The lines will extend according to the length of the text.
Whenever there is an entry in this block, the Patient Invoice (if Patient Invoice is issued)
and the Super Bill will both include the amount. If the amount is to be recovered
through the Super Bill, then amend the amount in the Patient Invoice to ‘Zero’.
408
EMR NEXT – User Manual
«◄○►»
Exhibit 09.167
Exhibit 09.168
409
EMR NEXT – User Manual
«◄○►»
09.04.01.03 – Block with Multiple Free Text Fields (Extensible
Rows)
When you click the third radio button in the “User Definable Blocks” section of the “Add
Blocks” window (Exhibit 09.162), and press the “Continue” Button, the following “Add”
window opens:
Exhibit 09.169
The difference in this and the previous block is that in this block, on the actual form, if
you want to add multiple lines for any field, they can be added and deleted. In the
previous form, each field had only one line, so limited writing space.
Write the name of the block in the white field on the top.
410
EMR NEXT – User Manual
Back
«◄○►»
Add as many rows as required by pressing the black down-arrow under the first two
fields. If you have added extra fields, they can be deleted by clicking the trash can icon
at the end of the respective field.
Now write the names of the fields in the white space at the beginning of each field. For
example, we created five fields, and gave them the names First Field, Second Field, Third
Field, Fourth Field and Fifth Field, as shown in Exhibit 09.170.
If you want this block to initially appear in opened state on charts, keep the checkbox
checked. If you want it to appear initially as de-activated, uncheck the checkbox.
If this block is billable, i.e., you recover charges for the entry in this block, then check the
‘Billable Procedure?’ checkbox. The next three fields will activate. Enter the billing code,
description and the amount to be filled in these fields.
Click Ok. The “Add” window will close, and the block will be created on the template.
Save the changes.
Now when you open a new chart, the block will appear on the Form as shown in Exhibit
09.171 (for simplicity and uniformity, we have opened the new block as the first block
on the chart. It is named Third Block)
Please note on the form in Exhibit 09.171 that:
Two additional full length fields also appear at the end of the block, for any freetype notes. The lines will extend according to the length of the text.
There is a black down arrow “Add Line” icon below each field to add lines. There
is also a cross shaped “Delete Line” icon at the end of each line, to delete line.
Whenever there is an entry in this block, the Patient Invoice (if Patient Invoice is issued)
and the Super Bill will both include the amount. If the amount is to be recovered
through the Super Bill, then amend the amount in the Patient Invoice to ‘Zero’.
411
EMR NEXT – User Manual
«◄○►»
Exhibit 09.170
Exhibit 09.171
412
EMR NEXT – User Manual
«◄○►»
09.04.01.04 – Block with Single Dropdown
Back
When you click the fourth radio button in the “User Definable Blocks” section of the
“Add Blocks” window (Exhibit 09.162), and press the “Continue” Button, the following
“Add” window opens:
Exhibit 09.172
As the name suggests, this block will have a single field with a dropdown list.
Write the name of the block (which is also the prompt of the field) in the white field on
the left side.
Add as many rows as required for values in the dropdown list by pressing the black
down-arrow under the first two rows. If you have added extra rows, they can be deleted
by clicking the trash can icon at the end of the respective row.
413
EMR NEXT – User Manual
«◄○►»
Now write the values of the dropdown list in the fields. For example, we created five
fields, and gave them the names First Option, Second Option, Third Option, Fourth
Option and Fifth Option, as shown in Exhibit 09.173.
If you want this block to initially appear in opened state on charts, keep the checkbox
checked. If you want it to appear initially as de-activated, uncheck the checkbox.
If this block is billable, i.e., you recover charges for the entry in this block, then check the
‘Billable Procedure?’ checkbox. The next three fields will activate. Enter the billing code,
description and the amount to be filled in these fields.
Click Ok. The “Add” window will close, and the block will be created on the template.
Save the changes.
Now when you open a new chart, the block will appear on the Form as shown in Exhibit
09.174 (for simplicity and uniformity, we have opened the new block as the first block
on the chart. It is named Fourth Block)
Whenever there is an entry in this block, the Patient Invoice (if Patient Invoice is issued)
and the Super Bill will both include the amount. If the amount is to be recovered
through the Super Bill, then amend the amount in the Patient Invoice to ‘Zero’.
414
EMR NEXT – User Manual
«◄○►»
Exhibit 09.173
Exhibit 09.174
415
EMR NEXT – User Manual
«◄○►»
09.04.01.05 – Block with Multiple Dropdowns
Back
When you click the fifth radio button in the “User Definable Blocks” section of the “Add
Blocks” window (Exhibit 09.162), and press the “Continue” Button, the following “Add”
window opens:
Exhibit 09.175
As the name suggests, this block will have a multiple fields with dropdown lists.
Write the name of the block in the top field.
416
EMR NEXT – User Manual
«◄○►»
Add as many fields as required by clicking the black down-arrow under the first field (the
black dropdown arrow on the left). If you have added extra fields, delete them by
clicking the trash can icon at the left of the respective field.
For each field, add as many rows as required for values in the dropdown list of the field
by pressing the black down-arrow under the first two rows of the respective field. If you
have added extra rows, they can be deleted by clicking the trash can icon at the right of
the respective row.
Write the name of each of the field
Write the values of the dropdown lists of each field in the rows you have made available
for each field. For example, we created two fields, and gave them the names First Field
and Second Field, as shown in Exhibit 09.176. For each field we created three row
values. The values for the first field are First Option, Second Option and Third Option.
For the second field, the values are Fourth Option, Fifth Option, and Sixth Option.
If you want this block to initially appear in opened state on charts, keep the checkbox
checked. If you want it to appear initially as de-activated, uncheck the checkbox.
If this block is billable, i.e., you recover charges for the entry in this block, then check the
‘Billable Procedure?’ checkbox. The next three fields will activate. Enter the billing code,
description and the amount to be filled in these fields.
Click Ok. The “Add” window will close, and the block will be created on the template.
Save the changes.
Now when you open a new chart, the block will appear on the Form as shown in Exhibit
09.177 (for simplicity and uniformity, we have opened the new block as the first block
on the chart. It is named Fifth Block). In Exhibit 09.178, the dropdown list on the Second
Field is open. Please note that on the form, the field values will arrange alphabetically.
Please note that two additional full length fields also appear at the end of the block, for
any free-type notes. The lines will extend according to the length of the text.
Whenever there is an entry in this block, the Patient Invoice (if Patient Invoice is issued)
and the Super Bill will both include the amount. If the amount is to be recovered
through the Super Bill, then amend the amount in the Patient Invoice to ‘Zero’.
417
EMR NEXT – User Manual
«◄○►»
Exhibit 09.176
Exhibit 09.177
418
EMR NEXT – User Manual
«◄○►»
Exhibit 09.178
419
EMR NEXT – User Manual
«◄○►»
09.04.01.06 – Block with Multiple Pick-lists
Back
When you click the sixth radio button in the “User Definable Blocks” section of the “Add
Blocks” window (Exhibit 09.162), and press the “Continue” Button, the following “Add”
window opens:
Exhibit 09.179
As the name suggests, this block will have a multiple fields with Pick Lists (Field
Windows). The advantage of this block over the previous block is that in the previous
block, only one value can be selected for each field on the History Form. In this block,
multiple values can be selected for each field.
Write the name of the block in the top field.
420
EMR NEXT – User Manual
«◄○►»
Add as many fields as required by clicking the black down-arrow under the first field (the
black dropdown arrow on the left). If you have added extra fields, delete them by
clicking the trash can icon at the left of the respective field.
For each field, add as many rows as required for values in the pick-list for the field by
pressing the black down-arrow under the first two rows of the respective field. If you
have added extra rows, they can be deleted by clicking the trash can icon at the right of
the respective row.
Write the name of each of the field
Write the values of the pick-lists of each field in the rows you have made available for
each field. For example, we created two fields, and gave them the names First Field and
Second Field, as shown in Exhibit 09.180. For each field we created three row values.
The values for the first field are First Option, Second Option and Third Option. For the
second field, the values are Fourth Option, Fifth Option, and Sixth Option.
If you want this block to initially appear in opened state on charts, keep the checkbox
checked. If you want it to appear initially as de-activated, uncheck the checkbox.
If this block is billable, i.e., you recover charges for the entry in this block, then check the
‘Billable Procedure?’ checkbox. The next three fields will activate. Enter the billing code,
description and the amount to be filled in these fields.
Click Ok. The “Add” window will close, and the block will be created on the template.
Save the changes.
Now when you open a new chart, the block will appear on the Form as shown in Exhibit
09.181 (for simplicity and uniformity, we have opened the new block as the first block
on the chart. It is named Sixth Block). In Exhibit 09.182, the pick-list on the First Field is
open. Please note that on the form, the field values will arrange alphabetically.
Please note that two additional full length fields also appear at the end of the block, for
any free-type notes. The lines will extend according to the length of the text.
Whenever there is an entry in this block, the Patient Invoice (if Patient Invoice is issued)
and the Super Bill will both include the amount. If the amount is to be recovered
through the Super Bill, then amend the amount in the Patient Invoice to ‘Zero’.
421
EMR NEXT – User Manual
«◄○►»
Exhibit 09.180
422
EMR NEXT – User Manual
«◄○►»
Exhibit 09.181
Exhibit 09.182
423
EMR NEXT – User Manual
«◄○►»
09.04.01.07 – Block with Large Free Text Area
Back
When you click the seventh radio button in the “User Definable Blocks” section of the
“Add Blocks” window (Exhibit 09.162), and press the “Continue” Button, the following
“Add” window opens:
Exhibit 09.183
As the name suggests, this block will have a single field with multiple rows.
Write the name of the block in the white field at the top.
If you want this block to initially appear in opened state on charts, keep the checkbox
checked. If you want it to appear initially as de-activated, uncheck the checkbox.
If this block is billable, i.e., you recover charges for the entry in this block, then check the
‘Billable Procedure?’ checkbox. The next three fields will activate. Enter the billing code,
description and the amount to be filled in these fields.
Click Ok. The “Add” window will close, and the block will be created on the template.
Save the changes.
Now when you open a new chart, the block will appear on the Form as shown in Exhibit
09.184 (for simplicity and uniformity, we have opened the new block as the first block
on the chart. It is named Seventh Block).
424
EMR NEXT – User Manual
«◄○►»
Please note that on the History Form, the lines in the block will extend according to
requirement.
Whenever there is an entry in this block, the Patient Invoice (if Patient Invoice is issued)
and the Super Bill will both include the amount. If the amount is to be recovered
through the Super Bill, then amend the amount in the Patient Invoice to ‘Zero’.
Exhibit 09.184
425
EMR NEXT – User Manual
«◄○►»
09.04.01.08 – Block with Multiple +/- Buttons
Back
When you click the eighth radio button in the “User Definable Blocks” section of the
“Add Blocks” window (Exhibit 09.162), and press the “Continue” Button, the following
“Add” window opens:
Exhibit 09.185
This block will have a single field with multiple factors. The factors can be marked
positive or negative by clicking the appropriate value of the respective + or – button for
the factor, on the History Form.
Write the name of the block in the white field at the top (this will also be the name of
the field).
426
EMR NEXT – User Manual
«◄○►»
Add as many factors as required, by clicking the black down-arrow under the second
row. If you create more rows than required, you can delete them by clicking the trash
can icon at the end of the respective row.
Write the name of the factor in each of the row created.
The default value of the factors shows as negative (-). If you want the default value to
show as positive (+), click the negative sign of the respective factor. It will turn positive.
We added four rows for four factors, naming them First Factor, Second Factor, Third
Factor, and Fourth Factor, and kept the initial values as negative (-), as shown in Exhibit
09.186.
If you want this block to initially appear in opened state on charts, keep the checkbox
checked. If you want it to appear initially as de-activated, uncheck the checkbox.
If this block is billable, i.e., you recover charges for the entry in this block, then check the
‘Billable Procedure?’ checkbox. The next three fields will activate. Enter the billing code,
description and the amount to be filled in these fields.
Click Ok. The “Add” window will close, and the block will be created on the template.
Save the changes.
Now when you open a new chart, the block will appear on the Form as shown in Exhibit
09.187 (for simplicity and uniformity, we have opened the new block as the first block
on the chart. It is named Eighth Block). All the factors are appearing on the form, with
their initial values showing as negative (-).
Whenever there is an entry in this block, the Patient Invoice (if Patient Invoice is issued)
and the Super Bill will both include the amount. If the amount is to be recovered
through the Super Bill, then amend the amount in the Patient Invoice to ‘Zero’.
427
EMR NEXT – User Manual
«◄○►»
Exhibit 09.186
Exhibit 09.187
428
EMR NEXT – User Manual
«◄○►»
09.04.01.09 – Block with Multiple Checkboxes
Back
When you click the ninth radio button in the “User Definable Blocks” section of the “Add
Blocks” window (Exhibit 09.162), and press the “Continue” Button, the following “Add”
window opens:
Exhibit 09.188
This block is quite similar to the previous one, with the exception that instead of +/toggle buttons, the values will be in shape of checkboxes. The block will have a single
field with multiple checkboxes.
Write the name of the block in the white field at the top (this will also be the name of
the field).
429
EMR NEXT – User Manual
«◄○►»
Add as many checkboxes as required, by clicking the black down-arrow under the
second row. If you create more rows than required, you can delete them by clicking the
trash can icon at the end of the respective row.
Write the descriptions of the checkboxes in the respective rows created.
The default value of the checkboxes is unchecked. If you want the default value to
appear as checked, check the checkboxes.
We added four rows for four checkboxes, naming them First Checkbox Description,
Second Checkbox Description, Third Checkbox Description, and Fourth Checkbox
Description, and kept them initially unchecked, as shown in Exhibit 09.189.
If you want this block to initially appear in opened state on charts, keep the checkbox
checked. If you want it to appear initially as de-activated, uncheck the checkbox.
If this block is billable, i.e., you recover charges for the entry in this block, then check the
‘Billable Procedure?’ checkbox. The next three fields will activate. Enter the billing code,
description and the amount to be filled in these fields.
Click Ok. The “Add” window will close, and the block will be created on the template.
Save the changes.
Now when you open a new chart, the block will appear on the Form as shown in Exhibit
09.190 (for simplicity and uniformity, we have opened the new block as the first block
on the chart. It is named Ninth Block). All the checkboxes are appearing on the form,
with their initial values being Unchecked.
Whenever there is an entry in this block, the Patient Invoice (if Patient Invoice is issued)
and the Super Bill will both include the amount. If the amount is to be recovered
through the Super Bill, then amend the amount in the Patient Invoice to ‘Zero’.
430
EMR NEXT – User Manual
«◄○►»
Exhibit 09.189
Exhibit 09.190
431
EMR NEXT – User Manual
«◄○►»
09.04.02 – Editing the Encounter Statistics Block
Back
When you click the Edit-Template-Block Icon of the Encounter Statistics Block, a small
three button window opens, as shown in Exhibit 09.191. The buttons include ‘Cut’, ‘Edit’
and ‘Delete’.
Exhibit 09.191
Cut
If you wish to change the location of this block on the form / template, click the cut
button. The blue boundary around the block will turn red, indicating that block is ready
to be shifted. Now click the yellow Add-New-Block Icon of the location where you want
to relocate the block. A small two button window opens, with the ‘Paste’ and ‘Add’
buttons. Click the ‘Paste’ button. The block will relocate to this position.
Delete
If you wish to delete the block altogether, click the ‘Delete’ button. The block will
remove from the template. Section 09.04.01 shows how to restore the block.
Edit
When you click the ‘Edit’ button, the following ‘Edit’ window opens:
432
EMR NEXT – User Manual
«◄○►»
Exhibit 09.192
The only editing possible for this block is to either enable the ‘Referred by’ field only on
those type of Encounters where the Encounter is of a consultation type, or to enable it
on all encounters. Change radio button to second row if you want to enable the
‘Referred by’ field only on consultation type Encounters, and click the OK button. Save
the changes.
If the radio button is changed, then the ‘Referred by’ field on the Encounter Form will
initially appear disabled. When a consultation type encounter is selected in the ‘type’
field, this field will get enabled.
433
EMR NEXT – User Manual
«◄○►»
09.04.03 – Editing the Fee Recovery Block
Back
When you click the Edit-Template-Block Icon of the Fee Recovery Block, a small two
button window opens, as shown in Exhibit 09.193. The buttons include ‘Cut’ and
‘Delete’.
Exhibit 09.193
Cut
If you wish to change the location of this block on the form / template, click the cut
button. The blue boundary around the block will turn red, indicating that block is ready
to be shifted. Now click the yellow Add-New-Block Icon of the location where you want
to relocate the block. A small two button window opens, with the ‘Paste’ and ‘Add’
buttons. Click the ‘Paste’ button. The block will relocate to this position.
Delete
If you wish to delete the block altogether, click the ‘Delete’ button. The block will
remove from the template. Section 09.04.01 shows how to restore the block.
434
EMR NEXT – User Manual
«◄○►»
09.04.04 – Editing the Chief Complaint / Encounter Reason
Block
Back
When you click the Edit-Template-Block Icon of the Chief Complaint / Encounter
Reason Block, a small three button window opens, as shown in Exhibit 09.194. The
buttons include ‘Cut’, ‘Edit’ and ‘Delete’.
Exhibit 09.194
Cut
If you wish to change the location of this block on the form / template, click the cut
button. The blue boundary around the block will turn red, indicating that block is ready
to be shifted. Now click the yellow Add-New-Block Icon of the location where you want
to relocate the block. A small two button window opens, with the ‘Paste’ and ‘Add’
buttons. Click the ‘Paste’ button. The block will relocate to this position.
Delete
If you wish to delete the block altogether, click the ‘Delete’ button. The block will
remove from the template. Section 09.04.01 shows how to restore the block.
Edit
When you click the ‘Edit’ button, the following ‘Edit’ window opens:
435
EMR NEXT – User Manual
«◄○►»
Exhibit 09.195
The window shows you how many entries you have in the Pick List for this block, and
how you could manage the list.
The only editing possible for this block is to either open it in Opened (activated) state on
the Encounter Form, or in de-activated state. To open it activated on new Encounter
Forms, keep the checkbox marked. To open it de-activated, uncheck the checkbox, and
click the OK button. Save the changes.
436
EMR NEXT – User Manual
«◄○►»
09.04.05 – Editing the History of Present Illness Block
Back
When you click the Edit-Template-Block Icon of the History of Present Illness Block, a
small three button window opens, as shown in Exhibit 09.196. The buttons include ‘Cut’,
‘Edit’ and ‘Delete’.
Exhibit 09.196
Cut
If you wish to change the location of this block on the form / template, click the cut
button. The blue boundary around the block will turn red, indicating that block is ready
to be shifted. Now click the yellow Add-New-Block Icon of the location where you want
to relocate the block. A small two button window opens, with the ‘Paste’ and ‘Add’
buttons. Click the ‘Paste’ button. The block will relocate to this position.
Delete
If you wish to delete the block altogether, click the ‘Delete’ button. The block will
remove from the template. Section 09.04.01 shows how to restore the block.
Edit
437
EMR NEXT – User Manual
«◄○►»
When you click the ‘Edit’ button, the following ‘Edit’ window opens:
Exhibit 09.197
There is two-tiered editing on this window. In the first tier, you can either add or
remove elements from the list. In the second tier, you can add or remove values for any
of the element.
First Tier Editing
To remove any of the eight elements in the History of Present Illness Block, uncheck the
checkbox to the left of the element. The element will remove, along with its values.
Second Tier Editing
For each of the eight elements there is a list of values for the element. Nature of the
values is according to the nature of the parent element. If you wish to remove any of
the values from any element, uncheck the corresponding checkbox, and the value will
remove from the list for this element. If you wish to add more values, click the black
438
EMR NEXT – User Manual
«◄○►»
down-arrow under the last row of the concerned element, and more rows will be
added, as shown in Exhibit 09.198. Now specify the values of the newly created rows.
To remove extra rows created by you, click the corresponding trash can icon.
Please note that changes made for one element are not automatically applicable to all
elements. Values of each element have to be changed individually.
You can either open the block in Opened (activated) state on the Encounter Form, or in
de-activated state. To open it activated on new Encounter Forms, keep the checkbox
marked. To open it de-activated, uncheck the checkbox
After making the changes to the block, click the OK button and save the changes.
Exhibit 09.198
439
EMR NEXT – User Manual
«◄○►»
09.04.06 – Editing the Review of Systems Block
Back
When you click the Edit-Template-Block Icon of the Review of Systems Block, a small
three button window opens, as shown in Exhibit 09.199. The buttons include ‘Cut’, ‘Edit’
and ‘Delete’.
Exhibit 09.199
Cut
If you wish to change the location of this block on the form / template, click the cut
button. The blue boundary around the block will turn red, indicating that block is ready
to be shifted. Now click the yellow Add-New-Block Icon of the location where you want
to relocate the block. A small two button window opens, with the ‘Paste’ and ‘Add’
buttons. Click the ‘Paste’ button. The block will relocate to this position.
Delete
If you wish to delete the block altogether, click the ‘Delete’ button. The block will
remove from the template. Section 09.04.01 shows how to restore the block.
Edit
When you click the ‘Edit’ button, the following ‘Edit’ window opens:
440
EMR NEXT – User Manual
«◄○►»
Exhibit 09.200
There is two-tiered editing on this window. In the first tier, you can either add or
remove elements from the list. In the second tier, you can add or remove values for any
of the element.
First Tier Editing
To remove any of the fifteen elements in the Review of Systems Block, uncheck the
checkbox to the left of the element. The element will remove, along with its values.
To add new elements in the Review of Systems Block, scroll down to the bottom of the
window, as shown in Exhibit 09.202. Click the black down-arrow icon at the left of the
window to create new fields, as shown in the Exhibit. Write the name of the elements in
the fields. You can create as many elements as required. After creating an element, add
rows for values of the element, by clicking the inner black down-arrow icon of the
respective element. Add as many rows as required, and specify their values. If extra
rows have been created, delete them by clicking the corresponding trash can icon.
441
EMR NEXT – User Manual
«◄○►»
Second Tier Editing
For each of the fifteen elements there is a list of values for the element. Nature of the
values is according to the nature of the parent element. If you wish to remove any of
the values from any element, uncheck the corresponding checkbox, and the value will
remove from the list for this element. If you wish to add more values, click the black
down-arrow under the last row of the concerned element, and more rows will be
added, as shown in Exhibit 09.201. Now specify the values of the newly created rows.
To remove extra rows created by you, click the corresponding trash can icon.
Please note that changes made for one element are not automatically applicable to all
elements. Values of each element have to be changed individually.
You can either open the block in Opened (activated) state on the Encounter Form, or in
de-activated state. To open it activated on new Encounter Forms, keep the checkbox
marked. To open it de-activated, uncheck the checkbox
After making the changes to the block, click the OK button and save the changes.
442
EMR NEXT – User Manual
«◄○►»
Exhibit 09.201
Exhibit 09.202
443
EMR NEXT – User Manual
«◄○►»
09.04.07 – Editing the Vital Signs Block
Back
When you click the Edit-Template-Block Icon of the Vital Signs Block, a small three
button window opens, as shown in Exhibit 09.203. The buttons include ‘Cut’, ‘Edit’ and
‘Delete’.
Exhibit 09.203
Cut
If you wish to change the location of this block on the form / template, click the cut
button. The blue boundary around the block will turn red, indicating that block is ready
to be shifted. Now click the yellow Add-New-Block Icon of the location where you want
to relocate the block. A small two button window opens, with the ‘Paste’ and ‘Add’
buttons. Click the ‘Paste’ button. The block will relocate to this position.
Delete
If you wish to delete the block altogether, click the ‘Delete’ button. The block will
remove from the template. Section 09.04.01 shows how to restore the block.
Edit
When you click the ‘Edit’ button, the following ‘Edit’ window opens:
444
EMR NEXT – User Manual
«◄○►»
Exhibit 09.204
Two kinds of editing are possible for this block:
1. You can either use British Measurement System for Vital Signs, or Metric
Measurement System. If you use British Measurement System, let the radio
button remain on the first row. If you use the Metric Measurement System,
change the radio button to the lower row.
2. To either open it in Opened (activated) state on the Encounter Form, or in deactivated state. To open it activated on new Encounter Forms, keep the
checkbox marked. To open it de-activated, uncheck the checkbox.
After editing, click the OK button and Save the changes.
445
EMR NEXT – User Manual
«◄○►»
09.04.08 – Editing the Physical Examination Block
Back
When you click the Edit-Template-Block Icon of the Physical Examination Block, a small
three button window opens, as shown in Exhibit 09.205. The buttons include ‘Cut’, ‘Edit’
and ‘Delete’.
Exhibit 09.205
Cut
If you wish to change the location of this block on the form / template, click the cut
button. The blue boundary around the block will turn red, indicating that block is ready
to be shifted. Now click the yellow Add-New-Block Icon of the location where you want
to relocate the block. A small two button window opens, with the ‘Paste’ and ‘Add’
buttons. Click the ‘Paste’ button. The block will relocate to this position.
Delete
If you wish to delete the block altogether, click the ‘Delete’ button. The block will
remove from the template. Section 09.04.01 shows how to restore the block.
446
EMR NEXT – User Manual
«◄○►»
Edit
When you click the ‘Edit’ button, the following ‘Edit’ window opens:
Exhibit 09.206
There is three-tiered editing on this window. In the first tier, you can either add or
remove elements from the list. In the second tier, you can add or remove values for any
of the element.
First Tier Editing
To remove any of the fifteen elements in the Physical Examination Block, uncheck the
checkbox to the left of the element. The element will remove, along with its values.
To add new elements in the Physical Examination Block, scroll down to the bottom of
the window, as shown in Exhibit 09.209. Click the black down-arrow icon at the left of
the window to create new fields, as shown in the Exhibit. Write the name of the
elements in the fields. You can create as many elements as required. After creating an
element, add rows for values of the element, by clicking the inner black down-arrow
icon of the respective element. Add as many rows as required, and specify their values.
If extra rows have been created, delete them by clicking the corresponding trash can
icon.
447
EMR NEXT – User Manual
«◄○►»
If you want the element to show on the Encounter Form in expanded state, click the
radio button called ‘Extended’. Otherwise the element will appear contracted, and will
expand upon clicking.
Second Tier Editing
For each of the fifteen elements there is a list of descriptive values for the element.
Nature of the values is according to the nature of the parent element. If you wish to
remove any of the values from any element, uncheck the corresponding checkbox, and
the value will remove from the list for this element, along with its own tertiary list of
values. If you wish to add more values, click the black down-arrow under the last row of
the concerned element, and more rows will be added, as shown in Exhibit 09.208. Now
specify the values of the newly created rows.
To remove extra rows created by you, click the corresponding trash can icon.
Third Tier Editing
For each of the second tier values, there is a tertiary tier of values, which shows the
abnormal findings of the secondary values. If you want to remove any of the tertiary
values for a secondary value, uncheck the respective checkbox. If you want to add extra
tertiary values for secondary values, click the black down-arrow icon of the respective
set of tertiary values, and extra rows will be created, as shown in Exhibit 09.207. Now
specify the values for these extra rows. If extra rows are created, delete them by clicking
the trash can icon corresponding to the rows.
The first row in the tertiary set of values is for the normal finding phrase. The default
phrase used in the system is ‘No Adverse Finding’. If you want to change the wording of
the phrase, click the square icon to the right of the field. The field will go blank and turn
blue, ready for inscription. Now write the changed wording.
Please note that changes made for one element are not automatically applicable to all
elements. Values of each element have to be changed individually.
You can either open the block in Opened (activated) state on the Encounter Form, or in
de-activated state. To open it activated on new Encounter Forms, keep the checkbox
marked. To open it de-activated, uncheck the checkbox.
After making changes to the block, click the OK button and save the changes.
448
EMR NEXT – User Manual
«◄○►»
Exhibit 09.207
Exhibit 09.208
449
EMR NEXT – User Manual
«◄○►»
Exhibit 09.209
450
EMR NEXT – User Manual
«◄○►»
09.04.09 – Editing the Procedures / Services Block
Back
When you click the Edit-Template-Block Icon of the Procedures / Services Block, a small
three button window opens, as shown in Exhibit 09.210. The buttons include ‘Cut’, ‘Edit’
and ‘Delete’.
Exhibit 09.210
Cut
If you wish to change the location of this block on the form / template, click the cut
button. The blue boundary around the block will turn red, indicating that block is ready
to be shifted. Now click the yellow Add-New-Block Icon of the location where you want
to relocate the block. A small two button window opens, with the ‘Paste’ and ‘Add’
buttons. Click the ‘Paste’ button. The block will relocate to this position.
Delete
If you wish to delete the block altogether, click the ‘Delete’ button. The block will
remove from the template. Section 09.04.01 shows how to restore the block.
Edit
When you click the ‘Edit’ button, the following ‘Edit’ window opens:
451
EMR NEXT – User Manual
«◄○►»
Exhibit 09.211
The window shows you how many entries you have in the Pick List for this block, and
how you could manage the list.
The only editing possible for this block is to either open it in Opened (activated) state on
the Encounter Form, or in de-activated state. To open it activated on new Encounter
Forms, keep the checkbox marked. To open it de-activated, uncheck the checkbox, and
click the OK button. Save the changes.
452
EMR NEXT – User Manual
«◄○►»
09.04.10 – Editing the Assessments / Diagnosis Block
Back
When you click the Edit-Template-Block Icon of the Assessment / Diagnosis Block, a
small three button window opens, as shown in Exhibit 09.212. The buttons include ‘Cut’,
‘Edit’ and ‘Delete’.
Exhibit 09.212
Cut
If you wish to change the location of this block on the form / template, click the cut
button. The blue boundary around the block will turn red, indicating that block is ready
to be shifted. Now click the yellow Add-New-Block Icon of the location where you want
to relocate the block. A small two button window opens, with the ‘Paste’ and ‘Add’
buttons. Click the ‘Paste’ button. The block will relocate to this position.
Delete
If you wish to delete the block altogether, click the ‘Delete’ button. The block will
remove from the template. Section 09.04.01 shows how to restore the block.
Edit
When you click the ‘Edit’ button, the following ‘Edit’ window opens:
453
EMR NEXT – User Manual
«◄○►»
Exhibit 09.213
The window shows you how many entries you have in the Pick List for this block, and
how you could manage the list.
Two kinds of editing are possible for this block:
1. To initially show the Onset field as a free-text field, or to show it as a fixed
format date field, with dates selectable from dropdown lists. To show it as a
free-text field, keep the radio button on the first value. To show it as a fixed
format date field, change the radio button to the second value.
2. To either open it in Opened (activated) state on the Encounter Form, or in deactivated state. To open it activated on new Encounter Forms, keep the
checkbox marked. To open it de-activated, uncheck the checkbox.
After editing, click the OK button and Save the changes.
454
EMR NEXT – User Manual
«◄○►»
09.04.11 – Editing the Orders / Requisitions Block
Back
When you click the Edit-Template-Block Icon of the Orders / Requisitions Block, a small
three button window opens, as shown in Exhibit 09.214. The buttons include ‘Cut’, ‘Edit’
and ‘Delete’.
Exhibit 09.214
Cut
If you wish to change the location of this block on the form / template, click the cut
button. The blue boundary around the block will turn red, indicating that block is ready
to be shifted. Now click the yellow Add-New-Block Icon of the location where you want
to relocate the block. A small two button window opens, with the ‘Paste’ and ‘Add’
buttons. Click the ‘Paste’ button. The block will relocate to this position.
Delete
If you wish to delete the block altogether, click the ‘Delete’ button. The block will
remove from the template. Section 09.04.01 shows how to restore the block.
Edit
When you click the ‘Edit’ button, the following ‘Edit’ window opens:
455
EMR NEXT – User Manual
«◄○►»
Exhibit 09.215
The window shows you how many entries you have in the Pick List for this block, and
how you could manage the list.
The only editing possible for this block is to either open it in Opened (activated) state on
the Encounter Form, or in de-activated state. To open it activated on new Encounter
Forms, keep the checkbox marked. To open it de-activated, uncheck the checkbox, and
click the OK button. Save the changes.
456
EMR NEXT – User Manual
«◄○►»
09.04.12 – Editing the Medications Block
Back
When you click the Edit-Template-Block Icon of the Medications Block, a small three
button window opens, as shown in Exhibit 09.216. The buttons include ‘Cut’, ‘Edit’ and
‘Delete’.
Exhibit 09.216
Cut
If you wish to change the location of this block on the form / template, click the cut
button. The blue boundary around the block will turn red, indicating that block is ready
to be shifted. Now click the yellow Add-New-Block Icon of the location where you want
to relocate the block. A small two button window opens, with the ‘Paste’ and ‘Add’
buttons. Click the ‘Paste’ button. The block will relocate to this position.
Delete
If you wish to delete the block altogether, click the ‘Delete’ button. The block will
remove from the template. Section 09.04.01 shows how to restore the block.
Edit
When you click the ‘Edit’ button, the following ‘Edit’ window opens:
457
EMR NEXT – User Manual
«◄○►»
Exhibit 09.217
The window shows you how many entries you have in the Pick List for this block, and
how you could manage the list.
Two kinds of editing are possible for this block:
1. To initially show the Signature field as a free-text field, or to show it as a
combination of Dosage, Route, Frequency and Duration values, selectable from
dropdown lists. To show it as a free-text field, keep the radio button on the first
value. To show it as a combination of values field, change the radio button to the
second value.
2. To either open it in Opened (activated) state on a Encounter Form, or in deactivated state. To open it activated on new Encounter Forms, keep the
checkbox marked. To open it de-activated, uncheck the checkbox.
After editing, click the OK button and Save the changes.
458
EMR NEXT – User Manual
«◄○►»
09.04.13 – Editing the Plan Notes Block
Back
When you click the Edit-Template-Block Icon of the Plan Notes Block, a small three
button window opens, as shown in Exhibit 09.218. The buttons include ‘Cut’, ‘Edit’ and
‘Delete’.
Exhibit 09.218
Cut
If you wish to change the location of this block on the form / template, click the cut
button. The blue boundary around the block will turn red, indicating that block is ready
to be shifted. Now click the yellow Add-New-Block Icon of the location where you want
to relocate the block. A small two button window opens, with the ‘Paste’ and ‘Add’
buttons. Click the ‘Paste’ button. The block will relocate to this position.
Delete
If you wish to delete the block altogether, click the ‘Delete’ button. The block will
remove from the template. Section 09.04.01 shows how to restore the block.
Edit
When you click the ‘Edit’ button, the following ‘Edit’ window opens:
459
EMR NEXT – User Manual
«◄○►»
Exhibit 09.219
The window shows you how many entries you have in the Pick List for this block, and
how you could manage the list.
The only editing possible for this block is to either open it in Opened (activated) state on
the Encounter Form, or in de-activated state. To open it activated on new Encounter
Forms, keep the checkbox marked. To open it de-activated, uncheck the checkbox, and
click the OK button. Save the changes.
460
EMR NEXT – User Manual
«◄○►»
09.04.14 – Editing the Encounter Checklist Block
Back
When you click the Edit-Template-Block Icon of the Encounter Checklist Block, a small
two button window opens, as shown in Exhibit 09.220. The buttons include ‘Cut’ and
‘Delete’.
Exhibit 09.220
Cut
If you wish to change the location of this block on the form / template, click the cut
button. The blue boundary around the block will turn red, indicating that block is ready
to be shifted. Now click the yellow Add-New-Block Icon of the location where you want
to relocate the block. A small two button window opens, with the ‘Paste’ and ‘Add’
buttons. Click the ‘Paste’ button. The block will relocate to this position.
Delete
If you wish to delete the block altogether, click the ‘Delete’ button. The block will
remove from the template. Section 09.04.01 shows how to restore the block.
461
EMR NEXT – User Manual
«◄○►»
09.04.15 – Editing the Evaluation & Management Code Block
Back
When you click the Edit-Template-Block Icon of the Evaluation & Management Code
Block, a small two button window opens, as shown in Exhibit 09.221. The buttons
include ‘Cut’ and ‘Delete’.
Exhibit 09.221
Cut
If you wish to change the location of this block on the form / template, click the cut
button. The blue boundary around the block will turn red, indicating that block is ready
to be shifted. Now click the yellow Add-New-Block Icon of the location where you want
to relocate the block. A small two button window opens, with the ‘Paste’ and ‘Add’
buttons. Click the ‘Paste’ button. The block will relocate to this position.
Delete
If you wish to delete the block altogether, click the ‘Delete’ button. The block will
remove from the template. Section 09.04.01 shows how to restore the block.
462
EMR NEXT – User Manual
«◄○►»
09.04.16 – Editing the Referral Block
Back
When you click the Edit-Template-Block Icon of the Referral Block, a small two button
window opens, as shown in Exhibit 09.222. The buttons include ‘Cut’ and ‘Delete’.
Exhibit 09.222
Cut
If you wish to change the location of this block on the form / template, click the cut
button. The blue boundary around the block will turn red, indicating that block is ready
to be shifted. Now click the yellow Add-New-Block Icon of the location where you want
to relocate the block. A small two button window opens, with the ‘Paste’ and ‘Add’
buttons. Click the ‘Paste’ button. The block will relocate to this position.
Delete
If you wish to delete the block altogether, click the ‘Delete’ button. The block will
remove from the template. Section 09.04.01 shows how to restore the block.
463
EMR NEXT – User Manual
«◄○►»
10 – Screen Sensitive Help
Back
EMR Next provides you with a facility of Screen Sensitive Help. There is a help Icon
(Question Mark shaped) on the Homepage, marked as Item 7 on Exhibit 05.001 in
Section 05.
When you click this icon, screen sensitive help will open, as shown in Exhibit 10.001
Exhibit 10.001
Some examples of how the help opens on various different locations on the system are
shown in Exhibits 10.002 to 10.006.
Apart from the main help icon on the homepage, various screens and windows also
have the help icons (question mark shaped). If you click those icons, help will open
focusing on that particular point.
464
EMR NEXT – User Manual
«◄○►»
Exhibit 10.002
Exhibit 10.003
465
EMR NEXT – User Manual
«◄○►»
Exhibit 10.004
Exhibit 10.005
466
EMR NEXT – User Manual
«◄○►»
Exhibit 10.006
467
EMR NEXT – User Manual
«◄○►»
11 – Creating and Restoring Backups
Back
It is important that you take backups of the system periodically, preferably every day at
the end of your working session. If you so wish, you can also take multiple backups for
the same day.
This will help you restore your workings on the system in case of a system crash, or in
case your tablet / laptop gets misplaced.
It is therefore important that you keep external copies of your backups also. This means,
that the backup file should also be saved at a location outside your tablet / laptop. It
could either be another computer, an external hard-drive or USB, or even on your email
address, if the backup file is within the permissible size of your email service.
Item 8 on Exhibit 05.001 in Section 05 (The Homepage) is for taking backups and
restoring them.
When you click on the icon, this window will open
Exhibit 11.001
The first option is for making a backup, and the second is for restoring it.
Making Backups
When you click the first button on Exhibit 11.001, the system takes you to the operating
System, and asks you to open the folder in which you want to save your backup, as
shown in Exhibit 11.002.
Browse to the desired folder / location, and click the ‘Save Backup at this location’
button.
The backup folder will save with the following naming convention:
468
EMR NEXT – User Manual
«◄○►»
EMR Backup, day of the week, date with time.
An alert will popup indicating that the backup has been saved (Exhibit 11.003).
Click OK to close the alert.
Exhibit 11.002
Exhibit 11.003
Restoring Backups
When you click the second button on Exhibit 11.001, an alert shown in Exhibit 11.004
will be raised, cautioning that if you restore backup, any existing data on the system will
be lost. If you wish to abort the restoration action, click ‘Don’t Restore’ on the alert. If
you wish to continue, click ‘Yes, Restore Now’.
469
EMR NEXT – User Manual
«◄○►»
EMR Next will then take you to the operating system, for selection of the backup folder
(Please note that there are multiple files in the backup folder. The entire folder must be
selected, and not individual files) as shown in Exhibit 11.005.
The first column in Exhibit 11.005 shows four backup folders. When you select your
desired backup folder, the system will open the folder, as shown in Exhibit 11.006.
Now click the ‘Select this backup’ button.
The backup will restore, and the system will give a confirmatory alert as shown in Exhibit
11.007. Click the OK button, and restart EMR Next to activate the restored backup.
Exhibit 11.004
Exhibit 11.005
470
EMR NEXT – User Manual
«◄○►»
Exhibit 11.006
Exhibit 11.007
471
EMR NEXT – User Manual
«◄○►»
12 – Navigation Guide
Back
Item 9 on Exhibit 05.001 on the Homepage (Section 05) is the Navigational Guide or the
menu in descriptive form. It operates in the same manner as the iconic menu.
FURTHER SUPPORT
Every effort has been made to make this guide as complete and comprehensive as
possible. Still, if you have more questions or need further clarification on any aspect of
the system, you can always contact us at [email protected] and submit your
queries. The usual response time is within 8 hours.
UnisonCare Corporation assumes no liability or responsibility to any person or
company for direct or indirect damages resulting from the use of any information
contained in this user manual.
472
EMR NEXT – User Manual