1
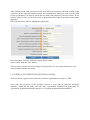
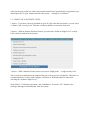
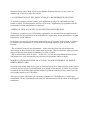
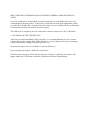
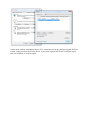
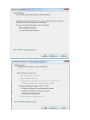
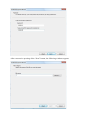
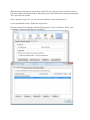
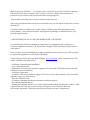
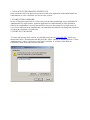
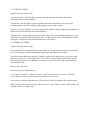
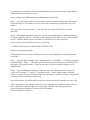
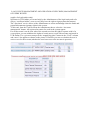
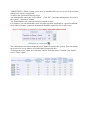
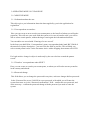
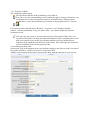
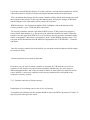
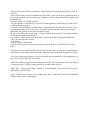
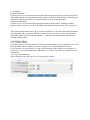
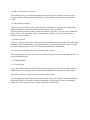
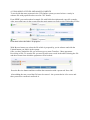
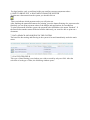
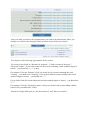
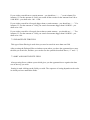
MANUAL
TABLE OF CONTENTS
1. INITIAL REGISTRATION
1.1 Submission of application for registration
1.2 Certificate Generation and Installation
1.3. Choice of a security level
1.4. Confirmation of the application in a bank office or branch
1.5 Storage of the certificate
1.6 Registration of a UES for work with CCB ONLINE
1.7 Non-active/destroyed certificate
1.8 Forgotten password
2. ENTRY IN CCB ONLINE
2.1 Types of users
2.2 Adding of users
2.3 Installation of a new user certificate
2.4 Accounst management and creation of specimen, management of users’ rights
3. OPERATING MENU IN CCB ONLINE
3.1 CARD FILE MENU
3.1.1 Information about the user
3.1.2 Correspondents to transfers
3.1.2 Transfers’ correspondents under SWIFT
3.1.4 Password change
3.1.5 SMS code generation and confirmation
3.2 ACCOUNTS MENU
3.2.1 Client’s accounts
3.2.2 Opening of a current account
3.2.2 Opening of a deposit account
3.2.4 Application for closing of an account
3.3 TRANFERS MENU
3.3.1 Transfers in BGN
3.3.2 Currency transfers
3.3.3. Purchase and sale of foreign currency
3.3.4 Others
3.3.5 Registry
3.4 REPORTS MENU
3.4.1 Accounts balances
3.4.2 Accounts statements
3.4.3 Movements on the accounts
3.4.4 Maturities of deposits
3.4.5 Received transfers from other banks
3.4.6 Received currency tranfers
3.4.7 Reports for transfers
3.4.8 State of loans
3.4.9 Currncy exchange rates with which the bank operates
3.5 CARDS MENU
3.5.1 Issued cards
4. UPLOADING OF FILES AND MASS PAYMENTS
5. 5. MASS CONFIRMATION OF DOCUMENTS
6. 6. HOW TO PRINT OUT A DOCUMENT FROM THE SYSTEM
7. DATA SEARCH AND SORT IN THE SYSTEM
7.1 Fast filter field
7.2 Enlarged filter field
7.3 Sort and sort delete field
1. INITIAL REGISTRATION
To use the CCB Online service you will need:
1. To register at the electronic bank address in the Internet – ;
2. To install a digital certificate;
3. To fill in an application for initial registration in a branch or bank office (for legal entities –
the branch/office where the company accounts are serviced).
To have access to CCB Online you need to have installed a digital certificate f the CCB or to
possess a UES (universal electronic signature), issued by a provider of certifying services
(Infonotary, Bankservice, Information servicing, Spectar), that you can register for work in
CCB Online.
Important!!! The installation of the certificate should be made from the same PC and browser
from where the application for initial registration was sent.
SECURITY LEVELS FOR ACCESS TO THE SYSTEM
The system offers a high and a low security levels depending on the used type of certificate –
a digital certificate or a UES.
- The highest security level for individuals or legal entities
Use of a Universal Electronic Signature (UES) issued by a provider of certifying services. The
signature is saved on a chip card and it is accessed only with the entering of a secret PIN code
known only by you. The electronic signature can be used also for electronic exchange of
documents with NRA, NSSI, Ministry of Finance, Employment Agency, NSI, etc.
- A high security level for individuals or legal entities
It is reached with the use of an Improved Electronic Signature, issued by the bank and saved
on your personal chip card. The signature is accessible only with the entering of a secret PIN
code known only by you. The certificate can be used only for the CCB online service.
- A high security level for individuals
It is reached with the use of an Improved Electronic Signature, issued by CCB and a
temporary code that you will receive on your mobile phone as an SMS for confirmation of
initiated transfers in the system. The certificate can be used only for the CCB online service.
- A low security level for individuals or legal entities
It is reached with the use of an Improved Electronic Signature (certificate), issued by the bank.
The certificate shall be installed in the PC browser itself and it can be used only for the CCB
online service.
The Central Cooperative Bank recommends to its clients the use of a Universal Electronic
Signature (UES), for the highest security level. Using a low security level, there is a
possibility that third parties receive access to your digital certificate and password.
1.1 SUBMISSION OF APPLICATION FOR REGISTRATION
Registration for the CCB online system shall be done from the Internet page of the Central
Cooperative Bank at the address: www.ccbank.bg - “CCB online registration” – “Submission
of an application for registration”.
You choose the type of registration – individual or a legal entity.
If you have a valid UES and you wish to use the highest security level while working with the
system, please select
“Registration by means of the use of a universal electronic signature”.
After clicking on the link, you need to enter your PIN code in order to allow the reading of the
certificate on the chip card and the system will automatically load from it all necessary data
for the registration. You need to fill in the user name and password you have chosen. If you
still don’t have a UES, you’ll need to select “Registration by means of an improved electronic
signature”.
Fill in the necessary data for making the registration.
Press the button “Review” and check up the filled in data.
Then confirm with the “OK” button.
The user name you have chosen is unique for the system. If it is used by another user, you
need to choose another user name.
1.2 CERTIFICATE GENERATION AND INSTALLATION
This item doesn’t apply to users who have chosen a registration be means of a UES.
Users who don’t possess a UES and have chosen to work with an improved electronic
signature, issued by the bank, and who have successfully submitted an application for
registration, should automatically transfer to “Certificate generation and installation”.
After the entering of the user name and password stated in the application for registration, you
should press the “Login” button and select the option – “Issuing of a certificate”.
1.3. CHOICE OF A SECURITY LEVEL
1 option – If you have correctly installed on your PC chip card and card reader, you can select
a “Smart Card” security level. Then the certificate shall be saved on the chip card.
2 option – With an Internet Explorer browser you select the “Software High Level” security
level (which is marked in the system).
3 option – With a Mozilla Firefox browser you select “High grade” – a high security level.
The security level determines the length of the pair of keys (private and public). Therefore we
recommend the use of keys with a length of 1024 bits or 2048 bits which is achievable
selecting the “Software High Level” .
Steps follow: ”Certificate generation“ and “Installation“. Press the “Yes” button to the
messages that appear automatically from the system.
IMPORTANT!!! If your browser is Internet Explorer version 7.0, Windows XP, for the
appearance of the security levels you need to allow the Active X Control. Above step 1.
“Select a security level” the following message appears: “The website wants to Run X Active
Control“, once you press the button “Run” and “Retry” the security levels will visualize. If
you work with Windows Vista and your browser is Internet explorer version 7.0, you can use
a previously installed certificate but you cannot generate and install a new one. The
generation and installation of a new certificate with Windows Vista is possible if you use the
Mozilla Firefox browser. The installation of the already generated certificate follows.
The certificate installation shall be made only on the PC, from which you have submitted your
application for registration.
Press the “Installation” button.
To the message that appears after, answer with
“YES”.
Next message shows that you have successfully installed your certificate.
Windows shown above hold if you use the Internet Explorer browser. In case of use of
another type of browser, steps are similar.
1.4 CONFIRMATION OF THE APPLICATION IN A BANK BRANCH OR OFFICE
To be able to operate with the system, your application needs to be confirmed in a bank
branch or office. For that purpose you have to fill in an “Application for registration for the
performance of bank transactions via Internet”.
ADDING OF NEW ACCOUNTS TO AN EXISTING REGISTRATION
To add new accounts to your CCB Online registration, you need to fill in an application in a
bank branch for the registration of an individual or a legal entity for the performance of bank
transactions via the Internet.
In the form you state the you accounts with which you will operate in the system, in order to
be added to your registration. You can order an operating regime of your accounts via the
Internet.
. The account is used only for information – in this case the client can only monitor the
movements on the account but he cannot make payments. This is convenient when you wish
only to follow the movements and balances on your accounts.
. The account shall be used as active – in this case, you can not only follow the movements
and balances on your accounts but you can also pass payments orders for them.
WORK IN CCB ONLINE WITH AN ACCOUNT TO WHICH THERE IS AN ISSUED
DEBIT/CREDIT CARD
If you have an issued debit card to your account and you wish to make transfers in the system,
you need to fill in a form in a bank branch for a change of parameters, in which you can state
an amount for card transactions and the balance beyond the amount you have stated you can
use to make transfers in CCB Online.
The types of cards with which you can make payments in CCB Online are: Comfort and
Guaranteed. For the Guaranteed credit card you will also need to fill in a form for a change of
parameters.
SMS CODE FOR CONFIRMATION OF PAYMENT ORDERS (FOR INDIVIDUALS
ONLY)
If you are registered as an individual, you can request the use of the SMS code service for
confirmation of payment orders. To this end, you will need to state in the application, which
you will fill in a bank office or branch, that you wish to receive an SMS code for confirmation
of the transactions that you make with your accounts.
The SMS code is completely free for clients who wish to use this service for CCB Online.
1.5 STORAGE OF THE CERTIFICATE
After the successful installation of the certificate, it is recommended that you save it on an
external device (disc, floppy disk, USB). Otherwise, it can be destroyed in case of operating
system reinstallation, change of Internet provider, etc.
Steps for the export (save) of certificate on an external device:
If you use Internet Explorer, follow the steps below:
In the browser menu go to Tools, Internet Options, Content, Certificates, your names will
appear (that's the CCB Online certificate), mark them, click the Export button...
On the next window, mandatory choose Yes, export the private key and press again the Next
button, in the password field write down, if you wish, a password for the certificate export
that you will have to confirm again.
After consecutive pressing of the “Next” button, the following windows appears
With the Browse button you select where on the PC you wish to save the certificate. Give a
File name and press the Save button. Afterwards you select Finish and a message will appear:
The export was successful.
Once exported on your PC, you can save the certificate on an external device.
If you use Mozilla Firefox, follow the steps below:
From the menu Tools, Options, Advanced, Encryption, View Certificates, in the “your
certificates” field you will find your certificate.
Mark it and press “Backup”…, you choose where on the PC to save the certificate, entering a
File name as well, then you press “Save” button, you have a field for the entering of a
password (if you wish to enter a password) and a message appears
Successfully backed up your security certificate and private key.
Once the certificate has been saved on an external device you can import it and use it on more
than one PC.
Certificate import is similar to the export. Steps to follow are the same but instead of the
Export button…in the Internet Explorer and respectively Backup...in Mozilla Firefox, you
press the Import button.
1.6 REGISTRATION OF A UES FOR WORK WITH CCB ONLINE
It is possible that you have submitted an application for registration with a n improved
electronic signature issued by CCB, but you have bought a UES afterwards and you wish to
work with it.
Once you have correctly installed your smart card and you have access to your UES you have
to register the signature for work with CCB Online.
To this end you need to go to the bank webpage www.ccbank.bg, select registration for CCB
Online and follow the steps below:
- Certificate Generation and Installation
- User’s ID and password
- Registration of a universal electronic signature for work with CCB Online (smart card and
reader have to be switched on)
- Certificate registration
- A window with your certificates appears. You have to select the certificate of the electronic
signature issuer (e.g. Info Notary)
- Enter the UES PIN code
- A window containing information about the certificate appears
- Press the Registration button
- meeting the condition that the user’s data in the Internet banking are the same as those of the
register client for UES, the system message will appear “Your certificate has been
successfully registered“. Otherwise the system will return an error “Invalid data“.
1.7 NON-ACTIVE/DESTROYED CERTIFICATE
If the certificate has been destroyed you need to fill in an application in the bank branch for
confirmation of a new certificate for access to the system.
1.8 FORGOTTEN PASSWORD
In case of forgotten password of a client who uses the Internet banking service Individual or
Administrator for legal entities, again an application in a bank branch or office should be
filled in for confirmation of a new password for access to the system. For a legal entity, in
case of user different form Administrator, the Administrator himself can change the password
or renew the certificate of certain user.
2. ENTRY IN CCB ONLINE
To enter and operate in the system, you should press Enter in CCB ONLINE . Again you
should enter user’s ID and password and press the “Enter” button. A window appears “Client
Authentication” where you have to select your certificate. If you have more than one
certificates, mark yours and confirm with OK.
2.1 TYPES OF USERS
(applies for legal entities only)
Certificate holder – has the right to prepare and sign payment documents and follow
movements and accounts balances.
Accountant – has the right to prepare payment documents and follow movements and
accounts balances but has no right to sign payment orders in the system.
Operator – has the right only to prepare payment documents, without signing them and has no
right to follow movements and accounts balances.
Administrator – has the right to create new user’s ID to the corresponding registration, renew
certificates and confirm passwords of the user’s he has created, create and manage the limits
and rights of signature of payment documents in CCB Online.
2.2 ADDING OF USERS
(applies for legal entities only)
Upon submission of an application for registration of a legal entity, the system automatically
gives to the person who has submitted the application the Administrator status.
Therefore when entering the system, if you have registered as legal entity, you will see only
the menu “Card file” и “Exchange rates”. To be able to make payment orders and to follow
the movements and accounts balances you need to create a new user with a status different
from Administrator.
How to add a new user?
Enter the system as Administrator.
Go to menus “Card file”, “Registry of users” and “Entering of a new record”. A window
opens where you enter the necessary information for the new user.
A necessary condition is that the user’s ID you enters differs from that of the Administrator.
When writing down the three names of the new user – name, father’s name, family name, you
can add a space or a digit to the
first name (if it is the same as that of the administrator) for your convenience to distinguish
which certificate to which user refers.
Once creating a user different from the administrator you should:
Step 1 – go to the bank website www.ccbank.bg, enter ccb online, Registration (the menu is
below the entry to CCB online), next step “Press here to make your registration for CCB
Online “.
Then you select “New password” – write enter the user's name of the new user and a
password.
Step 2 – the Administrator has to enter the system (enter Administrator’s ID and password),
“Card file, Registry of users”, click the record with the names of the new user, enter “Record
review”, and then he has to press the button “Confirmation of a new password”.
In this way the password of the new user is activated.
2.3 INSTALLATION OF A NEW USER CERTIFICATE
(applies for legal entities only)
The installation of a new user certificate is the same as the installation of an Administrator
certificate:
Step 1 – from the bank webpage select “Registration for CCB Online”, “Certificate generation
and installation”, “Entry” – enter the user’s ID and password of the new user and then select
the option “Certificate issuance”. Steps are the same as for the certificate issuance of an
Administrator.
Step 2 – Once installing the certificate of the new user, the Administrator has to enter in
“Entry to CCB online”, “Card file”, “Registry of users”, where with the button “Record
review” he enters the new user profile and selects the menu “Certificate renewal”, then he/she
confirms with he Administrator password.
After these actions you will be able to enter the system successfully with the new user’s ID.
If the user wishes to use a high security level (it is advisable for certificate holder users) to
have a UES that he should register for work with CCB Online from Registration of a
universal electronic signature for work with CCB Online.
(for more details see item 1.6)
2.4 ACCOUNTS MANAGEMENT AND CREATION OF SPECIMEN, MANAGEMENT
OF USERS’ RIGHTS
(applies for legal entities only)
Specimen in CCB Online are created only by the Administrator of the legal entity and refer
only to “certificate holder” users (as only they have the right to sign payment documents).
The “Specimen” service allows to the Administrator to create and manage alone the limits and
payment documents signature rights in the system.
To this end, from the Card file menu the Administrator has to select the “Accounts
management” button. All registered accounts for work in the system appear.
For each account it can be seen who of the created users has the right to operate with it. In
your opinion, you can withdraw the rights of certain user to work with accounts registered in
CCB Online. For a given account press the “magnifying glass” button in the “Users” column
and a user’s list appears as shown on the picture. From here you can see whether the user is
active or not for the account (whether the user has access to the account in question).
IMPORTANT!!! When creating a new user, he automatically receives access to all accounts
added to the client’s registration!
To add a new specimen follow the steps:
An Administrator enters the “CCB Online”, “Card file”, “Accounts management for work in
the system”, “Specimen” button.
The Administrator can create specimen for certain account.
For instance: you can define that a user can order payment documents to a specified amount
or in order to prepare a payment document it should be signed by two or more users.
The administrator can also manage the users’ rights for work in the system. You can restrain
the access of a user to make a specified kind of payment orders.
To change the users’ rights for work in the system, from the menu “Card file” you should
select “Users’ rights”.
3. OPERATING MENU IN CCB ONLINE
3.1 CARD FILE MENU
3.1.1 Information about the user
This object gives you information about the data supplied by you in the application for
registration.
3.1.2 Correspondents to transfers
Here you can create as new records your counterparts, to the benefit of whom you will make
payments. This will ease your work with the system, as in case of transfer order, you will be
able to select certain partner, without having to enter again the information about him.
You can add a new record with “Entering of a new record”
In the form you shall fill in: Correspondent’s name, correspondent bank, bank BIC, IBAN of
the transfer recipient, description – you can fill in the field as you like. This will help you
select certain partner easier. In the last menu Active with a dropping down menu select YES.
For legal entities: change in object is made only by the user who has created the partner
record.
3.1.2 Transfers’ correspondents under SWIFT
Here you can create as records your counterparts, to whom you will order currency transfers
in the country and abroad.
3.1.4 Password change
This field allows you to change the password in any time, each user changes his/her password.
In the “Password for access“ field fill in a new password, with which you will enter the
system from now on, in the “Password confirmation” field – confirm the new password, and
at the next step – confirm the password change with the password you used to enter the
system.
3.1.5 SMS code generation and confirmation
(applies for individuals only)
If while filling in the documents for your registration in the bank you have stated that you
wish to use a SMS code as an additional protection for preparation of payment documents,
from here you can generate it and confirm it.
The SMS code is valid 60 minutes only for the current session. The session is 15 minutes and
in case of required SMS code, if you press the exit button, you won’t be able to use the same
SMS code, you should require another after the expiry of the previous one.
3.2 ACCOUNTS MENU
3.2.1 Client’s accounts
From this object you can see all you accounts added to your registration, also in the foreign
currency of the account, the account IBAN as well as its description.
3.2.2 Opening of a current account
This is an object where you can open a current account in BGN and in foreign currency.
Opening an account via the system you should state the currency and the branch where you
wish to open the account.
3.2.2 Opening of a deposit account
This is an object where you can open a term deposits in BGN and in currency.
Opening a deposit via the system you should state the currency, the type of deposit account
and the branch where you wish to open the account.
3.2.4 Application for closing of an account
From this object you can submit only an application for closing of an account (this means
that you won’t see certain account online but you cannot close the account itself).
3.3 TRANSFERS MENU
3.3.1 Transfers in BGN
The following symbols mean:
The sign means that the field is mandatory to be filled in.
You can review the corresponding record without the right to change it.From here you
can change the record of payment documents with a bank status “pending client’s
confirmation”, where the preliminary given status of the payment order is “Unsent”.
«
For payment orders with the status “Booked“, “In process“ and “Pending available
balance“ with the preliminary set by you status “Sent”, you cannot change the payment
document record.
You can copy any record to avoid second entering of the transfer fields. Once you
copy the record while reviewing the payment document, before confirming the record
with your password, you need to pay attention whether you have loaded the new
requisites of the payment order that you wish to book. After clicking in the check box,
you can confirm or print out the payment order.
Loan transfer/payment order
In the menu Loan order/payment order you can make transfers only from a client’s account of
the sender in BGN to a client's account of a recipient in BGN.
Adding a new payment order in the system can be made with the entering of a new record.
Clarifications to the form fields:
Sample field
You can use the Sample field (copy payment order) from the menu Transfers, Samples,
Creation of samples. You select the type of transfer (e.g. loan transfer, currency transfer etc.)
and from the performed transfers you select the one to which you wish to create a sample. In
the Actions column press the Sample button, a message appears :”The sample has been
successfully created“.
To use the created sample, follow the steps:
Entering of a new payment order record, Sample menu and from ht dropping down menu
select the sample you have created, press the Review button and the payment order requisites
shall load automatically.
In the field “Client’s account payer” select from the drop down menu the corresponding
account from which you will order the transfer. There you will see all active accounts that
have been added to your registration.
In “For the amount of” enter the transfer amount.
In the “Reasons for payment” enter the reason for the payment.
The Select/Add field of the transfer recipient allows you to select with a button the partner
who has already been entered in the card file:
Or to add a new partner with a button: .
The new record is saved automatically in the Card file menu – Transfers’ correspondents.
When selecting certain partner, the fields: recipient’s IBAN, recipients’ name, recipient bank
– name and BIC shall load automatically.
In the field urgent payment state YES in cases when you wish to execute the transfer with the
RINGS system in real time. Urgent payment orders are executed from 9.00 to 15.00 o’clock.
Via RINGS only transfers to other banks pass.
The price of these transfers is higher (see the bank’s Tariff).
Transfers for the amounts equal or higher than 100,000 BGN pass mandatory as urgent via
the RINGS system, even if you have not stated that the payment order should be such.
There are three options to select a status of you payment order: SENT, UNSENT AND
REJECTED.
At the choice of:
SENT – the payment order is booked by the bank. When you have already sent the payment
order, you cannot make correction or sign it twice;
UNSENT – the payment order remains with a status of PENDING CONFIRMATION BY
THE CLIENT, i.e. the transfer waits for you confirmation (for legal entities – it waits for
confirmation of the certificate holder or several certificate holders in case that there is a
specified specimen on the account);
REJECTED – this status shall be stated in cases when you don’t wish the payment document
to be booked (to make the necessary change the initial status of the payment order needs to be
unsent).
If you have stated a payment order status SENT and the bank given status is PENDING
AVAILABLE BALANCE, this means that you don't have enough money on your account or
you didn’t have when you made the transfer.
To book the payment order you need to feed the account and send again that order from the
menu: Payments, Registry, Non-booked documents, you find the payment order by reference,
tick the empty box, press the Second send button and confirm it with your password.
For legal entities: The field “Select a status of the payment order” can be seen only by the
certificate holder.
In the field “Execution date”, the current date is always loaded. You can order certain
payment with a future date, i.e. state the date on which you wish to make the payment and to
give to the payment the SENT status. In this case the transfer will be booked automatically on
the date stated by you and until then the status of the payment order will be IN PROCESS.
If the transfer is for salaries, state YES, when you pay salaries.
Declaration under article 7, item 8 of the CSI gives you the possibility to fill in this
declaration online, when you have indicated in the field above that the transfer is for salaries.
To fill in the declaration you should click here
For each transfer for salary you need to fill in this declaration.
You shall fill in a declaration – origin of money if the transfer amount is above 30,000 BGN.
If you miss to fill it in, the system will not allow you to sign the transfer and will return you to
fill it.
Payment order/Payment note to the budget
This object is designed for use in the following payment cases:
- payment of tax liabilities;
- customs liabilities, including for the registration of a collateral with a money deposit;
- liabilities towards the National Insurance Institute;
- liabilities towards the National Health Insurance Institute;
To the fields: client’s account payer, For the amount of, Reasons for payment, Select/Add
transfer’s recipient, urgent payment order, Select the status of the payment order, Date of
execution and Declaration – origin of money, apply the same clarifications as above.
The new fields here are:
Type of payment which requires you to indicate the correct type of payment, accorded to the
thing you pay (to be filled in for accounts of Administrators of revenues to the central budget)
Document Type and Number to which you pay
Documents numbers are:
- declaration - 1
- act of inspection - 2
- punishment ordinance - 3
- advance payment - 4
- tax lot number of a property - 5
- forced collection enactment - 6
- others (for payment of insurances) - 9
Date of document to which you pay shall be filled in only in cases when there is a document
on the grounds on which you pay (e.g.: date of act of inspection). For payment of insurances
the field shall not be filled in.
In the fields “Date for beginning of period and date for end of period” you shall fill in a date,
month and year of the relevant period.
In the field “Liable person, BULSTAT of the liable person (for legal entities), Personal No of
the liable person (respectively for individuals)” you shall enter the data of the liable person.
If the client is a foreigner, you need to fill in the mandatory field “Personal number of a
foreigner”.
Transfers directed to accounts of NRA in CCB AD, are executed till 16.00 the latest.
Payment order/Payment note to the budget (multiple lines)
This object shall be used when you need to pay to Administrators of revenues, i.e. NRA,
Customs Agency, etc. and you need to pay more than one different liability.
For the multiple line payment order it is mandatory that the recipients’ IBAN has as 13-th
digit 8.
In the field “Type of payment” the payer account shall not be filed in as it is loaded
automatically after you have filled in the requisites of the multi lines document.
In the field “Liable person, BULSTAT of the liable person (for legal entities), Personal No of
the liable person (respectively for individuals)” you shall enter the data of the liable person.
If the client is a foreigner, you need to fill in the mandatory field “Personal number of a
foreigner”.
3.3.2 Currency transfers
Negotiation of an exchange rate
If you wish to obtain a preferential exchange rate for the purchase of sale of currency for the
equivalent of over 10,000 BGN, you should make a record “Negotiation of an exchange rate”.
After the exchange rate has been confirmed by the bank, a “Code of the exchange rate” is
made that will be used when entering the currency transfer. With this exchange rate code, the
transactions will be booked at the negotiated rate.
Currency transfers to other banks and abroad
From here you order currency transfers in ht country and abroad.
Transfers to another bank in the country but in a foreign currency shall be ordered from this
sample and treated as a currency transfer.
The sample has to be filled in Latin alphabet!
Beneficiary account field – it is desirable to fill in the IBAN of the recipient of the transfer.
Exchange rate code field – you fill in if you have a negotiated rate.
The rate code from the application for negotiation shall be filled in. The code is:
79000А00357. If you don’t have a negotiated rate, the transfer will be booked at the bank
daily rate, and the field remains empty.
In the field ”The transfer will be executed…” you can select the currency transfer value date.
Till the end of the business day – the transfer will be made by the bank with the value date
the same business day, for which additional fees will be collected from your account. It is
desirable that currency transfers wit ha value date „till the end of the business day” to be
ordered till 11 o’clock of the same day.
Up to one business day – the transfer will be made by the bank with the value date the next
business day, for which additional fees will be collected from your account.
Up to two business days - the transfer will be made by the bank with the value date two
business days. In this case only standard fees for currency transfer will be collected from your
account.
The indicated value dates mean only that the bank of the recipient you have given will
receive the money transfer on the set value date. The value date for the entering of the money
on the recipient’s account depends on the bank internal rules, as well as its direct participation
in the international payment systems.
Your costs are at the account of – you should state for whom are the costs – at your account
or at the recipient’s account.
The charges of the foreign banks are at the account of – in this case if you select that the
charges are at the payer’s account, i.e. yours, than your counterparty will receive the full
amount that you have ordered and you will pay additionally the charges of his/her bank.
If you have selected that the charges are at the recipient’s account, than commissions will be
collected from the recipient’s account reducing the amount transferred to his benefit.
You can indicate that charges for the currency transfer will be shared between the payer and
the recipient of the transfer. In this case the transfer payer will pay the charges of his bank,
and the charges of the other bank will be paid by the recipient.
BNB declaration – the declaration shall be filled it obligatory when the amount of the
currency transfer is over 25,000 the BGN equivalent.
For currency transfers with the equivalent in BGN of over 25,000 you need to present a
reason for the bank transfer (e.g.: the invoices for which the transfers are made). When the
transfer is for the equivalent in BGN of over 30,000 you need to present a declaration under
article 4, paragraph 7 and article 6, paragraph 5, item 3 of the MMLA plus the reason. You
can print out the declaration from the bank site: Registration for CCB ONLINE – Contracts
and forms.
Once the currency transfer has been booked, you can print out the document, tick the empty
box and press Print.
Currency transfers on accounts in the bank
From here you can order a currency transfer to accounts in CCB branches as well as to
purchase or sell currency on your accounts regardless whether they are in the same or
different bank branches. One of the accounts (to which or from which you make the order)
can be in BGN. A necessary condition is the currency transferred to correspond to the
recipient’s currency account.
3.3.3. Purchase and sale of foreign currency
Negotiation of an exchange rate in case of sale of currency
To negotiate an exchange rate the amount should be above the BGN equivalent of 10,000. To
this end, you need to go to the menu
Transfers, Purchase and Sale of currency. Negotiation of an exchange rate in case of sale of
currency.
After you enter the necessary information in the fields, a rate code will be formed that you can
use for the purchase and sale of currency. With this code the transaction will be booked at the
negotiated rate.
Purchase and sale of foreign currency
You can purchase or sell currency on your accounts regardless whether they are in the same
or different bank branches.
If you have a negotiated rate from the bank, you should write the rate code in Cyrillic in the
corresponding field. If you don’t have a negotiated rate, the transfer will be booked at the
bank daily rate, and the Code field will remain empty.
In cases of currency sale, in the field “ I wish to transfer the amount of”, you should indicate
the BGN equivalent of the transfer.
For instance: if you wish to sell 320 EURO, calculate their BGN equivalent at the bank
“buy“ rate and fill in the sample.
3.3.4 Others
Transfer order for direct debit
From this object you can send an application for direct debit to a CCB branch or to other
banks.
Entering of reason (NSSI) shall be filled in only in cases when you initiate an application for
encashment to the National Social Insurance Institute. The reason shall be filled in pressing
You fill in “Reason for payment” when you initiate the encashment to your counterparty. In
this case you don’t fill in the above field.
When you order an application for direct debit to NSSI, the reason for the transfer is filled in
“Entering reasons” (NSSI), and the reason below shall not be filled in!
Payer field – select a record from “Transfers’’ correspondents” (if you have created record)
and respectively the fields:
payer’s IBAN, payer’s name, payer’s bank name, payer’s bank BIC are loaded automatically
with the selection of a counterparty.
3.3.5 Registry
Booked documents
It allows you to see all ordered and booked documents (payment orders, currency transfers to
other banks and abroad, interbank currency transfers, where the date and time of booking are
indicated), without possibility to change the status of the relevant document.
Unbooked documents
It allows you to see all ordered unbooked documents with the status „Pending available
balance on the account”, as well as “Pending confirmation from the client” and “In process”.
The Unbooked documents menu gives you the possibility to cancel the unbooked documents
selecting them and pressing the “Refused” status button, as well as to order again payment
documents which wait for available balances – mark the relevant document and select the
Second sending button.
3.4 REPORTS MENU
3.4.1 Accounts balances
From this report you see the balances of all the accounts added to your registration, as well as
the disposable amount, whether you have an approved overdraft, blocked amounts.
If you account is a card account, you can see the amounts with which you can operate via
your card, i.е. the blocked amounts for BORICA, as well as if you have an amount for card
transactions.
3.4.2 Accounts statements
After clicking on the check-up, the following screen appears.
With the dropping down menu you select the accountant the period for which you wish to see
a statement. Then press ОК.
You print with the Statement print button.
3.4.3 Movements on the accounts
Here you can follow a specific movement on you respectively debit or credit card.
3.4.4 Maturities of deposits
From here you can follow the maturities of your deposit accounts, as well as the account
number, the branch where it has been registered, deposit term, interests conditions as well as
the deposit currency.
3.4.5 Received transfers from other banks
After you select an account and indicate a period, you can see what transfers from other
banks have entered to your accounts.
3.4.6 Received currency transfers
From this check-up you obtain information about the currency transfers entered on your
accounts from the country and abroad. Here you also indicate the respective account and
period.
3.4.7 Reports for transfers
From here you can check up the ordered by you loan transfers, payment notes from/to the
budget, applications for direct debit and internal bank currency transfers.
You can search by transfer status, period and indicate an account. You can select additional
filters such as: correspondent’s name, correspondent’s IBAN, reason for payment or to
indicate a specific amount.
3.4.8 State of loans
After you select the account on which you have a granted loan by the bank and confirm with
the button “Final confirmation”, the system informs you about the maturities (dates) for due
principals and interests, as well as for booked and unbookded installments.
3.4.9 Currency exchange rates with which the bank operates
This report shows the “buy“ and “sell“ rate for the currency with which the bank operates, as
well as the BNB fixing.
3.5 CARDS MENU
3.5.1 Issued cards
If you have debit cards issued, from this statement you can see the bank account number, in
which branch it was opened, the amount blocked for BORICA and the card holder name.
From here you can see the movement on your card account.
For the registered in the CCB Оnline system credit cards you can follow the current balance,
disposable limit for use and the minimal installment for repayment for the corresponding
month, as well as to print out the complete movement on the card.
4. UPLOADING OF FILES AND MASS PAYMENTS
To work with the mass payment in the CCB Оnline system you need to have a ready in
advance file with payment orders saved in CSV format.
From HERE you can download a sample file with fields description and a specific example.
After successful entry in the system from the main menu you need to select Uploading of files.
From there select the folder “In progress”
With Browse button you select the file which is prepared by you in advance and with the
Upload button you load it in the system.
Once you have loaded the file you will treat, go to menu Transfers – Mass payments –
Processing of file. To treat the file you need to add a new record in the table selecting the file
and the account from which the payments will be booked.
Press the Review button and then confirm the transaction with a password. Press OK.
After adding the new record the file has to be treated – the system checks it for errors and
then you need to confirm it and book it.
You select the record – tick it as shown on the picture below and press the button File
treatment.
You confirm with a password and if there are on errors in the file a message will appear that
the file has been treated and the transfers contained in it will be added to the objects with
payment orders.
Then you go again to the menu Transfers – Mass payments – Treatment of file, select again
the record and press the button “Confirmation” (confirm with your password and the payment
orders are sent for booking).
5. MASS CONFIRMATION OF DOCUMENTS
With the mass confirmation of documents you can sign several documents at once. This is
done by clicking on
next to all payments that you wish to confirm. A window appears:
From this window you see what kind of transaction you will execute Confirmation and the number of available records you will sign. Enter a password to confirm
the records.
For legal entities: only a certificate holder can confirm en masse payments orders.
6. HOW TO PRINT OUT A DOCUMENT FROM THE SYSTEM
To print out a document from the system you should click on
Thus you indicate which payment order you will print out.
After marking the patment document for printing, press the button Printing of a payment order.
Similarly you can print payment orders to the budget and applications for encashment.
To print a document from the system, the payment order should have the status “Booked”. If
the transfer has another status different from the indicated, you won’t be able to print out a
document.
7. DATA SEARCH AND SORTING IN THE SYSTEM
The band for data sorting and filtering in the system is located immediately under the main
menu.
7.1 FAST FILTER FIELD
This type of data filtering is used when you wish to search by only one field. After the
selection of such type of filter, the following window opens:
After you make a selection, the systemd brings you back to the initial menu, where you
already see a field for the entering of data for search in hte field of your choice.
You dispose of the following opportunities for the search:
For search in text fields, as “Reasons for payment”, “Client's account of the payer”,
“Recipient’s name”, if you wish to find out all records containing certain symbols (digits or
letters) – you should use “*...*” (a star).
For instance: If for the “Reasons” field, you search for all records containing the word
“feeding” – you shall write: *feeding*, if you wish to find all records starting with certain
symbols (digits or letters) – you should use “...*”.
If you wish to find all records ending wit hcertain symbols (digits or letters) – you should use
“*...”
For instance: If for the “Recipient’s name“ field, you search for all records ending with the
letters EAD, you shall write: *EAD
Search for in digit fields such as “For the amount of” and “date of execution”.
If you wish to search from to certain amount – you should use “..... ...” (semi column) For
instance: if “For the amount of“ field, you search all the records for the amount from 100 to
1000 BGN – you shall write: 100 .. 1000
If you wish to search for all records bigger than a certain amount – you should use “..... ” For
instance: If “For the amount of” field, you search for amounts bigger than 100 BGN – you
shall write: 100 ..
If you wish to search for all records lower than a certain amount – you should use “..... ” For
instance: If “For the amount of” field, you search for amounts bigger than 100 BGN – you
shall write: 100 ..
7.2 ENLARGED FILTER FIELD
This type of data filtering is used when you need to search in more than one field.
After pressing the Enlarged filter a windows opens where you have the opportunities to enter
the data you search for, and here you can also use the symbols described above (“*” and “..”)
7.3 SORT AND SORT DELETE FIELD
After pressing Sort a window opens which gives you the opportunities to organize the data
sort in the way you wish.
Sorting is made clicking on the fields you wish. The sequence of sorting depends on the order
in which you have marked the fields.