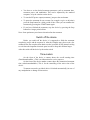
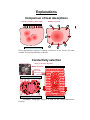
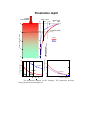
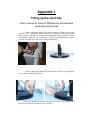
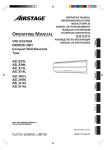
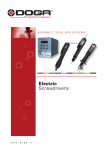
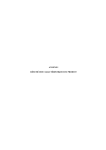
1
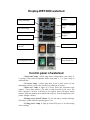
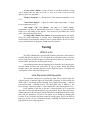
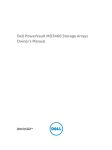
plus
USER’S MANUAL
TREATMENTS
OncoTherm Kft.
June 2010
Both the hardware and software are specially developed for the
OncoTherm systems.
Copyrights belong to OncoTherm Kft. Hungary
All rights reserved.
This book is sold subject to the condition that it shall not by way of trade or otherwise, be lent, re-sold, hired out or otherwise
circulated without the OncoTherm prior consent in any form of binding or cover other than that in which it is published and
without a similar condition including this condition being imposed on the subsequent purchase.
Contents
CONTENTS................................................................................................................................. 2
GENERAL DESCRIPTION ...................................................................................................... 3
INTENDED USE ........................................................................................................................... 3
HISTORY OF THE METHOD ......................................................................................................... 3
EFFECTS .................................................................................................................................... 4
SIDE EFFECTS ............................................................................................................................ 4
MAIN INDICATIONS ................................................................................................................... 4
CONTRA INDICATION ................................................................................................................. 4
TREATMENT PROCEDURE ................................................................................................... 5
PREPARATION............................................................................................................................ 5
RF TREATMENT WITH WATER-COOLED ASYMMETRIC ELECTRODES ........................................... 6
DISPLAY-EHY2000PLUS ........................................................................................................... 8
KEYBOARD .............................................................................................................................. 13
DISPLAY-WEY2000 WATERBED ............................................................................................. 15
CONTROL PANEL OF WATERBED .............................................................................................. 15
TUNING ................................................................................................................................... 16
STEP BY STEP MANUALLY ........................................................................................................ 17
EXPLANATIONS ..................................................................................................................... 19
COMPARISON OF HEAT ABSORPTIONS ...................................................................................... 19
CONDUCTIVITY SELECTION ..................................................................................................... 19
SHAPE ADOPTION .................................................................................................................... 20
SAFETY OF RF-CURRENT ......................................................................................................... 20
EXTRACELLULAR HEATING ..................................................................................................... 21
DESTRUCTION OF THE MEMBRANE BY VARIOUS PROCESSES .................................................... 21
COMPLETING THE METHODS IN MICROSCOPIC LEVEL............................................................... 22
PENETRATION DEPTH............................................................................................................... 23
APPENDIX 1 ............................................................................................................................. 24
FILLING UP THE ELECTRODE .................................................................................................... 24
APPENDIX 2 ............................................................................................................................. 34
ERROR MESSAGES OF THE EHY2000PLUS ............................................................................... 34
APPENDIX 3. ............................................................................................................................ 35
ERROR MESSAGES OF THE WEY2000 (COOLER)...................................................................... 35
APPENDIX 4. ............................................................................................................................ 37
BRAIN TREATMENT ................................................................................................................. 37
General description
Intended use
The EHY 2000plus device is devoted to the non-invasive treatment of
malignant tissues. The difference between the complex dielectric constant
(complex impedance) of the malignant and healthy tissues makes it possible to
select. The main effect is the local overheating of the tumor, but additionally other
electric effects are also in use. (See “Principles” chapter of the User’s Manual.)
History of the method
Electro-Hyperthermia (EHY) history
Germany
USA
Germany
Hungary 1946
France
USA
France
Italy
Italy
Ancient
Greece
100
1830
1893
1908
Douwes
& Szasz
Mayo
Nagelschmidt
Arsonval
Coley
OncoTherm GmbH
OncoTherm GmbH
1500
1500 FabrePalaprat
Leonides
Egypt,
Celsus
400BC
400BC Galenus
India
Hippocrates
2000
2000-3000
3000BC
BC
Ancient
Papiruses
1990
Local electrohyperthermia department
(Bad Aibling)
Effects
•
generates all effects of hyperthermia; heat dependent distortions, acidosis,
chemo- and radio-sensitizing, etc. (See: Manual part of “Principles”.)
•
stops both the chemical and physical positive feedback loops in malignant
proliferation
•
promotes Ca++ influx and Na+ efflux in malignant cells,
•
acts on the collective states by noise modulation, enhances the contrast of
the malignant area.
Side effects
•
The EHY treatment can have a side effect (about 3% of the cases). In cases
the treatment area is covered by a considerable adipose tissue, subcutane
fat-burn could happen and the skin can become red (slight burn) as well.
Main indications
•
deep-seated primer tumors and metastasizes in organs (incl. liver, pancreas,
kidney, lung, brain, etc.)
•
gastro-enterological tumors, including small and large intestine, stomach,
esophagus, etc
•
deep-seated gynaecological cases, sexual organs
Available applicators
•
abdominal electrode
•
head- and neck-electrode
•
lung electrode
•
special combined bed-system
Contra indication
•
Can not be used for treating patients who have pacemaker
•
Can not be used for treating patients with any metallic lead or implanted
system (e.g implanted deep brain stimulator (DBS))
•
Especial care is requested with continuous patient feedback at treating
patients who have joint-support, who have surgery clips, who have bonereplacement, who have any metallic implantation, or have unsensitive
surface area at the treatment region (due to the surgery of other.)
Treatment procedure
The OncoTherm EHY 2000plus is devoted to the high level requirements of
modern medical practice. The equipment, for safety purposes, is isolated from the
common power-network and supported by a specially developed software.
The treatment parameters (power, time) are freely adjustable, these also
being a possibility of limiting the parameters.
Preparation
The treatment starts with the preparation of the patient for the actual
treatment through medicine and psychological attention. After the treatment an
immunology support is suggested.
The most optimal electrode has to be chosen for the treatment. For smaller
solid tumors, a small applicator is suggested. Note that a small electrode with the
same output power has proportionally larger electric field surface.
The electrodes have to be positioned on the tumor area with best
overlapping.
The waterbed offers a comfortable feeling only if its temperature suits the
patient’s sensitivity. For this reason the water is preheated. It needs a few hours to
warm up such an amount of water, so switch on the heating minimum 12 hours
before starting the treatment, but it is better to keep the heating continuously on. To
better comply with the room temperature, the heating levels can be set to adjust the
comfort. The required temperature of the surface of waterbed is adjustable with Set
Temperature – Up – Down buttons. The actual setting is displayed continuously.
Between treatments - for a few hours – do not switch off the waterbed
heating. For a longer period – 10…30 hours – set a low temperature, but do not
switch off. For a longer unused period – e.g. to store – do switch off the heating.
Please periodically control:
•
water in bed: by pushing the mattress, it must be filled correctly
•
vapor/water wet surfaces: sides and bottom of the mattress must be dry
(some moisture is possible)
•
water in the cooling system: as well as with the other bed, the electrode’s
cooling water tube must be filled with water.
After half year of use the water must be changed in the bed. If a water-loss is
observable, call the service.
RF treatment with water-cooled
asymmetric electrodes
The first step is to disinfect the upper applicator (later referred to only as
electrode) with antiseptic solution or alcohol. Use only damp textile. If the textile is
too wet, liquid can penetrate into any part of the equipment.
Switch on the machine (but do not start the treatment) 15 minutes before the
treatment, so that the machine can warm up, and the cooling system also reaches its
working temperature. The device starts the self-test process. The self-test lasts for
about one minute. If the test is over, the message in the info window is “GOOD”.
Warning! Do not change electrodes during self test process, because in that case
device stops with an error-code. After getting the message “GOOD” you have the
possibility for changing the electrodes again.
All metal objects, parts (necklaces, rings, jewels, watches, pipes, coins,
phones…) must be far away from the electrode and the machine while the
treatment is run.
Also before the treatment give the patient the necessary medical aids
(injections, infusions) as needed and ordered by the doctor. (Please note that the
infusion can only be given before or after the treatment, while under the RF
conditions no metal needle can be in the patient.)
You could place special paper on the treated area of the patient and the
electrode can be placed on this paper. The electrode's vertical position must be set
so that when the patient breathes the electrode must always be on the patient.
(Typical case is the breast cancer treatment when the electrode moves continuously
because of the breathing.) Note that pushing the electrode too strongly can be
uncomfortable for the patient.
Take care of the cables and water pipes, do not break them, or obstruct the
free flow of the cooling water. Check the connection of the RF cable, and check if
it fits in the plastic holders on the applicator arm.
Now you are ready to start the treatment.
Press the start button on the device or start from the computer.
Correct tuning is very important for the correct and effective operation of
the machine. Correct tuning must be checked after the process. There are two
possibilities of checking the result.
•
The forwarded power and the absorbed power on the display show the
current state of power relations. If the tuning was correct, these two
numbers are close to each other. (In the worst case the forwarded power
must not be higher by 1.5 times then the absorbed power.
•
The LED row indicates the tuning proportions.
If the tuning is worse than the required, the device starts the tuning process
automatically again. If the device obviously can not find the proper working
conditions, the electrodes must be re-positioned. In this case stop the RF-power,
and then adjust the electrodes by putting them into a little bit different position and
fix their smooth touch within the entire surface. After repositioning the electrode
start the tuning process again.
When the treatment has been started and the tuning results are acceptable,
let the treatment run till the required time limit. The patient should NOT be left
alone without proper supervision. This supervision is needed, because during the
treatment special situations may happen, and intervention may be necessary, such
as:
•
The electrode's position has been changed because of the patient's
movements. In this case the machine must be stopped and the tuning
procedure must be repeated.
•
The set power is too high (or too small) and treatment values must be
changed by the supervisor. In this case the machine does not need to be
stopped, only values must be changed.
•
The patient feels heat on his/her skin. In this case the cooling system must
be checked. Check if the water cooling cable is not broken or obstructed.
Reduce the power if the cable of the cooling unit is not broken.
•
Also the tuning parameters can be changed during the treatment. This can
be the result of the correct treatment, while the tumour-destruction is in
progress. Tuning results must be checked periodically during the treatment.
To finish the treatment, (before removing the electrode), the device RF supply must
be stopped! Do not remove the applicator when the RF power is on.
Display-EHY2000plus
Forwarded power:
Current outgoing power in watts
Time:
Remaining time from the treatment
Modulation:
Modulation is on or off
Start:
On if power is going out
Tuning:
On if machine is tuning
Auto control:
On if machine is controlling the tuning
Manual control:
On if user controls the tuning
Results of the self-test:
Network:
On if machine is working
correctly
Controller:
On if control box is working
Tuner:
On if tuner is working
Forwarded power:
Outgoing power (Range: 0 to 300W)
Reflected power:
Reflected power (Range: 0 to 100W)
Ion transport:
Shows the change of the ion transport
The “equivalent temperature” (ECM temperature) is equivalent with the
static temperature, which does the same distortion which is the actual distortion
rate in the tissue. In this meaning the ECM temperature is the parameterization of
the actual distortion rate in the tumor. (See in Principles).
9
The actual denotations are:
German:
Forwarded Power
Leistungsabgabe
Manual Control
Manuelle Kontrolle
Reflec ted Power
Leistungsreflexion
Modem
Modem
Treatment Power
Behandlungsleistung
Network
Netz
ECM Temperature
Temperatur
Amplifier
Verstärker
RIFE
RIFE
Controller
Kontrolle
Time
Zeit
Error
Fehler
Information
Information
Tuning
Einstimmung
Self-test
Selbst-test
Iontransport
Ion transportierung
Stop
Stop
Tuner Motor
Einstimmung Motor
Pause
Pause
Mains On
Netz ein
Auto Pause
Auto Pause
Mains Off
Netz aus
Start
Start
Set
Einstellung
Tuning
Automatisc he Einstimmung
Select Time/Power
Zeit/Leistung Wahl
Automatic Control
Automatisc he Kontrolle
Power
Leistung
Hungarian:
Forwarded Power
Kiadott teljesítmény
Reflected Power
Visszavert teljesítmény Modem
Modem
Treatment Power
Kezelési teljesítmény
Network
Belső hálózat
ECM Temperature
ECM hőmérséklet
Amplifier
Erősítő
RIFE
RIFE
Controller
Vezérlő
Time
Idő
Error
Hiba
Information
Információ
Tuner
Kézi hangolás
Self-test
Belső teszt
Iontransport
Ion transzportáció
Stop
Leállítás
Tuner Motor
Hangoló motor
Pause
Szünet
Mains On
Hálózat be
Auto Pause
Automatikus szünet
Mains Off
Hálózat ki
Start
Índítás
Set
Beállítás
Tuning
Automatikus hangolás Select Time/Power
Automatic Control
Automatikus vezérlés
Manual Control
Power
Kézi vezérlés
Idő/teljesítmény választás
Teljesítmény
Italian:
Forwarded Power
Capacitá/produttiva emetta
Reflected Power
Capacitá/produttiva riflettuta Modem
Modem
Treatment Power
Capacitá/produttiva curativa Network
Rete interna
ECM Temperature
ECM temperatura
Amplifier
Intensificatore/tonificatore
RIFE
RIFE
Controller
Carrello
Time
Tempo
Error
Errore
Information
Informazione
Tuner
Accordatura manuale
Self-test
Controllo interno
Iontransport
Ion transporto
Stop
Fermo
Tuner Motor
Motore dell’accordatura
Pause
Pausa/intervallo
Mains On
Rete deutro
Auto Pause
Pausa/automatica
Mains Off
Rete fuori
Start
Parteuza
Set
Tuning
Accordatura automatica
Select Time/Power
Automatic Control
Comando automatico
Power
Aggiustaggio
Scelta del tempo
scelta della capacitá
Capacitá/productiva
12
Manual Control
Comando manuale
Keyboard
Some keys may have many functions depending on what the actual mode of
the device is.
Power
Here you can switch on and off the device. If the device is switched on the
switch should lighten up.
Note: if an emergency button is pressed then the device cannot be switched
on. A red light on the front panel will be lighted in this case.
Start/ReTune
The treatment can be started by pressing this button. By doing it, the
treatment starts and an automatic tuning also starts to set the correct parameters for
the treatment. Pressing this button during the treatment will start the retuning
algorithm, to find a new tuner position. Pressing this button for a long time, this
can also change the modulation.
Modulation
Pressing the button for a longer period of time you can change the
modulation. (If it was off then it will turn on, and if it was on, it will turn off.)
modulation doesn’t have effect on temperature.
Stop
With this button you can pause or stop the treatment. If you only pause the
treatment, you can continue later at where you left it, no parameters will be
changed. But if you stop it, then all the parameters will be reset to their default
value. The actual information will be stored only on the computer (if any).
Pause
Press only for a short time to pause the treatment. RF power is stopped.
Stop
Press for a longer period to stop the RF power (treatment).
Motor 1 clockwise
Rotate the first tuning motor clockwise. You should use this only if you are
an advanced user.
Motor 1 anticlockwise
Rotate the first tuning motor anticlockwise. You should use this only if you
are an advanced user.
Motor 2 clockwise
Rotate the second tuning motor clockwise. You should use this only if you
are an advanced user.
Motor 2 anticlockwise
Rotate the second tuning motor anticlockwise. You should use this only if
you are an advanced user.
Automatic/Manual selection
Automatic
Press for a short period of time to set automatic mode. In automatic mode
all limits are checked, and power is managed by the attached computer. In
automatic mode you can press shortly this button when you reach 46°C-47°C on
the E.C.M temperature and the alarm sound will disappear. You can continue the
treatment carefully.
Manual
Press for a long period of time to set manual mode. In manual mode a lot of
things are not controlled by the microcontroller.
Mute
Mute the device with this button if there is an alarm for high temperature
and temperature display is flashing.
Power / Time selection
To select the function of the up/down buttons. This will change from time
to power or from power to time settings.
Up (↑)
You can change the actual time limit or power setting upward with this
button. Which one you change depends on the power/time selection button.
Down (↓)
You can change the current time limit or power setting downward with this
button. Which one you change depends on the power/time selection button.
Display-WEY2000 waterbed
Temp fault lamp
Cooler
display
No sensor lamp
Danger! Overheat
lamp
Water loss lamp
Temperature
displays
Heating
On/Off
power
Cooling power lamp
status
Set temp Up/Down
Cooling
temp/Sound reset
Control panel of waterbed
“Temp. fault” lamp: 1 yellow lamp shows if temperature is not correct. It
is alerting if the surface temperature differs more than +/-1 ºC from setting in
stabilised state.
“No sensor” lamp: 1 yellow lamp alerts if one or more sensors are not
functioning correctly. It can occur if mattress is pulled out of its place.
“Water loss” lamp: It lights up if water flows into wastewater tank
(approx. 3 liters) from mattress. This tank is within foot-end of side cover. The
tank’s capacity is 20 litres. If flowing is not stopped, water will appear around
mattress. With wet mattress the treatment can not go on. It can be dangerous to the
patient. (Danger of burn.)
“Heating power On/Off” button: To turn off and on waterbed heating.
The lamp is yellow when the operating power is on.
“Cooling power” lamp: It lights up when EHY power is on and cooling
unit is working.
“Cooler status” display: It warns if there is a problem with the cooling
unit. If display does not show any code (--), there is no error. If any error code
appears, please see Appendix 3.
“Danger! Overheat!”: 1 red lamp alerts, if the mattress temperature is over
38 °C.
“Temerature displays”: 3 digits for actual surface temperature + 3 digits
for set temperature (xx.xºC)
“Set temp.” “Up” and “Down”: One push of a button changes
temperature with only an unnoticeable fraction of a degree, so push the button
longer to see the change on the display. You can also use this button for “sound
reset” after switching on the device.
“Cooling temp./ Sound reset” button: By pressing this button the display
shows the actual temperature of cooling water. Additionally this button clears
sound warning for maximum 8 minutes in case of simple failures. In case of serious
errors, when treatment is dangerous, sound can not be cleared.
Tuning
What it is for
The EHY 2000plus has a special radio frequency generator, which must be
carefully tuned to the patient. If it is not done the energy which comes out of the
device (in the form of radio frequency) will not heat the patient, it is lost in the air,
into the cables, and into the electronic parts inside.
A good tuning means that the outgoing power from the device mostly goes
into the patient and does not come back. In case of proper tuning the patient
becomes part of the resonant electronic circuit. (Reflected power is minimal and
useful power is near to the forwarded power.)
How the auto-matching works
The automatic tuning tries to position the tuner into a position where the
reflected power is minimal, while the forwarded is maximal. In this position the
SWR value is calculated (SWR (Standing Wave Ratio)=(forwarded + reflected
power)/(forwarded - reflected power)). The ideal SWR value is SWR=1.0. The
device accepts values only below 3.5, but normally this value should go below 2.0.
If the machine is not able to get into a correct position, up to a specified
time, then it will restart the tuning from a given position. This is done three times.
If during this procedure the proper tuning could not be established, the device stops
and resets the parameters. In such a case please try to modify by changing the
position of the electrodes and then restart the tuning again. Device has built-in
protective system, in case of improper tuning a watchdog will limit the incorrect
high (200W or more) outgoing power.
How I can do it manually
Important: This process needs a long-term practice and it is recommended only for
experienced users!
To do the tuning manually, please switch the device to manual mode. You
have to adjust the two parameters to the position where the reflected power is
minimal together with the maximal value of the forwarded one.
The process is managed by clockwise and anti-clockwise motions, selected
by denoted buttons.
Step by step manually
Starting the device
Switch on the device (power switch). If the Emergency Stop was pressed
before, you have to free the emergency stop button first from its fixed position by
pulling it out entirely, because till it is fixed you are not able to turn the power on.
The emergency blocking status is indicated by a light in the center of the front of
the device. Emergency blocking status is also indicated with an alarm signal.
After switching the power on, the machine will start a self-test procedure
and positions auto-matching to the calibrated start (reference) position. During the
self-test procedure the emergency buzzers will give sound signals (all the three
main units must give the signal) for testing purposes. If you cannot hear these
testing sound signals, please report it to the OncoTherm service team.
Now the device is ready for treatments. The message in the info window will show
“GOOD”.
(Remark: The waterbed for proper treatment must be on heated state.)
Doing a treatment
•
Patient lies down in the bed in a comfortable position. Note that the patient
has to keep this position during the whole treatment process, so please take
care of the proper arrangement. Place the applicator on her/him on the area
intended to treat.
Important: Please remove all the metallic things from the treated Patient.
•
You have to set the desired treatment parameters, such as treatment time,
treatment power and modulation. This can be adjusted by the attached
computer, or by the switches on the device.
•
To start the RF power output (treatment), just press the start button.
•
To pause the treatment for any reasons (for example: to give an injection)
press the Stop button for a short period of time. Then you can continue the
treatment by pressing the START button again.
•
If you have finished the treatment, stop the device by pressing the Stop
button for a longer period of time.
Note: Some patient may need some relaxation after the treatment.
Switch off the device
Before you switch off the device it is suggested to finish the treatment
completely (stop it and do not pause it). After the complete stop, please wait a few
minutes before the complete shut down to make it possible for the internal cooling
to cool down the important electronic parts in order to keep their lifetime longer.
After this switch off the device by the mains switch.
Time-meters
On the front of the device a counter shows the overall running time
(Betriebstundenzähler ). This is an information for service purposes.
On the front of the device another counter shows the summarized treatment
time (Arbeitsstundenzähler). This is for the controlling of the active time of the
device.
Treatment can not be provided (device is blocked automatically) in case of
any manipulation or damage of time-meters.
Explanations
Comparison of heat absorptions
Radiative approach
Capacitive coupling (electric field)
Electro-hyperthermia (capacitive coupling) self-focuses on the lesions. The other
methods are focusing artificially on the area.
Conductivity selection
Trans-Scan (SIEMENS)
Selects by the tumor impedance
Mainly two parts:
conductivity
(macroscopic)
2. dielectric constant
(microscopic)
Current lines
External field
Healthy tissue
External field
Malignant tissue
Current lines
1.
Malignant tissue
Healthy tissue
Impedance tomography selection is used for the electro-hyperthermia
focusing.
Shape adoption
Water-electrodes
RF supply
≈
tumor
Excellent shape-adoption
Excellent coupling
Capacitive coupling
The patient’s individual shape is corrected for planparalel electric
condenser with transmitter fluid.
Safety of RF-current
The deep focusing is made by the field, and the lateral and vertical currents
for adipose tissue burn are compensated. This is the reason, why the electrohyperthermia is safe enough.
Extracellular heating
RF current
RF current
RF current
RF current
RF current
Electro-hyperthermia
(Capacitive coupling)
Electric
Healthy environment
RF current
RF current
RF current
RF current
RF current
Cells in the low
impedance
environment
Low impedance tissue
The RF current flows only in the extracellular
matrix, it absorbs to energy there and transforms
to heat.
The RF-current flows around the cells, heating up the extracellular fluid.
The heated outside electrolite heats up the intracellular matrix.
Destruction of the membrane by various
processes
Approx. temperature [oC]
42
41
Extracellular electrolyte
Temperature
gradient
Inracellular electrolyte
40
Quasi-static effects
39
Dynamic effects
38
37
10
20
30
40
50
60
Approx. temp. gradient [oC]
Temperature gradient is retained across
the cell membrane until equilibrium
43
Temperature-gradient driven processes
0.01
0.0075
Intracellular electrolyte
Heat flow
Thermo-electrical current
0.005
Thermo-mechanical pressure
0.002
Synthesis of HSP-s is late
To
0.001
Extraction of membrane HSP-s
Specific absorption rate of water
Rectifying effect
Approx. time [min]
Temperature-gradient on the membrane effectively attacks the cancerous
cells.
Completing the methods in microscopic
level
SYNERGY WITH CLASSICAL METHODS
Radiotherapy
Chemotharpy
Radiotherapy
Hyperthermia
Tumorstructure and therapy action at a blood-vessel
Action of chemoand radiotherapy
COMPLETING
ACTIONS
Action of electrohyperthermia
Blood-vessel
Well oxygenated
area
Badly oxygenated
area
COMPLETING
ACTIONS
Action of
whole-bodyhyperthermia
Action of
COMPLETING
chemotherapy
ACTIONS
Hyperthermia completes the traditional, classical modalities perfectly
Penetration depth
Incident
beam/radiation
0
100/e2 100/e
25
50
0
0
1
1
2
2
3
3
4
4
presence [%]
75
100
penetration depth
Energy
Penetration depth [cm]
depth [penetration units]
depth [penetration units]
E-field
Penetration depth [cm]
0.2
0.220
f=10 MHz
0.15
15
δ 4, j
δ 1, j
0.1
10
25
20
15
10
f=40 MHz
σ=0.6 S/m
5
fat
5
0.05 0.05
0.2
0.2
0.2
0.4
0.4
σ=1 S/m
muscle
0.6
0.6
0.8
0.8
1
σj
1.0
1.2
1.2
1.4
1.4
Conductivity (σ) [S/m]
1.6
1.6
1.6
0
10
100
1000
Frequency [MHz]
The penetration depends on the frequency. The penetration decreases
sharply by the increased frequencies
Appendix 1
Filling up the electrode
User’s manual for the EHY 2000plus big and standard
electrodes with pictures
1. Please, unplug the cooling water quick connectors and the electric cable
connector. The fixing safety button of the power plug has to be pressed down
before pulling it out and be kept pressed throughout the whole procedure. Loosen
the electrode fixing bolt screw and pull it off of the electrode-holder arm. Please
place the electrode on a clean surface without sharp edges.
2. Take off both the packing nuts (the method is done by an appropriate
coin as shown on the picture below).
Before the opening of the filling up hole, put a tray or absorbing textile
below the electrode to avoid the water to overflow.
3. Lift up the electrode to such a height that the bolus does not touch the
mounting surface. Firstly fill up the electrode with a special liquid provided by
OncoTherm to avoid algae formation. Use the small bottle with the labeling:
“Algae control for large/medium electrode” with symbol L or M After this you
can fill up the electrode with double-distilled water in this position. Use a medical
syringe for the filling. Ask for help for the process because the action needs more
than two hands. (See the picture.)
4. Close one of the filling up holes with a screw.
5. Tilt the electrode in a small angle the way that the open filling up hole
must be higher than the closed one. Please press the bolus up until water appears on
the open filling up hole. With this process you de-aerationed the bolus.
6. Put the electrode in the horizontal position. Ask for help to hold the
electrode. Push the bolus up with one of the tip of your fingers til you reach the
electrode metallic plate. The access water is taken off from the bolus with this
procedure.
Take care that during this process air must not enter into the bolus. Take
care that you can continuously see the water in the filling hole. Just in this position
screw tightly in the packing nut.
7. Turn up the electrode and check once more the appropriate volume of the
water in the bolus and that it is de-aerated. .
8. Attention! In the next pictures we show some examples on the nonproperly filling up of the electrodes and we show how to avoid the mistakes.
•
Air must not remain in the electrode because this blocks or misleads the
tuning and the auto matching procedure and so it suppresses the efficacy of
the treatment. To correct this mistake, go back to point 5.
•
By pushing the bolus with your fingertips you cannot reach the metallic
plate of the electrode: the electrode is overfilled. In this case the electrode
cannot fit well on the patient’s treated region, the tuning accuracy
decreases. Take off water from the bolus! To correct this mistake, go back
to point 6.
•
By pushing the bolus with the entire palm you can reach the metallic
electrode plate: not enough water in the electrode. In this case, during the
treatment the RF radiator electrode will be too close to the patient’s skin
and could cause unwanted burning. Please fill more water into the
electrode. To correct this mistake, go back to point 3.
User’s manual for the EHY 2000plus small electrode
with pictures
1. Please, unplug the cooling water quick connectors and the electric cable
connector. The fixing safety button of the power plug has to be pressed down
before pulling it out and be kept pressed throughout the whole procedure. Loosen
the electrode fixing bolt screw and pull it off of the electrode-holder arm. Please
place the electrode on a clean surface without sharp edges.
2. Take off both the packing nuts (the method is done by an appropriate
coin as shown on the picture below).
Before the opening of the filling up hole, put a tray or absorbing textile
below the electrode to avoid the water to overflow.
3. Lift up the electrode to such a height that the bolus does not touch the
mounting surface. Firstly fill up the electrode with a special liquid provided by
OncoTherm to avoid algae formation. Use the small bottle with the labeling: Algae
control for small electrode with symbol S. After this you can fill up the electrode
with double-distilled water in this position. Use a medical syringe for the filling.
Ask for help for the process because the action needs more than two hands. (See
the picture.)
4. Close one of the filling up holes with a screw.
5. Tilt the electrode in a small angle the way that the open filling up hole
must be higher than the closed one. Please press the bolus up until water appears on
the open filling up hole. With this process you de-aerationed the bolus.
6. Put the electrode in the horizontal position. Ask for help to hold the
electrode. Push the bolus up with one of the tip of your fingers till you reach the
electrode metallic plate. The access water is taken off from the bolus with this
procedure.
Take care that during this process air must not enter into the bolus. Take
care that you can continuously see the water in the filling hole. Just in this position
screw tightly in the packing nut.
7. Turn up the electrode and check once more the appropriate volume of the
water in the bolus and that it is de-aerated. .
8. Attention! In the next pictures we show some examples on the nonproperly filling up of the electrodes and we show how to avoid the mistakes.
•
Air must not remain in the electrode because this blocks or misleads the
tuning and the auto matching procedure and so it suppresses the efficacy of
the treatment. To correct this mistake, go back to point 5.
•
By pushing the bolus with your fingertips you cannot reach the metallic
plate of the electrode: the electrode is overfilled. In this case the electrode
cannot fit well on the patient’s treated region, the tuning accuracy
decreases. Take off water from the bolus! To correct this mistake, go back
to point 6.
•
By pushing the bolus with the entire palm you can reach the metallic
electrode plate: not enough water in the electrode. In this case, during the
treatment the RF radiator electrode will be too close to the patient’s skin
and could cause unwanted burning. Please fill more water into the
electrode. To correct this mistake, go back to point 3.
Appendix 2
Error messages of the EHY2000plus
-SW
ver.2.46
SW
ver.2.46-
SW
ver.2.54-
SW
Err.U
E18U
Er.18
Er.18
Too much power is going
out
Err.O
E11O
Er.11
Er.11
Not enough power can be
produced
Err.t
E16t
Er.16
Er.16
Tuner is moving too fast
Err.T
E17T
Er.17
Er.17
Tuner is moving too slow
Err.l
E09l
Er.09
Er.09
Watchdog is working too
fast
Err.L
E10L
Er.10
Er.10
Watchdog is working too
slow
Err.S
E15S
Er.15
Er.15
Secondary shut down path
is not working
Err.r
E14r
Er.14
Er.14
ROM is corrupted
Err.A
E01A
Er.01
Er.01
RAM is corrupted
Err.J
E08J
Er.08
Er.08
Jump command
working well
Err.E
E06E
Er.06
Er.06
Registers are corrupted
Err.P.
E13P.
Er.13
Er.13
Power relay is not working
correctly
Err.P
E12P
Er.12
Er.12
Power relay is not working
correctly
Err.d
E05d
Er.05
Er.05
D/A controller can not shut
down the system
Err.C
E04C
Er.04
Er.04
Calibration error
Err.H
E07H
Er.07
Er.07
Machine is too hot inside
Err.c
E03c
Er.03
Er.03
Cooler error
Err.A
E02A
Er.02
Er.02
RAM error ( Power)
Err.8
E008
Er.00
Er.00
RAM error ( Time)
Er.22, Er.23
Electrode
self test
Err.u
ver.2.57- Reason of the error
If any of these errors occurs, please call OncoTherm service!
change
is
not
during
Appendix 3.
Error messages of the WEY2000 (cooler)
-SW ver.2.00
Reason of the error
1.
Ventilator voltage is not appropriate
2.
Ventilator cooling unit No. 1 failure
3.
Ventilator cooling unit No. 2 failure
4.
Ventilator cooling unit No. 3 failure
5.
Peltier 1 failure
6.
Peltier 2 failure
7.
Peltier 3 failure
8.
Reference voltage is not appropriate
9.
Power supply voltage failure
10.
No. 1. Peltier sensor failure
11.
No. 2. Peltier sensor failure
12.
No. 3. Peltier sensor failure
13.
No. 1. Peltier heat sink sensor failure
14.
No. 2. Peltier heat sink sensor failure
15.
No. 3. Peltier heat sink sensor failure
16.
Influent No. 1. sensor failure
17.
Influent No. 2. sensor failure
18.
Effluent No.1. sensor failure
19.
Effluent No. 2. sensor failure
20. *
Flow failure detected on the outgoing side
21.
Water pump failure
22. *
Flow failure detected on the ingoing side
23. *
Water temperature is higher than 30°C
24.
Processor time signal failure
25.
ROM failure
26.
RAM failure
27.
Peltier No. 1. heat sink is too warm
28.
Peltier No. 2. heat sink is too warm
29.
Peltier No. 3. heat sink is too warm
30. *
Water temperature is lower than 14°C
31.
Peltier temperature is lower than 12°C
32.
Cooling can’t be turned off
33.
Processor flag failure
20*/22*: First check the water tubes of the electrode please.
23*/30*: These failures can also occur because of the improper room
temperature
If any other of these errors occurs, please call OncoTherm service!
Appendix 4.
Brain Treatment
The brain treatment needs extra care (in Germany extra
training also). The main points are:
1. Please use the small or the medium size electrode. At the beginning (if you
have enough place to position it) please use the medium size, because its
energy density is smaller. The high energy density from small electrode
needs more expertise.
2. Put a thin paper towel under the electrode to avoid free-sweating. When
free-sweat appears and lapse down, please wipe it off to avoid the short
circuit of the RF current through the liquid.
3. Please start with 30-40 W for 30 min without modulation!
4. Increase the power in the second time from 40 W to 60 W during 40 min
gradually
5. From the third time you may switch on the modulation also and treat the
patient in the regime from 40 W to 80 W gradually for 60 min
6. Always control the patient (headache, dizziness, epilepsy, etc.) and ask
before the treatment how he/she was after the last time. In case of adverse
effects, do not increase the dose, till the adverse effects continue.
7. Please carefully place the electrode: the electrode frame (black plastic) must
not touch the patient’s skin, the electrode must be far as possible from the
eye.
8. The patient must lay on the water-bed. When placing any pillow under
his/her head, the pillow will prevent the RF-current to flow, and all the
current will flow through the neck and shoulder to the waterbed. It could be
OK sometimes (depending on the place of the tumor) but sometimes it
could be problematic. When you need more positioning, put a water-filled
pillow (may be a beach pillow filled with distilled water) under the head of
the patient to be sure how the RF- current flows.
9. The patient must be in relaxed position. Please fix his/her position with
pillows or blankets at the waist or
chest, and somehow fix the body
without he/she has to keep the
body by force.
10. You need very high care in the
full
treatment
process.
Concentrate on the patient’s
complains
and
ask
their
subjective feelings regularly,
make regulations, adjustment for
his/her quality of life.
11. Please give some edema-reducing product (usually glycerol-derivatives,
Manitol, etc) when the patient has complains for the perifocal edema.
12. Please make the protocol for two-three times a week, skip at least one day
between the treatments
13. Please remove all the metals from the patient head (ear-rings, necklet,
piercings, etc.)
14. Do not allow to use phone, ear-phone, etc.
15. Do not allow for the patient to touch something outside the bed during the
treatment.
16. Sometimes the metallic implants in the oral cavity (mainly amalgam
fillings) could be slightly painful. In this case adjust the electrode till the
feeling is over.
17. Please document carefully everything, because the brain tumor could
produce unexpected reactions, which has no any connection to oncothermia,
so you have to be well prepared for any cases.
18. Please treat the primary tumor also (if it is not operated out completely),
avoid the further dissemination to support the metastasis. Please do the lung
with the large electrode for largest power (gradually from 80 to 150 W) and
at least for 60 min (or longer, till 90 min).
19. Always position the black RF cable behind the patient, and it must be far
away from the eyes. (The long time “electrosmog” could cause eye
problems).