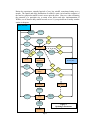
1
User Manual for the Potential Water Retention Model (PWRM) The model used by the SFWMD in the Northern Everglades Payment for Environmental Services (NE-PES) Program to estimate average annual water retention over a 10 year period of record. South Florida Water Management District June 14, 2012 Page 1 TABLE OF CONTENTS Section Page 1. Introduction and Objectives 3 2. Model Scope and Purpose 3 3. Hydrologic Setting 5 4. Technical Basis 8 5. Model Architecture 22 6. Data Input Requirements 24 7. References 54 Page 2 Northern Everglades Payment for Environmental Services Program User Manual for the Potential Water Retention Model (PWRM) for OnRanch Water Management Alternatives in the Northern Everglades 1. Introduction and Objectives The Florida Ranchlands Environmental Services Project (FRESP) collaboration partners developed the non-proprietary spreadsheet based model described in this manual. developed the non-proprietary model described in this manual. The model will be the common basis for the SFWMD and eligible landowners submitting a proposal to the NE-PES program to predict the potential retention of on-site stormwater and water pumped from offsite attributable to the installation and operation of site specific Water Management Alternatives (WMAs1) on Northern Everglades’ ranchlands. This Potential Water Retention Model (PWRM) will: Predict the daily water retained in the surface and soil profile in the drainage area influenced by a WMA with and without the WMA. Partition the retained water into water lost to ET and water that seeps through the subsurface. Aggregate the water retained over a water year or other time period of interest. Provide an average of the expected water retained over the water year(s) or other time period, based on the historical rainfall record. Rely on data that is readily available, or would be low in cost to obtain, for a typical Florida ranch and for scoping initial WMA design and operation. Require no more than 4 weeks to apply by a mid-level engineer (BS with experience or MS) or contractor. Be benchmarked using data streams for the eight pilot sites to provide a high degree of confidence that the resulting model can be applied to sites in the Northern Everglades. Is sufficiently documented and open access to allow model improvement over time as new data streams associated with the program’s verification requirements become available. 2. Model Scope and Purpose The purpose of the PWRM is to estimate the amount of rainfall and other inflows to the site that are retained (as opposed to detained) with and without a proposed specific WMA design and operation. The estimates are made on a daily volumetric basis using historical daily rainfall events recorded within the Northern Everglades Basin, other user-provided daily input data sets, published soil parameters, and evapotranspiration (ET) estimates for the region. 1 Water Management alternative (WMA) refers to the combinations of construction and management practices selected and implemented by the landowner within a defined drainage basin of the ranch in order to produce the water management services. Page 3 The technical methods employed by the model to calculate the various hydrologic components are based on empirical equations and data already well documented in literature, and widely used for hydrologic analysis by State and Federal agencies and private practitioners in Florida. It is not the intent of the model to introduce new or untested hydrologic algorithms or to expand the current knowledge base of how the hydrologic system functions in the Northern Everglades Basin. Further, no attempt has been made to generalize the model for use outside of the Northern Everglades. As such, it employs algorithms and data already used by the South Florida Water Management District [7], Florida Department of Environmental Protection [7], the Natural Resources Conservation Service [1][4] and in extensive field level studies conducted within the Basin such as work done by Capece, et.al. [3]. While the use of empirical formulas is very well accepted and adaptable to a spreadsheet based model, they are simply estimates of a much more complicated process. Accordingly, the model parameters and coefficients have been fine tuned during the calibration and verification process (benchmarking) by comparing the model output to actual measurements made at the currently participating ranches. Since the model’s major objective is to compute the volume of rainfall runoff and retention on a daily basis, no attempt has been made to equip it to calculate instantaneous runoff rates, peak runoff rates for specific design storm events or hydraulic parameters such as headloss, velocity, etc. This does not detract from the accuracy of the model in accomplishing its objectives and is well suited to the daily rainfall data available to accomplish the water balances. While it is true that the duration and intensity of a rainfall event can affect the amount of storage and discharge, sufficient instantaneous rainfall data are not available to compute a probabilistic distribution beyond the total daily volume of precipitation. The PWRM calculates water balances without knowledge of where features are located on the site (no spatial awareness). Accordingly, it is not necessary to identify specific locations of natural and WMA features. Each feature is simply represented as a water balance component that is linked to other features through appropriate mechanisms. For example, lateral seepage from vegetated areas to surface water features is computed using modelgenerated, daily water elevations in each component, user-provided dimensions to estimate the width and depth of the groundwater flow interface and an assumed flow length for computation of seepage via the Darcy equation. Another example would be in how runoff from vegetated surfaces to surface waters is computed. The NRCS equation simply computes runoff based on the daily-computed depth to root zone averaged over the entire vegetated area, a weight-averaged specific capacity (units of water per unit of soil) and the daily rainfall. This is consistent with the NRCS’s development of the runoff formula, and assumes all computed runoff contributes to increased surface storage no matter how far the water would actually have to travel to get there. Input features have been included to define the type and size of drainage control features such as weirs, open ditches, pumps and culverts. If the information is available, the user can also input daily flow and stage data for offsite receiving bodies such as ditches that are adjacent to the site. Input screens are also provided to describe above ground impoundments, surface water pumps and flowing wells. Page 4 There are two modes in which the model can be used. The first mode calculates the runoff/retention volumes for use in analyzing the potential water retention of a candidate NEPES program site and various proposed water management alternatives (WMAs) using the historic rainfall and ET data records. This gives the participants an opportunity to evaluate the cost and benefit of the WMAs prior to implementation. Once a candidate WMA site is selected and implemented, the model can be used in another mode to monitor the effectiveness of the site by comparing computed retention and discharge volumes to those measured in the field, using actual daily rainfall and stage data collected at the site. 3. Hydrologic Setting A. Introduction As shown in Figure 1, the hydrologic processes at work in either a natural or modified watershed, are numerous and complex. They are made even more complex by randomly varying series of rainfall events, meteorological changes, seasonal climatic patterns, soil types, topography and man-made changes to the natural landscape. B. Soils & Groundwater Movement Predominant soils within much of the Basin can be characterized as shallow, droughty surface sands with high infiltration and lateral hydraulic conductivities, underlain by a very low permeability layer of cemented silt and sand (often referred to as a hardpan). The depth to hardpan occurrence varies from about three feet to five feet below ground and the layer can be up to two feet thick. Generally water available for vegetative uptake and evapotranspiration will occur above this layer. Depressional wetlands in the locale are underlain by low permeability organic silts and clays often perching the water table. Where these soils occur, the predominant mode of groundwater movement is lateral, saturated flow to lower elevation ground or to/from adjacent surface water bodies. However, in some portions of the Basin, site soils can be characterized as pervious surface beds connected to a lower elevation aquifer by semi- impervious layers called aquitards. These soils will exhibit both horizontal seepage and vertical seepage to/from the lower aquifer. Typically one would observe a water table aquifer and a semiconfined aquifer below the aquitard. Vertical seepage rates are controlled by the conductivity of the aquitard, and the relative potentiometric elevation of the two aquifers. While lateral flow in the lower, semi-confined aquifer can transport water to down stream surface features, this process is not usually well defined and is beyond the scope of the PWRM. Accordingly, the model reports vertical seepage as retained water in that it doesn’t directly contribute to surface water discharge at the site boundary. The user is cautioned to carefully evaluate the site soil conditions to determine if it is appropriate to include a vertical seepage component in a model run. C. Rainfall The Northern Everglades Watershed experiences large amounts of precipitation. Typically, the majority of the rain falls in the summer months from June to October. The Page 5 Basin also experiences extended periods of very low rainfall, sometimes lasting over a month. The spatial and daily distribution of rainfall is quite varied and the response of the land to a particular rainfall event is never quite the same. However, when evaluating the potential of a particular site to retain water before and after implementation of WMAs, use of historic daily rainfall records over a 10 year period from a nearby weather station is adequate. Daily Rainfall Vegetation Interception Evaporation Surface Runoff Dike Evaporation Ditch Direct Rain Control Structure Impoundment Storage Surface Runoff Ditch Pump Upstream Water Source Horizontal Seepage Vertical S Ditch Deep Groundwater Downstream Receiving Body Evapotranspiration Ditch Direct Rain Dike Native Surface Storage Surface Runoff Horizontal Seepage Control Structure Ditch Vertical Seepage Seepage Impoundment Deep Groundwater Evapotranspiration Infiltration Horizontal Seepage Shallow Soil Storage Vertical Seepage Ditch Figure 1 Hydrologic Processes Deep Groundwater Page 6 D. Runoff & Infiltration Of more importance is how the daily rainfall data is used to compute infiltration and runoff volumes. For modeling purposes a site can be viewed as having two major components, vegetated surface that is not under water and land surface that has standing water on it. Rainfall is added directly to the inundated part. Rainfall landing on the vegetated surface either directly evaporates from leaf surfaces, infiltrates into the soil or runs off. The rate at which rain will infiltrate the ground surface is generally quite high in this Basin. Accordingly, the runoff response is mostly determined by how much soil storage is available just prior to the rainfall event, Capece, et. al. [3]; and much less so by ground slope and type of vegetative cover. Capece [3] and others have, therefore, replaced the initial abstraction term in the NRCS runoff equation with available soil storage and estimate the runoff curve number as a function of available soil storage. In South Florida, this seems to provide adequate estimates of runoff with a better fit of observed and computed values at higher rainfall amounts. E. Evapotranspiration Pasture grasses dominate the vegetation found in the Basin’s ranchlands. Mixed in with the pastures are native wetlands (both herbaceous and forested) and upland forests. Occasionally one will find other agronomic activities within the site including citrus and vegetable production. From a water balance perspective, the type of vegetative cover affects ET due to variations in the seasonal growing cycle, texture of the vegetated surface, percent of ground cover and effective root zone. Seasonal climatic variations of temperature, cloud clover, precipitation, wind speed and direction, foliage cover, incoming solar radiation, albedo and humidity have a direct impact on evapotranspiration. These variations occur continuously during the day but have statistically documented seasonal trends. According to the literature, ET is greatest from an open water surface [5] [6]. As direct ET measurements are only performed in a research setting, ET for specific agricultural production sites is estimated by various ET formulas. This is typically done in Florida by application of models such as the Penman or Blaney-Criddle formulas. The Penman equation is potentially more accurate as it takes into account many more climatic factors than the Blaney-Criddle. However, the data needed to make the Penman computations are often unavailable for a specific site. Accordingly, Penman ET computations are usually made from data collected at nearby weather stations that do monitor the requisite meteorological parameters. The historic monthly average ET rates computed in this manner, [5][6], are then assumed to be representative of average daily ET rates within that month divided by the number of days within the month. The open water surface ET rate is adjusted for vegetation through two methods. Recent modifications to the Penman equation attempt to adjust several parameters to directly compute ET for a reference crop, which is defined as a “short well-watered grass”. Another method to obtain the reference crop ET is just to apply a constant reduction Page 7 factor (reference crop ET = 70% of open water ET). Both methods provide reasonable approximations. ET rates for other types of vegetation are computed by the application of empirical coefficients that account for the type of crop and growth stage. While these models do a reasonably good job predicting ET when water is readily available to the plant, they overestimate evapotranspiration of rain-fed vegetation experiencing less-than-optimum moisture conditions unless appropriate adjustments are made. The effective root zone is viewed herein for modeling purposes as the depth to which a plant can readily consume water, either directly or indirectly through capillary rise, from the saturated water table (phreatic zone) and evapotranspire water at the plant’s maximum seasonal rate. Whenever the top of the phreatic zone recedes below the effective root zone, the plant is assumed to receive water only from the vadose zone. As moisture within the vadose zone is depleted, ET rates diminish to the point of permanent wilt. The partitioning of ET response based on water table depth and effective root zone is well documented and described by Jacobs, J.M., et.al. [2]. 4. Technical Basis A. PWRM Water Balance Partitioning The PWRM is a one-basin model. It is assumed that the drainage divides, i.e. site boundaries, have been carefully identified by the user such that it can be assumed that there is no sheet flow of water into the modeled basin from adjacent basins. If the user wishes to route gravity flow from another upstream basin, they must do so by preinserting a daily flow dataset from a previous model run of the upstream basin into the current model. Caution must be exercised in how this is done. When two basins are hydraulically linked the stage in the downstream basin can, to varying degrees, modify the inflow from the upstream basin. The PWRM partitions a modeled site into three separate water balance components: 1. the vegetated land surface that is not under water, 2. connected surface water storage (connected by ditches to the site discharge points), and 3. un-connected impoundments (no ditch connection). Un-connected surface storage can consist of either pumped aboveground impoundments or below-ground storage in wetlands or lakes which are isolated from the site’s discharge points. On a daily basis the model computes how much of site is under water (the connected surface water storage) and how much is not. This is determined by the stage-area relationships provided by the user. If an impoundment is present, the area of the impoundment is included in the total site area but the stagestorage curve for the connected surface water storage does not include the storage associated with the impoundment (this is explained further in the following paragraphs). The three components are linked to each other through empirical formulas describing conveyance mechanisms such as seepage, runoff and pumping. B. Stage-Storage and Stage-Area Curves The basic ranch site usually includes upland pasture and native areas, wetlands and ponds that have been hydraulically connected by ditches, one or more surface discharge points Page 8 and ditches that hydraulically connect these features. It is recognized that there can be significant depressional storage features, like wetlands or lakes, which are not directly connected to the onsite ditch system and discharge points. When these un-connected depressional areas are present, either in the pre or post WMA condition, they are treated separately as impoundments and the following discussion does not apply to them. Further, pumped above-ground impoundments are also treated separately from the rest of the site. At any given time, a portion of the site will be inundated (connected storage) and a portion will not (vegetated surface). The PWRM computes the amount of land that is inundated, and the volume of water in the inundated area, each day by use of stagestorage and stage-area curves. Employing whatever topographical and map data that is available, the PWRM user must develop a stage-area table and input it to the model. Typically, this is done by measuring the land area encompassed by each one foot contour. It is not necessary to have detailed one-foot contour maps to prepare the stage-area table. However, the accuracy of the model is directly related to the accuracy of the stage-area table, with flat sites being less affected than steep sites. Upon input of the stage-area table, the model computes a companion stage-storage table. Special Note: If the user elects to model un-connected depressional storage, it is modeled as an impoundment and the area at each stage below the rim elevation of the depression is not included in the stage-area table. However, the area of the depression at or above the rim elevation is included in the table. This is necessary because the PWRM computes a separate water balance for the un-connected depressional storage until the depression is filled to the rim elevation. When the depression is filled to the rim elevation the storage above that elevation is considered to be hydraulically connected and is accounted for in the stage-area and stage storage tables. As direct reference to the stage-area and stage-storage tables is computationally cumbersome for the model, the tables are approximated through a curve fitting technique so that an equation can be used in the daily calculations to describe the stage-area and stage-storage relationships. Upon input of the tables, the PWRM plots the data and prompts the user to select a curve type (polynomial or linear) that best fits the data. C. Water Balances The PWRM computes water balances on a daily basis for various inputs, outputs and storage components. Separate water balances are performed for vegetated surfaces and for those that are under water (inundated). This is shown graphically in Figure 2 and the computational procedure is discussed in the later paragraphs. For vegetated surfaces, the daily change in soil storage (ΔS) from the water balance can be presented as follows: ΔS = P - R - ET - HSP - VSP (1) Page 9 Where: ΔS = change in soil water storage P = precipitation R = Surface Runoff to onsite connected storage or to depressional impoundment ET = evapotranspiration from vegetated surface HSP and VSP = horizontal and vertical seepage (seepage into the soil is numerically negative) As discussed below in Section 4.F., the difference (P - R) is called total infiltration (TI). TI is further delineated into infiltration that remains in the vadose zone (VI) and infiltration that percolates down to the water table, phreatic zone, (PI). The PWRM tracks accumulated moisture content in the vadose zone to modify ET for drought conditions but does not track accumulated storage in the phreatic zone (see Section 4.F.). However, the PWRM does track the elevation of the phreatic zone surface (water table) as water is added and depleted to determine if the vegetation is in a drought condition. For inundated surfaces that are hydraulically connected (ditches) to the site surface water discharge points the water balance for accumulated surface storage is as follows: SSN = SSN-1 + P N-1 + R N-1 - Eo N-1 - D N-1 - SF N-1 - HSP N-1 - VSP N-1 + OF N-1 + IR N-1 - PU N-1 + ED N-1 (2) Where: N = day for which computation is done P = precipitation R = runoff from vegetated surfaces Eo = direct evaporation from open water surfaces D = surface discharge out of the site discharge points (D can be negative if backflow occurs) SF = sheet flow discharge out of the site when the elevation of the stored water exceeds the elevation of the drainage divide HSP and VSP = horizontal and vertical seepage either out of the site or to adjacent vegetated surfaces (seepage into the stored water is numerically negative) OF = offsite inflow to site (manually input by the model user or by pump) IR = irrigation (since most ranches seep irrigate, irrigation is input to the surface storage and connected to the vegetated surfaces via the horizontal seepage component) PU = pumped outflow to an above-ground impoundment or offsite ED = emergency overflow from an impoundment Impoundments are categorized as depressional and above-ground with pumped inflow. Depending on the type of impoundment some of the terms are deleted. The general water balance for accumulated surface storage in these features is as follows: SSN = SSN-1 + P N-1 + R N-1 - Eo N-1 - CD N-1 - HSP N-1 - VSP N-1 + PU N-1 - ED N-1 Page 10 (3) Where: N = day for which computation is done P = precipitation R = runoff from vegetated surfaces (applies only to depressional impoundments) Eo = direct evaporation from open water surfaces CD = surface discharge out of the impoundment control structure to offsite HSP and VSP = horizontal and vertical seepage out of the impoundment (depressional impoundments can have horizontal seepage into them) PU = pumped inflow from onsite connected storage or from offsite source to impoundment (applies only to above-ground impoundments) ED = emergency overflow from above-ground impoundment when water level exceeds design maximum stage of above-ground impoundment or rim elevation of depressional impoundment D. Precipitation Ten years of SFWMD daily rainfall data measured at their Okeechobee Field Station, are embedded in the model in inches of rainfall. The period of record is from January 1, 1999 to December 31, 2008. The user can view the data set in the look-up tables section of the PWRM. Longer periods of record can be used but become computationally burdensome to typical desktop computers. If the user wishes to evaluate a site using a longer period of record it is suggested that rainfall data be input in ten year increments, running the model as many times as needed to cover the desired period of record. If the user has site-specific daily rainfall records, they can be substituted for the SFWMD data in the look-up tables. However the data set has to be continuous for the same tenyear period of record. E. Surface Runoff From Vegetated Surfaces Incoming rainfall will contribute directly to surface storage, infiltrate to become soil storage or run off. After studying the runoff from gauged watersheds in response to rainfall, the SCS (now NRCS) [1] observed that the ratio of actual rainfall retention in a watershed to the potential maximum retention is equal to the ratio of the actual runoff to the potential maximum runoff. In formula terms: F = S’ Q P Where: F = actual retention S’ = potential maximum retention (S’ >= F) Q = actual runoff P = potential maximum runoff (P >= Q) Further: F = P – Q (4) (5) Equation (4) is rewritten and solved for Q as: Q = P2 / (P + S’) (6) Page 11 Buy SmartDraw!- purchased copies print this document without a watermark . Visit www.smartdraw.com or call 1-800-768-3729. Figure 2 Page 12 Since NRCS observed that runoff starts after some rain accumulates on the vegetation surfaces (called the “initial abstraction”), they modified equation (6) by subtracting the initial abstraction (Ia) from the rainfall (P) and added it to the potential maximum retention. It is then rewritten as: Q = (P – Ia)2 / ((P – Ia) + S) where: S = S’ + Ia (7) Accordingly equation (7) is the rainfall-runoff relationship with the initial abstraction taken into account. As understood by NRCS, the initial abstraction consists of mainly interception by vegetation and shallow depressional surface storage; all of which occur before runoff begins. To remove the need to estimate these components, they developed an empirical relationship between Ia and S from observation of small watersheds as: Ia = 0.2 S (8) By substituting the relationship of Ia and S into equation (7) we arrive at the standard NRCS method of estimating direct runoff from rainfall as: Q = (P – 0.2S)2/(P + 0.8S) (9) More recent work by Woodward, D.E., et.al. [10] showed that the ratio of initial abstraction to maximum potential retention (Ia/S) originally assumed by the NRCS (ratio of 0.2) is incorrect and proposed a ratio of 0.05. Use of the 0.05 ratio proved to provide much better correlations of measured vs. modeled discharges. Accordingly, equation (9) was modified to: Q = (P-0.05S)2/(P+0.95S) (10) NRCS noted that the amount of available soil water storage capacity can change when there are successive storm events of sufficient magnitude and frequency that the soil storage cannot fully recover prior to the next storm. The NRCS attempted to account for this by creating three “antecedent moisture conditions” that would modify the value of (S) (also expressed as the curve number (CN), where CN = 1000/(S+10)). Capece, J.C., et.al. [3], reviewed rainfall-runoff data collected by the U.S. Geological Survey and SFWMD for five small agricultural watersheds in the Lower Kissimmee River and Taylor Creek-Nubbin Slough Basins, which are within the Northern Everglades watershed to evaluate the performance of current runoff estimation techniques based on NRCS’s equation. The watersheds ranged in size from 20 to 3600 acres, and included improved and unimproved pasture. Runoff data for these watersheds was plotted against rainfall and compared to the predicted runoff for seven models that all rely on the NRCS runoff equation. They found that methods relying on measured water table elevations to assess the antecedent moisture condition (more accurately the amount of available soil storage above the water table) best matched the field data. Capece, J.C. et.al. [3] concluded that use of the soil storage capacity curve developed by the Agricultural Research Service (ARS) best fit the observed runoff data. Page 13 The author compared the ARS curve [3] to the available moisture capacity (AMC), data found in the NRCS Soil Survey [4] for Myakka soils and found the values to be quite similar. AMC is expressed as the volume of water in inches stored per unit depth of soil. Accordingly, it should be appropriate to use published AMC data [4] for the purpose of estimating the value of S and consequently the curve number (CN) for each soil series represented on the site. Accordingly, S is computed by: S = DWT * AMC (11) Where: DWT = depth to water table, feet AMC = available soil moisture capacity from NRCS Soil Survey (weightaveraged over the surficial soil strata presented in the Soil Survey), inches of water per inch of soil It is interesting to note that, although both the ARS [3] and SFWMD [7] values are numerically similar to the NRCS AMC values, the NRCS defines the AMC as the difference between field capacity (the maximum amount of water held that can be held in the soil pores after gravity drainage is complete) and the amount of moisture at the vegetation wilting point. Intuition would lead the practitioner to use higher values, closer to the soil porosity, in equation (11), not the AMC. However, research by Jaber, F.H., et.al. [9] showed that a soil water table rises much higher than would be predicted by dividing the amount of applied water by the soil porosity. They found that the observed rise was better predicted by using much smaller specific storage values. It was surmised that this occurs due to air entrapment and partial filling of the soil pores during initial infiltration. This further supports the use of AMC data to compute changes in the water table and (S). After the model has computed all of the inputs and outputs to the water table from the previous day, the depth to the water table is recomputed for the following day as: DWTN = DWTN-1 + (PIN-1 – HSPN-1 - VSPN-1 – ETN-1) / AMC (12) Where: DWT = depth to water table, feet AMC = available moisture capacity (weight averaged over the surficial soil strata), inches of water per foot of soil HSP and VSP = horizontal and vertical seepage out of the phreatic zone PI = amount of the total infiltration (TI) from the previous day rain that ends up in the phreatic zone ET = Evapotranspiration that depletes water from the phreatic zone (water table) The new value of (S) is then computed by substituting the value of DWTN into equation (11). Page 14 F. Infiltration & Soil Storage Once the surface runoff is computed for the daily rainfall, total infiltration (TI) into the soil is the difference of rainfall minus runoff (assumes that the initial abstraction eventually infiltrates). As touched on earlier in the Manual, the soil is delineated into two zones for modeling purposes, the vadose (unsaturated) and phreatic (saturated or water table). Depending on the depth to water table (top of the phreatic zone) relative to the effective root zone of the vegetation, the model partitions the TI into contributions to the vadose zone (VI) and the phreatic zone (PI). If the water table is within the effective root zone, it is assumed that the vadose zone moisture content is equal to the available moisture capacity (AMC), there is no contribution to the VI and all of the TI is placed into the phreatic zone. If the water table is below the effective root zone, the model checks the moisture content within the vadose zone and contributes a portion of TI to the vadose zone, up to the AMC. Any TI not used to re-supply the vadose zone is contributed to the phreatic zone via PI. After the TI is appropriately distributed to the vadose and phreatic zones, the change in the water table elevation is computed as shown in equation (12). G. Water Surface Evaporation Evaporation from a free water surface (Eo) can be estimated by several existing models. The Penman (1948) equation is probably the most widely accepted energy based method [5]. This approach combines two components to estimate evaporation. They are a radiative component and an advective component. Although the Penman equation provides far better estimates of Eo than traditional models like Blaney-Criddle, it requires the input of several climatic parameters, including net incoming solar radiation, air temperature, wind speed and relative humidity. These parameters are not usually collected at individual ranches, or the period of record of these observations at local weather stations is very short (less than 10 years). Jones, J.W., et.al. [6] computed Eo rates with the Penman equation on a monthly basis for average meteorological conditions in various parts of the State from meteorological observations available at that time. The South Florida Water Management District has accumulated up to six years of daily Eo data at a few sites in the Northern Everglades and computed Eo with the Simple Abtew Equation, Abtew, W. [11]. The data is available on the SFWMD’s DBHYDRO data base. Since the PWRM will be used to evaluate potential sites over a period of record of 10 years or greater, the average Eo data presented by Jones, et.al. [6] is currently being used. These average rates are provided in the model from a look-up table. Daily values are computed by dividing the monthly data by the number of days in the month. The user should note that the average Eo values are not correlated to actual meteorological conditions at any particular site. Rainfall is typically associated with cloud cover, which reduces net radiation, increases relative humidity and changes the Page 15 wind speed; all of which affect Eo. Accordingly, one must expect an error introduction when uncorrelated rainfall and Eo data sets are used. The error should be most pronounced during periods of persistent rainfall. Validation runs indicated that the error is somewhat “averaged out” over a year’s time but significant deviations can be seen between model-computed and measured discharges when compared over shorter periods of time. Daily values can deviate significantly. As more correlated Eo and rainfall data becomes available, the model user should employ the correlated data. Certainly, when the model is run in real time for site compliance monitoring, correlated data from the closest weather station should be used in lieu of the average Eo values. H. Vegetation Evapotranspiration Evaporation from a free water surface (Eo) is somewhat different than evapotranspiration from a vegetative cover (ET). Jones, J.W., et.al. [6] discussed that the difference is largely due to differences in the reflectivity of the surfaces, which in turn affects the net incoming solar radiation (Rn). This difference is found not only between water and vegetated surfaces, but also between the various types of vegetated surface, e.g. grass versus trees. Accordingly, free water surface evaporation rates (Eo) is converted to (ET) via the introduction of two coefficients. The first coefficient converts (Eo) to a reference (ETp), defined as ET for a short, well watered grass surface as follows: ETp = ETo x K1 (13) Where: ETp = evapotranspiration for short, well watered grass ETo = evaporation from a free water surface K1 = coefficient for short, well watered grass = 0.7 The value of (ETp) is converted for other types of vegetation as follows: ETv = ETp x Kc Where: Kc = vegetation coefficient (14) Values of Kc are included in the model look-up tables. I. Drought Evapotranspiration Jacobs, J.M., et.al. [2] noted that the methods used to predict evapotranspiration overestimate the amount during drought conditions when the vegetation is not benefited by an adequate water supply. They partitioned ET into two stages, wet and dry, based on the relative position of the water table to the effective root zone and employed a reduction factor based on the vadose zone soil moisture. As ranch lands within the Basin are not irrigated at all or are possibly irrigated at rates below the grass water demand, a similar mechanism is included in the PWRM water balance to reduce (ETv) during low rainfall periods. Accordingly, the values for drought conditions (ETd) can be calculated by: ETd= B x ETv (15) Page 16 Where: B = reduction coefficient based on vadose zone moisture content, dimensionless The reduction coefficient (B) is applied when the vadose zone soil moisture content falls below the AMC and decreases with decreasing soil moisture content (SMC) until the wilting point is reached. Jacobs, J.M., et. al. [2] found that the reduction coefficient followed a power law relationship based on a measured soil moisture content ranging from field capacity to permanent wilt (AMC). Field capacity, is defined as the amount of soil moisture held by soil particles after gravity drainage of the matrix has ceased. The effective root zone is defined as the depth at which most of the plant roots are found. As long as the water table stays below the effective root zone, the plant continues to deplete the moisture held by the soil particles within the effective root zone until the moisture content is reduced to the wilting point. At that point essentially no moisture is available for plant uptake and evapotranspiration minimizes. Values for the AMC are available from the NRCS Soil Survey [4]. For use in the PWRM, the same power law relationship is used; however, the linear coefficient is varied depending on the soil type and depth of effective root zone as follows: B = K x SMC0.427 (0.0 <= B <= 1.0) (16) Where: K = 1/ AMC0.427 SMC = soil water content, inches, with a maximum value equal to the (AMC) and a minimum value of zero. When the water table is within the plant’s effective root zone, water is readily available for crop uptake and B would have a value of 1.0. The PWRM water balance checks the depth to water table on a daily basis and when it drops below the effective root zone, the ETd rate is adjusted downward until the permanent wilting point is reached, when ETd becomes zero. Small rainfall events that occur while the water table is depressed below the effective root zone might not provide enough infiltration to raise the water table, but they will replenish the SMC in the effective root zone. Therefore, the SMC is adjusted based on these additions, commensurately increasing the ETd. These conditions are best shown by formula for each condition: Condition 1: Water Table at or Within Effective Root Zone (17) ET = ETv Condition 2: Water Table Below Effective Root Zone ET = ETd and (18) SMCN = SMCN-1 - ETdN-1 + VIN-1 (19) Page 17 Equation (19) is controlled by a logic test that will not allow the vadose infiltration (VI) to increase the SMC above the available moisture capacity (AMC). When there is excess TI, the SMC is set equal to the AMC and the remainder of the TI is added to the phreatic zone. J. Irrigation Where pastures are irrigated, irrigation is usually accomplished through a network of widely spaced ditches and shallow swales. The net effect of irrigation is to add water to the onsite surface storage followed by horizontal seepage into the ground water table. Accordingly, on ranches where irrigation is practiced or proposed as a WMA the PWRM water balance adds irrigated water to the surface storage volume. Horizontal seepage is estimated with the Darcy equation linking the surface storage and vegetated surface components discussed earlier. Daily irrigation volumes from onsite wells are input by the user based on irrigation records or through some proposed irrigation strategy. The PWRM does not have the capability to automatically determine when and how much irrigation water could be applied. Irrigation water pumped from outside surface sources can also be included in the model as an offsite inflow. K. Horizontal Ground Water Seepage Horizontal seepage of groundwater in ranches within the North Everglades Basin is predominantly shallow and horizontal above an impermeable layer. Horizontal seepage can be to or from the ground water to ditches or from above-ground impoundments. Regardless of the situation, a simple and useful formula developed by Darcy can be used to estimate horizontal seepage rates. The Darcy velocity is expressed in one dimensional flow above the hardpan as: v = K x (H1 – H2) / L (20) Where: v = Darcy velocity, feet/day K = soil hydraulic conductivity, feet/day H1 - H2 = elevation of the ground water minus the ditch water elevation, feet L = distance water travels in the soil, feet The seepage rate per unit width of flow area (q) is computed by: q = v x (H1 + H2) /2 where: q = lateral seepage per unit width, feet2 /day (21) Horizontal seepage (HSP) to or from the vegetated area and a surface water source that is either adjacent to or within the site would then be computed by multiplying (q) by the length of the external adjacent ditch or by two times the length of the internal ditch. In the case of an impoundment that is located next to a ditch, the actual value of (L) should be used, as it is a quantifiable distance from the edge of water in the impoundment to the Page 18 edge of water in the ditch. In the cases of seepage to or from a surface water source to vegetated areas the PWRM is not able to understand the geometry of the site so (L) is estimated by the user based on average site conditions. L. Vertical Ground Water Seepage If the user believes that the site lithology supports inclusion of a vertical seepage component, it can be turned on in the input screen. As discussed in the previous section regarding the hydrologic setting of the modeled area, it is assumed that the water table aquifer is separated from the lower aquifer by a lower permeability aquitard. Vertical seepage is estimated using the Darcy velocity equation (20) with a reasonable estimate of the aquitard hydraulic conductivity provided by the user. In this case, (H1 - H2) is now the elevation difference between the two aquifers and L is now the vertical thickness of the aquitard. The user must provide an estimate of H1 - H2. VSP is then computed by multiplying the Darcy velocity by the site area. In the real physical system the vertical seepage into the aquifer below the water table could be expressed as recharge to downstream surface waters. However, the fate of vertically seeped water is beyond the scope of the PWRM. It is considered a site water retention as the water is not directly discharged to surface waters adjacent to the modeled site. M. Surface Water Discharge Controls 1. Weir Flow: Water can leave the site by surface flow through several mechanisms: sheet flow over the site boundary, open ditches, culverts, surface water pumps and weirs. Discharge (D) via a flashboard riser weir is computed based on the rectangular sharp-crested weir formula, SFWMD [7]: D = 3.3 x L x H1.5 Where: D = discharge, feet3/sec L = weir length, feet H = head over the weir crest, feet (22) For V-notch weirs the formula becomes: D = 2.5 x Tan (Ө/2) x H2.5 (23) Where: Ө = angle of the notch, degrees H = head of water over the notch, feet If the weir becomes submerged, i.e. the downstream water level is higher than the weir crest; the discharge (Ds) will be reduced as follows: Ds = D x (1- (Hd/H)1.5)0.385 (24) Page 19 Where: Hd = downstream head, feet, relative to the weir crest Through the stage-storage function, the PWRM computes onsite surface water elevations on a daily basis. If the user has provided downstream elevations, the model will compare the two elevations with the weir crest elevation to determine if submerged flow or reversed flow is occurring. 2. Open Ditch or Culvert: Flow trough an open ditch or culvert is modeled with the Manning Equation as: D = A x 1.49/n x (A/P)2/3 x S1/2 Where: (25) A = cross-sectional area, feet n = Manning roughness coefficient, dimensionless P = wetted perimeter, feet S = slope of water surface, feet/foot The stage storage function computes the daily onsite surface water elevation. If the user doesn’t provide elevation data for the downstream end of the ditch or culvert, the user must enter a water surface gradient to complete the calculation. 3. Pumps: Surface water pumps can be included in the model to fill above-ground impoundments and/or discharge water from the site. The user is required to input a nominal pump capacity, an “on” elevation and if desired hours of operation per day. The PWRM will operate the pump at its nominal daily rate in the discharge mode, based on the model-computed onsite surface water elevation, the specified “on” elevation and the operating time. However, if there isn’t enough water left in the onsite surface storage, the pump will remove only the amount available. If a particular site includes pumped offsite inflow, the inflow is handled like a gravity inflow. That is, the user must provide a table of daily inflow volumes based on some pumping strategy. N. Computational Sequence 1. On day one of the model computation, the model uses assumed initial conditions for on-site groundwater and surface water stages (elevations) and the model partitions the total area into the inundated area (connected surface storage) and vegetated area. 2. Daily rainfall is applied to each of the three water balance components (two if no impoundment is included). If there are other sources of water, like irrigation or inflow from another basin, those amounts are added to the surface storage based on the daily flow data provided by user. 3. The NRCS runoff equation computes runoff from and total infiltration into the vegetated surface component and the runoff is added to the connected surface storage volume and depressional impoundment, if there is one. When a depressional impoundment is included, the user must tell the model what percent of the vegetated drains to the connected storage, with the rest draining to the impoundment. Page 20 4. Depending on the water table elevation versus the effective root zone of the plants within the vegetated component, the model decides how to prorate the total infiltration between the vadose and phreatic zones. 5. At the same time, depending on the water table/effective root zone relationship, the model computes ET for the vegetated surface. If the water table is within the effective root zone, all the infiltration goes to the phreatic zone, the plants ET at the maximum rate for that time of year and the ET water is deducted from the phreatic zone. If not, the model checks the moisture content of the vadose zone, reduces the ET for the less than well watered condition and deducts the ET water from the vadose zone. It also attempts to refill the vadose zone up to the maximum available water capacity and, if there is any infiltration left over, it goes into the phreatic zone. 6. Open water evaporation is simultaneously deducted from the connected surface storage based on the surface area computed by the stage-area curve, and from the impoundment based on the user supplied impoundment area. 7. The model compares the water table elevation to the onsite surface water elevation computed by the stage-volume and computes lateral seepage to or from the water table by the Darcy Equation. This is also done independently for the above-ground impoundment. 8. If vertical seepage is included, the model compares the water elevation in each of the three components to the potentiometric elevation of the lower aquifer and vertically seeps water based on the Darcy equation. 9. Based on the stage of the onsite surface water storage and discharge control devices selected by the user, the model adds or deducts water from the site surface storage and the impoundment. 10. Depending on the pump and impoundment characteristics (nominal pump rate, “on” elevation, maximum storage elevation, size of the impoundment) provided by the user, water is taken from the connected surface storage to the above-ground impoundment, if one is included. The model can also run a surface water pump that discharges directly offsite with a similar set of input specifications. 11. If a depressional impoundment is included, the model continues to add rainfall, seepage and runoff until the impoundment is filled to the rim elevation. As long as the water level is at the rim elevation further rainfall, seepage and runoff is returned to the connected surface storage as it can no longer hold these additions without spilling out onto the rest of the site. If the elevation of the connected surface storage exceeds the rim elevation of the depressional impoundment the storage on top of the impoundment is accounted for in the stage-storage data provided by the user. 12. If the amount of water added to the connected surface water storage results in a stage above the basin boundary elevation, the model assumes the excess water sheet flows from the site and that amount is deducted from the connected storage volume. 13. The model re-computes the water table, onsite surface storage and impoundment elevations after making the additions and subtractions above. These data are then used as initial conditions for the next day of the model run. 14. This process goes on for every day of the model run. When finished with the above computations for each day, the model totals on a monthly and annual basis the rainfall, surface discharge, change in volume of water stored onsite, sheet flow out, vertical seepage out and evaporation (delineated into open water Eo and vegetation Page 21 ET). Rainfall plus offsite inflows and irrigation, minus surface discharges and sheet flow out the basin boundary equals retention. O. Logic Tests There are numerous logical functions embedded in the model computations to keep the PWRM from applying the formulas when they are not appropriate or creating/deducting water that is not really there. Some examples are: 1. If the potential daily surface discharge of water from the site exceeds the amount left in the surface storage, the model limits the discharge to the amount that is actually available for discharge above the control elevation, e.g. weir crest elevation. 2. If the daily potential pumpage to an above ground impoundment exceeds the amount left in the surface storage available for pumping, the pumpage is set to the amount that is actually available above the pump shut off elevation. 3. If the daily rainfall is less than the initial abstraction, all of the rainfall is infiltrated into the vegetated surface. 4. The model tests to determine where the water table is relative to the effective root zone, and computes ET and vadose/phreatic zone additions/deletions accordingly. 5. If downstream stages are provided by the user, the model tests to determine if submerged weir flow exists or if there is flow reversal back into the site. 6. If onsite surface storage stages exceed the basin boundary elevation, the model computes the volume of water above the boundary elevation and deletes it from the onsite surface storage. 5. Model Architecture The formulas and data discussed in previous sections were placed into Microsoft Excel spreadsheets. As shown in the following graphic, the spreadsheets are organized into four main sections: 1. the I/O module, 2. water balance computations, 3. look-up tables and 4. reports. Data are exchanged between sections using cell references and macro commands. In this Section of the Manual the architecture of each module is discussed. A. I/O Module The I/O module contains all data input screens necessary to set up the model. The screens are shown in Section 6, part E below. The screens allow the model user to enter data for basic site information, control structures, pumps, irrigation inputs (like flowing wells), onsite ditches, above-ground impoundments, wetland area, land uses, topographic contours, external stages (if needed), and inflows from upstream basins (if needed). When calculations are complete the PWRM creates output graphs of the various hydrologic components on a monthly or annual time step. The average annual retention over the period of record is also calculated. Page 22 PWRM COMPONENTS FLOWCHART I/O SCREEN Water Balance Model • Basic Data • Hydrographs •Geometry • Storage Calcs. • Runoff •Soils • Retention •WMAs Look-Up Tables • Conductivity • Soil Storage • Rainfall Data • Probability Reports model is used in two different modes: B. Water Balance Computations This section of the model computes daily water balances for three components: surface water stored on site, onsite vegetated area (including groundwater storage) and aboveground impoundments. C. Look-up Tables The following information is embedded in the look-up tables: 1. Soil types, hydraulic conductivity and field capacity for all counties within the Northern Everglades Basin [4]. The soil parameters are weight-averaged over the reported strata. 2. Daily rainfall record from 1930 through 2011 from the SFWMD Okeechobee Field Station. 3. Monthly evaporation data [6] Page 23 6. Data Input Requirements A. Basin Boundaries Before inputting any data to the PWRM, the user must study the site and conduct field observations to clearly define the site drainage divides and the total area of the site. This is a one-basin model. As such, it is not equipped to compute offsite sheet flow from adjacent upstream basins. If there are offsite inflows they must be represented as daily inflows computed from previous model runs or other records. B. Existing Physical Features 1. Onsite Ditches: Catalog all existing onsite ditches, including length, bottom elevation and cross-section. This is input to the model to create a portion of the stage-storage and stage area curves. 2. Supplemental Water Sources: Identify onsite flowing wells and compile a daily flow volume (gallons) for the period of record being modeled and include this as a “Flowing Wells” input file to the model. If there are pumped wells and/or surface water pumps used to import water for irrigation include a similar daily flow volume “Irrigation” input file. 3. Control Structures: Identify and obtain dimensions and elevations of all culverts, pumps, ditches and flashboard risers that control discharge from the site. If the user wants the model to check for submerged or reverse flow of gravity controls, downstream daily elevations or a constant tailwater elevation must be provided. 4. Ditches Adjacent to Site: If there ditches or surface water features adjacent to the site that could receive lateral seepage, compute the length of the feature adjacent to the site and obtain estimates of the seasonal water elevation. While the elevation data is input on a daily basis, daily values are often not available. Accordingly, the user will have to estimate the values based on field reconnaissance and knowledge of the area. As seepage to an external, adjacent ditch is much greater when it is adjacent to an internal above-ground impoundment, separate the length of ditches adjacent to the impoundments from the rest of the site. 5. Vertical Seepage: If the user believes there is vertical seepage, obtain representative hydraulic conductivity data for the aquitard and lower aquifer potentiometric water elevation. While the potentiometric data is input on a daily basis, it is most likely the data won’t be available; which requires the user to make estimates based on expected seasonal variations. 6. Wetlands and other Depressions: Using aerials or survey data, estimate the surface and bottom area of wetlands and other depressions. The maximum depth of these features must be estimated based on survey or field approximation. This is input to the model to create a portion of the stage-storage, stage area curve. Page 24 7. Topographic Contours: Topographic contours are used to compute the surface area within each contour interval. This data is input to develop stage-storage and stagearea curves for storage above the onsite ditches and depressional areas up to the elevation of the site boundary. While one foot contours are preferable, the user is able to use whatever topographic information that is available to estimate the surface area at one-foot elevation intervals. 8. Soils: Using NRCS soils maps, compute the surface area of each soil type. 9. Land Uses: Using aerial photographs, confirmed by field observation, input the surface area of each land use, including pasture, upland forest, herbaceous wetlands, forested wetland, citrus groves, and vegetable fields. C. Proposed Water Management Alternatives Select potential water management alternatives (WMAs) for analysis and comparison to existing site conditions. Some examples of WMAs include but are not limited to: 1. Replacing uncontrolled open ditch and culvert discharges with flashboard risers (weirs) or pumps, 2. Changing the size and/or elevation of existing culverts and flashboard risers (seasonal flashboard elevation settings are possible), 3. Adding bleeder notches to flashboard risers, 4. Adding or modifying existing above-ground impoundment with pumps and control structures, 5. Increasing storage by adding a depressional impoundment or isolating a previously connected wetland, 6. Adding ditches at site boundary to enhance lateral seepage offsite, 7. Increasing storage by raising the elevation of the site boundary, 8. Adding or deleting supplemental water sources and adding offsite inflows, and 9. Changing crop types. 10. Implementing a stormwater “tailwater” recovery system for supplemental irritation. D. Model Installation The model was developed using Microsoft Excel© 2003 and has been tested in version 2007 with no documented problems as of this writing. It is currently not compatible with the 2010 version. A user requesting a copy of the model will receive it electronically in the 2003 version. If the user has a newer version of Excel© it can be opened and then saved to that version. The model will be contained in a single folder that will include three workbooks, a copy of the User Manual, and a blank Error Log File: The “PWRM Model” workbook contains the model itself, The “Client Data” workbook stores the user’s project data and allows the user to provide additional data to the model that is not included in the embedded lookup tables or the data input system, and Page 25 The “Output Data” workbook where the model results are written and made available to the user. It is recommended that the folder be copied to the user’s desktop but it can be copied to another directory. The original model folder provided to the user electronically should be preserved in case it becomes necessary to re-load the model. To simplify running the model, shortcuts for each of the three workbooks can be created on the desktop. The model workbook is a large file with extensive computations embedded throughout. Depending on the user’s hardware and software it may be slow to run and older systems may not be able to load the model at all. Calculations are controlled by the input system and may take some time to run. Do not interrupt the calculation process unless you find the model “unresponsive” which will require the model to be shut down and restarted. If this occurs, your system may not have the ability to run the model. When the PWRM Model workbook is first opened, a message box may appear asking if you want to update data from an external source. Select “Don’t Update” and the data input menu system will start up. Depending on your security settings you may be asked to enable macros. The Client Data workbook will automatically be opened and then both workbooks will be disabled leaving the input menu enabled. It is not intended that the user enter data directly into the workbook without sufficient training and understanding of the entire model functionality. The workbook consists of nine different worksheets that are interconnected by the equations and processes embedded in the workbook. If the user enters data or otherwise modifies anything directly into the workbook without using the data input menu system, it may result in errors being generated that cannot be cleared without a full understanding of the embedded equations and processes. The Client Data workbook consists of eleven worksheets. The first worksheet “Client Project Info” is not intended to be modified by the user. This worksheet is directly populated and updated by the model data input menu system. The other worksheets in this workbook are where additional data that the user may need to provide to the model is stored. This includes things like: culvert tailwater, evaporation, offsite inflows, flowing wells, irrigation, tailwater recovery, offsite seepage tailwater elevations, and open channel tailwater elevations. Additional data the user wants to provide must be in the form of two columns of data where the first column is the date and the second is the value (flows in gallons per day, evaporation in inches per day, or elevations in feet per day). The input data file must be continuous and include the exact same time period as the model start and stop dates January 1, 1999 through December 31, 2008) with no missing values. Columns A and B in each of these sheets are used by the model to import the data. Note that column A already has the dates in place for the 10-year model runs so the user will only need to copy in the data values. The other pairs of columns to the right in each worksheet are for the user to store the data specific to each project and basin. Rows 1 through 3,656 are used to store the “Pre-WMA” data and rows 3,657 through 7,312 are used to store the “Post-WMA” data. Prior to running a particular project and basin, the user can go into the appropriate worksheet(s) and copy the data values from the stored data area to column B. Save the Client Data workbook and close it before opening the model. Page 26 The Output Data workbook consists of four worksheets and the user is cautioned not to change or rename these worksheets. The first three worksheets each include both the “Pre-WMA” results in rows 1 through 3,999 and the “Post-WMA” results in rows 4,000 through 7,999. The first worksheet is the “Discharge Compiler” which includes daily calculations for separating discharge out based on the source and receiving body of each discharge structure. This is useful when the user needs to “split” the discharge in order to “route it” to a different basin by entering it into that basin model’s input worksheet. The second worksheet is the” Output” which includes the entire daily calculation section of the model. The third worksheet is the “Results” which include monthly and annual “rollup” summaries of the daily data. The fourth worksheet is “Graphs” and includes the automatically generated graphic output showing both “Pre-WMA” and “Post-WMA” retention and discharge results. This workbook can be used to review, analyze, manipulate, and/or print the data or graphs. The user is cautioned that the worksheets in this workbook will be overwritten the next time the model is run, so it is recommended to save this output workbook to a different named workbook to preserve the current results. Alternatively additional worksheets could be added to the workbook to preserve the results but these worksheets must be given different names. The user should be aware that adding too many worksheets in this workbook will quickly increase the size of the workbook and may slow down performance of the model in posting output to it. E. Data Input Screens The screens are set up left to right in the order in which they should be completed when entering a new project. In some cases, data from a previous screen is necessary to complete calculations for another screen. In these situations the model may show a delay in moving from one screen to the next as calculations are done and data updated. When the user is working with an existing project, the screens do not have to be accessed left to right so the user can “jump” around if they wish to make a modification without going through each screen to get to the one they want. However movement may still show some delays as the same internal calculations and data updating will occur. The top portion of the main screen is for overall project data and this section of the menu system remains visible to the user throughout the remainder of the screens. The other screens are accessed by the tabs running from left to right across the upper middle of the main screen. Each screen has a “Continue” button at the bottom that moves the user to the next screen while also updating all calculations and data. If the user chooses to move to the next screen by clicking on that screen’s tab across the middle, the same calculations and data updating will occur. The user is cautioned that in some cases this may take a few minutes depending on system hardware and software. When entering data into the screens, numerical elevation and acreage data should be entered to two decimals consistently throughout the screens. There are numerous “data checks” made during the calculation processes that look for inconsistencies between values. For example, the sum of the acres of the individual soil types must be the same as the basin acres. The sum of the individual land use types must also be the same as the Page 27 basin acres. Minimum and maximum elevation data (directly entered or calculated) should be the same throughout. These discrepancies may cause the model calculations to fail. The user will not be allowed to continue until any discrepancies are resolved. 1. PROJECT DATA (Figure 1) The project data at the top of the main screen starts with selecting one item from each of the three groups on the left side of the screen: WMA: The model has to be run twice for each basin. Select either “PreWMA” or “Post-WMA” depending on which model run you want to enter or modify. If this is a new project you must enter the “Pre-WMA” first. Project: Select either “New” or “Existing”. Basin: If you selected a “New” project the “New” basin button will automatically be selected. If you selected an “Existing” project you can select either a “New” or “Existing” basin. The next group of boxes to the right will either require you to enter the information or select from a list of values accessed using the down-arrow key at the right end of each box. If you selected a new project you will enter the project name in the top box, the basin name in the next box, and then select the county in the next box from the list of values. If the project overlaps county boundaries, select the county that includes the majority of the project. If you selected an existing project, select the project name from the list of values. Then if you selected a “New” basin enter the basin name. If you selected an “Existing” basin, select the basin from the list of values. If you selected an existing project then the county name will already be there. The “Copy Pre to Post-WMA” button under the County box will not be enabled until you have saved the “Pre-WMA” data. Once it is enabled you can click this button and then modify the necessary data for the “Post-WMA” model run and save it. In most cases you will want to use this to save time since most of the data does not change between “Pre” and “Post” conditions. The “Switch between Pre/Post” button under the County box will not be enabled unless both pre and post data already exist. Clicking this button allows you to quickly switch back and forth between the “Pre” and “Post” data for the current project and basin without re-selecting the information. The “Clear Current Project” button at the top right corner of the screen will clear all of the menu screens and allow you to select another project and/or basin or enter a new one without leaving the data input system. Page 28 Figure 1 – Project Data and Basin Information The last set of boxes on the right will already be populated if you selected an existing project and an existing basin. If you selected an existing project and are entering a new basin or you are entering a new project then all four boxes will need to be entered. Following is a description of each of these fields: Service Area: This is the area within the basin being entered that the landowner agrees to place into service, meaning that there may be times when the land is inundated for longer periods of time in the Post-WMA condition than is currently happening in the “Pre-WMA” or existing condition. Basin Area: This is a single contiguous piece of land that is hydrologically separated from surrounding land by natural or man-made features. Watershed Area: When there are multiple basins, this is the sum of the areas of all of the basins. This may be larger than the project area if there are offsite contributing inflows. Number of Basins: The total number of basins within the watershed. Page 29 Until all of the project data has either been entered or selected from existing data, none of the other input menus will be enabled. Once you have entered the necessary data click “Save” to enable the other input menus. The four buttons on the right side of the screen are self-explanatory. Depending on certain conditions one or more of these buttons may be disabled. If you are working on an existing project and basin and need to make a minor modification and re-run the model then after making the changes click on “Run the Model”. You can “Save” the data at any time but note that this will re-calculate the entire model. The “Results” button will copy the results to the Output Workbook discussed in Section D above. “Close” will exit the model without saving any changes although you will be asked to confirm this. If this is a new project and you haven’t entered all of the necessary information you can still “Save” the data and return later to finish but the “Results” may not be accurate. To ensure that the “Results” are accurate you will need to have both the Pre-WMA and Post-WMA data completed and saved. Then run the PreWMA model and click on the “Results” button and immediately after, run the Post-WMA model and click on the “Results” button. If you run a different project and/or basin in between the results will not be accurate. 2. Basin (Figure 1) This is the first tab on the left of the row of tabs in the upper middle section of the main screen. If you are working with an existing basin, the information previously stored for this basin will already be populated. This data can be modified as needed but be cautious about acreage and elevation changes as mentioned in the introduction to Section E above. The four boxes in the top left corner start with the Basin Area which will already be populated with the value entered on the main screen. The Initial Depth to Water Table simply provides the model with a starting point for calculations. If you are unsure then either estimate it or enter zero. The Maximum Basin Elevation represents the highest point in the basin and is typically somewhere around the perimeter of the basin. The Basin Overflow Elevation represents the highest elevation, also typically somewhere around the perimeter of the basin at which any additional water would discharge uncontrolled out of the basin. The Maximum Basin Elevation can be higher than the Basin Overflow Elevation. The reason for entering the Maximum Basin Elevation is so that the model can include area and storage above the Basin Overflow Elevation. Then if the selected WMA is to raise the perimeter berm and thus the Basin Overflow Elevation, the area and storage calculations are already in place to make the estimation of increased retention. The Additional Data Input box at the bottom left of the screen allows you to check off any input data that has been entered in the Client Data workbook described in Section D above. When the model first opens, the data from each of the input worksheets in Page 30 the Client Data workbook is automatically brought into the model workbook however the model will only use whatever data you have selected from these buttons. The two boxes on the right side of the screen are for informational purposes to document situations where there are multiple basins in the watershed and the basins are part of a “cascading” system where one basin discharges into another which discharges into another, etc. This allows you to enter how many basins are “Upstream” contributing basins that discharge into the current basin and the names of each; and/or how many basins and their names which the current basin discharges to “Downstream” which are receiving basin(s). There are a maximum of ten possible upstream and ten possible downstream basins that can be entered. Check either the “Yes” or “No” button. In this type of situation, it is important to model the basins in sequence from the “top” of the watershed to the “bottom” of the watershed. In more complicated watersheds it may be helpful to draw a “flow diagram” showing the basin inter-connects so they can be entered in the correct order. In this way when you go to enter this information for a specific basin, the drop-down box for selecting the upstream basin(s) will have a list of values populated with all of the previously entered basins for the user to select from. The “Add” and “Delete” buttons are used to add a new “connection” or delete an already existing “connection” either upstream or downstream if it is later determined not to be accurate. If you wish to add a new connection, make sure to increase the number in the box above and then enter the new connecting basin and click the “Add” button. To delete an existing connection, select the connecting basin from the list of values and click the “Delete” button. The number of interconnecting basins will automatically be updated. As interconnecting basins are added in either the Upstream or Downstream boxes, they will show up in the list on the right side of the box so the user can see what has already been entered. Click on the “Continue” button or the next tab to move to the next screen. 3. Soils (Figure 2) This is the second tab from the left of the row of tabs in the upper middle section of the main screen. It is recommended that you already have a list of each type of soil in the basin and the number of acres. If this is a new basin, enter the number of soil types in the first box on the left side of the screen. Then in the “Soil Types” drop-down box, select a soil type from the list of values. Enter the acres for that soil type and click the “Add” button. Note that you can not add the same soil type more than once. The box on the right side of the screen will be updated to show the information entered so far. The text fields on the bottom left side of the screen are informational and will show the Basin Area entered on the main screen and then a running total of the acreages of soil types entered so far. If you attempt to add more soil types than the number entered or have not entered Page 31 as many types as indicated; or you have entered acreages that total more or less than the basin area, you will be prompted to correct the data. Figure 2 – Soils Data If you need to change the acreage of a soil type already entered select that soil type from the box on the right. The soil type and acres will show up in the boxes on the left and you can edit the acres then click the “Modify” button. If you need to increase the number of soil types, then change the number of soil types and proceed to “Add” the new soil type(s). If you want to decrease the number of soil types and you have already entered acreages for the number of soil types previously entered, then first select the soil type you want to delete from the box on the right side of the screen and click the “Delete” button. Then go back and reduce the number of soil types. If you want to decrease the number of soil types and you have not already entered acreages for the number of soil types previously entered, then just change the number of soil types. Keep in mind if you are going to increase the number of acres a particular soil type and have already entered enough acres to match the basin acreage, you will first need Page 32 to reduce the acres of one or more of the other soil types already entered by the same amount using the modify procedure described above. If you are modifying a basin previously entered, use this same process. Click on the “Continue” button or the next tab to move to the next screen. 4. Ditch Storage (Figure 3) This is the third tab from the left of the row of tabs in the upper middle section of the main screen. There are a maximum number of ten “Storage Ditches” that can be entered for each basin. The purpose is to allow you to reasonably estimate the storage area and volume that can be achieved in the ditches. You can then modify the ditches in the “Post-WMA” model to increase storage capacity if this is a desired WMA. The model uses the information entered to calculate areas and volumes at each stage. Figure 3 – Ditch Storage Data Page 33 Once information on all of the existing ditches is collected as described in Section 6, Part B above, the ditches should be grouped together if there are more than ten to be entered. It is recommended that the ditches be grouped based on top-of-bank elevation, depth, and width. In simple cases, only one or two storage ditch groups may be sufficient to reasonably account for the area and storage while more complex systems may require all ten available storage ditches. It is recommended that each ditch be given a name that is “meaningful” to the user for future review of the input data; for instance “primary”, “secondary”, “lateral” or by “top-of-bank elevation, top-width, and depth”. The data entered for each ditch should represent an average of that ditch or the group of ditches it represents. The required data elements are self-explanatory and as each ditch is entered and you click the “Add” button, they will appear in the box on the right side of the screen along with a running count of the number of ditches entered so far in the box below. Modifying and/or deleting a ditch is accomplished by selecting one previously entered from the “Ditch Number/Name” drop-down box. Then change whatever data you need to change and click the “Modify” button or just click the “Delete” button if you need to delete it. If this is an existing basin, the data previously entered will already be displayed and can be modified in the same way described above. The only restrictions are: a maximum of ten ditches and whatever number of ditches you entered in the box on the top left side of the screen, the same number of ditches must be entered before clicking on the “Continue” button. If you originally entered three ditches and need to add more, change the number before adding any. If you originally entered three ditches and need less use the Delete function described above. The number of ditches will automatically adjust downward as you delete. If you are modifying a basin previously entered, use the same process. Click on the “Continue” button or the next tab to move to the next screen. 5. Impoundment (Figure 4) This is the fourth tab from the left of the row of tabs in the upper middle section of the main screen. Only one impoundment can be entered for a single basin. If there is or it is proposed to have more than one, they will have to be “grouped” together. The required data for the Impoundment is self-explanatory with the graphic on the right side of the screen to use as a reference. The Maximum Water Elevation is the same as the Impoundment Overflow Elevation and represents the elevation of water at which point no further storage can occur. Typically this is an emergency outfall intended to release water either back onto the basin (or another project basin) or offsite depending on the situation. Typically there will also be a control structure(s) to keep the water level in the impoundment at a lower elevation to accommodate Page 34 additional rainfall events. Once you’ve entered the required data click on the “Add” button. Figure 4 – Impoundment The pump station(s) that add water to the impoundment and the control structure(s) that discharge from the impoundment are entered in the Structures screens at the end of the menu system. These will include the necessary physical parameters and operating conditions to allow the model to move water back and forth between the basin and the impoundment and/or offsite depending on the prescribed conditions. If you are modifying an impoundment previously entered, change the data and click “Modify”. If you want to delete an existing impoundment click “Delete”. Click on the “Continue” button or the next tab to move to the next screen. Page 35 6. Landuse (Figure 5) This is the fifth tab from the left of the row of tabs in the upper middle section of the main screen. The Landuse screen is divided into two groups: Wetlands and Uplands. Within the wetlands group are Grassy Wetlands and Forested Wetlands. Within the uplands group are Pasture Grass, Forested Uplands, Citrus, and Vegetables. The Storage Ditch and Impoundment data (if applicable) should have already been entered and will automatically show up in the box on the right side of the screen. Figure 5 – Landuse Each landuse type is entered only once so the required data must be averaged and adjusted as necessary to allow the model to reasonably estimate the area of that landuse type for each topographic stage (elevation). For example, if you have ten different grassy wetlands in the basin they are probably all about two feet deep. If the basin has some topographic fall across it the top-of-bank elevation for wetlands near the bottom of the basin may be several feet below the top-of-bank elevation for ones near the top of the basin but they are all two feet deep. To account for this, you should enter the highest top-of-bank elevation and a depth that will result in a bottom Page 36 elevation of the lowest wetland. In other words you may have to enter a grassy wetland with a depth of eight feet which is not “real” but allows the model to better calculate areas at each elevation to include the entire group of wetlands. Enter the Number of Landuse Types (maximum 6) in the box at the top left side of the screen. If you have entered Storage Ditches and/or an Impoundment, include each as a landuse type in the number. To add wetlands, use the box on the left side of the screen and select a wetland type from the list of values. The data required for each wetland type is self-explanatory. You have the option of entering either the “Area at Minimum Elevation” (bottom area) or Side Slope where the number you enter is Horizontal change per 1-foot vertical change. When finished with each type click the “Add” button. To enter uplands, use the box in the center of the screen and select the upland type from the list of values. The data required for each upland type is self-explanatory. Keep in mind that the Storage Ditch area has already been calculated and listed in the table on the right based on data previously entered. Typically the ditch area would come out of the Pasture area and this should be taken into account when calculating the pasture area. The Impoundment area will also show up if it has been entered.As each landuse type is added it will be listed in the box on the right side of the screen. The text fields below this box are informational and will show the Basin Area entered on the main screen and then a running total of the acreages of the landuse types entered so far. If you attempt to add more landuse types than the number entered or have not entered as many types as indicated; or you have entered acreages that total more or less than the basin area, you will be prompted to correct the data. If you are editing a basin previously entered or need to edit data just entered, select the landuse you want to edit from the drop-down list of values and use the same processes described above for the “Add”, “Modify”, and “Delete” buttons. Click on the “Continue” button or the next tab to move to the next screen. 7. Basin Stage Area (Figure 6) This is the sixth tab from the left of the row of tabs in the upper middle section of the main screen. After you have entered the Ditch Storage and Landuse data, the minimum and maximum elevations will show up in the box on the left side of the screen along with instructions on modifying them if necessary. They can not be modified directly in this screen. This stage area input screen is for the Basin only and should not include the Impoundment if there is one. That data is entered separately in the next screen. You do not have to enter separate stage/area relationships for each landuse. The data you enter here should include all wetlands, uplands, and ditches. Page 37 Figure 6 – Basin Stage Area The center box on the screen is for “Elevation and Area Input”. The area at the minimum and maximum elevations will already be shown in the display box. The Acres reported for the maximum elevation in the display box will reflect the total basin area if there is no impoundment or the total basin area less the impoundment area if there is an impoundment. You will need to enter the area for each elevation between the minimum and maximum by entering the first elevation and area in the boxes on the left and hitting the “Add” button. This data in the display box will be updated with the new information. Continue until you have entered everything you need to up to the maximum elevation and area. If you are editing data for a basin previously entered or need to change any data just entered, select the row of data you want to change by clicking the radio button next to it in the display box and that data will show up in the boxes on the left. Edit the data and click the “Modify” button. If you need to delete an entry, click on the radio button next to it in the display box and hit the “Delete” button. Click on the “Continue” button or the next tab to move to the next screen. Page 38 8. Impoundment Stage Area (Figure 7) This is the seventh tab from the left of the row of tabs in the upper middle section of the main screen. After you have entered the Impoundment data, the minimum and maximum elevations will show up in the box on the left side of the screen along with instructions on modifying them if necessary. They can not be modified directly in this screen. This stage area input screen is for the Impoundment only and should not include the Basin data. That data is entered separately in the previous screen. Figure 7 – Impoundment Stage Area The center box on the screen is for “Elevation and Area Input”. The area at the minimum and maximum elevations will already be shown in the display box. You will need to enter the area for each elevation between the minimum and maximum by entering the first elevation and area in the boxes on the left and hitting the “Add” button. This data in the display box will be updated with the new information. Continue until you have entered everything you need to up to the maximum elevation and area. Page 39 If you are editing data for an impoundment previously entered or need to change any data just entered, select the data you want to change by clicking the radio button next to it in the display box and that data will show up in the boxes on the left. Edit the data and click the “Modify” button. If you need to delete an entry, click on the radio button next to it in the display box and hit the “Delete” button. Click on the “Continue” button or the next tab to move to the next screen. 9. Trend Analysis (Figure 8) This is the eighth tab from the left of the row of tabs in the upper middle section of the main screen. Once the stage area data for the basin and impoundment have been entered, the model requires equations that will reasonably estimate the following relationships for each (one set for the basin and one set for the impoundment): Given a storage volume, calculate a stage. Given a stage, calculate an area. Given a stage, calculate a storage volume. The model uses the “Trend Analysis” function of Excel© to generate equations to represent each data set. The type of equation (linear, 2nd order polynomial, or 3rd order polynomial) and the coefficients for each term of the equation are stored and the model uses this information to calculate the necessary daily relationships. The difficulty is that each of the relationships is generally not represented very well by a single equation due to the differences in landuse. A typical ranch in the Northern Everglades Basin includes some ditch networks, a lot of improved pasture land, and some wetlands. Ditches are usually a small component of the area and storage across the basin. They are typically narrow and deeper with steep side slopes. Wetlands are typically bigger and shallower areas with very gradual side slopes and are typically found only at the lower elevations of the basin. Pastures are usually the largest landuse component with more gradual slopes at the higher elevations. A typical dataset for each relationship will often have three “distinct” sections in the curve that usually coincide fairly well with the three different landuses (ditches, wetlands, and pastures). To provide more accurate estimations of the relationships the model allows the user to “break” each equation into two or three parts by adding “breakpoints” into the calculation process. The breakpoints identify the stage at which the equations should change from one to the next. For example if the stages go from elevation 10 to 50 and breakpoints are added at 15 and 25, the model will use the first equation to calculate from 10 up to and including 15, the second equation to calculate from +15 up to and including 25, and the third equation to calculate from +25 up to and including 50. Page 40 Figure 8 – Trend Analysis The Trend Analysis screen will start with the “Basin” radio button selected and the Storage/Stage relationship in the “Select Data to Analyze” drop-down box. In the “Select Equation” box, the radio button next to “1st” will be selected and the graph in the display box will show the entire dataset from the minimum elevation to the maximum elevation. If this is an existing project and basin that already has a breakpoint(s), the graph will reflect the breakpoint as the maximum elevation. You will also see the data that has been previously “Saved” for this basin so that you can compare the results of any changes you make. If this is a new project the “Saved” data will reflect null values or zeros. The “Current” data will reflect either what is “Saved” or whatever values you are currently testing. The “Equation” and “R Squared” text boxes below the graph are for informational purposes and can not be directly modified. The R Squared value may be a useful indicator of how well the trend line fits the dataset. You have the option to try any of the equation types (“Linear”, “Polynomial 2nd Order”, or “Polynomial 3rd Order”) by selecting from the “Trendline Type” drop- Page 41 down box in the “Current” data section on the bottom left side of the screen to see if any of them fit the dataset fairly well or if it should be broken up. If you want to use the single equation, do not add a breakpoint. The model will store the type of equation and the coefficients of that one equation and use it for calculations from the minimum to the maximum elevation for the Storage/Stage relationship. The user is cautioned that 2nd and 3rd order polynomials can produce unexpected results in some cases so it is important to carefully review the output data for outliers. To break up the equation, select the first breakpoint elevation from the “Elevations” drop-down box in the “Current” data section and then select a “Trendline Type” from that dropdown box. Click on the “Update Plot” button each time you change the breakpoint or the equation type. The model will reset the graph from the minimum elevation up to the breakpoint elevation as the maximum. You can then try out the different equation types to see if you get a better fit. If you don’t like the fit of any of the equations you can change the breakpoint elevation and then try the different equations again. Once you get a good fit, you can try different equations for the remaining dataset to see if you can find a good fit. If you can’t find a good fit you can enter a second breakpoint elevation and the model will allow you to go through the same process by selecting on the “3rd Equation” radio button or the tab above the graph. It will often be necessary to move backward and forward trying out different breakpoints and equations. Note that if you change the first breakpoint to an elevation equal to or higher than the second breakpoint, the second breakpoint and the third equation will be cleared and you will need to re-enter another one if necessary. Once complete you will have one, two, or three equations the model will use to represent the Storage/Stage relationship. When you are satisfied with all of the equations you have selected click on the “Save Equation” button at the bottom center of the screen. Caution: clicking on the “Save Equation” button will overwrite the data currently saved for this basin so do not do this until you are satisfied with all of the breakpoint(s) and equation(s) you have selected for this dataset. Once you are satisfied with the Storage/Stage equations and have saved them, click on the drop-down arrow in the “Select Data to Analyze” box and select the “Stage/Area” dataset. The Trend Analysis menu will take you through the same process for the Stage/Area relationship and then Stage/Storage relationship. If the project includes an impoundment then after completing the Basin trend analysis you will need to select the radio button for “Impoundment” and go through the same process for all three relationships separately for the impoundment. Click on the “Continue” button or the next tab to move to the next screen. 10. Horizontal Seepage (Figure 9) This is the ninth tab from the left of the row of tabs in the upper middle section of the main screen. There are six different potential horizontal seepage “interface types” included in the model calculations. These are shown in the graphic on the right side Page 42 of the data input screen numbered 1 through 6 with a legend at the bottom providing a name for each type. The names identify the direction of seepage, i.e. “From – To”. Figure 9 – Horizontal Seepage The first three types are “internal” seepage components that do not move water out of or into the basin but merely transport it from one component of the basin (water table, surface water, or impoundment) to another. Each day the model uses the calculated water table elevation, surface water elevation, and impoundment water elevation to determine the magnitude and direction of seepage for each of the interfaces entered. A positive number indicates the seepage is in the direction that the interface name assumes. A negative calculation means it is moving in the opposite direction. The data requirements for these three types are: Maximum Distance to Surface Water Conveyance or the distance the water would have to move from the source to the receiving body. This might be the center of a pasture to the nearest ditch or to the impoundment or from a ditch Page 43 near the impoundment. This distance is generally not going to be more than a couple of hundred feet since the driving head will be relatively small any further away than that. Length of Interface would be the total length of ditch adjacent to the pasture or if it is internal to the pasture it would be twice the length (accounting for seepage to the pasture from both sides. Where pastures are criss-crossed by ditches, the length would include all of them and can get quite large. The impoundment interface would be the length of the side(s) of the impoundment adjacent to the pasture or ditch. Tailwater Elevation is not required for the first three interface types as the model calculates the elevations each day. The Tailwater Elevation is required for the second three types (see below). Depth to Hardpan should be estimated from site specific data or soils information. This represents the “height” of the flow path. The 4th, 5th, and 6th types of seepage interfaces represent water moving out of the basin or impoundment. The data requirements are the same as the first three interface types but a Tailwater Elevation is required. Seepage calculations for these interfaces all start onsite using the model calculated elevation for the “From” component but you must provide an estimated “Offsite Tailwater” elevation for the “To” component based on field observations or other available information. You can either enter a single offsite tailwater value in the box to be used for every daily calculation or you can include an Input data file in the Client Data workbook with different daily values for the 10-year period for each of these three interfaces you want to enter. Use the “Client Offsite TW4”, “Client Offsite TW5”, and/or “Client Offsite TW6” worksheet(s) as appropriate. If you choose to include an input data file, leave the “Tailwater Elevation” box blank and the model will automatically use the input data file. The user can enter each applicable interface only once by selecting an interface, entering the data, and clicking the “Add” button on the bottom left side of the screen. If you are editing a basin previously entered or need to change any data just entered select the interface you want to modify from the “Interface Type” drop down list and then use the same processes previously described to “Modify” or “Delete”. Click on the “Continue” button or the next tab to move to the next screen. 11. Vertical Seepage (Figure 10) This is the tenth tab from the left of the row of tabs in the upper middle section of the main screen. There are two different potential vertical seepage “interface types” included in the model calculations. They are identified on the bottom right of the screen as: Page 44 1. Basin to Aquifer. 2. Impoundment to Aquifer. The required data elements are: Vertical Conductivity is the rate at which the aquitard will pass water. Head is the difference between the top of the water table elevation and the top of the underlying aquifer water elevation Aquitard thickness is the thickness of the semi-confining layer between. As discussed in Section 6, Part B(5) above, it is unlikely that the required data will be readily available. If the user can locate aquifer performance test data from anywhere in the surrounding area, this could be used for estimating the required data. Otherwise the user will need to make estimations based on best professional Figure 10 – Vertical Seepage Page 45 judgment. The user can enter each interface only once by selecting the interface, entering the data, and clicking the “Add” button on the bottom left side of the screen. If you are editing a basin previously entered or need to change any data just entered select the interface you want to modify from the “Interface Type” drop down list and then use the same processes previously described to “Modify” or “Delete”. Click on the “Continue” button or the next tab to move to the next screen. 12. Structures – Open Channels (Figure 11) This is the eleventh tab from the left of the row of tabs in the upper middle section of the main screen. The Structures tab opens a sub-menu set of four tabs representing each of the available structure types. The first type is Open Channels and allows a maximum of ten channels to be entered. If you have more than ten channels you will need to aggregate some by expanding widths and depths to create a single “equivalent” channel. Figure 11 – Structures – Open Channels Page 46 Select the Number of Open Channels you want to enter from the drop down list. For each channel, enter a Channel Number / Name identifying it. It is recommended the channels be given “meaningful” names if possible to facilitate future data review. The Top of Bank Elevation, Top Width, Channel Depth and Side Slope should all be based on field review of the channel at a location far enough upstream of the outfall so as to be away from “tailwater influence”. Tailwater elevation data can be provided to the model using an Input file in the Client Data workbook, “Open Channel TW” worksheet. If this information is not provided, the model will assume the tailwater elevation = 0.0 ft. This same tailwater elevation data will be used for all of the open channels entered. The Longitudinal Slope is not readily measurable in the field but can be reasonably estimated to follow the local land surface slope. The Manning’s Coefficient or “roughness coefficient” is dependent on the bottom surface of the channel and there is a list of values available. Select the type of channel bottom surface based on the list and the associated coefficient will be entered into the model. The Receiving Body is selected from the list of values and there are only two choices: “Offsite” or “Impoundment”. Note that even if the channel discharges to another basin in the project the model considers that to be “Offsite” for calculation purposes. Click either the “ON” or “OFF” button to have the model use this structure in the model run or not. This is most useful in “testing” different structural and operational WMAs without having to go back and forth re-entering data. Once you have entered the first channel, click the “Add” button above the display window on the right side of the screen. The channel you entered will show up in the display window and you can proceed to enter more channels if necessary. If you are editing a basin previously entered or need to change any data just entered select the channel you want to modify from the “Channel Number / Name” drop down and then use the same processes previously described to “Modify” or “Delete”. Click on the next tab to move to the next structure type. 13. Structures – Culverts (Figure 12) This is the twelfth tab from the left of the row of tabs in the upper middle section of the main screen. The Structures tab opens a sub-menu set of four tabs representing each of the available structure types. The second type is Culverts and allows a maximum of ten culverts to be entered. Select the number of culverts you want to enter from the drop down list. For each culvert click on the button representing where the culvert discharges from, then enter a Culvert Number / Name identifying it. It is recommended the culverts be given “meaningful” names if possible to facilitate future data review. Select the culvert Material. When you select this, the Manning’s Coefficient will be entered in the box to the right. Page 47 Figure 12 – Structures – Culverts Select the culvert Geometry from the list of values. Depending on the geometry you select, enter the Diameter, Height, and Width as appropriate. Enter the Length of the culvert and the Upstream and Downstream Invert Elevations. Select the Discharge Coefficient from the list of values accessed using the downarrow at the right end of the box. You can click on the “View Illustration” button to the right to help you select the appropriate coefficient. You must either enter a Tailwater Elevation based on in-field analysis, landowner input, etc. that will be used as a constant for every daily calculation or provide an Input file in the Client Data workbook, “Client Tailwater Data” worksheet. However if you do not enter a tailwater elevation for each culvert, the same tailwater elevation data input file will be used for each of the culverts entered without a specified tailwater elevation. The Receiving Body is selected from the list of values. The choices are “Offsite” or “Impoundment”. Note that even if the culvert discharges to another basin in the project the model considers that to be “Offsite” for calculation purposes. Click either Page 48 the “ON” or “OFF” button to have the model use this structure in the model run or not. This is most useful in “testing” different structural and operational WMAs without having to go back and forth re-entering data. Once you have entered the first culvert, click the “Add” button on the top right side of the screen. The data will be saved and the form cleared for the next culvert. If you are editing a basin previously entered or need to change any data just entered select the culvert you want to modify from the “Culvert Number / Name” drop down list and then use the same processes previously described to “Modify” or “Delete”. Click on the next tab to move to the next structure type. 14. Structures – Weirs (Figure 13) This is the thirteenth tab from the left of the row of tabs in the upper middle section of the main screen. The Structures tab opens a sub-menu set of four tabs representing each of the available structure types. The third type is Weirs and allows a maximum of ten weirs to be entered. Select the number of weirs you want to enter from the drop down list. For each weir, click on the button representing where the weir discharges from, then enter a Weir Number / Name identifying it. It is recommended the weirs be given “meaningful” names if possible to facilitate future data review. Select the Weir Type from the list of values and enter the Weir Width which is the length of the weir that allows water to discharge over it. If the weir is not intended to be operated at different elevations seasonally, enter a fixed elevation for the weir crest otherwise enter a “Wet Season Elevation” and a “Dry Season Elevation”. The model will either use the fixed elevation if it is there or it will use December through May as the “Dry” season weir crest elevation and June through November as the “Wet” season weir crest elevation. If the weir has a V-Notch, enter the angle of the notch in degrees. Enter the Top Elevation of the weir or V-Notch, the Height of the weir and the width of the weir at the top of the structure. The Receiving Body is selected from the list of values. The choices are “Offsite” or “Impoundment”. Note that even if the weir discharges to another basin in the project the model considers that to be “Offsite” for calculation purposes. Click either the “ON” or “OFF” button to have the model use this structure in the model run or not. This is most useful in “testing” different structural and operational WMAs without having to go back and forth re-entering data. Once you have entered the first weir, click the “Add” button on the top right side of the screen. The data will be saved and shown in the display box on the bottom right of the screen. The form will be cleared for the next weir to be entered. If you are editing a basin previously entered or need to change any data just entered select the weir you want to modify from the “Weir Number / Name” drop down list Page 49 and then use the same processes previously described to “Modify” or “Delete”. Click on the next tab to move to the next structure type. Figure 13 – Structures – Weirs 15. Structures – Pumps (Figure 14) This is the fourteenth tab from the left of the row of tabs in the upper middle section of the main screen. The Structures tab opens a sub-menu set of four tabs representing each of the available structure types. The fourth type is Pumps and allows four different pumps to be entered depending on the source and receiving body of the pump(s). If you have multiple pumps discharging from the same source to the same receiving body, they will need to be “grouped” into a single “pump”. Select the number of pumps you want to enter from the drop down list. For the first pump, click on the button representing where the pump discharges from (source) and then click on the button representing where the pump discharges to (receiving body). Page 50 Enter a Pump Number / Name identifying it. It is recommended the pumps be given “meaningful” names if possible to facilitate future data review. Figure 14 – Structures – Pumps Enter the Nominal Capacity of the pump representing a discharge rate (gallons per minute) at which the pump will operate under normal conditions. Normal conditions represent typical low-head/high-volume pumps used in agricultural applications in South Florida. These types of pumps will generally discharge at a fairly consistent rate operating over a small range of head. The nominal capacity is a reasonable approximation of the capacity of the pump to move water. Enter the operating parameters of the pump which include “On” and “Off” elevations and the anticipated operating time in hours per day. Click on the appropriate button representing whether or not the pump will be operated Seasonally and then click on the “ON” or “OFF” button to have the model use this structure in the model run or not. This is most useful in “testing” different structural and operational WMAs without having to go back and forth re-entering data. Page 51 Once you have entered the first pump, click the “Add” button on the top right side of the screen. The data will be saved and shown in the display box on the bottom right of the screen. The form will be cleared for the next pump to be entered. If you are editing a basin previously entered or need to change any data just entered select the pump you want to modify from the “Pump Number / Name” drop down list and then use the same processes previously described to “Modify” or “Delete”. Click on any other tab to move to a different screen. F. Save, Run, and Review Results Once you have entered the Pre-WMA data click the “Save” button on the top right side of the main Project screen. The data will be saved to your Client Data workbook, “Client Project Info” worksheet. Then click the “Run the Model” button to update all model calculations and results. You can then use the “Copy Pre to Post-WMA” button under the County box and then modify the necessary data for the “Post-WMA” model. In most cases you will want to use this to save time since most of the data does not change between “Pre” and “Post” conditions. Alternatively you can click the “Clear Current Project” button and enter the Post-WMA data. Once this is complete, click the “Save” button on the top right side of the main Project screen. The data will be saved to your Client Data workbook, “Client Project Info” worksheet. Then click the “Run the Model” button to update all model calculations and results. Then click the “Results” button to copy the model output to the Output workbook. You can then close the input menu system and review the Output data in that workbook. Refer back to Section 6 (D) for more information. Remember for the results to be accurate you must: 1. Run the Model with the Pre-WMA data and click the “Results” button 2. Immediately after, Run the Model with the Post-WMA data and click the “Results” button Page 52 7. References 1. Soil Conservation Service, U.S. Department of Agriculture. 1969. National Engineering Handbook, Section 4, Hydrology. 2. Jacobs, J.M., S.L. Mergelsberg, A.F. Lopera and D.A. Myers. 2002. Evapotranspiration from a wet prairie wetland under drought conditions: Paynes Prairie Preserve, Florida, USA. Wetlands, Vol. 22, pp. 374-385. 3. Capece, J.C., K.L. Campbell, L.B. Baldwin, K.D. Konyha. 1987. Estimating runoff volumes from flat, high-water-table watersheds. American Society of Agricultural Engineers Transactions, Soil and Water Vol. 30(5) pp. 1397-1402. 4. United States Department of Agriculture, Natural Resources Conservation Service. 2003. Soil surveys, Florida. 5. Clark, G.A., A.G. Smajstrla and F.S. Zazueta. 1993. Atmospheric parameters which affect evapotranspiration. Florida Cooperative Extension Service, Institute of Food and Agricultural Sciences, University of Florida. 6. Jones, J.W., L.H. Allen, S.F. Shih, J.S. Rogers, L.C. Hammond, A.G. Smajstrla and J.D. Martsolf. 1984. Estimated and Measured Evapotranspiration for a Florida climate, crops and soils. Bulletin 840 (Tech.) Institute of Food and Agricultural Sciences, University of Florida. 7. South Florida Water Management District, 2008. Environmental Resource Permit Information Manual Vol. IV 8. Shaw, J.E. and S.M. Trost. Hydrogeology of the Kissimmee Planning Area. South Florida Water Management District Technical Publication #84-1 9. Jaber, F.H., S. Shukla and S. Srivastava. 2006. Recharge, upflux and water table response for shallow water table conditions in southwest Florida, Hydrology Process. 20, 1895–1907 10. Woodward, D.E., R. Hawkins, R. Jiang, A. Hjelmfelt, Jr., J. Van Mullem and Q.D. Quan. 2001. Runoff Curve Number Method: Examination of the Initial Abstraction Ratio. USDA, Natural Resources Conservation Service, Water and Climate Center. 11. Abtew, W. 2005. Evapotranspiration in the Everglades: Comparison of Bowen Ratio Measurements and Model Estimations. ASAE Annual International Meeting in Tampa, Florida, Paper No, 052188. Page 53