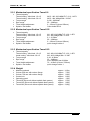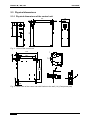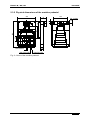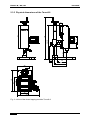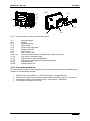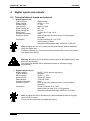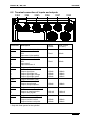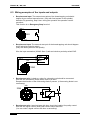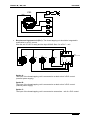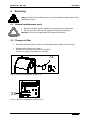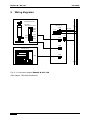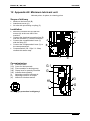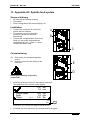
1
User Manual
Thread Tapping Machine
8 /25 / 83
thread-tapping.com
www.
Article # K254B
Version B.25
©
06.2014
user manual
Tauro® 8 / 25 / 83
How to contact us
Taurox e. K.
In der Stockleiten 8
94372 Rattiszell
Germany
Phone:
Fax:
E-Mail:
Internet:
+49 (0)9964 / 6010140
+49 (0)9964 / 6010139
[email protected]
www.thread-tapping.com
Service:
E-Mail:
Phone:
[email protected]
+49 (0)9964 / 6010141
This user manual is an integral part of the
Typ Tauro®:
________________________________________
Serial No:
________________________________________
Year of manufacture:
________________________________________
© Copyright
2
06.2014
user manual
Tauro® 8 / 25 / 83
EC Declaration of Conformity
Name and address of the manufacturer:
Taurox e. K.
In der Stockleiten 8
94372 Rattiszell
Germany
This declaration relates exclusively to the machinery in the state in which it was placed on the market, and
exludes components which are added and/or operations carried out subsequently by the final user. The
declaration is no more valid, if the product is modified without agreement.
Herewith we declare, that the machinery described below
product denomination:
model / type:
Thread tapping machine
Tauro® 8 /25 / 83
is complaying with all essential requirements of the Machinery Directive 2006/42/EC.
In addition the partly completed machinery is in conformity either the EC Directives 2014/30/EC relating to
electromagnetic compatibility.
Harmonised Standarts used
DIN EN ISO 12100:2011-03
EN 60204-1 :2007
Safety of Machinery
Electrical equipment of machines
EN 61000-6-4:2007
+ A1:2011
EN 55011:2009
+ A1:2010, section 6.2.2
EN 61000-6-2 :2005
Electromagnetic compatibility (EMC) -- Part 6-4: Generic standards - Emission
standard for industrial environments
Industrial, scientific and medical equipment - Radio-frequency disturbance
characteristics - Limits and methods of measurement
Electromagnetic compatibility (EMC) - Part 6-2: Generic standards - Immunity
for industrial environments
Electromagnetic compatibility (EMC) - Part 3-2: Limits - Limits for harmonic
current emissions (equipment input current <= 16 A per phase)
Electromagnetic compatibility (EMC) - Part 3-3: Limits - Limitation of voltage
changes, voltage fluctuations and flicker in public low-voltage supply systems,
for equipment with rated current <= 16 A per phase and not subject to
conditional connection
EN 61000-3-2:2006
+ A1:2009 + A2:2009
EN 61000-3-3:2008
The person authorised to compile the relevant technical documentation (must be established within EU)
Taurox e. K.
Herr Janich
In der Stockleiten 8
94372 Rattiszell
Germany
Rattiszell, 17.06.2014
Janich Martin, owner of a firm
Place, Date
suname, first name and function of signatory
Signature
3
Tauro® 8 / 25 / 83
user manual
Significance of this operator’s manual
This operator’s manual is an integral part of the thread tapping machine
Tauro® 8 /25/83.
•
•
Must be kept in a way that it is always at hand until the thread tapping machine
will be disposed of.
Pass this manual on if the thread tapping machine is sold or loaned/leased out.
Read this manual before installation and operation.
This protects you and avoids damages at the machine.
In any case you encounter difficulties to clearly understand the manual, please
contact the manufacturer.
Only persons with adequat technical knowledge and knowledge of this machine are
allowed to install and operate the machine.
Missing or inadequate knowledge of the manual results in the loss of any claim of
liability on part of Taurox e. K..
Taurox e. K. reserves the right to make alterations to its products in the interest of
technical progress. These alterations need not be documented in every single case.
Disclaimer
This manual and the information contained herein have been compiled with due
diligence. Taurox e. K. shall not be liable for errors contained herein or for incidental
or consequential damage in connection with the furnishing, performance, or use of
this material.
4
Tauro® 8 / 25 / 83
user manual
Description of symbols
General description of symbols
Indicates dangers which can be followed by death, heavy personal injury
or substantial property damage.
Danger
Indicates a possible risk which can be followed by death, heavy personal
injury or substantial property damage.
Warning
Indicates a possible risk which can be followed by minor personal injury
or property damage.
Caution
Indicates a possible impending situation, which can be followed by
damages at the product or in the environment.
Attention
Note
It communicates requirements which have to be absolutely considered
for an accurate operation.
Indicates applications and other useful information. It shows hints and
advices for an efficiant use of the machine and operation, to prevent
additional work.
5
Tauro® 8 / 25 / 83
user manual
Additional symbol explanation
The additional symbols include always a “general symbol“.
Warning of dangerous high voltage:
Indicates danger of life through high operating voltage and electrial
shock, which can be followed by death.
This symbol includes also „Danger“.
Warning of cutting damage:
Indicates a danger of sharp objects which can be followed by cuts.
This symbol includes also „Warning“.
Warning of automatically running:
Indicates a possible risk which can be followed by injuries.
This symbol includes „Warning“.
Warning of hot surface:
Indicates a possible risk which can be followed by burnings.
This symbol includes „Caution“.
Warning of hand injuries:
Indicates a possible risk, which can be followed by hand injuries and
crush injuries.
This symbol includes „Warning“.
Use eye protection:
Always wear eye protection! Indicates a possilbe risk which can be
followed by heavy injuries at the eyes or can be followed by blindness.
This symbol includes „Warning“.
6
user manual
Tauro® 8 / 25 / 83
Table of contens
1
Safety instructions
1.1
1.2
1.3
1.4
2
General information
10
1.1.1
1.1.2
1.1.3
1.1.4
1.1.5
Usage as agreed upon
Usage other than agreed upon
Modifications and alterations
Repairs and servicing
Decommissioning and disposing
10
10
10
10
10
Ensure your own safety / emergency stop
10
1.2.1
1.2.2
1.2.3
11
11
11
Malfunctions
Information signs and labels
Earthing procedure
Residual dangers
11
1.3.1
1.3.2
11
12
Hazards during operation
Hazards after power is turned off
Instructions on EMI
Technical data
12
13
2.1
Electrical specification
13
2.2
Mechanical specification
13
2.2.1
2.2.2
2.2.3
2.2.4
14
14
14
14
2.3
2.4
3
10
Mechanical specification Tauro® 8
Mechanical specification Tauro® 25
Mechanical specification Tauro® 83
Weight
Physical dimensions
15
2.3.1
2.3.2
2.3.3
2.3.4
2.3.5
15
16
17
18
19
Physical dimensions of the control unit
Physical dimensions of the machine pedestal
Physical dimensions of the Tauro® 8
Physical dimensions of the Tauro® 25
Physical dimensions of the Tauro® 83
Operating conditions
Installation / Commissioning
20
21
3.1
Scope of Delivery
21
3.2
Mechanical installation
21
3.3
Electrical installation
23
3.4
Commissioning
24
3.4.1
3.4.2
3.4.3
3.4.4
3.4.5
24
26
27
28
28
Brief description of components
Turn main switch on
Tool change
Adjust the counter balance
Adjust the workpart and height adjustment
7
user manual
Tauro® 8 / 25 / 83
4
Operation
4.1
Functions of buttons
29
4.2
Task menu
30
4.3
Main menu, quick reference / standard parameters
31
4.4
Main menu
33
4.4.1
4.4.2
4.4.3
4.4.4
4.4.5
4.4.6
4.4.7
4.4.8
5
8
29
Start settings
33
4.4.1.1
Start with start button
33
4.4.1.2
Start at workpiece zero point
33
4.4.1.3
Start at torque detection
33
Processing types
34
4.4.2.1
Threading blind hole
34
4.4.2.2
Threading through hole
34
4.4.2.3
Thread recutting
34
4.4.2.4
Thread forming
34
4.4.2.5
Insert threaded bushing
34
4.4.2.6
Insert bolt
34
4.4.2.7
Thread gauging
34
Lubricant settings
35
4.4.3.1
Lubricant pulse
35
4.4.3.2
Air pulse
35
4.4.3.3
Air cleaning pulse
35
Motor settings
35
4.4.4.1
Rotating direction
35
4.4.4.2
Reverse speed
35
4.4.4.3
Release height
35
Quality parameter
35
4.4.5.1
Torque window
35
4.4.5.2
Blowhole detection
35
4.4.5.3
Counter
35
4.4.5.4
Depth tolerance
36
4.4.5.5
Brake depth
37
Parameter database
37
4.4.6.1
Default parameters
37
4.4.6.2
User defined parameters
37
System settings and system information
37
4.4.7.1
Measurement unit
37
4.4.7.2
Language
37
4.4.7.3
Display brightness
37
4.4.7.4
System temperatures
37
4.4.7.5
System information
37
4.4.7.6
Last error
Fehler! Textmarke nicht definiert.
Extras
Fehler! Textmarke nicht definiert.
Messages
34
5.1
Quality notifications
39
5.2
Error message / status message
41
5.3
Error code
42
Tauro® 8 / 25 / 83
6
7
8
Digital inputs and outputs
user manual
43
6.1
Technical data of inputs and outputs
43
6.2
Terminal connection of inputs and outputs
44
6.3
Wiring examples of the inputs and outputs
45
Diagnostics / Troubleshooting
47
7.1
Troubleshooting / Error code
47
7.2
Contact Service
49
Servicing
50
8.1
General maintenance work
50
8.2
Change air filter
50
9
Wiring diagramn
51
10
Appendix A: Component part
52
11
Appendix A1: Quick change inserts
53
12
Appendix A2: Minimum lubricant unit
54
13
Appendix A3: Spindle feed system
56
14
Appendix A4: Pneumatic vice
58
15
Appendix C: Breakage of thread tools
59
16
Appendix D: Processing of small threads (M1)
60
9
Tauro® 8 / 25 / 83
1
user manual
Safety instructions
1.1 General information
This machine is conform to all general safety instructions and norms. To the security of the
user was payed special attention.
For the user are additional valid the:
• Relevant accident prevention regulations,
• General accepted safety related norms,
• EG-norms or other country specific regulations.
1.1.1 Usage as agreed upon
The appropriate usage encludes the procedure like mentioned in this manual. It is only
allowed to use the machine within the limits noted in the datas in this manual
(see chapter: "Technical Data").
1.1.2 Usage other than agreed upon
To use the machine in different ambient conditions as mentioned in the chapter “Operation
conditions” ask the manufacturer.
1.1.3 Modifications and alterations
Based on security reasons it is not allowed to do alterations and changes at the machine and
its functions.
Changings at the machine which are not allowed by the manufacturer are followed by the
exclusion of liabilty to the company Taurox e. K..
1.1.4 Repairs and servicing
It is not allowed to repair the machine by the user. The machine has no parts which can be
repaired by the user.
The machine has to be send to Taurox e. K. for repair.
1.1.5 Decommissioning and disposing
For the decommissioning and the disposal, the environment regulations are valid of the
country the user company is placed.
1.2 Ensure your own safety / emergency stop
•
•
•
•
Danger
10
Disconnect the machine of the power supply system before starting
maintenance work. This avoids accidents based on electrical voltage and
movable parts.
Please see chapter „Restrisks“
It is not allowed to override or avoid protection- and safety devices like
protection cover and machine cover parts or thermic protection switches,
emergency stop switch and motor switch.
Dismantled protections like i.e. machine cover, fuses, emergency stop
switch, motor protection switch, have to be reinstalled and to be checked
for a proper function.
The operator control modul with emergency stop switch and motor switch
has to be installed in a convenient distance of the user!
Tauro® 8 / 25 / 83
user manual
1.2.1 Malfunctions
•
•
Danger
•
In case of troubles or other damages immediately disconnect the machine
of the power supply system.
Pay attention to chapter „Residual Dangers“
Report troubles or other damages immediately to a responsible person or
to the company Taurox e. K..
Secury the machine against improper or accidentially use.
1.2.2 Information signs and labels
•
•
Obligatory intent letterings, signs and labels and let them be readable.
Renew damaged or not any longer readable signs and label
1.2.3 Earthing procedure
Connect the earth wire to the safety plug (min. 1,5 mm²) and the pin of the
casing earthing to the control unit.
It is not possible to use a fault Residual Current Device (RCD) to the power
supply.
Nevertheless a residual current protective device was installed, it switches the
machine off despite there is no malfunction.
If it is required to use the machine with a leakage current protector an isolation
transformer has to be used.
1.3 Residual dangers
1.3.1 Hazards during operation
Danger caused of high operation voltage!
Voltages up to DC 325V appearing which are causing danger of life!
These voltages lead to muscular cramps, burnings, unconsciousness,
breathing arrest and death.
• During operation hold all parts of the machine closed.
• Do not open the machine.
Danger caused of hot surface!
During operation surfaces in the machine and tools can get hot.
The internal parts can reach a temperature up to 90°C.
• Never touch internal parts in the cool down phase after switch off.
• Never touch tools directly after operation in the cool down phase.
Danger in explosive substances areas!
• Do not use the machine in explosive substances areas.
Danger
11
Tauro® 8 / 25 / 83
Danger
user manual
Danger by mechanical force influence!
The machine has a circulating spindle and movable parts.
• Depending on application fix additional protection cover.
• Secure that in case of unwantedly moving of the spindle no personell
hazard can happen.
• Do not remove neccessary protection covers.
• Do not wear gloves or loose clothing because of danger to hang in the
rotating working spindle.
• In case of too long hears wear a suitable headgear (hairnet).
• Always wear saftey glasses.
• Never touch the rotating spindle.
• Before changing the tool switch off the drive spindle by the motor switch
off.
1.3.2 Hazards after power is turned off
Danger by electric shock!
Capacitories in the machine carries dangerous residual voltage up to 5
additional minutes after switch off the machine.
• Always wait min. 5 minutes after switch of the machine before
disconnecting the machine of the power supply system.
• To open the machine wait min. 10 min. after switch off the machine before
disconnecting the machine of the power supper. (only personal with
electrotechnical qualification are allowed to do).
1.4 Instructions on EMI
The machine is designed for use in industrial.
Note
12
user manual
Tauro® 8 / 25 / 83
2
Technical data
2.1 Electrical specification
•
•
•
•
Voltage of the rated power supply
Power supply tolerance
Frequency
Overload protection
•
Leakage current
•
•
•
•
Power input permanent load
Power input non-operated
Digital inputs
Digital outputs
Attention
~ Ueff = 230V
Ueff = 207V … 253V (-10% … +10%)
48-62Hz
Fuse 5A T (time-lag)
Type: (G-fuse 5x20)
>3,5mA
(See chapter: "Earthing procedure")
max. 615W
< 40W
3 pcs 24V
10 pcs 24V / 3,6W (short-circuit proof)
Attention: Time between switch off and on of the main supply:
If the driving unit was used with motor power (torque and engine speed of the
motor) the starting current limitation has to cool down 2 - 3 minutes after
switching off the machine. The part which causes the starting current limitation
can be ruined if the a.m. was not cared about.
2.2 Mechanical specification
•
•
•
•
•
•
Spindle travel Tauro® 8 max.
Spindle travel Tauro® 25 / 83 max.
Thread depth Tauro® 8 max.
Thread depth Tauro® 25 / 83 max.
Depth accuracy
Finish
•
Travel
65mm
90mm
55mm
80mm
0,1mm
RAL 7035 / light grey
RAL 5005 / signal blue
+/- 30°
13
user manual
Tauro® 8 / 25 / 83
2.2.1 Mechanical specification Tauro® 8
•
•
•
•
•
Thread capacity
Thread cutting - blind hole 1,5 x D
Thread cutting - blind hole 2,0 x D
Torque range
Rpm range
Travel height adjustment
Spindle / tool holder
M0,5 – M3; X6CrNiMoTi17-12-2; 1.4571
M0,5 – M4; AlMg4,5Mn / 3.3547
0,030 - 0,800Nm
50 – 3000rpm
0 - 323mm (Column 650mm)
Collet holder ER11
2.2.2 Mechanical specification Tauro® 25
•
•
•
•
•
Thread capacity
Thread cutting - blind hole 1,5 x D
Thread cutting - blind hole 2,0 x D
Torque range
Rpm range
Travel height adjustment
Spindle / tool holder
M1 - M5; X6CrNiMoTi17-12-2; 1.4571
M1 - M6; AlMg4,5Mn / 3.3547
0,1 - 2,50Nm
50 – 3000rpm
0 - 330mm (Column 650mm)
quick change holder 0
2.2.3 Mechanical specification Tauro® 83
•
•
Thread capacity
Thread cutting - blind hole 1,5 x D
hread cutting - blind hole 2,0 x D
Torque range
Rpm range
•
•
Travel height adjustment
Spindle / tool holder
•
M2 - M8; X6CrNiMoTi17-12-2; 1.4571
M2 - M10; AlMg4,5Mn / 3.3547
0,30 - 8,30Nm
50 – 2400rpm
max. 2000rpm from 6,80Nm
70 – 415mm (Column 750mm)
quick change holder 1
2.2.4 Weight
•
•
•
•
•
•
•
•
14
Machine pedestal
Column 650 mm with column flange
Column 750 mm with column flange
Control unit
Operating panel
Tauro® 8 (Drive unit without spindle feed system)
Tauro® 25 (Drive unit without spindle feed system)
Tauro® 83 (Drive unit without spindle feed system)
approx. 14,3kg
approx. 7,5kg
approx. 9,2kg
approx. 8,3kg
approx. 1,2kg
approx. 9,7kg
approx. 9,9kg
approx. 13,9kg
user manual
Tauro® 8 / 25 / 83
2.3 Physical dimensions
2.3.1 Physical dimensions of the control unit
300
19.5
120
10.5
400
225
45
26.5
Fig.: 2.1 View of the control unit
341.4
32.3
20.7
1
281.5
20.7
335.4
388.4
1.4
9.25
Fig.: 2.2 Rear view of the control unit with fixation to the wall (1.4) (Component part)
15
user manual
Tauro® 8 / 25 / 83
2.3.2 Physical dimensions of the machine pedestal
200
270
45
30
84
10
80
400
181
60°
45
T-slots DIN 650
R206 (Tauro 8/25)
R226 (Tauro 83)
Fig.: 2.3 View of the machine pedestal
16
M8 - 16 depth
14
260
user manual
Tauro® 8 / 25 / 83
2.3.3 Physical dimensions of the Tauro® 8
45
Tauro® 8
45
0 - 323
67
91
max. 865
125
782
430
ø50
50
165
206
250
260
9
272
120
400
10
150
382
Fig.: 2.4 View of the thread tapping machine Tauro® 8
17
user manual
Tauro® 8 / 25 / 83
2.3.4 Physical dimensions of the Tauro® 25
45
Tauro®
25
45
0 - 330
60
91
max. 865
125
782
430
ø50
50
165
206
250
260
9
272
120
400
10
150
382
Fig.: 2.5 View of the thread tapping machine Tauro® 25
18
user manual
Tauro® 8 / 25 / 83
2.3.5 Physical dimensions of the Tauro® 83
45
Tauro
ø50
®
125
45
70 - 415
69
91
max. 980
882
450
83
50
185
226
270
272
150
400
260
164
390
Fig.: 2.6 View of the thread tapping machine Tauro® 83
19
user manual
Tauro® 8 / 25 / 83
2.4 Operating conditions
•
Transport conditions
•
Storage conditions
•
•
•
Ambient temperature
Atmospheric moisture
Operating altitude
•
•
•
Degree of protection
Protection class
•
20
Corrosion immunity /
Chemical resistance
Compressed-air (unoiled)
Spindle feed system
Minimum lubricant unit
Temperature: -25°C - 70°C
Air humidity: 5% - 95% (non-condensing)
Temperature: -25°C - 70°C
Air humidity: 5% - 95% (non-condensing)
Maximum storage period: < 1 year without restrictions
5 - 45°C
5% - 80% (non-condensing)
1000m max. above sea level from 1000 to 2500m
above sea level; derating 1.5 % per 100m increase
in altitude.
IP 54
I
No special protection against corrosion.
Ambient air must be free from higher concentrations
of acids, alcaline solutions, corrosive agents, salts,
metal vapours, or other corrosive or
electroconductive contaminants.
58 – 116psi (4 – 8bar)
58 – 116psi (4 – 8bar)
user manual
Tauro® 8 / 25 / 83
3
Installation / Commissioning
3.1 Scope of Delivery
(1) Control Unit (CU)
(2) Operating Panel with hinged bracket (OP)
(3) Drive Unit Tauro® 8 / 25 / 83 (DU)
(4) Machine pedestal
(5) Column with travel height adjustment
• Mains cable (2m)
• Motor power cable CU-DU (2m)
• Data cable CU-DU (2m)
• Data cable CU-OP (2,2m)
• Attachment screw 3pcs. M6x22; 3xWasher Ø 6,4; 2pcs. M5x16
• User manual
3.2 Mechanical installation
•
•
•
•
•
•
•
Verify if all parts of the delivery are available complete.
Before installing the machine verify if the machine or the accessories have transport
damages.
Verify if the installation underground is plane (installation surface).
Verify the minimum load capacity. (See chapter: „weight“)
Verify the operation conditions. (See chapter: „Operation conditions“)
Verify the electrical specification. (See chapter: „Electrical specification“)
Fix the machine pedestal (5) with two pieces
screws M8 on the installation surface.
(Dimensions see chapter: „Mechanical
dimensions “machine pedestal“)
A
5
Fig.: 3.1
•
•
Push the column (4.1) into the machine pedestal
(5) just until it reaches the ground. The nut of the
column has to show backwards.
Fix the screws (A) with a torque of 20Nm.
4.3
4.1
5
A
Fig.: 3.2
21
user manual
Tauro® 8 / 25 / 83
•
•
•
•
•
•
•
•
•
Clamp the clamping lever (4.3).
To avoid damages position a foam (B) or
something similar on the machine pedestal (5).
Take care that the distance between foam (B)
and quick change holder (3.1) is not too large.
Put the three peaces screws DIN912 M6x22
with washer (A) through the drilling of the
column flange (4.2).
Push the drive unit (3) onto the dowel pin of the
column flange (4.2) and screw one screw down
light.
Screw down the screws (A) with a torque of
10Nm.
Remove the foam.
Position or install the control unit at a suitable
position that way that the cables are not
exposed soilings directly.
By the assembly kit fixation to the wall (1.4)
(accessory) you are able to fix the control unit
beside the work bench.
(Dimension see chapter: „Mechanical
dimensions control unit“)
Fix the articulated bracket (2.16) of the control
unit (2) at the rear side of the drive unit (3) with
two pieces screws DIN912 M5x16 (A).
Screw down the screws (A) with a torque of
6Nm.
4.2
4.3
3.1 3
A
5
Fig.: 3.3
1
1.4
Fig.: 3.4
2
3
2.16
Fig.: 3.5
22
B
A
user manual
Tauro® 8 / 25 / 83
3.3 Electrical installation
•
•
•
Connect the motor power connector X161 of
the control unit (1) with the motor power
cable CU-DU (4 pol) with the motor power
connector X361 of the drive unit (3).
Connect the data connector CU X162 of the
control unit (1) with the data cable CU-DU (17
pol.) with the data connector DU X362 of the
drive unit (3).
Connect the data connector CU X163 of the
control unit (1) with the Data cable CU-OP (7
pol.) with the data connector OP X363 of the
drive unit (3).
1
X161
•
•
•
Connect the power cable with the connector
X160 of the control unit (1).
Do not plug in the safety plug of the power
cable! (see chapter: „Installation“)
2
X163
1
The thread tapping unit has a discharge
current more than 3,5mA.
To avoid electrical electromagnetic
interference and electric shock an installation
of a second earth wire is neccessary (see
chapter: „Earthing procedure“)
Connect the earthing screw M6 of the cover
earthing X164 of the control unit (1) with an
earth wire with the earth connection
(min. 10mm², cable length 2m).
3
X162
Fig.: 3.6
•
X361 X362
X261
X164
A
Fig.: 3.7
1
X160
Fig.: 3.8
23
user manual
Tauro® 8 / 25 / 83
3.4 Commissioning
•
Important! In case of immediate deviation of the operation conditions
before installation take care that the temperature and the humidity have to
be harmonised for 24 hours!
Attention
3.4.1 Brief description of components
4.4
3.4
3
4.1
3.6
2
3.2
3.1
5
4.2
3.5
4.3
3.3
Fig.: 3.9 Rear and front view of the thread tapping machine with operating panel
(2)
(3)
(3.1)
(3.2)
(3.3)
(3.4)
(3.5)
(3.5)
(4.1)
(4.2)
(4.3)
(4.4)
(5)
24
Operating panel (See chapter: "Operation")
Drive unit Tauro® 8 / 25 / 83
Quick change holder
Operating lever with start button
Adjustment wheel for the spindle counter balance system
Air cleaner for cooling system (in)
Air cleaner for cooling system (out)
Type plate
Column
Column flange
Clamp lever for column flange
Handwheel for column
Machine pedestal
user manual
Tauro® 8 / 25 / 83
X364
X365 X366 X367 X368
X363
X361 X362
Fig.: 3.10 Connector (Rear view) of the drive unit
(X361)
(X362)
(X363)
(X364)
(X365)
(X366)
(X367)
(X368)
1.1
Motor power connector
Data connector DU
Input foot switch (black)
Input automation (black)
Output signal column (black)
Output automation (red)
Output air cleaning unit (blue)
Output lubricant unit (green)
1
X160
1.5
X161
1.2
X164
X162
1.3
X163
Fig.: 3.11 Rear and front view of the control unit
(1)
(1.1)
(1.2)
(1.3)
(1.5)
(X160)
(X161)
(X162)
(X163)
(X164)
Control unit
Main switch
Control lamp for main switch
Mounting foot
Fuse 5A T (time-lag); Type: (G-fuse 5x20)
Main connector
Motor power connector
Data connector DU
Data connector OP
Earthing screw of the earthing of the housing
25
user manual
Tauro® 8 / 25 / 83
Drehzahl:
Tiefe:
Drehmoment
:
2.1
2.11
1,85 Nm
6,0 mm
X263
2.15
2.10
1000 U/m
in
6,0 mm
2,30 Nm
2.8
57 N
2.7
2.2
2.3
2.4 2.5
2.16
2.6
2.13
2.14
Fig.: 3.12 Rear and front view of the operating panel
(2)
(2.1)
(2.2)
(2.3)
(2.4)
(2.5)
(2.6)
(2.7)
(2.8-2.12)
(2.13)
(2.14)
(2.15)
(2.16)
(X263)
Operating panel
Display
Emergency stop
Motor switch
Rotary knob with button
Rotary knob LED
Menu button
Menu button LED
Select buttons for the set of parameters (component part)
Key switch (component part)
Clamp lever for vertical adjustment
Star grip for clamping the horizontal adjustment
Hinged bracket
Data connector OP
3.4.2 Turn main switch on
Secure that the machine is not damaged and the mechanical and electrical installation was
realised in a workmanlike manner.
•
•
•
•
26
Switch on the main switch (1.1). The control lamp (1.2) starts burning.
A start screen appears just until the start process is finished. (approx. 13 seconds).
The display changes to the working menu. (See chapter: „Operation“)
The machine is ready to work now.
user manual
Tauro® 8 / 25 / 83
3.4.3 Tool change
1. Switch the motor switch (2.3) to position stop.
STOP
2.3
The message „Stop motor switch!“ appears in the display.
Warning: The motor switch (2.3) has to be on position stop because the drive
spindle can start running.
Warnung: Tools are sharp and can cause injuries.
A1
A2
B2
B3
C1
C2
A
B
B1
C
Fig.: 3.13
2. Unclamp tool (C)
• Hold the quick change insert (B) with one hand and pull up the pressure cover (A1).
The quick change insert will be unclamped in this way.
• Press the spring dowel pin (B1) of the quick change insert (B) and remove the thread
tool. (C).
3. Insert tool (C)
• Insert the thread tool (C) into the quick change insert (B).
The square (C1) of the thread tool has to snap in the square (B2) of the quick change
insert (B).
• Plug the quick change insert (B) in the quick change holder (A).
The nose (B3) has to snap in the nut (A2). By doing this the pressure cover slips
down and clamps the quick change insert (B).
4. Switch back the motor switch (2.3) to the position RUN.
2.3
RUN
27
user manual
Tauro® 8 / 25 / 83
3.4.4 Adjust the counter balance
3.2
3.3
Fig.: 3.14
The retraction force of the drive spindle can be set by the adjustment wheel (3.3).
Pull down the drive spindle by the operating lever (3.2).
If you release the operating lever (3.2) the drive spindle should be brought back in the end
position by its own because of the balance system. Take care that the retraction force is not
set to high!
Attention!
A too powerful retraction force reduces the lifetime of the thread tool and can
affect the quality of the working process.
Attention
By turning the adjustment wheel to the right side the retraction force of the drive unit
becomes stronger.
3.4.5 Adjust the workpart and height adjustment
4.4
3
30°
30°
4.3
Fig.: 3.15
•
•
•
•
•
Open the clamping lever (4.3).
Position the distance between spindle and workpiece higher than 10mm with the
hand crank (4.4).
It is possible to swivel the drive unit (3) around 30° to the left and to the right at a
time.
Clamp the clamping lever (4.2).
Secure the workpiece against torsional stiffness and unwanted moving.
Use only suitable clamping devices.
Danger: Workpieces can turn with the tool and threaten peoples and
machines.
Danger
28
user manual
Tauro® 8 / 25 / 83
4
Operation
4.1 Functions of buttons
Rotation sp
eed:
Depth:
Torque:
2.1
1,85 Nm
6,0 mm
M5 - 6
1000 rpm
6,0 mm
2,30 Nm
12 DS
57 N
2.7
2.2
2.3
2.4 2.5
(2.1)
(2.2)
(2.3)
(2.4)
(2.5)
(2.6)
(2.7)
Display
Emergency stop
Motor switch
Rotary knob with button
Rotary knob LED
Menu button
Menu button LED
2.6
(2.1) The full color 4.3 "TFT display shows operating parameters, processing results, error
and fault messages.
(2.2) The emergency stop button stops the machine after activating (push) in the function
safe stop (stop category 0 to EN 60204). The message is "STOP EMERGENCY
STOP". (See chapter: "error / status message")
Unlock (pull) the emergency stop button. The machine can immediately be used again.
Note: The tool can be reversed from the workpiece if the emergency stop
button is activated during processing. Therefore unlock the emergency stop
button, press the start button and select safety reverse. (Tauro® 8 / 25 / 83)
Note
(2.3) The motor switch is used to lock the spindle (eg: tool change).
Note: The tool can be reversed from the workpiece if the motor switch is
activated during processing. Therefore unlock the motor switch, push the start
button and select safety reverse. (Tauro® 8 / 25 / 83)
Note
(2.4) The rotary knob with button is used to select, to adjust parameters and to confirm the
measures and commands.
(2.5) The rotary knob LED shows the current function of rotary knob with button (2.4).
Rotary knob LED on (2.4) shows activation of rotary knob.
(2.6) By pushing the menu button you enter the main menu and go back to the task menu.
(2.7) Menu button LED on displays activation of menu button (2.6).
29
user manual
Tauro® 8 / 25 / 83
4.2 Task menu
Abort!
Torque
exceeded
Depth not reached
Rotation speed:
Depth:
Torque:
M2,5 - 3
0,61 Nm
1,4 mm
A
1000 rpm
6,0 mm
0,61 Nm
B
C
100000 / 99
12 DS
57 N
Fig.: 4.1
A
Message and quality level
A1
Abort!
Torque
exceeded
Depth not reached
A2
A3
A4
0,61 Nm
1,4 mm
100000 / 99
A1 messages (See chapter: "messages")
A2 torque reached
A3 depth reached
B
Adjustment level
Rotation speed
working speed
Depth
working depth
Torque
maximum torque for the working process.
The mentioned thread size is only reference value!
The torque has to be under the breakage data of the tool.
C
Parameter level
12 DS
C1
57 N
C2
C1 Number of data set
C2 Feed force (only for the feed of the spindle positioning)
30
Tauro® 8 / 25 / 83
user manual
4.3 Main menu, quick reference / standard parameters
The main menu is divided into several levels.
The levels can also be represented by a path in the instructions. The last information can
also be a setting.
(eg: main menu/engine settings/direction/right)
Task menu
Main menu
Level 1
Level 2
Level 3
Task menu
Rotation speed: 1000 rpm
Depth: 6,0 mm
Torque: 1,00 Nm
Main menu
Start settings
Start with start button: on
Start at workpiece zero point: off / enter parameter
Start at torque detection: off / enter parameter
Processing types
Threading blind hole: on
Chip breaking: off / enter parameter
Reversions: on / 5 per cut
Threading through hole: off
Thread recutting: off / enter parameter
Thread forming: off
Insert threaded bushing: off
Stop parameter: Torque / Depth
Insert bolt: off
Stop parameter: Torque / Depth
Thread gauging: off / enter parameter
Lubricant settings
Lubricant pulse: on / 0,5 seconds
Air pulse: off / enter parameter
Air cleaning pulse: off / enter parameter
Motor settings
Rotating direction: right / left
Reverse speed: 100%
Release height: off / enter parameter
Brake depth: off / automatic / manuel
Depth progress control: 5 responsivity
Feed system: XX,X proof rotation
Quality parameter
Torque window: off / enter parameter
Blowhole detection: off / enter parameter
Counter: Day counter / Workpiece counter
Depth tolerance: on / 0,5 mm
Tool wear: off / on
Parameter database
Default parameters r: load
User defined parameters: load / overwrite
31
Tauro® 8 / 25 / 83
System settings and system information
Measuring unit: mm
Language: english
Display brightness: 100%
System temperatures: information
System information: information
Last error: information
Extras
No extras installed
32
user manual
Tauro® 8 / 25 / 83
user manual
4.4 Main menu
Start settings
Processing types
Lubricant settings
Motor settings
Quality parameters
Parameter database
System settings and system information
Extras
4.4.1 Start settings
The start settings can only be set to `„on“. The previous startup setting is set to „off"
by selecting a different startup setting to „on“.
4.4.1.1 Start with start button
Option: on
4.4.1.2 Start at workpiece zero point
Option: on and enter parameter
Enter parameter. Run the tool with the control handle in the bore. Save
parameter, by using the rotary knob (2.4) or the start button (3.2).
4.4.1.3 Start at torque detection
Option: on
It is possible, if confirmed, to adjust the starting torque (from 0.05 Nm to
peak torque).
33
user manual
Tauro® 8 / 25 / 83
4.4.2 Processing types
The types of processing can only be set to „on“. The previous setting is set to „off“" by
selecting a different startup setting to „on“.
4.4.2.1 Threading blind hole
Option: on
It is possible, if confirmed, to adjust chip breaking settings.
4.4.2.1.1 Chip breaking
Option: off / on
It is possible, if confirmed, to choose between following setting:
- first chip breaking
(first chip breaking depth in mm)
- interval
(interval depth in mm)
- chip clearance depth
(chip break angle or depth to the
workpiece zero point, which should be
turned back by chip breaking.)
4.4.2.1.2 Reversions
Option: on / off
Option: 3 – 15 (maximum number of reversing)
4.4.2.2 Threading through hole
Option: on
4.4.2.3 Thread recutting
Option: on
It is possible, if confirmed, of torque reduction during ingating.
(10 – 90%).
4.4.2.4 Thread forming
Option: on
4.4.2.5 Insert threaded bushing
Option: on
It is possible, if confirmed, to select stop parameters:
Option: torque stop parameter / depth stop parameter
4.4.2.6 Insert bolt
Option: on
It is possible, if confirmed, to select stop parameters:
Option: torque stop parameter / depth stop parameter
4.4.2.7 Thread gauging
Option: on
It is possible, if confirmed, to boost torque while withdrawing.
(10 – 4000%)
34
Tauro® 8 / 25 / 83
user manual
4.4.3 Lubricant settings
4.4.3.1 Lubricant pulse
Option: on / off
It is possible, if confirmed, to adjust time, from 0,1 bis 3,0 seconds.
4.4.3.2 Air pulse
Option: on / off
It is possible, if confirmed, to adjust time, from 0,1 bis 3,0 seconds. Air
pulse starts with the lubrication pulse.
4.4.3.3 Air cleaning pulse
Option: on / off
It is possible, if confirmed, to adjust time, from 0,1 bis 3,0 seconds.
4.4.4 Motor settings
4.4.4.1 Rotating direction
Option: right / left (right / left hand thread)
4.4.4.2 Reverse speed
Option: 20% to 1000%
rpm is always limited to the minimum or maximum rpm.
4.4.4.3 Release height
Option: on / off
It is possible, if confirmed, to enter parameters above the workpiece zero
point (from 5 mm to maximal feed). This is a virtual start position at
which the machine can already be started again.
4.4.5 Quality parameter
4.4.5.1 Torque window
Option: off / on
It is possible, if confirmed, to set torque tolerance starting from 0.1 Nm.
Torque used during processing must not exceed maximum torque in the
task menu and the maximum torque, less torque tolerance.
Measuring range is set between start depth and stop depth.
(stop depth e.g. for tap clearance hole)
(See chapter: "Quality Notifications")
4.4.5.2 Blowhole detection
Option: on / off
It is possible, if confirmed, to set torque decrease in % (5 - 95%).
End of the measuring range is set by stop depth.
(stop depth e.g. for tap clearance hole)
(See chapter: "new messages")
4.4.5.3 Counter
Counter can only be set to „on“. By starting next count previous count is
set to „off“.
35
user manual
Tauro® 8 / 25 / 83
4.4.6 Day counter
Option: on
It is possible, if confirmed, to reset day counter.
Day counter is being reset at machine startup.
Display while processing:
good thread (green)
A
1,85 Nm
6,0 mm
100000 / 100000
bad thread (red)
4.4.6.1.1 Workpiece counter
Option: on
It is possible, if confirmed, to set counter options and parameters.
Option:
Abort after confirmation - last part can be reset by confirmation, if an
error occurs.
Abort after a faulty thread - last part must be reset by
confirmation, if an error occurs.
Abort after a faulty workpiece - last part must be reset
after completion of the processing of the part by confirmation.
workpieces -set quantity
threads per workpiece - set
reset of counted workpieces
Display while processing:
Parts counted (yellow)
A
1,85 Nm
6,0 mm
100000 / 99
Threads counted each part (yellow)
4.4.6.2 Depth tolerance
Option: on / off
It is possible, if confirmed, to adjust depth tolerance from 0mm - 6mm.
(see: brake depth)
(See chapter: "Quality messages")
36
user manual
Tauro® 8 / 25 / 83
4.4.6.3 Brake depth
Option: off / automatic / manual
Machine calculates brake depth during processing. This is necessary for
careful processing. Due unfavorable processing parameters (eg, low
torque, high speed, high pitch), depth can be exceeded. Avoid this by
changing the processing parameters, or adjusting the brake depth.
- off
- automatic
- manual
brake depth is off (eg for applications with high
processing sequences of through threads).
brake depth is automatically calculated by the machine
during processing.
brake depth can be adjusted manually in low processing
parameters.
4.4.7 Parameter database
4.4.7.1 Default parameters
Option: load
It is possible, if confirmed, to reset the entire parameters to default
parameters. (See chapter: "default parameters")
(Please wait 3 seconds!)
In the the message area of the working menu the data set „0 DS“ is
displayed.
4.4.7.2 User defined parameters
Option: data set
After selecting the data set number it is possible to load or to overwrite
this data set.
(Please wait 3 seconds!)
In the message area of the working the selected data set is displayed
(e.g. 12 DS).
4.4.8 System settings and system information
4.4.8.1 Measurement unit
Option: not active (mm / inch)
4.4.8.2 Language
Option: (german / english / spanish)
4.4.8.3 Display brightness
Option: not active (10 - 100%)
4.4.8.4 System temperatures
Information: not active
4.4.8.5 System information
Information: not activ
37
Tauro® 8 / 25 / 83
4.4.8.6 Last error
Information: last error (for service)
4.4.9 Extras
No extras installed
38
user manual
user manual
Tauro® 8 / 25 / 83
5
Messages
5.1 Quality notifications
Quality notifications „ Good “
Quality good.
Quantity
achieved
Quality good,
Quantity has been achieved.
Quality notifications „Abort“
Abort!
User
Abort!
No
depth progress
Abort!
Torque
exceeded
in reverse
Processing canceled by user using manual start
button or foot switch.
Spindle has not progressed at processing start
during certain period of time.
Torque has been exceeded in reverse.
Drive spindle stops.
Drive spindle can be reversed in safety reverse
mode with 50 rpm by using start button.
Abort!
Maximum number
of reversions
Depth not reached
Threading blind holes:
The set number of reversions has been exceeded.
e.g. tool wear, grounding, improper cutting speed
Path: Main Menu/Engine Settings/Reversions
Abort!
Torque
exceeded
Depth not reached
Threading canceled!
Threading through hole: Processing will be stopped
immediately after exceeded torque.
Threading blind holes: Tool has reversed 3 times
without progress in depth.
e.g.: grounding
39
user manual
Tauro® 8 / 25 / 83
Quality notifications „Error “
Error!
Gating
Error!
Below
torque range
The torque has slightly dropped during processing.
e.g.: pipe cavities or air pockets in cast material
Path: Main menu/Quality Parameters/Pipe Cavities
Error!
Blowhole
detected
The torque has slightly dropped during processing.
e.g.: pipe cavities or air pockets in cast material
Path: Main menu/Quality Parameters/Pipe Cavities
Error!
Depth tolerance
exceeded
40
The infeed of drive spindle was moved in positive
direction after setting the zero point. (in direction
up)
Adjusted depth tolerance was exceeded.
Thread with large pitch, high speed and low torque
is being processed,.
Change depth tolerance, correct the speed or set
the brake depth manually (See chapter
"Operation")
Path: Main Menu/Quality Parameters/Depth
tolerance
user manual
Tauro® 8 / 25 / 83
5.2 Error message / status message
Emergency stop button (2.2) has been
operated.
Check and correct malfunction.
Unlock (pull) emergency stop button
EMERGENCY STOP
Motor switch!
Engine switch has been operated.
Drive spindle is locked!
Machine ready again for processing by
turning the motor switch (2.3).
Attention!
Spindle
not in initial position
Spindle is not in initial position after power or
exiting a menu position.
Run back spindle into initial position.
Attention!
Feed
does not react
The feed does not react after starting the foot
switch.
Check the air supply.
Attention!
process
distance covered
The maximum travel range of the drive unit was
reached.
Correct the infeed travel.
41
Tauro® 8 / 25 / 83
user manual
5.3 Error code
An hardware error has arrived.
(See chapter " Troubleshooting / Error
code")
SYSTEM ERROR
1234
42
user manual
Tauro® 8 / 25 / 83
6
Digital inputs and outputs
6.1 Technical data of inputs and outputs
•
Digital inputs 3 pcs:
Type of Inputs
Rated voltage
Voltage range
Input current
Signal voltage on
Signal voltage off
Delay input
Potential separation
Protective circuit
Connection
digital isolator
24VDC +/- 10%
0…30V
approx. 0,5mA
min. 15V
max. 5V
> 10ms (0 to 1 and 1to 0)
none
short-circuit proof, thermal cut-out, inverse-polarity
protection
circular connector Ø 11,5 / IP67
cable bushing 3-5mm
terminal cross-section max. AWG 24 / 0,25mm²
Note
Note: A digital exit of a PLC control can be layed directly (without additional
load) to a digital input.
Proximity switches (e.g. inductive proximity switches PNP) can be connected
to a digital input directly.
Warning: By a short circuit at the 24V power supply of the digital inputs a start
pulse can be triggered.
The feed of the spindle will be started and the drive unit starts turning
automatically.
•
Digital outputs 10 pcs:
Digital outputs
Type of outputs
Rated voltage
Rated current
Rated burden
Potential separation
Protective circuit
Connection
Note
24VDC / 3,6W (short-circuit proof)
transistor
24VDC +/- 10%
150mA per output
3,6W per output
none
short-circuit proof, thermal cut-out, inverse-polarity
protection
circular connector Ø 16 / IP67
cable bushing 4-6mm (2,5-4 / 6-8 optional)
terminal cross-section max. AWG 20 / 0,75mm²
Note: A digital exit can be layed directly (without additional load) to a digital
input of a PLC control.
Valves can be connected to a digital exit directly.
43
user manual
Tauro® 8 / 25 / 83
6.2 Terminal connection of inputs and outputs
X363
3
2
1
X364
4
3
1
2
X365
1
5
4
2
3
connector
description
X363 /
1
2
3
Input foot switch (black)*
GND
24V
Input start 1 (foot switch)
X364 /
1
2
3
4
Input automation (black)*
GND
24V
Input start 2
Input start button 2
X365 /
1
2
3
4
5
X366
1
2
3
X367
1
2
X368
1
3
3
Rated
current
max current
(<3 sec.)
75mA
90mA
75mA
90mA
Output quality / QA (black)
GND
Output signal horn
Output signal light red
Output signal light orange
Output signal light green
150mA
150mA
150mA
150mA
180mA
180mA
180mA
180mA
X366 /
1
2
3
Output automation (red)
GND
Output clamp thread
Output clamp workpiece
150mA
150mA
180mA
180mA
X367 /
1
2
3
Output air cleaning unit (blue)
GND
Output air cleaning pulse
Output ready signal
150 mA
150 mA
180 mA
180 mA
X368 /
1
2
3
Output lubricant unit (green)
GND
Output lubricant unit air
Output lubricant unit pulse
150mA
150mA
180mA
180mA
* Only with feed system for the spindle!
44
2
user manual
Tauro® 8 / 25 / 83
6.3 Wiring examples of the inputs and outputs
•
Requirements input: The external start pulse of the thread tapping unit should
happen by an external manual button. (Only with feed system for the spindle)
Attention: By operating „Stop! User“ during the operation the operation can be
cancelled.
This function is no Emergency Stop function!
start 1
3
1
2
X363
+24 V
•
Requirement input: The external start puls of the thread tapping unit should happen
by an inductive proximity switch.
(Only with feed system for the spindle)
Wire the input automation (X364/3 Start 2) with an inductive proximity switch PNP.
br
start 2
bk A
bl GND
GND
4 1
+24 V
X364
3 2
+24 V
•
Requirement exit: A relais or a valve for a clamping unit should be connected.
Wire the exit automation (X366) with a relais or a valve.
Respect the direction of the freerunning diode if present. (A freerunning diode is not
neccessary)
GND
X366
1 2
3
•
+
Requirement exit: A warning lamp with horn should be installed for quality control.
Wire the exit signal column (X365) with various lamps and horn.
(You can order a signal column with horn as accessory)
45
user manual
Tauro® 8 / 25 / 83
+
-
X365
GND
GND
5
red
1
2
4
orange
3
green
•
Requirement input and exit (PLC): The thread tapping unit should be integrated in
automation by a PLC control.
Wire the exit of X367/3 ready and the input X364/3 Start 2 to a PLC – unit.
L+ M
1 2
4 1
3
3 2
X364
B
4 1
3 2
X364
C
4 1
3 2
X364
GND
+24VDC external
SPS
relay
A
transistor
X367
I1 I2
Q1
Q2
Q2
Option A:
The input of the thread tapping unit is connected to a relais exit of a PLC control.
(external power supply)
Option B:
The input of the thread tapping unit is connected to a relais exit of a PLC control.
(internal power supply)
Option C:
The input of the thread tapping unit is connected to a transistor - exit of a PLC control.
46
user manual
Tauro® 8 / 25 / 83
7
Diagnostics / Troubleshooting
7.1 Troubleshooting / Error code
Display on the screen (2.1)
An hardware error occurred.
Based on the following list check the
error code numbers and proceed as
follows.
Error code
1234
Problem /
Error code
The control lamp
(1.2) doesn’t shine
No display in the
screen (2.1)
1001
1002
1003
1004
1050
1060
1061
1070-1072
1080-1083
1084
1300
1301
1303
1305
1306
1307
Reason
Retification
- No power supply
- Hardware error
- No power supply
- Cable dective
- Hardware error
- Hardware error
- Check the voltage supply
- Check the saftey fuse (1.5)
- Check if the control lamp (1.2) is shining
- Check the data cable OP between the
connectors X163 and X261
- Check the data cable OP between the
connectors X163 and X261
- Check the data cable DU between the
connectors X162 and X362
- Inform the technical service
- Hardware error
- Hardware error
- Temperature of the
drive unit is exceeded
- Temperature of the
drive unit is undershoot
- short time power
interruption
- Hardware error
- motor switch has
been activated during
processing
- Hardware error
- Error in voltage
supply
- Hardware error
- motor power cable
- Hardware error
- Hardware error
- Hardware error
- Temperature of the
control unit is
exceeded
- Switch off the machine and let it cool down
- Switch off the machine and
regard chapter: “Operating conditions“
- Press and unlock the emergency Stopp
button
- Inform the technical service
- Switch off the machine, wait approx.
2-3 minutes and switch it on again
- Inform the technical service
- Check the voltage supply
Check the motor power cable between
connectors X161 and X361
- Inform the technical service
- Switch off the machine, wait approx.
20 minutes and switch it on again
- Switch off the machine and let it cool down
47
user manual
Tauro® 8 / 25 / 83
Problem /
Error code
1308
Reason
Retification
- Switch off the machine and let it cool down
1309
- Motor temperature
- Hardware error
- Hardware error
1310-1342
- Hardware error
- Check the data cable DU between the
connectors X162 and X362
- Inform the technical service
To switch off the error message: Switch off the machine by the main switch
(1.1).
Note
If the error messages still appear again after switching off and on the machine
by the main switch (1.1) please inform the technical service.
Attention
Attention! Repair of electric devices are only allowed by qualified personnel.
Based on not qualified repairs substantial risks can happen
Please inform the technical service in case of defective or a sending back.
In every case state the serial number and the cause of the error or the error
code.
48
Tauro® 8 / 25 / 83
user manual
7.2 Contact Service
Taurox e. K.
Service
In der Stockleiten 8
94372 Rattiszell
Germany
Phone:
Phone:
Fax:
E-Mail:
+49 (0)9964 / 6010141
+49 (0)9964 / 6010140
+49 (0)9964 / 6010139
[email protected]
Note!
To avoid transport damages send the machine back in the original packaging.
Note
Transport damages caused of improper packing the company Taurox e. K. is not liable
for.
49
user manual
Tauro® 8 / 25 / 83
8
Servicing
Danger: Switch off the machine and cut it from the power supply before doing
maintenance work.
8.1 General maintenance work
• Keep the machine and the cables free of permanent contamination.
• Do not clean the machine with aggressive cleaning compounds.
Attention: Do not use compressed-air to clean the machine.
Attention
8.2 Change air filter
•
Check the air filter every 6 months to contamination and change it if neccessary.
•
Replace the air filter every 2 years.
Air filter: Air incoming (3.5) article no.: KA107A
Air filter: Air output (3.4) article no.: KA124A
3.4
Fig.: 8.1 Air filter changing air output (3.4)
3.5
Fig.: 8.2 Air filter changing air incoming (3.5)
50
user manual
Tauro® 8 / 25 / 83
9
Wiring diagramn
Drive unit (3)
(Thread tapping machine)
(X363)*
(X364)*
Control unit (1)
(1.5)
PE
N
L1
* See chapter:
"Digital Inputs and Outputs"
(X160)
AC 230V
(X365)*
(X361)
(X362)
(X366)*
(X367)*
5A T
(1.5)
(X161)
(X368)*
(X162)
Operating panel (2)
1,85 Nm
6,0 mm
rotation speed:
Tiefe:
torque:
1000 rpm
6,0 mm
2,30 Nm
12 DS
(X263)
(X163)
PE
N
L1
57 N
Fig.: 9.1: Connection diagram Tauro® 8 /25 / 83
(See chapter: "Electrical Installation")
51
user manual
Tauro® 8 / 25 / 83
10 Appendix A: Component part
52
•
•
•
•
•
•
Collet inserts
Quick change inserts
Quick change inserts
Quick change inserts
Spindle feed system
Minimum lubricant unit
•
Minimum lubricant unit
•
•
•
•
Signal column
Key switch
Additional push buttons
fixation to wall
ER11 (Tauro® 8)
Size 0 (Tauro® 25)
Size 1 (Tauro® 83 /120 / Taurox®300)
Size 1 (Taurox® 400 / 900)
with foot switch (pneumatic 87psi / 6bar)
lubricant pulse, air pulse
(pneumatic 87psi / 6bar)
lubricant pulse, air pulse, air cleaning pulse
(pneumatic. 87psi / 6bar)
red, orange, green and horn
with lock-out
selection for parameter data base
assembly kit for fixation to wall (control unit)
user manual
Tauro® 8 / 25 / 83
11 Appendix A1: Quick change inserts
Insert
Size
∅ /
tap
DIN 371
tap
Quick change system
DIN 374/376 Tauro® 25 Tauro® 83/120
Taurox® 300
Size 0
Size 1
Taurox® 400/900
Size 2
2,5/2,1
M 1 - 1,8
M 3,5
X
X
2,8/2,1
M 2 - 2,6
M4
X
X
X
X
X
X
X
X
X
X
X
X
X
X
X
X
X
X
X
X
X
X
3,15/2,5
3,5/2,7
M3
M 4,5 - 5
3,55/2,8
4,0/3,0
M 3,5
4,0/3,15
4,5/3,4
M4
M6
5,0/4,0
6,0/4,9
M 4,5 - 6 M 8
6,3/5,0
7,0/5,5
M7
M 9-10
X
X
X
8,0/6,2
M8
M 11
X
X
X
9,0/7,0
M9
M 12
X
X
10,0/8,0
M 10
X
X
X
X
X
X
X
X
X
X
11,0/9,0
M 14
11,2/9,0
12,0/9,0
M 16
12,5/10,0
14,0/11,0
M18
14,0/11,2
16,0/12,0
X
X
M20
X
16,0/12,5
X
18,0/14,0
X
18,0x14,5
M22-M24
X
- Adaptor to reduce Size 1 auf Size 0
- Adaptor to reduce Size 2 auf Size 0
- Adaptor to reduce Size 2 auf Size 1
53
user manual
Tauro® 8 / 25 / 83
12 Appendix A2: Minimum lubricant unit
lubricant pulse, air pulse, air cleaning pulse
Scope of delivery
•
•
•
Minimum lubricant unit (B)
Attachment screw (A)
Air tube with quick fitting coupling (C)
Installation
•
•
•
•
•
Mount the lubricant unit (B) with the
screws (A) at the rear side of the
machine.
Connect the electrical connection line (E)
with the connector (F) with the machine.
Connect the compressed-air hose (C)
with the fitting (D).
Connect the compressed-air hose (C) to
the commpressed-air.
Compressed-air (58 - 87psi / 4 - 6bar)
cleaned with steam trap!
G.1
F
E
A
B
C
Commissioning
(G)
(G1)
(H1)
(H2)
(H3)
(I)
(J)
(K)
Lubricant tank
Cover for lubricant tank
Flow controller for dosing pump
Clamp lever for quantity controller
Indicator dose quantity
Adjusting screw for lubricant air
Adjusting screw for air output
Nozzle for lubricant and air
G.1
G
H1
I
Wearing eye protection is obligatory!
54
D
J
H3
H2
K
user manual
Tauro® 8 / 25 / 83
•
Set in the main menu/lubricant settings of the operation unit (2) the desired parameters:
- Lubricant pulse: Time of lubricant pulse.
- Air pulse:
Time for the air which takes the forwarded lubricant by the air pulse.
The lubricant will be sprayed by this.
- Blow out pulse: Time for the blow out pulse after operation or chip clearance with
chip clearance throw out depth.
•
Open the cover (G1) of the lubricant tank and fill in the lubricant. Close cover (G1).
•
Bleeding: Open the clamp lever (H2) and set the quantity control (H1) approx the value 4
to advance enough lubricant.
Switch on the function main menu/settings/lubricant pulse (0,5 seconds).
By every starting process a lubricant pulse will be started. Trigger several lubricant
pulses as long as the lubricant will be advance out of the nozzle (K). Now turn the
quantity control (H1) to the desired value and clamp it with the clamp lever (H2).
•
Lubricant pulse: The lubricant pulse advances a minor quantity of lubricant by a dosing
pump. This function forms a drop dosage.
•
Air pulse: At minor quantities (quantity control less than 0,5) the function main menu
settings lubricant / air pulse is needed, because the drop becomes to small to unstick of
the nozzle (K) (adhesive force).
By the adjusting screw of the lubricant air (I) the quantity of the air is controllable. The
adjusting screw (I) should not have more than 2 cycles (forming of spray). This function in
association with the lubricant pulse creates a spray dosage.
•
Air pulse without lubricant pulse: This function can be used with lubricanting materials
or for dry processing for cooling.
•
Outblow pulse: The outblow pulse is used to clean the tool or to remove chips (Setting:
Main menu/Lubricant settings/Blowout pulse).
The quantity of air is controllable by the adjusting screw (J).
•
Adjusting of the nozzle: Align the noozle (K) with the
blow out drilling (K2) to the bottom.
Adjust the nozzle to the tap hole to ensure a lubrication
during the whole working process.
K
K2
55
user manual
Tauro® 8 / 25 / 83
13 Appendix A3: Spindle feed system
Scope of delivery
•
•
•
Air tube with quick fitting coupling
Foot switch
Feed is integrated in the thread tapping unit
Installation
•
•
•
A
Connect the connector (A) of the foot
switch with the machine.
For sensors you can connect the
connector (B) with the machine
alternatively.
Connect the compressed-air hose to the
fitting (C) and to the compressed-air.
compressed-air (58 - 116psi / 4 - 8bar)
cleaned with steam trap!
B
C
Commissioning
(D)
(E)
Flow control for the speed operation
control
Pressure control for the setting of the
feed force
E
D
Hand injury warnings respectivly
contusives!
•
Set at the pressure control (E) the desired feed force.
The feed force (C2) is shown in the display.
1,85 Nm
6,0 mm
Rotation speed:
Depth:
Torque:
M5 - 6
1000 rpm
6,0 mm
2,30 Nm
0 DS
57 N
If the value (2) is out of the range it becomes red.
•
56
C2
If needed set at the nozzle (D) the desired feed force speed.
user manual
Tauro® 8 / 25 / 83
•
•
Set in the main menu/start setting the desired start function.
(See chapter: „Operation“)
start with the start button
The spindle start by positioning the tool at the workpiece
doing this the start depth will be set to 0,0mm.
start at
workpiece zero point
The spindle starts after leaving the end position.
The start depth can be set in the main menu/startup
settings/start at work part surface zero.
start at torque rise
The spindle starts after leaving the end position.
The torque identification can be set in the main menu/start
settings/start. If the start torque is exceedet the start depth
will be set to 0,0mm.
Secure the workpiece against torsional stiffness and unwanted moving.
Use only suitable clamping devices.
Danger: Workpieces can turn with the tool and threaten peoples and
machines.
Danger
•
Start the feed by the foot switch or by a sensor.
Warning of automatically running!
The start process can be cancelled by a repeated pressing of the foot
switch or the start button.
Note
57
user manual
Tauro® 8 / 25 / 83
14 Appendix A4: Pneumatic vice
Scope of delivery
•
•
Air tube with quick fitting coupling or air distribution
Mounting lever with valve and pressure control
Installation
Fix the mounting lever (B) with the two
screw (A) at the rear side of the machine.
• Connect the electrical connection cabel
(E) with the connector (F) of the
machine.
• Connect the compressed-air hose (C)
with the connection (D).
• Connect the compressed-air hose (C) to
the compressed air.
• Connect the compressed-air hose of the
clamp unit to the air connection (G).
Compressed air (58 - 116psi / 4 - 8bar)
cleaned with steam trap!
•
F
A
E
G
B
C
D
Commissioning
(G)
(H)
(I)
(K)
Air connection clamp unit
Manual action
Pressure control to set the clamping
force
Pressure display
Hand injury warnings respectivly
contusives!
K
H
G
I
•
Set at the pressure control (I) the desired clamp force.
With a slot screwdriver you can operate the valve manually.
•
The machine sends the signal to clamp after leaving the end position automatically.
58
user manual
Tauro® 8 / 25 / 83
15 Appendix C: Breakage of thread tools
This breakage datas are for chipping production of thread tools.
The core diameter of a through whole thread tool is higher than a ground whole thread tool.
Thereby the fraction of through whole thread tools are approx. 10% higher.
Breakage list for ground whole thread tools
Thred size
Breakage in Nm
M0,5
0,02 -
0,07 Nm
M0,8
0,07 -
0,10 Nm
M1
0,10 -
0,15 Nm
M2
0,2
-
0,5 Nm
M3
0,7
-
1,5 Nm
M4
1,3
-
2,2 Nm
M5
3,5
-
8,0 Nm
M6
7,5
-
14 Nm
M8
18
-
35 Nm
M10
50
-
75 Nm
These data are empirical values of tools with different qualities.
At high engine speeds it is recommended to select a low breakage as set value for the
breakage.
If you need detailed breakage- and cut data of the thread tools, please ask the producer of
the thread tools.
Based on the diversity of the different tools it is not possible to state the values in a list.
Thread tools for non-cutting production (thread former) have are much more stable state
because of their construction and missing chip nuts.
59
Tauro® 8 / 25 / 83
user manual
16 Appendix D: Processing of small threads (M1)
Setting recommodation for small threads under 0,29Nm:
- Activate startsettings/start with workpiece zero point.
- Speed smaller than 300U/min. (M1 smaller 100rpm)
- Torque smaller than 0,3Nm. (M1 approx. 0,09Nm)
Additional the following parameter can be set.
- At operation thread cutting ground hole switch off the reversals.
(The operation will be cancelled after exceedance the torque)
- Turn on chip clearance and chip throw out depth
Procedure of the program function:
Under a torque of 0,29Nm a longer accelaration ramp and a stop time will be activated by
turning.
Under a speed of 300rpm and a torque of 0,29Nm the internal brake depth will be
deactivated to avoid an hitch.
60