1
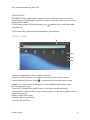
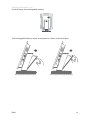
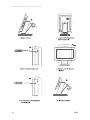
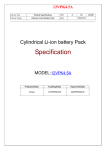
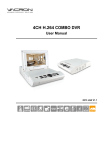
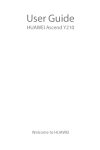
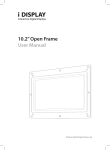
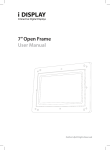
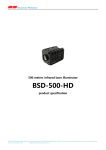
i VIEW
User Manual
Index
Operating Instructions4
Quick Start
4
Password
4
Settings
5
Home screen
6
Application screen
8
Auto play
9
Playing content
10
Reccommended formats
Overview11
Components
11
Front View
11
Side A
13
Side B
14
Back
Safety and Warning
17
Main Supply
17
Main Adaptor
18
FCC Radiation Statement
18
Warning
Accessories19
Troubleshooting19
Power Supply Unit Electrical Data19
2
Thank you for purchasing an i Display product. Before you start using your
new i Display product, please read the user manual carefully to enjoy optimum
performance and maximize the service life of this product. Keep this manual
in a safe place for future reference. In the interest of continually improving our
products, i Display reserves the right to update or modify information contained in
this manual. The screens and the illustrations shown in this manual were produced
during the development stage and may differ from the actual product, unless
otherwise specified.
For further information or support, please contact [email protected]

3
Operating Instructions
Quick start
Turning On
Plug the unit into the electricity or insert a fully charged battery. The Display
will automatically load its content and play. (To go to the Home screen and exit
the movie being played, press the Search button or Home button. Please note,
pressing the Home button will require a password to be inserted).
Turn the device on
Press and hold the power button for 3 seconds until the loading logo appears.
The unit will play the content stored within its internal memory or on the Micro SD
Card (if applicable). This can take up to 30 seconds to load.
Password
The content being played on your unit cannot be tempered with, changed,
deleted from the unit without inserting an authorized password. The default
password for this product is “iicore”.
When inserting the code to go to home screen you will have the option to
change it.
Settings
To enter the Settings Press the “search” button --> press
--> Settings.
You can use this icon at anytime to go back to a previous screen or to enter the
home page.
To set the wireless network go to settings (from home page press
--> from
application screen press
).Touch ”wireless & networks” --> touch “Wi-Fi settings”
--> choose the network that you wish to connect to and insert the network key
--> touch connect.
Note: Once the unit is connected to the network you disconnect it by touching
the “Wi-Fi” in the “wireless & network settings”.
To set the sound, double click on sound settings.
Within the sound settings page you can select silent mode and adjust the volume.
To set the Display setting, double click ‘Display’.
Double clicking the brightness allows you to adjust the brightness of the screen.
Within the Display settings you can also choose to auto rotate the screen, select
which animation will display on the screen (if any) and to adjust the delay before
4
Quick Start / Password / Settings
the screen automatically turns off.
Set Date & Time
IMPORTANT: Many applications require the Date and Time to be set correctly
according to your geographic location in order to connect with your accounts or
display correct data.
On the Home screen, Click the Settings icon
and then the “set the date and
time” button
Set the time zone, date and time according to your location.
Home screen
2
1
3
4
5
6
Tap on any application icon or widget to launch it.
Touch, hold and slide icons or widgets to reposition them on the screen.
Touch, hold and slide icons onto
to remove them from the Home screen.
1. Widgets (i.e., web search) and Shortcuts can be added to the Home screen.
2. Wi-Fi connection status
• The My Wi-Fi widget allows quick access to setting up and connecting to a local Wi-Fi network. After successful connection, simply tap the globe icon to
launch the browser.
• Battery charge level status
• Indicates Alarm is activated
• Current Date and Time
Home screen
5
3. Browser quick launch icon.
4. Applications screen quick launch icon. Touch & hold on the icon to show
thumbnails of all 5 screens. Tap on a screen to display it.
5. Settings quick launch icon.
6. Dots on left and right side of screen indicate the visible space of the 5 available
screens. Tap the left or right dots (or finger-slide the screen)
to display other screens. Touch & hold
screens; tap on a screen to display it.
to pop up thumbnails of all 5
Home Screen Function Menu
Press hard button Home to display Function Menu
Add
Manage apps
Wallpaper
Search
Notifications
Settings
Add Add Shortcuts ,Widgets and Folders on your Home screen.
If Add is not available,the visible screen space is full. Delete items to free up screen
space or slide the screen left or right to display extended screen space.
Wallpaper Assign a different photo as your background image.
Search Quickly and conveniently perform a Google search.
Notifications List of pending notifications (i.e., new email, events, completed
downloads, etc.).
Settings Set multiple functions and personal preferences that affect the usage of
the device.
Applications screen
Applications screen includes many preloaded apps (listed below).
As you download more AndroidTM apps, they can also be accessed on the
Applications screen.
To access the Applications screen, on the Home screen, tap
AppInstaller Install and uninstall third party AndroidTM apps.
Browser Access the Internet and ‘surf the web’.
6
Application Screen
Calculator Perform basic math equations.
Calendar Interfaces with your Exchange email account(s) to help you stay current
with all your appointments and scheduled events.
Clock Display a digital clock and schedule alarms.
Email Send/Receive email using your existing email addresses.
Gallery View and manage photo and video files.
Music Play and manage audio files.
Search Quickly perform a web search.
Settings Personalize and enhance the device as desired.
Video Player Play video formats not supported by the Gallery and ES File Explorer
media players.
Firmware Update Update the device Firmware.
Auto play Whilst in another screen such as Home screen, press this button
to return to the content on the Internal Memory, the content will start to play
automatically once pressed.
Es File Explorer Select to view files stored within the Internal Memory and Micro
SD Card.
Applications screen
7
Auto play content
ON Mode:
When the i view is in ON mode & as soon as the i view is turned on the content
in folder 0 starts playing. The content in folder 0 can be a series of JPGs / Video’s
or Applications (APK). The content will play in endless loop. If the unit is turned
on and there is no content in folder 0, the words: “No content available folder 0,
please insert content” will appear.
Once the new content is copied, the unit will auto play the content from the
internal memory.
Auto Copy/ Delete from USB
The i view has a folder called root folder name 0.
If a USB is connected to the i view USB socket, the following will happen:
• If the USB is empty: the wording: “USB Empty” will appear.
• If USB has folders named differently than 0: the wording “USB folders named
wrong – please change name to 0 will appear.
• If the USB has folders named 0 the words: “Delete Content in folders 0 YES/NO “ will
appear with an option to choose YES or NO.
User chooses not to delete old content in i view internal memory:
If the user chooses NO, the content in the folders of the USB will be copied to
the internal memory root folder. Content in USB folder 0 will be copied to folders
0 in i view root folder. If the root folder does not have these folders, the i view
automatically opens such folders and copies the content from the USB.
User chooses to delete old content in i view internal memory:
If the user chooses YES, the following question will appear:”Do you want to delete
content in folder 0 YES/NO?”.
After the chosen content is deleted, all content in USB will be copied to internal
memory root folder as explained above.
If a USB or Micro SD are placed into the unit a keyboard will appear asking to insert
a password.
Only if the password is correct will they work (USB – delete/copy content from
internal memory; S.D play content directly).
The password is defined in the same way the password is defined in the keyboard
which appears when one wants to exit the APK and go into the unit UI.
If a USB or Micro SD are placed into the unit a keyboard will appear asking to insert
a password.
Only if the password is correct will they work (USB – delete/copy content from
internal memory; S.D play content directly).
8
Auto play content
The password is defined in the same way the password is defined in the keyboard
which appears when one wants to exit the APK and go into the unit UI.
Exiting application to UI / Normal i view function
When the unit is turned on, it automatically activates an Application which is
responsible for all the features (auto run / auto copy / auto delete). It is possible to
exit this application by pressing the start button. When the start button is pushed
a keyboard appears. If the user inserts the correct password, he will leave the app
and be in the unit’s UI. If the user pressed the home button he will be able to exit
the auto play apk and insert the unit’s UI without the need to insert a password.
This feature may be cancelled in some units.
Changing Security code to exit App and go to UI
When inserting the code to enter the UI you will have an option to change the
password.
OFF mode:
Unit is off and does not use any power.
Playing content
1. Prepare a USB stick with a folder numbered 0.
2. Place the content you wish to play on the unit into folder 0 on the USB flashdrive
(or Micro SD Card if applicable).
3. Insert the USB flashdrive to the unit’s USB port.
4. A request to insert a password appears on the screen. Insert the password. you
will be asked if to first delete the old content. At that point you can delete the old
content and then copy the new one or copy the new content while leaving the old
content
5. The content in the USB flashdrive will be automatically copied to the devices
internal memory.
6. After copying is finished the unit will automatically start playing the content. You
can now remove the USB flashdrive.
Important comments:
• Do not turn off the unit or take the USB flashdrive out during copying process.
Doing so may damage the unit / USB flashdrive.
• Make sure you copy playable content to the USB flashdrive. Please refer to the
unit’s spec sheet for recommend formats.
• If the unit does not start to play the content after the copying has finished, restart
the unit and it will automatically play it.
Playing content
9
Recommended content format
Resolution: 1920X1080 Video
Format: XVID (.AVI)
Frame Rate: 23 frames per second (Up to 30 frames)
Rate :7 MB (Up to 38.4Mbps)
Audio code:MP3 160Kbps
Image format: JPEG, PNG, GIF, BMP
10
Recommended content format
Overview
Components
1. i View Android unit
2. Power Supply Unit – US, EU, UK Plugs available
3. Landscape/Portrait positioning screwdriver
4. Landscape/Portrait positioning screw
5. Remote control
6. User Manual
1
Side A
Setting buttons
Use to increases the volume
Use to decrease the volume
Use to go back to previous screen
Search - Use to go to home screen for search options (You will
Components / Front View / Side A
11
be asked to insert a password, enter the password provided within the ‘Password’
section further on in this manual.)
Home - Use to go to home screen (not password protected)
Menu - In the home screen this button uses to open a bottom bar which enables
you to add features to the home screen, manage apps, select the wall paper,
search in Google, see notification and enter the setting menu- see page 15.
In applications it can offer other functions per application design.
Please note, when a movie is being played the Menu button is disabled.
Menu - In the home screen this button uses to open a bottom bar which enables
you to add features to the home screen, manage apps, select the wall paper,
search in Google, see notification and enter the setting menu.
Add
Manage apps
Wallpaper
Search
Notifications
Settings
In applications it can offer other functions per application design.
Please note, when a movie is being played the Menu button is disabled.
12
Side A
Side B
Silicon cover for slots
This reduces access to slots or prevents stealing of SD Card (if used).
To insert or remove an SD Card the Silicon cover needs to be
positioned as shown and can be easily opened by gently
lifting up and turning clockwise. A screw can be added
for extra security.
USB slot
If you wish to upload content onto the devices internal memory, insert a USB Flash
drive into this port. (Content needs to be placed into the correct folder format
as described further on in this manual). Once the flash drive is connected, the
device will ask for a password, insert the password provided within this manual,
(see ‘Password’ section). The unit will ask you if you wish to delete the old content
or to add the new content. After choosing between the 2 options, the content
will automatically be copied from the USB flash drive onto the device’s internal
memory.
Please note, this feature (auto play content) only works when you are in auto play
mode application mode. Once you exit the auto play (by pushing the home or
search button) and insert a USB stick, the content will not play automatically.
Micro SD card slot
If you wish to play content from a Micro SD Card, insert the relevant Micro SD
card into the slot of the device. (The content needs to be placed into the correct
folder format as describes further on in this manual). A request to insert password
will appear on the screen. If the you insert the correct password The unit will
automatically start to play the contact contained on the Micro SD card. (Please
note, the content on the Micro SD Card will not be copied onto the internal
memory automatically).
Please note, this feature (auto play content) only works when you are in auto play
mode application mode. Once you exit the auto play (by pushing the home or
search button) and insert a Micro SD Card, the content will not play automatically.
When you have content on the internal memory and a Micro SD Card is inserted
into the device, the unit will play the content from the Micro SD Card. To revert to
playing the content on the Internal Memory, remove the Micro SD Card from the
device.
Side B
13
To view the content in the Internal Memory, select the “ES File Explorer”
which can be found on the application screen.
***If you insert a blank USB/Micro SD Card or a USB/Micro SD card without folder
0, the unit will show an error notification advising the user that the USB/SD card
has no content or incorrect folder name.
To view the content on the Micro SD card, select the “ES File Explorer”
which can be found on the application screen.
(Please note: A Micro SD Card is not included with this unit and should be
purchased separately).
Back
DC connector
Located at the back of the unit’s leg. To run the unit from electricity, connect the
power supply cable into the DC connector port and plug the power supply into an
electrical socket.
On/Off button
Located on the back bottom section of the unit. Red button indicates the unit is
switched off. Green button indicates the unit is switched on.
14
Side B / Back
Rechargeable battery slot
Used to house the rechargeable battery.
The rechargeable battery needs to be placed as shown in these images.
Placing the Rechargeable Battery
Back
Removing the Rechargeable Battery
15
Rotating screen to horizontal position
16
Back
Safety and Warnings
Main Supply
This equipment is designed to operate from a 100-240 Volt, 50/60Hz AC main
supply. The use of other power sources may damage this equipment. Check that
the voltage marked on the rating plate located at the rear of the power adaptor
states 100-240V. The manufacturer will NOT accept responsibility for damage or
injury caused by connecting to the wrong voltage.
Main Unit
This device complies with CE/FCC regulations.
Main Adaptor
The power adaptor supplied is compatible with a standard main socket. NB. If the
power adaptor or lead gets damaged, it must be replaced by a qualified service
agent with an approved adaptor of the same type and rating.
Operation is subject to the following two conditions: (1) this device may not cause
harmful interference, and (2) This device must accept any interference received,
including interference which may cause undesired operation. This equipment
has been tested and found to comply with the limits for a Class B digital device,
pursuant to Part 15 of the FCC Rules. These limits are designed to provide
reasonable protection against harmful interference in a residential installation.
This equipment generates uses and can radiate radio frequency energy and, if
not installed and used in accordance with the instructions, may cause harmful
interference to radio communications. However, there is no guarantee that
interference will not occur in a particular installation. If this equipment does cause
harmful interference to radio or television reception, which can be determined
by turning the equipment off and on, the user is encouraged to try to correct the
interference by one or more of the following measures:
Reorient or relocate the receiving antenna.
Increase the separation between the equipment and receiver.
Connect the equipment into an outlet on a circuit different from that to which the
receiver is connected.
Main Supply / Main Unit / Main Adaptor
17
Consult the dealer or an experienced radio / TV technician for help. In accordance
with FCC requirements, changes or modifications not expressly approved by
manufacturer could void the user’s authority to operate this product.
FCC Radiation Exposure Statement
This equipment complies with FCC radiation exposure limits set forth for an
uncontrolled environment. This equipment should be installed and operated with
minimum distance 20cm between the radiator & your body
Dangerous voltage constituting a risk of electric shock is present inside this
equipment.
This mark is applied to show the equipment conforms to European safety and
electro-magnetic compatibility standards.
There are important operating and maintenance instructions in the literature
accompanying this equipment.
The main plug shall be the main disconnect device and shall remain operable at all
times.
Never let anyone push objects into holes and ventilation slots.
Do not expose this product to dripping or splashing or place any objects filled
with liquids on or near the product.
Do not place a naked flame source such as lighted candles on or near this product.
Do not attempt to repair this product yourself; always get a qualified service agent
to carry out adjustments or repairs.
18
FCC Radiation Exposure Statement
Accessories
•
•
•
•
Battery
Desk Mount clip
Security cable
Docking station (1 or 6 batteries).
Troubleshooting
For further information or support, please contact: [email protected]
Power Supply Unit Electrical Data
Display: Input: 12 V, 3000mA
Power Adaptor: Input 100-240V, 50/60 Hz, 0.8A; Output 12V, 3000mA
Accessories / Troubleshooting / Power Supply Unit Electrical Data
19
For further information or support, please contact: [email protected]