1
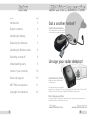
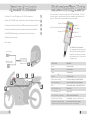
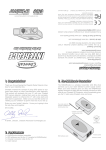
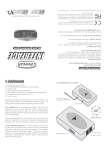
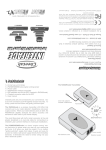
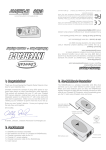
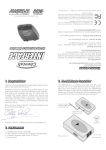
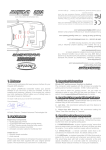
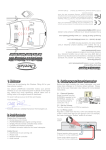
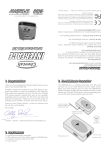
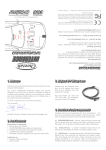
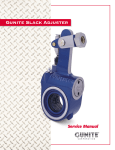
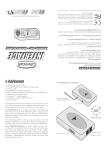
with VizAlert V2 Display
Owner’s Manual
Version 2
© 2009 Cheetah Advanced Technologies Ltd, Scotland. All rights reserved.
This product is covered by U.S. Patent No. 6,833,910, European Patent No. 1549969
and other patents.
“Cheetah” and “Trinity” are registered trademarks of Cheetah Advanced Technologies
Ltd, Scotland.
“Blinder” is a registered trademark of Blinder International, Denmark.
All other trademarks are the property of their respective owners.
Cheetah Advanced Technologies Ltd has made every effort to ensure that all the
information contained in this manual is accurate and reliable. However, the information
is subject to change without notice. Cheetah Advanced Technologies Ltd shall not be
liable for technical or editorial errors or omissions contained herein; nor for incidental or
consequential damages resulting from the performance or use of this material.
This document contains information protected by copyright. No part of this document
may be photocopied or reproduced in any form without prior written consent from
Cheetah Advanced Technologies Ltd.
Cheetah Advanced Technologies Ltd. declares that this product is in
compliance with the essential requirements and other relevant provisions of Directive 1999/5/EC.
This device complies with Part 15 of the FCC Rules. Operation is
subject to the following two conditions: (1) this device may not cause
harmful interference, and (2) this device must accept any interference
received, including interference that may cause undesired operation.
NOTE: The manufacturer is not responsible for any radio or TV
interference caused by unauthorized modifications to this equipment.
Such modifications could void the user’s authority to operate the
equipment.
12
To register for warranty purposes, visit:
www.register.speedcheetah.com
Please attach your receipt here for future reference. If you do not register online and
later require warranty support, you will need to send a copy to us as proof of purchase.
1
section
page
Introduction
3
Got a another helmet?
System contents
4
VizAlert Classic Display
Installing the display
5
Replacing the batteries
5
Installing the Blinder heads
6
Switching on and off
8
Understanding alerts
9
Limited 1 year warranty
10
Service & support
10
M27 Rider accessories
11
Copyright & compliance
12
100% waterproof helmet receiver to fit
on the outside of an open face helmet
Uncage your radar detector!
Radar Detector Interface
Make radar alerts visible on your
VizAlert display
Cheetah Interfaces are available for:
Valentine One, Beltronics STi Driver, Escort 8500 X50, Escort Solo S2, Escort SR7,
SR7plus, the Escort SRX and the Target EVO 966RM (European model)
Other Replacement Parts
Component parts for the M27rider, like cables, power supplies, boom support arms or
handlebar switches are available on request.
USA & Canada
www.GPSdetector.com
2
Europe & rest of world
www.SpeedCheetah.com
11
Cheetah Advanced Technologies Ltd. warrant our products against all defects in
materials and workmanship for a period of one year from the date of the original
purchase, subject to the following terms and conditions.
This warranty is limited to the original owner, and is Non-Transferable. This warranty
does not apply if the serial number has been removed or is unreadable or if the
product has been subjected to physical abuse, improper installation, modification or
internal examination. The sole responsibility of Cheetah Advanced Technologies Ltd
under this warranty is limited to repair or, at discretion, replacement of the product.
Cheetah Advanced Technologies disclaims all other warranties, expressed or implied, including warranties of fitness for any particular purpose or merchantability.
Cheetah Advanced Technologies Ltd accept no liability for any direct, indirect or
consequential claim arising from the use or misuse of this product or from any incident
arising from an installation that inhibits the correct operation of an airbag or any other
vehicle system.
Features, specifications and prices subject to change without notice.
Before sending any products back to us for service, please check the Customer
service website page on www.SpeedCheetah.com or send a support email to us at
[email protected]. Do not attempt to service this product yourself. Do
not open, puncture or disassemble the unit or your warranty will be void.
To obtain factory service, the product must be returned to Cheetah, at the address
below, in its original packaging or a suitable alternative. We cannot be held responsible for any returned product until it has been delivered to our premises - please
ensure you use a mail service that is insured against loss, and that you can track.
You must also include a description of the problem, your name, return shipping
address, daytime telephone number and proof of purchase.
Thank you for purchasing the Cheetah M27 Rider, the only laser jamming
system that’s custom made for motorcycles. Another world first from
Cheetah.
Your new laser jammer is based on the super effective “jamming engine”
of the Blinder M27 X-TREME platform, so it can detect and protect against
all the different laser guns in use today without showing jamming codes
on police laser. The officer sees the same normal error messages his
gun gives all the time so there is no indication that he is being jammed.
The Cheetah M27 Rider jams every laser gun in use today and what’s
more, it’s future proof. There’s a free factory upgrade service for when
new laser guns are released.
And don’t forget, if you have one of the top performing radar detectors
listed on page 10, like the Valentine 1, then we make Radar Detector
Interfaces that link your existing radar detector up wirelessly with the
Cheetah M27 Rider. The VizAlert display that’s part of your system is the
most advanced radar detector display in the world and it shows you
different colors for different radar or laser bands, and flashes more quickly
as the signal strength gets stronger. It’s the only heads up display that
lets you know exactly what’s going on, without looking down.
Ride safe and ticket free,
Proof of Purchase
Please keep your store receipt in a safe place. If you did not buy the unit directly from
Cheetah, or register the warranty online, you must include a copy of your dated store
receipt with any returned unit. If no copy of the receipt is included, out of warranty
service charges will apply.
Alisdair Smith, Director
Cheetah Advanced Technologies
Where to ship:
UK
Cheetah Advanced Technologies Ltd
Birchbrook House, Doune Road, Dunblane, Perthshire, FK15 9ND
USA
Cheetah USA LLC
3317 South Higley Road, #114-178, Gilbert, Arizona, 85297
Europe Please email us at [email protected] for country specific
& Other return address details.
3
10
3
1 x VizAlert V2 - 6 color LED display with 2 x CR2302 cell batteries
1
2 x Blinder M27 XTREME heads - modified short cables with waterproof connectors
2
1 x Waterproof Control Box with built-in LASERnode transmitter and status LED
3
1 x Waterproof handlebar kill switch with powder coated bracket and cable tie
4
1 x POWERSENSEnode engine running sensor with 3 Amp in-line fuse
5
When your jammer is firing, it will trigger the red LED to flash rapidly. The other
colors are used for radar detector alerts from compatible radar detectors (see
page 11). Different colors represent different radar / laser bands.
Green = KA
Yellow = X
Blue = Reserved for future use
Red = Laser
Orange = KU
White = K
Daylight Sensor
1 x Fitting kit for jammer heads
1 x User manual
The VizAlert is light sensitive.
The automatic dimming feature will
reduce the LED intensity at night time.
6 color display
If required, the display may be temporarily rotated away to further protect
your night vision.
Battery Pack with
ON / OFF switch
Wireless receiver
3
5
1
3
4
2
2
LED COLOR
MEANING
Green
KA band radar
White
K band radar
Yellow
X band radar
Orange
KU band radar
Red (medium flashing)
Laser alert from your radar detector
Red (rapid flashing)
Laser alert from your laser jammer
Blue
not currently used - reserved for future
All 6 LEDs flash once
Power ON
All 6 LEDs flash twice
Power OFF
All 6 LEDs flash in sequence
Wireless link established
Green, Blue then Orange
Low battery - replace the batteries soon
Yellow and Orange alternately
No wireless link / Out of range
(6 flashes ever 30 seconds until the wireless connection is re-established)
4
2
The helmet display and the jammers are switched on and off independently of
each other.
1 Switching the helmet display ON and OFF
The VizAlert V2’s battery pack has a sliding ON/OFF switch.
All 6 LEDs will flash once, at the same time, to confirm it is switched on.
Automatic shut-down - If you forget to switch the VizAlert display off, it will
automatically shut itself down 10 minutes after the jammer control box stops
transmitting, to conserve battery power. All 6 LEDs will flash twice to confirm it
is switching itself off automatically.
When you next use the system after an automatic shut down, you must first
move the battery switch on the VizAlert display to the OFF position, then
turn it back ON again as normal.
2 Switching the jammers ON and OFF
Your jammers will power up when you start the engine.
You can confirm they are switched on by checking the Status LED. If this is not
lit up, turn the system on at the handlebar kill switch.
When the jammers power up, the LASERnode transmitter inside the wireless
control box will begin transmitting to the VizAlert V2 display. All the LED's will
flash in a circular sequence to confirm that the wireless link is established
and that the two parts of the system are “talking” to each other.
You can turn the system off at any time using the handlebar kill switch. Also,
when you switch off your engine, power to the jammer system is automatically
cut off, so you won’t get a flat battery.
LED Display
The mounting location is a matter of personal
choice. It can be held securely in place by
your helmet’s cheek padding, so that it
does not move during use.
To begin with, we recommend fitting it as
far towards the front of the view port as
possible (position A), but it must never
interfere with your forward vision.
A
B
As you become familiar with using the
product, you may prefer to move it more
towards the side of your helmet, in your
peripheral vision (position B).
The warning lights are very directional, so
care must be taken to ensure that the raised
“bubbles” point directly towards your eye, otherwise you may miss some alerts. TIP: Use a mirror to
see where the warning beams are hitting your face and adjust their aim, if necessary.
Receiver
The receiver can be easily tucked behind the comfort liner or even slipped underneath the
base gasket, and secured with Velcro, if required.
Battery Pack
Secure the battery pack with Velcro, in a convenient location for access to the ON/OFF
switch. The battery pack is not waterproof so must be positioned inside the helmet.
Cruiser / Open Face / Shorty Helmets
The VizAlert V2 is designed for full-face helmets. For Cruiser style
helmets, we recommend replacing the VizAlert V2 display with the VizAlert
Classic display (see page 11). Its receiver / battery is 100% waterproof
and designed for mounting on the outside of helmets.
Two CR2032 batteries are already installed and should last more than 60 hours of normal
operation. Replacement CR2032 3V batteries are available at all good battery stockists.
1 Remove the four screws that secure the battery cover and
extract the battery holder from the casing.
RETAINING CLIP
2 Insert a nail file, screwdriver or similar object at the opposite
end of the battery to the retaining clip. Gently prise the battery out.
3 Insert 2 x CR2032 3V button cell batteries with the positive
side facing upwards. The batteries securely click into position.
4 Replace battery holder inside casing and re-tighten screws.
8
5
1 Blinder Heads
There are 2 heads for front and rear
protection. The exact fitting location
will vary from bike to bike.
1
On faired bikes fit the front jammer
under the fairing at the nose of the
bike using the brackets supplied, or
3M Dual Lock Velcro (not supplied).
On naked bikes it is best practice is to
try to install the Blinder heads as
close to the lights as possible.
It’s very important that the transponders are mounted correctly.
3
5
1
2
Laser beams cannot pass through
objects so the Blinder heads must
have a clear, unobstructed view.
The heads must point straight ahead
and be level, i.e. they must be horizontal to the road surface and parallel
to the driving direction.
Incorrect alignment may result in
failure to detect and protect
against police laser.
On the outer side of the front on each
head you will find a detachable plug.
Remove one plug on each head, and
put the spirit level into the cylindrical
hole. Now you can carefully adjust
the angle of the heads to horizontal
position. After finishing the adjustment, re-mount the 2 plugs into the
front of each head.
6
4
2 Wireless Control Box
Position the Wireless Control Box underneath your seat. It is waterproof so
can be installed elsewhere on the motorcycle if required.
Then plug and screw together the waterproof connectors from the heads.
3 Status LED (OPTIONAL)
4 Handlebar Kill Switch
The kill switch must be connected inline between the Interface box and the
POWERSENSEnode. The small black
connectors are pre- connected, but can
be unplugged by pressing the small
black lever. Secure the kill switch to the
handlebar or hand grip using the cable
ties provided.
5 Power Supply
Run the Status LED to your instrument
cluster and instal it in a suitable location.
Connect the POWERSENSEnode and
fuse pack to the battery terminals.
This LED can provide a secondary confirmation of whether your jammer is
turned on or off, and will also change
color during jammer alerts.
The POWERSENSEnode is an intelligent engine running sensor, which
senses when you start your bike, replacing the need for direct wiring into
your bike’s electrical system.
7