1
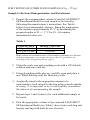
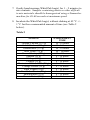
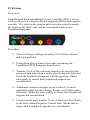
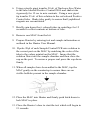
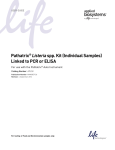
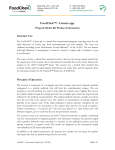
NON-CLINICAL RESEARCH USE ONLY
InstantLabs®
Salmonella Species Food Safety Kit
P/N 9034-0600-0003
PRODUCT DESCRIPTION
The InstantLabs Medical Diagnostics Corporation (InstantLabs)
Salmonella Species Food Safety Kit contains the reagents
necessary for performing qualitative, real-time PCR on the Hunter
Accelerated PCR® system (see Hunter System Specifications
below). The kit is intended to be used in an analytical laboratory
under standard laboratory conditions.
KIT STORAGE AND STABILITY
Store the InstantLabs® Food Safety Kit at 2 - 8° C. The kit is
stable through the expiration date printed on the package.
MATERIALS REQUIRED AND PROVIDED
•
•
Multiple Assay Cartridges (MAC)
Reagent Packs each containing the following:
o 6 – Colored Tubes With Lyophilized PCR Reagents
o 4 – Sample Extraction Tubes
o 1 – Tube of Positive Control DNA
o 1 – Tube of Nuclease-Free Water
Quantitative PCR complete master mix containing GoTaq® Hot Start Polymerase manufactured by Promega Corporation
for distribution by BioGX, Inc. Licensed to Promega under U.S. Patent Nos. 5,338,671 and 5,587,287 and their
corresponding foreign patents. For Research Use Only. Not for any clinical or therapeutic use in humans or animals.
ADDITIONAL MATERIALS REQUIRED BUT NOT
PROVIDED:
1. Hunter® Accelerated Real-Time PCR Instrument
2. Nitrile or Latex Gloves
3. Whirl-Pak® Filter Bag for Homogenizer Blenders (or
Other Similar Filter Bag)
For 750 g grain samples, use 138 oz. capacity bags. For
food samples between 25 g and 375 g, use an appropriately
sized bag.
4. 42 ± 1o C Incubator
5. FASTGRO™ SE Enrichment Broth (InstantLabs)
6. Sterile Spatula or Scoop (Single Use or Re-Usable
Laboratory-Sterilized)
7. 10-100 µL Pipette with RNase/DNase-Free Filter Tips
8. Laboratory Balance with a Sensitivity of 1 g
9. Heat Block Set at 95o C
10. Micro-Centrifuge (6,000 x g Minimum)
11. Stomacher® Instrument
Optional for most food types but recommended for meat
and other samples that cannot be effectively mixed by hand.
WARNINGS AND PRECAUTIONS
1. Wear eye protection, gloves, and laboratory coats when
handling samples, lysis buffer and kit reagents.
2. Avoid contamination of reagents by only using sterile
pipette tips.
3. Do not use kits beyond the printed expiration date.
4. Do not use kits that have been stored above 8°C.
5. A negative and a positive control must be included in each
test.
6. Do not reuse excess reagents from one reagent pack to
another, dispose of all remaining reagents once all kit
MACs have been used.
7. Material Safety Data Sheets (MSDS) are available upon
request.
8. Treat enriched samples as if they contain pathogenic
bacteria.
9. Enriched samples and MACs should be disposed of as biohazardous waste according to local regulations.
INSTRUCTIONS FOR USE
FOR TESTING OF GRAIN SAMPLES (750 g)
Sample Collection, Homogenization, and Enrichment
1. Prepare 3,375 mL of sterile FASTGRO™ SE Enrichment
Broth for each sample to be tested by following the
manufacturer’s instructions. Bring the temperature of the
media to approximately 42°C by incubating the prepared
media at 42 +/- 1°C for 30 - 60 minutes immediately
before use.
2. Clean the work area and weighing scale with a 10% bleach
solution and wipe until dry.
3. Using clean disposable gloves, carefully open and place a
new Whirl-Pak bag onto the laboratory scale.
4. Aseptically transfer approximately 750 g of a
representative grain sample to the bag using a sterile
spatula or scoop. It is important to try to work quickly to
minimize the chances of contaminating the sample.
5. Repeat steps 3 and 4 (above) for each additional sample to
be tested.
6. Pour 3,375 mL of pre-warmed FASTGRO™ SE
Enrichment Broth into each bag and loosely seal bag with
built-in wire closures. If necessary, sample size may
deviate from 750 g depending on availability of sample, as
long as the amount of FASTGRO™ SE is adjusted
proportionally.
7. Gently hand massage Whirl-Pak bag(s) for 1 – 2 minutes to
mix contents.
8. Incubate the Whirl-Pak bag(s) without shaking at 42°C +/1°C for 16 – 20 hours.
FOR TESTING OF OTHER FOOD SAMPLES (25 g – 375 g)
Sample Collection, Homogenization, and Enrichment
1. Prepare the recommended volume of sterile FASTGRO™
SE Enrichment Broth for each sample to be tested by
following the manufacturer’s instructions. See Table 1
below for recommended volumes. Bring the temperature
of the media to approximately 42°C by incubating the
prepared media at 42 +/- 1°C for 30 - 60 minutes
immediately before use.
Table 1
SAMPLE SIZE
25 g or 25 mL
375 g or 375 mL
MEDIA VOLUME
225 mL
1,500 mL
Media volume and enrichment times of food sample enrichments as a function
of desired sample size. Any sample size larger than 375 g should be run
according to the 750 g grain protocol, page 4.
2. Clean the work area and weighing scale with a 10% bleach
solution and wipe until dry.
3. Using clean disposable gloves, carefully open and place a
new Whirl-Pak bag onto the laboratory scale.
4. Aseptically transfer the appropriate amount of a
representative food sample to the bag using a sterile spatula
or scoop. It is important to try to work quickly to minimize
the chances of contaminating the sample.
5. Repeat steps 3 and 4 (above) for each additional sample to
be tested.
6. Pour the appropriate volume of pre-warmed FASTGRO™
SE Enrichment Broth (see Table 1 above) into each bag and
loosely seal bag with built-in wire closures.
7. Gently hand massage Whirl-Pak bag(s) for 1 – 2 minutes to
mix contents. Samples containing meats or other difficult
to mix materials should be homogenized using a Stomacher
machine for 30-60 seconds at maximum speed.
8. Incubate the Whirl-Pak bag(s) without shaking at 42°C +/1°C for the recommended amount of time (see Table 2
below).
Table 2
SAMPLE
Ground Chicken (375 g)
Solid Chicken (375 g)
Ground Beef (375 g)
Beef Trim (375 g)
Ground Turkey (375 g)
Spinach (25 g)
Cabbage (25 g)
Lettuce (25 g)
Pasteurized Whole Milk (25 g)
Cottage Cheese (25 g)
Plain Yogurt (25 g)
Vanilla Ice Cream (25 g)
Salted Butter (25 g)
Peanut Butter (25 g)
ENRICHMENT
TIME
10 - 16 hours
10 - 16 hours
10 - 16 hours
10 – 16 hours
10 – 16 hours
8 – 16 hours
8 – 16 hours
8 – 16 hours
8 – 16 hours
8 – 16 hours
8 – 16 hours
8 – 16 hours
8 – 16 hours
8 – 16 hours
DNA Extraction from Enriched Samples
1. Clean the work area and laboratory pipets with a 10%
bleach solution and wipe until dry.
2. Firmly tap Sample Extraction Tubes on the laboratory
bench to collect contents at bottom of tube. Label each
tube with the sample to be tested.
3. Remove Whirl-Pak bag(s) from incubator being careful not
to disturb the settled food debris.
4. Carefully open the bag and remove 50 µL of liquid from
the top 1 – 3 cm of the filtered compartment of the WhirlPak bag without disturbing the settled food debris and place
into the correctly labeled Sample Extraction Tube prepared
in step 2 above. Note that if a layer of fat is present, move
pipet tip to below the fat layer before removing aliquot.
5. Repeat step 4 for each sample to be tested.
6. Gently invert Sample Extraction Tube(s) 3 – 5 times to
ensure sample is mixed with the lysis reagents.
7. Incubate the Sample Extraction Tube(s) at 95°C for 20
minutes in a dry heat block to complete the lysis and then
let tube(s) cool at room temperature for 1 - 2 minutes.
8. Centrifuge tube(s) in a Micro-Centrifuge for 3 minutes at
maximum speed to pellet the lysing beads and any food
debris.
9. The supernatant contains the extracted DNA and is ready
to be tested immediately with the InstantLabs® Food
Safety Kit. If the samples will not be tested within 30
minutes, transfer 50 uL of supernatant to a new nucleasefree microcentrifuge tube and freeze at -20° C for up to 3
months.
Graphic of Sample Extraction Tube Following Centrifugation
PCR Setup
Overview:
Each Reagent Pack and Multiple-Assay Cartridge (MAC) can be
used to run up to 4 samples plus the required positive and negative
controls. The tubes in the reagent pack are color-coded to match
the wells on the MAC and contain convenient ready-to-use
lyophilized reagents:
Procedure:
1. Clean workspace and pipets with a 10% bleach solution
and wipe until dry.
2. Using clean gloves remove the tubes containing the
Lyophilized PCR Reagents from the kit.
3. Transfer 25 uL of the extracted sample to be tested to the
green colored tube using a sterile pipet being careful to not
touch the lyophilized reagents with the pipet tip. Shake
tube gently to ensure that lyophilized reagents are
reconstituted.
4. Additional extracted samples (up to a total of 4) can be
similarly loaded into the Orange, Purple, and Yellow tubes
if desired. Shake the tubes gently to ensure that lyophilized
reagents are reconstituted.
5. Using a sterile pipet transfer 25 uL of Nuclease-Free Water
to the blue colored Negative Control tube. Shake tube to
ensure that lyophilized reagents are reconstituted.
6. Using a sterile pipet transfer 50 uL of Nuclease-Free Water
to the tube labeled Positive Control DNA and shake tube
vigorously for 15 sec to mix contents. Using a new pipet
tip transfer 25 uL of this solution to the red colored Positive
Control tube. Shake tube gently to ensure that lyophilized
reagents are reconstituted.
7. Briefly spin down the 6 colored tubes in centrifuge for 15
seconds to collect contents at bottom of tube.
8. Remove one MAC from the kit.
9. Prepare Hunter by entering test and sample information as
outlined in the Hunter User Manual.
10. Pipette 20µl of each Sample/Control PCR mix solution to
the correct port on the MAC by matching the color of the
tube to the colors printed on the MAC. Insure that the
solution flows into the sample chamber and then close the
cap on the port. To ensure a proper seal press the cap down
firmly.
11. When all samples have been added to the MAC, tap the
MAC gently on the countertop to ensure there are no
visible bubbles present in the sample chamber.
12. Place the MAC into Hunter and firmly push latch down to
lock MAC in place.
13. Close the Hunter’s door to start the test which will begin in
15 seconds.
14. The results will be displayed automatically as Positive,
Negative, or Indeterminate when the cycling is completed.
TROUBLESHOOTING
Problem
No amplification of
Positive Control – The
Hunter calls the positive
control Negative or
Indeterminate
High background in the
Negative Control –
Hunter calls all samples
indeterminate (?)
•
•
Suggestion
Positive Control was expired,
not reconstituted properly,
stored incorrectly, or was not
loaded into the MAC correctly.
Repeat test with fresh reagents.
Potential contamination. Repeat
test with fresh reagents.
HUNTER SYSTEM SPECIFICATIONS
System Components
• Hunter device
• MAC Assay Cartridges (MAC)
Additional Components
• Hunter device User Manual CD
• 2 spare fuses
• AC line cord
Hunter instrument specifications
• Dimensions: 17.2 cm x 41.2 cm x 22 cm (6.77 in. H x 16.22 in. W x
8.66 in. D)
• Weight: 5.4 Kg (11.9 lbs.)
• Power usage: 90 to 264 VAC at 3 amps
• Fuses (2): 3 AMP slow blow
• Peak block heat rate ~ 4.5°C/sec
• Peak block cool rate ~ 4.5°C/sec
• Warm up time: ~10 minutes
• Decibel level: less than 40 db at 1 meter
Environment
• Temperature 10-35° C (50°-95°F)
• Relative humidity up to 90% (noncondensing)
• Locate away from heaters, cooling ducts and keep out of direct
sunlight
• Protect from all fluids
Throughput
• Six (6) samples every 2.25 hours (run time)
• Includes pos/neg control
• 18 samples per 8 hour shift
• Supported volumes 20ul
Area Requirements
• 8” recommended free space around the Hunter system for sample
preparation, airflow, etc.
TECHNICAL ASSISTANCE
Contact Your Local Distributor for Technical Assistance
Worldwide Support:
Phone:
Email:
Web:
703-904-4306
[email protected]
www.instantlabs.com
© 2012 by InstantLabs Medical Diagnostics Corporation, Inc
All rights reserved.